What's New in Pro Tools HD 7.3 - Digidesign
44
What’s New Pro Tools HD ® 7.3
Transcript of What's New in Pro Tools HD 7.3 - Digidesign
What’s NewPro Tools HD® 7.3
Copyright
© 2007 Digidesign, a division of Avid Technology, Inc. All rights reserved. This guide may not be duplicated in whole or in part without the express written consent of Digidesign.
AudioSuite, Avid, Command|8. Control|24, D-Command, D-Control, DigiBase, Digidesign, DigiTranslator, MachineControl, ProControl, Pro Tools, Pro Tools|HD, Pro Tools LE, Pro Tools M-Powered, Mojo, and QuickPunch are either trademarks or registered trademarks of Avid Technology, Inc. in the US and other countries. All other trademarks contained herein are the property of their respective owners.
Product features, specifications, system requirements, and availability are subject to change without notice.
PN 9320-56002-00 REV A 01/07

contents
Chapter 1. Introduction . . . . . . . . . . . . . . . . . . . . . . . . . . . . . . . . . . . . . . . . . . . . . . . . . . . . . . 1
System Requirements . . . . . . . . . . . . . . . . . . . . . . . . . . . . . . . . . . . . . . . . . . . . . . . . . . . . . 1
New Features in Pro Tools HD 7.3. . . . . . . . . . . . . . . . . . . . . . . . . . . . . . . . . . . . . . . . . . . . . 1
Chapter 2. System Configuration, Session and Navigation Enhancements . . . . . . . . . 3
New RTAS Engine Options . . . . . . . . . . . . . . . . . . . . . . . . . . . . . . . . . . . . . . . . . . . . . . . . . . 3
Opening Recent Sessions. . . . . . . . . . . . . . . . . . . . . . . . . . . . . . . . . . . . . . . . . . . . . . . . . . . 4
Window Configurations . . . . . . . . . . . . . . . . . . . . . . . . . . . . . . . . . . . . . . . . . . . . . . . . . . . . 4
Memory Locations Window Enhancements . . . . . . . . . . . . . . . . . . . . . . . . . . . . . . . . . . . . . 11
User-Definable Sample Rate Conversion with Import Audio . . . . . . . . . . . . . . . . . . . . . . . . . . 12
Changing Mixer Configuration During Playback . . . . . . . . . . . . . . . . . . . . . . . . . . . . . . . . . . 13
Mac HFS+ Drive Support Option . . . . . . . . . . . . . . . . . . . . . . . . . . . . . . . . . . . . . . . . . . . . . 14
DigiBase Enhancements . . . . . . . . . . . . . . . . . . . . . . . . . . . . . . . . . . . . . . . . . . . . . . . . . . 14
Navigating On-Screen Dialogs and Folders on ICON Worksurfaces . . . . . . . . . . . . . . . . . . . . . 16
Chapter 3. Music Creation Features and Enhancements. . . . . . . . . . . . . . . . . . . . . . . . 17
Dynamic Transport Mode . . . . . . . . . . . . . . . . . . . . . . . . . . . . . . . . . . . . . . . . . . . . . . . . . . 17
Loop Trim Tool . . . . . . . . . . . . . . . . . . . . . . . . . . . . . . . . . . . . . . . . . . . . . . . . . . . . . . . . . 21
Default Track Timebase . . . . . . . . . . . . . . . . . . . . . . . . . . . . . . . . . . . . . . . . . . . . . . . . . . . 23
Create Click Track . . . . . . . . . . . . . . . . . . . . . . . . . . . . . . . . . . . . . . . . . . . . . . . . . . . . . . . 23
Key Signatures . . . . . . . . . . . . . . . . . . . . . . . . . . . . . . . . . . . . . . . . . . . . . . . . . . . . . . . . . 24
Diatonic Transposition . . . . . . . . . . . . . . . . . . . . . . . . . . . . . . . . . . . . . . . . . . . . . . . . . . . . 27
Send to Sibelius . . . . . . . . . . . . . . . . . . . . . . . . . . . . . . . . . . . . . . . . . . . . . . . . . . . . . . . . 28
Export MIDI. . . . . . . . . . . . . . . . . . . . . . . . . . . . . . . . . . . . . . . . . . . . . . . . . . . . . . . . . . . . 29
MIDI Regions Created on Barlines. . . . . . . . . . . . . . . . . . . . . . . . . . . . . . . . . . . . . . . . . . . . 30
Selecting and Playing Notes with the Mini-Keyboard . . . . . . . . . . . . . . . . . . . . . . . . . . . . . . . 31
Contents iii
iv
Chapter 4. Editing Features and Enhancements . . . . . . . . . . . . . . . . . . . . . . . . . . . . . . . 33
New Track Heights . . . . . . . . . . . . . . . . . . . . . . . . . . . . . . . . . . . . . . . . . . . . . . . . . . . . . . 33
Continuously Variable Track Height . . . . . . . . . . . . . . . . . . . . . . . . . . . . . . . . . . . . . . . . . . 33
Customizable Zoom Toggle Functions. . . . . . . . . . . . . . . . . . . . . . . . . . . . . . . . . . . . . . . . . 34
Expanding Alternate Channels to New Tracks . . . . . . . . . . . . . . . . . . . . . . . . . . . . . . . . . . . 35
Half-Frame Grid/Nudge Capability . . . . . . . . . . . . . . . . . . . . . . . . . . . . . . . . . . . . . . . . . . . 36
Secondary Time Code Ruler. . . . . . . . . . . . . . . . . . . . . . . . . . . . . . . . . . . . . . . . . . . . . . . . 36
Chapter 5. Pro Tools Support for Avid Unity and Avid Video Peripherals . . . . . . . . . 37
Avid Interplay Integration . . . . . . . . . . . . . . . . . . . . . . . . . . . . . . . . . . . . . . . . . . . . . . . . . 37
Support for Avid Mojo-SDI . . . . . . . . . . . . . . . . . . . . . . . . . . . . . . . . . . . . . . . . . . . . . . . . . 37
Export of AAF Sequences at HD Frame Rates . . . . . . . . . . . . . . . . . . . . . . . . . . . . . . . . . . . 38
New and Reorganized Synchronization Features . . . . . . . . . . . . . . . . . . . . . . . . . . . . . . . . . 38
New Synchronization Preference . . . . . . . . . . . . . . . . . . . . . . . . . . . . . . . . . . . . . . . . . . . . 38
What’s New in Pro Tools HD 7.3
chapter 1
Introduction
This chapter is an overview of new features in Pro Tools HD 7.3 for Pro Tools|HD® systems on Windows XP or Mac OS X.
System RequirementsFor complete system requirements, refer to the Digidesign website (www.digidesign.com).
Compatibility Information
Digidesign can only assure compatibility and provide support for hardware and software it has tested and approved.
For a list of Digidesign-qualified computers, operating systems, hard drives, and third-party devices, visit the Digidesign website (www.digidesign.com).
New Features in Pro Tools HD 7.3Pro Tools HD 7.3 includes the following new or enhanced features:
Pro Tools Session Enhancements
• New RTAS Engine options for configuring error suppression
• Recent sessions menu
• Up to 99 Window Configurations for storing and recalling window arrangements
• Memory Locations window enhancements
• User-Definable Sample Rate Conversion with Import Audio
• New mixer configuration changes during playback
• New Mac HFS+ Disk Support option to read, write, record, and playback using Mac HFS+ drives on Windows XP (Pro Tools LE only)
DigiBase Enhancements
• New DigiBase™ preview options
• Loop Preview
• Spacebar Toggles File Preview
• Auto-Preview
• Support for Pro Tools Plug-in Settings files (.tfx)
Chapter 1: Introduction 1

2
Music Creation Features and Enhancements
• New Loop features and enhancements
• Dynamic Transport mode
• Loop Trim tool
• Default Track Timebase preference
• Create Click Track command and preference
• Key Signatures
• New Key Signature ruler
• Import and export of key signatures
• Diatonic transposition
• New Send to Sibelius command for exporting MIDI tracks to Sibelius notation software
• New Export MIDI Right-click command
• MIDI region creation on bar boundaries
Editing Features and Enhancements
• Continuously variable track height
• Customizable Zoom Toggle functions
• Expand alternate field recorder audio chan-nels to new tracks
• New Time Code 2 ruler
Plug-in Features and Enhancements
• DigiRack Time Shift plug-in (included with Pro Tools installer)
• Drag and drop Pro Tools Plug-in Settings files (.tfx) from browsers to Pro Tools plug-ins or inserts
Avid Interoperability Improvements
• Avid Interplay 1.0 integration (requires the Avid Interplay Add-On for Digidesign Pro Tools)
Avid Video Peripherals
• Support for Avid Mojo SDI
What’s New in Pro Tools HD 7.3
chapter 2
System Configuration, Session and Navigation Enhancements
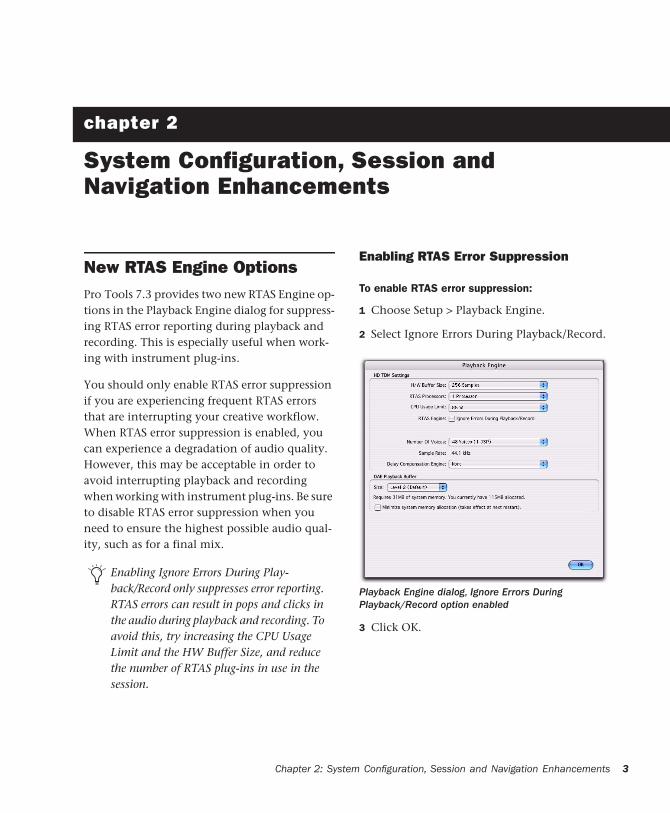
New RTAS Engine OptionsPro Tools 7.3 provides two new RTAS Engine op-tions in the Playback Engine dialog for suppress-ing RTAS error reporting during playback and recording. This is especially useful when work-ing with instrument plug-ins.
You should only enable RTAS error suppression if you are experiencing frequent RTAS errors that are interrupting your creative workflow. When RTAS error suppression is enabled, you can experience a degradation of audio quality. However, this may be acceptable in order to avoid interrupting playback and recording when working with instrument plug-ins. Be sure to disable RTAS error suppression when you need to ensure the highest possible audio qual-ity, such as for a final mix.
Enabling Ignore Errors During Play-back/Record only suppresses error reporting. RTAS errors can result in pops and clicks in the audio during playback and recording. To avoid this, try increasing the CPU Usage Limit and the HW Buffer Size, and reduce the number of RTAS plug-ins in use in the session.
Chapter 2: Syste
Enabling RTAS Error Suppression
To enable RTAS error suppression:
1 Choose Setup > Playback Engine.
2 Select Ignore Errors During Playback/Record.
3 Click OK.
Playback Engine dialog, Ignore Errors During Playback/Record option enabled
m Configuration, Session and Navigation Enhancements 3
4
Ignore Errors During Playback/Record
When the Ignore Errors During Playback/Record option is enabled, Pro Tools continues to play and record even if the RTAS processing require-ments exceed the selected CPU Usage Limit. This can result in pops and clicks in the audio during playback and recording, but does not stop the transport.
Opening Recent SessionsPro Tools 7.3 provides an Open Recent sub-menu in the File menu that lets you open any of the 10 most recently opened Pro Tools sessions.
To open a recent session:
■ Choose File > Open Recent and choose the session you want to open. You do not need to close the currently open session.
– or –
■ On ICON worksurfaces, the Open Most Re-cent command is available in the Soft Keys sec-tion.
If a session is open when choosing a recent ses-sion, you are prompted to save it before Pro Tools closes the session and opens the cho-sen recent session.
In previous versions of Pro Tools, it was necessary to close a session before creating a new or opening another session.
Control+Shift+O (Windows) or Com-mand+Shift+O (Mac) opens the most recent session.
What’s New in Pro Tools HD 7.3
Window ConfigurationsPro Tools 7.3 provides a powerful means of managing the configuration of windows in your session, as well as the internal window configu-rations of the Edit, Mix, and Transport win-dows. Use the Window Configuration List to create (or delete) and manage stored Window Configurations. Pro Tools lets you store up to 99 Window Configurations. Window Configura-tions are saved with the session.
A Window Configuration can store the location and size of all open windows, including:
• Edit window
• Mix window
• Workspace browser
• Project browser
• DigiBase browsers
• Session Setup window
• Time, Tempo, and MIDI Operations windows
• MIDI Event List
• Real-time MIDI Properties window
• Beat Detective window
• Plug-in windows
• Panner windows
• Mic Pre windows
Create a session template with your favorite Window Configurations. You can then use the template when you start a new session, or you can use Import Session Data to im-port Window Configurations into your cur-rent session.
• All floating windows listed in the Window menu:
• Task Manager window
• Transport window
• Big Counter window
• Automation window
• Memory Locations window
• Machine Track Arming window
• Universe window
• Video window
• Color Palette window
• Undo History window
• Disk Space window
• System Usage window
A Window Configuration can also store the Window Display Settings for the Edit, Mix, and Transport windows.
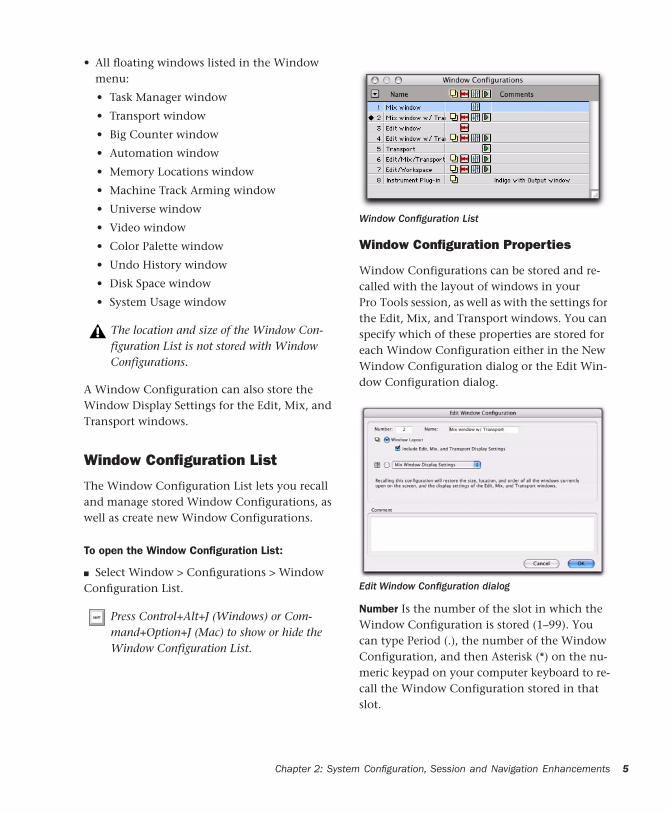
Window Configuration List
The Window Configuration List lets you recall and manage stored Window Configurations, as well as create new Window Configurations.
To open the Window Configuration List:
■ Select Window > Configurations > Window Configuration List.
The location and size of the Window Con-figuration List is not stored with Window Configurations.
Press Control+Alt+J (Windows) or Com-mand+Option+J (Mac) to show or hide the Window Configuration List.
Chapter 2: Syste
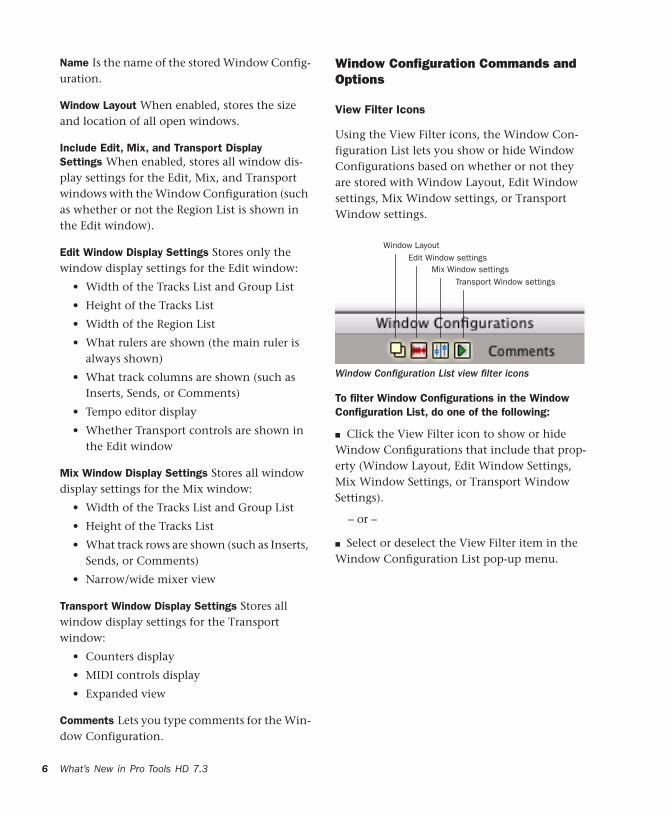
Window Configuration Properties
Window Configurations can be stored and re-called with the layout of windows in your Pro Tools session, as well as with the settings for the Edit, Mix, and Transport windows. You can specify which of these properties are stored for each Window Configuration either in the New Window Configuration dialog or the Edit Win-dow Configuration dialog.
Number Is the number of the slot in which the Window Configuration is stored (1–99). You can type Period (.), the number of the Window Configuration, and then Asterisk (*) on the nu-meric keypad on your computer keyboard to re-call the Window Configuration stored in that slot.
Window Configuration List
Edit Window Configuration dialog
m Configuration, Session and Navigation Enhancements 5
6
Name Is the name of the stored Window Config-uration.
Window Layout When enabled, stores the size and location of all open windows.
Include Edit, Mix, and Transport Display Settings When enabled, stores all window dis-play settings for the Edit, Mix, and Transport windows with the Window Configuration (such as whether or not the Region List is shown in the Edit window).
Edit Window Display Settings Stores only the window display settings for the Edit window:
• Width of the Tracks List and Group List
• Height of the Tracks List
• Width of the Region List
• What rulers are shown (the main ruler is always shown)
• What track columns are shown (such as Inserts, Sends, or Comments)
• Tempo editor display
• Whether Transport controls are shown in the Edit window
Mix Window Display Settings Stores all window display settings for the Mix window:
• Width of the Tracks List and Group List
• Height of the Tracks List
• What track rows are shown (such as Inserts, Sends, or Comments)
• Narrow/wide mixer view
Transport Window Display Settings Stores all window display settings for the Transport window:
• Counters display
• MIDI controls display
• Expanded view
Comments Lets you type comments for the Win-dow Configuration.
What’s New in Pro Tools HD 7.3
Window Configuration Commands and Options
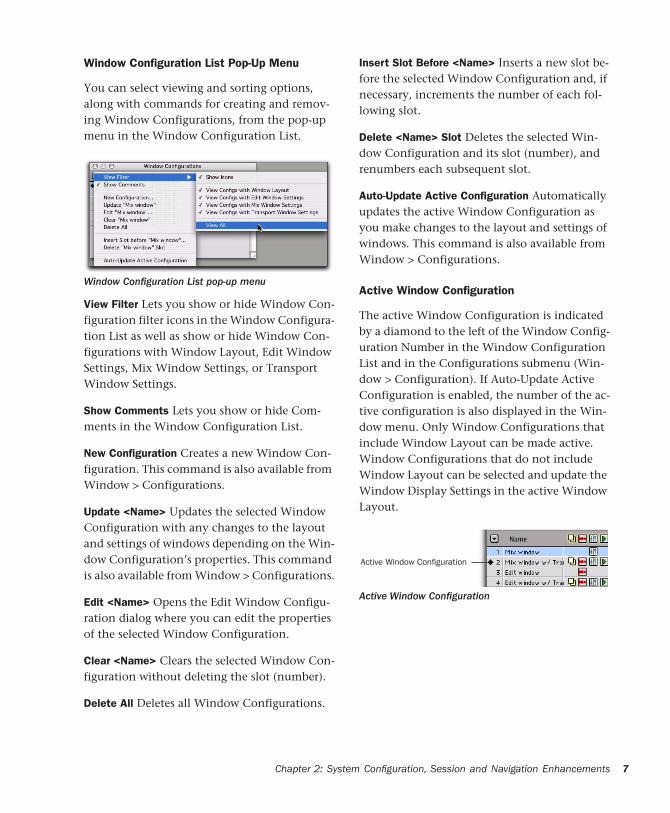
View Filter Icons
Using the View Filter icons, the Window Con-figuration List lets you show or hide Window Configurations based on whether or not they are stored with Window Layout, Edit Window settings, Mix Window settings, or Transport Window settings.
To filter Window Configurations in the Window Configuration List, do one of the following:
■ Click the View Filter icon to show or hide Window Configurations that include that prop-erty (Window Layout, Edit Window Settings, Mix Window Settings, or Transport Window Settings).
– or –
■ Select or deselect the View Filter item in the Window Configuration List pop-up menu.
Window Configuration List view filter icons
Window LayoutEdit Window settings
Mix Window settingsTransport Window settings
Window Configuration List Pop-Up Menu
You can select viewing and sorting options, along with commands for creating and remov-ing Window Configurations, from the pop-up menu in the Window Configuration List.
View Filter Lets you show or hide Window Con-figuration filter icons in the Window Configura-tion List as well as show or hide Window Con-figurations with Window Layout, Edit Window Settings, Mix Window Settings, or Transport Window Settings.
Show Comments Lets you show or hide Com-ments in the Window Configuration List.
New Configuration Creates a new Window Con-figuration. This command is also available from Window > Configurations.
Update <Name> Updates the selected Window Configuration with any changes to the layout and settings of windows depending on the Win-dow Configuration’s properties. This command is also available from Window > Configurations.
Edit <Name> Opens the Edit Window Configu-ration dialog where you can edit the properties of the selected Window Configuration.
Clear <Name> Clears the selected Window Con-figuration without deleting the slot (number).
Delete All Deletes all Window Configurations.
Window Configuration List pop-up menu
Chapter 2: Syste
Insert Slot Before <Name> Inserts a new slot be-fore the selected Window Configuration and, if necessary, increments the number of each fol-lowing slot.
Delete <Name> Slot Deletes the selected Win-dow Configuration and its slot (number), and renumbers each subsequent slot.
Auto-Update Active Configuration Automatically updates the active Window Configuration as you make changes to the layout and settings of windows. This command is also available from Window > Configurations.
Active Window Configuration
The active Window Configuration is indicated by a diamond to the left of the Window Config-uration Number in the Window Configuration List and in the Configurations submenu (Win-dow > Configuration). If Auto-Update Active Configuration is enabled, the number of the ac-tive configuration is also displayed in the Win-dow menu. Only Window Configurations that include Window Layout can be made active. Window Configurations that do not include Window Layout can be selected and update the Window Display Settings in the active Window Layout.
Active Window Configuration
Active Window Configuration
m Configuration, Session and Navigation Enhancements 7
8
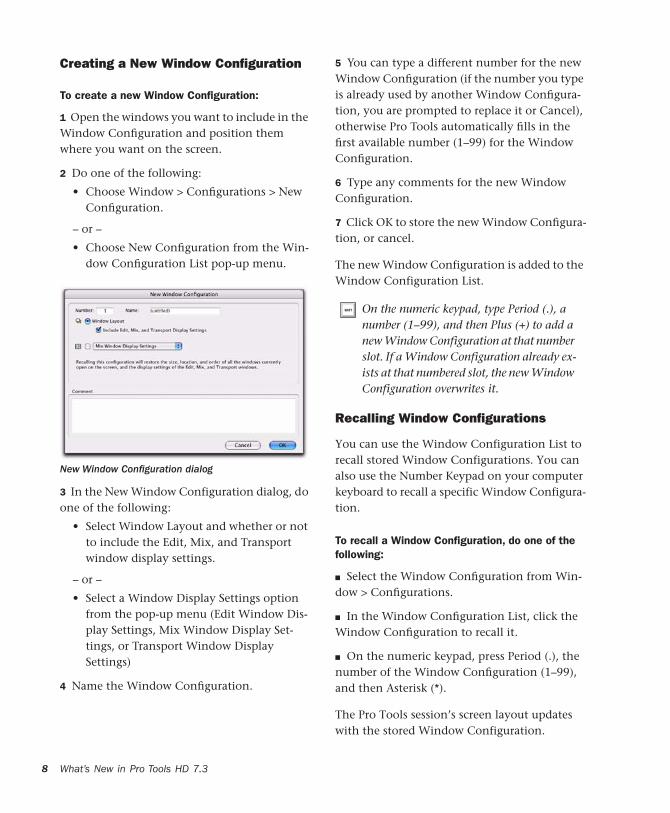
Creating a New Window Configuration
To create a new Window Configuration:
1 Open the windows you want to include in the Window Configuration and position them where you want on the screen.
2 Do one of the following:
• Choose Window > Configurations > New Configuration.
– or –
• Choose New Configuration from the Win-dow Configuration List pop-up menu.
3 In the New Window Configuration dialog, do one of the following:
• Select Window Layout and whether or not to include the Edit, Mix, and Transport window display settings.
– or –
• Select a Window Display Settings option from the pop-up menu (Edit Window Dis-play Settings, Mix Window Display Set-tings, or Transport Window Display Settings)
4 Name the Window Configuration.
New Window Configuration dialog
What’s New in Pro Tools HD 7.3
5 You can type a different number for the new Window Configuration (if the number you type is already used by another Window Configura-tion, you are prompted to replace it or Cancel), otherwise Pro Tools automatically fills in the first available number (1–99) for the Window Configuration.
6 Type any comments for the new Window Configuration.
7 Click OK to store the new Window Configura-tion, or cancel.
The new Window Configuration is added to the Window Configuration List.
Recalling Window Configurations
You can use the Window Configuration List to recall stored Window Configurations. You can also use the Number Keypad on your computer keyboard to recall a specific Window Configura-tion.
To recall a Window Configuration, do one of the following:
■ Select the Window Configuration from Win-dow > Configurations.
■ In the Window Configuration List, click the Window Configuration to recall it.
■ On the numeric keypad, press Period (.), the number of the Window Configuration (1–99), and then Asterisk (*).
The Pro Tools session’s screen layout updates with the stored Window Configuration.
On the numeric keypad, type Period (.), a number (1–99), and then Plus (+) to add a new Window Configuration at that number slot. If a Window Configuration already ex-ists at that numbered slot, the new Window Configuration overwrites it.
Undoing a Window Configuration
Pro Tools lets you revert to the previous Win-dow Layout and Window Settings with a single level of undo. This is useful, for example, if you recall a Window Configuration, but then decide you want to revert to the previous screen state.
To undo a Window Configuration:
■ On the numeric keypad, press Period (.), 0, and then Asterisk (*).
To redo a Window Configuration:
■ On the numeric keypad, press Period (.), 0, and then Asterisk (*).
If Auto-Update Active Configuration is enabled, undoing the Window Configuration reverts to the previously stored Window Configuration without automatically saving changes (see “Up-dating Window Configurations” on page 9).
Editing Window Configurations
You can change which properties are stored with Window Configurations, as well as the number, name, or comments.
To edit a Window Configuration:
1 In the Window Configuration List, select the Window Configuration you want to edit.
2 From the Window Configuration List pop-up menu, select Edit <Name>.
3 In the Edit Window Configuration dialog, make the desired changes and click OK.
Chapter 2: Syste
Updating Window Configurations
After you recall a stored Window Configuration, you can make changes to the window layout and window settings, and then update the stored Window Configuration with your changes. You can do this manually, or you can have Pro Tools automatically update the active configuration.
To manually update a Window Configuration, do one of the following:
■ Choose Window > Configurations > Update Active Configuration.
The active Window Configuration updates to include any changes to its included properties (Window Layout and Window Display Set-tings).
– or –
■ From the Window Configuration List pop-up menu, choose Update <Name>.
The selected Window Configuration updates with any changes to its included properties.
To have Pro Tools automatically update the active Window Configuration, do one of the following:
■ Select Window > Configurations > Auto-Up-date Active Configuration.
– or –
■ From the Window Configuration List pop-up menu, select Auto-Update Active Configuration.
When Auto-Update Active Configuration is se-lected, the active Window Configuration up-dates with every change to the Window Layout and Window Display Settings.
Window Configurations that do not include Window Layout and only store Window Display Settings cannot be made active and thus won't automatically update. If you want to update a
m Configuration, Session and Navigation Enhancements 9
10
Window Configuration with changes to the Window Display Settings (such as the width of the Region List in the Edit window), use the Up-date command in the Window Configuration List.
Clearing Window Configurations
Clearing a window configuration removes it and its associated slot number while keeping the slot numbers of other window configurations un-changed. The Clear command is useful if you want to insert another configuration it the same slot.
To clear a Window Configuration:
1 In the Window Configuration List, select the Window Configuration you want to clear.
2 From the Window Configuration List pop-up menu, select Clear <Name>.
Deleting Window Configurations
Deleting a Window Configuration removes the it and its slot number, and renumbers any sub-sequent Window Configurations.
To delete a Window Configuration:
1 In the Window Configuration List, select the Window Configuration you want to delete.
2 Do one of the following:
• From the Window Configuration List pop-up menu, select Delete <Name>.
– or –
• You can delete all Window Configurations by choosing Delete All.
What’s New in Pro Tools HD 7.3
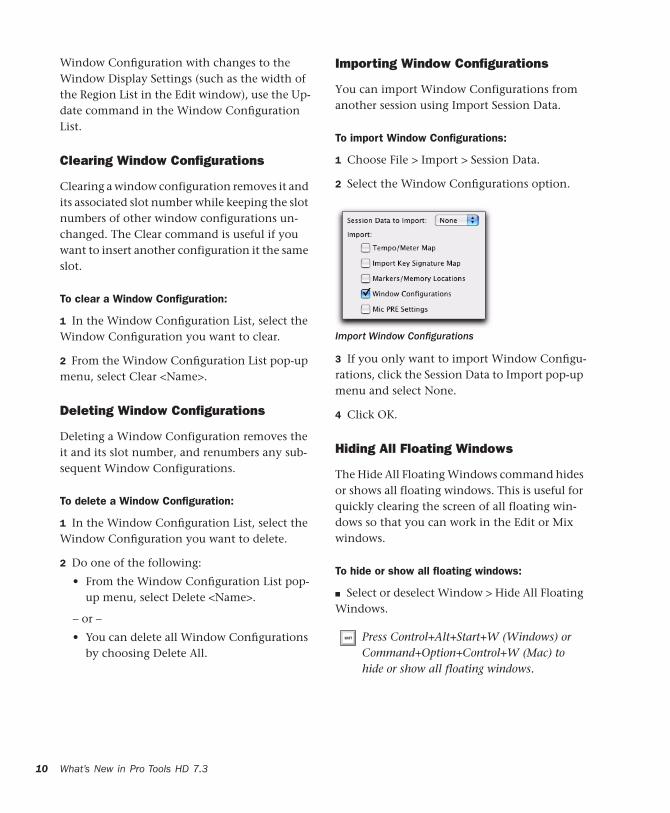
Importing Window Configurations
You can import Window Configurations from another session using Import Session Data.
To import Window Configurations:
1 Choose File > Import > Session Data.
2 Select the Window Configurations option.
3 If you only want to import Window Configu-rations, click the Session Data to Import pop-up menu and select None.
4 Click OK.
Hiding All Floating Windows
The Hide All Floating Windows command hides or shows all floating windows. This is useful for quickly clearing the screen of all floating win-dows so that you can work in the Edit or Mix windows.
To hide or show all floating windows:
■ Select or deselect Window > Hide All Floating Windows.
Import Window Configurations
Press Control+Alt+Start+W (Windows) or Command+Option+Control+W (Mac) to hide or show all floating windows.
Memory Locations Window EnhancementsPro Tools 7.3 provides the following new or en-hanced commands for managing the display of Memory Locations in the Memory Locations window:
View Filter Sub-menu Provides commands to show or hide specific memory location proper-ties:
• Show Icons
• Show Markers Only
• Markers
• Selections
• Zoom Settings
• Pre/Post Roll Times
• Track Show/Hide
• Track Height
• Group Enables
• All
Edit <Name> Opens the Edit Memory Location dialog for the selected Memory Location. You can also double-click a Memory Location in the Memory Locations window to edit it.
Clear <Name> Clears the selected Memory Loca-tion, but does not remove its slot. Subsequent Memory Locations are not renumbered.
Insert Slot Before <Name> Adds a new, empty Memory Location slot above the selected Mem-ory Location, and renumbers all subsequent Memory Locations.
Delete <Name> Slot Deletes the selected Mem-ory Location, and renumbers all subsequent Memory Locations.
Alt-click (Windows) or Option-click (Mac) a Memory Location in the Memory Loca-tions window to clear it.
Chapter 2: Syste
Delete All Deletes all Memory Locations. The next Memory Location you add starts at slot number 1.
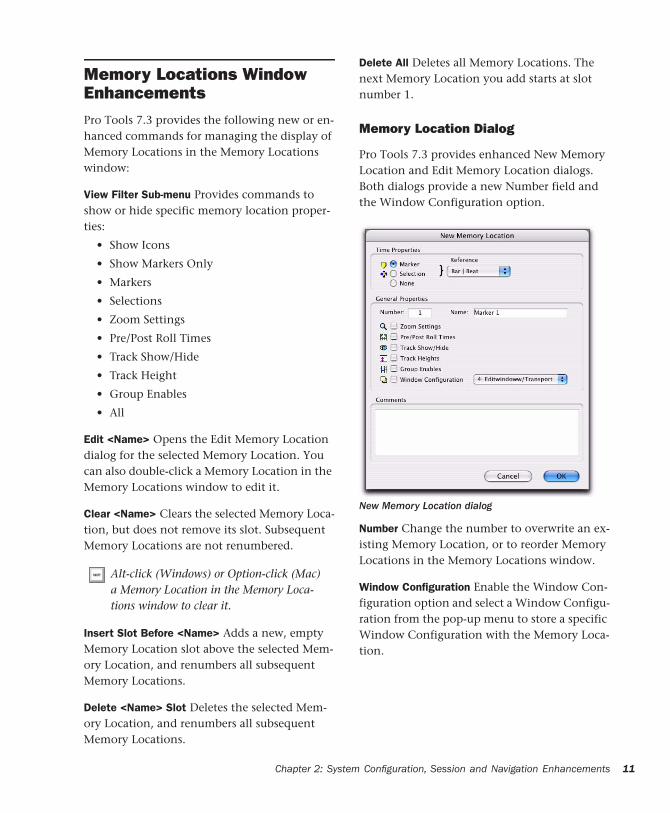
Memory Location Dialog
Pro Tools 7.3 provides enhanced New Memory Location and Edit Memory Location dialogs. Both dialogs provide a new Number field and the Window Configuration option.
Number Change the number to overwrite an ex-isting Memory Location, or to reorder Memory Locations in the Memory Locations window.
Window Configuration Enable the Window Con-figuration option and select a Window Configu-ration from the pop-up menu to store a specific Window Configuration with the Memory Loca-tion.
New Memory Location dialog
m Configuration, Session and Navigation Enhancements 11
12
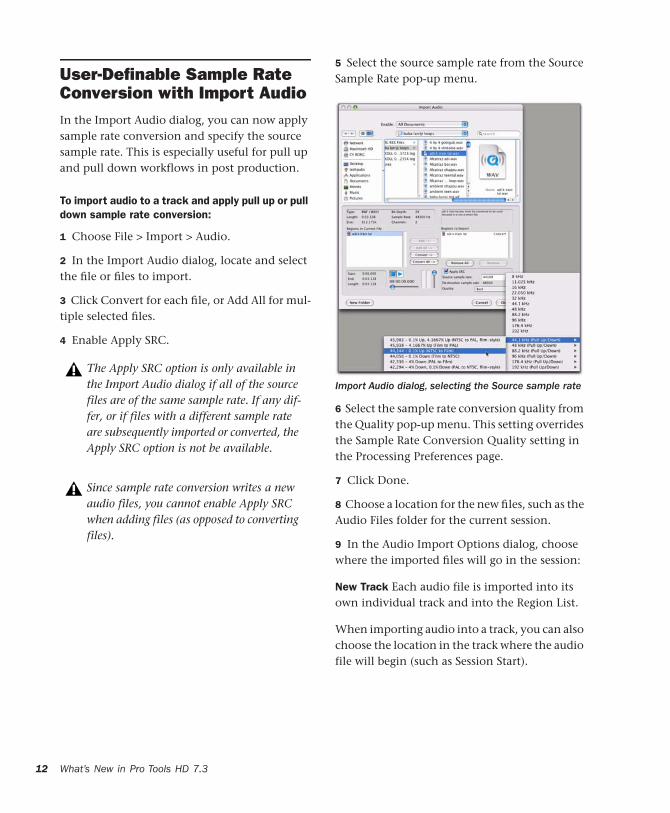
User-Definable Sample Rate Conversion with Import AudioIn the Import Audio dialog, you can now apply sample rate conversion and specify the source sample rate. This is especially useful for pull up and pull down workflows in post production.
To import audio to a track and apply pull up or pull down sample rate conversion:
1 Choose File > Import > Audio.
2 In the Import Audio dialog, locate and select the file or files to import.
3 Click Convert for each file, or Add All for mul-tiple selected files.
4 Enable Apply SRC.
The Apply SRC option is only available in the Import Audio dialog if all of the source files are of the same sample rate. If any dif-fer, or if files with a different sample rate are subsequently imported or converted, the Apply SRC option is not be available.
Since sample rate conversion writes a new audio files, you cannot enable Apply SRC when adding files (as opposed to converting files).
What’s New in Pro Tools HD 7.3
5 Select the source sample rate from the Source Sample Rate pop-up menu.
6 Select the sample rate conversion quality from the Quality pop-up menu. This setting overrides the Sample Rate Conversion Quality setting in the Processing Preferences page.
7 Click Done.
8 Choose a location for the new files, such as the Audio Files folder for the current session.
9 In the Audio Import Options dialog, choose where the imported files will go in the session:
New Track Each audio file is imported into its own individual track and into the Region List.
When importing audio into a track, you can also choose the location in the track where the audio file will begin (such as Session Start).
Import Audio dialog, selecting the Source sample rate
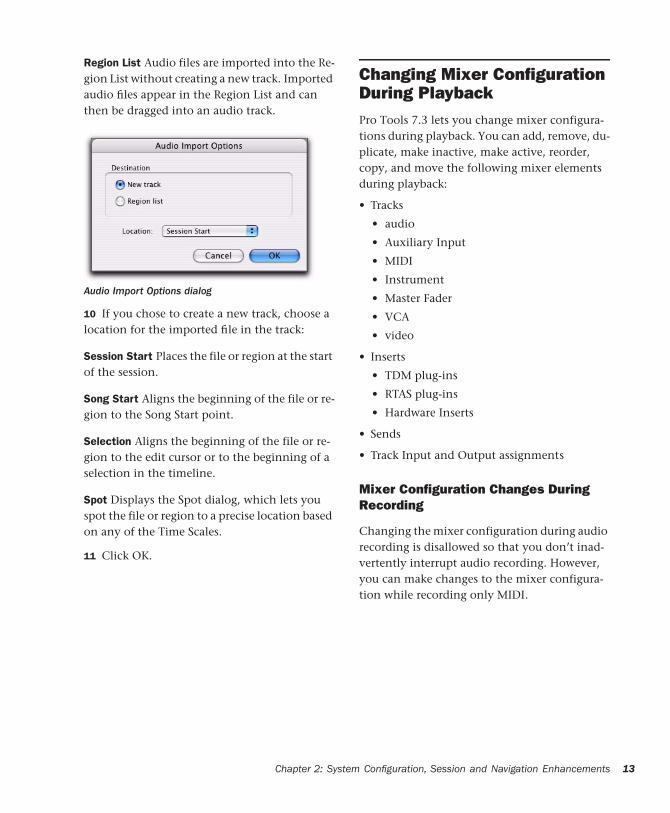
Region List Audio files are imported into the Re-gion List without creating a new track. Imported audio files appear in the Region List and can then be dragged into an audio track.
10 If you chose to create a new track, choose a location for the imported file in the track:
Session Start Places the file or region at the start of the session.
Song Start Aligns the beginning of the file or re-gion to the Song Start point.
Selection Aligns the beginning of the file or re-gion to the edit cursor or to the beginning of a selection in the timeline.
Spot Displays the Spot dialog, which lets you spot the file or region to a precise location based on any of the Time Scales.
11 Click OK.
Audio Import Options dialog
Chapter 2: Syste
Changing Mixer Configuration During Playback Pro Tools 7.3 lets you change mixer configura-tions during playback. You can add, remove, du-plicate, make inactive, make active, reorder, copy, and move the following mixer elements during playback:
• Tracks
• audio
• Auxiliary Input
• MIDI
• Instrument
• Master Fader
• VCA
• video
• Inserts
• TDM plug-ins
• RTAS plug-ins
• Hardware Inserts
• Sends
• Track Input and Output assignments
Mixer Configuration Changes During Recording
Changing the mixer configuration during audio recording is disallowed so that you don’t inad-vertently interrupt audio recording. However, you can make changes to the mixer configura-tion while recording only MIDI.
m Configuration, Session and Navigation Enhancements 13

14
Mac HFS+ Drive Support Option(Windows Only)
Pro Tools 7.3 for Windows XP now supports re-cording and playback of sessions directly from Mac-formatted (HFS+) drives using the Mac HFS+ Disk Support option. You can choose to install the Mac HFS+ Disk Support option when you install Pro Tools. The Mac HFS+ Disk Sup-port option is included free with Pro Tools HD.
When using the Mac HFS+ Disk Support option for recording and playback on a Windows sys-tem, the session file and all associated files (such as audio, video and MIDI files) must be stored on Mac-formatted (HFS+) drives. Recording and playback of a session from a mixture of Win-dows- and Mac-formatted drives is not sup-ported.
For more information, see the Mac HFS+ Disk Support Option Guide.
What’s New in Pro Tools HD 7.3
DigiBase EnhancementsIn Pro Tools 7.3, DigiBase Browsers now have the following new features:
New Preview Options and Commands
Pro Tools 7.3 adds new options and commands for previewing audio and MIDI in browsers:
Normal Preview Mode Previews the selected file by playing it once. If multiple files are selected, it plays through each file in order.
Loop Preview Mode Previews the selected file by looping playback of the file. If multiple files are selected, only the first selected file previews. The Preview button updates to show that Loop Pre-view mode is enabled.
Spacebar Toggles File Preview Enables or dis-ables the Spacebar for starting and stopping pre-view. When this option is disabled, use the Pre-view button to start and stop preview.
DigiBase Preview button, Loop Preview mode
When a browser is front-most, Control+P (Windows) or Command+P (Mac) starts and stops preview. Also, the Esc key stops preview.

Auto-Preview Enables or disables automatic pre-view of files. When this option is enabled, se-lecting a file in the browser starts preview. The Preview button updates to show that Auto-Pre-view is enabled.
Support for Plug-in Settings Files
Plug-in Settings files (.txf) appear in DigiBase browsers and you can drag and drop them to Pro Tools plug-in windows and Inserts. You can also search for plug-in settings by type.
Searching for Plug-in Settings Files
To search for plug-in settings files:
1 In the Workspace browser, click the Search icon.
2 Select Plug-in Settings File from the Type pop-up menu.
DigiBase Preview button, Auto-Preview enabled
Searching for plug-in settings files
To find plug-in settings for a specific plug-in or manufacturer, you can also sort and search using the Plug-in Name or Plug-in Manufacturer column.
Chapter 2: Syste
3 To further narrow your search, type all or part of the name of the plug-in settings file you want.
4 Click Search.
5 To sort your search by Plug-in Name or Man-ufacturer, click the corresponding column title.
Dragging and Dropping Plug-in Settings Files
You can insert a plug-in with a specific plug-in settings file, as well as change plug-in settings of inserted plug-ins by dragging and dropping plug-in settings files from a DigiBase browser.
Plug-in settings files found in the Workspace browser and sorted by Plug-in Name
With DigiBase Pro, you can create catalogs of specific plug-in settings that you work with frequently to streamline your work-flow. For more information on DigiBase Pro and Catalogs, see the Pro Tools Reference Guide.
m Configuration, Session and Navigation Enhancements 15
16
To insert a plug-in by drag and drop:
■ Drag and drop a plug-in settings file from a DigiBase browser to an available Insert in the Mix (or Edit) window.
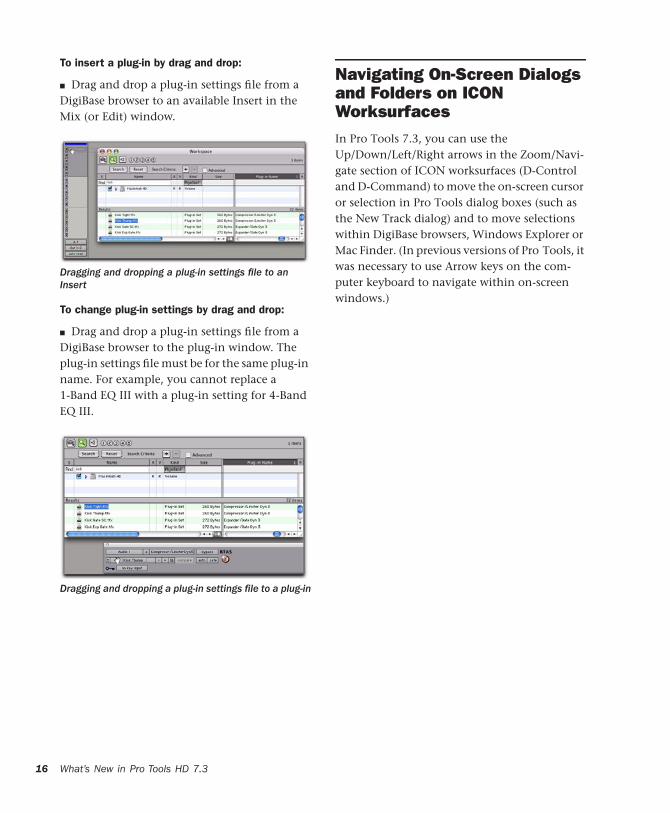
To change plug-in settings by drag and drop:
■ Drag and drop a plug-in settings file from a DigiBase browser to the plug-in window. The plug-in settings file must be for the same plug-in name. For example, you cannot replace a 1-Band EQ III with a plug-in setting for 4-Band EQ III.
Dragging and dropping a plug-in settings file to an Insert
Dragging and dropping a plug-in settings file to a plug-in
What’s New in Pro Tools HD 7.3
Navigating On-Screen Dialogs and Folders on ICON WorksurfacesIn Pro Tools 7.3, you can use the Up/Down/Left/Right arrows in the Zoom/Navi-gate section of ICON worksurfaces (D-Control and D-Command) to move the on-screen cursor or selection in Pro Tools dialog boxes (such as the New Track dialog) and to move selections within DigiBase browsers, Windows Explorer or Mac Finder. (In previous versions of Pro Tools, it was necessary to use Arrow keys on the com-puter keyboard to navigate within on-screen windows.)
chapter 3
Music Creation Features and Enhancements
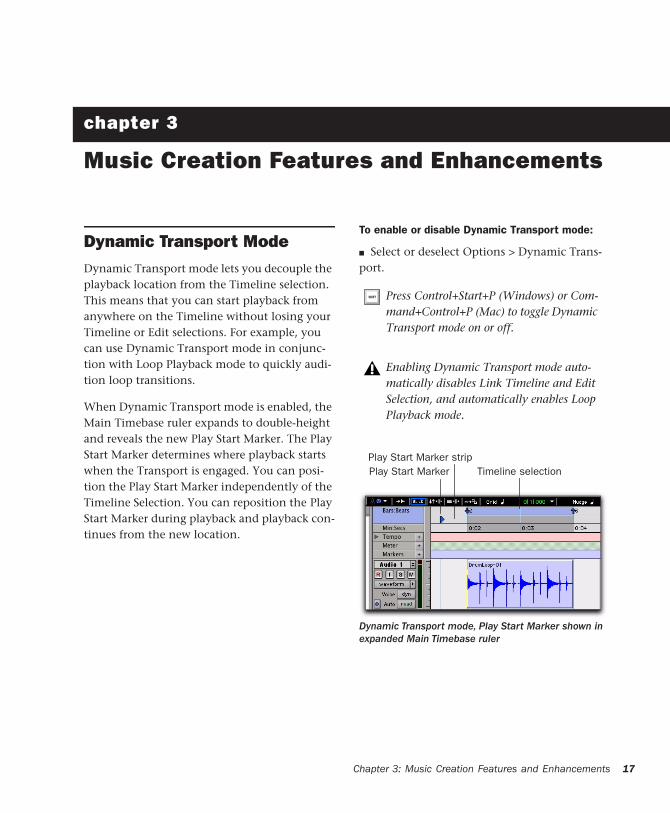
Dynamic Transport ModeDynamic Transport mode lets you decouple the playback location from the Timeline selection. This means that you can start playback from anywhere on the Timeline without losing your Timeline or Edit selections. For example, you can use Dynamic Transport mode in conjunc-tion with Loop Playback mode to quickly audi-tion loop transitions.
When Dynamic Transport mode is enabled, the Main Timebase ruler expands to double-height and reveals the new Play Start Marker. The Play Start Marker determines where playback starts when the Transport is engaged. You can posi-tion the Play Start Marker independently of the Timeline Selection. You can reposition the Play Start Marker during playback and playback con-tinues from the new location.
To enable or disable Dynamic Transport mode:
■ Select or deselect Options > Dynamic Trans-port.
Press Control+Start+P (Windows) or Com-mand+Control+P (Mac) to toggle Dynamic Transport mode on or off.
Enabling Dynamic Transport mode auto-matically disables Link Timeline and Edit Selection, and automatically enables Loop Playback mode.
Dynamic Transport mode, Play Start Marker shown in expanded Main Timebase ruler
Play Start Marker Timeline selectionPlay Start Marker strip
Chapter 3: Music Creation Features and Enhancements 17
18
To reposition the Play Start Marker, do one of the following:
■ With any Edit tool selected, click in the Play Start Marker strip in the Main Timebase ruler.
■ With any Edit tool selected, click and drag the Play Start Marker to a new location.
■ Click Fast Forward or Rewind in the Transport to relocate the Play Start Marker forward or backward by the standard Fast Forward and Re-wind increment amount.
To change the Timeline Selection Start or End Markers:
1 Make a Timeline selection with the Selector tool by clicking and dragging in the Main Time-base ruler. If Link Timeline and Edit Selection is enabled (Options > Link Timeline and Edit Se-lection), you can make an Edit selection with the Selector or any of the Grabber tools.
2 With any Edit tool selected, click and drag ei-ther the Timeline Selection Start or End Markers left or right, extending or constricting the Time-line selection.
Double-click anywhere in the Play Start Marker strip in the Main Timebase ruler to move the Play Start Marker to that location and start playback.
Changes to the Timeline selection during playback temporarily interrupts playback. To minimize this interruption, reduce the DAE Playback Buffer size in the Playback Engine dialog.
What’s New in Pro Tools HD 7.3
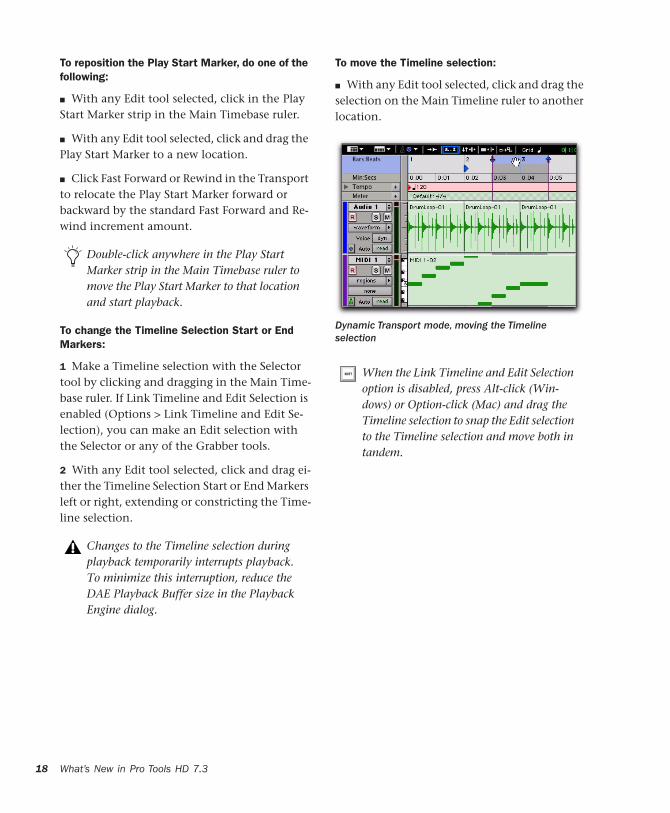
To move the Timeline selection:
■ With any Edit tool selected, click and drag the selection on the Main Timeline ruler to another location.
Dynamic Transport mode, moving the Timeline selection
When the Link Timeline and Edit Selection option is disabled, press Alt-click (Win-dows) or Option-click (Mac) and drag the Timeline selection to snap the Edit selection to the Timeline selection and move both in tandem.
Play Start Marker Follows Timeline Selection
When enabled, the Play Start Marker snaps to the Timeline Selection Start Marker when you move the Timeline Selection, draw a new Time-line Selection, or adjust the Timeline Selection Start. When disabled, the Play Start Marker doesn’t move with the Timeline selection.
To have the Play Start Marker always snap to the Timeline Selection Start Marker:
1 Choose Setup > Preferences.
2 Click the Operation tab.
3 Select Play Start Marker Follows Timeline Se-lection.
4 Click OK.
Timeline Insertion/Play Start Marker Follows Playback
When enabled, the Play Start Marker moves to the point in the Timeline when playback stops. When disabled, the Play Start Marker does not follow playback.
When not in Dynamic Transport mode, the Timeline Insertion follows playback.
To have the Timeline Insertion and the Play Start Marker follow playback:
1 Choose Setup > Preferences.
2 Click the Operation tab.
3 Select Timeline Insertion/Play Start Marker Follows Playback.
4 Click OK.
Using Dynamic Transport Mode with Loop Playback
Use Dynamic Transport mode in conjunction with Loop Playback to specify the loop start and end points with the Timeline selection while us-ing the Play Start Marker to specify where play-back begins. This is especially useful for audi-tioning loop transitions.
Enabling Dynamic Transport mode automati-cally enables Loop Playback mode.
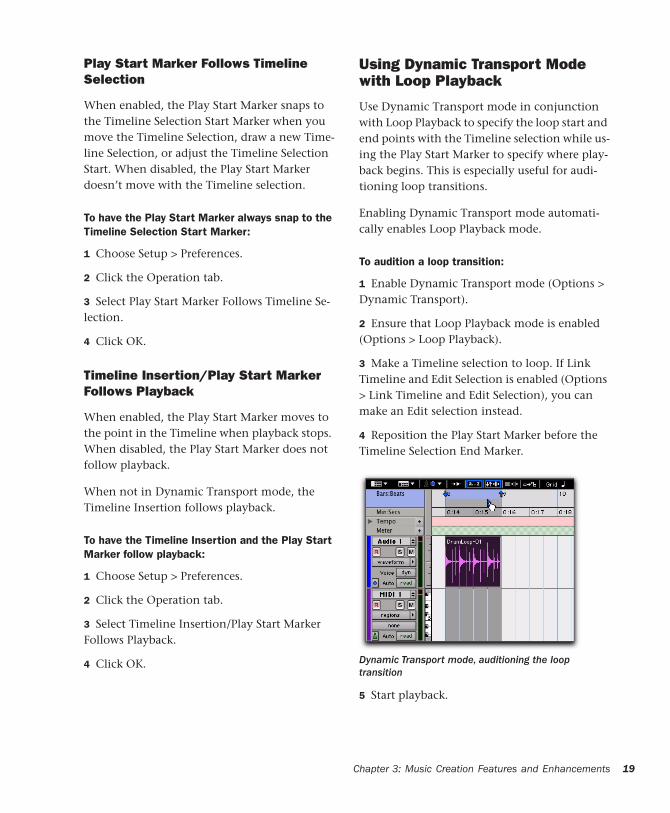
To audition a loop transition:
1 Enable Dynamic Transport mode (Options > Dynamic Transport).
2 Ensure that Loop Playback mode is enabled (Options > Loop Playback).
3 Make a Timeline selection to loop. If Link Timeline and Edit Selection is enabled (Options > Link Timeline and Edit Selection), you can make an Edit selection instead.
4 Reposition the Play Start Marker before the Timeline Selection End Marker.
5 Start playback.
Dynamic Transport mode, auditioning the loop transition
Chapter 3: Music Creation Features and Enhancements 19
20
Playback starts before the loop end point and continues across the loop point through the loop start. You can reposition the Timeline Se-lection Start and End Markers by clicking and dragging them left or right, even during play-back.
Using Separate Play and Stop Keys
When enabled, the Use Separate Play and Stop Keys option lets you start playback with the En-ter key and stop playback with the 0 key on the numeric keypad. This is useful for quickly start-ing and stopping playback when auditioning loop transitions.
To use separate play and stop keys on the numeric keypad:
1 Choose Setup > Preferences.
2 Click the Operation tab.
3 Select Transport for the Numeric Keypad.
4 Select Use Separate Play and Stop Keys.
5 Click OK.
The Enter key starts playback. The Zero key stops playback. Pressing Zero twice locates the Play Start Marker to the Timeline Selection start.
Keyboard Shortcuts for Relocating the Play Start Marker
In Dynamic Transport mode, you can use key-board shortcuts to quickly relocate the Play Start Marker either during playback or when the Transport is stopped.
When this option is enabled, it overrides us-ing the Enter key to add Memory Location markers. Press Period (.) and then Enter on the numeric keypad to add a Memory Loca-tion marker. The new marker is created when you press Enter.
What’s New in Pro Tools HD 7.3
To move the Play Start Marker to the Timeline Selection Start:
■ Press Period (.) on the numeric keypad and then the Left Arrow.
To move the Play Start Marker to the Timeline Selection End:
■ Press Period (.) on the numeric keypad and then the Right Arrow.
To move the Play Start Marker to the Edit Selection Start:
■ Press Period (.) on the numeric keypad and then the Down Arrow.
To move the Play Start Marker to location of the Playhead:
■ Press Period (.) on the numeric keypad and then the Up Arrow.
To nudge the Play Start Marker backward (rewind):
■ Press 1 on the numeric keypad.
To nudge the Play Start Marker forward (fast forward):
■ Press 2 on the numeric keypad.
To move the Play Start to a specific bar:
■ With Bars:Beats selected as the Main Timebase ruler, do the following on the numeric keypad:
• Press Asterisk (*).
• Type the bar number.
• Press Enter.
Recording in Dynamic Transport Mode
Recording in Dynamic Transport mode lets you start playback independently of the Timeline se-lection. Recording punches in and out based on the Timeline selection.
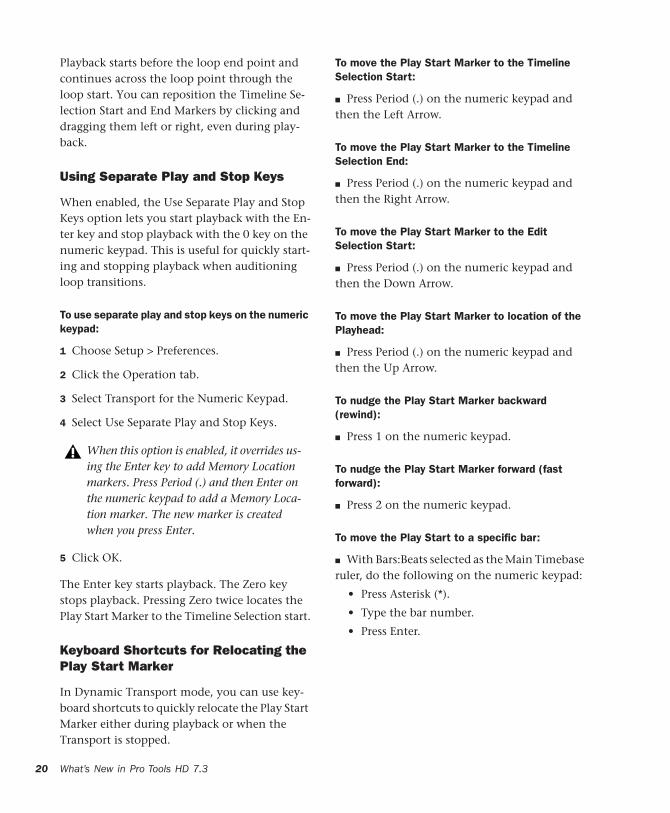
Loop Trim ToolPro Tools 7.3 provides a new Loop Trim tool. You can use the Loop Trim tool to create or trim looped regions.
To select the Loop Trim tool:
1 Click the Trim tool icon in the Edit window to access the Trim Tool Selector pop-up menu.
2 Select the Loop Trim tool.
Loop Trim tool
Selecting the Loop Trim tool
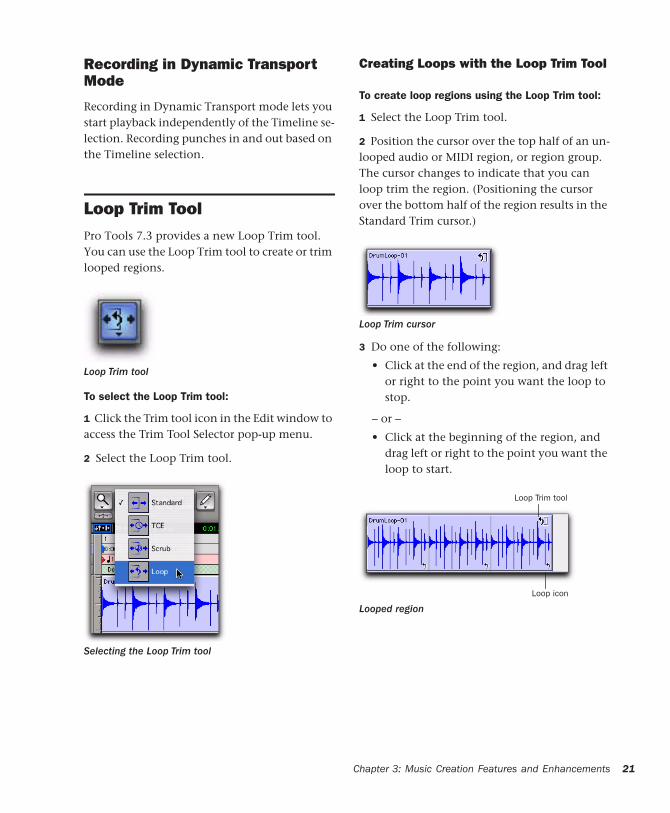
Creating Loops with the Loop Trim Tool
To create loop regions using the Loop Trim tool:
1 Select the Loop Trim tool.
2 Position the cursor over the top half of an un-looped audio or MIDI region, or region group. The cursor changes to indicate that you can loop trim the region. (Positioning the cursor over the bottom half of the region results in the Standard Trim cursor.)
3 Do one of the following:
• Click at the end of the region, and drag left or right to the point you want the loop to stop.
– or –
• Click at the beginning of the region, and drag left or right to the point you want the loop to start.
Loop Trim cursor
Looped region
Loop Trim tool
Loop icon
Chapter 3: Music Creation Features and Enhancements 21
22
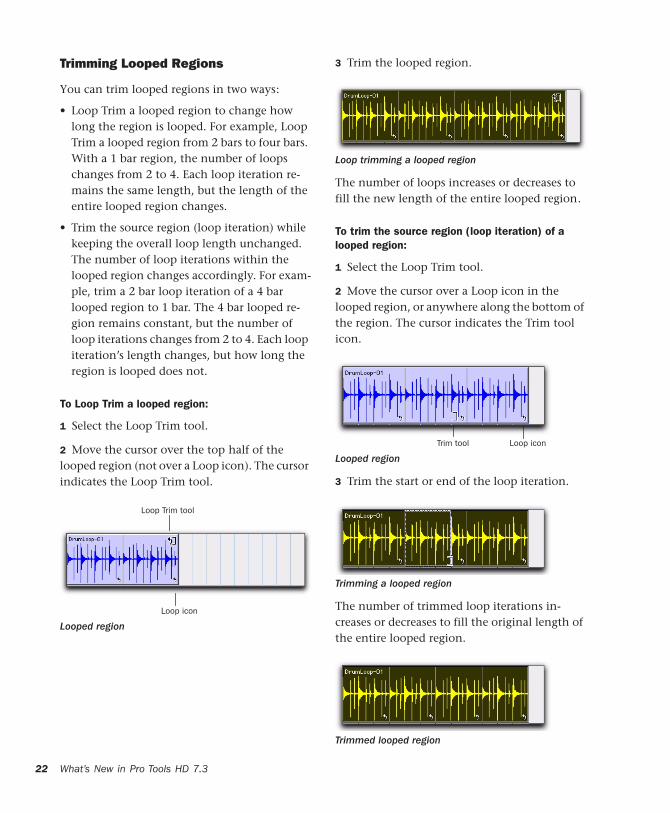
Trimming Looped Regions
You can trim looped regions in two ways:
• Loop Trim a looped region to change how long the region is looped. For example, Loop Trim a looped region from 2 bars to four bars. With a 1 bar region, the number of loops changes from 2 to 4. Each loop iteration re-mains the same length, but the length of the entire looped region changes.
• Trim the source region (loop iteration) while keeping the overall loop length unchanged. The number of loop iterations within the looped region changes accordingly. For exam-ple, trim a 2 bar loop iteration of a 4 bar looped region to 1 bar. The 4 bar looped re-gion remains constant, but the number of loop iterations changes from 2 to 4. Each loop iteration’s length changes, but how long the region is looped does not.
To Loop Trim a looped region:
1 Select the Loop Trim tool.
2 Move the cursor over the top half of the looped region (not over a Loop icon). The cursor indicates the Loop Trim tool.
Looped region
Loop Trim tool
Loop icon
What’s New in Pro Tools HD 7.3
3 Trim the looped region.
The number of loops increases or decreases to fill the new length of the entire looped region.
To trim the source region (loop iteration) of a looped region:
1 Select the Loop Trim tool.
2 Move the cursor over a Loop icon in the looped region, or anywhere along the bottom of the region. The cursor indicates the Trim tool icon.
3 Trim the start or end of the loop iteration.
The number of trimmed loop iterations in-creases or decreases to fill the original length of the entire looped region.
Loop trimming a looped region
Looped region
Trimming a looped region
Trimmed looped region
Trim tool Loop icon

Default Track TimebasePro Tools 7.3 provides a new preference that lets you set the default timebase for all new tracks to Ticks. This is useful for quickly setting up a new session for loop-based music projects where you are working extensively with tick-based audio (such as REX and ACID files) and MIDI material.
New Tracks Default To Tick Timebase
When the New Tracks Default To Tick Timebase preference is selected, all new tracks default to ticks. When deselected, audio, Auxiliary Input, Master Fader, and VCA (Pro Tools HD only) tracks default to samples.
To have new tracks default to Ticks:
1 Choose Setup > Preferences.
2 Click the Editing tab.
3 Select New Tracks Default to Tick Timebase.
New Tracks Default to Tick Timebase preference, Editing tab
Create Click TrackPro Tools 7.3 provides a new command to quickly and easily create a new click track.
To create a new click track:
■ Choose Track > Create Click Track.
Pro Tools creates a new Auxiliary Input track named “Click” with the Click plug-in already inserted. In the Edit window, the click track’s Track Height is set to Mini. You can create more than one click track and each subsequent click track is named in sequence Click 1, Click 2, and so on.
Automatically Create Click Track In New Sessions
Enable the Automatically Create Click Track In New Sessions option (Setup > Preferences, MIDI tab) to have Pro Tools automatically create a click track when you create a new session.
Selecting the Automatically Create Click Track In New Sessions option
Chapter 3: Music Creation Features and Enhancements 23

24
Key SignaturesPro Tools 7.3 provides a new Key Signature ruler for adding key signatures to Pro Tools sessions. Key signatures can be imported and exported with MIDI data. This is especially useful when exporting MIDI sequences for use in notation programs like Sibelius. The default key signature is C major.
Key Signature Ruler
The new Key Signature ruler lets you add, edit, and delete key signatures. You can use key sig-natures to indicate key and key changes in your Pro Tools session. Key signatures can also be used for certain diatonic functions, such as transposing in key or constraining pitches to the specified key.
To view the Key Signature ruler, do one of the following:
■ Select View > Rulers > Key Signature.
– or –
■ From the View selector in the Edit window, se-lect Key Signatures.
You can also show or hide the Key Signature Staff for the Key Signatures ruler.
Key Signature ruler
What’s New in Pro Tools HD 7.3
To view the staff for the Key Signature ruler:
1 Show the Key Signature ruler.
2 Do one of the following:
• Select View > Rulers > Key Signature Staff.
– or –
• Click the Show/Hide triangle on the Key Signature ruler.
Changing Key Signatures
You can add, edit, or delete key signatures.
To add a key signature:
1 Place the cursor in the Timeline where you want to add a key signature.
2 Do one of the following:
• Choose Event > Add Key Change.
– or –
• Click the Plus (+) button in the Key Signa-ture ruler.
3 In the Key Change dialog, select the mode (major or minor), the key, its location and range, and how you want it to affect pitched tracks.
4 Click OK.
To edit a key signature:
1 Double-click the Key Signature marker in the Key Signature ruler.
2 In the Key Change dialog, make the desired changes.
3 Click OK.

To delete a key signature, do one of the following:
■ Alt-click (Windows) or Option-click (Mac) the Key Signature marker in the Key Signature ruler.
– or –
■ Make a selection in the Key Signature ruler that includes the key signature you want to de-lete and choose Edit > Clear or press Delete.
Key Change Dialog
The Key Change dialog lets you specify the mode (major or minor), the key (from seven flats to seven sharps), the range affected (for ex-ample, from Bar 1 to the next key change), and whether or not existing MIDI notes on pitched tracks are transposed or constrained to key (see “Pitched Tracks” on page 26). The Key Change dialog opens whenever you add or edit a Key Signature marker.
Major Keys Displays the major keys from seven flats to seven sharps.
Minor Keys Displays the minor keys from seven flats to seven sharps. Pro Tools only applies the natural minor mode.
Sharps Lets you select any of the sharp keys to seven sharps and C major (or A minor).
Flats Lets you select any of the flat keys to seven flats and C major (or A minor).
Key Change dialog
From Lets you specify where to place the Key Sig-nature marker in Bars|Beats.
To Lets you specify to where you want the key change to take effect: to the next Key Signature marker, to a selection, or to the end of the ses-sion.
Snap To Bar Snaps the Key Signature marker to the bar line.
Edit Pitched Tracks
Enabling the Edit Pitched Tracks option lets you transpose existing MIDI notes on Pitched tracks up or down, either diatonically or chromatically based on the key change, or constrain pitches to the new key. For more information on Pitched tracks, see “Pitched Tracks” on page 26.
Transpose Lets you transpose existing MIDI notes on Pitched tracks up or down, diatonically or chromatically. For example, if the session is in C major and you are adding a key change to D minor, select Edit Pitched Tracks, Transpose, Up, and Diatonically to transpose notes on Pitched tracks up a whole step and then lower the third, sixth, and seventh scale degrees by a half step. The sequence C, D, E is transposed to D, E, F (natural, rather than sharp as happens when transposing chromatically).
When transposing diatonically, chromatic notes are maintained when changing key. For example, when changing key from C major to E major, the note B-flat is transposed to D-natural. This lets you maintain “blue notes” when changing keys and applying diatonic transposi-tion.
Constrain Pitches To Key Lets you constrain pitches to the notes of the new key. This means that any diatonic pitches of the old key on Pitched tracks that are not in the new key are in-
Chapter 3: Music Creation Features and Enhancements 25
26
dividually transposed to the nearest diatonic pitch of the new key. For example, when chang-ing from C major to D major, the sequence C, D, E, F, G changes to C-sharp, D, E, F-sharp, G.
Constraining pitches to key also constrains any chromatic pitches to the new diatonic scale. For example, when changing from C major to D ma-jor, the sequence C, D, D-sharp, E changes to C-sharp, D, D, E.
Pitched Tracks
Pitched tracks are MIDI or Instrument tracks that can be affected by transpositions due to key changes (including constrain to key). MIDI and Instrument tracks are “pitched” by default. However, if you have MIDI or Instrument tracks assigned to drum machines or samplers, you do not want those tracks to be affected by key changes because of key mappings. You can dese-lect the Pitched option for specific MIDI and In-strument tracks so that they won’t be affected by key changes.
To deselect Pitched tracks:
■ Click the track’s Playlist selector and deselect the Pitched option.
Pitched enabled in Playlist selector
What’s New in Pro Tools HD 7.3
Importing Key Signatures
When importing MIDI, Pro Tools 7.3 lets you se-lect whether or not to import any key signatures stored in MIDI files.
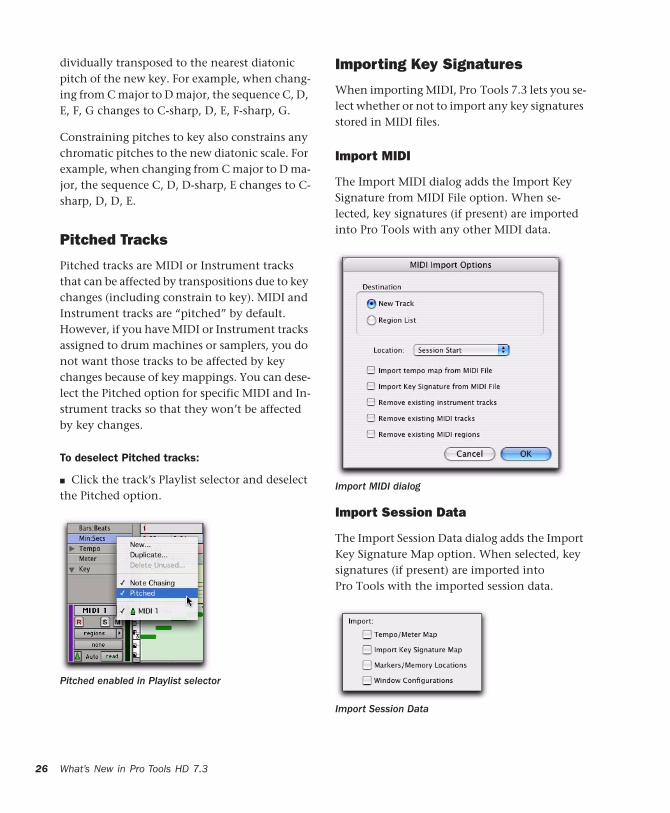
Import MIDI
The Import MIDI dialog adds the Import Key Signature from MIDI File option. When se-lected, key signatures (if present) are imported into Pro Tools with any other MIDI data.
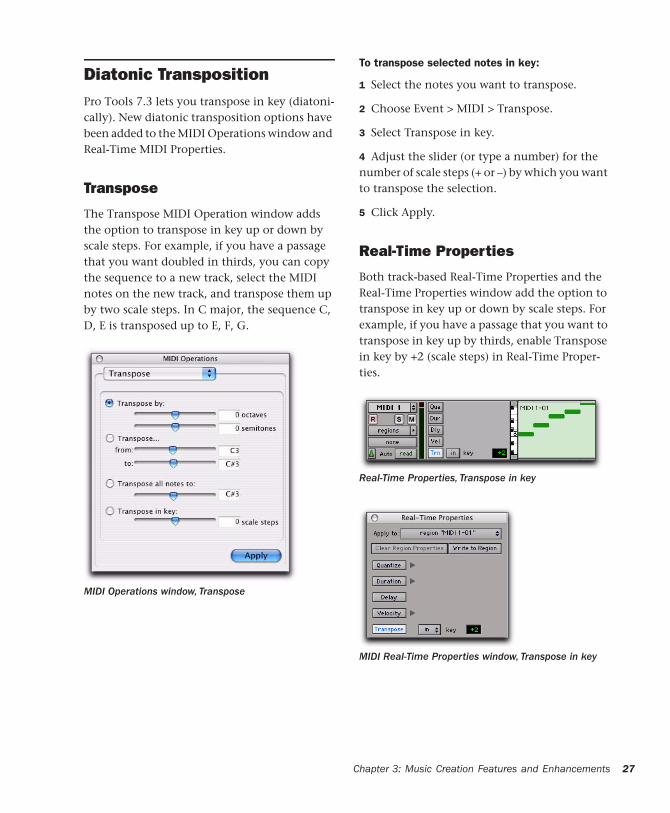
Import Session Data
The Import Session Data dialog adds the Import Key Signature Map option. When selected, key signatures (if present) are imported into Pro Tools with the imported session data.
Import MIDI dialog
Import Session Data
Diatonic TranspositionPro Tools 7.3 lets you transpose in key (diatoni-cally). New diatonic transposition options have been added to the MIDI Operations window and Real-Time MIDI Properties.
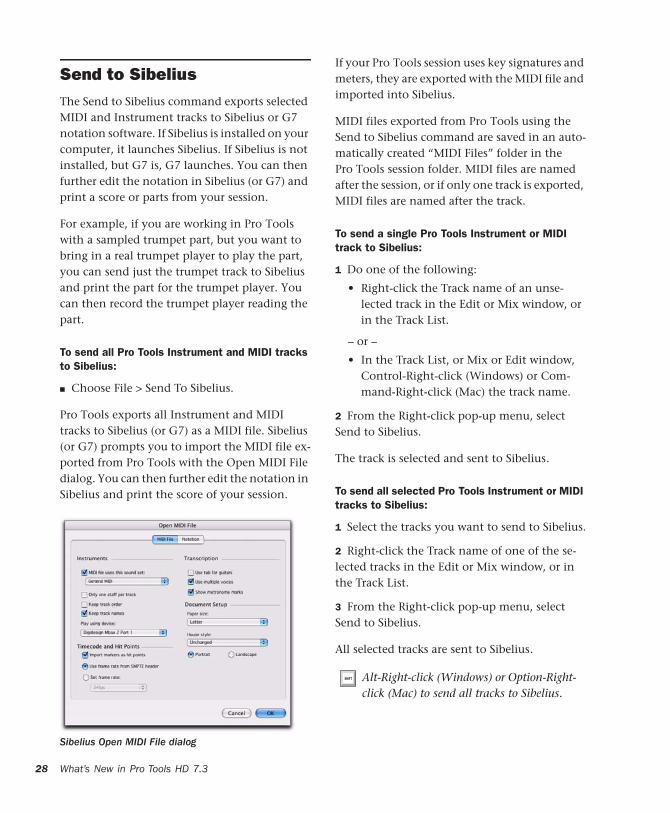
Transpose
The Transpose MIDI Operation window adds the option to transpose in key up or down by scale steps. For example, if you have a passage that you want doubled in thirds, you can copy the sequence to a new track, select the MIDI notes on the new track, and transpose them up by two scale steps. In C major, the sequence C, D, E is transposed up to E, F, G.
MIDI Operations window, Transpose
To transpose selected notes in key:
1 Select the notes you want to transpose.
2 Choose Event > MIDI > Transpose.
3 Select Transpose in key.
4 Adjust the slider (or type a number) for the number of scale steps (+ or –) by which you want to transpose the selection.
5 Click Apply.
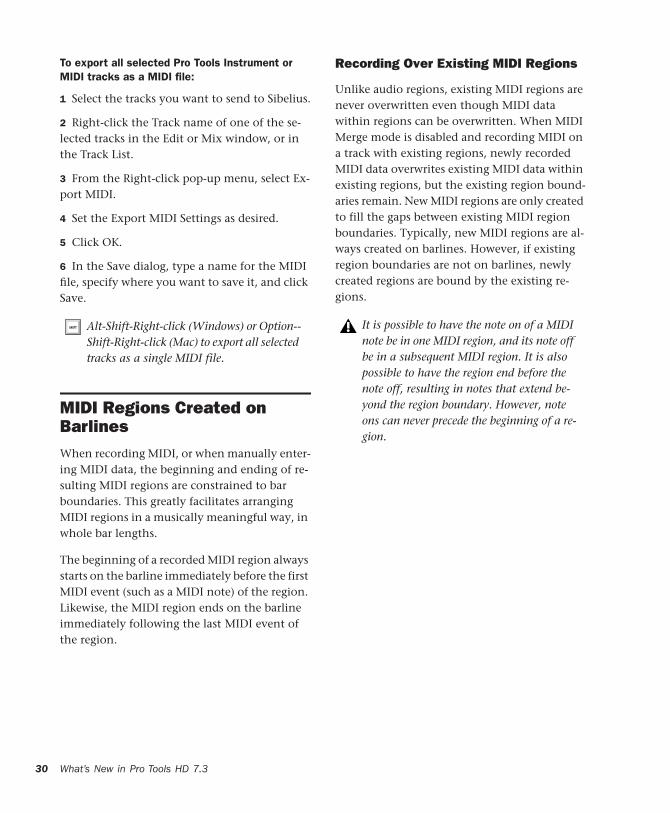
Real-Time Properties
Both track-based Real-Time Properties and the Real-Time Properties window add the option to transpose in key up or down by scale steps. For example, if you have a passage that you want to transpose in key up by thirds, enable Transpose in key by +2 (scale steps) in Real-Time Proper-ties.
Real-Time Properties, Transpose in key
MIDI Real-Time Properties window, Transpose in key
Chapter 3: Music Creation Features and Enhancements 27
28
Send to SibeliusThe Send to Sibelius command exports selected MIDI and Instrument tracks to Sibelius or G7 notation software. If Sibelius is installed on your computer, it launches Sibelius. If Sibelius is not installed, but G7 is, G7 launches. You can then further edit the notation in Sibelius (or G7) and print a score or parts from your session.
For example, if you are working in Pro Tools with a sampled trumpet part, but you want to bring in a real trumpet player to play the part, you can send just the trumpet track to Sibelius and print the part for the trumpet player. You can then record the trumpet player reading the part.
To send all Pro Tools Instrument and MIDI tracks to Sibelius:
■ Choose File > Send To Sibelius.
Pro Tools exports all Instrument and MIDI tracks to Sibelius (or G7) as a MIDI file. Sibelius (or G7) prompts you to import the MIDI file ex-ported from Pro Tools with the Open MIDI File dialog. You can then further edit the notation in Sibelius and print the score of your session.
Sibelius Open MIDI File dialog
What’s New in Pro Tools HD 7.3
If your Pro Tools session uses key signatures and meters, they are exported with the MIDI file and imported into Sibelius.
MIDI files exported from Pro Tools using the Send to Sibelius command are saved in an auto-matically created “MIDI Files” folder in the Pro Tools session folder. MIDI files are named after the session, or if only one track is exported, MIDI files are named after the track.
To send a single Pro Tools Instrument or MIDI track to Sibelius:
1 Do one of the following:
• Right-click the Track name of an unse-lected track in the Edit or Mix window, or in the Track List.
– or –
• In the Track List, or Mix or Edit window, Control-Right-click (Windows) or Com-mand-Right-click (Mac) the track name.
2 From the Right-click pop-up menu, select Send to Sibelius.
The track is selected and sent to Sibelius.
To send all selected Pro Tools Instrument or MIDI tracks to Sibelius:
1 Select the tracks you want to send to Sibelius.
2 Right-click the Track name of one of the se-lected tracks in the Edit or Mix window, or in the Track List.
3 From the Right-click pop-up menu, select Send to Sibelius.
All selected tracks are sent to Sibelius.
Alt-Right-click (Windows) or Option-Right-click (Mac) to send all tracks to Sibelius.

Export MIDIPro Tools lets you export your Pro Tools session or one or more MIDI or Instrument tracks as a standard MIDI file.You can export the file as a Type 1 (multitrack) or Type 0 (merged) Standard MIDI file. The exported MIDI file includes meter and tempo information, and any key signatures in your session.
Exporting individual MIDI and Instrument tracks as MIDI files can be useful for storing li-braries of your favorite MIDI sequences or SysEx data (such as bulk or individual patch dumps for your external MIDI devices), or for importing MIDI into notation applications other than Si-belius or G7.
If your Pro Tools session uses key signatures and meters, they are exported with the MIDI file.
To export your Pro Tools session as a MIDI file:
1 Choose File > Export > MIDI.
2 Set the Export MIDI Settings.
3 Click OK.
4 In the Save dialog, type a name for the MIDI file, specify where you want to save it, and click Save.
To export a single MIDI or Instrument track as a MIDI file:
1 Do one of the following:
• Right-click the Track name of an unse-lected track in the Edit or Mix window, or in the Track List.
– or –
• In the Track List, or Mix or Edit window, Control-Right-click (Windows) or Com-mand-Right-click (Mac) the track name.
2 From the Right-click pop-up menu, select Ex-port MIDI.
3 Set the Export MIDI settings.
4 Click OK.
5 In the Save dialog, type a name for the MIDI file, specify where you want to save it, and click Save.
Export MIDI Settings dialog
Alt-Right-click (Windows) or Option-Right-click (Mac) to export all tracks to a single MIDI file.
Chapter 3: Music Creation Features and Enhancements 29
30
To export all selected Pro Tools Instrument or MIDI tracks as a MIDI file:
1 Select the tracks you want to send to Sibelius.
2 Right-click the Track name of one of the se-lected tracks in the Edit or Mix window, or in the Track List.
3 From the Right-click pop-up menu, select Ex-port MIDI.
4 Set the Export MIDI Settings as desired.
5 Click OK.
6 In the Save dialog, type a name for the MIDI file, specify where you want to save it, and click Save.
MIDI Regions Created on BarlinesWhen recording MIDI, or when manually enter-ing MIDI data, the beginning and ending of re-sulting MIDI regions are constrained to bar boundaries. This greatly facilitates arranging MIDI regions in a musically meaningful way, in whole bar lengths.
The beginning of a recorded MIDI region always starts on the barline immediately before the first MIDI event (such as a MIDI note) of the region. Likewise, the MIDI region ends on the barline immediately following the last MIDI event of the region.
Alt-Shift-Right-click (Windows) or Option--Shift-Right-click (Mac) to export all selected tracks as a single MIDI file.
What’s New in Pro Tools HD 7.3
Recording Over Existing MIDI Regions
Unlike audio regions, existing MIDI regions are never overwritten even though MIDI data within regions can be overwritten. When MIDI Merge mode is disabled and recording MIDI on a track with existing regions, newly recorded MIDI data overwrites existing MIDI data within existing regions, but the existing region bound-aries remain. New MIDI regions are only created to fill the gaps between existing MIDI region boundaries. Typically, new MIDI regions are al-ways created on barlines. However, if existing region boundaries are not on barlines, newly created regions are bound by the existing re-gions.
It is possible to have the note on of a MIDI note be in one MIDI region, and its note off be in a subsequent MIDI region. It is also possible to have the region end before the note off, resulting in notes that extend be-yond the region boundary. However, note ons can never precede the beginning of a re-gion.
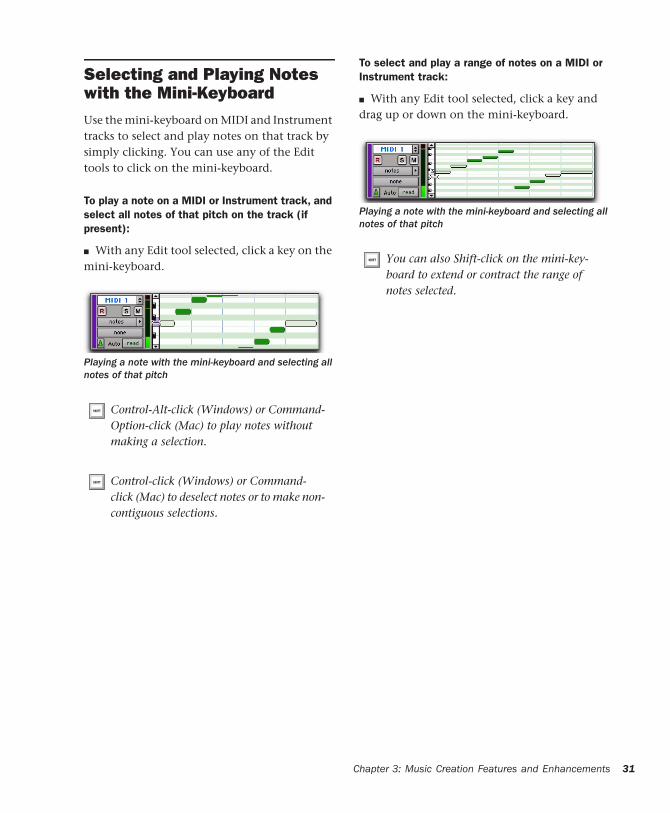
Selecting and Playing Notes with the Mini-Keyboard Use the mini-keyboard on MIDI and Instrument tracks to select and play notes on that track by simply clicking. You can use any of the Edit tools to click on the mini-keyboard.
To play a note on a MIDI or Instrument track, and select all notes of that pitch on the track (if present):
■ With any Edit tool selected, click a key on the mini-keyboard.
Playing a note with the mini-keyboard and selecting all notes of that pitch
Control-Alt-click (Windows) or Command-Option-click (Mac) to play notes without making a selection.
Control-click (Windows) or Command-click (Mac) to deselect notes or to make non-contiguous selections.
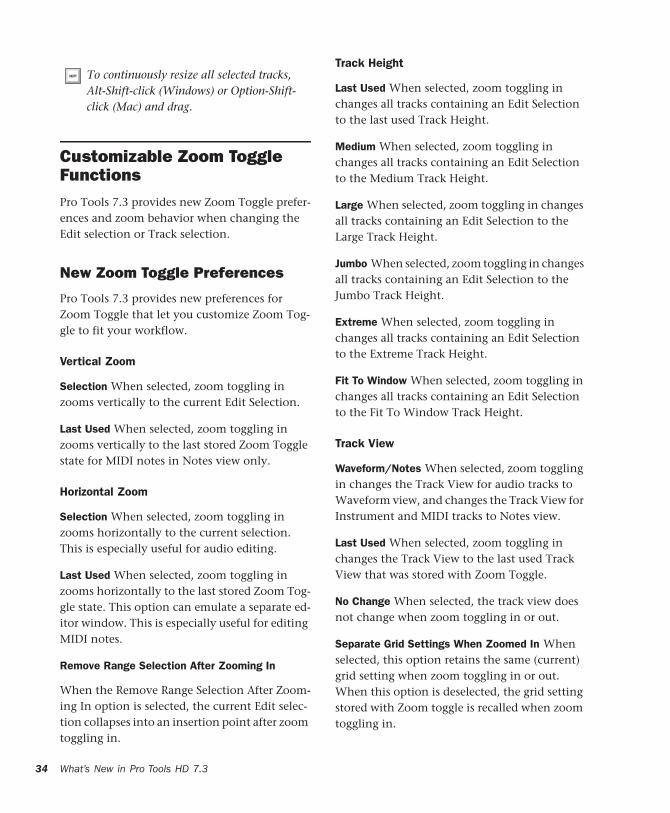
To select and play a range of notes on a MIDI or Instrument track:
■ With any Edit tool selected, click a key and drag up or down on the mini-keyboard.
Playing a note with the mini-keyboard and selecting all notes of that pitch
You can also Shift-click on the mini-key-board to extend or contract the range of notes selected.
Chapter 3: Music Creation Features and Enhancements 31

32
What’s New in Pro Tools HD 7.3
chapter 4
Editing Features and Enhancements
New Track HeightsPro Tools 7.3 adds the following new track heights:
Micro Is the smallest possible Track Height.
Fit To Window Fills the entire height of the tracks portion of the Edit window (at whatever window size) with the selected track. This set-ting can be useful to focus on a single track for editing (especially when editing MIDI notes on a single MIDI or Instrument track).
Track Height pop-up menu, audio track
To fit all tracks with an Edit selection to the window, press Control+Start+Up or Down Arrow (Windows) or Command+Con-trol+Up or Down Arrow (Mac).
To fit all selected tracks to the window, Alt-Shift-click (Windows) or Option-Shift-click (Mac) the Track Height pop-up menu and select Fit to Window.
Continuously Variable Track HeightIn the Edit window, Pro Tools 7.3 lets you con-tinuously resize the Track Height of any given track by simply clicking and dragging the lower boundary of the Track Controls column.
To resize the Track Height of any track in the Edit window:
■ Click and drag the bottom line of any given track’s Track Controls column up or down.
The track’s Track Height changes incrementally.
Adjusting the Track Height of an audio track
Hold Control (Windows) or Command (Mac) while adjusting track height for con-tinuous, non-incremental adjustments.
To continuously resize all tracks, Alt-click (Windows) or Option-click (Mac) and drag.
Chapter 4: Editing Features and Enhancements 33
34
Customizable Zoom Toggle FunctionsPro Tools 7.3 provides new Zoom Toggle prefer-ences and zoom behavior when changing the Edit selection or Track selection.
New Zoom Toggle Preferences
Pro Tools 7.3 provides new preferences for Zoom Toggle that let you customize Zoom Tog-gle to fit your workflow.
Vertical Zoom
Selection When selected, zoom toggling in zooms vertically to the current Edit Selection.
Last Used When selected, zoom toggling in zooms vertically to the last stored Zoom Toggle state for MIDI notes in Notes view only.
Horizontal Zoom
Selection When selected, zoom toggling in zooms horizontally to the current selection. This is especially useful for audio editing.
Last Used When selected, zoom toggling in zooms horizontally to the last stored Zoom Tog-gle state. This option can emulate a separate ed-itor window. This is especially useful for editing MIDI notes.
Remove Range Selection After Zooming In
When the Remove Range Selection After Zoom-ing In option is selected, the current Edit selec-tion collapses into an insertion point after zoom toggling in.
To continuously resize all selected tracks, Alt-Shift-click (Windows) or Option-Shift-click (Mac) and drag.
What’s New in Pro Tools HD 7.3
Track Height
Last Used When selected, zoom toggling in changes all tracks containing an Edit Selection to the last used Track Height.
Medium When selected, zoom toggling in changes all tracks containing an Edit Selection to the Medium Track Height.
Large When selected, zoom toggling in changes all tracks containing an Edit Selection to the Large Track Height.
Jumbo When selected, zoom toggling in changes all tracks containing an Edit Selection to the Jumbo Track Height.
Extreme When selected, zoom toggling in changes all tracks containing an Edit Selection to the Extreme Track Height.
Fit To Window When selected, zoom toggling in changes all tracks containing an Edit Selection to the Fit To Window Track Height.
Track View
Waveform/Notes When selected, zoom toggling in changes the Track View for audio tracks to Waveform view, and changes the Track View for Instrument and MIDI tracks to Notes view.
Last Used When selected, zoom toggling in changes the Track View to the last used Track View that was stored with Zoom Toggle.
No Change When selected, the track view does not change when zoom toggling in or out.
Separate Grid Settings When Zoomed In When selected, this option retains the same (current) grid setting when zoom toggling in or out. When this option is deselected, the grid setting stored with Zoom toggle is recalled when zoom toggling in.
Auto-Toggle When Changing Selection
When Zoom Toggle is enabled, selecting a dif-ferent range of material, or selecting material on a different track affects Zoom Toggle as follows:
• Changing the selection length does not re-zoom the window, the current zoom level is maintained.
• Changing the selection to a different track sets the toggle-in state for track height and view. However, horizontal zoom remains unchanged. When moving the selection from a toggled in track, the toggled out track height and view are restored.
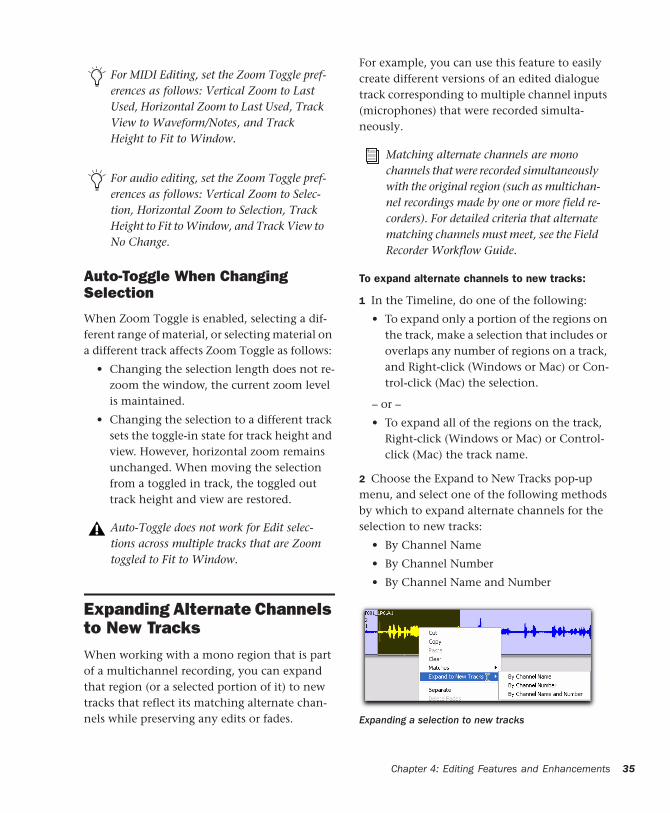
Expanding Alternate Channels to New TracksWhen working with a mono region that is part of a multichannel recording, you can expand that region (or a selected portion of it) to new tracks that reflect its matching alternate chan-nels while preserving any edits or fades.
For MIDI Editing, set the Zoom Toggle pref-erences as follows: Vertical Zoom to Last Used, Horizontal Zoom to Last Used, Track View to Waveform/Notes, and Track Height to Fit to Window.
For audio editing, set the Zoom Toggle pref-erences as follows: Vertical Zoom to Selec-tion, Horizontal Zoom to Selection, Track Height to Fit to Window, and Track View to No Change.
Auto-Toggle does not work for Edit selec-tions across multiple tracks that are Zoom toggled to Fit to Window.
For example, you can use this feature to easily create different versions of an edited dialogue track corresponding to multiple channel inputs (microphones) that were recorded simulta-neously.
To expand alternate channels to new tracks:
1 In the Timeline, do one of the following:
• To expand only a portion of the regions on the track, make a selection that includes or overlaps any number of regions on a track, and Right-click (Windows or Mac) or Con-trol-click (Mac) the selection.
– or –
• To expand all of the regions on the track, Right-click (Windows or Mac) or Control-click (Mac) the track name.
2 Choose the Expand to New Tracks pop-up menu, and select one of the following methods by which to expand alternate channels for the selection to new tracks:
• By Channel Name
• By Channel Number
• By Channel Name and Number
Matching alternate channels are mono channels that were recorded simultaneously with the original region (such as multichan-nel recordings made by one or more field re-corders). For detailed criteria that alternate matching channels must meet, see the Field Recorder Workflow Guide.
Expanding a selection to new tracks
Chapter 4: Editing Features and Enhancements 35
36
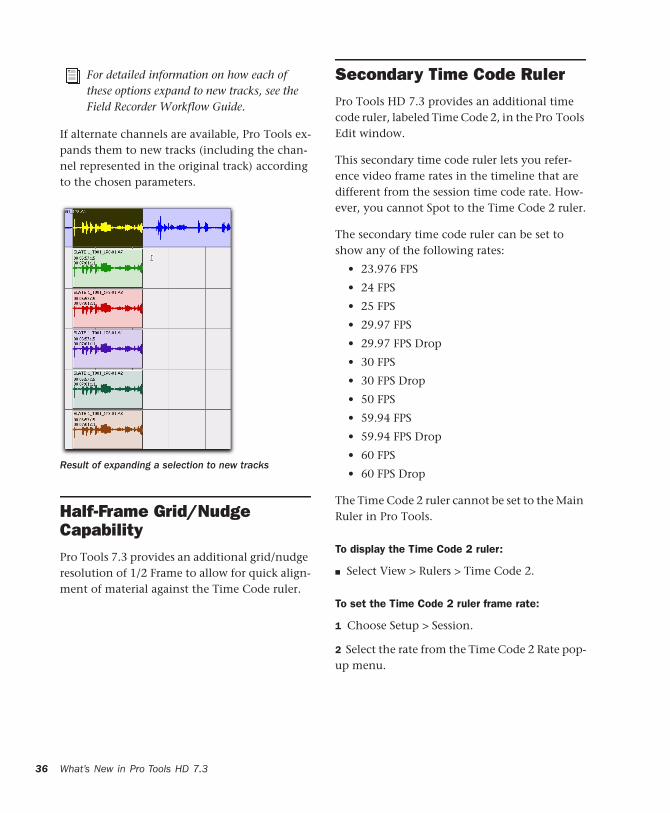
If alternate channels are available, Pro Tools ex-pands them to new tracks (including the chan-nel represented in the original track) according to the chosen parameters.
Half-Frame Grid/Nudge CapabilityPro Tools 7.3 provides an additional grid/nudge resolution of 1/2 Frame to allow for quick align-ment of material against the Time Code ruler.
For detailed information on how each of these options expand to new tracks, see the Field Recorder Workflow Guide.
Result of expanding a selection to new tracks
What’s New in Pro Tools HD 7.3
Secondary Time Code RulerPro Tools HD 7.3 provides an additional time code ruler, labeled Time Code 2, in the Pro Tools Edit window.
This secondary time code ruler lets you refer-ence video frame rates in the timeline that are different from the session time code rate. How-ever, you cannot Spot to the Time Code 2 ruler.
The secondary time code ruler can be set to show any of the following rates:
• 23.976 FPS
• 24 FPS
• 25 FPS
• 29.97 FPS
• 29.97 FPS Drop
• 30 FPS
• 30 FPS Drop
• 50 FPS
• 59.94 FPS
• 59.94 FPS Drop
• 60 FPS
• 60 FPS Drop
The Time Code 2 ruler cannot be set to the Main Ruler in Pro Tools.
To display the Time Code 2 ruler:
■ Select View > Rulers > Time Code 2.
To set the Time Code 2 ruler frame rate:
1 Choose Setup > Session.
2 Select the rate from the Time Code 2 Rate pop-up menu.
chapter 5
Pro Tools Support for Avid Unity and Avid Video Peripherals
Avid Interplay IntegrationPro Tools 7.3 adds support for integration with Avid Interplay with the Pro Tools Avid Interplay option, which lets Pro Tools and Avid users work within the same asset management sys-tem.
The Pro Tools Avid Interplay option lets you do the following:
• Open sequences checked in specifically for the Pro Tools user by an Avid editor directly within Interplay
• Export tracks directly back to the sequence on Interplay, either by adding or replacing audio tracks in the sequence
• Work in the Pro Tools Timeline with draft-res-olution video that is linked to high-resolution video in Avid Interplay
• Allow administrators to manage import and export options, or shield users from complex AAF import/export steps
• Maintain past versions of sequences, along with a history of user names, check-in dates, and comments
For more information, see the Pro Tools Avid Interplay Guide.
Chapter 5: Pro
Support for Avid Mojo-SDIPro Tools 7.3 adds support for Avid Mojo-SDI on Windows and Mac dual-processor comput-ers, providing playback of all standard-defini-tion Avid video files.
Synchronization Enhancements
• Secondary time code ruler in Edit window
• Half-frame grid setting and nudge capability in Grid mode
• HD frame rate capability when exporting AAF sequences
• New and reorganized MachineControl fea-tures in the Peripherals Dialog
• New Synchronization Preference
See the Avid Video Peripherals Guide for de-tailed instructions on installing Avid Mojo-SDI.
Tools Support for Avid Unity and Avid Video Peripherals 37
38
Export of AAF Sequences at HD Frame Rates(Pro Tools HD with DigiTranslator 2.0 only)
When exporting to an AAF sequence, Pro Tools allows HD rates as target time code formats, to ensure compatibility with Avid workstations that support HD-rate AAF files. The Pro Tools Export to AAF command can export sequences at the following rates:
• 23.976 FPS
• 24 FPS
• 25 FPS
• 29.97 FPS
• 29.97 FPS Drop
• 50 FPS
• 59.94 FPS
• 59.94 FPS Drop
• 60 FPS
• 60 FPS Drop
New and Reorganized Synchronization FeaturesPro Tools 7.3 includes a reorganized Peripherals dialog that provides access to more synchroni-zation commands and synchronization periph-eral features from Pro Tools software.
HD projects that are interlaced have an ac-tual frame rate that is half that implied by the format description. For example, a 1080i/50 project has a frame rate of 25 fps, so an AAF sequence destined for this project should be exported at 25 fps. In a progressive HD project, the true frame rate is implied in the project name. For example, a 720p/59.94 project has a frame rate of 59.94 fps, so an AAF sequence destined for this project should be exported at 59.94 fps.
What’s New in Pro Tools HD 7.3
Synchronization Page
The following items have been moved to the Synchronization page of the Peripherals dialog:
• MTC Generator Port pop-up menu
The following items have been added to the Synchronization page of the Peripherals dialog:
• VITC Insertion enable option
• Pitch Memory enable option
• Idle MTC enable option
• LTC Output Gain pop-up menu
• VITC Reader lines pop-up menu
• VITC Generate lines pop-up menu
• Bi-phase/Tach wiring pop-up menu
• Bi-phase/tach pulses per frame setting
Machine Control Page
The “Enable Control of PT via MMC” option has been moved to the Machine Control page of the Peripherals dialog and renamed as “MIDI Ma-chine Control Remote (Slave).”
The following items have been renamed:
• MIDI Machine Control (Master)
• 9-Pin Machine Control (Deck Control)
• 9-Pin Remote (Deck Emulation)
New Synchronization PreferenceIn Pro Tools 7.3, the “Minimum Sync Delay” setting has been moved from the Synchroniza-tion page of the Peripherals dialog to the Syn-chronization page of the Preferences dialog.


DIGIDESIGN2001 Junipero Serra Boulevard
Daly City, CA 94014-3886 USA
Tel: 650.731.6300
Fax: 650.731.6399
TECHNICAL SUPPORT (USA)Tel: 650.731.6100
Fax: 650.731.6384
PRODUCT INFORMATION (USA)Tel: 800.333.2137
INTERNATIONAL OFFICESVisit the Digidesign websitefor contact information
www.digidesign.com