WHAT’S NEW IN MICROSOFT DYNAMICS NAV 5.0 …bcinc.net/js/NA50_ENUS_WNLOC_KIT.pdf · transmitted...
144
Microsoft Official Training Materials for Microsoft Dynamics ™ Your use of this content is subject to your current services agreement WHAT’S NEW IN MICROS OFT DYNAMICS NAV 5.0 – LOCAL FUNCTIONALITY KITTING
-
Upload
phungkhuong -
Category
Documents
-
view
219 -
download
3
Transcript of WHAT’S NEW IN MICROSOFT DYNAMICS NAV 5.0 …bcinc.net/js/NA50_ENUS_WNLOC_KIT.pdf · transmitted...

Microsoft Official Training Materials for Microsoft Dynamics ™ Your use of this content is subject to your current services agreement
WHAT’S NEW IN MICROSOFT DYNAMICS NAV 5.0 – LOCAL FUNCTIONALITY
KITTING

Microsoft Official Training Materials for Microsoft Dynamics ™ Your use of this content is subject to your current services agreement
February, 2007
The information contained in this document represents the current view of Microsoft Corporation on the issues
discussed as of the date of publication. Because Microsoft must respond to changing market conditions, it should
not be interpreted to be a commitment on the part of Microsoft, and Microsoft cannot guarantee the accuracy of any
information presented after the date of publication.
This document is for informational purposes only. MICROSOFT MAKES NO WARRANTIES, EXPRESS, IMPLIED
OR STATUTORY, AS TO THE INFORMATION IN THIS DOCUMENT.
Complying with all applicable copyright laws is the responsibility of the user. Without limiting the rights under
copyright, no part of this document may be reproduced, stored in or introduced into a retrieval system, or
transmitted in any form or by any means (electronic, mechanical, photocopying, recording, or otherwise), or for any
purpose, without the express written permission of Microsoft Corporation.
Microsoft may have patents, patent applications, trademarks, copyrights, or other intellectual property rights
covering subject matter in this document. Except as expressly provided in any written license agreement from
Microsoft, the furnishing of this document does not give you any license to these patents, trademarks, copyrights, or
other intellectual property.
2005 Microsoft Corporation. All rights reserved. Microsoft, Excel, Word, Windows, and Navision are trademarks
or registered trademarks of Microsoft Corporation or their affiliates in the United States and/or other countries.
The names of actual companies and products mentioned herein may be the trademarks of their respective owners.
The names of actual companies and products mentioned herein may be the trademarks of their respective owners.

Microsoft Official Training Materials for Microsoft Dynamics ™ Your use of this content is subject to your current services agreement
Table of Contents
Page i
Introduction to Kitting in Microsoft Dynamics NAV 1
E-Learning ........................................................................................................... 1 Instructor-Led Training ......................................................................................... 2 Courseware ......................................................................................................... 2 Certifications ........................................................................................................ 3 Microsoft Dynamics Training Courseware Elements ............................................ 4 About This Course ............................................................................................... 6 Student Objectives ............................................................................................... 8
Chapter 1: Setting up Kitting 9
Objectives ............................................................................................................ 9 Introduction .......................................................................................................... 9 Differences between Manufacturing and Kitting ................................................. 10 Architectural Considerations .............................................................................. 11 Setting up Inventory for Kitting ........................................................................... 11 Setting up Sales & Receivables ......................................................................... 13 Customer Card Settings ..................................................................................... 14 Working with Components ................................................................................. 15 Test Your Knowledge Setting Up Kitting.......................................................... 16 Conclusion ......................................................................................................... 18 Quick Interaction: Lessons Learned ................................................................... 19
Chapter 2: Creating Kits 21
Objectives .......................................................................................................... 21 Introduction ........................................................................................................ 21 Establish a Kit BOM ........................................................................................... 22 Demonstration Create a Kit BOM .................................................................... 27 Creating a Kit Item ............................................................................................. 29 Demonstration Creating a Kit Item .................................................................. 30 Building and Stocking Kits .................................................................................. 32 Demonstration Building and Stocking Kits ....................................................... 34 Lab 2.1 Creating a Kit BOM ............................................................................ 36 Lab 2.2 Creating a Kit Item.............................................................................. 38 Lab 2.3 Building and Stocking Kits with the BOM Journal ............................... 39 Test Your Knowledge Creating Kits ................................................................. 40 Conclusion ......................................................................................................... 41 Quick Interaction: Lessons Learned ................................................................... 42
Chapter 3: Kit Disassembly 43
Objectives .......................................................................................................... 43 Introduction ........................................................................................................ 43 Return a Kit ........................................................................................................ 44 Demonstration Return a Kit ............................................................................. 44 Kit Disassembly Using the BOM Journal ............................................................ 48 Demonstration Kit Disassembly using the BOM Journal .................................. 49 Costing During Disassembly .............................................................................. 52 Demonstration Costing During Disassembly ................................................... 53 Lab 3.1 Return a Kit ........................................................................................ 59

Microsoft Official Training Materials for Microsoft Dynamics ™ Your use of this content is subject to your current services agreement
What's New in Dynamics NAV 5.0 - Local Functionality
Page ii
Lab 3.2 Kit Disassembly using the BOM Journal ............................................. 60 Test Your Knowledge Kit Disassembly ............................................................ 61 Conclusion ......................................................................................................... 62 Quick Interaction: Lessons Learned ................................................................... 63
Chapter 4: Order Processing with Kitting 65
Objectives .......................................................................................................... 65 Introduction ........................................................................................................ 65 Enter a Kit onto an Order ................................................................................... 66 Demonstration Enter a kit onto an Order ......................................................... 67 Reviewing Kit Sales Lines .................................................................................. 70 Demonstration Reviewing Kit Sales Lines ....................................................... 70 Order Promising ................................................................................................. 75 Demonstration Order Promising ...................................................................... 75 Printing Order Confirmations .............................................................................. 81 Demonstration Printing Order Confirmations ................................................... 81 Shipping without Warehouse Functionality ......................................................... 83 Demonstration Shipping without Warehouse Functionality .............................. 84 Printing Invoices ................................................................................................ 86 Demonstration Printing Invoices ...................................................................... 86 Lab 4.1 Processing a Kit Order ....................................................................... 89 Lab 4.2 Order Promising ................................................................................. 90 Test Your Knowledge Order Processing with Kitting ....................................... 91 Conclusion ......................................................................................................... 93 Quick Interaction: Lessons Learned ................................................................... 94
Chapter 5: Warehouse management of kits 95
Objectives .......................................................................................................... 95 Introduction ........................................................................................................ 95 Creating Shipments for Kits ............................................................................... 97 Demonstration Creating Shipments for Kits ..................................................... 98 Creating and Registering Picks ........................................................................ 100 Demonstration Creating and Registering Picks ............................................. 101 Shipping ........................................................................................................... 103 Demonstration Shipping ................................................................................ 104 Lab 5.1 Warehouse Management of Kits ...................................................... 105 Test Your Knowledge Warehouse Management of Kits ................................ 106 Conclusion ....................................................................................................... 107 Quick Interaction: Lessons Learned ................................................................. 108
Chapter 6: Reporting 109
Objectives ........................................................................................................ 109 Introduction ...................................................................................................... 109 BOM Movement ............................................................................................... 110 Order Pick Ticket ............................................................................................. 111 Kit Component Statistics ............................................................................... 112 Kit Availability ................................................................................................... 112 Kit/Component Sales ....................................................................................... 113 Test Your Knowledge Reporting ................................................................... 114

Microsoft Official Training Materials for Microsoft Dynamics ™ Your use of this content is subject to your current services agreement
Table of Contents
Page iii
Conclusion ....................................................................................................... 115 Quick Interaction: Lessons Learned ................................................................. 116
Chapter 7: Kitting and other Features 117
Objectives ........................................................................................................ 117 Introduction ...................................................................................................... 117 Purchasing ....................................................................................................... 118 Order Planning and Planning Worksheet ......................................................... 118 Production Orders ............................................................................................ 119 Commerce Gateway and Biztalk ...................................................................... 119 Service Management ....................................................................................... 119 Test Your Knowledge Kitting and Other Features ......................................... 120 Conclusion ....................................................................................................... 121 Quick Interaction: Lessons Learned ................................................................. 122
Appendix A: Answers to Test Your Knowledge 123
Chapter 1 – Setting Up Kitting .......................................................................... 123 Chapter 2 Creating Kits ................................................................................. 124 Chapter 3 Kit Disassembly ............................................................................ 125 Chapter 4 Order Processing with Kitting........................................................ 126 Chapter 5 Warehouse Management of Kits ................................................... 128 Chapter 6 Reporting ...................................................................................... 129 Chapter 7 Kitting and Other Features ............................................................ 130
Appendix B: Solutions to Labs 131
Lab 2.1 Creating a Kit BOM .......................................................................... 131 Lab 2.2 Creating a Kit Item............................................................................ 132 Lab 2.3 Building and Stocking Kits with the BOM Journal ............................. 133 Lab 3.1 Return a Kit ...................................................................................... 133 Lab 3.2 Kit Disassembly using the BOM Journal ........................................... 134 Lab 4.1 Processing a Kit Order ..................................................................... 135 Lab 4.2 Order Promising ............................................................................... 136 Lab 5.1 Warehouse Management of Kits ...................................................... 137
Microsoft Official Training Materials for Microsoft Dynamics ™ Your use of this content is subject to your current services agreement
What's New in Dynamics NAV 5.0 - Local Functionality
Page iv

Microsoft Official Training Materials for Microsoft Dynamics ™ Your use of this content is subject to your current services agreement
Introduction
Page 1
INTRODUCTION TO KITTING IN MICROSOFT DYNAMICS NAV
Training is a vital component of retaining the value of your Microsoft Dynamics™ NAV investment. Quality training from industry experts helps to keep you updated on your solution, and develop skills to maximize the value of your solution. Whether choosing e-learning, instructor-led training, or self-paced study using training manuals, there is a type of training that meets your needs. Additionally, validate your training and demonstrate your expertise with one of many Microsoft Dynamics certification designations. Choose the training or certification type that best enables you to stay ahead of the competition.
E-Learning Microsoft Dynamics offers online training to help you increase your productivity without spending time away from your home or office. eLearning allows you to learn at your own pace through flexible access to training, therefore proving beneficial for those lacking the time or budget to travel. eLearning is available in the Foundation Library or as an eCourse.
Foundation Library The Foundation Library is a fee-based collection of overview tutorials specific to the Microsoft Dynamics family of products. These tutorials have the following features:
• Covers a broad range of topics at a high level, and typically does not exceed 60 minutes in length.
• Provides tips and tricks to show you how to increase productivity and save time.
• Enables you to learn about the changes in features and functionality of a new version.
• Allows you to evaluate a new module or product from Microsoft Dynamics.
Foundation Library subscriptions are available for individual purchase or through partner and customer service plans.
eCourses eCourses are fee-based online training designed to cover detailed concepts on specific product areas and can allow you to:
• Gain in-depth technical and business application training through daily on-demand training
• Learn at your own pace – lessons can be stopped and restarted, skipped or repeated

Microsoft Official Training Materials for Microsoft Dynamics ™ Your use of this content is subject to your current services agreement
What's New in Dynamics NAV 5.0 - Local Functionality
Page 2
• Save time and increase your productivity • Receive product knowledge comparable to instructor-led training
without the need for travel or time away from the office • Gain beneficial training when preparing for Microsoft Dynamics
certification exams
Instructor-Led Training With instructor-led training, you can gain a solid foundation or refresh your knowledge in Microsoft Dynamics products and processes while learning from an expert in an interactive environment. With courses on a variety of topics, you can:
• Follow demonstrations and attend presentations • Receive hands-on product experience • Participate in classroom activities and discussions with other
attendees • Gain beneficial training when preparing for Microsoft Dynamics
certification exams
Courseware Courseware can be ordered for the purpose of self-paced study. These materials are comparable to Courseware used with instructor-led training, and enable you to:
• Learn at your own pace, in your own time. • Refer to an abundance of tips, tricks, and insights • Learn in a self-study format when preparing for Microsoft Dynamics
certification exams For selected training manuals there are training Extensions which cover country specific features in the product. These training Extensions are separate training manuals designed to teach local functionality within a given country. Please notice that training Extensions are used in conjunction with the courseware, not as stand-alone training manuals. If an Extension is available for this course, you will find it in your training material.

Microsoft Official Training Materials for Microsoft Dynamics ™ Your use of this content is subject to your current services agreement
Introduction
Page 3
Certifications The Microsoft Dynamics certification program recognizes an individual's expertise in working with a Microsoft Dynamics product. The following certification options are available for individuals as part of the Microsoft Dynamics certification program.
Microsoft Dynamics Certified Professional The Microsoft Dynamics Certified Professional credential is intended for professionals who have demonstrated proficiency with at least one series of a Microsoft Dynamics product. In order to become a Microsoft Dynamics Certified Professional, candidates are required to pass one Microsoft Dynamics certification exam.
Microsoft Dynamics Certified Master Microsoft Dynamics Certified Professionals are eligible to work toward one or more Microsoft Dynamics Certified Master credentials. Master level certifications are Microsoft Dynamics premier certifications. They are an accumulation of exams that satisfy a set of predefined requirements. Each master level certification track contains a core group of required exams and variety of elective exams, in which a specified number needs to be taken to achieve certification. Together with the core exams, elective exams provide a valid and reliable measure of proficiency and expertise on a specific Microsoft Dynamics product. When an individual achieves a Master level certification, he or she has demonstrated an extensive knowledge base on a Microsoft Dynamics product, much more than what is needed to achieve a Professional level certification. Microsoft Dynamics training can help you develop the skills you need to do your job. However, Microsoft Dynamics does not expect or intend a course to be the sole preparation method for passing an exam. To help prepare for a certification exam, Microsoft Dynamics highly recommends the use of the preparation guides available for each exam. Preparation guides contain valuable information about a specific exam, including:
• The target audience • Skills being measured • Time & pass requirements • Question types and topics • Preparation tools, such as
– Recommended training – Supplemental learning resources – Additional recommended skills

Microsoft Official Training Materials for Microsoft Dynamics ™ Your use of this content is subject to your current services agreement
What's New in Dynamics NAV 5.0 - Local Functionality
Page 4
Microsoft Dynamics Training Courseware Elements Within the Microsoft Dynamics Training Courseware are a number of sections or elements. Each chapter includes the following elements:
Objectives Each chapter begins with stating the learning objectives specifically for that chapter. Learning objectives are important because they inform of what needs to be done to successfully complete the chapter.
Introduction An introduction sets the stage for the learning to take place and prepares you with key statements of the chapter.
Topics Chapters are split up into topic areas, usually according to the learning objectives for the chapter. This is especially beneficial in large chapters so that the knowledge and skills to be learned are split up into more manageable units.
Test your Knowledge Test your knowledge section consists of review questions for each chapter or topic and are designed to help reinforce learning concepts. Questions can be short answer, true/false, multiple-choice, fill-in-the-blank, or any other type. Answers to the questions are also provided.
Conclusion The conclusion wraps up the chapter by highlighting the important parts of the chapter as well as providing a transition to the next chapter. The conclusion also offers an opportunity to refresh earlier learning.
Labs Labs test your skills with the learning concepts presented and learned during a topic or chapter. Labs begin with a scenario paragraph, which describes the business problem to be solved and also sets the stage for the exercise. Solutions to the labs are provided. Many labs may also be offered at different levels to accommodate the variety of skills and expertise of each student:
Challenge Yourself! Challenge Yourself! labs are the most challenging. These exercises are designed for the experienced student who requires little instruction to complete the required task. This level of exercise states the business problem to be solved and describes the tasks the learner needs to complete.
Need a Little Help? Level 2 exercises are designed to challenge students, while providing some assistance. These exercises do not provide step-by-step instructions; however, they provide the user with helpful hints and more information to complete the lab.

Microsoft Official Training Materials for Microsoft Dynamics ™ Your use of this content is subject to your current services agreement
Introduction
Page 5
We suggest you try the "Challenge Yourself!" labs first, and if you need help completing the task, look to the information in the "Need a Little Help?" labs.
Quick Interaction: Lessons Learned At the end of each chapter within the Microsoft Dynamics Training Courseware, you will find a Quick Interaction: Lessons Learned page. This interaction is designed to provide you with a moment to reflect on the material you have learned. By outlining three key points from the chapter, you are maximizing knowledge retention, and providing yourself with an excellent resource for reviewing key points after class.

Microsoft Official Training Materials for Microsoft Dynamics ™ Your use of this content is subject to your current services agreement
What's New in Dynamics NAV 5.0 - Local Functionality
Page 6
About This Course This section provides you with a brief description of:
• The course • Audience • Suggested prerequisites • Course objectives • Student materials • Related certification exams
Description This half-day instructor-led course provides students with the knowledge and skills to implement and use the Kitting in Microsoft Dynamics™ NAV. All materials used in the Kitting course is based on version 5.0 of Microsoft Dynamics NAV. This course is intended for Microsoft Dynamics Certified Partners' employees selling, implementing, and supporting Microsoft Dynamics NAV. This audience typically includes application consultants tasked with assessing a customer's business needs and advising them on the use, configuration and customization of the application. Additionally, consultants who are responsible for training or supporting the customer will benefit from the course.
At Course Completion After completing this course, students should be able to:
• Set up the Kitting granule for use • Understand the application of Kitting • Define a kit bill-of-materials (BOM) • Create a kit item and assign an assembly and disassembly BOM • Build and stock kits using the BOM Journal • Return a kit item to inventory • Disassemble a kit using the BOM Journal • Trace cost application during disassembly • Enter a kit onto an order • Designate a kite sales line as "ship-from-stock" or "assemble-to-
order" • Review and modify the components associated with a kit order • Check current stock for kit components

Microsoft Official Training Materials for Microsoft Dynamics ™ Your use of this content is subject to your current services agreement
Introduction
Page 7
• Roll up unit cost and unit price for a kit from the kit's components • Use Order Promising with kits • Print sales order confirmations for kits, with or without listing
components • Ship kits without the Warehouse Management Systems granule • Invoice orders containing kits • Create warehouse shipment orders for kits • Create and register warehouse picks for kit components • Post warehouse shipments for assembled kits • Run special kit reports: BOM Movement, Order Pick Ticket, Kit
Component – Statistics, Kit Availability, and Kit/Component – Sales • Understand how kits work with other features of Microsoft
Dynamics NAV: Purchasing, Planning, Production Orders, Commerce Gateway, and Service Management
Course Prerequisites Before attending this course, students must have:
• Completed the Microsoft Dynamics NAV Introductory Course • Completed the Microsoft Dynamics NAV Trade Course • A background in assembly and distribution
In addition, it is recommended, but not required, that students have completed:
• The Microsoft Dynamics NAV Warehouse Management Course

Microsoft Official Training Materials for Microsoft Dynamics ™ Your use of this content is subject to your current services agreement
What's New in Dynamics NAV 5.0 - Local Functionality
Page 8
Student Objectives What do you hope to learn by participating in this course? List three main objectives below. 1.
2.
3.

Microsoft Official Training Materials for Microsoft Dynamics ™ Your use of this content is subject to your current services agreement
Chapter 1: Setting Up Kitting
Page 9
CHAPTER 1: SETTING UP KITTING Objectives
The objectives are:
• Review the differences between Manufacturing and Kitting • Set up the Inventory granule for Kitting • Set up the Sales and Receivables granule for Kitting • View Kitting options on the Customer Card • Learn about kit components
Introduction Kitting is the assembly, grouping or packaging of several inventory items into a consolidated product. Examples of kitting include:
• Items packaged and sold together such as first aid kits, lunch baskets, gift baskets, or an assortment of fasteners.
• Assemblies put together from prefabricated parts such as a bicycle, computer system, or radio.
Kits can be bought, sold, and returned. Kits are available for processing in:
• Quotes • Orders • Invoices • Credit memos • Blanket orders
Kitting is sometimes referred to as "light manufacturing." Like manufactured goods, kits are built using components, however where manufacturing may involve the transformation of materials through operations such as cutting, drilling, bending, melting, or blending, kitting operations are generally limited to assembly and packaging. Manufacturing and Kitting serve different needs and the Kitting functionality is not a substitute for the more fully functional Manufacturing granule. Within Microsoft Dynamics™ NAV, Kitting touches a number of areas. Because of this it was considered more appropriate to add additional configuration settings to existing areas rather than create a new and separate Kitting setup form.

Microsoft Official Training Materials for Microsoft Dynamics ™ Your use of this content is subject to your current services agreement
What's New in Dynamics NAV 5.0 - Local Functionality
Page 10
Differences between Manufacturing and Kitting In addition to understanding how to set up and use the Kitting functionality, you need to understand the difference between it and the Manufacturing granules. The terms are defined as follows: Manufacturing: The transformation of raw materials into finished goods for sale. Chemical, mechanical, thermal, or electrical processes are often employed to transform or convert materials, which may involve multiple steps. Kitting: The process by which individual components are grouped or packaged together to create a special, single item for sale. Both processes involve the use of components to create a new item for sale, but kitting is a simple physical process whereby items are packaged together. In contrast, manufacturing normally involves the transformation of materials using the following processes:
• Chemical • Mechanical • Thermal • Electrical
Another differentiator is that kits can normally be disassembled back into their original pieces, while reverting a manufactured good to raw components is often difficult to accomplish and rarely done. For example, making donuts is a form of manufacturing because raw materials (flour, water, sugar, eggs, oil, etc.) are transformed through mechanical mixing and heat into a saleable product. Putting a dozen donuts together in a box and selling the boxed dozen as a new product is considered kitting. Understanding these differences is key to knowing when to employ Kitting in place of Manufacturing and vice versa.

Microsoft Official Training Materials for Microsoft Dynamics ™ Your use of this content is subject to your current services agreement
Chapter 1: Setting Up Kitting
Page 11
Architectural Considerations When creating the Kitting functionality, much of the supporting understructure relies on the Production BOM tables used with Manufacturing. The granules are set up to allow enough access to the Production and Manufacturing functionality so that Kitting will work without requiring the customer to buy the Manufacturing granules. Kit BOMs are stored in the Production BOM tables with a special Kit flag set to differentiate them from normal production BOMs. This reuse of the Production BOM functionality for Kitting provides several benefits which include:
• The same costing routines are used for both Production and Kitting
• Forecasting and MRP calculations consider both kits and their components.
Although they share the same tables, kit BOMs cannot be used in Production, nor can production BOMs be used for Kitting. In addition, neither work centers nor machine centers may be included in a kit BOM. You can capture setup and assembly costs for kits by including resources.
Setting up Inventory for Kitting The first area of configuration is Inventory. The Kitting configuration settings for Inventory may be found under WAREHOUSE→SETUP→INVENTORY SETUP. There are two tabs containing settings for Kitting. The first, shown in Figure 1-1, is the Numbering tab containing the Kit BOM Nos. setting. This is used to define a numbering series for kit BOMs.
FIGURE 1-1: NUMBERING TAB ON INVENTORY SETUP FORM

Microsoft Official Training Materials for Microsoft Dynamics ™ Your use of this content is subject to your current services agreement
What's New in Dynamics NAV 5.0 - Local Functionality
Page 12
The other inventory settings are on the Kitting tab. As shown in Figure 1-2, this tab contains two fields: Components on Pick Ticket: This field has two selections – Show and Do not show. If Show is selected, the components are listed on pick tickets for assemble-to-order kits. A similar setting is available on the Item Card for the kit. If a global setting in Inventory Setup is not selected, than the setting on the Item Card takes precedence. Kit parameters on the item card are discussed in a later chapter. Automatic Build Kit BOM: This check box establishes the system default for handling kit fulfillment. If selected, kit lines are created when a sales line for a kit is entered. The kit lines support assembling the kit from components at the time of fulfillment. If cleared, it is assumed that kits will be assembled to stock and kit lines will not be created. A similar setting, overriding the system default, is available on the kit's Item Card. Both defaults can be overridden on the sales order by selecting or clearing the Build Kit setting on the line.
FIGURE 1-2: KITTING TAB ON INVENTORY SETUP FORM

Microsoft Official Training Materials for Microsoft Dynamics ™ Your use of this content is subject to your current services agreement
Chapter 1: Setting Up Kitting
Page 13
Setting up Sales & Receivables Kitting defaults for customer documents can be found by navigating to: SALES & MARKETING→SETUP→SALES & RECEIVABLES SETUP.
As shown in Figure 1-3, the kitting settings are found on the Kitting tab.
FIGURE 1-3: SALES & RECEIVABLES SETUP FORM Components on Sales Order: This field has two options: Show and Do not Show. If Show is selected, and the kit is entered as an assemble-to-order item on the sales order, then the kit's components will be listed on order confirmations. Components on Shipment: Both Show and Do not Show options are available. If Show is selected, and the kit is entered as an assemble-to-order item on the sales order, then the kit's components will be listed on the shipment documents. Components on Invoices: Both Show and Do not Show options are available. If Show is selected, and the kit is entered as an assemble-to-order item on the sales order, then the kit's components will be listed on the Invoice.
Microsoft Official Training Materials for Microsoft Dynamics ™ Your use of this content is subject to your current services agreement
What's New in Dynamics NAV 5.0 - Local Functionality
Page 14
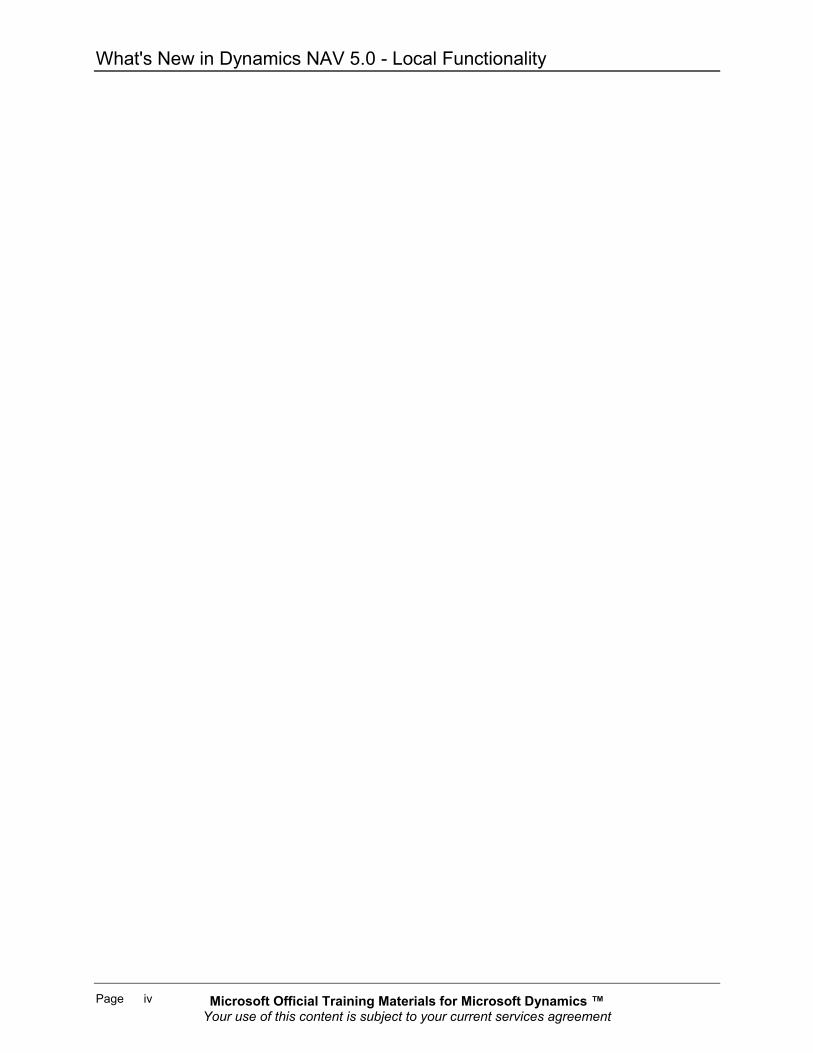
Customer Card Settings In addition to the global default settings under Sales & Receivables Setup, the program also allows you to define settings for each customer. These kitting parameters are found on the Kitting tab on the Customer Card. Show, Do Not Show, and blank (no selection) options are available on the Customer Card. The meaning of the Show and Do Not Show settings on the Customer Card are identical to those in Sales & Receivables Setup. The Customer Card settings provide a way to modify behavior based on the Sell-To customer listed on the sales order. If specified, the settings on the Customer Card for take priority over those selected in Sales & Receivables Setup. If the setting is left blank on the Customer Card, then those on the Sales & Receivables Setup are used.
FIGURE 1-4: KITTING TAB ON CUSTOMER CARD Components on Sales Order: This field has three options: Show, Do not Show and blank. If Show is selected, and the kit is entered as an assemble-to-order item on the sales order, then the kit's components will be listed on order confirmations. If Do not Show is selected, then kit components are not listed on order confirmations. If this field is left blank (the default setting) then the global setting under Sales & Receivables Setup takes effect. Components on Shipment: Show, Do not Show, and blank options are available. If Show is selected, and the kit is entered as an assemble-to-order item on the sales order, then the kit's components will be listed on the shipment documents. If Do not Show is selected, then kit components are not listed. If this field is left blank (the default setting) then the global setting under Sales & Receivables Setup takes effect.

Microsoft Official Training Materials for Microsoft Dynamics ™ Your use of this content is subject to your current services agreement
Chapter 1: Setting Up Kitting
Page 15
Components on Invoices: Show, Do not Show, and blank options are available. If Show is selected, and the kit is entered as an assemble-to-order item on the sales order, then the kit's components will be listed on the Invoice. If Do not Show is selected, then kit components are not listed. If this field is left blank (the default setting) then the global setting under Sales & Receivables Setup takes effect.
Working with Components As previously mentioned, kits are made up of finished items which are packaged together to form a new item. The items that make up a kit are often called components. In Microsoft Dynamics NAV, resources, setup resources, and comments can be included in the definition of a kit. This list of components, resources, and comments is sometimes called a Bill of Materials or BOM for short. Standard material components are defined through the creation of a new Item Card. These items are purchased or manufactured. When used in a kit, the cost of these items is derived by the unit cost of the item times the quantity of the item used. Resources refer to a person, machine, or expense that can be charged based on a unit of measure times a cost per that unit of measure. Resources are defined through the Resource card under the Resource Planning menu. Resource items are not printed on order documents or invoices. Setup resources may also be defined in a kit BOM. As with normal resources, Setup resources are people, machines, or expenses defined through the Resource card. Costs for setup resources are calculated as the unit cost of the resource times one. The idea behind setup resources is to capture one-time costs associated with assembly or disassembly of a group of kits.
Example Suppose a packaging machine needs to be reset for each kind of kit. Only one setup is required regardless of the number of kits processed, so a setup resource would be defined to capture the cost of setting up the equipment. Setup resources are not printed on order documents or invoices. Comments may be added to a Kit BOM to convey additional information about the kit, its assembly or disassembly. No costs are identified with a comment. In a kit BOM, comments are identified through a blank item number, however comments are not inventoried. Kit comments do not print on order documents or invoices. Transactions for kit components always carry the dimension values from the parent kit item. Dimension values for components cannot be edited.
Microsoft Official Training Materials for Microsoft Dynamics ™ Your use of this content is subject to your current services agreement
What's New in Dynamics NAV 5.0 - Local Functionality
Page 16
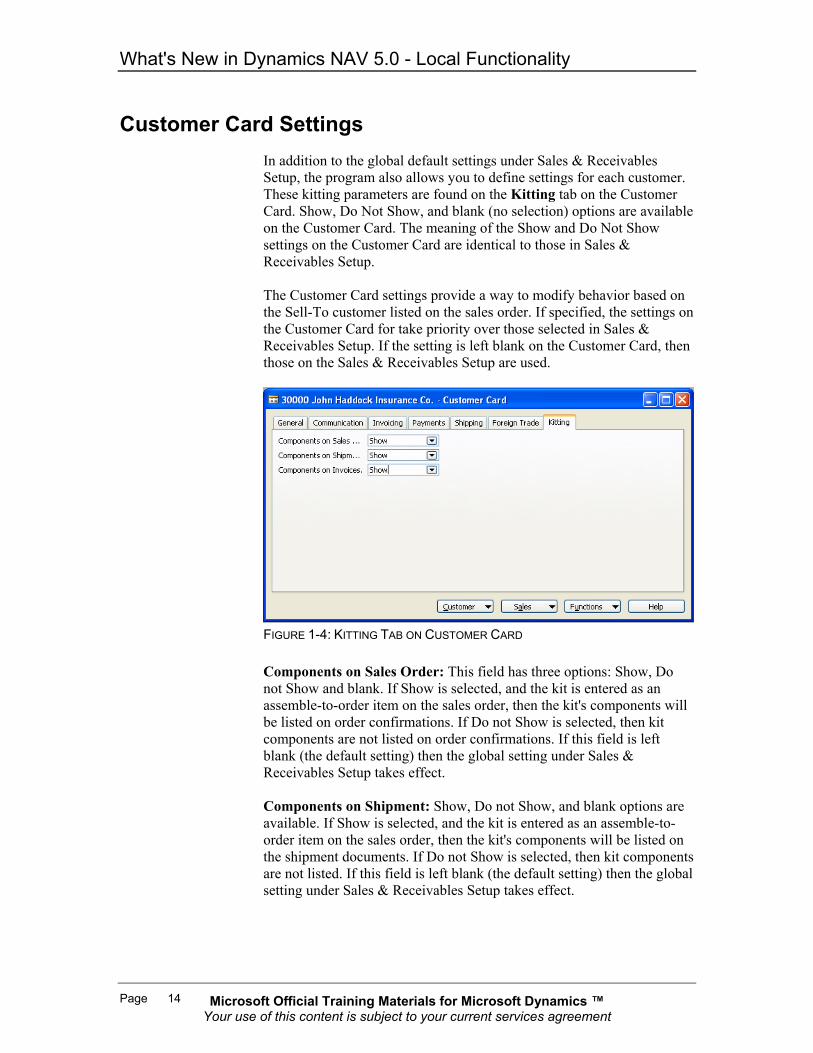
Test Your Knowledge − Setting Up Kitting
1. Which sentence best describes Kitting:
a. The process by which individual components are grouped or packaged together to create a single item for sale.
b. The transformation of raw materials into a finished good for sale.
2. Fill in the blank. A key distinction between Kitting and Manufacturing is that finished kits may be ___________ into individual components.
3. Which of the following is not a benefit derived from the fact
that manufactured items and kit items share the use of the use of the Production BOM table:
a. The same costing routines are used for both Production and Kitting.
b. Kit BOMs can be used in Production Orders. c. Forecasting and MRP calculations consider both kits and
their components.
4. Which field on the kit item card should be selected if the kit will generally be assembled at the time of order fulfillment?
5. Where are number series for Kit BOMs established?
6. The setting which defines whether or not components appear
on pick tickets for assemble-to-order items is found in which two places?

Microsoft Official Training Materials for Microsoft Dynamics ™ Your use of this content is subject to your current services agreement
Chapter 1: Setting Up Kitting
Page 17
7. The setting which defines whether or not components appear on invoices appears in which of the following:
a. Item Card b. Inventory Setup c. Sales & Receivables Setup d. Customer Card
8. True or False. Dimensions for component transactions default from the parent kit item, but may be edited.

Microsoft Official Training Materials for Microsoft Dynamics ™ Your use of this content is subject to your current services agreement
What's New in Dynamics NAV 5.0 - Local Functionality
Page 18
Conclusion Kits are special items that are built using components. Like other items, kits can be bought and sold. Kits are similar in concept to manufactured goods and share some internal structures, but differ in how they are processed. Kitting involves the grouping or packaging of finished items that will be sold together under one item number. Kits can either be built ahead of time, or put together at the time of fulfillment. Microsoft Dynamics NAV provides several setup parameters which control how kit information will be displayed on standard reports and forms such as order confirmations, pick lists, and invoices.
Microsoft Official Training Materials for Microsoft Dynamics ™ Your use of this content is subject to your current services agreement
Chapter 1: Setting Up Kitting
Page 19
Quick Interaction: Lessons Learned Take a moment and write down three Key Points you have learned from this chapter: 1.
2.
3.
Microsoft Official Training Materials for Microsoft Dynamics ™ Your use of this content is subject to your current services agreement
What's New in Dynamics NAV 5.0 - Local Functionality
Page 20
Microsoft Official Training Materials for Microsoft Dynamics ™ Your use of this content is subject to your current services agreement
Chapter 2: Creating Kits
Page 21
CHAPTER 2: CREATING KITS Objectives
The objectives are:
• Define a kit bill-of-materials • Create a kit item and assign an assembly and disassembly
BOM • Build and stock kits using the BOM journal
Introduction Kitting refers to the combining of individual finished products into a new product which may be sold or distributed. An example of a kit is a car emergency kit which might contain a flashlight, jumper cables, emergency warning sign, flares, and so forth. As well as the kit, each item in the kit may itself be saleable. There are essentially two ways of processing kits:
• Kits are stocked. Pre-assembled kits are kept in stock as a finished item and can be used to immediately fulfill sales orders. This is sometimes referred to as a "build-to-stock" environment.
• Kits are not stocked. Kits are assembled as part of the sales order picking and shipping processes. This is sometimes called an "assemble-to-order" environment.
The components that make up a kit are established through a Bill of Materials, or BOM. To differentiate between a BOM used for traditional manufacturing, a BOM for a kit is often called a kit BOM. Microsoft Dynamics™ NAV 5.0 introduces a structured method for designing, building, and selling kits. This chapter focuses on the first two tasks: design and build. The selling of kits, and the assembling of kits to-order will be discussed in later chapters.

Microsoft Official Training Materials for Microsoft Dynamics ™ Your use of this content is subject to your current services agreement
What's New in Dynamics NAV 5.0 - Local Functionality
Page 22
Establish a Kit BOM The first step in creating a kit is setting up a kit bill-of-materials (BOM). The kit BOM defines all of the components and resources used by the kit. Once created, the kit BOM can be attached to a kit item through the Item Card. The setup of a kit BOM is similar to the setup of a Production BOM used for manufacturing. Each kit BOM is identified by a unique number. Components consisting of items, resources, and setup resources, are added as lines within the BOM. The quantity of each component or resource is provided along with the appropriate unit of measure.
Example You want to sell a deluxe first aid kit. In the kit BOM, you might list different types of bandages, medications, ointments, and tools such as scissors, along with the case in which they are packed. You might also include the amount of time necessary to package everything together. A difference between Production BOMs used for manufacturing, and Kit BOMs is that a kit BOM can consist of one level only. If you insert a kit item into another kit's BOM, the Microsoft Dynamics NAV assumes the item is in finished form.
Example Suppose you want the deluxe first aid kit to include an emergency dental kit. The dental kit contains a special mirror, material to act as a temporary filling, and a tool for applying the temporary filling. When constructing the BOM for the first aid kit, you can include the dental kit as a component, but when assembling the first aid kit, the individual items in the dental kit will not be identified. While Kit BOMs are commonly used to identify components and resources used to assemble a new kit, they may also identify the resources necessary to disassemble a completed kit back into individual elements. This is called a disassembly BOM. A kit has both an assembly BOM and a disassembly BOM attached to it, but often the BOMs are the same.
Microsoft Official Training Materials for Microsoft Dynamics ™ Your use of this content is subject to your current services agreement
Chapter 2: Creating Kits
Page 23
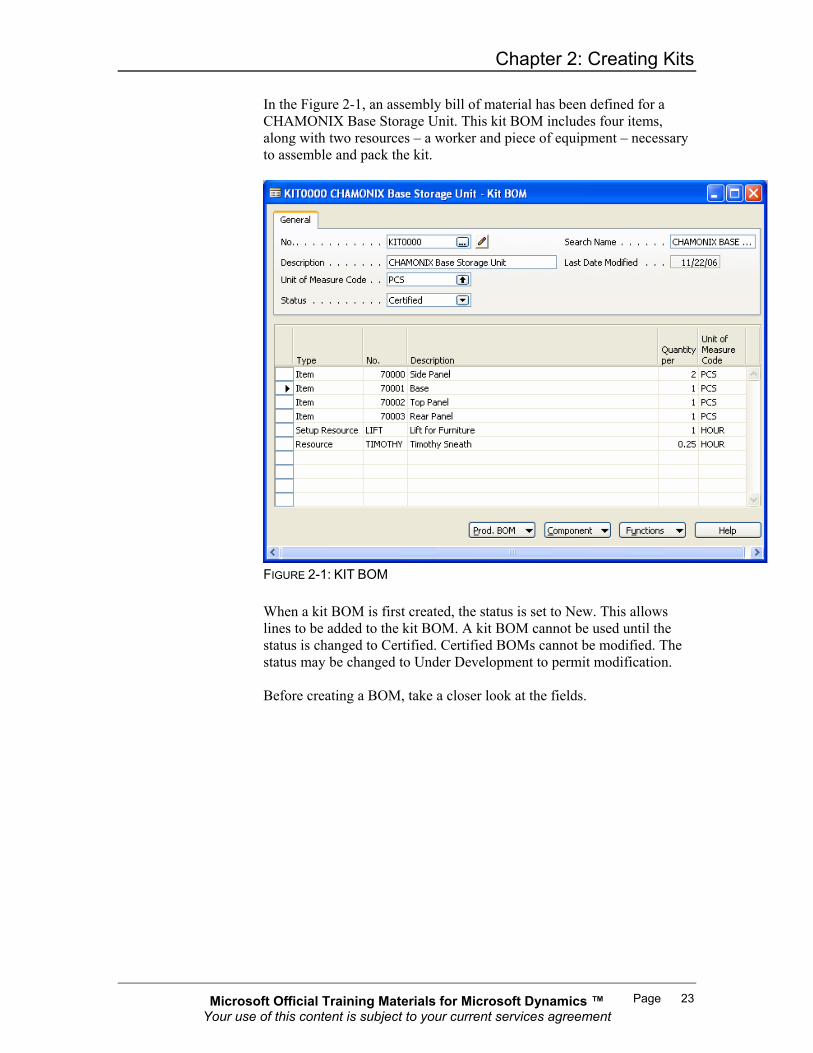
In the Figure 2-1, an assembly bill of material has been defined for a CHAMONIX Base Storage Unit. This kit BOM includes four items, along with two resources – a worker and piece of equipment – necessary to assemble and pack the kit.
FIGURE 2-1: KIT BOM When a kit BOM is first created, the status is set to New. This allows lines to be added to the kit BOM. A kit BOM cannot be used until the status is changed to Certified. Certified BOMs cannot be modified. The status may be changed to Under Development to permit modification. Before creating a BOM, take a closer look at the fields.

Microsoft Official Training Materials for Microsoft Dynamics ™ Your use of this content is subject to your current services agreement
What's New in Dynamics NAV 5.0 - Local Functionality
Page 24
Kit BOM Header New kit BOMs are created by following the path WAREHOUSE→PLANNING & EXECUTION→KIT BOM. To create a kit BOM, complete the following fields in the header:
Field Comments No. This field identifies the BOM. It must be unique and contain a
maximum of 20 characters. The number field can be set to fill in automatically, using No. Series in the inventory setup (WAREHOUSE→SETUP→INVENTORY SETUP→ NUMBERING TAB), or can be manually created. In a company where kit BOMs are used on only one item (a 1:1 relationship), the kit BOM is often set up with the same number or a number similar to the item it is connected to.
Description This field contains an easily recognizable description of the BOM. Unit of Measure This field is used as a basis for recalculation factors in the BOM
line item. The unit of measure used on a kit BOM must also be set up in the Item Unit of Measure table (from the Item card). It is common to match the unit of measure on the kit BOM to the Base Unit of Measure field on the Item card
Status This field indicates the status of the BOM. Valid statuses include: New – The status is automatically set to New when creating a new BOM. The BOM is editable when the status is New. Certified – A BOM must have a status of Certified before it can be used for orders. A Certified BOM is not editable and an error message displays if you attempt to use a non-Certified BOM. Under Development – This status is used to make modifications to a previously Certified BOM. After the changes are complete, the status must be changed back to Certified. A Cost Rollup cannot be calculated for a kit with a Under Development status. Closed – A BOM with a Closed status indicates that the BOM is no longer used. A Cost Rollup cannot be calculated for a kit with this status.
Search Name This field can be used to search for a BOM when the number is unknown. Search Name initially defaults from the description and can be edited if desired. It can be up to 30 characters in length.
Last Date Modified This field tracks the last date the BOM was edited or changed.
Microsoft Official Training Materials for Microsoft Dynamics ™ Your use of this content is subject to your current services agreement
Chapter 2: Creating Kits
Page 25
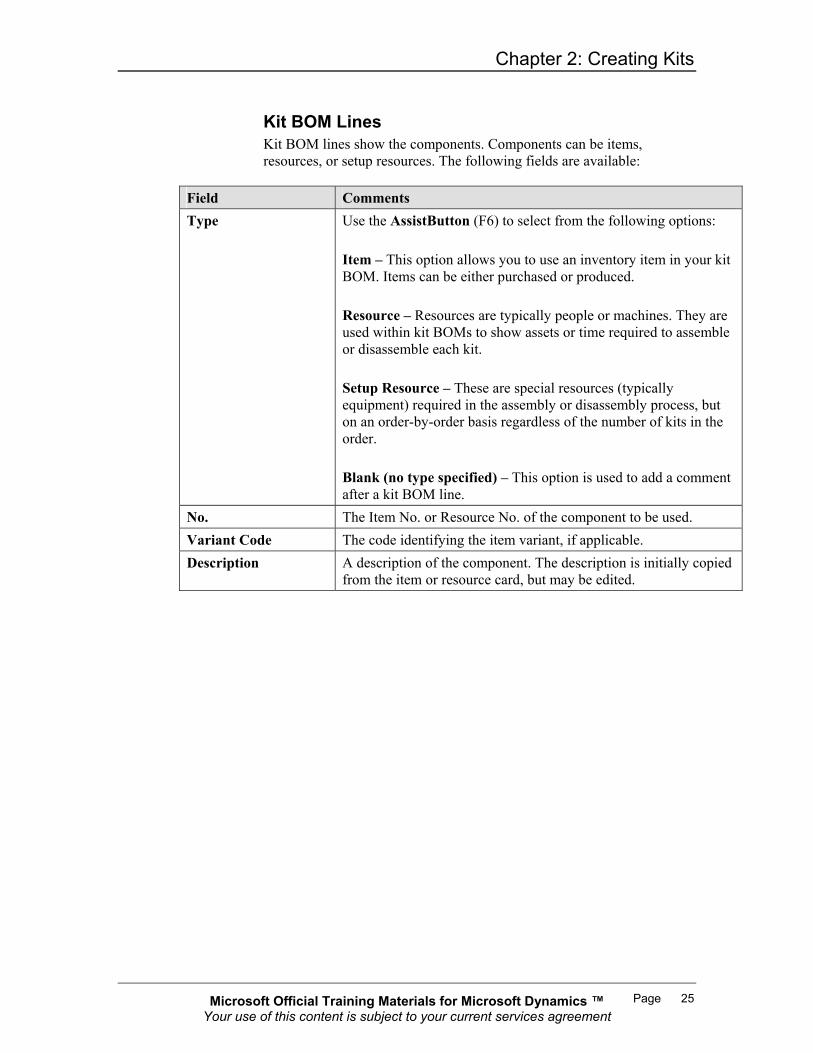
Kit BOM Lines Kit BOM lines show the components. Components can be items, resources, or setup resources. The following fields are available:
Field Comments Type Use the AssistButton (F6) to select from the following options:
Item – This option allows you to use an inventory item in your kit BOM. Items can be either purchased or produced. Resource – Resources are typically people or machines. They are used within kit BOMs to show assets or time required to assemble or disassemble each kit. Setup Resource – These are special resources (typically equipment) required in the assembly or disassembly process, but on an order-by-order basis regardless of the number of kits in the order. Blank (no type specified) – This option is used to add a comment after a kit BOM line.
No. The Item No. or Resource No. of the component to be used. Variant Code The code identifying the item variant, if applicable. Description A description of the component. The description is initially copied
from the item or resource card, but may be edited.

Microsoft Official Training Materials for Microsoft Dynamics ™ Your use of this content is subject to your current services agreement
What's New in Dynamics NAV 5.0 - Local Functionality
Page 26
Field Comments Calculation Formula
This field is used to determine how the quantity needed per kit is calculated and works in conjunction with the Length, Width, Depth, and Weight fields. You can select one of the following options: Blank (no formula specified) – No modification to the basic formula is made. The quantity needed is based on the Quantity Per field. Quantity = Quantity Per Length Quantity = Length * Quantity Per Length *Width Quantity = Length * Width * Quantity Per Length*Width*Depth Quantity = Length * Width * Quantity Per Weight Quantity = Weight * Quantity Per
Quantity Per This field usually corresponds to the quantity of the component in one finished kit.
Unit of Measure Code
Use the AssistButton (F6) to select the unit of measure used by this kit BOM line. The unit of measure defaults from the item or resource card. You may use a "consumption unit of measure" by entering new information in the Item Units of Measure table.

Microsoft Official Training Materials for Microsoft Dynamics ™ Your use of this content is subject to your current services agreement
Chapter 2: Creating Kits
Page 27
Demonstration − Create a Kit BOM This demonstrates how to create a Bill-of-Materials for a kit. Scenario: Your office supply company has a client with a fast growing organization. The client has requested that you put together a "basic office furniture" kit that they can order when new employees are hired. The kit must contain a:
• Desk • Storage unit with shelves • Chair • Lamp
To create the assembly BOM for the kit:
1. Go to WAREHOUSE→PLANNING & EXECUTION→KIT BOM.
2. Insert a new, empty kit BOM by pressing F3.
3. In the Number field, enter 700BC-A.
4. In the Description field type Basic Office Kit.
5. Move to the Unit of Measure field and press F6 to view the list of available units of measure. Select PCS from the list.
6. Move to the kit BOM lines section. Use the mouse or CTRL+Arrow Down to get to the lines.
7. Enter the values in the table below.
Type No. Description Quantity
Per Unit of Measure
Type No. Description Quantity per
Unit of Measure Code
Item 1896-S ATHENS Desk 1 PCS Item 1952-W OSLO Storage Unit/Shelf 1 PCS Item 1928-S AMSTERDAM Lamp 1 PCS Item 1908-S LONDON Swivel Chair,
blue 1 PCS
8. Move to the header section, use the mouse or CTRL +
ARROW UP, set the Status field to Certified.

Microsoft Official Training Materials for Microsoft Dynamics ™ Your use of this content is subject to your current services agreement
What's New in Dynamics NAV 5.0 - Local Functionality
Page 28
When finished, your kit BOM should look like Figure 2-2:
FIGURE 2-2: KIT BOM
Copying a BOM The creation of a new BOM can be streamlined using the Copy BOM function. After the components have been copied to the new BOM, you can make desired changes or additions. The following steps show you how to copy a BOM:
1. Go to WAREHOUSE→PLANNING & EXECUTION→KIT BOM.
2. Insert a new, empty production BOM by pressing F3.
3. In the Number field, enter a number.
4. Fill in the Description field.
5. Select a unit of measure.
6. Move to the kit BOM lines section.
7. Click the Function button.
8. From the list, select the kit BOM you want to copy, and click OK.
9. The above steps copy the components from the selected kit BOM to the new kit BOM. Make any necessary changes, such as adding or deleting components, or changing quantities.
10. Move back to the header and change the Status field to Certified.

Microsoft Official Training Materials for Microsoft Dynamics ™ Your use of this content is subject to your current services agreement
Chapter 2: Creating Kits
Page 29
Creating a Kit Item This section explains how to define a new kit item. Kits are created the same way as other items, by using the Item Card. The Item Card contains a special Kitting tab to hold the fields that describe how the kit item will be constructed and used. A sample of Item Card for a kit is shown in Figure 2-3:
FIGURE 2-3: KITTING TAB ON ITEM CARD To identify an item as a kit, you need to complete the fields on the Kitting tab. These settings identify the assembly and disassembly BOMs associated with the kit and how kits should be displayed on various documents. The fields on the Kitting tab are described in the table below: Field Usage Kit BOM No. The number of the kit BOM containing
components for assembly. Kit Disassembly BOM No. The number of the kit BOM containing
the components resulting from disassembly. By default, the disassembly BOM is set to the same value as the Kit BOM No..
Components on Sales Order
If Show is selected, component lines will print on sales quotes and orders.
Components on Shipments
If Show is selected, component lines will print on packing slips.
Components on Invoices If Show is selected, component lines will print on invoices.
Components on Pick Tickets
If Show is selected, component lines will print on pick tickets.

Microsoft Official Training Materials for Microsoft Dynamics ™ Your use of this content is subject to your current services agreement
What's New in Dynamics NAV 5.0 - Local Functionality
Page 30
Field Usage Automatic Build Kit BOM
If this box is selected, then kits are assembled to order by default. Component lines for the kit are automatically created when the item is entered on a sales line.
Roll-up Kit Pricing If Always is selected, and Build Kit is selected on the Sales Order line, then the unit price for the kit will be calculated by rolling up the prices attached to the components.
Settings for the Components on Sales Order, Components on Shipments, and Components on Invoices fields are visible on the Customer Card and Sales & Receivables Setup. If left blank on the item card, the settings on the sell-to Customer Card are used. If the settings on the Customer Card are left blank, the settings on the Kitting tab within Sales & Receivables Setup are used. In a similar fashion, if the setting for Components on Pick Tickets is left blank on the Item Card, the setting on the Kitting tab within Inventory Setup is used.
NOTE: A Kit Bom cannot be assigned to a Stockkeeping Unit or Item Variant. Calculation of standard cost on a Kit item works the same way it does for true manufactured items. The cost of the Kit item can be rolled up based on the component costs connected to the assembly BOM. The KITTING→CALC. TTANDARD COST option under the Item button on the Item Card total the unit costs associated with the components specified in the assembly BOM. It stores this total in the standard cost field on the kit's Item Card.
Demonstration − Creating a Kit Item This demonstrates how to create a kit item and assign assembly and disassembly BOMs to the item. Scenario: We have created a BOM for our "basic office furniture" kit, now we need to set up a new item to build and sell the kit under.
1. Go to WAREHOUSE→PLANNING & EXECUTION→ITEMS.
2. Insert a new, empty item by pressing F3.
3. Fill in the Item Card using the values in the following table.

Microsoft Official Training Materials for Microsoft Dynamics ™ Your use of this content is subject to your current services agreement
Chapter 2: Creating Kits
Page 31
Tab Field Value General No. 700BC Description Basic Office Kit Base Unit of Measure PCS Invoicing Costing Method Standard Gen. Prod. Posting
Group RETAIL
VAT Prod. Posting Group
VAT25
Inventory Product Posting Group
RESALE
Kitting Kit BOM No. 700BC-A Kit Disassembly
BOM No. 700BC-A
NOTE: A unit of measure on the kit BOM has to be listed in the item or resource Units of Measure table for any item or resource it is used with. In this demonstration the item is new and will have no existing Units of Measure settings. An entry for PCS (Pieces) needs to be created in the Units of Measure table before it can be selected as the base unit of measure.
Rolling up Kit Cost Once a kit item has been created and the assembly BOM defined, Microsoft Dynamics NAV provides a method for calculating the cost of the kit by "rolling up" the cost of components. This process is nearly identical to the cost roll-up process for manufactured goods and is intended for items using the standard costing method only. Use the following steps to roll up cost:
1. Select the item card for the kit you want to calculate cost for.
2. Select the Invoicing tab.
3. Select KITTING→CALC. STANDARD COST from the Item button.
4. Select the All Levels option and click OK.
The rolled up cost will be calculated and placed into the Standard Cost field.
Microsoft Official Training Materials for Microsoft Dynamics ™ Your use of this content is subject to your current services agreement
What's New in Dynamics NAV 5.0 - Local Functionality
Page 32
Building and Stocking Kits The acquisition of kits can be handled in several ways:
• Kits can be purchased. Purchase orders can be used to bring stock into inventory. Purchased kit items are handled the same as other items on a purchase order. Intercompany purchase orders generated from sales order for kits being purchased are supported. However, kit components on purchase orders are not supported.
• Kits can be assembled as needed. Demand for kit assembly can be created when the kit is placed on a sales order line. Components are then assembled into the final kit as part of the order fulfillment process. This is also known as "instant production." These processes are discussed in later chapters.
• Kits can be built and placed into inventory ahead of demand. Using the BOM Journal, you can record the creation of kits and place them into inventory. The remainder of this section focuses on using the BOM Journal for this purpose.
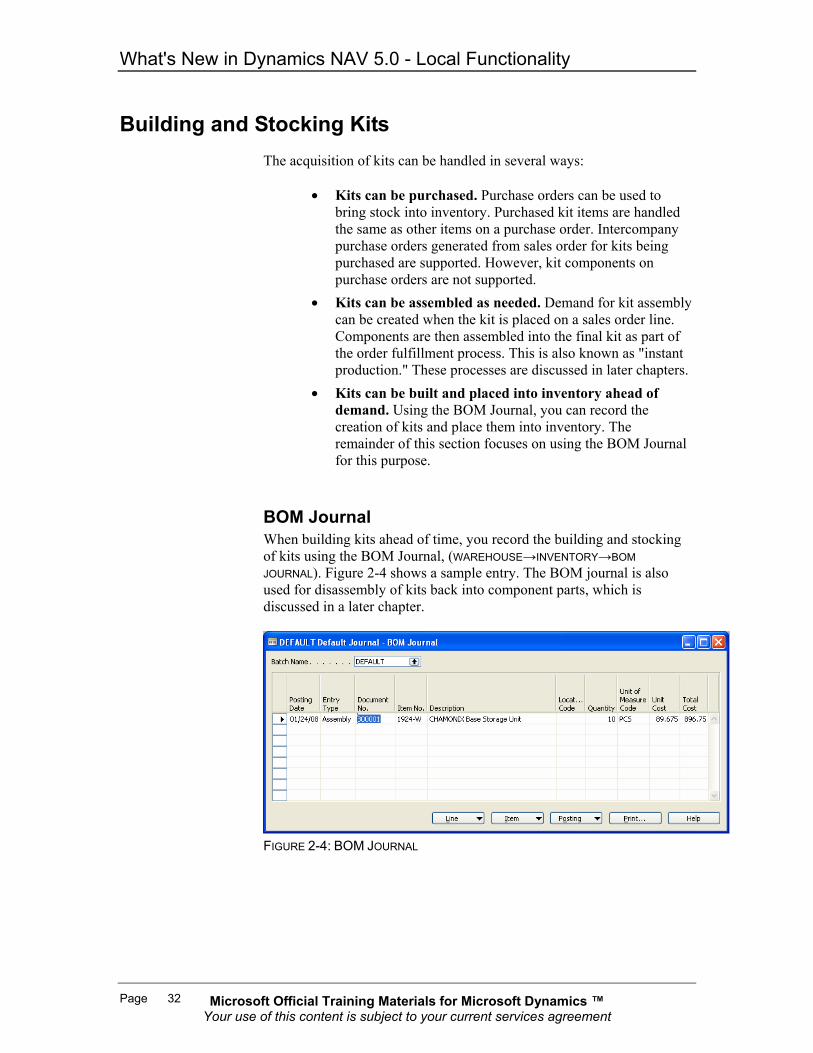
BOM Journal When building kits ahead of time, you record the building and stocking of kits using the BOM Journal, (WAREHOUSE→INVENTORY→BOM JOURNAL). Figure 2-4 shows a sample entry. The BOM journal is also used for disassembly of kits back into component parts, which is discussed in a later chapter.
FIGURE 2-4: BOM JOURNAL

Microsoft Official Training Materials for Microsoft Dynamics ™ Your use of this content is subject to your current services agreement
Chapter 2: Creating Kits
Page 33
The following table describes the use of fields in the BOM journal: Field Usage Posting Date The effective date of the entry.
Normally, the default date is acceptable.
Entry Type The options include Assembly or Disassembly. Use Assembly to record the creation of a kit. Use Disassembly to record the return of components from a kit back into stock.
Document Date Date associated with the actual document.
Document No. Number used for identifying the transaction in a journal. If a number series has been defined, a document number will be automatically supplied.
Item No. The item number of the kit being assembled or disassembled.
Location Code If locations are used, enter the code matching the location kit items will be placed in to, and components will be consumed from.
Bin Code If bins are used, enter the bin where kit items will be placed after assembly.
Quantity The number of kits being assembled or disassembled.
Unit of Measure Code The unit of measure associated with the kit quantity. Defaulted from the Item Card.
Unit Cost The cost of one kit. Defaulted from the Item Card.
Total Cost The calculated cost of all kits, based on the unit cost and quantity fields.

Microsoft Official Training Materials for Microsoft Dynamics ™ Your use of this content is subject to your current services agreement
What's New in Dynamics NAV 5.0 - Local Functionality
Page 34
Item Tracking Kits produced through the BOM Journal can be assigned serial or lot numbers if the kit item has been set up for these features. Use the Item Tracking Lines option under the Line button to enter serial or lot information for a kit which is being shipped. . Component items appearing on kit lines can also be set up for tracking by serial or lot numbers. Generally, serial number or lot numbers are assigned when components are received under a purchase order or recorded as output from a production order. Use the Item Tracking Lines option under the Line button to select serial or lot tracked inventory.
Demonstration − Building and Stocking Kits This demonstrates how to build kits ahead of time and place them into stock using the BOM journal. Scenario: Our client is growing so fast that they want to make sure we always have a few of the basic office furniture kits in stock. Based on the volume of orders, we have decided to build three kits and keep them in stock. This demonstration shows you how to create a kit using the BOM Journal:
1. Go to WAREHOUSE→INVENTORY→BOM JOURNALS.
2. Use the default batch.
3. Move to the lines section of the BOM journal.
4. Accept the default Posting date.
5. Select Assembly as the Entry Type.
6. Accept the default Document number.
7. Enter the Kit item number (700BC) or use the AssistButton (F6) to select it from the item listing.
8. Enter 3 in the Quantity field.
NOTE: When the kit quantity is entered, Microsoft Dynamics NAV checks the availability of components. You receive warnings that insufficient component stock exists. Select Yes to ignore the warnings and continue.
9. Enter BLUE in the Location field.

Microsoft Official Training Materials for Microsoft Dynamics ™ Your use of this content is subject to your current services agreement
Chapter 2: Creating Kits
Page 35
Figure 2-5 shows what your journal should look like:
FIGURE 2-5: BOM JOURNAL
10. (Optional) View the list of components which will be consumed in the production of the kit, by selecting the Kit Lines option from the Line button before posting. Figure 2-6 shows what the Kit Lines window looks like.
FIGURE 2-6: KIT BOM JOURNAL LINES If you need to modify the components use the Kit Lines form. Otherwise, close the form and return to the BOM journal to finish the transaction.
11. Post the transaction by pressing F11 or selecting the Post menu option from the Posting button.

Microsoft Official Training Materials for Microsoft Dynamics ™ Your use of this content is subject to your current services agreement
What's New in Dynamics NAV 5.0 - Local Functionality
Page 36
Lab 2.1 − Creating a Kit BOM Scenario: Your company offers build-your-own computer kits to customers. You want to offer a new gaming computer kit. To do this, you need to supply your warehouse personnel with a list of what goes into the kit. Since you sometimes get returns, you will be creating a disassembly list as well. The disassembly BOM will be very similar to the assembly BOM, but with minor differences.
Challenge Yourself! Create assembly and disassembly BOMs for a gaming computer kit and certify both BOMs. Name the assembly kit "A-GAMEPC" and the disassembly kit "D-GAMEPC." Include the following components in your assembly BOM: Type No. Description Quantity
Per Unit of Measure
Item 80005 Computer III 866 Mhz 1 PCS Item 80014 512 MB PC800 ECC 4 PCS Item 80027 36GB Ultra 160/M SCSI 2 PCS Item 80204 Ultra 160/M SCSI Controller 1 PCS Item 80105 24" UltraScan 1 PCS Item 80203 Graphics Card 9400 1 PCS Item 80210 8x/4x/32x IDE CD read/write 1 PCS Item 80212 Performance Keyboard 1 PCS Item 80208-T Microsoft Intellimouse 1 PCS Item LS-10PC Loudspeakers, White for PC 1 BOX Item 80217 Power Supply Cable 1 PCS Resource MARK Assemble Kit 0.5 HOUR Burn in for 24 hours 0
Your disassembly BOM should include the same components with the following exceptions:
• Remove the "Burn in for 24 hours" comment. • Change the Resource from "Mark" to "Mary" and the
description from "Assemble Kit" to "Disassemble Kit."
Microsoft Official Training Materials for Microsoft Dynamics ™ Your use of this content is subject to your current services agreement
Chapter 2: Creating Kits
Page 37
Need a Little Help?
1. Refer to the procedure under Create a Kit BOM if you are having trouble getting started.
2. Use the AssistButton (F6) in the Status, Type and Unit of Measure Code fields to look up and select the appropriate option.
3. Make sure you change the Status field in the header section to Certified when you are finished making changes to a BOM.
4. Use the Copy a BOM procedure to simplify creating the disassembly BOM.
Microsoft Official Training Materials for Microsoft Dynamics ™ Your use of this content is subject to your current services agreement
What's New in Dynamics NAV 5.0 - Local Functionality
Page 38
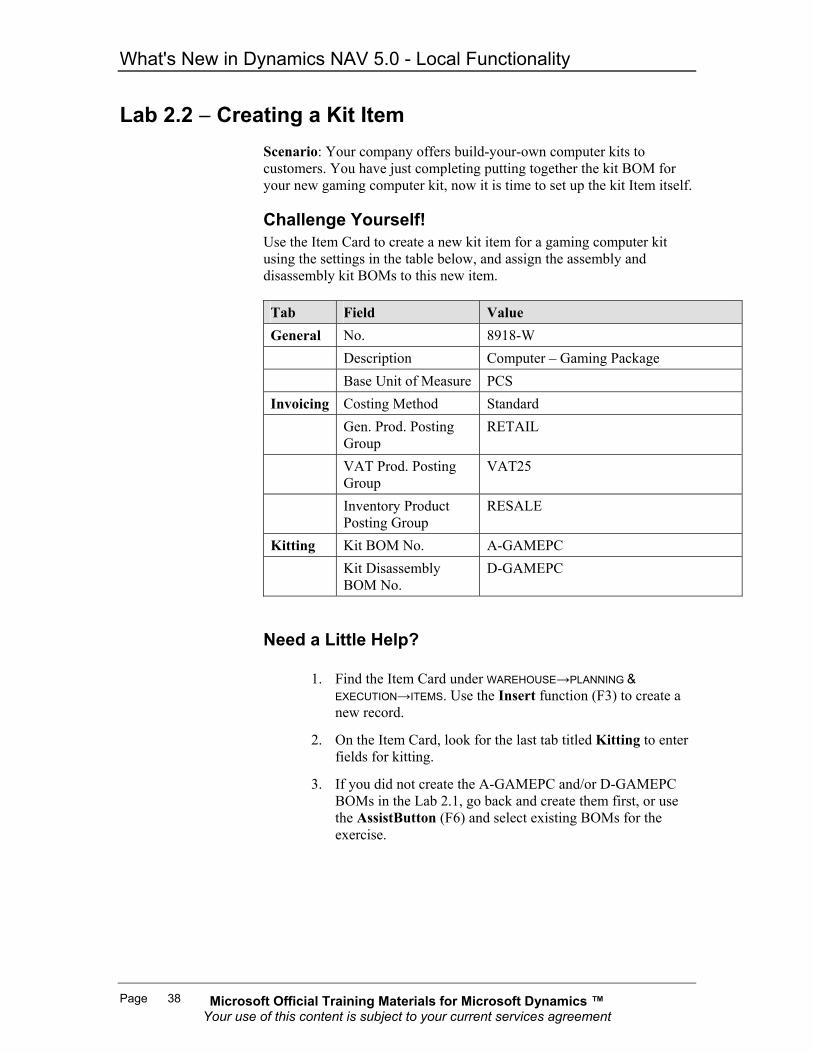
Lab 2.2 − Creating a Kit Item Scenario: Your company offers build-your-own computer kits to customers. You have just completing putting together the kit BOM for your new gaming computer kit, now it is time to set up the kit Item itself.
Challenge Yourself! Use the Item Card to create a new kit item for a gaming computer kit using the settings in the table below, and assign the assembly and disassembly kit BOMs to this new item. Tab Field Value General No. 8918-W Description Computer – Gaming Package Base Unit of Measure PCS Invoicing Costing Method Standard Gen. Prod. Posting
Group RETAIL
VAT Prod. Posting Group
VAT25
Inventory Product Posting Group
RESALE
Kitting Kit BOM No. A-GAMEPC Kit Disassembly
BOM No. D-GAMEPC
Need a Little Help?
1. Find the Item Card under WAREHOUSE→PLANNING & EXECUTION→ITEMS. Use the Insert function (F3) to create a new record.
2. On the Item Card, look for the last tab titled Kitting to enter fields for kitting.
3. If you did not create the A-GAMEPC and/or D-GAMEPC BOMs in the Lab 2.1, go back and create them first, or use the AssistButton (F6) and select existing BOMs for the exercise.

Microsoft Official Training Materials for Microsoft Dynamics ™ Your use of this content is subject to your current services agreement
Chapter 2: Creating Kits
Page 39
Lab 2.3 − Building and Stocking Kits with the BOM Journal
Scenario: You own a office supply store that offers a "build your own office" service. You have several types of kits which you like to assemble ahead of time and stock in your warehouse.
Challenge Yourself! Record the assembly of two 766BC-B – CONTOSO Office System kits using the BOM Journal. Use location BLUE for both kit and components.
Need a Little Help?
1. Find the BOM Journal from WAREHOUSE→INVENTORY→BOM JOURNALS.
2. On the Item Card, look for the last tab titled Kitting to enter fields for kitting.
3. If you did not create the A-GAMEPC and/or D-GAMEPC BOMs in the Lab 2.1, go back and create them first, or use the AssistButton (F6) and select existing BOMs for the exercise

Microsoft Official Training Materials for Microsoft Dynamics ™ Your use of this content is subject to your current services agreement
What's New in Dynamics NAV 5.0 - Local Functionality
Page 40
Test Your Knowledge − Creating Kits
1. Name the two basic ways kits can be processed.
2. What is one basic difference between a BOM for a kit and a BOM for manufactured item?
3. A kit BOM may contain all of the following types of components except:
a. Items b. Resources c. Setup Resources d. Another Kit BOM e. A Comment
4. What feature would you use to create a new kit BOM that
was similar to an existing one.
5. Before a Kit BOM can be used, what must its status must be changed to?
6. What does the Calc. Standard Cost function on the Item Card do?
7. True or False. The BOM Journal is used to record the building of Assemble-to-Order kits.

Microsoft Official Training Materials for Microsoft Dynamics ™ Your use of this content is subject to your current services agreement
Chapter 2: Creating Kits
Page 41
Conclusion Microsoft Dynamics NAV 5.0 contains improvements that support the definition of BOMs for kit assembly and disassembly and the assignment of BOMs to kit items. These capabilities allow companies to assemble a number of components into new items which can be stocked and sold. The current version also allows resources to be included in kit definitions. This allows operational costs to be rolled up into the cost of the kit and identifies resources necessary for kit construction or disassembly. Through the new BOM Journal, Microsoft Dynamics NAV 5.0 provides a method for building and stocking kits ahead of need.

Microsoft Official Training Materials for Microsoft Dynamics ™ Your use of this content is subject to your current services agreement
What's New in Dynamics NAV 5.0 - Local Functionality
Page 42
Quick Interaction: Lessons Learned Take a moment and write down three Key Points you have learned from this chapter: 1.
2.
3.

Microsoft Official Training Materials for Microsoft Dynamics ™ Your use of this content is subject to your current services agreement
Chapter 3: Kit Disassembly
Page 43
CHAPTER 3: KIT DISASSEMBLY Objectives
The objectives are:
• Return a kit item to inventory • Disassemble a kit using the BOM Journal • Trace cost application during disassembly
Introduction For many companies, sales returns are a part of doing business. The entire returns process may involve many tasks:
• Crediting customer balances • Accounting for additional costs • Updating inventory quantities and values • Inspecting returned items • Repairing or returning them to vendors • Dealing with warranties
These same issues must be dealt with when working with kits. Returns Management as a whole is discussed in the Microsoft Dynamics™ NAV 5.0 Trade course. This chapter focuses on:
• The process of returning kits to stock • Kit disassembly • Placing components back into inventory • Tracing the cost of disassembly
Just as different methods must be employed when building ship-from-stock and assemble-to-order kits, you use different procedures for returns depending on whether the kits need to be broken back down into components, or simply placed as-is back into inventory. Returning a kit item back into inventory as a finished item is fairly straight forward, however disassembling a kit is more complex and may require special resources or equipment. Moreover, the cost to break the kit down into components must be accounted for. Microsoft Dynamics NAV 5.0 supports the use of a Disassembly BOM to identify the costs of disassembly as well as the resulting components which can be reused.

Microsoft Official Training Materials for Microsoft Dynamics ™ Your use of this content is subject to your current services agreement
What's New in Dynamics NAV 5.0 - Local Functionality
Page 44
Return a Kit As with any item, a kit item may be returned for a number of reasons. However, unlike other kinds of items, kits may be returned to stock in several ways:
1. They may be returned to stock as an end item.
2. They may be directly returned to stock as individual components.
3. They may be returned as an end item, and then broken down into components.
This section focuses on the first two methods of returning kits. The last option, which entails disassembling kits, is discussed in the next section. One way of processing kit returns is through the Sales return Order Management granule. The Sales Return Order Management granule in Microsoft Dynamics NAV provides an efficient manner for handling returns, however this granule may not be available. In such cases, returns can be processed through the Credit Memo process as follows:
Demonstration − Return a Kit This demonstrates how to return a kit to stock, first as an end item, and then as components using a Credit Memo. The process for returning a kit using the Sales Return Order Management granule is nearly identical. Scenario: A Computer – Turbo Package has been sold to Guildford Water Department, and the invoice has been processed. The customer has decided they no longer need the item and have returned the merchandise for credit. For this example, assume that the Returns granule is not available, so a Credit Memo will be processed to handle the return.
1. Go to SALES & MARKETING→ORDER PROCESSING→CREDIT MEMOS.
2. Insert a new Credit Memo by pressing F3.
3. Use "50000" in the Sell-to Customer No. field on the General tab.
4. On a blank line in the Lines section of the form, select Item in the Type field.

Microsoft Official Training Materials for Microsoft Dynamics ™ Your use of this content is subject to your current services agreement
Chapter 3: Kit Disassembly
Page 45
5. In the No. column, enter the item number of the kit being returned. Several other fields fill in automatically. These may be adjusted as required. In this example, the Item No. is 8916-W.
6. In the Quantity field, enter the number of units being returned, in this case one. The resulting form should look similar to Figure 3-1:
FIGURE 3-1: SALES CREDIT MEMO
NOTE: Quantities should be entered as positive values denoting the number of units returned. Remember that the program does not generally permit posting of any orders with a negative total amount. Moreover, according to the general conventions in the program, the warehouse management functionality does not handle negative lines. This is because for the warehouse, it does not make sense to pick a negative quantity. Consequently, this means that when using warehousing, the user has to move negative lines to documents where they appear positive.
7. Select the form tab entitled Application. Select Invoice from
the list associated with the Applies-to Doc. Type field.
8. In the Applies-to Doc No. field, enter the invoice number (103020) connected to the returned product.
9. Return to the lines section of the form. Use the AssistButton (F6) while focused on the Appli.-from Item Entry field to select the appropriate item ledger entry. Figure 3-2 shows what the resulting form looks like:

Microsoft Official Training Materials for Microsoft Dynamics ™ Your use of this content is subject to your current services agreement
What's New in Dynamics NAV 5.0 - Local Functionality
Page 46
FIGURE 3-2: APPLIES-TO FIELDS ON SALES CREDIT MEMO
10. To return the kit(s) to stock in their finished form, select the Post option under the Posting button, or press F11 to post the transaction.
Once the return has been processed, you can use the BOM Journal to break the kit down into components. This process is discussed in the next section. It is also possible to directly return components through the Credit Memo process. To do so, substitute the following steps 10a and 11a in place of step 10.
10a. Select the kit item on the credit memo. From the Functions button, select the Explode BOM option. As shown in Figure 3-3, this function replaces the finished kit item with a listing of components.
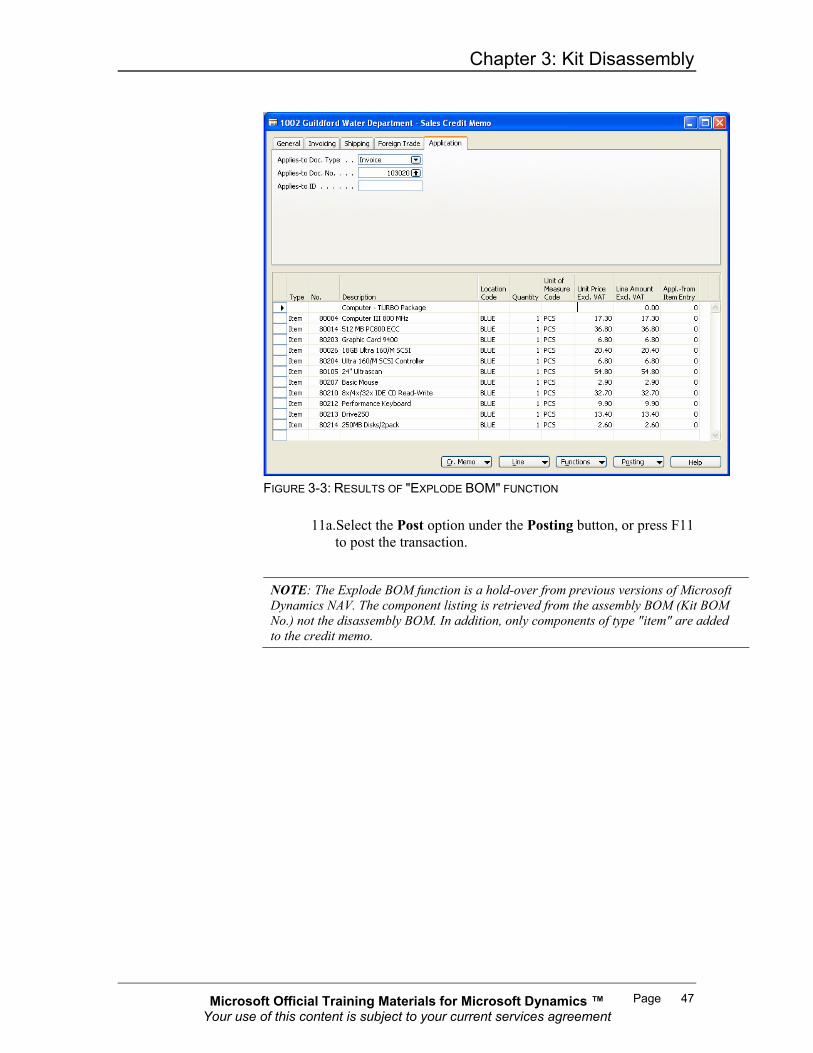
Microsoft Official Training Materials for Microsoft Dynamics ™ Your use of this content is subject to your current services agreement
Chapter 3: Kit Disassembly
Page 47
FIGURE 3-3: RESULTS OF "EXPLODE BOM" FUNCTION
11a.Select the Post option under the Posting button, or press F11 to post the transaction.
NOTE: The Explode BOM function is a hold-over from previous versions of Microsoft Dynamics NAV. The component listing is retrieved from the assembly BOM (Kit BOM No.) not the disassembly BOM. In addition, only components of type "item" are added to the credit memo.

Microsoft Official Training Materials for Microsoft Dynamics ™ Your use of this content is subject to your current services agreement
What's New in Dynamics NAV 5.0 - Local Functionality
Page 48
Kit Disassembly Using the BOM Journal An important feature of the Kitting granule is the ability to process the disassembly of a kit. Disassembly means breaking a finished kit into its original components. This may be done for several reasons:
a. Components may be required for other purposes and only be available in kit form.
b. Kits may have been returned and it is desirable to restock these as components.
Regardless of the reason, completed kits that will be disassembled must already reside in inventory. So, when processing returns, the kit should be received back into on-hand inventory before being disassembled. As discussed in Chapter 2, Microsoft Dynamics NAV allows both an assembly and disassembly BOM to be assigned to each kit item. A separate BOM for disassembly is provided because some original components may be destroyed, and because there may be additional costs which may be accounted for. The disassembly is processed as a negative adjustment for the kit and positive adjustments for the item components. In other words, disassembling a kit results in inventory for the kit being decreased and inventory for the components being increased.

Microsoft Official Training Materials for Microsoft Dynamics ™ Your use of this content is subject to your current services agreement
Chapter 3: Kit Disassembly
Page 49
Demonstration − Kit Disassembly using the BOM Journal
This demonstrates how to disassemble a kit back into Components using the BOM Journal. Scenario: A CONTOSO Office System has been returned by a customer. Since this kit is normally assembled as needed, the item will be disassembled and the component items returned to stock. The disassembly BOM for the item is shown in Figure 3-4.
FIGURE 3-4: DISASSEMBLY BOM FOR CONTOSO OFFICE SYSTEM
1. Go to WAREHOUSE→INVENTORY→BOM JOURNALS.
2. Select the appropriate Batch Name. Default is used in this example.
3. On a blank line in the Lines section of the form, select Disassembly in the Entry Type field.
4. In the Item No. column, enter the item number (766BC-B) of the kit being disassembled. Several other fields will fill in automatically. These may be adjusted as required.
5. Use the AssistButton (F6) while positioned in the Location Code field to select the location code where the kit is currently stocked, in this case RED.

Microsoft Official Training Materials for Microsoft Dynamics ™ Your use of this content is subject to your current services agreement
What's New in Dynamics NAV 5.0 - Local Functionality
Page 50
NOTE: Components resulting from disassembly will be returned to the same location as the original kit. Use the Warehouse Transfer process to move components from one location to another.
6. In the Quantity field, enter the number of kits being
disassembled, one in this case. The resulting screen looks similar to Figure 3-5:
FIGURE 3-5: DISASSEMBLY ENTRY IN THE BOM JOURNAL 7. The system puts together a journal line listing of components based
on the Disassembly BOM identified with the kit. View the listing by selecting Kit Lines from the Line button. A form similar to Figure 3-6 appears:
FIGURE 3-6: KIT LINES VIEW OF JOURNAL ENTRIES

Microsoft Official Training Materials for Microsoft Dynamics ™ Your use of this content is subject to your current services agreement
Chapter 3: Kit Disassembly
Page 51
8. Link the BOM journal lines to the Item Ledger entries that were created when the kit was built. Use the AssistButton (F6) while focused on the Applies-to Entry field to select the appropriate Item Ledger entry for each component line. Press the ESC key to return focus to the BOM Journal.
9. In some situations you may want a paper document to record the disassembly transaction. Use the options under the Print button to preview or print a hard copy report. Figure 3-7 shows a sample of the report.
FIGURE 3-7: BOM JOURNAL REPORT
9. Press F11, or select Post from the Posting button to
complete the transaction.

Microsoft Official Training Materials for Microsoft Dynamics ™ Your use of this content is subject to your current services agreement
What's New in Dynamics NAV 5.0 - Local Functionality
Page 52
Costing During Disassembly The costs generated in the original assembly of a kit can be used to identify the exact costs of disassembly. This is done by linking the Kit BOM Journal Lines to the original ledger entries by manually filling in the Applies-To Entry field. This capability is not specific to Kitting. Linking the kit back to original ledger entries is not required. When a link does not exist, the Unit Cost field on the Kit BOM Journal is based on the costing method of the component item. Components using the Standard cost method default to the component's Standard Cost. Components using the FIFO, LIFO, or Average methods default to Current Cost. Specific Cost methods are not supported. If the kit's assembly BOM and disassembly BOM are the same, assembly costs will be reversed using the unit cost defaults described above. If the kit's assembly BOM and disassembly BOM are different, then the following process is used to determine the costs that will be returned.
1. The assembly and disassembly BOMs will be compared.
2. Any component in the assembly BOM of type Item that does not exist in the disassembly BOM is considered a cost of disassembly.
3. Any component in the disassembly BOM of type Item that does not exist in the assembly BOM is considered a cost of disassembly.
4. Any component in the assembly BOM of type Resource is considered a cost of disassembly.
5. Any component in the disassembly BOM of a type other than Item is considered a cost of disassembly.
6. Original resource costs associated with assembly, resource costs associated with disassembly, and the cost of assembly items not reclaimed during disassembly are expensed as follows:
– The value of resources used during assembly, along with the value of assembly items not reclaimed during disassembly are posted to the Cost of Disassembly account defined in the general posting group setup for the kit item. An offsetting entry is made to the Inventory Adjustment account associated with the kit through the general posting group setup.

Microsoft Official Training Materials for Microsoft Dynamics ™ Your use of this content is subject to your current services agreement
Chapter 3: Kit Disassembly
Page 53
– The value of resources used during disassembly is posted to the Cost of Disassembly account defined in the general posting group setup for the resource. An offsetting entry is made to the Direct Cost Applied account defined in the resource's general posting group setup.
7. The Inventory account associated with the finished kit
through the Inventory Posting setup is decreased by the unit cost of the kit, and the Inventory Adjustment account identified in the general posting group setup is increased by the same amount. In similar fashion, the Inventory accounts associated with items reclaimed through disassembly are increased by the unit cost of each item, and the Inventory Adjustment account is decreased.
Demonstration − Costing During Disassembly By examining the disassembly of a kit item in more detail, we can see how costs and inventory flows through the process. Scenario: A CHAMONIX Base Storage Unit has been returned by a customer. Since this kit is normally assembled as needed, the item will be disassembled and the component items returned to stock. The disassembly BOM for this item, part number 1924-W, differs from the assembly BOM. We want to trace the cost effects of disassembling a kit.
1. Review the assembly and disassembly BOMs for item number 1924-W. To determine the BOM numbers of this part, look at the Kitting tab on the item card. The assembly BOM number is KIT0000 and the disassembly BOM is KIT0000D.
To view the BOMs, navigate to WAREHOUSE→PLANNING & EXECUTION→KIT BOM and use the AssistButton (F6) to look up each BOM as shown in Figure 3-8:
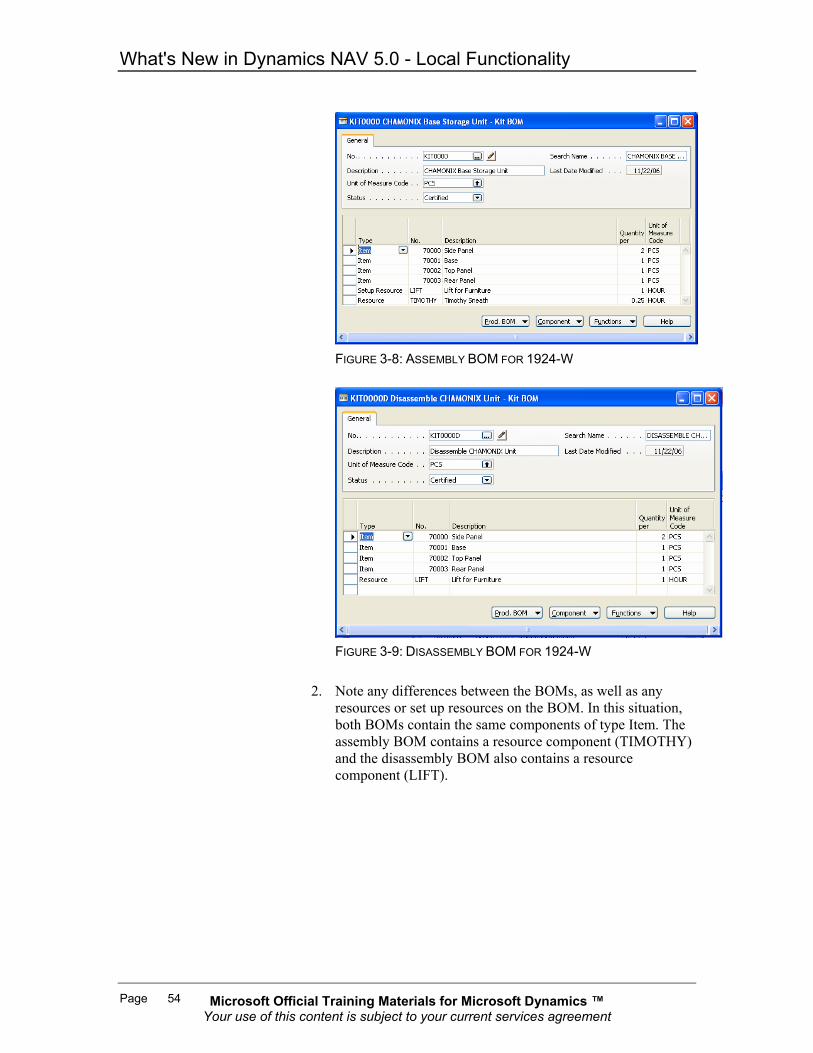
Microsoft Official Training Materials for Microsoft Dynamics ™ Your use of this content is subject to your current services agreement
What's New in Dynamics NAV 5.0 - Local Functionality
Page 54
FIGURE 3-8: ASSEMBLY BOM FOR 1924-W
FIGURE 3-9: DISASSEMBLY BOM FOR 1924-W
2. Note any differences between the BOMs, as well as any
resources or set up resources on the BOM. In this situation, both BOMs contain the same components of type Item. The assembly BOM contains a resource component (TIMOTHY) and the disassembly BOM also contains a resource component (LIFT).

Microsoft Official Training Materials for Microsoft Dynamics ™ Your use of this content is subject to your current services agreement
Chapter 3: Kit Disassembly
Page 55
3. Review the cost of the resource items by looking at the resource card (RESOURCE PLANNING→RESOURCE) to determine the cost per unit of measure.
FIGURE 3-10: RESOURCE CARD FOR TIMOTHY SHOWING UNIT COST
FIGURE 3-11: RESOURCE CARD FOR LIFT SHOWING UNIT COST From the resource cards, you can see that the unit cost for TIMOTHY is 31.90 and for LIFT it is 1.00. The cost of disassembly is found by multiplying the unit cost of the TIMOTHY resource by the Quantity Per field on the assembly BOM and adding it to the product of the unit cost of the LIFT resource times the Quantity Per field on the disassembly BOM: 31.90 * 0.25 = 7.98 + 1.00 * 1.00 = 1.00
8.98 Total cost of disassembly

Microsoft Official Training Materials for Microsoft Dynamics ™ Your use of this content is subject to your current services agreement
What's New in Dynamics NAV 5.0 - Local Functionality
Page 56
4. Confirm that Microsoft Dynamics NAV has applied 8.98 toward the cost of disassembly by viewing the general ledger entries associated with the disassembly. One way to do this is to go to ENTRIES→LEDGER ENTRIES from the Item button on the item card for part 1924-W, as shown in Figure 3-12:
FIGURE 3-12: ITEM CARD
5. From the ledger entry form view, locate a ledger entry associated with the disassembly. The Document No. field helps you locate the entry.
FIGURE 3-13: ITEM LEDGER ENTRIES

Microsoft Official Training Materials for Microsoft Dynamics ™ Your use of this content is subject to your current services agreement
Chapter 3: Kit Disassembly
Page 57
6. Click the Navigate button to view a summary of table entries related to the ledger entry.
FIGURE 3-14: NAVIGATE
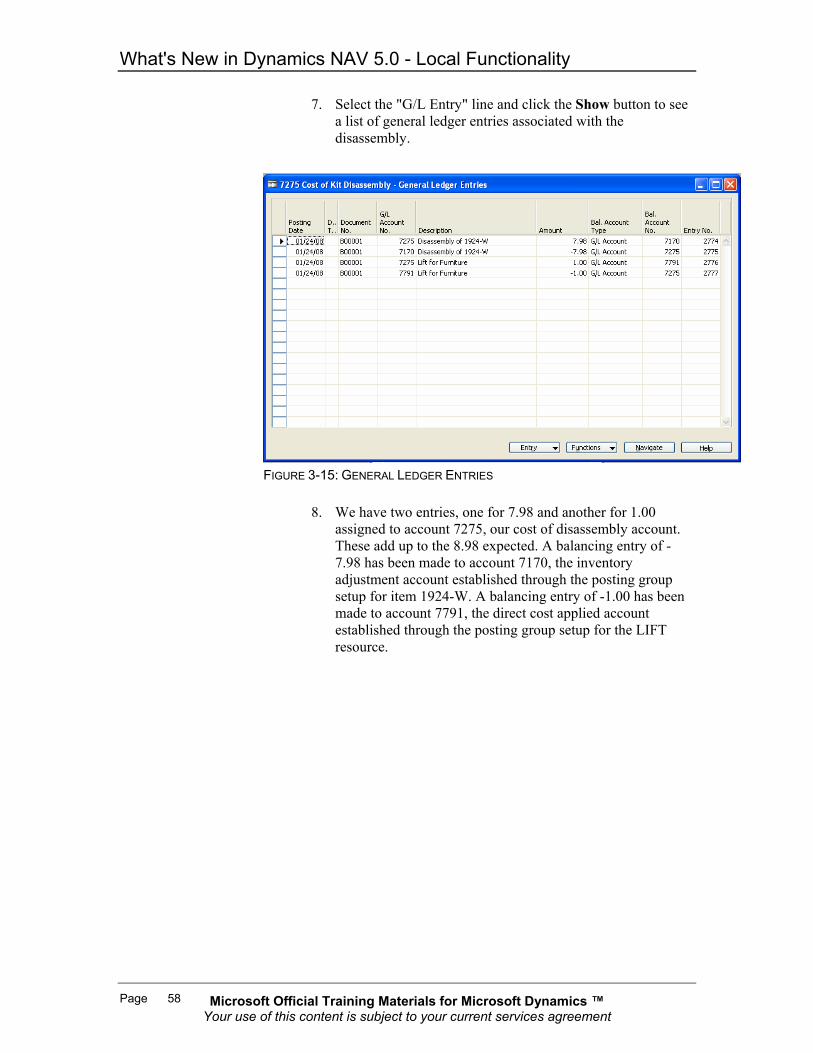
Microsoft Official Training Materials for Microsoft Dynamics ™ Your use of this content is subject to your current services agreement
What's New in Dynamics NAV 5.0 - Local Functionality
Page 58
7. Select the "G/L Entry" line and click the Show button to see a list of general ledger entries associated with the disassembly.
FIGURE 3-15: GENERAL LEDGER ENTRIES
8. We have two entries, one for 7.98 and another for 1.00 assigned to account 7275, our cost of disassembly account. These add up to the 8.98 expected. A balancing entry of -7.98 has been made to account 7170, the inventory adjustment account established through the posting group setup for item 1924-W. A balancing entry of -1.00 has been made to account 7791, the direct cost applied account established through the posting group setup for the LIFT resource.

Microsoft Official Training Materials for Microsoft Dynamics ™ Your use of this content is subject to your current services agreement
Chapter 3: Kit Disassembly
Page 59
Lab 3.1 − Return a Kit Scenario: A Computer – Highline Package kit (item number 8908-W) has been returned by The Cannon Group PLC.
Challenge Yourself! Process the return of the kit and immediately return the components to inventory. It is not necessary to apply the return to a specific sales order.
Need a Little Help?
1. Refer to the procedure under Return a Kit if you are having trouble getting started.
2. Use a Credit Memo to process the return.
3. Since you do not need to apply the return to a specific sales order, do not fill out the Applies-to Doc. Type or Applies-to Doc. No. fields.
4. To return the kit in component form, you must use the Explode BOM function to convert the kit item into a list of components.

Microsoft Official Training Materials for Microsoft Dynamics ™ Your use of this content is subject to your current services agreement
What's New in Dynamics NAV 5.0 - Local Functionality
Page 60
Lab 3.2 − Kit Disassembly using the BOM Journal Scenario: You have determined that there are too many ST.MORITZ Storage Unit/Drawers kits in stock. Since some of the components are used in other kits, you have decided to disassemble 20 of the kits from the YELLOW location.
Challenge Yourself! Use the BOM Journal to disassemble 20 kits from the YELLOW location and return the components to the same location.
Need a Little Help?
1. Remember to set the Entry Type field to Disassembly.
2. Make sure you set the Location Code field to "YELLOW."

Microsoft Official Training Materials for Microsoft Dynamics ™ Your use of this content is subject to your current services agreement
Chapter 3: Kit Disassembly
Page 61
Test Your Knowledge − Kit Disassembly
1. Which of the following statements are accurate in regard to processing returns for kits:
a. Kits may be returned to inventory as an end item. b. Kits may be returned to stock as individual components. c. Kits may be returned to inventory as an end item, and
then be broken down into components.
2. When you return kit components directly to stock using a credit memo which option on the Functions menu do you use?
3. To break a finished kit back down into components, which journal would you use?
4. Why is a separate BOM for disassembly provided?
5. Which of the following are considered costs of disassembly?
a. Components in the assembly BOM of type Item that do not exist in the disassembly BOM.
b. Components in the disassembly BOM of type Item that do not exist in the assembly BOM.
c. Any component in the disassembly BOM that is not of type Item.
d. Any component in the assembly BOM that is not of type Item.

Microsoft Official Training Materials for Microsoft Dynamics ™ Your use of this content is subject to your current services agreement
What's New in Dynamics NAV 5.0 - Local Functionality
Page 62
Conclusion Like other items for sale, kits can be returned for credit. Once returned, kits can be placed back into inventory as finished items or disassembled into components which are individually returned to stock. In order to identify components which may not be reusable after disassembly, and other costs of the disassembly process, Microsoft Dynamics NAV provides the option of defining a disassembly BOM which is different from the assembly BOM.

Microsoft Official Training Materials for Microsoft Dynamics ™ Your use of this content is subject to your current services agreement
Chapter 3: Kit Disassembly
Page 63
Quick Interaction: Lessons Learned Take a moment and write down three Key Points you have learned from this chapter: 1.
2.
3.

Microsoft Official Training Materials for Microsoft Dynamics ™ Your use of this content is subject to your current services agreement
What's New in Dynamics NAV 5.0 - Local Functionality
Page 64

Microsoft Official Training Materials for Microsoft Dynamics ™ Your use of this content is subject to your current services agreement
Chapter 4: Order Processing with Kitting
Page 65
CHAPTER 4: ORDER PROCESSING WITH KITTING Objectives
The objectives are:
• Enter a kit onto an order • Designate a kit sales line as "ship-from-stock" or "assemble-
to-order" • Review the components associated with a kit order • Change the components associated with a kit order • Check current stock levels for components • Roll up unit cost and unit price from components • Use Order Promising with kits • Print sales order confirmations • Ship kits without Warehouse functionality • Invoice Kit Orders
Introduction Like other types of items, kits can be bought and sold. Kits are available for processing:
• Quotes • Orders • Invoices • Blanket orders
This chapter is not meant to substitute for the Microsoft Dynamics™ NAV Trade course which covers sales order management in a much more detailed manner. This chapter focuses on adjustments to the normal process necessary to process kits versus standard items.

Microsoft Official Training Materials for Microsoft Dynamics ™ Your use of this content is subject to your current services agreement
What's New in Dynamics NAV 5.0 - Local Functionality
Page 66
Enter a Kit onto an Order Demand for Kits can be handled three basic ways:
• The kit can be pre-assembled and shipped from stock. The kit may have been assembled in-house using the BOM Journal or received from a purchase order.
• Kits may be linked to a purchase order as a drop shipment or special order.
• As kits assembled from components at the time of picking and packing. This is known as "instant production."
When kits are shipped from existing stock or linked to a purchase order, they are handled like any other item; the top level kit item is listed and individual components are not listed. When kits are to be assembled from components at the time of pick and pack, the individual kits are listed and may be modified. Kit sales lines are identified as "assemble-to-order" based on the value of the Build Kit field. When this field is set to Yes on a sales order line, Microsoft Dynamics NAV attaches kit lines to the order line based on the components listed in the kit's assembly BOM. The kit lines, rather than the finished kit item, become the focus of the picking and packing processes. The initial value of the Build Kit field is controlled through the settings of the Automatic Build Kit BOM field on the item card attached to the finished kit item. When Automatic Build Kit is set to Yes on the item card, Build Kit defaults to Yes on sales order lines.
NOTE: Since reserving finished kit items does not make sense when assembling the kit from components, it is recommended that the Reserve field on the item card be set to Never if Automatic Build Kit BOM is selected.

Microsoft Official Training Materials for Microsoft Dynamics ™ Your use of this content is subject to your current services agreement
Chapter 4: Order Processing with Kitting
Page 67
Demonstration − Enter a kit onto an Order This demonstrates how to enter a kit onto an order. Lines for both shipped-from-stock and assemble-to-order kits will be illustrated. Scenario: The Cannon Group PLC would like to order the CONTOSO Storage System and CONTOSO Conference System kits. The CONTOSO Storage System is a fairly common request, so the kit is generally built ahead of time and kept in stock. Demand for the CONTOSO Conference System is fairly sporadic, so these kits are generally put together as orders come in.
1. Go to SALES & MARKETING→ORDER PROCESSING→ORDERS.
2. Insert a new Order by pressing F3.
3. Navigate to the Sell-to Customer No. field on the General tab. Use the AssistButton (F6) to look up and select The Cannon Group PLC from the list of customers.
4. In this demonstration we will be shipping product from the Blue location. Navigate to the Location Code field on the Shipping tab and select Blue using the AssistButton (F6).
5. Move to the Lines section of the form. Enter the two kit items into the order as documented in the table below.
Field Name Value, First Item Value, Second item Type Item Item No. 766BC-C 766BC-A Build Kit √ Location Code
BLUE BLUE
Reserve Optional Never Quantity 1 1
Additional fields will automatically fill in. The resulting form should
look similar to Figure 4-1:

Microsoft Official Training Materials for Microsoft Dynamics ™ Your use of this content is subject to your current services agreement
What's New in Dynamics NAV 5.0 - Local Functionality
Page 68
FIGURE 4-1: SALES ORDER FORM WITH KIT ENTRIES
NOTE: Selecting the Build Kit field denotes that the kit order will be fulfilled by assembling components rather than retrieving a finished item from inventory. Since reserving finished kit items does not make sense when you are assembling the kit from components, the Reserve field must be set to Never before selecting the Build Kit field. In addition, the kit quantity must be entered after Build Kit has been selected.
Exploding a BOM Prior to the introduction of the Kitting granule, previous versions of the software supported the basic concept of Assembly BOMs. Much of this original functionality has been retained. For example, under the Functions button on the Sales Order form, the Explode BOM function is still available. When executed on a sales line, the Explode BOM function converts a kit item in a sales order to a new list of the components based on the kit item's assembly BOM. An example of the resulting sales order is shown in Figure 4-2. In this example, the CONTOSO Storage System is exploded into its various components.

Microsoft Official Training Materials for Microsoft Dynamics ™ Your use of this content is subject to your current services agreement
Chapter 4: Order Processing with Kitting
Page 69
FIGURE 4-2: RESULTS OF EXPLODING A KIT BOM
Note that, although a comment line is added referring to the CONTOSO Storage System, the kit item itself is removed from the order. In its place, new lines are added to the sales order, one for each component. Although the components now appear on the order instead of the original kit item, the only reference to the kit itself is a comment line in the order; there is no substantial identifier available to tie all of the components together as being part of the same kit. For this reason, use of the Explode BOM function is discouraged.

Microsoft Official Training Materials for Microsoft Dynamics ™ Your use of this content is subject to your current services agreement
What's New in Dynamics NAV 5.0 - Local Functionality
Page 70
Reviewing Kit Sales Lines When you designate a kit on a sales order as an "assemble-to-order" kit by selecting the Build Kit field, a list of components is attached as Kit Sales Lines to the order line. View this list by selecting Kit Lines from the menu under the Line button. From the Kit Sales Lines view, you can perform of the following actions:
• Add new components or remove components from this kit order.
• Modify the number of component units required per kit by changing the Quantity per field.
• Change the unit cost or unit price to be recorded for each component.
• Designate the bin the component should be picked from.
NOTE: Remember that the location is specified on the sales order line and may not be changed in the Kit Sales Line.
• Assign lot or serial numbers to each component. • Create reservations for components. • Check the current availability of each component. • Roll-up costs and/or pricing for the kit based on the
component unit costs/prices.
Demonstration − Reviewing Kit Sales Lines This demonstrates how to view the listing of components connected to a kit item appearing on a sales order, and some of the functions available to modify the component listing. Scenario: One of your customers, The Cannon Group PLC, would like to order the CONTOSO Conference System kit. The components that make up this kit (which include tables, chairs, and an erasable marker board) are also part of other kits and are sold separately as well. To minimize inventory, kits are put together as needed as part of the picking routine. A sales order for the Conference System kit has already been prepared. You want review the list of components.
1. Open the order via SALES & MARKETING→ORDER PROCESSING→ORDERS and navigate to the order previously created.
2. Move to the lines section of the order, highlight the kit order line you want to review.

Microsoft Official Training Materials for Microsoft Dynamics ™ Your use of this content is subject to your current services agreement
Chapter 4: Order Processing with Kitting
Page 71
NOTE: Kit Lines only appear if the Build Kit field is selected.
3. Select Kit Lines from the Line button. A sample of this
process is shown in Figure 4-3:
FIGURE 4-3: SELECTING THE KIT LINES OPTION
4. After selecting the Kit Lines option, the listing of
components appears as in Figure 4-4:
FIGURE 4-4: KIT LINES DISPLAY

Microsoft Official Training Materials for Microsoft Dynamics ™ Your use of this content is subject to your current services agreement
What's New in Dynamics NAV 5.0 - Local Functionality
Page 72
Modifying Kit Lines From the Kit Sales Lines form, you can make modifications specific to this order line. For example, you can use the F3 key to insert a new line or the F4 key to delete a line. You can change the quantity needed:
• Per kit • Unit of measure • Cost per unit • Unit price
You can also specify the bin the component is to be picked from. These changes do not affect the original assembly BOM; the changes are specific to the order line only. The next time you create a sales order line for a kit, the original kit assembly BOM will be used.
Unsupported attributes on Kit Lines The following are unsupported fields and features for Kit Sales Lines:
• Extended texts • Discounts: Discounts are taken on the kit item, not the
individual components. • Dimensions: The dimension values for kit components are
inherited from the kit item and may not be changed. • Substitutions • Cross References: These may be associated with a
component item on the component's item card, but are not available on the kit lines form.
• Changes to the location code: The location code is inherited from the kit item.

Microsoft Official Training Materials for Microsoft Dynamics ™ Your use of this content is subject to your current services agreement
Chapter 4: Order Processing with Kitting
Page 73
Checking Component Availability If Build Kit is selected on your sales order line, the system automatically checks to make sure a sufficient quantity of components are available when the kit quantity is entered. If an insufficient number of components exists, you receive a warning as shown in Figure 4-5:
FIGURE 4-5: INSUFFICIENT COMPONENT STOCK WARNING
This warning message says that you will be short some components and tells how many kits can be made using currently available inventory. You can check the availability of any individual components from within the Kit Sales Lines form by selecting the Item Availability by option under the Lines button. Three views for Item Availability are available:
• Availability by Period • Availability by Variant • Availability by Location
These standard views are identical to the Item Availability by options which can be launched from Item Cards, Sales Order, Purchase Orders, Invoices and other familiar documents.

Microsoft Official Training Materials for Microsoft Dynamics ™ Your use of this content is subject to your current services agreement
What's New in Dynamics NAV 5.0 - Local Functionality
Page 74
Reservations If the Build Kit box is selected, the Reserve field must be set to Never and you cannot reserve existing kits under the sales order. If the Build Kit box is not selected and the Reserve field is set to Optional or Always, you can place reservations against kits already built and placed into stock. Use the Reserve option under the Function button to create a reservation for a build-to-stock kit. Components can be reserved if the order is for an assemble-to-order kit. If the Reserve field on the Kit Sales Lines form is set to Optional or Always, existing kit component stock can be reserved for a particular order. Use the Reserve option under the Function button to reserve stock.
Item Tracking Kits, whether built to stock or assembled to order, can be set up for serialization or lot tracking. Use the Item Tracking Lines option under the Line button to enter serial or lot information for a kit which is being shipped. When the Build Kit box is clear (indicating the kit should already be in stock), use the Item Tracking Lines option to select an existing lot or serial number which is assigned when the kit is assembled via the BOM Journal. When the Build Kit box is selected, you must assign a new serial or lot number. Component items appearing on kit lines can also be set up for tracking by serial or lot numbers. Generally, serial or lot numbers are assigned when components are received under a purchase order or recorded as output from a production order. Use the Item Tracking Lines option under the Line button to select serial or lot tracked inventory.
Rolling up costs, prices By default, the unit cost for a kit comes from the kit's item card setting. You can set the cost of the kit based on the total cost of the components by selecting the Roll up cost option under the Functions button. Likewise, you can set the price of the kit based on the component prices using the Roll up price option.

Microsoft Official Training Materials for Microsoft Dynamics ™ Your use of this content is subject to your current services agreement
Chapter 4: Order Processing with Kitting
Page 75
Order Promising The Order Promising function is a tool used to calculate the earliest possible date an item will be available for shipment. Sales people can use Order Promising to provide customers with accurate information on order delivery. The function operations in two modes:
• Available to Promise (ATP) • Capable to Promise (CTP)
ATP checks inventory for unreserved stock. As part of this analysis, ATP takes into account:
• Purchase orders • Production orders • Transfers • Returns
CTP performs a "what if" analysis. If items are not available in inventory, CTP uses lead times associated with the item to determine the earliest date it could be available if purchased, produced, or transferred. Beyond simply calculating delivery dates, the CTP function creates planned replenishment orders and reserve inventory. Order Promising is described in detail in the Trade course, so in this section we will focus on how the feature is used with Kitting. Kit items provide an extra layer of complication for Order Promising because the availability date for the kit may be dependent on the availability of component items.
Demonstration − Order Promising Scenario: The Cannon Group PLC, wants to order 10 units of the Computer - Basic Package kit (item no. 8904-W), for delivery by 3/15/2008. These kits will be assembled as needed from components at the Blue location. Insufficient components are currently available to construct the kits. You want to determine the components can arrive in time to make the kits, and if so, you want to place orders for the components.

Microsoft Official Training Materials for Microsoft Dynamics ™ Your use of this content is subject to your current services agreement
What's New in Dynamics NAV 5.0 - Local Functionality
Page 76
1. Open the order via SALES & MARKETING→ORDER PROCESSING→ORDERS and enter an order using the attributes below:
Header Section
Field Name Value Sell-to Customer No. 10000 Promised Delivery Date
3/15/08
Line Section
Field Name Value Type Item No. 8904-W Reserve Never Build Kit √ Location Code Blue Quantity 10
Accept defaults for other fields. The resulting order should look similar to Figure 4-6:
FIGURE 4-6: SALES ORDER FOR KIT

Microsoft Official Training Materials for Microsoft Dynamics ™ Your use of this content is subject to your current services agreement
Chapter 4: Order Processing with Kitting
Page 77
2. When you enter the quantity on the order, a message as shown in Figure 4-7 shows warning you of insufficient stock for the kit and its components. Click the Yes button to proceed.
FIGURE 4-7: CHECK KIT ITEM AVAILABILITY
3. Return to the Sales Order form. Select Order Promising from the Line button. Note that the item components from the kit are displayed, not the kit. This is because the Build Kit box was selected on the sales order line, indicating that this kit will be assembled to order. The Unavailable Quantity field shows the amount of each component that is currently unavailable.
FIGURE 4-8: ORDER PROMISING LINES
4. Select the Capable-to-Promise option from the Calculate button. Review the results as shown in Figure 4-9:

Microsoft Official Training Materials for Microsoft Dynamics ™ Your use of this content is subject to your current services agreement
What's New in Dynamics NAV 5.0 - Local Functionality
Page 78
FIGURE 4-9: ORDER PROMISING LINES
Notice that the Requested Delivery Date and Earliest Shipment Date have been filled in. This indicates that it is possible to fulfill these requirements given the lead time for each component. At this point however, the necessary replenishment orders have not been created, so the values in the Unavailable Quantity column have not changed.
5. We can take the next step and create Action Messages
instructing a planner that the components listed need to be purchased by clicking the Accept button. This creates action messages in a Planning Worksheet, Requisition Worksheet, or Recurring Worksheet, depending on which template has been specified in the setup for Order Promising. In this situation, the Planning Worksheet template has been specified. Review the contents of the Planning Worksheet by navigating to MANUFACTURING→PLANNING→PLANNING WORKSHEET. A sample of results is shown in Figure 4-10:
FIGURE 4-10: PLANNING WORKSHEET

Microsoft Official Training Materials for Microsoft Dynamics ™ Your use of this content is subject to your current services agreement
Chapter 4: Order Processing with Kitting
Page 79
The planner or buyer can convert these action messages into purchased order or requisitions. Or, if a component was manufactured in-house, a corresponding production order could be created. These activities are outside the scope of our objectives for this class, so we will not illustrate them here, but imagine that these action messages were converted to purchase orders.
6. Return to the sales order you originally created. Select Order
Promising from the Line button. From the Order Promising form, select the Capable-to-Promise option from the Calculate button. Review the results as shown below. Note that values in the Unavailable Quantity column are all zero. This is because we have created a purchase order which will replenish kit component inventory in time to assemble and ship the kit.
FIGURE 4-11: ORDER PROMISING LINES

Microsoft Official Training Materials for Microsoft Dynamics ™ Your use of this content is subject to your current services agreement
What's New in Dynamics NAV 5.0 - Local Functionality
Page 80
7. Return to the sales order form. Select Kit Lines from the Line button. A form similar to the following should appear. Note that the Reserved Quantity column shows that reservations exist for each component.
FIGURE 4-12: KIT SALES LINES 8. Select item 80010 and select the Reservation Entries option from
the Line button. A form similar to that shown in Figure 4-13 appears. This shows that a reservation for the component has been created between a purchase order and the sales order you entered.
FIGURE 4-13: RESERVATION ENTRIES
Microsoft Official Training Materials for Microsoft Dynamics ™ Your use of this content is subject to your current services agreement
Chapter 4: Order Processing with Kitting
Page 81
Printing Order Confirmations As with any sales order, you can print sales order confirmations for orders involving kits. The appearance of the confirmation depends on the following:
• The status of the Build Kit box. • The setting of the Components on Sales Order field in
Sales & Receivables Setup. • The setting of the Components on Sales Order field on the
Customer card. • The setting of the Components on Sales Order field on the
Item card. If the Build Kit box is not selected, then kit components will not print on the order confirmation report. If Build Kit is selected, then components will be displayed on the order confirmation report as long as the Components on Sales Order field is set to Show according to the following hierarchy:
• Use the setting (Show or Do not Show) on the Item card for the kit item. If the setting is blank, then
• Use the setting on the sell-to customer of the order. If the setting is blank, then
• Use the setting under Sales & Receivable Setup
Demonstration − Printing Order Confirmations Scenario: The Cannon Group PLC has ordered the CONTOSO Conference System kit. A sales order for the Conference System kit has already been prepared and Build Kit is selected. You now want to print an order confirmation showing the components.
1. Navigate to SALES & MARKETING→SETUP→SALES & MARKETING SETUP.
2. On the Kitting tab, verify that Show Components on Sales Orders is set to Show. If not, use the AssistButton (F6) to view the choices and select Show.
3. Navigate to SALES & MARKETING→ORDER PROCESSING→ ORDERS. Select the order previously entered for The Cannon Group PLC.
4. Select Order Confirmation from the Print button.

Microsoft Official Training Materials for Microsoft Dynamics ™ Your use of this content is subject to your current services agreement
What's New in Dynamics NAV 5.0 - Local Functionality
Page 82
5. Click Print to send the report to a printer or Preview to view a likeness of the report on your screen.
6. Navigate to SALES & MARKETING→SETUP→SALES & MARKETING SETUP and change the setting of the Show Components on Sales Orders field to Do Not Show.
7. Repeat steps 3, 4 and 5 and compare the two reports.
FIGURE 4-14: ORDER CONFIRMATION
NOTE: Regardless of the settings used, comments, resources, and setup resources do not appear on an order confirmation.
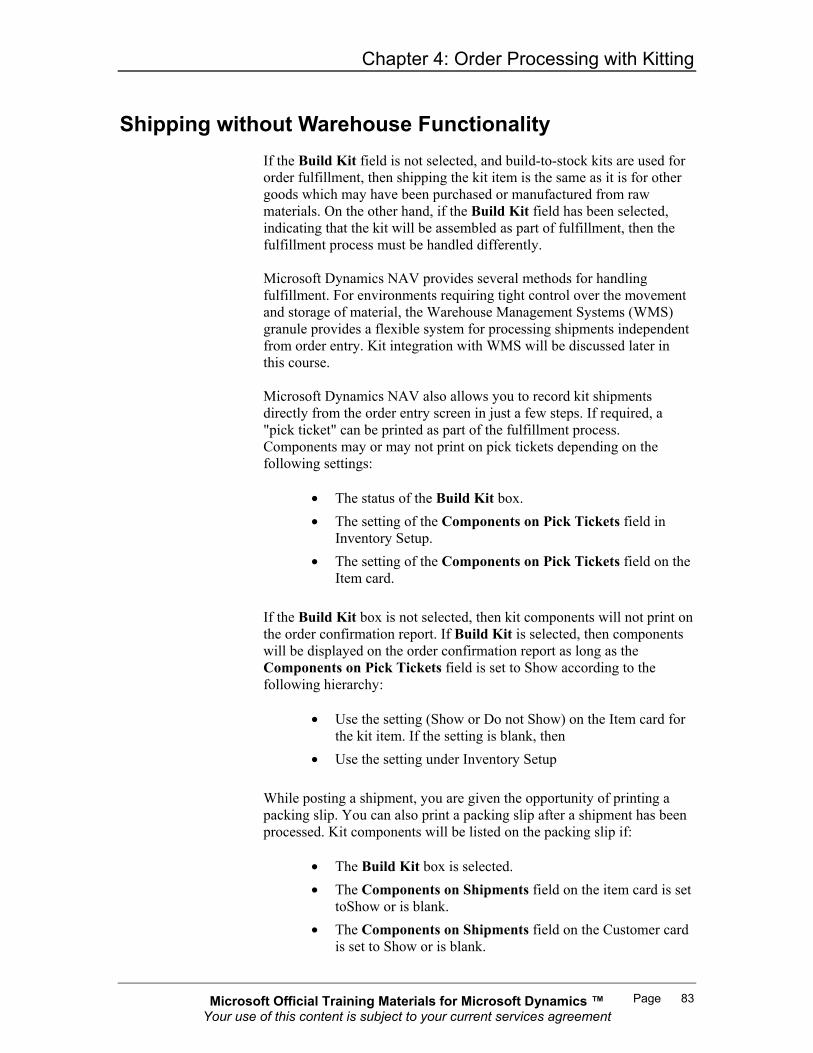
Microsoft Official Training Materials for Microsoft Dynamics ™ Your use of this content is subject to your current services agreement
Chapter 4: Order Processing with Kitting
Page 83
Shipping without Warehouse Functionality If the Build Kit field is not selected, and build-to-stock kits are used for order fulfillment, then shipping the kit item is the same as it is for other goods which may have been purchased or manufactured from raw materials. On the other hand, if the Build Kit field has been selected, indicating that the kit will be assembled as part of fulfillment, then the fulfillment process must be handled differently. Microsoft Dynamics NAV provides several methods for handling fulfillment. For environments requiring tight control over the movement and storage of material, the Warehouse Management Systems (WMS) granule provides a flexible system for processing shipments independent from order entry. Kit integration with WMS will be discussed later in this course. Microsoft Dynamics NAV also allows you to record kit shipments directly from the order entry screen in just a few steps. If required, a "pick ticket" can be printed as part of the fulfillment process. Components may or may not print on pick tickets depending on the following settings:
• The status of the Build Kit box. • The setting of the Components on Pick Tickets field in
Inventory Setup. • The setting of the Components on Pick Tickets field on the
Item card. If the Build Kit box is not selected, then kit components will not print on the order confirmation report. If Build Kit is selected, then components will be displayed on the order confirmation report as long as the Components on Pick Tickets field is set to Show according to the following hierarchy:
• Use the setting (Show or Do not Show) on the Item card for the kit item. If the setting is blank, then
• Use the setting under Inventory Setup While posting a shipment, you are given the opportunity of printing a packing slip. You can also print a packing slip after a shipment has been processed. Kit components will be listed on the packing slip if:
• The Build Kit box is selected. • The Components on Shipments field on the item card is set
toShow or is blank. • The Components on Shipments field on the Customer card
is set to Show or is blank.

Microsoft Official Training Materials for Microsoft Dynamics ™ Your use of this content is subject to your current services agreement
What's New in Dynamics NAV 5.0 - Local Functionality
Page 84
• The Components on Shipments field on the Inventory Setup" form is set to Show.
Demonstration − Shipping without Warehouse Functionality
This demonstrates how to ship kits without using the optional functionality provided by the Warehouse Management System (WMS) granule. Scenario: The Cannon Group PLC has placed an order for the CONTOSO Conference System kit. A sales order for the Conference System kit has already been prepared, noting that the order is to be assembled-to-order as part of the fulfillment process.
1. Open the order via SALES & MARKETING→ ORDER PROCESSING →ORDERS and navigate to the order previously created.
2. From the Print button, select Pick Ticket to print or preview a report listing the need for each component. A sample is shown in Figure 4-15:
FIGURE 4-15: ORDER PICK TICKET SHOW KIT COMPONENTS
NOTE: If the system is configured to show kit components, comments, resources, and setup resources associated with the kit, it will also appear on pick tickets.
3. The Qty. to Ship field normally populates with the full
quantity ordered, but can be modified. Enter the exact number of units shipped – in this case, one.
4. Post the transaction by selecting Post and Print from the Post button.
5. A confirmation screen as shown in Figure 4-16 appears. Select the option to Ship and click the OK button.

Microsoft Official Training Materials for Microsoft Dynamics ™ Your use of this content is subject to your current services agreement
Chapter 4: Order Processing with Kitting
Page 85
FIGURE 4-16: Because we elected to print a packing slip, one will be printed. Figure 4-17 shows an example of a printed packing slip.
FIGURE 4-17: PACKING SLIP FOR A KIT SHOWING COMPONENTS
NOTE: Comments, resources, and setup resources that are part of the kit BOM do not appear on packing slips. Only components of type "item" appear on the packing slip.

Microsoft Official Training Materials for Microsoft Dynamics ™ Your use of this content is subject to your current services agreement
What's New in Dynamics NAV 5.0 - Local Functionality
Page 86
Printing Invoices After a sales order has entered a fulfillment has occurred, the order can be invoiced and a corresponding document can be printed. No special process is required for invoicing orders with kit items. The same process used for invoicing the sale of manufactured or purchased goods can be used for kits. However, when printing invoice documents, you can control whether or not components are listed. Components show on the invoice if:
• The Build Kit box is selected on the sales order. • The Components on Invoices field on the item card is set to
Show or is blank. • The Components on Invoices field on the Customer card is
set toShow or is blank. • The Components on Invoices field on the Sales &
Receivable Setup form is set to Show.
Demonstration − Printing Invoices This demonstrates how to print an invoice for an order and illustrates how components can be displayed on the invoice for a kit. Scenario: One of your customers, Antarcticopy, has placed an order for several items, including an INNSBRUCK Storage Unit/W.Door kit which has been shipped and invoiced. The customer prefers that the components of the kit appear on printed invoices. The invoice number is 103010.
1. View the previously prepared invoice via SALES & MARKETING→ HISTORY→POSTED INVOICES and select invoice number 103010. The invoice form appears as in Figure 4-18:

Microsoft Official Training Materials for Microsoft Dynamics ™ Your use of this content is subject to your current services agreement
Chapter 4: Order Processing with Kitting
Page 87
FIGURE 4-18: POSTED SALES INVOICE
2. Click the Print button to obtain a hard copy of the report or
preview it on screen. A report similar Figure 4-19 will be generated:

Microsoft Official Training Materials for Microsoft Dynamics ™ Your use of this content is subject to your current services agreement
What's New in Dynamics NAV 5.0 - Local Functionality
Page 88
FIGURE 4-18: INVOICE FOR A KIT, SHOWING COMPONENTS

Microsoft Official Training Materials for Microsoft Dynamics ™ Your use of this content is subject to your current services agreement
Chapter 4: Order Processing with Kitting
Page 89
Lab 4.1 − Processing a Kit Order Scenario: One of your customers, John Haddock Insurance Co., would like to order 50 pieces of the CHAMONIX Base Storage Unit kit. The order is to be fulfilled from the Blue location.
Challenge Yourself! Set up a new sales order to sell the John Haddock Insurance Co. 50 pieces of the CHAMONIX Base Storage Unit from the BLUE location. Ten kits should be shipped from stock and the remainder assembled during fulfillment. After the sales order has been entered, print or preview an order confirmation and pick list for the order, then complete shipment.
Need a Little Help?
1. You cannot fulfill one sales order line using pre-built kits and components assembled at the time of fulfillment. Use separate sales order lines for each kind of kit.
2. You can print order confirmations and pick lists from the sales order using options under the Print menu.
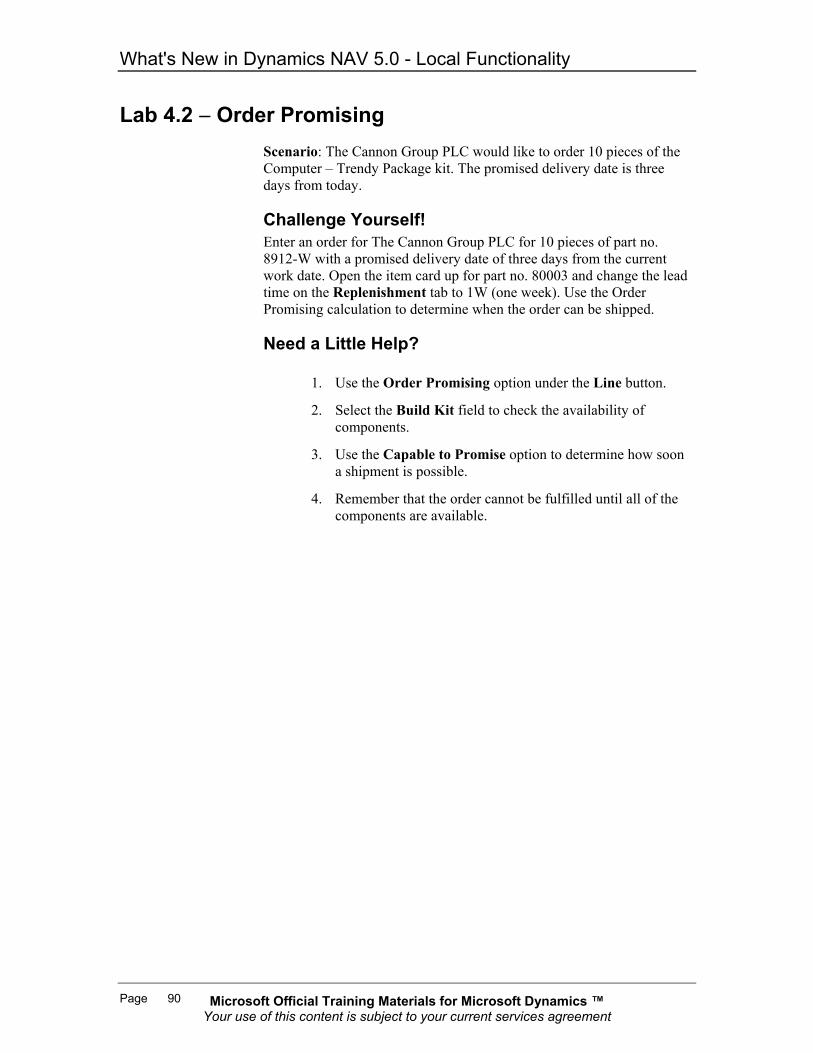
Microsoft Official Training Materials for Microsoft Dynamics ™ Your use of this content is subject to your current services agreement
What's New in Dynamics NAV 5.0 - Local Functionality
Page 90
Lab 4.2 − Order Promising Scenario: The Cannon Group PLC would like to order 10 pieces of the Computer – Trendy Package kit. The promised delivery date is three days from today.
Challenge Yourself! Enter an order for The Cannon Group PLC for 10 pieces of part no. 8912-W with a promised delivery date of three days from the current work date. Open the item card up for part no. 80003 and change the lead time on the Replenishment tab to 1W (one week). Use the Order Promising calculation to determine when the order can be shipped.
Need a Little Help?
1. Use the Order Promising option under the Line button.
2. Select the Build Kit field to check the availability of components.
3. Use the Capable to Promise option to determine how soon a shipment is possible.
4. Remember that the order cannot be fulfilled until all of the components are available.

Microsoft Official Training Materials for Microsoft Dynamics ™ Your use of this content is subject to your current services agreement
Chapter 4: Order Processing with Kitting
Page 91
Test Your Knowledge − Order Processing with Kitting
1. If a kit item is to be "shipped from stock" as a pre-assembled item, the Build Kit field should be ___________?
2. The customer has ordered 10 kits. You have seven
completed kits in stock, but enough components to build the remaining three. What is the best way to indicate on a sales order that you want to ship seven kits from stock and assemble the remaining three kits as part of the fulfillment process?
3. What function on a sales order line converts a kit item to a list of components with each component listed on a separate sales order line?
4. If you wanted to add or remove a kit component for one particular order, how would you do so?
5. If the Build Kit box is selected, the Reserve field must be set to _____________.
6. True or False. Both kits and kit components can be assigned
lot numbers.
7. By default, the unit cost for a kit comes from where?
8. What is the difference between the "Roll up cost" and "Roll up price" functions.
9. If the Build Kit box is not selected and the Components on
Sales Order field is set to Show, will components be listed on order confirmations?

Microsoft Official Training Materials for Microsoft Dynamics ™ Your use of this content is subject to your current services agreement
What's New in Dynamics NAV 5.0 - Local Functionality
Page 92
10. How can you print a pick ticket listing kit components without using
the warehouse granule?
11. If the Build Kit box is selected, the Components on Shipments field on the Inventory Setup form is set to Do not Show, and the Components on Shipments field on the Item card is set to Show will components be listed on packing slips?
12. True or False. No special process is required for invoicing kit items.

Microsoft Official Training Materials for Microsoft Dynamics ™ Your use of this content is subject to your current services agreement
Chapter 4: Order Processing with Kitting
Page 93
Conclusion The Kitting feature allows you to enter a kit onto a sales order. Kit orders can be designated as ship-from-stock or assemble-to-order using the Build Kit check box. When constructing a kit order, you can review and modify the components for that order. By default, the kit cost and price is retrieved from the kit's item card settings, however you can use the roll-up feature to calculate the cost or price based on the settings for components included in the kit. The Order Promising feature can be used to determine both available-to-promise and capable-to-promise calculations for kits. When used with an assemble-to-order kit, Order Promising takes into account the availability of components. When used in conjunction with kits, order-related reports such as pick lists, order confirmations, and invoices can display information on kit components. It is possible to process kit shipments with or without the Warehouse Management System granule. In this chapter we examined fulfillment without the WMS granule.

Microsoft Official Training Materials for Microsoft Dynamics ™ Your use of this content is subject to your current services agreement
What's New in Dynamics NAV 5.0 - Local Functionality
Page 94
Quick Interaction: Lessons Learned Take a moment and write down three Key Points you have learned from this chapter: 1.
2.
3.

Microsoft Official Training Materials for Microsoft Dynamics ™ Your use of this content is subject to your current services agreement
Chapter 5: Warehouse Management of Kits
Page 95
CHAPTER 5: WAREHOUSE MANAGEMENT OF KITS Objectives
The objectives are:
• Create Shipment Orders for Kits • Creating and Registering Picks for Kit components • Posting Shipments For Assembled Kits
Introduction Warehouse Management Systems (WMS) is aimed at companies that not only need to receive and ship goods, but are also interested in optimizing the use of space. In such environments, zones and bins are often defined to manage storage. The flow of inventory through a warehouse can be divided up into three basic processes:
• Receiving items at the Warehouse and making them available.
• Handling items for internal distribution, movement, or production.
• Picking and shipping items to customers and other locations. These tasks are usually handled by dedicated warehouse staff and special documents are used to direct personnel to place or retrieve goods into/from predetermined locations. Warehouse resources are tightly managed so warehouse managers need to know which items are to be shipped or used in production and which are expected to arrive. This allows the manager to estimate workload and allocate resources accordingly. As discussed throughout this course, kits can be built and stocked ahead of need, or kit orders can be fulfilled by picking and combining the components as sales orders are processed. When kits are produced ahead of time using BOM Journal and placed into stock as finished goods, they are handled like normal finished good items within WMS. For this reason, we will not detail process of handling build-to-stock items in WMS. Receipt of purchased kits also follows the standard WMS receipt process and will not be discussed in this chapter. Purchase kits may be disassembled using the BOM Journal.
Microsoft Official Training Materials for Microsoft Dynamics ™ Your use of this content is subject to your current services agreement
What's New in Dynamics NAV 5.0 - Local Functionality
Page 96
When kits are assembled from components at the time of order fulfillment, components must be picked and packaged together instead of simply pulling the finished product off the shelf. Once packed together, the finished kit is then shipped against the original order. This represents a slight departure from the usual WMS process, so the remainder of this chapter will focus on the processing of assemble-to-order kits within WMS. Although the chapter covers some basic WMS functions, Warehouse Management is a much wider subject. Those seeking a full explanation of the WMS granule are directed to the Warehouse Management course for details.
IMPORTANT NOTE: To do the demonstrations and labs, you need to set up the BLUE location to Require Shipment and Require Pick. This is accomplished by navigating to the Warehouse tab on the WAREHOUSE→SETUP→LOCATIONS form. Ask your instructor for assistance if needed.

Microsoft Official Training Materials for Microsoft Dynamics ™ Your use of this content is subject to your current services agreement
Chapter 5: Warehouse Management of Kits
Page 97
Creating Shipments for Kits Shipping of product through the warehouse begins with the creation of a standard sales order. In Figure 5-1 we have created an order for an ALBERTVILLE Whiteboard, green, item number 1992-W. This is an assemble-to-order kit item consisting of the following items: Item No. Description Quantity per Kit 1996-S ATLANTA Whiteboard, base 1 70104 Paint, green 1
FIGURE 5-1: SALES ORDER Once the sales order has been created, create the shipment order for the warehouse. This is accomplished by selecting the option Create Whse. Shipment from the Functions button.

Microsoft Official Training Materials for Microsoft Dynamics ™ Your use of this content is subject to your current services agreement
What's New in Dynamics NAV 5.0 - Local Functionality
Page 98
Demonstration − Creating Shipments for Kits Scenario: The Cannon Group PLC has ordered 10 ALBERTVILLE Whiteboard, green kits from your office supply company. Your company assembles these kits to order from components stored in the BLUE warehouse. Your customer service group has entered the order and now wants to release a shipment order to the warehouse.
1. Navigate to WAREHOUSE→ORDERS & CONTACTS→SALES ORDERS.
2. Enter a new sales order for The Cannon Group PLC. Enter one sales line with the following attributes:
Field Value Item No. 1992-W Reserve Never Build Kit Checked (yes) Location BLUE Quantity 10
3. Change the status of the sales order to Released by selecting
the Release option from the Functions button.
4. Select the Create Whse. Shipment option from the Functions button.
When this option is selected, a pop-up message appears:
FIGURE 5-2:
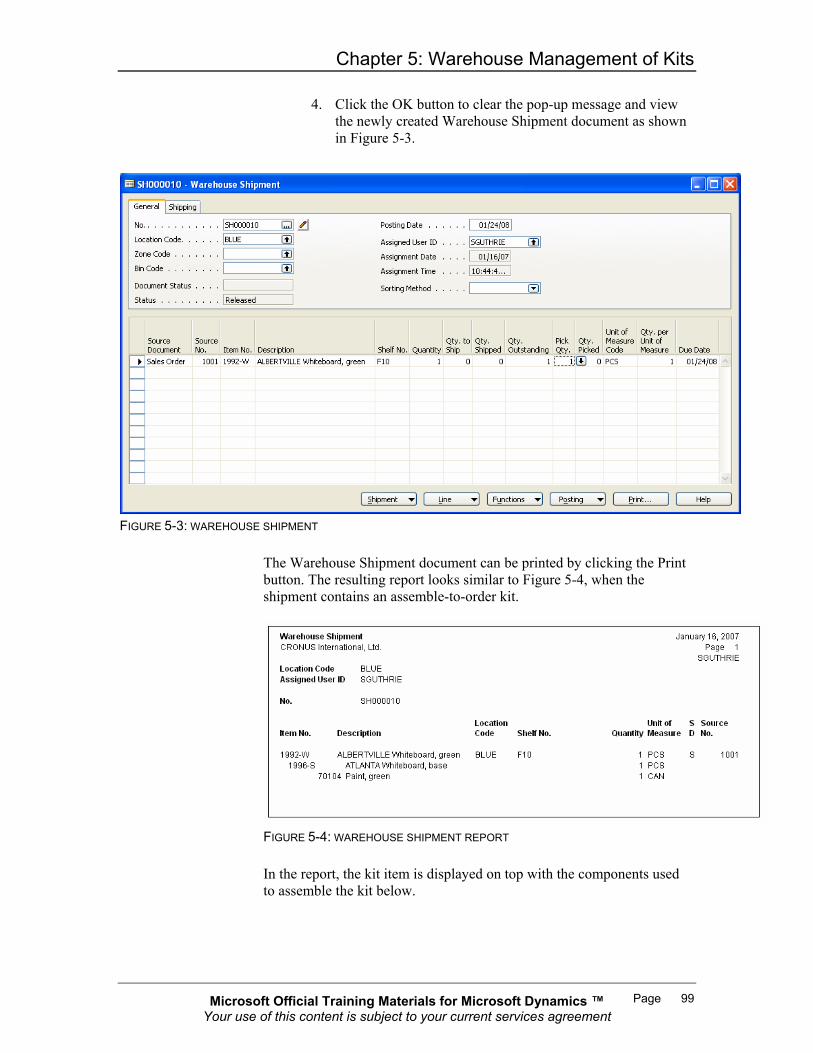
Microsoft Official Training Materials for Microsoft Dynamics ™ Your use of this content is subject to your current services agreement
Chapter 5: Warehouse Management of Kits
Page 99
4. Click the OK button to clear the pop-up message and view the newly created Warehouse Shipment document as shown in Figure 5-3.
FIGURE 5-3: WAREHOUSE SHIPMENT
The Warehouse Shipment document can be printed by clicking the Print button. The resulting report looks similar to Figure 5-4, when the shipment contains an assemble-to-order kit.
FIGURE 5-4: WAREHOUSE SHIPMENT REPORT In the report, the kit item is displayed on top with the components used to assemble the kit below.

Microsoft Official Training Materials for Microsoft Dynamics ™ Your use of this content is subject to your current services agreement
What's New in Dynamics NAV 5.0 - Local Functionality
Page 100
NOTE: If included as components on the Assembly BOM, Resources, Setup Resources, and Comments do not print on the Warehouse Shipment report.
Creating and Registering Picks Often, bins and zones are used with WMS.
• A bin is a unique area defined within the warehouse location. A bin might be a particular shelf in a particular cabinet, a shelf on one level in a row of pallet racking, or even an outlined spot on the floor.
• Zones are areas within a warehouse location with defined attributes or usage. For example, a food warehouse may have a special zone for product that must be kept frozen, or a particular zone might be used for receiving only. Bins can be assigned to a particular zone.
Bins and zones are an important part of space management and can be tagged with attributes that contribute to operating the warehouse efficiently. For example, some bins can be given priority over others when product is picked for order fulfillment. The need to pick product based on zone or bin attributes is why pick orders are generated. If the same item is located in various locations within a warehouse, pick orders can be used to tell the warehouse worker precisely where to pull kit components from. To create the pick order, navigate to the shipment order to be fulfilled then select the Create Picks option from the Functions menu. Once the pick is created, you can print a pick list report that warehouse personnel can use to pull material off the shelf. If bins are used, the pick list will direct the workers to pull from specific locations in the warehouse. Stock is not relieved from inventory until picks are registered. Finally, after all picks have been registered, the shipment can be posted.

Microsoft Official Training Materials for Microsoft Dynamics ™ Your use of this content is subject to your current services agreement
Chapter 5: Warehouse Management of Kits
Page 101
Demonstration − Creating and Registering Picks Scenario: Continuing in our previous demonstration, The Cannon Group PLC has ordered an ALBERTVILLE Whiteboard, green kit from your office supply company. Your company assembles these kits to orders using components stored in the BLUE warehouse. Your customer service group has entered the order and released a shipment order to the warehouse. The warehouse manager now wants to create pick orders for the components. After the picks are complete, the warehouse manager will register the picks to record the transfer of inventory.
1. If the shipment document is still on your screen from the last demonstration, proceed to step two. Otherwise, navigate to the shipment via:
WAREHOUSE →PLANNING & EXECUTION→SHIPMENTS. Use the AssistButton (F6) to find the appropriate shipment.
2. Create the pick by selecting the Create Picks option from the Functions button. A form like Figure 5-5 appears:
FIGURE 5-5: CREATE PICK
3. Click OK to continue. Navigate to WAREHOUSE→GOODS HANDLING MULTIPLE ORDERS→PICKS. Use the AssistButton (F6) to find the pick associated with the shipment previously entered. The Pick should look similar to Figure 5-6:

Microsoft Official Training Materials for Microsoft Dynamics ™ Your use of this content is subject to your current services agreement
What's New in Dynamics NAV 5.0 - Local Functionality
Page 102
FIGURE 5-6: WAREHOUSE PICK
4. It may be convenient to print a copy of the pick order to hand to warehouse personnel. This can be accomplished by clicking the Print button on the Warehouse Pick form. A sample of the printed pick is shown in Figure 5-7:
FIGURE 5-7: SAMPLE PICK LIST
NOTE: The Pick Worksheet can also be used to generate picks from a shipment. The Pick Worksheet is often used when generating a batch of picks at one time rather than order by order. It allows you to group picks by such things as item, customer, bin, or zone and/or limit the number of picks or source documents assigned to a warehouse worker.
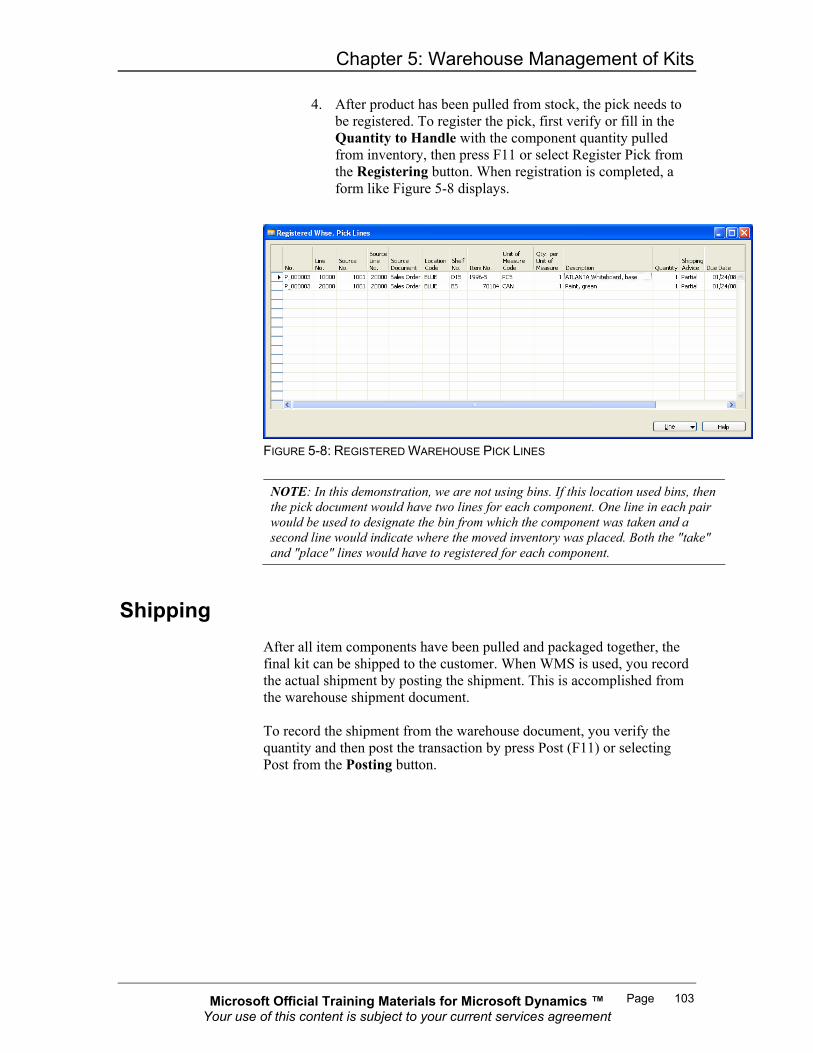
Microsoft Official Training Materials for Microsoft Dynamics ™ Your use of this content is subject to your current services agreement
Chapter 5: Warehouse Management of Kits
Page 103
4. After product has been pulled from stock, the pick needs to be registered. To register the pick, first verify or fill in the Quantity to Handle with the component quantity pulled from inventory, then press F11 or select Register Pick from the Registering button. When registration is completed, a form like Figure 5-8 displays.
FIGURE 5-8: REGISTERED WAREHOUSE PICK LINES
NOTE: In this demonstration, we are not using bins. If this location used bins, then the pick document would have two lines for each component. One line in each pair would be used to designate the bin from which the component was taken and a second line would indicate where the moved inventory was placed. Both the "take" and "place" lines would have to registered for each component.
Shipping After all item components have been pulled and packaged together, the final kit can be shipped to the customer. When WMS is used, you record the actual shipment by posting the shipment. This is accomplished from the warehouse shipment document. To record the shipment from the warehouse document, you verify the quantity and then post the transaction by press Post (F11) or selecting Post from the Posting button.
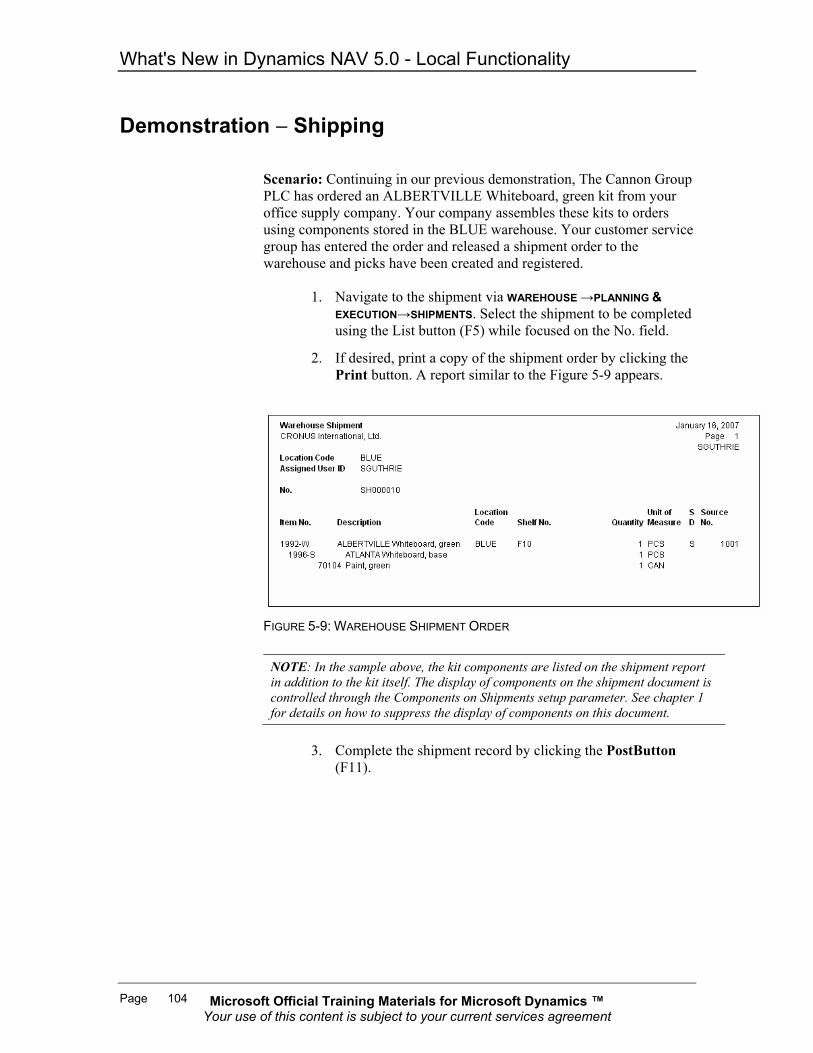
Microsoft Official Training Materials for Microsoft Dynamics ™ Your use of this content is subject to your current services agreement
What's New in Dynamics NAV 5.0 - Local Functionality
Page 104
Demonstration − Shipping Scenario: Continuing in our previous demonstration, The Cannon Group PLC has ordered an ALBERTVILLE Whiteboard, green kit from your office supply company. Your company assembles these kits to orders using components stored in the BLUE warehouse. Your customer service group has entered the order and released a shipment order to the warehouse and picks have been created and registered.
1. Navigate to the shipment via WAREHOUSE →PLANNING & EXECUTION→SHIPMENTS. Select the shipment to be completed using the List button (F5) while focused on the No. field.
2. If desired, print a copy of the shipment order by clicking the Print button. A report similar to the Figure 5-9 appears.
FIGURE 5-9: WAREHOUSE SHIPMENT ORDER
NOTE: In the sample above, the kit components are listed on the shipment report in addition to the kit itself. The display of components on the shipment document is controlled through the Components on Shipments setup parameter. See chapter 1 for details on how to suppress the display of components on this document.
3. Complete the shipment record by clicking the PostButton
(F11).

Microsoft Official Training Materials for Microsoft Dynamics ™ Your use of this content is subject to your current services agreement
Chapter 5: Warehouse Management of Kits
Page 105
Lab 5.1 − Warehouse Management of Kits Scenario: Sales for your office supply business have grown and you have added several stores plus a central warehouse. Orders are still entered at the stores, but fulfillment is now done by a dedicated staff at the warehouse which you have designated as the BLUE location. All kits are kept in component form and assembled into kits as part of order fulfillment.
Challenge Yourself! Enter an order for The Cannon Group PLC for 10 pieces of the INNSBRUCK Storage Unit/G.Door (part no. 1964-W) to be fulfilled from the BLUE location as an assemble-to-order kit. Create a warehouse shipment order from the sales order. Print or preview a copy of the shipment document. From the shipment order, create a pick order and print a pick list. Register the picks for all components. Finally, post the shipment for the order.
IMPORTANT NOTE: To accomplish this lab, you need to set up the BLUE location to Require Shipment and Require Pick. This is accomplished by navigating to the Warehouse tab on the WAREHOUSE→SETUP→LOCATIONS form. Ask for assistance if needed.
Need a Little Help?
1. Remember that you must select the Build Kit box to designate the sales line as assemble-to-order.
2. From the Sales Order, select the option Create Whse. Shipment from the Functions button to create a shipment.
3. You create picks from the Warehouse shipment by selecting the Create Picks option from the Functions button.
4. To register a pick, press F11 or select Register Pick from the Registering button.
5. Navigate to WAREHOUSE→PLANNING & EXECUTION→SHIPMENTS to find a shipment.

Microsoft Official Training Materials for Microsoft Dynamics ™ Your use of this content is subject to your current services agreement
What's New in Dynamics NAV 5.0 - Local Functionality
Page 106
Test Your Knowledge − Warehouse Management of Kits
1. Which of the following are typical warehouse processes:
a. Receiving purchased items. b. Handling items for internal distribution, movement, or
production. c. Picking and shipping items to customers. d. Transforming raw materials into finished products for
sale. e. Processing returns.
2. From what form/screen do you create a warehouse shipment
order?
3. True or False. If included as components on a kit BOM, resources and comments print on the Warehouse Shipment Report.
4. A warehouse worker confirms that they have pulled kit
components from the shelf by which of the following:
a. Updating the Quantity Shipped field on the sales order and posting the transaction by pressing F11.
b. Filling in the Quantity to Handle field on the warehouse pick and selecting the Register Pick option.
c. Selecting the pick in the Pick Worksheet, filling in the Quantity field, and posting the transaction by pressing F11.
5. The display of components on the shipment document is
controlled through which setup parameter?

Microsoft Official Training Materials for Microsoft Dynamics ™ Your use of this content is subject to your current services agreement
Chapter 5: Warehouse Management of Kits
Page 107
Conclusion Warehouse Management Systems (WMS) provides a formal process for receiving, handling, picking, and shipping product when resources need to be tightly managed. When kits are assembled and stocked ahead of need (built to stock) using the BOM Journal, kit orders are fulfilled just like other resale items. Receipt of purchased kits also follows the standard WMS receipt process. When kits are assembled from components at the time of order fulfillment, components must be identified on documents and in warehouse transactions.

Microsoft Official Training Materials for Microsoft Dynamics ™ Your use of this content is subject to your current services agreement
What's New in Dynamics NAV 5.0 - Local Functionality
Page 108
Quick Interaction: Lessons Learned Take a moment and write down three Key Points you have learned from this chapter: 1.
2.
3.

Microsoft Official Training Materials for Microsoft Dynamics ™ Your use of this content is subject to your current services agreement
Chapter 6: Reporting
Page 109
CHAPTER 6: REPORTING Objectives
The objectives are:
• BOM Movement • Order Pick Ticket • Kit Component – Statistics • Kit Availability • Kit/Component – Sales
Introduction The Kitting granule includes a few special reports that are designed specifically for kits and components. These reports, described in this section, can be used in conjunction with standard reports available in Microsoft Dynamics™ NAV.

Microsoft Official Training Materials for Microsoft Dynamics ™ Your use of this content is subject to your current services agreement
What's New in Dynamics NAV 5.0 - Local Functionality
Page 110
BOM Movement The BOM Movement report (shown in Figure 6-1) provides a break-down of kits assembled or disassembled through the BOM Journal. For each assembly or disassembly posting, the report lists the posting date of the transaction, the kit item, variant (if used) number of kits assembled or disassembled, and the unit of measure specified. If locations and bins are used, information on these fields is included. Similar information is provided for each component in the kit as well. The report may be run from the SALES & MARKETING→INVENTORY & PRICING→ REPORTS or WAREHOUSE→REPORTS→BILL OF MATERIALS.
FIGURE 6-1: BOM MOVEMENT REPORT
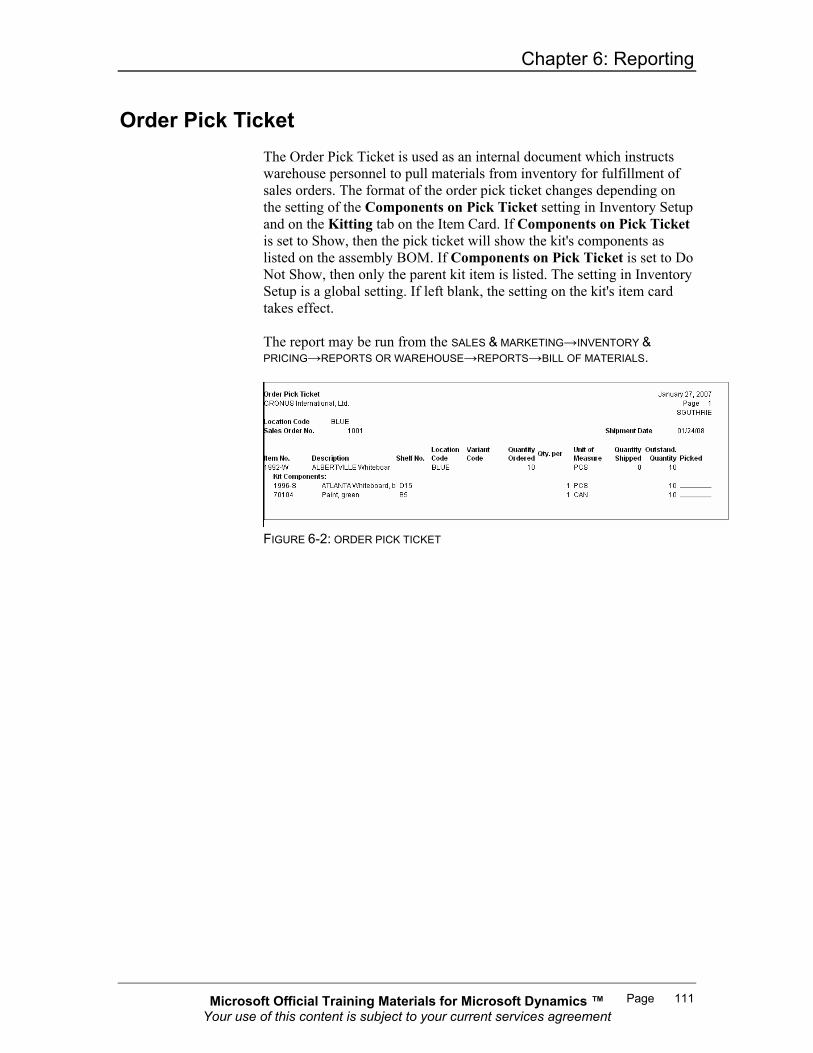
Microsoft Official Training Materials for Microsoft Dynamics ™ Your use of this content is subject to your current services agreement
Chapter 6: Reporting
Page 111
Order Pick Ticket The Order Pick Ticket is used as an internal document which instructs warehouse personnel to pull materials from inventory for fulfillment of sales orders. The format of the order pick ticket changes depending on the setting of the Components on Pick Ticket setting in Inventory Setup and on the Kitting tab on the Item Card. If Components on Pick Ticket is set to Show, then the pick ticket will show the kit's components as listed on the assembly BOM. If Components on Pick Ticket is set to Do Not Show, then only the parent kit item is listed. The setting in Inventory Setup is a global setting. If left blank, the setting on the kit's item card takes effect. The report may be run from the SALES & MARKETING→INVENTORY & PRICING→REPORTS OR WAREHOUSE→REPORTS→BILL OF MATERIALS.
FIGURE 6-2: ORDER PICK TICKET

Microsoft Official Training Materials for Microsoft Dynamics ™ Your use of this content is subject to your current services agreement
What's New in Dynamics NAV 5.0 - Local Functionality
Page 112
Kit Component − Statistics The Kit Component – Statistics report provides a summary sales listing for component items. For each component included in the report filter, the report shows the number sold as part of a kit and sold alone. As the sample report in Figre 6-3 shows, when the Show Kit Details option is selected, the sales statistics are detailed based on the parent kit item which the component was included in. The report may be run from the SALES & MARKETING→INVENTORY & PRICING→REPORTS MENU OR WAREHOUSE→REPORTS→BILL OF MATERIALS.
FIGURE 6-3: KIT COMPONENTS – STATISTICS REPORT WITH KIT DETAILS SHOWN
Kit Availability The Kit Availability report provides information on the availability of kits. If the Show Kit Details option is selected, the report lists the availability of the components making up the kit. For each kit or component, the report shows the:
• Gross requirements • Scheduled receipts • Planned order receipts • Total projected available including existing inventory • Unit cost
If the Show Kit Details option is selected, a note appears indicating whether or not each component is also used in other kits. The report may be run from SALES & MARKETING→INVENTORY & PRICING→REPORTS.

Microsoft Official Training Materials for Microsoft Dynamics ™ Your use of this content is subject to your current services agreement
Chapter 6: Reporting
Page 113
FIGURE 6-4: KIT AVAILABILITY REPORT SHOWING DETAILS
Kit/Component Sales Figure 6-5 shows the Kit/Component – Sales report. It provides sales contribution information for kit components. For each component, the report lists the number of components shipped and invoiced as part of each kind of kit, along with the unit and extended cost of the component within the kit. The report also shows the component's contribution towards each kit's sales and profit margin. The total margin on the parent kit is calculated based on the revenue and total cost applied to the kit at posting. Margin from the kit sale is allocated based on the percentage of the actual cost that the kit component represents for each sales line. For example, if the individual component cost is 10% of the total kit cost for a sales line, then 10% of the margin is allocated to that component. If the kit was shipped from stock or purchased ahead of time, then margins are allocated based on current component costs. Resource costs are considered during the calculation of margins and costs. The total cost of the kit includes the cost of the resources expended to ship it. Since margin is calculated as sales minus total cost, the resource costs are removed from the margin. Resources are also used in the calculation for component margin allocation. The report may be run from SALES & MARKETING→INVENTORY & PRICING→REPORTS OR WAREHOUSE→REPORTS→BILL OF MATERIALS.
FIGURE 6-5: KIT/COMPONENT – SALES REPORT

Microsoft Official Training Materials for Microsoft Dynamics ™ Your use of this content is subject to your current services agreement
What's New in Dynamics NAV 5.0 - Local Functionality
Page 114
Test Your Knowledge − Reporting
1. Which report would you use to provide warehouse personnel with a listing of kit components that should be pulled for an order?
2. Which report provides information on the margin contribution made by a component?
3. What option must be selected when running the Kit Component – Statistics report in order to see a break-down by parent kit?
4. To obtain a listing of components resulting from a disassembly, you would run which report?
5. Which report lists the gross requirements, scheduled receipts, planned order receipts, and total projected available components by kit?

Microsoft Official Training Materials for Microsoft Dynamics ™ Your use of this content is subject to your current services agreement
Chapter 6: Reporting
Page 115
Conclusion The Kitting feature includes several special reports which provide information on both parent kits and kit components. The BOM Movement report provides documentation on kit assembly and disassembly through the BOM Journal. The Order Pick Ticket includes modifications to show kit component information when used in conjunction with assemble-to-order kits. Similar to the existing Inventory Availability report, the Kit Availability report shows projected availability of kit items. When the Show Kit Details option is selected, the report lists the availability of the components making up the kit. The Kit Component – Statistics report provides an analysis of kit components and the parent kits in which they were sold. The Kit/Component – Sales report is an analysis of components and their margin contribution.
Microsoft Official Training Materials for Microsoft Dynamics ™ Your use of this content is subject to your current services agreement
What's New in Dynamics NAV 5.0 - Local Functionality
Page 116
Quick Interaction: Lessons Learned Take a moment and write down three Key Points you have learned from this chapter: 1.
2.
3.

Microsoft Official Training Materials for Microsoft Dynamics ™ Your use of this content is subject to your current services agreement
Chapter 7: Kitting and Other Features
Page 117
CHAPTER 7: KITTING AND OTHER FEATURES Objectives
The objectives are to understand:
• How Kits are Purchased • How Kits work with Planning • How kits function with Production Orders • Which features do not support kit items
Introduction Due to their nature, Kit items are handled differently through-out Microsoft Dynamics™ NAV. This chapter discusses how Kitting works with other granules in the product.

Microsoft Official Training Materials for Microsoft Dynamics ™ Your use of this content is subject to your current services agreement
What's New in Dynamics NAV 5.0 - Local Functionality
Page 118
Purchasing Kit items can be purchased and received as pre-assembled kits. It is possible to link a sales line for a kit to a purchase order as a drop shipment or special order. In this situation, a kit item is considered a normal item. Issuing a purchase order for a kit item, but listing the components on the purchase order document is not supported, however an Explode BOM function is available when entering a kit on a purchase order. The Explode BOM function converts the line containing the original kit item to a comment, and adds a series of new lines based on the kit's assembly BOM. Component items are still purchased and received as individual items, which can then be assembled and placed into stock as finished kits using the BOM Journal.
Order Planning and Planning Worksheet You can use the Order Planning and Planning Worksheet features to identify demands for kit items and suggest replenishment. The planning functionality works differently depending on whether the Build Kit box is selected on the sales order line or not. If Build Kit is selected, indicating that the kit is to be assembled to order at the time of fulfillment, then Planning suggests the need for items in the kit's assembly BOM. However, if Build Kit is not selected, indicating that the kit is to be built to stock ahead of fulfillment, then Planning suggests the need for final kit item. While you can use Order Planning to identify the need for both assemble-to-order kits and build-to-stock kits, the Make Orders function only works with items that have a replenishment system of Purchase. Order Planning suggests kit items be replenished through a production order and you cannot use a production order to create a kit. Similar restrictions apply to the Planning Worksheet. While the Planning Worksheet identifies the needs for both kinds of kits, you cannot select the Accept Action Message field for kit items with a replenishment system of Prod. Order.

Microsoft Official Training Materials for Microsoft Dynamics ™ Your use of this content is subject to your current services agreement
Chapter 7: Kitting and Other Features
Page 119
Production Orders Kit items may not be replenished through a production order. An error message is displayed if you try to enter a production order for a kit item. Kit items must be purchased, assembled through the BOM Journal, or assembled as part of the order fulfillment process. It is possible to include a kit item in the bill of materials for another manufactured item, and even post consumption of the kit item as part of producing the parent part. In such situations however, the kit item is treated the same as other raw materials and deducted from inventory as a complete item rather than a set of components.
Commerce Gateway and Biztalk There is no support for Kitting within Commerce Gateway or the Biztalk Document Transfer areas. When a user attempts to send an order via Biztalk and the Build Kit box is selected on the kit item, an error displays.
Service Management There is no special support for Kitting within Service Management. Kit items may be used as service items and loaners, and may appear on orders, but are treated no differently than other items; no support for components exists.

Microsoft Official Training Materials for Microsoft Dynamics ™ Your use of this content is subject to your current services agreement
What's New in Dynamics NAV 5.0 - Local Functionality
Page 120
Test Your Knowledge − Kitting and Other Features
1. True or False. When creating a purchase order for a kit item, you can view the components in the kit through the Kit Lines option under the Lines button.
2. Which of the following is true when Build Kit is selected while running Order Planning:
a. Planning will suggest the need for final kit items. b. Planning will suggest the need for components, but not
the parent kit.
3. Which of the following are correct regarding Order Planning:
a. You can use the Make Orders function to establish purchase orders for kit items or kit components.
b. Order Planning will suggest kit items be replenished through the BOM Journal.
c. You select the Accept Action Message field to create kits items with a replenishment system of Prod. Order.
d. Order Planning will not suggest replenishment of kit items.
4. What happens if you try to enter a production order for a kit
item?
5. True or False. You can post consumption of a kit item as manufacturing another item.
Microsoft Official Training Materials for Microsoft Dynamics ™ Your use of this content is subject to your current services agreement
Chapter 7: Kitting and Other Features
Page 121
Conclusion Although Kitting affects the functionality of some features within Microsoft Dynamics NAV, many functions remain unaffected. Kits may be purchased as finished items just like any other item. If desired, the Explode BOM function may be used on a kit to replace the parent kit item with individual components, however the components purchased are not tied to the kit. The Order Planning and Planning Worksheet features identify demands for kit items and suggest replenishment. The planning functionality works differently depending on whether the Build Kit box is selected on the sales order line or not.
• If Build Kit is not selected, then Planning works as it would for any other item.
• If Build Kit is selected, Planning will suggest the need for components.
Although kits and manufactured items both have a bill-of-materials, you cannot produce kits through a production order. There is no support for kits in Commerce Gateway and Biztalk document transfer areas, nor is there any special support for Kitting within Service Management.

Microsoft Official Training Materials for Microsoft Dynamics ™ Your use of this content is subject to your current services agreement
What's New in Dynamics NAV 5.0 - Local Functionality
Page 122
Quick Interaction: Lessons Learned Take a moment and write down three Key Points you have learned from this chapter: 1.
2.
3.

Microsoft Official Training Materials for Microsoft Dynamics ™ Your use of this content is subject to your current services agreement
Appendix A: Answers to Test Your Knowledge
Page 123
APPENDIX A: ANSWERS TO TEST YOUR KNOWLEDGE Chapter 1 – Setting Up Kitting
1. Which sentence best describes Kitting:
a. The process by which individual components are grouped or packaged together to create a single item for sale.
b. The transformation of raw materials into a finished good for sale.
2. Fill in the blank. A key distinction between Kitting and
Manufacturing is that finished kits may be Disassembled back into individual components.
3. Which of the following is not a benefit derived from the fact that manufactured items and kit items share the use of the use of the Production BOM table:
a. The same costing routines are used for both Production and Kitting.
b. Kit BOMs can be used in Production Orders. c. Forecasting and MRP calculations consider both kits and
their components.
4. Which field on the kit item card should be left selected if the kit will generally be assembled at the time of order fulfillment?
Automatic Build Kit BOM
5. Where are number series for Kit BOMs established?
The Numbering tab on the WAREHOUSE→SETUP→INVENTORY SETUP FORM
6. The setting which defines whether or not components appear
on pick tickets for assemble-to-order items is found in which two places?
The Kitting tab on the WAREHOUSE→SETUP→INVENTORY SETUP FORM AND THE ITEM CARD

Microsoft Official Training Materials for Microsoft Dynamics ™ Your use of this content is subject to your current services agreement
What's New in Dynamics NAV 5.0 - Local Functionality
Page 124
7. The setting which defines whether or not components appear
on invoices appears in which of the following:
a. Item Card b. Inventory Setup c. Sales & Receivables Setup d. Customer Card
8. True or False. Dimensions for component transactions
default from the parent kit item, but may be edited.
False. Dimensions do default from the parent item, but may NOT be edited.
Chapter 2 − Creating Kits
1. Name the two basic ways kits can be processed.
a. Built to Stock b. Assembled to Order
2. What is one basic difference between a BOM for a kit and a
BOM for manufactured item.
Manufacturing BOMs may be multiple levels deep, Kit BOMs can be one level deep only. In other words, a Manufactured BOM may refer to another BOM as a component. Kit BOMs are limited to items, resources, setup resources, and comments.
3. A kit BOM may contain all of the following types of
components except:
• Items • Resources • Setup Resources • Another Kit BOM • A Comment
4. What feature would you use if you wanted to create a new
kit BOM that was similar to an existing one.
Copy BOM

Microsoft Official Training Materials for Microsoft Dynamics ™ Your use of this content is subject to your current services agreement
Appendix A: Answers to Test Your Knowledge
Page 125
5. Before a Kit BOM can be used, its status must be changed to
what?
Certified
6. What does the Calc. Standard Cost function on the Item Card
do?
It rolls up (totals) the cost of all components and updates the unit cost on the unit cost on the kit item accordingly.
7. True or False. The BOM Journal is used to record the
building of Assemble-to-Order kits.
False. The BOM Journal is used to a record the building of Build-to-stock kits.
Chapter 3 − Kit Disassembly
1. Which of the following statements are accurate in regard to processing returns for kits:
– Kits may be returned to inventory as an end item. – Kits may be returned to stock as individual
components – Kits may be returned to inventory as an end item,
and then be broken down into components.
2. When you return kit components directly to stock using a credit memo you must use which option on the Functions button?
Explode BOM
3. To break a finished kit back down into components, you would use which journal?
The BOM Journal
4. Why is a separate BOM for disassembly provided?
To account for components which may not be usable after disassembly and to account for costs specific to disassembly.
Microsoft Official Training Materials for Microsoft Dynamics ™ Your use of this content is subject to your current services agreement
What's New in Dynamics NAV 5.0 - Local Functionality
Page 126
5. Which of the following are considered costs of disassembly?
– Components in the assembly BOM of type "item" that do not exist in the disassembly BOM.
– Components in the disassembly BOM of type "item" that do not exist in the assembly BOM.
– Any component in the disassembly BOM that is not of type "item".
– Any component in the assembly BOM that is not of type "item".
Chapter 4 − Order Processing with Kitting
1. If a kit item is to be "shipped from stock" as a pre-assembled item, the Build Kit field should be unchecked?
2. The customer has ordered 10 kits. You have seven completed kits in stock, but enough components to build the remaining three. What is the best way to indicate on a sales order that you want to ship seven kits from stock and assemble the remaining three kits as part of the fulfillment process?
Create two sales lines for the item. On the first sales line, leave the Build Kit box clear and se the quantity to seven. On the second line, select the Build Kit box and set the quantity to three.
3. What function on a sales order line converts a kit item to a
list of components with each component listed on a separate sales order line?
Explode BOM
4. If you wanted to add or remove a kit component for one
particular order, how would you do so?
Within the Sales Order, select the Kit Lines option from the Line button. Add/remove the component from the kit lines form.
5. If the Build Kit box is selected, the Reserve field must be
set to Never.
6. True or False. Both kits and kit components can be assigned lot numbers.
True

Microsoft Official Training Materials for Microsoft Dynamics ™ Your use of this content is subject to your current services agreement
Appendix A: Answers to Test Your Knowledge
Page 127
7. By default, the unit cost for a kit comes from where?
The unit cost listed on the kit item's Item Card.
8. What is the difference between the Roll up cost and Roll up
price functions.
Roll up Cost sets the unit cost for the kit item based on the total cost of all Kit Lines components. Roll up Price sets the unit price for the kit item based on the total cost of all Kit Lines components.
9. If the Build Kit box is not selected and the Components on
Sales Order field is set to Show, will components be listed on order confirmations?
No.
10. How can you print a pick ticket listing kit components without using the warehouse granule?
From the Sales Order form, use the Pick Ticket option available under the Print button.
11. If the Build Kit box is selected, the Components on
Shipments field on the Inventory Setup form is set to Do not Show, and the Components on Shipments field on the Item card is set to Show will components be listed on packing slips?
Yes
12. True or False. No special process is required for invoicing
kit items.
True

Microsoft Official Training Materials for Microsoft Dynamics ™ Your use of this content is subject to your current services agreement
What's New in Dynamics NAV 5.0 - Local Functionality
Page 128
Chapter 5 − Warehouse Management of Kits
1. Which of the following are typical warehouse processes:
– Receiving purchased items – Handling items for internal distribution, movement,
or production. – Picking and shipping items to customers. – Transforming raw materials into finished products for
sale. – Processing returns.
2. From what form/screen do you create a warehouse shipment
order?
Sales Orders
3. True or False. If included as components on a kit BOM, resources and comments print on the Warehouse Shipment Report.
False
4. A warehouse worker confirms that they have pulled kit components from the shelf by which of the following:
– Updating the Quantity Shipped field on the sales order
and posting the transaction by pressing F11. – Filling in the Quantity to Handle field on the
warehouse pick and using the "Register Pick" option. – Selecting the pick in the Pick Worksheet, filling in the
Quantity field, and posting the transaction by pressing F11.
5. The display of components on the shipment document is
controlled through which setup parameter?
Components on Shipments

Microsoft Official Training Materials for Microsoft Dynamics ™ Your use of this content is subject to your current services agreement
Appendix A: Answers to Test Your Knowledge
Page 129
Chapter 6 − Reporting
1. Which report would you use to provide warehouse personnel with a listing of kit components that should be pulled for an order?
Order Pick Ticket
2. Which report provides information on the margin
contribution made by a component?
Kit/Component Sales
3. What option must be checked when running the Kit
Component – Statistics report in order to see a break-down by parent kit?
Show Kit Details
4. To obtain a listing of components resulting from a
disassembly, you would run which report?
BOM Movement
5. Which report lists the gross requirements, scheduled
receipts, planned order receipts, and total projected available components by kit?
Kit Availability

Microsoft Official Training Materials for Microsoft Dynamics ™ Your use of this content is subject to your current services agreement
What's New in Dynamics NAV 5.0 - Local Functionality
Page 130
Chapter 7 − Kitting and Other Features
1. True or False. When creating a purchase order for a kit item, you can view the components in the kit through the Kit Lines option under the Lines button.
False. Kit Lines are not available on purchase orders.
2. Which of the following is true when Build Kit is selected
while running Order Planning:
– Planning will suggest the need for final kit items. – Planning will suggest the need for components, but
not the parent kit.
3. Which of the following are correct regarding Order Planning:
– You can use the Make Orders function to establish
purchase orders for kit items or kit components. – Order Planning will suggest kit items be replenished
through the BOM Journal. – You check the Accept Action Message field to create
kits items with a replenishment system of "Prod. Order". – Order Planning will not suggest replenishment of kit
items.
4. What happens if you try to enter a production order for a kit item?
An error message will be displayed.
5. True or False. You can post consumption of a kit item as
manufacturing another item.
True

Microsoft Official Training Materials for Microsoft Dynamics ™ Your use of this content is subject to your current services agreement
Appendix B: Solutions to Labs
Page 131
APPENDIX B: SOLUTIONS TO LABS
Lab 2.1 − Creating a Kit BOM
Solution
1. Navigate to WAREHOUSE→PLANNING & EXECUTION→KIT BOM.
2. Press F3 to insert a new kit BOM.
3. Enter A-GAMEPC in No. field and Assembly BOM in the Description field.
4. Enter PCS into the Unit of Measure Code field.
5. Navigate to the lines section of the form. Enter each item and resource on a separate line as listed in the table. Leave the Type and No. fields empty when entering the comment.
6. Navigate back to the header section of the form.
7. While in the Status field, use the AssistButton (F6) to select Certified from the drop-down menu.
8. Move to the No. field in the header section.
9. Press F3 to insert a new kit BOM. Enter D-GAMEPC in No. field and Disassembly BOM in the description.
10. Use the mouse, or press ALT-U to open the Functions button. Select Copy BOM from the drop-down.
11. Select A-GAMEPC from the list of BOMs.
12. Navigate to the comment line in the lines section of the form. Press F4 to delete the comment. Change the No. on the resource line that says "Mark" to "Mary."
13. Navigate back to the header section of the form.
14. While in the Status field, use the AssistButton (F6) to select Certified from the drop-down menu.

Microsoft Official Training Materials for Microsoft Dynamics ™ Your use of this content is subject to your current services agreement
What's New in Dynamics NAV 5.0 - Local Functionality
Page 132
Lab 2.2 − Creating a Kit Item
Solution
1. Navigate to WAREHOUSE→PLANNING & EXECUTION→ITEMS.
2. Insert a new, empty item by pressing F3.
3. Enter 8918-W into the No. field and change the description to Computer – Gaming Package.
4. Move to the Base Unit of Measure field. Press F6 twice. Select PCS and click the OK button. Click the OK button on the Item Units of Measure form.
5. Navigate to the Invoicing tab.
6. Move to the Costing Method field. Press F6 and select Standard from the list of options.
7. Move to the Gen. Prod. Posting Group field. Press F6 and select RETAIL from the list of options.
8. Move to the VAT Prod. Posting Group field. Press F6 and select VAT25 from the list of options.
9. Move to the Inventory Prod. Posting Group field. Press F6 and select RESALE from the list of options.
10. Navigate to the Kitting tab.
11. Move to the Kit BOM No. field. Enter A-GAMEPC.
12. Move to the Disassembly Kit BOM No. field. Enter D-GAMEPC.

Microsoft Official Training Materials for Microsoft Dynamics ™ Your use of this content is subject to your current services agreement
Appendix B: Solutions to Labs
Page 133
Lab 2.3 − Building and Stocking Kits with the BOM Journal
Solution
1. Navigate to WAREHOUSE→INVENTORY→BOM JOURNALS.
2. Move to the lines section of the BOM Journal.
3. Press F3 to insert a new line.
4. While in the Entry Type field, press F6 and select Assembly from the options list.
5. Move to the Item No. field. Enter 766BC-B.
6. Move to the Location Code field. Press F6 and select BLUE from the list of options.
7. Move to the Quantity field. Enter 2 in the field.
8. Press the F11 button to post the entry.
Lab 3.1 − Return a Kit
Solution
1. Navigate to SALES & MARKETING→ORDER PROCESSING→CREDIT MEMOS.
2. Press F3 to insert a new credit memo.
3. Move to the Sell-to Customer No. field. Press F6 and select The Cannon Group PLC from the list shown.
4. Move to the lines section of the form.
5. Move to the Type field. Press F6 and select Item from the options listed.
6. Move to the No. field. Enter 8908-W in the field.
7. Move to the Quantity field. Enter 1 in the field.
8. Select Explode BOM from the Functions button.
9. Press F11 to post the transaction.
Microsoft Official Training Materials for Microsoft Dynamics ™ Your use of this content is subject to your current services agreement
What's New in Dynamics NAV 5.0 - Local Functionality
Page 134
Lab 3.2 − Kit Disassembly using the BOM Journal Solution
1. Navigate to WAREHOUSE→INVENTORY→BOM JOURNALS.
2. Move to the lines section of the BOM Journal.
3. Press F3 to insert a new line.
4. While in the Entry Type field, press F6 and select Disassembly from the options list.
5. Move to the Item No. field. Enter 1928-W.
6. Move to the Location Code field. Press F6 and select YELLOW from the list of options.
7. Move to the Quantity field. Enter 20 in the field.
8. Press the F11 button to post the entry.
Microsoft Official Training Materials for Microsoft Dynamics ™ Your use of this content is subject to your current services agreement
Appendix B: Solutions to Labs
Page 135
Lab 4.1 − Processing a Kit Order Solution
1. Navigate to SALES & MARKETING→ORDER PROCESSING→ORDERS.
2. Press F3 to insert a new order.
3. Move to the Sell-to Customer No. field on the General tab. Press F6 and select John Haddock Insurance Co. from the list of customers.
4. Navigate to the Location Code field on the Shipping tab. Press F6 and select BLUE from the list of locations.
5. Move to the lines section of the form. Press F3 to insert a new line.
6. Move to the Type field. Press F6 and select Item from the list of options.
7. Move to the No. field. Press F6 and select the item corresponding to CHAMONIX Base Storage Unit from the list of items.
8. Move to the Build Kit field. If it is selected, clear it, otherwise continue to the next step.
9. Move to the Quantity field. Enter 10 in the field.
10. Press F3 to insert a new line.
11. Move to the Type field. Press F6 and select Item from the list of options.
12. Move to the No. field. Press F6 and select the item corresponding to CHAMONIX Base Storage Unit from the list of items.
13. Move to the Reserve field. Press F6 and select Never from the list of options.
14. Move to the Build Kit field. If it is clear, select it, otherwise continue to the next step.
15. Move to the Quantity field. Enter 40 in the field.
16. Select Order Confirmation from the Print button. Select Preview to view the report on screen.
17. Select Pick Ticket from the Print button. Select Preview to view the report on screen.
18. Move to the Qty. to Ship field on the first line. Verify that it is sent to 10. Repeat for the second line and verify that it is set to 40.
19. Press F11 to post the transaction.

Microsoft Official Training Materials for Microsoft Dynamics ™ Your use of this content is subject to your current services agreement
What's New in Dynamics NAV 5.0 - Local Functionality
Page 136
Lab 4.2 − Order Promising Solution
1. Navigate to SALES & MARKETING→INVENTORY & PRICING→ITEMS.
2. Use the AssistButton (F6) from the No. field to select item number 80003.
3. Select the Replenishment Tab. Enter 1W in the Lead Time Calculation field.
4. Navigate to Sales & Marketing→Order Processing→Orders.
5. Press F3 to insert a new order.
6. Move to the Sell-to Customer No. field on the General tab. Press F6 and select The Cannon Group PLC from the list of customers.
7. Move to the Promised Delivery Date field. Enter a date three days beyond the work date being used.
8. Navigate to the Location Code field on the Shipping tab. Press F6 and select BLUE from the list of locations.
9. Move to the lines section of the form. Press F3 to insert a new line.
10. Move to the Type field. Press F6 and select Item from the list of options.
11. Move to the No. field. Press F6 and select item no. 8912-W from the list of items.
12. Move to the Build Kit field. If it is clear, select it, otherwise continue to the next step.
13. Move to the Quantity field. Enter 10 in the field.
14. Select Order Promising from the Line button.
15. Select Capable-to-Promise from the Calculate button.
16. Note the date furthest out in the Earliest Shipment Date column.

Microsoft Official Training Materials for Microsoft Dynamics ™ Your use of this content is subject to your current services agreement
Appendix B: Solutions to Labs
Page 137
Lab 5.1 − Warehouse Management of Kits Solution
1. Navigate to WAREHOUSE→ORDERS & CONTACTS→SALES ORDERS.
2. Press F3 to insert a new order.
3. Move to the Sell-to Customer No. field on the General tab. Press F6 and select The Cannon Group PLC from the list of customers.
4. Navigate to the Location Code field on the Shipping tab. Press F6 and select BLUE" from the list of locations.
5. Move to the lines section of the form. Press F3 to insert a new line.
6. Move to the Type field. Press F6 and select Item from the list of options.
7. Move to the No. field. Press F6 and select item 1964-W from the list of items.
8. Move to the Build Kit field. If it is clear, select it, otherwise continue to the next step.
9. Move to the Quantity field. Enter 10 in the field.
10. Select Release from the Functions button.
11. Select Create Whse. Shipment from the Functions button.
12. Click OK to clear the shipment header message.
13. From the Warehouse Shipment document, click the Print button. From the print form, click Preview to view the shipment document on screen.
14. Press the ESC button to close the preview and return to the shipment document.
15. Select Create Pick from the Functions button.
16. Click OK when the Whse.-Shipment – Create Pick form appears.
17. Note the pick number when the pick creation notification appears. Click OK to clear the dialog box.
18. Navigate to WAREHOUSE→GOODS HANDLING MULTIPLE ORDERS→PICKS.
19. From the No. field, use the ListButton (F5) to display a list of picks. Select the pick number created in step 15.
20. Click the Print button. On the print options form, click the Preview button to view the pick list. Press the ESC key to close the preview when ready.
Microsoft Official Training Materials for Microsoft Dynamics ™ Your use of this content is subject to your current services agreement
What's New in Dynamics NAV 5.0 - Local Functionality
Page 138
21. Press F11 to register the pick.
22. Navigate to WAREHOUSE→PLANNING & EXECUTION→SHIPMENTS.
23. From the No. field, use the ListButton (F5) to display a list of shipments. Select the shipment noted in step 11.
24. Press F11 to post the shipment. Select the Ship option from the Post option form and click OK.