
What is Pictometry? Opening Images in a Workspace...
4
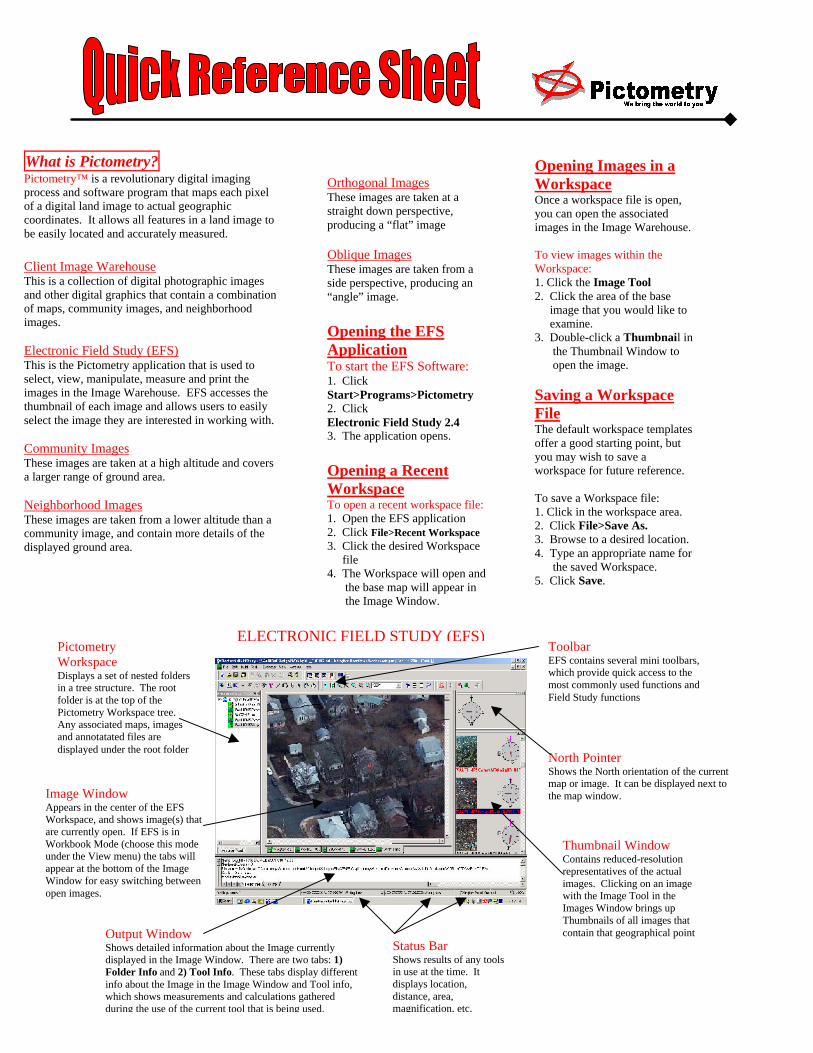
What is Pictometry? Pictometry™ is a revolutionary digital imaging process and software program that maps each pixel of a digital land image to actual geographic coordinates. It allows all features in a land image to be easily located and accurately measured. Client Image Warehouse This is a collection of digital photographic images and other digital graphics that contain a combination of maps, community images, and neighborhood images. Electronic Field Study (EFS) This is the Pictometry application that is used to select, view, manipulate, measure and print the images in the Image Warehouse. EFS accesses the thumbnail of each image and allows users to easily select the image they are interested in working with. Community Images These images are taken at a high altitude and covers a larger range of ground area. Neighborhood Images These images are taken from a lower altitude than a community image, and contain more details of the displayed ground area. Orthogonal Images These images are taken at a straight down perspective, producing a “flat” image Oblique Images These images are taken from a side perspective, producing an “angle” image. Opening the EFS Application To start the EFS Software: 1. Click Start>Programs>Pictometry 2. Click Electronic Field Study 2.4 3. The application opens. Opening a Recent Workspace To open a recent workspace file: 1. Open the EFS application 2. Click File>Recent Workspace 3. Click the desired Workspace file 4. The Workspace will open and the base map will appear in the Image Window. Opening Images in a Workspace Once a workspace file is open, you can open the associated images in the Image Warehouse. To view images within the Workspace: 1. Click the Image Tool 2. Click the area of the base image that you would like to examine. 3. Double-click a Thumbnail in the Thumbnail Window to open the image. Saving a Workspace File The default workspace templates offer a good starting point, but you may wish to save a workspace for future reference. To save a Workspace file: 1. Click in the workspace area. 2. Click File>Save As. 3. Browse to a desired location. 4. Type an appropriate name for the saved Workspace. 5. Click Save. Thumbnail Window Contains reduced-resolution representatives of the actual images. Clicking on an image with the Image Tool in the Images Window brings up Thumbnails of all images that contain that geographical point Pictometry Workspace Displays a set of nested folders in a tree structure. The root folder is at the top of the Pictometry Workspace tree. Any associated maps, images and annotatated files are displayed under the root folder Toolbar EFS contains several mini toolbars, which provide quick access to the most commonly used functions and Field Study functions North Pointer Shows the North orientation of the current map or image. It can be displayed next to the map window. Image Window Appears in the center of the EFS Workspace, and shows image(s) that are currently open. If EFS is in Workbook Mode (choose this mode under the View menu) the tabs will appear at the bottom of the Image Window for easy switching between open images. Output Window Shows detailed information about the Image currently displayed in the Image Window. There are two tabs: 1) Folder Info and 2) Tool Info. These tabs display different info about the Image in the Image Window and Tool info, which shows measurements and calculations gathered during the use of the current tool that is being used. Status Bar Shows results of any tools in use at the time. It displays location, distance, area, magnification, etc. ELECTRONIC FIELD STUDY (EFS)
Transcript of What is Pictometry? Opening Images in a Workspace...
What is Pictometry? Pictometry™ is a revolutionary digital imaging process and software program that maps each pixel of a digital land image to actual geographic coordinates. It allows all features in a land image to be easily located and accurately measured. Client Image Warehouse This is a collection of digital photographic images and other digital graphics that contain a combination of maps, community images, and neighborhood images. Electronic Field Study (EFS) This is the Pictometry application that is used to select, view, manipulate, measure and print the images in the Image Warehouse. EFS accesses the thumbnail of each image and allows users to easily select the image they are interested in working with. Community Images These images are taken at a high altitude and covers a larger range of ground area. Neighborhood Images These images are taken from a lower altitude than a community image, and contain more details of the displayed ground area.
Orthogonal Images These images are taken at a straight down perspective, producing a “flat” image Oblique Images These images are taken from a side perspective, producing an “angle” image. Opening the EFS Application To start the EFS Software: 1. Click Start>Programs>Pictometry 2. Click Electronic Field Study 2.4 3. The application opens. Opening a Recent Workspace To open a recent workspace file: 1. Open the EFS application 2. Click File>Recent Workspace 3. Click the desired Workspace file 4. The Workspace will open and the base map will appear in the Image Window.
Opening Images in a Workspace Once a workspace file is open, you can open the associated images in the Image Warehouse. To view images within the Workspace: 1. Click the Image Tool 2. Click the area of the base image that you would like to examine. 3. Double-click a Thumbnail in the Thumbnail Window to open the image. Saving a Workspace File The default workspace templates offer a good starting point, but you may wish to save a workspace for future reference. To save a Workspace file: 1. Click in the workspace area. 2. Click File>Save As. 3. Browse to a desired location. 4. Type an appropriate name for the saved Workspace. 5. Click Save.
Thumbnail Window Contains reduced-resolution representatives of the actual images. Clicking on an image with the Image Tool in the Images Window brings up Thumbnails of all images that contain that geographical point
Pictometry Workspace Displays a set of nested folders in a tree structure. The root folder is at the top of the Pictometry Workspace tree. Any associated maps, images and annotatated files are displayed under the root folder
Toolbar EFS contains several mini toolbars, which provide quick access to the most commonly used functions and Field Study functions
North Pointer Shows the North orientation of the current map or image. It can be displayed next to the map window.
Image Window Appears in the center of the EFS Workspace, and shows image(s) that are currently open. If EFS is in Workbook Mode (choose this mode under the View menu) the tabs will appear at the bottom of the Image Window for easy switching between open images.
Output Window Shows detailed information about the Image currently displayed in the Image Window. There are two tabs: 1) Folder Info and 2) Tool Info. These tabs display different info about the Image in the Image Window and Tool info, which shows measurements and calculations gathered during the use of the current tool that is being used.
Status Bar Shows results of any tools in use at the time. It displays location, distance, area, magnification, etc.
ELECTRONIC FIELD STUDY (EFS)
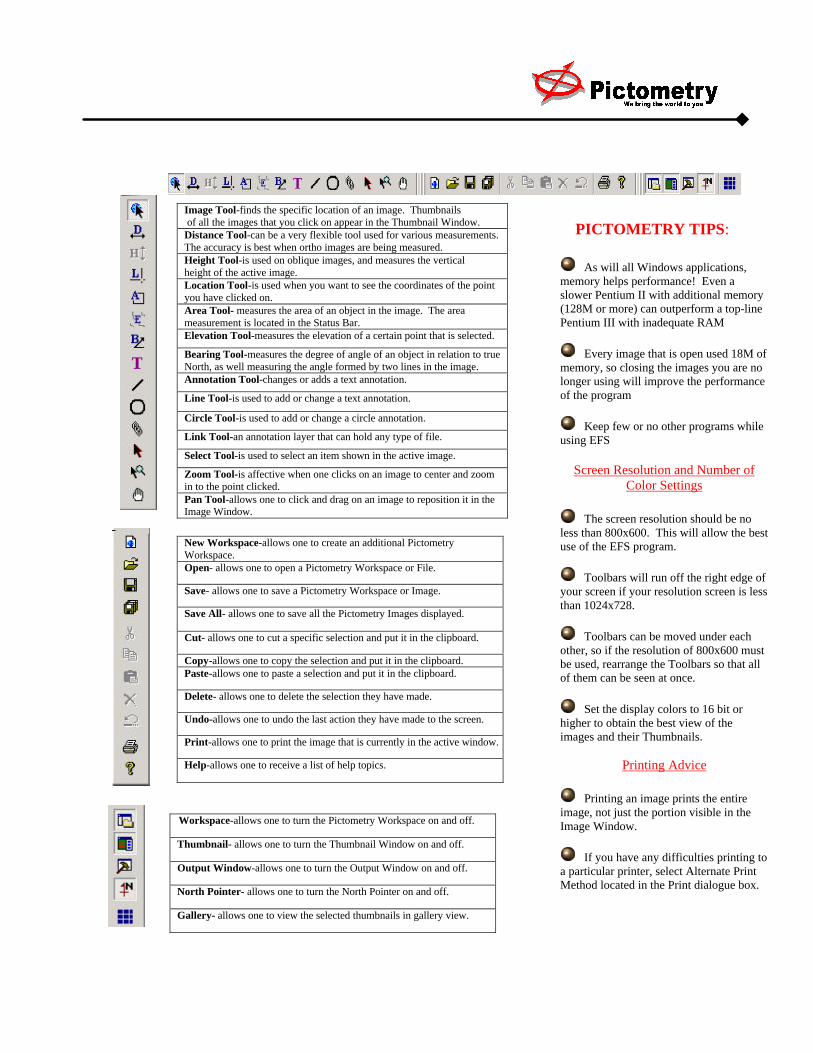
Image Tool-finds the specific location of an image. Thumbnails of all the images that you click on appear in the Thumbnail Window. Distance Tool-can be a very flexible tool used for various measurements. The accuracy is best when ortho images are being measured. Height Tool-is used on oblique images, and measures the vertical height of the active image. Location Tool-is used when you want to see the coordinates of the point you have clicked on. Area Tool- measures the area of an object in the image. The area measurement is located in the Status Bar. Elevation Tool-measures the elevation of a certain point that is selected.
Bearing Tool-measures the degree of angle of an object in relation to true North, as well measuring the angle formed by two lines in the image. Annotation Tool-changes or adds a text annotation.
Line Tool-is used to add or change a text annotation.
Circle Tool-is used to add or change a circle annotation.
Link Tool-an annotation layer that can hold any type of file.
Select Tool-is used to select an item shown in the active image.
Zoom Tool-is affective when one clicks on an image to center and zoom in to the point clicked. Pan Tool-allows one to click and drag on an image to reposition it in the Image Window.
New Workspace-allows one to create an additional Pictometry Workspace. Open- allows one to open a Pictometry Workspace or File.
Save- allows one to save a Pictometry Workspace or Image.
Save All- allows one to save all the Pictometry Images displayed.
Cut- allows one to cut a specific selection and put it in the clipboard.
Copy-allows one to copy the selection and put it in the clipboard. Paste-allows one to paste a selection and put it in the clipboard.
Delete- allows one to delete the selection they have made.
Undo-allows one to undo the last action they have made to the screen.
Print-allows one to print the image that is currently in the active window.
Help-allows one to receive a list of help topics.
Workspace-allows one to turn the Pictometry Workspace on and off.
Thumbnail- allows one to turn the Thumbnail Window on and off.
Output Window-allows one to turn the Output Window on and off.
North Pointer- allows one to turn the North Pointer on and off.
Gallery- allows one to view the selected thumbnails in gallery view.
PICTOMETRY TIPS:
As will all Windows applications, memory helps performance! Even a slower Pentium II with additional memory (128M or more) can outperform a top-line Pentium III with inadequate RAM
Every image that is open used 18M of memory, so closing the images you are no longer using will improve the performance of the program
Keep few or no other programs while using EFS
Screen Resolution and Number of
Color Settings
The screen resolution should be no less than 800x600. This will allow the best use of the EFS program.
Toolbars will run off the right edge of your screen if your resolution screen is less than 1024x728.
Toolbars can be moved under each other, so if the resolution of 800x600 must be used, rearrange the Toolbars so that all of them can be seen at once.
Set the display colors to 16 bit or higher to obtain the best view of the images and their Thumbnails.
Printing Advice
Printing an image prints the entire image, not just the portion visible in the Image Window.
If you have any difficulties printing to a particular printer, select Alternate Print Method located in the Print dialogue box.
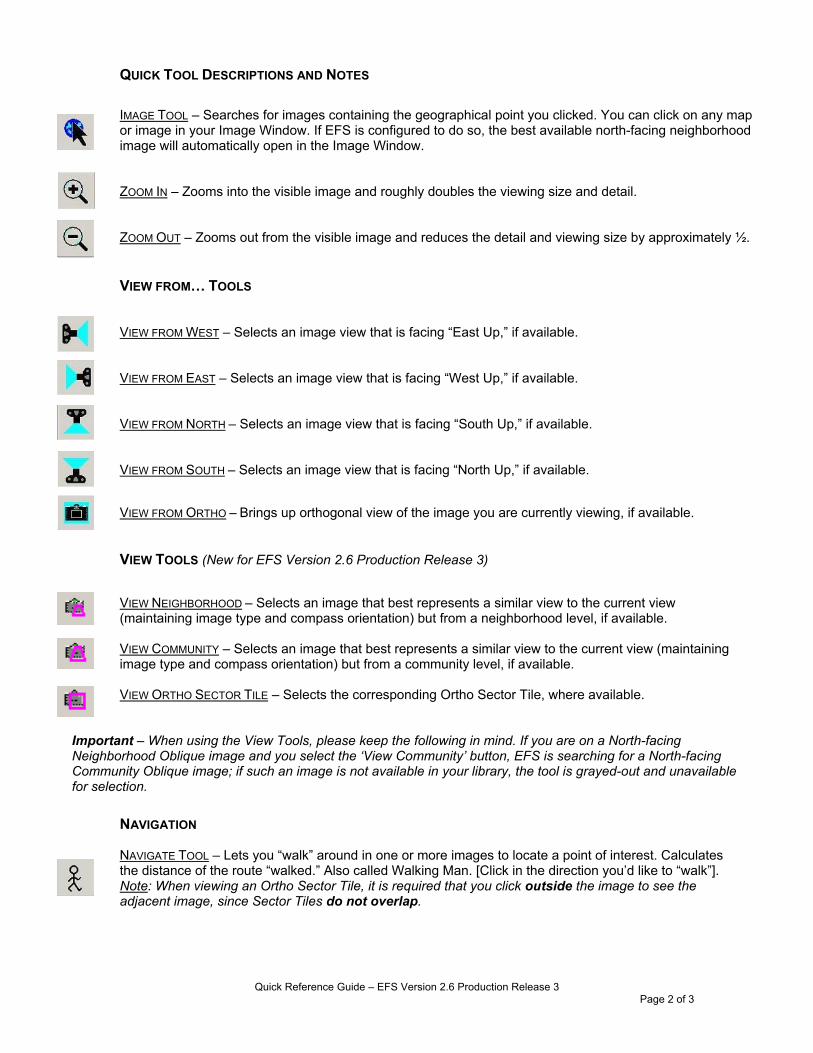
QUICK TOOL DESCRIPTIONS AND NOTES IMAGE TOOL – Searches for images containing the geographical point you clicked. You can click on any map or image in your Image Window. If EFS is configured to do so, the best available north-facing neighborhood image will automatically open in the Image Window.
ZOOM IN – Zooms into the visible image and roughly doubles the viewing size and detail. ZOOM OUT – Zooms out from the visible image and reduces the detail and viewing size by approximately ½. VIEW FROM… TOOLSVIEW FROM WEST – Selects an image view that is facing “East Up,” if available. VIEW FROM EAST – Selects an image view that is facing “West Up,” if available. VIEW FROM NORTH – Selects an image view that is facing “South Up,” if available.
VIEW FROM SOUTH – Selects an image view that is facing “North Up,” if available.
VIEW FROM ORTHO – Brings up orthogonal view of the image you are currently viewing, if available. VIEW TOOLS (New for EFS Version 2.6 Production Release 3) VIEW NEIGHBORHOOD – Selects an image that best represents a similar view to the current view
(maintaining image type and compass orientation) but from a neighborhood level, if available.VIEW COMMUNITY – Selects an image that best represents a similar view to the current view (maintaining image type and compass orientation) but from a community level, if available.
VIEW ORTHO SECTOR TILE – Selects the corresponding Ortho Sector Tile, where available.
Important – When using the View Tools, please keep the following in mind. If you are on a North-facing Neighborhood Oblique image and you select the ‘View Community’ button, EFS is searching for a North-facing Community Oblique image; if such an image is not available in your library, the tool is grayed-out and unavailable for selection.
NAVIGATION NAVIGATE TOOL – Lets you “walk” around in one or more images to locate a point of interest. Calculates the distance of the route “walked.” Also called Walking Man. [Click in the direction you’d like to “walk”].
Note: When viewing an Ortho Sector Tile, it is required that you click outside the image to see the adjacent image, since Sector Tiles do not overlap.
Quick Reference Guide – EFS Version 2.6 Production Release 3
Page 2 of 3
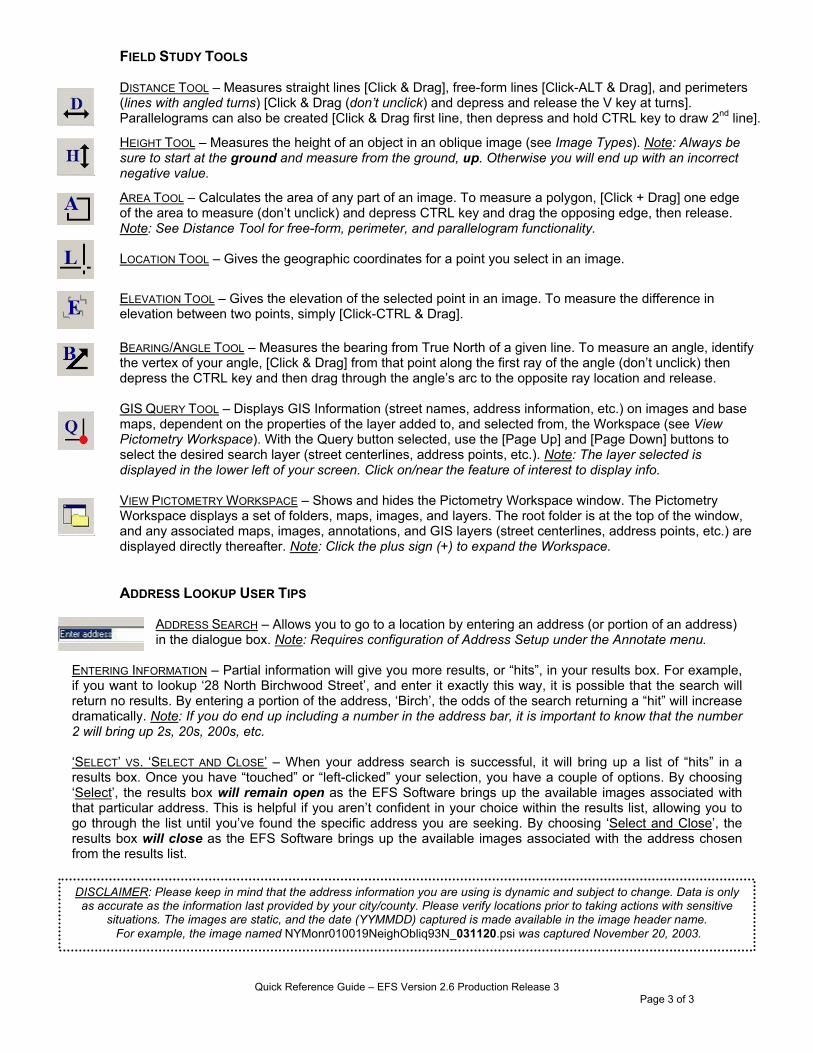
FIELD STUDY TOOLS DISTANCE TOOL – Measures straight lines [Click & Drag], free-form lines [Click-ALT & Drag], and perimeters (lines with angled turns) [Click & Drag (don’t unclick) and depress and release the V key at turns]. Parallelograms can also be created [Click & Drag first line, then depress and hold CTRL key to draw 2nd line].
HEIGHT TOOL – Measures the height of an object in an oblique image (see Image Types). Note: Always be sure to start at the ground and measure from the ground, up. Otherwise you will end up with an incorrect negative value.
AREA TOOL – Calculates the area of any part of an image. To measure a polygon, [Click + Drag] one edge of the area to measure (don’t unclick) and depress CTRL key and drag the opposing edge, then release. Note: See Distance Tool for free-form, perimeter, and parallelogram functionality. LOCATION TOOL – Gives the geographic coordinates for a point you select in an image.
ELEVATION TOOL – Gives the elevation of the selected point in an image. To measure the difference in elevation between two points, simply [Click-CTRL & Drag].
BEARING/ANGLE TOOL – Measures the bearing from True North of a given line. To measure an angle, identify the vertex of your angle, [Click & Drag] from that point along the first ray of the angle (don’t unclick) then depress the CTRL key and then drag through the angle’s arc to the opposite ray location and release. GIS QUERY TOOL – Displays GIS Information (street names, address information, etc.) on images and base maps, dependent on the properties of the layer added to, and selected from, the Workspace (see View Pictometry Workspace). With the Query button selected, use the [Page Up] and [Page Down] buttons to select the desired search layer (street centerlines, address points, etc.). Note: The layer selected is displayed in the lower left of your screen. Click on/near the feature of interest to display info. VIEW PICTOMETRY WORKSPACE – Shows and hides the Pictometry Workspace window. The Pictometry Workspace displays a set of folders, maps, images, and layers. The root folder is at the top of the window, and any associated maps, images, annotations, and GIS layers (street centerlines, address points, etc.) are displayed directly thereafter. Note: Click the plus sign (+) to expand the Workspace.
ADDRESS LOOKUP USER TIPS
ADDRESS SEARCH – Allows you to go to a location by entering an address (or portion of an address)
Quick Reference Guide – EFS Version 2.6 Production Release 3
Page 3 of 3
in the dialogue box. Note: Requires configuration of Address Setup under the Annotate menu. ENTERING INFORMATION – Partial information will give you more results, or “hits”, in your results box. For example, if you want to lookup ‘28 North Birchwood Street’, and enter it exactly this way, it is possible that the search will return no results. By entering a portion of the address, ‘Birch’, the odds of the search returning a “hit” will increase dramatically. Note: If you do end up including a number in the address bar, it is important to know that the number 2 will bring up 2s, 20s, 200s, etc. ‘SELECT’ VS. ‘SELECT AND CLOSE’ – When your address search is successful, it will bring up a list of “hits” in a results box. Once you have “touched” or “left-clicked” your selection, you have a couple of options. By choosing ‘Select’, the results box will remain open as the EFS Software brings up the available images associated with that particular address. This is helpful if you aren’t confident in your choice within the results list, allowing you to go through the list until you’ve found the specific address you are seeking. By choosing ‘Select and Close’, the results box will close as the EFS Software brings up the available images associated with the address chosen from the results list.
DISCLAIMER: Please keep in mind that the address information you are using is dynamic and subject to change. Data is only as accurate as the information last provided by your city/county. Please verify locations prior to taking actions with sensitive
situations. The images are static, and the date (YYMMDD) captured is made available in the image header name. For example, the image named NYMonr010019NeighObliq93N_031120.psi was captured November 20, 2003.