WET & DRY VACUUM 25L CYCLONIC
20
KNOW YOUR PRODUCT INSTRUCTION MANUAL WARNING: Read all safety warnings and all instructions. Failure to follow the warnings and instructions may result in electric shock, fire and/or serious injury. Save all warnings and instructions for future reference. 0719 • 1200W MOTOR • BAGLESS DUST & LIQUID COLLECTION • CYCLONIC ACTION, HIGH POWER SUCTION WET & DRY VACUUM 25L CYCLONIC
Transcript of WET & DRY VACUUM 25L CYCLONIC

KNOW YOUR PRODUCT
INSTRUCTION MANUALWARNING: Read all safety warnings and all instructions. Failure to follow the
warnings and instructions may result in electric shock, fire and/or serious injury. Save all warnings and instructions for future reference.
0719
• 1200W MOTOR• BAGLESS DUST & LIQUID
COLLECTION• CYCLONIC ACTION, HIGH
POWER SUCTION
WET & DRYVACUUM25L CYCLONIC

2
SPECIFICATIONS - MODEL NO. FBCWDV-1225PT
KNOW YOUR PRODUCT
1
210
4 11
3
5
8
6
7
9
Mains Voltage: 220Ð240V ~ 50Hz
Input Power: 1200W
Power Outlet Max.: 1200W
Psum: 2400W
Suction Power Max.: 200 mbar
Suction Volume: 24 l/s
Tank Capacity: 25 l
Suction Hose:: ¯35mm x 1.5m
IP Rating IPX4
Sound Power Lever: 83 dB (A)
Gross Weight: 14 kg
12
13
14
15

3
KNOW YOUR PRODUCT (cont.)
23
24
20
21
22
19
17
18
1. Flexible suction hose2. Carry handle3. Appliance head4. On/off/automatic switch5. Automatic power take-off outlet6. Release button7. Water drain outlet8. Castors x 29. Air regulator10. Telescopic suction tube11. Accessory mount.12. 2 x Appliance securing clip
13. Transparent tank14. Vacuum inlet.15. Wheels x 216. Quick height adjustment17. Small floor tool18. Upholstery tool19. Crevice tool20. Wet floor tool21. Foam filter22. Screws x 423. Dual purpose floor tool24. Filter cartridge
16
10
1
8
15

4
SPECIFICATIONS....................................................... Page 02
KNOW YOUR PRODUCT........................................... Page 02
INTRODUCTION........................................................ Page 05
SAFETY INSTRUCTIONS........................................... Page 05
ASSEMBLY.................................................................. Page 10
SUCTION TOOLS....................................................... Page 13
OPERATION............................................................... Page 14
MAINTENANCE......................................................... Page 16
DESCRIPTION OF SYMBOLS..................................... Page 18
CONTENTS................................................................ Page 19
WARRANTY................................................................ Page 20
TABLE OF CONTENTS

5
INTRODUCTION
WARNING! When using mains-powered equipment, basic safety precautions, including the following, should always be followed to reduce risk of fire, electric shock, personal injury and material damage.
SAFETY INSTRUCTIONS
ELECTRICAL SAFETY
Read and understand the manual prior to operating this tool.
Save these instructions and other documents supplied with this tool for future reference.
Congratulations on purchasing a Full Boar Cyclonic Wet and Dry Vac. The Full Boar Cyclonic Wet and Dry Vac is designed for wet and dry vacuuming without the need of a dust bag. The appliance is not suitable for the vacuuming of combustible, explosive or harmful substances.
The electric motor has been designed for 220V and 240V only. Always check that the power supply corresponds to the voltage on the rating plate.
Note: The supply of 230V and 240V on Full Boar tools are interchangeable for Australia and New Zealand.
Note: The power outlet used for the vacuum must be protected by a 30mA residual current device or earth leakage circuit breaker.
The supply cored assessed as type Y attached by using AS/NZS 60335.1.
If the supply cord is damaged, it must be replaced by an electrician or a power tool repairer in order to avoid a hazard.
Using an Extension Lead
Always use an approved extension lead suitable for the power input of this tool. Before use, inspect the extension lead for signs of damage, wear and ageing. Replace the extension lead if damaged or defective. When using an extension lead on a reel, always unwind the lead completely. Use of an extension lead not suitable for the power input of the tool or which is damaged or defective may result in a risk of fire and electric shock.

6
GENERAL POWER TOOL SAFETY WARNINGS
SAVE THESE INSTRUCTIONS
1. Work area safety
a. Keep work area clean and well lit. Cluttered or dark areas invite accidents.
b. Do not operate power tools in explosive atmospheres, such as in the presence of flammable liquids, gases or dust. Power tools create sparks which may ignite the dust or fumes.
c. Keep children and bystanders away while operating a power tool. Distractions can cause you to lose control.
2. Electrical safety
a. Power tool plugs must match the outlet. Never modify the plug in any way. Do not use any adapter plugs with earthed (grounded) power tools. Unmodified plugs and matching outlets will reduce risk of electric shock.
b. Avoid body contact with earthed or grounded surfaces, such as pipes, radiators, ranges and refrigerators. There is an increased risk of electric shock if your body is earthed or grounded.
c. Do not expose power tools to rain or wet conditions. Water entering a power tool will increase the risk of electric shock.
d. Do not abuse the cord. Never use the cord for carrying, pulling or unplugging the power tool. Keep cord away from heat, oil, sharp edges or moving parts. Damaged or entangled cords increase the risk of electric shock.
e. When operating a power tool outdoors, use an extension cord suitable for outdoor use. Use of a cord suitable for outdoor use reduces the risk of electric shock.
3. Personal safety
a. Stay alert, watch what you are doing and use common sense when operating a power tool. Do not use a power tool while you are tired or under the influence of drugs, alcohol or medication. A moment of inattention while operating power tools may result in serious personal injury.
b. Use personal protective equipment. Always wear eye protection. Protective equipment such as dust mask, non-skid safety shoes, hard hat, or hearing protection used for appropriate conditions will reduce personal injuries.
c. Prevent unintentional starting. Ensure the switch is in the off-position before connecting to power source and/or battery pack, picking up or carrying the tool. Carrying power tools with your finger on the switch or energising power tools that have the switch on invites accidents.
d. Remove any adjusting key or wrench before turning the power tool on. A wrench or a key left attached to a rotating part of the power tool may result in personal injury.
WARNING! Read all safety warnings and instructions. Failure to follow all instructions listed below may result in electric shock, fire and/or serious injury. The term “power tool” in all of the warnings listed below refers to your mains operated (corded) power tool or battery operated (cordless) power tool.

7
GENERAL POWER TOOL SAFETY WARNINGS (cont.)
e. Do not overreach. Keep proper footing and balance at all times. This enables better control of the power tool in unexpected situations.
f. Dress properly. Do not wear loose clothing or jewellery. Keep your hair, clothing and gloves away from moving parts. Loose clothes, jewellery or long hair can be caught in moving parts.
g. If devices are provided for the connection of dust extraction and collection facilities, ensure these are connected and properly used. Use of dust collection can reduce dust-related hazards.
h. Do not let familiarity gained from frequent use of tools allow you to become complacent and ignore tool safety principles. A careless action can cause severe injury within a fraction of a second.
4. Power tool use and care
a. Do not force the power tool. Use the correct power tool for your application. The correct power tool will do the job better and safer at the rate for which it was designed.
b. Do not use the power tool if the switch does not turn it on and off. Any power tool that cannot be controlled with the switch is dangerous and must be repaired.
c. Disconnect the plug from the power source and/or the battery pack from the power tool before making any adjustments, changing accessories, or storing power tools. Such preventive safety measures reduce the risk of starting the power tool accidentally.
d. Store idle power tools out of the reach of children and do not allow persons unfamiliar with the power tool or these instructions to operate the power tool. Power tools are dangerous in the hands of untrained users.
e. Maintain power tools. Check for misalignment or binding of moving parts, breakage of parts and any other condition that may affect the power tool’s operation. If damaged, have the power tool repaired before use. Many accidents are caused by poorly maintained power tools.
f. Keep cutting tools sharp and clean. Properly maintained cutting tools with sharp cutting edges are less likely to bind and are easier to control.
g. Use the power tool, accessories and tool bits etc. in accordance with these instructions, taking into account the working conditions and the work to be performed. Use of the power tool for operations different from those intended could result in a hazardous situation.
h. Keep handles and grasping surfaces dry, clean and free from oil and grease. Slippery handles and grasping surfaces do not allow for safe handling and control of the tool in unexpected situations.
5. Service
a. Have your power tool serviced by a qualified repair person using only identical replacement parts. This will ensure that the safety of the power tool is maintained.
b. If the supply cord is damaged, it must be replaced by an electrician or a power tool repairer in order to avoid a hazard.

8
• Do not leave appliance unattended when plugged in. Unplug from outlet when not in use and before servicing and cleaning.
• To avoid electric shock, do not expose to rain. Store indoors.
• Never use in the presence of explosive liquids, vapours or explosive dust – such as coal or grain.
• Never pick up asbestos or asbestos dust.
• Wood dust and chips in a confined area can give rise to fire or an explosion. Guard against possible ignition sources.
• Do not pick up anything that is burning or smouldering – such as metal grinding dust, cigarette ends, hot coals, matches or similar.
• The appliance is not intended for use by young children or infirm persons without supervision. Young children should be supervised to ensure they do not play with the appliance.
• Use only manufacturer’s recommended attachments and consumables.
• Never modify the cleaner in any way - this is dangerous and will invalidate the warranty.
• Do not use cleaner without the filter in place.
• If motor sound becomes higher pitched always check for the following:
- Blocked hose or accessory. - Blocked filter - Full container.
• Never try to move the cleaner by pulling with the mains lead.
• Always check that the filter is clear and not blocked. Keep all openings clear of any blockages.
• When lifting the unit, always lift it with the handle or under rim of bucket. Beware of excess weight.
• Always switch the unit off before changing attachments or connecting different power tools.
• Always disconnect equipment from the appliance when it is not in use.
• If the cordset is damaged have it repaired by an authorised service centre.
WET & DRY VACUUM SAFETY WARNINGS
IMPORTANT! When using the equipment, a few safety precautions must be observed to avoid injuries and damage. Please read the complete operating manual with due care. Keep this manual in a safe place so that the information is available at all times. If you give the equipment to any other person, give them these operating instructions as well.
The manufacturer cannot accept any liability for damage or accidents which arise due to a failure to follow these instructions and the safety information.
WARNING! DO NOT connect power tools to outlet when using the vacuum for wet pick up.

9
WET & DRY VACUUM SAFETY WARNINGS (cont.)
• This appliance is not intended for use by persons (including children) with reduced physical, sensory or mental capabilities, or lack of experience and knowledge, unless they have been given supervision or instruction concerning use of the appliance by a person responsible for their safety.
• Children should be supervised to ensure that they do not play with the appliance.
• The wet and dry vacuum cleaner is designed for wet and dry vacuuming using the appropriate filter. The appliance is not suitable for the vacuuming of combustible, explosive or harmful substances.
• The equipment is to be used only for its prescribed purpose. Any other use is deemed to be a case of misuse. The user / operator and not the manufacturer will be liable for any damage or injuries of any kind caused as a result of this.

10
KNOW YOUR PRODUCT
Fitting the wheels (15):
Each of the wheels has a different shaped bracket. You will need to identify each before fitting into the underside of the vacuum.
1. Align the correct shaped bracket with its corresponding mounting on the underside of the vacuum. Push the wheels (15) firmly into the mounting until they engage with a clicking noise (fig. 1).
2. Secure each in position with the four supplied screws (22) (fig. 2)
ASSEMBLY
Fig. 2
WARNING! During assembly ensure the cyclonic wet and dry vac is switched OFF and disconnected from the power supply.
Fig. 1
Fitting the castors (8):
1. Fit the castors (8) into the appropriate mountings on the underside of the vacuum. Push the castors (8) firmly into the mounting until they engage with a clicking noise (fig. 3).
Fig. 3

11
KNOW YOUR PRODUCTASSEMBLY (cont.)
IMPORTANT! Never use the cyclonic wet and dry vacuum cleaner without the filter cartridge (24) and foam filter (21). Check that both filters are securely fitted at all times.
Fitting the filter
Fig. 5
Filter cartridge (24) - for wet and dry vacuuming
1. When vacuuming always use the filter cartridge (24). Sit the filter in the vacuum (fig. 5).
Foam filter (21) - for wet & dry vacuuming.
1. When vacuuming always use the foam filter (21). Wrap the filter around the cyclonic cone (fig. 6).
Fitting the appliance head (3)
1. The appliance head (3) is fastened to the transparent tank (13) by the appliance securing clips (12 ).
2. To remove the appliance head (3), open the clips (12) and lift the appliance head (3) by the carry handle (2) (fig. 4).
3. When fitting the appliance head (3), make sure that the appliance securing clips (12) lock into place correctly (fig 4).
Fig. 6
Fig. 4

12
ASSEMBLY (cont.)
Fitting the flexible suction hose (1)1. Connect the suction hose (1) to the vacuum inlet (14) on the cyclonic wet and
dry vacuum (fig. 7)
2. Press the release button (6) to remove suction hose (1) (fig. 8)..
Fig. 7
Telescopic suction tube (10)The flexible suction hose (1) can be extended by attaching the telescopic suction tube (10) (fig. 9).
The height of the telescopic suction tube (10) can be adjusted by using the quick height adjustment (16) (fig. 10).
Fig. 10
Fig. 9
Fig. 8

13
SUCTION TOOLS
Fig. 11
Dual purpose floor tool (23)The dual-purpose floor tool is for vacuuming solids, dust on carpet and hard floors over medium and large areas (fig. 11).
Fig. 12
Wet floor tool (20)The wet floor tool is for vacuuming liquids over medium to large area (fig. 12).
Fig. 13
Small floor tool (17)The small floor tool is for vacuuming solids on carpet and hard floors, over small areas such as stairs. Suitable in the car or work van to clean carpets and floor mats (fig. 13).
Fig. 14
Upholstery tool (18)The upholstery tool is for vacuuming solids and dust in cars, on furniture, blinds, curtains, bookshelves, and windows (fig. 14).
Fig. 15
Crevice tool (19)The crevice tool is designed for vacuuming solids and liquids in narrow, hard-to-reach areas like in between car seats, in corners, skirting boards and along edges (fig. 15)

14
ON/OFF/AUTOMATIC switch (4)Switch position 0: Off (fig. 16)
Switch position I: Normal operation
Switch position: Automatic mode
Water drain outlet (7)To make the transparent tank (13) easier to empty after wet vacuuming, it is fitted with a water drain outlet (7).
Open the water drain outlet (7) by turning it anti-clockwise (fig. 17) and drain the liquid.
Note: If after emptying the tank the vacuum fails to start refer to Water sensor in the maintenance section.
OPERATION
IMPORTANT! The cyclonic wet and dry vacuum cleaner is not suitable for the vacuuming of combustible liquids.
WARNING! The power supply for this product should be protected by a residual current device rated at 30mA or less.
Fig. 16
Fig. 17
Fig. 18
Air regulator (9)The suction power of the floor tool can be adjusted by using the band on the air regulator (9) (fig. 18). When wet vacuuming, make selective use of the air regulator to suck in air as well as liquids. This will help to take some strain off the equipment when vacuuming liquids.
IMPORTANT! When wet vacuuming, the water sensor prevents operation when the maximum tank level is reached. You must then switch off the equipment and empty the transparent tank (13).

15
Automatic mode (1200W max.)Connect the power cable on your electric tool to the automatic power take off outlet (5) and connect the flexible suction hose (1) to the extractor connector on your electric tool. Check that the connections are secure and airtight.
Set the switch (4) on the cyclonic wet and dry vacuum cleaner to drill icon position, automatic mode (fig. 19). The moment you switch on the electric tool, the cyclonic wet and dry vacuum cleaner switches on as well. When you switch off the electric tool, the cyclonic wet and dry vacuum cleaner switches off as well after a preset delay.
Emptying the transparent tank (13)You do not have to empty the transparent tank after each use; however it is best to do so. The cyclonic wet & dry vacuum will work until the tank is full, although you may find a loss of performance as the transparent tank nears capacity.
1. Switch the power off, remove the plug from the wall power outlet, and leave for a minute to allow the dust settle.
2. Remove the appliance motor head (3), open the securing clips (12 ) and lift the appliance head (3) by the carry handle (2).
3. Remove the cyclonic cone from inside the transparent tank (13).
4. Empty contents in the transparent tank (13) into a garbage bag or directly into a rubbish bin.
5. Refit all parts removed in reverse order.Note: Align the cyclonic cone with the vacuum inlet (14) (fig. 20) for correct fitment.
OPERATION (cont.)
Fig. 19
Fig. 20

16
MAINTENANCE
CleaningKeep all safety devices, air vents and the motor housing free of dirt and dust as far as possible.We recommend that you clean the appliance immediately after you use it.
Cleaning the appliance head (3)Clean the appliance head regularly with a damp cloth and some soft soap. Do not use cleaning agents or solvents; these may be aggressive to the plastic parts in the appliance.
Cleaning the transparent tank (13)The tank can be cleaned with a damp cloth and some soft soap or under running water, depending on the amount of dirt.
Cleaning internal parts (fig. 21)The internal parts with a little soft soap under running water and allow them to air-dry.
WARNING! Before cleaning your cyclonic wet & dry vac or carrying out any maintenance procedure, make sure that the motor is off and the vac disconnected from the power supply to prevent accidental starting.
Fig. 21
17
MAINTENANCE (cont.)
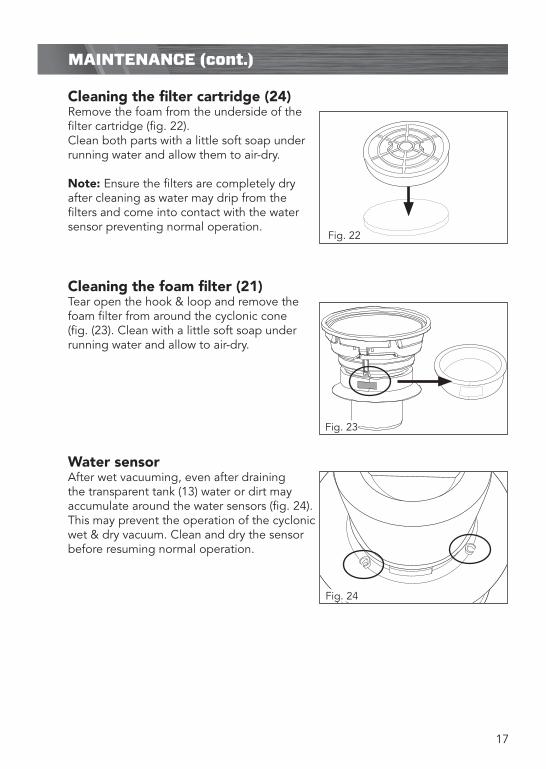
Cleaning the filter cartridge (24)Remove the foam from the underside of the filter cartridge (fig. 22).Clean both parts with a little soft soap under running water and allow them to air-dry.
Note: Ensure the filters are completely dry after cleaning as water may drip from the filters and come into contact with the water sensor preventing normal operation.
Cleaning the foam filter (21)Tear open the hook & loop and remove the foam filter from around the cyclonic cone (fig. (23). Clean with a little soft soap under running water and allow to air-dry.
Water sensorAfter wet vacuuming, even after draining the transparent tank (13) water or dirt may accumulate around the water sensors (fig. 24). This may prevent the operation of the cyclonic wet & dry vacuum. Clean and dry the sensor before resuming normal operation.
Fig. 22
Fig. 23
Fig. 24

18
DESCRIPTION OF SYMBOLS
Power tools that are no longer usable should not be disposed of with household waste but in an environmentally friendly way. Please recycle where facilities exist. Check with your local council authority for recycling advice.
Recycling packaging reduces the need for landfill and raw materials. Reuse of recycled material decreases pollution in the environment. Please recycle packaging where facilities exist. Check with your local council authority for recycling advice.
Read instruction manual
Ingress protection from water
Litresl
lPX4 mbar Pressure rating (millibar)
l/s Litres per second
CARING FOR THE ENVIRONMENT

19
CONTENTS
1 x Cyclonic wet & dry vac 2 x Wheels 4 x Screws 2 x Castors 1 x Suction tube, telescopic 1 x Crevice tool 1 x Upholstery tool 1 x Small floor tool 1 x Dual purpose floor tool 1 x Wet floor tool 1 x Foam filter 1 x Filter cartridge 1 x Suction hose 1 x Instruction manual
Distributed by: Ozito Industries Pty Ltd
AUSTRALIA (Head Office)
1-23 Letcon Drive, Bangholme Victoria, Australia, 3175
Telephone: 1800 069 486

20
WARRANTY EXCLUSIONS
The following actions will result in the warranty being void.
If the tool has been operated on a supply voltage other than that specified on the tool.• If the tool shows signs of damage or defects caused by or resulting from abuse, accidents • or alterations.Failure to perform maintenance as set out within the instruction manual.• If the tool is disassembled or tampered with in any way.The warranty excludes damage resulting from product misuse or product neglect.
•
•
This warranty is given by Ozito Industries Pty Ltd. ABN: 17 050 731 756Ph.1800 069 486Australia/New Zealand (Head Office)1-23 Letcon Drive, Bangholme, Victoria, Australia 3175
FB1
WARRANTY
TO ENSURE A SPEEDY RESPONSE PLEASE HAVE THE MODEL NUMBER AND DATE OF PURCHASE AVAILABLE. A CUSTOMER SERVICE REPRESENTATIVE WILL TAKE YOUR CALL AND ANSWER ANY QUESTIONS YOU MAY HAVE RELATING TO THE WARRANTY POLICY
OR PROCEDURE.
The benefits provided under this warranty are in addition to other rights and remedies whichare available to you under law. The warranty covers manufacturer defects in materials, workmanship and finish under normal use.
1 YEAR WARRANTYYour product is guaranteed for a period of 12 months from the original date of purchase.If a product is defective it will be repaired in accordance with the terms of this warranty.Warranty excludes consumable parts, for example: wheels, bearings.
Our goods come with guarantees that cannot be excluded under Australian Consumer law & Consumer Guarantees Act 1993 (NZ). You are entitled to a replacement or refund for a major failure and to compensation for other reasonably foreseeable loss or damage. You are also entitled to have the goods repaired and replaced if the goods fail to be of acceptable quality and the failure does not amount to a major failure.
`Australia 1800 069 486New Zealand 0508 069 486
YOUR WARRANTY FORM SHOULD BE RETAINED BY YOU AT ALL TIMES. IN ORDER TO MAKE A CLAIM UNDER THIS WARRANTY YOU MUST RETURN THE PRODUCT TO YOUR NEAREST
BUNNINGS WAREHOUSE (see www.bunnings.com.au or www.bunnings.co.nz for store locations) WITH YOUR BUNNINGS REGISTER RECEIPT. PRIOR TO RETURNING YOUR PRODUCT FOR
WARRANTY PLEASE TELEPHONE OUR CUSTOMER SERVICE HELPLINE: