Welcome to your iPass Mobile Broadband Service. Through the
14
Transcript of Welcome to your iPass Mobile Broadband Service. Through the
iPass.com iPass Mobile Broadband Service Installation Guide – United Kingdom 2
Welcome to your iPass Mobile Broadband Service. Through the iPassConnect
interface, this iPass Mobile Broadband USB adapter will provide you with reliable,
high-speed wireless connectivity on the move.
This guide provides all the information you will need to successfully install your iPass Mobile Broadband
USB adapter and configure it for use with iPassConnect. This installation guide shows you how to install
the Sierra Wireless Compass 885 Mobile Broadband USB adapter.
Note: This device is designed to auto-install on your system, with no CD required
2
• Installation requirements
3
• Pre-installation
• Installation of SIM
• Installation of MicroSD card
• Installing Compass 885 USB adapter and 3G Watcher software
• Configuring iPassConnect for the iPass Mobile Broadband Service
7
• Connecting to Mobile Broadband networks
9
• Configuring 3G Watcher to work with iPassConnect™
• Verifying that your iPass Mobile Broadband USB adapter can connect to the network
• What to do if iPassConnect does not recognize your iPass Mobile Broadband USB adapter
• Activating your iPass Mobile Broadband USB adapter
12
• Removing your iPass Mobile Broadband USB adapter from your computer
• Using and storing your iPass Mobile Broadband USB adapter
13

iPass.com iPass Mobile Broadband Service Installation Guide – United Kingdom 3
PRE-INSTALLATION
Before starting the installation, please ensure that:
• You save any open documents or work, and close any unnecessary programs
• iPassConnect is not running (if it is running, right-click the iPassConnect system
tray icon and select Disconnect & Exit or Exit)
INSTALLATION REQUIREMENTS
• iPassConnect software version 3.5x or later
• Windows® 2000, XP (Home or Professional); Vista
• Hard Drive Space: 32 MB
• RAM: 32 MB
• Microsoft Internet Explorer 5.5 or higher
• USB Port
• Pentium Processor: 150+MHz
The Sierra Wireless Compass 885 Mobile Broadband USB adapter is designed to
auto-install, without requiring a CD-ROM for installation. To install your USB
adapter, simply insert the device into an open USB port on your computer.
Windows will detect new hardware, and the device drivers and 3G Watcher
software will install automatically.
INSTALLATION OF SIM
The Sierra Wireless Compass 885 requires a SIM card to connect to Mobile Broadband networks, which
should come with your device and may already be inserted. Before you install the USB adapter and its
management software, please check that the SIM has been inserted into your Sierra Wireless Compass
885 Mobile Broadband USB adapter. If not already inserted, first detach the SIM from its carrier, then
insert it into the device as detailed in the graphic below. The SIM must be inserted with the notched
corner in, and the metal contacts down, the “graphic” side of the SIM facing up.

iPass.com iPass Mobile Broadband Service Installation Guide – United Kingdom 4
INSTALLATION OF MicroSD CARD
The Sierra Wireless Compass 885 is built to accommodate a MicroSD external storage card. To utilize
the MicroSD feature, simply remove the plastic insert from the lower slot (see image below), by pushing
it in, and allowing it to spring back. After removing the plastic insert, insert your MicroSD card into the
device, ensuring that it is pushed all the way into the slot. Once inserted, connect your device to the
USB port of your computer. The MicroSD external storage will appear as a USB memory drive, and can
be used as any other USB external storage.
INSTALLING THE COMPASS 885 USB ADAPTER AND 3G Watcher SOFTWARE
1. Close all Windows programs and insert the Sierra Wireless Compass 885 into a USB port on your
computer. The Setup wizard launches automatically and a Welcome window is displayed
Note: On Windows Vista machines, you may be prompted as to whether or not to allow the Autorun
on the device to run. Please allow the installation to run

iPass.com iPass Mobile Broadband Service Installation Guide – United Kingdom 5
Warning: The installation process should happen automatically, with a minimum of user
interaction. If you receive any warnings or requests to launch Setup.exe, please allow
the Setup.exe to execute. Prior to device insertion, please save any open documents and
close all programs
2. Upon device insertion, Windows will display an icon in the system tray, showing that it has detected
new hardware. The auto-install feature of the device should handle the device driver installation
automatically
3. After Windows has detected the device and installed the drivers required, it will launch Setup.exe
from a virtual drive within the device automatically. (If you receive a security warning, asking if you
wish to allow the Setup.exe program to execute, please allow this)
4. A new window will appear (TRU-Install Setup), as shown below, click OK to begin the installation of
the 3G Watcher program
5. On the Sierra Wireless 3G Watcher InstallShield screen, select Next to begin
6. You must accept the terms and conditions of the software license agreement (while it is possible to
adjust the installation folder, it is highly recommended that you leave it set to the default), and then
click Install to continue
7. The software and device drivers will be installed, and once complete, click the Finish button to exit
the installation
8. Once the TRU-Install screen disappears, you may be prompted to restart your computer. If
prompted to do so, restart your computer
You are now ready to use the iPassConnect mobility manager to connect to Mobile Broadband
networks.
Note: Before launching iPassConnect, to verify that your iPassConnect mobility manager is able to
see and utilize the USB adapter, you must close the 3G Watcher program completely, as
iPassConnect and 3G Watcher use the same drivers to manage the device, and will not function
correctly if both are running simultaneously
Insert the Compass 885
USB adapter, and 3G
Watcher Software
Installation
iPass.com iPass Mobile Broadband Service Installation Guide – United Kingdom 6
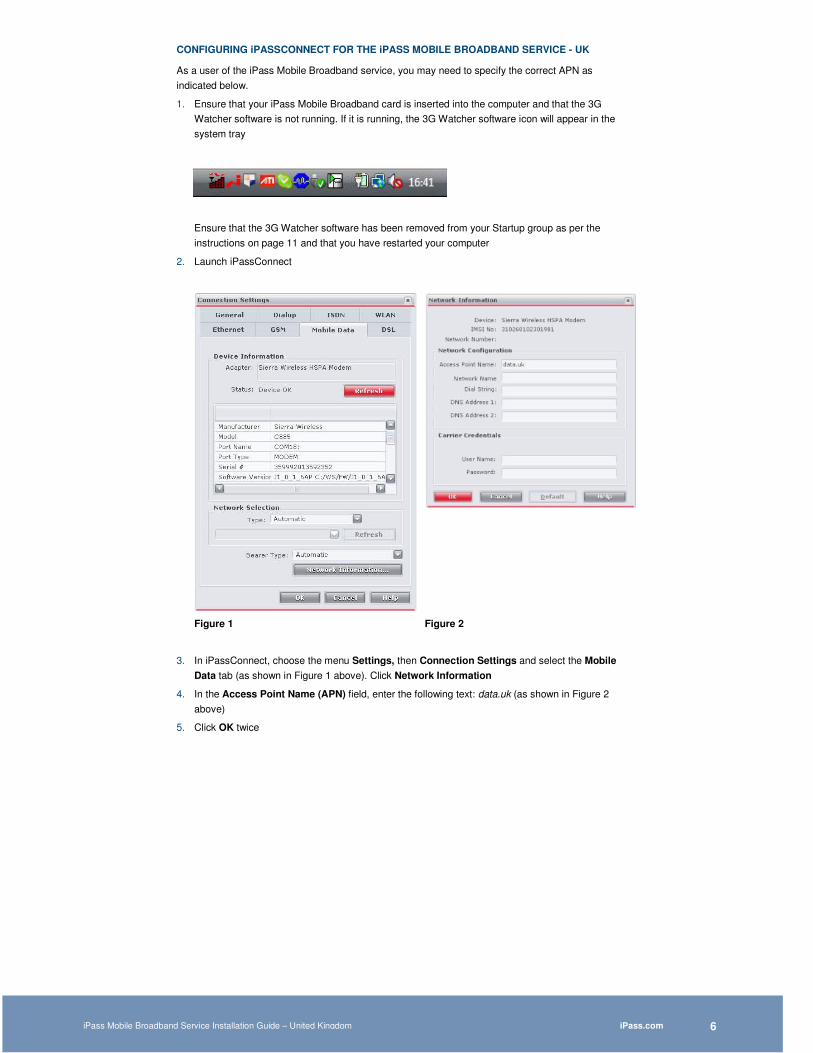
CONFIGURING iPASSCONNECT FOR THE iPASS MOBILE BROADBAND SERVICE - UK
As a user of the iPass Mobile Broadband service, you may need to specify the correct APN as
indicated below.
1. Ensure that your iPass Mobile Broadband card is inserted into the computer and that the 3G
Watcher software is not running. If it is running, the 3G Watcher software icon will appear in the
system tray
Ensure that the 3G Watcher software has been removed from your Startup group as per the
instructions on page 11 and that you have restarted your computer
2. Launch iPassConnect
Figure 1 Figure 2
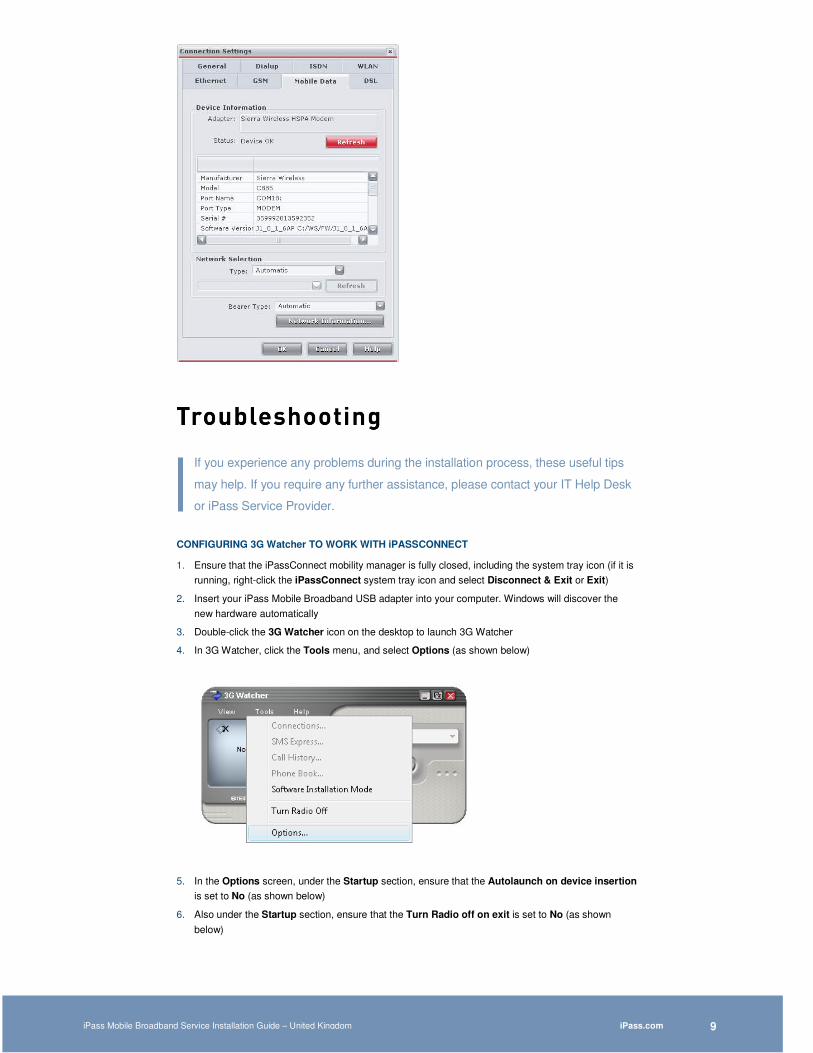
3. In iPassConnect, choose the menu Settings, then Connection Settings and select the Mobile
Data tab (as shown in Figure 1 above). Click Network Information
4. In the Access Point Name (APN) field, enter the following text: data.uk (as shown in Figure 2
above)
5. Click OK twice
iPass.com iPass Mobile Broadband Service Installation Guide – United Kingdom 7
iPass gives you one simple global service for secure remote and mobile
connectivity in over 160 countries around the world.
So whether you’re connecting via your iPass Mobile Broadband card in the UK,
from your local café via Wi-Fi, or from a hotel on the other side of the world, iPass
makes it easy for you to get online from virtually anywhere.
CONNECT WITH iPASS AT MORE THAN 100,000 WI-FI HOTSPOT LOCATIONS
WORLDWIDE!
As well as providing you with Mobile Broadband connectivity in the United Kingdom, iPass offers
seamless Wi-Fi connectivity at 100,000 wireless broadband locations around the world, including more
than 440 airports and 23,000 hotels and conference facilities.
For details about how and where to connect via Wi-Fi, visit our online end-user resource centre at
http://connect.ipass.com
And to find your closest hotspot, try using our Online Hotspot Finder at www.ipass.com/hotspot
CONNECTING TO MOBILE BROADBAND NETWORKS
iPassConnect will automatically detect the Mobile Broadband network available to you, and
display it under Available Networks (as shown).

iPass.com iPass Mobile Broadband Service Installation Guide – United Kingdom 8
Note: If you insert your iPass Mobile Broadband USB adapter after iPassConnect has been
launched, it may take up to 20 seconds to recognize the device. If the device is not detected, you
can take either of the following actions to force iPassConnect to search for your iPass Mobile
Broadband USB adapter:
1. Exit and restart iPassConnect
or
2. Go to Settings, select Connection Settings, then select the Mobile Data tab, and click the
Refresh button
1. To connect, click on
the network listing
2. Enter any required
credentials
3. Click Connect and you
will be connected
iPass.com iPass Mobile Broadband Service Installation Guide – United Kingdom 9
If you experience any problems during the installation process, these useful tips
may help. If you require any further assistance, please contact your IT Help Desk
or iPass Service Provider.
CONFIGURING 3G Watcher TO WORK WITH iPASSCONNECT
1. Ensure that the iPassConnect mobility manager is fully closed, including the system tray icon (if it is
running, right-click the iPassConnect system tray icon and select Disconnect & Exit or Exit)
2. Insert your iPass Mobile Broadband USB adapter into your computer. Windows will discover the
new hardware automatically
3. Double-click the 3G Watcher icon on the desktop to launch 3G Watcher
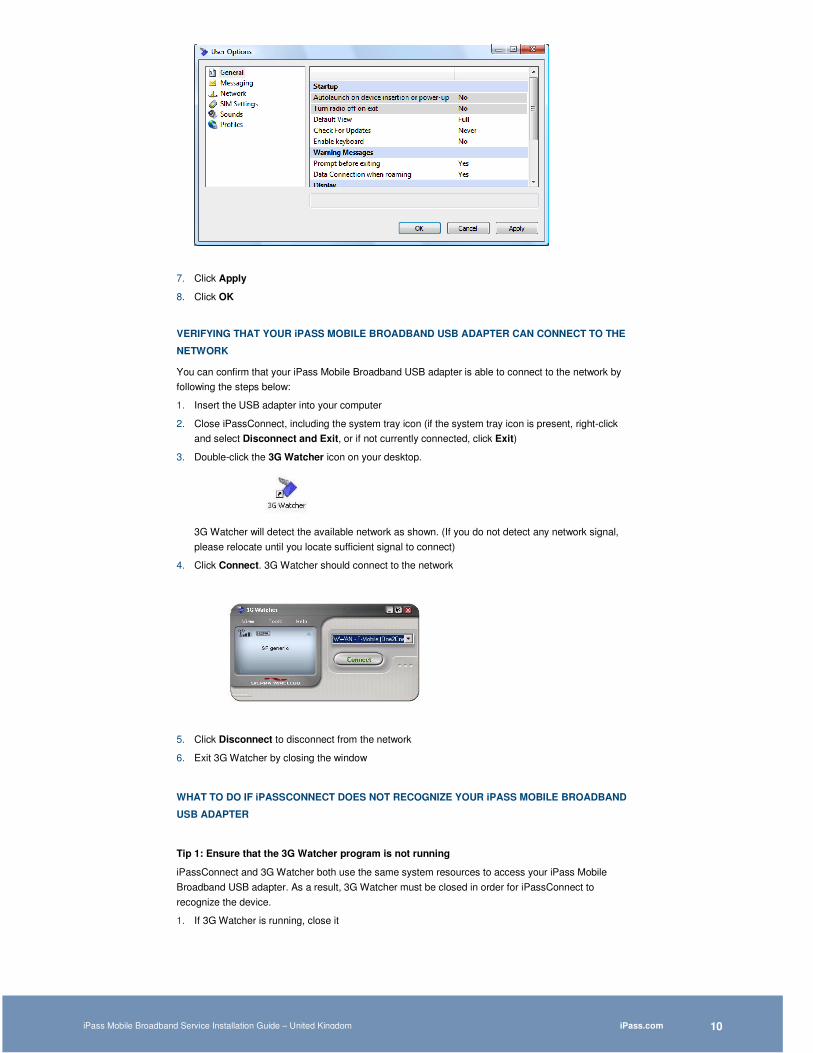
4. In 3G Watcher, click the Tools menu, and select Options (as shown below)
5. In the Options screen, under the Startup section, ensure that the Autolaunch on device insertion
is set to No (as shown below)
6. Also under the Startup section, ensure that the Turn Radio off on exit is set to No (as shown
below)
iPass.com iPass Mobile Broadband Service Installation Guide – United Kingdom 10
7. Click Apply
8. Click OK
VERIFYING THAT YOUR iPASS MOBILE BROADBAND USB ADAPTER CAN CONNECT TO THE
NETWORK
You can confirm that your iPass Mobile Broadband USB adapter is able to connect to the network by
following the steps below:
1. Insert the USB adapter into your computer
2. Close iPassConnect, including the system tray icon (if the system tray icon is present, right-click
and select Disconnect and Exit, or if not currently connected, click Exit)
3. Double-click the 3G Watcher icon on your desktop.
3G Watcher will detect the available network as shown. (If you do not detect any network signal,
please relocate until you locate sufficient signal to connect)
4. Click Connect. 3G Watcher should connect to the network
5. Click Disconnect to disconnect from the network
6. Exit 3G Watcher by closing the window
WHAT TO DO IF iPASSCONNECT DOES NOT RECOGNIZE YOUR iPASS MOBILE BROADBAND
USB ADAPTER
Tip 1: Ensure that the 3G Watcher program is not running
iPassConnect and 3G Watcher both use the same system resources to access your iPass Mobile
Broadband USB adapter. As a result, 3G Watcher must be closed in order for iPassConnect to
recognize the device.
1. If 3G Watcher is running, close it

iPass.com iPass Mobile Broadband Service Installation Guide – United Kingdom 11
2. Ensure that 3G Watcher is not running in the System Tray. If it is, click the System Tray
icon and choose Exit
3. Ensure that the option to Autolaunch upon device insertion option is set to No (see
“Configuring 3G Watcher to work with iPassConnect” for more information)
Tip 2: Ensure that iPassConnect has been enabled to recognize Mobile Broadband devices
1. Ensure that the 3G Watcher program is not running (actively, or in the system tray)
2. Launch iPassConnect
3. Go to Settings, then Update iPassConnect, then select Phonebook (allow the Phonebook update
to complete)
4. Go to Settings, then Connection Settings and confirm that there is a tab labelled Mobile Data
(see image):
• If the tab is not available, contact your IT Help Desk or iPass Service Provider
• If the Mobile Data tab is available, your iPassConnect software is appropriately enabled
5. In the Mobile Data tab, click Refresh. This should populate the information in the screen as shown:
If the information is not populated, or if it reports errors in the fields, your device may not be installed
correctly. You may have to reinstall the USB adapter:
• Go to Start, select Control Panel, then use the Add or Remove Programs function to remove
the program ‘Sierra Wireless 3G Watcher’
• Reinstall your iPass Mobile Broadband USB adapter following the directions in this guide

iPass.com iPass Mobile Broadband Service Installation Guide – United Kingdom 12
Note: If you insert your iPass Mobile Broadband USB adapter after iPassConnect has been
launched, it may take up to 20 seconds to recognize the device. If the device is not detected, you
can take either of the following actions to force iPassConnect to search for your iPass Mobile
Broadband USB adapter:
1. Exit and restart iPassConnect
or
2. Go to Settings, then Connection Settings, select the Mobile Data tab, and click the
Refresh button
Tip 3: Ensure that 3G Watcher can recognize your iPass Mobile Broadband USB adapter
1. If iPassConnect is running, close it. Also, ensure it is not running in the System Tray. If it is, click the
System Tray icon and choose Disconnect & Exit or Exit
2. Launch 3G Watcher and check the status message:
• No Device Detected...: your iPass Mobile Broadband USB adapter is not being recognized by
3G Watcher. First, ensure that your device is inserted, and showing a green light. If not, eject
the device, wait 30 seconds, and then reinsert. If the device still is not recognized, un-install 3G
Watcher and attempt to re-install your USB adapter following the process above
• Ready: If the USB adapter is recognized by 3G Watcher and a signal is available, you will see
Ready in the left side of the 3G Watcher window, and the network type (i.e. HSDPA) above. The
Connect button will be displayed (if the Connect button is greyed out, then 3G Watcher is not
ready to connect yet)
• Not in service: The USB adapter is recognized by 3G Watcher, but a signal is not available. Try
changing location until a signal is available. You may also connect your adapter using the
included USB extension cable, and clip the device to your laptop monitor using the included clip,
to try to better detect signal
REMOVING YOUR iPASS MOBILE BROADBAND USB ADAPTER FROM YOUR COMPUTER
Warning: Always use the procedure outlined here to remove your iPass Mobile
Broadband USB adapter from your computer. Removing the device improperly may
cause serious damage to the device or the integrity of the software on your computer
To remove your iPass Mobile Broadband USB adapter
1. Exit iPassConnect (to exit, right-click the iPassConnect system tray icon and choose
Disconnect & Exit)
2. In the System Tray, double-click the Safely Remove Hardware icon
3. On the Safely Remove Hardware dialog, select USB Mass Storage Device and click Stop
4. On the Stop a Hardware Device dialog click OK
5. When the Safe to Remove Hardware dialog is displayed, you may remove your iPass Mobile
Broadband USB adapter from your computer. Grip the device by both sides firmly when removing it
from the USB port
USING AND STORING YOUR iPASS MOBILE BROADBAND USB ADAPTER
As with any electronic device, your iPass Mobile Broadband USB adapter must be handled with care to
ensure reliable operation. Follow these guidelines while using and storing the iPass Mobile Broadband
USB adapter:
• The USB adapter should fit easily into your USB port. Forcing the device into a port may
damage the device or the computer
iPass.com iPass Mobile Broadband Service Installation Guide – United Kingdom 13
• Do not apply adhesive labels to the portion of the device that fits into the computer. They can
cause the USB adapter to become jammed inside the USB port
• Protect the device from liquids, dust and excessive heat
• When not inserted in your computer, store your iPass Mobile Broadband USB adapter in a
safe place
The Sierra Wireless Compass 885 Mobile Broadband USB Adapter
KEY FEATURES:
• UMTS with HSDPA Category 8 (7.2 Mbps downlink)
• HSUPA Category 5 (2.0 Mbps uplink) & Upgradeable to Category 6 (5.76 Mbps)
• EDGE/GPRS MS Class 12
• WCDMA advanced receiver on UMTS 800/850, 1900, 2100 MHz bands
• Durable high performance antenna design
• 2-in-1 Device – Up to 4 GB of storage on Micro-SD card, inserted into Micro-SD slot on device
• TRU-Install Auto-install feature for ease of use
HIGH-PERFORMANCE ANTENNA DESIGN
Sierra Wireless has developed a new patent pending design for your device antenna. With the new
highly-efficient and receptive antenna, your iPass Mobile Broadband USB adapter provides fast, reliable
connections with improved speeds and extended coverage through better network signal acquisition in
fringe areas.
TECHNOLOGY:
UMTS with HSDPA Category 8 (7.2 Mbps downlink)
HSUPA Category 5 (2.0 Mbps uplink) & Upgradeable to Category 6 (5.76 Mbps)
EDGE/GPRS MS Class 12
WCDMA advanced receiver on UMTS 800/850, 1900, 2100 MHz bands
MEMORY:
Removable Memory Storage via MicroSD (SDHC Support)
OPERATING SYSTEM SUPPORT:
Windows® Vista
Windows® XP
Windows® 2000
ENVIRONMENTAL:
Operating Temperature:
0° to 45° Celsius
Storage Temperature:
-40° to 85° Celsius
POWER CONSUMPTION:
Voltage: 5 V

iPass.com iPass Mobile Broadband Service Installation Guide – United Kingdom 14
SYSTEM REQUIREMENTS:
1 Type A USB Port
System: Pentium 150 Mhz or higher
Memory: 32 MB
Disk Space: 32 MB
Internet Explorer 5.5 or higher
iPassConnect software version 3.5x or later
DIMENSIONS:
65mm (L) x 25mm (W) x 13.5mm (H)
Weight: 3.0 grams
Volume: 19.5 cc
VISUAL INDICATOR (LED):
3-Color Service State LED (Power LED and Status LED – Blue, Amber, Off)
INCLUDED ACCESSORIES
Notebook Monitor Clip and USB Cable
Carrying Pouch
Lanyard
OPTIONAL ACCESSORIES (SOLD SEPARATELY)
microSD card (up to 4 GB)
External Antenna Option
Copyright © 2009, Sierra Wireless, Inc. Copyright © 2009, iPass Inc. All rights reserved.
Trademarks iPass and the iPass logo are registered trademarks of iPass Inc. and iPassConnect is a trademark of iPass Inc. All other brand or product names are trademarks or registered trademarks of their respective owners. While every effort is made to ensure the information given is accurate, iPass does not accept liability for any errors or mistakes which may arise. Specifications and other information in this document may be subject to change without notice.
MB UK 02 2009
iPass.com