
Welcome to the electric era! - Askoll · Welcome to the electric era! Thank you for having chosen a...
70
Transcript of Welcome to the electric era! - Askoll · Welcome to the electric era! Thank you for having chosen a...


Welcome to the electric era!Thank you for having chosen a more sustainable mobility which makes air more breathable with lower consumption and great savings, as well as guaranteed autonomy; a way to do good to yourself and the planet.Congratulations for having decided to embrace a new lifestyle and innovative thinking: using cutting-edge technology such as electricity can only have positive effects. Acquiring Askoll eS1, eS2 or eS3, you will finally enjoy a mean that concentrates the best of Askoll functionality, design and technology, a company with thirty years of experience in the design and manufacture of electric engines. This manual has been prepared to allow you to fully appreciate its quality. It contains information, warnings and advice on the proper use and maintenance of your new vehicle. It is important to read it entirely before driving your vehicle for the first time. You will find out details and features that will reassure you of the choice made. This publication is to be considered an integral part of the vehicle. If the vehicle is sold, the manual must be delivered to the new owner.
The constant evolution in the design, aimed to guarantee the safety and quality standards of Askoll vehicles, may result in the fact that some information contained in this Use and Maintenance Handbook can be different from the vehicle in your possession. We are therefore confident that you will understand that the data, figures and descriptions herein may not be grounds for any claims.
DE
SL
HU
EN
eS1_eS2_eS3_Rev_0_EN.indb ieS1_eS2_eS3_Rev_0_EN.indb i 10/10/2017 16:51:1010/10/2017 16:51:10

INDEXINDEX IIGENERAL INFORMATIONS 1
SYMBOLS 1
SAFETY IMPORTANT INFORMATION 2
IDENTIFICATION 3
CONTROLS AND INSTRUMENTS 4SCOOTER OVERVIEW 4
eS1 LEFT SIDE 4eS1 RIGHT SIDE 4eS2 LEFT SIDE 5eS2 RIGHT SIDE 5eS3 LEFT SIDE 6eS3 RIGHT SIDE 6
CONTROLS AND INSTRUMENTS POSITION 7DASHBOARD (eS1 - eS2) 7DASHBOARD (eS3) 8LH CONTROLS 9
Rear brake lever 9Drum brake lever with combined function (eS3 only) 9Power regeneration switch 9Turn indicators switch 10Horn 10
eS1_eS2_eS3_Rev_0_EN.indb iieS1_eS2_eS3_Rev_0_EN.indb ii 10/10/2017 16:56:2610/10/2017 16:56:26

INDEX
DE
SL
HU
EN
RH CONTROLS 11Front brake lever 11Throttle control 11Headlight high beam light ON/OFF selector (eS3 only) 12Driving mode switch 12Engine start switch 12
KEY SWITCH 13Enabling and disabling the system 13
INSTRUMENT PANEL 14WARNING LIGHTS 15
Engine enabling warning light (eS1 - eS2 only) 15Temperature warning light 16Serious problem warning light 16Operating turn indicators warning light 17Lights warning light 17High beam light indicator (eS3 only) 17Charging warning light 17
SPEEDOMETER (eS1 - eS2) 18SPEEDOMETER (eS3) 18MENU SETTING BUTTONS 18DIGITAL DISPLAY 19
Maintenance warning light 19
eS1_eS2_eS3_Rev_0_EN.indb iiieS1_eS2_eS3_Rev_0_EN.indb iii 10/10/2017 16:56:2610/10/2017 16:56:26
INDEXUSE 20
CHECKS BEFORE DEPARTURE 20
SAFE DRIVING 20
OPERATIONS TO START 22Steering lock engagement 22Engine enabling 23Driving mode selection (eS1 - eS2) 24Driving mode selection (eS3) 25Power regeneration selection 26
SELECTION OF DISPLAY FUNCTIONS 27Odometer data display mode 27Setting the clock 28
SEAT 29Opening the seat 29Bag hook 29
PARKING THE SCOOTER 30
BATTERIES AND RECHARGE 31BATTERIES 31
Battery management in the first use of the scooter 31
BATTERY CHARGER 33
eS1_eS2_eS3_Rev_0_EN.indb iveS1_eS2_eS3_Rev_0_EN.indb iv 10/10/2017 16:56:2610/10/2017 16:56:26

INDEX
DE
SL
HU
EN
CHARGING THE BATTERIES 35CHARGING WITH BATTERY ON BOARD 36
Locking the seat in raised position for cable passage 37CHARGING WITH BATTERY OUTBOARD 39
ADJUSTMENTS AND PERIODIC MAINTENANCE 43ADJUSTMENTS 43
REAR VIEW MIRRORS 43HEADLAMP 43FRONT DISC BRAKE 44REAR BRAKE DRUM (eS1 - eS2) 45REAR DRUM BRAKE WITH COMBINED FUNCTION (eS3 only) 45
ORDINARY MAINTENANCE PROCEDURES 46TYRES 46FRONT BRAKE FLUID LEVEL CONTROL 47HEADLAMP BULB REPLACEMENT (eS1 - eS2) 48HEADLIGHT (eS3) 49TAIL LIGHTS AND TURN INDICATORS 50ORDINARY MAINTENANCE PROCEDURES TABLE 51CLEANING THE VEHICLE 52VEHICLE INACTIVITY 53
eS1_eS2_eS3_Rev_0_EN.indb veS1_eS2_eS3_Rev_0_EN.indb v 10/10/2017 16:56:2610/10/2017 16:56:26

INDEXERROR CODES 54
ERROR CODES 54
TECHNICAL DATA 57SCOOTER DIMENSIONS eS1 - eS2 - eS3 57
ENGINE DATA 58BATTERY 58VEHICLE DATA 58HEADLIGHT DATA 59TAIL LIGHT DATA 59
DECLARATION OF CONFORMITY LX
eS1_eS2_eS3_Rev_0_EN.indb vieS1_eS2_eS3_Rev_0_EN.indb vi 10/10/2017 16:56:2710/10/2017 16:56:27

1
DE
SL
HU
EN
GENERAL INFORMATIONSSYMBOLSThis manual contains particularly important information that should be read with care.Each signal consists of a different symbol to make clear the content of the text that follows it, and to facilitate the placement of the subjects in the different areas.
CAUTION This symbol indicates situations of particular danger, which could result in death or serious injury if not avoided.
WARNING This symbol indicates a security generic warning. It is used to put warn about potential danger of personal injury or damage to things.Failure to fully comply with these requirements may cause serious damage to the vehicle and in some cases void the warranty.Right behaviour is indicated to prevent damaging nature by using the vehicle.
eS1_eS2_eS3_Rev_0_EN.indb 1eS1_eS2_eS3_Rev_0_EN.indb 1 10/10/2017 16:56:2710/10/2017 16:56:27

2
GENERAL INFORMATIONSSAFETY IMPORTANT INFORMATION
CAUTION It is very important for you to know the electric scooter: read and understand this manual before the first use.
CAUTION This operating manual is part of the scooter, keep it for future reference. If the scooter is sold, the manual must be delivered to the next owner.
CAUTIONThe scooter is not intended to be used by persons with reduced physical, sensory or mental capacities, or lack of experience or knowledge, unless a person responsible for their safety has supervised or instructed them concerning the use of the scooter.
CAUTION Failure to fully comply with these requirements may cause serious damage to people, the vehicle, the environment and in some cases void the warranty.
CAUTIONEach processing that changes either performance or main structure of the scooter, besides from being forbidden by law, void vehicle compliance and approvals, making it dangerous.
eS1_eS2_eS3_Rev_0_EN.indb 2eS1_eS2_eS3_Rev_0_EN.indb 2 10/10/2017 16:56:2910/10/2017 16:56:29

3
GENERAL INFORMATIONS
DE
SL
HU
EN
IDENTIFICATIONIdentification plates are stamped on frame, engine casing and battery compartment. They must be indicated when ordering spare parts.It is advisable to check the correspondence of vehicle plates with the ones present in its documents.
WARNINGAlteration of identification plates can incur in serious penalties.
(*) Valid only for eS1 - eS2. Not required for eS3.
ASKOLL EVA S.R.L.
TYPE: (code: ) dB(A) min (-- kW) 1- - - - -
(*)
eS1_eS2_eS3_Rev_0_EN.indb 3eS1_eS2_eS3_Rev_0_EN.indb 3 10/10/2017 16:56:3110/10/2017 16:56:31

4
CONTROLS AND INSTRUMENTSSCOOTER OVERVIEW
eS1 RIGHT SIDE
A. Rear view mirrorB. HeadlightsC. Turn indicatorD. Front LH reflectorE. StandF. Battery compartmentG. SeatH. Seat hook
I. Tail lightJ. License plate holderK. Rear reflectorL. EngineM. Front RH reflectorN. Ignition switch
eS1 LEFT SIDE
A
B
CDE
FG
H
I
J
K
L
M
N
eS1_eS2_eS3_Rev_0_EN.indb 4eS1_eS2_eS3_Rev_0_EN.indb 4 10/10/2017 16:56:3310/10/2017 16:56:33

5
CONTROLS AND INSTRUMENTS
DE
SL
HU
EN
SCOOTER OVERVIEWeS2 RIGHT SIDE
A. Rear view mirrorB. HeadlightsC. Turn indicatorD. Front LH reflectorE. StandF. Battery compartmentG. SeatH. Seat hook
I. Tail lightJ. License plate holderK. Rear reflectorL. EngineM. Front RH reflectorN. Ignition switchO. Passenger grab handleP. Passenger pegs
eS2 LEFT SIDE
A
B
CD E
F
G
H
I
J
K
L
M
NO
P
eS1_eS2_eS3_Rev_0_EN.indb 5eS1_eS2_eS3_Rev_0_EN.indb 5 10/10/2017 16:56:4010/10/2017 16:56:40

6
CONTROLS AND INSTRUMENTSSCOOTER OVERVIEW
eS3 RIGHT SIDE
A. Rear view mirrorB. HeadlightsC. Turn indicatorD. Front LH reflectorE. StandF. Battery compartmentG. SeatH. Seat hook
I. Tail lightJ. License plate holderK. Rear reflectorL. EngineM. Front RH reflectorN. Ignition switchO. Passenger grab handleP. Passenger pegs
eS3 LEFT SIDE
A
B
CD E
F
G
H
I
J
K
L
M
NO
P
eS1_eS2_eS3_Rev_0_EN.indb 6eS1_eS2_eS3_Rev_0_EN.indb 6 10/10/2017 16:56:4710/10/2017 16:56:47
7
CONTROLS AND INSTRUMENTS
DE
SL
HU
EN
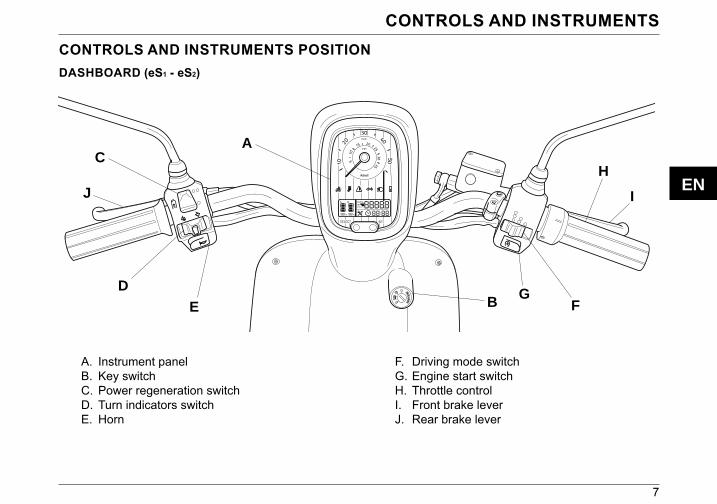
F. Driving mode switchG. Engine start switchH. Throttle controlI. Front brake leverJ. Rear brake lever
A. Instrument panelB. Key switchC. Power regeneration switchD. Turn indicators switchE. Horn
DASHBOARD (eS1 - eS2)
CONTROLS AND INSTRUMENTS POSITION
% %
Km/tripA B
PWR ECOKm/
SELECT SET
1020
Km/h
mph
10
1 20
2
PUSH
IGNITIO
N
B
C
DE F
G
H
IJ
A
eS1_eS2_eS3_Rev_0_EN.indb 7eS1_eS2_eS3_Rev_0_EN.indb 7 10/10/2017 16:56:5410/10/2017 16:56:54

8
CONTROLS AND INSTRUMENTS
G. Engine start switchH. Throttle controlI. Front brake leverJ. Combined brake control leverK. Headlight switch
A. Instrument panelB. Key switchC. Power regeneration switchD. Turn indicators switchE. HornF. Driving mode switch
DASHBOARD (eS3)
CONTROLS AND INSTRUMENTS POSITION
% %
Km/tripA B
PWR ECOKm/
SELECT SET
Km/h
mph
PUSH
IGNITIO
N
B
K
C
DE F
G
H
IJ
A
eS1_eS2_eS3_Rev_0_EN.indb 8eS1_eS2_eS3_Rev_0_EN.indb 8 10/10/2017 16:56:5710/10/2017 16:56:57

9
CONTROLS AND INSTRUMENTS
DE
SL
HU
EN
LH CONTROLSRear brake leverRear drum brake lever is placed on the left side of the handlebar.
Drum brake lever with combined function (eS3 only)The brake acts on both wheels, with prevalence on the rear one to ensure greater safety and improved stopping distances.
Power regeneration switchDuring scooter deceleration, the battery can be automatically recharged by activating the power regeneration mode.Use the 2 position turn indicators switch to activate or deactivate power regeneration.
MODE
eS1 - eS2 eS3
eS1_eS2_eS3_Rev_0_EN.indb 9eS1_eS2_eS3_Rev_0_EN.indb 9 10/10/2017 16:57:0110/10/2017 16:57:01

10
CONTROLS AND INSTRUMENTSTurn indicators switchMove the lever to the left to operate LH turn indicator.Move the lever to the right to operate RH turn indicator.Press the button in the centre of the lever to turn the indicators off.
HornPress to honk the horn.
eS1 - eS2
eS1 - eS2
eS3
eS3
eS1_eS2_eS3_Rev_0_EN.indb 10eS1_eS2_eS3_Rev_0_EN.indb 10 10/10/2017 16:57:0210/10/2017 16:57:02

11
CONTROLS AND INSTRUMENTS
DE
SL
HU
EN
RH CONTROLSFront brake leverFront disk brake lever is placed on the right side of the handlebar.
Throttle controlScooter speed is adjusted through the grip.
DE DE
eS1 - eS2 eS3
eS1_eS2_eS3_Rev_0_EN.indb 11eS1_eS2_eS3_Rev_0_EN.indb 11 10/10/2017 16:57:0410/10/2017 16:57:04

12
CONTROLS AND INSTRUMENTS
Driving mode switchThree different driving modes can be selected using the switch depending on driving style, road conditions or other.
Headlight high beam light ON/OFF selector (eS3 only)Using the selector is possible to activate the high beam light.
Engine start switchPressing the button for 3 seconds will start or stop the engine depending on key position.
MODE MODE
MODE MODE
eS1 - eS2
eS1 - eS2
eS3
eS3
eS3
eS1_eS2_eS3_Rev_0_EN.indb 12eS1_eS2_eS3_Rev_0_EN.indb 12 10/10/2017 16:57:0510/10/2017 16:57:05

13
CONTROLS AND INSTRUMENTS
DE
SL
HU
EN
KEY SWITCHThe key switch enables or disables system and steering lock.The scooter is provided with a main key and a duplicate, both can be used to actuate the key switch and to open the seat.Please, keep the duplicate key separated from the main one.
Enabling and disabling the system
Turning the key to the system enables.Turning the key to the system disables.
WARNING Do not turn or remove key while driving.
PUSH
IGNITIO
NeS1_eS2_eS3_Rev_0_EN.indb 13eS1_eS2_eS3_Rev_0_EN.indb 13 10/10/2017 16:57:0710/10/2017 16:57:07

14
% %
Km/tripA B
PWR ECOKm/
SELECT SET
1020
Km/h
mph10
1 20
2
% %
Km/tripA B
PWR ECOKm/
SELECT SET
Km/h
mph
CONTROLS AND INSTRUMENTSINSTRUMENT PANEL
A. Warning lightsB. SpeedometerC. Digital displayD. Display controls
A A
B B
C C
D D
eS1 - eS2 eS3
eS1_eS2_eS3_Rev_0_EN.indb 14eS1_eS2_eS3_Rev_0_EN.indb 14 10/10/2017 16:57:0910/10/2017 16:57:09

15
CONTROLS AND INSTRUMENTS
DE
SL
HU
EN
WARNING LIGHTSE. Engine enabling warning lightF. Temperature warning lightG. Serious problem warning lightH. Operating turn indicators warning lightI. Lights warning lightJ. Charging warning lightK. High beam light ON indicator (eS3 only)
Engine enabling warning light (eS1 - eS2 only)The warning light indicating that the engine is enabled is amber, it turns on as soon as the engine is enabled and remains on until it is disabled.
E F G H J KI
eS1_eS2_eS3_Rev_0_EN.indb 15eS1_eS2_eS3_Rev_0_EN.indb 15 10/10/2017 16:57:1210/10/2017 16:57:12

16
CONTROLS AND INSTRUMENTSTemperature warning lightThe warning light indicating high temperature is amber, it turns on and remains on to indicate an overtemperature alarm. Its alarm code can be read on the display.Alarm description regarding displayed code is explained in “ERROR CODES” chapter.
Serious problem warning lightSerious problem warning light is red, it turns on together with the malfunction one.Stop the vehicle when it turns on and read the error code on the display.It is necessary to go to an authorized workshop to have the vehicle checked.Alarm description regarding displayed code is explained in “ERROR CODES” chapter.
eS1_eS2_eS3_Rev_0_EN.indb 16eS1_eS2_eS3_Rev_0_EN.indb 16 10/10/2017 16:57:1610/10/2017 16:57:16

17
CONTROLS AND INSTRUMENTS
DE
SL
HU
EN
Operating turn indicators warning lightTurn indicators warning light is green, it turns on and blinks to indicate RH or LH activation and it turns off when they are deactivated.
Lights warning lightLights warning light is green, it turn on when engine is enabled.
Charging warning lightCharging warning light is amber, it turns on and remains on when the battery charger is connected and batteries are being charged. It also turns on when power regeneration is active.
High beam light indicator (eS3 only)The high beam light indicator is blue, it is turned on by actuating the selector on the left stalk.
eS1_eS2_eS3_Rev_0_EN.indb 17eS1_eS2_eS3_Rev_0_EN.indb 17 10/10/2017 16:57:1610/10/2017 16:57:16

18
CONTROLS AND INSTRUMENTSSPEEDOMETER (eS1 - eS2)Speedometer indicates current speed.The value is displayed in kilometres per hour (km/h) and miles per hour (mph).
MENU SETTING BUTTONS SELECT and SET buttons must be used to:• select the parameter to display,• reset displayed value (km/trip),• set and confirm new values (hour).
SPEEDOMETER (eS3)Speedometer indicates current speed.The value is displayed in kilometres per hour (km/h) and miles per hour (mph).
1020
Km/h
mph
10
1 20
2
Km/h
mph
SELECT SET
eS1_eS2_eS3_Rev_0_EN.indb 18eS1_eS2_eS3_Rev_0_EN.indb 18 10/10/2017 16:57:1810/10/2017 16:57:18

19
CONTROLS AND INSTRUMENTS
DE
SL
HU
EN
DIGITAL DISPLAYOn the digital display it is possible to have all the information regarding vehicle status, namely:• battery presence on A and B compartments,• battery charge,• total mileage,• partial mileage,• mileage to go with remaining battery charge,• time,• alarms and their error codes.•
Maintenance warning lightMaintenance warning light can light by itself or together with Serious problem warning light.If it turns on, it is advisable to take the vehicle to an Authorized Dealer to have the problem controlled and solved.
% %
Km/tripA B
PWR ECOKm/
eS1_eS2_eS3_Rev_0_EN.indb 19eS1_eS2_eS3_Rev_0_EN.indb 19 10/10/2017 16:57:1910/10/2017 16:57:19

20
USECHECKS BEFORE DEPARTUREBefore using the scooter, it is always good practice to carry out certain controls:• check battery charge,• check headlight, tail light, turn indicators and number plate light operation,• check front and rear brakes operation,• check fluid level in front brake reservoir,• check tire pressure,• check that the seat is not raised and locked and that charger cables are properly placed in the battery
compartment.To properly carry out these controls, refer to the instructions in this manual.
SAFE DRIVING WARNING Before the first use, we suggest you to try the scooter in areas closed to traffic until
you familiarise yourself with it.WARNING Always ride within the limits of your abilities.
CAUTION Riding under the influence of alcohol, drugs or certain medicines is dangerous and it is prohibited by law.
WARNING Before you start riding, always wear a helmet and fasten it correctly.
WARNING If you are carrying a passenger, before starting to drive check that he has worn the helmet and that it is correctly fitted and fastened.
WARNING Recommend the passenger to always remain firmly attached to the appropriate grab handle while traveling.
eS1_eS2_eS3_Rev_0_EN.indb 20eS1_eS2_eS3_Rev_0_EN.indb 20 10/10/2017 16:57:1910/10/2017 16:57:19

21
USE
DE
SL
HU
EN
WARNING Avoid departing with the centre stand down: when the rear wheel makes contact with the ground, it should not turn to avoid abrupt departure.
WARNING Drive very carefully on bumpy, wet, snowy or slippery roads, it will be necessary to reduce speed and increase safety distance from other vehicles.
WARNING Use both brakes to allocate braking action on both wheels.
CAUTION Do not brake hard on wet, slippery or dirt roads.
WARNING If travelling on a wet road for some time without actuating the brakes, initially there will be less braking action. Under these conditions, periodically actuate the brakes.
CAUTION In case of rain visibility decreases, so reduce speed and drive carefully.
eS1_eS2_eS3_Rev_0_EN.indb 21eS1_eS2_eS3_Rev_0_EN.indb 21 10/10/2017 16:57:2110/10/2017 16:57:21
22
USE
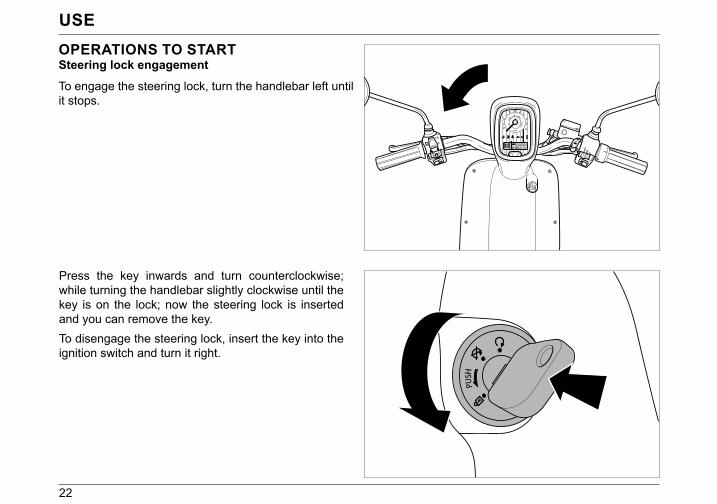
Press the key inwards and turn counterclockwise; while turning the handlebar slightly clockwise until the key is on the lock; now the steering lock is inserted and you can remove the key.To disengage the steering lock, insert the key into the ignition switch and turn it right.
OPERATIONS TO STARTSteering lock engagementTo engage the steering lock, turn the handlebar left until it stops.
% %
Km/tripA B
PWR ECOKm/
SELECT SET
1020
Km/h
mph
10
1 20
2
PUSH
IGNI TIO
PUSH
eS1_eS2_eS3_Rev_0_EN.indb 22eS1_eS2_eS3_Rev_0_EN.indb 22 10/10/2017 16:57:2410/10/2017 16:57:24

23
USE
DE
SL
HU
EN
Engine enablingThe engine must be enabled to start.To enable the engine, insert the key into the switch and turn it to , then press for 3 seconds to enable the engine, motion warning light will turn on.To disable the engine, press the engine enabling button again for 3 seconds and turn the key in the ignition switch to the left on .The engine will be disabled also by rotating the key to .
MODE MODE
PUSH
IGNITIO
N
eS1 - eS2 eS3
eS1_eS2_eS3_Rev_0_EN.indb 23eS1_eS2_eS3_Rev_0_EN.indb 23 10/10/2017 16:57:2410/10/2017 16:57:24

24
USEDriving mode selection (eS1 - eS2)Three different riding modes can be selected through the ignition switch: Mode ECONOMY Max speed: 32 Km/h. ECO icon appears on the display. Mode NORMAL Max speed: 37 Km/h. No icon appears on the display. Mode POWER Max speed: 45 Km/h. PWR icon appears on the display.eS1 version: autonomy up to 50 KmeS2 version: autonomy up to 80 KmFor the eS1 vehicle, the autonomy values listed above are valid with the use of only one battery and the maximum regeneration mode set, with the use of a second battery the autonomy values listed above are doubled.In the case of eS2 and eS3 vehicles, the autonomy values listed above are valid with the use of 2 batteries connected and with the same charging value.
WARNING Lithium-ion batteries undergo a progressive performance decay that reduces the initial autonomy values.
MODE
eS1 - eS2
eS1_eS2_eS3_Rev_0_EN.indb 24eS1_eS2_eS3_Rev_0_EN.indb 24 10/10/2017 16:57:2710/10/2017 16:57:27
25
USE
DE
SL
HU
EN
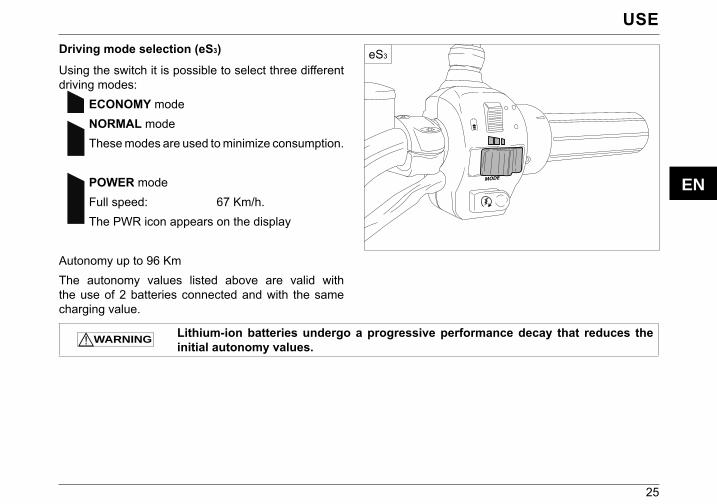
Driving mode selection (eS3)Using the switch it is possible to select three different driving modes: ECONOMY mode NORMAL mode
These modes are used to minimize consumption.
POWER mode Full speed: 67 Km/h. The PWR icon appears on the display
Autonomy up to 96 KmThe autonomy values listed above are valid with the use of 2 batteries connected and with the same charging value.
WARNING Lithium-ion batteries undergo a progressive performance decay that reduces the initial autonomy values.
MODE
eS3
eS1_eS2_eS3_Rev_0_EN.indb 25eS1_eS2_eS3_Rev_0_EN.indb 25 10/10/2017 16:57:2810/10/2017 16:57:28

26
USEPower regeneration selectionDuring scooter deceleration, the battery can be automatically recharged by activating the power regeneration mode.Use the 2 position turn indicators switch to activate or deactivate power regeneration: Pressing the button upwards, power
regeneration mode is activated and deceleration increases.
Pressing the button downwards, power
regeneration mode is deactivated.Combining braking with deceleration, charging will be greater.When power regeneration mode is activated, charging warning light is on.With a high level of battery charge, power regeneration mode is not activated.
MODE
eS1 - eS2 eS3
eS1_eS2_eS3_Rev_0_EN.indb 26eS1_eS2_eS3_Rev_0_EN.indb 26 10/10/2017 16:57:3010/10/2017 16:57:30

27
USE
DE
SL
HU
EN
SELECTION OF DISPLAY FUNCTIONSOdometer data display modeUpon power up, all display lights will remain lit for a few seconds.Press SELECT to change the parameter on the display:Km Total mileage. The parameter cannot be modified.Km/trip Partial mileage. Keep SET pressed to zero during parameter
display.Km/ Mileage to go with remaining battery
charge. The value varies depending on the conditions of use, remaining battery charge, driving mode set and power regeneration mode selected.
PWR ECO
% %
Km/tripA BKm/
SELECT SET
eS1_eS2_eS3_Rev_0_EN.indb 27eS1_eS2_eS3_Rev_0_EN.indb 27 10/10/2017 16:57:3210/10/2017 16:57:32

28
USESetting the clock• Press and hold SELECT button for 2 seconds: two
hour digits will start blinking.• Press SELECT as necessary to set the right hour.• Press SET: minutes digits will start blinking while
hour digits will not blink any more.• Press SELECT as necessary to set the right
minutes.• Press SET button to exit.Since time is stored in the vehicle battery, in case of two batteries, it is convenient to set the clock with both batteries installed to synchronize time. In the presence of two batteries, time displayed is the one stored in compartment A.For battery description and placement in compartments A and B refer to the chapter “BATTERY AND CHARGE”.
%
Km/tripA
PWR
SELECT SET
eS1_eS2_eS3_Rev_0_EN.indb 28eS1_eS2_eS3_Rev_0_EN.indb 28 10/10/2017 16:57:3210/10/2017 16:57:32

29
USE
DE
SL
HU
EN
SEATOpening the seatInsert the key into the lock on the rear left.Turn clockwise.Tilt the seat forward.While closing, the seat lock will automatically lock.
Bag hookThe bag hook is located between the seat and the footrest.Pressing on the bottom of the hook, the upper part comes out and it is possible to hang an object.Releasing the hook, it will automatically return to its seat.
WARNING The object carried should not tamper or restrict movement of the legs.
WARNING Avoid placing all the weight on the hook, the object carried should also rest on the platform.
eS1_eS2_eS3_Rev_0_EN.indb 29eS1_eS2_eS3_Rev_0_EN.indb 29 10/10/2017 16:57:3310/10/2017 16:57:33

30
USEPARKING THE SCOOTERUse the stand to park.Lower the stand with your foot until complete opening and simultaneously rest the scooter on it.Pushing the scooter forward, the stand automatically returns to its starting position.
WARNING Use the stand on compact and flat surfaces.
WARNING Pay attention to manoeuvring when parked, in particular when placing the scooter on the stand so that the vehicle does not fall.
eS1_eS2_eS3_Rev_0_EN.indb 30eS1_eS2_eS3_Rev_0_EN.indb 30 10/10/2017 16:57:3410/10/2017 16:57:34

31
DE
SL
HU
EN
BATTERIES AND RECHARGEBATTERIESThe first equipment of the vehicle eS2 is provided with two lithium ion batteries. The eS1 model is supplied with a standard battery while the second is provided as an option (model TVC102 batteries). The eS3 model is equipped with two standard batteries (model TVC103 batteries).The two batteries are housed in the two compartments A and B located under the seat.Weight of each battery: 7.6 kg.Internal temperature of the battery while charging: From +10 C° to +45 C°.There may be autonomy reduction at low temperatures.Autonomy is doubled when using both batteries.If you use the mod scooter. eS1, the system lets you use the optional second battery simultaneously. The vehicle can still circulate using a single battery that can be located either both in the compartment A and the compartment B. With the use of two batteries autonomy doubles.The battery is an always active component, it may show light voltage drops even with the control panel off.Battery management in the first use of the scooterWith new batteries it is necessary to perform at least 3 - 4 complete charging/discharging cycles, bringing the charge to 100% and discharging the battery at a value close to 0%, this allows you to properly align the batteries in the first period of use.
If the scooter remains off for a long period at low temperatures (0 to 10°C), recharging might take longer.If the scooter is not used for a long period of time, recharge the batteries at least every three months and until 50% (MODE - MAINTENANCE)
A
B
eS1_eS2_eS3_Rev_0_EN.indb 31eS1_eS2_eS3_Rev_0_EN.indb 31 10/10/2017 16:57:3610/10/2017 16:57:36

32
BATTERIES AND RECHARGE
Never disconnect wires from the electrical system with engine running so as to prevent battery damage.
Disassembling and/or tampering with the batteries will make the warranty void.
Respecting the environment, at the end of their life cycle, batteries must be collected and disposed of according to law.
CAUTION Do not use this battery for purposes other than those indicated. Use other than intended could result in short circuit within the battery which could catch fire.
CAUTION
Fire hazard• Do not disassemble or brake the battery.• As a result of an accident with serious mechanical damage to the battery, there
could be short circuits within the battery itself and it may be damaged or catch fire.
• In case of an accident leave the vehicle outdoors for about an hour at a safe distance from any flammable material. With a finger touch the battery briefly and cautiously. If you sense an unusually high temperature, leave your vehicle where it is. Do not continue using it for any reason. As soon as the battery has cooled, take the vehicle to your dealer.
• In the presence of flames or smoke rising from the battery, stop the vehicle immediately. Then turn off the fire with a fire extinguisher, if available. If a fire extinguisher is not available, wait until the fire has extinguished and all parts of the vehicle have cooled down. If there is a risk that the fire spreads to nearby objects, notify the Fire Department.
WARNING After charging and before removing the batteries, disconnect the power plug of the charger from the socket.
eS1_eS2_eS3_Rev_0_EN.indb 32eS1_eS2_eS3_Rev_0_EN.indb 32 10/10/2017 16:57:3810/10/2017 16:57:38

33
BATTERIES AND RECHARGE
DE
SL
HU
EN
BATTERY CHARGERBatteries are charged using the specific charger supplied (MOD. TVC202).The charger is activated only when connected to the mains with its cable and to the vehicle or to a battery through the socket. Once connected, all leds will flash for a few seconds, and then indicate the remaining battery depending on the amount of leds lit.The button MODE on the battery charger allows setting research mode choosing between:MAINTENANCE: press MODE until 2 leds blink (up to 50), battery is charged until 50%. Now it is possible to leave the battery unused for longer periods while preserving battery life. LONG LIFE (90% recharge): this mode is recommended in periods when the scooter is frequently used to obtain the best and prolonged operation of the batteries. For maximum system efficiency, it is recommended to alternate 1 100% charge cycle every 10 90% cycles.This procedure allows to obtain a high number of charge and discharge cycles of the batteries, maintaining a good charge percentage performance over time.To select this mode press MODE until 4 leds start flashing (up to 90).MAX. CHARGE: default mode, press MODE until 5 leds blink (up to 100), battery is charged until 100%. In this way there is maximum autonomy.Charging time (eS1 - eS2): from 1 to 4 hours (full charge starting from low battery).Charging time (eS3): from 1 to 6 hours (full charge starting from low battery).
eS1_eS2_eS3_Rev_0_EN.indb 33eS1_eS2_eS3_Rev_0_EN.indb 33 10/10/2017 16:57:3910/10/2017 16:57:39

34
BATTERIES AND RECHARGE
CAUTION
The charger is not intended to be used by persons with reduced physical, sensory or mental capacities, or lack of experience or knowledge, unless a person responsible for their safety has supervised or instructed them concerning the use of the charger.Keep the battery charger and batteries out of the reach of children, make sure that they do not play with the devices.
CAUTION
Risk of electric shock• This device is equipped with a 3-pole plug with grounding contact. Make sure that
the power outlet has 3 pins and grounding contact. If not, contact an electrician to replace the outlet.
• Do not try to neutralize the grounding contact safety of the 3-pole plug. • Connect the device to a power supply network protected by a differential switch
with a sensitivity not exceeding 30mA. • The electrical connection of the device must comply with the details on its
electrical data label.• Do not use extension cords. If the length of the power cord is not sufficient,
consult an electrician or qualified installer.• Do not cut or repair the power cord.• The power cord of this device is of special type: if it is damaged it must be
replaced by the manufacturer, or by its service centre or by an operator with similar qualification, in order to to avoid all risk.
CAUTIONThe battery chargers model TC202 and TC203 are intended to be used exclusively for charging batteries model TVC102 and TVC103 in indoor environments. Do not use the battery charger for purposes other than those specified.
eS1_eS2_eS3_Rev_0_EN.indb 34eS1_eS2_eS3_Rev_0_EN.indb 34 10/10/2017 16:57:4010/10/2017 16:57:40

35
BATTERIES AND RECHARGE
DE
SL
HU
EN
CHARGING THE BATTERIESCharge level of the batteries is shown on the left side of the digital display of the vehicle. On the display, the icon A indicates the charge of the battery housed in compartment A, icon B indicates the charge of the battery housed in compartment B. When battery charge level is close to 0% it is necessary to recharge.Batteries can be recharged in two ways:CHARGING WITH BATTERY ON BOARDCHARGING WITH BATTERY OUTBOARD
CAUTION Charging must be performed indoors and protected from the weather.
CAUTION To recharge the batteries first connect the battery charging connector to the battery outlet and then connect the battery charger plug to the mains.
Km/trip
SELECT SET
PWR
% %
A B
eS1_eS2_eS3_Rev_0_EN.indb 35eS1_eS2_eS3_Rev_0_EN.indb 35 10/10/2017 16:57:4110/10/2017 16:57:41

36
BATTERIES AND RECHARGE
While charging, the amber light on the instrument panel will turn on and remain lit until the plug is removed from the mains.
CHARGING WITH BATTERY ON BOARDTo charge with battery on board:Disable the system.Raise the seat, make sure the charger is connected to the socket and that the batteries are properly inserted in their compartments and plugged to the connectors, pull out the battery charger spring wire equipped with plug.
Connect the plug to the socket.
eS1_eS2_eS3_Rev_0_EN.indb 36eS1_eS2_eS3_Rev_0_EN.indb 36 10/10/2017 16:57:4210/10/2017 16:57:42

37
BATTERIES AND RECHARGE
DE
SL
HU
EN
Locking the seat in raised position for cable passageWhile charging the battery on board you can close the seat using its lock while maintaining a sufficient opening for the charging cable.This can be useful in case of outdoors charging so as to keep batteries and charger covered but allowing heat generated by the process to escape.Open the seat, move the spring closing mechanism to the left and press.
eS1_eS2_eS3_Rev_0_EN.indb 37eS1_eS2_eS3_Rev_0_EN.indb 37 10/10/2017 16:57:4310/10/2017 16:57:43

38
BATTERIES AND RECHARGEClose the seat pressing the mechanism.
The seat is locked in raised position to allow the charging cable to pass.Open the lock with the key and lift the seat to automatically return to its original position.
eS1_eS2_eS3_Rev_0_EN.indb 38eS1_eS2_eS3_Rev_0_EN.indb 38 10/10/2017 16:57:4410/10/2017 16:57:44

39
BATTERIES AND RECHARGE
DE
SL
HU
EN
CHARGING WITH BATTERY OUTBOARDThe charger can be removed to allow charging a battery leaving the scooter the possibility to circulate only with the other one.Disconnect the battery cable by pressing on the two side tabs of the connector and pull it out.
Remove the battery from the compartment using the lifting handle.Once removed, hold it with both hands.
eS1_eS2_eS3_Rev_0_EN.indb 39eS1_eS2_eS3_Rev_0_EN.indb 39 10/10/2017 16:57:4510/10/2017 16:57:45

40
BATTERIES AND RECHARGEDisconnect the charger cable from its socket, to remove it press the two side tabs.
Remove the charger along with its two cables.
CAUTION When removing the battery charger it is recommended to handle it with care to prevent it from falling on yourself or on the ground.
eS1_eS2_eS3_Rev_0_EN.indb 40eS1_eS2_eS3_Rev_0_EN.indb 40 10/10/2017 16:57:4610/10/2017 16:57:46

41
BATTERIES AND RECHARGE
DE
SL
HU
EN
Place battery and charger on a stable surface.First, connect the charger cable to the battery socket under the spring flap. A “click” shows correct introduction.Then connect the charger to the mains.Select desired recharge mode, as shown in “BATTERY CHARGER”.
Once charging has finished, place battery and charger in their compartment as follows:First place the charger on the vehicle and connect the cable with connector to the vehicle socket.
eS1_eS2_eS3_Rev_0_EN.indb 41eS1_eS2_eS3_Rev_0_EN.indb 41 10/10/2017 16:57:4710/10/2017 16:57:47

42
BATTERIES AND RECHARGEPlace the battery in its compartment holding it by the handle and plug the connector cable of the vehicle to the socket under the spring flap on the battery, insert the connector until you hear a “click” and make sure it is properly secured.
Then place the spring cable next to the battery charger and rewind the cable on top of the battery.
eS1_eS2_eS3_Rev_0_EN.indb 42eS1_eS2_eS3_Rev_0_EN.indb 42 10/10/2017 16:57:4810/10/2017 16:57:48

43
DE
SL
HU
EN
ADJUSTMENTS AND PERIODIC MAINTENANCEADJUSTMENTSREAR VIEW MIRRORSOn the right and left of the handlebar, two mirrors are mounted and can be adjusted manually by rotating the rod to the desired position.
HEADLAMPHeadlamp light beam height can be adjusted by turning the adjustment screw under the lamp with TORX T 20 wrench supplied as an accessory and placed under the seat.By rotating the screw 1/2 turn clockwise, the light beam will point downwards while counterclockwise it will point upwards.
eS1 - eS2 eS3
eS1_eS2_eS3_Rev_0_EN.indb 43eS1_eS2_eS3_Rev_0_EN.indb 43 10/10/2017 16:57:4910/10/2017 16:57:49

44
ADJUSTMENTS AND PERIODIC MAINTENANCEFRONT DISC BRAKEThe wear of disc and pads is automatically compensated, therefore it has no effect on the operation of the brake and does not require registration.If there is excessive stroke and the lever is too close to the grip when operating the brake, it could be due to the presence of air in the circuit or to irregular operation of the brake. Effective braking action should begin after approximately 1/3 of the brake lever stroke.
WARNING In case of brake malfunctions check brake pad wear, if thickness is reduced both are to be replaced at an authorized workshop.
WARNING After replacing the pads operate the brake lever several times to reposition them and bring the lever to the right position.
eS1 - eS2 eS3
eS1_eS2_eS3_Rev_0_EN.indb 44eS1_eS2_eS3_Rev_0_EN.indb 44 10/10/2017 16:57:5010/10/2017 16:57:50

45
ADJUSTMENTS AND PERIODIC MAINTENANCE
DE
SL
HU
EN
REAR BRAKE DRUM (eS1 - eS2)To adjust rear brake act on the nut as shown.Tightening the nut, free play of the control lever decreases and braking action increases.Conversely, loosening the nut, free play of the control lever increases and braking action decreases. After adjustment, with the brake control lever in rest position, check that the wheel turns freely.Effective braking action should begin after approximately 1/3 of the brake lever stroke.
REAR DRUM BRAKE WITH COMBINED FUNCTION (eS3 only)The scooter model eS3 uses the dual braking: actuating the rear brake automatically also activates the front brake.The distribution has prevalence on the rear and the adjustment of the rear adjusting nut affects both wheels.
eS1_eS2_eS3_Rev_0_EN.indb 45eS1_eS2_eS3_Rev_0_EN.indb 45 10/10/2017 16:57:5210/10/2017 16:57:52

46
ADJUSTMENTS AND PERIODIC MAINTENANCEORDINARY MAINTENANCE PROCEDURES
CAUTION Tires should be replaced when treads reach the wear limit provided by law.
TYRESThe vehicle is equipped with tubeless tires.Regularly check tyre pressure and, if necessary, adjust it before riding.eS1
Front tyre pressure 2,0 bar.Rear tyre pressure 2,5 bar.eS2 - eS3
Front tyre pressure 2,0 bar.Rear tyre pressure 2,8 bar.Tires have a wear indicator and must be changed as soon as these are visible on the tread.Check also for cuts in the sides or irregular wear. In this case consult an authorized workshop for replacement.
CAUTION Always check tire pressure when cold, wrong pressure causes abnormal tire wear and makes driving dangerous.
eS1_eS2_eS3_Rev_0_EN.indb 46eS1_eS2_eS3_Rev_0_EN.indb 46 10/10/2017 16:57:5210/10/2017 16:57:52

47
ADJUSTMENTS AND PERIODIC MAINTENANCE
DE
SL
HU
EN
FRONT BRAKE FLUID LEVEL CONTROLThe front brake fluid reservoir is equipped with an inspection window to control the level in the tank.If the brake fluid level is low or insufficient, DO NOT fill the tank but check the wear of pads and disc as well as for leaks in the braking circuit.
WARNING Brake fluid is hygroscopic, i.e. it absorbs moisture from the surrounding air. If humidity in the fluid exceeds a certain value, braking will be inefficient.
WARNING It is advisable to change the fluid every 2 years, never use brake fluid from partially used or open containers.
WARNING Use only DOT4 brake fluid
WARNING Brake fluid is highly corrosive. Prevent it from being in contact with skin or with painted parts. In case of contact with skin, wash thoroughly with water.
eS1_eS2_eS3_Rev_0_EN.indb 47eS1_eS2_eS3_Rev_0_EN.indb 47 10/10/2017 16:57:5310/10/2017 16:57:53

48
ADJUSTMENTS AND PERIODIC MAINTENANCEHEADLAMP BULB REPLACEMENT (eS1 - eS2)To replace the headlamp H8 35W bulb, use a supplied TORX T 20 wrench (under the seat), remove the 2 lateral screws under the headlamp and then follow the procedure:
first remove the left half-shell and then the right one turning them outwards,
eS1 - eS2
eS1 - eS2
eS1_eS2_eS3_Rev_0_EN.indb 48eS1_eS2_eS3_Rev_0_EN.indb 48 10/10/2017 16:57:5510/10/2017 16:57:55

49
ADJUSTMENTS AND PERIODIC MAINTENANCE
DE
SL
HU
EN
disconnect the connector, turn the bulb holder anticlockwise and remove it.
Replace bulb and holder with a new one.
HEADLIGHT (eS3)In the scooter model eS3 the headlight is equipped with an LED lamp and there is no need to replace it.If the bulb is exhausted it is necessary to change the complete headlight.For the replacement, contact an authorized service point.
eS1 - eS2 eS1 - eS2
eS3
eS1_eS2_eS3_Rev_0_EN.indb 49eS1_eS2_eS3_Rev_0_EN.indb 49 10/10/2017 16:57:5610/10/2017 16:57:56

50
ADJUSTMENTS AND PERIODIC MAINTENANCETAIL LIGHTS AND TURN INDICATORSThe tail light, front and rear turn indicators and number plate light are equipped with LEDs and are integrated to the vehicle structure. To replace them contact an authorized workshop.
eS1_eS2_eS3_Rev_0_EN.indb 50eS1_eS2_eS3_Rev_0_EN.indb 50 10/10/2017 16:57:5710/10/2017 16:57:57

51
ADJUSTMENTS AND PERIODIC MAINTENANCE
DE
SL
HU
EN
YEARS 1 2 3 4 5 6 7 8 9 10
Km x 1,000 1 4 8 12 16 20 24 28 32 36
Headlamp orientation C/R C/R C/R C/R C/R C/R C/R C/R C/R
Front brake fluid (replace every 2 years) S S S S S
Front brake pad wear C S C S C S C S C
Rear brake shoe wear C/R C/S C/S C/S C/S
Transmission belts C C C/S C C/S C C/S C C/S C
Nuts, bolts, fasteners C C C C C C
Stand C/L C/L C/L C/L C/L
Steering bearings C C C C
ORDINARY MAINTENANCE PROCEDURES TABLEC: clean; R: adjust; L: lubricate; S: replace
Except for “Headlamp orientation” all checks must be carried out by qualified personnel from ASKOLL.
eS1_eS2_eS3_Rev_0_EN.indb 51eS1_eS2_eS3_Rev_0_EN.indb 51 10/10/2017 16:57:5710/10/2017 16:57:57

52
ADJUSTMENTS AND PERIODIC MAINTENANCECLEANING THE VEHICLETo avoid oxidation, wash the scooter every time it is used in extreme weather conditions or roads sprinkled with salt or de-icing products, conditions of air pollution such as cities, industrial zones, areas of high salinity or moisture in the atmosphere such as maritime areas.Keep the frame clean from long-accumulated dirt, residues of industrial dust, dead insects, bird droppings, etc.Use a low pressure water jet to soften dirt accumulated on the paintwork, then remove it with a soft sponge soaked with abundant water and shampoo, rinse and dry with a suede.Avoid washing the scooter under direct sunlight, especially in summer, to prevent it from drying and warming the shampoo immediately before rinsing since this may damage the paint.
Do not use high pressure water jets to washing, so as to prevent damaging delicate components of the vehicle.
When washing do not direct the water jet directly on delicate components such as electrical wiring or their connections.Never use rags soaked in gasoline, alcohol or potentially corrosive liquids to wash painted surfaces, plastic or the seat to avoid loss of gloss and mechanical properties of the materials, or even damaging them.
The scooter must be washed in areas equipped for collecting and purifying the liquid used.
eS1_eS2_eS3_Rev_0_EN.indb 52eS1_eS2_eS3_Rev_0_EN.indb 52 10/10/2017 16:57:5810/10/2017 16:57:58

53
ADJUSTMENTS AND PERIODIC MAINTENANCE
DE
SL
HU
EN
VEHICLE INACTIVITYIn preparation for a long period of inactivity it is advisable to:• make a general clean up of the scooter,• store in a covered place,• park the scooter on the stand so that wheels are not in contact with the ground in the same position.• cover the scooter with a canvas.
eS1_eS2_eS3_Rev_0_EN.indb 53eS1_eS2_eS3_Rev_0_EN.indb 53 10/10/2017 16:57:5910/10/2017 16:57:59

54
ERROR CODESERROR CODES
Communication system failure: detection of communication problems between intelligent units. It is advisable to take the vehicle to an authorized workshop.
Inverter failure: the system detects a failure on the inverter. It is advisable to take the vehicle to an authorized workshop.
ECU failure: the system detects a failure on the ECU. It is advisable to take the vehicle to an authorized workshop.
Power circuit failure: the system detects an abnormal absorption by the engine. For safety reasons, the system does not supply power. It is advisable to take the vehicle to an authorized workshop.
Battery A failure:the system detects a failure on battery A. It is advisable to take the battery to an authorized workshop.
%
A
%
A
%
A
%
A
%
A
eS1_eS2_eS3_Rev_0_EN.indb 54eS1_eS2_eS3_Rev_0_EN.indb 54 10/10/2017 16:57:5910/10/2017 16:57:59

55
ERROR CODES
DE
SL
HU
EN
Battery B failure: the system detects a failure on battery B. It is advisable to take the battery to an authorized workshop.
Battery overtemperature: the system detects excessive temperature on the batteries and inhibits the supply power. Remove the vehicle from places with high temperature and wait for the batteries to cool down.Inverter overtemperature: the system detects excessive temperature on the electronic unit. The system does not supply power until the temperature drops. Remove the vehicle from sources of heat.
Engine overtemperature: the system detects excessive temperature on the engine. It can function at reduced power to allow cooling.
Headlight malfunction: the system detects the failure or malfunction of the front lamp. Check its operation and replace it at an authorized workshop.
%
A
%
A
%
A
%
A
%
A
eS1_eS2_eS3_Rev_0_EN.indb 55eS1_eS2_eS3_Rev_0_EN.indb 55 10/10/2017 16:58:0110/10/2017 16:58:01

56
ERROR CODES
Turn indicators malfunction: the system detects the failure or malfunction of the turn indicators. Check its operation and replace them at an authorized workshop.
Tail light and number plate light malfunction: tthe system detects the failure or malfunction of the Tail light and number plate light. Check its operation and replace them at an authorized workshop.
%
A
%
A
eS1_eS2_eS3_Rev_0_EN.indb 56eS1_eS2_eS3_Rev_0_EN.indb 56 10/10/2017 16:58:0210/10/2017 16:58:02

57
DE
SL
HU
EN
TECHNICAL DATASCOOTER DIMENSIONS eS1 - eS2 - eS3
eS1_eS2_eS3_Rev_0_EN.indb 57eS1_eS2_eS3_Rev_0_EN.indb 57 10/10/2017 16:58:0310/10/2017 16:58:03

58
TECHNICAL DATA
MODEL eS1 eS2 eS3
ENGINE DATAModel Brushless permanent magnet sinusoidal motorMotor type EME 200 EME 201Operating voltage 54 VMAX power 1,5 KW electronically
limited3 KW electronically limited* with 2 batteries connected and with the same charging value
3 KW electronically limited* with 2 batteries connected and with the same charging value according to 168/2013 EC
BATTERYModel TVC102 TVC103Charge LI - IONWeight 7,6 KgAutonomy
50 Km in ECO mode80 Km in ECO mode* with 2 batteries connected and with the same battery charge
95.8 Km in POWER mode according to 168/2013 EC
Operation temperature When operating -20° a 45°
VEHICLE DATALong 1830 mmWide 726 mmWheelbase 1245 mmRearview mirror connection height 1011 mm
eS1_eS2_eS3_Rev_0_EN.indb 58eS1_eS2_eS3_Rev_0_EN.indb 58 10/10/2017 16:58:0410/10/2017 16:58:04

59
TECHNICAL DATA
DE
SL
HU
EN
MODEL eS1 eS2 eS3
VEHICLE DATAFront tire pressure 2 bar 2 barRear tire pressure 2,5 bar 2,8 barNet weight 72 Kg 77 KgMax. weight 235 Kg (vehicle + driver
+ additional load)245 Kg (vehicle + driver + additional load)
Maximum permissible weight on the rear carrier luggage rack 10Kg centered on the luggage rack
Seats 1 2 2Transmission Toothed belt
HEADLIGHT DATA Headlight H8 35W LEDTurn indicators LEDDashboard lights LED
TAIL LIGHT DATA Taillight LEDBrake light LEDTurn indicators LEDLicense plate light LED
eS1_eS2_eS3_Rev_0_EN.indb 59eS1_eS2_eS3_Rev_0_EN.indb 59 10/10/2017 16:58:0410/10/2017 16:58:04

DECLARATION OF CONFORMITY
DECLARATION OF CONFORMITY The undersignedname: Elio Marionilegal representative of the manufacturer: Askoll EVA Srladdress: Via Industria, 30 36031 DUEVILLE VI – Italy herewith declares that the productdescription: Battery chargers for electric scootersmodel: TVC202complies with the provisions of the following Directives(including all applicable amendments)
Directive 2014/35/EU (and Directive 2006/95/CE)Directive 2014/30/EU (and Directive 2004/108/CE)Directive 2011/65/EU
and all the following standards and / or technical specifications have been applied EN 60335-1; EN 60335-2-29EN 61000-3-2; EN 61000-3-3; EN 55014-1; EN 55014-2EN 62223EN 50581
Place Date Signature
Dueville January 1, 2016
eS1_eS2_eS3_Rev_0_EN.indb lxeS1_eS2_eS3_Rev_0_EN.indb lx 10/10/2017 16:58:0510/10/2017 16:58:05

61
NOTES
DE
SL
HU
EN
eS1_eS2_eS3_Rev_0_EN.indb 61eS1_eS2_eS3_Rev_0_EN.indb 61 10/10/2017 16:58:0510/10/2017 16:58:05

62
NOTES
eS1_eS2_eS3_Rev_0_EN.indb 62eS1_eS2_eS3_Rev_0_EN.indb 62 10/10/2017 16:58:0510/10/2017 16:58:05

E1616501