Weekly Lessons: Week 8 - Cloud Object Storage | Store ... Lessons: Week 8 Right Hand Muting...
6
Weekly Lessons: Week 8 Right Hand Muting Technique In this weeks lesson we will look at a great technique for creating a Muting Sound on your bass with your Right Hand. This technique is great for grooving as demonstrated in the Video. I use the muting technique a lot when playing Funk, R&B and Pop music. All the muting is done with the right hand, which is placed over the strings nearest the bridge with the right hand side of your palm. From there use your index finger (1 st finger) and thumb to strike the strings. The sound you get is a really warm almost dead sound with very little sustain. Exercise 1
Transcript of Weekly Lessons: Week 8 - Cloud Object Storage | Store ... Lessons: Week 8 Right Hand Muting...

Weekly Lessons: Week 8 Right Hand Muting Technique
In this weeks lesson we will look at a great technique for creating a Muting Sound on your bass with your Right Hand. This technique is great for grooving as demonstrated in the Video. I use the muting technique a lot when playing Funk, R&B and Pop music. All the muting is done with the right hand, which is placed over the strings nearest the bridge with the right hand side of your palm. From there use your index finger (1st finger) and thumb to strike the strings. The sound you get is a really warm almost dead sound with very little sustain.
Exercise 1
Exercise 1 is a great Warm Up Exercise and a way for you to get comfortable with this muting technique and also a way for you to work on your tone and articulation. It is based on a very simple chromatic concept. Here are some guidelines on how to practice this Warm Up Exercise:
• This Exercise should be played without stopping from start to finish.
• Start on your lowest open string and work your way down across each string before returning to your lowest string this time on the 1st Fret.
• Keep moving up 1 fret at a time using the fingering pattern 1 – 2 – 3 – 4 until you reach the 12th fret
with your pointer Finger (1st finger).
• Alternate with the thumb and pointer finger when playing this exercise.
• From there again without stopping descend back down the fingerboard 1 fret at a time until return back to the open string where you started. This time the fingering pattern will be 4 – 3 – 2 – 1 until the open string where the fingering pattern will be 3 – 2 – 1 – 0.
• At first don’t worry about using a Metronome, just make sure you can play the pattern really slowly
and smoothly.
• Once you are comfortable you can start using the metronome, which I recommended using at a very slow tempo at first. Stick with that slow tempo until t’s very easy and comfortable. Once you are at that point just raise the tempo increments by a small degree.
• To help improve your time and feel try using the metronome clicks on beats 2 and 4. Relying on less
of the metronome helps stabilize your time feel. Also beats 2 and 4 resemble the backbeat. It is a myth that improving your technique comes from playing fast. Technique is all aspects of your physical playing. Being patient, structured and patient builds technique and good form. It’s a good idea to work on technical exercises slowly regardless of whether or not you are using a metronome, because it helps you correct and adjust things you may not be aware of when you are pushing your limits.
• It helps with awareness when it comes to correct posture • Helps you remove or correct any bad habits

• You can focus on your left and right hand positioning
• You can focus and be aware of the tone you are creating
• Once you are comfortable then raise the tempo slowly This lesson is just an overview on how to improve your muting technique. Inside the Tony Grey Bass Academy we really get into this stuff in-depth with a lot of daily routines to help you stay structured. In time the thought process behind your technique will become natural and organic, allowing you to focus on the moment and express yourself creatively. Exercise 2a
• Exercise 2a is a pattern that’s played across 3 strings.
• The Right Hand is alternating between the thumb and Pointer Finger. They will be labeled T and P within the notation.
• The Left Hand fingering pattern is 1 – 3 – 1 – 2
• The exercise is designed to strengthen the 2nd and 4th fingers.
• This exercise also helps you gain control of your Right Hand by focusing on Alternating with the Thumb (T) and Pointer Finger (P).
• Follow the same instructions for Exercise 2a as we did for Exercise 1. In the Video Lesson I’m
demonstrating this exercise.
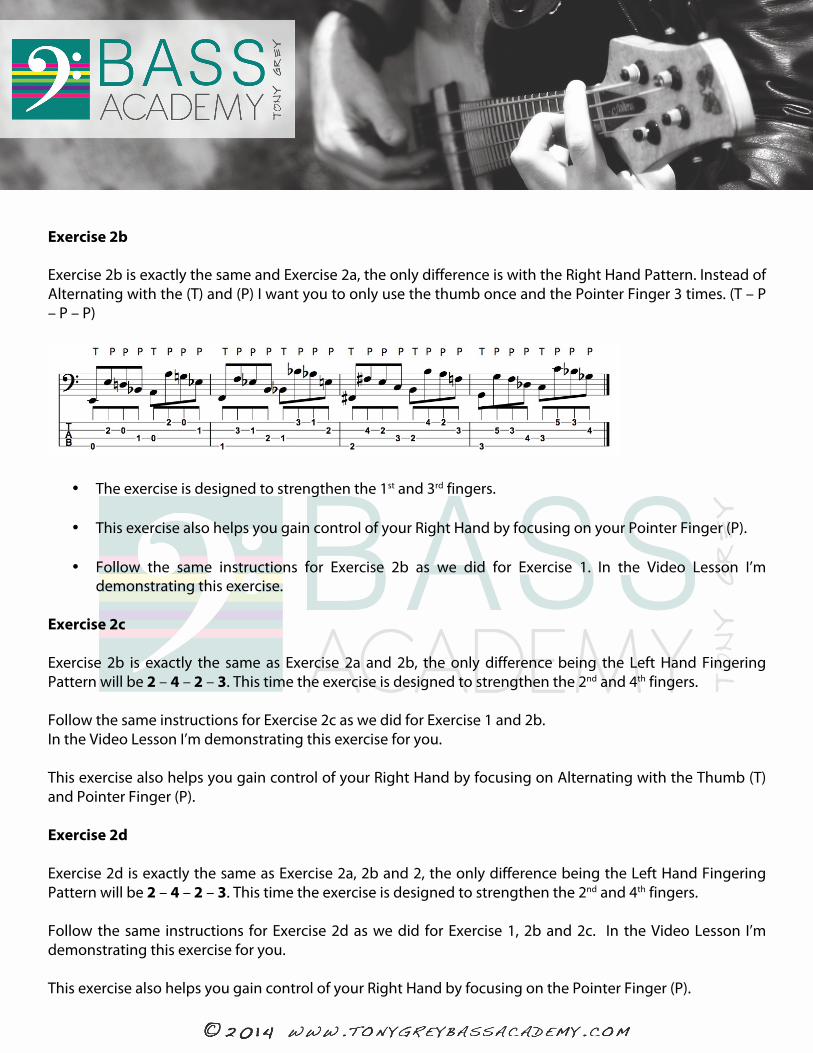
Exercise 2b Exercise 2b is exactly the same and Exercise 2a, the only difference is with the Right Hand Pattern. Instead of Alternating with the (T) and (P) I want you to only use the thumb once and the Pointer Finger 3 times. (T – P – P – P)
• The exercise is designed to strengthen the 1st and 3rd fingers.
• This exercise also helps you gain control of your Right Hand by focusing on your Pointer Finger (P).
• Follow the same instructions for Exercise 2b as we did for Exercise 1. In the Video Lesson I’m demonstrating this exercise.
Exercise 2c Exercise 2b is exactly the same as Exercise 2a and 2b, the only difference being the Left Hand Fingering Pattern will be 2 – 4 – 2 – 3. This time the exercise is designed to strengthen the 2nd and 4th fingers. Follow the same instructions for Exercise 2c as we did for Exercise 1 and 2b. In the Video Lesson I’m demonstrating this exercise for you. This exercise also helps you gain control of your Right Hand by focusing on Alternating with the Thumb (T) and Pointer Finger (P). Exercise 2d Exercise 2d is exactly the same as Exercise 2a, 2b and 2, the only difference being the Left Hand Fingering Pattern will be 2 – 4 – 2 – 3. This time the exercise is designed to strengthen the 2nd and 4th fingers. Follow the same instructions for Exercise 2d as we did for Exercise 1, 2b and 2c. In the Video Lesson I’m demonstrating this exercise for you. This exercise also helps you gain control of your Right Hand by focusing on the Pointer Finger (P).

Exercise 3a Because the Muted technique is used more in a groove setting, I thought it would be a good idea to write a technical exercise that would be closer to something you would actually be playing while using it.
• Lets first look quickly at the rhythms. It is basically a 2 Bar phrase that repeats itself up one fret at a time. Please watch the accompanying video demonstration for tips on how to feel and count this groove.
• The Right Hand fingering pattern is T – P – T – T – P – T – T – P – T – T – P repeated.
• The Fingering Pattern moves up 1 Fret every bar.
• Keep playing this pattern without stopping until you reach the 12th Fret of the E String with your
Pointer Finger.
• Once you are here descend back down the fingerboard 1 Fret at a time again without stopping until you return back to where you started from
• Without stopping continue this pattern this time on the A String.
• Repeat all the above instructions found in Exercise 1.
• In the Video Lesson I’m demonstrating this exercise.
Exercise 3b Exercise 3b is exactly the same and Exercise 3a; the only difference is with the Right Hand Pattern.
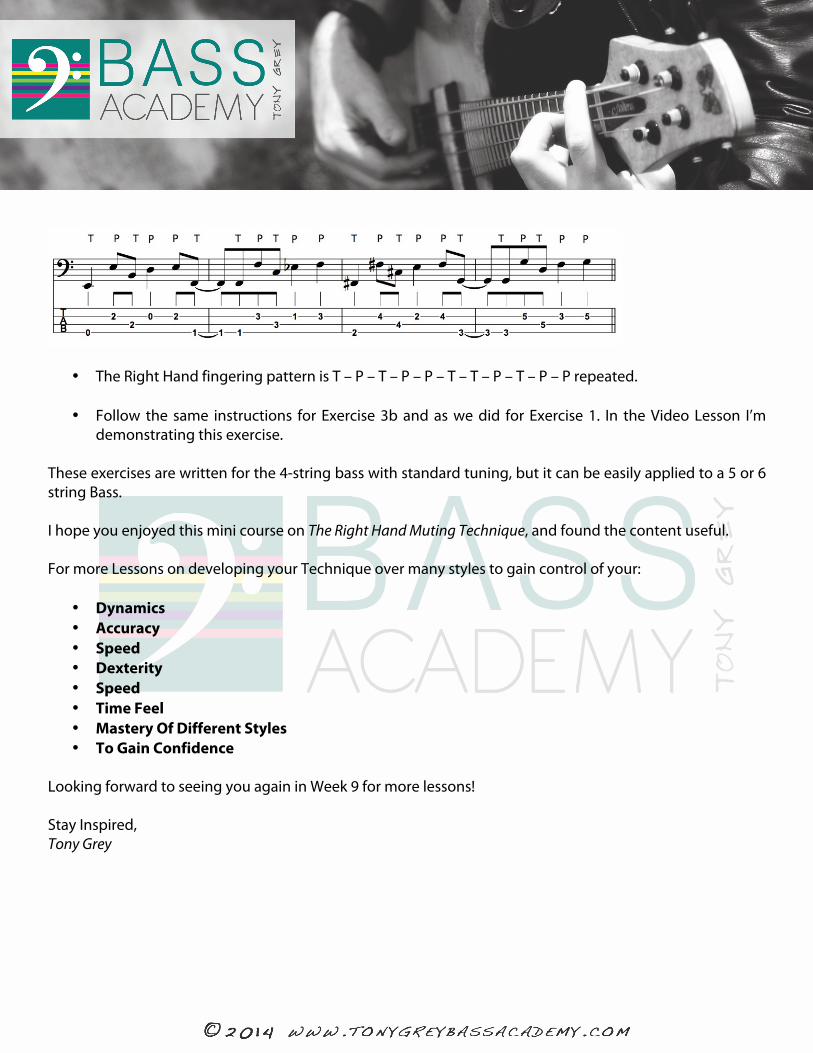
• The Right Hand fingering pattern is T – P – T – P – P – T – T – P – T – P – P repeated.
• Follow the same instructions for Exercise 3b and as we did for Exercise 1. In the Video Lesson I’m demonstrating this exercise.
These exercises are written for the 4-string bass with standard tuning, but it can be easily applied to a 5 or 6 string Bass. I hope you enjoyed this mini course on The Right Hand Muting Technique, and found the content useful. For more Lessons on developing your Technique over many styles to gain control of your:
• Dynamics • Accuracy • Speed • Dexterity • Speed • Time Feel • Mastery Of Different Styles • To Gain Confidence
Looking forward to seeing you again in Week 9 for more lessons! Stay Inspired, Tony Grey

](https://static.fdocuments.in/doc/165x107/577cb11a1a28aba7118b82f5/jesse-gress-guitar-school-the-beatles-guitar-technique-transcribed-solos.jpg)


![Operating Instructions Flexi Classic Muting Modular Safety Controller en IM0026926[1]](https://static.fdocuments.in/doc/165x107/577c837f1a28abe054b53102/operating-instructions-flexi-classic-muting-modular-safety-controller-en-im00269261.jpg)