WEEK 1 INTRODUCTION TO MICRO:BIT - Maker Ed
13
INTRODUCTION This week makers learn how to start using a microcontroller (Micro:bit) with coding software (MakeCode) to begin designing cool physical computing projects. ESSENTIAL QUESTIONS • What is a microcontroller? • How can I use one to make cool stuff that connects to the physical world? • How do artists, engineers, and makers solve problems when they’re working/inventing? LEARNING OUTCOMES 1. Learn about a microcontroller and how to program one with coding software. 2. Write lines of code and learn how to save, download, and upload code from software to the microcontroller. 3. Engage in pair programming as a way of collaborating with a partner. WEEK 1 INTRODUCTION TO MICRO:BIT INTRODUCTION | CYBER ARCADE: PROGRAMMING AND MAKING WITH MICRO:BIT 1-1 | MIDDLE SCHOOL
Transcript of WEEK 1 INTRODUCTION TO MICRO:BIT - Maker Ed

INTRODUCTIONThis week makers learn how to start using a microcontroller (Micro:bit) with coding software (MakeCode) to begin designing cool physical computing projects.
ESSENTIAL QUESTIONS• What is a microcontroller?
• How can I use one to make cool stuff that connects to the physical world?
• How do artists, engineers, and makers solve problems when they’re working/inventing?
LEARNING OUTCOMES1. Learn about a microcontroller and how to program one
with coding software.
2. Write lines of code and learn how to save, download, and upload code from software to the microcontroller.
3. Engage in pair programming as a way of collaborating with a partner.
WEEK 1 INTRODUCTION TO MICRO:BIT
INTRODUCTION | CYBER ARCADE: PROGRAMMING AND MAKING WITH MICRO:BIT 1-1 | MIDDLE SCHOOL

LESSON | CYBER ARCADE: PROGRAMMING AND MAKING WITH MICRO:BIT 1-2 | MIDDLE SCHOOL
VOCABULARYPhysical computing: Creating or using devices that interact with the world around us
Microcontroller: Small device (similar to a mini computer) used to control other devices and machines
Pair programming: Method of working in pairs where one person “drives” the laptop while the other “navigates” or instructs the driver
Software: Term used to describe computer programs
Code: Set of instructions that a computer understands
Upload: Sending information or data to a device or computer
Download: Taking information or data from a device or computer
USB to micro-USB cable: Cord that transfers data and information from the computer to a device
USB flash drive: Portable storage device that can store and move files
Troubleshooting: Using resources to solve issues as they arise
TEACHER RESOURCE | CYBER ARCADE: PROGRAMMING AND MAKING WITH MICRO:BIT 1-2 | MIDDLE SCHOOL
LESSON | CYBER ARCADE: PROGRAMMING AND MAKING WITH MICRO:BIT 1-3 | MIDDLE SCHOOL
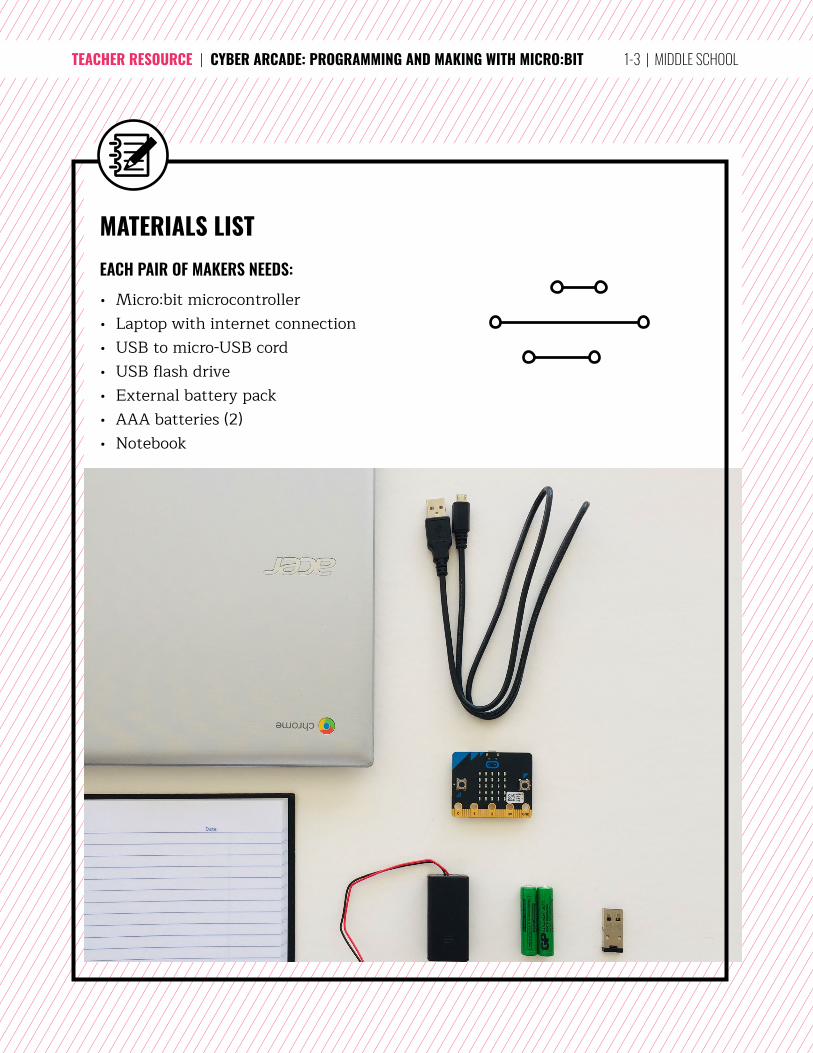
MATERIALS LIST EACH PAIR OF MAKERS NEEDS:• Micro:bit microcontroller• Laptop with internet connection• USB to micro-USB cord• USB flash drive• External battery pack• AAA batteries (2)• Notebook
TEACHER RESOURCE | CYBER ARCADE: PROGRAMMING AND MAKING WITH MICRO:BIT 1-3 | MIDDLE SCHOOL
TEACHER PREP WORK1. Ensure the internet connection is
working.2. Connect your laptop to a projector
or screen.3. Preload videos and slideshow.
4. Print the Troubleshooting Tips at the end of the lesson and post in the classroom.
FACILITATION TIPSMake sure that you’re comfortable with the save/download/upload process so you can help makers going through this process.Makers will likely be curious and explore various other blocks on the software page. It’s up to you as the facilitator to decide how much you want to let your makers explore. It can be helpful to verbally honor their curiosity but remind them to follow your specific instructions to ensure everyone learns the basics first. Remind them that there will be more time to explore and that this is just the first day.For makers who finish quickly or need more of a challenge, inform them that there are many tutorials on the MakeCode website (such as “Flashing Heart,” “Name Tag,” or “Smiley Buttons”) that they can try on their own to explore the Micro:bit further.
Saving files: This curriculum doesn’t require that students create MakeCode accounts and instead uses USB flash drives to save files. Students can create accounts if they have an email address they can login and verify their account with. This enables them to easily save their files, and they can then login and use MakeCode from any other computer with an internet connection.
Collaboration: Let smaller issues work themselves out. Record specific positive examples that you can share with makers in the moment or at the end of the project. These examples provide models for all learners.
Frustration: When frustration levels are not high, let learners figure it out on their own or keep facilitation at a minimum by asking a question and walking away. When frustration levels are high, intervene more directly to help makers find some success.
Circulate among the makers and monitor for both collaboration and frustration.
ADDITIONAL RESOURCESMicro:bit Project Tutorials
Wonderful Idea Co: Micro:bit Mutants
Micro:bit Tutorial on YouTube
TEACHER RESOURCE | CYBER ARCADE: PROGRAMMING AND MAKING WITH MICRO:BIT 1-4 | MIDDLE SCHOOL
LESSON | CYBER ARCADE: PROGRAMMING AND MAKING WITH MICRO:BIT 1-5 | MIDDLE SCHOOL
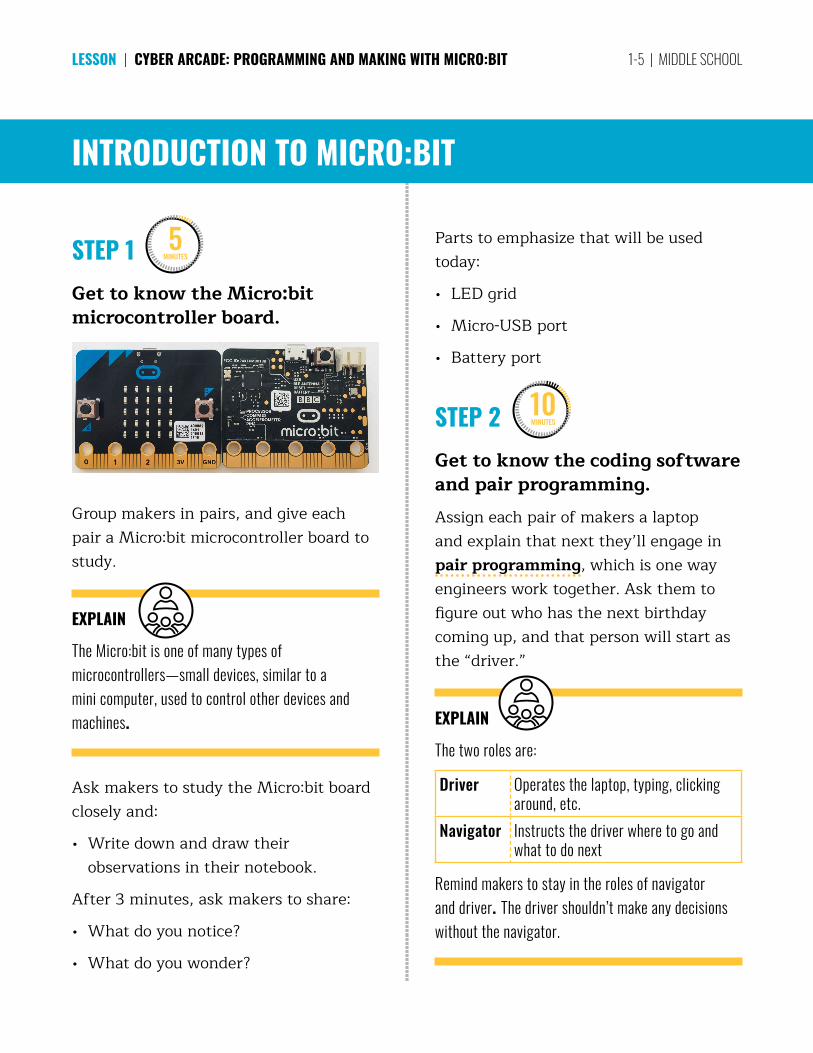
STEP 1Get to know the Micro:bit microcontroller board.
Group makers in pairs, and give each pair a Micro:bit microcontroller board to study.
EXPLAINThe Micro:bit is one of many types of microcontrollers—small devices, similar to a mini computer, used to control other devices and machines.
Ask makers to study the Micro:bit board closely and:
• Write down and draw their observations in their notebook.
After 3 minutes, ask makers to share:
• What do you notice?
• What do you wonder?
Parts to emphasize that will be used today:
• LED grid
• Micro-USB port
• Battery port
STEP 2Get to know the coding software and pair programming.Assign each pair of makers a laptop and explain that next they’ll engage in pair programming, which is one way engineers work together. Ask them to figure out who has the next birthday coming up, and that person will start as the “driver.”
EXPLAIN The two roles are:
Driver Operates the laptop, typing, clicking around, etc.
Navigator Instructs the driver where to go and what to do next
Remind makers to stay in the roles of navigator and driver. The driver shouldn’t make any decisions without the navigator.
10MINUTES
5MINUTES
INTRODUCTION TO MICRO:BIT

LESSON | CYBER ARCADE: PROGRAMMING AND MAKING WITH MICRO:BIT 1-6 | MIDDLE SCHOOL
Instruct the navigators to help the driver to get to the MakeCode website: makecode.microbit.org
Next, makers will:
• Create a [+new project] in MakeCode. This will take them to the coding software.
• Explore the coding software for 3 minutes (timed).
After 3 minutes, ask makers to switch roles. Set the timer for another 3 minutes.
After makers have each had a chance to explore in the driver and navigator roles, ask them to share:
• What did you discover?
• What do you wonder?
STEP 3Write code for the LED display grid.Ask makers to switch roles again, and instruct drivers to open a new blank project. Share your screen so that everyone can see how to write their first lines of code to program the Micro:bit.
Note: This first project is also available as a step-by-step tutorial called “Flashing Heart” on the MakeCode website.
EXPLAINWe’ll program an animated display for the LED grid using the software and simulator. Navigators, watch closely and instruct your driver to follow these instructions.
DEMONSTRATE AND HAVE MAKERS FOLLOW ALONG:1. Start by using the forever block that is
in the coding space.
2. Go to the Basic menu and drag over a show icon block into the forever block. You should see a heart display pop up in the simulator on the left side of the screen. 15
MINUTES

LESSON | CYBER ARCADE: PROGRAMMING AND MAKING WITH MICRO:BIT 1-7 | MIDDLE SCHOOL
3. Next, click, drag, and drop a second show icon block into the code. This time, click the show icon dropdown menu and choose the second small heart image to be displayed on the Micro:bit simulator.
4. Repeat Steps 3 and 4 two more times so you have four show icon blocks in a row with large and small hearts.
5. Check to see if the simulator shows a flashing heart.
Once makers have successfully coded the flashing heart animation, they will switch roles again to create a new animation using different show icon choices from the Basic menu. Remind them to stay within the Basic menu and show icon blocks. Set a timer for 5 minutes.

LESSON | CYBER ARCADE: PROGRAMMING AND MAKING WITH MICRO:BIT 1-8 | MIDDLE SCHOOL
STEP 4Save the code.After makers have programmed their animated display using the show icon blocks, they should see their animation in the simulator on the left side of the screen. It’s now time to save their code to the USB flash drive.
Makers will switch roles again before continuing to the next step.
EXPLAIN Give your partner a high five for writing your first lines of code together! Next, we’ll save our code, then upload the code to the Micro:bit so we can see our animation on the Micro:bit. Navigators, watch closely and instruct your driver to do the following steps.
DEMONSTRATE AND HAVE MAKERS FOLLOW ALONG:1. Give your project a unique name, like
“Flashing Heart”.
2. Save your file by clicking on the blue disk icon to the right of the file name.
3. Connect your USB flash drive into a USB port on your computer.
4. Go to the Files-Downloads folder on your computer. This is a digital folder that holds information. You can think of it like a backpack full of different folders. You should see both the file
5MINUTES

LESSON | CYBER ARCADE: PROGRAMMING AND MAKING WITH MICRO:BIT 1-9 | MIDDLE SCHOOL
you just named and your USB flash drive listed on the left.
5. Drag the file to the USB flash drive. You need to do this EVERY TIME to save your files so you can keep track and use them again in the future.
In the next step, we’ll upload the code to our Micro:bit microcontroller!
STEP 5Upload the code onto the Micro:bit microcontroller.Makers will now connect the Micro:bit board to the laptop in another USB port to upload the code onto the Micro:bit. Remind them to be gentle, look carefully
at the shape of the ports, and not force the connection.
DEMONSTRATE AND HAVE MAKERS FOLLOW ALONG:1. First, carefully connect the micro-
USB cord to the board.
2. Next, connect the USB to the laptop. You should see the LED grid on the Micro:bit light up. It might have some previously saved code already displayed on it.
3. Once the board is connected, press the purple Download button in the MakeCode software.
10MINUTES

LESSON | CYBER ARCADE: PROGRAMMING AND MAKING WITH MICRO:BIT 1-10 | MIDDLE SCHOOL
You should see this window pop up:
4. Next, go to the Files-Downloads folder again in the computer’s hard drive and find your named file. Click and drag it onto the Micro:bit icon.
5. You should see a yellow LED on the Micro:bit flashing quickly. This means your code is being uploaded to the
Micro:bit. It will stop when the code is finished uploading.
6. Watch to see the display you created load up onto the Micro:bit display grid!
STEP 6Connect the battery pack to the Micro:bit.
DEMONSTRATE AND HAVE MAKERS FOLLOW ALONG:Next, it’s time to eject the Micro:bit board from the laptop and connect it to an external battery pack!
1. First, we need to safely eject the Micro:bit from the computer by
10MINUTES

LESSON | CYBER ARCADE: PROGRAMMING AND MAKING WITH MICRO:BIT 1-11 | MIDDLE SCHOOL
clicking the eject button next to the Micro:bit listed in the finder.
2. Next, safely remove the board from the USB cord. The board will no longer display the code because it isn’t being powered.
3. Connect the external battery pack to the Micro:bit
4. You should now see your code displayed on the LED grid!
Once everyone is comfortable with the saving, downloading, and uploading process, they can reconnect the Micro:bit to the computer and continue exploring and coding displays for the Micro:bit.
STEP 7Clean up.Makers will:
• Disconnect the battery pack.
• Put supplies and technology in assigned bins.
• Return laptops to cart and plug in for charging.
• Clear tables of garbage and recycling.
5MINUTES

TROUBLESHOOTING TIPS
Display on board is not showing what we expected.
Version check
• Check to see if the latest saved copy of the code has been uploaded.
• Re-save the latest version and drag it onto the Micro:bit.
Bugs in code
• Check your code to look for mistakes.• Check to see if there are extra blocks hiding in the
coding space.
The LED on the Micro:bit isn’t flashing when we press upload.
Bad cable or USB port
• If the Micro:bit doesn’t show up in the computer’s menu, try a different cable.
• Try a different USB port.
Code isn’t uploading correctly to the board, and the board might feel hot.
Burnt board
• Press the reset button on the board, and then try uploading again.
• If the Micro:bit board feels hot, it could be overheated and stop working. Try uploading to a new Micro:bit board.
When we connect the battery pack, the Micro:bit doesn’t power up.
Battery problems
• Check the batteries to see if they’re in the right position (+/–).
• The batteries could be low or dead. Try replacing them.• Battery pack could overheat or have stopped working.
Try a new battery pack.
RESOURCE | CYBER ARCADE: PROGRAMMING AND MAKING WITH MICRO:BIT 1-12 | MIDDLE SCHOOL

TROUBLESHOOTING TIPSPrint and use the empty rows to fill in with other problems and solutions that can be shared.
RESOURCE | CYBER ARCADE: PROGRAMMING AND MAKING WITH MICRO:BIT 1-13 | MIDDLE SCHOOL