Website Integration Guide - Web Builders for CSS Menu ... this case, the html code of the DIV tag...
25
Likno Web Modal Windows Builder – Website Integration Guide Website Integration Guide Page 1 of 25
Transcript of Website Integration Guide - Web Builders for CSS Menu ... this case, the html code of the DIV tag...

Likno Web Modal Windows Builder – Website Integration Guide
Website Integration Guide
Page 1 of 25
Likno Web Modal Windows Builder – Website Integration Guide
What do I need for the Web Modal Windows to work in my website? In order to successfully add a modal window to your website the following conditions must be met:
1. You should be able to edit the source HTML of any page(s) where the modal window is added or at least have the ability to add or change existing attributes of the target element. The target element is the page element that triggers the modal (for example a DIV, SPAN, A, BUTTON, IMG etc).
2. You should be able to upload your own files to the host server. In some cases online editors do not allow the files to be uploaded in folders that you create but they require all files to be stored in a specific folder. In this case, make sure that the settings in “Project Properties” are set in a way for all Web Modal Windows script files and images to be stored in the same folder.
Page 2 of 25

Likno Web Modal Windows Builder – Website Integration Guide
How to add the Web Modal Windows script in my website pages?
1. Assuming that you created the desired modal window, you have to save the project in a local folder. When you save the project, a *.wmw file will be created along with its corresponding assets folder. For example, when the project name is “modal.wmw” the name of the generated assets folder will be “modal-assets”. The assets folder will contain all files (mostly images) the project needs. The images (or other external files) referenced in the “Embedded HTML” of the modal or in any other page that you use as “External” or “AJAX” source, will NOT be save in the assets folder. That means, the modal script will call them from their original location in the web server after the site is published.
2. Then you need to define the folders where the files will be stored (locally). Click on the “Project” icon in the toolbar and set the appropriate folder in the Project Properties window:
You also need to define the domain where the modal window(s) will be used. The combo box contains all domains that you allocate via your User Area account and each time you make a change in your domains, you need to get a new activation code for the installed application to be updated.
3. Finally, you need to “Compile” the project. Click on the "Compile" icon in the toolbar and all the files needed will be generated and stored in the Site_Root/likno-scripts folder.
4. When the compilation is completed you will be asked to “Link compiled project to web pages”. Click on the following button in the “Project compiled successfully!” window:
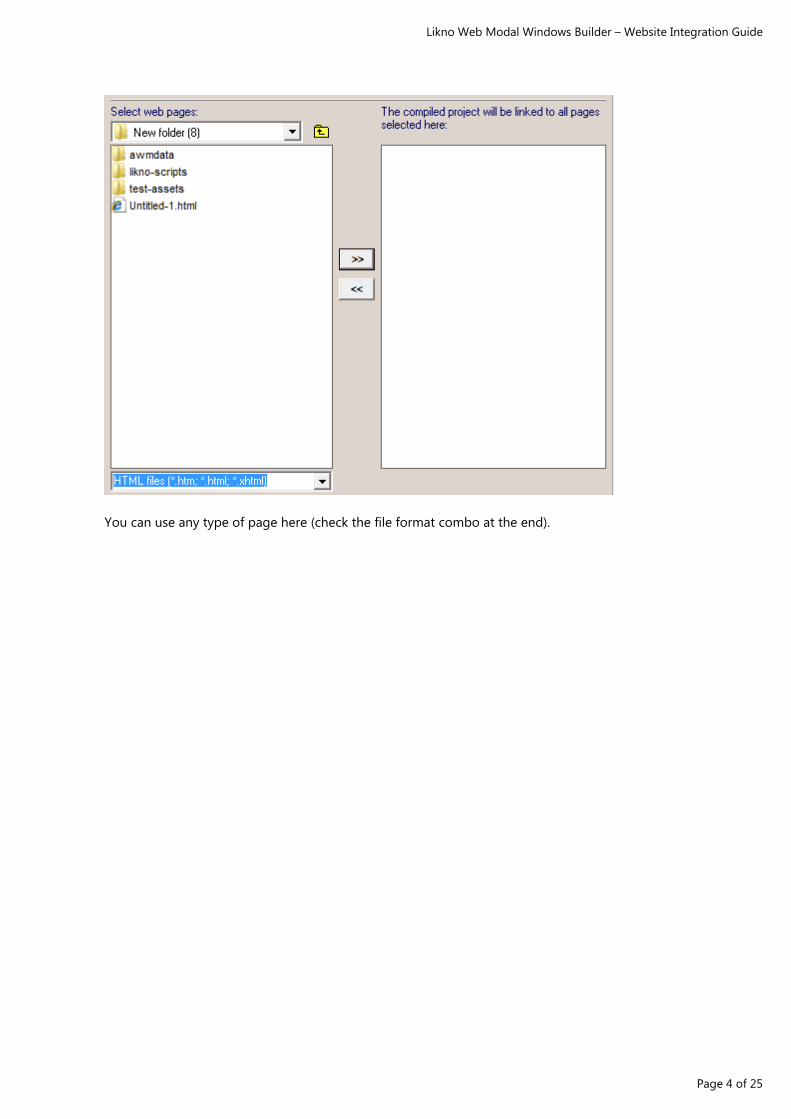
Then you can select the local files of your website where the web modal windows linking code will be inserted:
Page 3 of 25
Likno Web Modal Windows Builder – Website Integration Guide
You can use any type of page here (check the file format combo at the end).
Page 4 of 25

Likno Web Modal Windows Builder – Website Integration Guide
I don’t have direct access to the html source code or I use templates. What to do? In case your website is based on dynamic web templates (dwt files) or master pages, you should use these files as the target where the script will be linked. Usually a dwt or master page has editable and non-editable areas. If your template has the BODY tag inside a non-editable area, the modal linking code will be inserted just below the BODY tag and that means you will not have to insert it in all pages separately. If you do NOT want the modal to be used in all pages handled by the template, you should manually add the linking code in a non-editable area in each of these pages. To do this you have to select the tab “Give me the linking code and I will add it myself to my pages”.
Then you have to copy the code in the text area, and add it manually in a non-editable area of your pages. The same process should be used if you do NOT have access to the source html code of the pages or your web editor doesn’t allow any external application to make changes in the html files. Many of these web editors do have built-in functionality to create “includes” or “HTML snippets”. In this case, the modal linking code that you copied should be pasted manually in an “include” or “HTML snippet” for the web editor to handle the code on its own way.
Page 5 of 25

Likno Web Modal Windows Builder – Website Integration Guide
I want the modal to appear when the visitor clicks on a “link” (A tag). In Web Modal Windows Project Windows (tab) Opens When, you can find the methods you can use to “attach” the modal in your A tag:
According to the settings above, the following A tags would trigger the modal to appear:
<a href="myweblink.html" id="Modal_Window_1">Suspendisse mauris</a> <a href="myweblink.html" onClick="Modal_Window_1();">Suspendisse mauris</a>
In case your A tag already has an existing ID attribute, you can keep it but you should change ID in the Web Modal Windows (Opens When). For example if the A tag has an existing ID=”value”, then you must use this ID in “Opens When”:
In addition, you can also use the Class attribute:
In this case, the html code of the A tag should look like this:
<a href="myweblink.html" class="myClass">Suspendisse mauris</a>
Page 6 of 25

Likno Web Modal Windows Builder – Website Integration Guide
When the A tag already has an existing class defined, you can append the new class in the class value:
<a href="myweblink.html" class="existingClass myClass">Suspendisse mauris</a>
Note that while the A tag (and any other tag) can have more than one “classes” they should have only one and unique ID. Since ID and A's Name attribute share the same name space, authors cannot use the same value for an ID attribute and an A element's Name attribute for different elements in the same document.
Page 7 of 25

Likno Web Modal Windows Builder – Website Integration Guide
I want the modal to appear when the visitor clicks on a “button” (BUTTON tag). In Web Modal Windows Project Windows (tab) Opens When, you can find the methods you can use to “attach” the modal in your BUTTON tag:
According to the settings above, the following BUTTON tags would trigger the modal to appear:
<button type="button" id="Modal_Window_1">Click Me!</button> <button type="button" onClick="Modal_Window_1();">Click Me!</button>
In case your BUTTON tag already has an existing ID attribute, you can keep it but you should change ID in the Web Modal Windows (Opens When). For example if the BUTTON tag has an existing ID=”value”, then you must use this ID in “Opens When”:
In addition, you can also use the Class attribute:
In this case, the html code of the A tag should look like this:
<button type="button" class="myClass">Click Me!</button>
Page 8 of 25

Likno Web Modal Windows Builder – Website Integration Guide
When the A tag already has an existing class defined, you can append the new class in the class value:
<button type="button" class="existingClass myClass">Click Me!</button>
Note that while the BUTTON tag (and any other tag) can have more than one “classes” they should have only one and unique ID. Make sure that this rule is respected at all times; otherwise the page will produce errors when viewed in the browser.
Page 9 of 25

Likno Web Modal Windows Builder – Website Integration Guide
I want the modal to appear when the visitor clicks on a “layer” (DIV tag). In Web Modal Windows Project Windows (tab) Opens When, you can find the methods you can use to “attach” the modal in your DIV tag:
According to the settings above, the following DIV tags would trigger the modal to appear:
<div id="Modal_Window_1">Click Me!</div> <div onClick="Modal_Window_1();">Click Me!</div>
In case your DIV tag already has an existing ID attribute, you can keep it but you should change ID in the Web Modal Windows (Opens When). For example if the DIV tag has an existing ID=”value”, then you must use this ID in “Opens When”:
In addition, you can also use the Class attribute:
In this case, the html code of the DIV tag should look like this:
<div class="myClass">Click Me!</div>
Page 10 of 25

Likno Web Modal Windows Builder – Website Integration Guide
When the DIV tag already has an existing class defined, you can append the new class in the class value:
<div class="existingClass myClass">Click Me!</div>
Note that while the DIV tag (and any other tag) can have more than one “classes” they should have only one ID. Make sure that this rule is respected at all times; otherwise the page will produce errors when viewed in the browser.
Page 11 of 25

Likno Web Modal Windows Builder – Website Integration Guide
I want the modal to appear when the visitor clicks on a “table” (TABLE tag). In Web Modal Windows Project Windows (tab) Opens When, you can find the methods you can use to “attach” the modal in your DIV tag:
According to the settings above, the following TABLE tags would trigger the modal to appear:
<table width="100%" id="Modal_Window_1"><tr><td>Click Me!</td></tr></table> <table width="100%" onClick="Modal_Window_1();"><tr><td>Click Me!</td></tr></table>
In case your TABLE tag already has an existing ID attribute, you can keep it but you should change ID in the Web Modal Windows (Opens When). For example if the TABLE tag has an existing ID=”value”, then you must use this ID in “Opens When”:
In addition, you can also use the Class attribute:
In this case, the html code of the TABLE tag should look like this:
<table width="100%" class="myClass"><tr><td>Click Me!</td></tr></table>
Page 12 of 25

Likno Web Modal Windows Builder – Website Integration Guide
When the TABLE tag already has an existing class defined, you can append the new class in the class value: <table width="100%" class="existingClass myClass"><tr><td>Click Me!</td></tr></table>
Note that while the TABLE tag (and any other tag) can have more than one “classes” they should have only one ID and only one Name. Make sure that this rule is respected at all times; otherwise the page will produce errors when viewed in the browser.
Page 13 of 25
Likno Web Modal Windows Builder – Website Integration Guide
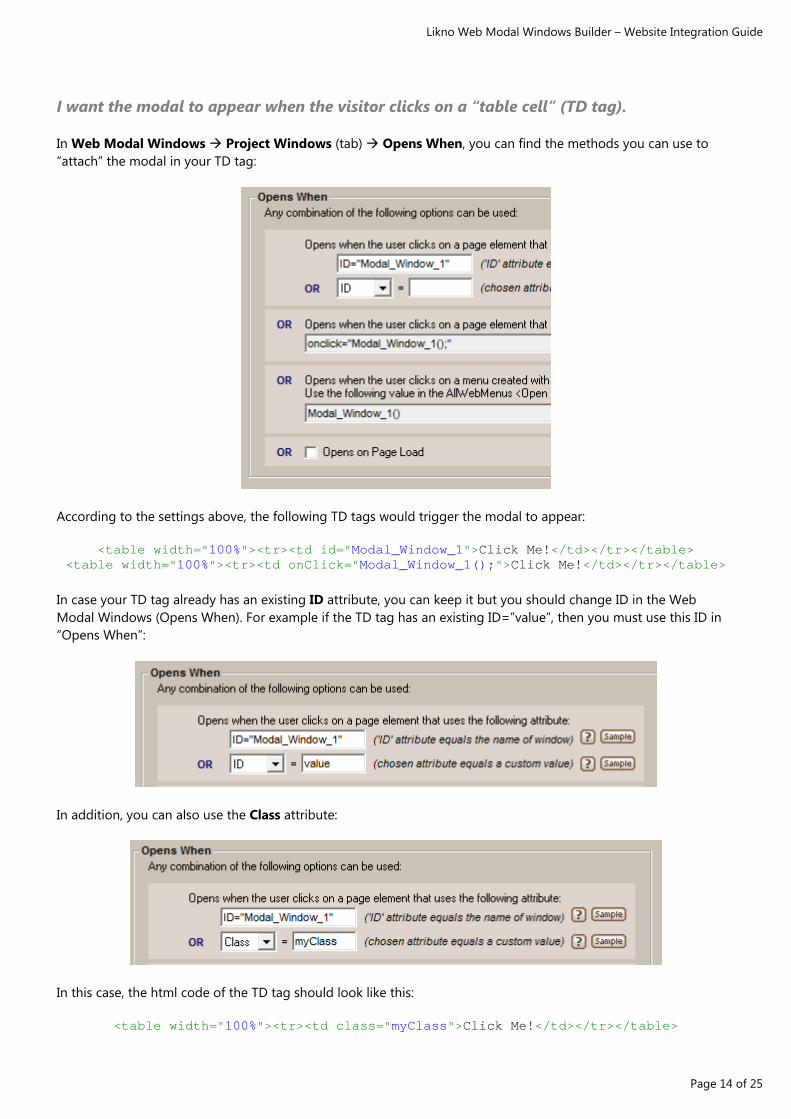
I want the modal to appear when the visitor clicks on a “table cell” (TD tag). In Web Modal Windows Project Windows (tab) Opens When, you can find the methods you can use to “attach” the modal in your TD tag:
According to the settings above, the following TD tags would trigger the modal to appear:
<table width="100%"><tr><td id="Modal_Window_1">Click Me!</td></tr></table> <table width="100%"><tr><td onClick="Modal_Window_1();">Click Me!</td></tr></table>
In case your TD tag already has an existing ID attribute, you can keep it but you should change ID in the Web Modal Windows (Opens When). For example if the TD tag has an existing ID=”value”, then you must use this ID in “Opens When”:
In addition, you can also use the Class attribute:
In this case, the html code of the TD tag should look like this:
<table width="100%"><tr><td class="myClass">Click Me!</td></tr></table>
Page 14 of 25

Likno Web Modal Windows Builder – Website Integration Guide
When the TD tag already has an existing class defined, you can append the new class in the class value: <table width="100%"><tr><td class="existingClass myClass">Click Me!</td></tr></table>
Note that while the TD tag (and any other tag) can have more than one “classes” they should have only one ID and only one Name. Make sure that this rule is respected at all times; otherwise the page will produce errors when viewed in the browser.
Page 15 of 25

Likno Web Modal Windows Builder – Website Integration Guide
I want the modal to appear when the visitor clicks on a “list element” (LI tag). In Web Modal Windows Project Windows (tab) Opens When, you can find the methods you can use to “attach” the modal in your LI tag:
According to the settings above, the following LI tags would trigger the modal to appear:
<ol><li id="Modal_Window_1">Click Me!</li> <ol><li onClick="Modal_Window_1();">Click Me!</li></ol>
In case your LI tag already has an existing ID attribute, you can keep it but you should change ID in the Web Modal Windows (Opens When). For example if the LI tag has an existing ID=”value”, then you must use this ID in “Opens When”:
In addition, you can also use the Class attribute:
In this case, the html code of the LI tag should look like this:
<ol><li class="myClass">Click Me!</li></ol>
Page 16 of 25

Likno Web Modal Windows Builder – Website Integration Guide
When the LI tag already has an existing class defined, you can append the new class in the class value:
<ol><li class="existingClass myClass">Click Me!</li></ol>
Note that while the LI tag (and any other tag) can have more than one “classes” they should have only one ID and only one Name. Make sure that this rule is respected at all times; otherwise the page will produce errors when viewed in the browser.
Page 17 of 25

Likno Web Modal Windows Builder – Website Integration Guide
I want the modal to appear when the visitor clicks on an “image” (IMG tag). In Web Modal Windows Project Windows (tab) Opens When, you can find the methods you can use to “attach” the modal in your IMG tag:
According to the settings above, the following IMG tags would trigger the modal to appear:
<img src="myimage.jpg" id="Modal_Window_1" /> <img src="myimage.jpg" onClick="Modal_Window_1();" />
In case your IMG tag already has an existing ID attribute, you can keep it but you should change ID in the Web Modal Windows (Opens When). For example if the IMG tag has an existing ID=”value”, then you must use this ID in “Opens When”:
In addition, you can also use the Class attribute:
In this case, the html code of the IMG tag should look like this:
<img src="myimage.jpg" class="myClass" />
Page 18 of 25

Likno Web Modal Windows Builder – Website Integration Guide
When the IMG tag already has an existing class defined, you can append the new class in the class value:
<img src="myimage.jpg" class="existingClass myClass" />
Note that while the IMG tag (and any other tag) can have more than one “classes” they should have only one and unique ID. Since ID and IMG's Name attribute share the same name space, authors cannot use the same value for an ID attribute and an IMG element's Name attribute for different elements in the same document.
Page 19 of 25

Likno Web Modal Windows Builder – Website Integration Guide
I want the modal to appear when the visitor clicks an “image hotspot” (AREA tag). In Web Modal Windows Project Windows (tab) Opens When, you can find the methods you can use to “attach” the modal in your AREA tag:
The AREA tag defines an area inside an image-map (an image-map is an image with clickable areas). The area element is always nested inside a <map> tag.
According to the settings above, the following AREA tags would trigger the modal to appear:
<area shape="circle" coords="90,58,3" href="mercur.htm" id="Modal_Window_1" /> <area shape="circle" coords="90,58,3" href="mercur.htm" onClick="Modal_Window_1();" />
In case your AREA tag already has an existing ID attribute, you can keep it but you should change ID in the Web Modal Windows (Opens When). For example if the AREA tag has an existing ID=”value”, then you must use this ID in “Opens When”:
In addition, you can also use the Class attribute:
Page 20 of 25

Likno Web Modal Windows Builder – Website Integration Guide
In this case, the html code of the AREA tag should look like this:
<area shape="circle" coords="90,58,3" href="mercur.htm" class="myClass" />
When the AREA tag already has an existing class defined, you can append the new class in the class value: <area shape="circle" coords="90,58,3" href="mercur.htm" class="existingClass myClass" />
Note that while the AREA tag (and any other tag) can have more than one “classes” they should have only one ID and only one Name. Make sure that this rule is respected at all times; otherwise the page will produce errors when viewed in the browser.
Page 21 of 25

Likno Web Modal Windows Builder – Website Integration Guide
I want the modal to appear when the visitor clicks on an element inside another modal window. Basically we have two modal windows:
What we want is a piece of code that closes Modal_Window_1 and loads Modal_Window_2. In Modal_Window_1 Text/HTML property we can use an A tag (a “link”) like this:
<a onClick="likno_modal_project.close(function() {Modal_Window_2(0);});" href="javascript:void(0);">Click here</a>
This code closes the existing modal window while Modal_Window_2 is triggered.
Only one modal window can be open at any given time.
Page 22 of 25

Likno Web Modal Windows Builder – Website Integration Guide
I want the modal to appear when the visitor clicks on an element inside a page which is loaded in an IFRAME. In this scenario the Web Modal Windows script is loaded in the parent document while the page that contains the “trigger” element, is loaded inside an IFRAME. Inside a page we have an IFRAME element and also the Web Modal Window linking code:
The IFRAME calls the Untitled-2.html where the following A tag will call the modal in the PARENT document and the modal overlay will cover the entire browser window:
<a onClick="parent.Modal_Window_1();" href="javascript:void(0);">Click here</a>
The key to properly call the modal window (no matter where we want to load it) is that the modal linking code should be present in the page where the modal appear and NOT necessarily in the page where the trigger element exists.
Page 23 of 25
Likno Web Modal Windows Builder – Website Integration Guide
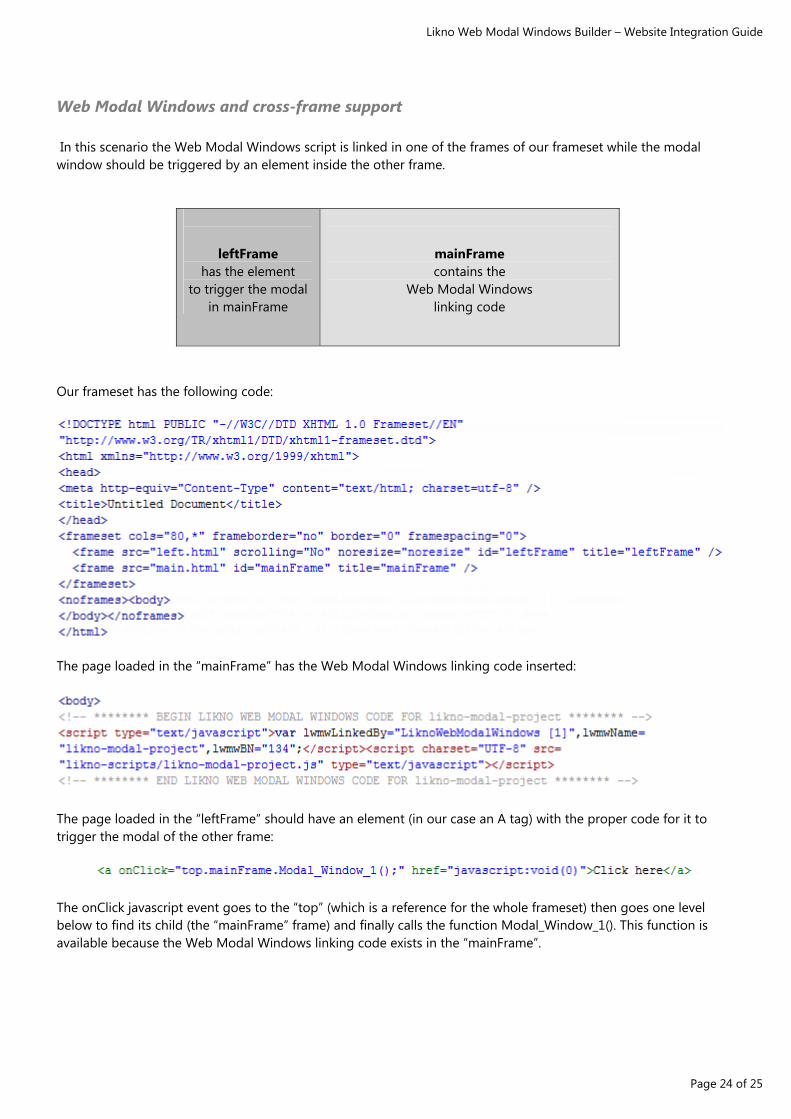
Web Modal Windows and cross-frame support In this scenario the Web Modal Windows script is linked in one of the frames of our frameset while the modal window should be triggered by an element inside the other frame.
leftFrame has the element
to trigger the modal in mainFrame
mainFrame contains the
Web Modal Windows linking code
Our frameset has the following code:
The page loaded in the “mainFrame” has the Web Modal Windows linking code inserted:
The page loaded in the “leftFrame” should have an element (in our case an A tag) with the proper code for it to trigger the modal of the other frame:
The onClick javascript event goes to the “top” (which is a reference for the whole frameset) then goes one level below to find its child (the “mainFrame” frame) and finally calls the function Modal_Window_1(). This function is available because the Web Modal Windows linking code exists in the “mainFrame”.
Page 24 of 25

Likno Web Modal Windows Builder – Website Integration Guide
Page 25 of 25
In our browser the code above would make the modal to open in the mainFrame only:
Make sure that all pages loaded in the frames are stored in the same domain; otherwise the Web Modal Windows script might not work properly and/or script errors will occur mostly because an attempt to load JavaScript in a cross-domain setup is considered by most browsers as a security breach. For this reason you cannot load a Web Modal Window over the whole frameset.