WEB EDITION QUICK GUIDE...backrest. Second row seats, outboard positions – Pull up the handle on...
48
QUICK GUIDE WEB EDITION
Transcript of WEB EDITION QUICK GUIDE...backrest. Second row seats, outboard positions – Pull up the handle on...

QUICK GUIDEWEB EDIT ION

VÄLKOMMEN!
The illustrations in this Quick Guide are generic examples and may not exactly reflect the screen views in your vehicle.An asterisk (*) indicates optional equipment.
The vehicle’s center display
The owner’s manual is available in digital form in the center display and can be accessed from Top view.
Mobile app The owner’s manual is available as an app (Volvo Manual) for smartphones and tablets. The app also contains instructional films for certain features.
Volvo’s support site
Volvo’s support site (support.volvocars.com) contains manuals and instructional films but also provides additional information regarding owning and operating your Volvo.
Printed information
A printed owner’s manual supplement is provided in the vehicle’s glove compartment, which contains information about fuses, specifications and a summary of other useful informa-tion. A printed owner’s manual can also be ordered at any time.
This Quick Guide describes a selection of the features and functions in your Volvo. More detailed owner’s information is available digitally in the vehicle, in an app and on-line.
01. GETTING TO KNOW YOUR VEHICLEThis section helps you familiarize yourself with your Volvo and includes information about e.g., remote keys, the vehicle’s three displays, how to start and switch off the engine. It also tells you how to adjust the seats and make climate system settings.
02. HYBRID-RELATED INFORMATIONThis section provides information about starting and stopping the hybrid battery charging process.
03. DRIVING AND DRIVER SUPPORTThis section includes information about drive modes, the Start/Stop function as well as various driver support functions such as Park Assist Pilot (PAP)*, Blind Spot Information (BLIS)* and City Safety.
04. INSTRUMENTS AND CONTROLSThis section explains e.g., lighting controls, wipers, how to operate the trip computer and how to use voice commands.
05. INTERNET CONNECTIONS, INFOTAINMENT AND SUPPORTYour Volvo can connect to the Internet to give you access to information, entertainment and support. This section provides instruc-tions for pairing and connecting a cell phone to your Volvo, connecting to the Internet and using apps.
06. SUPPLEMENTARY TEXTSThis section contains important information such as warnings, cautions and notes that the driver should be familiar with.

Press to lock the doors and tailgate and arm the alarm.
Press to unlock the doors and tailgate and disarm the alarm.
Press briefly to unlock and disarm the alarm on the tailgate. Press and hold to open or close the power tailgate*.
BUTTONS ON THE REMOTE KEY
“Panic” alarm: Press and hold for at least 3 seconds or press twice within 3 seconds to sound the horn and flash the turn signals. After approx. 5 seconds, press the same button to turn off the function (it will deactivate automatically after approx. 3 minutes).
01
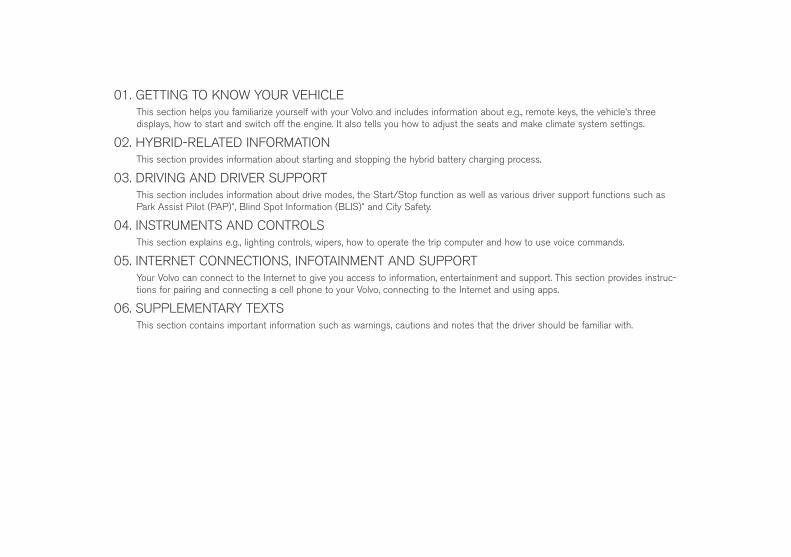
KEYLESS LOCKING/UNLOCKING*
You only need to have a remote key in your possession to lock or unlock the vehicle. The remote key has to be within a radius of approx. 5 ft. (1.5 meters) from a door handle or approx. 3 ft. (1 meter) from the tailgate (see the illustration).
Unlocking and disarming the alarm1. Grasp one of the door handles or press the rubber-covered button
next to the tailgate opening control. Unlocking is complete when the turn signals flash twice and the alarm indicator in the windshield goes out.
2. Open the door or tailgate in the normal way.
Locking and arming the alarm1. Close all of the doors. The tailgate can be open if the vehicle is
locked using one of the door handles.
2. Press the marked surface on the outside rear section of a door handle or press the lock button on the lower edge of the tailgate before it is closed. Locking is complete when the turn signals flash once and the alarm indicator on the dashboard begins to flash.
01

ADJUSTING A POWER FRONT SEAT*Adjust backrest tilt by pressing the control forward/rearward.
Settings for the massage function, side bolsters, lumbar support and extending the seat cushion are linked to the multifunction control*.
1. Activate seat adjustment by turning the control up or down. The seat adjustment view will open in the center display.
2. Select a seat adjustment setting in the center display by turning the multifunction control up or down.
3. Adjust a setting by pressing the multifunction control’s button up/down/forward/rearward.
Certain settings can also be made by tapping the center display.
Raise/lower the seat by moving the rear section of the control up or down. Move the seat forward/rearward by moving the control forward/rearward.
Raise/lower the front edge of the seat cushion by moving the front section of the control up or down.
Adjust lumbar support by pressing the control up/down/forward/rearward.
01
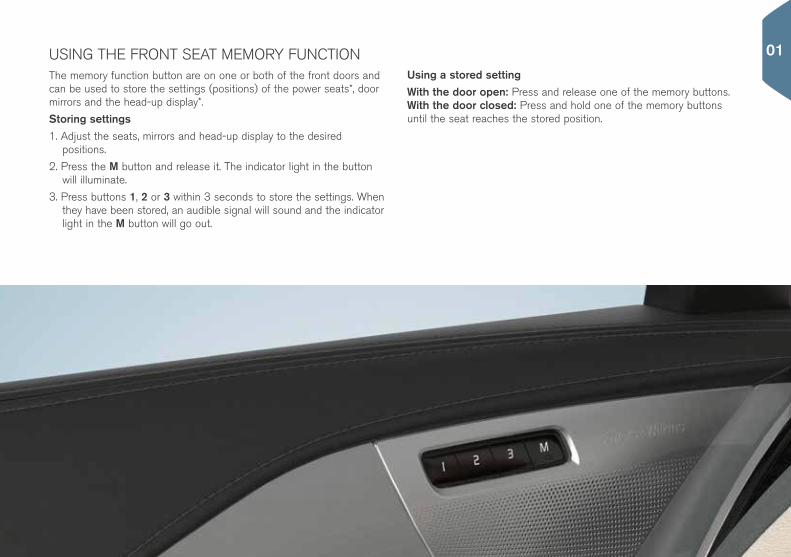
The memory function button are on one or both of the front doors and can be used to store the settings (positions) of the power seats*, door mirrors and the head-up display*.
Storing settings1. Adjust the seats, mirrors and head-up display to the desired
positions.
2. Press the M button and release it. The indicator light in the button will illuminate.
3. Press buttons 1, 2 or 3 within 3 seconds to store the settings. When they have been stored, an audible signal will sound and the indicator light in the M button will go out.
Using a stored settingWith the door open: Press and release one of the memory buttons. With the door closed: Press and hold one of the memory buttons until the seat reaches the stored position.
USING THE FRONT SEAT MEMORY FUNCTION 01
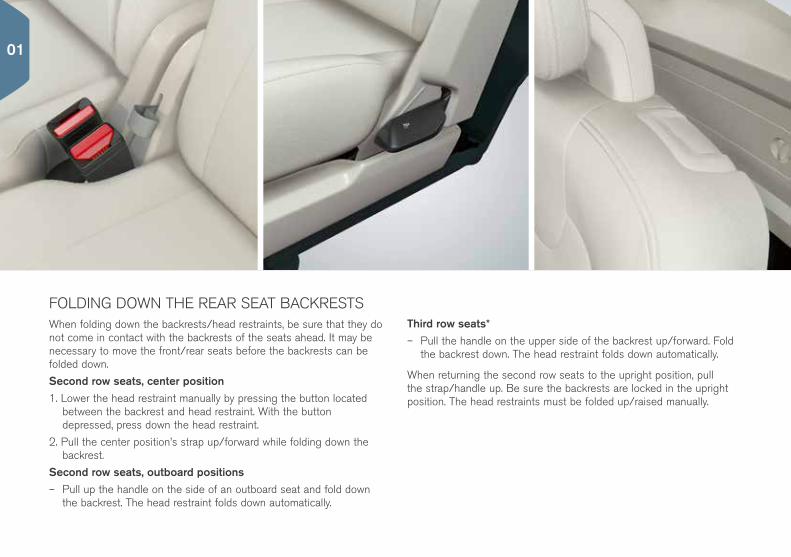
When folding down the backrests/head restraints, be sure that they do not come in contact with the backrests of the seats ahead. It may be necessary to move the front/rear seats before the backrests can be folded down.
Second row seats, center position1. Lower the head restraint manually by pressing the button located
between the backrest and head restraint. With the button depressed, press down the head restraint.
2. Pull the center position’s strap up/forward while folding down the backrest.
Second row seats, outboard positions – Pull up the handle on the side of an outboard seat and fold down
the backrest. The head restraint folds down automatically.
Third row seats* – Pull the handle on the upper side of the backrest up/forward. Fold
the backrest down. The head restraint folds down automatically.
When returning the second row seats to the upright position, pull the strap/handle up. Be sure the backrests are locked in the upright position. The head restraints must be folded up/raised manually.
FOLDING DOWN THE REAR SEAT BACKRESTS
01

GETTING IN AND OUT OF THIRD ROW SEATS
1. On the second row outboard seats: pull the handle on the upper edge up and forward.
2. Fold down the backrest and push the seat forward.
Return the backrest to the upright position by first moving the seat rearward and then folding up the backrest until it locks in position.
ADJUSTING THE STEERING WHEEL
The steering wheel can be adjusted up/down/fore/aft.
1. Push down the lever under the steering wheel to release it.
2. Adjust the steering wheel to the desired position.
3. Pull back the lever to lock the steering wheel in position.
01

STARTING AND SWITCHING OFF THE ENGINE
The remote key is not used physically to start the engine since the vehicle has a Passive Start system as standard equipment. The key only has to be in the front section of the passenger compartment.
If the vehicle is equipped with the optional Passive Entry system, the remote key can be anywhere in the passenger compartment.
Start1. Select P or N.
2. Press the brake pedal.
3. Turn the start knob to START and release it.
Selecting a gear – Select a gear by pressing the gear selector forward or rearward and
releasing it. The selected gear will be displayed in the instrument panel.
Park mode is activated by pressing the P button near the base of the gear selector. Change from P mode to R or D by moving the gear selector forward or rearward twice. Brake mode (B) can be selected at any time during a drive to utilize engine braking and to help charge the hybrid battery.
Switch off – Turn the start knob to STOP and release it.
01
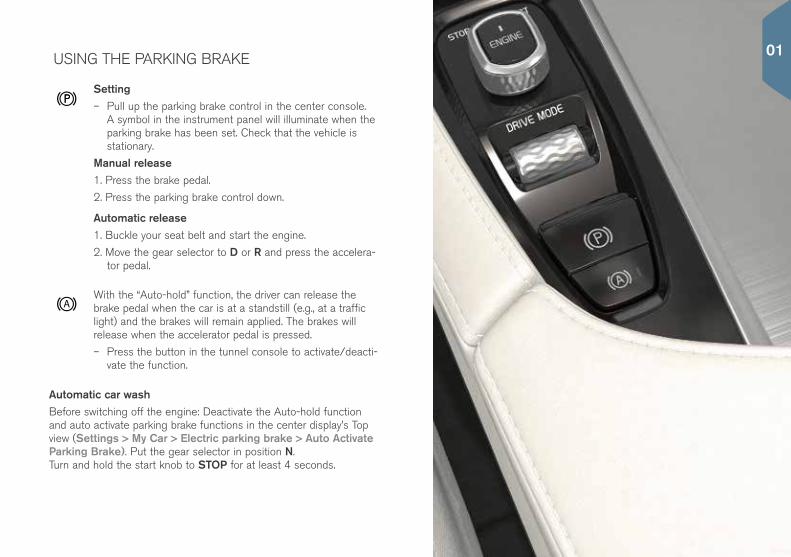
USING THE PARKING BRAKE
Setting – Pull up the parking brake control in the center console.
A symbol in the instrument panel will illuminate when the parking brake has been set. Check that the vehicle is stationary.
Manual release1. Press the brake pedal.
2. Press the parking brake control down.
Automatic release1. Buckle your seat belt and start the engine.
2. Move the gear selector to D or R and press the accelera-tor pedal.
With the “Auto-hold” function, the driver can release the brake pedal when the car is at a standstill (e.g., at a traffic light) and the brakes will remain applied. The brakes will release when the accelerator pedal is pressed.
– Press the button in the tunnel console to activate/deacti-vate the function.
Automatic car washBefore switching off the engine: Deactivate the Auto-hold function and auto activate parking brake functions in the center display’s Top view (Settings > My Car > Electric parking brake > Auto Activate Parking Brake). Put the gear selector in position N. Turn and hold the start knob to STOP for at least 4 seconds.
01

THE VEHICLE’S THREE DISPLAYSCenter displayMany of the vehicle’s primary features and functions, such as the climate and infotain-ment systems and system updates can be controlled from this display.
Instrument panelThis display shows vehicle and driving-related information using gauges, indicators, and indi-cator/warning lights. The instrument panel is available in 12” and 8” versions. 12” version: the speedometer and odometer are on the left side. The clock, media player, navigation system map, etc. can be displayed in the center. The tachometer, selected driving mode and the app menu, which is activated using the right-side steering wheel keypad, are on the right. Different themes can be selected to change the appearance of the center display.
Head-up-display (HUD)*The head-up-display supplements the instrument panel and projects e.g., traffic sign information, speed-related information, navigation and incoming phone calls on the windshield. HUD’s display alternatives, bright-ness and position on the windshield can be adjusted from the center display. HUD is also activated/deactivated from the center display.
01
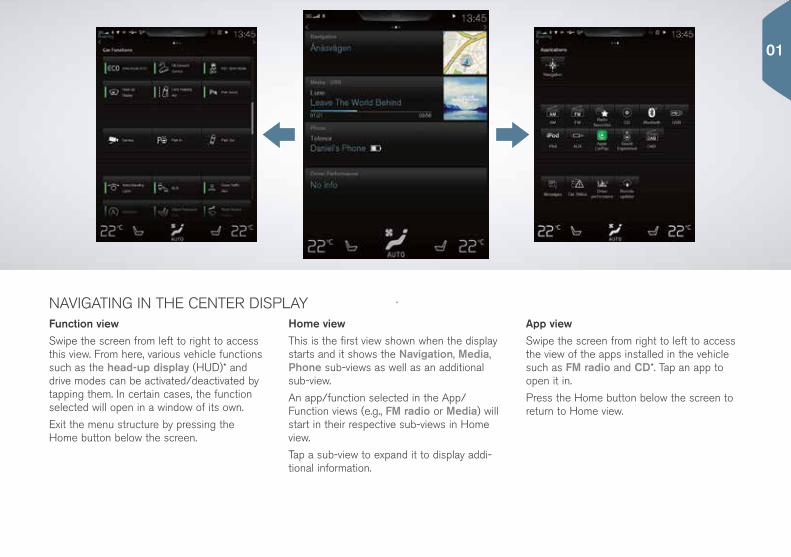
Function viewSwipe the screen from left to right to access this view. From here, various vehicle functions such as the head-up display (HUD)* and drive modes can be activated/deactivated by tapping them. In certain cases, the function selected will open in a window of its own.
Exit the menu structure by pressing the Home button below the screen.
App viewSwipe the screen from right to left to access the view of the apps installed in the vehicle such as FM radio and CD*. Tap an app to open it in.
Press the Home button below the screen to return to Home view.
Home viewThis is the first view shown when the display starts and it shows the Navigation, Media, Phone sub-views as well as an additional sub-view.
An app/function selected in the App/Function views (e.g., FM radio or Media) will start in their respective sub-views in Home view.
Tap a sub-view to expand it to display addi-tional information.
NAVIGATING IN THE CENTER DISPLAY
01
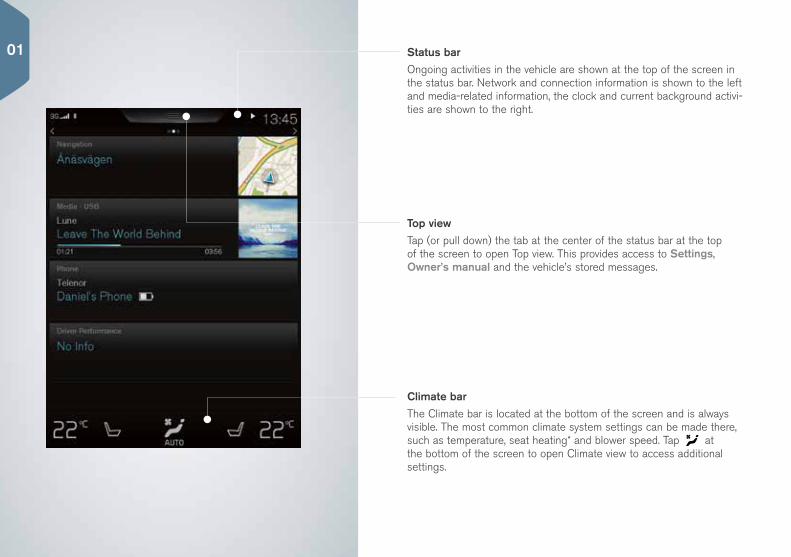
Climate barThe Climate bar is located at the bottom of the screen and is always visible. The most common climate system settings can be made there, such as temperature, seat heating* and blower speed. Tap at the bottom of the screen to open Climate view to access additional settings.
Status barOngoing activities in the vehicle are shown at the top of the screen in the status bar. Network and connection information is shown to the left and media-related information, the clock and current background activi-ties are shown to the right.
Top viewTap (or pull down) the tab at the center of the status bar at the top of the screen to open Top view. This provides access to Settings, Owner’s manual and the vehicle’s stored messages.
01

CLIMATE SYSTEM SETTINGS
Climate system functions for the front and rear sections of the passenger compartment are controlled from the center display, using buttons on the center console and the climate panel on the rear side of the tunnel console*. Some functions can be controlled using voice commands. Certain climate system information is always shown at the bottom of the center display in the climate bar, where certain settings can also be made.
Climate view button at the bottom center of the screen. The graphic in the button shows the currently activated climate system settings. Open Climate view by pressing the button.
Tap AUTO in Climate view to activate/deactivate automatic control of certain climate system functions.
Tap the left or right temperature icons to set the tempera-ture for the driver and passenger sides. These icons are always visible at the bottom of the screen and the temperature can be set even if Climate view is not open.
To synchronize the temperature for all of the vehicle’s zones with the driver side’s temperature, tap the driver side’s temperature icon and then tap Synchronize temperature.
Controls for heated and ventilated* front seats and heated steering wheel*. Tap the left or right side seat and/or steering wheel icon to open the control. Tap repeatedly on the respective icon to select different levels.
01

PRECONDITIONING
Preconditioning can be started using the Volvo On Call mobile app or from the vehicle’s center display.
Preconditioning is used to heat or cool the passenger compartment to a comfortable temperature, which helps reduce wear and energy consumption during your drive. Preconditioning can be started directly or by setting a timer. The hybrid battery charging cable must be connected.
This function utilizes several of the vehicle’s systems. The hybrid battery heating feature helps warm the passenger compartment in cold weather or the ventilation/air conditioning is used to cool the passen-ger compartment in warm weather. Heating for the seats, steering wheel, windshield, rear window and door mirrors can also be activated.
Direct start:1. With the hybrid battery’s charger cable connected, open Climate
view in the center display by tapping at the bottom of the screen.
2. Select the Parking climate tab.
3. Opt to include heating of the steering wheel and seats by tapping the respective boxes.
4. Tap Preconditioning. Preconditioning will start and the button illuminates.
Setting a preconditioning timer: – Tap Parking climate > Add timer and choose a date/time.
For full preconditioning functionality, the hybrid battery’s charging cable must be connected.
01

CLEANING THE CENTER DISPLAY
The center display starts automatically when the driver’s door is opened. The display should be turned off for cleaning.
1. Turn the center display off by pressing and holding the Home button.
2. Wipe the screen with the microfiber cleaning cloth provided or with a microfiber cloth of similar quality. Wipe with small, circular move-ments. Moisten the cloth slightly with clean water if necessary.
3. Turn the screen on again by briefly pressing the Home button.
The center display is turned off automatically when the ignition is switched off and the driver’s door is opened.
CLEAN ZONE: BETTER PASSENGER COMPARTMENT AIR QUALITY
The Interior Air Quality System (IAQS*) is part of the Clean Zone Interior Package* and is a fully automatic system that filters passen-ger compartment air to help remove gases, particles and other contaminents.
1. Tap Settings in the center display’s Top view.
2. Tap Climate.
3. Select Air quality sensor to activate/deactivate the air quality sensor.
01
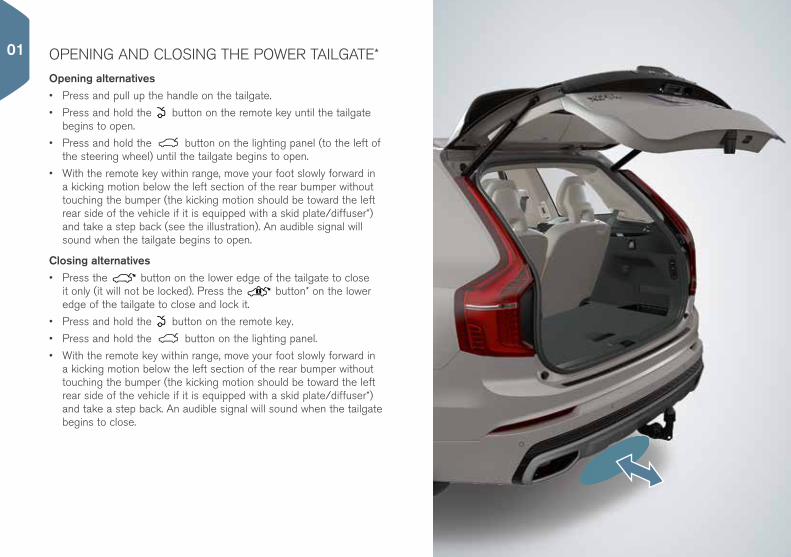
OPENING AND CLOSING THE POWER TAILGATE*
Opening alternatives• Press and pull up the handle on the tailgate.
• Press and hold the button on the remote key until the tailgate begins to open.
• Press and hold the button on the lighting panel (to the left of the steering wheel) until the tailgate begins to open.
• With the remote key within range, move your foot slowly forward in a kicking motion below the left section of the rear bumper without touching the bumper (the kicking motion should be toward the left rear side of the vehicle if it is equipped with a skid plate/diffuser*) and take a step back (see the illustration). An audible signal will sound when the tailgate begins to open.
Closing alternatives• Press the button on the lower edge of the tailgate to close
it only (it will not be locked). Press the button* on the lower edge of the tailgate to close and lock it.
• Press and hold the button on the remote key.
• Press and hold the button on the lighting panel.
• With the remote key within range, move your foot slowly forward in a kicking motion below the left section of the rear bumper without touching the bumper (the kicking motion should be toward the left rear side of the vehicle if it is equipped with a skid plate/diffuser*) and take a step back. An audible signal will sound when the tailgate begins to close.
01

STOWING THE CHARGING CABLE
The charging cable is stowed in a storage compartment under the cargo area floor.
OPENING/CLOSING THE CHARGER DOOR
1. Press in the rear section of the door and release it.
2. Open the door.
3. Pull off the charging socket’s protective cover and place it in the holder on the inside of the door. Be sure that the protective cover’s rubber strap is bent downward to help keep the cover in place in the holder.
Closer the charger door in the reverse order.
02

CHARGE MODULE INDICATOR LIGHTS
The blue indicator light on the cable’s charge module (the unit that is plugged into the wall socket) will flash red several times when the unit is plugged in while a safety check is being performed and will then glow steadily blue to indicate that the charger is ready to use.
02

CHARGING THE HYBRID BATTERYThe hybrid battery is charged using a charging cable connected to a 120-/240-volt socket. The length of time needed to charge the battery depends on the current used.
The vehicle’s start battery will also be charged while the hybrid battery is being charged.
1. Connect the charging cable to a 120-/240-volt wall socket. Never use an extension cord.
2. Open the charger door on the vehicle, remove the cover on the charging socket and place the cover on the holder on the charging socket door.
3. Insert the charging cable’s coupler into the charging socket. It will lock in place automatically and charging will begin within approx. 5 seconds.
Charging with the gasoline engineCurrent is generated to charge the hybrid battery during light braking and when using engine braking on downslopes using the B gear mode. This type of recharging will be indicated in the instrument panel.
02
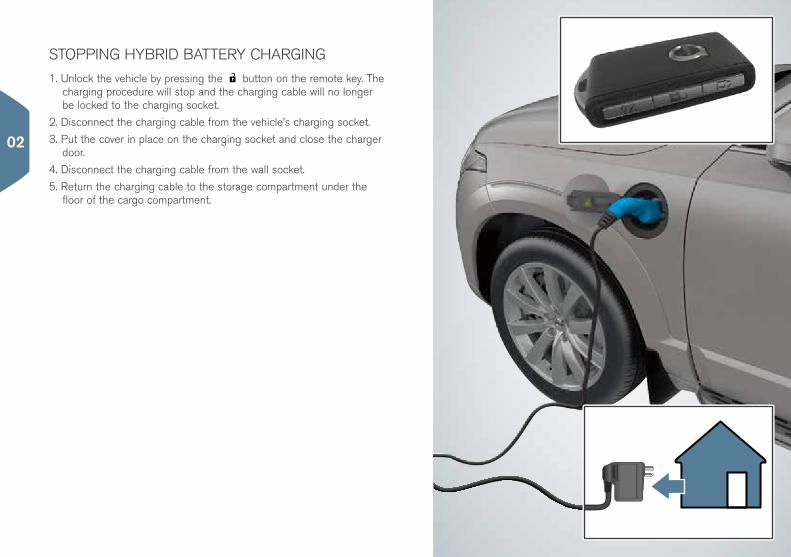
STOPPING HYBRID BATTERY CHARGING
1. Unlock the vehicle by pressing the button on the remote key. The charging procedure will stop and the charging cable will no longer be locked to the charging socket.
2. Disconnect the charging cable from the vehicle’s charging socket.
3. Put the cover in place on the charging socket and close the charger door.
4. Disconnect the charging cable from the wall socket.
5. Return the charging cable to the storage compartment under the floor of the cargo compartment.
02

HYBRID-RELATED INFORMATION IN THE INSTRUMENT PANEL
A number of symbols and animations will be displayed in the instru-ment panel depending on the currently selected drive mode (the illustration is a generic example and shows information that cannot actually be displayed at the same time).
Driver-requested power in HYBRID modeThe long needle in the gauge indicates the amount of energy that the vehicle is currently using. The higher the needle goes in the scale, the greater the power requested by the driver in the current gear.
The location of the needle in the illustration indicates that power is being used. If the needle is in the orange section of the scale, this indicates that current is being generated to charge the hybrid battery. This also occurs during light braking and during engine braking using the B gear mode.
Symbols in the instrument panel
Indicates the currently available power from the electric motor. A solid symbol indicates that the vehicle is being powered by the electric motor.
Marks the output level at which the gasoline engine will start. A solid symbol indicates that the vehicle is being powered by the gasoline engine.
Indicates that the hybrid battery is being charged, e.g., during engine braking.
This gauge indicates the hybrid battery’s current energy (charge) level, which can be used by the electric motor and/or to heat/cool the passenger compartment.
Indicates that the SAVE drive mode is activated and that current in the hybrid battery is being saved for later use.
Charging status in the instrument panelCharging in progress: Fully charged at: [Time] will be displayed with an animated blue pulsing light through the charging cable.
The battery is fully charged: Charging complete will be displayed.
Charging problem: Charging error will be displayed. Check the charging cable’s connections to the vehicle and to the wall socket.
02

SELECTING A DRIVE MODE
Select a drive mode that is best suited for the current driving condi-tions. Not all drive modes can be selected in every situation.
1. Press the DRIVE MODE control in the tunnel console. A pop-up menu will open in the center display.
2. Roll the control up/down until the desired mode is highlighted in the center display.
3. Press the control or tap the center display to select.
Drive modesHYBRID: The vehicle’s normal mode. The electric motor and gasoline engine are used (separately or in tandem). PURE: This mode activates the electric motor only with as low energy consumption as possible to help conserve the energy in the hybrid battery. SAVE: This mode saves electrical energy (hybrid battery charge) for use at a later time. OFF ROAD: maximizes the vehicle’s low-speed capacity to traverse difficult terrain and poor roads.
AWD: This mode offers improved traction using four-wheel drive. POWER: This mode offers sportier, more active driving. INDIVIDUAL: This mode allows you to adapt a driving mode to your personal preferences. Tap Settings in the center display’s Top view and select My Car > Individual drive mode.
03

DRIVER SUPPORT CONTROLS IN THE LEFT-SIDE STEERING WHEEL KEYPAD
Functions such as Speed limiter*, Cruise control, Adaptive cruise control* and Pilot assist* can be selected using the and keys in the left-side steering wheel keypad. A white symbol indicates that a function is active; a gray symbol indicates that the function has been canceled or is in standby mode.
Symbols in the instrument panel
Speed limiter: Helps prevent the vehicle from exceeding a set max. speed.
Cruise control: Helps maintain a set speed.
Adaptive cruise control: Helps maintain a set speed and/or a preselected time interval to the vehicle ahead.
Pilot Assist: At speeds below 30 mph (50 km/h), this func-tion helps keep the vehicle in its current traffic lane, at a set time interval to the vehicle ahead.
Symbols on the left-side steering wheel keypad
Press to activate, cancel or put a function in standby mode. If these functions are active, set the current speed for the speed limiter/cruise control/adaptive cruise control.
Press to increase the set speed or to resume a previously set speed for the speed limiter/cruise control/adaptive cruise control.
Press to reduce the set speed.
Adaptive cruise control and Pilot Assist: Reduce the distance to the vehicle ahead.
Adaptive cruise control and Pilot Assist: Increase the distance to the vehicle ahead.
03
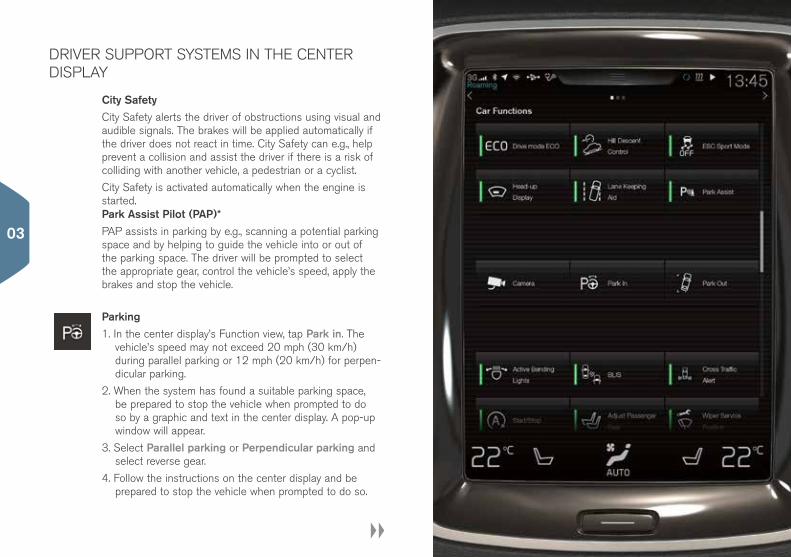
DRIVER SUPPORT SYSTEMS IN THE CENTER DISPLAY
City SafetyCity Safety alerts the driver of obstructions using visual and audible signals. The brakes will be applied automatically if the driver does not react in time. City Safety can e.g., help prevent a collision and assist the driver if there is a risk of colliding with another vehicle, a pedestrian or a cyclist.
City Safety is activated automatically when the engine is started. Park Assist Pilot (PAP)*PAP assists in parking by e.g., scanning a potential parking space and by helping to guide the vehicle into or out of the parking space. The driver will be prompted to select the appropriate gear, control the vehicle’s speed, apply the brakes and stop the vehicle.
Parking1. In the center display’s Function view, tap Park in. The
vehicle’s speed may not exceed 20 mph (30 km/h) during parallel parking or 12 mph (20 km/h) for perpen-dicular parking.
2. When the system has found a suitable parking space, be prepared to stop the vehicle when prompted to do so by a graphic and text in the center display. A pop-up window will appear.
3. Select Parallel parking or Perpendicular parking and select reverse gear.
4. Follow the instructions on the center display and be prepared to stop the vehicle when prompted to do so.
03

Leaving a parking space using PAPThis function can only be used for parallel parking.
1. Tap Park out in Function view.
2. Follow the instructions on the center display.
Park Assist Camera*This camera helps the driver see what is around the vehicle and to indicate potential obstructions using a camera image and graphics in the center display. The camera view and guiding lines are selected in the center display. The camera starts automatically when the gear selector is in R. This setting is made in the center display’s Top view in Settings, My Car > Park Assist > Auto Camera Reverse Activation. The camera can also be started manually by tapping the Camera button in Function view to activate/deactivate.
Lane Keeping Aid (LKA)*If the vehicle is about to inadvertently cross a driving lane’s marker lines, LKA will actively guide the vehicle back into the lane through slight force on the steering wheel. When the vehicle reaches or crosses a line, the driver will be alerted by an audible signal or vibrations in the steering wheel.
– Tap the Lane Keeping Aid button in Function view to activate/deactivate.
LKA settings can be made in the center display’s Top view under Settings. Select My Car > IntelliSafe > Lane Keeping Aid.
Blind Spot Information (BLIS)*BLIS informs the driver of vehicles in the door mirrors’ blind angles or of rapidly approaching vehicles in the driving lanes to the right and/or left of your vehicle.
– Tap the BLIS button in Function view to activate/deactivate.
Cross Traffic Alert (CTA)*CTA alerts the driver to crossing traffic behind your vehicle when backing up or if reverse gear is selected. CTA is activated automatically when the engine is started.
– Tap the Cross Traffic Alert button in Function view to activate/deactivate. 03

USING THE WIPERS AND RAIN SENSOR
The wipers and rain sensor are controlled from the right steering wheel lever.
Move the lever down and release it for a single sweep.
Move the lever to position 0 to turn off the windshield wipers.
Move the lever to INT (interval). Set the interval speed by moving the thumb wheel on the lever up or down.
Move the lever up for the wipers to operate at normal speed.
Move the lever up to the next position for maximum wiper speed.
Press the button to activate/deactivate the rain sensor. Turn the thumb wheel on the lever for higher/lower sensitivity.
Pull the right-side steering wheel lever toward the steering wheel to start the windshield and headlight washers.
Push the right-side steering wheel lever forward to start the tailgate wiper/washer.
Press for tailgate interval wiper.
Press for tailgate continuous wiper.
04
USING THE AUTO LIGHTING MODE
Select the AUTO position on the left-side steering wheel lever to:
• Activate the Daytime Running Lights (the low beam headlights will automatically switch on in dark conditions or if the rear fog lights are on).
• Activate tunnel detection.
• Enable high beam flash.
• Activate the Active High Beam (AHB) function. Activate/deactivate by turning the thumb wheel to and releasing it. Activate high beams manually by pushing the lever toward the instrument panel. Deactivate by pulling the lever back toward the steering wheel.
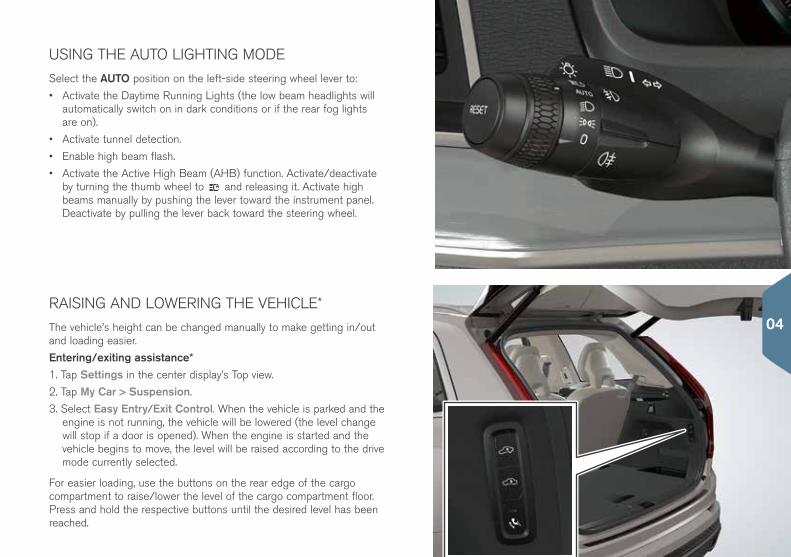
RAISING AND LOWERING THE VEHICLE*
The vehicle’s height can be changed manually to make getting in/out and loading easier.
Entering/exiting assistance*1. Tap Settings in the center display’s Top view.
2. Tap My Car > Suspension.
3. Select Easy Entry/Exit Control. When the vehicle is parked and the engine is not running, the vehicle will be lowered (the level change will stop if a door is opened). When the engine is started and the vehicle begins to move, the level will be raised according to the drive mode currently selected.
For easier loading, use the buttons on the rear edge of the cargo compartment to raise/lower the level of the cargo compartment floor. Press and hold the respective buttons until the desired level has been reached.
04

The trip computer registers and calculates e.g., mileage, fuel consumption and average speed. You can choose the type of trip computer information that will be displayed in the instrument panel.
Distance to emptyThe trip computer calculates the distance that can be driven on the amount of fuel remaining in the tank.
Use the buttons on the right-side steering wheel keypad to display Distance to empty: in the instrument panel.
1. Press .
2. Navigate to the trip computer’s menu using or .
3. With the trip computer’s menu highlighted, use to scroll down to Distance to empty:.
4. Select Distance to empty by pressing .
When ”----” is displayed in the instrument panel, refuel as soon as possible.
Distance to discharged hybrid battery This gauge shows the approximate distance that can be driven using the electric motor. It is accessed in the same way as Distance to empty. When the gauge displays “----” there is no guaranteed driving charge remaining in the hybrid battery.
Resetting the trip odometers
The manual trip odometer (TM) is reset manually by pressing and holding the RESET button on the left steering wheel lever. The automatic trip odometer (TA) is reset automatically when the ignition has been switched off for at least 4 hours.
USING THE TRIP COMPUTER
The instrument panel is controlled from e.g., the right-side steering wheel lever, making it possible to select what is to be displayed.
Open/close the instrument panel’s App view to control the trip computer, media player, a connected cell phone and the navigation system.
Scroll among the various apps by pressing the left or right arrow keys.
Select, deselect or confirm a choice.
Scroll up or down in the selected app’s functions by pressing the up or down arrows.
INSTRUMENT PANEL CONTROLS04

USING VOICE CONTROL
The voice control system enables the driver to control certain functions in the media player, the Sensus navigation system, the climate system and a Bluetooth-connected cell phone. Voice commands are given either as direct commands from the user or in dialog form with verbal responses from the system.
Press this button on the right-side steering wheel keypad to activate the voice control system and initiate a command dialog.
Examples of voice commands: – Press . Say ”Navigation” to start a navigation system dialog.
– Press . Say ”Raise temperature” to raise the temperature one step.
– Press . Say ”Play Robyn” to play music by the selected artist.
Voice commands that can be used at any time:• “Repeat”: repeats the most recent system response.
• “Cancel”: cancels a dialog. Pressing and holding will also cancel a dialog.
• ”Help”: starts a help dialog.
Keep in mind: • Speak after the tone in a normal tone of voice at a normal speed.
• Avoid speaking when the system is responding.
• Avoid background noise by keeping the vehicle’s doors, windows and panoramic roof* closed.
Consult your owner’s information for more information about voice controls and examples of voice commands.
04

GLOVE COMPARTMENTOpening
– Press the button under the center display to open the glove compartment.
Locking/unlockingPrivate locking locks the glove compartment and tailgate. This function can be activated/deactivated in two ways from the center display:
Method 1: – Tap Private locking locked in Function view to activate/deactivate.
Method 2: – Tap Settings > My Car > locking in Top view and select Private locking.
A pop-up window will appear to indicate activation/deactivation.
A 4-digit security code will have to be selected each time the function
is used. When the function is used for the first time, an extra security code has to be selected. This code is used to reset the one-time code if necessary. In either case, enter the code and tap Confirm.
04

PAIRING AND CONNECTING A BLUETOOTH CELL PHONE
Pair a cell phone with the vehicle and connect it to make/receive calls, send/receive text messages, stream media and connect to the Internet. Two Bluetooth devices can be connected at the same time, one of which can only be used to stream media. The two most recently connected cell phones (if they are in the vehicle) will be connected automatically when the ignition is switched on.
Searching for a cell phone from the vehicle1. Make the phone discoverable/visible using its Bluetooth settings.
2. Activate tethering (sharing an Internet connection) in the phone via its Bluetooth settings.
3. Open the Phone sub-view in the center display. Tap Add phone. If the phone is already paired, tap Change and in the pop-up window that appears, tap Add phone.
4. Tap the name of the phone to be connected.
5. Check that the code displayed in the vehicle is the same as the one in the phone. Confirm in both places.
6. For the phone selected, accept or cancel the alternatives for the phone book (list of contacts), text messages, etc. The text message function may have to be activated on certain cell phones1.
The phone is now connected and can be controlled from the vehicle.
1 Go to support.volvocars.com for a list of compatible cell phones.
05

Phone calls can be made and answered using a Bluetooth-connected cell phone.
Making a call from the center display1. Open the Phone sub-view in the center display’s Home view.
2. Make a call from a list of calls, a list of contacts (phone book) or enter a number using the keyboard.
3. Tap Call or , depending on the alternative selected in step 2.
Making a call from the right-side steering wheel keypad1. Tap and scroll to Phone by pressing or .
2. Scroll in the list of calls using and select by pressing .
Calling a contact using voice commands – Press and say ”Call [contact]”.
Answering/declining/ending a callAnswer: Press on the right-side steering wheel keypad or tap Answer in the center display.
Decline: Highlight Decline by pressing on the right-side steering wheel keypad and confirm by pressing , or tap Decline in the center display.
End a call – Press on the right-side steering wheel keypad to confirm that
you would like to end a call or tap End call in the center display.
MAKING, ANSWERING AND ENDING PHONE CALLS
05
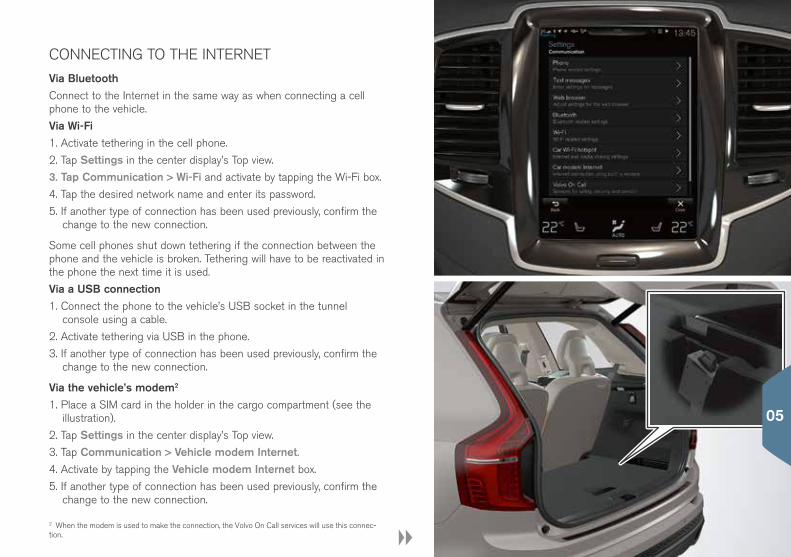
CONNECTING TO THE INTERNET
Via BluetoothConnect to the Internet in the same way as when connecting a cell phone to the vehicle.
Via Wi-Fi1. Activate tethering in the cell phone.
2. Tap Settings in the center display’s Top view.
3. Tap Communication > Wi-Fi and activate by tapping the Wi-Fi box.
4. Tap the desired network name and enter its password.
5. If another type of connection has been used previously, confirm the change to the new connection.
Some cell phones shut down tethering if the connection between the phone and the vehicle is broken. Tethering will have to be reactivated in the phone the next time it is used.
Via a USB connection1. Connect the phone to the vehicle’s USB socket in the tunnel
console using a cable.
2. Activate tethering via USB in the phone.
3. If another type of connection has been used previously, confirm the change to the new connection.
Via the vehicle’s modem2
1. Place a SIM card in the holder in the cargo compartment (see the illustration).
2. Tap Settings in the center display’s Top view.
3. Tap Communication > Vehicle modem Internet.4. Activate by tapping the Vehicle modem Internet box.
5. If another type of connection has been used previously, confirm the change to the new connection.
2 When the modem is used to make the connection, the Volvo On Call services will use this connec-tion.
05
6. Enter the SIM card’s PIN code.
Wi-Fi tethering (hotspot)When the vehicle is connected to the Internet, tethering (sharing a Wi-Fi hotspot) can be used to allow other devices to access the vehi-cle’s Internet connection3.
1. Tap Settings in the center display’s Top view.
2. Tap Communication > Vehicle Wi-Fi hotspot 3. Select a Network name for the hotspot.
4. Select the Password to be used by devices that will connect to the hotspot.
5. Select the Frequency band that the hotspot will use to transmit data (not available in all markets).
6. Tap the Vehicle Wi-Fi hotspot box to activate.
7. If another connection source has been used previously, confirm the new connection.
When the hotspot (tethering) is activated, will appear in the center display’s status bar. Tap Connected devices Vehicle Wi-Fi hotspot to see a list of connected devices.
3 Does not apply to a Wi-Fi connection. The network service provider (SIM card) must support tethering.
05

APPLE CARPLAY* IN THE CENTER DISPLAY
Apple CarPlay makes it possible to use certain apps in an iPhone via the vehicle to e.g., listen to music or podcasts, etc. Interaction is done through the center display or by using Siri.
Starting Apple CarPlayVoice control with Siri has to be activated in the iPhone before using Apple CarPlay.
1. Connect an iPhone to the USB socket in the tunnel console. Read the information in the pop-up window and tap OK.
2. Tap Apple CarPlay in the center display’s App view. If this is the first time the iPhone has been connected, agree to the conditions.
3. The Apple CarPlay sub-view will open and compatible apps will be displayed. .
Starting Apple CarPlay automaticallyWith automatic start activated, Apple CarPlay will open automatically when the iPhone is connected. In the center display’s Top view, tap Settings and select Communication > Apple CarPlay.If the vehicle is not already equipped with Apple CarPlay, it can be retro-fitted. Contact a Volvo retailer.
Information about the apps supported and compatible cell phones is available from Apple at: www.apple.com/ios/carplay/.
05
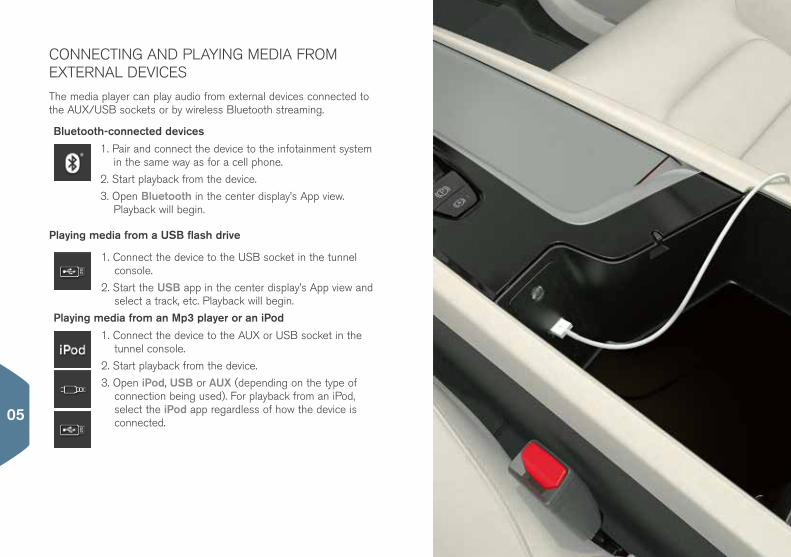
CONNECTING AND PLAYING MEDIA FROM EXTERNAL DEVICES
The media player can play audio from external devices connected to the AUX/USB sockets or by wireless Bluetooth streaming.
Bluetooth-connected devices
1. Pair and connect the device to the infotainment system in the same way as for a cell phone.
2. Start playback from the device.
3. Open Bluetooth in the center display’s App view. Playback will begin.
Playing media from a USB flash drive
1. Connect the device to the USB socket in the tunnel console.
2. Start the USB app in the center display’s App view and select a track, etc. Playback will begin.
Playing media from an Mp3 player or an iPod
1. Connect the device to the AUX or USB socket in the tunnel console.
2. Start playback from the device.
3. Open iPod, USB or AUX (depending on the type of connection being used). For playback from an iPod, select the iPod app regardless of how the device is connected. 05
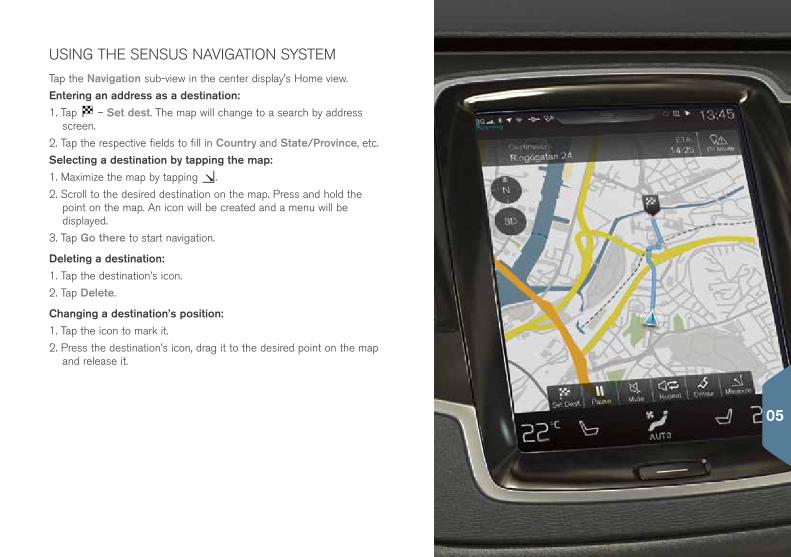
USING THE SENSUS NAVIGATION SYSTEM
Tap the Navigation sub-view in the center display’s Home view.
Entering an address as a destination:1. Tap – Set dest. The map will change to a search by address
screen.
2. Tap the respective fields to fill in Country and State/Province, etc.
Selecting a destination by tapping the map:1. Maximize the map by tapping .
2. Scroll to the desired destination on the map. Press and hold the point on the map. An icon will be created and a menu will be displayed.
3. Tap Go there to start navigation.
Deleting a destination:1. Tap the destination’s icon.
2. Tap Delete.
Changing a destination’s position:1. Tap the icon to mark it.
2. Press the destination’s icon, drag it to the desired point on the map and release it.
05
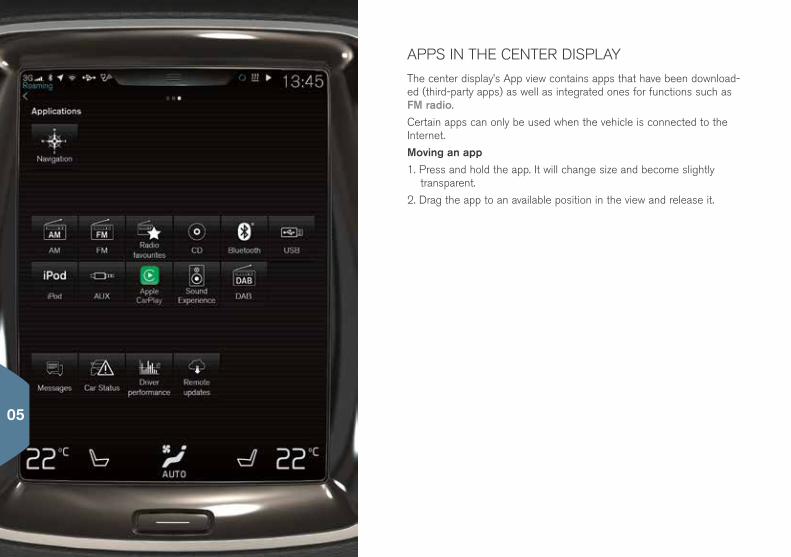
APPS IN THE CENTER DISPLAY
The center display’s App view contains apps that have been download-ed (third-party apps) as well as integrated ones for functions such as FM radio.
Certain apps can only be used when the vehicle is connected to the Internet.
Moving an app1. Press and hold the app. It will change size and become slightly
transparent.
2. Drag the app to an available position in the view and release it.
05
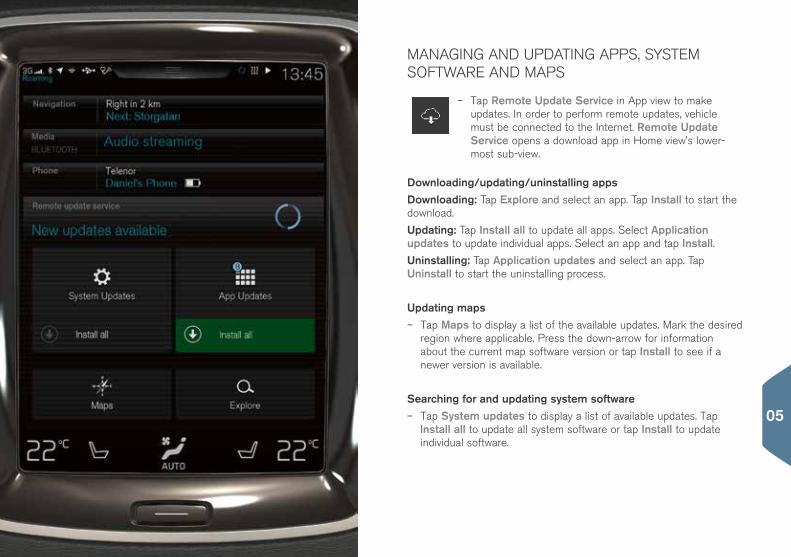
MANAGING AND UPDATING APPS, SYSTEM SOFTWARE AND MAPS
– Tap Remote Update Service in App view to make updates. In order to perform remote updates, vehicle must be connected to the Internet. Remote Update Service opens a download app in Home view’s lower-most sub-view.
Downloading/updating/uninstalling appsDownloading: Tap Explore and select an app. Tap Install to start the download.
Updating: Tap Install all to update all apps. Select Application updates to update individual apps. Select an app and tap Install.Uninstalling: Tap Application updates and select an app. Tap Uninstall to start the uninstalling process.
Updating maps – Tap Maps to display a list of the available updates. Mark the desired
region where applicable. Press the down-arrow for information about the current map software version or tap Install to see if a newer version is available.
Searching for and updating system software – Tap System updates to display a list of available updates. Tap
Install all to update all system software or tap Install to update individual software.
05
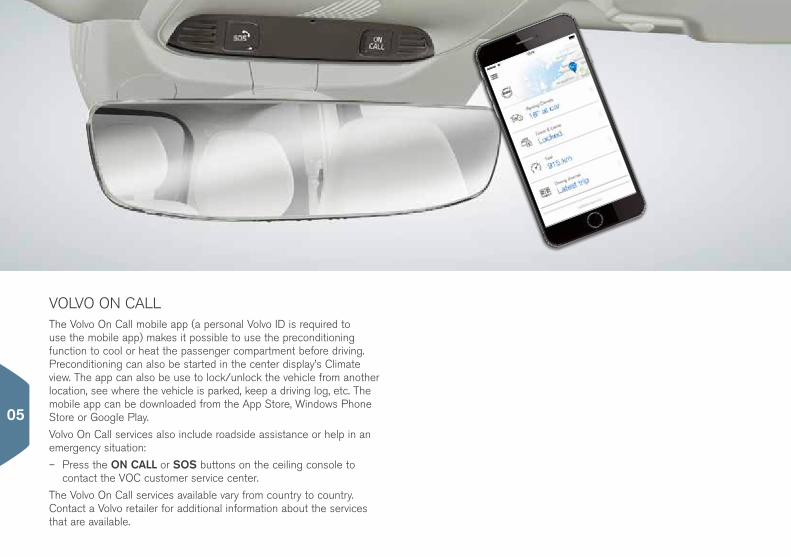
VOLVO ON CALLThe Volvo On Call mobile app (a personal Volvo ID is required to use the mobile app) makes it possible to use the preconditioning function to cool or heat the passenger compartment before driving. Preconditioning can also be started in the center display’s Climate view. The app can also be use to lock/unlock the vehicle from another location, see where the vehicle is parked, keep a driving log, etc. The mobile app can be downloaded from the App Store, Windows Phone Store or Google Play.
Volvo On Call services also include roadside assistance or help in an emergency situation:
– Press the ON CALL or SOS buttons on the ceiling console to contact the VOC customer service center.
The Volvo On Call services available vary from country to country. Contact a Volvo retailer for additional information about the services that are available.
05
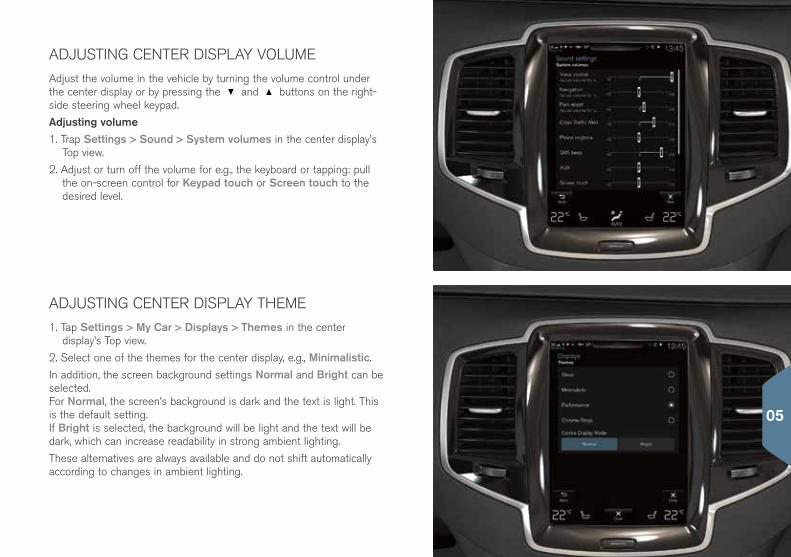
ADJUSTING CENTER DISPLAY THEME
1. Tap Settings > My Car > Displays > Themes in the center display’s Top view.
2. Select one of the themes for the center display, e.g., Minimalistic.
In addition, the screen background settings Normal and Bright can be selected. For Normal, the screen’s background is dark and the text is light. This is the default setting. If Bright is selected, the background will be light and the text will be dark, which can increase readability in strong ambient lighting.
These alternatives are always available and do not shift automatically according to changes in ambient lighting.
ADJUSTING CENTER DISPLAY VOLUME
Adjust the volume in the vehicle by turning the volume control under the center display or by pressing the and buttons on the right-side steering wheel keypad.
Adjusting volume1. Trap Settings > Sound > System volumes in the center display’s
Top view.
2. Adjust or turn off the volume for e.g., the keyboard or tapping: pull the on-screen control for Keypad touch or Screen touch to the desired level.
05

CONNECTED SERVICE BOOKING (CSB)
Connected Service Booking makes it possible to use the vehicle’s Internet connection to set up a time for service, maintenance and/or repairs.
To send an appointment request4:
1. In the center display’s App view, open the Car status app.
2. Tap Appointments > Request appoint.3. Check that your Volvo ID is filled in correctly.
4. Check that the correct preferred retailer is listed or if you prefer, tap the button to initiate a call to the retailer.
5. Tap Send appointment request. Your request and vehicle data will be sent to your retailer through the vehicle’s Internet connection.
6. Volvo will send a booking invitation to your email address.
4 A Volvo ID is required. The engine must be running in order to send an appointment request..
05

AUX and USB socketsThe AUX and USB sockets are located under the tunnel console armrest.
Electrical socketThe vehicle has three electrical sockets:
• There is a 12-volt socket in the tunnel console storage compartment.
• There is a 12-volt socket on the rear side of the tunnel console.
• There is also a 12-volt socket in the cargo compartment.
The ignition must be in at least mode I for the electrical sockets to provide current.
LOCATION OF THE AUX, USB AND ELECTRICAL SOCKETS
05
SUPPLEMENTARY TEXTSThe owner’s manual and other owner’s information contain safety-related instructions and all warnings, cautions and notes, which must be read. Not all functions are available in all markets.
WARNINGS
Using the parking brakeUse the parking brake when parking on inclines. Putting the transmission in the P position may not be adequate to keep the vehicle at a standstill.
Starting and switching off the engineAlways remove the remote key from the passenger compartment when leaving the vehicle and ensure that the ignition is in mode 0.
Folding down the rear seat backrestsWhen one or more sections of the backrest is returned to the upright position, check that it is properly locked in place by pushing and pulling it. The outboard head restraints in the second row of seats must always be in the upright position if the third-row seats are occupied.
Stowing the charging cable
Do not use the charging cable if it is damaged in any way. Only use the charging cable provided with your vehicle or a replacement cable purchased from a Volvo retailer.
Charging the hybrid battery
Charging the hybrid battery may only be done from approved, grounded 120-/ 240-volt sockets. If the electrical circuit or electrical socket’s capacity is not known, let a licensed electrician inspect the electrical circuit’s capacity. Using a charge level that exceeds the electrical circuit’s or electrical outlet’s capacity may start a fire or damage the electrical circuit.
The charging cable’s residual current breaker helps protect the vehicle’s charging system but cannot
ensure that an current overload will never occur.
Never use visibly worn or damaged electrical sock-ets. Doing so could lead to fires or serious injury.
Never connect the charging cable to an extension cord or a multiple plug socket.
Opening and closing the power tailgate*
Be sure that no one is near the tailgate when it is opened or closed automatically. The tailgate should never be obstructed in any way when it is operated.
City SafetyCity Safety™ is a supplemental aid to the driver. It can never replace the driver’s attention to traffic conditions or his/her responsibility for operating the vehicle in a safe manner. City Safety™ does not function in all driving situations or in all traffic, weather or road conditions. Warnings will only be provided if there is an imminent risk of a collision taking place. The driver should be aware of the system’s limitations before operating the vehicle.
Warnings for pedestrians and cyclists will not be provided if the vehicle’s speed is above 50 mph (80 km/h). City Safety’s auto-brake function can help prevent a collision or reduce the speed at which a collision occurs. However, the driver should always apply the brakes, even if auto-brake is operating. The driver is always responsible for maintaining the correct speed and distance in relation to the vehi-cle ahead. Never wait for a collision warning or for City Safety to intervene. City Safety maintenance may only be carried out by a trained and qualified Volvo service technician.
Park Assist Pilot (PAP)*PAP does not function in all situations and is only intended to assist the driver during parallel or perpendicular parking. As the driver, you have full responsibility for parking the vehicle in a safe manner.
Park Assist Camera (PAC)*PAC is designed to be a supplementary aid when parking the vehicle. It is not, however, intended to replace the driver’s attention and judgment. The camera has blind spots where it cannot detect
objects or people behind the vehicle. Pay particular attention to people or animals that are close to the vehicle. Objects seen on the screen may be closer than they appear to be.
Lane keeping Aid (LKA)*LKA is only intended to assist the driver and does not function in all driving, weather, traffic or road conditions. As the driver, you have full responsibility for operating the vehicle in a safe manner.
Blind Spot Information (BLIS)* and Cross Traffic Alert (CTA)*BLIS and CTA are information systems, NOT warning or safety systems and do not function in all situations. BLIS and CTA do not eliminate the need for you to visually confirm the conditions around you, and the need for you to turn your head and shoulders to make sure that you can safely change lanes or back up. As the driver, you have full responsibility for changing lanes/backing up in a safe manner.
Using voice controlThe driver is always responsible for operating the vehicle in a safe manner and adhering to all current traffic regulations.
Using the navigation systemDirect all your attention to the road and make sure that all your concentration is on driving. Follow applicable traffic legislation and drive with good judgment. Due to weather conditions or time of year affecting the road conditions, some recom-mendations may be less reliable.
Volvo On Call (VOC)This system only functions in areas where VOC’s partner organizations have cell phone reception. Just as with a cell phone, atmospheric disturbances or areas with few cell phone transmitting masts may make it difficult or impossible to make a connection.
In addition to the owner’s manual, refer also to your VOC service agreement for information about VOC warnings/cautions/notes.
CAUTIONS
Folding down the rear seat backrestsTo help avoid damage to the seat upholstery, before a rear seat backrest is folded down, remove any objects from the seat and ensure that the seat belts are not buckled. The integrated booster cushion* in the center position must be stowed (folded down) before the backrest is folded down. The center seating position armrest must be folded up before the backrest is folded down.
The vehicle’s three displaysThe HUD’s projection unit is located in the dash-board. Avoid scratching or placing objects on the unit’s glass surface.
Climate system settings
Seat ventilation* cannot be started if the passenger compartment temperature is too low to help avoid discomfort to the seat’s occupant.
Cleaning the center displayThe microfiber cloth used should be free of sand, dirt or anything abrasive that might scratch the screen. Do not use rough cloths, paper towels or tissues that could scratch the screen. When clean-ing the center display, apply only light pressure on the screen. Pressing too hard could cause damage. Do not spray any liquid or corrosive chemicals directly on the screen. Do not use window cleaning liquid, cleaning agents (particularly ones containing abrasives), sprays, solvents, alcohol or ammonia to clean the screen.
Charge module indicator lights
To clean the charging cable, wipe it with a clean cloth dampened with water or a mild detergent solution suitable for use on automobile paint. Do not use chemicals or solvents. Do not submerge the charging cable.
Initiating hybrid battery charging
Never connect the charging cable if there is a risk of thunderstorms/lightning. Place the charging socket’s protective cover on the holder provided on the charging socket door to help prevent paint 06

damage . Never disconnect the charging cable from the 120-/240-volt socket while charging is in progress. This could damage the socket. Always stop the charging process (by unlocking the vehicle) and disconnect the charging cable from the vehicle’s charging socket before disconnecting the other end from the 120-/240-volt socket being used.
Selecting a drive mode
OFF ROAD drive mode may not be used if the vehicle is towing a trailer without an electrical connection. This could result in damage to the pneumatic suspension system’s bellows.
Location of the AUX, USB and electrical socketsMax. current provided is 10 A (120 W) if one socket is used at a time. If both of the sockets in the tunnel console are used at the same time, the max. current provided per socket is 7.5 A (90 W). If the tire sealing system’s compressor is being used, no other device should be connected to any of the other sockets while the compressor is operating.
NOTES
Keyless locking/unlocking*Electromagnetic fields or metal obstructions can interfere with the keyless drive system. The remote key should never be placed closer than approxi-mately 4-6 in. (10-15 cm) to cell phones, metallic objects or e.g., stored in a metal briefcase.
Starting and switching off the engineAfter a cold start, idle speed may be noticeably higher than normal for a short period. This is done to help bring components in the emission control system to their normal operating temperature as quickly as possible, which enables them to control emissions and help reduce the vehicle’s impact on the environment.
The vehicle’s three displaysIf Forward Collision Warning* is activated, informa-tion in the head-up display will be replaced by the Forward Collision Warning* graphic. This graphic
will appear even if the head-up display is turned off. The driver’s ability to see information in the HUD may be impeded by the use of polarizing sunglasses, not sitting in the center of the driver’s seat, objects on the HUD projector glass on the dashboard, certain ambient lighting conditions, certain types of vision problems, which may also result in headaches or eye strain.
Climate system settings
Heating or cooling cannot be speeded up by se-lecting a higher/lower temperature than the actual temperature required.
Cleaning the center displayThe display cannot be turned off when a message prompting the driver to take action is displayed.
Opening and closing the power tailgate*If the tailgate has been opened and closed con-tinuously for too long, the automatic function will be deactivated to avoid overloading the electrical system. The automatic function can be used again after approximately 2 minutes.
Stopping hybrid battery charging
Always unlock the vehicle to stop the charging pro-cess before disconnecting the charging cable from the vehicle’s charging socket and then unplugging it from the 120-/240-volt socket.
Selecting a drive mode
OFF ROAD drive mode is not intended for normal street driving.
Park Assist Camera*Keep the camera’s lens free of dirt, ice and snow. This is particularly important in poor ambient lighting conditions.
Using the trip computerThe accuracy of the “distance to empty” figure may vary if your driving style changes. An economical driving style will generally increase this distance.
Glove compartmentA security code has to be selected the first time the private locking function is used. This code is used to reset the function if an attempt has been made
to deactivate private locking using an incorrect code. Keep this code in a safe place.
Pairing and connecting a Bluetooth cell phoneIf your cell phone’s operating system is updated, this may break the connection between the phone and the vehicle. If this happens, delete the phone from the list of paired phones and repeat the pairing procedure.
Managing and updating apps, system software and mapsDownloading data may affect other system features that share the Internet connection. A download can be canceled at any time or the other features can be temporarily turned off while the software download is underway.
Volvo On CallAlways observe applicable state, province and/or local laws regarding engine idling when using the mobile app’s Engine Remote Start feature.
Apple Carplay* in the center displayPlease be aware that Volvo has no control over the content of the Apple CarPlay app. If a cell phone or a media player is connected via Bluetooth, it will not be accessible while Apple Car-Play is active because Bluetooth will be disabled. To connect the vehicle to the Internet, use Wi-Fi or the vehicle’s integrated modem.
06

TP 20480 (English - USA & Canada) AT 1546, MY16. Printed in Sweden, Göteborg 2015, Copyright © 2000-2015 Volvo Car Corporation