Web Development with MyEclipse and JBoss - …read.pudn.com/downloads66/ebook/239912/EJB_Dev.pdfWeb...
28
Web Development with MyEclipse and JBoss – Part 2 Web Development with MyEclipse and JBoss Part 2 – Enterprise Java Bean Development with MyEclipse The WebStock Case Study The WebStoThe WebStock Case Study Study Module 1 By Karim Djaafar Senior Consultant Author of “Developing J2EE Applications with Eclipse and JBoss” Paris, October 2005 Enterprise Java Bean Development with MyEclipse
Transcript of Web Development with MyEclipse and JBoss - …read.pudn.com/downloads66/ebook/239912/EJB_Dev.pdfWeb...

Web Development with MyEclipse and JBoss – Part 2
Web Development with MyEclipse and JBoss
Part 2 – Enterprise Java Bean Development with MyEclipse
The WebStock Case Study
The WebStoThe WebStock Case Study Study
Module 1By Karim Djaafar
Senior Consultant Author of
“Developing J2EE Applications with Eclipse and JBoss”
Paris, October 2005
Enterprise Java Bean Development with MyEclipse

Web Development with MyEclipse and JBoss – part 2
About the authorThe series J2EE development with MyEclipse and JBoss is a collaborative effort between Karim Djaafar from Sitepilot.fr in France and Sebastian Hennebrueder from laliluna.de in Germany. Karim and Sebastian cooperate to offer a wide choice of seminars in the English, French and German languages on their E-Learning platform java-learning.com.
Karim works as a senior consultant for large companies in France and is author of a book focussing on development with Eclipse and JBoss.
Sebastian works as a consultant and developer and runs the platform laliluna.de which provides a large number of tutorials about J2EE, Hibernate, Struts and JavaServer Faces.
This part of the series, J2EE development with MyEclipse and JBoss, is written by Sebastian Hennebrueder and implements the case study explained in the book J2EE Applications with Eclipse and Jboss of Karim Djaafar.
Enterprise Java Bean Development with MyEclipse2

Web Development with MyEclipse and JBoss – part 2
Table of Content
Table of Figures
FIGURE 1 - SAMPLE J2EE APPLICATION STRUCTURE............................................. 5
FIGURE 2 - SELECT AN EJB PROJECT FORM THE NEW PROJECT DIALOG.......... 7
FIGURE 3 - ADDING THE JBOSS TASK TO THE XDOCLET CONFIGURATION.........8
FIGURE 4 - CREATING A SESSION BEAN WITH MYECLIPSE WIZARDS.................. 9
FIGURE 5 - CLASSES AND INTERFACES AFTER RUNNING XDOCLET.................. 11
FIGURE 6 - MYECLIPSE WIZARD TO CREATE NEW ENTITY BEAN........................ 16
Enterprise Java Bean Development with MyEclipse3
Web Development with MyEclipse and JBoss – part 2
Tutorial PrerequisitesThe reader should be familiar with the basics concepts of J2EE, such as EJB, application server technologies and how to develop and deploy server side applications.
J2EE Technology BasicsIn this section, we briefly introduce the J2EE technologies used throughout this tutorial.
J2EE offers a wide choice of services and containers to develop Web Services, enterprise applications and web applications. An Enterprise Java Bean (EJB) container is part of J2EE application server specification and provides features to the developer including distributed communication, threading, scaling, and transaction management. There are three basic types of EJBs:
• Entity Beans• Session Beans• Message Driven Beans.
Entity Bean
The entity bean provides the functionality to map persistent data entities to class objects. An example entity bean use would be to map a record of a table « dog » to a class object of type « dog ».
Session Bean
The session bean provides functionality to implement business logic. Session beans come in two flavors, either stateless or stateful. For example, a stateless session bean may be a class which returns only data when invoked by the client and does not maintain any session state between calls. The stateful session bean could be used as a shopping cart for an ecommerce site. The cart is stateful, because it saves the products and other session data between calls in the same session.
Message Driven Beans
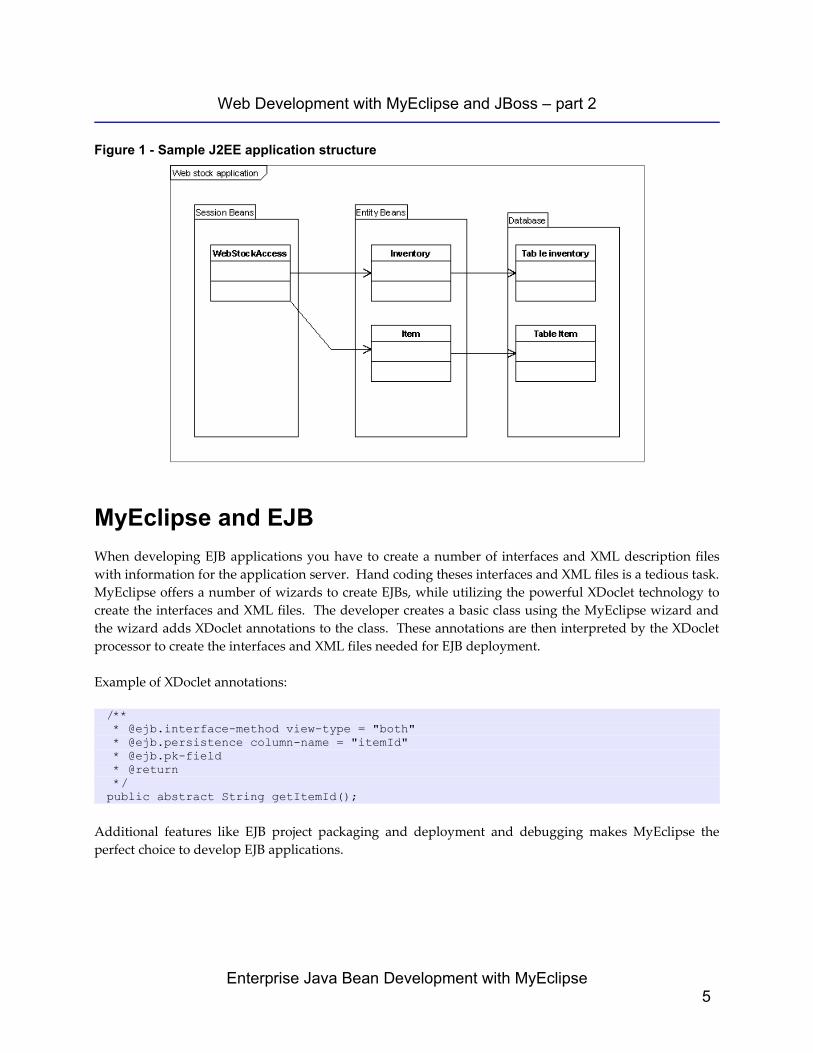
Message driven beans allow asynchronous messaging between applications. An internet shop application can send an order message to a warehouse application. In our example we will use a session bean to implement the business logic and entity beans to access entries from the database. The structure of our J2EE application is displayed below in Figure 1.
Enterprise Java Bean Development with MyEclipse4
Web Development with MyEclipse and JBoss – part 2
Figure 1 - Sample J2EE application structure
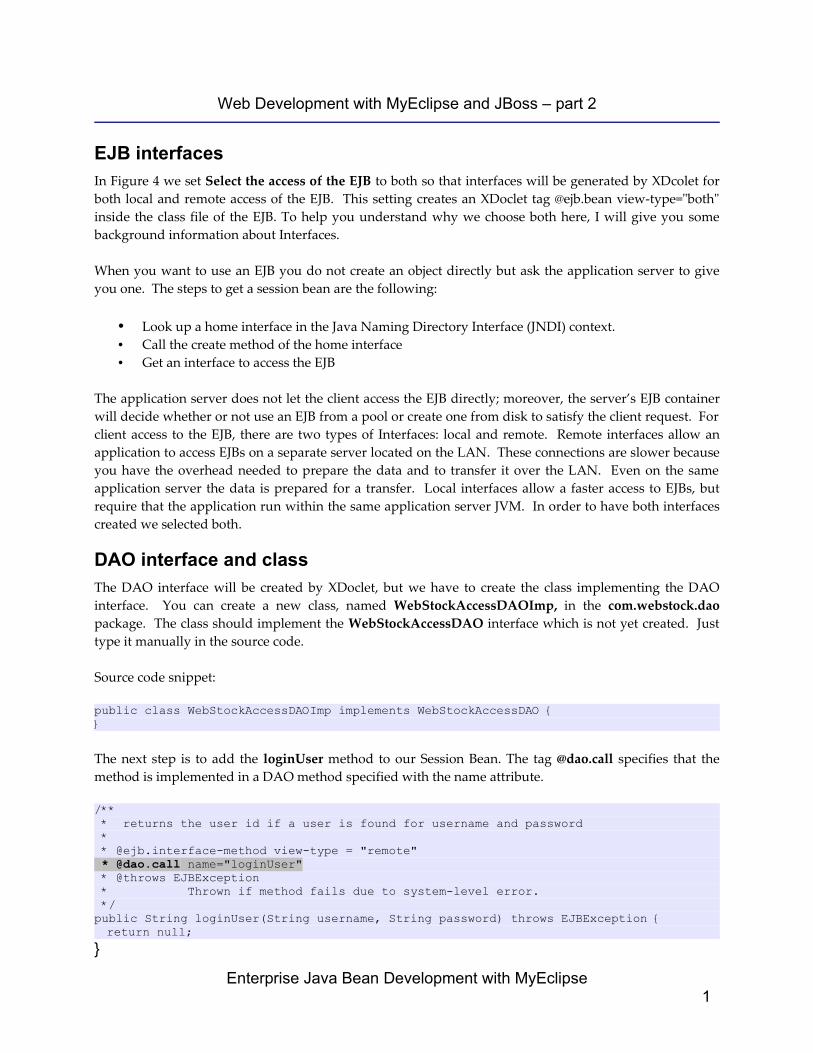
MyEclipse and EJBWhen developing EJB applications you have to create a number of interfaces and XML description files with information for the application server. Hand coding theses interfaces and XML files is a tedious task. MyEclipse offers a number of wizards to create EJBs, while utilizing the powerful XDoclet technology to create the interfaces and XML files. The developer creates a basic class using the MyEclipse wizard and the wizard adds XDoclet annotations to the class. These annotations are then interpreted by the XDoclet processor to create the interfaces and XML files needed for EJB deployment.
Example of XDoclet annotations:
/** * @ejb.interface-method view-type = "both" * @ejb.persistence column-name = "itemId" * @ejb.pk-field * @return */public abstract String getItemId();
Additional features like EJB project packaging and deployment and debugging makes MyEclipse the perfect choice to develop EJB applications.
Enterprise Java Bean Development with MyEclipse5

Web Development with MyEclipse and JBoss – part 2
Design of the EJB ProjectIn the section below we will explain various aspects of J2EE technology. The design should be understood as a technology overview introducing technologies like Entity Beans with Container Managed Persistence (CMP) and design patterns like Data Access Objects (DAO).
As explained earlier in this document, we are using a central Session Bean to implement our business logic. We will implement two of the use cases introduced in Part One of this three part series:
• Login User• Local Dealership Inquiry ( for browsing items which are available in stock)
The Login User use case is implemented as a method in the WebStockAccess Session Bean. This bean will be responsible for authenticating the user by communicating with the database using a Data Access Object (DAO) which encapsulates the Java Database Connectivity (JDBC) code. In fact, we do not want to implement the JDBC query directly in this Session Bean method, but move it to a Data Access Object (DAO). There are a several advantages to using this design:
• First, we have clean separation between our business logic and the underlying JDBC exceptions and connections.
• Second, in the case where we change the underlying database technology, we only have to check that our DAOs are still working. We do not have to worry about our business logic.
• Third, we can implement database specific DAOs when we want to support multiple database types.
The Local Dealership Inquiry use case is also implemented as a method in the WebStockAccess Session Bean. The method returns a list of StockItems which are composite classes that include the information from an Inventory class and an Item class. We moved the implementation into a DAO object, and the implementation will use a Finder method of a CMP entity bean.
Enterprise Java Bean Development with MyEclipse6

Web Development with MyEclipse and JBoss – part 2
Setting up the projectThe first step to setting up our project is to create a new EJB project in MyEclipse. This is accomplished by pressing Ctrl + n and opening the New dialog and then selecting an EJB Project.
Figure 2 - Select an EJB project form the New Project Dialog
An EJB project provides all the features and libraries you need to create a Jar and deploy the project to an application server.
Open the project properties and select the MyEclipse>XDoclet tab to add a Standard EJB configuration. We are using the JBoss Application Server, so you have to add a JBoss task to the default tasks shown below. You can find the needed settings for the JBoss task in Figure 3 below.
Enterprise Java Bean Development with MyEclipse7

Web Development with MyEclipse and JBoss – part 2
Figure 3 - Adding the JBoss task to the XDoclet configuration.
The data source mapping must be specified according to your database. For MySQL it is mySQL. You can find all supported mappings in the file jboss-x.y\server\default\conf\standardjbosscmp-jdbc.xml.Do not forget to create a data source in your JBoss server configuration. We propose jdbc/webstockDS as JNDI name.
Enterprise Java Bean Development with MyEclipse8

Web Development with MyEclipse and JBoss – part 2
Use case: Login User Create a Session Bean in the package com.webstock.ejb. You can find the configuration in Figure 4, below.
Figure 4 - Creating a Session Bean with MyEclipse wizards
Enterprise Java Bean Development with MyEclipse9
Web Development with MyEclipse and JBoss – part 2
EJB interfacesIn Figure 4 we set Select the access of the EJB to both so that interfaces will be generated by XDcolet for both local and remote access of the EJB. This setting creates an XDoclet tag @ejb.bean view-type="both" inside the class file of the EJB. To help you understand why we choose both here, I will give you some background information about Interfaces.
When you want to use an EJB you do not create an object directly but ask the application server to give you one. The steps to get a session bean are the following:
• Look up a home interface in the Java Naming Directory Interface (JNDI) context.• Call the create method of the home interface• Get an interface to access the EJB
The application server does not let the client access the EJB directly; moreover, the server’s EJB container will decide whether or not use an EJB from a pool or create one from disk to satisfy the client request. For client access to the EJB, there are two types of Interfaces: local and remote. Remote interfaces allow an application to access EJBs on a separate server located on the LAN. These connections are slower because you have the overhead needed to prepare the data and to transfer it over the LAN. Even on the same application server the data is prepared for a transfer. Local interfaces allow a faster access to EJBs, but require that the application run within the same application server JVM. In order to have both interfaces created we selected both.
DAO interface and classThe DAO interface will be created by XDoclet, but we have to create the class implementing the DAO interface. You can create a new class, named WebStockAccessDAOImp, in the com.webstock.dao package. The class should implement the WebStockAccessDAO interface which is not yet created. Just type it manually in the source code.
Source code snippet:
public class WebStockAccessDAOImp implements WebStockAccessDAO {}
The next step is to add the loginUser method to our Session Bean. The tag @dao.call specifies that the method is implemented in a DAO method specified with the name attribute.
/** * returns the user id if a user is found for username and password * * @ejb.interface-method view-type = "remote" * @dao.call name="loginUser" * @throws EJBException * Thrown if method fails due to system-level error. */public String loginUser(String username, String password) throws EJBException {return null;
}
Enterprise Java Bean Development with MyEclipse1

Web Development with MyEclipse and JBoss – part 2
Now, you must specify the DAO class in which the method should be implemented; this is done just before the class definition in the class file.
@ejb.dao impl-class=" com.webstock.dao.WebStockAccessDAOImp" * */public class WebStockAccess implements SessionBean {
To create the DAO and the other interfaces of the Session Bean, you must run the XDoclet processor on the project. This is done by right-clicking on the project and selecting the MyEclipse>Run XDoclet menu item from the popup menu. Below you can see a picture showing the complete classes and interfaces in Figure 5. The files we have created so far are marked with a red ellipse.
Figure 5 - Classes and Interfaces after running XDoclet
We have nearly finished this part. Now we need to open the source code of the
Enterprise Java Bean Development with MyEclipse1

Web Development with MyEclipse and JBoss – part 2
WebStockAccessDAOImp and implement the init and loginUser methods. You can find the source code below. We use a data source configured in the JBoss application server. The next paragraph explains how to create a data source.
public class WebStockAccessDAOImp implements WebStockAccessDAO {
private DataSource dataSource;
public void init() {InitialContext initialContext = null;if (dataSource == null){try{initialContext = new InitialContext();dataSource = (DataSource) initialContext
.lookup("java:/jdbc/webstockDS");} catch (NamingException e){e.printStackTrace();
}}
}public String loginUser(String username, String password) throws EJBException {
String userId = null;Connection connection = null;PreparedStatement ps = null;ResultSet rs = null;try{connection = dataSource.getConnection();String sql = "select userid from webstockaccess where username = ? and password = ?
";ps = connection.prepareStatement(sql);ps.setString(1, username);ps.setString(2, password);rs = ps.executeQuery();if (rs.next())userId = rs.getString(1);
} catch (SQLException e){// do nothing, we will return nulle.printStackTrace();
} finally{try{ps.close();rs.close();connection.close();
} catch (SQLException e){}
}return userId;
}
Enterprise Java Bean Development with MyEclipse1

Web Development with MyEclipse and JBoss – part 2
The init method is called by default after having created the DAO. Have a look in the WebStockAccessSession class to see what XDoclet created for you and how the DAO is accessed.
So far we have configured our EJB project, created a DAO interface, configured our Session Bean WebStockAccess to use the DAO and created a dummy method loginUser in the Session Bean. We have also implemented the loginUser and init methods in the DAO. XDoclet created all we needed to initialize the DAO and to delegate the method calls. We can now test what we and XDoclet have created.
Creating a Data sourceCopy the driver of your database to \jboss-x.y\server\default\lib and then create the database before configuring the data source. You can find configuration examples for data sources for all supported databases in \jboss-x.y\docs\examples\jca\. Create a new data source file named your-dbds.xml and copy it to the directory \jboss-x.y\server\default\deploy. JBoss will read the file and output a message in the log or in the console showing that the data source is created successfully.
Below you can see an example data source file for a MySQL database:
<datasources> <local-tx-datasource> <jndi-name>jdbc/webstockDS</jndi-name> <connection-url>jdbc:mysql://localhost:3306/test</connection-url> <driver-class>com.mysql.jdbc.Driver</driver-class> <user-name>root</user-name> <password>r</password> <exception-sorter-class-name>org.jboss.resource.adapter.jdbc.vendor.MySQLExceptionSorter</exception-sorter-class-name> <metadata> <type-mapping>mySQL</type-mapping> </metadata> </local-tx-datasource></datasources>
Deployment and Testing
To test our application we need to create the table needed by our use case. Create the table webstockaccess (see Resources at the end of this document).
Add a user entry in your table:
insert into webstockaccess (userid, username, password) values ('1', 'Hugo','h');
Deploy the EJB Project to the application server and verify that it is successfully deployed.
Enterprise Java Bean Development with MyEclipse1

Web Development with MyEclipse and JBoss – part 2
Creating a J2EE test clientIn order to test our EJBs we need an EJB test client. First we must create a new Java project. Next, we create a class named TestClient in the com.webstock package and implement the following simple test method. The testUserLogin() method calls the session bean method we have implemented, and uses an existing user (Hugo) with the correct password. The testUserLogin() method also uses a non existing user for testing purposes. The TestClient creates an initial JNDI that will allow our application to get access to resources like home interfaces or data sources from a JNDI.
Our test method testUserLogin() uses the JNDI to get a home interface of our WebStockAccess session bean. It cannot convert it directly to a local interface but needs the method PortableRemoteObject to narrow the object. The reason is as explained before that a remote home interface is not accessed directly. Each request is packed to be sent over a LAN, unpacked at the target server and the result is returned the same way.
As our client does not execute within the application server, we need access to the remote interface to access our EJBs.
package com.webstock;
import java.rmi.RemoteException;import java.util.Iterator;import java.util.List;import java.util.Properties;
import javax.ejb.CreateException;import javax.naming.InitialContext;import javax.naming.NamingException;import javax.rmi.PortableRemoteObject;
import com.webstock.interfaces.WebStockAccess;import com.webstock.interfaces.WebStockAccessHome;
public class TestClient {
private InitialContext initialContext;
/** * @param args */public static void main(String[] args) {TestClient client = new TestClient();client.init();client.testUserLogin();
}
public void init() {Properties properties = new Properties();properties = new Properties();properties.put("java.naming.factory.initial",
"org.jnp.interfaces.NamingContextFactory");
Enterprise Java Bean Development with MyEclipse1

Web Development with MyEclipse and JBoss – part 2
properties.put("java.naming.factory.url.pkgs","org.jboss.naming:org.jnp.interfaces");
properties.put("java.naming.provider.url", "jnp://localhost:1099");properties.put("jnp.disableDiscovery", "true");
try{InitialContext context = new InitialContext(properties);
} catch (NamingException e){e.printStackTrace();
}}
private void testUserLogin() {try{
Object object = initialContext.lookup(WebStockAccessHome.JNDI_NAME);WebStockAccessHome webStockAccessHome = (WebStockAccessHome) PortableRemoteObject
.narrow(object, WebStockAccessHome.class);WebStockAccess webStockAccess = webStockAccessHome.create();System.out.println(webStockAccess.loginUser("Hugo", "h"));System.out.println("Bad user: "
+ webStockAccess.loginUser("baduser", "b"));
} catch (RemoteException e){e.printStackTrace();
} catch (NamingException e){e.printStackTrace();
} catch (CreateException e){e.printStackTrace();
}}
We have finished implementing the first use case. We needed to prepare the structure we chose, so the first use case took considerable efforts. However, the second use case can reuse this structure.
Use case: Local Dealership InquiryThe second use case permits us to browse items available in the stock. To access the stock we will need the CMP entity bean, Inventory. To read detail information about our item, we will need another CMP entity bean, Item. Later we will implement our business logic using both CMP entity beans.
CMP and Finder methodsWhy do we use CMP entity beans?
There are two types of entity beans:
• Container Managed Persistence beans (CMP)
Enterprise Java Bean Development with MyEclipse1

Web Development with MyEclipse and JBoss – part 2
• Bean Managed Persistence beans (BMP)
CMP entity beans only have abstract getter and setter method and a description file which defines which getter belongs to which database fields. All SQL queries to the database are generated by the application server’s EJB container. BMP entity beans do not provide this functionality; moreover, with BMP entity beans you have to code all queries on your own.
In the first versions of CMP the query language for finder methods was very basic and the features of CMP very limited. EJB 2.4 is quite powerful and there is no need to create BMP implementations for simple entity beans any more.
Now, we continue our project by creating a new entity Bean using the MyEclipse wizard. We will implement a limited choice of the attributes shown in the model in Part One of this series. You may complete the implementation on your own.
Figure 6 - MyEclipse wizard to create new entity bean
Enterprise Java Bean Development with MyEclipse1

Web Development with MyEclipse and JBoss – part 2
The next task is to provide the abstract getters and setters for our attributes. Each of these abstract methods is described with annotations, which are used by XDoclet to create the needed interfaces.
Example of annotations for a primary key field:/** * @ejb.interface-method view-type = "both" * @ejb.persistence column-name = "itemId" * @ejb.pk-field * @return */
The annotations noted above tell XDoclet to create remote and local interfaces for the method. It further defines the table column to which the getter is mapped to and it defines the column as a primary key. For
Enterprise Java Bean Development with MyEclipse1

Web Development with MyEclipse and JBoss – part 2
further information about XDoclet you can have a look in the XDoclet reference provided by MyEclipse in the Help pages.
Add the following methods and annotations to your class:
public abstract class Inventory implements EntityBean {
/** * @ejb.interface-method view-type = "both" * @ejb.persistence column-name = "itemId" * @ejb.pk-field * @return */public abstract String getItemId();
/** * @ejb.interface-method view-type = "both" * @param itemId */public abstract void setItemId(String itemId);
/** * @ejb.interface-method view-type = "both" * * @return */public abstract InventoryData getData();
/** * @ejb.interface-method view-type = "both" * * @param name */public abstract void setData(InventoryData inventoryData);
/** * @ejb.interface-method view-type = "both" * @ejb.persistence column-name = "partId" * @return */public abstract String getPartId();
/** * @ejb.interface-method view-type = "both" * @param partId */public abstract void setPartId(String partId);
/** * @ejb.interface-method view-type = "both" * @ejb.persistence column-name = "quantity" * @return */public abstract int getQuantity();
/** * @ejb.interface-method view-type = "both"
Enterprise Java Bean Development with MyEclipse1

Web Development with MyEclipse and JBoss – part 2
* @param quantity */public abstract void setQuantity(int quantity);
/** * @ejb.interface-method view-type = "both" * @ejb.persistence column-name = "shelf" * @return */public abstract String getShelf();
/** * @ejb.interface-method view-type = "both" * @param shelf */public abstract void setShelf(String shelf);
/** * @ejb.interface-method view-type = "both" * @ejb.persistence column-name = "location" * @return */public abstract String getLocation();
/** * @ejb.interface-method view-type = "both" * @param location */public abstract void setLocation(String location);
/** * @ejb.create-method */public String ejbCreate(InventoryData inventoryData) throws CreateException {setItemId(inventoryData.getItemId());this.setData(inventoryData);return null;
}public void ejbPostCreate(InventoryData inventoryData) throws CreateException {}
Our use case allows us to browse all stocked items in the WebStock inventory system. To accomplish this we need to query all inventory records which have a quantity which is not zero. We will implement a custom finder. A finder is a database-independent query implemented in the EJB-QL language that allows the querying of data sources like SQL. The application server translates it to the database- specific SQL language based on the database you selected in the earlier data source mapping.
Below you can find the annotation needed for your finder:
* @ejb.finder * query="select object (i) from Inventory as i where i.quantity <> 0" * signature="java.util.Collection findStockedItems()" * description="find all stock items with positive quantity" */public abstract class Inventory implements EntityBean {
Enterprise Java Bean Development with MyEclipse1

Web Development with MyEclipse and JBoss – part 2
The last step is to complete the annotations of your class. We will add convenience annotations to have the tables created automatically:
* @ejb.bean name="Inventory" * display-name="Name for Inventory" * description="Description for Inventory" * jndi-name="ejb/Inventory" * type="CMP" * cmp-version="2.x" * view-type="local" * primkey-field="itemId" * @jboss.persistence * create-table="true" * remove-table="false" * table-name="inventory"
We have finished our Inventory method. We can now run XDoclet to have all the interfaces created and proceed to the second entity bean that we need: Item.
You are a CMP expert by now, so I will not give you any details but only the source which needed to be implemented. Create a second entity bean named Item, implement it and run XDoclet when finished.
Source code for the entity bean, Item:
* @ejb.bean name="Item" * display-name="Name for Item" * description="Description for Item" * jndi-name="ejb/Item" * type="CMP" * cmp-version="2.x" * view-type="local" * primkey-field="partId" * @jboss.persistence * create-table="true" * remove-table="false" * table-name="item" */public abstract class Item implements EntityBean {
/** The entity context */private EntityContext context;
public Item() {super();// TODO Auto-generated constructor stub
}
/** * @ejb.interface-method view-type = "both" * * @return */public abstract ItemData getData();
Enterprise Java Bean Development with MyEclipse2

Web Development with MyEclipse and JBoss – part 2
/** * @ejb.interface-method view-type = "both" * * @param name */public abstract void setData(ItemData itemValue);
/** * @ejb.interface-method view-type = "both" * @ejb.persistence column-name = "partid" * @ejb.pk-field * @return */public abstract String getPartId();
/** * @ejb.interface-method view-type = "both" * @param partid */public abstract void setPartId(String partid);
/** * @ejb.interface-method view-type = "both" * @ejb.persistence column-name = "description" * @return */public abstract String getDescription();
/** * @ejb.interface-method view-type = "both" * @param description */public abstract void setDescription(String description);
/** * @ejb.interface-method view-type = "both" * @ejb.persistence column-name = "weight" * @return */public abstract Float getWeight();
/** * @ejb.interface-method view-type = "both" * @param weight */public abstract void setWeight(Float weight);
/** * @ejb.interface-method view-type = "both" * @ejb.persistence column-name = "image_url" * @return */public abstract String getImageUrl();
/** * @ejb.interface-method view-type = "both" * @param image_url */public abstract void setImageUrl(String image_url);
Enterprise Java Bean Development with MyEclipse2

Web Development with MyEclipse and JBoss – part 2
/*** @ejb.create-method */public String ejbCreate(ItemData itemData) throws CreateException {setPartId(itemData.getPartId());setData( itemData);return null;
}
public void ejbPostCreate(ItemData itemData) throws CreateException {}
Implementing the business methods
In this part we are going to implement the business logic using the two entity beans that we have just created. Open the class WebStockAccess and add a method getItemsInStock. This method will be moved to our DAO. This must be configured using the annotations. Have a look at the source code below:
/** * returns a list of Items * @ejb.interface-method view-type="both" * @dao.call name="getItemsInStock" * @return * @throws EJBException */public List getItemsInStock() throws EJBException{return null;
}
Run XDoclet to have the new method added to our interface WebStockDAO and open the file WebStockAccessDAOImp. This file should show a Java error as you configured it to implement the WebStockAccessDAO interface but you have not implemented the getItemsInStock method yet. This is our next task.
We want to use the finder to select the items with a positive quantity and show the detail data of each item. To do this we are going to return a list of objects showing attributes from two entity beans: Inventory and Item. In order to provide the information from two objects in one object, we will use composition.
There are two possibilities to have attributes from two classes. First, we could use inheritance from both classes. However, Java does not support multiple-inheritance. The second technique is to use composition. Even if you only need attributes from one class, composition is often the better choice as it allows you to select attributes from the available child classes and control attribute access through business logic.
Create a class StockItem and add the classes ItemData and InventoryData as private attributes.
Enterprise Java Bean Development with MyEclipse2
Web Development with MyEclipse and JBoss – part 2
public class StockItem implements Serializable {private ItemData itemData;private InventoryData inventoryData;
public StockItem(){itemData = new ItemData();inventoryData = new InventoryData();
}
Implement delegate methods for each attribute of ItemData and StockItem. Below you can see an example of a delegate method for the attribute ItemId. Eclipse provides a convenient way to create delegate methods. In the context menu of the source code, choose Source and then Generate delegate methods.
public String getItemId() {return inventoryData.getItemId();
}
public void setItemId(String itemId) {inventoryData.setItemId(itemId);
}
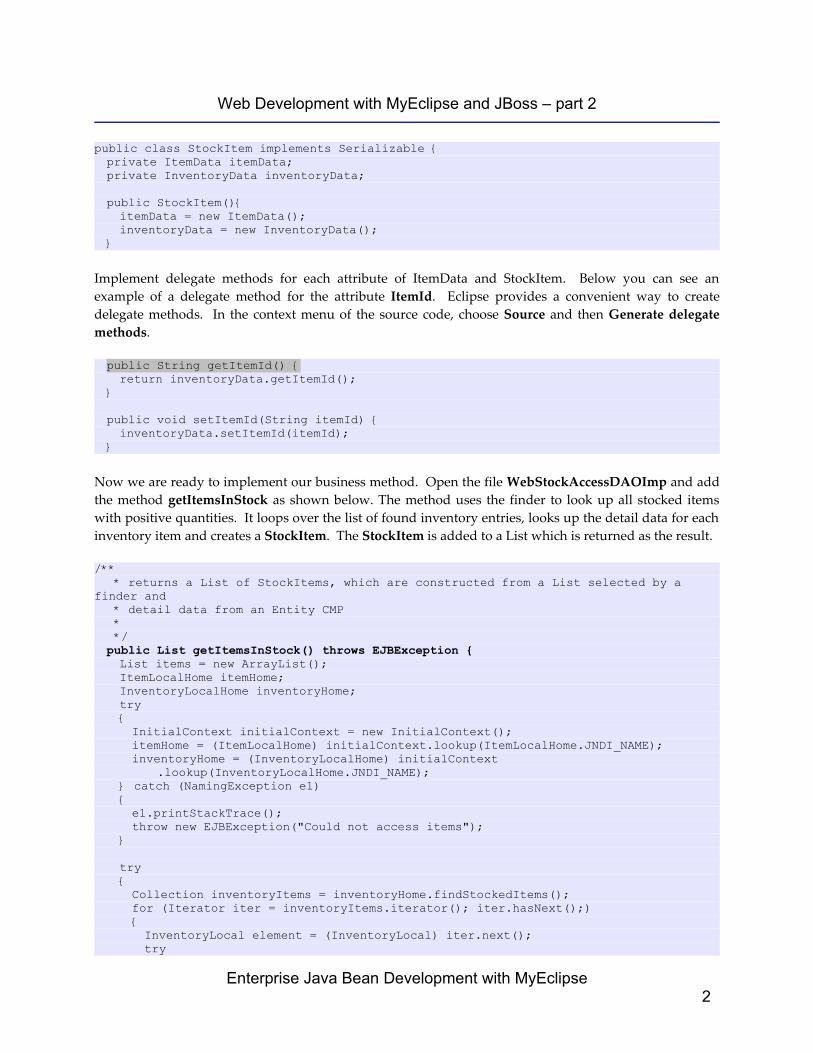
Now we are ready to implement our business method. Open the file WebStockAccessDAOImp and add the method getItemsInStock as shown below. The method uses the finder to look up all stocked items with positive quantities. It loops over the list of found inventory entries, looks up the detail data for each inventory item and creates a StockItem. The StockItem is added to a List which is returned as the result.
/** * returns a List of StockItems, which are constructed from a List selected by a
finder and * detail data from an Entity CMP * */public List getItemsInStock() throws EJBException {List items = new ArrayList();ItemLocalHome itemHome;InventoryLocalHome inventoryHome;try{InitialContext initialContext = new InitialContext();itemHome = (ItemLocalHome) initialContext.lookup(ItemLocalHome.JNDI_NAME);inventoryHome = (InventoryLocalHome) initialContext
.lookup(InventoryLocalHome.JNDI_NAME);} catch (NamingException e1){e1.printStackTrace();throw new EJBException("Could not access items");
}
try{Collection inventoryItems = inventoryHome.findStockedItems();for (Iterator iter = inventoryItems.iterator(); iter.hasNext();){InventoryLocal element = (InventoryLocal) iter.next();try
Enterprise Java Bean Development with MyEclipse2

Web Development with MyEclipse and JBoss – part 2
{ItemLocal item = itemHome.findByPrimaryKey(element.getPartId());StockItem stockItem = new StockItem();stockItem.setQuantity(element.getQuantity());stockItem.setPartId(item.getPartId());stockItem.setDescription(item.getDescription());stockItem.setImageUrl(item.getImageUrl());stockItem.setWeight(item.getWeight());stockItem.setLocation(element.getLocation());items.add(stockItem);
} catch (FinderException e){e.printStackTrace();throw new EJBException("Corrupt data in stock");
}
}
} catch (FinderException e){e.printStackTrace();
}return items;
}
To give you a short summary, we have implemented a composite class to hold information from two other classes. We created CMP entity beans and a custom finder methods using EJB-QL. Finally, we added a second business method to our session bean which is delegated to a DAO class.
Deployment and TestingDeploy your application to the JBoss application server and verify that it is successfully deployed. Verify in your database that the item and inventory tables were created. The creation of these tables was configured using XDoclet tags in the definition of the CMP entity beans.
Our application looks for entries with positive quantity in the inventory table. If entries are found with positive quantities, the details of each entry are retrieved from the item table. Next we need to create some example data with the following insert statements:
insert into inventory ( partid , itemid , quantity , shelf , "location") values ('p2','i2',5,'top','B66');insert into inventory ( partid , itemid , quantity , shelf , "location") values ('p3','i3',3,'middle','B66');insert into item ( partid, description , weight , image_url) values('p2', 'hard disk type xy', 500, 'no image');insert into item ( partid, description , weight , image_url) values('p3', 'monitor lcd 17-5311', 3500, 'no image');
Creating a J2EE Test client
Open the TestClient class and add the following method to test your implementation of the Local Dealership Inquiry use case:
Enterprise Java Bean Development with MyEclipse2

Web Development with MyEclipse and JBoss – part 2
private void testGetStockItems() {try{Object object = initialContext.lookup(WebStockAccessHome.JNDI_NAME);WebStockAccessHome webStockAccessHome = (WebStockAccessHome) PortableRemoteObject
.narrow(object, WebStockAccessHome.class);WebStockAccess webStockAccess = webStockAccessHome.create();List items = webStockAccess.getItemsInStock();for (Iterator iter = items.iterator(); iter.hasNext();){StockItem element = (StockItem) iter.next();System.out.println(element.toString());
}} catch (RemoteException e){e.printStackTrace();
} catch (NamingException e){e.printStackTrace();
} catch (CreateException e){e.printStackTrace();
}}
Add a call to this method in your main method and execute it. If your implementation is correct, your output should resemble the following:
{partId=p2 description=hard disk type xy weight=500.0 imageUrl=no image}{partId=p3 description=monitor lcd 17-5311 weight=3500.0 imageUrl=no image}
Use case: Add Stock ItemIn this use case we will provide a method needed to create an item in the stock. We will not delegate the method to the DAO class, but implement it directly in the Session Bean. The reason is that we are using only EJB access and not native SQL in this method.
Our method takes a stockItem as a parameter, reads the item and the inventory information from it, generates a primary key, and then saves both objects in the database.
/** * @ejb.interface-method view-type="both" * @param stockItem * @return * @throws EJBException */public StockItem addItem(StockItem stockItem) throws EJBException{//extract composited dataItemData itemData = stockItem.getItemData();InventoryData inventoryData = stockItem.getInventoryData();// we are not having a defined part number so we will just create a random numberString partId = ItemUtil.generateGUID(this.getClass());itemData.setPartId(partId);
Enterprise Java Bean Development with MyEclipse2

Web Development with MyEclipse and JBoss – part 2
inventoryData.setPartId(partId);String itemId = InventoryUtil.generateGUID(this.getClass());inventoryData.setItemId(itemId);// get Home interfacestry{InitialContext context = new InitialContext();ItemLocalHome itemLocalHome = (ItemLocalHome)
context.lookup(ItemLocalHome.JNDI_NAME);InventoryLocalHome ilh = (InventoryLocalHome)
context.lookup(InventoryLocalHome.JNDI_NAME);ItemLocal itemLocal = itemLocalHome.create(itemData);InventoryLocal inventoryLocal = ilh.create(inventoryData);stockItem.setInventoryData(inventoryData);stockItem.setItemData(itemData);
} catch (NamingException e){// lazy handling of exception, do not do this in real world applications.e.printStackTrace();
} catch (CreateException e){// TODO Auto-generated catch blocke.printStackTrace();
}
return stockItem;}
Modifying the J2EE Test clientTo test the method, open the TestClient that you created before and add the following method.
public void testAddStockItem(){try{Object object = initialContext.lookup(WebStockAccessHome.JNDI_NAME);WebStockAccessHome webStockAccessHome = (WebStockAccessHome) PortableRemoteObject
.narrow(object, WebStockAccessHome.class);WebStockAccess webStockAccess = webStockAccessHome.create();StockItem stockItem = new StockItem();stockItem.setWeight(20f);stockItem.setQuantity(5);stockItem.setDescription("test");webStockAccess.addItem(stockItem);
} catch (ClassCastException e){// TODO Auto-generated catch blocke.printStackTrace();
} catch (RemoteException e){// TODO Auto-generated catch blocke.printStackTrace();
} catch (NamingException e){// TODO Auto-generated catch blocke.printStackTrace();
Enterprise Java Bean Development with MyEclipse2

Web Development with MyEclipse and JBoss – part 2
} catch (CreateException e){// TODO Auto-generated catch blocke.printStackTrace();
}}
Congratulations, you have finished the second part of this series and implemented all the business methods that are needed for the web application construction. The web application will be constructed in the last part of this series.
Conclusion and OutlookIn this second part of our three part series we introduced a variety of technologies and design strategies that illustrated how to implement a concrete case study using J2EE technology. We tried to show a number of techniques in a small example application, while the implementation became more and more “sophisticated”.
The WebStock case study could be extended by a number of exciting technologies:
• Usage of Message Driven Beans to implement asynchronous messaging between local
and central warehouses.
• Authentication using LDAP directories and implementation of JAAS authorization to
configure the access of roles to business logic.
• Complex CMP relationships between entity beans.
• Usage of the powerful design pattern Value Objects which is well supported by XDoclet.
This full case study is used in seminars held on the E-Learning platform java-learning.com. The seminars are held for JBoss and WebSphere application servers in the English, German and French languages.
Enterprise Java Bean Development with MyEclipse2
Web Development with MyEclipse and JBoss – part 2
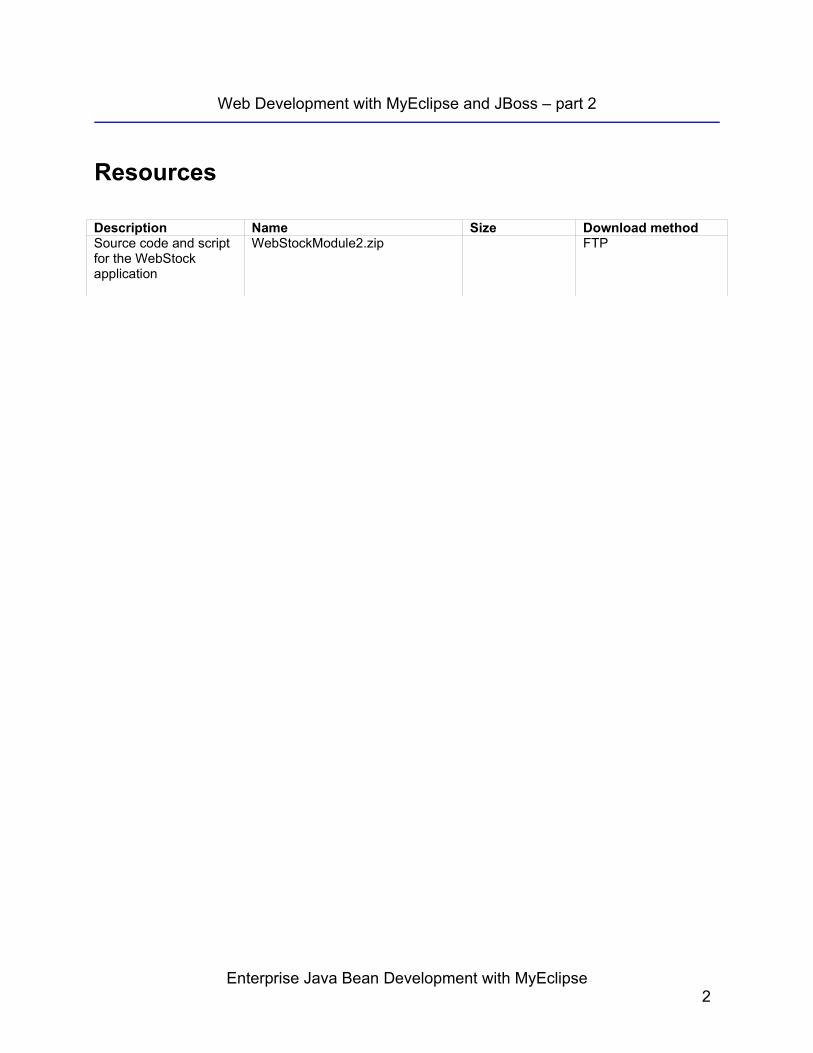
Resources
Description Name Size Download methodSource code and script for the WebStock application
WebStockModule2.zip FTP
Enterprise Java Bean Development with MyEclipse2