Web 2.0 tools – An introduction to Voki and Glogster Workshop activities at CS Kleitoria 2011...
23
Web 2.0 tools – An introduction to Voki and Glogster Workshop activities at CS Kleitoria 2011 Sakis Pantazis – Hellenic NSS
-
Upload
dayna-ramsey -
Category
Documents
-
view
216 -
download
0
Transcript of Web 2.0 tools – An introduction to Voki and Glogster Workshop activities at CS Kleitoria 2011...

Web 2.0 tools – An introduction to Voki and Glogster
Workshop activities at CS Kleitoria 2011Sakis Pantazis – Hellenic NSS

Avatar• In Hinduism, an avatar (English: /ˈæv.ə.tɑːr/, from
Sanskrit avatāra, अवता�र in the Devanagari script, meaning "descent") is a deliberate descent of a deity to earth, or a descent of the Supreme Being (i.e., Vishnu for Vaishnavites) and is mostly translated into English as "incarnation," but more accurately as "appearance" or "manifestation".
• In computing, an avatar is the graphical representation of the user or the user's alter ego or character. It may take either a three-dimensional form, as in games or virtual worlds, or a two-dimensional form as an icon in Internet forums and other online communities. It can also refer to a text construct found on early systems such as MUDs. It is an object representing the user. The term "avatar" can also refer to the personality connected with the screen name, or handle, of an Internet user.

Voki
• Web 2.0 tool at www.voki.com based on Adobe Shockwave-Flash technology – Make sure you have the latest Adobe Flash Player
and Adobe Shockwave Player plugins installed on your browser (www.adobe.com )
• FREE service that lets you:– Create customized avatars.– Add voice to your Voki avatars.– Post your Voki to any blog, website, or
profile.– Take advantage of Voki's learning
resources.• “Voki classroom”- pay service to manage class
– Manage Students, Manage Classes & Lessons, Review Vokis, Showcase, Support

The Voki website

Step 1: Create a free Voki account• Click on “GET VOKI”
button• Fill out the “Create
your Voki Account” form
• Use a valid email account
• Activate your Voki account following the respective link inside the notification email.

Step 2: Create and customize your Voki scene• Character Style
Select a character from one of our many styles: Classic, Animals, Oddballs and more!
• Customization Change the look, clothing and accessories.
• Voice Add your own voice via phone, microphone, text to speech or upload a file.
• Background Choose a background from our library or upload your own.

Step 3: Save and Publish your Voki scene
• Name your Voki scene and save it inside your Voki account
• Add your Voki to a website• Directly posting it to
a website (i.e. Facebook, blogspot, twitter, etc.)
• Indirectly posting it by copying/pasting the HTML code

Step 4: Edit your Voki scene

Workshop activity on Voki:• Checkout our voki on the CS Kleitoria Twinspace• Goto www.voki.com and create a Voki account• Login to your Voki account• Create a voki scene• Customize the voki character using all features at least once• Upload files for background and/or voice• Alternatively record your voice• Save your voki scene
• Publish your voki scene• Directly to a social network website, e.g. FaceBook• Indirectly using HTML code, e.g. to your Twinspace
• Edit your voki• Change your voice message and/or other features of your voki
scene

Blog• a blend of the term web log - type of website or part of a website supposed to
be updated with new content from time to time. • maintained by an individual with regular entries of commentary, descriptions of
events, or other material such as graphics or video. • entries are commonly displayed in reverse-chronological order. • can also be used as a verb, meaning to maintain or add content to a blog.• good quality blogs are interactive, compared to static webpages, allowing
visitors to leave comments and even message each other via widgets on the blogs
• usage: provide commentary on a particular subject; personal online diaries; online brand advertising of a particular individual or company
• types: primarily textual, although some focus on art (art blog), photographs (photoblog), videos (video blogging or vlogging), music (MP3 blog), and audio (podcasting).
• microblogging is another type of blogging, featuring very short posts.

GlogsterGlogster (www.glogster.com since 2007)• social network that allows users to create free interactive posters, or glogs, short for graphical
blog, i.e. an interactive multimedia image. It looks like a poster, but readers can interact with the content
• over one million registered users – majority are teenagers• provides environment to design interactive posters by inserting text, images, photos, audio
(MP3), videos, special effects and other elements to generate a multimedia online creation• based on flash elements (install latest Adobe Flash Player plugin for your browser from
www.adobe.com). • posters can be shared with other users on the site, embedded in external wikis or blogs, and
shared via many social networks such as Facebook and Twitter. • glogs can also be exported and saved to computer-compatible formats.Glogster EDU (edu.glogster.com)
Launched in 2009, Glogster EDU allows teachers and pupils to use glogs as instructional aids and share their Glogs in safe, private virtual classroom. User licensing• Free single license account• Subscription fee for teacher account with student accounts and additional features (i.e.
email and chat support, student management, class management, project management, creation tools, organization and extra features)
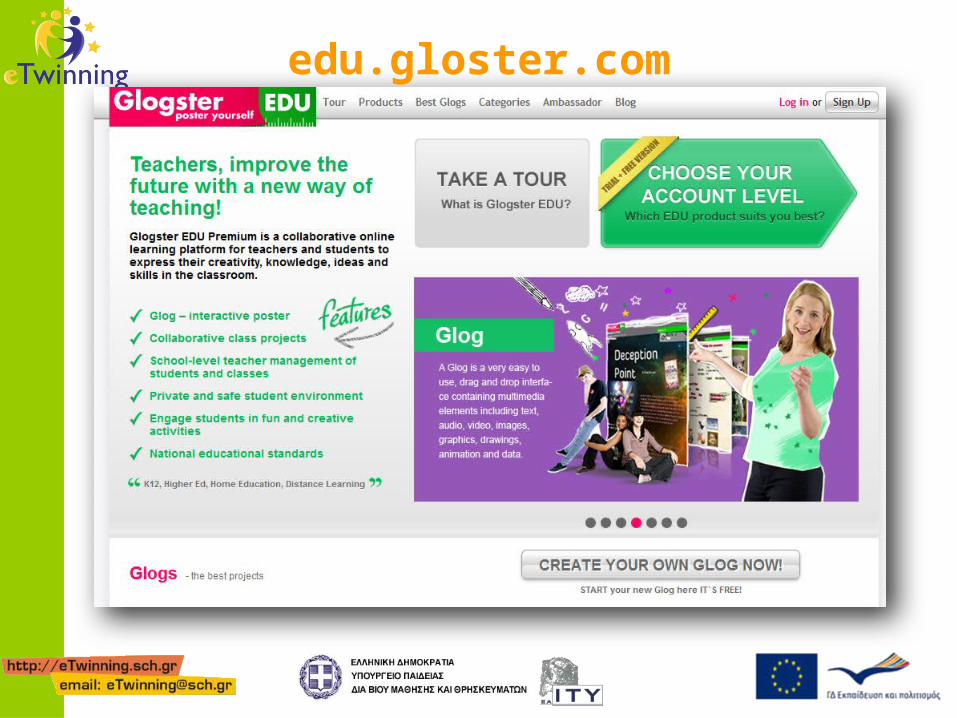
edu.gloster.com

Glog samples

Step 1: Create an edu glogster account• At the Free Single License
column click on the “GET IT” button
• Fill out the “Register to EDU” form
• Choose a nickname (not already used)
• Use a valid email account • Activate your Glogster
account following the respective link inside the notification email.
• Login using your nickname and password

Step 2: Start a glog/poster• Click on the
“CREATE NEW GLOG” button
• Use the “Magnet Tool” to add multimedia objects on your poster
• Choose objects from build in galleries or upload your own (i.e. upload files, specify links or grab your audio or video)
• Tip: Start from the wall

Step 3a (i): Adding gallery multimedia objects

Step 3a(ii): Adding your multimedia objects

Step 3b: Edit multimedia objects• Click on the object• Use the object’s “EDIT” toolbar
in order to• bring it forward• put it behind• clone• cancel changes• delete
• Use the object handles to• resize• rotate• movethe object
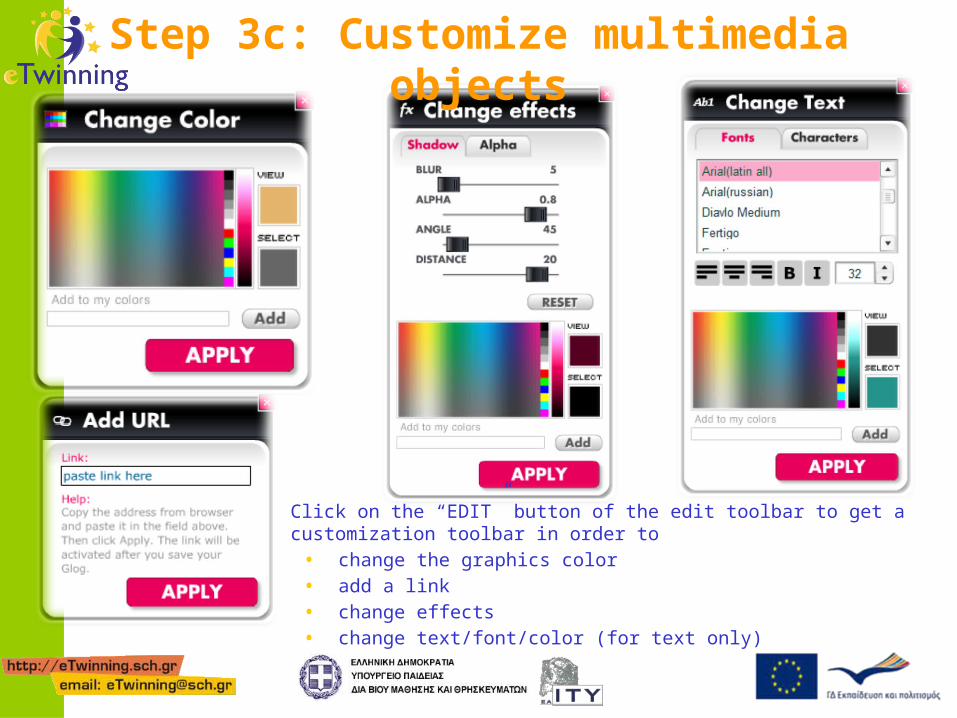
Step 3c: Customize multimedia objects
Click on the “EDIT” button of the edit toolbar to get a customization toolbar in order to• change the graphics color• add a link• change effects• change text/font/color (for text only)

Step 4: Main menu bar• Upload files from your local computer• Link to files already uploaded somewhere else• Grab audio or video from your microphone and/or webcam
• Preview your glog while working• Save and Publish your glog• Exit from edit mode to the Dashboard (management mode)

Step 5: Save and publish your glog• Name your glog• Check out the URL
(address) of your glog
• Choose the Category• Add your own tag• Save• Unfinished• Finished

Step 5: Embed it in your web page

Workshop activity on Glogster:• Go to edu.glogster.com and create a Glogster account• Login to your Glogster account
• Create a glog• Add multimedia objects from the galleries , upload your own and grab a video
from your webcam.• Customize the glog multimedia objects• Preview your glog• Save your glog (i.e. name, category, tag, finish/unfinished)
• Share your glog• Provide the URL address• Indirectly using embed HTML code, e.g. in your Twinspace
• Edit your glog• Change your voice message and/or other features of your voki scene
• Checkout edu glogster’s pay service features• Create student accounts (one-by-one and excel mass import tutorial)