WCPSS Google Apps - Sites
5
http://wakeid.wcpss.net or http://sites.google.com Access It At... • Creates websites based on templates • Permits sharing options for viewing/editing • teachers and students can create websites • integrates well with other Google Apps, like Google Drive At a Glance... Required Knowledge... • Basic MS Windows / PC operation • Helpful: Previous web design experience Username / Password • Username: WCPSS email name (ex. jsmith1) • Password: WCPSS email password There are several ways to login to Google. The easiest is to nagivate to http://wakeid.wcpss.net enter your WakeID and password - and launch Google Drive from the applications listed. Click “Sign In.” Enter your full WCPSS email address (ex. [email protected]) No need to enter password yet. You’ll be forwarded to the WCPSS WakeID login entry. Choose your role, enter your username (your WakeID) and your WakeID password and click “Log In.” After logging into the WakeID portal, enter the following address in your web browser: In WCPSS, you may receive a document via email that someone has shared with you from Google. You may have to enter this login information to be able to view / access it. WCPSS Google Apps - Sites WCPSS Google Apps - Sites Alternatively, you can click “Sign in” on a Google page (such as here at Google.com) You’ll see a listing of all Google websites you’ve created. If it’s your first time here, you may not have any listed! To begin creating a site, click the red “Create” button. March 2017 http://sites.google.com
Transcript of WCPSS Google Apps - Sites
http://wakeid.wcpss.net or http://sites.google.com
Access It At...
• Creates websites based on templates
• Permits sharing options for viewing/editing
• teachers and students can create websites
• integrates well with other Google Apps, like Google Drive
At a Glance...
Required Knowledge...
• Basic MS Windows / PC operation• Helpful: Previous web design experience
Username / Password• Username: WCPSS email name (ex. jsmith1)• Password: WCPSS email password
There are several ways to login to Google. The easiest is to nagivate to http://wakeid.wcpss.netenter your WakeID and password - and launch Google Drive from the applications listed.
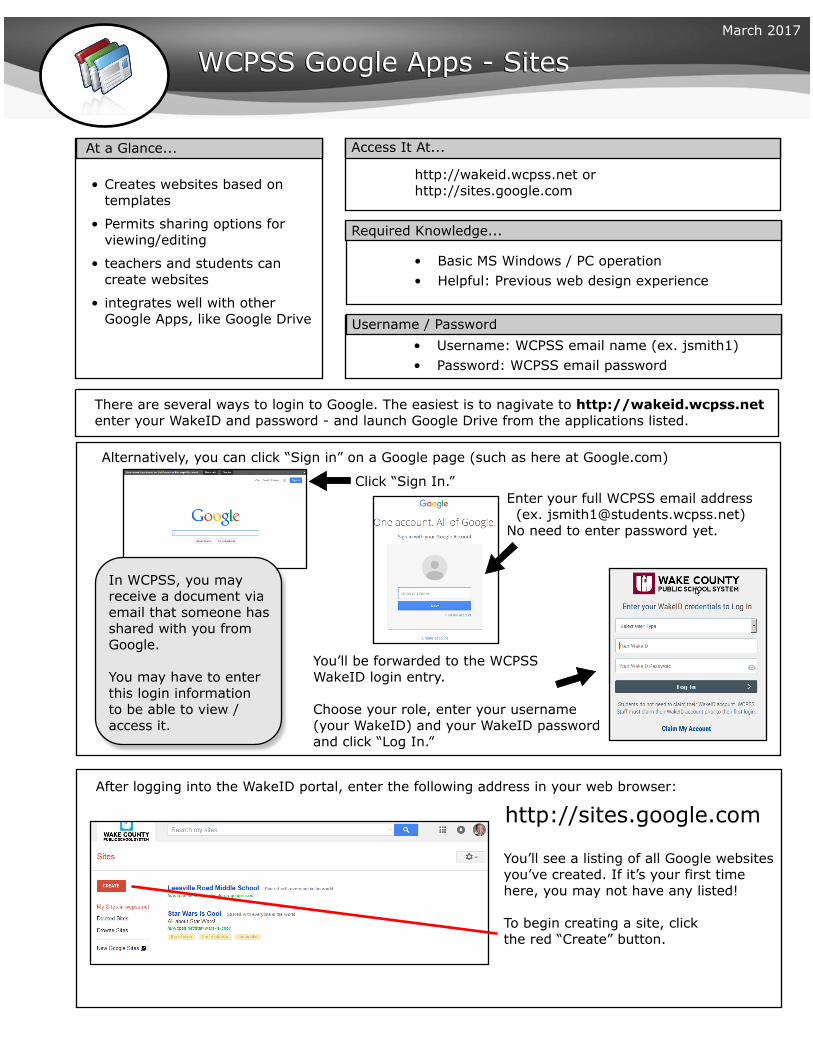
Click “Sign In.”Enter your full WCPSS email address (ex. [email protected])No need to enter password yet.
You’ll be forwarded to the WCPSSWakeID login entry.
Choose your role, enter your username(your WakeID) and your WakeID passwordand click “Log In.”
After logging into the WakeID portal, enter the following address in your web browser:
In WCPSS, you mayreceive a document viaemail that someone hasshared with you fromGoogle.
You may have to enterthis login informationto be able to view /access it.
WCPSS Google Apps - SitesWCPSS Google Apps - Sites
Alternatively, you can click “Sign in” on a Google page (such as here at Google.com)
You’ll see a listing of all Google websitesyou’ve created. If it’s your first timehere, you may not have any listed!
To begin creating a site, clickthe red “Create” button.
March 2017
http://sites.google.com
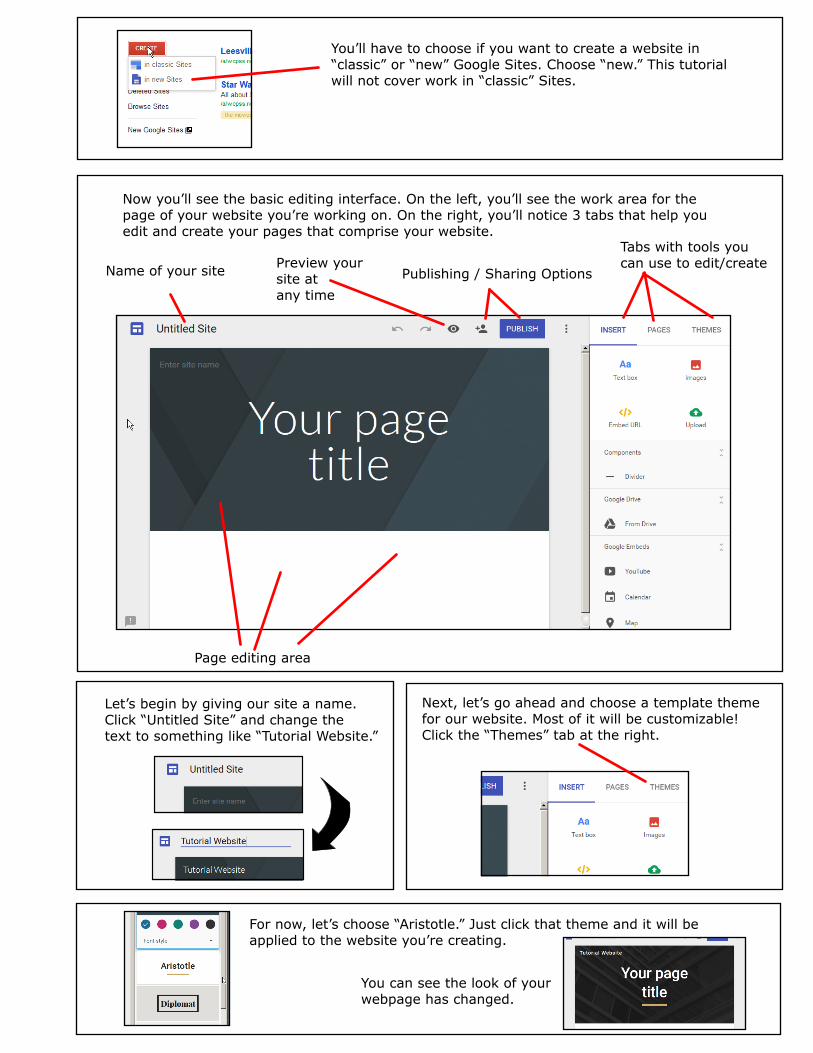
You’ll have to choose if you want to create a website in“classic” or “new” Google Sites. Choose “new.” This tutorialwill not cover work in “classic” Sites.
Now you’ll see the basic editing interface. On the left, you’ll see the work area for thepage of your website you’re working on. On the right, you’ll notice 3 tabs that help youedit and create your pages that comprise your website.
Name of your site Publishing / Sharing OptionsPreview yoursite atany time
Page editing area
Tabs with tools youcan use to edit/create
Let’s begin by giving our site a name.Click “Untitled Site” and change thetext to something like “Tutorial Website.”
Next, let’s go ahead and choose a template themefor our website. Most of it will be customizable!Click the “Themes” tab at the right.
For now, let’s choose “Aristotle.” Just click that theme and it will beapplied to the website you’re creating.
You can see the look of yourwebpage has changed.
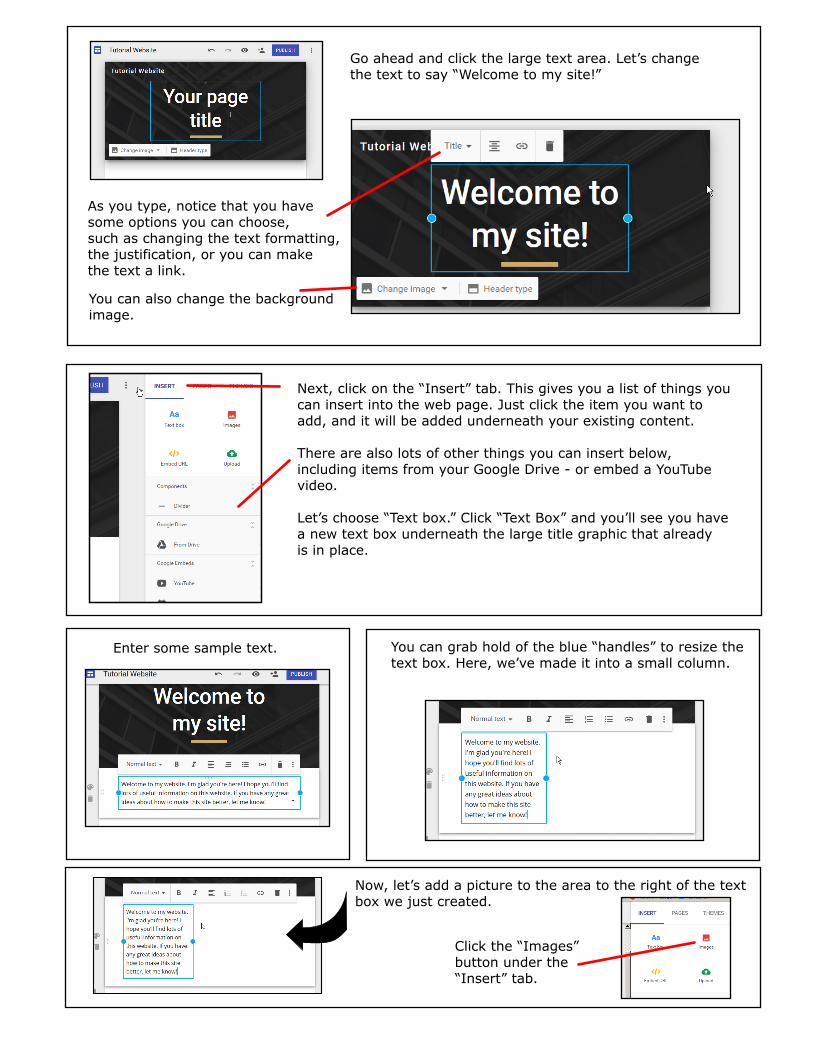
Now, let’s add a picture to the area to the right of the textbox we just created.
Go ahead and click the large text area. Let’s changethe text to say “Welcome to my site!”
As you type, notice that you havesome options you can choose,such as changing the text formatting,the justification, or you can makethe text a link.
You can also change the backgroundimage.
Next, click on the “Insert” tab. This gives you a list of things youcan insert into the web page. Just click the item you want toadd, and it will be added underneath your existing content.
There are also lots of other things you can insert below,including items from your Google Drive - or embed a YouTubevideo.
Let’s choose “Text box.” Click “Text Box” and you’ll see you havea new text box underneath the large title graphic that alreadyis in place.
Enter some sample text. You can grab hold of the blue “handles” to resize thetext box. Here, we’ve made it into a small column.
Click the “Images”button under the“Insert” tab.
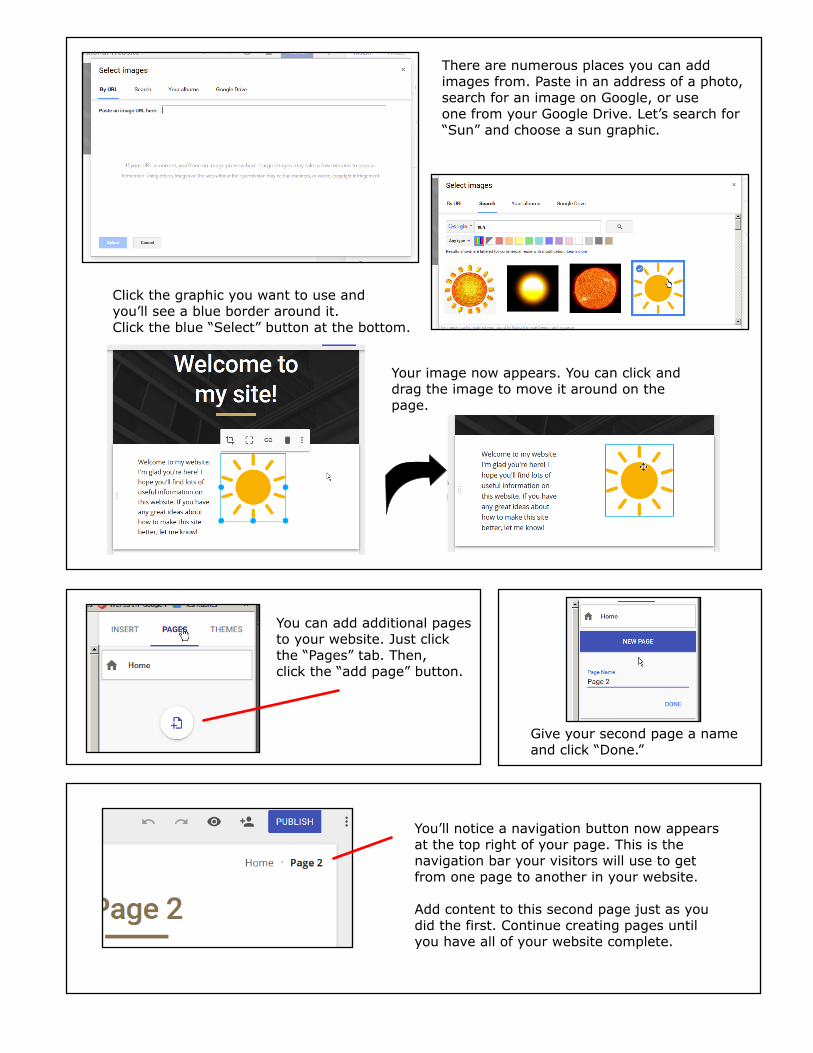
There are numerous places you can addimages from. Paste in an address of a photo,search for an image on Google, or useone from your Google Drive. Let’s search for“Sun” and choose a sun graphic.
Click the graphic you want to use andyou’ll see a blue border around it.Click the blue “Select” button at the bottom.
Your image now appears. You can click anddrag the image to move it around on thepage.
You can add additional pagesto your website. Just clickthe “Pages” tab. Then,click the “add page” button.
Give your second page a nameand click “Done.”
You’ll notice a navigation button now appearsat the top right of your page. This is thenavigation bar your visitors will use to getfrom one page to another in your website.
Add content to this second page just as youdid the first. Continue creating pages untilyou have all of your website complete.
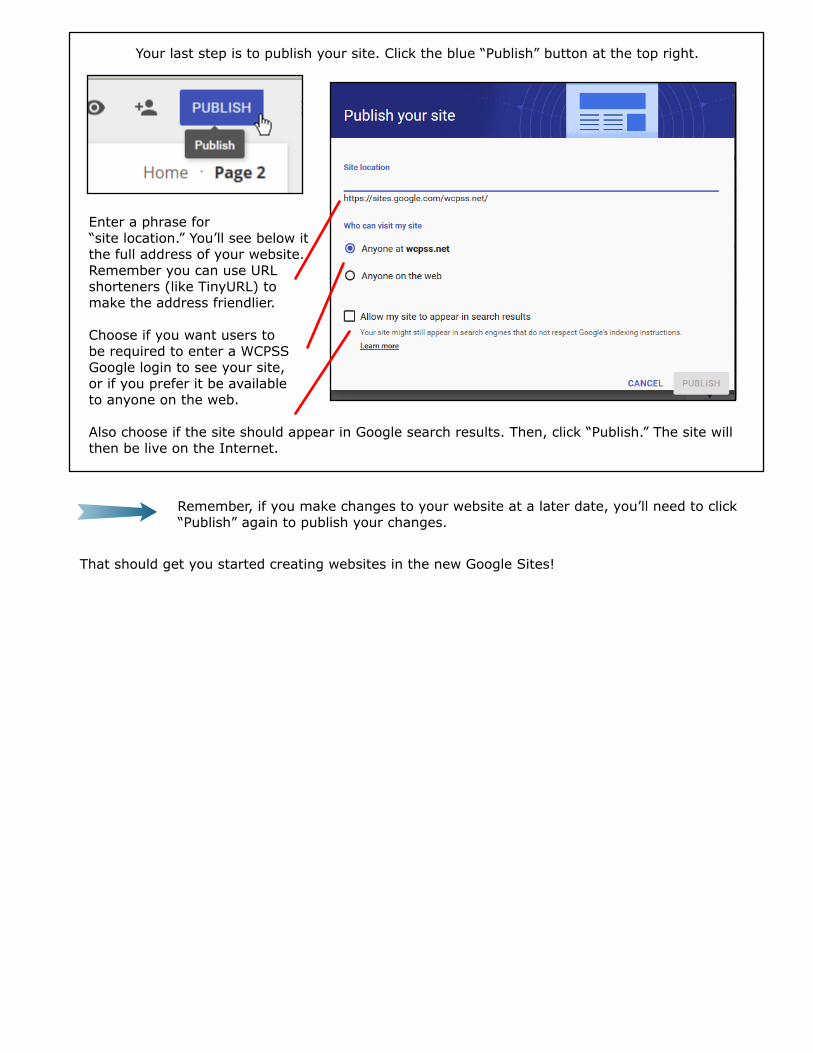
Your last step is to publish your site. Click the blue “Publish” button at the top right.
Enter a phrase for“site location.” You’ll see below itthe full address of your website.Remember you can use URLshorteners (like TinyURL) tomake the address friendlier.
Choose if you want users tobe required to enter a WCPSSGoogle login to see your site,or if you prefer it be availableto anyone on the web.
Also choose if the site should appear in Google search results. Then, click “Publish.” The site willthen be live on the Internet.
Remember, if you make changes to your website at a later date, you’ll need to click“Publish” again to publish your changes.
That should get you started creating websites in the new Google Sites!