WAV Manager (V2.1) operation manual (for Windows) - Fostex · 2 Allowance of use The...
13
WAV Manager (V2.1) operation manual (for Windows)
Transcript of WAV Manager (V2.1) operation manual (for Windows) - Fostex · 2 Allowance of use The...

WAV Manager (V2.1) operation manual (for Windows)

2
Allowance of useThe specifications of this software and the contents of this document are subject to change without prior notice. Be assured Fostex Company is not responsible for any warranties or any supports for any direct or indirect losses or damages occurred from use of this software application or this document.The WAV manager is a freeware application and anyone can use it.The copyright of this software application is reserved by Fostex Company. Sales distri-bution, lease or rental of this software application, or any modifications to this software application without permission are prohibited.Note that this software application is not a commercial product. Therefore, Fostex Company and its distributors/service stations are not able to answer to any questions such as concrete process or operation methods by telephones, e-mails etc.
Summary“WAV Manager” is a utility software application that enables you to import each audio track from a song cretaed by the Fostex MR series Multitrackers into the PC as a stan-dard mono WAV file (sixteen files for an 16-track song). Also, you can export WAV file data created and edited in the PC to the MR series Multitracker, as well as you can burn audio CDs.
Operating EnvironmentWAV Manager (V2.1) operates on Windows XP Home Edition and Windows XP Profes-sional Edition. (* To use WAV Manager V1.10 with the MR-8, the MR-8 software ver-sion must be 1.20 or later.)
Starting & exiting WAV Manager1. Set the “USB Device Mode” item in the MENU mode of your MR series Multitracker to “USB mode” (See the operation manual of your multitracker for details about how to set the “USB Device Mode” item).
2. Connect your multitracker to your PC using a USB cable.
3. Start WAV Manager.
Please read before using
<Notes>: If you set your MR series Multitracker to the USB mode while WAV Man-ager is running, quit WAV Manager and start WAV Manager again. To quit WAV Manager, click the close box on the upper right of the window.To burn stereo WAV files on your PC to an audio CD, you do not need to connect your MR series Multitracker to your PC (see page 9).

3
When the MR series Multitracker is in the USB mode, the “Removable Disk” drive is shown in “Devices with Removable Storage” on the desktop of the PC, as shown below.If it is not shown, check USB mode setting and USB cable connection.When you use WAV Manager, make sure that “Removable disk” is shown.
Removable disk

4
Starting WAV ManagerDouble-click “WAV Manager” on the PC to start WAV Manager.The WAV Manager window as below is shown. This window allows you to import song data of the MR series Multitracker into the PC. You can switch the window among “MR to PC”, “PC to MR” and “CD Writer” windows by clicking the appropriate control tab.The left part of each window shows the directory tree, in which “My computer” is the root. You can select a desired directory here.
Control tab
< “PC to MR” window >
< “CD Writer” window >
< “MR to PC” window >

5
1. Directory tree From the directory tree, select the destination folder for the imported file.
2. MR Drive The available MR series Multitracker drives are listed in the “MR Drive” combo box. When more than one drive is listed, you can select a desired drive from the pulldown menu shown by clicking ▼ .
In the “Song name” combo box, all song names on the currently selected drive is listed.
3. Song name In the “Song name” combo box, all songs on the drive selected in the “MR Drive” combo box is listed.
Select a desired song from the pulldown menu which appears when you click ▼ . The song data is read from the corresponding song folder.
The sampling frequency and bit information is shown in the “Song Information” section, while the appropriate checkboxes in the “Select Track” section are enabled depending on available tracks in the song.
Importing a song on the MR series Multitracker to the PC
1
2
3
4
6
5
7

6
4. Song Information The song information of the selected song is shown. The “Sampling Freq” item shows the sampling frequency, while the “BIT” item shows the quantization bit number. In the example on page 5, the sampling frequency is 44.1kHz, while the quantization bit number is 16.
5. Select Track Depending on available tracks in the song, the appropriate checkboxes for tracks are enabled (checked). You can import only enabled tracks. Clicking a checked checkbox unchecks it. Clicking it again checks the checkbox.
6. Import Mode There are two import modes: “ALL” and “A-B”. In the “ALL” mode, all data between ABS 0 and REC END of the tracks selected by the “Select Track” section are imported. In the “A-B” mode, data between Locate point A and B specified by the MR series Multitracker are imported. In the “A-B” mode, if you attempt to import data when Locate point A is ahead of Locate point B (A>B), the error message is shown and the operation is cancelled.
7. [Import] button Clicking the [Import] button starts importing the selected track/song data. Each track data is imported as a single WAV file. While data is imported, the status window as below appears. The imported file is stored to the folder selected in the directory tree section. If you click [Cancel] while importing data, the import operation is cancelled. If the import operation is interrupted by an error or clicking [Cancel], the incomplete file is deleted.
<Note>: If the same track data ex-ists in the destination folder, clicking the [Import] button brings up the alert message window as shown on the right. If you overwrite the existing file, click [OK]. If you do not overwrite the existing file, click [Cancel].

7
Exporting a song on the PC to the MR series Multitracker
1
2
3
456
1. Directory tree From the directory tree, select the folder which contains the WAV files to be exported.
2. File list All the WAV files in the folder selected from the directory tree are shown together with the Fs, bit length, number of channels and size.
3. Select Track Depending on available wav files in the selected folder, the appropriate checkboxes are enabled (checked). You can import only enabled tracks. With the WAV Manager, you can only export files whose file names are of the form “tr**.wav” (** shows the track number). Note that uppercase and lowercase characters are not distinguished. Clicking a checked checkbox unchecks it. Clicking it again checks the checkbox.
4. MR Drive The available MR series Multitracker drives are listed in the “MR Drive” combo box. When more than one drive is listed, you can select a desired drive from the pulldown menu shown by clicking ▼ . In the “Song name” combo box, all song names on the currently selected drive are listed.

8
5. Song name In the “Song name” combo box, all songs on the drive selected in the “MR Drive” combo box is listed. Select a desired destination song from the pulldown menu which appears when you click ▼ . At the bottom of the pulldown menu, “---: (New Song)” is shown. If you select an existing song, the exported files overwrite song data. If you select “---: (New Song)”, the files are exported to a newly created song. Therefore, if you do not want to overwrite an existing song, select “---: (New Song)” as the destination song. When you select “---: (New Song)”, the default new song name is shown. You can edit the song name at this stage, therefore, you can export files to a new song with a desired name.
Clicking the [OK] button of the left window above creates a new song on the drive and starts exporting the files to the new song. Clicking the [OK] button of the right window above starts exporting the files which overwrite the existing files. While exporting files, the progress bar window as below is shown.
<When selecting a new song> <When selecting an existing song>
If the format of the destination song does not match the format of track files, the error message is shown and the operation is interrupted. If the export operation is interrupted by an error or clicking [Cancel], no file is created.
<Note>: If the remaining space of the des-tination drive is too small, the alert mes-sage window as shown on the right ap-pears. Clicking [OK] cancels the operation and dismisses the window. Reserve the enough space for recording on the desti-nation drive and retry again.
6. [Export] button If you click the [Export] button, either of the following windows appears depending on whether you select an existing song or new song in the “Song name” combo box.
<Note>: If you select an existing song and export a file after editing the song name, the file is exported to the new song, as with exporting to “---: (New Song)”.

9
1
2
4
3
6
5
7
1. Drive Location Selects the source drive (“PC” or “MR”) which contains the stereo WAV files you want to write. To write stereo WAV files on the PC to an audio CD, select “PC”. When “PC” is selected, you can select a folder in the directory tree. To write stereo WAV files in the “2MIX folder” of the MR series Multitracker to an audio CD, select “MR”. When “MR” is selected, you can select desired drive and song in the “MR” box below “Drive Location”.
2. Directory tree Only when “PC” is selected in the “Drive Location” section, you can select a folder which contains WAV files you want to write. When selecting a folder, the WAV files in the selected folder are listed in the “Wave File” section.
Burning an audio CD
<Note>: Using the WAV Manager, you can write data only in “track at once” mode.Note that depending on your PC environment, you may not be able to burn an audio CD correctly.
Using the CD-R/RW drive installed on the PC (or connected to the PC), you can burn an audio CD. You can write stereo WAV files in the “2MIX folder” in the song folder of the MR series Multitracker or on the PC. When you write stereo WAV files on the PC, you do not need to connect the MR series Multitracker to the PC.
10
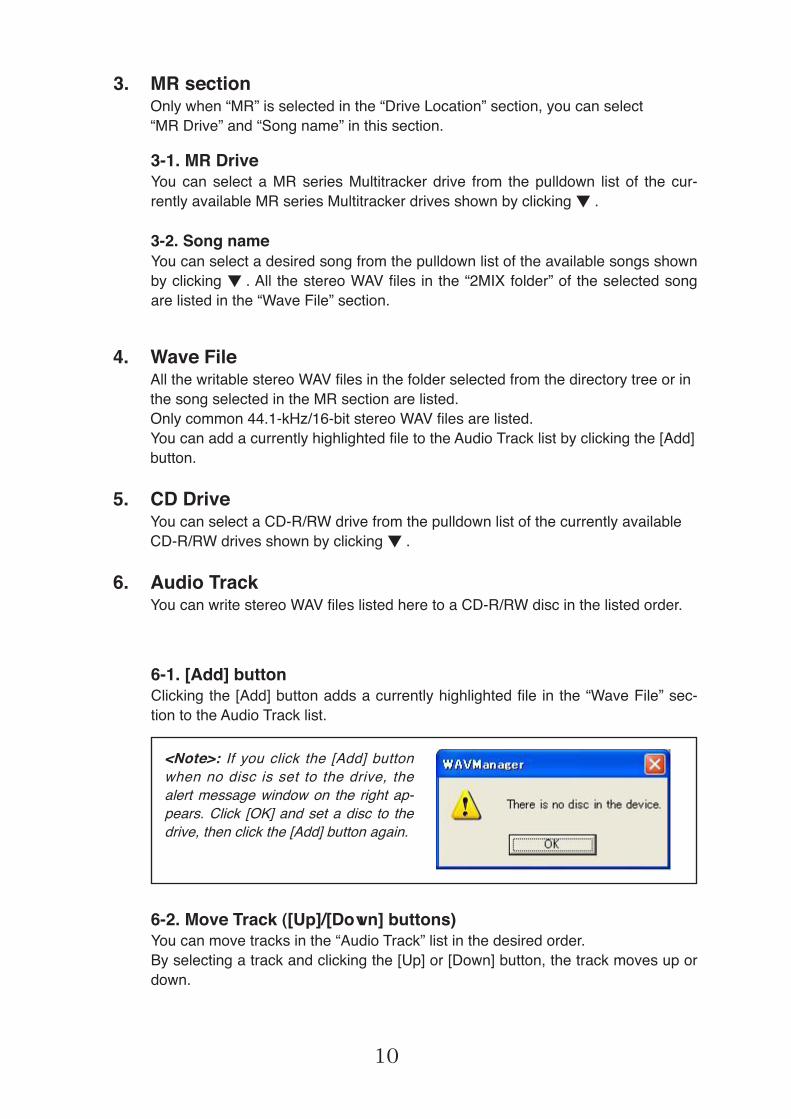
3. MR section Only when “MR” is selected in the “Drive Location” section, you can select “MR Drive” and “Song name” in this section.
6-2. Move Track ([Up]/[Down] buttons)You can move tracks in the “Audio Track” list in the desired order.By selecting a track and clicking the [Up] or [Down] button, the track moves up or down.
<Note>: If you click the [Add] button when no disc is set to the drive, the alert message window on the right ap-pears. Click [OK] and set a disc to the drive, then click the [Add] button again.
6-1. [Add] buttonClicking the [Add] button adds a currently highlighted file in the “Wave File” sec-tion to the Audio Track list.
4. Wave File All the writable stereo WAV files in the folder selected from the directory tree or in the song selected in the MR section are listed. Only common 44.1-kHz/16-bit stereo WAV files are listed. You can add a currently highlighted file to the Audio Track list by clicking the [Add] button.
5. CD Drive You can select a CD-R/RW drive from the pulldown list of the currently available CD-R/RW drives shown by clicking ▼ .
6. Audio Track You can write stereo WAV files listed here to a CD-R/RW disc in the listed order.
3-1. MR DriveYou can select a MR series Multitracker drive from the pulldown list of the cur-rently available MR series Multitracker drives shown by clicking ▼ .
3-2. Song nameYou can select a desired song from the pulldown list of the available songs shown by clicking ▼ . All the stereo WAV files in the “2MIX folder” of the selected song are listed in the “Wave File” section.

11
7. [Burn] button By pressing the [Burn] button, you can start writing the files in the Audio Track list to the CD-R/RW disc. During burning, the progress bar window as below is shown.
6-3. [Remove] buttonBy selecting a track in the Audio Track list and clicking the [Remove] button, you can remove the track from the list.
<Note>: If you select the uppermost track in the list and click the [Up] but-ton or select the lowermost track and click the [Down] button, the alert mes-sage window on the right appears. Press [OK] and reselect a track, then press the [Up] or [Down] button.
During burning, while “Add track” is shown on the window as above (i.e. an audio block is being added), you can cancel the operation by clicking the [Cancel] but-ton. If an error occurs during burning, the error message is shown and the opera-tion is cancelled.
When burning is successfully completed, the disc is automatically ejected.
About the menu barThere are “Tool (T)” and “Help (H)” menus in the menu bar at the top of the WAV Man-ager window. The “Tool (T)” menu contains “Drive/Medium (D)”, while the “Help (H)” menu contains “About WAVManager (A)”.

12
Drive/Medium (D)Clicking “Drive/Medium (D)” brings up the following dialog window, which shows the drive and media information, as well as allows you to erase a CD-RW disc.
Drive InformationShows the name and drive type of the currently selected drive.
Medium InformationShows the medium type and status of the currently loaded disc.
[Refresh] buttonClicking this button updates the information in the window.When you erase a disc or change a disc, press the [Refresh] button. Otherwise, the information is not updated.
[Eject] buttonClicking this button opens the drive tray.
[Erase] buttonWhen a CD-RW disc which contains audio data is set to the drive, clicking this button erases data.Note that you cannot cancel erasing once you start erasing.
About WAVManager (A)Clicking “About WAVManager (A)” brings up the following dialog window, which shows the WAV Manager version.
Notes on drive access・ While the “CD Writer” top window (shown on page 9) or “Drive/Medium” dialog window is shown, the WAV Manager sometimes accesses the drive for executing the operation. Therefore, if another application (or the OS) and the WAV Manager attempt to access disc at the same time, an error may occur. In such a case, retry after a while.・ The WAV Manager may malfunction if any other CD writing software application or drive utility of a third party is installed on the PC.

13