WatchGuard XCS v10.0 Field Guide€¦ · The WatchGuard XCS incorporates a Web Proxy that allo ws...
128
WatchGuard ® XCS v10.0 Field Guide
-
Upload
truongkien -
Category
Documents
-
view
225 -
download
0
Transcript of WatchGuard XCS v10.0 Field Guide€¦ · The WatchGuard XCS incorporates a Web Proxy that allo ws...

WatchGuard® XCS
v10.0 Field Guide

ii WatchGuard XCS
ADDRESS505 Fifth Avenue SouthSuite 500Seattle, WA 98104
SUPPORTwww.watchguard.com/supportU.S. and Canada +877.232.3531All Other Countries +1.206.521.3575
SALESU.S. and Canada +1.800.734.9905All Other Countries +1.206.613.0895
ABOUT WATCHGUARDWatchGuard offers affordable, all-in-one network and content security solutions that provide defense-in-depth and help meet regulatory compliance requirements. The WatchGuard XTM line combines firewall, VPN, GAV, IPS, spam blocking and URL filtering to protect your network from spam, viruses, malware, and intrusions. The new XCS line offers email and web content security combined with data loss prevention. WatchGuard extensible solutions scale to offer right-sized security ranging from small businesses to enterprises with 10,000+ employees. WatchGuard builds simple, reliable, and robust security appliances featuring fast implementation and comprehensive management and reporting tools. Enterprises throughout the world rely on our signature red boxes to maximize security without sacrificing efficiency and productivity.
For more information, please call 206.613.6600 or visit www.watchguard.com.
Notice to UsersInformation in this guide is subject to change without notice. Companies, names, and data used in examples herein are fictitious unless otherwise noted. No part of this guide may be reproduced or transmitted in any form or by any means, electronic or mechanical, for any purpose, without the express written permission of WatchGuard Technologies, Inc.
Document Version: 2.0
Revised: October 10, 2013
Copyright, Trademark, and Patent InformationCopyright © 2013 WatchGuard Technologies, Inc. All rights reserved. All trademarks or trade names mentioned herein, if any, are the property of their respective owners.
Complete copyright, trademark, patent, and licensing information can be found in the Copyright and Licensing Guide, available online:http://www.watchguard.com/help/documentation/
This product is for indoor use only.

Field Guide iii
Table of Contents
Chapter 1 WatchGuard XCS Overview ...................................................................................................... 1
Chapter 2 Email Basics .............................................................................................................................. 11
Chapter 3 Pre-installation Tasks .............................................................................................................. 15
Chapter 4 Install the WatchGuard XCS ................................................................................................... 23
Chapter 5 Mail and Network Configuration ........................................................................................... 37
Chapter 6 Anti-Virus ................................................................................................................................. 49
Chapter 7 Reputation Enabled Defense ................................................................................................. 55
Chapter 8 Anti-Spam ................................................................................................................................ 61
Chapter 9 Directory Services ................................................................................................................... 73
Chapter 10 Content Control ....................................................................................................................... 77
Chapter 11 Monitor the WatchGuard XCS ................................................................................................ 87
Chapter 12 System Administration ........................................................................................................... 97
Chapter 13 Clustering and Queue Replication ....................................................................................... 107
Chapter 14 Web Scanning ........................................................................................................................ 115
Chapter 15 Available Resources .............................................................................................................. 123

iv WatchGuard XCS

Field Guide 1
1 WatchGuard XCS Overview
WatchGuard XCS Overview
The WatchGuard XCS is the industry’s first consolidated messaging security platform. It delivers integrated protection, control, and management for email and web content.
Firewall-level Network and System Security
The WatchGuard XCS delivers the most complete security available for messaging systems. The system runs on a customized and hardened Unix operating system, and does not allow uncontrolled access to the system. There is no command line access and the WatchGuard XCS runs as a closed system, preventing accidental or deliberate misconfiguration by administrators, which is a common cause of security vulnerabilities.
Message Delivery Security
The WatchGuard XCS content security features provide instant-on data loss prevention, encryption and content filtering with integrated threat prevention for viruses, spam, spyware, phishing, and malware attacks, all in a secured appliance. In addition, the WatchGuard XCS protects outbound content against unintentional or malicious data loss, privacy discrepancies and non-compliance with regulations and company policies. The WatchGuard XCS utilizes a sophisticated message delivery system with several security features and benefits to make sure that the identifying information about your company’s messaging infrastructure remains private.
Web Security
The WatchGuard XCS incorporates a Web Proxy that allows the system to proxy web traffic and control access to external web sites. The system can scan web traffic using a subset of the same scanners that examine email messages to inspect the content of web traffic and downloaded files. The WatchGuard XCS can also scan encrypted HTTPS traffic and FTP traffic communicated over HTTP. Policy features apply specific HTTP access policies to different users, groups, IP addresses, and domains, and you can customize notifications for blocked connections or files and send them to the administrator and recipient.
The Web Traffic Accelerator solution provides critical Web traffic enhancements, for example, disk caching and streaming media support, that reduce bandwidth consumption, server loads, and latency to improve network performance. Web Reputation allows you to block web site domains that have a bad reputation for hosting viruses and malware.
WatchGuard XCS Overview
2 WatchGuard XCS
Content Controls
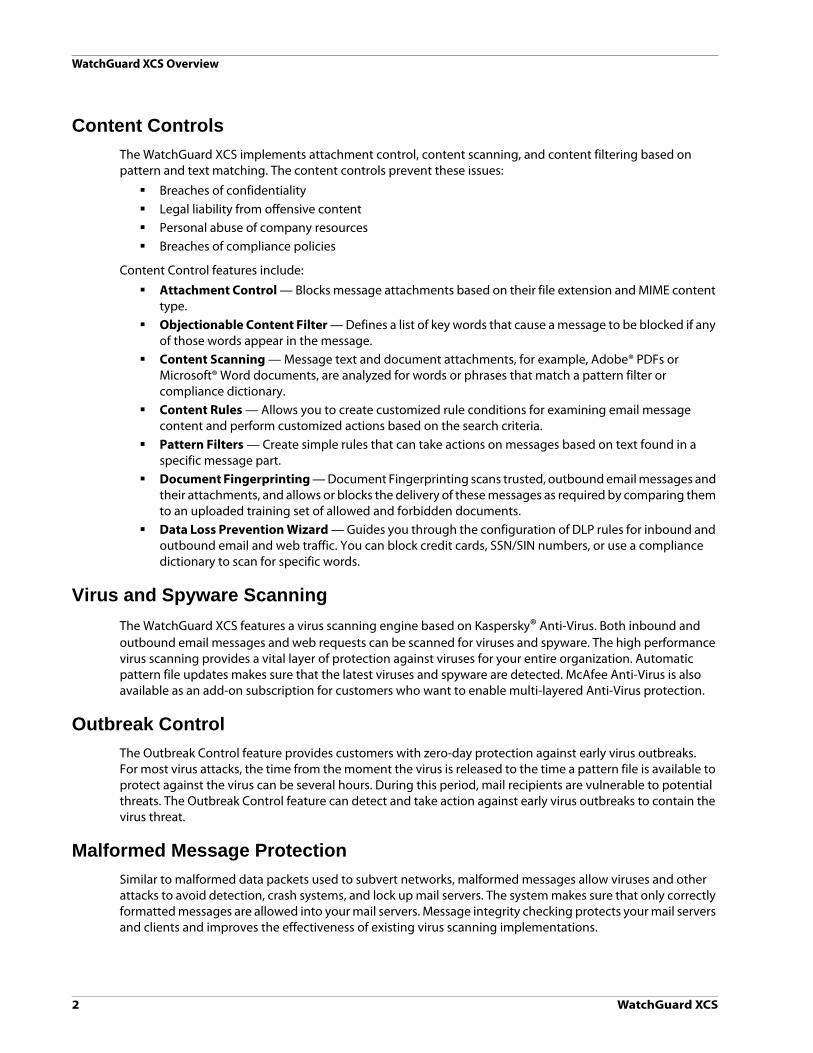
The WatchGuard XCS implements attachment control, content scanning, and content filtering based on pattern and text matching. The content controls prevent these issues:
Breaches of confidentiality Legal liability from offensive content Personal abuse of company resources Breaches of compliance policies
Content Control features include:
Attachment Control — Blocks message attachments based on their file extension and MIME content type.
Objectionable Content Filter — Defines a list of key words that cause a message to be blocked if any of those words appear in the message.
Content Scanning — Message text and document attachments, for example, Adobe® PDFs or Microsoft® Word documents, are analyzed for words or phrases that match a pattern filter or compliance dictionary.
Content Rules — Allows you to create customized rule conditions for examining email message content and perform customized actions based on the search criteria.
Pattern Filters — Create simple rules that can take actions on messages based on text found in a specific message part.
Document Fingerprinting — Document Fingerprinting scans trusted, outbound email messages and their attachments, and allows or blocks the delivery of these messages as required by comparing them to an uploaded training set of allowed and forbidden documents.
Data Loss Prevention Wizard — Guides you through the configuration of DLP rules for inbound and outbound email and web traffic. You can block credit cards, SSN/SIN numbers, or use a compliance dictionary to scan for specific words.
Virus and Spyware Scanning
The WatchGuard XCS features a virus scanning engine based on Kaspersky® Anti-Virus. Both inbound and outbound email messages and web requests can be scanned for viruses and spyware. The high performance virus scanning provides a vital layer of protection against viruses for your entire organization. Automatic pattern file updates makes sure that the latest viruses and spyware are detected. McAfee Anti-Virus is also available as an add-on subscription for customers who want to enable multi-layered Anti-Virus protection.
Outbreak Control
The Outbreak Control feature provides customers with zero-day protection against early virus outbreaks. For most virus attacks, the time from the moment the virus is released to the time a pattern file is available to protect against the virus can be several hours. During this period, mail recipients are vulnerable to potential threats. The Outbreak Control feature can detect and take action against early virus outbreaks to contain the virus threat.
Malformed Message Protection
Similar to malformed data packets used to subvert networks, malformed messages allow viruses and other attacks to avoid detection, crash systems, and lock up mail servers. The system makes sure that only correctly formatted messages are allowed into your mail servers. Message integrity checking protects your mail servers and clients and improves the effectiveness of existing virus scanning implementations.

Field Guide 3
WatchGuard XCS Overview
Intercept Anti-Spam
The WatchGuard XCS provides a complete set of anti-spam features specifically designed to protect against the full spectrum of current and evolving spam threats. Intercept can combine the results of several anti-spam components to provide a better informed decision on whether a message is spam or legitimate mail with minimal false positives. These features include:
Spam Words — Filters messages based on a dictionary of typical spam words and phrases that are matched against a message.
Spam Rules — Uses dynamic content rules generated by WatchGuard to help detect new types of spam messages that are not easily detected by other Intercept Anti-Spam features.
Mail Anomalies — Checks various aspects of the incoming message for issues such as unauthorized SMTP pipelining, missing headers, and mismatched identification fields.
DNS Block List (DNSBL) — Detects spam using domain-based lists of hosts with a poor reputation. Messages can also be rejected immediately regardless of the results of other anti-spam processing if the client appears on a DNSBL. A configurable threshold allows administrators to specify how many DNSBLs must trigger to consider the sender as unreliable.
URL Block List — Detects spam by examining the URLs in a message and querying a SURBL (Spam URI Realtime Block Lists) server to determine if this URL has been used in spam messages.
Reputation Enabled Defense (RED) — Reputation Enabled Defense helps to identify spam by reporting a collection of metrics about the sender of a message, including their overall reputation, whether the sender is a dial-up, and whether the sender appears to be virus-infected, based on information collected from installed customer products and global DNS Block Lists. This information can be used by Intercept to reject the message, or used as part of the overall Anti-Spam decision.
Token Analysis — Detects spam based on advanced content analysis using databases of known spam and valid mail. This feature is also specially engineered to effectively detect image spam.
Backscatter Detection — Detects spam based on signature verification of the Envelope Sender to prevent spam bounce emails to forged sender addresses.
Sender Policy Framework (SPF) — Performs a verification of a sending host’s SPF DNS records to identify the source of a message.
DKIM/DomainKeys Authentication — Performs a verification of a sending host’s DKIM/DomainKeys DNS records to identify the source of a message.
Brightmail Anti-Spam is also available as an add-on subscription for customers who want to enable multi-layered Anti-Spam engines.
Outbound Anti-Spam
Outbound Anti-Spam controls are used to prevent trusted internal users from sending spam outside of your organization. You can use the Spam Rules, Spam Words, and URL Block List Anti-Spam features to scan outbound mail for spam messages.
The Mail Surge Detection feature identifies internal mail users who are sending an unusually large amount of mail messages which can indicate spam activity. Outbound Anti-Spam features are configurable within policies to define actions and notifications for different users, groups, and domains.
WatchGuard XCS Overview
4 WatchGuard XCS
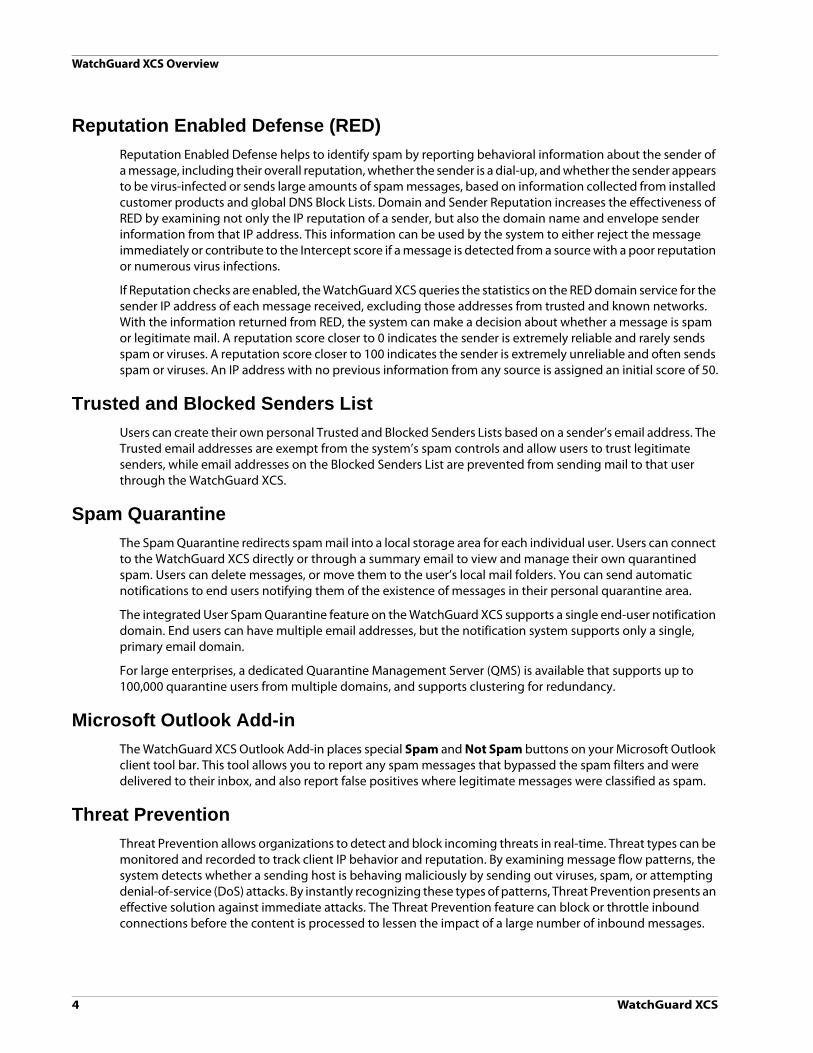
Reputation Enabled Defense (RED)
Reputation Enabled Defense helps to identify spam by reporting behavioral information about the sender of a message, including their overall reputation, whether the sender is a dial-up, and whether the sender appears to be virus-infected or sends large amounts of spam messages, based on information collected from installed customer products and global DNS Block Lists. Domain and Sender Reputation increases the effectiveness of RED by examining not only the IP reputation of a sender, but also the domain name and envelope sender information from that IP address. This information can be used by the system to either reject the message immediately or contribute to the Intercept score if a message is detected from a source with a poor reputation or numerous virus infections.
If Reputation checks are enabled, the WatchGuard XCS queries the statistics on the RED domain service for the sender IP address of each message received, excluding those addresses from trusted and known networks. With the information returned from RED, the system can make a decision about whether a message is spam or legitimate mail. A reputation score closer to 0 indicates the sender is extremely reliable and rarely sends spam or viruses. A reputation score closer to 100 indicates the sender is extremely unreliable and often sends spam or viruses. An IP address with no previous information from any source is assigned an initial score of 50.
Trusted and Blocked Senders List
Users can create their own personal Trusted and Blocked Senders Lists based on a sender’s email address. The Trusted email addresses are exempt from the system’s spam controls and allow users to trust legitimate senders, while email addresses on the Blocked Senders List are prevented from sending mail to that user through the WatchGuard XCS.
Spam Quarantine
The Spam Quarantine redirects spam mail into a local storage area for each individual user. Users can connect to the WatchGuard XCS directly or through a summary email to view and manage their own quarantined spam. Users can delete messages, or move them to the user’s local mail folders. You can send automatic notifications to end users notifying them of the existence of messages in their personal quarantine area.
The integrated User Spam Quarantine feature on the WatchGuard XCS supports a single end-user notification domain. End users can have multiple email addresses, but the notification system supports only a single, primary email domain.
For large enterprises, a dedicated Quarantine Management Server (QMS) is available that supports up to 100,000 quarantine users from multiple domains, and supports clustering for redundancy.
Microsoft Outlook Add-in
The WatchGuard XCS Outlook Add-in places special Spam and Not Spam buttons on your Microsoft Outlook client tool bar. This tool allows you to report any spam messages that bypassed the spam filters and were delivered to their inbox, and also report false positives where legitimate messages were classified as spam.
Threat Prevention
Threat Prevention allows organizations to detect and block incoming threats in real-time. Threat types can be monitored and recorded to track client IP behavior and reputation. By examining message flow patterns, the system detects whether a sending host is behaving maliciously by sending out viruses, spam, or attempting denial-of-service (DoS) attacks. By instantly recognizing these types of patterns, Threat Prevention presents an effective solution against immediate attacks. The Threat Prevention feature can block or throttle inbound connections before the content is processed to lessen the impact of a large number of inbound messages.

Field Guide 5
WatchGuard XCS Overview
Secure WebMail
Secure WebMail provides remote access support to internal mail servers. With Secure WebMail, users can get access to their mailboxes with email web clients such as Outlook® Web Access, Lotus iNotes, or the WatchGuard XCS web mail client. The WatchGuard XCS addresses the security issues that currently prevent deployment of web mail services and offers the following protection:
Strong authentication (including integration with Active Directory) Encrypted sessions Advanced session control to prevent information leaks on workstations
Authentication
The WatchGuard XCS supports the following authentication methods for administrators, WebMail users, Trusted/Blocked Senders List, and Spam Quarantine purposes:
User ID and Password LDAP RADIUS
Integrated and External Message Encryption
The WatchGuard XCS provides an integrated message encryption option and also includes integration with external encryption servers to provide email encryption and decryption functionality. Email encryption allows users to encrypt individual messages by the integrated encryption service or through a separate encryption server before the messages are delivered to their destination by the WatchGuard XCS.
Incoming encrypted messages are sent to the encryption server to be decrypted before the WatchGuard XCS accepts the message and delivers it to the intended recipient. This integration allows organizations to make sure that encrypted messages are still processed for security issues, for example, viruses, malformed mail, and content filtering and scanning.
Mail Delivery Encryption
All messages delivered to and from the WatchGuard XCS can be encrypted using TLS (Transport Layer Security). This includes connections to remote systems, local internal mail systems, or internal mail clients. Encrypted messages are delivered with complete confidentiality both locally and remotely.
TLS encryption can be used for the following:
Secure mail delivery on the Internet to prevent anyone from viewing email while in transit Secure mail delivery across a LAN to prevent malicious users from viewing email other than their own Create policies for secure mail delivery to branch offices, remote users and business partners Supports TLS/SSL encryption for all user and administrative sessions. TLS/SSL is used to encrypt SMTP sessions, which effectively prevents eavesdropping and interception
Policies
Policy-based controls allow settings for the WatchGuard XCS security features, including Annotations, Anti-Spam, Anti-Virus, and Attachment Control, to be customized and applied based on the group membership, domain membership, IP address, or email address of the recipient. Time policies allow you to configure an effective time frame for a specific policy (web scanning only).

WatchGuard XCS Overview
6 WatchGuard XCS
User groups can be imported from an LDAP-based directory, and then policies can be created to apply customized settings to these groups. For example, you can set up an Attachment Control Policy to allow your Development group to accept and send executable files (.exe), and configure your Attachment Control settings for all your other departments to block this file type to prevent the spread of viruses among the general users.
Directory Services
The WatchGuard XCS integrates with LDAP (Lightweight Directory Access Protocol) directory services such as Active Directory, OpenLDAP, and iPlanet, which allows you to perform the following:
LDAP lookup prior to internal delivery — The system can check for the existence of an internal user through LDAP before it delivers a message. This feature allows you to reject mail to unknown addresses in relay domains, and reduces the number of attempted deliveries of spam messages for non-existent local addresses. This verification can be done directly to an LDAP server or to a cached directory stored locally on the system.
Group/User Imports — An LDAP lookup determines the group membership of a user you apply policy-based controls. LDAP users can also be imported and mirrored on the system to be used for services such as the Spam Quarantine.
Authentication — LDAP can be used to authenticate Web Proxy access, IMAP access, user mailbox, and WebMail logins.
SMTP Relay Authentication — LDAP can be used to authenticate clients for SMTP Relay. Mail Routing — LDAP can be used to look up mail route information for a domain to deliver mail to its
destination server.
System Management
The WatchGuard XCS provides a complete range of monitoring and diagnostics tools to monitor the system and troubleshoot mail delivery issues. Admin sessions can also be encrypted for additional security, while comprehensive logs record all mail activity.
Web browser-based management — The web browser management interface displays a live view of system activity and traffic flows. The management interface can be configured to display this information for one or many systems, including systems in a local cluster or systems that are being centrally managed.
Frequent Tasks — Appears as the default page when you log in to the WatchGuard XCS and provides direct links to the most frequent tasks you can perform to configure and manage the WatchGuard XCS.
Dashboard — The WatchGuard XCS system Dashboard provides administrators with a brief statistical and graphical summary of current inbound and outbound email and web activity, to allow rapid assessment of the current status of the WatchGuard XCS.
Enterprise integration with SNMP — With SNMP (Simple Network Management Protocol), the system can generate both information and traps to be used by SNMP monitoring tools. This extends the administrator’s view of the WatchGuard XCS and allows notification of significant system events, including excessive traffic flows and system failures.
Alarms — The system can generate system alarms that can automatically notify the administrator through email and console alerts of a system condition that requires attention.
Archiving — Archiving support allows organizations to define additional mail handling controls for inbound and outbound mail. These features are especially important for organizations that must archive certain types of mail for regulatory compliance or for corporate security policies.

Field Guide 7
WatchGuard XCS Overview
Clustering
The WatchGuard XCS clustering features provide a highly scalable, redundant messaging security infrastructure that enables two or more systems to act as a single logical unit to process messages with redundancy and high availability benefits. There is no theoretical limit to the size of the cluster, and systems can be easily added to the cluster to increase processing and high-availability capabilities. Clustering makes sure that the flow of traffic is not interrupted due to individual system failures. A cluster can be managed from any single system in the cluster without the need for a separate management console, and all systems in the cluster can process messages. Any configuration changes, such as Anti-Spam and Policies, are propagated to all systems in the cluster.
Reports
The WatchGuard XCS report functionality provides a comprehensive range of informative reports that can be generated in PDF (Adobe Portable Document Format), CSV, and HTML format on demand and at scheduled times. The reports are derived from information written to the systems and message logs that are stored in the message database. Up to a month's report data can be stored and viewed online depending on message loads for a particular environment. Reports are stored on the system for online viewing, and can also be emailed automatically to the systems administrator.
In clustered environments, reports aggregate information for the entire cluster. System and resource reports display information for each system in the cluster.
For organizations that support multiple domains, per domain information can be added to the reports to provide the administrator with statistics for each hosted domain. Hosted domain reports can also be enabled that create separate reports for a specific domain that can be emailed to the administrators of each hosted domain.
Security Connection
The Security Connection provides an automated software update service that polls WatchGuard’s support servers for new updates, security alerts, and Anti-Spam database updates. When new information and updates are received, a notification can be sent to the administrator.
Internationalization
The WatchGuard XCS supports internationalization for annotations, notification messages, and message database views. For example, if a message is sent to someone who is on vacation and the message used character set ISO-2022-JP (Japanese), the vacation notification sent back is in the same character set.
You can view the message history database (such as the message history, message details, logs and reports), with international character sets.
The WatchGuard XCS supports the ISO-8859-1 (Western European Languages) character set and non-Western international character sets for dictionary-based content filtering with the Content Scanning, Objectionable Content Filter, and Spam Words features.

WatchGuard XCS Overview
8 WatchGuard XCS
WatchGuard XCSv
The WatchGuard XCSv is a version of the WatchGuard XCS security appliance that runs as a virtual machine on a VMware or Microsoft Hyper-V host. You can use the WatchGuard XCS web admin UI to manage an XCSv device, just as you manage any other WatchGuard XCS device.
XCSv Licensing
XCSv devices are licensed in several different editions that provide different levels of scalability and performance:
Small Office Edition Medium Office Edition Large Office Edition Large Office XC Edition
When you activate your XCSv device, you receive a feature key that enables the WatchGuard XCS capabilities for the XCSv edition you have licensed. You can upgrade from one XCSv edition to another.
Installation Prerequisites for VMware
You must install the XCSv virtual device in a VMware environment that meets these requirements.
VMware To install an XCSv virtual device, you must have a VMware vSphere/ESXi v4.1 Update 2 (or later version)
host installed on any supported server hardware. Make sure your vSphere/ESXi software is updated to the latest patch level.
You must also install the VMware vSphere Client 4.1 (or later version) on a supported Windows computer.
VMware Tools is installed by default with the XCSv virtual device. VMware Tools is a suite of utilities that enhances and improves the performance and management of the virtual machine, and includes the ability to cleanly power off or reset the guest operating system software from the host system.
Hardware The hardware requirements for XCSv are the same as the hardware requirements for VMware vSphere/
ESXi. For information about VMware hardware compatibility, see the VMware Compatibility Guide at: http://www.vmware.com/resources/compatibility/search.php
WatchGuard XCSv requires that your host hardware supports Intel Virtualization Technology (Intel VT) or AMD Virtualization (AMD-V) and has these options enabled in the host system BIOS. For more information about Intel VT compatibility, see the Intel Virtualization Technology List at: http://ark.intel.com/VTList.aspx
AMD-V is supported in all K8 AMD (Athlon 64) processors from revision F, and all newer processors support AMD-V technology.

Field Guide 9
WatchGuard XCS Overview
Installation Prerequisites for Microsoft Hyper-V
You must install the XCSv virtual device in a Hyper-V environment that meets these requirements.
Hyper-V Hyper-V role on Windows Server 2008 R2 or Windows Server 2012, or stand-alone version of Hyper-V
Server 2008 R2 or Hyper-V Server 2012. Make sure your Windows Server or Hyper-V Server software is updated to the latest patch level. You can use the Hyper-V Manager on Windows Server 2012 to deploy, configure , and provision the
XCSv virtual machine in the Hyper-V environment. You can also use System Center Virtual Machine Manager (VMM) interface, or a Hyper-V role on a client computer instead of Hyper-V Manager.
Hardware The hardware requirements for XCSv are the same as the hardware requirements for Hyper-V on
Windows Server 2008 R2 or Windows Server 2012.
Network You can configure a maximum of 8 interfaces.
XCSv Device Installation Overview
For VMware, WatchGuard distributes XCSv as an OVF template file. To complete initial installation on VMware, you must perform these procedures:
1. In the VMware vSphere client, deploy the XCSv OVF template file to the VMware host.2. Perform any resource allocation (CPU, memory, disk) modifications on the VMware host based on your
XCSv edition.3. Power on the XCSv virtual machine.4. Connect to the XCSv device to run the Setup Wizard.
For Hyper-V, WatchGuard distributes XCSv as a virtual hard disk (.vhd) file. To deploy an XCSv virtual hard disk in a Hyper-V environment:
1. In Hyper-V, create your virtual machine for the XCSv software. 2. Perform any resource allocation (Processors, memory, disk, network) modifications on the Hyper-V
host based on your XCSv edition.3. Power on the XCSv virtual machine.4. Connect to the XCSv virtual machine to run the Setup Wizard.
For detailed steps to set up an XCSv device, see the WatchGuard XCSv Setup Guide available at http://www.watchguard.com/help/documentation.
Features Not Supported with WatchGuard XCSv
These features are not supported for use with WatchGuard XCSv:
General Network storage disks for the virtual host. XCSv console options: Serial console — This feature is redundant with the physical host system serial console. UPS configuration — UPS communications must be configured on the physical host system.

WatchGuard XCS Overview
10 WatchGuard XCS
VMware vMotion for virtual device migration between VMware hosts. You cannot set the SMBIOS.reflectHost setting in VMware. This interferes with product identification
and licensing.
Hyper-V XCSv does not support the dynamic memory setting on Hyper-V. The Data Exchange and Volume Backup features are not supported. Time synchronization is not supported. We recommend you use an NTP server in the XCSv network
configuration.

Field Guide 11
2 Email Basics
Email Basics
A mail transport system consists of these components:
Email clients (Mail User Agents MUA)o Compose mailo Read mailo Store mail locally
Mail Servers (Mail Transfer Agents MTA)o Relay mail to other mail serverso Store mail in local mailboxes
Additional network components involved in the mail delivery process are:
Domain Name Servers (DNS)o Resolve hostnameo Resolve MX records to the addresses of mail servers
Email Basics
12 WatchGuard XCS
Routerso Route network packets between networks
Firewallso Protect the internal networko Prevent unauthorized access to internal networko Prevent unauthorized access to the external network
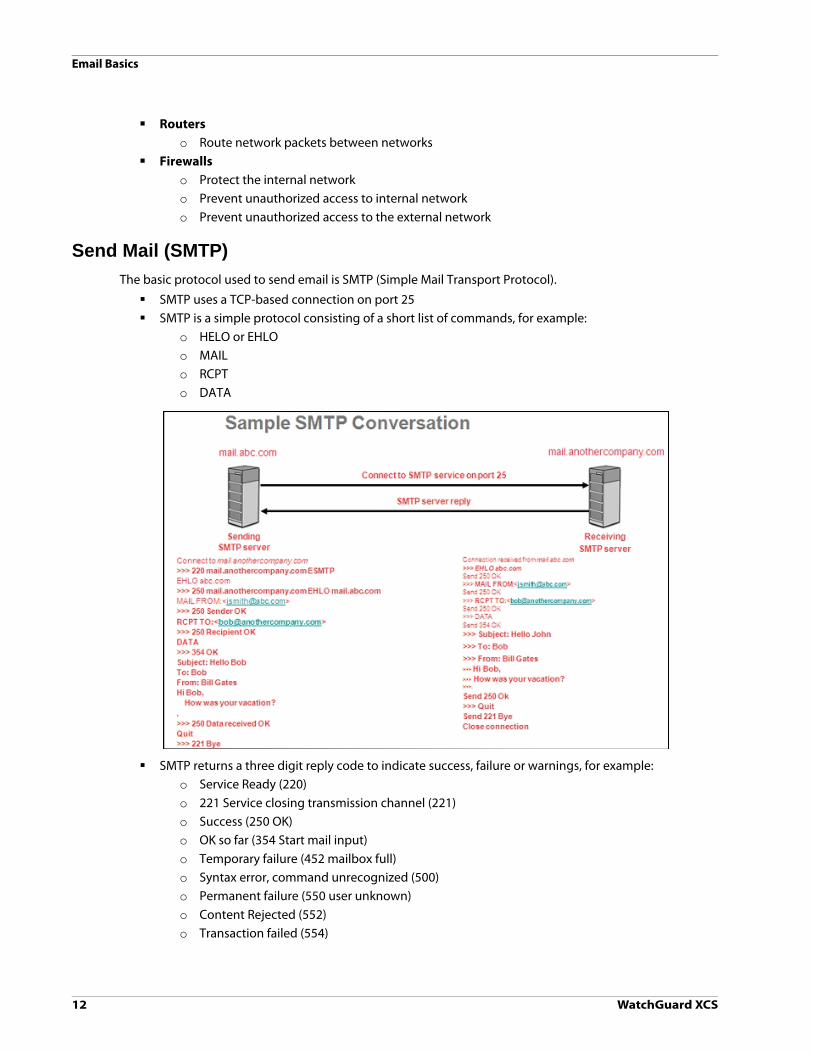
Send Mail (SMTP)
The basic protocol used to send email is SMTP (Simple Mail Transport Protocol).
SMTP uses a TCP-based connection on port 25 SMTP is a simple protocol consisting of a short list of commands, for example:
o HELO or EHLOo MAILo RCPTo DATA
SMTP returns a three digit reply code to indicate success, failure or warnings, for example:o Service Ready (220)o 221 Service closing transmission channel (221)o Success (250 OK)o OK so far (354 Start mail input)o Temporary failure (452 mailbox full)o Syntax error, command unrecognized (500)o Permanent failure (550 user unknown)o Content Rejected (552)o Transaction failed (554)

Field Guide 13
Email Basics
Retrieve Mail (POP and IMAP)
These two protocols are typically used by mail clients to retrieve email:
POP (Post Office Protocol) uses a TCP-based connection on port 110, and is used to retrieve messages from a shared message store for offline processing.
IMAP (Internet Message Access Protocol) uses a TCP-based connection port 143, and is used to access messages in a shared message store.
MAPI (Messaging Application Programming Interface) is a proprietary email protocol of Microsoft that can be used by Outlook to communicate with Microsoft Exchange.
Email Message Parts
This is an example of a typical mail message:
Envelope The message envelope is never seen by the end user It is used internally by the MTA to route the message Contains the sender and recipient address
Headers Each header is transmitted as a single line of text Date, From, To are mandatory headers Other header fields include Reply-to, Sender, and others. These fields can be forged by spammers
because they do not affect how the mail is delivered. Header beginning with “X-” are for custom usage
Received fromIndicates the final path that the message followed to get to its destination. It arrived from mail.example.com, which delivered it to server.example.com to be put in the mailbox of [email protected].

Email Basics
14 WatchGuard XCS
Received byThis indicates a previous hop that the message followed. In this case, the message came through mail.example.com which accepted the message addressed to [email protected].
Delivered-ToThe user to which to deliver to, in this example, [email protected].
Received fromThis field marks the origin of the message. Note that it is not necessarily the same as the actual server that sent the message.
SubjectThis is a free form field and is displayed by a typical mail client.
ToThis is a free form field and is displayed by a typical mail client. It may be different from the destination address in the Received headers or from the actual recipient.
FromThis is a free form field and is displayed by a typical mail client. It may be different from the From address in the Received headers. It is typically faked by spammers.
Message-IDThis is added by the mail server and is often faked by spammers.
Message Body The message body is the actual content of the email message Must be in plain text and Separated from the headers by a single blank line Binary content must be encoded into ASCII text

Field Guide 15
3 Pre-installation Tasks
WatchGuard XCS Deployments
The WatchGuard XCS is designed to be situated between internal email servers and clients, and external servers on the Internet so that there are no direct connections between external and internal systems.
The WatchGuard XCS is installed in one of these locations:
On the DMZ (Demilitarized Zone) of a network firewall In parallel with a network firewall Behind the existing firewall on the internal network
Messaging traffic is redirected from either the external interface of the network firewall or from the external router to the WatchGuard XCS. When the WatchGuard XCS accepts and processes a message, the device initiates a connection to the internal mail servers to deliver the messages.
WatchGuard XCS on the DMZ of a Network Firewall
The most common deployment strategy for the WatchGuard XCS is to be situated on the DMZ of a network firewall. This type of deployment prevents any direct connections from the Internet to the internal mail servers, and makes sure the WatchGuard XCS is located on a secure network behind the firewall.
This deployment uses a single network interface connected to the DMZ network of the network firewall. The Installation Wizard helps you install the WatchGuard XCS in this deployment configuration.
Pre-installation Tasks
16 WatchGuard XCS
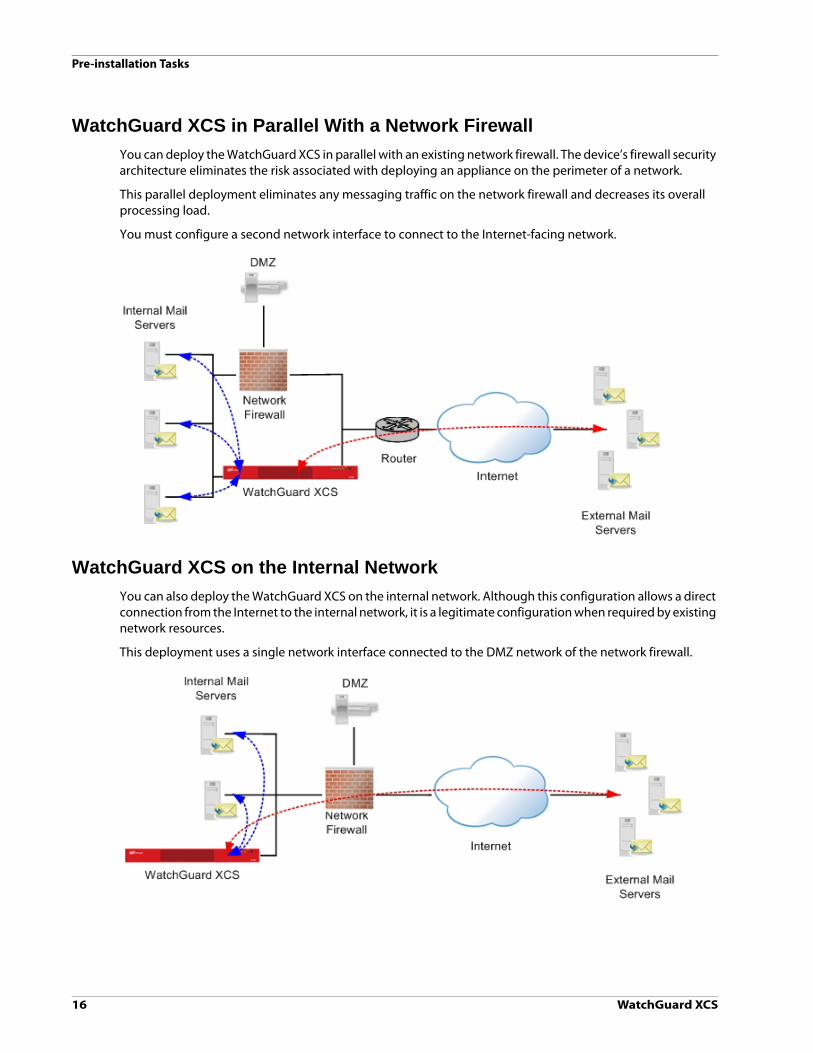
WatchGuard XCS in Parallel With a Network Firewall
You can deploy the WatchGuard XCS in parallel with an existing network firewall. The device’s firewall security architecture eliminates the risk associated with deploying an appliance on the perimeter of a network.
This parallel deployment eliminates any messaging traffic on the network firewall and decreases its overall processing load.
You must configure a second network interface to connect to the Internet-facing network.
WatchGuard XCS on the Internal Network
You can also deploy the WatchGuard XCS on the internal network. Although this configuration allows a direct connection from the Internet to the internal network, it is a legitimate configuration when required by existing network resources.
This deployment uses a single network interface connected to the DMZ network of the network firewall.

Field Guide 17
Pre-installation Tasks
Before You Begin
Before you begin the installation process, make sure you do the tasks described in the subsequent sections.
Verify Basic Components
Make sure that you have:
A computer with an Ethernet network interface card and a web browser installed A WatchGuard XCS device Ethernet cables Power cables
You can also attach an optional monitor and keyboard (USB or PS/2) to get access to the WatchGuard XCS console.
Hardware Installation
For detailed instructions on how to install the WatchGuard XCS device in an equipment rack, see the Hardware Guide.
Connect the Network Interfaces
Before installation, make sure that you physically connect at least one of the network interfaces to the network.
When you install your device, we recommend you use the first onboard Ethernet network interface on the back of the device (NIC 1) to connect to your network. This is the first default interface assigned by the WatchGuard XCS. After you complete the installation, you can configure additional network interfaces.
Pre-installation Tasks
18 WatchGuard XCS
Get a Feature Key
A feature key is a license that enables you to activate your purchased feature set on your WatchGuard XCS. You must register the device serial number on the WatchGuard LiveSecurity® web site and retrieve your feature key.
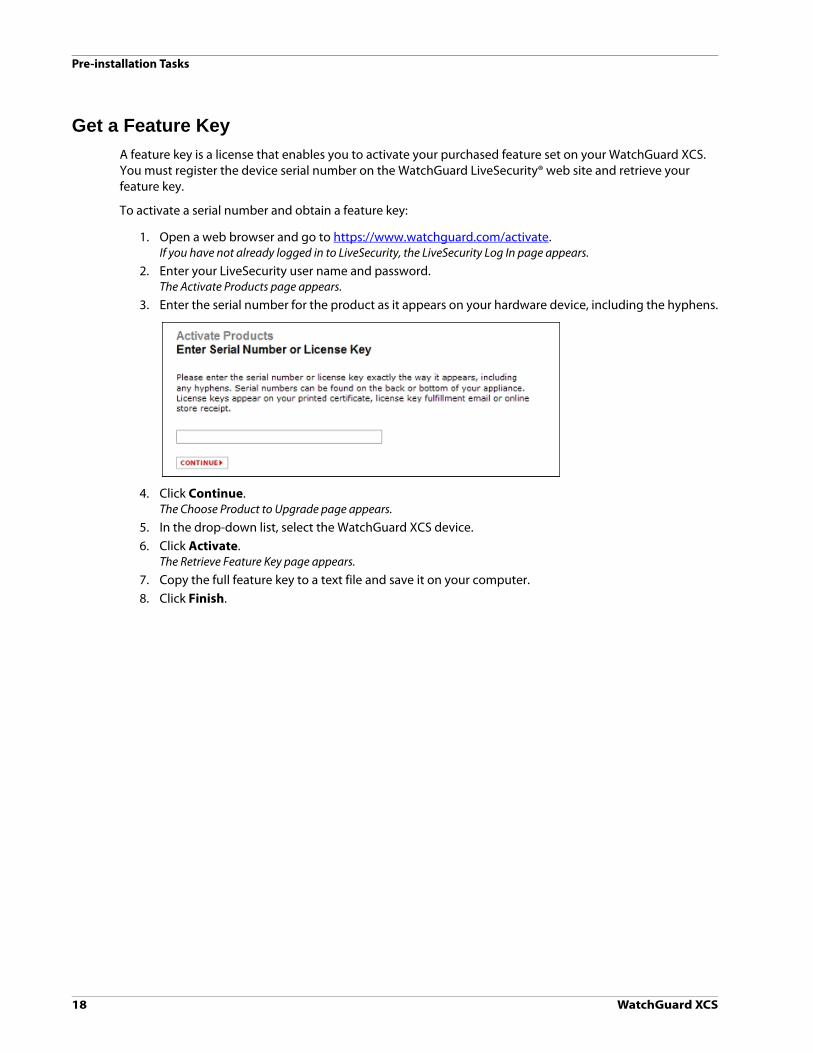
To activate a serial number and obtain a feature key:
1. Open a web browser and go to https://www.watchguard.com/activate.If you have not already logged in to LiveSecurity, the LiveSecurity Log In page appears.
2. Enter your LiveSecurity user name and password.The Activate Products page appears.
3. Enter the serial number for the product as it appears on your hardware device, including the hyphens.
4. Click Continue.The Choose Product to Upgrade page appears.
5. In the drop-down list, select the WatchGuard XCS device.6. Click Activate.
The Retrieve Feature Key page appears.
7. Copy the full feature key to a text file and save it on your computer. 8. Click Finish.
Field Guide 19
Pre-installation Tasks
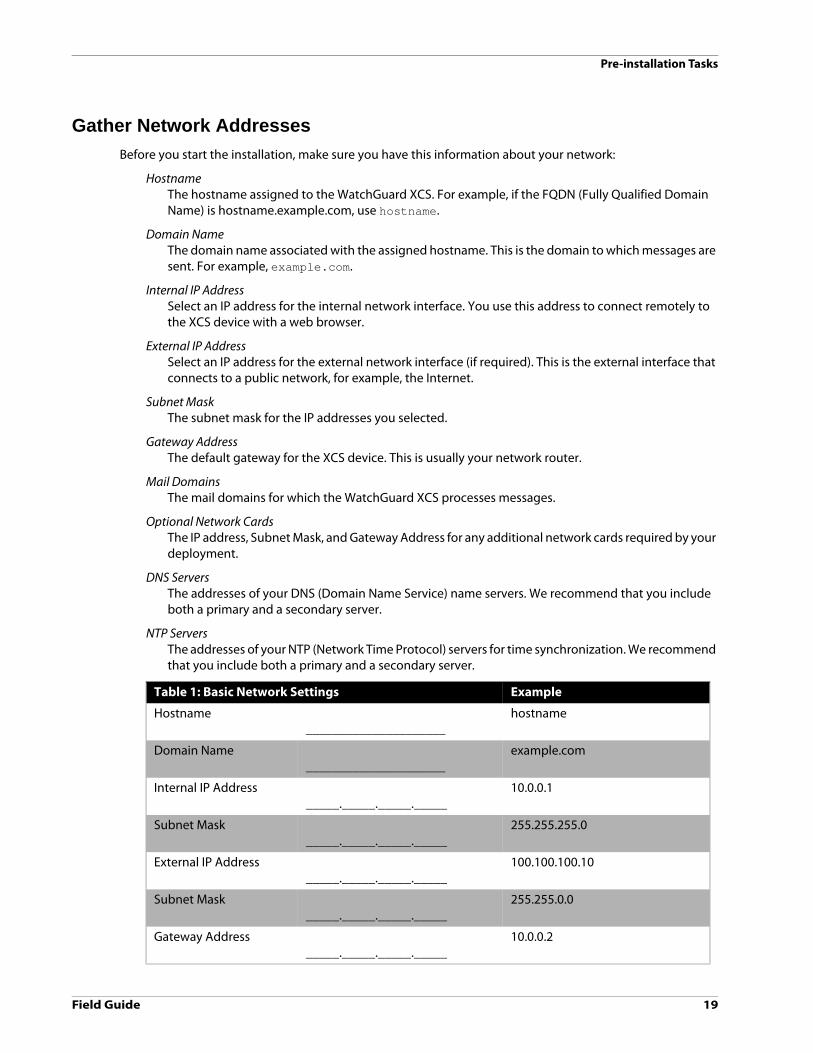
Gather Network Addresses
Before you start the installation, make sure you have this information about your network:
HostnameThe hostname assigned to the WatchGuard XCS. For example, if the FQDN (Fully Qualified Domain Name) is hostname.example.com, use hostname.
Domain NameThe domain name associated with the assigned hostname. This is the domain to which messages are sent. For example, example.com.
Internal IP AddressSelect an IP address for the internal network interface. You use this address to connect remotely to the XCS device with a web browser.
External IP AddressSelect an IP address for the external network interface (if required). This is the external interface that connects to a public network, for example, the Internet.
Subnet MaskThe subnet mask for the IP addresses you selected.
Gateway AddressThe default gateway for the XCS device. This is usually your network router.
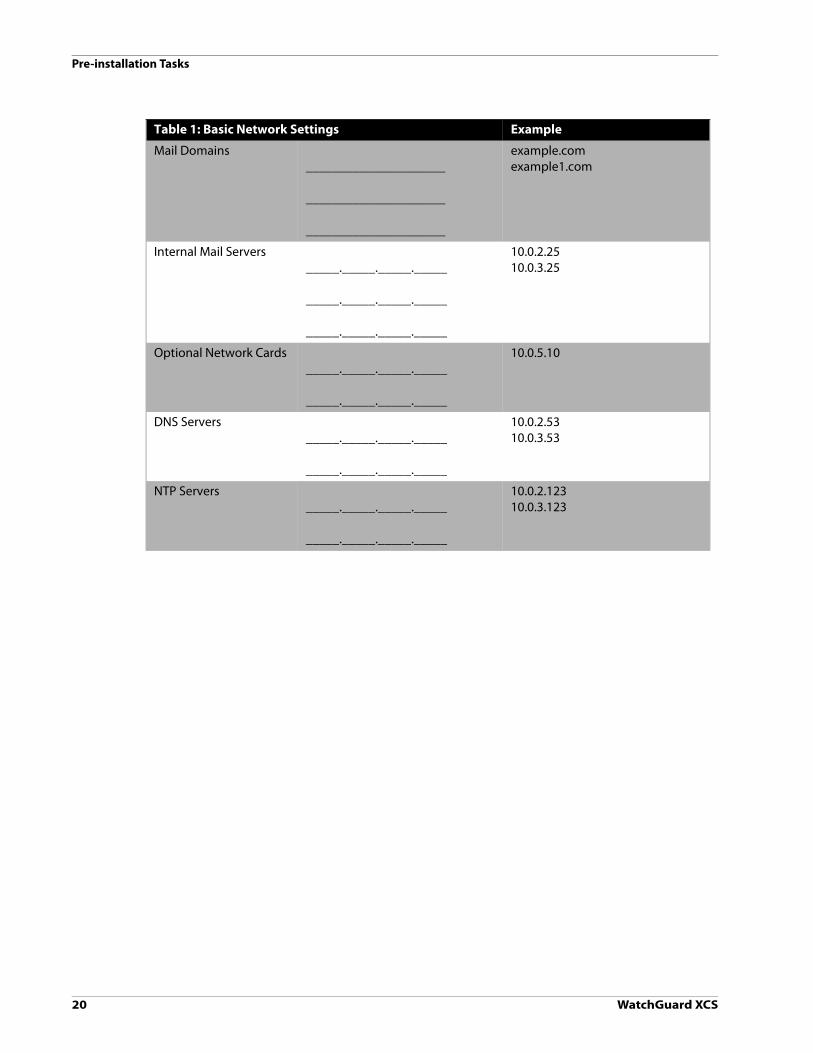
Mail DomainsThe mail domains for which the WatchGuard XCS processes messages.
Optional Network CardsThe IP address, Subnet Mask, and Gateway Address for any additional network cards required by your deployment.
DNS ServersThe addresses of your DNS (Domain Name Service) name servers. We recommend that you include both a primary and a secondary server.
NTP ServersThe addresses of your NTP (Network Time Protocol) servers for time synchronization. We recommend that you include both a primary and a secondary server.
Table 1: Basic Network Settings Example
Hostname_____________________
hostname
Domain Name_____________________
example.com
Internal IP Address _____._____._____._____
10.0.0.1
Subnet Mask_____._____._____._____
255.255.255.0
External IP Address_____._____._____._____
100.100.100.10
Subnet Mask_____._____._____._____
255.255.0.0
Gateway Address_____._____._____._____
10.0.0.2
Pre-installation Tasks
20 WatchGuard XCS
Mail Domains_____________________
_____________________
_____________________
example.comexample1.com
Internal Mail Servers_____._____._____._____
_____._____._____._____
_____._____._____._____
10.0.2.2510.0.3.25
Optional Network Cards_____._____._____._____
_____._____._____._____
10.0.5.10
DNS Servers_____._____._____._____
_____._____._____._____
10.0.2.5310.0.3.53
NTP Servers_____._____._____._____
_____._____._____._____
10.0.2.12310.0.3.123
Table 1: Basic Network Settings Example

Field Guide 21
Pre-installation Tasks
Network Firewall Configuration
To enable the WatchGuard XCS to effectively process messages when it is located behind a network firewall, you must correctly configure the network ports on your network firewall.
This table describes the ports required for each feature. If you do not use a feature in the table, you do not have to open the port for that feature:
Port Description From Internet
To Internet
From Internal Network
To Internal Network
Protocol
21 FTP for System Backups
X TCP
22 SCP (Backup or Offload)
X TCP
25 SMTP (standard port used to send and receive mail)
X X X X TCP
53 DNS and RED Queries X X TCP/UDP
80 Anti-Virus Updates (also requires port 443)
X TCP
80 URL Categorization Updates
X TCP
80 Web Mail Access (OWA, iNotes, etc.) See port 443 for Secure WebMail access.
X X TCP
110 POP3 X X TCP
123 Network Time Protocol (NTP)
X X UDP
143 IMAP Proxy X X TCP
161 SNMP X UDP
162 SNMP trap X UDP
389 LDAP X TCP
443 WatchGuard XCS Software Updates
X TCP
443 Anti-Virus Updates (also requires port 80)
X TCP
443 Secure Web Mail Access
X X TCP
443 Web UI connections X X TCP
443 RED Statistics Sharing X TCP
443 SecureMail Email Encryption
X TCP
514 Syslog X UDP

Pre-installation Tasks
22 WatchGuard XCS
DNS Configuration for Mail Routing
Use DNS services to route mail messages from the Internet to the WatchGuard XCS. DNS configurations are complex and are dependant on your specific network environment.
These instructions represent the minimum changes required for mail routing:
Add an MX (mail exchanger) record to your DNS configuration to forward incoming messages to the WatchGuard XCS:example.com. IN MX 0 hostname.example.com
Add an A record to resolve the domain name to an IP address:hostname.example.com. IN A 203.0.113.1
Add a PTR record to allow reverse look-ups to succeed and prevent messages sent from the WatchGuard XCS from being marked as suspected spam:1.113.0.203.in-addr.arpa. IN PTR hostname.example.com
It is useful to keep an MX record with a higher preference pointed at your current mail server in the integration phase. If the WatchGuard XCS is taken out of service, the messages automatically route directly to the mail server. This entry must be deleted before you move to a production environment because spammers could find this alternate route and bypass the WatchGuard XCS.example.com. IN MX 10 mailserver.example.com
Outbound Mail Routing
You must modify existing internal mail servers to route outbound messages through the WatchGuard XCS.
After the installation is complete, you must configure all internal mail servers to use the WatchGuard XCS for mail delivery. This allows the WatchGuard XCS to scan outbound message content and file attachments to prevent the spread of viruses introduced locally, and to improve the spam detection capabilities of the Intercept Anti-Spam features.
See “Modify Internal Mail Servers for Outbound Mail” on page 42 for more detailed information on how to integrate your internal mail servers with the WatchGuard XCS after installation.
636 LDAPS X TCP
993 Secure IMAP X X TCP
995 Secure POP3 X X TCP
1812 RADIUS Server X UDP
5500 RSA Secure ID ACE Server
X UDP
10101 Support Access X X TCP
10106 Centralized Management
X X X X TCP
10108 Web Reputation X UDP
Port Description From Internet
To Internet
From Internal Network
To Internal Network
Protocol

Field Guide 23
4 Install the WatchGuard XCS
Connect the WatchGuard XCS
To connect the WatchGuard XCS:
1. Unpack the device, cables, and documentation from the shipping carton.2. Connect the power cable to the system and a power source, preferably a UPS (Uninterruptible Power
Supply).3. Connect the first onboard Ethernet network interface on the back of the device (NIC 1) to the network.
For the initial installation, you only need to connect the internal network interface to be able to connect to the device with a web browser. You can configure additional network interfaces after the installation.
4. Use one of these methods to get access to the Web UI Installation Wizard: Connect your computer to the same network as the WatchGuard XCS through a network switch.
Connect the WatchGuard XCS to the network switch using the first onboard Ethernet connector (NIC 1) on the back panel.
Connect your computer directly to the WatchGuard XCS with a cross-over Ethernet cable connected to the first onboard Ethernet connector (NIC 1) on the back panel.

Install the WatchGuard XCS
24 WatchGuard XCS
Default Network Settings
The default network settings for the WatchGuard XCS are:
IP address: 10.0.0.1 Netmask: 255.255.255.0 Gateway: 10.0.0.2
To connect to the WatchGuard XCS Web UI, we recommend you configure your computer to use the IP address 10.0.0.2.
The WatchGuard XCS supports these web browsers:
Internet Explorer 8 and 9 (Windows XP, Windows 2000, Windows 2003, Windows Vista, Windows 7) Firefox 3 and greater (Windows, Linux, Mac)
Use a minimum screen resolution of 1024x768.
Start the Installation Wizard
1. Power on your device. Wait at least 5 minutes for the system to initialize before you try to connect to the WatchGuard XCS with a web browser. Ping is enabled on the configured network interface. You can ping the default address 10.0.0.1 to check connectivity before you connect with a web browser.
2. Launch a web browser on your computer and type the IP address of the WatchGuard XCS as the URL in the location bar. For example, https://10.0.0.1The login page appears.
3. Type the default Username and Password.When you access the system for the first time after installation, the default settings are admin for the username, and admin for the password.
A security certificate notification appears in the browser because the system uses a self-signed certificate. It is safe to ignore the warning (Internet Explorer) or to add a certificate exception (Mozilla Firefox).

Field Guide 25
Install the WatchGuard XCS
4. The Installation Wizard introduction page appears. Click Continue to start the installation.Make sure you register your device serial number with the WatchGuard® LiveSecurity® web site and receive a feature key before you continue with installation.
5. In the Regional Settings page, configure these options: Time Settings — Type the current Time and Date. For the time, use 24-hour format hh:mm:ss.
For the date, use this format: YYYY-MM-DD. Time Zone — Select the closest city to your location and time zone. Keyboard — Select the keyboard layout for your location. You can attach a keyboard and monitor
to the WatchGuard XCS to get access to the console.
6. Click Continue.

Install the WatchGuard XCS
26 WatchGuard XCS
7. On the Networks Settings page, configure the first network interface. This is the first onboard Ethernet connector (NIC 1) at the left side of the back panel of your device.
You can configure these options:
Hostname — Type the hostname for the device.For example, if your fully qualified domain name is hostname.example.com, type hostname.
Domain — Type your domain.For example, type example.com.
Gateway — Type the gateway (typically the router) for your network.For example, type 10.0.0.2.
DNS Server 1 — Type the IP address of your DNS Name Server.For example, type 10.0.2.53.
DNS Server 2 — Type the IP address of a secondary DNS name server.For example, type 10.0.3.53.
NTP Server — Type the IP address or hostname of your NTP server.For example, type 10.0.2.123.
IP Address — Type the IP address for this interface.For example, type 10.0.0.1.
Netmask — Type the netmask.For example, type 255.255.255.0.

Field Guide 27
Install the WatchGuard XCS
External Proxy Server — If your network uses a proxy server to access the Internet, you must set this option to Enabled and enter your external proxy server configuration. The WatchGuard XCS requires access to the Internet through the proxy server to retrieve license information and software updates. If you do not use an external proxy server, keep this option set to Disabled.
Server Address — Type the IP address of your external proxy server. Server Port — Type the server port used by the external proxy server. The default is TCP port 80. User Name — If your proxy server requires authentication, type the user name to log in to the
proxy server. Password — Type and confirm a password.
8. Click Continue.If you make any network changes, you must restart the device and reconnect to the WatchGuard XCS with the new IP address you assigned to the network interface.
9. On the Customer Information page, type the Organization Name and Server Admin Email.Device alerts and notifications are sent to the Server Admin Email address.
10. Click Continue.
Make sure your computer is properly configured to access the new IP address settings on the WatchGuard XCS.

Install the WatchGuard XCS
28 WatchGuard XCS
11. On the Admin Password page, type and confirm a new admin password.We recommend that you choose a secure password of at least 8 characters in length and include a mixture of upper and lowercase letters, numbers, and special characters.
12. Click Continue.13. If you are installing WatchGuard XCSv, enter your Serial Number.
This page does not appear for WatchGuard XCS installations.
14. On the Feature Key page, select one of these options to add your feature key: Click Manual Update to manually add a feature key. Paste your feature key into the text box and
click Apply. Click Download to automatically download and apply your feature key from the WatchGuard
LiveSecurity service. This option requires an Internet connection and an existing LiveSecurity account. Make sure you can have access to the Internet if the device is installed behind a network firewall, or connects through an external proxy server.
Click Enter Feature Key Later to manually add the feature key after installation. To enter the feature key manually, from the Web UI, select Administration > System > Feature Key.
If you see errors when you add your feature key, try this:
For Automatic Download:
Make sure you have a valid LiveSecurity account and that you have registered your device serial number.
If you do not enter a valid feature key in this step, the Mail Configuration and Messaging steps of the wizard are not displayed.

Field Guide 29
Install the WatchGuard XCS
You must have an Internet connection to retrieve your feature key. Make sure communications are not blocked by a network firewall.
For Manual Update:
Make sure you cut and paste the entire feature key text. The first line must be “Serial Number: B0Exxxxxxxxxx”. The last line is a long line that starts with “Signature: “.
15. On the Mail Configuration page, type your mail domain and internal mail server details, and select the initial status of the WatchGuard XCS security scanning features.
In the Email Domain text box, type the domain for which the WatchGuard XCS processes messages. For example, example.com.
In the Internal Mail Server text box, type the IP address of the internal mail server that receives and sends mail through the WatchGuard XCS.
The WatchGuard XCS automatically configures a mail route for the domain and internal mail server you enter on this page. To configure additional domains for mail routing after the installation is complete, from the Web UI, select Configuration > Mail > Routing.
The WatchGuard XCS also automatically configures a Specific Access Pattern to trust your internal mail server address to allow the mail server to relay mail outbound through the WatchGuard XCS. Mail that originates from the internal mail server is also trusted for Anti-Spam processing. To configure Specific Access Patterns after the installation is complete, from the Web UI, select Configuration > Mail > Access.
In the Security Settings section of the Mail Configuration page, you can enable or disable Intercept Anti-Spam, Anti-Virus, and the Attachment Control features.
Install the WatchGuard XCS
30 WatchGuard XCS
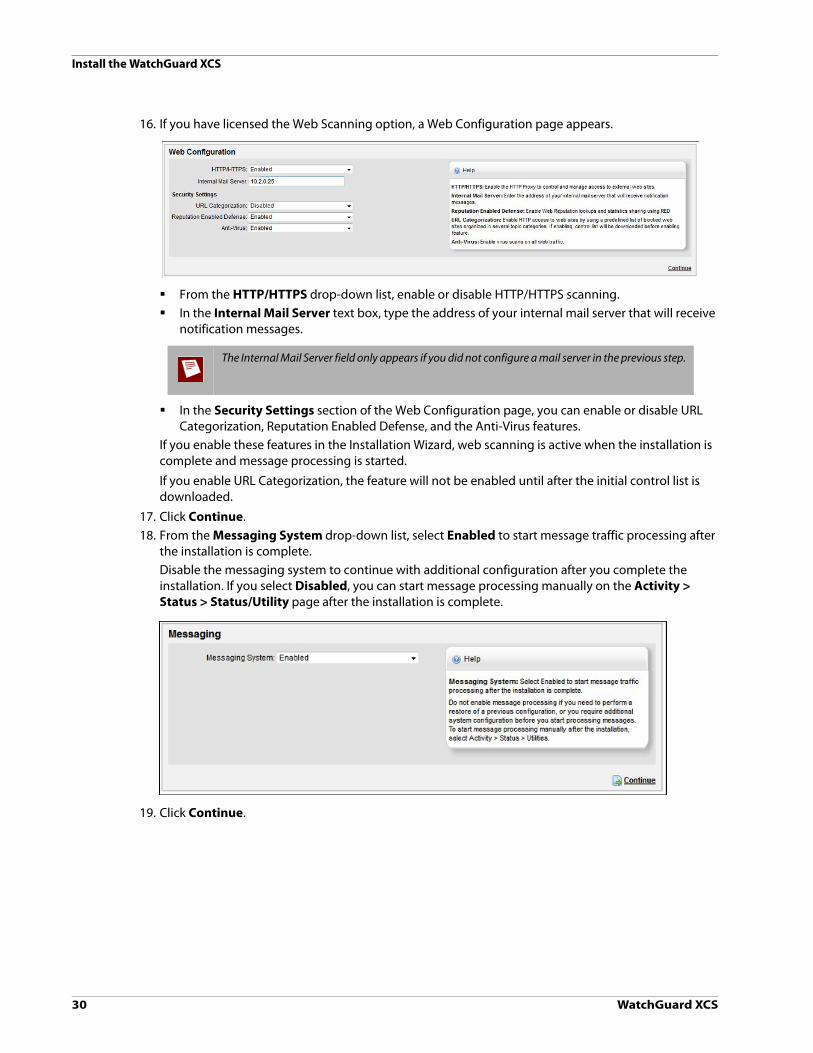
16. If you have licensed the Web Scanning option, a Web Configuration page appears.
From the HTTP/HTTPS drop-down list, enable or disable HTTP/HTTPS scanning. In the Internal Mail Server text box, type the address of your internal mail server that will receive
notification messages.
In the Security Settings section of the Web Configuration page, you can enable or disable URL Categorization, Reputation Enabled Defense, and the Anti-Virus features.
If you enable these features in the Installation Wizard, web scanning is active when the installation is complete and message processing is started.
If you enable URL Categorization, the feature will not be enabled until after the initial control list is downloaded.
17. Click Continue.18. From the Messaging System drop-down list, select Enabled to start message traffic processing after
the installation is complete.Disable the messaging system to continue with additional configuration after you complete the installation. If you select Disabled, you can start message processing manually on the Activity > Status > Status/Utility page after the installation is complete.
19. Click Continue.
The Internal Mail Server field only appears if you did not configure a mail server in the previous step.
Field Guide 31
Install the WatchGuard XCS
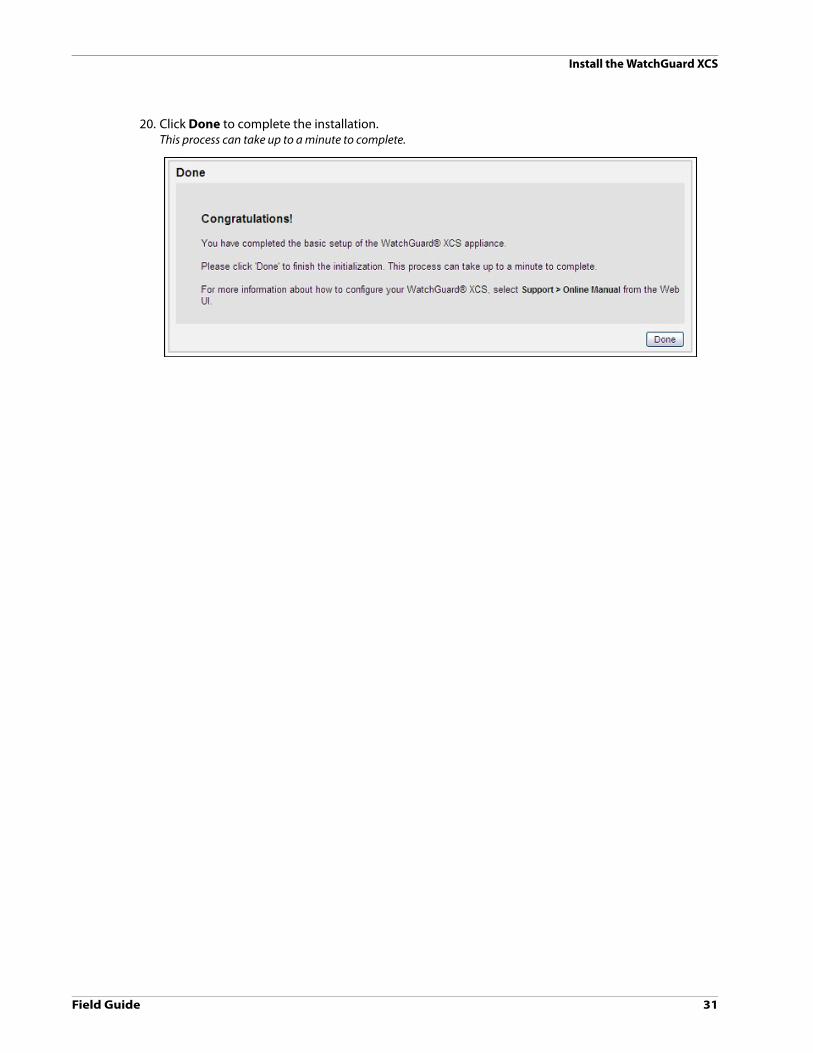
20. Click Done to complete the installation.This process can take up to a minute to complete.

Install the WatchGuard XCS
32 WatchGuard XCS
Feature Key
A feature key is a license that enables you to activate your purchased feature set on your WatchGuard XCS. You must register the device serial number on the WatchGuard LiveSecurity® web site and retrieve your feature key before you can add it to the WatchGuard XCS. If you have not yet obtained a feature key, see “Get a Feature Key” on page 18
If you did not enter your feature key in the Installation Wizard, you must add a feature key to the WatchGuard XCS to enable your purchased features and to start the processing and scanning of email messages.
Add a Feature Key
To install a new feature key:
1. Select Administration > System > Feature Key. The Feature Key page appears.
2. Click Manual Update. The Update Feature Key page appears.
3. Copy the text of the feature key file and paste it in the text box.

Field Guide 33
Install the WatchGuard XCS
4. Click Update Key. The Feature Key page reappears with the new feature key information.

Install the WatchGuard XCS
34 WatchGuard XCS
Update a Feature Key
If you already have a LiveSecurity login and your WatchGuard device serial number is registered, you can update your feature key automatically from the LiveSecurity site.
To update a feature key:
1. Select Administration > System > Feature Key. The Feature Key page appears.
2. Click Download.Your feature key is downloaded from the LiveSecurity site and automatically updated on your system.
Feature Key Synchronization
Select the Enable automatic feature key synchronization option to always keep your feature key synchronized with your WatchGuard LiveSecurity account. If you purchase new feature options or renew your product, your feature key will be automatically updated on the XCS device.
Field Guide 35
Install the WatchGuard XCS
Update Anti-Virus Pattern Files
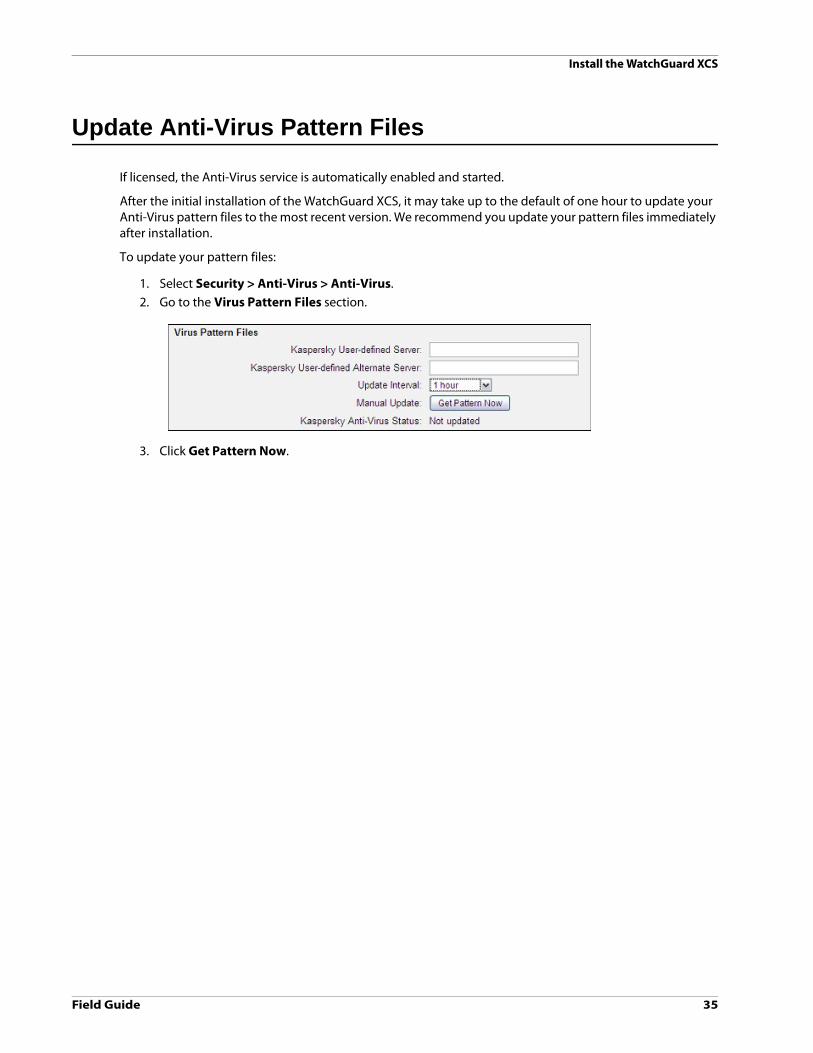
If licensed, the Anti-Virus service is automatically enabled and started.
After the initial installation of the WatchGuard XCS, it may take up to the default of one hour to update your Anti-Virus pattern files to the most recent version. We recommend you update your pattern files immediately after installation.
To update your pattern files:
1. Select Security > Anti-Virus > Anti-Virus.2. Go to the Virus Pattern Files section.
3. Click Get Pattern Now.

Install the WatchGuard XCS
36 WatchGuard XCS
Field Guide 37
5 Mail and Network Configuration
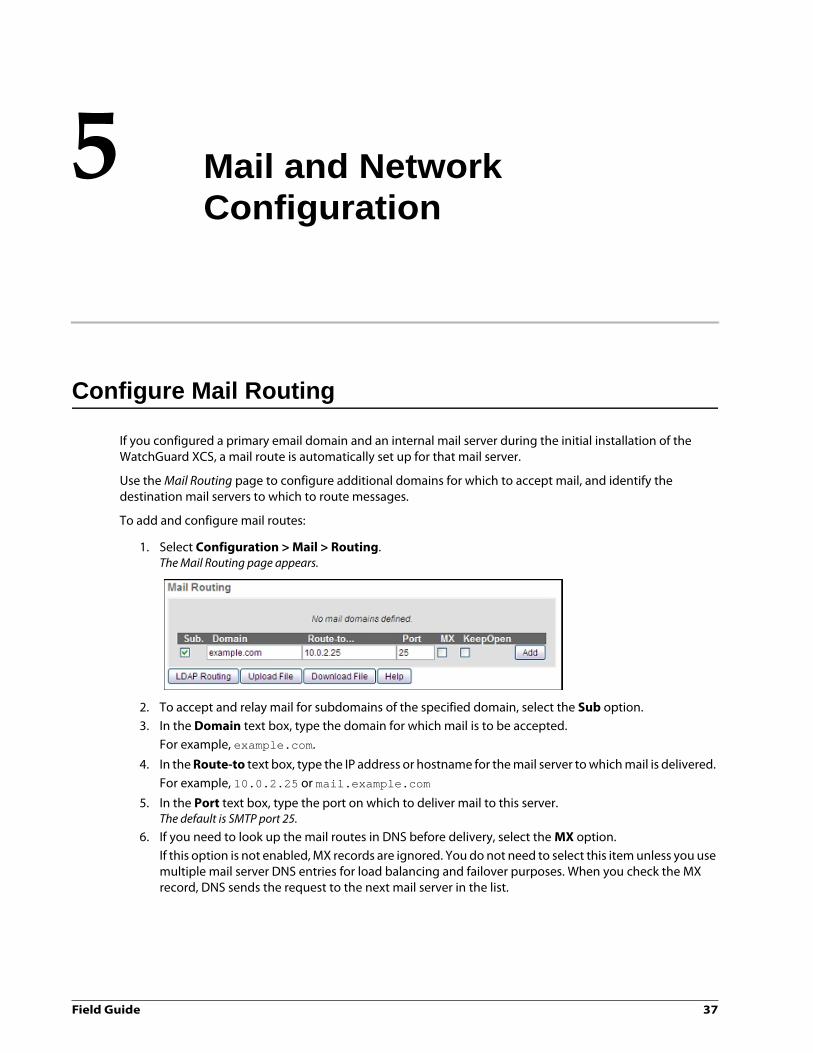
Configure Mail Routing
If you configured a primary email domain and an internal mail server during the initial installation of the WatchGuard XCS, a mail route is automatically set up for that mail server.
Use the Mail Routing page to configure additional domains for which to accept mail, and identify the destination mail servers to which to route messages.
To add and configure mail routes:
1. Select Configuration > Mail > Routing.The Mail Routing page appears.
2. To accept and relay mail for subdomains of the specified domain, select the Sub option.3. In the Domain text box, type the domain for which mail is to be accepted.
For example, example.com.
4. In the Route-to text box, type the IP address or hostname for the mail server to which mail is delivered. For example, 10.0.2.25 or mail.example.com
5. In the Port text box, type the port on which to deliver mail to this server. The default is SMTP port 25.
6. If you need to look up the mail routes in DNS before delivery, select the MX option.If this option is not enabled, MX records are ignored. You do not need to select this item unless you use multiple mail server DNS entries for load balancing and failover purposes. When you check the MX record, DNS sends the request to the next mail server in the list.

Mail and Network Configuration
38 WatchGuard XCS
7. Select the KeepOpen option to make sure that each mail message to the domain is not removed from the active queue until delivery is attempted, even if the preceding mail failed or was deferred. This option makes sure that local mail servers receive high priority.
8. Click Add.9. Repeat the procedure for any additional domains and mail servers.
Trust Internal Mail Servers
To allow internal mail systems to relay mail outbound through the WatchGuard XCS, you must configure a Specific Access Pattern. A Specific Access Pattern makes sure that your mail servers and their messaging traffic is trusted and not processed for spam.
If you configured an internal mail server during the initial installation of the WatchGuard XCS, a Specific Access Pattern is automatically set up for that mail server.
To configure Specific Access Patterns for additional mail servers:
1. Select Configuration > Mail > Access.2. Click Add Pattern.
The New Access Pattern page appears.
3. In the Pattern text box, type the IP address of the internal mail server. For example, 10.0.2.25.
4. Select the Client Access check box.5. From the if pattern matches drop-down list, select Trust.6. Click Apply.
You must only use the KeepOpen option for reliable domains. If the domain is unavailable, it can result in system performance problems because of excessive error conditions and deferred mail.

Field Guide 39
Mail and Network Configuration
Configure Network Settings
When you complete the initial installation process for your WatchGuard XCS, you configure the basic network information for your device. From the Network Configuration page, you can configure other network interfaces and advanced network settings.
To configure network settings:
1. Select Configuration > Network > Interfaces.The Network Configuration page appears.
2. The Hostname, Domain, and Gateway are configured during the initial installation and can be modified on this page. In the Hostname text box, type the hostname (not the Fully Qualified Domain Name) of this device.
For example, if your Fully Qualified Domain Name is hostname.example.com, type hostname. In the Domain text box, type the domain name for your device.
For this example, type example.com. In the Gateway text box, type the IP address of the default route for this device.
This is usually the external router connected to the Internet or the network firewall’s interface if the XCS device is located on the DMZ network.
3. In the DNS Servers text boxes, type the name of your primary and secondary DNS servers. At least one DNS (Domain Name Service) name server must be configured for hostname resolution. We recommend that you specify at least one secondary DNS server to use when the primary DNS server is unavailable.

Mail and Network Configuration
40 WatchGuard XCS
4. To enable DNS caching, select the Enable DNS Cache check box. This option is enabled by default and provides the best performance in most cases. When this option is enabled, the system determines which of the configured DNS servers sends the fastest response, and caches the result.
Clear the Enable DNS Cache check box to:
Use the configured DNS servers in the order they appear Use your ISP DNS servers as failover servers
5. To make sure private reserved IP addresses are not used in a reverse lookup to a DNS server, select the Block Reserved Reverse Lookups check box. This option is enabled by default.
Clear the Block Reserved Reverse Lookups check box if you use your ISP DNS servers, and reverse lookups for reserved addresses are required in your network environment.
6. In the NTP Server text boxes, type the IP address or hostname for your primary time server and any secondary time servers. We recommend that you specify secondary NTP servers to use if the primary NTP server is unavailable.
7. If you use a syslog host on your network, in the Syslog Host text box, type the IP address or hostname of your syslog host.A syslog host collects and stores log files from many sources.
8. You can configure any other additional network interfaces you require.For each network interface, you can configure these options:
9. Type an IP Address for this interface.For example, 10.0.0.1.
10. Type the Netmask for this interface.For example, 255.255.255.0.
11. Select the Media type for the network card.For automatic configuration, select Auto select.
12. There are several additional options that you can enable on a network interface.
Field Guide 41
Mail and Network Configuration
Large MTUSets the MTU (Maximum Transfer Unit) to 1500 bytes. The regular MTU size is 576 bytes. Large MTU can improve performance connecting to servers on the local network. You must enable Large MTU if you are using the Web Proxy. This option is enabled by default, and should only be disabled if required and in consultation with a Technical Support representative.
Respond to Ping and ICMP RedirectAllows ICMP ping requests to this interface. This allows you to perform network connectivity tests to this interface, but makes this interface more susceptible to denial of service ping attacks.
Trusted SubnetConsider all hosts on this subnet trusted for mail relaying, and exclude them from Anti-Spam processing.
Admin and Web User LoginAllows access to this interface for administrative purposes. This includes Tiered Admin users and Web users.
WebMailAllows access to WebMail through this interface. This includes the WebMail client, Secure WebMail, Tiered Admin, User Spam Quarantine, and Trusted/Blocked Senders List access.
SNMP AgentAllows access to the SNMP (Simple Network Management Protocol) agent through this network interface. You should only enable access to the SNMP agent on an internal interface.
Centralized ManagementEnables Centralized Management on this interface.
HTTP/HTTPS ProxyEnables access to the HTTP proxy on this interface.
13. Click Apply.You must restart the system.

Mail and Network Configuration
42 WatchGuard XCS
Modify Internal Mail Servers for Outbound Mail
Changes are required to your existing internal mail servers to route outbound mail through the WatchGuard XCS. You must configure your internal mail servers to use the hostname or IP address of the XCS device for SMTP delivery of outbound mail. The procedure depends on the type of internal mail server you use. See the instructions for your specific mail server to route outgoing mail through the WatchGuard XCS.
These instructions are for a Microsoft® Exchange mail server.
Exchange 2007 and 2010
To add the WatchGuard XCS to the outbound configuration on an Exchange 2007 or 2010 server:
1. Open the Exchange Management Console.2. Expand the Organization Configuration option.3. Select Hub Transport.4. Select the Send Connectors tab.5. Right-click on the existing Send Connector. 6. Select Properties.7. Go to the Network tab.8. Select Route mail through the following smart hosts:.9. Click Add.10. Type the IP address of the WatchGuard XCS system to which to forward outbound mail.
For example: 10.0.1.25
Repeat this procedure to add the addresses of all of your WatchGuard XCS systems.
11. Click OK.
Exchange 2000 and 2003
To add the WatchGuard XCS to the outbound configuration on an Exchange 2000 or Exchange 2003 server:
1. Open Exchange System Manager. 2. Select Connectors.3. Go to the Internet Mail SMTP Connector.4. Select the Forward all mail through this connector to the following smart hosts: option.5. Type the IP address of your WatchGuard XCS system in square brackets.
For example, [10.0.1.25]
To add multiple systems, separate them with commas.
For example, [10.0.1.25],[10.0.2.25]
6. Click OK.
Multiple Exchange Server Configuration
In an environment with multiple Microsoft Exchange servers (not in a clustered configuration), you must configure each system to route outbound mail through the WatchGuard XCS. This can be performed on a per-server basis with the SMTP connector configuration on each server.
To provide a more efficient configuration, add an SMTP Connector to the Exchange Routing Groups configuration instead of the Servers configuration item. The Routing Group configuration applies to all your Exchange servers.

Field Guide 43
Mail and Network Configuration
To configure the SMTP Connector in a routing group of Exchange servers:
1. Open the Exchange System Manager.2. Select Routing Groups.3. Select the First Routing Group.4. Select Add. 5. Select SMTP Connector.6. Type a name for the SMTP Connector.
For example, XCSConnector.
7. Select the Forward all mail through this connector to the following smart hosts: option.8. Type the IP address of your WatchGuard XCS system in square brackets.
For example, [10.0.1.25]
To add multiple systems, separate them with commas.
For example, [10.0.1.25],[10.0.2.25]
9. In the Local bridgeheads section, click Add.10. Add each Exchange server that must send mail through the WatchGuard XCS to the list.
Make sure you add all servers and not just the primary Bridgehead server.
11. Select the Address Space configuration tab. 12. Use the default values of Type: SMTP, Address: *, and Cost: 1.13. Click OK.
Start Messaging Services
When you have configured the WatchGuard XCS with your required networking information and mail routes, you can start the messaging system and start to process messages.
To start the messaging system:
1. Select Activity > Status > Utilities.2. In the Messaging System Control section, click Start.
The status message changes from “Messaging System is stopped” to “Messaging System is running”.

Mail and Network Configuration
44 WatchGuard XCS
Utilities
The Utilities page (Activity > Status > Utilities) provides this information:
Controls to start and stop the message processing and flush the message queues Diagnostic tools, for example, a Hostname Lookup function, SMTP Probe, Ping, and Traceroute utilities,
that are useful to correct message and networking problems
Messaging System Controls
You can control the flow of message processing for inbound and outbound messages.
Messaging System Control — To stop or start all email and web messaging services, click on the Stop or Start Messaging System Control button.
Message Receiving — You can enable or disable only the receiving of messages when you click the Disable Receiving or Enable Receiving button. This is useful if you only want to stop the processing of inbound messages. For example, you may want to turn off the receiving of messages to troubleshoot errors with inbound mail, but still send outbound messages.
Message Sending — You can enable or disable only the sending of messages when you click the Disable Sending or Enable Sending button. This is useful if you only want to stop the processing of outbound messages. For example, you may want to turn off the sending of messages to troubleshoot errors with SMTP delivery, but still receive inbound messages.
The Stop and Start messaging controls are replicated in a cluster environment. When you stop message processing on the Primary, you stop message processing on all devices in the cluster.

Field Guide 45
Mail and Network Configuration
Diagnostics
The Diagnostics section contains networking and SMTP utilities to help troubleshoot network and message delivery issues.
Hostname Lookup — Look up a host on a DNS name server to verify hostname resolution. SMTP Probe — Send a test email to a remote SMTP server. Ping — Verify network connectivity with ICMP ping. Traceroute — Trace the routes of network data from the source to the destination server to verify
routing connectivity. Web RED URL Lookups — Lookup the web reputation of a specific URL.
Test Email Connectivity with SMTP Probe
Use the SMTP (Simple Mail Transport Protocol) Probe to test email connectivity with a remote SMTP server. This allows you to verify that the SMTP server responds to connection requests and returns a valid response.
To perform an SMTP probe:
1. In the SMTP Server text box, type the domain name or IP address of the destination SMTP server to test.
I
2. In the envelope-from (MAIL FROM) text box, type the address to identify the sender of the email message.
3. In the envelope-to (RCPT TO) text box, type the address to identify the recipient of the email message.4. In the HELO text box, type text that identifies the SMTP Client to the SMTP Server.
You can enter any value here, but typically you specify the sending server’s domain name.
5. In the Message to Send (DATA command) text box, type the text to include in the test email message. You can enter an optional subject to make sure you do not send a message with a blank subject.
Mail and Network Configuration
46 WatchGuard XCS
6. Click Send Message. The response displays the result of the SMTP diagnostic probe, and includes the response for each SMTP command:Sending mail...<<< 220 ESMTP Postfix (2.1.0)HELO example.com<<< 250 mail.example.comMAIL FROM:[email protected]<<< 250 OkRCPT TO:[email protected]<<< 250 OkDATA<<< 354 End data with <CR><LF>.<CR><LF>sending /tmp/smtpdata.<<< 250 Ok: queued as F130F33EA6QUIT<<< 221 Bye
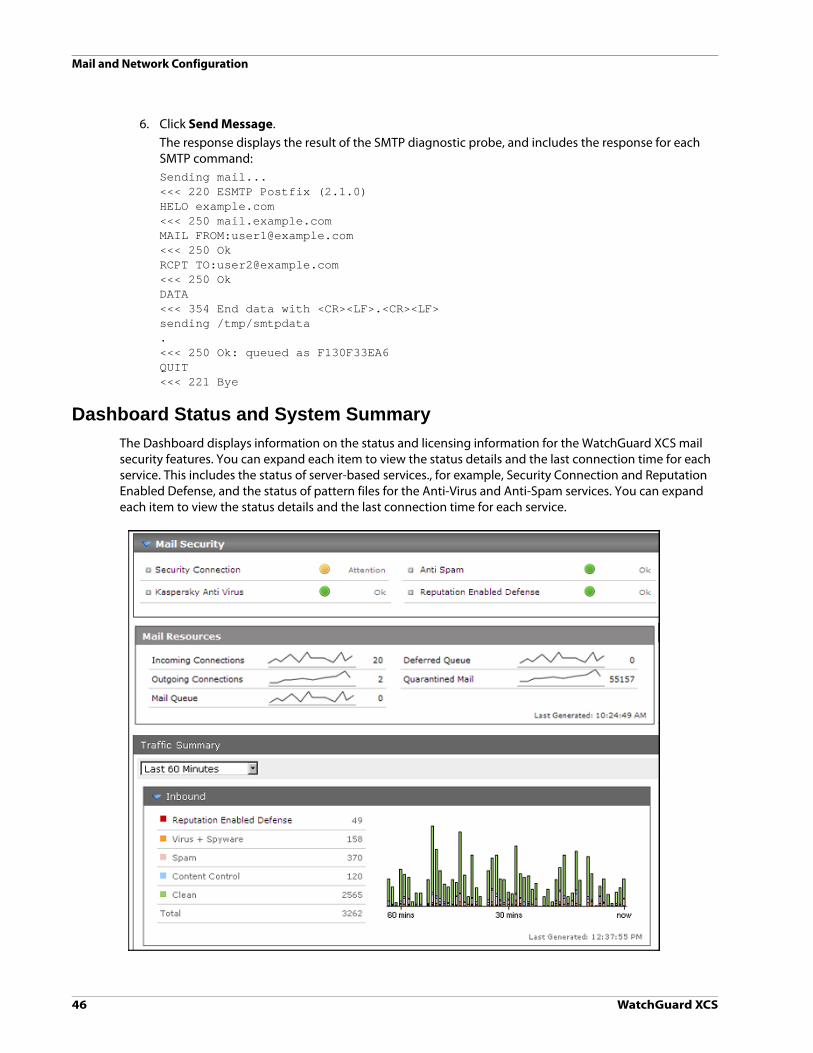
Dashboard Status and System Summary
The Dashboard displays information on the status and licensing information for the WatchGuard XCS mail security features. You can expand each item to view the status details and the last connection time for each service. This includes the status of server-based services., for example, Security Connection and Reputation Enabled Defense, and the status of pattern files for the Anti-Virus and Anti-Spam services. You can expand each item to view the status details and the last connection time for each service.

Field Guide 47
Mail and Network Configuration
System Summary
The Dashboard System Summary page displays the status of critical aspects of your WatchGuard XCS, for example, the software version and uptime, users logged in, disk/swap/CPU usage, and RAID status.

Mail and Network Configuration
48 WatchGuard XCS
Field Guide 49
6 Anti-Virus
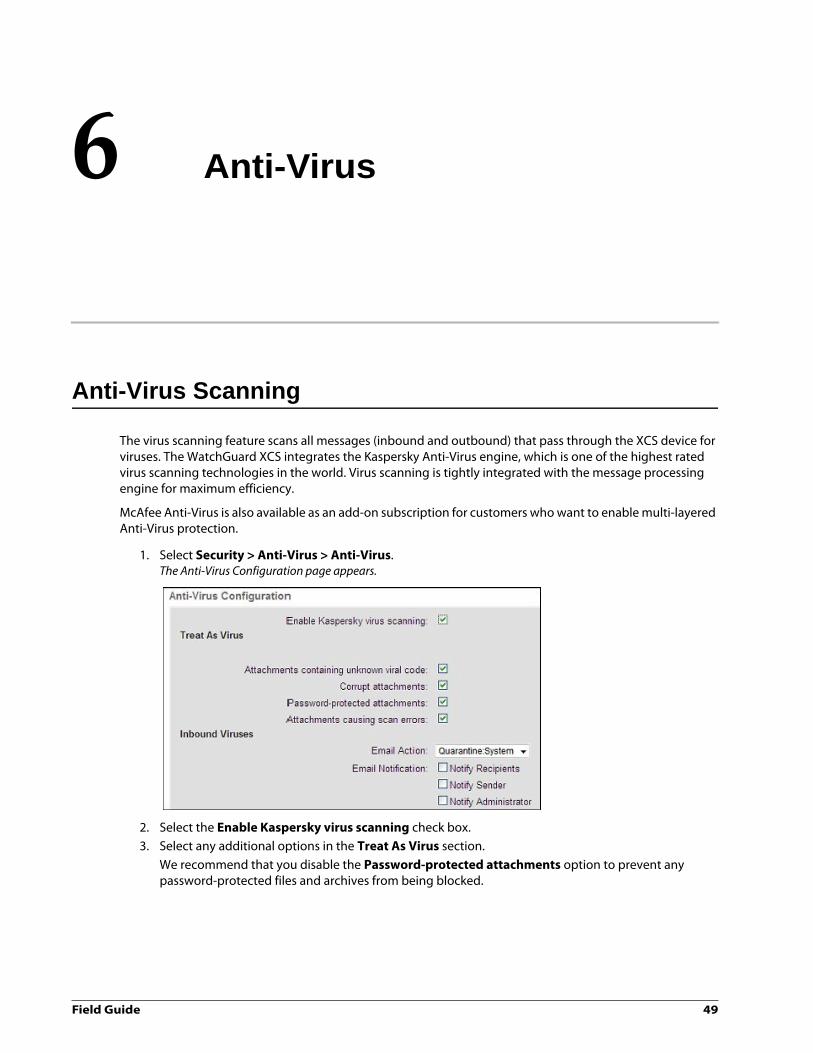
Anti-Virus Scanning
The virus scanning feature scans all messages (inbound and outbound) that pass through the XCS device for viruses. The WatchGuard XCS integrates the Kaspersky Anti-Virus engine, which is one of the highest rated virus scanning technologies in the world. Virus scanning is tightly integrated with the message processing engine for maximum efficiency.
McAfee Anti-Virus is also available as an add-on subscription for customers who want to enable multi-layered Anti-Virus protection.
1. Select Security > Anti-Virus > Anti-Virus.The Anti-Virus Configuration page appears.
2. Select the Enable Kaspersky virus scanning check box.3. Select any additional options in the Treat As Virus section.
We recommend that you disable the Password-protected attachments option to prevent any password-protected files and archives from being blocked.

Anti-Virus
50 WatchGuard XCS
4. In the Email Action drop-down list, select the action to perform for both inbound and outbound mail.We recommend you set the inbound action to Discard or Reject mail. This automatically rejects virus-infected messages instead of storing them in your quarantine. Use Discard to discard the message without notification to the sending system. Reject mail sends a notification to the sending system which could be a forged sender.
For outbound mail, set the action to Quarantine and enable the administrator notification so that you can more easily track the details of an internal virus outbreak.
Just log — Log the event and take no further action. Reject mail — Reject the message and send a notification to the sending system. Quarantine: System — Place the message into the system quarantine area. This is the default
action. You can also choose a custom quarantine. Quarantine: DLP — Place the message into the DLP quarantine area. Discard mail — Discard the message and do not send a notification to the sending system.
5. Select the notifications to send when a virus is detected in a message. You can send notifications to the Sender, Recipient, and Administrator, and customize the notification text.
6. From the Update interval drop-down list, select the interval for how often to check for pattern file updates. You can select 30 min, 1 hour, and 3 hours. The default is 1 hour.
Click Get Pattern Now to update the pattern files immediately.
The Kaspersky Anti-Virus Status field displays the date and time of the last pattern file update.
7. Click Apply.
Field Guide 51
Anti-Virus
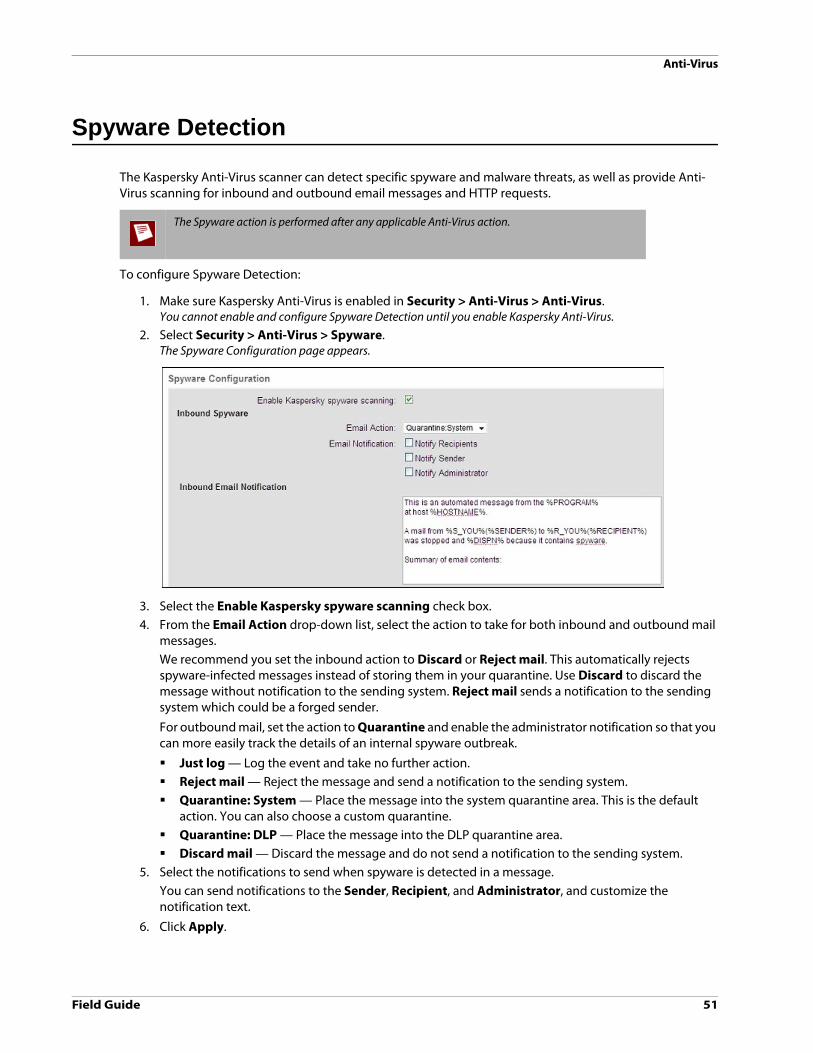
Spyware Detection
The Kaspersky Anti-Virus scanner can detect specific spyware and malware threats, as well as provide Anti-Virus scanning for inbound and outbound email messages and HTTP requests.
To configure Spyware Detection:
1. Make sure Kaspersky Anti-Virus is enabled in Security > Anti-Virus > Anti-Virus. You cannot enable and configure Spyware Detection until you enable Kaspersky Anti-Virus.
2. Select Security > Anti-Virus > Spyware.The Spyware Configuration page appears.
3. Select the Enable Kaspersky spyware scanning check box.4. From the Email Action drop-down list, select the action to take for both inbound and outbound mail
messages. We recommend you set the inbound action to Discard or Reject mail. This automatically rejects spyware-infected messages instead of storing them in your quarantine. Use Discard to discard the message without notification to the sending system. Reject mail sends a notification to the sending system which could be a forged sender.
For outbound mail, set the action to Quarantine and enable the administrator notification so that you can more easily track the details of an internal spyware outbreak.
Just log — Log the event and take no further action. Reject mail — Reject the message and send a notification to the sending system. Quarantine: System — Place the message into the system quarantine area. This is the default
action. You can also choose a custom quarantine. Quarantine: DLP — Place the message into the DLP quarantine area. Discard mail — Discard the message and do not send a notification to the sending system.
5. Select the notifications to send when spyware is detected in a message. You can send notifications to the Sender, Recipient, and Administrator, and customize the notification text.
6. Click Apply.
The Spyware action is performed after any applicable Anti-Virus action.

Anti-Virus
52 WatchGuard XCS
Outbreak Control
The Outbreak Control feature provides customers with zero-day protection against early virus outbreaks. For most virus attacks, the time from the moment the virus is released to the time a pattern file is available to protect against the virus can be several hours.
Outbreak Control can detect and take action against early virus outbreaks to contain the virus threat. If a message contains a possible virus, the message can be quarantined, deleted, or a log message can be sent. When an updated Anti-Virus pattern file is received, any quarantined files are scanned again automatically. If a virus is detected with the new pattern file, the configured Anti-Virus action is taken on the message. If the hold period for a message in the quarantine expires and the message has not been positively identified as a virus in that time, the configured “release” action is taken.
To configure Outbreak Control:
1. Select Security > Anti-Virus > Outbreak Control.The Outbreak Control page appears.
2. From the Email Action drop-down list, select the action to take if a possible virus is detected.We recommend that you set this action to Quarantine. This is the default setting.
Just Log — Deliver the message and send a log message to the log file. Reject mail — Reject the message and send a notification to the sender. Quarantine: System — Place the message into the system quarantine area. This is the default
action. You can also choose a custom quarantine. Quarantine: DLP — Place the message into the DLP quarantine area. Discard mail — Discard the message and do not send a notification to the sender.
3. In the Hold Period text box, type the number of hours for which to hold the message in the administrative quarantine area.The default hold period is 8 hours.
Field Guide 53
Anti-Virus
4. Select the notifications to send when a possible virus is detected in a message. You can send notifications to the Sender, Recipient, and Administrator, and customize the notification text.
5. In the Release section, from the Email Action drop-down list, select the action to take if the Hold Period has elapsed for a quarantined message: Just Notify — Send a message to notify the specified users that the Hold Period for a quarantined
message has elapsed without it being classified as a virus. The message remains in the quarantine until released manually by the administrator.
Release mail — The message is automatically released from the quarantine and delivered to the original recipients. You can also enable notifications to notify users when the message is released. If the message was discarded or rejected by Attachment Control or Malformed Mail and was then quarantined by Outbreak Control, the message is discarded on release. The final action is Outbreak Control and Quarantine because of a possible virus.
6. Select the notifications to send when a message is released from the quarantine.You can send notifications to the Sender, Recipient, and Administrator, and customize the notification text.
7. Click Apply.

Anti-Virus
54 WatchGuard XCS
Malformed Mail
Many viruses and denial of service (DoS) attacks conceal themselves in malformed messages to try to elude virus scanners. The scan engines cannot detect the attachment and therefore pass the complete message through to an internal server. Some mail clients try to rebuild malformed messages and may rebuild or activate a virus-infected attachment. Other types of malformed messages are designed to attack mail servers directly. Most often these types of messages are used in denial-of-service (DoS) attacks.
To configure malformed mail scanning:
1. Select Security > Anti-Virus > Malformed Mail.The Malformed Mail page appears.
2. Select the Malformed Scanning check box.3. Make sure Enable NULL character detect is set to Disable.
A null character is a character in the raw mail body of the message that has a byte value of 0. The null character detection feature can cause incompatibility with certain mail servers and we recommend that you disable this option if issues occur.
4. From the Action drop-down list, select an action to take when a malformed message is detected.We recommend you set the action to Quarantine. This is the default setting.
Just log — Send a log message to the log file and take no further action. Reject mail — Reject the message and send a notification to the sending system. Quarantine: System — Place the message into the system quarantine area. This is the default
action. You can also choose a custom quarantine. Quarantine: DLP — Place the message into the DLP quarantine area. Discard mail — Discard the message and do not send a notification to the sending system.
5. Select the notifications to send when a malformed message is detected.You can send notifications to the Sender, Recipient, and Administrator, and customize the notification text.
6. Click Apply.

Field Guide 55
7 Reputation Enabled Defense
Reputation Enabled Defense
Reputation Enabled Defense (powered by ReputationAuthority) provides connection-level security for email and web through a reputation lookup that scores mail servers and web site URLs as good, bad, or unknown/neutral. The lookup relies on a powerful, cloud-based reputation database that aggregates data from multiple feeds, including industry-leading block lists and Anti-Virus engines.
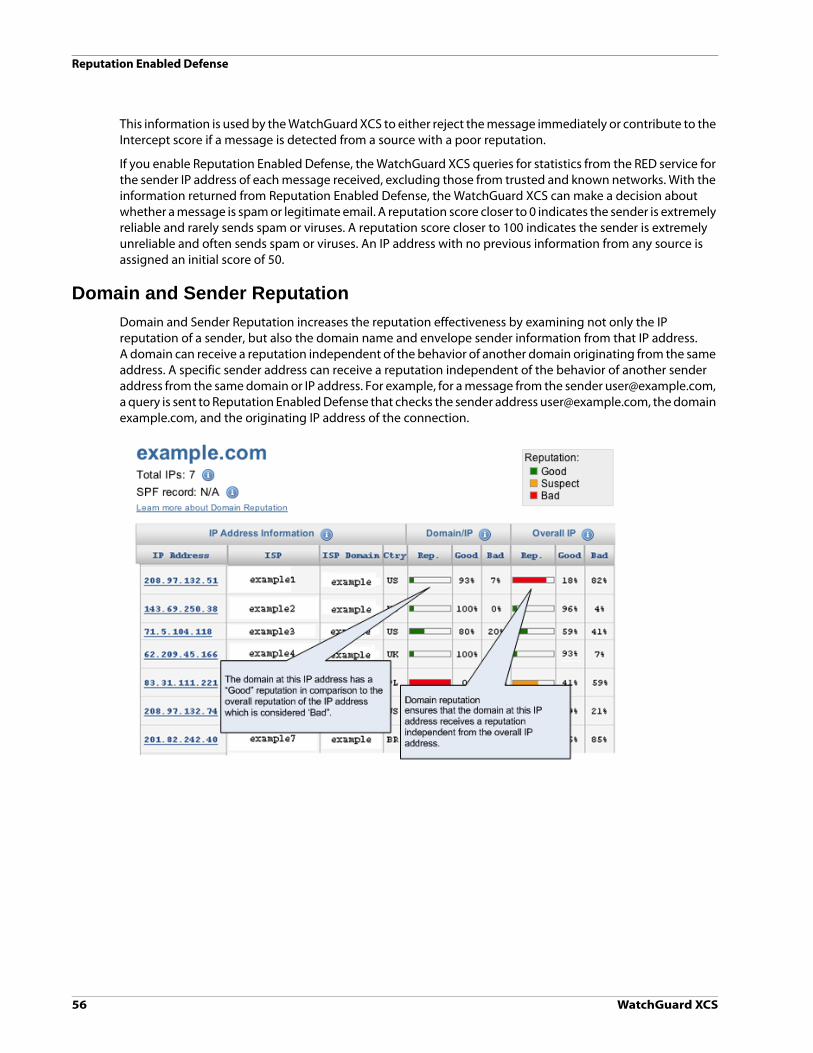
Reputation Enabled Defense
56 WatchGuard XCS
This information is used by the WatchGuard XCS to either reject the message immediately or contribute to the Intercept score if a message is detected from a source with a poor reputation.
If you enable Reputation Enabled Defense, the WatchGuard XCS queries for statistics from the RED service for the sender IP address of each message received, excluding those from trusted and known networks. With the information returned from Reputation Enabled Defense, the WatchGuard XCS can make a decision about whether a message is spam or legitimate email. A reputation score closer to 0 indicates the sender is extremely reliable and rarely sends spam or viruses. A reputation score closer to 100 indicates the sender is extremely unreliable and often sends spam or viruses. An IP address with no previous information from any source is assigned an initial score of 50.
Domain and Sender Reputation
Domain and Sender Reputation increases the reputation effectiveness by examining not only the IP reputation of a sender, but also the domain name and envelope sender information from that IP address. A domain can receive a reputation independent of the behavior of another domain originating from the same address. A specific sender address can receive a reputation independent of the behavior of another sender address from the same domain or IP address. For example, for a message from the sender [email protected], a query is sent to Reputation Enabled Defense that checks the sender address [email protected], the domain example.com, and the originating IP address of the connection.

Field Guide 57
Reputation Enabled Defense
Configure Reputation Enabled Defense
To configure Reputation Enabled Defense:
1. Select Security > Anti-Spam > Reputation Enabled Defense.The Reputation Enabled Defense page appears.
2. From the Timeout Mode drop-down list, select a timeout mode to use in the event the primary domain is unavailable. In the event the primary RED domain is unavailable and the timeout mode is set to Alternate, an alternate RED domain is queried. If the primary or alternate RED domains cannot be contacted, the RED check is skipped for the message. An alarm triggers to notify you if you cannot contact service.
Disable — No RED lookups are performed if the RED domain is unavailable. The system checks the status of the domain every 5 minutes. Domain queries resume when the service becomes available.
Alternate — Use an alternate RED domain for queries. The system checks the status of the primary domain every 5 minutes. The system reverts to the primary domain when the primary domain service is restored. You cannot modify the alternate RED domain.
Ignore — Continue to attempt a lookup to the RED domain. The query is skipped and an alarm triggers if you exceed the timeout threshold (900 seconds).
3. To share Reputation Enabled Defense information, for example, spam and virus statistics for connecting client IP addresses, from this XCS device with the RED network, select the Share Statistics check box.
You must enable TCP Port 443 outbound to upload statistics to the reputation server. There are no security risks associated with sharing statistics. The XCS device does not relay any private or sensitive information to the Reputation Enabled Defense service.
Reputation Enabled Defense
58 WatchGuard XCS
4. To use domain and sender behavior when you perform Reputation Enabled Defense checks, select the Use Domain and Sender Behaviour check box.
5. To reject messages from senders whose reputation is above the configured Reputation Threshold, select the Reject on Reputation check box.
6. In the Rejection Threshold text box, type a threshold over which a message is rejected. The default value is “90”. If the reputation of a connecting system is greater than this value, it is rejected. The lower the reputation threshold, the greater the chance that a system with valid mail is blocked. This setting is only valid when you enable Reject on Reputation.
7. To reject messages from senders based on the criteria configured in the Infection Threshold option, select Reject on Infection.
8. From the Infection Threshold drop-down list, select the criteria for rejecting messages based on whether the sending host is Currently infected (received in last hour), or Recently infected (received in last day).
9. To reject messages sent directly from dial-up connection, select the Reject Connection From Dial-ups check box.
10. You can customize the Reputation Enabled Defense Reject Message. Use “%s” to specify the IP address of the rejected sender.
11. To check incoming messages against the spam information gathered by the RED network, select the Enable Reputation Enabled Defense for Anti-Spam check box.
12. In the Check Relays text box, specify how many received headers to check with RED. For example, an email message may have been relayed by four mail servers before it reached the XCS. Use this field to specify how many relay points, starting from the latest headers to the earliest, should have their reputation checked by RED. Acceptable values are between “0” and “ALL”. The default is “0”.
13. In the Exclude Relays field, specify how many received headers to exclude from RED checks, starting from the earliest header to the most recent. For example, if Check Relays is enabled, setting this value to “1” means that the first relay point is not checked. Note that some ISPs include the originating dial-up IP as the first relay point which can lead to legitimate mail being classified as spam by RED. We recommend you set this value to “0” (off) or “1”. The default is “0”.
14. Click Apply.
You must enable Check Relays if the system is installed behind another MTA or mail gateway. This action makes sure that the relay before the intermediary MTA is checked.

Field Guide 59
Reputation Enabled Defense
Trusted Clients and Known Mail Servers
You can trust friendly local networks or addresses of known mail servers in your environment that relay mail through this XCS device. You must add these specific networks and servers to the relays IP Address list in the Threat Prevention configuration page to make sure these servers are not blocked by Threat Prevention and Reputation Enabled Defense. This also makes sure that reputation statistics for these addresses are not reported to the Reputation Enabled Defense servers.
To add a system to the relays list:
1. Click the internal hosts and friendly mail relays link on the Reputation Enabled Defense page.The relays Static IP/CIDR List screen appears.
2. In the IP/CIDR text box, type the address of any internal relays, and include a descriptive comment.3. Click Add.

Reputation Enabled Defense
60 WatchGuard XCS

Field Guide 61
8 Anti-Spam
Intercept Anti-Spam Overview
The Intercept Anti-Spam features take advantage of the extensive message control features of the WatchGuard XCS, and provide a solutions-based approach in which each anti-spam component, when enabled, provides input to the final spam score of a message. Information retrieved by all of the enabled Anti-Spam components results in a more informed decision on whether the message is in fact spam or legitimate mail.
You can set Thresholds to take appropriate action on a message based on its score and classification, for example, Certainly Spam, Probably Spam, and Maybe Spam. A different action can be set for each threshold, for example, “Reject”, for messages that are classified as Certainly Spam, or “Modify Subject Header” for messages that are classified as Maybe Spam.
You can use the advanced Intercept options to provide more granular control over each Anti-Spam Intercept component for your environment; however, the default Intercept configuration has been engineered to provide maximum protection against spam without additional configuration.
The Intercept Anti-Spam engine includes these components:
Spam WordsFilters messages based on a dictionary of typical spam words and phrases that are matched against the message.
Spam RulesUse content rules generated by WatchGuard to help detect new types of spam messages that are not easily detected by other Intercept Anti-Spam features.
Mail AnomaliesChecks various aspects of the incoming message for issues, for example, unauthorized SMTP pipelining, missing headers, and mismatched identification fields.
DNS Block List (DNSBL)Detects spam using domain-based lists of hosts that have a poor reputation. Messages can also be rejected immediately, regardless of the results of other Anti-Spam processing, if the client appears on a DNSBL. A configurable threshold allows administrators to specify how many DNSBLs must be triggered to consider the sender as unreliable.

Anti-Spam
62 WatchGuard XCS
URL Block ListURL Block Lists contain a list of domains and IP addresses of URLs that have appeared previously in spam messages. This feature is used to determine if the message is spam by examining any URLs contained in the body of a message to see if they appear on a block list.
Reputation Enabled DefenseReputation Enabled Defense helps to identify spam by reporting a collection of metrics about the sender of a mail message, including their overall reputation, whether the sender is a dial-up, and whether the sender appears to be virus-infected. This information is based on data collected from installed WatchGuard XCS products and global DNS Block Lists. This information is used by Intercept to reject the message, or included as part of the overall anti-spam decision.
Token AnalysisDetects spam based on advanced content analysis against databases of known spam and valid mail.
Backscatter DetectionDetects spam based on signature verification of the Envelope Sender to prevent spam bounce emails to forged sender addresses.
Sender Policy Framework (SPF)Performs a verification of a sending host’s SPF DNS records to identify and validate the source of a message to determine whether a message was spoofed.
DKIM/DomainKeys AuthenticationPerforms a check of a sending host’s DKIM/DomainKeys DNS records to identify and validate the source of a message to determine whether a message was spoofed.
BrightmailYou can utilize the Symantec Brightmail Anti-Spam™ engine as a cost-option.Brightmail integrates into the overall Intercept spam score, or you can run Brightmail independently.
Outbound Anti-Spam
Outbound Anti-Spam controls are used to prevent trusted internal users from sending spam outside of your organization. You can use the Spam Rules, Spam Words, and URL Block List Anti-Spam features to scan outbound mail for spam messages.
The Mail Surge Detection feature identifies internal mail users who are sending an unusually large amount of mail messages which can indicate spam activity. Outbound Anti-Spam features are configurable within policies to define actions and notifications for different users, groups, and domains.

Field Guide 63
Anti-Spam
Trusted and Untrusted Mail Sources
The WatchGuard XCS must be correctly configured for interaction with local and remote mail servers. The WatchGuard XCS only processes mail through the spam filters when a message originates from an untrusted source. Mail from trusted sources bypass the spam controls.
There are two ways to control how sources of mail are identified and trusted:
Trusted Subnet — All mail from a specific network interface is considered trusted. Specific Access Pattern — An IP address (or address block), server, or domain name is identified as
trusted through a specific access pattern rule.
Trusted Subnet
To specify a network interface as trusted or untrusted:
1. Select Configuration > Network > Interfaces.2. For the specified interface, enable or disable the Trusted Subnet check box.
Do not enable the Trusted Subnet option if the WatchGuard XCS is deployed internally or behind a network firewall.

Anti-Spam
64 WatchGuard XCS
3. Click Apply.You must restart the system.
Trust with Specific Access Patterns
To trust a system with a Specific Access Pattern:
1. Select Configuration > Mail > Access.2. Click Add Pattern.
The New Access Pattern page appears.
3. In the Pattern field, type the IP address or hostname of the system.4. Select the Client Access check box.5. From the If pattern matches drop-down list, select Trust.6. Click Apply.

Field Guide 65
Anti-Spam
Configure Intercept Anti-Spam
1. Select Security > Anti-Spam > Anti-Spam.The Intercept Anti-Spam page appears.
You can assign actions for three levels of spam score thresholds:
Certainly SpamAny message with a score over this threshold (Default: 99) is Certainly Spam. These types of messages require a strong action, for example, Reject Mail or Discard Mail.
Probably SpamAny message with a score over this threshold (Default: 90) is probably spam. This threshold indicates a message with a very high spam score, but not high enough to be Certainly Spam. You can treat this messages with a lighter action than Certainly Spam, for example, Modify Subject Header or Quarantine, but we recommend that you do not reject these messages.
Maybe Spam (Click Show Advanced Options)Any message with a score over this threshold (Default: 60) could be spam but should be treated with caution to prevent false positives. This threshold indicates messages which could be spam, but could also be legitimate mail. We recommend that you use a light action, for example, Just log or Modify Subject header. With these actions, the message is delivered and noted in the logs, or delivered to the end user with a modified subject header to alert the user that the message could be spam.

Anti-Spam
66 WatchGuard XCS
Configure Intercept Anti-Spam Components
You can enable or disable each component of the Intercept Anti-Spam engine depending on your requirements. To configure the settings for each feature:
1. Select Security > Anti-Spam > Anti-Spam.
2. Select the Enable check box for a specific feature.3. Select the spam feature link to review or customize the default settings. 4. When finished, click the Apply button to save the configuration.
Each Intercept Anti-Spam feature is discussed in more detail in the next sections.
Automatic Intercept Configuration
Select the Update Intercept Settings Automatically check box to allow advanced Intercept settings to be updated automatically by WatchGuard. If you use this option, WatchGuard will update your advanced Intercept settings on a periodic basis to make sure you always use the most up-to-date and recommended configuration. Your Intercept actions, thresholds, and component settings are not modified with this option.
This option configures these advanced settings:
Intercept Component Weights Reputation/UBL/DNSBL domains and timeout settings Advanced Token Analysis options
o Enable Image Analysiso Enable PDF Analysiso Analyze PDF text o Analyze PDF imageso Enable RTF Analysiso Legitimate mail and Spam training sourceso Legitimate mail and Spam limits and thresholdso Adaptive decision strategy training thresholdso Dictionary spam counto Reputation Whitelist
Automatic Intercept configuration requires that Security Connection be enabled and running.

Field Guide 67
Anti-Spam
Intercept Decision Strategy
The Intercept Decision Strategy allows administrators to modify the way in which Intercept processes messages for spam.
To configure the Intercept Decision Strategy:
1. Select Security > Anti-Spam > Anti-Spam. 2. Click Show Advanced Options.
3. From the Decision Strategy drop-down list, select Adaptive. This is the default strategy.
Adaptive monitors the initial message training period, and when the system has trained a suitable amount of spam and legitimate mail, it adjusts its internal aggressiveness strategy accordingly to utilize the trained mail.
4. Click Apply.
Other decision strategies are available that should only be used under specific circumstances. See the User Guide for more detailed explanations of the different Intercept Anti-Spam decision strategies.

Anti-Spam
68 WatchGuard XCS
Outbound Anti-Spam
Outbound Anti-Spam controls are used to prevent trusted internal users from sending spam outside of your organization.
You can use the Spam Rules, Spam Words, and URL Block List Anti-Spam features to scan outbound mail for spam messages. You can also use the Mail Surge Detection feature to identify internal mail users who are sending an unusually large amount of mail messages which can indicate spam activity.
You can use Outbound Anti-Spam features within policies to define actions and notifications for different users, groups, and domains.
Configure Outbound Anti-Spam
To enable and configure Outbound Anti-Spam:
1. Select Security > Anti-Spam > Outbound Anti-Spam from the menu.2. Select the Enable Outbound Anti-Spam check box to enable Outbound Anti-Spam checks.
3. From the Email Action drop-down list, select the action to take on outbound mail messages identified as spam. Just log — Log the event and take no further action. Reject — Reject the message and send a notification to the sending system. Discard — Discard the message and do not send a notification to the sending system. Quarantine — Place the message into the specified quarantine area.
4. Select who to send notifications to when outbound spam is detected.You can select Notify Recipient, Notify Sender, or Notify Administrator, and customize the notification text.
Field Guide 69
Anti-Spam
5. Select the Anti-Spam components to use to scan outbound mail: Spam Rules — A list of content rules generated by WatchGuard that detects new types of spam
messages that are not easily detected by other Intercept Anti-Spam features. Spam Words — Scans all inbound messages passing through the system for spam words and
phrases that appear in a spam words dictionary. URL Block List — Lists of domains and IP addresses that have appeared previously in URLs in spam
messages.6. Click Apply.
Mail Surge Detection
The Mail Surge Detection feature identifies internal mail users who are sending an unusually large amount of mail messages which can indicate spam activity. When a mail surge is detected, you can set a hold period that prevents the user from sending further emails for the duration of the specified time.
To configure mail surge detection:
1. Select the Enable Surge Detection check box to enable the feature.2. In the Surge Threshold text box, type the number of messages for the surge threshold.
If the user exceeds this amount of sent messages per hour, they will be prevented from sending further messages during the specified hold period. The default is 1000.
3. In the Hold Period text box, type the number of hours for the hold period. The specified action is taken if the user tries to send messages during the hold period duration. The default is 4 hours.
4. From the Email Action drop-down list, select an action to perform on outbound messages during the hold period time after a user has exceeded the mail surge threshold. Just log — Log the event and take no further action. Reject — Permanently reject the message (code 550) and send a notification to the sending
system. Discard — Discard the message and do not send a notification to the sending system. Temporary Reject — Reject the message with a temporary reject (code 450). Quarantine — Place the message into the specified quarantine area.
5. Select who to send notifications to when a mail surge is detected.You can select Notify Recipient, Notify Sender, or Notify Administrator, and customize the notification text.
6. Click Apply.

Anti-Spam
70 WatchGuard XCS
Brightmail Anti-Spam
Symantec Brightmail Anti-Spam™ is an add-on subscription that you can run independently from Intercept, or you can fully integrate Brightmail with the Intercept Anti-Spam engine.
You can enable Brightmail for a 30-day evaluation period to allow you to test multi-layered Anti-Spam engines.
Brightmail generates a classification for a message that is used with the Intercept Anti-Spam engine. A message classified as spam by Brightmail is considered Certainly Spam by Intercept and receives a score equal to the Certainly Spam threshold. Messages classified as suspected spam by Brightmail are considered Probably Spam in Intercept and receive a score equal to the Probably Spam threshold. If a message passes Brightmail scanning as a clean message, it receives an Intercept score of 0. You can also skip Brightmail scanning if Intercept has already classified a message as spam.
To enable and configure Brightmail:
1. Select Security > Anti-Spam > Brightmail.The Brightmail page appears.
2. To enable Brightmail Anti-Spam scanning, select the Enable check box.3. From the Brightmail Mode drop-down list, select which mode to run in: Perform Brightmail Actions — Brightmail runs independently of Intercept and perform its own
actions. Use in Intercept Spam Decision — Enable Brightmail for use with the Intercept Anti-Spam engine.
The Brightmail scanning result is used in the Intercept Anti-Spam decision for a message.

Field Guide 71
Anti-Spam
4. From the Brightmail Skip Threshold drop-down list, select when to skip Brightmail processing depending on how Intercept has classified the message. Never Skip — Perform Brightmail scanning regardless of previous Intercept scanning results. Intercept Maybe Spam — Skip Brightmail scanning for messages already classified by Intercept as
Maybe Spam or higher. Intercept Probably Spam — Skip Brightmail scanning for messages already classified by Intercept
as Probably Spam or higher. Intercept Certainly Spam — Skip Brightmail scanning for messages already classified by Intercept
as Certainly Spam.5. In the Bytes of Message to Scan text box, type the number of bytes of a message to scan.
Use a lower number of bytes to increase the scanning speed of Brightmail.
6. In the Largest Message To Scan text box, type the largest size of message to scan with Brightmail.Messages larger than this value are ignored because spam mail is typically small in size. Scanning large messages also decreases performance.
7. In the Maximum Total Headers to Scan text box, type the maximum number of headers to scan to prevent messages with many thousands of headers from causing delays in processing. The default maximum total number of message headers to scan is set to 32768 bytes. If the maximum is exceeded, the message is classified as spam.
8. In the Statistics Update Interval text box, type the interval (in minutes) to send statistics to Brightmail.The default interval is set to ten minutes.
9. To enable a tracker header that contains a description of what Brightmail rules apply for a message, select the Tracker Header check box.
10. To enable the Open Proxy List feature, select the Brightmail Open Proxy List check box.The Open Proxy List contains the IP addresses of proxy servers with open or insecure ports. Brightmail blocks all mail coming from any server on this list.
11. From the Action drop-down list, select the action to take when Brightmail classifies a message as spam and the mode is set to Perform Brightmail Actions. Just log — Log the occurrence and take no other action. Modify Subject Header — Insert the specified text in the Action Data field into the message
subject line. Add header — Add an “X-” mail header as specified in the Action Data field. Redirect to — The message is delivered to the mail address or server specified in the Action Data
field. Discard mail — Reject the message and do not send a notification to the sender. Reject mail — Reject the message and send a notification to the sender. BCC — Send a blind carbon copy of the message to the mail address specified in the Action Data
field. Quarantine: System — Place the message into the system quarantine area. This is the default
action. You can also choose a custom quarantine. Quarantine: DLP — Place the message into the DLP quarantine area.
12. In the Action Data text box, type the additional data for the specified action: Modify Subject Header — The specified text is inserted into the subject line.
For example, [BMSPAM]. Redirect to — Send the message to a mailbox, for example, [email protected]. You can also
redirect the message to a spam quarantine server, for example, spam.example.com.
Brightmail processing is skipped if the message size exceeds the threshold, even if the Brightmail Skip Threshold is set to “Never Skip”.
Anti-Spam
72 WatchGuard XCS
Add header — An “X-” message header is added with the specified text, for example, “X-Reject: bmspam”. The header action data must start with “X-” and must contain a colon followed by a space.
13. To enable Brightmail suspected spam processing, select the Enable Suspected Spam Processing check box. Messages detected by Brightmail as suspected spam are classified by Intercept as Probably Spam.
14. In the Suspected Spam Threshold text box, type the threshold level to detect suspected spam. You can enter values from 25 to 89. Lower numbers are more aggressive. The default value is 70.
15. Click Apply.

Field Guide 73
9 Directory Services
Directory Services
The WatchGuard XCS can use LDAP (Lightweight Directory Access Protocol) services to access directory servers (for example, Active Directory, OpenLDAP, and iPlanet) for user and group information.
You can use LDAP for these tasks:
User and group membership lookups for policies User lookups for Reject on Unknown Recipient feature Alias and virtual mappings Remote authentication Mail routing
Directory Servers
To configure directory servers:
1. Select Configuration > LDAP > Directory Servers.2. Click Add to configure a new directory server, or click Edit to modify an existing server.

Directory Services
74 WatchGuard XCS
3. Type the Server URI (Uniform Resource Identifier) address. For example, ldap://10.0.2.120. Use "ldaps:" if you use SSL with the LDAP server directory.
4. Type an optional Label or alias for the LDAP server.5. Select the Type of LDAP server you use, for example, Active Directory, or choose Others for
OpenLDAP or iPlanet.6. Select the Bind check box.7. Type the Bind DN (Distinguished Name).
For example, for Active Directory, use: cn=Administrator,cn=users,dc=example,dc=com
Older Windows login names, for example, DOMAIN/Administrator, are also supported. Make sure that you enter a bind DN specific to your environment. In Active Directory, if you use an account other than Administrator to bind to the LDAP server, specify the name as the full name, not the account name. For example, use “John Smith” instead of “jsmith”.
8. Type the Bind Password for the LDAP server.9. Specify a default Search Base for lookups. For example: dc=example,dc=com.10. Type the maximum Timeout interval, in seconds, to wait for the search to complete.
Valid values are from 1 to 100 seconds.
11. From the Dereference Aliases drop-down list, select how alias dereferences are performed during a search: Never — Aliases are never dereferenced. Searching — Aliases are dereferenced in subordinates of the base object, but not in locating the
base object of the search. Finding — Aliases are only dereferenced when locating the base object of the search. Always — Aliases are dereferenced when searching and locating the base object of the search.
12. To enable paging support for an Active Directory server, select the Paged check box.When queries are sent to an LDAP server, the amount of information returned can contain thousands of entries and sub-entries. When you enable the Paged option, LDAP information is retrieved in more manageable sections to control the rate of data return.
13. Type the Page Size for an Active Directory server. If this field is left blank, the default value is 1000. The Page Size must match the size configured in the Active Directory server's LDAP query policy.
14. Click Apply.

Field Guide 75
Directory Services
Directory Users
Use the Directory Users feature to import user account and group membership data from LDAP-based directory servers.
To configure directory users:
1. Select Configuration > LDAP > Directory Users.2. Click Add.
The Directory User page appears.
3. From the Directory Server drop-down list, select a configured directory server.4. Type the Search Base to start the search from.
For example: dc=example,dc=com.
5. Type the Scope of the search. Base — Searches the base object only. One Level — Searches objects beneath the base object, but excludes the base object. Subtree — Searches the entire subtree, of which the base distinguished name is the topmost
object, including that base object.6. Type the appropriate Query Filter.
For example, for Active Directory use:(|(|(objectCategory=group)(objectCategory=person))(objectCategory=publicFolder))
This query filter includes mail-enabled Exchange public folders to prevent them from being rejected if Reject on Unknown Recipient is enabled. For iPlanet and OpenLDAP, use the(objectClass=person) query filter.
7. Type the maximum Timeout interval, in seconds, to wait for the search to complete. Valid values are from 1 to 100 seconds.
8. Type the Email attribute that identifies the user’s email address. For Active Directory, iPlanet, and OpenLDAP, type mail.
9. Type the Email alias attribute that identifies the user’s alternate email addresses. In Active Directory, the default is proxyAddresses. For iPlanet, use Email. For OpenLDAP, leave this field blank.

Directory Services
76 WatchGuard XCS
10. Type the Member Of attribute that identifies the group(s) that the user belongs to. This information is used for Policy controls. In Active Directory, the default is memberOf. For iPlanet, type Member. For OpenLDAP, leave this field blank.
11. Type the Account Name Attribute that identifies a user’s account name for login. In Active Directory, the default is sAMAccountName. For iPlanet, use uid. For OpenLDAP, use cn.
12. Click Test to test your LDAP settings. 13. Click Apply.
Import Settings
The WatchGuard XCS can automatically import LDAP user data on a scheduled basis to stay synchronized with the LDAP directory.
To import LDAP users and groups:
1. Select Configuration > LDAP > Directory Users.2. Click Import Settings.
3. To enable automatic import of LDAP user data, select the Import User Data check box. 4. Select the Frequency of LDAP imports. 5. In the Start Time text box, type the time to start the import in the format hh:mm.
For example, to schedule an import at midnight, type 00:00.
6. Click Apply. 7. To immediately start the import of users, click Import Now.
To view the progress of LDAP imports, select Activity > Logs > System.
Mirror LDAP Accounts as Local Users
You can mirror existing LDAP accounts to create a locally-stored account on the WatchGuard XCS for each imported user. If you enable the Spam Quarantine feature and the Trusted/Blocked Senders lists, mirror accounts provide a simple method to allow directory-based users to view and manage quarantined messages.
1. Select the Mirror accounts check box.2. Choose an Expiry period for the mirrored accounts.
If the user no longer exists in the LDAP directory for the specified period of time, the local mirrored account is deleted. This option only applies to a local mirrored account and does not apply to accounts used for the Reject on Unknown Recipients feature.
3. Click Apply. 4. To immediately start the import of users and create mirrored accounts, click Import Now.
To view the progress of LDAP imports, select Activity > Logs > System.
To view and manage mirrored accounts, select Administration > Accounts > Mirrored Accounts.
Field Guide 77
10 Content Control
Attachment Control
Use the WatchGuard XCS attachment scanning features to control a wide range of problems caused by both inbound and outbound attachments in email messages and web requests.
Viruses and Spyware — You can block attachments and downloads that carry viruses, spyware, and other types of malware.
Offensive Content — The XCS device blocks the transfer of images to reduce the possibility that an offensive picture is transmitted to or from your organization’s messaging and web systems.
Confidentiality — Prevents the transmission of unauthorized documents through the device. Loss of Productivity — Prevents employee abuse of your organization’s computer resources.
Attachment controls are based on these characteristics:
File Extension Suffix — The suffix of the file is checked to determine the attachment type, for example, .exe, or .jpg.
MIME Content Type — You can check MIME (Multipurpose Internet Mail Extensions) to identify the actual content type of the message.
Content Analysis — The file is analyzed to look for characteristics that can identify the file type. This advanced analysis makes sure that the attachment controls are not circumvented, for example, by a simple file rename.
Attachment Stripping
The Attachment Control feature provides the ability to identify and remove attachments from inbound and outbound mail messages. You can configure a list of specific attachment extensions or MIME types to strip from a message before it is delivered. A configurable notification text attachment replaces the attachment to indicate to the user that the attachment was stripped and specifies the reason.

Content Control
78 WatchGuard XCS
Configure Attachment Control
To configure Attachment Control:
1. Select Security > Content Control > Attachment Control.The Attachment Control page appears.
2. For Inbound and Outbound messages, select the Enable check box to enable scanning on attachments.
3. Select Block Unlisted Attachments to block any attachments that are not listed in your email and web file extension and content types.
4. From the Email Action drop-down list, select the action to perform when Attachment Control blocks an email attachment. Just log — Log the event and take no further action. Reject mail — Reject the message and send a notification to the sending system. Quarantine: System — Place the message into the system quarantine area. This is the default
action. You can also choose a custom quarantine. Quarantine: DLP — Place the message into the DLP quarantine area. Discard mail — Discard the message and do not send a notification to the sending system.
5. Click Show Notification Settings to select who to send notifications to when a message is caught by Attachment Control. You can select Notify Recipient, Notify Sender, or Notify Administrator, and customize the notification text.
6. Click Apply.

Field Guide 79
Content Control
Edit File Attachment Types
To edit file attachment types:
1. Select a file type to edit the list: Email File Extensions — Edit the list of email attachment file extensions, such as .exe. Email Content Types — Edit the list of email attachment content types, such as application/x-
dosexec. Web Content Types — Edit the list of web content types, such as application/x-dosexec.
Actions for blocked web file types are configured in Policies.
2. For example, select a file extension name, such as ".exe".3. From the Inbound Action and Outbound Action drop-down list, select the action to perform when
this file extension is detected. Block — Block the file extension using the assigned action. Allow — Allow the specified file extension. Strip — Strip the attachment from the message while still delivering the message to its
destination. The stripped attachment can be replaced by customized notification text.4. Select the Check Inbound Archive or Check Outbound Archive check box to deep scan archive files,
such as .zip files, for files with this extension.5. In the Comment text box, enter a description for this file extension.6. Click Apply.

Content Control
80 WatchGuard XCS
Attachment Size Limits
The Attachment Control feature can filter inbound and outbound mail messages based on the size of their attachments. You can set a size limit threshold that triggers an action if it is exceeded. If there is more than one attachment to the message, the attachment sizes are added together. You can set attachment size limits globally and in policies.
To configure attachment size limits:
1. Select Security > Content Control > Attachment Size Limits.
2. Go to the Inbound Settings or Outbound Settings section.3. Select the Enable check box.4. In the Limit text box, type the maximum attachment size (in bytes).
Attachments greater than this threshold trigger the Email Action defined in the next step. The default is 10240000 bytes. Set to 0 to indicate no size limit.
5. From the Email Action drop down list, select an action to perform on an email message when the attachment size threshold limit is exceeded: Just log — Log the event and take no further action. Reject mail — Reject the message and send a notification to the sending system. Quarantine: System — Place the message into the system quarantine area. This is the default
action. You can also choose a custom quarantine. Quarantine: DLP — Place the message into the DLP quarantine area. Discard mail — Discard the message and do not send a notification to the sending system.
6. Click Show Notification Settings to select who to send notifications to when an attachment exceeds the size limit.You can select Notify Recipient, Notify Sender, or Notify Administrator, and customize the notification text.
7. Click Apply.
Attachment size limits are checked before any other attachment control function, and size limit actions take precedence over attachment control actions.

Field Guide 81
Content Control
Objectionable Content Filter
The Objectionable Content Filter (OCF) defines a list of key words that cause a message to be blocked if any of those words appear in the message. The Objectionable Content Filter provides enhanced content filtering functionality and flexibility, allowing users to restrict objectionable words and phrases, and offensive content.
To configure OCF:
1. Select Security > Content Control > Objectionable Content.The Objectionable Content Filtering page appears.
2. Select the Enable OCF check box.3. Select the Enable international character support check box to support international languages
when you use the OCF feature to scan messages that use Unicode or other supported international character sets. If you do not require international character support for OCF, we recommend you leave this option disabled to improve message processing performance. This option also controls international character support for the Spam Words feature.
4. From the Logging drop-down list, select the type of logging to perform for OCF processing: No Logging — Do not log OCF actions. First match only — Log the first word that is matched by the filter. All matches — Log all words that are matched by the filter.
OCF has a maximum of 35 characters for a word. OCF does not detect plurals of words. You must define both plural and singular word forms in the dictionaries.
Content Control
82 WatchGuard XCS
5. From the Email Action drop-down list, select an action to perform: Just log — Log the event and take no further action. Reject mail — Reject the message and send a notification to the sending system. Quarantine: System — Place the message into the system quarantine area. This is the default
action. You can also choose a custom quarantine. Quarantine: DLP — Place the message into the DLP quarantine area. Discard mail — Discard the message and do not send a notification to the sending system. Encrypt — Redirect the message to an encryption server. Decrypt — Redirect the message to a decryption server. Archive — Redirect the message to an archive server. PostX Encrypt — Encrypt the message with the integrated message encryption engine.
6. In the Weighted Threshold text box, type a threshold for OCF to classify a message as containing objectionable content. This threshold only applies if you use weighted dictionaries.You can specify a value between 1 and 9999. The default is 100.If the aggregate weight of the OCF words found in a message matches or exceeds this threshold, OCF performs the configured action. If you use both weighted and unweighted dictionaries, the final action is triggered if the sum of the weights exceeds the configured weighted threshold, or if a match occurs in an unweighted dictionary.
7. Select the OCF Dictionaries to use with inbound and outbound OCF. The dictionaries available are listed in the Available Dictionaries section. Use the arrow buttons to move the dictionaries to the Dictionaries in Use section as required.
The default OCF dictionaries consist of a “Short”, “Medium”, and “Long” list of common objectionable words and phrases.
Click Add or Edit to create a new dictionary or edit an existing dictionary.
8. Select who to send notifications to when a message is caught by OCF.You can select Notify Recipient, Notify Sender, or Notify Administrator, and customize the notification text.
9. Click Apply.
The OCF dictionaries contain content that are of a vulgar nature. The pre-defined dictionaries must be viewed with caution because they contain words and phrases that are offensive. Review and modify all dictionaries as required before you enable them for use with OCF.

Field Guide 83
Content Control
Content Scanning
Content Scanning is a feature that performs deep scanning of attachments in email messages and web requests, for example, PDF and Microsoft document files, for patterns of text and phrases. This allows organizations to use filter rules and policy settings to scan attachments for specific content that could be considered offensive, private and confidential, or against existing compliance rules.
If you enable Content Scanning globally, no additional message processing occurs until you configure additional features to use the Content Scanning feature.
There are two methods for scanning the content of messages and attachments:
Configure a Pattern Filter or Content Rule with the “Content Scanning” message part to search for text and phrases in a document.
Use a dictionary with a policy to scan extracted message text and attachments for words and phrases that appear in the dictionary.
Configure Content Scanning
To configure Content Scanning:
1. Select Security > Content Control > Content Scanning.The Content Scanning Page appears.
2. Select the Enable content scanning check box.3. Select the Enable international document capability check box to perform content scanning on
attachments that use non-Western international Unicode characters sets.4. To treat unopenable documents as though they were not compliant, select the Treat unopenable
documents as violations check box.Attachments that are protected by a password or encrypted can contain text that is a compliance violation.
5. In the Phrase Length text box, type the phrase length to use for pattern-matching checks. For this example, type 4. This number of words is passed to the scanning engine to check if it matches any phrases in your compliance file.
6. From the File Types drop-down list, select the types of files to scan: All Supported Formats — Scans all file formats supported by the content scanner. Common Document Formats — Scans only common word processing, spreadsheet, database,
presentation, text, and archive formats. This is the default setting.
Long phrases result in greater processing times. We recommend that phrases be five words or less. The phrase length of the compliance dictionary selected for Content Scanning must not be greater than the phrase length selected in this text box. A phrase length of at least four must be used with the default Financial and Medical dictionaries and Credit Card pattern filters.

Content Control
84 WatchGuard XCS
Standard Document Formats — Scans only common document formats (word processing, spreadsheet, database, presentation, text, and archive files). This includes less common formats, for example, graphics and desktop publishing formats.
7. From the Punctuation Treatment drop-down list, select how to treat punctuation in words and phrases: Significant — The punctuation is considered as part of the word or phrase it appears in. This is the
default setting. Treat as space — The punctuation is treated as a space. For example, the phrase “This, is classified”
is treated as “This is classified”. Ignore — The punctuation is completely ignored.
8. From the Case Sensitivity drop-down list, select how the scanning engine treats capitalization.The default is Insensitive. Select Sensitive to take capitalization of letters into account. For example, the word “Classified” must appear in the phrase compliance file with the first letter capitalized.
9. Select who to send notifications to when a message is caught by Content Scanning.You can select Notify Recipient, Notify Sender, or Notify Administrator, and customize the notification text.
10. Click Apply.
Use Pattern Filters with Content Scanning
You can use a Pattern Filter to search for compliance text in a file.
To create a pattern filter:
1. Select Security > Content Control > Pattern Filters.2. Click Add.3. From the Apply To drop-down list, select whether you want to check Inbound, Outbound, or All Mail.4. From the Message Part drop-down list, select Content Scanning.
5. In the Pattern text box, enter a text pattern to match against.6. From the Action drop-down list, select an action to perform on a message that contains the pattern
text, for example, Reject.7. Click Apply.
Use a Policy Compliance Dictionary with Content Scanning
You can also perform Content scanning with policies by uploading compliance dictionaries. The compliance dictionaries contain a list of words and phrases that are checked against text in scanned attachment files and web uploads and downloads.
1. Select Security > Policies > Policies.2. Select an existing policy or add a new policy.3. Select Content Control.
Content Scanning scans the entire email message. This includes the header, body and any attachment for matching content.
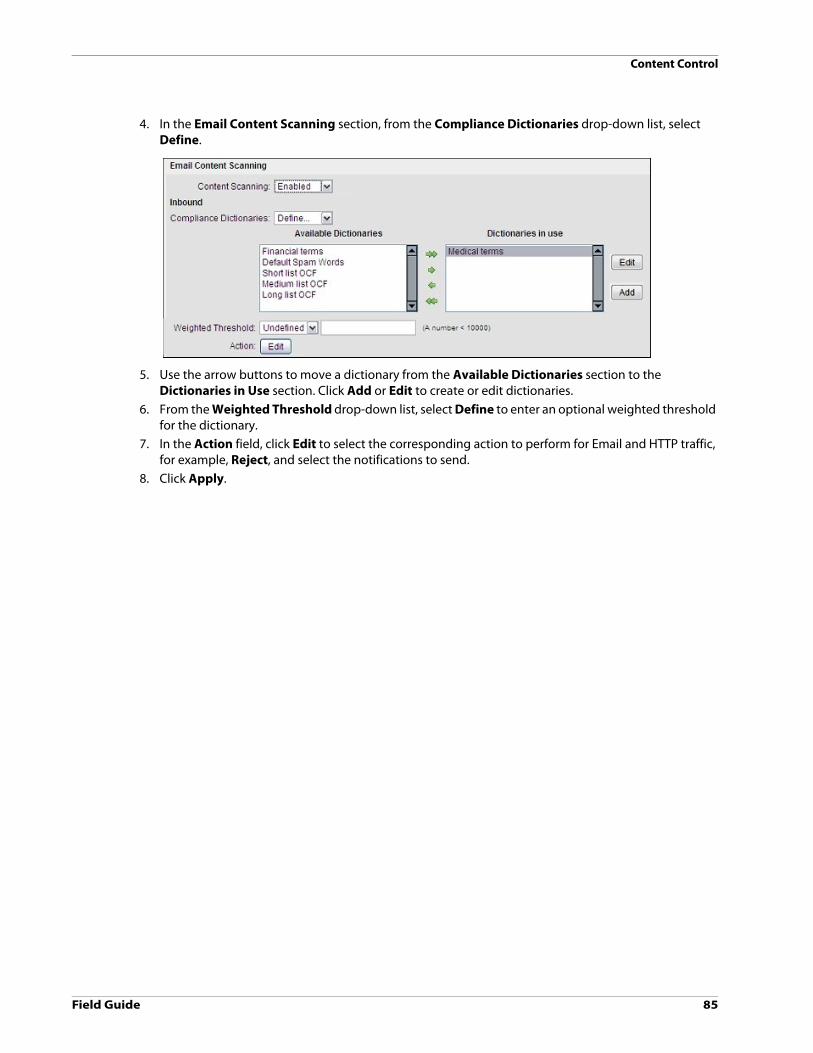
Field Guide 85
Content Control
4. In the Email Content Scanning section, from the Compliance Dictionaries drop-down list, select Define.
5. Use the arrow buttons to move a dictionary from the Available Dictionaries section to the Dictionaries in Use section. Click Add or Edit to create or edit dictionaries.
6. From the Weighted Threshold drop-down list, select Define to enter an optional weighted threshold for the dictionary.
7. In the Action field, click Edit to select the corresponding action to perform for Email and HTTP traffic, for example, Reject, and select the notifications to send.
8. Click Apply.

Content Control
86 WatchGuard XCS
Data Loss Prevention Wizard
The Data Loss Prevention (DLP) wizard guides you through the configuration of DLP content controls and rules for inbound and outbound email and web traffic.
You can perform these tasks with the DLP Wizard:
Block financial identification numbers — Creates Content Rules in the Default Policy to block financial identification numbers such as credit card and bank account numbers in email messages. This includes these identification numbers. Credit Cards (Visa, MasterCard, American Express, Diners Club, Discover, and other credit cards) Credit Card Magnetic Track 1 - International Air Transport Association (IATA). This track is
sometimes used by airlines when securing reservations with a credit card. Credit Card Magnetic Track 2 - American Banking Association (ABA). This track is read by ATMs and
credit card verification systems. National Securities Identification Number (CUSIP) International Bank Account Number (IBAN) Routing Transit Number (RTN)
Block national identification numbers — Creates Content Rules in the Default Policy to block national identification numbers. This includes these identification numbers: Social Security Number (USA) Social Insurance Number (Canada) Social Insurance Number (UK) Social Insurance Number - INSEE (France) National Identification Number (Brazil) National identification numbers (Denmark) Social Insurance Number (Germany) Personal Public Service numbers (Ireland) Fiscal code numbers (Italy) Fiscal identification numbers (Spain) National identity card (Hong Kong) Permanent account numbers (India) National registration identity card (Singapore)
Block healthcare identification numbers — Creates Content Rules in the Default Policy to block national identification numbers. This includes these identification numbers: Drug Enforcement Administration Number – DEA (USA) National Provider Identifier – NPI (USA) National Health Service – NHS (UK)
Block based on compliance terms Email — Creates Content Rules in the Default Policy to content scan email messages based on the
selected dictionary, such as Medical, Financial, or a custom dictionary. Web — Configures Content Scanning in the Default Policy to content scan web content based on
the selected dictionary, such as Medical, Financial, or a custom dictionary.
You can access the DLP Wizard on the Frequent Tasks page, or select Security > Content Control > DLP Wizard on the menu.

Field Guide 87
11 Monitor the WatchGuard XCS
Dashboard
The WatchGuard XCS system Dashboard provides you with a brief statistical and graphical summary of the current system status, and inbound/outbound email and web activity. This enables you to rapidly assess the current status of the WatchGuard XCS.
To see the Dashboard, select Activity > Status > Dashboard.
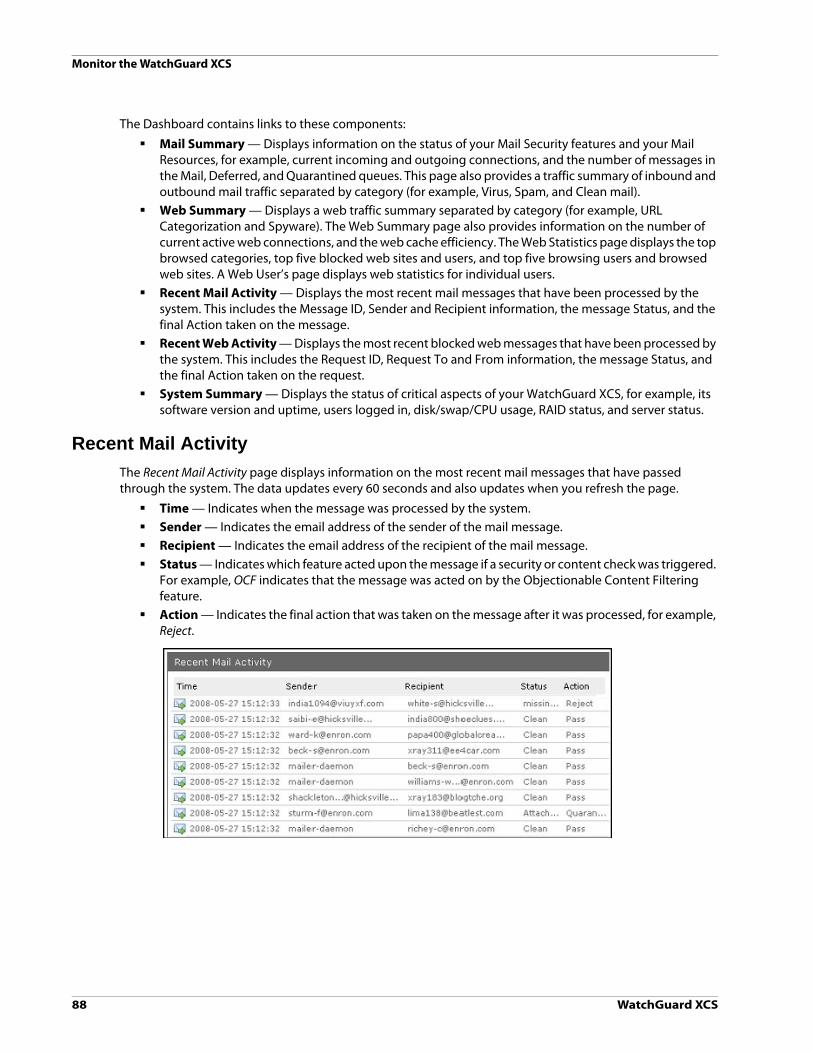
Monitor the WatchGuard XCS
88 WatchGuard XCS
The Dashboard contains links to these components:
Mail Summary — Displays information on the status of your Mail Security features and your Mail Resources, for example, current incoming and outgoing connections, and the number of messages in the Mail, Deferred, and Quarantined queues. This page also provides a traffic summary of inbound and outbound mail traffic separated by category (for example, Virus, Spam, and Clean mail).
Web Summary — Displays a web traffic summary separated by category (for example, URL Categorization and Spyware). The Web Summary page also provides information on the number of current active web connections, and the web cache efficiency. The Web Statistics page displays the top browsed categories, top five blocked web sites and users, and top five browsing users and browsed web sites. A Web User’s page displays web statistics for individual users.
Recent Mail Activity — Displays the most recent mail messages that have been processed by the system. This includes the Message ID, Sender and Recipient information, the message Status, and the final Action taken on the message.
Recent Web Activity — Displays the most recent blocked web messages that have been processed by the system. This includes the Request ID, Request To and From information, the message Status, and the final Action taken on the request.
System Summary — Displays the status of critical aspects of your WatchGuard XCS, for example, its software version and uptime, users logged in, disk/swap/CPU usage, RAID status, and server status.
Recent Mail Activity
The Recent Mail Activity page displays information on the most recent mail messages that have passed through the system. The data updates every 60 seconds and also updates when you refresh the page.
Time — Indicates when the message was processed by the system. Sender — Indicates the email address of the sender of the mail message. Recipient — Indicates the email address of the recipient of the mail message. Status — Indicates which feature acted upon the message if a security or content check was triggered.
For example, OCF indicates that the message was acted on by the Objectionable Content Filtering feature.
Action — Indicates the final action that was taken on the message after it was processed, for example, Reject.
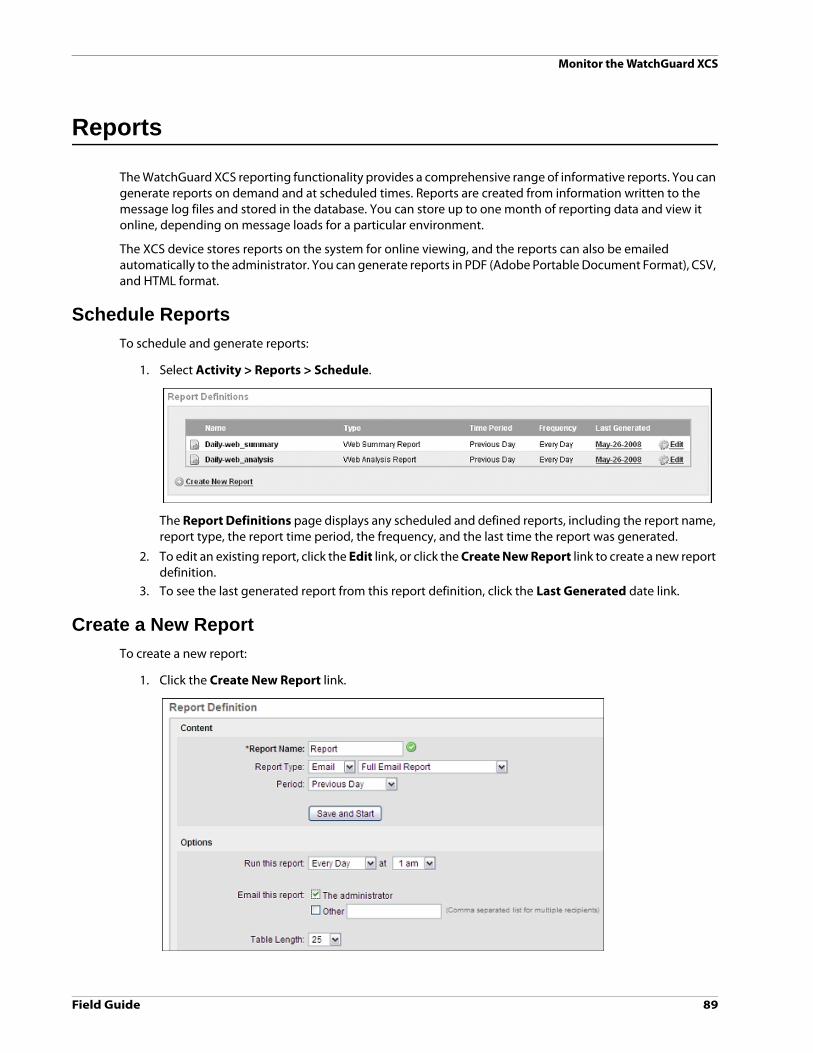
Field Guide 89
Monitor the WatchGuard XCS
Reports
The WatchGuard XCS reporting functionality provides a comprehensive range of informative reports. You can generate reports on demand and at scheduled times. Reports are created from information written to the message log files and stored in the database. You can store up to one month of reporting data and view it online, depending on message loads for a particular environment.
The XCS device stores reports on the system for online viewing, and the reports can also be emailed automatically to the administrator. You can generate reports in PDF (Adobe Portable Document Format), CSV, and HTML format.
Schedule Reports
To schedule and generate reports:
1. Select Activity > Reports > Schedule.
The Report Definitions page displays any scheduled and defined reports, including the report name, report type, the report time period, the frequency, and the last time the report was generated.
2. To edit an existing report, click the Edit link, or click the Create New Report link to create a new report definition.
3. To see the last generated report from this report definition, click the Last Generated date link.
Create a New Report
To create a new report:
1. Click the Create New Report link.

Monitor the WatchGuard XCS
90 WatchGuard XCS
2. In the Report Name text box, type a descriptive name for this report. The name must only contain alphanumerical letters, numbers, and spaces, and must not contain any special characters.
3. From the Report Type drop-down list, select the which type of report to run. Select a category of reports, for example, Email, Web, and System, and then choose a report sub-type for that category.
4. From the Period drop-down list, select the time period for the report coverage: Previous Day (includes up to midnight of the previous day) Last 7 Days Sunday - Saturday (includes 7 days from a Sunday to the next Saturday) Monday - Friday (includes 5 days from Monday to Friday) Previous Month (this is the previous calender month).
5. From the Run this report drop-down list, select the day and time to run the scheduled report.6. In the Email this report section, select who to send a copy of the report to when it is generated.
Select The administrator to send it to the administrator of this system, and/or select Other and enter a comma separated list of addresses to which to send the report.
For example,
[email protected],[email protected],[email protected]
7. From the Table Length drop-down list, select the length for each report field. For example, in the Top Viruses list, the top 50 viruses are displayed if this field is set to 50. The default is 25. You can configure the default value in Configuration > Miscellaneous > Reports.
8. Click Save and Start to save the report and generate it immediately. Select Save or Save As (to save under a different name) to save the report and run it at the scheduled time and day.
Click Delete to remove this report definition. Any reports associated with this report definition are not deleted and can still be viewed.
View Reports
To view your generated reports:
1. Select Activity > Reports > View.The Generated Reports page appears.
Reports are generated in PDF (Adobe Portable Document Format), CSV, and HTML format.
To report on the previous month in a report definition, the Reporting Summary Days option in Configuration > Miscellaneous > Reports must be set to 60 days or more to have enough data to cover the previous month time period.
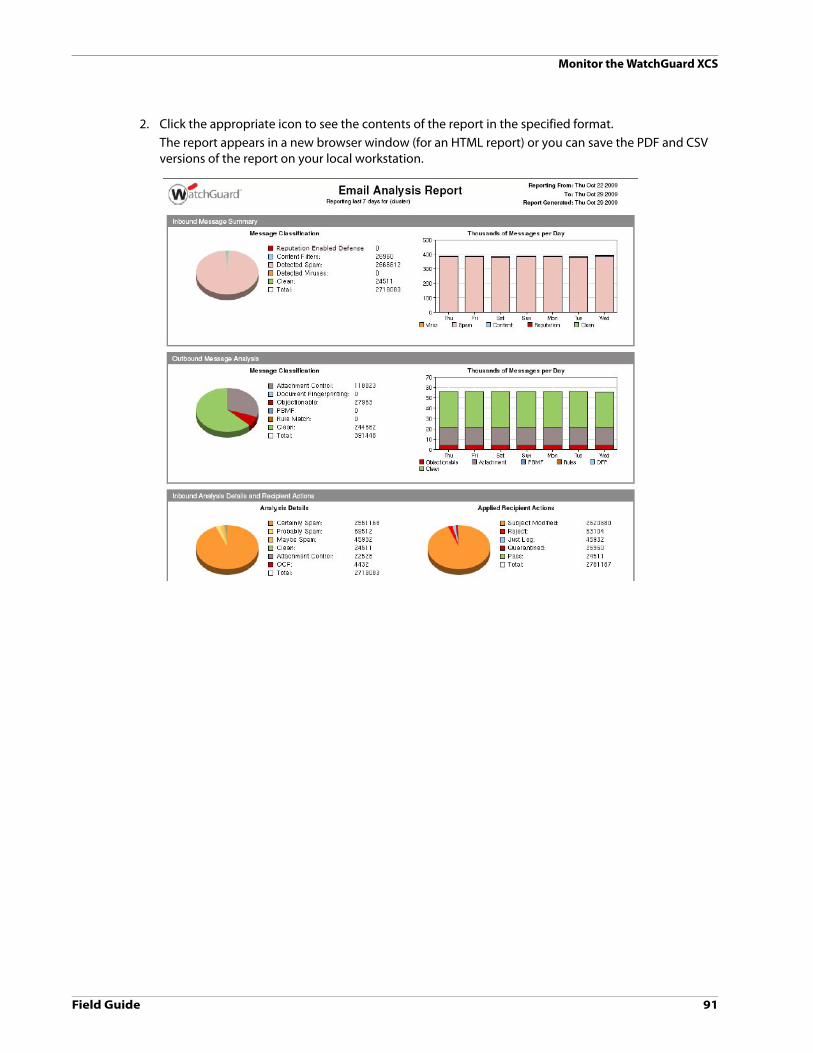
Field Guide 91
Monitor the WatchGuard XCS
2. Click the appropriate icon to see the contents of the report in the specified format. The report appears in a new browser window (for an HTML report) or you can save the PDF and CSV versions of the report on your local workstation.
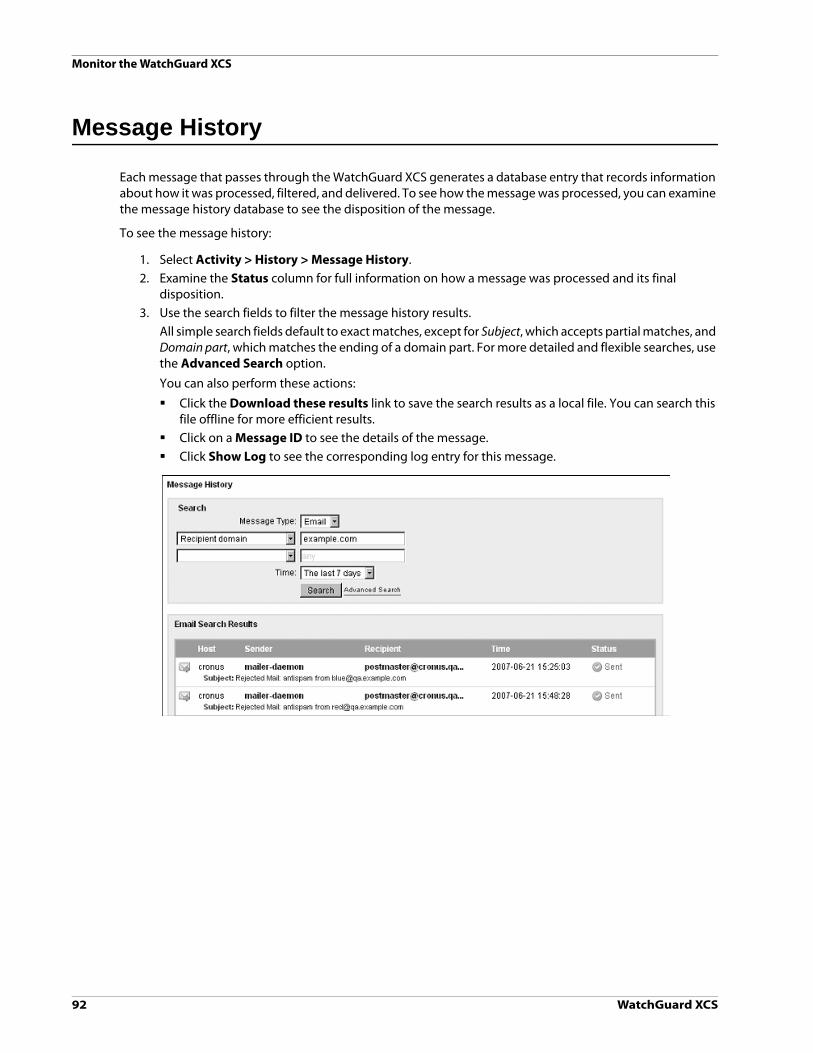
Monitor the WatchGuard XCS
92 WatchGuard XCS
Message History
Each message that passes through the WatchGuard XCS generates a database entry that records information about how it was processed, filtered, and delivered. To see how the message was processed, you can examine the message history database to see the disposition of the message.
To see the message history:
1. Select Activity > History > Message History. 2. Examine the Status column for full information on how a message was processed and its final
disposition.3. Use the search fields to filter the message history results.
All simple search fields default to exact matches, except for Subject, which accepts partial matches, and Domain part, which matches the ending of a domain part. For more detailed and flexible searches, use the Advanced Search option.
You can also perform these actions:
Click the Download these results link to save the search results as a local file. You can search this file offline for more efficient results.
Click on a Message ID to see the details of the message. Click Show Log to see the corresponding log entry for this message.
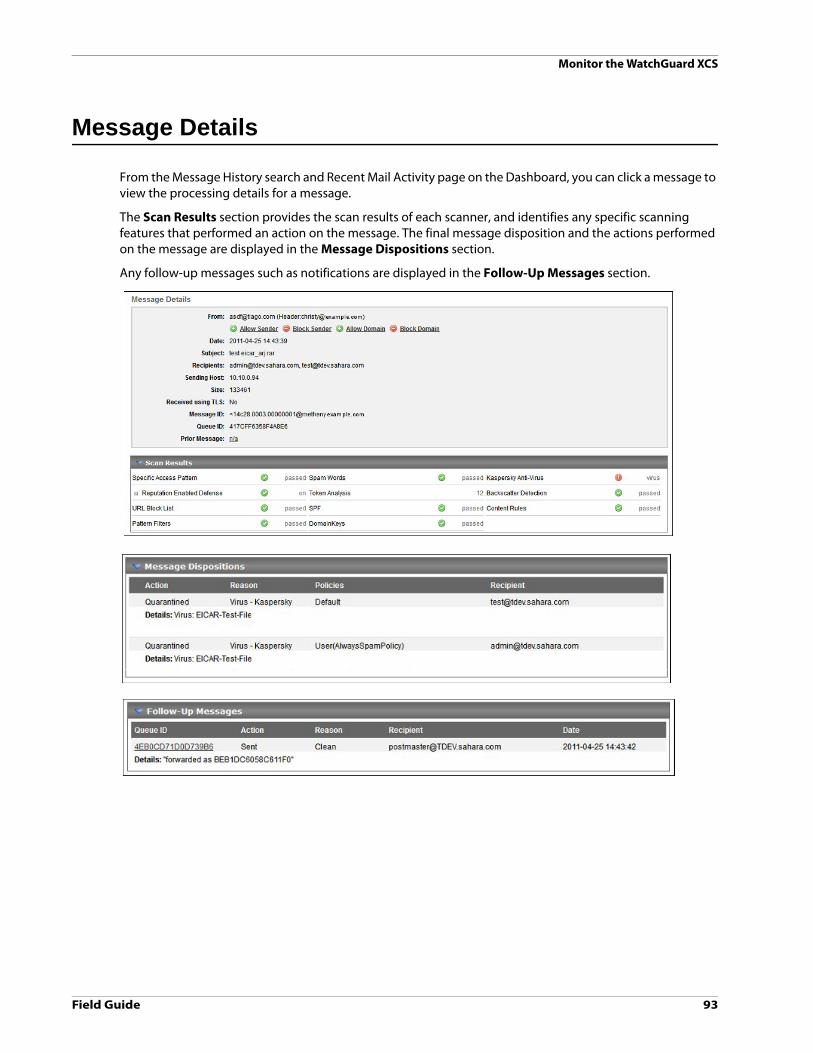
Field Guide 93
Monitor the WatchGuard XCS
Message Details
From the Message History search and Recent Mail Activity page on the Dashboard, you can click a message to view the processing details for a message.
The Scan Results section provides the scan results of each scanner, and identifies any specific scanning features that performed an action on the message. The final message disposition and the actions performed on the message are displayed in the Message Dispositions section.
Any follow-up messages such as notifications are displayed in the Follow-Up Messages section.

Monitor the WatchGuard XCS
94 WatchGuard XCS
Mail Logs
The Mail Logs are the most important and informative log messages to monitor because they contain a record of all mail messages processed by the WatchGuard XCS.
To view the Mail Log:
1. Select Activity > Logs > Mail.The Mail Logs page appears and displays the end of the log file.
2. Use the slider control to page through the log file, or use the right and left arrow icons. You can also jump to the start or end of the log file using the arrow icons as required.
The start of a single message log entry begins with a connect message, and ends with the disconnect message. To make sure that you are looking at the entries for a specific message, check the message ID (for example, 7FA528120033BE34) for each log entry.
3. Click Expand All to show a summary of the processing for the message.
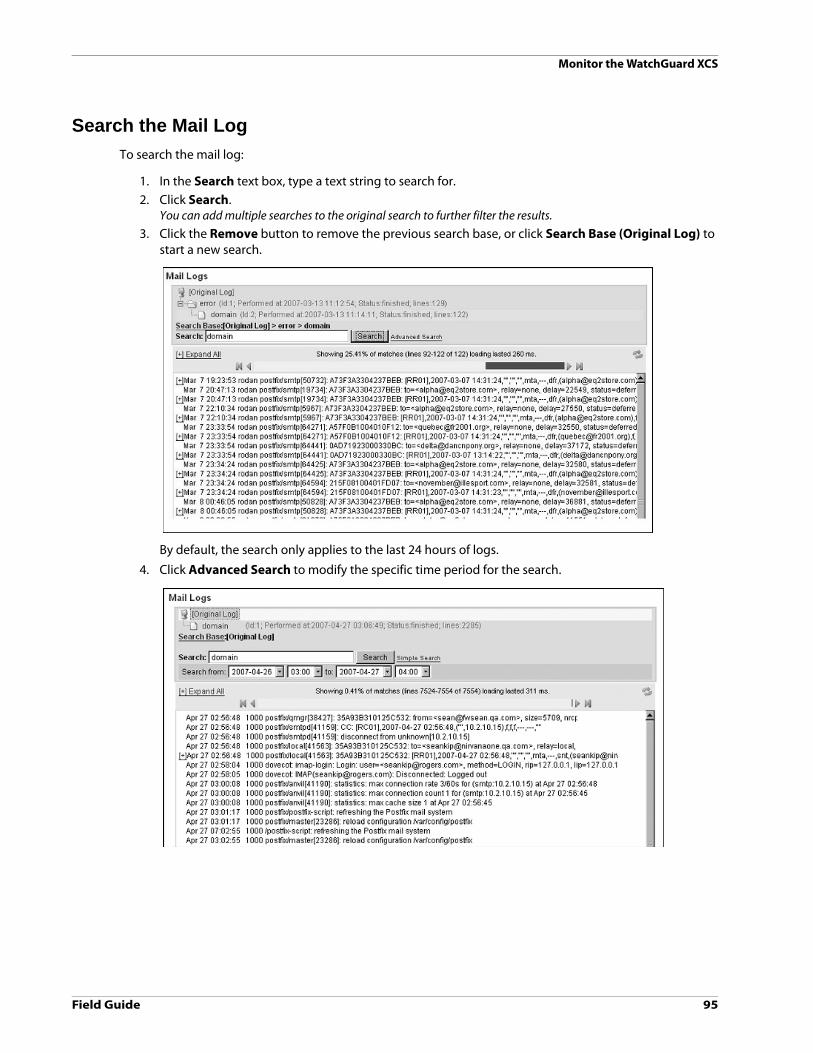
Field Guide 95
Monitor the WatchGuard XCS
Search the Mail Log
To search the mail log:
1. In the Search text box, type a text string to search for.2. Click Search.
You can add multiple searches to the original search to further filter the results.
3. Click the Remove button to remove the previous search base, or click Search Base (Original Log) to start a new search.
By default, the search only applies to the last 24 hours of logs.
4. Click Advanced Search to modify the specific time period for the search.

Monitor the WatchGuard XCS
96 WatchGuard XCS

Field Guide 97
12 System Administration
Backup and Restore
The WatchGuard XCS can back up all data. This includes the reporting database, quarantined items, mail queues, user mail directories, uploaded user lists, SSL certificates, feature keys, and the system configuration.
The XCS device supports three backup methods:
FTP server (recommended for large, full backups) SCP (Secure Copy) server Local disk (for small size or partial configuration backups downloaded to a workstation)
Restore from Backup
The restore feature can restore any of the backup items individually. You must back up the XCS device before you perform any type of software upgrade or update. The restore operation restores the configuration and reporting data in two separate stages.
Configuration restore — The XCS device configuration is restored first. This process takes only a short amount of time and you can quickly return to the administrative user interface to start processing messages again. A critical alarm “Critical Restore: Complete PASSED” is generated to alert you when this first stage of the restore is complete.
Reporting data restore — The reporting data (if required) is then restored as a background process. This process is performed while the system is processing messages. When restoring reporting data, it may take 24 to 72 hours before the restore is fully completed, depending on the amount of data that is restored. These serious alarms are generated at different points in the reporting restore process: “Serious: RESTORE: Reporting: Recovery Started”: This indicates that the online reporting restore
process has started and data is copying into a temporary database. “Serious: RESTORE: Reporting: Migration Started”: This indicates the data has been fully copied into
the temporary database and migrating to the online database. “Serious: RESTORE: Reporting: Recovery Complete”: This indicates that the online reporting restore
process is complete.
We strongly recommend that you use the FTP backup method for large backup requirements. You must use Local Disk backups for only small, partial configuration backups. The XCS device cannot restore a local backup file over 2GB in size.

System Administration
98 WatchGuard XCS
Start a Backup
To start a local disk backup:
1. Select Administration > Backup/Restore > Backup & Restore.
2. Select the Local Disk backup destination and click Next>>.
Encrypt Backup — Encrypts the backup file to protect its contents. Backup System Configuration — Back up all configuration data. This includes mailboxes,
licenses, and feature keys. You must enable this option if you need to restore system functionality. Backup Quarantine Mail — Back up all quarantined mail. Backing up quarantined mail may
greatly increase the size of the backup file. Backup Token Analysis Data — Back up the Token Analysis database. Backup Reporting Data — Back up the entire reporting database. This greatly increases the size
of the backup file. We recommend that you use the FTP or SCP method for very large backup files.3. When you have set your options, click Next >> to continue.
Verify that your options are correct, and then click Create backup now to start the backup. You are prompted for a location to download the backup file (backup.gz). The backup file is saved in a gzip compressed archive.
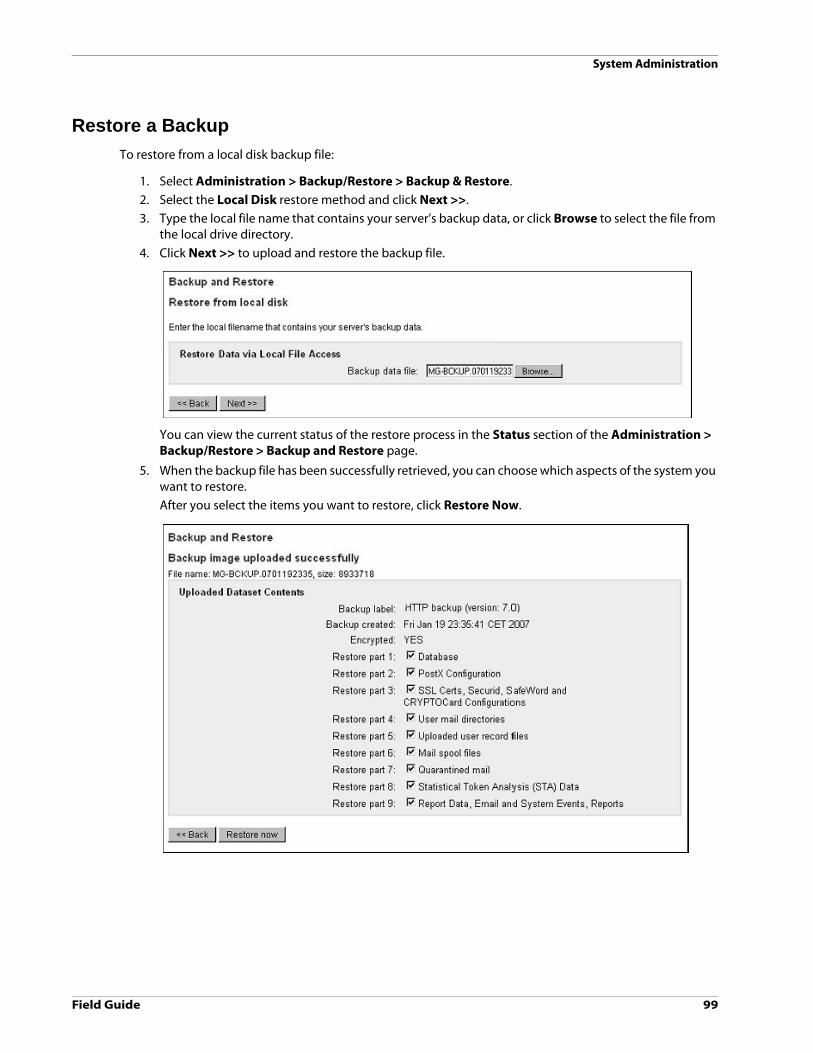
Field Guide 99
System Administration
Restore a Backup
To restore from a local disk backup file:
1. Select Administration > Backup/Restore > Backup & Restore.2. Select the Local Disk restore method and click Next >>.3. Type the local file name that contains your server’s backup data, or click Browse to select the file from
the local drive directory. 4. Click Next >> to upload and restore the backup file.
You can view the current status of the restore process in the Status section of the Administration > Backup/Restore > Backup and Restore page.
5. When the backup file has been successfully retrieved, you can choose which aspects of the system you want to restore. After you select the items you want to restore, click Restore Now.
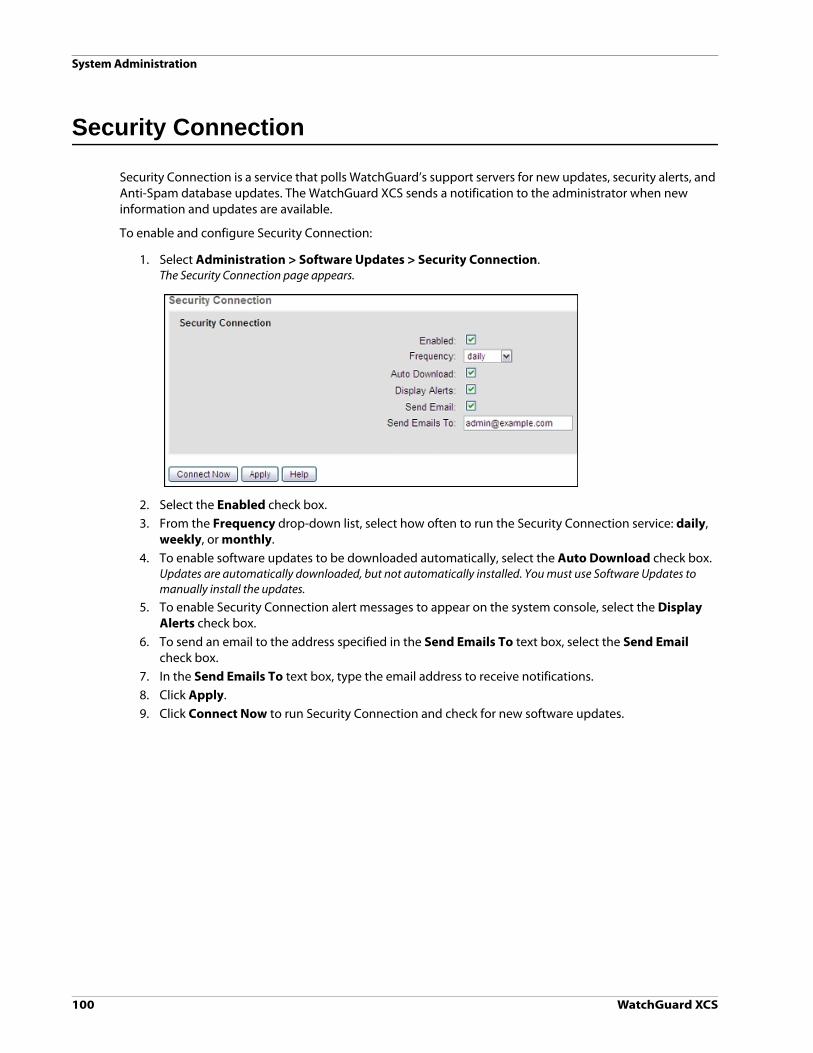
System Administration
100 WatchGuard XCS
Security Connection
Security Connection is a service that polls WatchGuard’s support servers for new updates, security alerts, and Anti-Spam database updates. The WatchGuard XCS sends a notification to the administrator when new information and updates are available.
To enable and configure Security Connection:
1. Select Administration > Software Updates > Security Connection.The Security Connection page appears.
2. Select the Enabled check box.3. From the Frequency drop-down list, select how often to run the Security Connection service: daily,
weekly, or monthly. 4. To enable software updates to be downloaded automatically, select the Auto Download check box.
Updates are automatically downloaded, but not automatically installed. You must use Software Updates to manually install the updates.
5. To enable Security Connection alert messages to appear on the system console, select the Display Alerts check box.
6. To send an email to the address specified in the Send Emails To text box, select the Send Email check box.
7. In the Send Emails To text box, type the email address to receive notifications.8. Click Apply. 9. Click Connect Now to run Security Connection and check for new software updates.
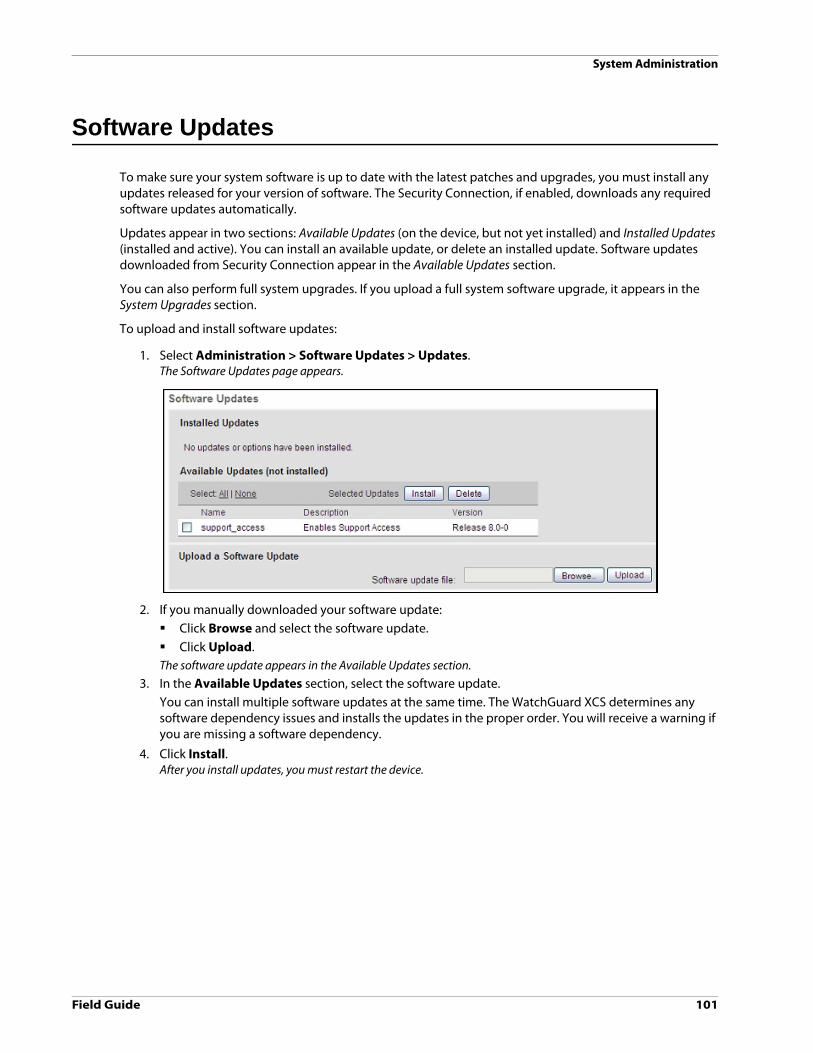
Field Guide 101
System Administration
Software Updates
To make sure your system software is up to date with the latest patches and upgrades, you must install any updates released for your version of software. The Security Connection, if enabled, downloads any required software updates automatically.
Updates appear in two sections: Available Updates (on the device, but not yet installed) and Installed Updates (installed and active). You can install an available update, or delete an installed update. Software updates downloaded from Security Connection appear in the Available Updates section.
You can also perform full system upgrades. If you upload a full system software upgrade, it appears in the System Upgrades section.
To upload and install software updates:
1. Select Administration > Software Updates > Updates.The Software Updates page appears.
2. If you manually downloaded your software update: Click Browse and select the software update. Click Upload.The software update appears in the Available Updates section.
3. In the Available Updates section, select the software update.You can install multiple software updates at the same time. The WatchGuard XCS determines any software dependency issues and installs the updates in the proper order. You will receive a warning if you are missing a software dependency.
4. Click Install.After you install updates, you must restart the device.
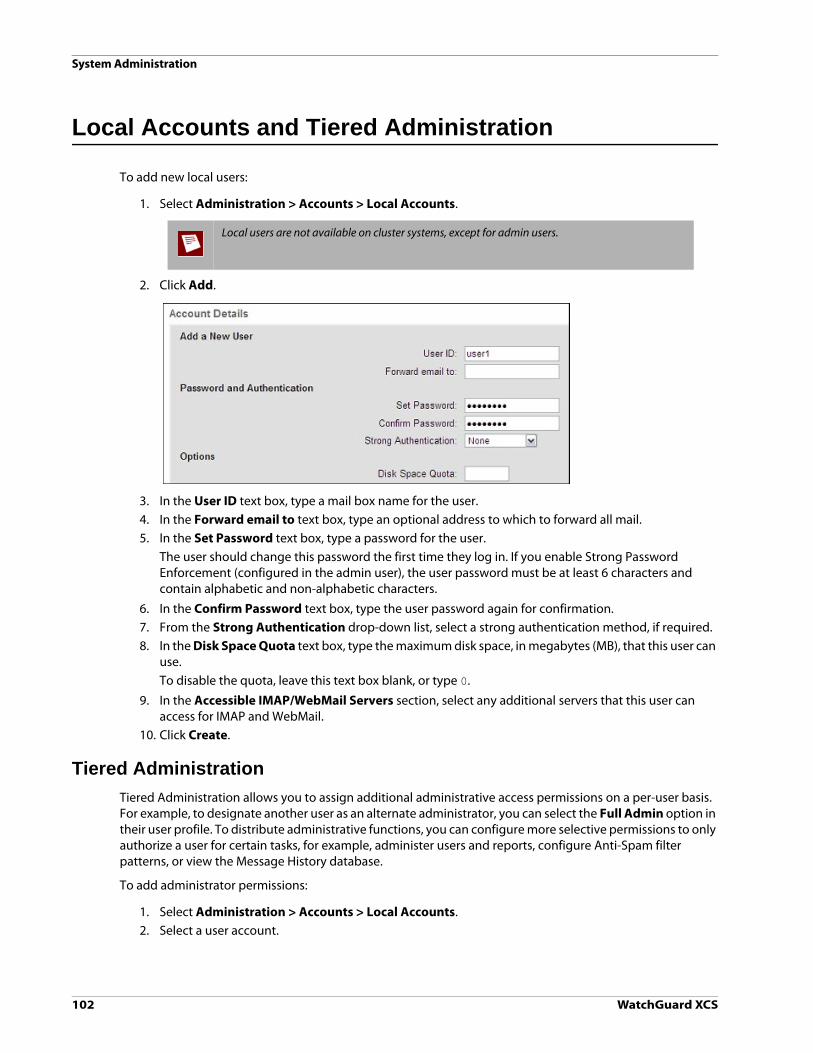
System Administration
102 WatchGuard XCS
Local Accounts and Tiered Administration
To add new local users:
1. Select Administration > Accounts > Local Accounts.
2. Click Add.
3. In the User ID text box, type a mail box name for the user.4. In the Forward email to text box, type an optional address to which to forward all mail.5. In the Set Password text box, type a password for the user.
The user should change this password the first time they log in. If you enable Strong Password Enforcement (configured in the admin user), the user password must be at least 6 characters and contain alphabetic and non-alphabetic characters.
6. In the Confirm Password text box, type the user password again for confirmation. 7. From the Strong Authentication drop-down list, select a strong authentication method, if required.8. In the Disk Space Quota text box, type the maximum disk space, in megabytes (MB), that this user can
use. To disable the quota, leave this text box blank, or type 0.
9. In the Accessible IMAP/WebMail Servers section, select any additional servers that this user can access for IMAP and WebMail.
10. Click Create.
Tiered Administration
Tiered Administration allows you to assign additional administrative access permissions on a per-user basis. For example, to designate another user as an alternate administrator, you can select the Full Admin option in their user profile. To distribute administrative functions, you can configure more selective permissions to only authorize a user for certain tasks, for example, administer users and reports, configure Anti-Spam filter patterns, or view the Message History database.
To add administrator permissions:
1. Select Administration > Accounts > Local Accounts.2. Select a user account.
Local users are not available on cluster systems, except for admin users.

Field Guide 103
System Administration
3. Select the corresponding check box to enable a specific admin privilege.
Full AdminThe user has administrative privileges equivalent to the admin user.
Administer AliasesThe user can add, edit, remove, upload, and download aliases (this excludes LDAP aliases.)
Administer Filter PatternsThe user can add, edit, remove, upload, and download Pattern Filters and Specific Access Patterns.
Administer Mail QueueThe user can administer mail queues.
Administer ReportsThe user can view, configure and generate reports, and view system activity.
Administer UsersThe user can add, edit, and relocate user mailboxes (except the Full Admin users). This includes the ability to upload and download user lists. The user can also configure User vacation notifications.
Administer VacationsThe user can edit local user’s vacation notification settings and other global vacation parameters.
Message HistoryThe user can view the Message History database and perform quick searches of the recent Mail and Web activity on the Dashboard.
View DashboardThe user can view the Dashboard page. Tiered admins can only perform a quick search of the recent Mail and Web activity if Message History is also enabled.
View AlarmsThe user can view the Alarms in the Alarms Indicator and the Local Alarms page, but cannot acknowledge them.
View System LogsThe user can view all system logs.
Administer All QuarantinesThe user can view, delete, and send all quarantined files in the system quarantine and all custom quarantines.
Quarantine: SystemThe user can view, delete, and send quarantined files in the primary system quarantine only.

System Administration
104 WatchGuard XCS
Quarantine: DLPThe user can view, delete, and send quarantined files in the DLP quarantine only.
Any other custom quarantines will also appear in this list and can be independently managed by a tiered admin user.
4. Click Apply.
Tiered Admin and WebMail Access
You must enable Tiered Admin and WebMail access on a network interface to allow Tiered Admin users to log in and administer the WatchGuard XCS.
1. Select Configuration > Network > Interfaces.2. Select the Admin & Web User Login and WebMail check boxes on the required network interface.
3. Click Apply.You must restart the system.
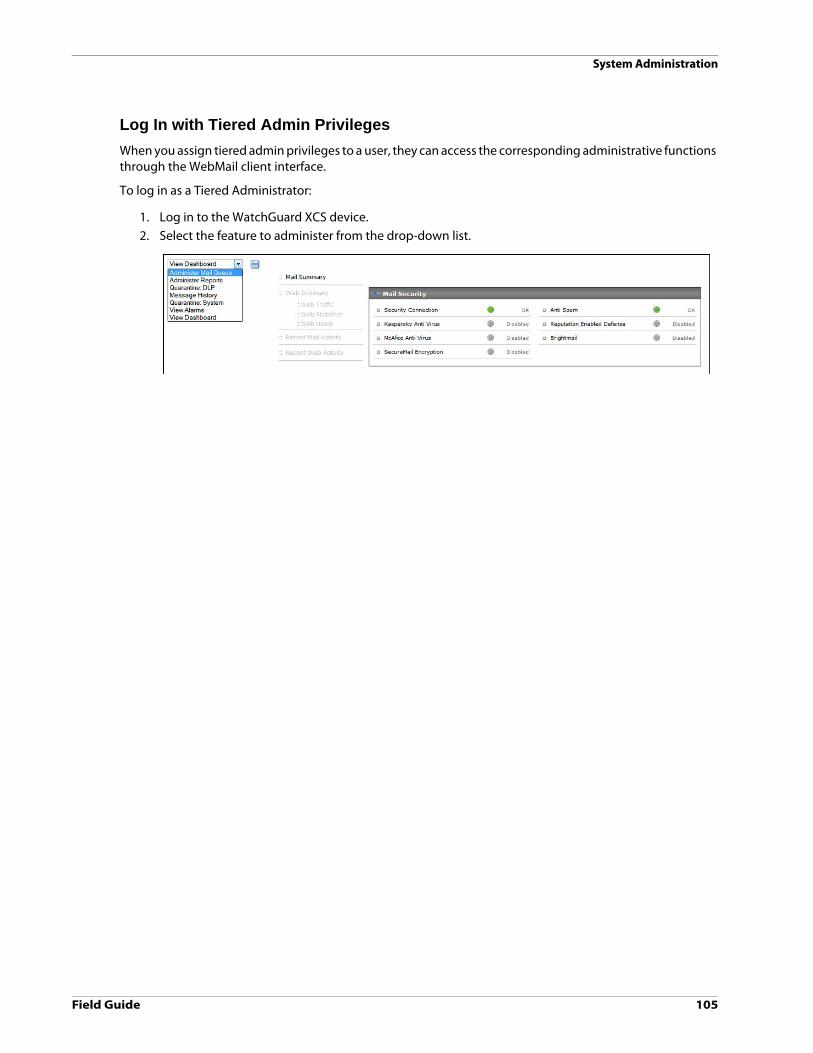
Field Guide 105
System Administration
Log In with Tiered Admin Privileges
When you assign tiered admin privileges to a user, they can access the corresponding administrative functions through the WebMail client interface.
To log in as a Tiered Administrator:
1. Log in to the WatchGuard XCS device.2. Select the feature to administer from the drop-down list.

System Administration
106 WatchGuard XCS
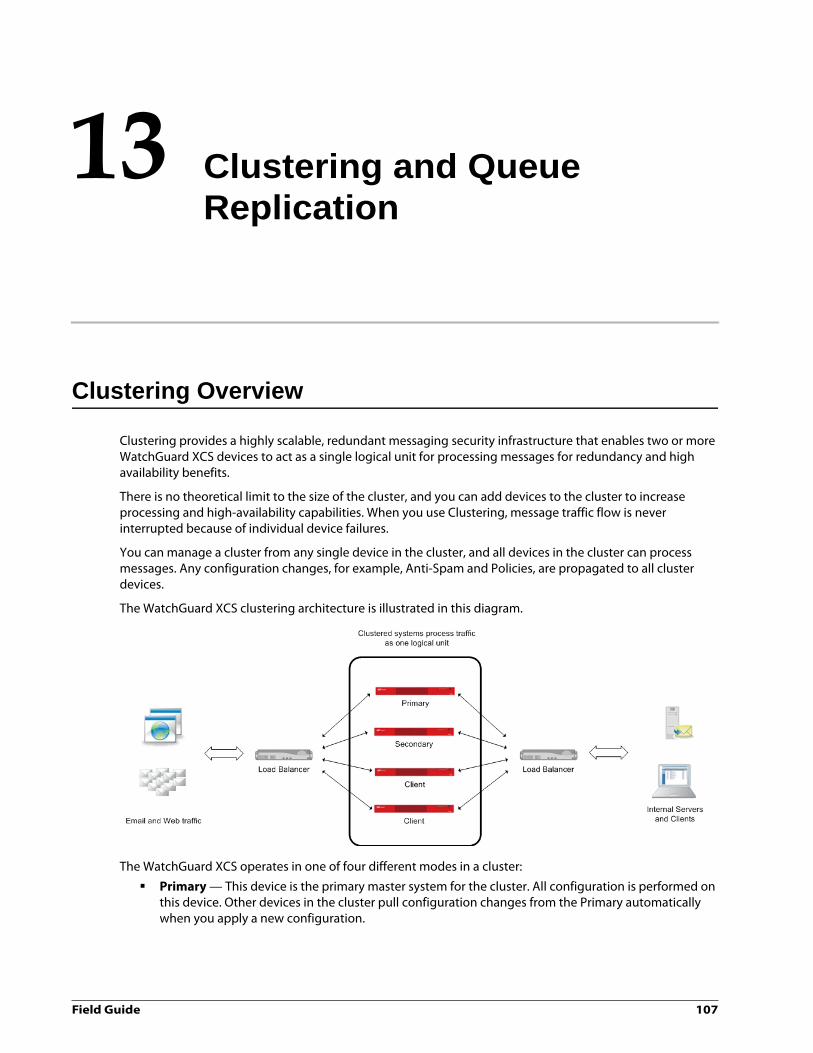
Field Guide 107
13 Clustering and Queue Replication
Clustering Overview
Clustering provides a highly scalable, redundant messaging security infrastructure that enables two or more WatchGuard XCS devices to act as a single logical unit for processing messages for redundancy and high availability benefits.
There is no theoretical limit to the size of the cluster, and you can add devices to the cluster to increase processing and high-availability capabilities. When you use Clustering, message traffic flow is never interrupted because of individual device failures.
You can manage a cluster from any single device in the cluster, and all devices in the cluster can process messages. Any configuration changes, for example, Anti-Spam and Policies, are propagated to all cluster devices.
The WatchGuard XCS clustering architecture is illustrated in this diagram.
The WatchGuard XCS operates in one of four different modes in a cluster:
Primary — This device is the primary master system for the cluster. All configuration is performed on this device. Other devices in the cluster pull configuration changes from the Primary automatically when you apply a new configuration.

Clustering and Queue Replication
108 WatchGuard XCS
Secondary — A device running in Secondary mode operates the same way as a Client cluster device except that it retains a copy of the master database replicated from the Primary. If the Primary cluster device fails, you can promote the Secondary to Primary status.
Client — A device that runs in Client mode pulls its configuration from an existing Primary. After the initial setup, no configuration is required on the Client. You can promote a Client to a Secondary. Unlike a Primary or Secondary, a Client does not contain a copy of the full configuration database.
Standalone — The device initially installs in Standalone mode. In this mode, the device still processes mail, but does not participate as part of the cluster and does not pull configuration updates. This mode is primarily used to remove a cluster device for offline maintenance or software updates.
XCSv Cluster Setup
To set up multiple XCSv virtual devices in a cluster, you must configure a dedicated virtual network switch on the VMware host system to ensure that no data can leak to other virtual machines running on your VMware host. This virtual switch must be mapped to actual physical network interfaces on the VMware host system if you are clustering with XCSv devices on another physical VMware host. If your clustered XCSv devices are hosted on the same VMware host system, the virtual switch does not have to be mapped to physical network interfaces and you can configure the switch as an internal logical switch.
If you install clustered XCSv devices on the same VMware host, this configuration only provides software redundancy in the event one of the XCSv virtual devices fails. If a hardware or software issue affects the VMware host, your entire XCSv cluster will be affected.
We recommend that if you set up multiple XCSv devices in a cluster, you should install your XCSv virtual devices on separate VMware hosts for hardware and software redundancy in the event an issue affects the VMware host.
For more detailed information on configuring XCSv virtual devices in a cluster, see the XCSv Setup Guide.
Load Balancing
Although the cluster is treated as one logical system for processing messages, network traffic is processed independently by each cluster device and requires the use of a load balancing system to distribute mail flow between the devices in the cluster.
Email Load Balancing with DNS
You can use a DNS round-robin technique to distribute incoming SMTP mail connections to the devices in the cluster. For example, add these entries to your DNS MX records to distribute mail to two different WatchGuard XCS devices.
example.com IN MX 10 mail1.example.com
example.com IN MX 10 mail2.example.com
Assign different priority values to give priority to specific devices. For example:
example.com IN MX 5 mail1.example.com
example.com IN MX 10 mail2.example.com
Load balancing for specific types of network traffic (for example, HTTP) is not possible with DNS round-robin techniques.

Field Guide 109
Clustering and Queue Replication
Traffic Load Balancing with a Load Balancing Device
You can also use a hardware load balancing device to send messages to different WatchGuard XCS devices in a cluster. If one of the devices fails, the load balancer distributes the load between the remaining devices. You can configure the load balancer to distribute the mail stream connections intelligently across all devices in the cluster based on device load and availability.
External load balancing devices are mandatory if you need to route specific traffic (for example, SMTP and HTTP) through specific hosts in the cluster. For example, SMTP mail can be processed by two cluster devices, while HTTP is handled by another two different devices. You can configure the load balancer to route protocol-specific traffic as required.
Configure Clustering
To configure the network settings for two devices in a cluster:
1. Connect an unused network interface from each device in the cluster to a common network switch, or connect each interface with a crossover network cable. This forms the cluster network, a control network where clustering information is passed back and forth between the devices that form the cluster. For security reasons, this network must be isolated and not be connected to the main network. For a cluster of two devices, you can connect a crossover network cable between the selected interfaces to provide a secure connection without the need for a network switch.
2. On each device, select Configuration > Network > Interfaces.3. Select the interface connected to the cluster network.4. From the Interface Mode drop-down list, select Cluster.
The interface is automatically configured for exclusive use on the cluster network..
5. Make sure that an NTP time server is configured on each device, and add additional NTP servers for redundancy. You cannot enable clustering until you configure an NTP server. The time server synchronizes all cluster devices from a common time source.
6. Click Apply. You must restart the system.
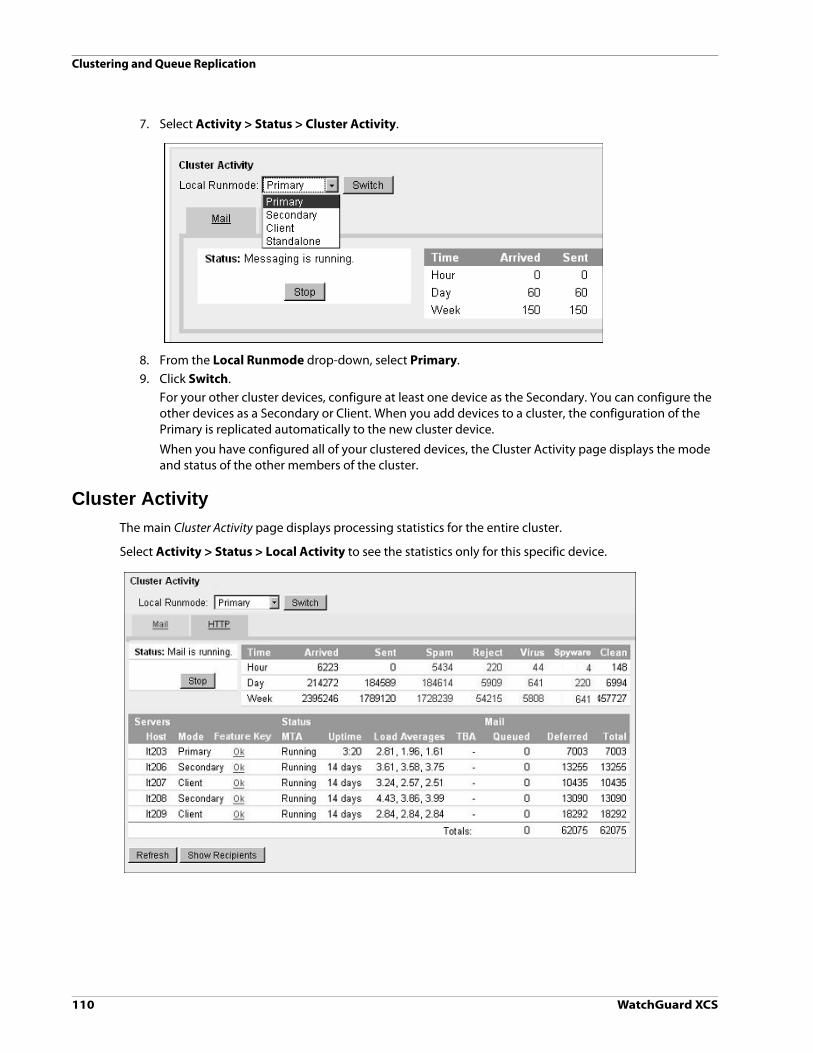
Clustering and Queue Replication
110 WatchGuard XCS
7. Select Activity > Status > Cluster Activity.
8. From the Local Runmode drop-down, select Primary.9. Click Switch.
For your other cluster devices, configure at least one device as the Secondary. You can configure the other devices as a Secondary or Client. When you add devices to a cluster, the configuration of the Primary is replicated automatically to the new cluster device.
When you have configured all of your clustered devices, the Cluster Activity page displays the mode and status of the other members of the cluster.
Cluster Activity
The main Cluster Activity page displays processing statistics for the entire cluster.
Select Activity > Status > Local Activity to see the statistics only for this specific device.

Field Guide 111
Clustering and Queue Replication
Queue Replication
The Queue Replication feature enables mail queue replication and failover between two devices. In the event that the primary owner of a mail queue is unavailable, the mirror system can take ownership of the mirrored mail queue for delivery.
Queue replication actively copies any queued mail to the mirror device, to make sure that, if one device should fail or be taken offline, the mirror device can take ownership of the queued mail and deliver it. If the source device successfully delivers the message, the copy of the message on the mirror device is automatically removed.
In this diagram, System A and System B are configured to be mirrors of each other’s mail queues.
When a message is received by System A, it is queued locally and a copy of the message is also immediately sent over the failover connection to the mirror queue on System B.
If System A fails, you can login to System B and take ownership of the queued mail to deliver it. Messages are exchanged between the systems to make sure that the mirrored mail queues are correctly synchronized and to prevent duplicate messages from being delivered when a failed system has come back online.

Clustering and Queue Replication
112 WatchGuard XCS
Configure Queue Replication
To configure queue replication:
1. Select Administration > Multi-System Management > Queue Replication. The Queue Replication page appears.
2. Select the Enable Queue Replication check box.3. Click Apply.4. Select Configuration > Network > Interfaces.5. Go to the Queue Replication section.
These options only appear in the Network settings screen after you enable Queue Replication.
6. Select the Enable Replication check box.7. In the Replication Host text box, type the IP address of the host that is backing up mail for this
WatchGuard XCS. If you configure Queue Replication in a cluster, you can use the interface connected to the cluster network for replication. Specify the hostname of the host cluster device, for example, SystemA, in the address SystemA.example.com.
8. In the Replication Client text box, type the IP address of the client that is backing up its mail queue to this WatchGuard XCS. If you configure Queue Replication in a cluster, you can use the interface connected to the cluster network for replication. Specify the hostname of the host cluster device, for example, SystemB, in the address SystemB.example.com.
9. From the Replication Interface drop-down list, select the network interface to use for queue replication. This network interface must be connected to a secure network. We recommend that queue replication and clustering functions be run together on their own dedicated subnet.
10. Click Apply.
For example, because messages from System A are replicated on System B, enter the IP address for System B in the Replication Host field. System A also acts as a host for System B, so enter the address for System B in the Replication Client field.
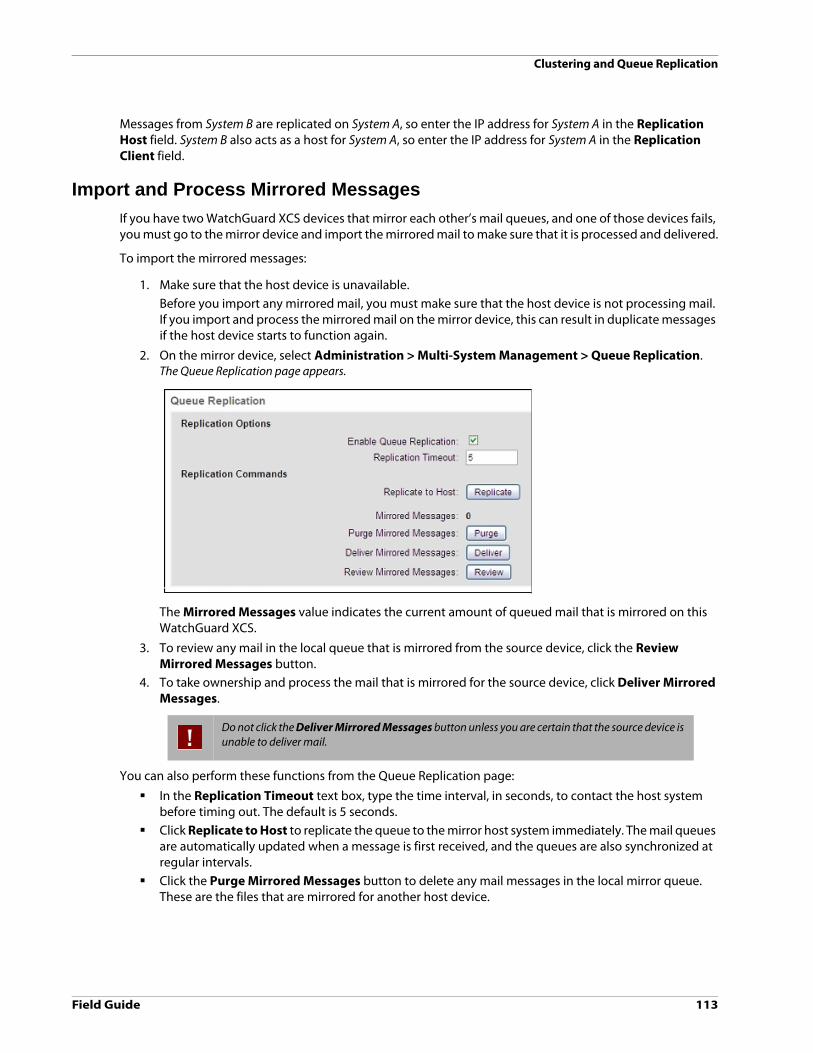
Field Guide 113
Clustering and Queue Replication
Messages from System B are replicated on System A, so enter the IP address for System A in the Replication Host field. System B also acts as a host for System A, so enter the IP address for System A in the Replication Client field.
Import and Process Mirrored Messages
If you have two WatchGuard XCS devices that mirror each other’s mail queues, and one of those devices fails, you must go to the mirror device and import the mirrored mail to make sure that it is processed and delivered.
To import the mirrored messages:
1. Make sure that the host device is unavailable. Before you import any mirrored mail, you must make sure that the host device is not processing mail. If you import and process the mirrored mail on the mirror device, this can result in duplicate messages if the host device starts to function again.
2. On the mirror device, select Administration > Multi-System Management > Queue Replication.The Queue Replication page appears.
The Mirrored Messages value indicates the current amount of queued mail that is mirrored on this WatchGuard XCS.
3. To review any mail in the local queue that is mirrored from the source device, click the Review Mirrored Messages button.
4. To take ownership and process the mail that is mirrored for the source device, click Deliver Mirrored Messages.
You can also perform these functions from the Queue Replication page:
In the Replication Timeout text box, type the time interval, in seconds, to contact the host system before timing out. The default is 5 seconds.
Click Replicate to Host to replicate the queue to the mirror host system immediately. The mail queues are automatically updated when a message is first received, and the queues are also synchronized at regular intervals.
Click the Purge Mirrored Messages button to delete any mail messages in the local mirror queue. These are the files that are mirrored for another host device.
Do not click the Deliver Mirrored Messages button unless you are certain that the source device is unable to deliver mail.

Clustering and Queue Replication
114 WatchGuard XCS

Field Guide 115
14 Web Scanning
Web Scanning Overview
The WatchGuard XCS incorporates a Web Proxy that manages web traffic and controls access to external web sites. The system scans web traffic using a subset of the same scanners that examine email messages to inspect the content of web traffic and file transfers. The WatchGuard XCS can also scan encrypted HTTPS traffic and FTP traffic sent over HTTP with the same scanners that scan HTTP traffic.
With the WatchGuard XCS policy features, you can apply web access policies to different users, groups, IP addresses, and domains. The Web Proxy analyzes client requests and allows or blocks access to specific web sites based on the configured access policies.
Web Traffic Content Inspection
The Web Proxy inspects downloaded and uploaded content with these features:
Kaspersky Anti-Virus — Scans for viruses and spyware in downloaded and uploaded files. URL Block Lists — Blocks access to web sites that appear on a URL Block List. Objectionable Content Filter (OCF) — Scans web traffic for objectionable content based on a
dictionary of blocked words and phrases. Attachment Control — Allows or blocks specific file extensions and MIME types. Content Scanning — Allows or blocks files based on specific text content in a file. Web Reputation — Allows or blocks web requests based on the reputation of the web site. URL Categorization — Allows or blocks web sites based on a list of blocked web site content
categories. HTTP Trusted and Blocked Sites List — Allows or blocks web sites based on a managed list of web
site domains.
You can configure a different action for each scanner, for example, Reject to reject the request, or Just Log to allow the request and send a log message to the Web Proxy log file.
Web Scanning
116 WatchGuard XCS
Web Proxy Authentication
You can allow unauthenticated access for all users, or require authentication before access to external web sites is allowed. If authentication is enabled, all end users that use the Web Proxy must be authenticated by the WatchGuard Single Sign-On Agent (Active Directory), LDAP server, or have a local account to get access to web sites through the Web Proxy.
Users must authenticate to the system with their account credentials. All access is denied until the user is authenticated to the system. If authentication is disabled, all users use the Default policy, or an IP address policy if one is assigned, for web access control. You can also configure the WatchGuard XCS to bypass HTTP authentication for specific web domains or from specific source IP addresses and networks.
Traffic Accelerator
The expansive growth of large, media intensive, interactive, and collaborative web sites requires greater bandwidth that can overload corporate networks.
The WatchGuard Traffic Accelerator solution provides several web traffic enhancements to reduce bandwidth consumption, server loads, and network latency, which results in better network performance and availability. The WatchGuard Traffic Accelerator includes these features:
Streaming Media Bypass — The WatchGuard Traffic Accelerator has the ability to bypass streaming media content to reduce the strain on bandwidth resources.
Web Cache — The web cache feature of the WatchGuard Traffic Accelerator solution enables faster retrieval of web sites to provide temporary storage of web data. This feature reduces bandwidth consumption and improves performance for subsequent accesses of these web sites because the data and images are read from the disk cache instead of going out to the Internet.
These additional features help improve scanning efficiency:
Preview Scanning — The system can scan the initial header of the response and take immediate action based on your configured policies. This increases scanning efficiency because the rest of the content does not have to be scanned. Only certain types of responses can be handled with a header preview scan, such as detection of MIME types for content control and streaming media bypass, or checks on maximum files sizes reported in the header.
Early Response — Early response scanning allows the web proxy to take action based on scanning only part of the downloaded content. This early response is useful for detecting issues such as files beyond the maximum file size where the file should not be scanned. The remainder of the content is not scanned.
Client Request — Many HTTP security features, such as URL Categorization, URL Block Lists, and Trusted/Blocked Lists can perform actions based on the URL without scanning the actual downloaded content. For example, if a requested URL is blocked by URL Categorization, the actual downloaded content is not scanned.
Policy Caching — For greater efficiency, some common policy results are cached, such as those where continuous amounts of web traffic with the same content triggers the same policy. In general, access of cached data is still sent to the Web Proxy content scanners because different users can have different HTTP content policies applied to them, but efficiency can be improved by using fewer policies that are wider in scope. The more policies you have results in a higher probability that cached policy results are replaced by the scanning result of a different policy.
Field Guide 117
Web Scanning
Automatic Client Web Proxy Configuration
Organizations that want to enforce the use of a proxy policy without manual configuration of each individual browser can use these methods for automatic proxy configuration:
Proxy Auto-Config (PAC) file — A Proxy Auto-Config (PAC) file defines how a web browser can automatically choose an appropriate proxy server to connect to. The PAC file is a script file that browsers read and execute to determine which proxy to use.
Web Proxy Autodiscovery Protocol (WPAD) — The Web Proxy Autodiscovery Protocol (WPAD) is supported by most web browsers to locate a Proxy Auto-Config (PAC) file automatically and then use this information to configure the browser's web proxy settings. The protocol can use DHCP or DNS to locate the PAC file.
Web Proxy Best Practices
These are best practices to follow when you implement the Web Proxy for the first time:
We recommend that you run the system for at least 24-48 hours with minimal scanning enabled before you enable threat and content control scans on web traffic. This allows the web cache to be populated and increases performance. After this initial period, you can enable threat and content control scanners as needed.
We recommend you enable DNS caching to increase Web Proxy performance. This option is enabled by default in Configuration > Network > Interfaces.
Make sure you enable Large MTU on the network interface designated for HTTP Proxy access. This option is enabled by default in Configuration > Network > Interfaces.
When you configure the Web Proxy in Transparent Mode, make sure that you enable the Large MTU setting on the network interface configured as the Bridge In interface. You must enable the Web Proxy and reboot the system before you can enable bridging and Transparent Mode on a network interface.
Make sure that your local DNS server is configured and works properly. Misconfigured DNS services and domain name translation issues can significantly decrease Web Proxy performance or cause the Web Proxy to fail.
If you enable the URL Categorization feature, it can take several minutes to download the initial URL Categorization Control List. While the Control List downloads, web traffic is not processed and users can receive policy error messages when web browsing. When the update is complete, web traffic processing resumes. We recommend that you do not start processing HTTP traffic until the initial download process is complete.

Web Scanning
118 WatchGuard XCS
Web Proxy Support and Limitations
These are the current limitations with the Web Proxy:
Clustering is not supported in Transparent Mode. A Web Proxy running in Transparent Mode can be clustered with a non-Web Proxy system, for example, a WatchGuard XCS appliance that processes email.
URL Categorization of HTTPS URLs and FTP over HTTP scanning is not supported in Transparent mode. FTP over HTTP scanning only supports FTP used in a web browser. Standalone FTP clients or web
browser extensions that use the “CONNECT” method are not supported. You cannot use local or LDAP authentication when in Transparent mode.
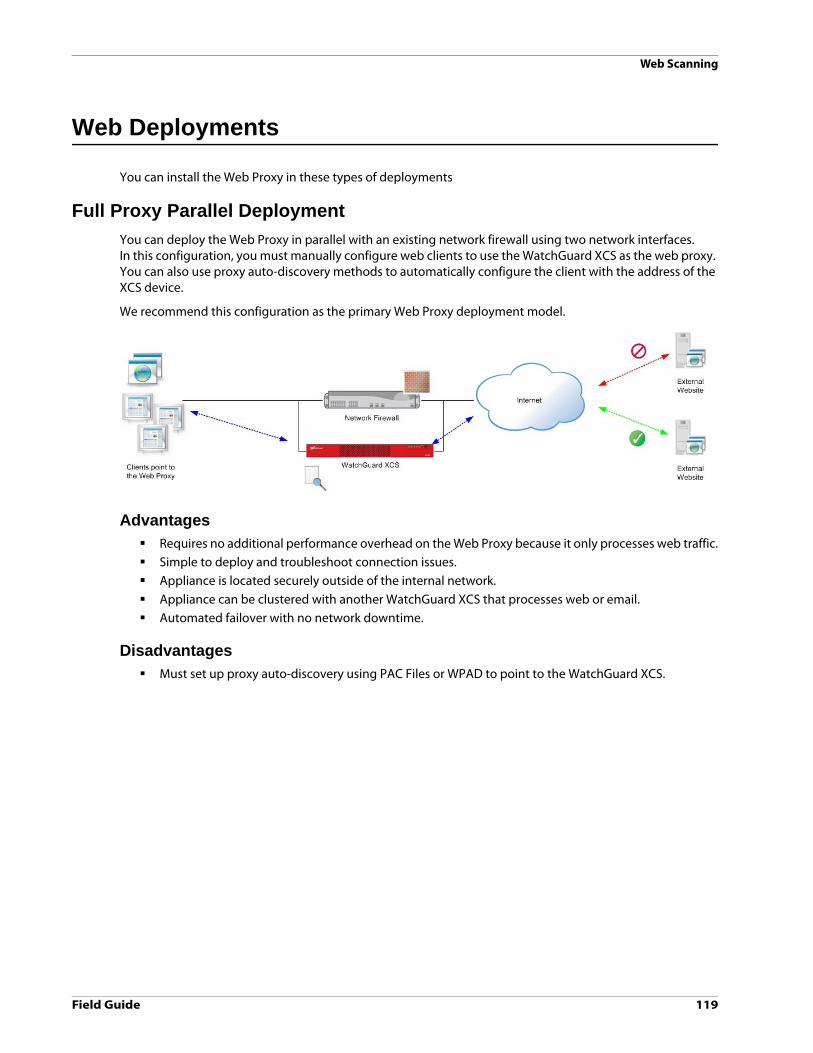
Field Guide 119
Web Scanning
Web Deployments
You can install the Web Proxy in these types of deployments
Full Proxy Parallel Deployment
You can deploy the Web Proxy in parallel with an existing network firewall using two network interfaces. In this configuration, you must manually configure web clients to use the WatchGuard XCS as the web proxy. You can also use proxy auto-discovery methods to automatically configure the client with the address of the XCS device.
We recommend this configuration as the primary Web Proxy deployment model.
Advantages Requires no additional performance overhead on the Web Proxy because it only processes web traffic. Simple to deploy and troubleshoot connection issues. Appliance is located securely outside of the internal network. Appliance can be clustered with another WatchGuard XCS that processes web or email. Automated failover with no network downtime.
Disadvantages Must set up proxy auto-discovery using PAC Files or WPAD to point to the WatchGuard XCS.

Web Scanning
120 WatchGuard XCS
Internal Network Deployment
You can deploy the Web Proxy on the internal network connected with one network interface. The network firewall must block HTTP traffic (for example, TCP port 80) to prevent circumvention of the proxy by network clients. HTTP port access must be allowed for the Web Proxy only.
You must manually configure web clients to use the WatchGuard XCS as their web proxy. You can also use proxy auto-discovery or other HTTP traffic redirection methods to automatically configure the client.
Advantages Requires no additional performance overhead on the system. Simple to deploy and troubleshoot connection issues.
Disadvantages Must set up proxy auto-discovery using PAC Files or WPAD to point to the WatchGuard XCS.

Field Guide 121
Web Scanning
Transparent Mode Deployment
The Web Proxy offers a Transparent Mode deployment option to integrate the system into existing environments with minimal network reconfiguration. This method requires no network reconfiguration and the implementation is transparent to clients.
In a typical Transparent Mode implementation, the Web Proxy system is installed between the primary internal switch or router and an existing network firewall to act as a bridge for all non-local traffic, except selected web traffic that is examined by the Web Proxy. The system listens for web traffic on TCP port 80 and any specific HTTP requests are processed by the Web Proxy for security threat processing and content filtering before it allows the request through.
Advantages Offers a simple and seamless deployment. No network or client system reconfiguration is required.
Disadvantages All network traffic is sent through the Web Proxy, which may not be preferable depending on the
network environment. Packet inspection is performed on all traffic to determine if data should be proxied or bridged, which
can add additional performance overhead on the Web Proxy. The default port for HTTP traffic (TCP port 80) cannot be modified in Transparent Mode. Only IP-based Proxy or Portal authentication can be used in Transparent Mode. Clustering with other Web Proxy systems is not supported in Transparent Mode. You can cluster a Web
Proxy that runs in Transparent Mode with a non-Web Proxy system, for example, a WatchGuard XCS device that process email.
If the system fails, all network traffic is stopped.

Web Scanning
122 WatchGuard XCS

Field Guide 123
15 Available Resources
Available Resources
For additional information about the WatchGuard XCS and other WatchGuard products, please visit these online resources.
Product DocumentationYou can view and download the most current documentation for the WatchGuard XCS on the WatchGuard Product Documentation page:
http://www.watchguard.com/help/documentation
Training ResourcesTraining presentations and additional training resources are available on the WatchGuard Product Training page:
http://www.watchguard.com/training/courses.asp
WatchGuard User ForumThe WatchGuard forum is an interactive online user forum moderated by senior support engineers. Visit the WatchGuard XCS forum at:
http://www.watchguard.com/forum
Knowledge BaseYou can view and search the knowledge base for information on specific WatchGuard product issues at:
http://customers.watchguard.com
WatchGuard Products and ServicesFor more information on WatchGuard products and services, visit the WatchGuard product information page:
http://www.watchguard.com/products

Available Resources
124 WatchGuard XCS