WARRIOR TRAINING CENTER RAPPEL MASTER · PDF fileWARRIOR TRAINING CENTER RAPPEL MASTER ......
120
WARRIOR TRAINING CENTER WARRIOR TRAINING CENTER WARRIOR TRAINING CENTER RAPPEL MASTER RAPPEL MASTER RAPPEL MASTER HANDBOOK HANDBOOK HANDBOOK “WHEN THE WILL IS STRONG, “WHEN THE WILL IS STRONG, “WHEN THE WILL IS STRONG, EVERYTHING IS EASY” EVERYTHING IS EASY” EVERYTHING IS EASY” FY2013 FY2013 FY2013
Transcript of WARRIOR TRAINING CENTER RAPPEL MASTER · PDF fileWARRIOR TRAINING CENTER RAPPEL MASTER ......

WARRIOR TRAINING CENTER WARRIOR TRAINING CENTER WARRIOR TRAINING CENTER
RAPPEL MASTER RAPPEL MASTER RAPPEL MASTER HANDBOOKHANDBOOKHANDBOOK
“WHEN THE WILL IS STRONG,“WHEN THE WILL IS STRONG,“WHEN THE WILL IS STRONG, EVERYTHING IS EASY”EVERYTHING IS EASY”EVERYTHING IS EASY”
FY2013FY2013FY2013

2

3
TABLE OF CONTENTS
RAPPEL MASTER OPERATIONS
CHAPTER 1
DUTIES AND RESPONSIBILITIES……..………………….…..7
CHAPTER 2
EQUIPMENT AND ROPE MANAGEMENT…….……...…….23
CHAPTER 3
KNOTS AND DEPLOYMENT BAGS……………………..…..26
CHAPTER 4
RAPPEL MASTER PERSONNEL INSPECTION (RMPI)…….50
CHAPTER 5
HOOK-UP INSPECTION………………….……………………78
CHAPTER 6
RAPPELLING PROCEDURES...……………………………….80
CHAPTER 7
AIRCRAFT PREPARATION AND RIGGING...…...…...…….88
CHAPTER 8
AIRCRAFT COMMAND AND CONTROL..…...……………..96
4
APPENDIX
APPENDIX A
TOWER INSPECTION SHEET…..……………..…………......101
APPENDIX B
KNOT EXAMINATION (TEST)……...……………………….104
APPENDIX C
KNOT EXAMINATION (RE-TEST)………………………….105
APPENDIX D
EQUIPMENT INSPECTION (TEST)………...………………..106
APPENDIX E
EQUIPMENT INSPECTION (RE-TEST).…………………….107
APPENDIX F
DA FORM 5752-R (ROPE USAGE LOG)…..………….……..108
APPENDIX G
HOOK-UP EXAMINATION (TEST)...….………………....….109
APPENDIX H
HOOK-UP EXAMINATION (RE-TEST)………………..…....110
APPENDIX I
A/C PREPARATION AND RIGGING UH-1H (TEST).............111
APPENDIX J
A/C PREPARATION AND RIGGING UH-1H (RE-TEST)......112
APPENDIX K
A/C PREPARATION AND RIGGING UH-60 (TEST)……….113
APPENDIX L
A/C PREPARATION AND RIGGING UH-60 (RE-TEST)…...114

5
APPENDIX CONTINUED
APPENDIX M
AIR MISSION BRIEF………………………………………….115
APPENDIX N
AIRCRAFT COMMAND AND CONTROL (TEST)…....…….119
APPENDIX O
AIRCRAFT COMMAND AND CONTROL (RE-TEST)..……120

6
REFERENCES
TC 21-24, Rappelling, January 2008
TC 3-97.61, Military Mountaineering, July 2012
(Replaced FM 3-97.61)
7
CHAPTER 1
DUTIES AND RESPONSIBILITIES (TOWER OPERATIONS)
The static tower used may vary in size and height from 34ft to
90ft. These towers should resemble the structure or aircraft of their
training objective. Plans and designs for static rappel towers can be
obtained through the Directorate of Public Works (DPW) Engi-
neering Division, BLDG 6, Fort Benning, Georgia 31905
(706-545-1591).
Rappel towers must be inspected annually by post safety or post
engineers. Installations, MACOMs, and unit commanders may
establish additional policies and safety procedures as needed to
ensure safe and effective rappelling operations.
RAPPEL MASTER (RM):
The Rappel Master’s primary responsibility is SAFETY. The
RM maintains consistent control of the operation and is
responsible for everything that happens or fails to happen. The
serviceability of all equipment (installation, unit, and personal
property) and the personal supervision of rappelling operations are
the Rappel Master’s (RM) responsibility.
RM qualification is awarded only after the successful comple-
tion of a TRADOC accredited Rappel Master course that includes
the following subjects:
Duties and Responsibilities of a Rappel Master
Safety SOP, regulations, and references
Construction of a deployment bag
Conduct of an equipment rappel off the rappel tower
Conduct a Lock-In
Talking a rappeller through completion of a rappel
Conduct of ground training
Inspecting for proper hook-ups
Inspecting and maintaining equipment

8
Inspecting and maintaining snap links
Inspecting and maintaining rappelling gloves
Inspecting and maintaining rappel ropes
Identifying the rappel capabilities of aircraft used
Controlling rappels from UH-1H or UH-60 aircraft
Tying knots (square, end-of-the-line bowline, anchor-
line, bowline, and Prusik), safety lines, and rappel seats
Inspecting a rappel seat
Aircraft rigging for rappelling operations
Aircraft command and control
RM’s must execute their duties in a tactical or training exercise
once every six months to remain current. Failure to remain current
will require a refresher class taught by a current Rappel Master on
the subjects listed above.
Ground training and wall-side tower rappelling can be
conducted without a school-trained Rappel Master as long as a
fully qualified Rappel Safety Officer (RSO) is on site to assume
the duties and responsibilities of the Rappel Master. (NOTE: The
RSO must be certified and appointed by the commander)
RAPPEL SAFETY OFFICER (RSO):
Must be the rank of SFC or above, trained on applicable Rappel
Master tasks, and is certified by his commander to serve in the
position.
Must have extensive training in rappel operations and risk man-
agement or graduate from one of the following courses:
Rappel Master Course
Air Assault Course
Ranger Course
Basic Military Mountaineering Course
Serves as the OIC during all rappel operations and is responsi-
ble for the overall safety of all rappellers. Ensures that all safety
precautions are followed and briefs VIPs/inspecting authorities.

9
RAPPEL LANE NCO:
Commander-appointed Corporal or above who is trained in the
safe and proper execution of rappelling operations. Rappel Lane
NCO must be qualified to supervise their lane operations and the
following subjects:
Responsibilities and safety requirements
Inspection and maintenance of equipment
Identification of satisfactory anchor points
Identification of safe and unsafe hook-ups
Establishment of a rappel point
Inspection of a rappel seat
Coaching techniques
Rappelling procedures
Emergency procedures
Belay control procedures
Safety is their number one priority. The Rappel Lane NCO en-
sures proper safety procedures are followed, proper hook-ups on
their lane, and issues commands and maintains eye contact with the
rappeller at all times.
Note: If a Rappel Lane NCO has not conducted their duties
within the last six months, they must complete the training listed
above under the supervision of a current Rappel Master.
RAPPELLER:
The following requirements, under the supervision of a Rappel
Master, must be successfully completed before beginning Aircraft
(A/C) rappel training.
Identify all rappelling equipment
Demonstrate construction of rappel seat; donning of rap-
pel harness; proper use and hook-up of rappel device and
rappel rope
Identify unsafe attachments, equipment, rope connec-
tions, and seat construction

10
Define terms used in rappelling operations
Identify knots used in rappel operations
Understand and demonstrate rappel commands
Demonstrate rappelling positions
Demonstrate belaying procedures
Demonstrate the ability to conduct a Lock-In
Exhibit satisfactory performance from a rappel tower of
at least 34ft in height
NOTE: 2 rappels with equipment and weapon and 2 without
equipment and weapon (2 rappels are conducted from the free
side of the tower)
BELAY SAFETY:
Must be Ranger or Air Assault qualified. One Belay Safety must
be present for each two rappel stations.
The Belay Safety ensures belay personnel are performing their
duties properly and should possess the same qualifications as a
Rappel Lane NCO.
BELAYER:
Responsibilities are a subtask of basic rappel requirements and
Soldiers must be trained before conducting rappelling training.
Proper belay procedures include:
Assume a position at the base of the lane about one pace
away from the tower area
Ensures that the rappel ropes are even with the ground
during tower rappels
Loosely holds the rappel rope with both hands to avoid
interference with the rappeller while remaining able to
stop the rappeller
Immediately stops the rappeller by pulling downward on
the rappel ropes if Rappel Master shouts ―FALLING‖ or
loses control of his brake hand during descent
Watches the rappeller at all times and maintains constant
voice or visual contact
Wears a helmet to prevent injuries from falling debris

11
PREPARATION AND SAFETY:
The Rappel Master is in charge of the tower and conducts a visual
and physical inspection of every item of equipment. This includes
the structural lumber and timber, the ladder, the platform floor, and
all anchor points. (Unit SOPs will establish a specific tower in-
spection but for an example see Appendix A)
Static towers will not be used during thunderstorms or
excessively high winds. If ice is present, or the platform is slick from
rain, rappelling will be delayed until conditions are safe.
Following personnel and equipment must be present during static
tower training:
Two military rappel ropes for each rappel station
One Rappel Safety Officer (RSO)
One Rappel Master for each rappel site
One Rappel Lane NCO per rappel station
One medic with medical kit and backboard
One safety or medical evacuation vehicle with driver
One Belayer for each rope station
One Belay Safety for each two rappel stations
Safety briefing must be conducted prior to rappel operations and
must include the following instructions:
Each rappeller must secure loose clothing and equipment
Rappellers climb the tower only when directed by the
RM or Rappel Lane NCO
Rappellers stay in the center of the tower until instructed
to move to a rappel point
When using the troop ladder only three Soldiers are on
the ladder at one time and they must wait until directed to
move up by the RM
All personnel working within 3ft of the edge of the top of
the tower must wear a restraining strap, safety rope
attached to the anchor, or safety rope attached to the rap-
pel rope with break applied. 3FT MUST BE SECURED

12
No one should lean or sit on the railing or banisters of the
tower
When attaching the rappel rope to the snap link, rappel-
lers pull the slack toward the anchor point (Must be
check by the Rappel Master or Rappel Lane NCO) All personnel weighing more than 200lbs will conduct a
standard hook-up rappel to determine if they require a
friction hook-up (Friction hook-up is created by plac-
ing an additional two ropes in the gate of the snap link
for a total of 6 ropes) Combat equipment is positioned on the rappeller so it
does not interfere with the brake hand and the weapon
must be slung diagonally across the back with the muzzle
pointing down/opposite side of brake hand
Heavy duty gloves are required for all rappel training
Ballistic or safety helmets with chin straps fastened are
worn during tower rappel training
Rappellers must maintain eye contact with the RM or
Rappel Lane NCO while receiving commands from them
Rappellers ensure that they have a Belayer on their rope
Belayer keeps both hands on the rope at all times and al-
ways faces the rappeller
All tower rappelling is performed with a double strand of
rope
No running is allowed on the tower
No smoking or eating is allowed near the tower
All participants who are unable to rappel, lack confi-
dence, or refuse to rappel are reported to the RM or OIC
RSO and RM must be aware of the overconfidence and
carelessness of some rappellers
RM ensures all personnel are tower qualified before be-
ginning A/C rappel training
Rappel seats are tied (or harnesses donned) by Soldier
and inspected by the Rappel Master before climbing the
tower.
Rappel seats are removed upon completion of every rap-
pel
Seats must be re-tied and re-inspected by a qualified RM
or Rappel Lane NCO before subsequent rappels

13
All rope stations are rigged with two anchor points
(SEE FIGURE 1.1). The first anchor point is a middle-of-the-rope
knot; the second is an end-of-the-rope anchor knot. The Rappel Mas-
ter removes all slack between the knots to create equal tension on the
anchor points. Also, they ensure rappel ropes reach all the way to the
ground.
FIGURE 1.1
RAPPELLER PREPARATION:
Each rappeller must prepare their individual clothing and equip-
ment. Focus on the following:
Secure shirt tails, loose clothing, equipment, straps, and
long hair
Properly fasten all straps and ensure the helmet is in
serviceable condition
Wear heavy leather workman’s gloves or rappelling
gloves
14
Wear identification tags
Load-bearing equipment (LBE) or load-bearing vests
(LBV) should be unfastened in the front or fastened
loosely behind the back of the rappeller
Rucksack should be worn high and tight on the back of
the rappeller to allow the brake hand to reach the small
of the back (Rucksack adjustment straps will be tied
across the chest or tucked away) Sling the weapon diagonally across the back with the
muzzle down/away from the brake hand side
NOTE: Failure to properly prepare rappellers could result in
bodily injury or damage to equipment
RAPPELLING PROCEDURES:
Friction is created by a snap link that is inserted in a sling rope
seat and fastened to the rappeller. This method provides a faster
and more controlled descent than other methods.
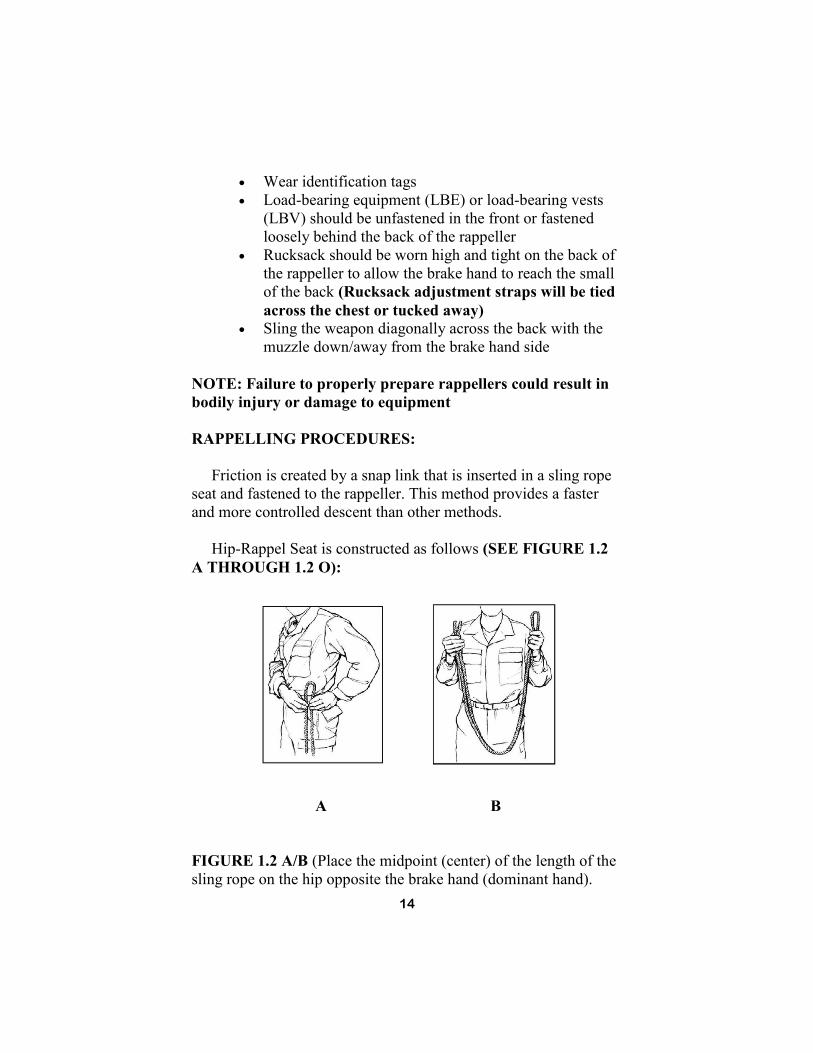
Hip-Rappel Seat is constructed as follows (SEE FIGURE 1.2
A THROUGH 1.2 O):
A B
FIGURE 1.2 A/B (Place the midpoint (center) of the length of the
sling rope on the hip opposite the brake hand (dominant hand).
15
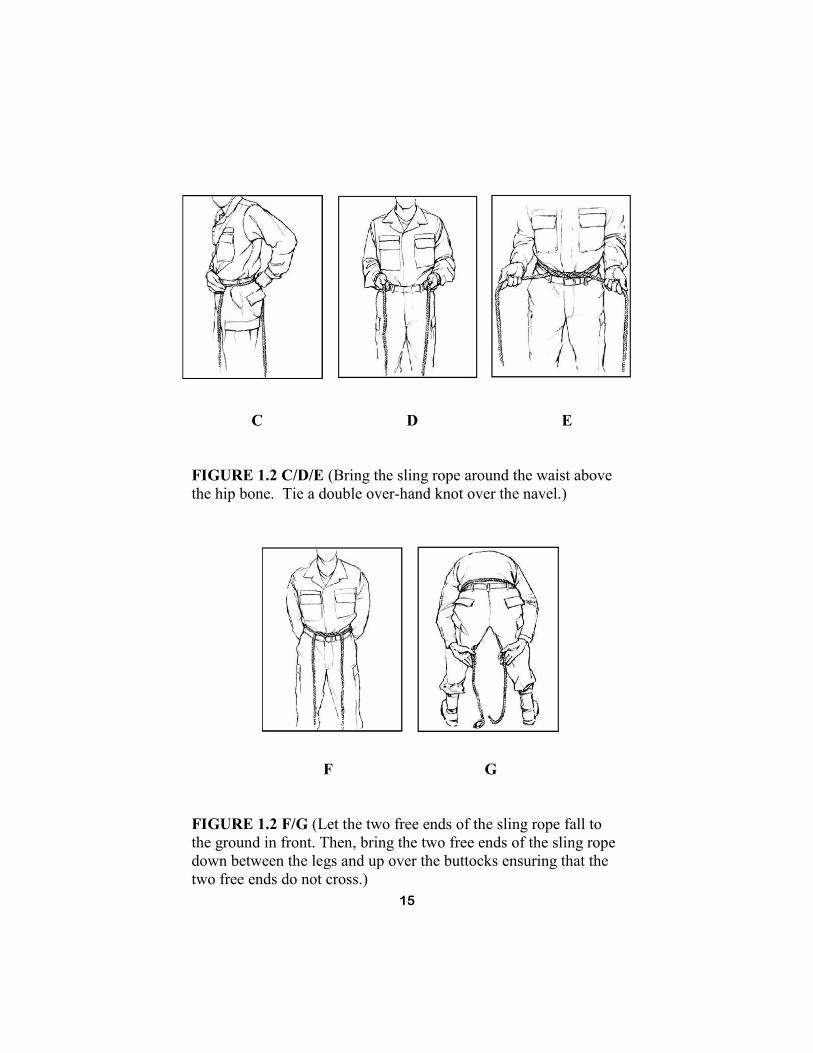
C D E
FIGURE 1.2 C/D/E (Bring the sling rope around the waist above
the hip bone. Tie a double over-hand knot over the navel.)
F G
FIGURE 1.2 F/G (Let the two free ends of the sling rope fall to
the ground in front. Then, bring the two free ends of the sling rope
down between the legs and up over the buttocks ensuring that the
two free ends do not cross.)

16
H I J
FIGURE 1.2 H/I/J (Pass the ends of the ropes over the rope that is
tied around the waist at the two points above the center of the two
rear seat pockets. Grab the free end of the rope that is on the left
side of the body with the left hand, and the free end of the rope that
is on the right side of the body with the right hand. Squat down
and simultaneously pull on both running ends of the ropes and
stand up. Take the two running ends of the rope down the back
over the waist rope from the inside. Bring the running ends back
under the ropes that are going across the buttocks. Secure both free
ends of the rope and move to the opposite side of your brake hand.)
K L
FIGURE 1.2 K/L (Tie the two running ends with a square knot
and two over-hand knots on the hip.)

17
M N O
FIGURE 1.2 M/N/O (Place any excess rope in the trouser pocket
near the square knot. Gate down/hook end of the snap link against
the navel, place the end of the snap link through both sets of ropes.
Rotate the snap link a half turn so the gate is facing up and will
open away from the body.)

18
(HELICOPTER OPERATIONS)
Helicopter rappelling can provide a means of quick insertion
with or without a Landing Zone (LZ).
Personnel required for helicopter operations include the Rappel
Master, the Rappel Safety Officer, the Rappellers, and the
Belayers. In addition, we will discuss the duties and responsibili-
ties of the Pilot-In-Command (PIC).
RAPPEL MASTER (RM):
A qualified RM is aboard each aircraft and SAFETY is their
number one priority. Rappel Masters are responsible for the
following:
Ensures internal communication between the pilot and
RM
Ensures external communication between the A/C and
the Ground-to-Air (GTA)
Inspects all equipment and uses only authorized, ser-
viceable equipment
Inspects and tests all anchor points and knots before the
mission starts
Ensures that all rappellers receive a safety briefing and
the pilots and aircrew receive an Air Mission Brief
(AMB)
Ensures rappellers are rappel qualified before conduct-
ing helicopter rappelling
Maintains communications with the pilot at all times
RAPPEL SAFETY OFFICER (RSO):
RSO is a SFC or above who is either Air Assault or Ranger
qualified. They have overall responsibility for the safety of all rap-
pellers and ensures that all safety precautions are followed.
RSO maintains communication at all times with the pilot and
RM through FM radio. Alert the RM and pilot of any unsafe acts.

19
RAPPELLER:
In addition to the tower qualification requirements outlined on
Page 8 & 9, the individual rappeller must complete advance training
under the supervision of a qualified RM to participate in
TACTICAL helicopter rappelling operations. This includes:
Satisfactorily complete three rappels from a helicopter
from a height of 60ft (2 rappels with combat equipment
and weapon) Demonstrate confidence and proficiency in the tech-
niques, procedures, and equipment used in rappelling
from a helicopter
Know the rappelling equipment used in helicopter opera-
tions and any special equipment required for helicopter
rappelling.
BELAYER:
Assigned to EACH rope and is responsible for walking the rope
(removing slack from underneath the helicopter by walking
backward with the rope as the helicopter descends to land) beneath the helicopter during the descent. Belayer ensures the ropes
are not caught on the A/C skids or tires or entangled with another
rope to ensure a safe landing.
PILOT-IN-COMMAND (PIC):
PIC of the aircraft has the following duties and responsibilities:
Ensures that the aircrew and all non-aircrew personnel
are briefed and understand their responsibilities during
rappelling operations (Includes A/C safety and action in
the event of an emergency) Ensures that the donut ring anchoring device assembly
and/or aircraft anchor points have been inspected for
completeness and functionality
Emphasizes procedural techniques for clearing, recovery,
and/or jettison of ropes
A/C centered over the target with corrections from RM

20
TRAINING:
Sustainment training must be conducted before an element or unit
can perform helicopter rappelling.
Review of the construction of a rappel seat, equipment to
be used, and hook-up procedures Conduct of two rappels on the 34ft or higher tower wall
(One with equipment) Conduct two rappels from the open side of a 34ft or
higher rappel tower
Refresher training must be conducted if a Soldier has not per-
formed a helicopter rappel during the past six months. Consists of
three satisfactory rappels from a tower, to include:
One rappel with a weapon and equipment One rappel executing a Lock-In
PREPARATION AND SAFETY
Medical coverage must consist of a qualified, equipped medic to
respond to any mishap. Also, medical transportation must be
available. (Absence of a medic, medical equipment, or
transportation will terminate training)
If the situation warrants, and the installation cannot support a
MEDEVAC mission, the rappel aircraft may be used as CASEVAC
vehicle as a last resort.
During helicopter rappel training, the RSO will have radio com-
munications with the A/C. Voice communications are required be-
fore starting A/C rappelling. Additionally, the RSO will inform the
PIC to stop operations if an unsafe condition develops.
Rappel operations will not be conducted under the following
conditions:
Ambient temperature is 30-degrees Fahrenheit or less

21
Winds in excess of 30 knots
Lightning strikes within one nautical mile of rappelling
operations
Wind chill factors caused by the helicopter’s rotor wash
or extraction cruise air speeds (Cold weather injuries)
Water or ice on the rope inhibiting the ability of the
rappellers to control their descent
The rope is exposed to the elements for a sufficient length
of time to freeze, thereby reducing its tensile strength
Blowing particles produced by rotor wash causes the air-
crew or the RM to lose visual contact with the ground
The following requirements are necessary for night rappelling
operations:
One chemlight will be attached to the end of the rope and
one on each rappeller
One chemlight will be secured to the attachment point of
the rope
Night Vision Goggles (NVG’s) will not be worn by rap-
pellers during the descent (Aircrew members will wear
NVG’s as required during night operations)
The following safety measures must be discussed during the
safety briefing and enforced during the operation:
Loose clothing and equipment are secured
Helmets are worn with chin straps fastened
Rappellers wear identification tags and earplugs, carry
identification cards, and role down their sleeves
Weapons are slung diagonally across the back with the
muzzle pointing down on the guide hand side
All seats and rappelling equipment must be inspected by
a RM before rappelling
No running is allowed within 50ft of the A/C
Personnel approach and depart the helicopter from the
front and forward of the rear of the cargo doors
(Personnel bend their bodies forward at the waist to
ensure clearance of the rotor blades)

22
Upon boarding the A/C, the rappeller sits or kneels down,
hook-ups, and applies his brake hand to the small of their
back
While in the helicopter, the rappeller maintains eye-to-
eye contact with the RM and receives commands from
them
The rappeller ensures that they have a Belayer on their
rope at all times when conducting training at a hover site
During the descent, the rappeller maintains eye-to-
ground contact
If the rappeller sees their rope coming off the ground or
sees that their Belayer has lost control of their rope, the
rappeller immediately brakes and executes a Lock-In
(Wait for commands from the RM) The rappeller brakes once every 30ft during descent
Belayer does not wear gloves and keeps both hands on
the rope (Eyes on the rappeller at all times)
All rappelling will be conducted using a double strand of
rope

23
CHAPTER 2
EQUIPMENT AND ROPE MANAGEMENT
This Chapter discusses basic equipment used for rappelling
operations, rope types, rope selection, and care procedures for each
rope type.
GLOVES:
The gloves are inspected for serviceability and are
unserviceable if holes are found in the friction-bearing surfaces or
along the seams.
UNSERVICEABLE:
Broken Stitches: 3 consecutive stitches or 5 broken or
loose stitches in a general area
Cuts, rips, burns, or tears that show exposed skin
Missing glove inserts when wearing gloves without
friction bearing pad
SNAP LINKS:
Snap links are used to join equipment, rope, and people into a
functioning system. When used properly they are strong, versatile
items. Snap links are metal (steel, aluminum, or alloys) loops with
a hinged, spring-loaded gate on one side. They come in many sized
shapes, and strengths (with and without locking gates), and in
many types of metal. Though the heaviest of available snap link
metals, steel is the strongest.
TYPES:
1. STANDARD SNAP LINK
2. LOCKING SNAP LINK
Steel

24
2,000 lbs with the gate closed
Spring-loaded gate without locking sleeve
Weight 3.9 ounces
INSPECTION:
Should be inspected daily, before, during, and after use.
The metal should be checked for cracks, grooves, burrs,
rust, and flaws.
There should be no lateral movement when the gate is
open.
The gate spring action should snap shut when released.
The locking notch should have a slant or slot so the gate
remains shut under the impact of a rappellers fall.
Gate pins should not work their way out of their holes
and should not be shorter than their holes.
Locking mechanism should not have stripped threads
and should lock completely
NOTE: The snap link must be boiled in water for 20 to 30 sec-
onds to remove the cleaning agents.
ROPES:
Ropes are the rappeller’s most important items of equipment.
They provide access down the obstacle or aerial platform while
ensuring individual safety.
CONSTRUCTION:
1. KERMANTLE ROPE
2. LAID ROPE
TYPES:
1. STATIC ROPE
2. DYNAMIC ROPE
25
INSPECTION:
Ropes should be inspected before and after each use,
especially when working around loose rock or sharp
edges (KEEP A ROPE LOG FOUND ON APPENDIX
F OF THIS HANDBOOK)
Check Kermantle rope by carefully inspecting how the
rope feels as it runs through the hands. Ensure there are
no lumps or depressions
Ensure ends of the rope are either whipped and dipped
or taped and burned
Check for any cuts or frays in the rope

26
CHAPTER 3
KNOTS AND DEPLOYMENT BAGS
This chapter discusses rope terminology, knots, deployment of
ropes, and coiling techniques.
TERMINOLOGY:
When using ropes, understanding basic terminology is impor-
tant. Most commonly used terms in rappelling include:
A BIGHT of rope is a simple bend
of rope in which the rope does not
cross itself
A LOOP is a bend of a rope in
which the rope crosses itself
A HALF HITCH is a
loop that runs around an
object in such a manner as
to lock or secure itself

27
A TURN wraps around an object
providing 360-degree contact
A ROUND TURN wraps around
an object one and one-half times
RUNNING END
is the loose or
working end of the
rope
STANDING END
is the static, sta-
tionary, or non-
working end of the
rope
LAY is the direction of twist used in construction of the rope
PIGTAIL is the portion of the rope’s running end located
between the safety knot and end of the rope
DRESS is the proper arrangement of all knot parts. Removal of
unnecessary kinks, twists, and slack to ensure all rope parts of
the knot make contact is ensured during the dress arrangement
28
KNOTS:
All knots used by a rappeller are divided into four classes:
CLASS I: JOINING KNOTS
CLASS II: ANCHOR KNOTS
CLASS III: MIDDLE ROPE KNOTS
CLASS IV: SPECIAL KNOTS
NOTE: The following knot classes are provided as a general guide
and some knots may be appropriate in more than one class.
Knot tying is an important skill that can be lost if not used and
practiced. Experience/practice in tying knots, bights, bends, and
hitches help the rappeller in many situations.
SQUARE KNOT is used to tie the ends of two ropes of equal
diameter. Therefore, it is a Joining Knot (CLASS I). Listed below
are the steps to tying the Square Knot:
STEP 1. Holding one working end in each hand, place the
working end in the right hand over the one in the left hand.
STEP 2. Pull the working end under and back over the top
of the rope in the left hand.
STEP 3. Place the working end in the left hand over the
one in the right hand and repeat STEP 2.
STEP 4. Dress the knot down and secure it with an
over-hand knot on each side of the Square Knot.
CHECKPOINTS
(1) There are two interlocking bights.
(2) The running end and standing end are
on the same side of the bight formed by
the other rope.
(3) The running ends are parallel to and on
the same side of the standing ends with 4in
minimum pigtails after the over-hand
safeties are tied.

29
END-LINE BOWLINE is used to tie a single fixed loop in the
end of a rope. It is an Anchor Knot (CLASS II). Listed below are
the steps to tying the End-Line Bowline Knot:
STEP 1. Bring the working end of the rope from right to
left (as the climber faces the anchor).
STEP 2. Form an over-hand loop in the standing part of the
rope (on the climber’s right) toward the anchor.
STEP 3. Reach through the loop and pull up a bight.
STEP 4. Place the working end of the rope (on the
climber’s left) through the bight and bring it back onto
itself. Now dress the knot down.
STEP 5. Form an over-hand knot with the tail from the
bight.
CHECKPOINTS
(1) The bight is locked into
place by a loop.
(2) The short portion of the
bight is on the inside of the
fixed loop.
(3) There is a minimum 4in
pigtail after tying the over-
hand safety.
IN-LINE BOWLINE is used to tie the end of a rope around an
anchor. It is an Anchor Knot (CLASS II). Listed below are the
steps to tying the In-Line Bowline Knot:
STEP 1. Bring the working end of the rope around the
anchor, from right to left (as the climber faces the anchor).
STEP 2. Form an over-hand loop in the standing part of the
rope (on the climber’s right) toward the anchor.
STEP 3. Reach through the loop and pull up a bight.
STEP 4. Place the working end of the rope (on the
climber’s left) through the bight and bring it back onto
itself. Now dress the knot down.
STEP 5. Form an over-hand knot with the tail from the
bight.

30
CHECKPOINTS
(1) The bight is locked into place by
a loop.
(2) The short portion of the bight is
on the inside of the loop around the
anchor.
(3) There is a minimum 4in pigtail
after tying the over-hand safety.
MIDDLE-OF-THE-ROPE PRUSIK
is used to put a moveable rope on a fixed rope such as a Prusik as-
cent or a tightening system. It is a Special Knot (CLASS IV).
Listed below are the steps to tying the Middle-of-the-Rope Prusik
Knot:
STEP 1. Double the short rope forming a bight with the
working ends even. Lay it over the long rope so the closed
end of the bight is 12in below the long rope and the
remaining part of the rope (working ends) are the closest to
the climber; spread the working end apart.
STEP 2. Reach down through the 12in bight. Pull up both
working ends and lay them over the long rope. Repeat this
process making sure the working ends pass in the middle of
the first two wraps. Now there are four wraps and a
locking bar working across them on the long rope.
STEP 3. Dress the wraps and locking bar down to ensure
they are tight and not twisted. Tying an over-hand knot
with both ropes will prevent the knot from slipping during
periods of variable tension.
CHECKPOINTS
(1) Four wraps with a locking bar.
(2) The locking bar faces the
climber.
(3) The knot is tight and dressed
down with no ropes twisted or
crossed.
(4) Knot should contain an over-
hand knot.

31
END-OF-THE-ROPE PRUSIK is used to put a moveable
rope on a fixed rope such as a Prusik ascent or a tightening system.
It is a Special Knot (CLASS IV). Listed below are the steps to
tying the End-of-the-Rope Prusik Knot:
STEP 1. Using an arm’s length of rope, place it over the
long rope.
STEP 2. Form a complete round turn in the rope.
STEP 3. Cross over the standing part of the short rope with
the working end of the short rope.
STEP 4. Lay the working end under the long rope.
STEP 5. Form a complete round turn in the rope, working
back toward the middle of the knot.
STEP 6. There are four wraps and a locking bar running
across them on the long rope. Dress the wraps and locking
bar down. Ensure they are tight, parallel, and not twisted.
STEP 7. Finish the knot with a bowline to ensure that the
Prusik knot will not slip out during periods of varying
tension.
CHECKPOINTS
(1) Four wraps with a locking
bar.
(2) The locking bar faces the
climber.
(3) The knot is tight and
dressed down with no ropes
twisted or crossed.
(4) Knot should contain an
over-hand knot.
WATER KNOT is used to attach two webbing ends. It is also
called a ring bend, over-hand retrace, or tape knot. It is a Joining
Knot (CLASS I). Listed below are the steps to tying the Water
Knot:
STEP 1. Tie an over-hand knot in one of the ends.
STEP 2. Feed the other end back through the knot
following the path of the first rope in reverse.
32
STEP 3. Draw tight and pull all of the slack out of the
knot. The remaining tails must extend at least 4in beyond
the knot in both directions.
CHECKPOINTS
(1) There are two over-hand knots,
one retracing the other.
(2) There is no slack in the knot and
the working ends come out of the
knot in opposite directions.
(3) There is a minimum 4in pigtail.
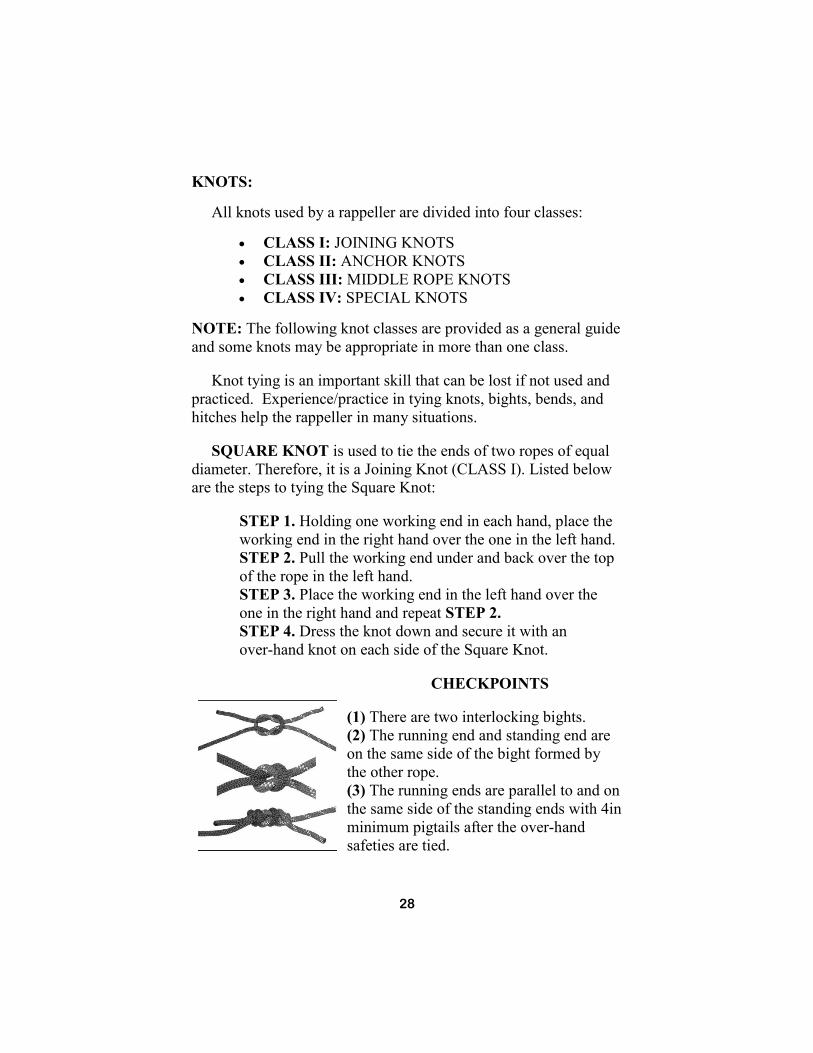
FISHERMAN’S KNOT is used to tie two ropes of the same or
approximately the same diameter. It is a Joining Knot (CLASS I).
Listed below are the steps to tying the Fisherman’s Knot:
STEP 1. Tie an over-hand knot in one end of the rope.
STEP 2. Pass the working end of the other rope through the
first over-hand knot. Tie an over-hand knot around the
standing end of the first rope with the working end of the
second rope.
STEP 3. Tightly dress down each over-hand knot and
tightly draw the knots together.
CHECKPOINTS
(1) The two separate over-hand knots
are tied tightly around the long
standing end of the opposing rope.
(2) The two over-hand knots are
drawn snug.
(3) Ends of rope exit knot opposite
each other with 4in pigtails.

33
DOUBLE FISHERMAN’S KNOT (Double English or
Grapevine Knot) is used to tie two ropes of the same or approxi-
mately the same diameter. It is a Joining Knot (CLASS I). Listed
below are the steps to tying the Double Fisherman’s Knot:
STEP 1. With the working end of one rope, tie two wraps
around the standing end of another rope.
STEP 2. Insert the working end (STEP 1) back through the
two wraps and draw it tight.
STEP 3. With the working end of the other rope, which
contains the standing end (STEPS 1/2), tie two wraps
around the standing end of the other rope (the working end
in STEP 1). Insert the working end back through the two
wraps and draw tight.
STEP 4. Pull on the opposing ends to bring the two knots
together.
CHECKPOINTS
(1) Two double over-hand knots se-
curing each other as the standing
ends of the rope are pulled apart.
(2) Four rope parts on one side of the
knot form two ―X‖ patterns. Four
rope parts on the other side of the
knot are parallel.
(3) Ends of rope exit knot opposite
each other with 4in pigtails.
FIGURE-EIGHT BEND is used to join the ends of two ropes
of equal or unequal diameter within a 5mm difference. It is a
Joining Knot (CLASS I). Listed below are the steps to tying the
Figure-Eight Bend:
STEP 1. Grasp the top of a 2ft bight.
STEP 2. With the other hand, grasp the running end (short
end) and make a 360-degree turn around the standing end.

34
STEP 3. Place the running end through the loop just
formed creating an in-line figure-eight.
STEP 4. Route the running end of the other rope back
through the figure-eight starting from the original rope’s
running end. Trace the original knot to the standing end.
STEP 5. Remove all unnecessary twists and crossovers.
Dress the knot down.
CHECKPOINTS
(1) There is a figure-eight with two
ropes running side by side.
(2) The running ends are on opposite
sides of the knot.
(3) There is a minimum 4in pigtail.
ROUND TURN AND TWO HALF HITCHES is used to tie the
end of a rope to an anchor, so it must have constant tension. It is an
Anchor Knot (CLASS II). Listed below are the steps to tying the
Round Turn and Two Half Hitches:
STEP 1. Route the rope around the anchor from right to
left and wrap down (must have two wraps in the rear of the
anchor, and one in the front). Run the loop around the ob-
ject to provide 360-degree contact, distributing the load
over the anchor.
STEP 2. Bring the working end of the rope left to right and
over the standing end, forming a half hitch (first half hitch).
STEP 3. Repeat STEP 2 (last half hitch has a 4in pig-
tail).
STEP 4. Dress the knot down.
35
CHECKPOINTS
(1) A complete round turn should
exist around the anchor with no
crosses.
(2) Two half hitches should be held
in place by a diagonal locking
bar with no less than a 4in pigtail
remaining.
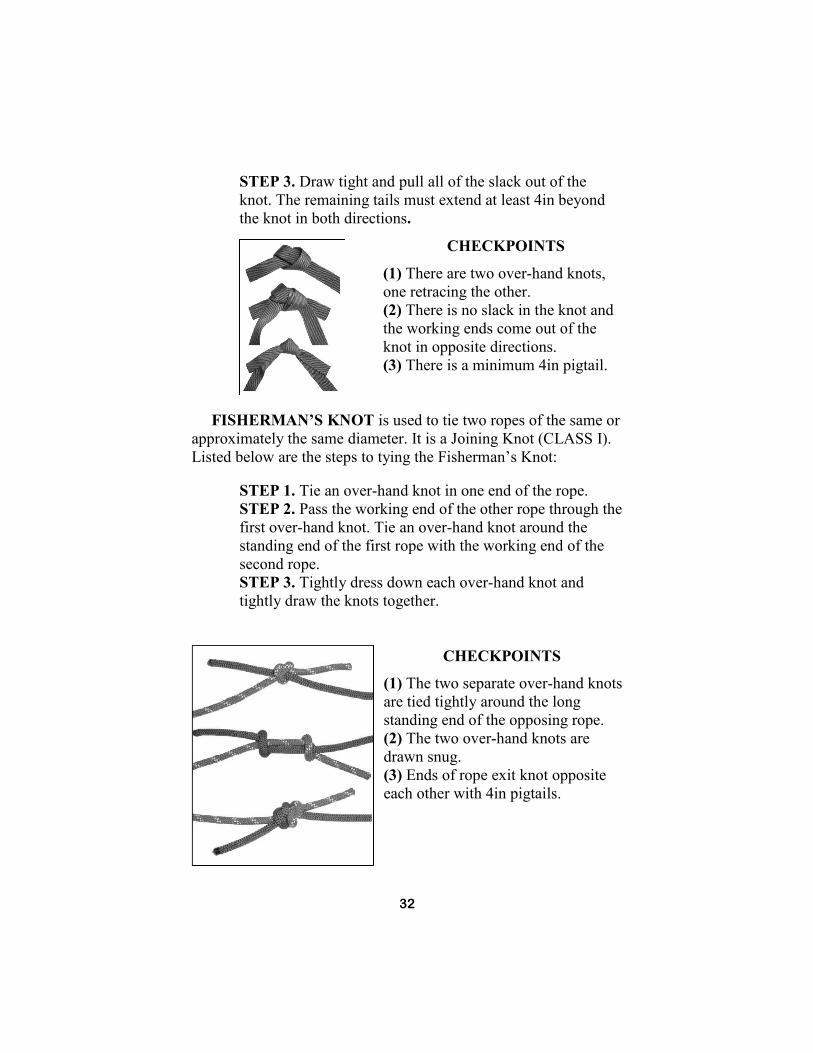
FIGURE-EIGHT RETRACE is used in the same way as the
figure-eight bend. However, by tying the knot in a retrace it can be
used to fasten the rope to trees or to place where the loop cannot be
used. It is an Anchor Knot (CLASS II). Listed below are the steps
to tying the Figure-Eight Retrace:
STEP 1. Use a length of rope long enough to go around the
anchor, leaving enough rope to work with.
STEP 2. Tie a figure-eight knot in the standing end of the
rope, leaving enough rope to go around the anchor. To tie a
figure-eight knot form a loop in the rope, wrap the working
end around the standing part and route the working end
through the loop. The finished knot is dressed loosely.
STEP 3. Take the working end around the anchor point.
STEP 4. With the working end, insert the rope back
through the loop of the knot in reverse.
STEP 5. Keep the original figure-eight as the outside rope
and retrace the knot around the wrap and back to the long-
standing end.
STEP 6. Dress the knot down.
CHECKPOINTS
(1) A figure-eight with a doubled
rope running side-by-side, forming
a fixed loop around a fixed object or
harness.
(2) There is a minimum 4in pigtail.

36
CLOVE HITCH is used at the end of the rope or middle of the
rope. The knot must have constant tension on it once tied to
prevent slipping. It is an Anchor Knot (CLASS II) or Middle Rope
Knot (CLASS III). Listed below are the steps to tying the Clover
Hitch:
MIDDLE OF THE ROPE:
STEP 1. Hold rope in both hands, palms down with
hands together. Slide the left hand to the left from 5
to 7in.
STEP 2. Form a loop away from and back toward
the right.
STEP 3. Slide the right hand from 5 to 7in to the
right. Form a loop inward and back to the left hand.
STEP 4. Place the left loop on top of the right loop.
Place both loops over the anchor and pull both ends
of the rope in opposite directions. The knot is tied.
END OF THE ROPE:
STEP 1. Place 2ft of rope over the top of the an-
chor. Hold the standing end in the left hand. With
the right hand reach under the horizontal anchor,
grasp the working end and bring it inward.
STEP 2. Place the working end of the rope over the
standing end (to form a loop). Hold the loop in the
left hand. Place the working end over the anchor
from 5 to 7in to the left of the loop.
STEP 3. With the right hand, reach down to the left
hand side of the loop under the anchor. Grasp the
working end of the rope. Bring the working end up
and outward.
STEP 4. Dress down the knot.
37
CHECKPOINTS
(1) The knot has two round turns around the anchor with a
diagonal locking bar.
(2) The locking bar is facing 90-degrees from the direction of pull.
(3) The ends exit 180-degrees from each other.
(4) The knot has more than a 4in pigtail remaining.
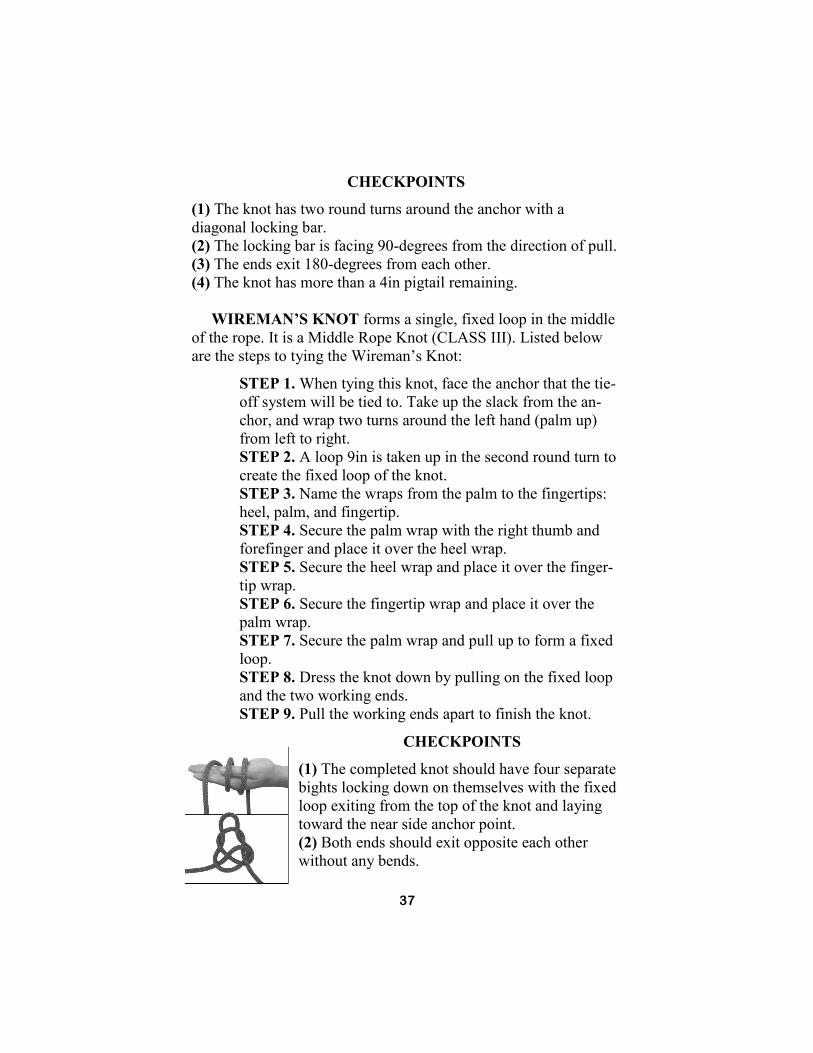
WIREMAN’S KNOT forms a single, fixed loop in the middle
of the rope. It is a Middle Rope Knot (CLASS III). Listed below
are the steps to tying the Wireman’s Knot:
STEP 1. When tying this knot, face the anchor that the tie-
off system will be tied to. Take up the slack from the an-
chor, and wrap two turns around the left hand (palm up)
from left to right.
STEP 2. A loop 9in is taken up in the second round turn to
create the fixed loop of the knot.
STEP 3. Name the wraps from the palm to the fingertips:
heel, palm, and fingertip.
STEP 4. Secure the palm wrap with the right thumb and
forefinger and place it over the heel wrap.
STEP 5. Secure the heel wrap and place it over the finger-
tip wrap.
STEP 6. Secure the fingertip wrap and place it over the
palm wrap.
STEP 7. Secure the palm wrap and pull up to form a fixed
loop.
STEP 8. Dress the knot down by pulling on the fixed loop
and the two working ends.
STEP 9. Pull the working ends apart to finish the knot.
CHECKPOINTS
(1) The completed knot should have four separate
bights locking down on themselves with the fixed
loop exiting from the top of the knot and laying
toward the near side anchor point.
(2) Both ends should exit opposite each other
without any bends.

38
BOWLINE-ON-A-BIGHT (Two-Loop Bowline) is used to
form two fixed loops in the middle of a rope. It is a Middle Rope
Knot (CLASS III). Listed below are the steps to tying the Bowline-
On-A-Bight Knot:
STEP 1. Form a bight in the rope about twice as long as the
finished loops will be.
STEP 2. Tie an over-hand knot on a bight.
STEP 3. Hold the over-hand knot in the left hand so the
bight is running down and outward.
STEP 4. Grasp the bight with the right hand and fold it
back over the over-hand knot so the over-hand knot goes
through the bight.
STEP 5. From the end (apex) of the bight, follow the bight
back to where it forms the cross in the over-hand knot.
Grasp the two ropes that run down and outward and pull
up, forming two loops.
STEP 6. Pull the two ropes out of the over-hand knot and
dress the knot down.
STEP 7. A final dress is required. Grasp the ends of the
two fixed loops and pull, spreading them apart to ensure the
loops do not slip.
CHECKPOINTS
(1) There are two fixed loops that
will not slip.
(2) There are no twists in the knot.
(3) A double loop is held in place by
a bight.
TWO-LOOP FIGURE-EIGHT is used to form two fixed
loops in the middle of a rope. It is a Middle Rope Knot (CLASS
III). Listed below are the steps to tying the Two-Loop Figure-Eight
Knot:
STEP 1. Using a doubled rope, form an 18in bight in the
left hand with the running end facing to the left.

39
STEP 2. Grasp the bight with the right hand and make a
360-degree turn around the standing end in a counterclock-
wise direction.
STEP 3. With the working end, form another bight and
place that bight through the loop just formed in the left
hand.
STEP 4. Hold the bight with the left hand and place the
original bight (moving toward the left hand) over the knot.
STEP 5. Dress the knot down.
CHECKPOINTS
(1) There is a double figure-eight
knot with two loops that share a
common locking bar.
(2) The two loops must be adjustable
by means of a common locking bar.
(3) The common locking bar is on
the bottom of the double figure-eight
knot.
FIGURE-EIGHT LOOP (Figure-eight-on-a-bight) is used to
form a fixed loop in a rope. It is a Middle Rope Knot (CLASS III).
Listed below are the steps to tying the Figure-Eight Loop Knot:
STEP 1. Form a bight in the rope about as large as the di-
ameter of the desired loop.
STEP 2. With the bight as the working end, form a loop in
rope (standing end).
STEP 3. Wrap the working end around the standing end
360-degrees and feed the working end through the loop.
Dress the knot tightly.
CHECKPOINTS
(1) The loop is the desired size.
(2) The ropes in the loop are
parallel and do not cross over
each other.
(3) The knot is tightly dressed.
40
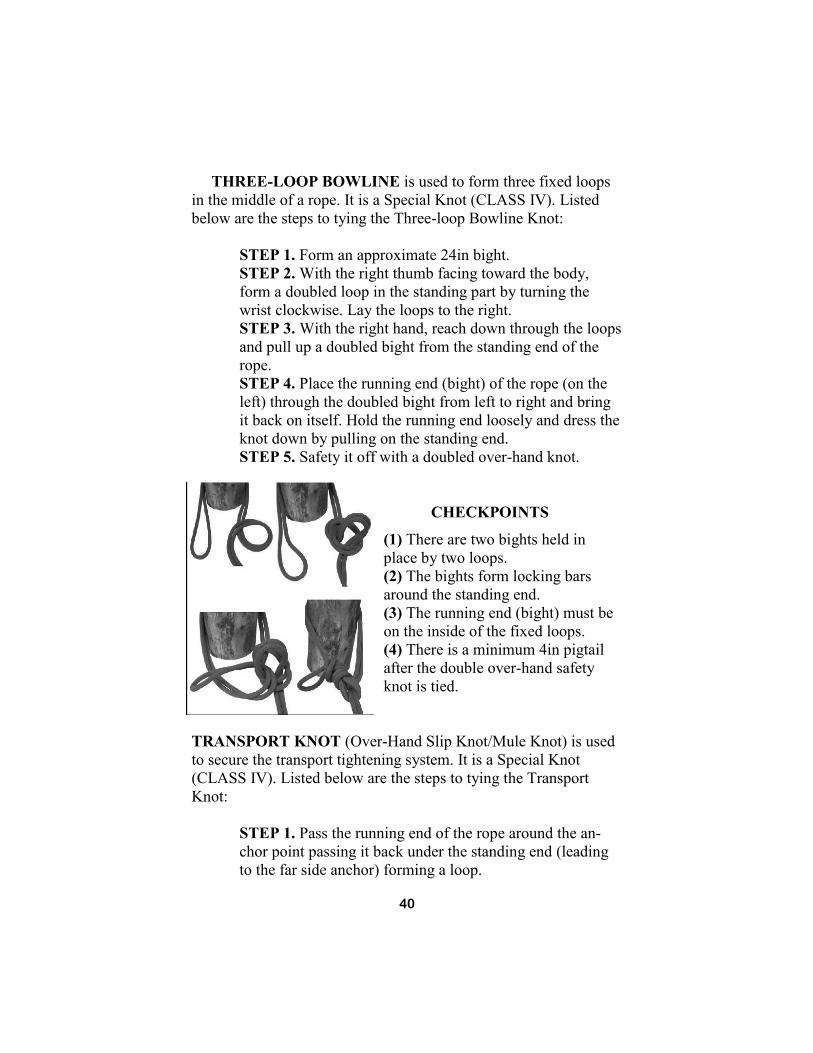
THREE-LOOP BOWLINE is used to form three fixed loops
in the middle of a rope. It is a Special Knot (CLASS IV). Listed
below are the steps to tying the Three-loop Bowline Knot:
STEP 1. Form an approximate 24in bight.
STEP 2. With the right thumb facing toward the body,
form a doubled loop in the standing part by turning the
wrist clockwise. Lay the loops to the right.
STEP 3. With the right hand, reach down through the loops
and pull up a doubled bight from the standing end of the
rope.
STEP 4. Place the running end (bight) of the rope (on the
left) through the doubled bight from left to right and bring
it back on itself. Hold the running end loosely and dress the
knot down by pulling on the standing end.
STEP 5. Safety it off with a doubled over-hand knot.
CHECKPOINTS
(1) There are two bights held in
place by two loops.
(2) The bights form locking bars
around the standing end.
(3) The running end (bight) must be
on the inside of the fixed loops.
(4) There is a minimum 4in pigtail
after the double over-hand safety
knot is tied.
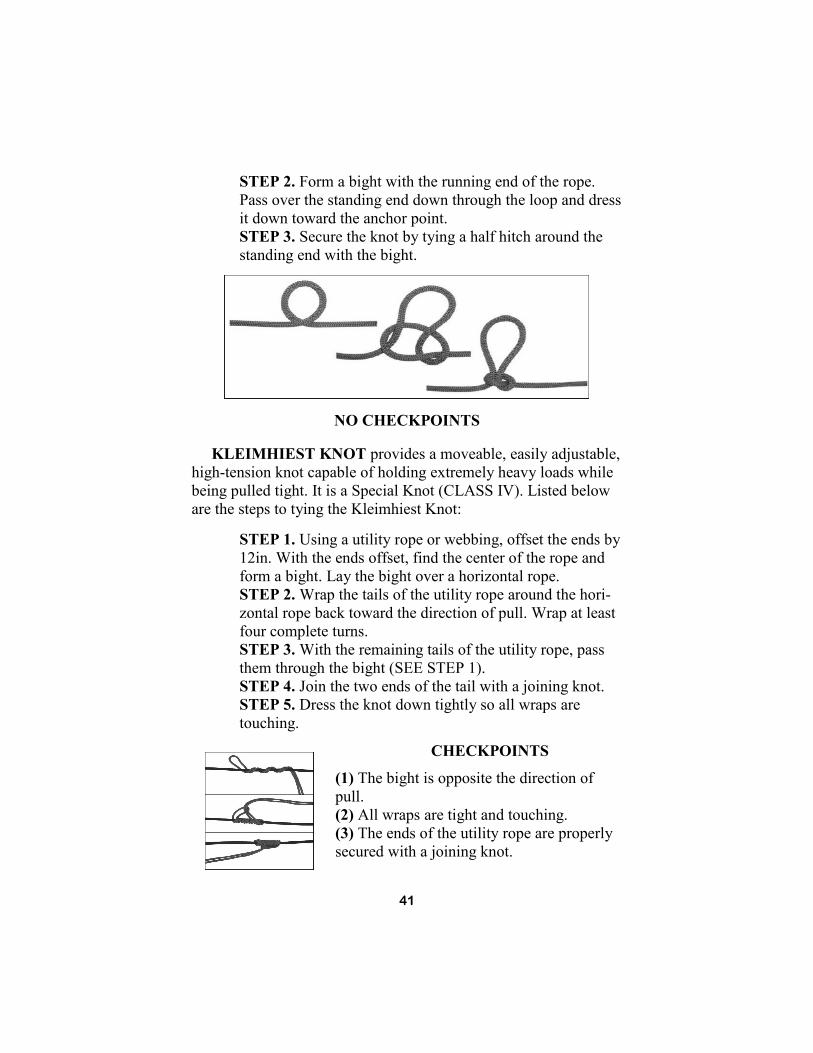
TRANSPORT KNOT (Over-Hand Slip Knot/Mule Knot) is used
to secure the transport tightening system. It is a Special Knot
(CLASS IV). Listed below are the steps to tying the Transport
Knot:
STEP 1. Pass the running end of the rope around the an-
chor point passing it back under the standing end (leading
to the far side anchor) forming a loop.
41
STEP 2. Form a bight with the running end of the rope.
Pass over the standing end down through the loop and dress
it down toward the anchor point.
STEP 3. Secure the knot by tying a half hitch around the
standing end with the bight.
NO CHECKPOINTS
KLEIMHIEST KNOT provides a moveable, easily adjustable,
high-tension knot capable of holding extremely heavy loads while
being pulled tight. It is a Special Knot (CLASS IV). Listed below
are the steps to tying the Kleimhiest Knot:
STEP 1. Using a utility rope or webbing, offset the ends by
12in. With the ends offset, find the center of the rope and
form a bight. Lay the bight over a horizontal rope.
STEP 2. Wrap the tails of the utility rope around the hori-
zontal rope back toward the direction of pull. Wrap at least
four complete turns.
STEP 3. With the remaining tails of the utility rope, pass
them through the bight (SEE STEP 1).
STEP 4. Join the two ends of the tail with a joining knot.
STEP 5. Dress the knot down tightly so all wraps are
touching.
CHECKPOINTS
(1) The bight is opposite the direction of
pull.
(2) All wraps are tight and touching.
(3) The ends of the utility rope are properly
secured with a joining knot.

42
FROST KNOT is used when working with webbing and you
need to create the top loop of an etrier. It is a Special Knot
(CLASS IV). Listed below are the steps to tying the Frost Knot:
STEP 1. Lap one end (a bight) of webbing over the other
about 10 to 12in.
STEP 2. Tie an over-hand knot with the newly formed tri-
ple-strand webbing; dress tightly.
CHECKPOINTS
(1) The tails of the webbing run in
opposite directions.
(2) Three strands of webbing are
formed into a tight over-hand knot.
(3) There is a bight and tail exiting
the top of the over-hand knot.
GIRTH HITCH is used to attach a runner to an anchor or piece of
equipment. It is a Special Knot (CLASS IV). Listed below are the
steps to tying the Girth Hitch:
STEP 1. Form a bight.
STEP 2. Bring the runner back through the bight.
STEP 3. Cinch the knot tightly.
CHECKPOINTS
(1) Two wraps exist with a locking bar running across the wraps.
(2) The knot is dressed tightly.

43
MUNTER HITCH is used in conjunction with a pear-shaped
locking snap link, the Munter Hitch is used to form a mechanical
belay. It is a Special Knot (CLASS IV). Listed below are the steps
to tying the Munter Hitch:
STEP 1. Hold the rope in both hands, palms down about
12in apart.
STEP 2. With the right hand, form a loop away from the
body toward the left hand. Hold the loop with the left hand.
STEP 3. With the right hand, place the rope that comes
from the bottom of the loop over the top of the loop.
STEP 4. Place the bight that has just been formed around
the rope into the pear shaped snap link. Lock the locking
mechanism.
CHECKPOINTS
(1) A bight passes through the snap
link, with the closed end around the
standing or running end of the rope.
(2) The snap link is locked.
DEPLOYMENT OF ROPES:
Deployment of the ropes from a helicopter is a critical task. It
can cause a planned rappelling operation to fail or it can increase
the time required to conduct the operation. This is due to the likeli-
hood of the ropes becoming entangled. To prevent this, ropes must
be deployed using a positive control technique. The two techniques
we will discuss are the DEPLOYMENT BAGS and LOG COIL
techniques.

44
DEPLOYMENT BAGS (D-Bags):
Placed on a flat surface with the stow loop facing upward. If the D-
bag still has a static line, the rappeller removes it by cutting the
static line where it attaches to the bag. A 12ft section of the static
line can be used as a safety line in the helicopter.
(1) Use a sandbag or something heavy (5 to 10lbs) as a
weight in the deployment system. Roll the weight into a
rectangular shape, tie it, then place it in a small plastic
bag, rolled and taped. Place a retaining band over the
middle of the weight and place the weight on top of the
D-bag. The weight should be about the same width as
the D-bag.
(2) Lay out and inspect the two ropes. The working ends
(closest to the D-bag) should be even. Place a round
turn with the two working ends of the ropes on the
weight’s retaining band. Working on top of the deploy-
ment bag, start forming figure-eights. The stack should
consist of 8 to 10 figure-eights, one on top of another—
do not exceed the width of the D-bag. Then, Starting
from either side, center a retaining band over the stack.
Ensure that it is over all the figure-eights in the stack.
Repeat the process each time, placing one stack in front
of the other. Continue until about 10ft of rope remains.
If one rope is shorter than the other, the end of the
shorter rope should be about 10ft from the last stack.
(3) For primary anchor point, measure down about 4ft from
the end of the shortest rope. Using both ropes, tie a
bowline without a half hitch. This knot is the primary
anchor point.
(4) For a secondary anchor point, tie an end-of-the-rope
bowline with a half hitch toward the end of the ropes.
The dressed knot should be 18 to 22 in from the pri-
mary anchor point knot when using the UH-1H helicop-
ter and 22 to 30in when using the UH-60 helicopter. If
excess rope remains, S-Fold and tape it between the two
knots. Ensure that 3 to 6 ft of rope remain from the last
stack of figure-eights.

45
(5) To place the ropes in the D-bag, remove the bag from
under the stack of rope. Place the weight into the
bottom of the D-bag, and place all the stacks of figure-
eights, in the order they were made, one on top of the
other into the bag.
(6) Two left, two right, and two rear loops are in the
opening of the D-bag. DO NOT USE THE TWO REAR
LOOPS. Close the flap on the D-bag and push the loops
through the aligning holes on the flap. Using an 8in
piece of gutted Type III Nylon (550-cord), tie the two
loops together with a square knot and two hitches.
Ensure that two 120ft ropes are coming out of the
center of the flap—not to one side. Repeat the process
and tie the right loops together. Wrap the excess rope
lengthwise around the bag.
NOTE: The sizes of the loops of the bowline should be no larger
than an average size fist.
LOG COIL:
Rappeller lays the running end of the double rope along the length
of the coiling log. Then, rappeller coils the double rope around
both the running end of the rope and the coiling log. The rope must
be coiled evenly and tightly.
46
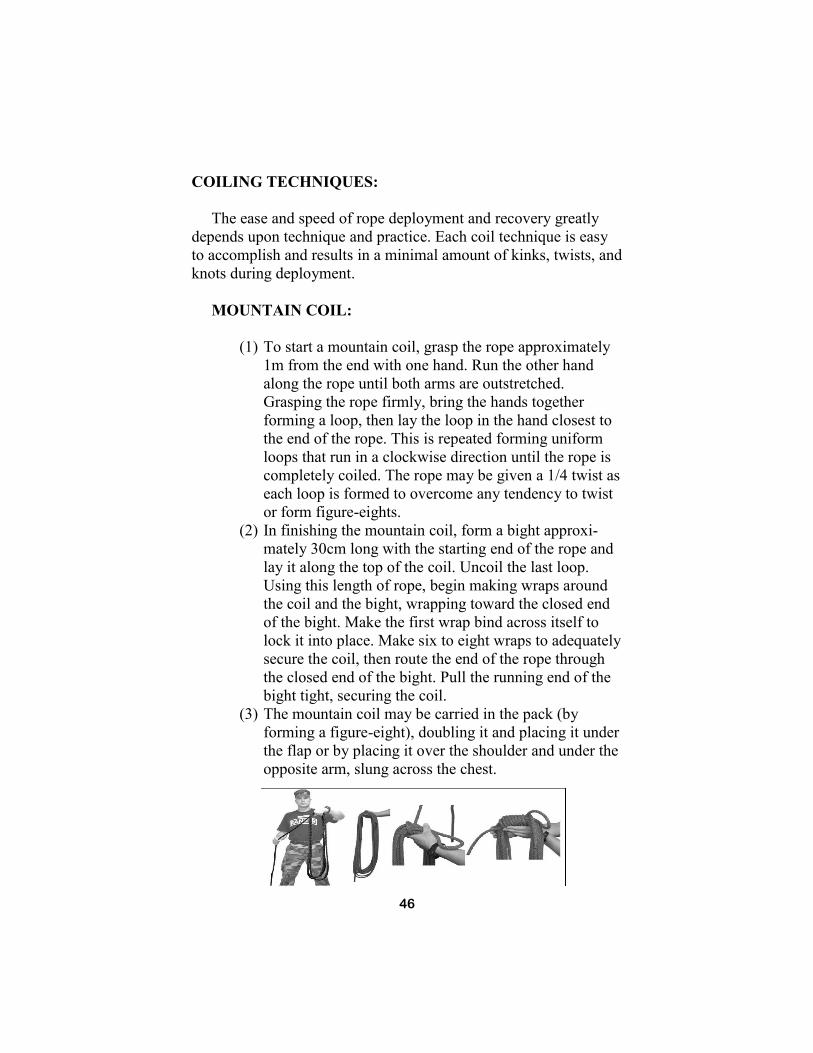
COILING TECHNIQUES:
The ease and speed of rope deployment and recovery greatly
depends upon technique and practice. Each coil technique is easy
to accomplish and results in a minimal amount of kinks, twists, and
knots during deployment.
MOUNTAIN COIL:
(1) To start a mountain coil, grasp the rope approximately
1m from the end with one hand. Run the other hand
along the rope until both arms are outstretched.
Grasping the rope firmly, bring the hands together
forming a loop, then lay the loop in the hand closest to
the end of the rope. This is repeated forming uniform
loops that run in a clockwise direction until the rope is
completely coiled. The rope may be given a 1/4 twist as
each loop is formed to overcome any tendency to twist
or form figure-eights.
(2) In finishing the mountain coil, form a bight approxi-
mately 30cm long with the starting end of the rope and
lay it along the top of the coil. Uncoil the last loop.
Using this length of rope, begin making wraps around
the coil and the bight, wrapping toward the closed end
of the bight. Make the first wrap bind across itself to
lock it into place. Make six to eight wraps to adequately
secure the coil, then route the end of the rope through
the closed end of the bight. Pull the running end of the
bight tight, securing the coil.
(3) The mountain coil may be carried in the pack (by
forming a figure-eight), doubling it and placing it under
the flap or by placing it over the shoulder and under the
opposite arm, slung across the chest.
47
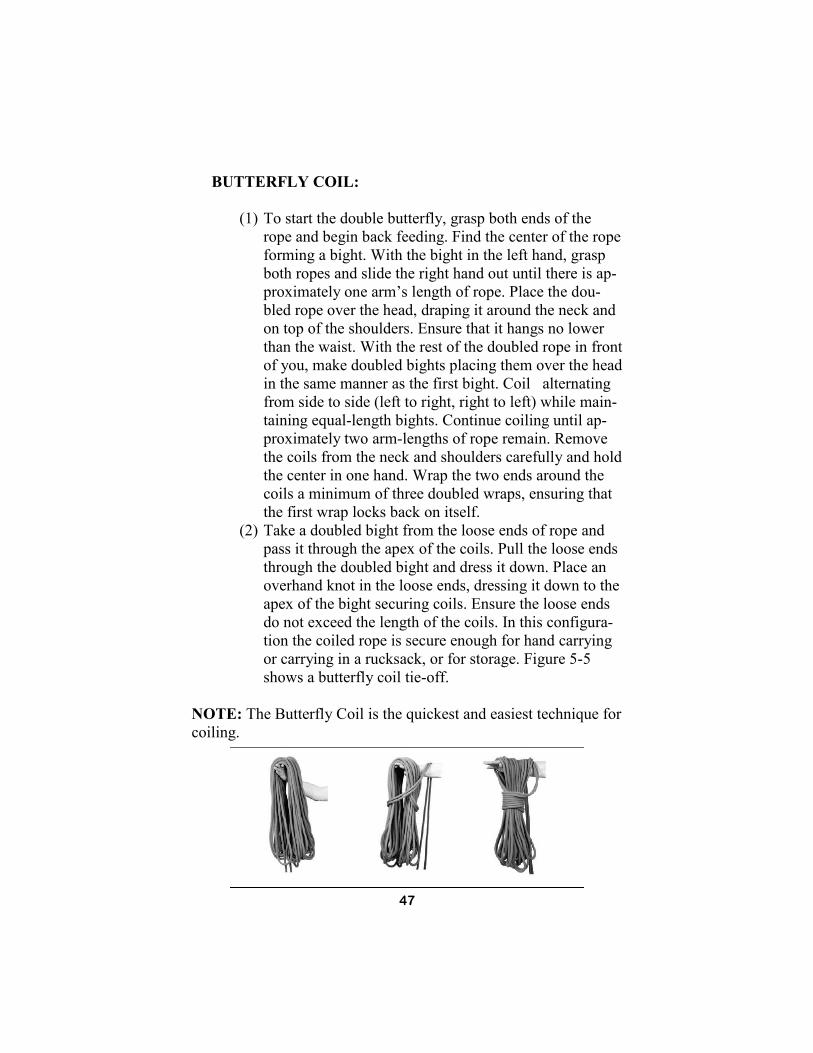
BUTTERFLY COIL:
(1) To start the double butterfly, grasp both ends of the
rope and begin back feeding. Find the center of the rope
forming a bight. With the bight in the left hand, grasp
both ropes and slide the right hand out until there is ap-
proximately one arm’s length of rope. Place the dou-
bled rope over the head, draping it around the neck and
on top of the shoulders. Ensure that it hangs no lower
than the waist. With the rest of the doubled rope in front
of you, make doubled bights placing them over the head
in the same manner as the first bight. Coil alternating
from side to side (left to right, right to left) while main-
taining equal-length bights. Continue coiling until ap-
proximately two arm-lengths of rope remain. Remove
the coils from the neck and shoulders carefully and hold
the center in one hand. Wrap the two ends around the
coils a minimum of three doubled wraps, ensuring that
the first wrap locks back on itself.
(2) Take a doubled bight from the loose ends of rope and
pass it through the apex of the coils. Pull the loose ends
through the doubled bight and dress it down. Place an
overhand knot in the loose ends, dressing it down to the
apex of the bight securing coils. Ensure the loose ends
do not exceed the length of the coils. In this configura-
tion the coiled rope is secure enough for hand carrying
or carrying in a rucksack, or for storage. Figure 5-5
shows a butterfly coil tie-off.
NOTE: The Butterfly Coil is the quickest and easiest technique for
coiling.

48
UNCOILING, BACK-FEEDING, AND STACKING:
When the rope is needed for use, it must be uncoiled and stacked
on the ground properly to avoid kinks and snarls.
(1) Untie the tie-off and lay the coil on the ground. Back-
feed the rope to minimize kinks and snarls. (This is also
useful when the rope is to be moved a short distance
and coiling is not desired.) Take one end of the rope in
the left hand and run the right hand along the rope until
both arms are outstretched. Lay the end of the rope in
the left hand on the ground. With the left hand, re-grasp
the rope next to the right hand and continue laying the
rope on the ground.
(2) The rope should be laid or stacked in a neat pile on the
ground to prevent it from becoming tangled and knotted
when throwing the rope or feeding it to a lead climber.
This technique can also be started using the right hand.
THROWING THE ROPE:
Before throwing the rope it must be properly managed to prevent it
from tangling during deployment. The rope should first be
anchored to prevent its loss over the edge when thrown. Several
techniques can be used when throwing. Personal preference,
situational, and environmental conditions should be taken into
consideration when determining which technique is best. Basic
techniques include:
(1) Back-feed and neatly stack the rope into coils beginning
with the anchored end of the rope working toward the
running end.
(2) Once stacked, make six to eight smaller coils in the left
hand. Pick up the rest of the larger coils in the right
hand. The arm should be generally straight when throw-
ing.
(3) The rope may be thrown underhanded or over-handed
depending on obstacles around the edge of the site.
Make a few preliminary swings to ensure a smooth
throw. Throw the large coils in the right hand first.

49
(4) Throw up and out. A slight twist of the wrist so the
palm of the hand faces up as the rope is thrown allows
the coils to separate easily without tangling. A smooth
follow through is essential.
(5) When a slight tug on the left hand is felt, toss the six to
eight smaller coils out. This will prevent the ends of the
rope from becoming entangled with the rest of the coils
as they deploy.
(6) As soon as the rope leaves the hand, the thrower should
sound off with the warning, ROPE, to alert anyone be-
low the site.
Also, the following techniques could be used when throwing ropes:
(1) Anchor, back feed, and stack the rope properly as
described above.
(2) Take the end of the rope and make six to eight helmet-
size coils in the right hand (more may be needed de-
pending on the length of the rope).
(3) Assume a "quarterback" simulated stance.
(4) Aiming just above the horizon, vigorously throw the
rope, over-handed, up and out toward the horizon.
When windy weather conditions prevail, adjustments must be
made. When throwing into a strong cross wind, the rope should be
angled into the wind so it will land on the desired target. The
stronger the wind, the harder the rope must be thrown to compen-
sate.
TESTING STANDARD:
On Day Two students will have 30 seconds to construct each of the
four knots taught in your block of instruction:
SQUARE KNOT W/ TWO OVER-HANDS
IN-LINE BOWLINE
END-LINE BOWLINE
PRUSIK KNOT
Students will be given a rope corral and 7/16‖ nylon rope.
Students are expected to tie each knot IAW FM 21-24.
NOTE: EVALUATION SHEET CAN BE FOUND IN APPEN-
DIX B OF THE RM HANDBOOK.

50
CHAPTER 4
RAPPEL MASTER PERSONNEL INSPECTION
Rappel Master Personnel Inspection (RMPI) is performed by a
current and qualified Rappel Master. A Rappel Master inspects all
rappellers who are rappelling off a tower or out of an aircraft.
During the inspection, the hip rappel seat and equipment are
inspected for deficiencies that could potentially cause serious
injury or death to a rappeller.
A Rappel Masters number one priority is SAFETY. At no time
will a rappeller attempt a rappel without being properly inspected
by a certified Rappel Master. Failure to check a rappeller before
conducting any type of rappel could result in serious injury or
death.
On Day Three students will be evaluated on their ability to lo-
cate and correctly identify deficiencies on three rappellers. The
three rappellers will consist of a Hollywood rappeller, a Semi-
Combat rappeller, and a Full-Combat rappeller. Students must
identify all major deficiencies and miss no more than two minor
deficiencies collectively for all three rappellers. Majors are -32,
Minors are -15, and incorrect nomenclature, without changing the
meaning, is -10. Three ―Seal of Approvals‖ are needed to stop the
clock which is one ―Seal of Approval‖ per rappeller. Students will
have three minutes and thirty seconds to inspect all three rappel-
lers.
If students create a deficiency, they must call it or it
will be counted against them.
If the student calls a deficiency that is not there, it will
be counted against them.
Every student will begin the test with 100 points.
A major is -32 points, a minor is -15 points, -10 for no-
menclature.
Each rappeller will receive a ―Seal of Approval‖ after
the student has finished inspecting that rappeller. (All 3
to stop time)
The clock will stop after the third seal of approval.
A score of 70% or above is needed to receive a GO.

51
Each Major missed or created and not called will
result in -32 pts.
KNOT ON WRONG SIDE OVER-HAND LAY NOT IN SNAP-
LINK
GLOVE(S) NOT WORN SNAPLINK INVERTED
UNSERVICEABLE GLOVE SNAPLINK BACKWARDS
ACH NOT WORN SNAPLINK THROUGH
OVER-HAND LAY
CHIN STRAP NOT FASTENED SNAPLINK TOUCHES SQUARE
KNOT
IMPROPER SQUARE KNOT ROPES CROSSED BETWEEN LEGS
MISSING OVER-HAND(S) EQUIPMENT ON BRAKE HAND
SIDE OF FLC
OVER-HAND KNOT(S) TIED
THROUGH SQUARE KNOT
EQUIPMENT ON BRAKE HAND
SIDE OF RUCK
RUCKSACK CHEST STRAP NOT
SECURED
EQUIPMENT ON BREAK HAND
SIDE
SNAPLINK MISSING KNIFE ON BRAKE HAND SIDE
WAIST ROPE NOT IN SNAPLINK MISSING ½ HITCH(S)

52
Each Minor missed or created and not called will
result in -15 pts.
SLEEVE(S) NOT DOWN SEAT BELOW BELT
CHIN STRAP NOT BISECTING
CHIN/TOO LOOSE SINGLE OVER-HAND LAY
OVER-HAND TIED BEHIND ½
HITCH TRIPLE OVER-HAND LAY
½ HITCH(S) INSTEAD OF
OVER-HAND(S) IMPROPER OVER-HAND LAY
ONE ROPE USED FOR BOTH
OVER-HAND(S) ROPE ROUTED THROUGH BELT
OVER-HAND KNOT(S) TIED TO
WAIST ROPE
ROPE ROUTED THROUGH BELT
LOOP
OVERHAND TIED AROUND BOTH
ROPES WEAPON IMPROPERLY SLUNG
ROPE ENDS NOT IN POCKET IMPROPER ½ HITCH (S)
FLC NOT ZIPPED LEG ROPES TOO CLOSE
TOGETHER
BELT IN SNAPLINK SEAT TOO LOOSE
SHIRT NOT TUCKED IN RUCKSACK POCKETS NOT
SECURE
RUCKSACK STRAPS NOT
TAPED/SECURED

53
RMPI SEQUENCE:
HOLLYWOOD RAPPELLER
FOLLOWING DEFICIENCIES ARE IN THE ORDER THEY
WOULD BE FOUND DURING THE INSPECTION OF ALL
THREE TYPES OF RAPPELLERS

54
KNOT ON WRONG SIDE (MAJOR)
GLOVE(S) NOT WORN (MAJOR)

55
UNSERVICEABLE GLOVE (MAJOR)
SLEEVE(S) NOT DOWN (MINOR)

56
ACH NOT WORN (MAJOR)
CHINSTRAP NOT FASTENED (MAJOR)
57
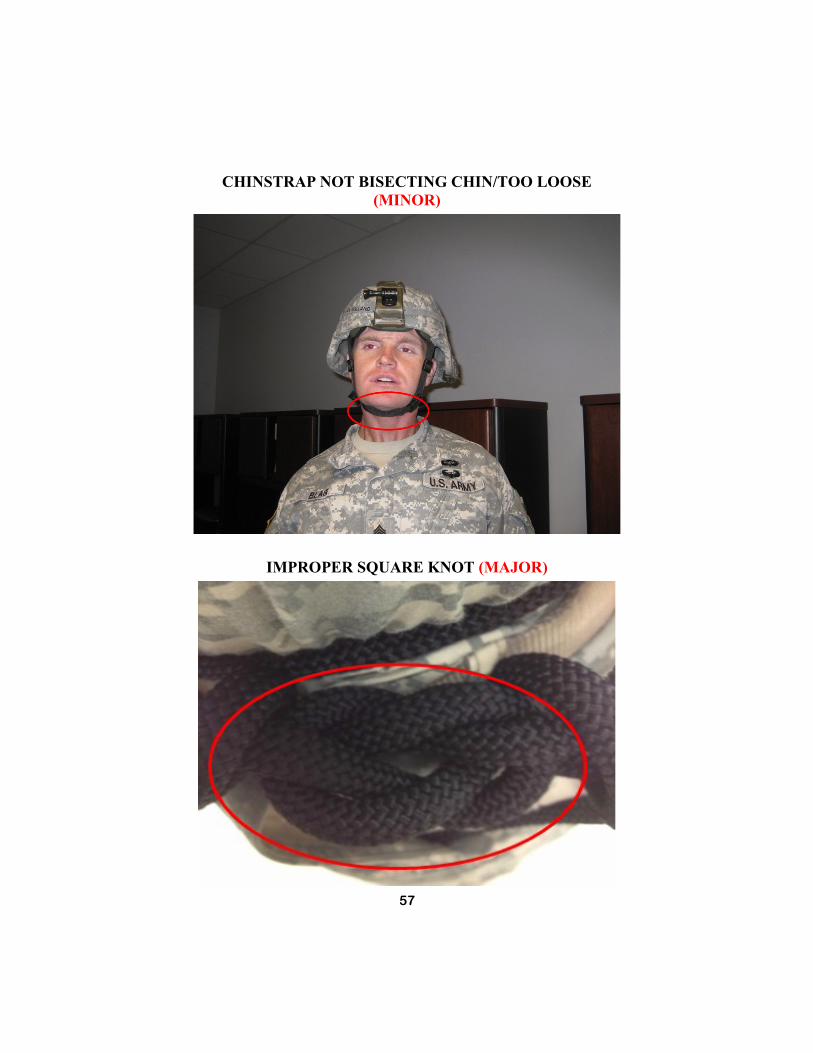
CHINSTRAP NOT BISECTING CHIN/TOO LOOSE
(MINOR)
IMPROPER SQUARE KNOT (MAJOR)
58
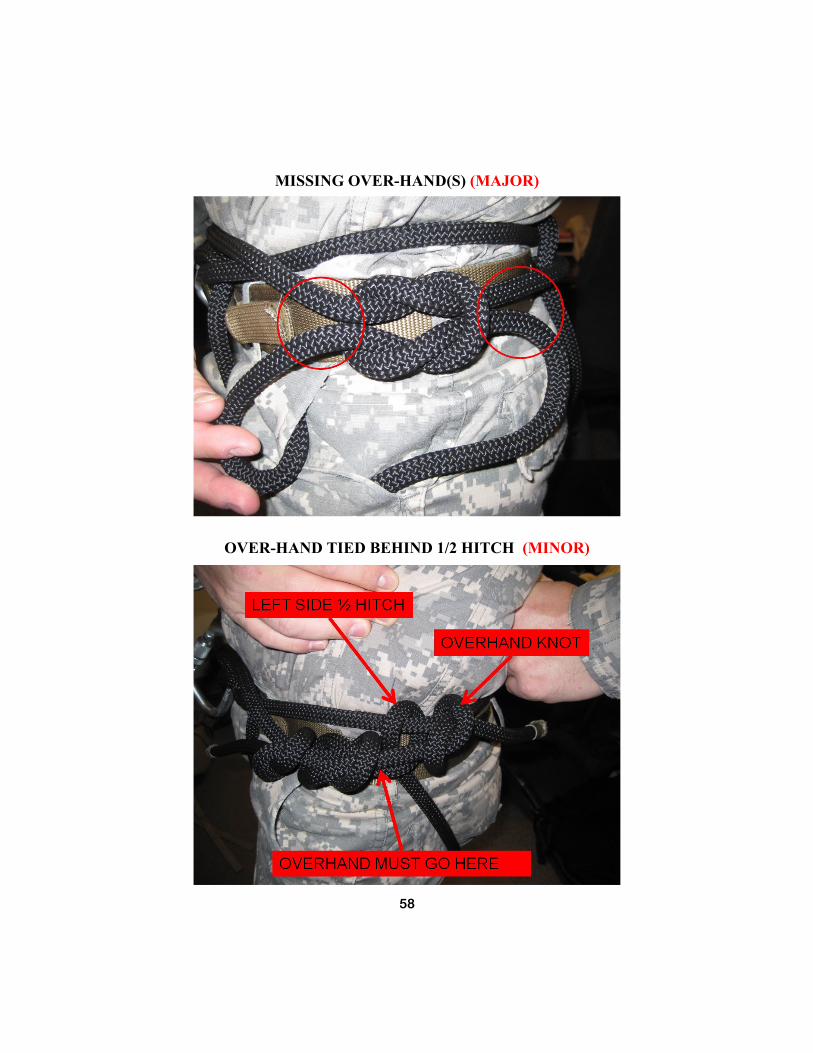
MISSING OVER-HAND(S) (MAJOR)
OVER-HAND TIED BEHIND 1/2 HITCH (MINOR)

59
OVER-HAND KNOT(S) TIED THROUGH SQUARE KNOT
(MAJOR)
1/2 HITCH(S) INSTEAD OF OVER-HAND(S) (MINOR)

60
ONE ROPE USED FOR BOTH OVER-HANDS (MINOR)
OVER-HAND KNOT(S) TIED TO WAIST ROPE (MINOR)

61
OVER-HAND(S) TIED AROUND BOTH ROPES (MINOR)
ROPE END(S) NOT IN POCKET (MINOR)

62
SNAP LINK MISSING (MAJOR)
WAIST ROPE NOT IN SNAP LINK (MAJOR)

63
OVER-HAND LAY NOT IN SNAP LINK (MAJOR)
BELT IN SNAP LINK (MINOR)

64
SHIRT NOT TUCKED IN (MINOR)
SEAT BELOW BELT (MINOR)

65
SNAP LINK INVERTED (MAJOR)
SNAP LINK BACKWARDS (MAJOR)

66
SNAP LINK THROUGH OVER-HAND LAY (MAJOR)
SNAP LINK TOUCHES SQUARE KNOT (MAJOR)

67
SINGLE OVER-HAND LAY (MINOR)
TRIPLE OVER-HAND LAY (MINOR)

68
IMPROPER OVER-HAND LAY (MINOR)
ROPE ROUTED THROUGH BELT (MINOR)
69
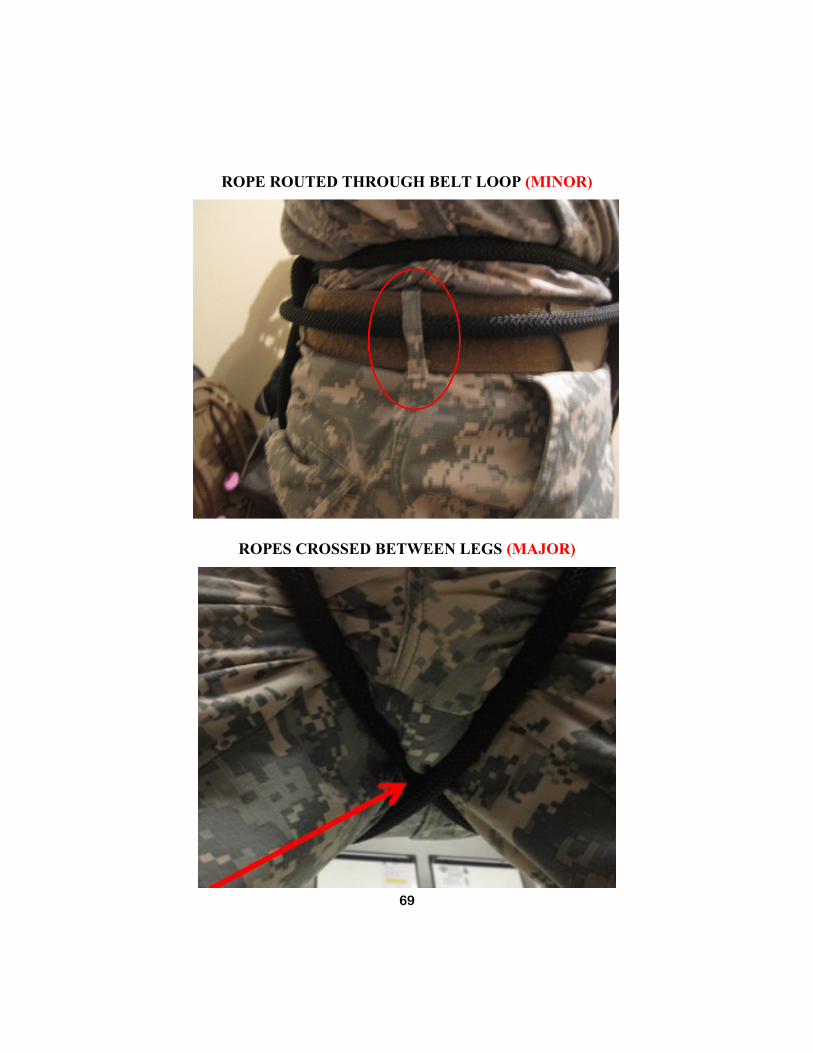
ROPE ROUTED THROUGH BELT LOOP (MINOR)
ROPES CROSSED BETWEEN LEGS (MAJOR)

70
EQUIPMENT ON BRAKE HAND SIDE (MAJOR)
KNIFE ON BRAKE HAND SIDE (MAJOR)

71
MISSING 1/2 HITCH(S) (MAJOR)
IMPROPER 1/2 HTICH(S) (MINOR)
72
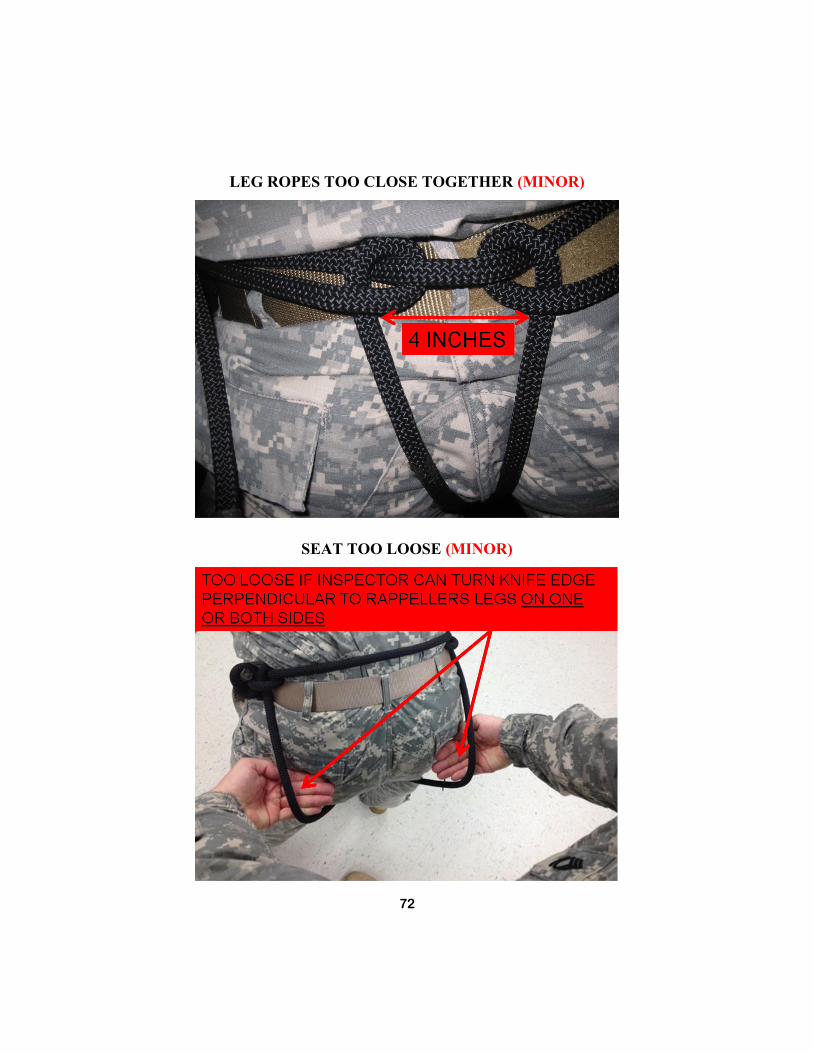
LEG ROPES TOO CLOSE TOGETHER (MINOR)
SEAT TOO LOOSE (MINOR)

73
RMPI SEQUENCE:
SEMI
&
FULL
RAPPELLERS
FOLLOWING DEFIENCIENCIES ARE IN THE ORDER
THEY WOULD BE FOUND DURING THE INSPECTION
OF ONLY SEMI AND FULL COMBAT RAPPELLERS
(THESE ARE IN ADDITION TO THE RMPI SEQUENCE
FOR THE HOLLYWOOD RAPPELLER)
74
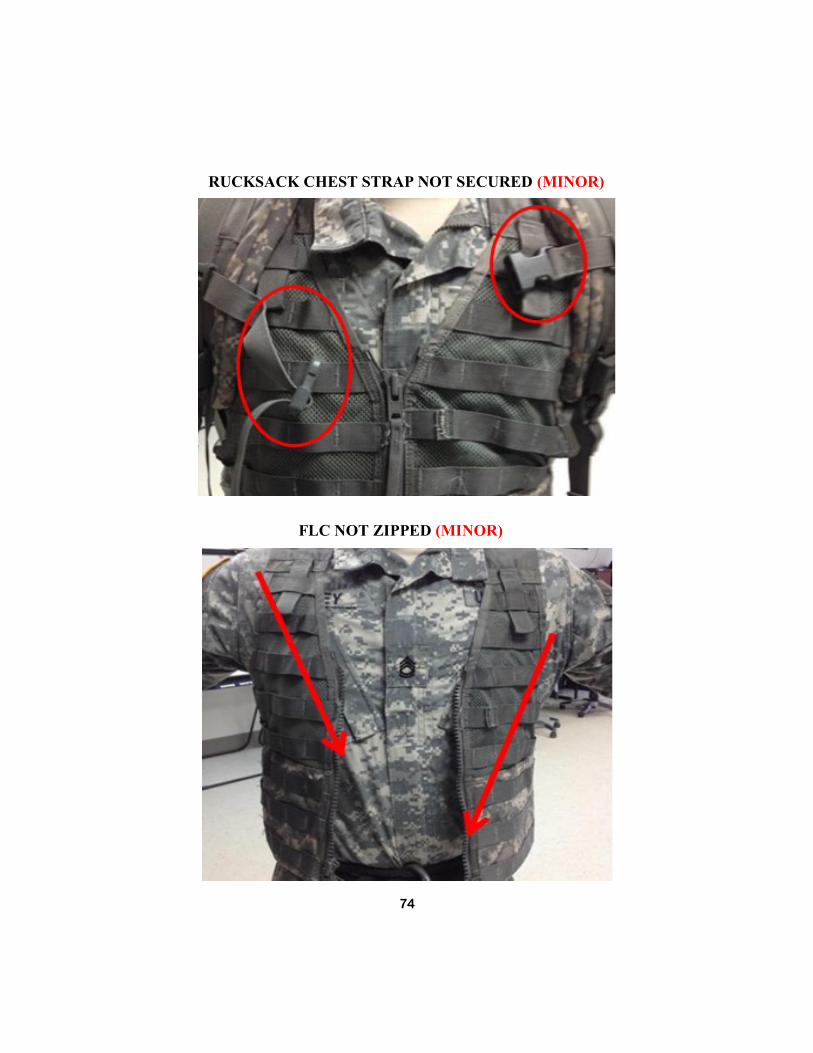
RUCKSACK CHEST STRAP NOT SECURED (MINOR)
FLC NOT ZIPPED (MINOR)

75
WEAPON IMPROPERLY SLUNG (MINOR)
EQUIPMENT ON BRAKE HAND SIDE OF FLC (MAJOR)

76
EQUIPMENT ON BRAKE HAND SIDE OF RUCK (MAJOR)
RUCKSACK POCKETS NOT SECURED (MINOR)

77
RUCKSACK STRAPS NOT TAPED/SECURED (MINOR)
ANY STRAP ON RUCK SACK TO
INCLUDE KIDNEY PAD NOT
SECURED WITH TAPE OR
RETAINER BAND

78
CHAPTER 5
HOOK-UP INSPECTION
Rappel Master will be graded on the proper inspection of a
Hollywood and Aussie rappeller. The standards can be found in
Appendix G and H of this Handbook.
HOLLYWOOD RAPPELLER:
1. Rappel Master will check the anchor point to make sure
there is a secure connection.
2. The guide hand will be palm facing up and there will be
a glove present
3. Sleeves will be rolled down
4. Kevlar/ACH will be worn with the chinstrap bisecting
chin and fastened.
5. The square knot on the rappel seat must face the anchor
point
6. The rappeller will have shirt tucked in and the snap link
will have the gate opening down and away from the Rappel
Master. Also, snap link will not be inverted or backwards.
7. Rappel Master will check for routing of the ropes (two
closest to the RM go towards the anchor point and the
ropes closest to the rappeller go to the ground). There will
be 4 or 6 ropes in the snap link and never 3 or 5 and the
barrel will be locked.
8. Slap the arm to reveal the brake hand so you may
observe if sleeves are rolled down and glove is present on
the brake hand.
9. Check the routing of the ropes to ensure the rappeller or
another object is not tangled.
10. Finally replace the brake hand by tapping the arm.

79
AUSSIE RAPPELLER:
1. Rappel Master will check the anchor point to make sure
there is a secure connection.
2. Snap link will have the gate opening down and away
from the Rappel Master. Also, snap link will not be
inverted or backwards.
3. Rappel Master will check for routing of the ropes (two
closest to the RM go towards the anchor point and the
ropes closest to the rappeller go to the ground). There will
be 4 or 6 ropes in the snap link and never 3 or 5 and the
barrel will be locked.
4. Rappel Master will (visually) make sure the guide hand
has a glove present and the sleeves are rolled down.
(NO POINTING)
5. Visually inspects the Kevlar/ACH is worn with the chin
strap bisecting chin and fastened. (NO POINTING)
6. The square knot on the Aussie seat must be present in the
front of the rappeller.
7. Slap the arm to reveal the brake hand so you may
observe if sleeves are rolled down and glove is present on
the brake hand.
8. Check the routing of the ropes to ensure the rappeller or
another object is not tangled.
9. Finally replace the brake hand by tapping the arm.
NOTE: There will be a 10 second time standard to inspect each
rappeller in which you must correctly identify if the rappeller
is a good hook-up and if not what is wrong.

80
CHAPTER 6
RAPPELLING PROCEDURES
BASIC RAPPELLING:
THREE BRAKES:
1. The Rappel Master states, ―Next rappeller step forward,
take a knee, and sound off with what brake hand you are‖
2. After ensuring knot is towards the anchor point and
Rappel Master is sure the Belay person is in place, Rappel
Master tells the rappeller to hook up
3. Once rappeller has locked their barrel, put their guide-
hand palm facing up, and brake hand in the small of their
back the Rappel Master will check for a ―good‖ hook-up
4. For ―good‖ hook-up refer to Chapter Five of the Rappel
Master Handbook
5. After Rappel Master has checked the hook-up they will
state ―you are lane ___‖ and give the command of ―Get
Ready‖
6. The rappeller will tug on the rappel ropes three times and
ensure the ropes are secured to the anchor point. Also,
rappeller will look over the edge of the tower and ensure
the belay is in place by stating, ―Lane #, On Rappel‖
7. Once rappeller is confident belay is paying attention then
the Rappel Master will give the command of ―Position‖
8. Rappel Master will ensure the rappeller slowly
approaches the edge of the tower and ―milk‖ themselves
out to a good ―L‖ position
9. Once rappeller is set, Rappel Master will give a
statement that gives their expectation for the upcoming
rappel. (For example: ―Three bounds, three brakes all the
way to the ground. On each brake look back at me for a
critique. Make sure you do your 4 point body check.‖)

81
10. The Rappel Master will then give the command of
―GO‖
11. After each brake the Rappel Master will give the
student a critique on their steps of performance and then
give the command of ―GO‖
12. Once rappeller is above the Belay person’s head the
Rappel Master will tell the rappeller to get off the ropes.
13. Once the ropes are clear the Rappel Master will call the
next rappeller forward.
LOCK-IN:
1. The Rappel Master states, ―Next rappeller step forward,
take a knee, and sound off with what brake hand you are‖
2. After ensuring knot is towards the anchor point and
Rappel Master is sure the Belay person is in place, Rappel
Master tells the rappeller to hook up
3. Once rappeller has locked their barrel, put their guide-
hand palm facing up, and brake hand in the small of their
back the Rappel Master will check for a ―good‖ hook-up
4. For ―good‖ hook-up refer to Chapter Five of the Rappel
Master Handbook
5. After Rappel Master has checked the hook-up they will
state ―you are lane ___‖ and give the command of ―Get
Ready‖
6. The rappeller will tug on the rappel ropes three times and
ensure the ropes are secured to the anchor point. Also,
rappeller will look over the edge of the tower and ensure
the belay is in place by stating, ―Lane #, On Rappel‖
7. Once rappeller is confident belay is paying attention then
the Rappel Master will give the command of ―Position‖
8. Rappel Master will ensure the rappeller slowly
approaches the edge of the tower and ―milk‖ themselves
out to a good ―L‖ position

82
9. Once rappeller is set, Rappel Master will give a
statement that gives their expectation for the upcoming
rappel. (For example: ―Give me one good bound half way
down and then look back at me. Make sure you do your
four point body check.‖)
10. The Rappel Master will then give the command of
―GO‖
11. After the rappeller brakes the Rappel Master will give
the student a critique on their steps of performance.
12. The Rappel Master will give the command of ―Lock-
In‖ and then ensure the rappeller conducts a proper lock-in
13. Once the rappeller is sure they conducted a proper
lock-in they will begin to count and at that time the Rappel
Master will tell the rappeller to separate ropes to ―name
tape‖ level
14. The Rappel Master will then give the command of
―GO‖ ensuring when the rappeller brakes they do so to
―name tape‖ level
15. Once rappeller is above the Belay person’s head the
Rappel Master will tell the rappeller to get off the ropes.
16. Once the ropes are clear the Rappel Master will call the
next rappeller forward.
STEPS OF PERFORMANCE:
Rappeller hooks-up correctly (NO FATAL HOOK-UPS)
Checks anchor point and belay person
Doesn’t stand up until given the command of ―Position‖
Gets into a good ―L‖ position
Does four point body check
Fully extends their brake arm
Clears the tower without incident
Clears decent the entire bound until they brake
83
Takes all commands from the Rappel Master
Brakes to the small of their back with knuckle to spine contact
( Not to their hip)
Continues to do four point body checks after each brake before
the next bound
Does four point body check
Displays confidence throughout the rappel

84
ADVANCED RAPPELLING:
AUSTRALIAN RAPPEL:
1. Rappeller is called forward to conduct the rappel.
2. Rappellers snap link is placed on Aussie seat with the
opening gate facing up. The gate should open down and
away from rappeller and placed on the brake hand side.
3. The rappeller steps forward with hands on their helmet
so that the rappel ropes are on the same side as their snap
link. (The RM will hook up rappeller to the ropes).
4. The rappeller holds out their brake hand at a 45 degree
angle to the front, palm facing the sky, and slightly lower
than shoulder level.
5. The RM will hand the rappeller two ropes which will be
going to the ground. The rappeller will then place their
brake hand across their chest to the ―nametape‖ keeping
their hand closed. Their guide hand will be fully extended
at shoulder level, palm facing forward, and will remain
there until completion of rappel.
6. The rappeller will walk forward until their toes are over
the edge of the tower. The rappeller will begin to milk
themselves out until they’re parallel to the ground. They
will need to keep their hips rotated forward, back slightly
arched, and keep their head up and eyes on the horizon.
7. The RM will tap the rappellers leg or simply say ―GO‖.
8. The rappeller will fully extend their brake arm. This
should put their brake arm 45degrees in front of them.
9. Once the rappeller leaves the tower they should assume a
―starfish‖ like position keeping their guide hand fully
extended at shoulder level, palm facing forward.
10. Brake two or three times during descent. To brake
simply move the brake hand back to nametape.
11. Once on the ground double time away from the tower
and assume belay.

85
RESCUE RAPPEL:
(A) Rappel Master with the ―HUNG‖ rappeller
(B) Rappel Master on Top Belay
(C) Rappel Master responsible for Rescue
1. (A) states ―HUNG RAPPELER‖ and will place all of
their attention on the hung rappeller. (A) will instruct the
hung rappeller to lock-in while reassuring them.
2. Immediately, ALL other Rappel Masters or Lane NCO’s
will clear their rope by sending all rappellers to the ground.
If the rappeller(s) are not in the ―L‖ shape position then
place them behind the safety line and have them take a
knee.
3. The Belay Safety located at the bottom of the tower
directs their attention to the lane of the hung rappeller and
will assist the belay person if needed. They will assist in
securing the rope that will be redirected from another
rappel lane.
4. The lane next to the hung rappeller will redirect their
rope to the lane of the hung rappeller. They will place the
redirected rope into the redirect snap link that is on the
secondary anchor point. That Rappel Master will become
the rescue rappeller or (C).
5. Simultaneously, the first Rappel Master that is available
(B) will secure the safety rope and hand it to (A). Once the
safety rope is completely lowered to the hung rappeller, (A)
instructs the hung rappeller to attach the snap link that is on
the end of the safety rope around all three ropes of their
rappel seat. (B) then ties a Munter hitch and places it into
the redirect snap link that is located on the primary anchor
point. All of the slack in the safety rope will be removed
and (B) will control the hung rappellers brake and descent
all the way to the ground.

86
6. (C) can utilize two different techniques for the rescue
rappel.
(Option 1) is utilizing a Munter hitch to form a
mechanical belay; to use this technique (C) will
make a loop in the rope and place the rope that
comes from the bottom of the loop over the top of
the loop. This will make a bight around the running
end of the rope. The two ropes used to form the
bight will be placed into the snap link and (C) will
lock their barrel. (C) will be inspected by any
available Rappel Master on the tower.
(Option 2) is utilizing a rescue 8 friction device. (C)
will form a bight in the rope and then route the
bight through the large loop end of the device along
the bridge and over the small looped end. (C) will
then attach the rescue 8 to the snap link through the
small looped end of the device, locking their own
barrel, and then will be inspected by any available
Rappel Master on the tower.
7. (C) will then begin their decent from the tower to the
hung rappeller using only a single rope rappel. Once close
to the rappellers head, (C) will conduct a lock-in. The lock-
in procedures will be based on whichever technique (C)
used.
8. (C) relays ALL information to (A) & (B). Why the
rappeller got hung? What is in the rappellers snap link? The
medical status of the rappeller. Also, any other information
from their prospective. Lastly, they will relay to (A) & (B)
how their going to free the hung rappeller. Cutting
equipment, uniforms, gloves, and if needed the ropes.
9. All three Rappel Masters involved in the rescue WILL
maintain constant communication throughout the entire
process.

87
10. If (C) chooses to cut the ropes the following must take
place prior to the ropes being cut:
(C) states ―I NEED TO CUT THE ROPES‖.
(A) states ―DO YOU NEED TO CUT THE
ROPES‖.
(C) states ―YES I NEED TO CUT THE ROPES‖.
(A) states ―ROGER YOU NEED TO CUT THE
ROPES‖.
(C) states ―ROGER CUTTING ROPES‖
(C) proceeds to cut only the rappellers ropes that
they were using to rappel.
**NOTE: (C) WILL NEVER CUT THE SAFETY ROPE THAT
WAS LOWERED TO THE HUNG RAPPELLER AND IS BEING
CONTROLLED BY (B)**
11. (A) ensures that (B) is controlling the hung rappellers
safety rope prior to confirming to (C) that they are okay to
cut the ropes.
12. (B) slowly allows the hung rappeller to descend by
moving the working end of the safety rope towards the
center of the tower and away from the standing end of the
rope.
13. Simultaneously, (C) prepares to finish their descent by
pulling on the free running end of their rope freeing the
locking mechanism.
14. Once the hung rappeller and (C) begin their descent (C)
counts down the number of feet they are from the ground.
For example; 30 ft, 20 ft, 10 ft all the way to the ground.
The last 5 ft will be counted in increments of 1 foot.
15. (A) relays this information to (B) until both rappellers
are safely on the ground.
A successful rescue rappel is measured in safety then in speed and
accuracy. A well prepared and practiced team of Rappel Masters
should be able to safely complete a rescue rappel, meaning both
rappellers are safely on the ground within 2 minutes from the time
the incident happened. Speed will never outweigh safety!

88
CHAPTER 7
AIRCRAFT PREPARATION AND RIGGING
RAPPEL OPERATIONS FOR THE UH-1H HELICOPTER:
The UH-1H helicopter provides a safe, stable aerial platform
from where rappelling operations can be conducted when landing
is not feasible.
CHARACTERISTICS:
DUAL-ENGINE, MEDIUM-SPEED, AND SINGLE-
MAIN ROTOR
TRANSPORT EIGHT RAPPELLERS, ONE RM,
AND A THREE-PERSON CREW
LIFT CAPACITY OF 2,300LBS
SEVEN FLOOR-MOUNTED TIE-DOWN FITTINGS
USED DURING RAPPELLING OPERATIONS
PREPARATION AND RIGGING:
(1) Remove all seats.
(2) Lock the doors in the open position. If no locks are pre-
sent, remove doors. Also, remove small cargo doors.
(3) Pad and tape all sharp edges on the floor, door ledge,
and all protrusions on the skids. Ensure each door ledge has
a scuff pad to protect the rope from contacting the metal
door ledge.
(4) Secure the donut ring to the center of the floor of the
helicopter. The donut ring has six snap hooks numbered
clockwise, with 12 o’clock being toward the front of the
helicopter. The RM positions the clamps of the donut ring
toward the aft end of the helicopter. The RM ensures the
front two snap links and rear two snap links are facing out-
side of the donut ring and hooks them to the tie-down ring
with the snap hook facing down. RM ensures the center
two snap hooks face into the donut ring and are connected
to the floor tie-down ring with the gate facing down. Attach
the free-floating safety ring to the center floor tie-down
ring using a seventh snap hook.

89
(DONUT RING ATTACHED TO THE FLOOR OF THE UH-1H)
NOTE: Using this technique has caused equipment failure in
many aircraft. Therefore, the cable clamp nuts must be inspected
and certified as airworthy by the pilot or maintenance crew before
flying the mission.
CONSTRUCTION OF ANCHOR POINTS:
In addition to the usual equipment requirements for rappelling
operations, an anchor assembly is fabricated. This anchor assembly
is commonly known as a ―DONUT RING‖. The secondary anchor
point is a ―FLOATING SAFETY RING‖.
DONUT RING
Primary (No. 1) anchor point for the rappelling ropes is con-
structed from a 1/2in steel cable with a steel wire core. The cable is
120in long, consists of 6 strands (18 wires per strand), and has a
tensile strength of 21,000lbs. The completed donut ring has a ten-
sile strength of 3,000lbs.
(1) Thread six parachute static line snap hooks onto the
120in steel cable so four snap hooks are facing out with the gates
down, and the center two snap hooks are facing in with the gates
down. Drill the end portion of each snap hook to make a 5/8in di-
ameter hole, and thread the cable through the hole in the snap
hooks.

90
(2) Overlap the ends of the 120in cable 20in to form a
circle. Secure the ends with four 1/2in U-bolts placed at 2 to 3in
intervals.
(3) Attach two U-bolts to each dead end of the cable so
the bolts engage the dead end. Before torquing the U-bolts, posi-
tion a 12in length of chain or 1/8in diameter cable on the center of
the overlapped 120in steel cable so it remains in position between
the two center U-bolts. Tighten each nut of the U-bolts with a
torque wrench (if possible) to 40ft pounds (480in pounds). After
the U-bolt clamps have been attached and tightened, fasten a steel
plate (drill to fit) over the open end of the U-bolt studs and spot
weld in place to prevent loosening.
(DONUT RING AND RAPPEL ROPE CONNECTION IN A UH-1H)
FLOATING SAFETY RING
Referred to as the secondary (No. 2) anchor point for the rap-
pelling ropes. The snap link at the end of the rappelling rope is
hooked to this connection. Either of the two types of floating safety
rings may be used:
(1) First Method. Thread an elliptical rappelling ring
through the free end of the keeper chain (cable). It is constructed of
cold-rolled steel that is 1/4in in diameter, with inside dimensions
of 2 1/4in (minor axis) and 4in (major axis). Thread a seventh
parachute static line snap hook onto the ring before welding. Weld
this ring together so it can withstand a force up to 3,000 lbs.

91
(2) Second Method. Attach two snap links to the aircraft
tie-down ring in the center of the donut ring. Insert the first snap
link through the free end of the keeper chain (cable) and the tie-
down ring with the gate down. Insert the second snap link through
the free end of the keeper chain (cable) and the tie-down ring with
the gate up. Tape the snap link gates closed with masking tape.
Then tape the snap links together to ensure that the snap link gates
are on opposite sides of each other.
(FLOATING SAFETY RING FORMED WITH TWO SNAP LINKS)
RAPPEL ROPE ANCHOR POINTS
The rappelling rope is connected to the floating safety ring and
donut ring as follows:
(1) No. 1 (Donut Ring) anchor point. Use a bight about
5ft from the end of the standing part of the rope, make one turn
through the snap link forming a round turn. The bowline is the pre-
ferred method of attaching rappel ropes to snap links or anchor
systems. The round turn with two half hitches is a reliable means
of attaching ropes to anchor systems. Secure the round turn to the
snap link with two half hitches. Make the connection to the donut
ring by attaching the snap link gate upward. Ensure the gate faces
upward with the opening away from the knot.
(2) No. 2 (Floating Ring) anchor point. Attach the snap
link the same as the first with some exceptions. Using a bight
about 2ft from the end of the standing part of the rope, connect the
snap link to the rope the same as the first connection.

92
Tape the end of the standing part of the rope and the knots with 2‖
Adhesive Tape to secure them in place. Make the connection to the
floating safety ring the same as the connection to the donut ring.
Four ropes can be connected to the floating safety ring using two
snap links.
(TWO SNAP LINKS FOR THE FLOATING SAFETY RING)
(FOUR RAPPEL ROPES CONNECTED TO FLOATING SAFETY RING)

93
RAPPEL OPERATIONS FOR THE UH-60 HELICOPTER:
The techniques used by the rappeller when rappelling from dif-
ferent A/C are similar. However, positioning, seating, and the tie-
down anchor point are different. Each rappeller is well trained on
each A/C before conducting a rappel.
CHARACTERISTICS:
TWIN ENGINE, MEDIUM-SPEED, AND SINGLE-
MAIN ROTOR
TRANSPORT TEN RAPPELLERS, ONE RM, AND A
FOUR-PERSON CREW
LIFT CAPACITY OF 8,000LBS
FOUR CEILING-MOUNTED TIE-DOWN FITTINGS
USED DURING RAPPELLING OPERATIONS
PREPARATION AND RIGGING:
(1) Lock both cargo doors in the open position.
(2) Removes the center row of troop seats.
(3) Tapes any sharp edges or protrusions on the cargo floor
and door ledges that may come in contact with the rappeller
or the rappelling rope.
(4) Stow loose equipment forward in the cargo compart-
ment.
(5) Extend the RM’s intercom cord to the rear over the aft
utility drain line and tape the cord to the overhead troop
seat support tube.
(6) Install the floor restraint provisions for rappellers No.1
through 6.
(7) Rig and connect rappelling ropes to the A/C primary
and secondary anchoring points.
CONSTRUCTION OF ANCHOR POINTS
PRIMARY ANCHOR POINT:
(1) RM ties a bowline with a half hitch about 4ft from
the standing end of the rope.

94
(2) Attach the two primary snap links to the respective
cabin tie-down fitting ring with gates facing in the opposite and
opposing directions.
(PRIMARY SNAP LINK ATTACHING POINT)
SECONDARY ANCHOR POINT:
(1) RM ties a bowline with a half hitch about 1 1/2ft
from the standing end of the rope.
(2) Attach the secondary snap link to the adjacent over-
head cargo restraint net ring.
(SECONDARY SNAP LINK ATTACHING POINT)
(3) Remove and secure the cargo hook access door and
deploy the cargo hook in the DOWN position.
(4) Install the recovery rope for endangered rappellers.

95
(5) Tapes the unused floor rings.
(PRIMARY AND SECONDARY SNAP LINK ATTACHING POINTS)
NOTE: THERE MUST BE A MINIMUM OF 22IN AND A
MAXIMUM OF 30IN BETWEEN THE ANCHOR KNOTS.
RAPPEL OPERATIONS FOR THE MH-53 HELICOPTER:
The MH-53 helicopter is a highly versatile A/C. It is used for a
variety of missions, usually in conjunction with special operations.
CHARACTERISTICS:
TWO-ENGINE, HEAVY LIFT, AND SEVEN BLADE
MAIN ROTOR
TRANSPORT 23 RAPPELLERS, 1 RM, AND A FIVE
-PERSON CREW
SIX TIE-DOWN RINGS USED DURING
RAPPELLING OPERATIONS

96
CHAPTER 8
AIRCRAFT COMMAND AND CONTROL
PERFORMANCE STEPS:
1. ENTER HELICOPTER AND HOOK UP SAFETY LINE.
2. PERFORM COMMUNICATION CHECK WITH PILOT. (ENSURES COMMUNICATION BETWEEN GTA AND PILOT)
3. WAVE ON RAPPELLERS USING THE PROPER HAND &
ARM SIGNAL.
4. PHYSICALLY TOUCH EACH RAPPELLER’S KNOT
(IN THE CORRECT ORDER) TO ENSURE FACING
TOWARDS INSIDE OF THE A/C.
5. INSPECT EACH RAPPELLER
(BEGIN AT THE FRONT, LEFT OF THE A/C).
CHECK ANCHOR POINT
GUIDE HAND GLOVE
SLEEVE
HELMET, CHINSTRAP FASTENED
SHIRT IS TUCKED IN.
CORRECT HOOK-UP
(SNAP LINK LOCKED – ROUTED ROPES)
EXTEND BRAKE HAND
SLEEVE
GLOVE
ROUTING OF ROPES
REPLACE BRAKE HAND.
SWEEP: BODY PARTS IN A/C
(3 CONSECUTIVE TIMES)
―FREEZE, HEAD AND EYES ON ME‖
(CORRECT HAND & ARM SIGNAL)
6. CHECK WITH BELAY MASTER
(THUMBS UP).
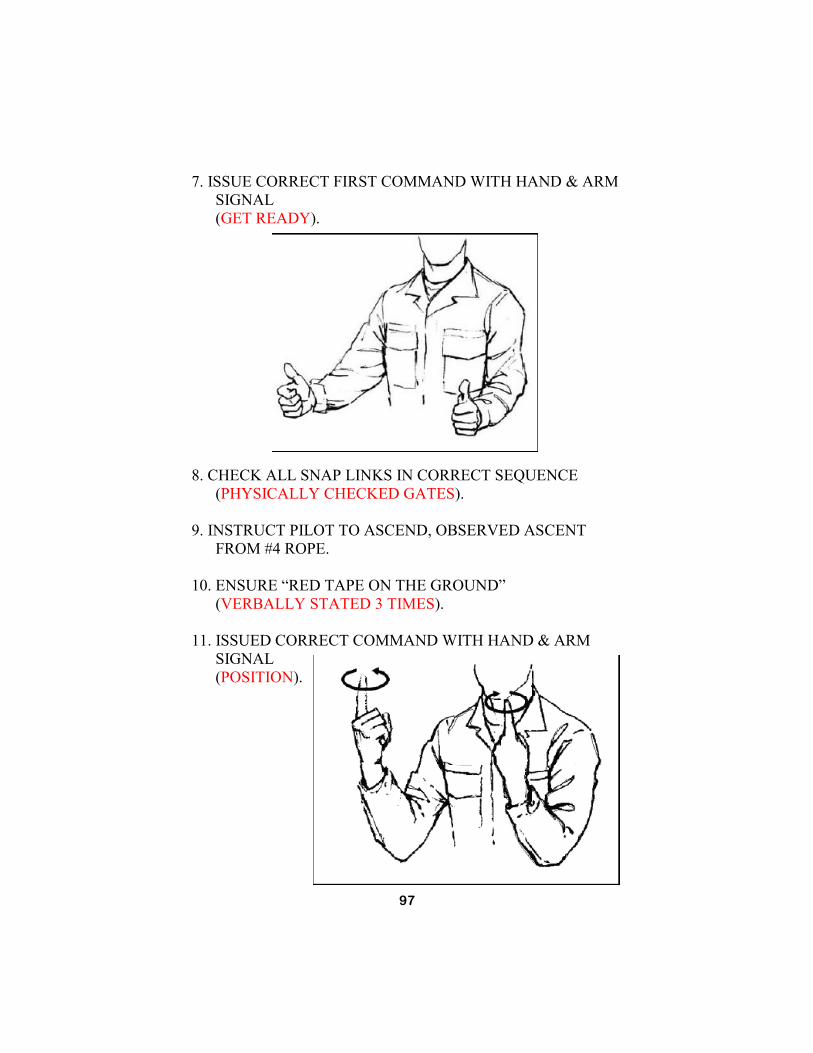
97
7. ISSUE CORRECT FIRST COMMAND WITH HAND & ARM
SIGNAL
(GET READY).
8. CHECK ALL SNAP LINKS IN CORRECT SEQUENCE
(PHYSICALLY CHECKED GATES).
9. INSTRUCT PILOT TO ASCEND, OBSERVED ASCENT
FROM #4 ROPE.
10. ENSURE ―RED TAPE ON THE GROUND‖
(VERBALLY STATED 3 TIMES).
11. ISSUED CORRECT COMMAND WITH HAND & ARM
SIGNAL
(POSITION).

98
12. CHECK ALL SNAP LINKS IN CORRECT SEQUENCE
(VISUAL CHECK ONLY-DON’T POINT).
13. CHECK ROPES FROM #4 ROPE
(ADJUST HEIGHT IF NECESSARY).
14. ENSURE ―RED TAPE ON THE GROUND‖
(VERBALLY STATED 3 TIMES).
15. ISSUE CORRECT COMMAND WITH HAND & ARM
SIGNAL
(GO).
16. GO TO THE DECK OF A/C AT THE #4 ROPE AND
OBSERVE DESCENT OF RAPPELLER.
17. ACKNOWLEDGE WHEN ALL RAPPELLERS ARE ON
ROPES, ON THE GROUND, AND OFF ROPES
(VERBALLY).
18. REPORT STATUS TO PILOT
(CLEAR AND TANGLED).
19. RECOVER FROM DECK ONLY AFTER A/C IS FIRMLY
GROUNDED.
20. DISPLAY CONFIDENCE, REMAIN IN CHARGE
THROUGHOUT.

99
EMERGENCY STEPS:
OPPOSUM:
1. GIVE ―FREEZE‖ COMMAND TO ALL RAPPELLERS.
2. VISUALLY CHECK RAPPELLER’S SNAP LINK
(REMOVE/REPLACE GUIDE HAND BY PROPER HAND
& ARM SIGNAL).
3. IF SNAP LINK IS NOT INVERTED, SEND RAPPELLER
WITH PROPER HAND & ARM SIGNAL
(GO).
4. IF SNAP LINK IS INVERTED, GIVE RAPPELLER LOCK-IN
HAND & ARM SIGNAL.
5. SECURE RAPPELLER WITH RECOVERY LINE.
6. RE-INSPECT ALL RAPPELLER’S SNAP LINKS
(VISUAL CHECK - DON’T POINT).
7. CHECK THE #4 ROPE FOR ―RED TAPE ON THE
GROUND‖ PRIOR TO CONTINUING.
(VERBALLY STATE 3 TIMES).
8. CONTINUE WITH OTHER RAPPELLERS WITH PROPER
HAND & ARM SIGNAL
(GO).
9. ONCE RAPPELERS ARE ON GROUND, SAFELY ―TALK‖
THE PILOT TO THE GROUND WITH OPOSSUM
RAPPELLER.

100
EMERGENCY STEPS:
TANGLED RAPPEL ROPES:
1. ALLOW RAPPELLERS ON UNTANGLED ROPES TO
CLEAR ROPES.
2. INSTRUCT PILOT TO DESCEND, HOVER AS TANGLED
RAPPELLERS TOUCH GROUND.
3. WHEN CLEARED BY BELAY MASTER, INSTRUCT PILOT
TO LOWER HELICOPTER.
4. REMAIN ON DECK OF A/C UNTIL A/C HAS FIRMLY
LANDED.
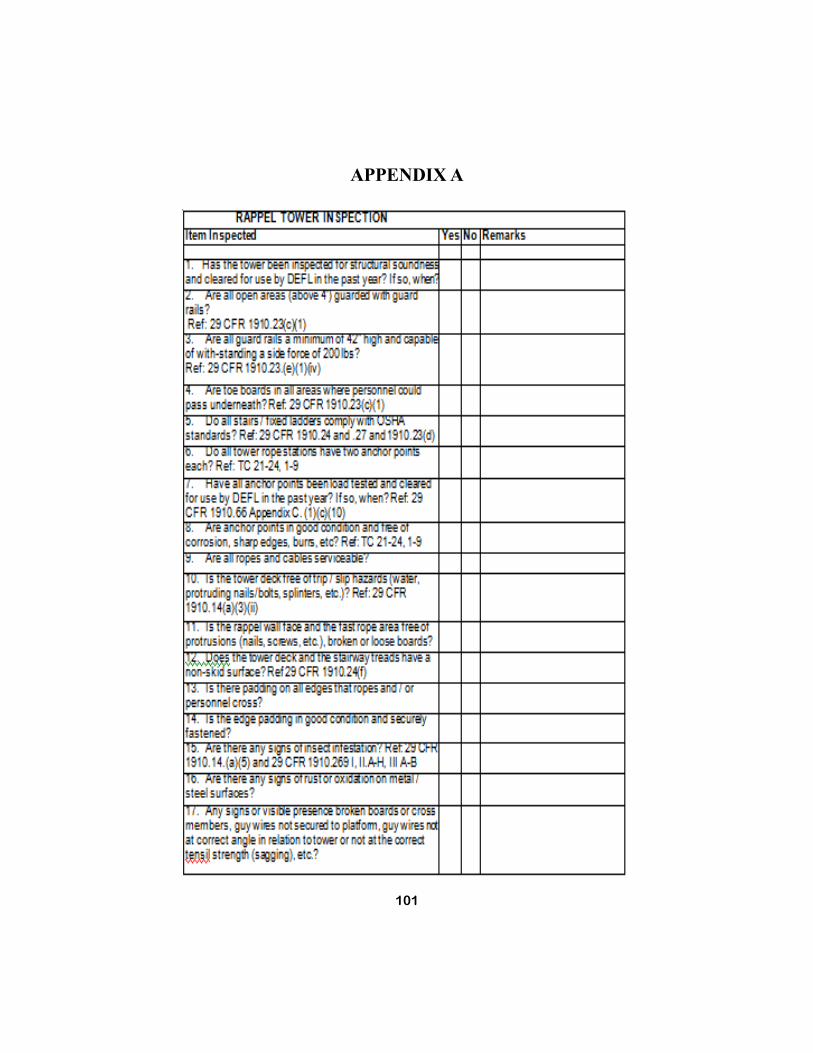
101
APPENDIX A

102
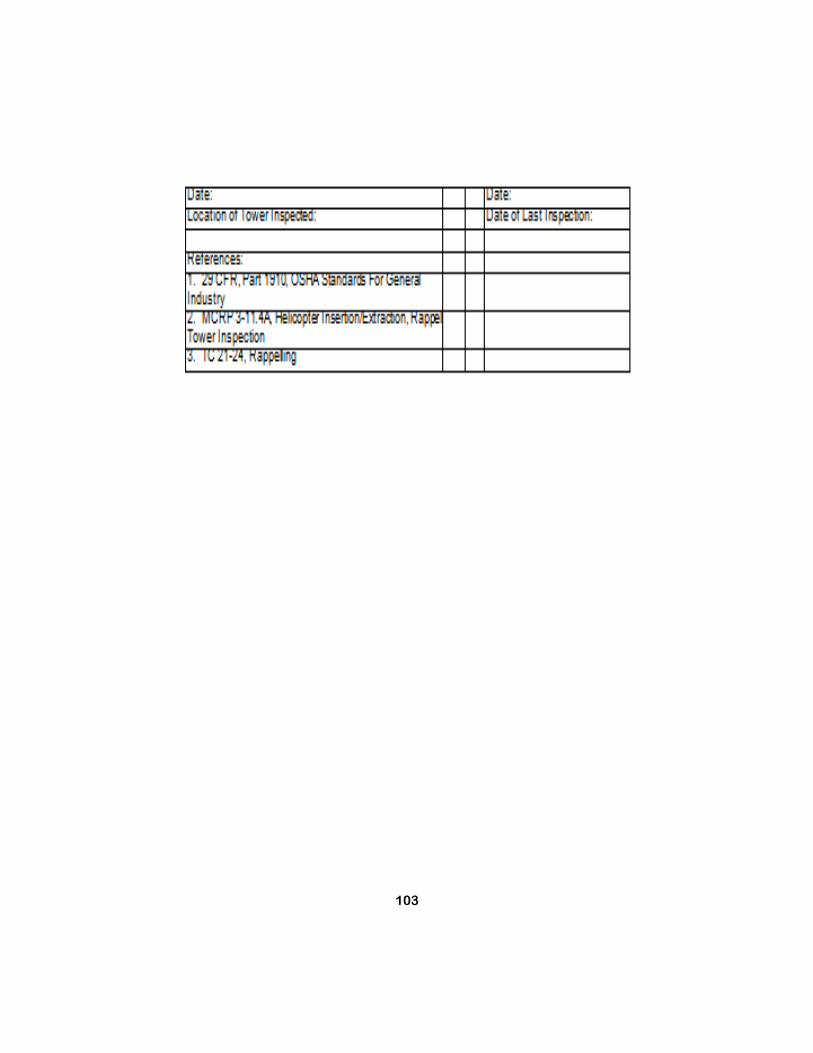
103

104
APPENDIX B
KNOTS EXAMINATION
STUDENT NAME: _________________________________________________
INSTRUCTOR NAME: ______________________________________________
YOU WILL HAVE A HANDS-ON EXAMINATION ON THE FOUR BASIC
KNOTS THAT YOU LEARNED TO TIE IN YOUR BLOCK OF INSTRUC-
TION. YOU WILL HAVE THIRTY SECONDS TO SUCCESSFULLY TIE
EACH KNOT; SQUARE KNOT, END-OF-THE-LINE BOWLINE KNOT, AN-
CHOR-LINE BOWLINE KNOT, AND PRUSIK KNOT. YOU MUST COR-
RECTLY TIE EACH KNOT TO PASS THIS EXAM. ONLY ONE RE-TEST IS
ALLOWED PER KNOT.
INITIAL
CIRCLE ONE:
DEMONSTRATED A SQUARE KNOT GO / NO-GO
DEMONSTRATED END-OF-THE-LINE BOWLINE GO / NO-GO
DEMONSTRATED ANCHOR-LINE BOWLINE GO / NO-GO
DEMONSTRATED A PRUSIK KNOT GO / NO-GO
OVERALL GO / NO-GO
GRADER SIGNATURE: ____________________________________________
STUDENT SIGNATURE: ___________________________________________
DATE: _______________

105
APPENDIX C
KNOTS EXAMINATION
STUDENT NAME: _________________________________________________
INSTRUCTOR NAME: ______________________________________________
YOU WILL HAVE A HANDS-ON EXAMINATION ON THE FOUR BASIC
KNOTS THAT YOU LEARNED TO TIE IN YOUR BLOCK OF INSTRUC-
TION. YOU WILL HAVE THIRTY SECONDS TO SUCCESSFULLY TIE
EACH KNOT; SQUARE KNOT, END-OF-THE-LINE BOWLINE KNOT, AN-
CHOR-LINE BOWLINE KNOT, AND PRUSIK KNOT. YOU MUST COR-
RECTLY TIE EACH KNOT TO PASS THIS EXAM. THIS IS YOUR RE-
TEST.
RE-TEST
CIRCLE ONE:
DEMONSTRATED A SQUARE KNOT GO / NO-GO
DEMONSTRATED END-OF-THE-LINE BOWLINE GO / NO-GO
DEMONSTRATED ANCHOR-LINE BOWLINE GO / NO-GO
DEMONSTRATED A PRUSIK KNOT GO / NO-GO
OVERALL GO / NO-GO
GRADER SIGNATURE: ____________________________________________
STUDENT SIGNATURE: ___________________________________________
DATE: _______________

106
APPENDIX D
EQUIPMENT INSPECTION EXAMINATION
STUDENT NAME: _________________________________________________
INSTRUCTOR NAME: _____________________________________________
YOU WILL HAVE A HANDS-ON EXAMINATION ON THE FOUR PIECES
OF EQUIPMENT THAT YOU LEARNED TO INSPECT IN YOUR BLOCK OF
INSTRUCTION. YOU WILL HAVE TWO MINUTES TO SUCCESSFULLY
INSPECT THE EQUIPMENT AND LET THE CADRE KNOW WHETHER
EACH PIECE IS SERVICEABLE OR UNSERVICEABLE. IF UNSERVICE-
ABLE, YOU MUST BE ABLE TO EXPLAIN WHY THE PIECE OF EQUIP-
MENT IS UNSERVICEABLE. YOU MUST RECEIVE A 100% ―GO‖ TO PASS
THIS EXAM. ONLY ONE RE-TEST IS ALLOWED.
INITIAL
CIRCLE ONE:
1. SNAPLINK SERVICEABLE / UNSERVICEABLE
2. GLOVES SERVICEABLE / UNSERVICEABLE
3. KERNMANTLE SERVICEABLE / UNSERVICEABLE
4. 7/16‖ NYLON ROPE SERVICEABLE / UNSERVICEABLE
OVERALL GO / NO-GO
GRADER SIGNATURE: ____________________________________________
STUDENT SIGNATURE: ___________________________________________
DATE: _______________

107
APPENDIX E
EQUIPMENT INSPECTION EXAMINATION
STUDENT NAME: _________________________________________________
INSTRUCTOR NAME: _____________________________________________
YOU WILL HAVE A HANDS-ON EXAMINATION ON THE FOUR PIECES
OF EQUIPMENT THAT YOU LEARNED TO INSPECT IN YOUR BLOCK OF
INSTRUCTION. YOU WILL HAVE TWO MINUTES TO SUCCESSFULLY
INSPECT THE EQUIPMENT AND LET THE CADRE KNOW WHETHER
EACH PIECE IS SERVICEABLE OR UNSERVICEABLE. IF UNSERVICE-
ABLE, YOU MUST BE ABLE TO EXPLAIN WHY THE PIECE OF EQUIP-
MENT IS UNSERVICEABLE. YOU MUST RECEIVE A 100% ―GO‖ TO PASS
THIS EXAM. THIS IS YOUR RE-TEST.
RE-TEST
CIRCLE ONE:
1. SNAPLINK SERVICEABLE / UNSERVICEABLE
2. GLOVES SERVICEABLE / UNSERVICEABLE
3. KERNMANTLE SERVICEABLE / UNSERVICEABLE
4. 7/16‖ NYLON ROPE SERVICEABLE / UNSERVICEABLE
OVERALL GO / NO-GO
GRADER SIGNATURE: ____________________________________________
STUDENT SIGNATURE: ___________________________________________
DATE: _______________

108
RO
PE
LO
G (
US
AG
E A
ND
HIS
TO
RY
) U
NIT
ID
MA
RK
ING
NS
N
DO
CU
ME
NT
NU
MB
ER
S
ER
IAL N
UM
BE
R
MF
R L
OT
NU
MB
ER
DA
TE
OF
MF
R
ISS
UE
DA
TE
D
AT
E O
F S
ER
VIC
E
LE
NG
TH
DIA
ME
TE
R
FIB
ER
C
OLO
R
CO
NS
TR
UC
TIO
N
INS
PE
CT
RO
PE
FO
R D
AM
AG
E O
R E
XC
ES
SIV
E W
EA
R E
AC
H T
IME
IT
IS
DE
PL
OY
ED
AN
D A
GA
IN
DA
TE
US
ED
LO
CA
TIO
N
TY
PE
OF
US
E
RO
PE
EX
PO
-S
UR
E
INS
PE
CT
OR
'S S
IG-
NA
TU
RE
R
OP
E C
ON
DIT
ION
AN
D
CO
MM
EN
TS
APPENDIX F

109
APPENDIX G
HOOK-UP EXAMINATION
STUDENT NAME: _________________________________________________
INSTRUCTOR NAME: _____________________________________________
YOU WILL HAVE A HANDS-ON EXAMINATION ON THE TWO TYPES OF
HOOK-UPS YOU LEARNED IN YOUR BLOCK OF INSTRUCTION. YOU
WILL HAVE 10 SECONDS TO DETERMINE IF EACH HOOK-UP, HOLLY-
WOOD AND AUSTRALIAN, ARE A ―GO‖ OR ―NO-GO‖. UPON INSPEC-
TION OF A ―NO-GO‖ YOU MUST BE ABLE TO IDENTIFY AND EXPLAIN
THE DEFIENCY. YOU MUST RECEIVE A 100% ―GO‖ FOR EACH HOOK-
UP TO PASS THIS EXAM. ONLY ONE RE-TEST IS ALLOWED AND ONLY
THE HOOK-UP(S) THAT ARE FAILED ON THE TEST.
INITIAL
CIRCLE ONE:
1. HOLLYWOOD GO / NO-GO
NOTES: ___________________________________________________________
2. AUSTRALIAN GO / NO-GO
NOTES: ___________________________________________________________ OVERALL GO / NO-GO
GRADER SIGNATURE: ____________________________________________
STUDENT SIGNATURE: ___________________________________________
DATE: _________________

110
APPENDIX H
HOOK-UP EXAMINATION
STUDENT NAME: _________________________________________________
INSTRUCTOR NAME: _____________________________________________
YOU WILL HAVE A HANDS-ON EXAMINATION ON THE TWO TYPES OF
HOOK-UPS YOU LEARNED IN YOUR BLOCK OF INSTRUCTION. YOU
WILL HAVE 10 SECONDS TO DETERMINE IF EACH HOOK-UP, HOLLY-
WOOD AND AUSTRALIAN, ARE A ―GO‖ OR ―NO-GO‖. UPON INSPEC-
TION OF A ―NO-GO‖ YOU MUST BE ABLE TO IDENTIFY AND EXPLAIN
THE DEFIENCY. YOU MUST RECEIVE A 100% ―GO‖ FOR EACH HOOK-
UP TO PASS THIS EXAM. THIS IS YOUR RE-TEST.
RE-TEST
CIRCLE ONE:
1. HOLLYWOOD GO / NO-GO
NOTES: ___________________________________________________________
2. AUSTRALIAN GO / NO-GO
NOTES: ___________________________________________________________ OVERALL GO / NO-GO
GRADER SIGNATURE: ____________________________________________
STUDENT SIGNATURE: ___________________________________________
DATE: _________________
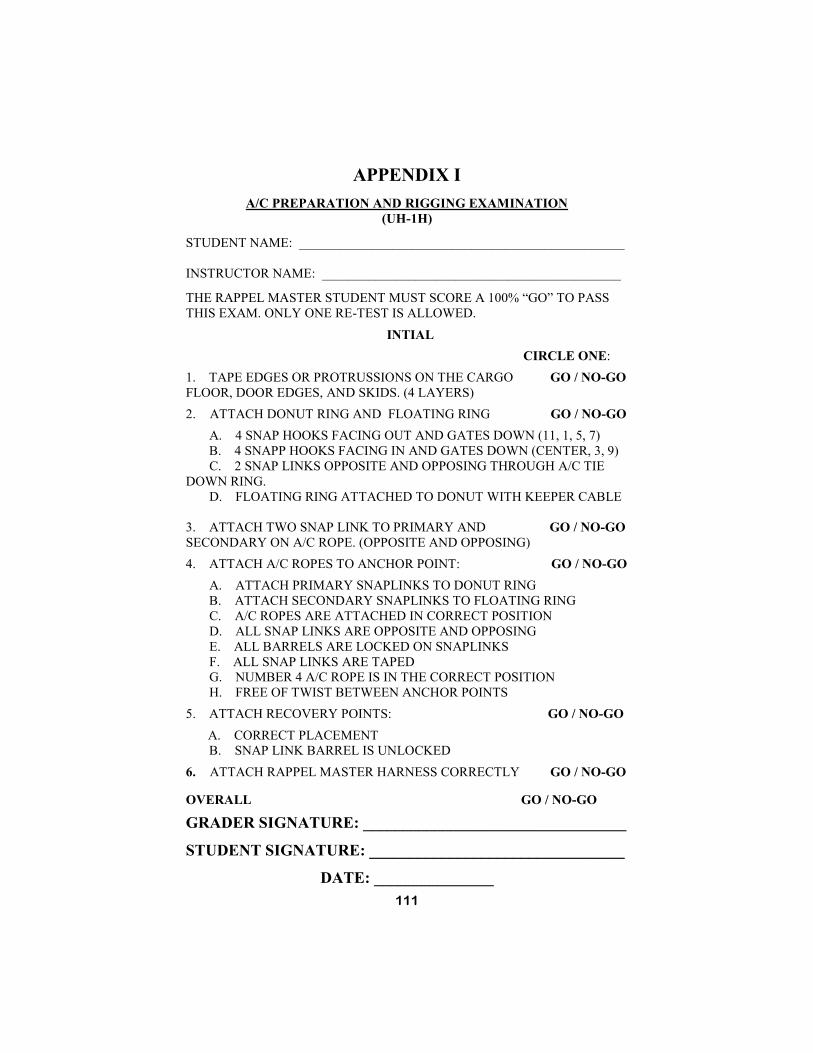
111
APPENDIX I
A/C PREPARATION AND RIGGING EXAMINATION
(UH-1H)
STUDENT NAME: _________________________________________________
INSTRUCTOR NAME: _____________________________________________
THE RAPPEL MASTER STUDENT MUST SCORE A 100% ―GO‖ TO PASS
THIS EXAM. ONLY ONE RE-TEST IS ALLOWED.
INTIAL
CIRCLE ONE:
1. TAPE EDGES OR PROTRUSSIONS ON THE CARGO GO / NO-GO
FLOOR, DOOR EDGES, AND SKIDS. (4 LAYERS)
2. ATTACH DONUT RING AND FLOATING RING GO / NO-GO
A. 4 SNAP HOOKS FACING OUT AND GATES DOWN (11, 1, 5, 7)
B. 4 SNAPP HOOKS FACING IN AND GATES DOWN (CENTER, 3, 9)
C. 2 SNAP LINKS OPPOSITE AND OPPOSING THROUGH A/C TIE
DOWN RING.
D. FLOATING RING ATTACHED TO DONUT WITH KEEPER CABLE
3. ATTACH TWO SNAP LINK TO PRIMARY AND GO / NO-GO
SECONDARY ON A/C ROPE. (OPPOSITE AND OPPOSING)
4. ATTACH A/C ROPES TO ANCHOR POINT: GO / NO-GO
A. ATTACH PRIMARY SNAPLINKS TO DONUT RING
B. ATTACH SECONDARY SNAPLINKS TO FLOATING RING
C. A/C ROPES ARE ATTACHED IN CORRECT POSITION
D. ALL SNAP LINKS ARE OPPOSITE AND OPPOSING
E. ALL BARRELS ARE LOCKED ON SNAPLINKS
F. ALL SNAP LINKS ARE TAPED
G. NUMBER 4 A/C ROPE IS IN THE CORRECT POSITION
H. FREE OF TWIST BETWEEN ANCHOR POINTS
5. ATTACH RECOVERY POINTS: GO / NO-GO
A. CORRECT PLACEMENT
B. SNAP LINK BARREL IS UNLOCKED
6. ATTACH RAPPEL MASTER HARNESS CORRECTLY GO / NO-GO
OVERALL GO / NO-GO
GRADER SIGNATURE: _________________________________
STUDENT SIGNATURE: ________________________________
DATE: _______________

112
APPENDIX J
A/C PREPARATION AND RIGGING EXAMINATION
(UH-1H)
STUDENT NAME: _________________________________________________
INSTRUCTOR NAME: _____________________________________________
THE RAPPEL MASTER STUDENT MUST SCORE A 100% ―GO‖ TO PASS
THIS EXAM. THIS IS YOUR RE-TEST.
RE-TEST
CIRCLE ONE:
1. TAPE EDGES OR PROTRUSSIONS ON THE CARGO GO / NO-GO
FLOOR, DOOR EDGES, AND SKIDS. (4 LAYERS)
2. ATTACH DONUT RING AND FLOATING RING GO / NO-GO
A. 4 SNAP HOOKS FACING OUT AND GATES DOWN (11, 1, 5, 7)
B. 4 SNAPP HOOKS FACING IN AND GATES DOWN (CENTER, 3, 9)
C. 2 SNAP LINKS OPPOSITE AND OPPOSING THROUGH A/C TIE
DOWN RING.
D. FLOATING RING ATTACHED TO DONUT WITH KEEPER CABLE
3. ATTACH TWO SNAP LINK TO PRIMARY AND GO / NO-GO
SECONDARY ON A/C ROPE. (OPPOSITE AND OPPOSING)
4. ATTACH A/C ROPES TO ANCHOR POINT: GO / NO-GO
A. ATTACH PRIMARY SNAPLINKS TO DONUT RING
B. ATTACH SECONDARY SNAPLINKS TO FLOATING RING
C. A/C ROPES ARE ATTACHED IN CORRECT POSITION
D. ALL SNAP LINKS ARE OPPOSITE AND OPPOSING
E. ALL BARRELS ARE LOCKED ON SNAPLINKS
F. ALL SNAP LINKS ARE TAPED
G. NUMBER 4 A/C ROPE IS IN THE CORRECT POSITION
H. FREE OF TWIST BETWEEN ANCHOR POINTS
5. ATTACH RECOVERY POINTS: GO / NO-GO
A. CORRECT PLACEMENT
B. SNAP LINK BARREL IS UNLOCKED
6. ATTACH RAPPEL MASTER HARNESS CORRECTLY GO / NO-GO
OVERALL GO / NO-GO
GRADER SIGNATURE: _________________________________
STUDENT SIGNATURE: ________________________________
DATE: _______________

113
APPENDIX K
A/C PREPARATION AND RIGGING EXAMINATION
(UH-60)
STUDENT NAME: _________________________________________________
INSTRUCTOR NAME: _____________________________________________
THE RAPPEL MASTER STUDENT MUST SCORE A 100% ―GO‖ TO PASS
THIS EXAM. ONLY ONE RE-TEST IS ALLOWED.
INTIAL
CIRCLE ONE:
1. TAPE EDGES OR PROTRUSIONS ON THE CARGO GO / NO-GO
FLOOR AND DOOR EDGES. (4 LAYERS)
2. ATTACH TWO SNAP LINK TO PRIMARY AND GO / NO-GO
SECONDARY ON A/C ROPE. (OPPOSITE AND OPPOSING)
3. ATTACH A/C ROPES TO ANCHOR POINT: GO / NO-GO
A. ATTACH PRIMARY SNAPLINKS TO CABIN CEILING TIE-DOWN
B. ATTACH SECONDARY SNAPLINKS TO CARGO RESTRAINT NET
RING
C. ALL SNAP LINKS ARE OPPOSITE AND OPPOSING
D. ALL BARRELS ARE LOCKED ON SNAPLINKS
E. ALL SNAP LINKS ARE TAPED
F. NUMBER 4 A/C ROPE IS IN THE CORRECT POSITION
G. FREE OF TWIST BETWEEN ANCHOR POINTS
4. ATTACH RECOVERY POINTS: GO / NO-GO
A. CORRECT PLACEMENT
B. SNAP LINK BARREL IS UNLOCKED
5. ATTACH RAPPEL MASTER HARNESS CORRECTLY GO / NO-GO
OVERALL GO / NO-GO
GRADER SIGNATURE: _________________________________
STUDENT SIGNATURE: ________________________________
DATE: _______________
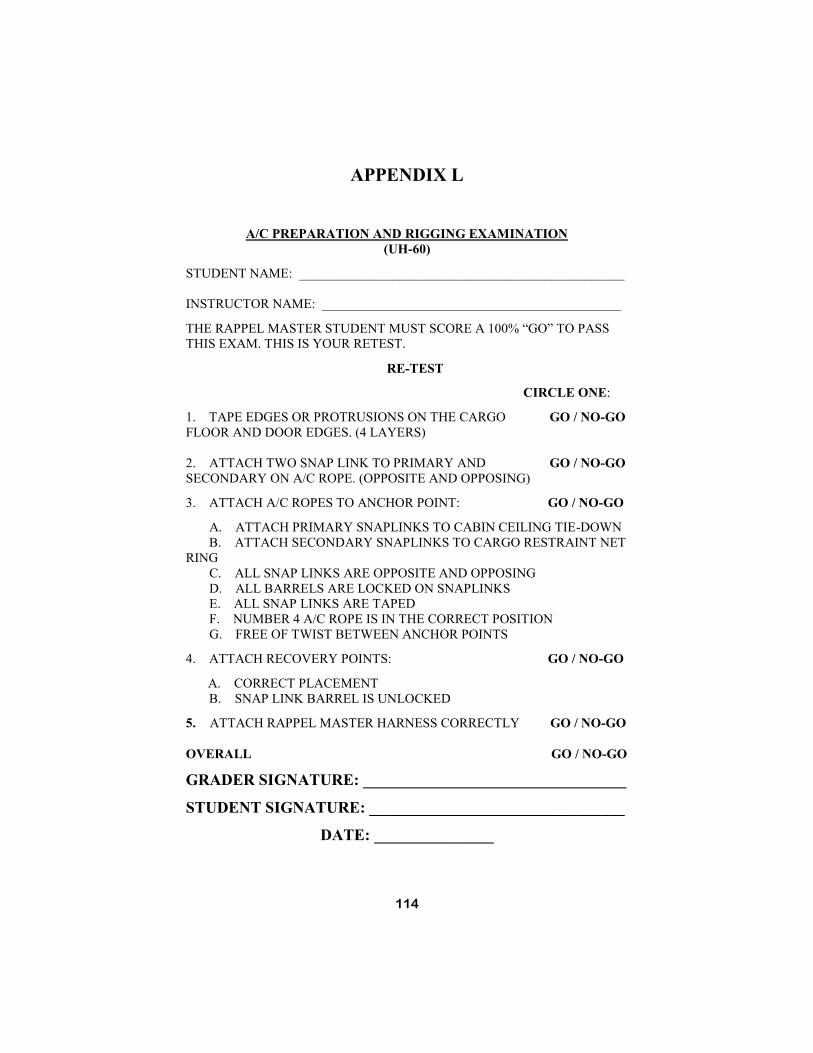
114
APPENDIX L
A/C PREPARATION AND RIGGING EXAMINATION
(UH-60)
STUDENT NAME: _________________________________________________
INSTRUCTOR NAME: _____________________________________________
THE RAPPEL MASTER STUDENT MUST SCORE A 100% ―GO‖ TO PASS
THIS EXAM. THIS IS YOUR RETEST.
RE-TEST
CIRCLE ONE:
1. TAPE EDGES OR PROTRUSIONS ON THE CARGO GO / NO-GO
FLOOR AND DOOR EDGES. (4 LAYERS)
2. ATTACH TWO SNAP LINK TO PRIMARY AND GO / NO-GO
SECONDARY ON A/C ROPE. (OPPOSITE AND OPPOSING)
3. ATTACH A/C ROPES TO ANCHOR POINT: GO / NO-GO
A. ATTACH PRIMARY SNAPLINKS TO CABIN CEILING TIE-DOWN
B. ATTACH SECONDARY SNAPLINKS TO CARGO RESTRAINT NET
RING
C. ALL SNAP LINKS ARE OPPOSITE AND OPPOSING
D. ALL BARRELS ARE LOCKED ON SNAPLINKS
E. ALL SNAP LINKS ARE TAPED
F. NUMBER 4 A/C ROPE IS IN THE CORRECT POSITION
G. FREE OF TWIST BETWEEN ANCHOR POINTS
4. ATTACH RECOVERY POINTS: GO / NO-GO
A. CORRECT PLACEMENT
B. SNAP LINK BARREL IS UNLOCKED
5. ATTACH RAPPEL MASTER HARNESS CORRECTLY GO / NO-GO
OVERALL GO / NO-GO
GRADER SIGNATURE: _________________________________
STUDENT SIGNATURE: ________________________________
DATE: _______________

115
APPENDIX M
AIR MISSION BRIEF
1. Mission Name: (Mission type such as: Rappel Master A/C
Command and Control Test; Rappelling Operations) 2. Number of Personnel to be trained: (##)
3. Lifts needed to complete mission: (##)
4. Scheme of maneuvers by troops on ground:
5. A/C equipment needed: (Cabin Ceiling Tie-Downs, Cargo Re-
straint net hooks, safety wire to secure cabin ceiling tie-
downs, cabin ceiling tie-down bolts with “H” stamped on
them, 2 ICS headsets) 6. Load: (Internal) (## of Pax; Rappel Master, Rappel Master stu-
dent, and rappellers)
7. Expected density of air traffic:
8. Tactical Situation:
9. Number and Type of visual and electronic aids used:
10. Commanders Concept/Ground Tactical Plan:
11. Pathfinder insertion method:
12. Pathfinder extraction method:
13. Location of medical support: (Next to GTA)
14. Verify pilot is current and rated for task:
15. Pick-Up zone data:
A. Location: (8 digit grid coordinate)
B. Name of primary and alternate HLS:
C. Flight route to PZ: (Aircrew Brief)
D. Location of CCP/RP: (Discussion on Map)
E. Description: (Map Recon)
F. Field Elevation: (Feet; Mean Sea Level)
G. Overall Size: (Meters wide x Meters long)
H. Usable Size: (Meters wide x Meters long)
I. Markings: (Obstacles in RED)
J. Hazards: (Light Poles, etc)
K. Aircraft Formation:
L. Approach and Departure routes:
M. Identification signal:
N. Use of Visual Approach-Path Indicator (VAPI):
116
APPENDIX M
O. Land/Drop heading (000 degrees) (000 degrees)
P. Location of sun and shade:
Q. Communication:
R. Troop staging area:
S. Troop landing plan:
T. Environmental conditions:
16. Landing Zone data:
A. Location: (8 digit grid coordinate)
B. Name of primary and alternate HLS:
C. Flight route to PZ: (Aircrew Brief)
D. Location of CCP/RP: (Discussion on Map)
E. Description: (Map Recon)
F. Field Elevation: (Feet; Mean Sea Level)
G. Overall Size: (Meters wide x Meters long)
H. Usable Size: (Meters wide x Meters long)
I. Markings: (Obstacles in RED)
J. Hazards: (Light Poles, etc)
K. Aircraft Formation:
L. Approach and Departure routes:
M. Identification signal:
N. Use of Visual Approach-Path Indicator (VAPI):
O. Land/Drop heading (000 degrees) (000 degrees)
P. Location of sun and shade:
Q. Communication:
R. Troop staging area:
S. Troop landing plan:
T. Environmental conditions:
17. Time Flow:
A. Time zone used:
B. Next AMB time to confirm and conduct rehearsals:
C. Time Pathfinder is on site:
D. Time Pathfinder can accept A/C:
E. Time Pathfinder will close LZ/PZ:
F. Time at A/C:

117
APPENDIX M
G. Load time:
H. Take-off time:
I. Time on Target/Station:
J. No earlier than/no later than time:
K. Time of expected Re-fuel:
L. Weather decision time:
18. Communication: (Aircraft/Pathfinder/Air Operations/Range
Control/Rappel Master) A. Primary Frequency:
B. Alternate Frequency:
C. Supported Unit PRI/ALT:
D. Other friendly units PRI/ALT:
E. Visual Signals:
F. Call Signs:
G. Signalman:
H. Hand and Arm Signals:
I. Markings for obstacles:
J. Communications check/time:
L. Location of GTA:
M. FM Homing beacons in A/C:
N Code words for PZ secure:
O. No communications plan:
19. Weather Forecast: (NLT 48 hrs out)
A. Ceiling:
B. Visibility:
C. Temperatures:
D. Winds:
E. Pressure:
F. Density Altitude:
G. Percent of moon illumination:
H. Moonrise and Moonset:
I. Sunrise and Sunset:
J. Precipitation:
K. Night Vision Capabilities of A/C:

118
APPENDIX M
20. Route Briefing:
A. Distance and Time to checkpoints:
B. Flight formations and airspeed:
C. Location of CCP:
D. Location of RP/SP:
E. Location of friendly forces:
F. Mission Decision Line:
G. Location of Forward Arming and Refueling Point:
21. Contingencies:
A. Maintenance abort:
B. Sling load abort:
C. Rappel emergency procedures:
D. Inclement weather:
E. Refueling Plan:
F. Pathfinder considerations:
G. Emergency Ditch:
H. Location of back-up aircraft:
22. Orientation Flight:
A. Planned load/unload time:
B. Number of troops per lift:
C. Equipment being worn:
D. False insertion/extraction location:
23. Rappelling Operations:
A. Rappel Master actions:
B. Opossum rappeller:
C. Entangled rappeller:
D. Altitude for rappelling
E. Belay safety duties:
F. Cutting Ropes:

119
APPENDIX N
AIRCRAFT COMMAND AND CONTROL EXAMINATION
THE RAPPEL MASTER STUDENT MUST SCORE 100% ―GO‖ TO PASS THIS EXAM. ONLY ONE RE-TEST IS ALLOWED.
INITIAL
CIRCLE ONE:
1. ENTER HELICOPTER AND HOOK UP SAFETY LINE. GO / NO-GO
2. PERFORM COMMUNICATION CHECK WITH PILOT AND GTA. GO / NO-GO
3. WAVE ON RAPPELLERS USING THE PROPER HAND & ARM SIGNAL. GO / NO-GO
4. PHYSICALLY TOUCH EACH RAPPELLER’S KNOT (IN THE CORRECT ORDER) TO ENSURE FACING TOWARDS INSIDE OF THE A/C. GO / NO-GO
5. INSPECT EACH RAPPELLER (BEGIN AT THE FRONT, LEFT OF THE A/C).
GO / NO-GO
A. CHECK ANCHOR POINT B. GUIDE HAND GLOVE
C. SLEEVE
D. HELMET, CHINSTRAP FASTENED E. SWEEP FRONT OF RAPPELLER TO ENSURE SHIRT IS TUCKED IN.
f. CORRECT HOOK-UP (SNAP LINK LOCKED/ROUTED ROPES)
G. EXTEND BRAKE HAND, SLEEVE, GLOVE, ROUTING OF ROPES, AND REPLACE BRAKE HAND.
h. SWEEP: BODY PARTS IN A/C (3 CONSECUTIVE TIMES) i. ―FREEZE, HEAD AND EYES ON ME‖
(CORRECT HAND & ARM SIGNAL)
6. CHECK WITH BELAY MASTER (THUMBS UP). GO / NO-GO
7. ISSUE CORRECT FIRST COMMAND WITH HAND & ARM SIGNAL
(GET READY). GO / NO-GO
8. CHECK ALL SNAP LINKS IN CORRECT SEQUENCE (PHYSICALLY CHECKED GATES). GO / NO-GO
9. INSTRUCT PILOT TO ASCEND, OBSERVED ASCENT FROM #4 ROPE. GO / NO-GO
10. ENSURE ―RED TAPE ON THE GROUND‖ (VERBALLY STATED 3 TIMES). GO / NO-GO
11. ISSUED CORRECT COMMAND WITH HAND & ARM SIGNAL (POSITION). GO / NO-GO
12. CHECK ALL SNAP LINKS IN CORRECT SEQUENCE
(VISUAL CHECK ONLY-DON’T POINT). GO / NO-GO
13. CHECK ROPES FROM #4 ROPE (ADJUST HEIGHT IF NECESSARY). GO / NO-GO
14. ENSURE ―RED TAPE ON THE GROUND‖ (VERBALLY STATED 3 TIMES). GO / NO-GO
15. ISSUE CORRECT COMMAND WITH HAND & ARM SIGNAL (GO). GO / NO-GO
16. GO TO THE DECK OF A/C AT THE #4 ROPE AND OBSERVE
DESCENT OF RAPPELLER. GO / NO-GO
17. ACKNOWLEDGE WHEN ALL RAPPELLERS ARE ON ROPES,
ON THE GROUND, AND OFF ROPES (VERBALLY). GO / NO-GO
18. REPORT STATUS TO PILOT (CLEAR AND TANGLED). GO / NO-GO
19. RECOVER FROM DECK ONLY AFTER A/C IS FIRMLY GROUNDED. GO / NO-GO
20. DISPLAY CONFIDENCE, REMAIN IN CHARGE THROUGHOUT. GO / NO-GO
OVERALL GO / NO-GO

120
APPENDIX O
AIRCRAFT COMMAND AND CONTROL EXAMINATION
THE RAPPEL MASTER STUDENT MUST SCORE 100% ―GO‖ TO PASS THIS EXAM. THIS IS YOUR RE-TEST.
RE-TEST
CIRCLE ONE:
1. ENTER HELICOPTER AND HOOK UP SAFETY LINE. GO / NO-GO
2. PERFORM COMMUNICATION CHECK WITH PILOT AND GTA. GO / NO-GO
3. WAVE ON RAPPELLERS USING THE PROPER HAND & ARM SIGNAL. GO / NO-GO
4. PHYSICALLY TOUCH EACH RAPPELLER’S KNOT (IN THE CORRECT ORDER) TO ENSURE FACING TOWARDS INSIDE OF THE A/C. GO / NO-GO
5. INSPECT EACH RAPPELLER (BEGIN AT THE FRONT, LEFT OF THE A/C).
GO / NO-GO
A. CHECK ANCHOR POINT B. GUIDE HAND GLOVE
C. SLEEVE
D. HELMET, CHINSTRAP FASTENED E. SWEEP FRONT OF RAPPELLER TO ENSURE SHIRT IS TUCKED IN.
f. CORRECT HOOK-UP (SNAP LINK LOCKED/ROUTED ROPES)
G. EXTEND BRAKE HAND, SLEEVE, GLOVE, ROUTING OF ROPES, AND REPLACE BRAKE HAND.
h. SWEEP: BODY PARTS IN A/C (3 CONSECUTIVE TIMES) i. ―FREEZE, HEAD AND EYES ON ME‖
(CORRECT HAND & ARM SIGNAL)
6. CHECK WITH BELAY MASTER (THUMBS UP). GO / NO-GO
7. ISSUE CORRECT FIRST COMMAND WITH HAND & ARM SIGNAL
(GET READY). GO / NO-GO
8. CHECK ALL SNAP LINKS IN CORRECT SEQUENCE (PHYSICALLY CHECKED GATES). GO / NO-GO
9. INSTRUCT PILOT TO ASCEND, OBSERVED ASCENT FROM #4 ROPE. GO / NO-GO
10. ENSURE ―RED TAPE ON THE GROUND‖ (VERBALLY STATED 3 TIMES). GO / NO-GO
11. ISSUED CORRECT COMMAND WITH HAND & ARM SIGNAL (POSITION). GO / NO-GO
12. CHECK ALL SNAP LINKS IN CORRECT SEQUENCE
(VISUAL CHECK ONLY-DON’T POINT). GO / NO-GO
13. CHECK ROPES FROM #4 ROPE (ADJUST HEIGHT IF NECESSARY). GO / NO-GO
14. ENSURE ―RED TAPE ON THE GROUND‖ (VERBALLY STATED 3 TIMES). GO / NO-GO
15. ISSUE CORRECT COMMAND WITH HAND & ARM SIGNAL (GO). GO / NO-GO
16. GO TO THE DECK OF A/C AT THE #4 ROPE AND OBSERVE
DESCENT OF RAPPELLER. GO / NO-GO
17. ACKNOWLEDGE WHEN ALL RAPPELLERS ARE ON ROPES,
ON THE GROUND, AND OFF ROPES (VERBALLY). GO / NO-GO
18. REPORT STATUS TO PILOT (CLEAR AND TANGLED). GO / NO-GO
19. RECOVER FROM DECK ONLY AFTER A/C IS FIRMLY GROUNDED. GO / NO-GO
20. DISPLAY CONFIDENCE, REMAIN IN CHARGE THROUGHOUT. GO / NO-GO
OVERALL GO / NO-GO