WARNING WARNING WARNING WARNINGapi.ning.com/files/AnHDvDwmMkhzZ2AXvhTP8T5UxTuJ*SRkhzxk6Z08… ·...
33
Transcript of WARNING WARNING WARNING WARNINGapi.ning.com/files/AnHDvDwmMkhzZ2AXvhTP8T5UxTuJ*SRkhzxk6Z08… ·...


1
WARNING WARNING WARNING WARNING
CAN BE FIRED WHEN THE MAGAZINE IS REMOVED IF THE CARTRIDGE IS IN THE CHAMBER AND THE TRIGGER IS PULLED.
CAUTION
READ THESE INSTRUCTIONS AND WARNINGS CAREFULLY. BE SURE THAT YOU UNDERSTAND THESEINSTRUCTIONS AND WARNINGS BEFORE USING THIS FIREARM.
This SAFETY, INSTRUCTION & PARTS MANUAL should always accompany this firearm and be transferredwith it upon change of ownership or when the firearm is loaned or presented to another person. A copyof the SAFETY, INSTRUCTION & PARTS MANUAL is available FREE upon request from:
Boberg Arms Corporation, 1755 Commerce Court, White Bear Lake, Minnesota 55110www.bobergarms.com
TABLE OF CONTENTSBASIC RULES OF FIREARMS SAFETY . . . . . . . . . . . . . . . . . . . . . . . . . . . . . . 2GENERAL PREPARATION FOR FIRING . . . . . . . . . . . . . . . . . . . . . . . . . . . . . . 3AMMUNITION . . . . . . . . . . . . . . . . . . . . . . . . . . . . . . . . . . . . . . . . . . . . . . . . 4LOADING . . . . . . . . . . . . . . . . . . . . . . . . . . . . . . . . . . . . . . . . . . . . . . . . . . . 5FIRING . . . . . . . . . . . . . . . . . . . . . . . . . . . . . . . . . . . . . . . . . . . . . . . . . . . . . 7CLEARING MISFIRES . . . . . . . . . . . . . . . . . . . . . . . . . . . . . . . . . . . . . . . . . . 7UNLOADING . . . . . . . . . . . . . . . . . . . . . . . . . . . . . . . . . . . . . . . . . . . . . . . . . 8TARGETING & SIGHT ADJUSTMENT . . . . . . . . . . . . . . . . . . . . . . . . . . . . . . . . 8
Dry Firing . . . . . . . . . . . . . . . . . . . . . . . . . . . . . . . . . . . . . . . . . . . . . . . . . .8FIELD STRIPPING . . . . . . . . . . . . . . . . . . . . . . . . . . . . . . . . . . . . . . . . . . . . . 9
Disassembly . . . . . . . . . . . . . . . . . . . . . . . . . . . . . . . . . . . . . . . . . . . . . . . 9Reassembly . . . . . . . . . . . . . . . . . . . . . . . . . . . . . . . . . . . . . . . . . . . . . . 12
CLEANING & MAINTENANCE . . . . . . . . . . . . . . . . . . . . . . . . . . . . . . . . . . . . 14Magazine Disassembly . . . . . . . . . . . . . . . . . . . . . . . . . . . . . . . . . . . . . . 14Magazine Cleaning . . . . . . . . . . . . . . . . . . . . . . . . . . . . . . . . . . . . . . . . . 14Magazine Reassembly . . . . . . . . . . . . . . . . . . . . . . . . . . . . . . . . . . . . . . . 14
LUBRICATION GUIDE . . . . . . . . . . . . . . . . . . . . . . . . . . . . . . . . . . . . . . . . . 15TRANSPORTATION & STORAGE . . . . . . . . . . . . . . . . . . . . . . . . . . . . . . . . . . 19USE OF GUN LOCK . . . . . . . . . . . . . . . . . . . . . . . . . . . . . . . . . . . . . . . . . . . 19
Installation of Gun Lock . . . . . . . . . . . . . . . . . . . . . . . . . . . . . . . . . . . . . . 20SERVICE & RETURNS . . . . . . . . . . . . . . . . . . . . . . . . . . . . . . . . . . . . . . . . . 21PARTS AND ACCESSORIES . . . . . . . . . . . . . . . . . . . . . . . . . . . . . . . . . . . . .21
Parts and Exploded View . . . . . . . . . . . . . . . . . . . . . . . . . . . . . . . . . . . . . 22TROUBLESHOOTING . . . . . . . . . . . . . . . . . . . . . . . . . . . . . . . . . . . . . . . . . . 24WARRANTY . . . . . . . . . . . . . . . . . . . . . . . . . . . . . . . . . . . . . . . . . . . . . . . . .31
BASIC RULES OF FIREARMS SAFETY
At home, in the field, at the range or anywhere, the first concern of every firearm owner should be safe-ty. Apply the following safety rules in every situation, with any kind of firearm.
1. Learn how to safely use your firearm. No person should handle any firearm withoutfirst becoming familiar with how to operate it safely. Read this manual thoroughly until you under-stand how to operate the pistol safely.
2. Always treat your pistol as if it were loaded and ready to fire if the trigger is pulled.Always exercise the utmost caution when handling your pistol. DO NOT take anyone’s word thatthe pistol is unloaded—always check for yourself.
3. Always keep your finger off the trigger until you are ready to shoot. Your pistol cannot fireunless the trigger is pulled.
4. Always keep the muzzle pointed in a safe direction. This is particularly important when load-ing, unloading or field stripping your pistol. Never point a firearm at anyone or anything you do notintend to shoot.
5. Know your target and what is beyond it. Always be sure of where the bullet will strike and shootonly where there is a safe backstop free of obstructions, water or other surfaces which can causericochets.
6. Never store your pistol in a loaded condition.
7. Keep all firearms away from children. Always secure your firearm from children or unauthorizedpersons. Always store your unloaded firearm and ammunition separately and in a secure placeinaccessible to children.
8. Use only the correct ammunition for your firearm. Never use a cartridge not specifically designated for use in your pistol. The correct caliber designation is 9 mm Luger and is stampedon the slide.
9. Make sure there are no obstructions in the barrel. With the magazine removed and the slideopen, visually inspect the chamber to determine that it is empty. Then check that the barrel isclear of obstructions.
10. Wear eye and ear protection as appropriate. Protect your vision and hearing from damage byalways wearing safety glasses and hearing protection.
11. Never use alcohol or drugs before or while shooting.
12. When transporting your firearm, make sure it is unloaded.
13. Use only appropriate accessories. Be sure all accessories, such as holster and grips, are compatible with the firearm and that the accessories do not interfere with safe operation.
2

GENERAL PREPARATION FOR FIRING
> Wear safety glasses and ear protection whether indoors or out.
> Select a place to shoot which has a safe backstop, is free from obstructions, water or other surfaces which cause ricochets. Check local and state laws to be sure that shooting is permittedat the site you have selected.
> Always be aware of other people so that persons cannot accidentally walk into the line of fire.
> Position the shooter and all others so that they are not within an area where they may be struckby particle-spitting from a revolver or by ejected cases from other types of firearms.
> Keep fingers and other parts of your body away from the muzzle and slide.
> When firing on a target range, be alert and follow the range officer’s commands.
> Before anyone is allowed forward of the firing position, be sure that all cylinders and actions offirearms are open, that chambers are clear of cartridges, magazines are removed, and thatfirearms are pointing in a safe direction and NOT HANDLED ON THE BENCH. Do not handlefirearms while someone is forward of the firing position.
> Never use alcoholic beverages or other drugs before or during shooting.
> Be alert at all times. Never shoot if you are tired, cold or impaired in any way.
> Never cross obstacles such as fences or streams with a loaded firearm.
> If you are carrying a loaded firearm in the field, keep the muzzle pointed in a safe direction.
> Think before shooting.
> Guns don’t think, so you must!
3
AMMUNITION
Never use ammunition where the pressure levels exceedindustry standards. Boberg XR9 pistols are manufactured from high quality material. However, +P+ cartridges – whose pressure often exceedeven factory proof-test levels – should never be used in your pistol. Allwarranties, expressed or implied, are voided and Boberg ArmsCorporation will not be liable for property damage or personal injury andconsequential damages, if +P+ ammunition is used in Boberg XR9 pistols.
A firearm and ammunition are a system. Their performance is closely related. Boberg XR9 pistols aredesigned for specific caliber ammunition, 9mm Luger (9mm Parabellum); do not alter the barrel orchamber of your Boberg XR9 pistol.
The caliber designation for this pistol is clearly stamped on the left side of the frame. Use only commercially manufactured ammunition for the caliber indicated on the barrel hood.Never use non-standard or reloaded ammunition.
Due to the Boberg XR9’s unique feed mechanism, aluminum-cased ammunition is not recommended(See back cover for color example). This type of ammunition has no crimp, and usually no adhesive,and could allow the bullet and case to become separated while being drawn from the magazine. Whilethis is not considered a safety hazard, it can result in a mis-feed or jam. Please note that there may bestyles of brass-cased ammunition that have no crimp that may cause feeding problems. Information oncrimp-less styles of ammunition can be found at www.BobergArms.com. We always recommend thatyou first test fire any style of ammunition in your XR9 before using it for self-defense purposes.
WARNING
4

5
LOADINGDo not load your Boberg XR9 pistol until you are ready to use it and thoroughly understand theseinstructions. Keep your finger outside the trigger guard until you are ready to fire. For safe and reliable performance, use only original Boberg XR9 magazines specifically manufactured for your pistol.
Figure 0. Magazine Removal
Remove the magazine from the pistol by depressing the magazine release. (See Figure 0.)
Note: this magazine does not have (or need) a magazine follower. Load magazine by pressing the cartridge nose (front of the cartridge) downward on the rearward portion of the magazine spring and sliding the cartridge fully under the lips of the magazine until the cartridge head is all the way forward inthe magazine. (See Figure 1.) Repeat this procedure until the number of cartridges you wish to load, upto the magazine capacity of seven (which can be viewed through the holes in the magazine) is attained.
Before inserting the magazine, hold the pistol in one hand with the muzzle pointing in a safe directionand with your trigger finger outside of the trigger guard. With the other hand, pull the slide back untilyou can look into the chamber, verify that the chamber is empty, and allow the slide to return forward.Insert the loaded magazine firmly into the magazine well of the pistol until it is locked in place. To makesure the magazine is fully and securely seated, apply some removal tension to the exposed portion ofthe magazine floor plate.
Figure 1. Magazine Loading
Insert Cartridge
Magazine release button

LOADING
6
Pull back Slide
After securely inserting the magazine into the pistol, quickly pull the slide fully rearward. It is usually eas-ier to pull the slide back more quickly than slowly. Since pulling the slide rearward actuates the feedmechanism, it is useful to become acquainted with the unique operation of the XR9. To verify that theslide has successfully reached its full rearward position, look at the ejection port area of the slide tosee if a live cartridge is fully upward and trapped against the underside of the slide. (See Figure 2.)If the cartridge is not in this position, continue drawing the slide rearward until this condition is met.If there is no cartridge present, release the slide, allowing it to go to its full forward (battery) position,and draw the slide back once again. If there is still no cartridge, verify that there are cartridges pres-ent in the magazine. If a cartridge is in the correct position as shown in Figure 2, release the slidesharply (in essence,“slingshotting” it forward).This chambers a cartridge, making the pistol ready to fire.THE BOBERG XR9 PISTOL CAN NOW BE FIRED BY PULLING THE TRIGGER.
If you wish to reload the magazine in your Boberg XR9 pistol to its full capacity, depress the magazinerelease and remove the magazine from the pistol. The Boberg XR9 pistols are capable of firing evenwhen the magazine has been removed if the trigger is pulled. If the magazine is removed with a roundleft in the chamber, be sure to holster or otherwise secure the pistol under your direct control while themagazine is being reloaded. Load one cartridge into the magazine to replace the cartridge which waschambered when you allowed the slide to go forward. Reinsert the loaded magazine into the magazinewell until it is locked into place. To make sure the magazine is again fully and securely seated, applysome removal tension to the exposed portion of the magazine (floor plate).
Your Boberg XR9 pistol is now fully loaded and ready to fire. Remember to keep your pistol pointed ina safe direction at all times and always keep your finger outside the trigger guard until ready to fire.Never leave any loaded firearm unattended.
Figure 2. Chambering a Round
Cartridge in correct position

7
WARNING
FIRING
Some users of Boberg XR9 pistols may “stage” the triggerin anticipation of firing a shot using its double-action-only (DAO) trigger.“Staging” is the act of pulling the trigger rearward toward – but just shortof – the point where the hammer falls and the pistol fires. Such manipu-lation of the trigger can reduce the user’s control of the handgun and canresult in an unintentional discharge. Furthermore, if the user decides notto fire, release of the trigger from a position close to the firing point in the“staging” process could result in a discharge. Obviously, “staging” thetrigger violates a basic rule of firearm safety which warns you to keep yourfinger off the trigger and outside the trigger guard until ready to fire. Wewarn all users of our DAO pistols to refrain from “staging” the trigger.
Hold the pistol firmly in your shooting hand with your finger outside the trigger guard. After verifying thatthe target and the area beyond are safe, align the sights on the target. When you are ready to shoot,place the pad of your index finger on the trigger.
When the trigger is drawn fully to the rear, the hammer is released, striking the firing pin, which strikesthe cartridge primer. Upon firing, the slide moves rearward, thereby extracting and ejecting the spentcartridge case. At the same time, a fresh cartridge is being drawn from the magazine and lifted intoalignment with the barrel. On the forward stroke of the slide, the new cartridge is placed into the cham-ber. During firing operation, the thumb or any other part of the hand should not interfere with the slide.This sequence can be repeated until the last round has been fired.
Please note that the Boberg XR9 has NO AUTOMATIC SLIDE STOP on the last shot.
CLEARING MISFIRES
If a cartridge fails to fire, pull the trigger again. If this does not result in a discharge wait at least thir-ty seconds while keeping the muzzle pointed in a safe direction. Then draw back the slide to eject thebad round and chamber a new round.
After waiting at least sixty seconds, retrieve the misfired round and inspect it. If the firing pin indent onthe primer is off center, light or non-existent. (See Troubleshooting Guide on page 28.) Be sure to dispose of the misfired round according to the ammunition manufacturer’s instructions.

UNLOADING
While keeping your finger outside the trigger guard and pointing the muzzle in a safe direction, depressthe magazine release and remove the magazine. With your finger still outside the trigger guard and themuzzle still pointing in a safe direction, grasp the slide from the rear and briskly pull the slide fully rear-ward to eject the round from the chamber and lock back the slide with the takedown lever rotated downto the 6:00 position. (See Figure 3.) Visually inspect the barrel chamber to be sure it is empty. Unloadthe magazine by holding it with the bullet end of the cartridge pointing away from you and drawing eachcartridge backward and out of the magazine.
TARGETING & SIGHT ADJUSTMENT
To adjust for windage, simply move the rear sight in the direction you want the bullet to move on thetarget. For example, if you want the bullet to move to the right, move the rear sight to the right. To movethe rear sight, simply loosen the set screw with a 1/16” hex key and re-tighten when sight is in desiredposition.
Dry FiringIt’s OK to dry fire the XR9-S pistol, this will not harm the gun in any way. However, always make certainthat the gun is unloaded and aimed in a safe direction.
8
Figure 3. Slide Hold—Open
Step 1. Pull back Slide
Step 2. Turn takedown lever Clockwise 90˚to 6:00 position
Takedown Lever
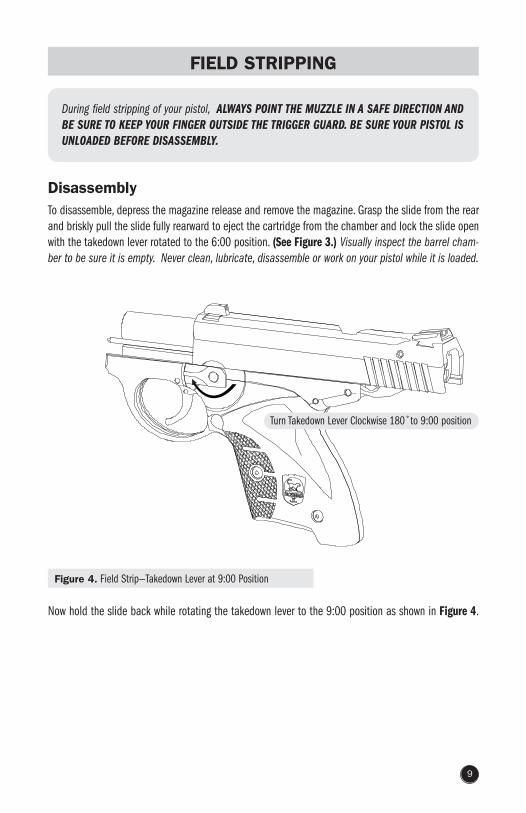
FIELD STRIPPING
DisassemblyTo disassemble, depress the magazine release and remove the magazine. Grasp the slide from the rearand briskly pull the slide fully rearward to eject the cartridge from the chamber and lock the slide openwith the takedown lever rotated to the 6:00 position. (See Figure 3.) Visually inspect the barrel cham-ber to be sure it is empty. Never clean, lubricate, disassemble or work on your pistol while it is loaded.
9
During field stripping of your pistol, ALWAYS POINT THE MUZZLE IN A SAFE DIRECTION ANDBE SURE TO KEEP YOUR FINGER OUTSIDE THE TRIGGER GUARD. BE SURE YOUR PISTOL ISUNLOADED BEFORE DISASSEMBLY.
Figure 4. Field Strip—Takedown Lever at 9:00 Position
Turn Takedown Lever Clockwise 180˚to 9:00 position
Now hold the slide back while rotating the takedown lever to the 9:00 position as shown in Figure 4.
10
FIELD STRIPPING
Figure 6a. Recoil Spring Removal
Figure 5. Slide Removal
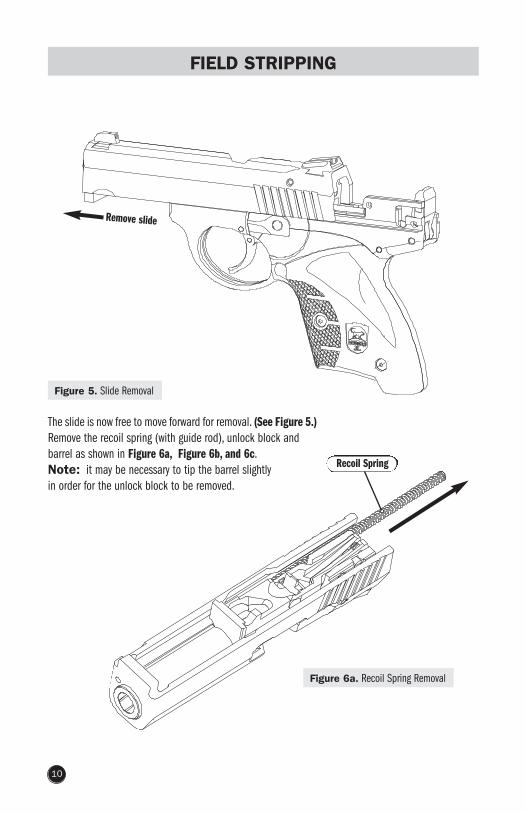
The slide is now free to move forward for removal. (See Figure 5.)Remove the recoil spring (with guide rod), unlock block and barrel as shown in Figure 6a, Figure 6b, and 6c.Note: it may be necessary to tip the barrel slightly in order for the unlock block to be removed.
Remove slide
Recoil Spring

11
FIELD STRIPPING
Figure 6b. Unlock Block Removal
Figure 6c. Barrel Tip-Out
Now with the unlock block removed, the barrel can be tipped outas shown in Figure 6c.
The pistol is now ready for normal cleaning and lubrication. Further disassembly is notrecommended and should only be undertaken by Boberg Arms Service Department.
Unlock Block
12
FIELD STRIPPING
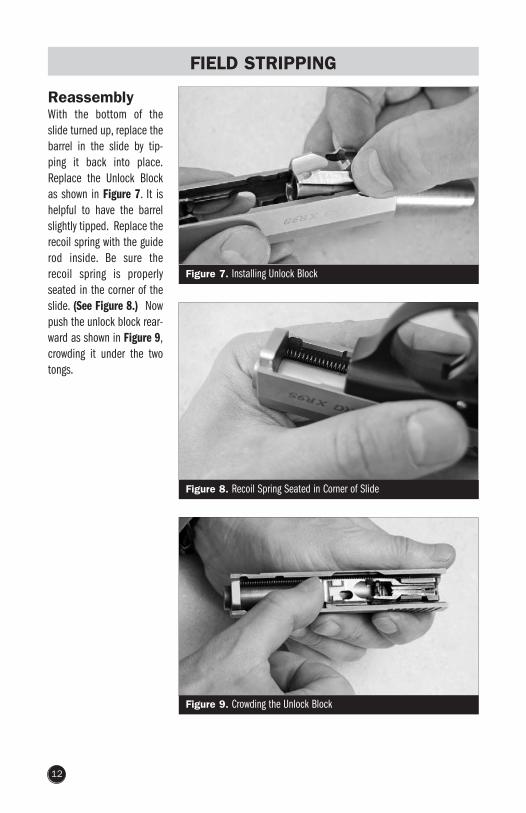
ReassemblyWith the bottom of theslide turned up, replace thebarrel in the slide by tip-ping it back into place.Replace the Unlock Blockas shown in Figure 7. It ishelpful to have the barrelslightly tipped. Replace therecoil spring with the guiderod inside. Be sure therecoil spring is properlyseated in the corner of theslide. (See Figure 8.) Nowpush the unlock block rear-ward as shown in Figure 9,crowding it under the twotongs.
Figure 7. Installing Unlock Block
Figure 8. Recoil Spring Seated in Corner of Slide
Figure 9. Crowding the Unlock Block

13
FIELD STRIPPING
Figure 10. Spring/Guide Rod in Notch
Figure 11. Flip Link Flush with Hammer
Holding the slide assembly in one hand, move the rear of the slide ontothe frame rails. It is recommended that this be done with the gunupside-down. When installing the slide onto the frame, be certain that the recoil spring/guide rod is seated into the notch in the frame.(See Figure 10.) If the slide does not go on completely at this point,check to make sure that the flip link is flush with the hammer.(See Figure 11.) If it is not, hold it in while installing the slide. Oncethese requirements have been met, continue moving the slide onto theframe until the slide is fully rearward before rotating the takedown leverback to its 3:00 position. The gun is now assembled.
Notch
Flip Link
Hammer

14
CLEANING AND MAINTENANCE
Follow this routine maintenance procedure to ensure that your pistol functions properly.
CleaningAfter firing your Boberg XR9 pistol, be sure to unload it following the procedure outlined in the sectionentitled “Unloading” (See page 8.) before field stripping and beginning any cleaning or maintenanceprocedure. Clean the barrel bore with a premium quality, powder removing solvent and bore brush. Wipethe bore clean with a bore patch or swab. Using a small brush and solvent, remove all deposits fromaround the breech of the barrel, and chamber, extractor, locking lugs, and adjacent areas which havebeen subjected to the action of the powder or primer residue. Remove any residue on the frame withlight brushing and solvent. Clean the magazine well by removing any grit, dust, or residue with a mag-azine well swab.
Magazine DisassemblyHold magazine with floor-plate facing up and front of magazine facing away from you. Use a smallscrewdriver to lift the leg of the magazine spring out of the groove while shoving the magazine floorplateforward. (See Figure 12.) Exercise caution during floorplate removal since the magazine spring is undercompression. Always wear eye protection when performing such tasks.
Magazine CleaningSwab the inside of the magazine tube with a clean brush to remove lint and debris.
Magazine ReassemblyInsert spring. Then slide floorplate over the spring until the floor plate comes to a stop. Use a small screwdriver to lift the spring leg into the groove in the floor plate. (See Figure 12 below.)
Figure 12. Magazine Assembly.Disassembly
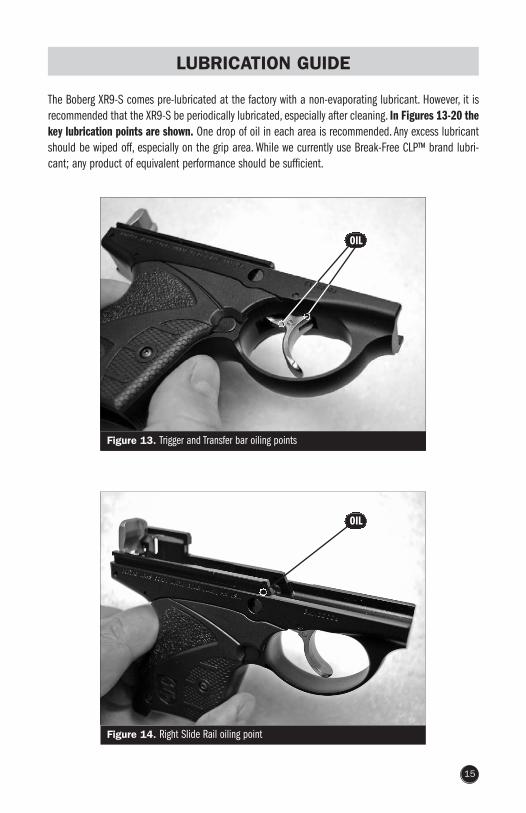
The Boberg XR9-S comes pre-lubricated at the factory with a non-evaporating lubricant. However, it isrecommended that the XR9-S be periodically lubricated, especially after cleaning. In Figures 13-20 thekey lubrication points are shown. One drop of oil in each area is recommended. Any excess lubricantshould be wiped off, especially on the grip area. While we currently use Break-Free CLP™ brand lubri-cant; any product of equivalent performance should be sufficient.
15
LUBRICATION GUIDE
Figure 13. Trigger and Transfer bar oiling points
Figure 14. Right Slide Rail oiling point
OIL
OIL
16
LUBRICATION GUIDE
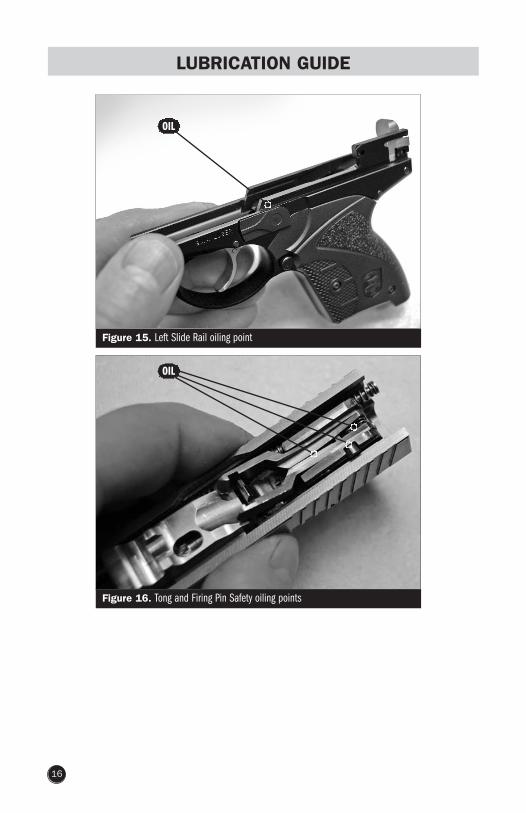
Figure 15. Left Slide Rail oiling point
Figure 16. Tong and Firing Pin Safety oiling points
OIL
OIL

17
LUBRICATION GUIDE
Figure 17. Lift Mechanism/Sear oiling points
Figure 18. Slide assembly oiling points
OIL
OIL
18
LUBRICATION GUIDE
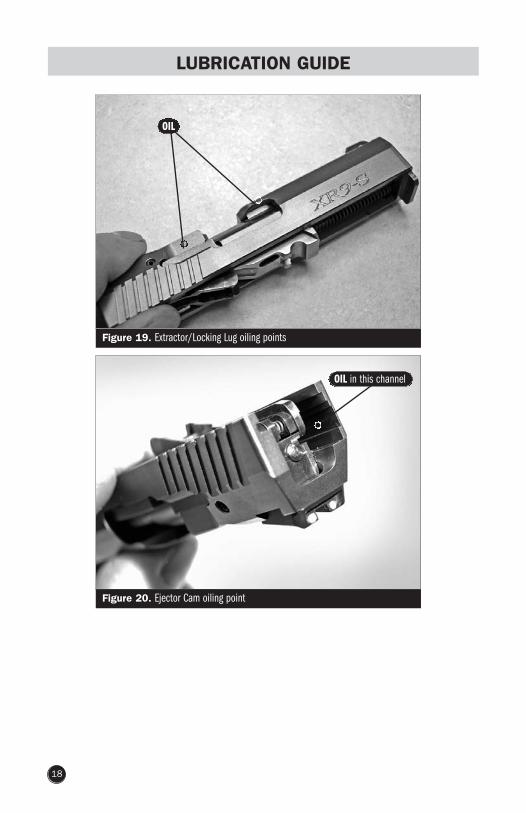
Figure 19. Extractor/Locking Lug oiling points
Figure 20. Ejector Cam oiling point
OIL
OIL in this channel
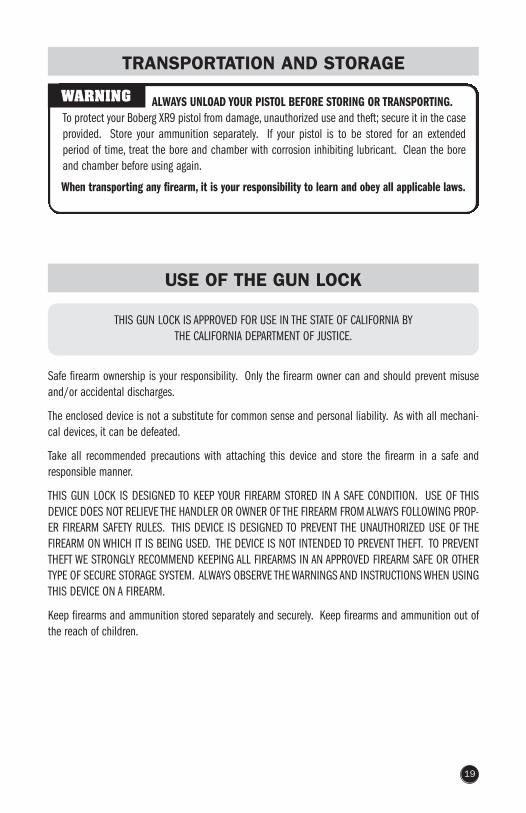
USE OF THE GUN LOCK
WARNING ALWAYS UNLOAD YOUR PISTOL BEFORE STORING OR TRANSPORTING.To protect your Boberg XR9 pistol from damage, unauthorized use and theft; secure it in the caseprovided. Store your ammunition separately. If your pistol is to be stored for an extended period of time, treat the bore and chamber with corrosion inhibiting lubricant. Clean the boreand chamber before using again.
When transporting any firearm, it is your responsibility to learn and obey all applicable laws.
THIS GUN LOCK IS APPROVED FOR USE IN THE STATE OF CALIFORNIA BY THE CALIFORNIA DEPARTMENT OF JUSTICE.
Safe firearm ownership is your responsibility. Only the firearm owner can and should prevent misuseand/or accidental discharges.
The enclosed device is not a substitute for common sense and personal liability. As with all mechani-cal devices, it can be defeated.
Take all recommended precautions with attaching this device and store the firearm in a safe andresponsible manner.
THIS GUN LOCK IS DESIGNED TO KEEP YOUR FIREARM STORED IN A SAFE CONDITION. USE OF THISDEVICE DOES NOT RELIEVE THE HANDLER OR OWNER OF THE FIREARM FROM ALWAYS FOLLOWING PROP-ER FIREARM SAFETY RULES. THIS DEVICE IS DESIGNED TO PREVENT THE UNAUTHORIZED USE OF THEFIREARM ON WHICH IT IS BEING USED. THE DEVICE IS NOT INTENDED TO PREVENT THEFT. TO PREVENTTHEFT WE STRONGLY RECOMMEND KEEPING ALL FIREARMS IN AN APPROVED FIREARM SAFE OR OTHERTYPE OF SECURE STORAGE SYSTEM. ALWAYS OBSERVE THE WARNINGS AND INSTRUCTIONS WHEN USINGTHIS DEVICE ON A FIREARM.
Keep firearms and ammunition stored separately and securely. Keep firearms and ammunition out ofthe reach of children.
TRANSPORTATION AND STORAGE
19

20
USE OF THE GUN LOCK
WARNINGNEVER INSTALL THIS DEVICE OR ANY OTHER TYPE OF FIREARM SAFETY
DEVICE ON A LOADED FIREARM. ALWAYS UNLOAD THE FIREARM BEFORE INSTALLING THISDEVICE OR BEFORE STORAGE.
THE USE OF THIS GUN LOCK WILL HELP TO PREVENT YOUR FIREARM FROM BEING USED (DISCHARGED) BY UNAUTHORIZED PERSONS. THIS DEVICE IS NOT INTENDED TO PREVENTTHE FIREARM FROM BEING STOLEN. STRICT FIREARM SAFETY PRACTICES SHOULD ALWAYS BEFOLLOWED WHEN YOUR FIREARM IS SECURED BY THIS SAFETY DEVICE.
Installation1. Unload all ammunition in a safe manner as explained in your firearm owner’s manual.
(See page 8.)2. Visually inspect the chamber(s), feed mechanism, receiver and magazine to confirm the
firearm is completely unloaded.3. Use the key to release the cable.4. For proper installation of this lock on your new Boberg XR9 firearm see Figure 21.5. Remove magazine.6. Check to ensure the gun is completely empty of loaded shells.7. While pulling the slide partially rearward, insert cable through the ejection port and
push down through the magazine well.8. Insert open end of cable into the lock body and turn key to lock.9. Remove keys.10. Pull on lock body
to ensure the device has locked properly.
11. Store your keys in a secure location.
Figure 21. Proper Installation of the Gun Lock

Replacement parts and accessories for your Boberg XR9 pistol are available for purchase from BobergArms Corporation by shopping at our web address, mailing, faxing, or calling the factory. When order-ing parts directly from the factory, please provide the serial number and approximate date of purchaseof your XR9 pistol. Be sure to include the part number (BA-000-XXXX format) and description of theparts or accessories you want to order. (See Figure 22 on page 22.)
For information on Parts and Accessories contact:
Boberg Arms Corporation1755 Commerce CourtWhite Bear Lake, Minnesota 55110(651) 209-4812 FAX (651) 209-4813www.BobergArms.com
21
SERVICE AND RETURNS
PARTS AND ACCESSORIES
Should your Boberg XR9 pistol require adjustment or repair, please return it in its original case to thefactory after you are absolutely certain that it is unloaded. Be sure to include a note briefly stating thereason you are returning your Boberg XR9 pistol with a contact phone number and shipping address.Do not send it to a Boberg Arms unauthorized gunsmith, return to Boberg Arms Service Department.Before returning, please call Boberg Arms Corp. Service Department for a Return Authorization (RA) number. Returns should be sent to:
Boberg Arms Corporation1755 Commerce CourtWhite Bear Lake, Minnesota 55110(651) 209-4812
22
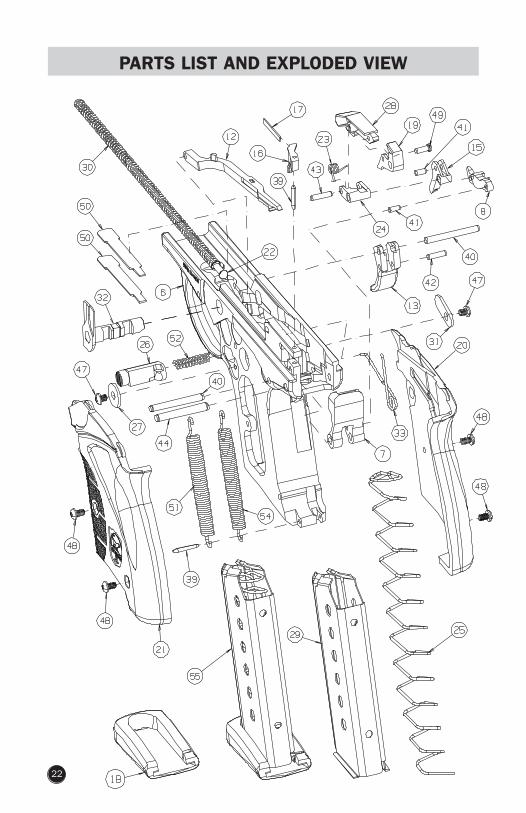
PARTS LIST AND EXPLODED VIEW

23
PART LIST AND EXPLODED VIEW
Figure 22. Boberg XR9-S Pistol Parts List and Drawing
In the unlikely event that the Boberg XR9-S fails to perform as expected, there are a few things youcan check before contacting us so that we can better serve you.
LIVE ROUND FALLS OUT DURING FIRINGAfter firing your Boberg XR9 pistol, be sure to unload it following the procedures outlined in the sectionentitled “Unloading” (See page 8.) before field stripping and beginning any cleaning or maintenanceprocedure. Clean the barrel bore with a premium quality, powder removing solvent and bore brush. Wipethe bore clean with a bore patch or swab. Using a small brush and solvent, remove all deposits fromaround the breech of the barrel, and chamber, extractor, locking lugs, and adjacent areas which havebeen subjected to the action of the powder or primer residue. Remove any residue on the frame withlight brushing and solvent.
Possible cause #1: Partially-loaded magazine.Remedy: If you have been firing the XR9-S pistol, and decide to add rounds to the magazine while thereis still a live round in the chamber, it is recommended that there are at least four rounds in the maga-zine to assure proper functioning. With fewer rounds there is a chance that the top cartridge might notbe fully inserted into the tongs, causing them to prematurely release the cartridge during cycling.
Possible cause #2: Magazine not latched.Remedy: If the magazine is not latched, it may not be high enough for the tongs to grab the cartridge.Make certain that the magazine is latched by pushing up on it until an audible clicking sound is heard.
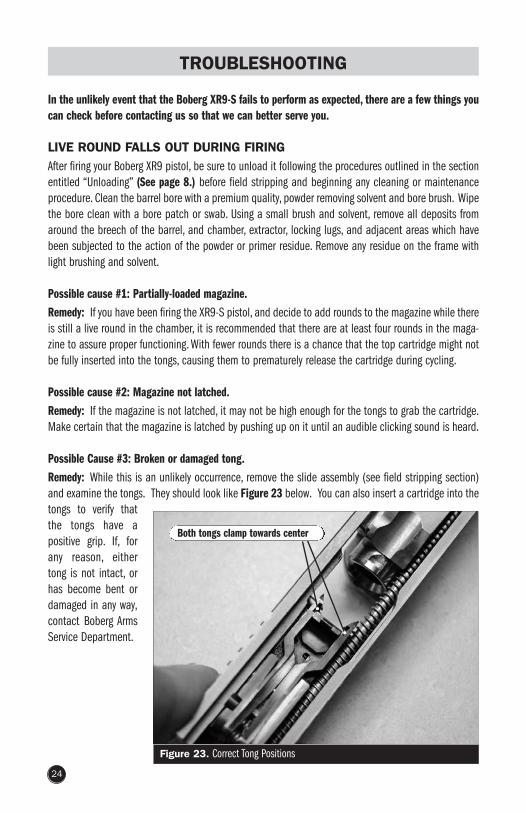
Possible Cause #3: Broken or damaged tong.Remedy: While this is an unlikely occurrence, remove the slide assembly (see field stripping section)and examine the tongs. They should look like Figure 23 below. You can also insert a cartridge into thetongs to verify thatthe tongs have a positive grip. If, forany reason, eithertong is not intact, orhas become bent ordamaged in any way,contact Boberg ArmsService Department.
TROUBLESHOOTING
24
Figure 23. Correct Tong Positions
Both tongs clamp towards center

Possible Cause #4: Damaged magazine.Remedy: If the upper portion of the magazine has been bent, the top cartridge may be presented off-center, not allowing the tongs to get a full grip. (See Figures 24 and 25 below.) Replace magazine.
TROUBLESHOOTING
25
Figure 24. Bent upper lip
Figure 25. Undamaged Magazine
Bent Lip
LIVE ROUND FALLS OUT DURING FIRING Cont.
Possible Cause #5: worn out magazine spring.Remedy: The magazine spring can lose force if cycled several thousand times. Check spring force byinserting a magazine containing only 3 cartridges. If you are not able to successfully chamber a round,then replace the magazine spring. Long-term storage of a full magazine affects spring force to a verysmall degree.
Possible Cause #6: Dirty magazine.Remedy: If the magazine has a significant amount of build-up or debris in it, it can impede the upwardflow of cartridges. A quick way of checking this is to manually unload a full magazine and watch if thecartridge column moves up quickly. If it moves up slowly, or not at all, disassemble the magazine andclean the interior thoroughly. A narrow toothbrush will work well for this.
Possible Cause: #7: Non-functional tong springs.Remedy: The two tong springs have been designed for infinite life, but if either of them fails, or getsgummed up, the tongs may not be able to properly grab a cartridge. Examine the tong springs to makecertain that they are free of debris. Use Gun Scrubber™ or a similar product to clean between the tongs.Check the tongs by alternatively pushing one away from the other. The tongs should return to center withabout 1.5 lbs of force.
STOVEPIPEThe term “stovepipe” refers to when an empty case gets caught in the ejection port. While this occur-rence is rare, it can occur with the last cartridge from a magazine since the empty case does not receivethe additional ejective action from another rising cartridge. To clear the ejection port, simply draw theslide back and tip the gun so that the empty case falls out.
MAGAZINE SPRING POPS OUT OF THE TOP OF THE MAGAZINEIf the magazine is not removed during field stripping, the magazine spring can get caught by the tongs
and get partially pulled out. To re-insert the magazine spring, remove the floor plate, (See Figure 12.)and work the spring in from the top, one coil at a time, then re-install floorplate.
TROUBLESHOOTING
26
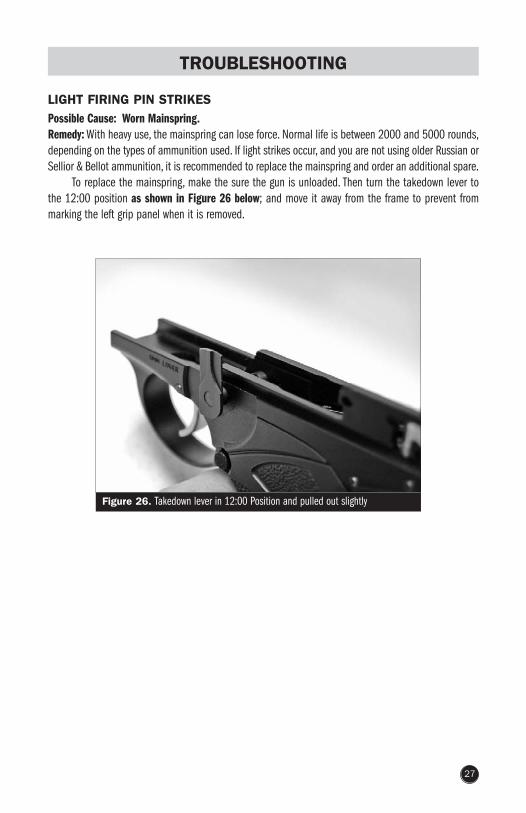
LIGHT FIRING PIN STRIKESPossible Cause: Worn Mainspring.Remedy: With heavy use, the mainspring can lose force. Normal life is between 2000 and 5000 rounds,depending on the types of ammunition used. If light strikes occur, and you are not using older Russian orSellior & Bellot ammunition, it is recommended to replace the mainspring and order an additional spare.
To replace the mainspring, make the sure the gun is unloaded. Then turn the takedown lever tothe 12:00 position as shown in Figure 26 below; and move it away from the frame to prevent frommarking the left grip panel when it is removed.
TROUBLESHOOTING
27
Figure 26. Takedown lever in 12:00 Position and pulled out slightly
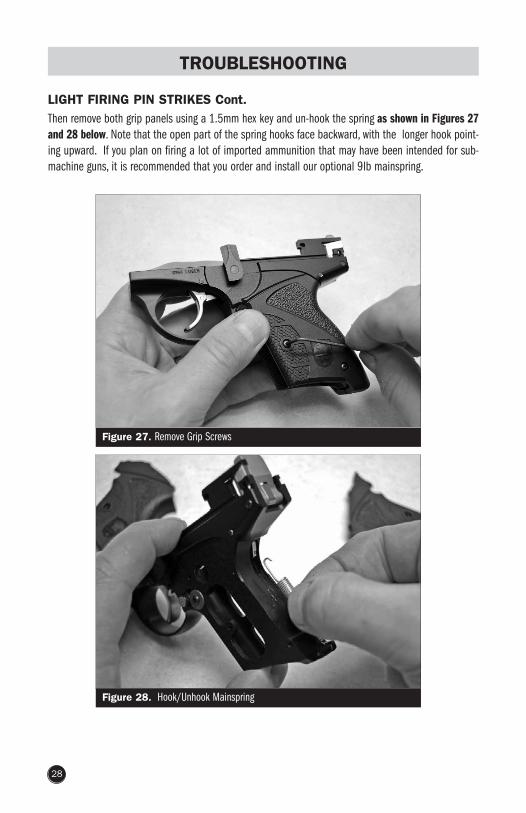
LIGHT FIRING PIN STRIKES Cont.Then remove both grip panels using a 1.5mm hex key and un-hook the spring as shown in Figures 27and 28 below. Note that the open part of the spring hooks face backward, with the longer hook point-ing upward. If you plan on firing a lot of imported ammunition that may have been intended for sub-machine guns, it is recommended that you order and install our optional 9lb mainspring.
TROUBLESHOOTING
28
Figure 27. Remove Grip Screws
Figure 28. Hook/Unhook Mainspring
CARTRIDGE SEPARATIONThis problem can show up as an empty case in the chamber and a lone bullet left in the magazine.It can also show up as a bullet that is slightly backed out of its case (“prairie dogging”) that can be difficult to eject. We recommend that you fire the bullet down range rather than attempting to eject it.Otherwise, a very fast draw of the slide or a tool may be required to remove it from the gun.
Possible cause #1: Aluminum-Cased Ammunition.Remedy: As stated earlier, the Boberg XR9-S is not rated for aluminum-cased ammunition—cease usingthis type of ammunition immediately.
Possible Cause #2: Ammunition with little or no crimp.Remedy: While we at Boberg Arms have no control over ammunition manufacturing, you should alwaystest fire ammunition at a range before using for self-defense. Our recommended minimum crimp pull-out force is 30 lbs (many styles of hollow-point ammunition achieve 100 lbs or more). While this isdifficult for most people to measure, we recommend you use only high-quality name brands of ammunition. Hand-loaded ammunition is not recommended and will invalidate any warranties.
Possible cause #3: Dirty Chamber.Remedy: Clean chamber with bore brush and solvent (at least after every 500 rounds). A partially-clogged chamber throat can cause excessively high pressure spikes that can significantly increase slideacceleration and potentially damage your weapon.
TROUBLESHOOTING
29
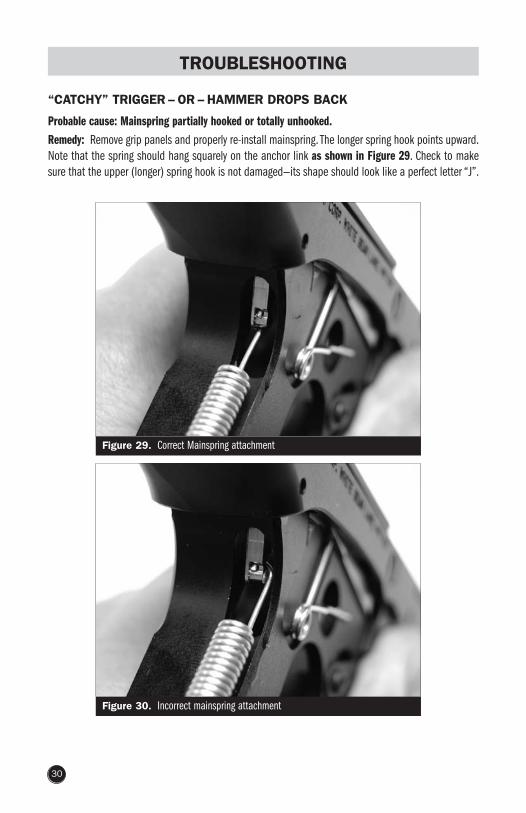
“CATCHY” TRIGGER – OR – HAMMER DROPS BACK
Probable cause: Mainspring partially hooked or totally unhooked.Remedy: Remove grip panels and properly re-install mainspring. The longer spring hook points upward.Note that the spring should hang squarely on the anchor link as shown in Figure 29. Check to makesure that the upper (longer) spring hook is not damaged—its shape should look like a perfect letter “J”.
TROUBLESHOOTING
30
Figure 29. Correct Mainspring attachment
Figure 30. Incorrect mainspring attachment

WARRANTY STATEMENT
31
LIMITED WARRANTY
PRODUCT. This Limited Warranty is made by Boberg Arms Corporation (the “Company”) for the BobergXR9-S Pistol (the “Product”)
WARRANTY. Subject to the terms and conditions contained in this Limited Warranty, the Company pro-vides a limited warranty to the original purchaser of the Product that the Product will be free from man-ufacturing defects for a period of three (3) years from the date of purchase. THIS WARRANTY ISEXPRESSLY IN LIEU OF ALL OTHER WARRANTIES EXPRESS OR IMPLIED, INCLUDING ANY WARRANTYOF MERCHANTABILITY OR FITNESS FOR A PARTICULAR PURPOSE OR USE AND ALL OTHER LIABILI-TIES OR OBLIGATIONS ON THE PART OF THE COMPANY. THERE ARE NO WARRANTIES WHICH EXTENDBEYOND THE DESCRIPTION IN THIS LIMITED WARRANTY,AND THE COMPANY NEITHER ASSUMES NORAUTHORIZED ANY PERSON TO ASSUME FOR IT ANY OTHER LIABILITY.
REGISTRATION. The attached Warranty Registration must be completed by the Original Purchaser andmailed with a copy of the sales receipt, Bill of Sale in the owner’s name, or a copy of ATF Form 4473,indicating the date and location of purchase, to the Company within thirty (30) days of purchase orthis Limited Warranty is void. The Limited Warranty is issued to the original purchaser of the Productand upon the sale or transfer of the Product to any third party, the Limited Warranty expires andbecomes null and void.
USE. This Limited Warranty shall only apply where the Product is handled in accordance with the man-ufacturer’s instructions and maintained strictly in accordance with the maintenance instructions, andprovided further that investigation and inspection by the Company or its representatives discloses thatsuch defects developed under normal and proper use and are not due to unauthorized adjustments,modifications or defective or improper ammunition. Unauthorized adjustments are those done by any-one who is not a Boberg Arms Corp. authorized gunsmith. Pistols should be returned to the factory forrepairs. The Purchaser is solely responsible for the inspection of the Product and any claims for visibledefects in the Product must be made before the use of the Product. This Limited Warranty does notcover damage or defects caused by mishandling, misuse, or damage from excessive heat or unevenexposure to extreme conditions and physical or chemical abuse.
WARRANTY CLAIMS. Any Limited Warranty claims must be addressed in writing and delivered to theCompany at 1755 Commerce Court, White Bear Lake, Minnesota 55110, along with the Product, a copyof the Bill of Sale in the owner’s name, or a copy of ATF Form 4473, indicating the date and location ofpurchase, and must state a description of the difficulty or defect experienced. All Limited Warrantyclaims must be postmarked within thirty (30) days after the Purchaser first learns the facts upon whichthe Limited Warranty claim is based or such claim shall be deemed to be waived.
EXCLUSIVE REMEDY. Purchaser’s sole and exclusive remedy against the Company shall be, at the soleoption of the Company, the replacement of the defective Product, repair, or refund of the purchase price.THE COMPANY SHALL NOT BE LIABLE FOR ANY DIRECT, INDIRECT, GENERAL, PUNITIVE, INCIDENTAL,SPECIAL OR CONSEQUENTIAL DAMAGES OF ANY KIND WHATSOEVER RESULTING FROM DEFECTS ORNON-CONFORMITY OF THE PRODUCT, REGARDLESS OF THE CAUSES OF SUCH DAMAGE.
32
IMPORTANT! IMPORTANT! IMPORTANT!
READ AND UNDERSTAND THE ENCLOSED MANUAL (“SAFETY, INSTRUCTIONS & PARTS MANUAL”)INCLUDING SPECIAL WARNINGS AND PRECAUTIONS CAREFULLY BEFORE REMOVING THIS FIREARMFROM ITS PACKAGE!
RECORD YOUR SERIAL NUMBER HERE AND KEEP THIS BOOKLET WITH YOUR PISTOL CASE FOR YOUR CONVENIENCE.
Name of Owner_______________________________________________________________________________
Address_____________________________________________________________________________________
City_________________________________________ State____________________ Zip________________
Contact Phone No.________________________________________________
Model______________________________________________ Caliber________________________________
Serial No. _____________________________________________________________
Where Purchased_____________________________________________________________________________
Date of Purchase_____________________________
Boberg Arms CORPORATION
1755 Commerce Court, White Bear Lake, Minnesota 55110