Wall Hung WC Pan Model CWC 100 Series - Wallgate Ltd · Wallgate CWC_100 Series ... operating or...
18
Wallgate Ltd. tel: +44 (0) 1722 744594 Crow Lane, Wilton, fax: +44 (0) 1722 742096 Salisbury, Wiltshire, email: [email protected] SP2 0HB, England web: www.wallgate.com Wallgate CWC_100 Series PRODUCT MANUAL Issue 2 ORIGINAL INSTRUCTIONS © 2013 Wallgate Ltd. Wall Hung WC Pan Model CWC_100 Series Product Manual
Transcript of Wall Hung WC Pan Model CWC 100 Series - Wallgate Ltd · Wallgate CWC_100 Series ... operating or...

Wallgate Ltd. tel: +44 (0) 1722 744594 Crow Lane, Wilton, fax: +44 (0) 1722 742096 Salisbury, Wiltshire, email: [email protected] SP2 0HB, England web: www.wallgate.com
Wallgate CWC_100 Series PRODUCT MANUAL Issue 2
ORIGINAL INSTRUCTIONS © 2013 Wallgate Ltd.
Wall Hung WC Pan Model CWC_100 Series
Product Manual
2
Wallgate CWC_100 Series PRODUCT MANUAL Issue 2
ORIGINAL INSTRUCTIONS © 2013 Wallgate Ltd.
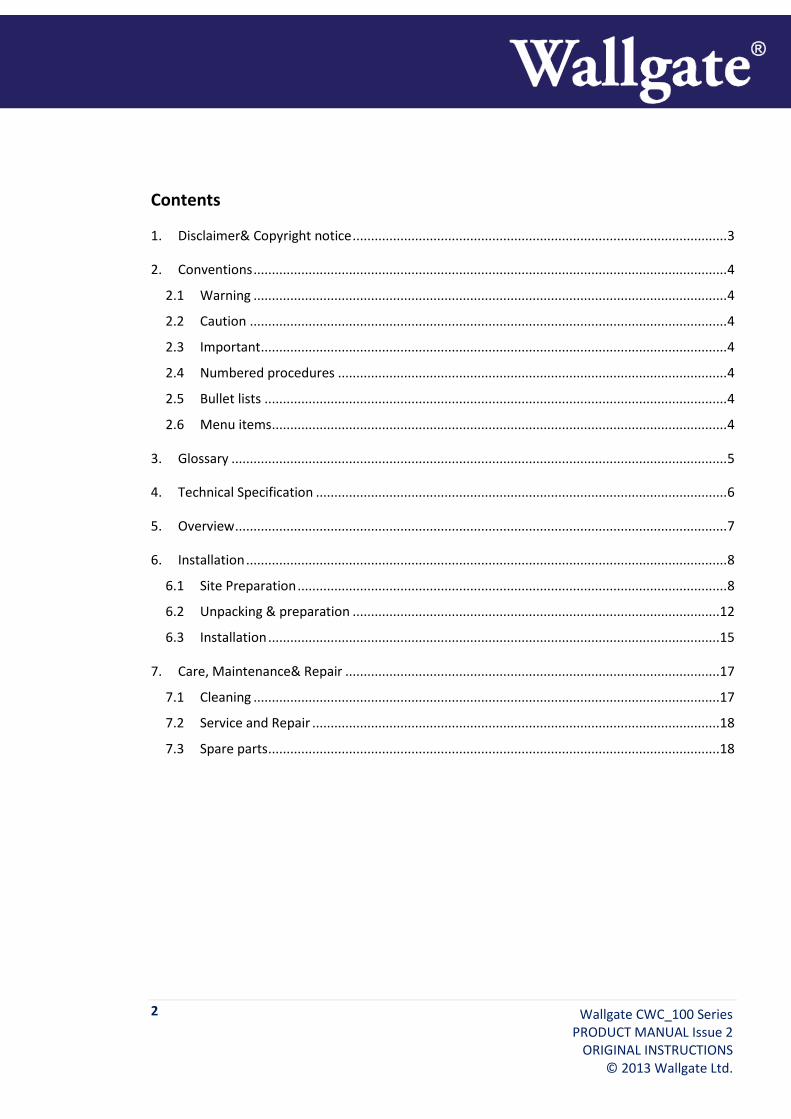
Contents
1. Disclaimer& Copyright notice ...................................................................................................... 3
2. Conventions ................................................................................................................................. 4
2.1 Warning ................................................................................................................................. 4
2.2 Caution .................................................................................................................................. 4
2.3 Important ............................................................................................................................... 4
2.4 Numbered procedures .......................................................................................................... 4
2.5 Bullet lists .............................................................................................................................. 4
2.6 Menu items ............................................................................................................................ 4
3. Glossary ....................................................................................................................................... 5
4. Technical Specification ................................................................................................................ 6
5. Overview ...................................................................................................................................... 7
6. Installation ................................................................................................................................... 8
6.1 Site Preparation ..................................................................................................................... 8
6.2 Unpacking & preparation .................................................................................................... 12
6.3 Installation ........................................................................................................................... 15
7. Care, Maintenance& Repair ...................................................................................................... 17
7.1 Cleaning ............................................................................................................................... 17
7.2 Service and Repair ............................................................................................................... 18
7.3 Spare parts ........................................................................................................................... 18
3
Wallgate CWC_100 Series PRODUCT MANUAL Issue 2 ORIGINAL INSTRUCTIONS © 2013 Wallgate Ltd.
1. Disclaimer & Copyright notice
Every effort has been made to supply information within this manual which is correct. Wallgate Limited will not be liable for any damage or loss that arises if the person installing, operating or maintaining the unit has not read or not complied with the manual
In any event, and without prejudice to any warranties in Wallgate Limited’s terms and conditions of sale, Wallgate Limited’s liability for all damages and losses (including negligence) shall not in any circumstances exceed the amount paid by the customer for the unit.
Wallgate reserves the right to alter, update or improve its product specification at any time without prior notice. This manual is specific to the product that it has been supplied with at the date of supply.
Without prejudice to any warranties in Wallgate Limited’s terms and conditions of sale, any warranty will be invalidated if the equipment is installed or serviced by unqualified personnel.
No part of this publication and the information contained may be reproduced, transmitted, stored in a retrieval system, used or disclosed wholly or partly without prior written permission from Wallgate Limited.
For full warranty details please see Wallgate Limited Terms and Conditions.
Please ensure this manual is passed to the end user. The manual forms an integral part of the product and should be kept for it's working life. Additional copies of this and other supporting documents are available by contacting Wallgate Ltd or by visiting www.wallgate.com
4
Wallgate CWC_100 Series PRODUCT MANUAL Issue 2
ORIGINAL INSTRUCTIONS © 2013 Wallgate Ltd.
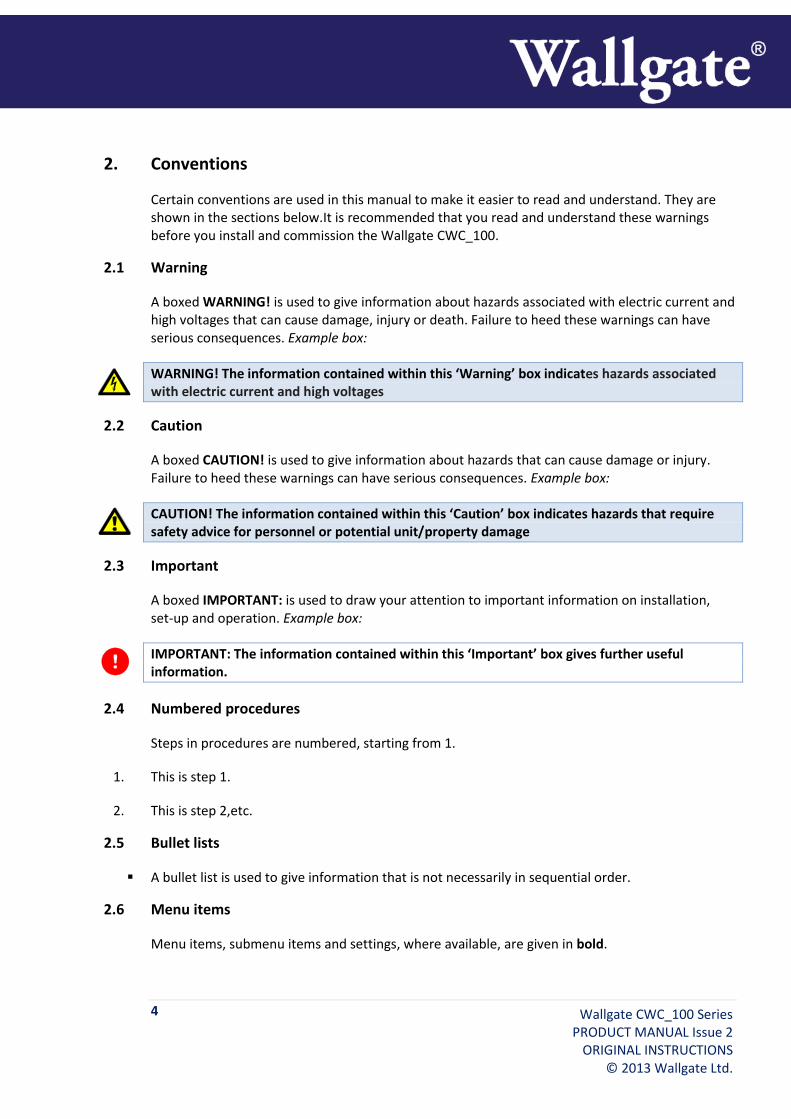
2. Conventions
Certain conventions are used in this manual to make it easier to read and understand. They are shown in the sections below.It is recommended that you read and understand these warnings before you install and commission the Wallgate CWC_100.
2.1 Warning
A boxed WARNING! is used to give information about hazards associated with electric current and high voltages that can cause damage, injury or death. Failure to heed these warnings can have serious consequences. Example box:
WARNING! The information contained within this ‘Warning’ box indicates hazards associated with electric current and high voltages
2.2 Caution
A boxed CAUTION! is used to give information about hazards that can cause damage or injury. Failure to heed these warnings can have serious consequences. Example box:
CAUTION! The information contained within this ‘Caution’ box indicates hazards that require safety advice for personnel or potential unit/property damage
2.3 Important
A boxed IMPORTANT: is used to draw your attention to important information on installation, set-up and operation. Example box:
IMPORTANT: The information contained within this ‘Important’ box gives further useful information.
2.4 Numbered procedures
Steps in procedures are numbered, starting from 1.
1. This is step 1.
2. This is step 2,etc.
2.5 Bullet lists
A bullet list is used to give information that is not necessarily in sequential order.
2.6 Menu items
Menu items, submenu items and settings, where available, are given in bold.

5
Wallgate CWC_100 Series PRODUCT MANUAL Issue 2 ORIGINAL INSTRUCTIONS © 2013 Wallgate Ltd.
3. Glossary
The glossary lists all words, abbreviations and technical terminology used in this manual, along with a short description of these terms.
Term Description
CWC_100 Wall Hung Closet
Solid Surface The term Solid Surface refers to the hard granite-effector solid colour material that is moulded to form the CWC.
Pan Bowl-shaped part of a toilet

6
Wallgate CWC_100 Series PRODUCT MANUAL Issue 2
ORIGINAL INSTRUCTIONS © 2013 Wallgate Ltd.
4. Technical Specification
Weight Item CWC_100 Pan Total (Boxed)
With Seat 53.5 kg 55 kg
Without Seat 48 kg 51.5 kg
Dimensions 390 mm wide x 535 mm high x 585 mm depth
Regulatory compliance
Complies with: BE EN 33:2011
Solid Surface Approvals
BS476 Pt. 6 Class 0 & 7 Class 1 – fire propagation and surface spread of flame ISO EN 19712-3-2007 rated 5 for durability, stain resistance, cigarette burns, etc.

7
Wallgate CWC_100 Series PRODUCT MANUAL Issue 2 ORIGINAL INSTRUCTIONS © 2013 Wallgate Ltd.
5. Overview
The Wallgate CWC_100 series are a back-to-wall, solid surface WC pan. The series of models are:
CWC_100 Pan only without seat. CWC_100_ST Pan with solid surface seat (Fixed non-hinged) CWC_100_AST Pan with solid surface ligature resistant seat (Fixed non-hinged)

8
Wallgate CWC_100 Series PRODUCT MANUAL Issue 2
ORIGINAL INSTRUCTIONS © 2013 Wallgate Ltd.
6. Installation
The Wallgate CWC_100 unit is a wall-hung closet. It is necessary to prepare the mounting surface or install the mounting frame and prepare the services (water and waste) prior to installing the WC.
Fig. 1 Typical installation (wall removed for clarity)
The CWC_100 pan can be installed directly onto solid pre-cast concrete walls, concrete block walls & brick walls where the wall construction strength is rated to accommodate the combined weight of the pan and a 400kg loading. For other wall types such as IPS panels & timber stud construction walls, then it must be installed using a suitable support frame and critical consideration must be given to ensure that the floor and wall construction is adequate to support a 400 kg load as stated in the BS EN 997:2012.
The diagram includes components that are purchased separately to the CWC_100 wall-hung WC:
Control unit
Touch button or IR Sensor
Cistern and flush pipe and seal
WC wall support frame
WC waste connector

9
Wallgate CWC_100 Series PRODUCT MANUAL Issue 2 ORIGINAL INSTRUCTIONS © 2013 Wallgate Ltd.
6.1 Site Preparation
Insert apertures for pan fixing points, flush pipe hole and waste connector hole as per Fig 2 and 3. Note fig 4 details hole positions
There are two pan models, requiring hole positions to be at the relevant height for each model. Ensure the correct dimensions are used prior to commencing wall preparation.
Refer to the following drawings for additional dimensions for each pan model: CWC_100, CWC_100ST and CWC_100_AST
Fig.2 Pan Without Seat mounting dimensions (mm) showing optional wall frame.

10
Wallgate CWC_100 Series PRODUCT MANUAL Issue 2
ORIGINAL INSTRUCTIONS © 2013 Wallgate Ltd.
Fig.3 Pan With Seat mounting dimensions (mm) showing optional wall frame.

11
Wallgate CWC_100 Series PRODUCT MANUAL Issue 2 ORIGINAL INSTRUCTIONS © 2013 Wallgate Ltd.
Fig 4 Solid wall holes detail, pan without seat.
4 off 60mm sq, washer plates are supplied to be positioned on each fixing stud on the back of the wall prior to fitting the M10 fixing nuts.
Note that in some case the holes in pre cast concrete are formed with a draft angle so they are cast in rather than drilled. If the hole diameter on the back of the wall is greater than the hole size specified (ǿ15mm), then consideration must be given to whether the effectiveness of the 60mm sq plates supplied to support the wc pan with a 400kg load is likely to be compromised. Plates of a larger size & thickness shall be required to provide the required support in this event.
Pan without seat on solid wall

12
Wallgate CWC_100 Series PRODUCT MANUAL Issue 2
ORIGINAL INSTRUCTIONS © 2013 Wallgate Ltd.
Fig Solid wall holes detail, pan with seat.
Pan with seat on solid wall
4 off 60mm sq, washer plates are supplied to be positioned on each fixing stud on the back of the wall prior to fitting the M10 fixing nuts.
Note that in some case the holes in pre cast concrete are formed with a draft angle so they are cast in rather than drilled. If the hole diameter on the back of the wall is greater than the hole size specified (ǿ15mm), then consideration must be given to whether the effectiveness of the 60mm sq plates supplied to support the wc pan with a 400kg load is likely to be compromised. Plates of a larger size & thickness shall be required to provide the required support in this event.

13
Wallgate CWC_100 Series PRODUCT MANUAL Issue 2 ORIGINAL INSTRUCTIONS © 2013 Wallgate Ltd.
6.2 Unpacking & preparation
The Wallgate CWC_100 packaging has been designed to support the WC pan during installation. The pan is boxed sitting on a support block, which is the correct height for mounting the pan against the mounting wall and can be slid into position whilst boxed.
To avoid unnecessary lifting and possible damage to the CWC_100 it is recommended to move the boxed pan into position before removing the packaging. Use constraint using sharp tools to open the packaging so as to avoid damaging the contents.
1. Move the boxed pan close to the intended installation.
2. Open the top, remove the instructions and the fittings pack and keep safe for use later. Noting the orientation of the pan in the box, rotate the box so that the back of the pan is nearest the mounting wall.
3. Cut down the four corners and flatten the box, leaving the pan sat on the foam support block
1
2
3

14
Wallgate CWC_100 Series PRODUCT MANUAL Issue 2
ORIGINAL INSTRUCTIONS © 2013 Wallgate Ltd.
4. Insert the flush pipe seal into the water inlet aperture on the pan, as supplied with the cistern or flush valve assembly
5. Insert the WC pan connector to the waste spigot, as supplied by others. It may be required to cut the waste connector to the required length. This is best done prior to pan installation.
6. Install the four fixing studs into the M10 fixing points on the pan & tighten to a torque of 6Nm. Ensure they are inserted by a minimum of 35mm. Alternatively, this can be done later in the installation from the other side of the mounting wall through into the pan, see point 13.
35mm minimum insertion, torque 6Nm
4
5
6
15
Wallgate CWC_100 Series PRODUCT MANUAL Issue 2 ORIGINAL INSTRUCTIONS © 2013 Wallgate Ltd.
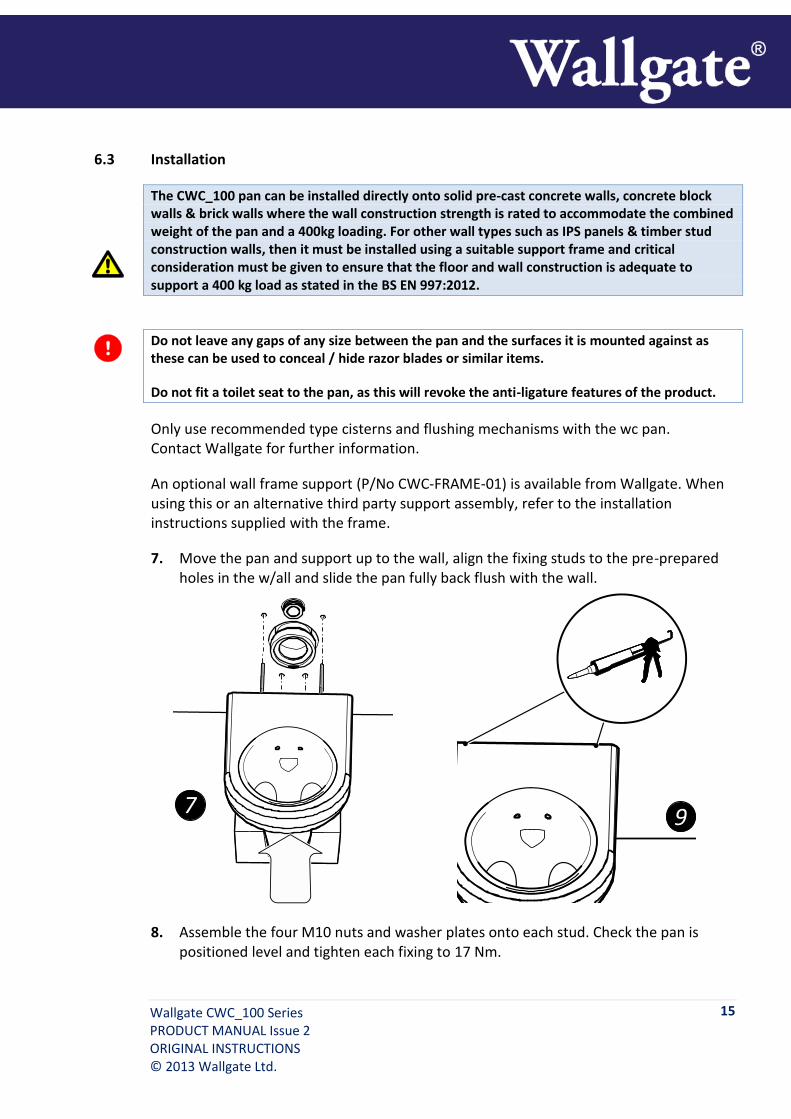
6.3 Installation
The CWC_100 pan can be installed directly onto solid pre-cast concrete walls, concrete block walls & brick walls where the wall construction strength is rated to accommodate the combined weight of the pan and a 400kg loading. For other wall types such as IPS panels & timber stud construction walls, then it must be installed using a suitable support frame and critical consideration must be given to ensure that the floor and wall construction is adequate to support a 400 kg load as stated in the BS EN 997:2012.
Do not leave any gaps of any size between the pan and the surfaces it is mounted against as these can be used to conceal / hide razor blades or similar items.
Do not fit a toilet seat to the pan, as this will revoke the anti-ligature features of the product.
Only use recommended type cisterns and flushing mechanisms with the wc pan. Contact Wallgate for further information.
An optional wall frame support (P/No CWC-FRAME-01) is available from Wallgate. When using this or an alternative third party support assembly, refer to the installation instructions supplied with the frame.
7. Move the pan and support up to the wall, align the fixing studs to the pre-prepared holes in the w/all and slide the pan fully back flush with the wall.
8. Assemble the four M10 nuts and washer plates onto each stud. Check the pan is positioned level and tighten each fixing to 17 Nm.
7 9

16
Wallgate CWC_100 Series PRODUCT MANUAL Issue 2
ORIGINAL INSTRUCTIONS © 2013 Wallgate Ltd.
9. Seal the edges of the product to the wall surface with an non pick mastic as appropriate.
10. Connect the waste connector to the main pipe system. Depending on the installation design, this may be best connected prior to full pan installation.
11. Installation of the flush pipe and flush system will depend on the type being used. For specific installation requirements refer to the fitting instructions as supplied with the flush system.
12. The flush pipe should be connected to the WC pan water inlet and seal as fitted earlier. The pipe may require cutting to adjust the horizontal length. Allow for a minimum insertion depth of 65mm in to the pan seal.
13. For alternative installations where it is better to install the fixing studs after the pan has been presented to the mounting wall, ensure the studs are inserted into the pan by a minimum of 35mm, and that the pan is drawn up evenly. Failure to do so may cause the assembly to bind and may damage the pan’s threaded inserts. This installation method may be difficult as there will be little line of sight on the fixing holes and it is important that the fixing rods are perpendicular to the pan. Once again, leave the pan on the supporting block during installation, and remove once the assembly has been completed.
13

17
Wallgate CWC_100 Series PRODUCT MANUAL Issue 2 ORIGINAL INSTRUCTIONS © 2013 Wallgate Ltd.
7. Care, Maintenance& Repair
The CWC_100 wall Hung Closet unit is well designed and manufactured from high quality materials. If you install, operate and maintain them according to the instructions given in this manual, the unit will give reliable and efficient service. If you need any further information or advice, please contact Wallgate Customer Services.
7.1 Cleaning
The CWC_100 is manufactured from a cast solid surface composite that is very durable. A planned on going care and maintenance routine will ensure that the product will last for many years. Solid surface cleaning kits are available from Wallgate.
7.1.1 Surface Maintenance
Routine hygienic cleaning should consist of spraying the CWC_100 with a bathroom-type cleaner (which may have anti-bacterial or anti-lime scale properties) and wiping or washing down with a soft cloth. Bleach based toilet cleaners may also be used. Lime scale can be removed using proprietary products and abrasives. Stains and surface marks may be removed with the use of a 3M Scotch-Brite™ pad, grade “Green” fine, used wet, with a liquid cleaning agent if necessary. The following maintenance may also require re-polishing: Stubborn stains such as cigarette burns can also be removed with a 3M Scotch-Brite™ pad, grade “Green” fine and used with an abrasive cream cleaner. Fine sandpaper will remove the most difficult marks restoring the surface colour. Deep scratches can be rubbed down and removed using fine grade sandpaper with a final polish using an abrasive cream cleaner. Damage requiring filling can be repaired with “Plastic Metal” type products or suitably coloured two-part filler/catalyst epoxy fillers and finished by fine sanding back to the required shape and then re-polishing.
7.1.2 Re-Polishing
Final polishing should be carried out using an abrasive cleanser and Scotch-Brite™ pad. Gloss & high satin finishes can be restored with a polishing compound e.g Farecla Rubbing Compound – Grade G3 (or similar); by hand or with a rotary powered tool with a mop head fitting.
Further advice on any of the above mentioned cleaning products may be obtained by contacting the “Wallgate Sales or Service Offices”.

18
Wallgate CWC_100 Series PRODUCT MANUAL Issue 2
ORIGINAL INSTRUCTIONS © 2013 Wallgate Ltd.
7.2 Service and Repair
Any service or repair work must be done by a qualified engineer. During the warranty period, the service or repair must only be done by a Wallgate engineer or appointed service agent. Refer to the Wallgate terms and conditions for warranty information.
7.3 Spare parts
Contact Wallgate after sales service for assistance regarding spares and service maintenance.
Wallgate Ltd offer comprehensive after-sales and service support. For more information contact Wallgate Ltd or visit www.wallgate.com
Wallgate Ltd. Crow Lane, Wilton, Salisbury, Wiltshire, SP2 0HB, England tel: +44 (0) 1722 744594 fax: +44 (0) 1722 742096 email: [email protected] web: www.wallgate.com