WALK-THROUGH - Stukent · • iMac (21.5-inch, Mid 2014) • iMac (27-inch, Late 2013) • iMac...
11
MacBook • MacBook (Retina, 12-inch, Early 2016) • MacBook (Retina, 12-inch, Early 2015) iMac • iMac (Retina 5K, 27-inch, Late 2015) • iMac (Retina 4K, 21.5-inch, Late 2015) • iMac (21.5-inch, Late 2015) • iMac (Retina 5k, 27-inch, Mid 2015) • iMac (Retina 5K, 27-inch, Late 2014) • iMac (21.5-inch, Mid 2014) • iMac (27-inch, Late 2013) • iMac (21.5-inch, Late 2013) • iMac (27-inch, Late 2012) • iMac (21.5-inch, Late 2012) Mac Mini • Mac mini (Late 2014) • Mac mini Server (Late 2012) • Mac mini (Late 2012) Mac Pro • Mac Pro (Late 2013) WINDOWS 10 INSTALLATION WALK-THROUGH
Transcript of WALK-THROUGH - Stukent · • iMac (21.5-inch, Mid 2014) • iMac (27-inch, Late 2013) • iMac...

MacBook• MacBook (Retina, 12-inch, Early 2016)• MacBook (Retina, 12-inch, Early 2015)
iMac• iMac (Retina 5K, 27-inch, Late 2015)• iMac (Retina 4K, 21.5-inch, Late 2015)• iMac (21.5-inch, Late 2015)• iMac (Retina 5k, 27-inch, Mid 2015)• iMac (Retina 5K, 27-inch, Late 2014)• iMac (21.5-inch, Mid 2014)• iMac (27-inch, Late 2013)• iMac (21.5-inch, Late 2013)• iMac (27-inch, Late 2012)• iMac (21.5-inch, Late 2012)
Mac Mini• Mac mini (Late 2014)• Mac mini Server (Late 2012)• Mac mini (Late 2012)
Mac Pro• Mac Pro (Late 2013)
WINDOWS 10 INSTALLAT IONW A L K - T H R O U G H

I N T R O D U C T I O N
This walk-through will help you download Windows 10 on a Mac to use Commspoint. The installation can be a little time consuming, so make sure your Mac is connected to a power source to ensure the fastest installation.
Since you’ll be downloading another computer system onto your existing Mac, this will require a large amount of space, 70 GB is the recommend amount with 55 GB being absolute minimum. The bigger the space you set aside for Windows 10, the easier it will run.
Check out this full video walk-through:“How to install Windows 10 on a Mac using Boot Camp Assistant”

M A C S T H AT S U P P O R T W I N D O W S 1 0
For more details, visit Apple’s Boot Camp support page for Windows 10.
MacBook Pro• MacBook Pro (15-inch, Late 2016)• MacBook Pro (13-inch, Late 2016, Four Thunderbolt 3 Ports)• MacBook Pro (13-inch, Late 2016, Two Thunderbolt 3 Ports)• MacBook Pro (Retina, 15-inch, Mid 2015)• MacBook Pro (Retina, 13-inch, Early 2015)• MacBook Pro (Retina, 15-inch, Mid 2014)• MacBook Pro (Retina, 13-inch, Mid 2014)• MacBook Pro (Retina, 15-inch, Late 2013)• MacBook Pro (Retina, 13-inch, Late 2013)• MacBook Pro (Retina, 15-inch, Early 2013)• MacBook Pro (Retina, 13-inch, Early 2013)• MacBook Pro (Retina, 13-inch, Late 2012)• MacBook Pro (Retina, Mid 2012)• MacBook Pro (13-inch, Mid 2012)• MacBook Pro (15-inch, Mid 2012)
MacBook Air• MacBook Air (13-inch, Early 2015)• MacBook Air (11-inch, Early 2015)• MacBook Air (13-inch, Early 2014)• MacBook Air (11-inch, Early 2014)• MacBook Air (13-inch, Mid 2013)• MacBook Air (11-inch, Mid 2013)• MacBook Air (13-inch, Mid 2012)• MacBook Air (11-inch, Mid 2012)
MacBook• MacBook (Retina, 12-inch, Early 2016)• MacBook (Retina, 12-inch, Early 2015)
iMac• iMac (Retina 5K, 27-inch, Late 2015)• iMac (Retina 4K, 21.5-inch, Late 2015)• iMac (21.5-inch, Late 2015)• iMac (Retina 5k, 27-inch, Mid 2015)• iMac (Retina 5K, 27-inch, Late 2014)• iMac (21.5-inch, Mid 2014)• iMac (27-inch, Late 2013)• iMac (21.5-inch, Late 2013)• iMac (27-inch, Late 2012)• iMac (21.5-inch, Late 2012)
Mac Mini• Mac mini (Late 2014)• Mac mini Server (Late 2012)• Mac mini (Late 2012)
Mac Pro• Mac Pro (Late 2013)
D O W N L O A D M I C R O S O F T 1 0 & R U N B O O T C A M P A S S I S TA N T
Note: Be sure to back up your Mac before starting to keep anything from being lost.
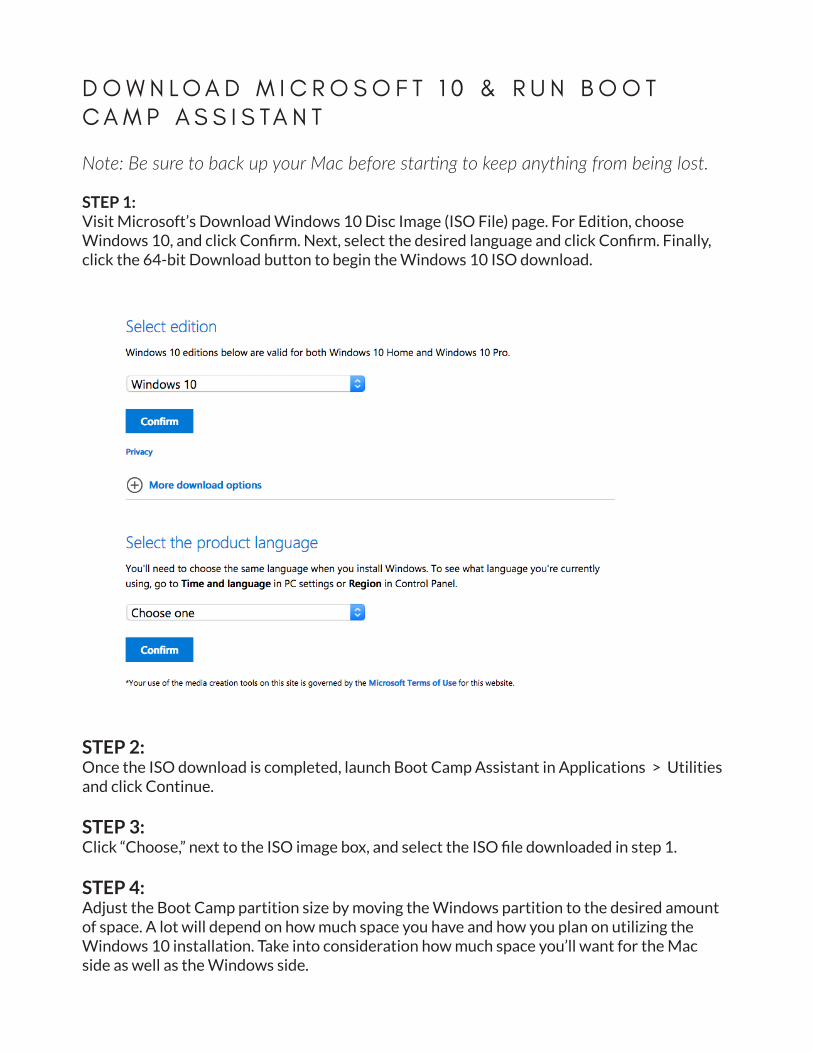
STEP 1: Visit Microsoft’s Download Windows 10 Disc Image (ISO File) page. For Edition, choose Windows 10, and click Confirm. Next, select the desired language and click Confirm. Finally, click the 64-bit Download button to begin the Windows 10 ISO download.
STEP 2: Once the ISO download is completed, launch Boot Camp Assistant in Applications > Utilities and click Continue.
STEP 3: Click “Choose,” next to the ISO image box, and select the ISO file downloaded in step 1.
STEP 4: Adjust the Boot Camp partition size by moving the Windows partition to the desired amount of space. A lot will depend on how much space you have and how you plan on utilizing the Windows 10 installation. Take into consideration how much space you’ll want for the Mac side as well as the Windows side.

I N S TA L L W I N D O W S 1 0
STEP 5: After selecting the ISO file and adjusting the partition sizes, click Install. The Boot Camp Assistant will download Windows support software, partition the disk, and copy the necessary Windows files to get started. You will then be prompted to enter your administrator password, and soon after, macOS will reboot into Windows Setup.
STEP 6: Upon reboot, you’ll see the Windows logo followed by the Windows Setup screen. Select the desired language, time and country format, along with keyboard or input method and click Next.
STEP 7: You’ll now arrive at the Activate Windows box. If you already have a Windows 10 product key, enter it and click Next. Otherwise, click I don’t have a product key at the bottom of the box.
STEP 8: Select either Windows 10 Pro or Windows 10 Home. Which one you choose is up to you. You can compare each version of Windows 10 here. Click Next after choosing the desired version.
STEP 9: On the Applicable notices and license terms screen, check the I accept the license terms box in the bottom left-hand corner and click Next.

STEP 10: The installation process will now start. Windows Setup will copy needed files, and install features and updates. Once it’s complete, your Mac will automatically reboot after 10 seconds.
STEP 11:Upon rebooting, the Windows logo will appear again, and the setup process will continue and reboot again. You’ll see the blue Get going fast screen. You can opt to use express settings or clicking the Customize button and disabling switches how you’d prefer. Click Next to proceed to the next pages and repeat the process.
STEP 12: You’ll now be asked to create an account. An account name is required, but a password is not. Click Next once you select the desired user name and password combination.
STEP 13: Windows will now finish up the setup process, and you’ll be taken to the Windows 10 desktop. On the Welcome to Boot Camp installer box, click Next and accept the terms of the license agreement. Click Install to proceed with the installation. If any additional driver installation boxes appear, be sure to Install those as well. Once the installer completes, make sure the Restart System box is checked, and click Finish to reboot your machine.

STEP 14: Upon rebooting, click the Wi-Fi icon in the system tray and connect to your local Wi-Fi network.
A P P L E S O F T W A R E U P D AT E
Note: This next step is very important because it updates to the latest sound driver. The initial driver is known to cause speaker problems, so it’s important that you update.
STEP 15: Click the Start Button and select Apple Software Update. Select any of the updates that appear, and click the Install items button in the bottom right-hand corner. Click Yes on the User Account Control pop up windows that appears, and click Install on any additional related software installations.
STEP 16: Ensure that any in-progress installations complete, and then click Yes on the Apple Software Update Restart pop up window that appears. Your Mac will reboot back into Windows 10.

Step 17: Finally, go to Start > Settings > Update & security, and click the Check for updates button. Windows will download any needed updates and prompt you to restart after doing so. Click Restart now to complete the installation and reboot.
A C T I VAT E W I N D O W S O R J O I N T H E W I N D O W S I N S I D E R P R O G R A M
You have two options for this next part- purchase a Windows 10 Activation key and activate Windows, or you can sign up to the Windows Insider Program.
If you wish to activate with a purchased key, click Start > Settings > Update & security > Activation, and click Change product key.
If you wish to join the Windows Insider Program, click Start > Settings > Update & security > Windows Insider Program, and wait until the Get Insider Preview builds page loads. Click the Get started button to begin. You’ll need to sign in with your Microsoft account to get started. Once you’re signed in, click the Get started button again to confirm your enrollment.
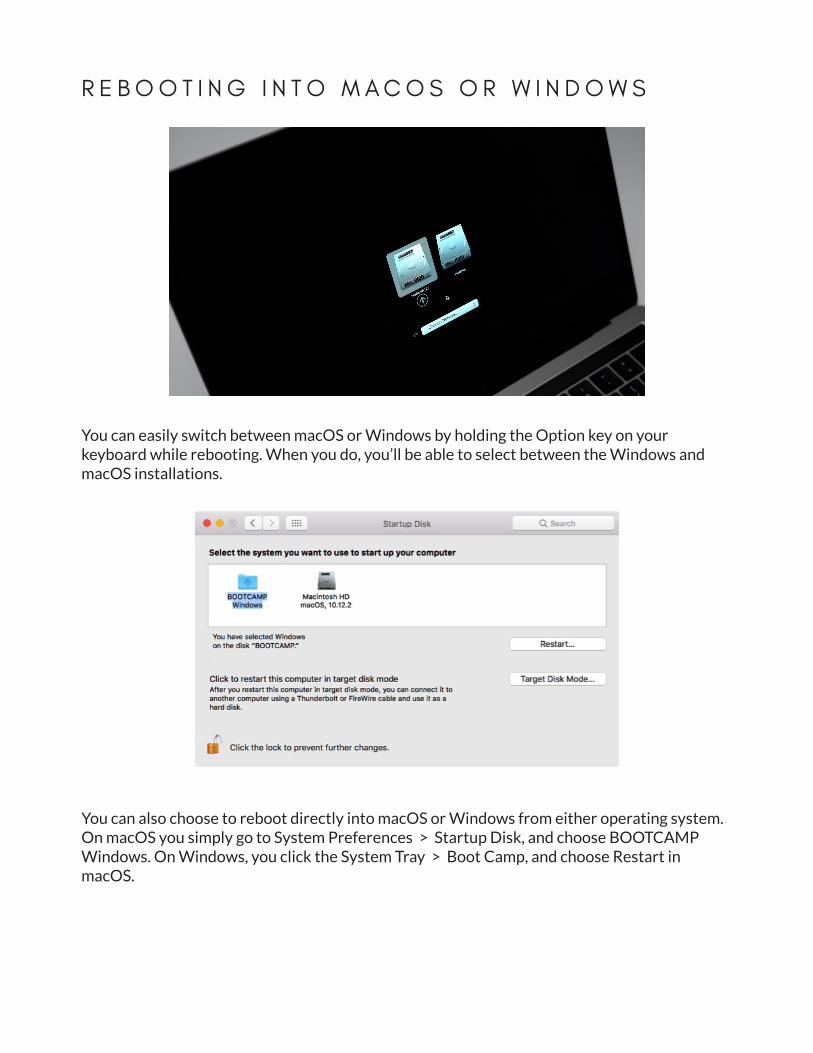
R E B O O T I N G I N T O M A C O S O R W I N D O W S
You can easily switch between macOS or Windows by holding the Option key on your keyboard while rebooting. When you do, you’ll be able to select between the Windows and macOS installations.
You can also choose to reboot directly into macOS or Windows from either operating system. On macOS you simply go to System Preferences > Startup Disk, and choose BOOTCAMP Windows. On Windows, you click the System Tray > Boot Camp, and choose Restart in macOS.

C O M M S P O I N T D O W N L O A D T U T O R I A L
After downloading Windows, you are now ready to install Commspoint.
STEP 1: Sign in to your account at stukent.com.(If you don’t have an account yet, you’ll need to be invited to your professor’s course to create one.)
STEP 2: Go to the product, “Commspoint Influence by Pointlogic” and click Download Application
STEP 3: After installing and running the Pointlogic application, you MUST select “register online” in order to use the product. Once you register you will receive an Unlock Code from PointLogic via email. AFTER you enter the Unlock Code you received in your email into the application you will be prompted to enter your Stukent ID. Use the code above as your Stukent ID NOT as the PointLogic Unlock Code. The code can only be used once.

DisclaimerStukent, Inc. is not responsible for, and expressly disclaims all liability for, damages of any kind arising out of use, reference to, or reliance on any information contained within this document. This walkthrough references and links to other websites which are not under the control of Stukent, Inc. We have no control over the nature, content and availability of those sites.
Stukent, Inc. has made every effort to provide an easy-to-follow walkthrough. However, partitioning a computer is not a basic task and it is recommended that each student regardless of computer knowledge consults their school’s IT department as they go step by step partitioning their Macintosh computer.