W343 Cascade Rustic Chambord Pullover
6
Designed by Nancy Rieck Cascade Rustic Chambord Pullover W343
Transcript of W343 Cascade Rustic Chambord Pullover

Designed by Nancy Rieck
Cascade Rustic Chambord Pullover
W343

FINISHED MEASUREMENTS Chest: 32(36. 40, 44, 48, 52) inches. Options given to customize size. Length: 16 (16, 17, 17, 18, 18) inches MATERIALS 980(1372, 1568, 1760, 1960, 2156) Yards Cascade Yarn, Rustic #14 16, 24, 32 (40) inch circular needles size 6 U.S./4.25mm Or to gauge. Plus 2 sizes larger needle for binding off. Notions Required: waste yarn or cable holders, markers, cable needle, tapestry needle. GAUGE 18 sts x 26 rows = 4 inches in Stockinette (size 6 U.S./4.25mm) Adjust needle size if necessary to obtain the correct gauge. ABBREVIATIONS M: Marker, PM: Place Marker, SM: Slip Marker, M1:(Make One) Lift st below up to LH needle and k into it. W/T: (Wrap and Turn) Place yarn on opposite side of work, Slip next st as if to purl. Bring yarn to original side of work and slip st back to left needle. Turn work, return yarn to wrong side. (When you come to a wrap on the following row, make it less visible by knitting the wrap together with the stitch it wraps.) Repeat patterns in between ** PATTERN With 16 inch circular needles loosely CO 80 (80, 84, 84, 88, 88) sts. Being careful not to twist, join in the round and work *K2, p2* rib for 6 inches. Row 1 and 2: Front: K2, work 36 st chart, k2, PM, Sleeve: k8 (8, 9, 9, 6, 6), PM Back: k24(24, 26, 26, 28, 28), PM, Sleeve: k8 (8, 9, 9, 6, 6), PM. The charted cable runs down your center front. All other sts are worked in Stockinette until change is indicated. Increases Your increases will be worked around the markers. (8 sts increases per round.) Row 1: *SM, k1, M1, work to 1 st before, M, M1, k1*. Row 2: Work established pattern. Row 3: *SM, k2, M1, work to 2 sts before M, M1, k2*. Row 4: Work to 4 before M, W/T, work to 4 sts before marker, W/T, work to end of row. Row 5: *SM, k3, M1, work to 3 sts before M, M1, k3*. Row 6: Work to 3 before M, W/T, work to 3 sts before marker, W/T, work to end of row. Row 7: *SM, k4, M1, work to 4 sts before M, M1, k4*. Row 8: Work to 2 before M, W/T, work to 2 sts before marker, W/T, work to end of row. Row 9: *SM, k5, M1, work to 5 sts before M, M1, k5*. Row 10: Work established pattern. Increase Set of 10 Rows: Row 1: *SM, k1, M1, work to 1 st before, M, M1, k1*. Row 2 and all even rows through 10: work established pattern all sts. Row 3: *SM, k2, M1, work to 2 sts before M, M1, k2*. Row 5: *SM, k3, M1, work to 3 sts before M, M1, k3*. Row 7: *SM, k4, M1, work to 4 sts before M, M1, k4*. Row 9: *SM, k5, M1, work to 5 sts before M, M1, k5*. Repeat these 10 rows until you have your st count needed for each section. (Some sections may stop increasing before others.)
Rustic Chambord Pullover By Nancy Rieck
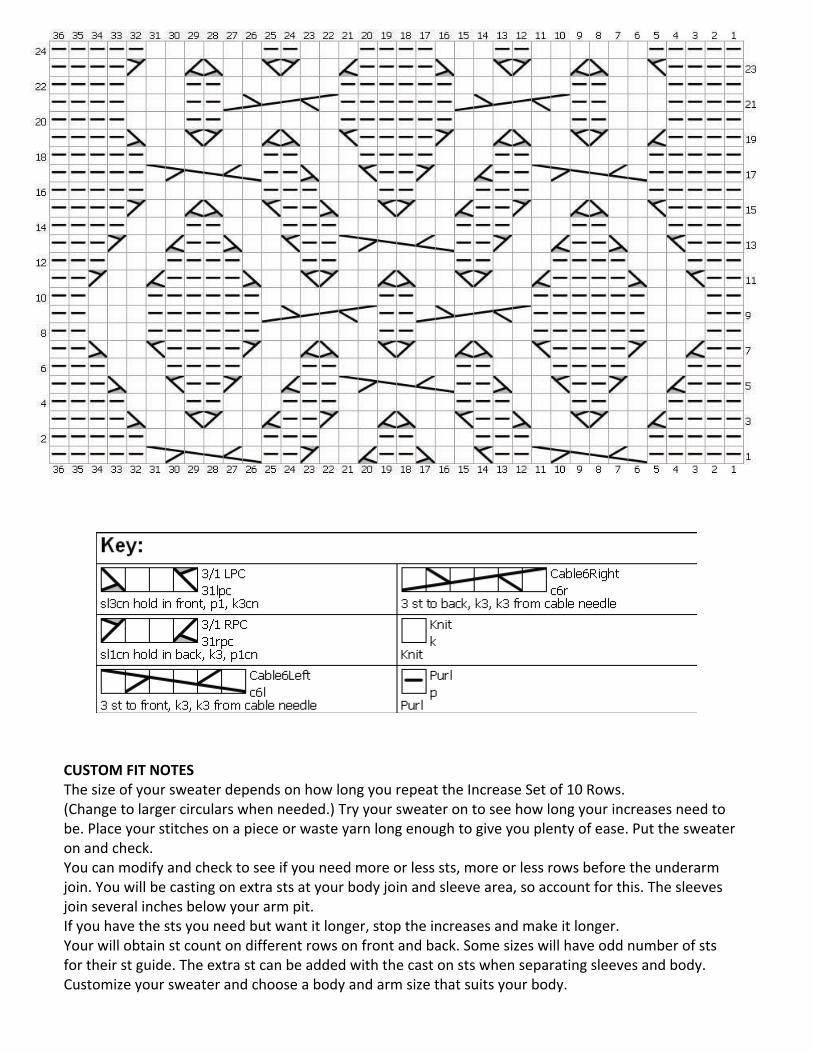
CUSTOM FIT NOTES The size of your sweater depends on how long you repeat the Increase Set of 10 Rows. (Change to larger circulars when needed.) Try your sweater on to see how long your increases need to be. Place your stitches on a piece or waste yarn long enough to give you plenty of ease. Put the sweater on and check. You can modify and check to see if you need more or less sts, more or less rows before the underarm join. You will be casting on extra sts at your body join and sleeve area, so account for this. The sleeves join several inches below your arm pit. If you have the sts you need but want it longer, stop the increases and make it longer. Your will obtain st count on different rows on front and back. Some sizes will have odd number of sts for their st guide. The extra st can be added with the cast on sts when separating sleeves and body. Customize your sweater and choose a body and arm size that suits your body.

Here are your stitch guides before your join: Front (number of sts each side of chart): 24 sts = 30”, 28 sts = 32”, 30 sts = 34”, 32 sts = 36”, 34 sts = 38”, 36 sts = 40”, 38 sts = 42”, 40 sts = 44”, 42 sts = 46”, 46 sts = 48”, 48 sts = 50”, 50 sts = 52”. Back: 63 sts = 30”, 67 sts = 32”, 71 sts = 34”, 76 sts = 36”, 81 sts = 38”, 85 sts = 40”, 89 sts = 42”, 95 sts = 44”, 99 sts = 46”, 103 sts = 48”, 107 sts = 50”, 113 sts = 52”. Arms (each section): 49 sts = 12”, 53 sts = 13”, 59 sts = 14”, 63 sts = 15”, 67 sts = 16”, 71 sts = 17”. Separating Sleeves When you have your desired sts and length *Work to M, CO 5 sts, slip arm sts to waste yarn or knit onto a cable holder*, knit across your second body area and repeat process for second sleeve (in be‐tween *’s). Your body area is now joined in the round with an extra 5 sts at each side. Keep only your one start‐ing marker. Continue working your pattern to 12 (12, 13, 13, 14, 14) total inches or 4 inches from desired finished length. On last row decrease by k2tog evenly 1(1, 2, 3, 1, 1, 3) to obtain multiple of 4 sts. 168(176, 184, 200, 220, 240, 256) sts. Rib *K2, p2*. Work Rib Pattern for 4 inches. BO using needle 2 sizes larger. SLEEVES Place your sleeves on DPN’s or 2 circular needles. Pick up and knit 5 sts where your body CO sts are. Knit all sts in the round to your elbow. (Try your sweater on.) Decreases Starting with: 58(64, 68, 72, 76, 81, 86) sts. (If you have a different starting st count, decrease using the rows below to one of the st counts above, then continue.) Row 1: K1, k2tog, knit to last 3 sts, k2tog, k1. (2 decreased) Row 2, 3 and 4: Knit. Repeat rows 1‐4, 6(9, 9, 8, 9, 8) more times for a total of 14(,20, 20, 18, 20, 17) sts decreased. 44(48, 48, 56, 56, 64) sts remain. Knit all rounds until 4 inches from desired length. Rib *K2, p2*.

Work Rib Pattern for 4 inches. BO using needle 2 sizes larger. Repeat for 2nd sleeve. FINISHING With tapestry needle weave in all loose ends. Soak knitwear in cold water. Squeeze out water, lay flat and roll in towel to release more water. Block to size.
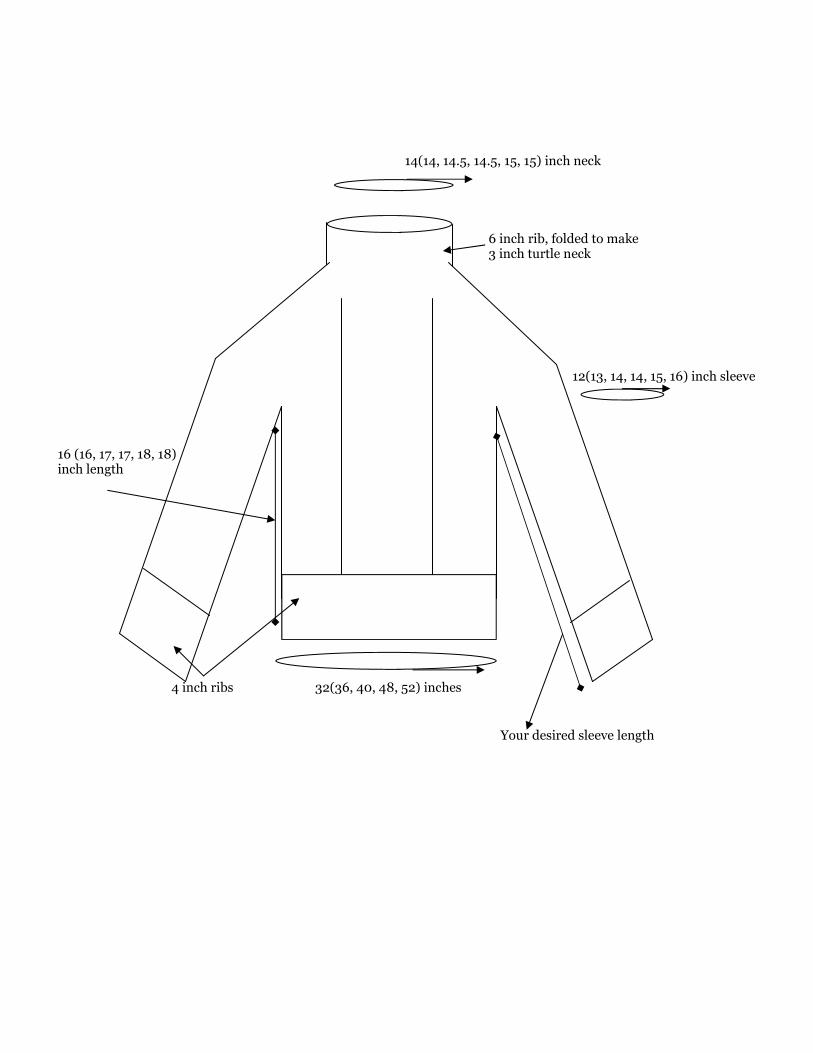
14(14, 14.5, 14.5, 15, 15) inch neck
12(13, 14, 14, 15, 16) inch sleeve
32(36, 40, 48, 52) inches
Your desired sleeve length
4 inch ribs
16 (16, 17, 17, 18, 18) inch length
6 inch rib, folded to make 3 inch turtle neck