Hitachi vsp-and-vsp-g1000-mainframe-software-compatibility-overview
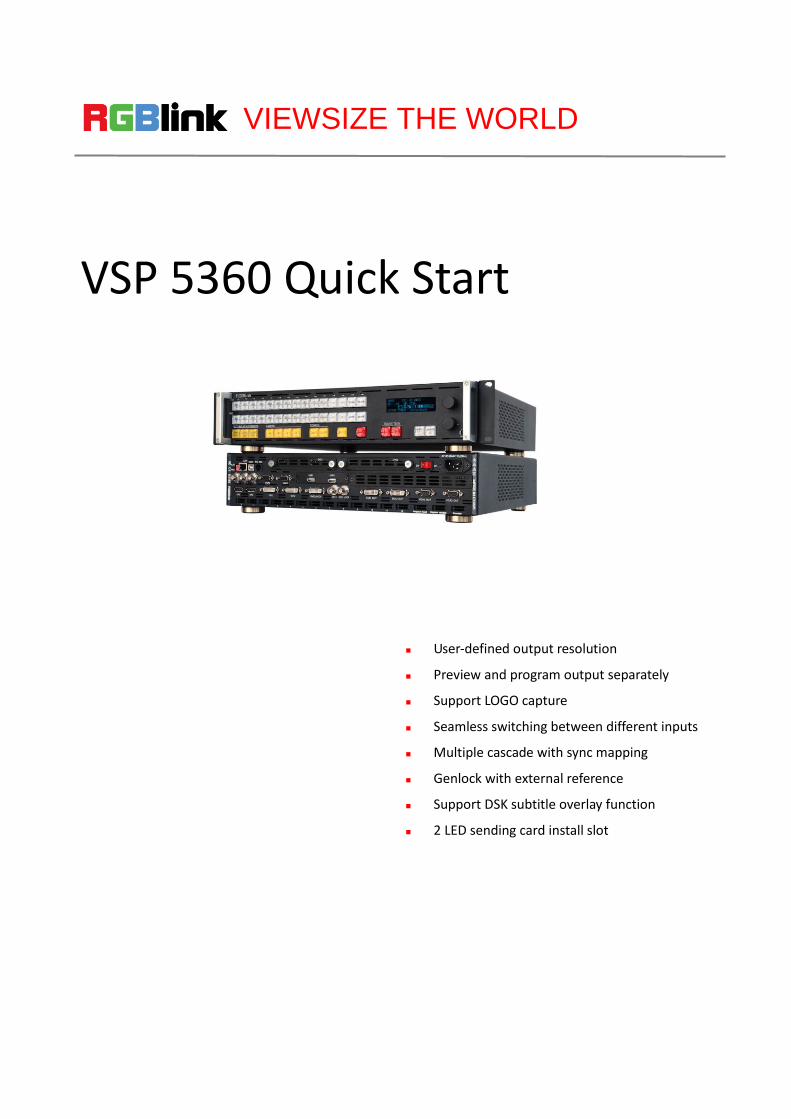
VSP 5360 Quick Start
VIEWSIZE THE WORLD
User-defined output resolution
Preview and program output separately
Support LOGO capture
Seamless switching between different inputs
Multiple cascade with sync mapping
Genlock with external reference
Support DSK subtitle overlay function
2 LED sending card install slot

Address:S603-604 Weiye Building Torch Hi-Tech Industrial Development Zone Xiamen, Fujian Province, P.R.C
Tel: 00865925771197 Fax: 00865925771202
Email: [email protected] http://www.rgblink.cn
1
CONTENT
Product Introduction ................................................................................................................................... 2
Packing Configuration .................................................................................................................................. 3
Hardware Orientation .................................................................................................................................. 4
Front Panel ........................................................................................................................................................ 4
Back Panel ......................................................................................................................................................... 5
Operating Instruction ................................................................................................................................... 6
3 Screen Preview Setting................................................................................................................................... 6
Select 3 Screen Preview Mode .................................................................................................................. 6
Screen Preview Setting ............................................................................................................................. 6
Preset ........................................................................................................................................................ 7
Load ........................................................................................................................................................... 7
Single Image Switching ..................................................................................................................................... 8
Set the Output Resolution ................................................................................................................................ 9
Select the Output Resolution .................................................................................................................... 9
Custom the Output Resolution ................................................................................................................. 9
Add or Clear the Layer .................................................................................................................................... 11
Set the Size and Position ................................................................................................................................. 12
Crop the Image................................................................................................................................................ 13
Zoom the Image .............................................................................................................................................. 14
Set the Brightness and Color ........................................................................................................................... 15
LOGO Capture ................................................................................................................................................. 16
Screen Size Setting .......................................................................................................................................... 17
DSK Setting ...................................................................................................................................................... 18
User Define BLACK Key ................................................................................................................................... 19
User Define DSK Key ........................................................................................................................................ 20
Using Black Out ............................................................................................................................................... 21
Saving Views ................................................................................................................................................... 22
Recall Saved Settings ....................................................................................................................................... 23
Product Application ................................................................................................................................... 24
Single Image Preview and Program ................................................................................................................ 24
Contact Information................................................................................................................................... 25
Address:S603-604 Weiye Building Torch Hi-Tech Industrial Development Zone Xiamen, Fujian Province, P.R.C
Tel: 00865925771197 Fax: 00865925771202
Email: [email protected] http://www.rgblink.cn
2
Product Introduction
The VSP 5360 is a landmark product which
combines video processing algorithm CSMXP of
RGBlink. Seamless switching between the 13
inputs, DSK for subtitle overlay, preview and
program separately, 1 to 4 layers layout and
seamless switching, multiple cascade with sync
splicing.
VSP 5360 is based on module based design, can
easily expansion input interfaces including USB
inputs for media files play, and supports more
outputs with Genlock input for multiple sync
control.
VSP 5360 launches the new milestone for video
scaler and switcher by introducing the latest 10
bit motion adaptive de-interlace, advance noise
reduction and detail enhancement core
processor.
VSP 5360 also release with seamless switching,
cross and frame rate conversion with pixel based
scale and zoom engine up to 4K×2K.
VSP 5360 can be widely applied to switcher and
scale market, especially for the best
presentation.
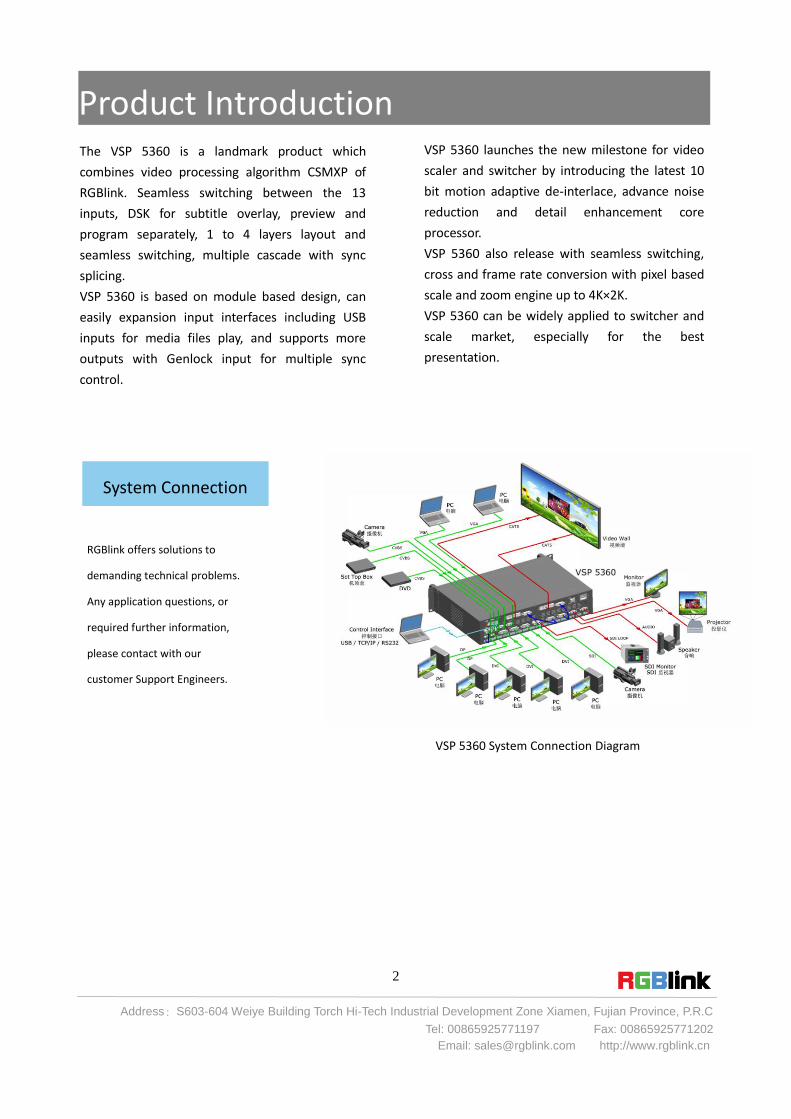
System Connection
RGBlink offers solutions to
demanding technical problems.
Any application questions, or
required further information,
please contact with our
customer Support Engineers.
VSP 5360 System Connection Diagram
Address:S603-604 Weiye Building Torch Hi-Tech Industrial Development Zone Xiamen, Fujian Province, P.R.C
Tel: 00865925771197 Fax: 00865925771202
Email: [email protected] http://www.rgblink.cn
3
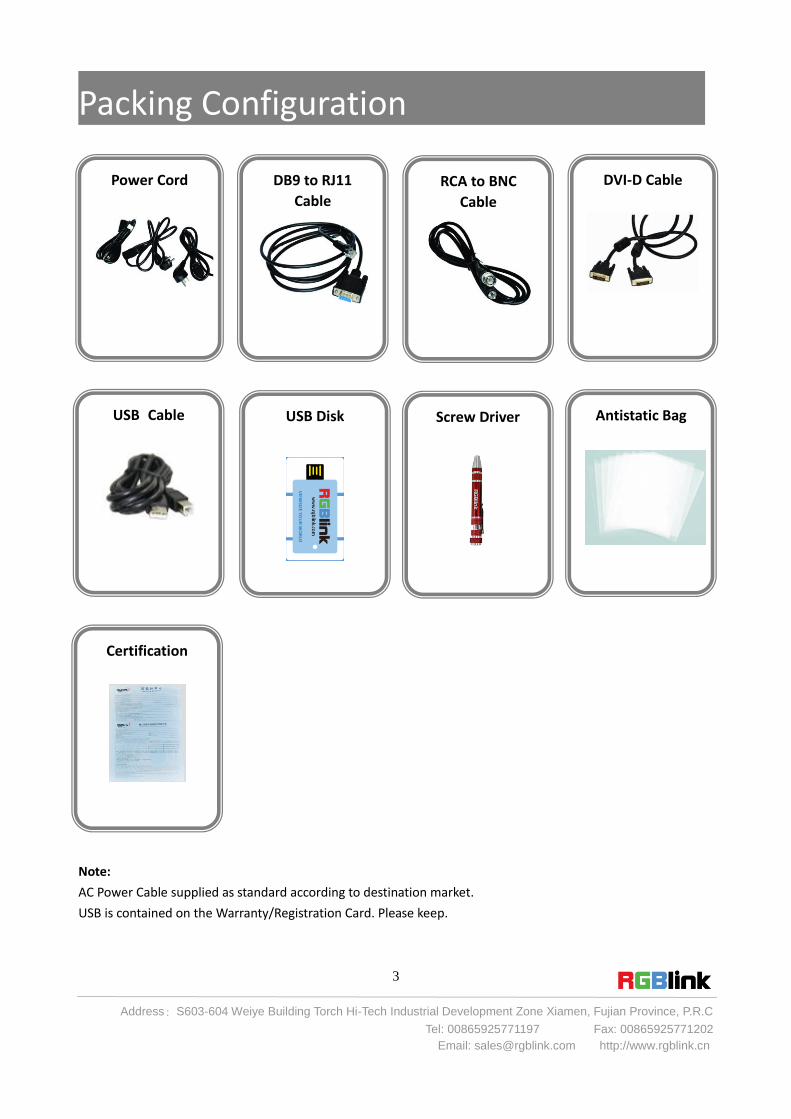
Packing Configuration
Note:
AC Power Cable supplied as standard according to destination market.
USB is contained on the Warranty/Registration Card. Please keep.
Power Cord
DB9 to RJ11
Cable
RCA to BNC
Cable
DVI 转 HDMI 线
防静电袋
Antistatic Bag
DVI-D Cable
Screw Driver
USB Disk
USB Cable
Certification
Address:S603-604 Weiye Building Torch Hi-Tech Industrial Development Zone Xiamen, Fujian Province, P.R.C
Tel: 00865925771197 Fax: 00865925771202
Email: [email protected] http://www.rgblink.cn
4
Hardware Orientation
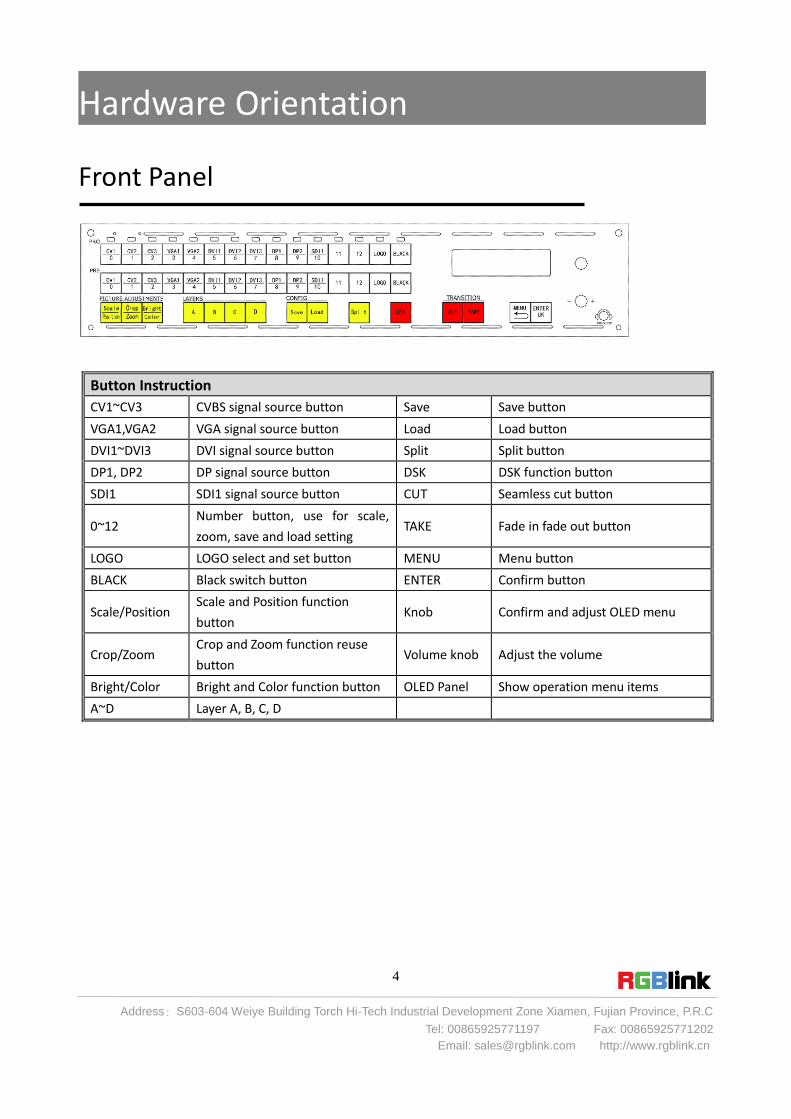
Front Panel
Button Instruction
CV1~CV3 CVBS signal source button Save Save button
VGA1,VGA2 VGA signal source button Load Load button
DVI1~DVI3 DVI signal source button Split Split button
DP1, DP2 DP signal source button DSK DSK function button
SDI1 SDI1 signal source button CUT Seamless cut button
0~12 Number button, use for scale,
zoom, save and load setting TAKE Fade in fade out button
LOGO LOGO select and set button MENU Menu button
BLACK Black switch button ENTER Confirm button
Scale/Position Scale and Position function
button Knob Confirm and adjust OLED menu
Crop/Zoom Crop and Zoom function reuse
button Volume knob Adjust the volume
Bright/Color Bright and Color function button OLED Panel Show operation menu items
A~D Layer A, B, C, D
Address:S603-604 Weiye Building Torch Hi-Tech Industrial Development Zone Xiamen, Fujian Province, P.R.C
Tel: 00865925771197 Fax: 00865925771202
Email: [email protected] http://www.rgblink.cn
5
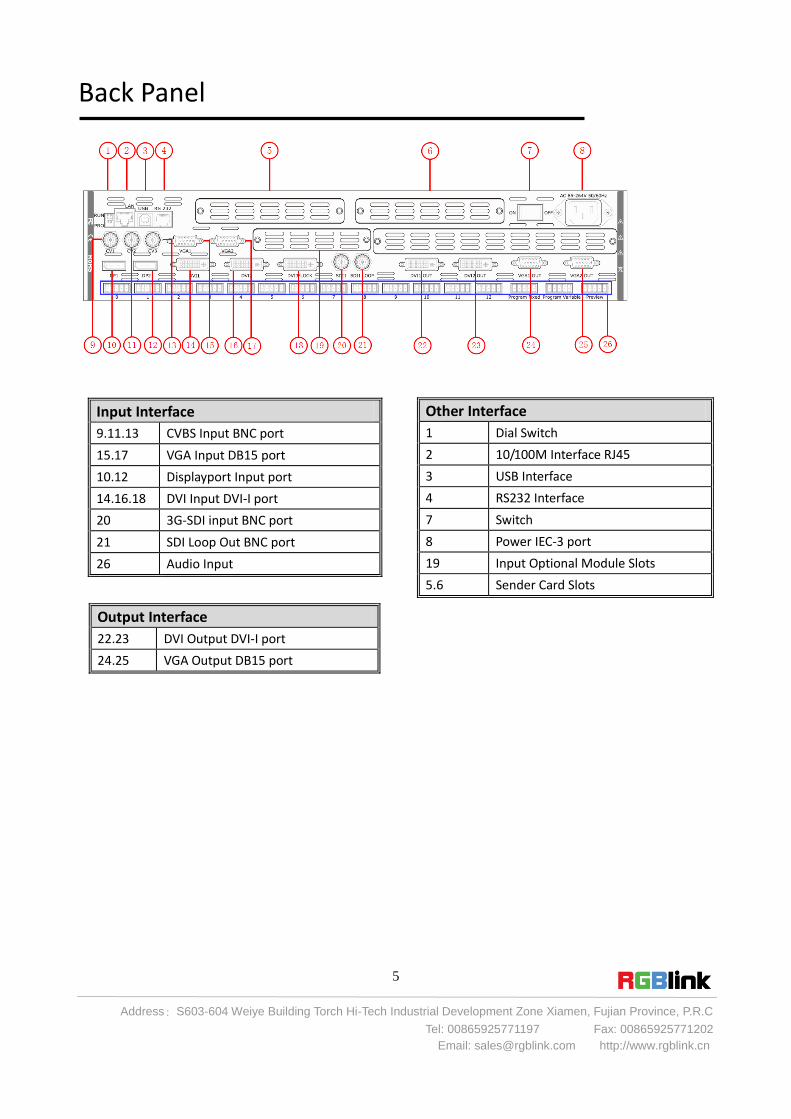
Back Panel
Input Interface
9.11.13 CVBS Input BNC port
15.17 VGA Input DB15 port
10.12 Displayport Input port
14.16.18 DVI Input DVI-I port
20 3G-SDI input BNC port
21 SDI Loop Out BNC port
26 Audio Input
Other Interface
1 Dial Switch
2 10/100M Interface RJ45
3 USB Interface
4 RS232 Interface
7 Switch
8 Power IEC-3 port
19 Input Optional Module Slots
5.6 Sender Card Slots
Output Interface
22.23 DVI Output DVI-I port
24.25 VGA Output DB15 port

Address:S603-604 Weiye Building Torch Hi-Tech Industrial Development Zone Xiamen, Fujian Province, P.R.C
Tel: 00865925771197 Fax: 00865925771202
Email: [email protected] http://www.rgblink.cn
6
Operating Instruction
3 Screen Preview Setting
Select 3 Screen Preview Mode
1. Push the [MENU] button, and enter to the menu items, turn the rotary knob, select <SYSTEM>:
2. Push the knob to confirm. Turn the knob, and select <SYSTEM MODE>:
3. Push the knob to confirm. Turn the knob, and select <3 SCREEN PREVIEW>:
4. Push the knob to confirm, and enter to the 3 screen preview modes.
Screen Preview Setting
VSP 5360 supports 3 Layers Preview and 3 layers Program seamless switching, select the layer, set on Preview
output, and switch it to the program output by the [CUT] or [TAKE] button.
Note
Layer A supports DVI3/SDI/LOGO output, and layer B
and layer C, any signal.
For example, to display the DVI3, VGA1, CVBS1 on preview monitor.
AUDIO SETUP >>
->SYSTEM >>
LANGUAGE ENG
FACTORY RESET >>
OUTPUT MATRIX >>
PREVIEW DISPLAY >>
->SYSTEM MODE >>
TRANSITION >>
->3 SCREEN PREVIEW >>
SPLIT >>
OUTPUT MATRIX >>
COMMON MODE >>
Address:S603-604 Weiye Building Torch Hi-Tech Industrial Development Zone Xiamen, Fujian Province, P.R.C
Tel: 00865925771197 Fax: 00865925771202
Email: [email protected] http://www.rgblink.cn
7
1. Select Layer B, and click VGA1 in PRE area, the [VGA1] light is on.
2. Select Layer A, and click DVI3 in PRE area, the [DVI3] light is on.
3. Select Layer C, and click CV1 in PRE area, the [CV1] light is on.
Then the VGA1, DVI3 and CV1 signals are displayed on the preview monitor display.
4. User can do the scale for any layer, the layer only changed on preview output, but not changed on program
output.
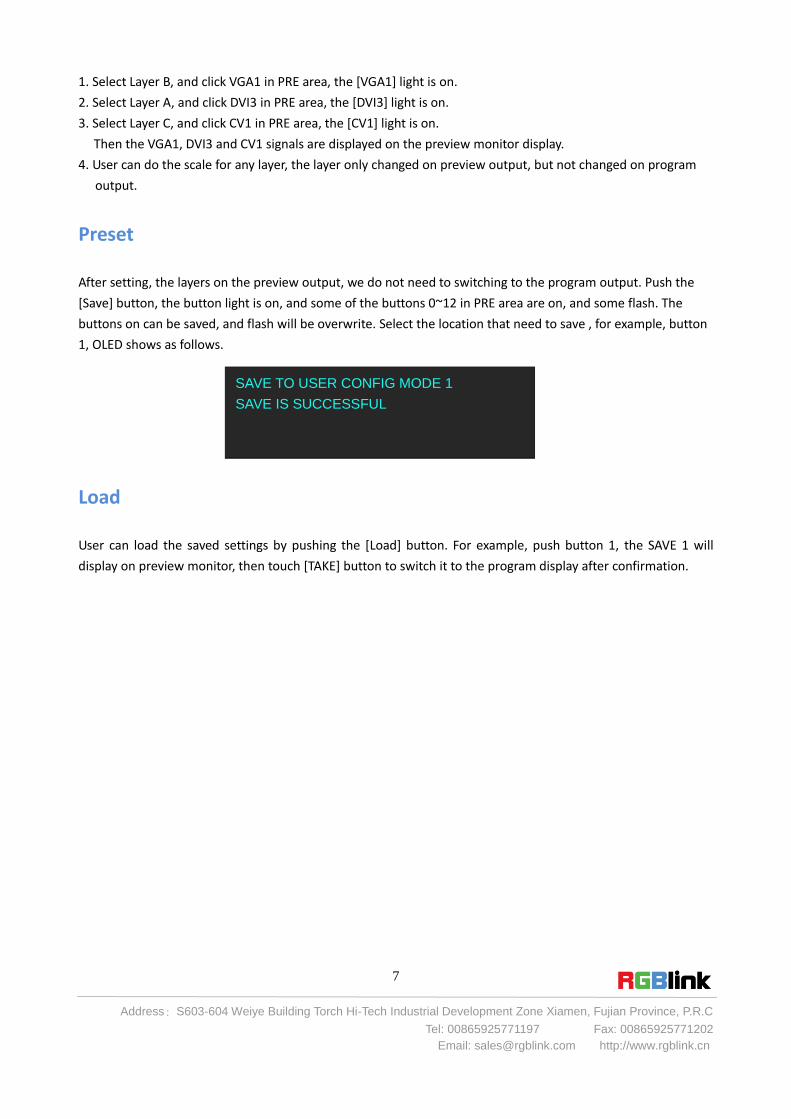
Preset
After setting, the layers on the preview output, we do not need to switching to the program output. Push the
[Save] button, the button light is on, and some of the buttons 0~12 in PRE area are on, and some flash. The
buttons on can be saved, and flash will be overwrite. Select the location that need to save , for example, button
1, OLED shows as follows.
Load
User can load the saved settings by pushing the [Load] button. For example, push button 1, the SAVE 1 will
display on preview monitor, then touch [TAKE] button to switch it to the program display after confirmation.
SAVE TO USER CONFIG MODE 1
SAVE IS SUCCESSFUL
Address:S603-604 Weiye Building Torch Hi-Tech Industrial Development Zone Xiamen, Fujian Province, P.R.C
Tel: 00865925771197 Fax: 00865925771202
Email: [email protected] http://www.rgblink.cn
8
Single Image Switching
VSP 5360 can realize seamless effects switch between two channels, select the signal in PRE area, then push
[CUT] or [TAKE] button, the signal will be switched to LED display.
For example, switch VGA1 to LED display, first push the [VGA1] button in PRE area, then push [CUT] or [TAKE]
button, and the LED display will show VGA1 signal.
Default the switch time is 1 seconds for [TAKE] button, if need to adjust the fade in fade out time, push [MENU]
button and enter to the menu items, turn the knob, select <SYSTEM>, push the knob to confirm. Turn the
rotary knob, select <TRANSITION>, and set the fade time, push the [TAKE] button again, the signal will be
switched to the LED display with the adjusted time.
User can also switch the signal by pushing the signal button in PRO area, but the signal in monitor will not
change.
Address:S603-604 Weiye Building Torch Hi-Tech Industrial Development Zone Xiamen, Fujian Province, P.R.C
Tel: 00865925771197 Fax: 00865925771202
Email: [email protected] http://www.rgblink.cn
9
Set the Output Resolution
Select the Output Resolution
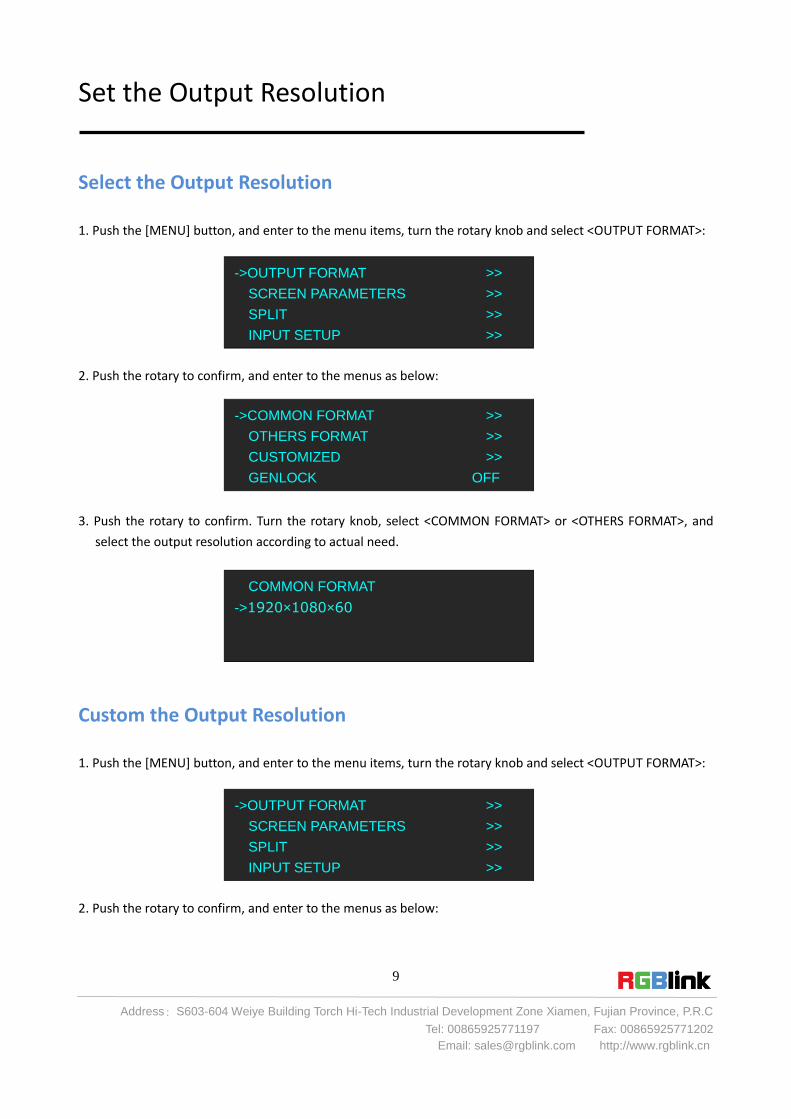
1. Push the [MENU] button, and enter to the menu items, turn the rotary knob and select <OUTPUT FORMAT>:
2. Push the rotary to confirm, and enter to the menus as below:
3. Push the rotary to confirm. Turn the rotary knob, select <COMMON FORMAT> or <OTHERS FORMAT>, and
select the output resolution according to actual need.
Custom the Output Resolution
1. Push the [MENU] button, and enter to the menu items, turn the rotary knob and select <OUTPUT FORMAT>:
2. Push the rotary to confirm, and enter to the menus as below:
->OUTPUT FORMAT >>
SCREEN PARAMETERS >>
SPLIT >>
INPUT SETUP >>
->COMMON FORMAT >>
OTHERS FORMAT >>
CUSTOMIZED >>
GENLOCK OFF
COMMON FORMAT
->1920×1080×60
->OUTPUT FORMAT >>
SCREEN PARAMETERS >>
SPLIT >>
INPUT SETUP >>
Address:S603-604 Weiye Building Torch Hi-Tech Industrial Development Zone Xiamen, Fujian Province, P.R.C
Tel: 00865925771197 Fax: 00865925771202
Email: [email protected] http://www.rgblink.cn
10
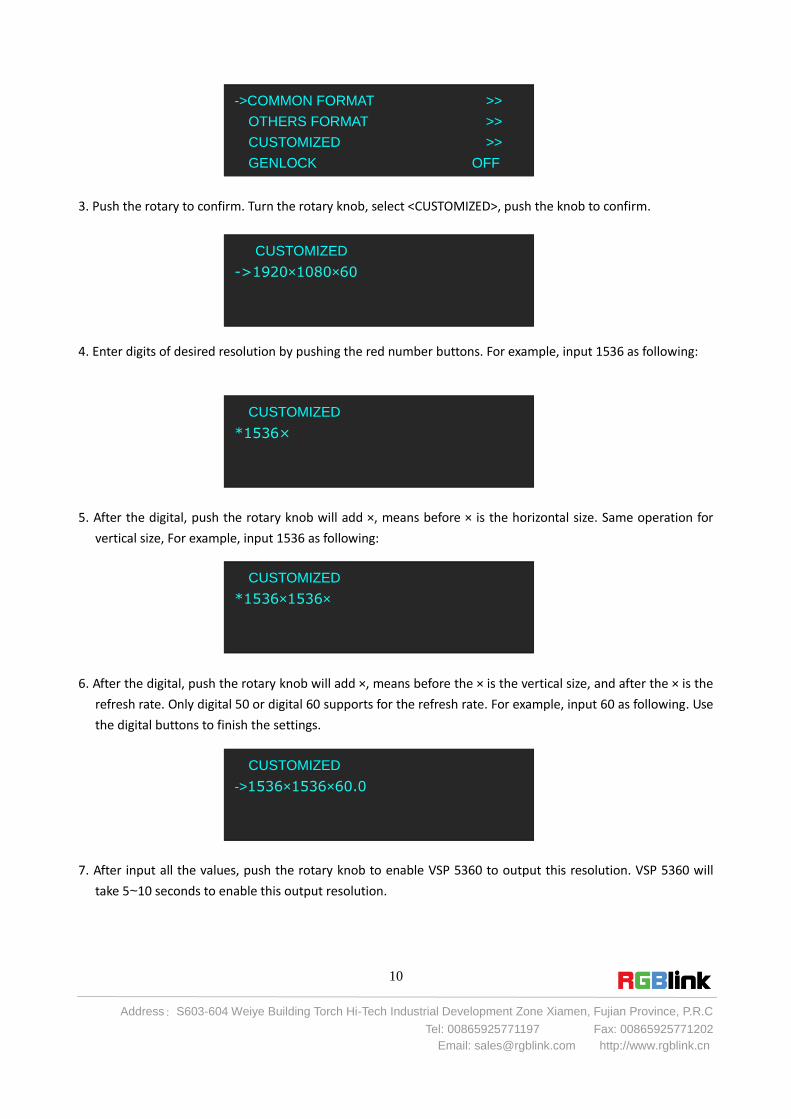
3. Push the rotary to confirm. Turn the rotary knob, select <CUSTOMIZED>, push the knob to confirm.
4. Enter digits of desired resolution by pushing the red number buttons. For example, input 1536 as following:
5. After the digital, push the rotary knob will add ×, means before × is the horizontal size. Same operation for
vertical size, For example, input 1536 as following:
6. After the digital, push the rotary knob will add ×, means before the × is the vertical size, and after the × is the
refresh rate. Only digital 50 or digital 60 supports for the refresh rate. For example, input 60 as following. Use
the digital buttons to finish the settings.
7. After input all the values, push the rotary knob to enable VSP 5360 to output this resolution. VSP 5360 will
take 5~10 seconds to enable this output resolution.
CUSTOMIZED
*1536×
CUSTOMIZED
*1536×1536×
CUSTOMIZED
->1536×1536×60.0
->COMMON FORMAT >>
OTHERS FORMAT >>
CUSTOMIZED >>
GENLOCK OFF
CUSTOMIZED
->1920×1080×60
Address:S603-604 Weiye Building Torch Hi-Tech Industrial Development Zone Xiamen, Fujian Province, P.R.C
Tel: 00865925771197 Fax: 00865925771202
Email: [email protected] http://www.rgblink.cn
11
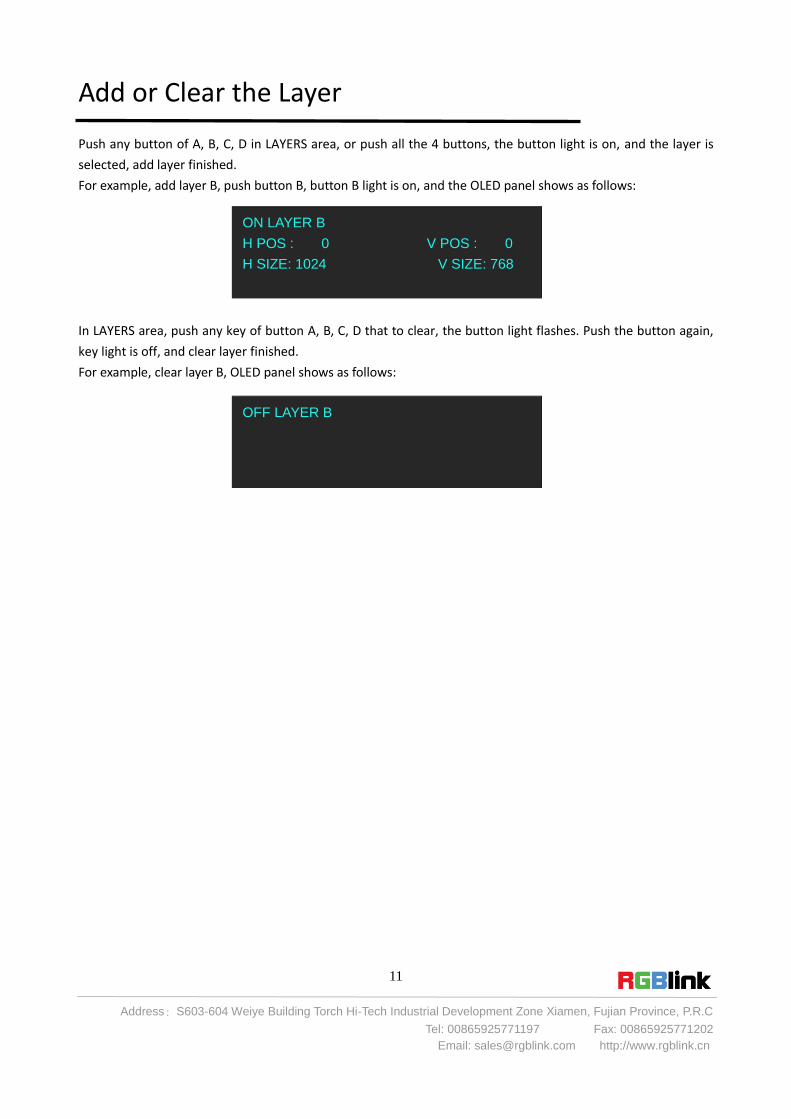
Add or Clear the Layer
Push any button of A, B, C, D in LAYERS area, or push all the 4 buttons, the button light is on, and the layer is
selected, add layer finished.
For example, add layer B, push button B, button B light is on, and the OLED panel shows as follows:
In LAYERS area, push any key of button A, B, C, D that to clear, the button light flashes. Push the button again,
key light is off, and clear layer finished.
For example, clear layer B, OLED panel shows as follows:
ON LAYER B
H POS : 0 V POS : 0
H SIZE: 1024 V SIZE: 768
OFF LAYER B
Address:S603-604 Weiye Building Torch Hi-Tech Industrial Development Zone Xiamen, Fujian Province, P.R.C
Tel: 00865925771197 Fax: 00865925771202
Email: [email protected] http://www.rgblink.cn
12
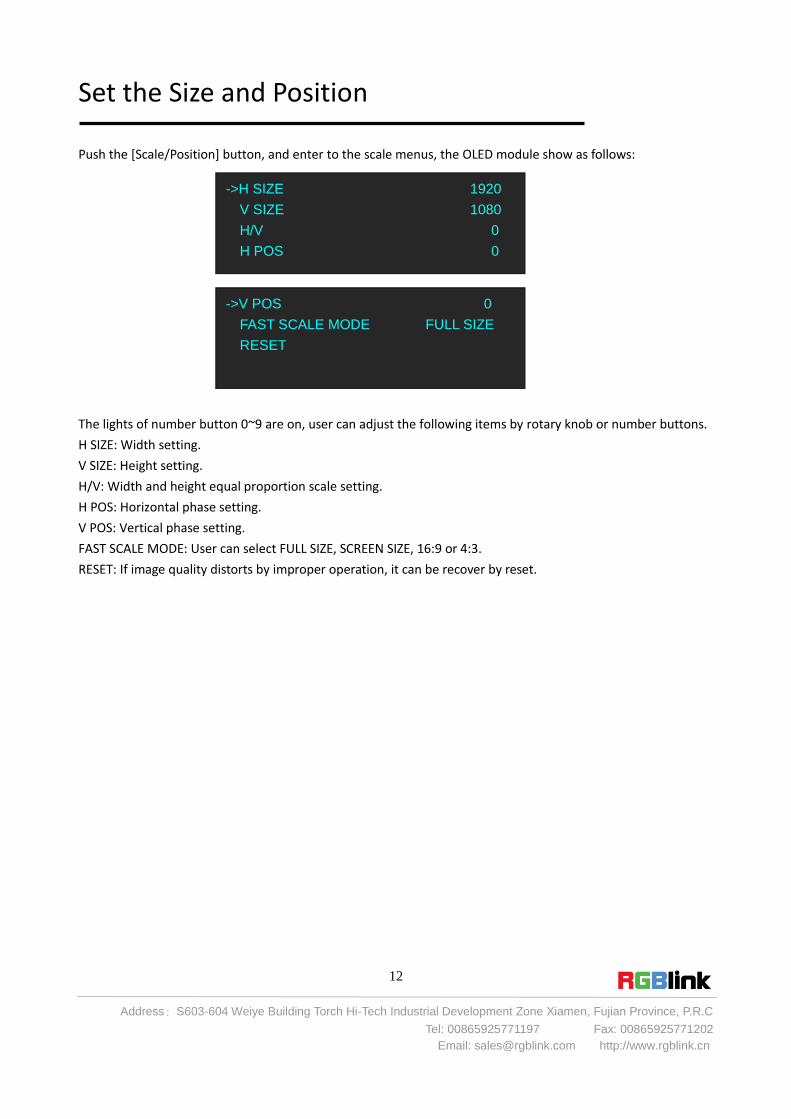
Set the Size and Position
Push the [Scale/Position] button, and enter to the scale menus, the OLED module show as follows:
The lights of number button 0~9 are on, user can adjust the following items by rotary knob or number buttons.
H SIZE: Width setting.
V SIZE: Height setting.
H/V: Width and height equal proportion scale setting.
H POS: Horizontal phase setting.
V POS: Vertical phase setting.
FAST SCALE MODE: User can select FULL SIZE, SCREEN SIZE, 16:9 or 4:3.
RESET: If image quality distorts by improper operation, it can be recover by reset.
->H SIZE 1920
V SIZE 1080
H/V 0
H POS 0
->V POS 0
FAST SCALE MODE FULL SIZE
RESET
Address:S603-604 Weiye Building Torch Hi-Tech Industrial Development Zone Xiamen, Fujian Province, P.R.C
Tel: 00865925771197 Fax: 00865925771202
Email: [email protected] http://www.rgblink.cn
13
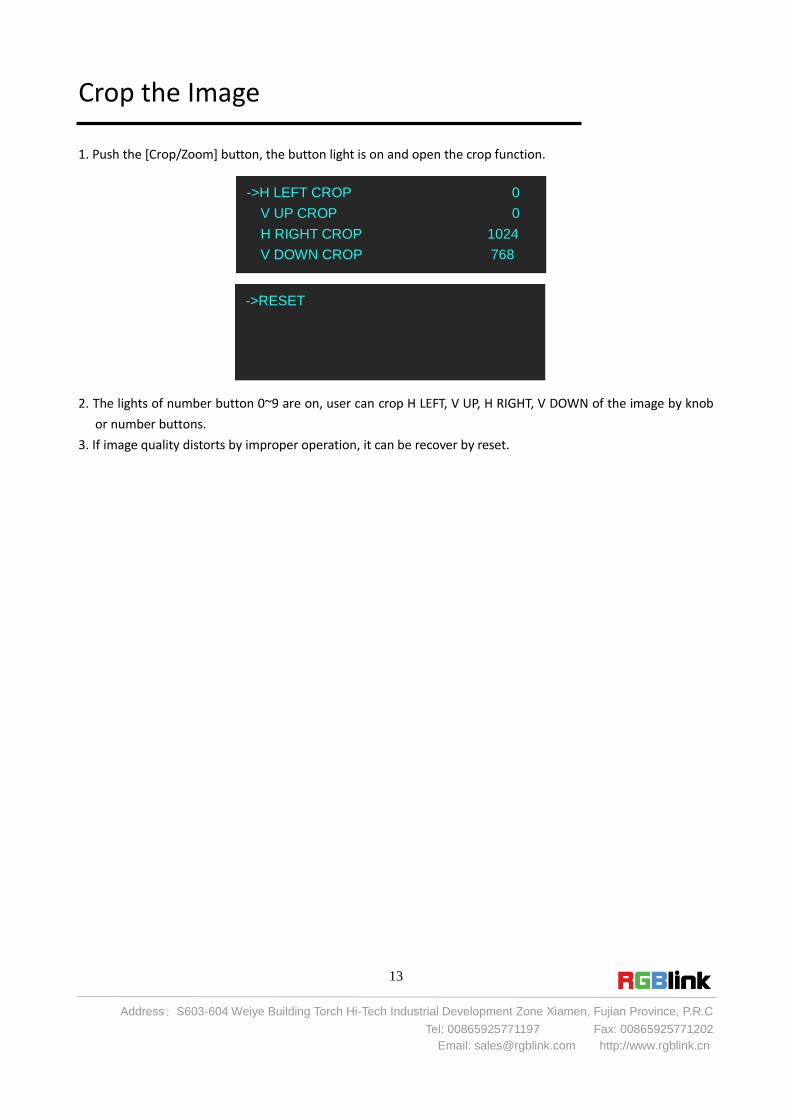
Crop the Image
1. Push the [Crop/Zoom] button, the button light is on and open the crop function.
2. The lights of number button 0~9 are on, user can crop H LEFT, V UP, H RIGHT, V DOWN of the image by knob
or number buttons.
3. If image quality distorts by improper operation, it can be recover by reset.
->H LEFT CROP 0
V UP CROP 0
H RIGHT CROP 1024
V DOWN CROP 768
->RESET
Address:S603-604 Weiye Building Torch Hi-Tech Industrial Development Zone Xiamen, Fujian Province, P.R.C
Tel: 00865925771197 Fax: 00865925771202
Email: [email protected] http://www.rgblink.cn
14
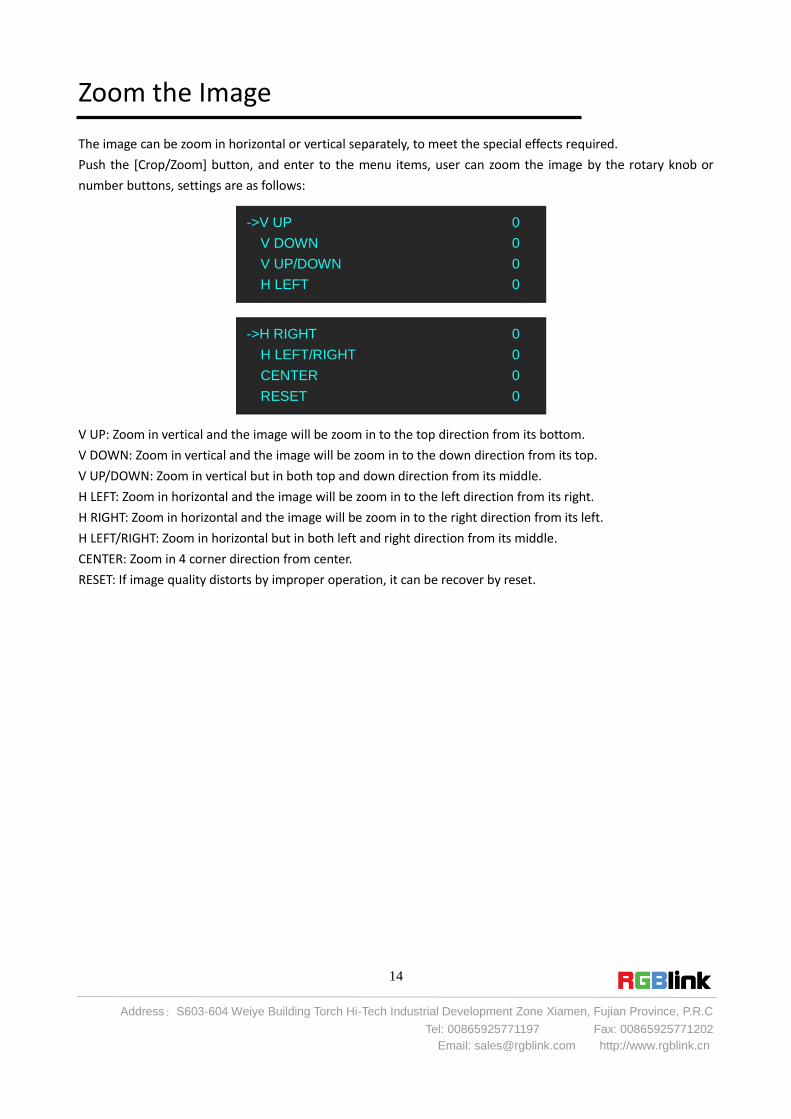
Zoom the Image
The image can be zoom in horizontal or vertical separately, to meet the special effects required.
Push the [Crop/Zoom] button, and enter to the menu items, user can zoom the image by the rotary knob or
number buttons, settings are as follows:
V UP: Zoom in vertical and the image will be zoom in to the top direction from its bottom.
V DOWN: Zoom in vertical and the image will be zoom in to the down direction from its top.
V UP/DOWN: Zoom in vertical but in both top and down direction from its middle.
H LEFT: Zoom in horizontal and the image will be zoom in to the left direction from its right.
H RIGHT: Zoom in horizontal and the image will be zoom in to the right direction from its left.
H LEFT/RIGHT: Zoom in horizontal but in both left and right direction from its middle.
CENTER: Zoom in 4 corner direction from center.
RESET: If image quality distorts by improper operation, it can be recover by reset.
->V UP 0
V DOWN 0
V UP/DOWN 0
H LEFT 0
->H RIGHT 0
H LEFT/RIGHT 0
CENTER 0
RESET 0
Address:S603-604 Weiye Building Torch Hi-Tech Industrial Development Zone Xiamen, Fujian Province, P.R.C
Tel: 00865925771197 Fax: 00865925771202
Email: [email protected] http://www.rgblink.cn
15
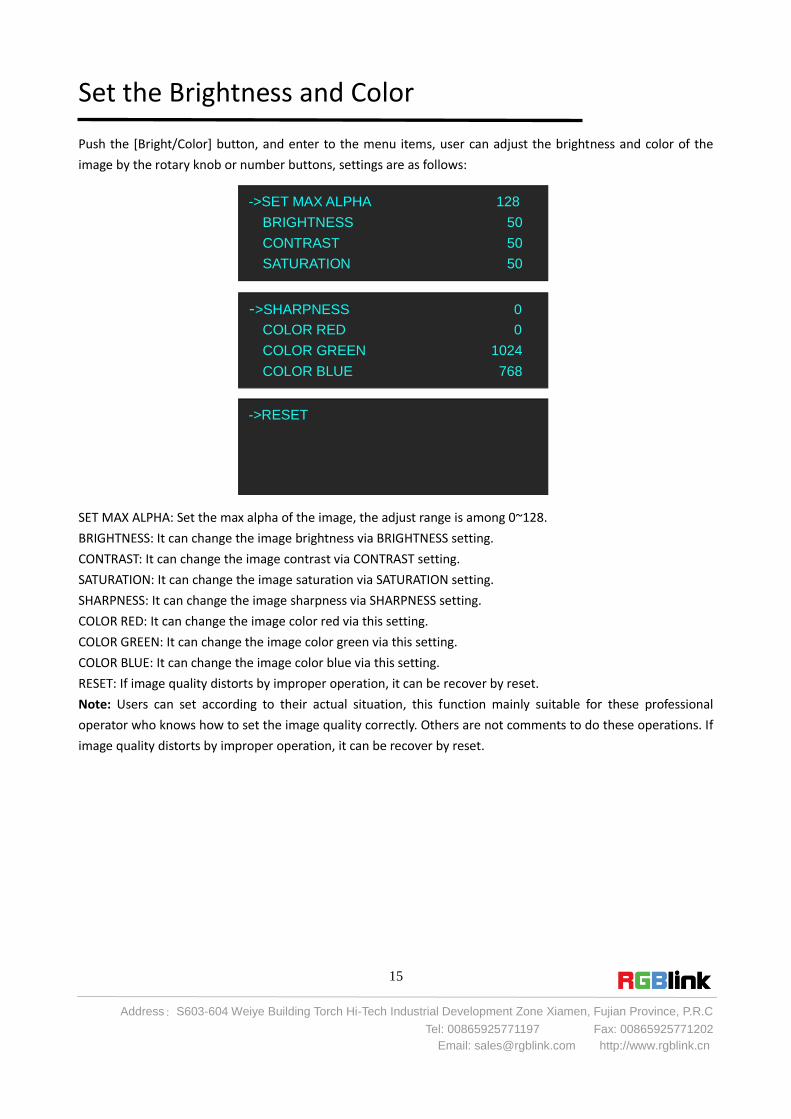
Set the Brightness and Color
Push the [Bright/Color] button, and enter to the menu items, user can adjust the brightness and color of the
image by the rotary knob or number buttons, settings are as follows:
SET MAX ALPHA: Set the max alpha of the image, the adjust range is among 0~128.
BRIGHTNESS: It can change the image brightness via BRIGHTNESS setting.
CONTRAST: It can change the image contrast via CONTRAST setting.
SATURATION: It can change the image saturation via SATURATION setting.
SHARPNESS: It can change the image sharpness via SHARPNESS setting.
COLOR RED: It can change the image color red via this setting.
COLOR GREEN: It can change the image color green via this setting.
COLOR BLUE: It can change the image color blue via this setting.
RESET: If image quality distorts by improper operation, it can be recover by reset.
Note: Users can set according to their actual situation, this function mainly suitable for these professional
operator who knows how to set the image quality correctly. Others are not comments to do these operations. If
image quality distorts by improper operation, it can be recover by reset.
->SET MAX ALPHA 128
BRIGHTNESS 50
CONTRAST 50
SATURATION 50
->SHARPNESS 0
COLOR RED 0
COLOR GREEN 1024
COLOR BLUE 768
->RESET
Address:S603-604 Weiye Building Torch Hi-Tech Industrial Development Zone Xiamen, Fujian Province, P.R.C
Tel: 00865925771197 Fax: 00865925771202
Email: [email protected] http://www.rgblink.cn
16
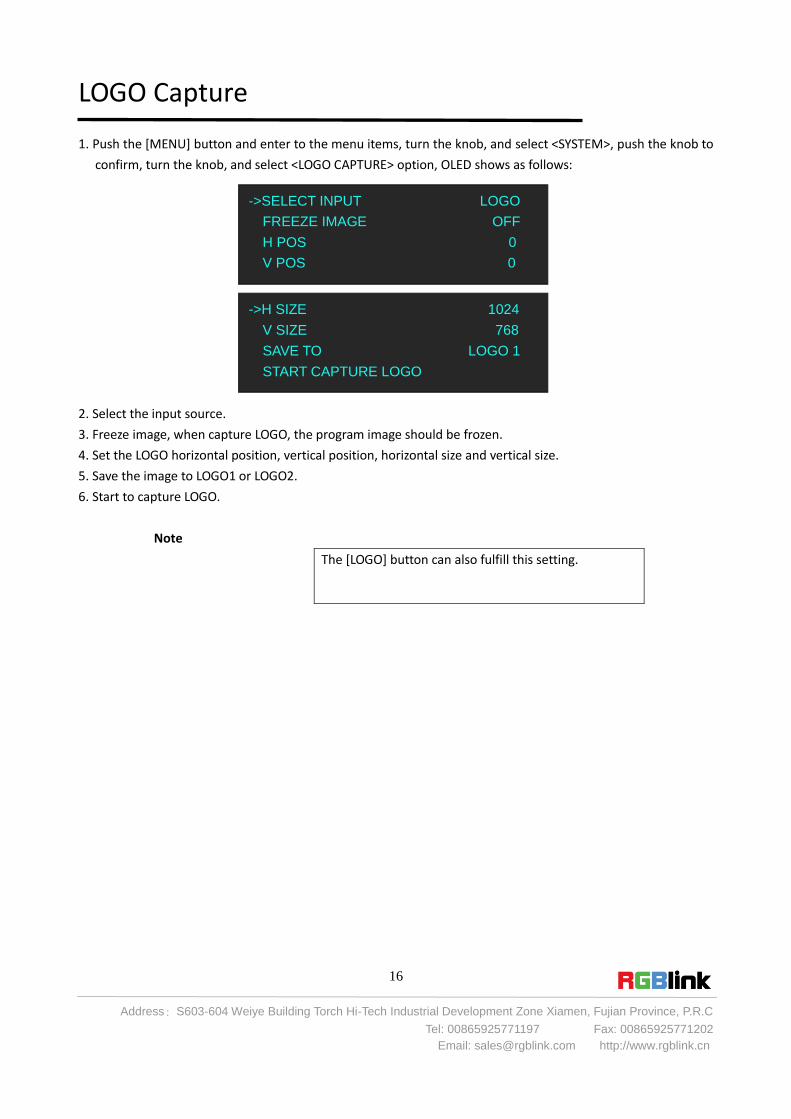
LOGO Capture
1. Push the [MENU] button and enter to the menu items, turn the knob, and select <SYSTEM>, push the knob to
confirm, turn the knob, and select <LOGO CAPTURE> option, OLED shows as follows:
2. Select the input source.
3. Freeze image, when capture LOGO, the program image should be frozen.
4. Set the LOGO horizontal position, vertical position, horizontal size and vertical size.
5. Save the image to LOGO1 or LOGO2.
6. Start to capture LOGO.
Note
The [LOGO] button can also fulfill this setting.
->SELECT INPUT LOGO
FREEZE IMAGE OFF
H POS 0
V POS 0
->H SIZE 1024
V SIZE 768
SAVE TO LOGO 1
START CAPTURE LOGO
Address:S603-604 Weiye Building Torch Hi-Tech Industrial Development Zone Xiamen, Fujian Province, P.R.C
Tel: 00865925771197 Fax: 00865925771202
Email: [email protected] http://www.rgblink.cn
17
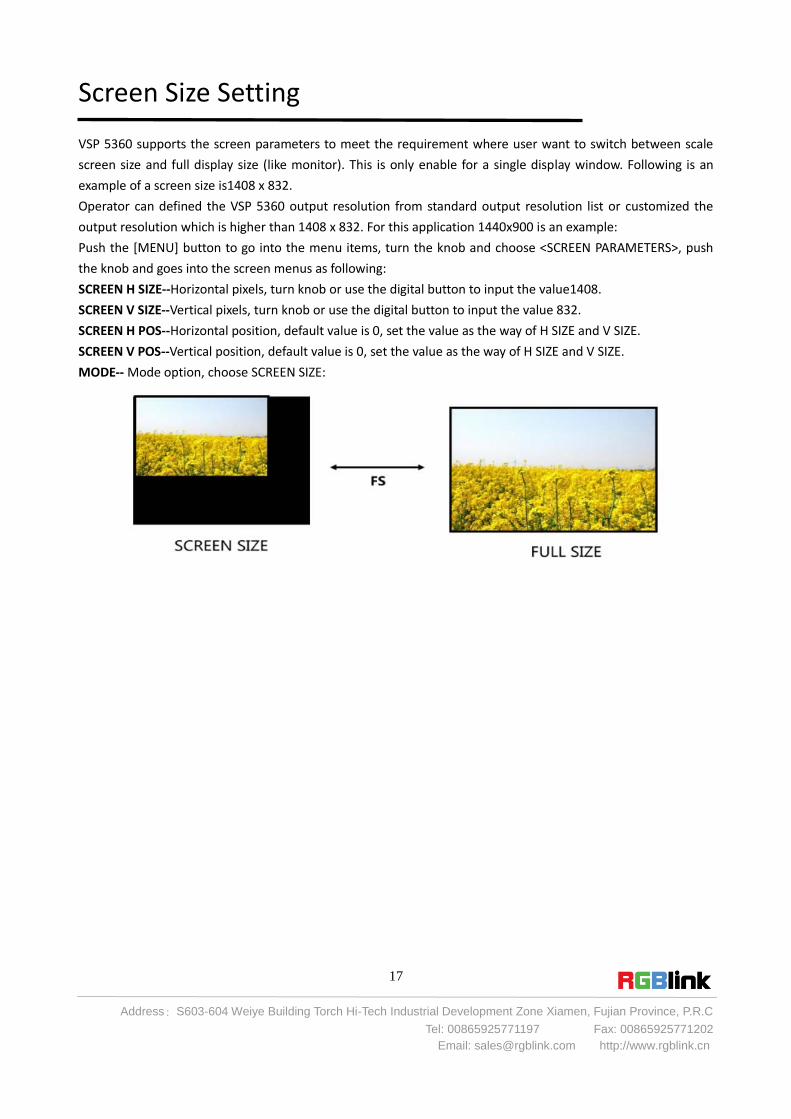
Screen Size Setting
VSP 5360 supports the screen parameters to meet the requirement where user want to switch between scale
screen size and full display size (like monitor). This is only enable for a single display window. Following is an
example of a screen size is1408 x 832.
Operator can defined the VSP 5360 output resolution from standard output resolution list or customized the
output resolution which is higher than 1408 x 832. For this application 1440x900 is an example:
Push the [MENU] button to go into the menu items, turn the knob and choose <SCREEN PARAMETERS>, push
the knob and goes into the screen menus as following:
SCREEN H SIZE--Horizontal pixels, turn knob or use the digital button to input the value1408.
SCREEN V SIZE--Vertical pixels, turn knob or use the digital button to input the value 832.
SCREEN H POS--Horizontal position, default value is 0, set the value as the way of H SIZE and V SIZE.
SCREEN V POS--Vertical position, default value is 0, set the value as the way of H SIZE and V SIZE.
MODE-- Mode option, choose SCREEN SIZE:
Address:S603-604 Weiye Building Torch Hi-Tech Industrial Development Zone Xiamen, Fujian Province, P.R.C
Tel: 00865925771197 Fax: 00865925771202
Email: [email protected] http://www.rgblink.cn
18
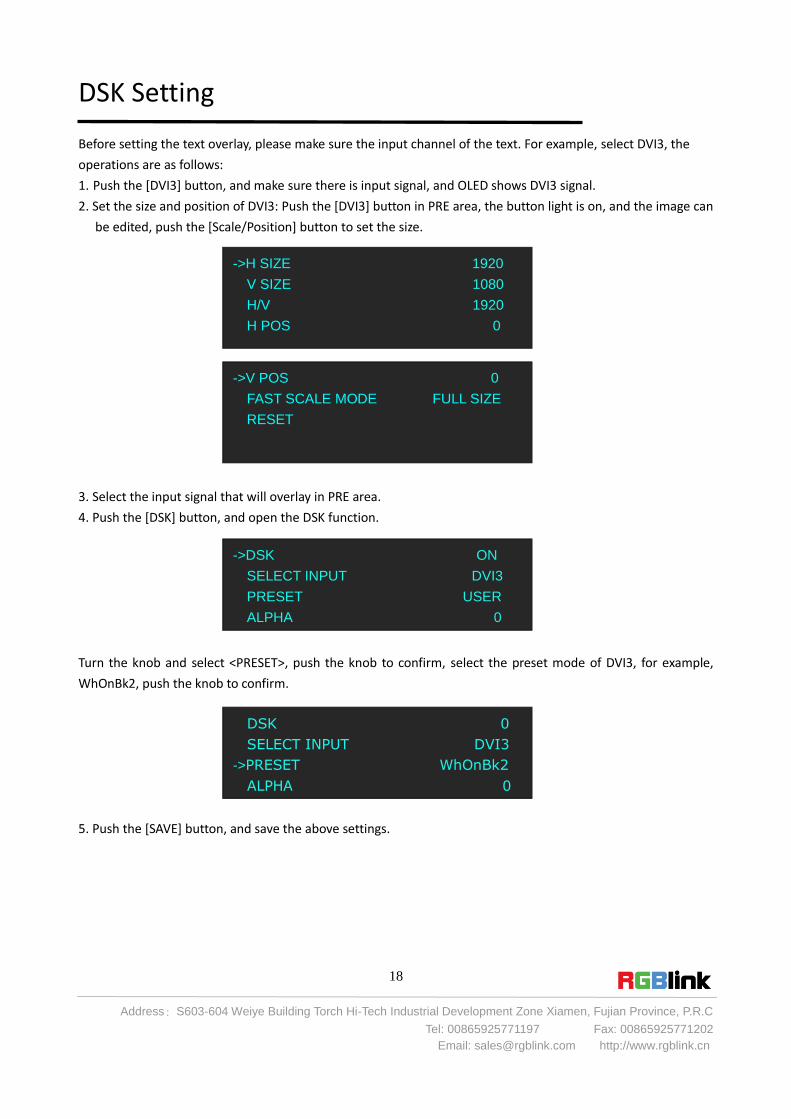
DSK Setting
Before setting the text overlay, please make sure the input channel of the text. For example, select DVI3, the
operations are as follows:
1. Push the [DVI3] button, and make sure there is input signal, and OLED shows DVI3 signal.
2. Set the size and position of DVI3: Push the [DVI3] button in PRE area, the button light is on, and the image can
be edited, push the [Scale/Position] button to set the size.
3. Select the input signal that will overlay in PRE area.
4. Push the [DSK] button, and open the DSK function.
Turn the knob and select <PRESET>, push the knob to confirm, select the preset mode of DVI3, for example,
WhOnBk2, push the knob to confirm.
5. Push the [SAVE] button, and save the above settings.
->DSK ON
SELECT INPUT DVI3
PRESET USER
ALPHA 0
->H SIZE 1920
V SIZE 1080
H/V 1920
H POS 0
->V POS 0
FAST SCALE MODE FULL SIZE
RESET
DSK 0
SELECT INPUT DVI3
->PRESET WhOnBk2
ALPHA 0
Address:S603-604 Weiye Building Torch Hi-Tech Industrial Development Zone Xiamen, Fujian Province, P.R.C
Tel: 00865925771197 Fax: 00865925771202
Email: [email protected] http://www.rgblink.cn
19
User Define BLACK Key
Default the [BLACK] button as black function. Push the button, its LED light is on, the output will be switched to
black, push the button again, its LED light is off, and output the video image.
For more details, please refer to: Using Black Out.
Besides BLACK, user can define this button as FREEZE, the operations are as follows:
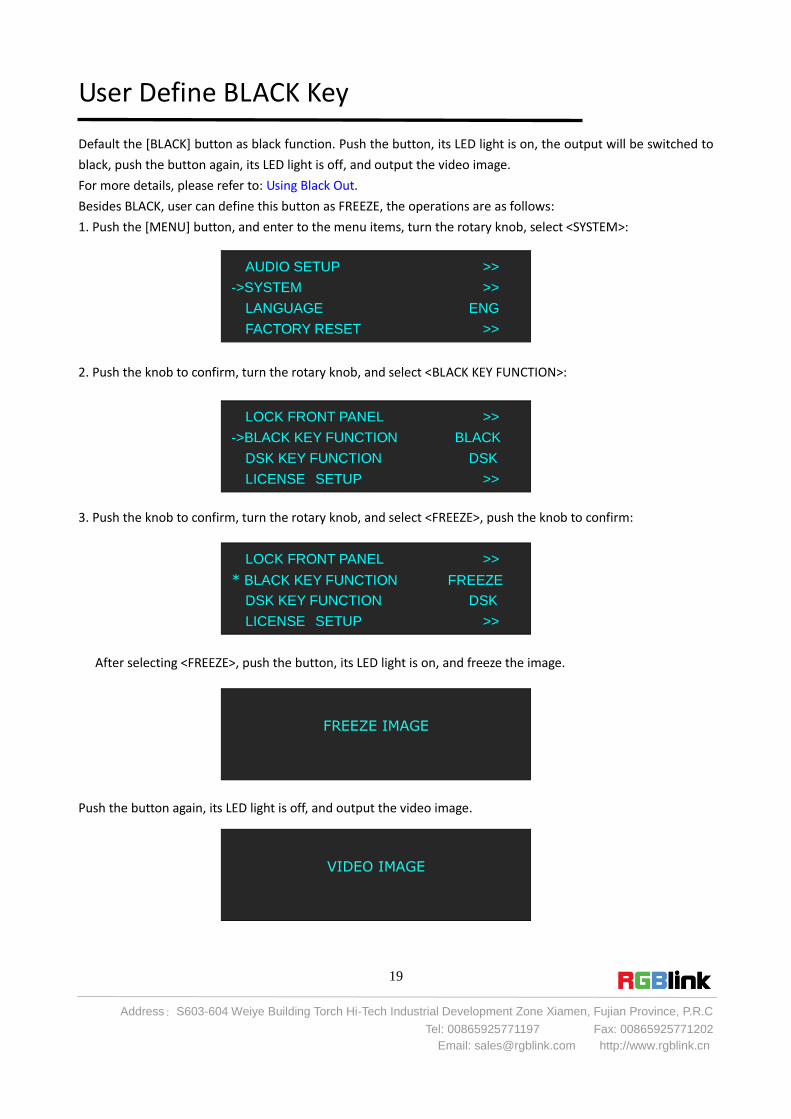
1. Push the [MENU] button, and enter to the menu items, turn the rotary knob, select <SYSTEM>:
2. Push the knob to confirm, turn the rotary knob, and select <BLACK KEY FUNCTION>:
3. Push the knob to confirm, turn the rotary knob, and select <FREEZE>, push the knob to confirm:
After selecting <FREEZE>, push the button, its LED light is on, and freeze the image.
Push the button again, its LED light is off, and output the video image.
AUDIO SETUP >>
->SYSTEM >>
LANGUAGE ENG
FACTORY RESET >>
LOCK FRONT PANEL >>
->BLACK KEY FUNCTION BLACK
DSK KEY FUNCTION DSK
LICENSE SETUP >>
LOCK FRONT PANEL >>
* BLACK KEY FUNCTION FREEZE
DSK KEY FUNCTION DSK
LICENSE SETUP >>
FREEZE IMAGE
VIDEO IMAGE
Address:S603-604 Weiye Building Torch Hi-Tech Industrial Development Zone Xiamen, Fujian Province, P.R.C
Tel: 00865925771197 Fax: 00865925771202
Email: [email protected] http://www.rgblink.cn
20
User Define DSK Key
Default the [DSK] button as DSK function. Push the button, its LED light is on, and enter to the DSK menu items.
For more details, please refer to: DSK Setting.
Besides DSK, user can define this button as FREEZE, the operations are as follows:
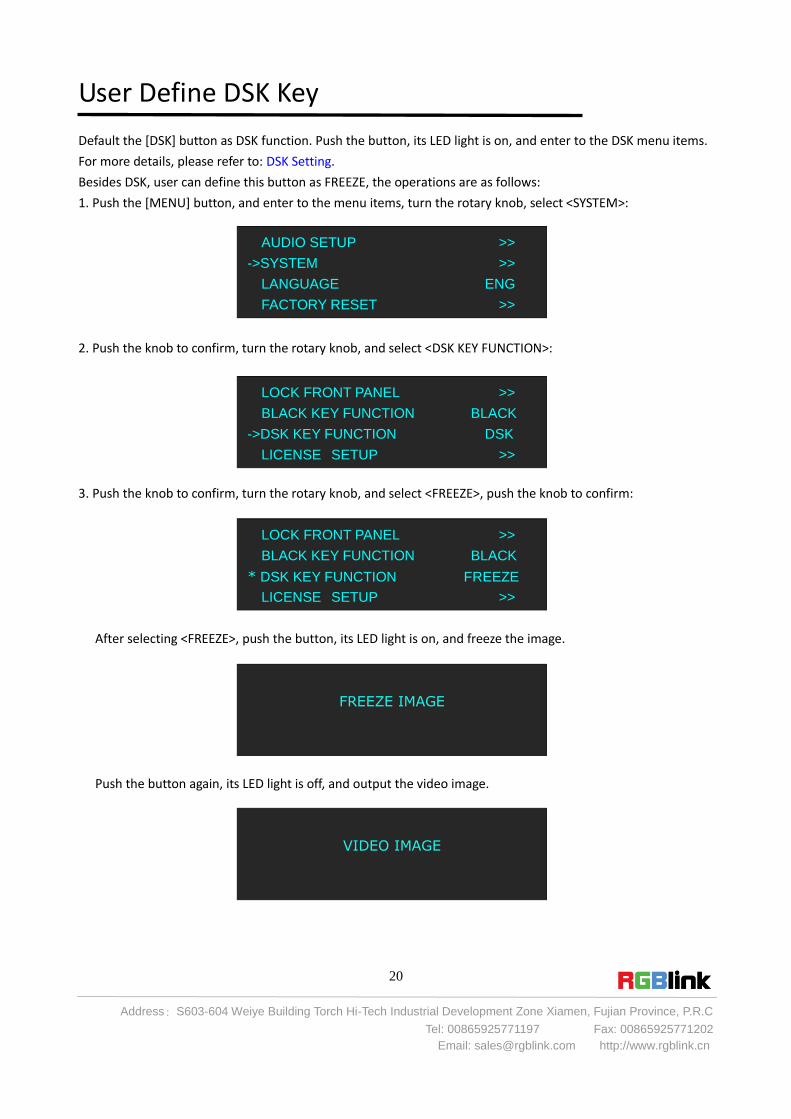
1. Push the [MENU] button, and enter to the menu items, turn the rotary knob, select <SYSTEM>:
2. Push the knob to confirm, turn the rotary knob, and select <DSK KEY FUNCTION>:
3. Push the knob to confirm, turn the rotary knob, and select <FREEZE>, push the knob to confirm:
After selecting <FREEZE>, push the button, its LED light is on, and freeze the image.
Push the button again, its LED light is off, and output the video image.
AUDIO SETUP >>
->SYSTEM >>
LANGUAGE ENG
FACTORY RESET >>
LOCK FRONT PANEL >>
BLACK KEY FUNCTION BLACK
->DSK KEY FUNCTION DSK
LICENSE SETUP >>
LOCK FRONT PANEL >>
BLACK KEY FUNCTION BLACK
* DSK KEY FUNCTION FREEZE
LICENSE SETUP >>
FREEZE IMAGE
VIDEO IMAGE
Address:S603-604 Weiye Building Torch Hi-Tech Industrial Development Zone Xiamen, Fujian Province, P.R.C
Tel: 00865925771197 Fax: 00865925771202
Email: [email protected] http://www.rgblink.cn
21
Using Black Out
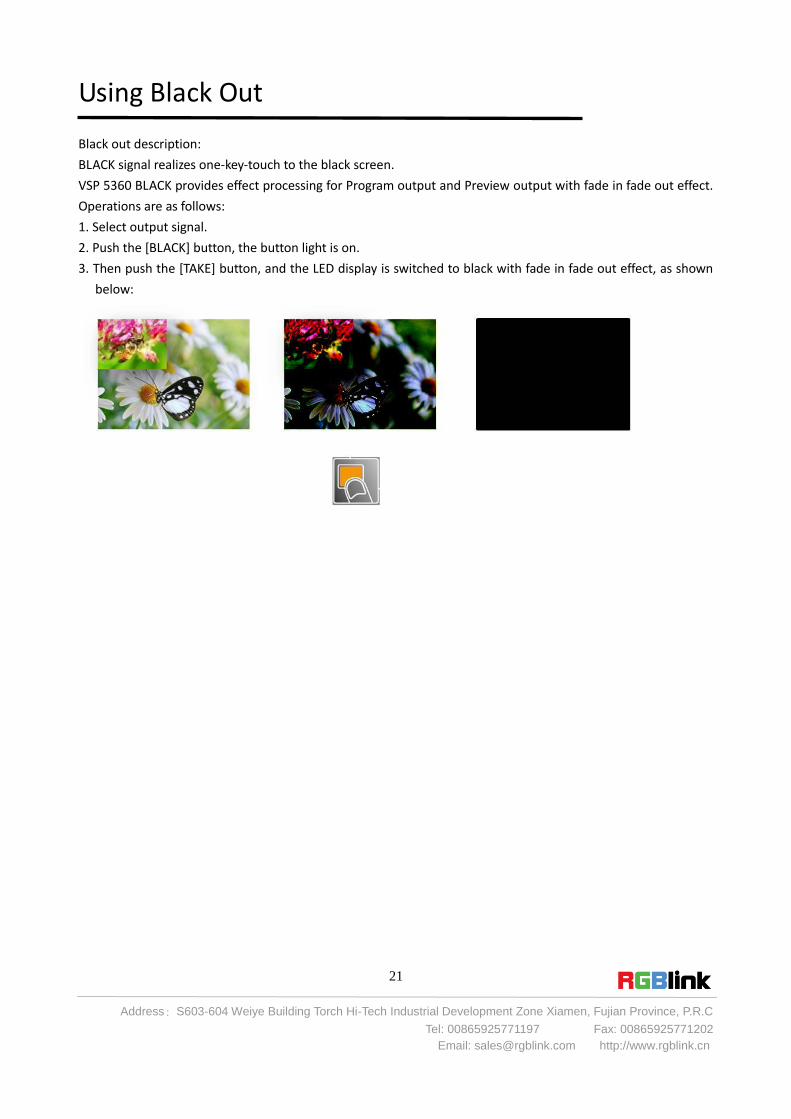
Black out description:
BLACK signal realizes one-key-touch to the black screen.
VSP 5360 BLACK provides effect processing for Program output and Preview output with fade in fade out effect.
Operations are as follows:
1. Select output signal.
2. Push the [BLACK] button, the button light is on.
3. Then push the [TAKE] button, and the LED display is switched to black with fade in fade out effect, as shown
below:

Address:S603-604 Weiye Building Torch Hi-Tech Industrial Development Zone Xiamen, Fujian Province, P.R.C
Tel: 00865925771197 Fax: 00865925771202
Email: [email protected] http://www.rgblink.cn
22
Saving Views
VSP 5360 provides 12 positions for saving or recording parameters. To save current parameters and settings:
1. Push the [Save] button, the button light is on, and enable the SAVE function.
2. Some of the buttons 0~12 in PRE area are on, and some flash. The buttons on can be saved, and flash will be
overwrite. Select the location that need to save, for example, button 1, OLED shows as follows.
3. User can also push the [MENU] button to enter the menu items, and choose <SYSTEM> option, turn the knob
and select <SAVE TO>, show as follows:
4. Push the knob to confirm. Turn the knob again, and select the save mode, for example, save to mode1, OLED
shows as follows:
Note
If position 1 is saved, this will be recalled and loaded
at power on.
PUSH THE LEDS ARE ON TO SAVE
Button is on can be saved
Button flashes will be overwrite
SAVE TO USER CONFIG MODE 1
SAVE IS SUCCESSFUL
->SAVE TO >>
RECALL >>
CLEAR SAVE1
CLEAR ALL >>
SAVE TO USER CONFIG MODE 1
SAVE IS SUCCESSFUL
Address:S603-604 Weiye Building Torch Hi-Tech Industrial Development Zone Xiamen, Fujian Province, P.R.C
Tel: 00865925771197 Fax: 00865925771202
Email: [email protected] http://www.rgblink.cn
23
Recall Saved Settings
VSP 5360 provides 12 positions for saving or recording parameters. To recall saved settings:
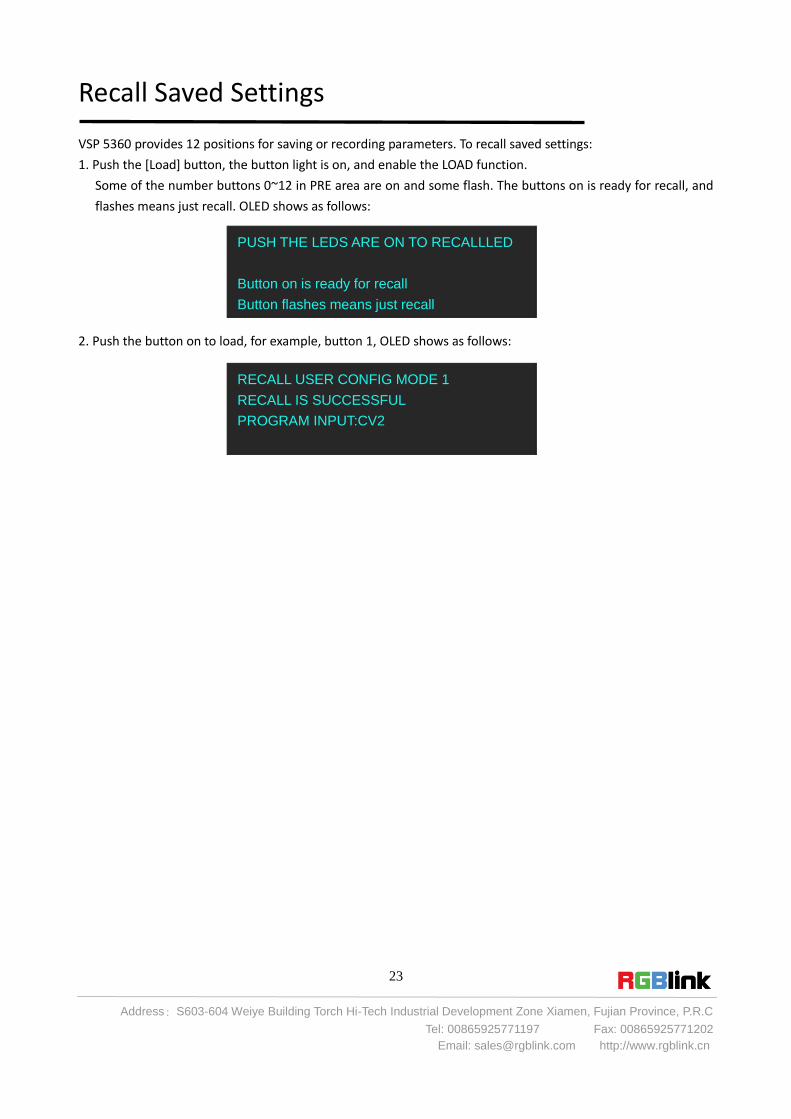
1. Push the [Load] button, the button light is on, and enable the LOAD function.
Some of the number buttons 0~12 in PRE area are on and some flash. The buttons on is ready for recall, and
flashes means just recall. OLED shows as follows:
2. Push the button on to load, for example, button 1, OLED shows as follows:
PUSH THE LEDS ARE ON TO RECALLLED
Button on is ready for recall
Button flashes means just recall
RECALL USER CONFIG MODE 1
RECALL IS SUCCESSFUL
PROGRAM INPUT:CV2
Address:S603-604 Weiye Building Torch Hi-Tech Industrial Development Zone Xiamen, Fujian Province, P.R.C
Tel: 00865925771197 Fax: 00865925771202
Email: [email protected] http://www.rgblink.cn
24
Product Application
Single Image Preview and Program
Select the signal in PRE area in the front panel, user can preview the signal on the monitor. After it has been
confirmed, switch the signal to LED display by pushing [CUT] or [TAKE] button, and then the monitor signal will
be switched to LED display.
User can also switch the signal by pushing the signal button in PRO area, but the signal in monitor will
not change.
Address:S603-604 Weiye Building Torch Hi-Tech Industrial Development Zone Xiamen, Fujian Province, P.R.C
Tel: 00865925771197 Fax: 00865925771202
Email: [email protected] http://www.rgblink.cn
25
Contact Information
Warranty: All video products are designed and tested to the highest quality standard and backed by full 3 years parts and
labor warranty. Warranties are effective upon delivery date to customer and are non-transferable. RGBlink
warranties are only valid to the original purchase/owner. Warranty related repairs include parts and labor, but
do not include faults resulting from user negligence, special modification, lighting strikes, abuse(drop/crush),
and/or other unusual damages.
The customer shall pay shipping charges when unit is returned for repair.
Headquarter: S603~604 Weiye Building Torch Hi-Tech Industrial Development Zone Xiamen, Fujian Province,
P.R.C
● Tel: +86-592-5771197
● Fax: +86-592-5771202
● Customer Hotline: 4008-592-315
● Web:
~ http://www.rgblink.com
~ http://www.rgblink.cn
● E-mail: [email protected]