VPN Tracker for Mac OS X - equinux Websitedownload.equinux.com/HowTo_DrayTek_Rev_1.0.pdf · 3....
11
VPN Tracker for Mac OS X How-to: Interoperability with DrayTek Vigor Rev. 1.0 Copyright © 2003 equinux USA Inc. All rights reserved.
Transcript of VPN Tracker for Mac OS X - equinux Websitedownload.equinux.com/HowTo_DrayTek_Rev_1.0.pdf · 3....

VPN Tracker for Mac OS X
How-to:
Interoperability with
DrayTek Vigor
Rev. 1.0
Copyright © 2003 equinux USA Inc. All rights reserved.

1. Introduction
2
1. Introduction
This document describes how VPN Tracker can be used to establish a connectionbetween a Macintosh running Mac OS X and a DrayTek Vigor VPN router. The entrieDrayTek product range should be compatible with VPN Tracker. equinux has tested theDrayTek Vigor 2200. Please note: The Vigor 2000 has no built-in VPN Server.
The DrayTek Vigor is configured as a router, connecting a company LAN to theInternet.
The example demonstrates a connection scenario, with a dial-in Mac connecting to aDrayTek Vigor.
This paper is only a supplement to, not a replacement for, the instructions that havebeen included with your DrayTek Vigor. Please be sure to read and understand thoseinstructions before beginning.
All trademarks, product names, company names, logos, screenshots displayed, cited orotherwise indicated on the How-to are the property of their respective owners.
EQUINUX SHALL HAVE ABSOLUTELY NO LIABILITY FOR ANY DIRECT OR INDIRECT,SPECIAL OR OTHER CONSEQUENTIAL DAMAGES IN CONNECTION WITH THE USE OF THEHOW-TO OR ANY CHANGE TO THE ROUTER GENERALLY, INCLUDING WITHOUTLIMITATION, ANY LOST PROFITS, BUSINESS, OR DATA, EVEN IF EQUINUX HAS BEENADVISED OF THE POSSIBILITY OF SUCH DAMAGES.

2. Prerequisites
3
2. Prerequisites
Firstly, you have to make sure that your DrayTek Vigor has VPN support built in.Please refer to your DrayTek Vigor manual for details.
Furthermore, you should use a recent DrayTek firmware version. The latest firmwarerelease for your DrayTek Vigor can be obtained from:
http://www.DrayTek.com.tw
For this document, firmware version 2.3.1 has been used.
The type of the VPN Tracker license needed (personal or professional edition) dependson the connection scenario you are using. With a this router you can only connect whita dial-in Mac without it’s own subnet to the DrayTek Vigor so you need the personaledition in all cases.
VPN Tracker is compatible with Mac OS X 10.2 or higher.
Be sure to use VPN Tracker 1.6.1 or higher.1
1 All VPN Tracker versions prior to the 1.6.1 did not include a connection type for DrayTek products.

3. Connecting a VPN Tracker Host to a DrayTek Vigor
4
3. Connecting a VPN Tracker Host to aDrayTek Vigor
In this example, the Mac running VPN Tracker is directly connected to the internet viaa dialup or PPP connection.2 The DrayTek Vigor is configured in NAT mode and hasthe static WAN IP address 169.1.2.3 and the private LAN IP address 192.168.1.1. Thestations in the LAN behind the DrayTek Vigor use 192.168.1.1 as their default gatewayand should have a working Internet connection.
Figure 1: VPN Tracker - DrayTek Vigor connection diagram (host to network)
2 Please note that the connection via a router, which uses Network Address Translation (NAT), only worksif the NAT router supports „IPSEC passthrough“. Please contact your router’s manufacturer for details.
VPN Tracker Mac(dynamic IP)
local host 10.1.2.3
DrayTek VigorWAN 169.1.2.3
LAN 192.168.1.1
LAN192.168.1.0/24
192.168.1.10
192.168.1.20
192.168.1.30
3. Connecting a VPN Tracker Host to a DrayTek Vigor
5
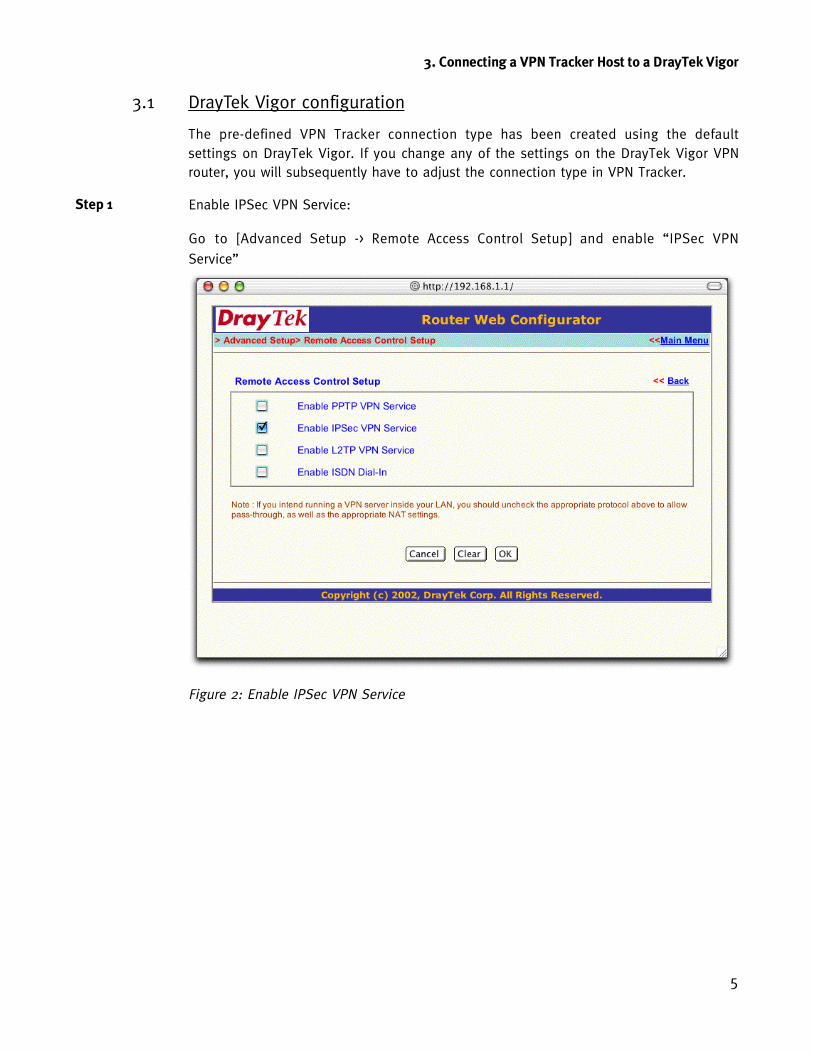
3.1 D rayT ek V igor configuration
The pre-defined VPN Tracker connection type has been created using the defaultsettings on DrayTek Vigor. If you change any of the settings on the DrayTek Vigor VPNrouter, you will subsequently have to adjust the connection type in VPN Tracker.
Enable IPSec VPN Service:
Go to [Advanced Setup -> Remote Access Control Setup] and enable “IPSec VPNService”
Figure 2: Enable IPSec VPN Service
Step 1

3. Connecting a VPN Tracker Host to a DrayTek Vigor
6
VPN IKE / IPSec Setup:
Go to [Advanced Setup -> VPN IKE / IPSec Setup]. Enter your Pre-Shared key twice inthe Dial-in Setup. Disable “Medium (AH)” and select “High (ESP)” and choose “Both”as ‘IPSec Security method’. You can leave the Pre-Shared Key for the Dial-Out Setupblank. Please Note: Every user uses the same shared key.
Figure 3: VPN IKE / IPSec Setup
Step 2

3. Connecting a VPN Tracker Host to a DrayTek Vigor
7
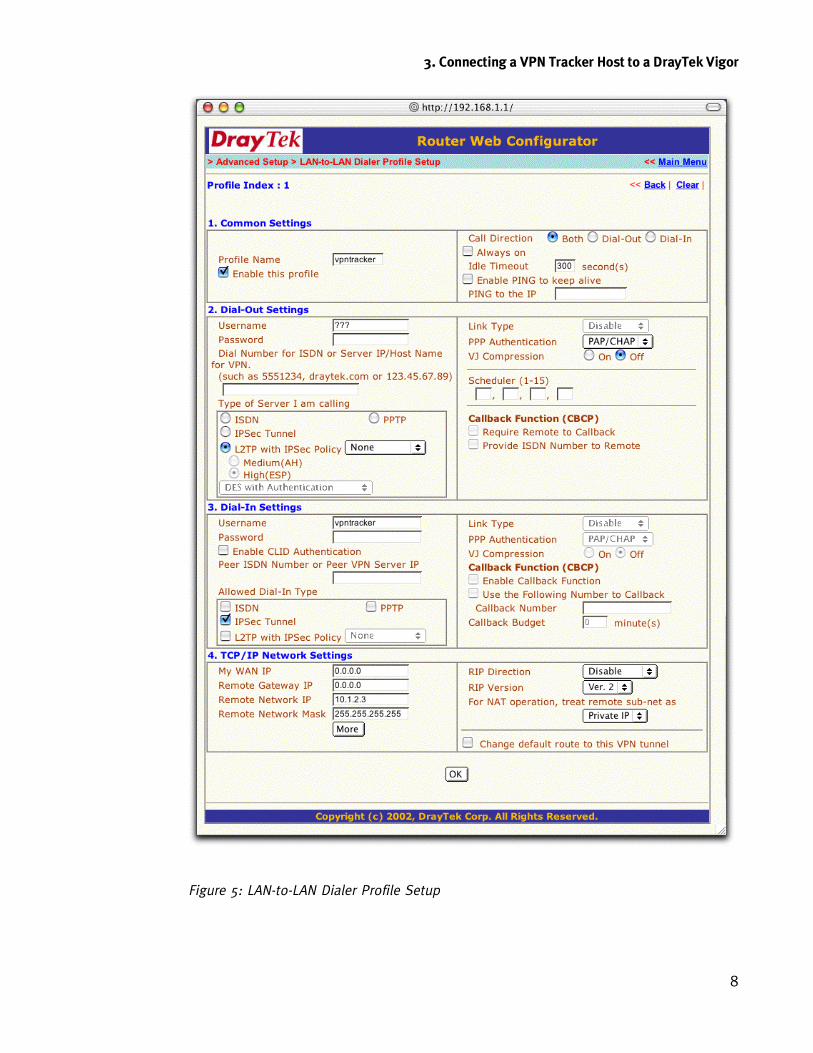
Add a LAN-to-LAN dialer profile:
To add a dialer profile, go to [Advanced Setup -> LAN-to-LAN Dialer Profile Setup]. Byclicking on Index ‘ 1. ’ you can create a new dialer profile.
Figure 4: LAN-to-LAN Dialer Profile Setup
Edit a LAN-to-LAN dialer Profile Setup:
Enter a name for this profile (e.g. vpntracker) and select “Enable this profile”. Choose‘Dial-In’ as “Call Direction”.
Please leave the Dial-Out Settings blank.
Enter a username for the Dial-In Setting and leave the password field blank. Make surethat the only allowed dial-in type is ‘IPSec tunnel’.
Enter the same “Remote Network IP” (e.g. 10.1.2.3) that you will use for ‘local host’ inVPN Tracker (figure 8) and change the “Remote Network Mask” to ‘255.255.255.255’.This setting refers to the “Local Host” field in VPN Tracker. Please note: The remotehost IP is not the same as the dynamic IP from the ISP. Finally please change the “RIPdirection” to ‘Disable’.
Step 3
Step 4
3. Connecting a VPN Tracker Host to a DrayTek Vigor
8
Figure 5: LAN-to-LAN Dialer Profile Setup

3. Connecting a VPN Tracker Host to a DrayTek Vigor
9
> Multiple VPN Tracker Hosts
Repeat step 4, using different names e.g. vpn2 and a different ‘Remote Network IP’.The Vigor 2200/2600 can handle up to 8 simultaneous connections. The Vigor 2300 upto 16.
3.2 VPN T racker configuration
Add a new connection with the following options: Choose „DrayTek Vigor“ as theConnection Type, „Host to Network“ as mode, then type in the remote endpoint(169.1.2.3) and the remote network (192.168.1.0/24). Enter the same “local host” thatyou typed in in Figure 5, which will be the virtual IP address of your Mac (10.1.2.3).
Figure 6: VPN Tracker connection dialog
Click „Edit pre-shared key“ and type in the shared secret key that you typed-in in theDrayTek Vigor (Figure 2).
Step 1
Step 2

3. Connecting a VPN Tracker Host to a DrayTek Vigor
10
Figure 7: Shared key dialog
Save the connection and Click „Start IPsec“ in the VPN Tracker main window.
You’re done. After 10-20 seconds the red status indicator for the connection shouldchange to green, which means you’re securely connected to the DrayTek Vigor. AfterIPsec has been started, you may quit VPN Tracker. The IPsec service will keep running.
Now to test your connection simply ping a host in the DrayTek Vigor network from thedialed-in Mac in the “Terminal” utility:
ping 192.168.1.10
And from the DrayTek Vigor network (192.168.1.0/24) you can:
ping 10.1.2.3
> Debugging
If the status indicator does not change to green please have a look at the log file onboth sides. You can define the amount of information available in the log file in theVPN Tracker preferences.
Step 3

4. Connecting a VPN Tracker host to a DrayTek Vigor with dynamic DNS
11
4. Connecting a VPN Tracker host to aDrayTek Vigor with dynamic DNS
The majority of users don’t receive a fixed IP-Address from a provider without a leasedline. In most cases of PPoE you will be disconnected from the network after 24 hoursat the latest, and a new IP- Address will be assigned. Firstly, make sure that theconfiguration with static IP addresses (Chapter 3) works properly, then begin testingwith dynamic DNS.
A known IP address is the requirement for a VPN server. There are special DynDNSservices available online to avoid entering the address each time. The DynDNS serviceproviders translate a domain name like vpntracker.dyndns.org to the appropriate IP-Address. The Vigor-Router automatically informs the DynDNS-service after everychange made. However, you have to restart your VPN connection on the Mac side toaccess the server again.
To use this feature, set up a DynDNS account on your router as described in theDrayTek Vigor users guide. In VPN Tracker just replace the IP-Address in the field“Remote Endpoint” in the VPN Tracker connection dialog (e.g. 169.1.2.3) with thehostname of your DynDNS host (e.g. vpntracker.dyndns.org).
Figure 8: VPN Tracker connection dialog