Vocal 300 Manual
15
User’s Guide
-
Upload
jfoster1977 -
Category
Documents
-
view
886 -
download
1
description
User's Manual Digitech Vocal 300
Transcript of Vocal 300 Manual

User’sGuide
Vocal 300 Manual 11/20/01 8:23 AM Page 1

These symbols are internationally accepted symbols that warn of potentialhazards with electrical products.The lightning flash means that there aredangerous voltages present within the unit.The exclamation point indicatesthat it is necessary for the user to refer to the owners manual.
These symbols warn that there are no user serviceable parts inside the unit.Do not open the unit. Do not attempt to service the unit yourself. Refer allservicing to qualified personnel. Opening the chassis for any reason will voidthe manufacturer’s warranty. Do not get the unit wet. If liquid is spilled onthe unit, shut it off immediately and take it to a dealer for service.
Disconnect the unit during storms to prevent damage.
Warning
For your protection, please read the following:
Water and Moisture: Appliances should not be used near water(e.g. near a bathtub, washbowl, kitchen sink, laundry tub, in a wetbasement, or near a swimming pool, etc.) Care should be taken sothat objects do not fall and liquids are not spilled into the enclosurethrough openings.
Power Sources: The appliance should be connected to a powersupply only of the type described in the operating instructions or asmarked on the appliance.
Grounding or Polarization: Precautions should be taken so thatthe grounding or polarization means of an appliance is not defeated.
Power Cord Protection: Power supply cords should be routed sothat they are not likely to be walked on or pinched by items placedupon or against them, paying particular attention to cords at plugs,convenience receptacles, and the point where they exit from theappliance.
Servicing: To reduce the risk of fire or electrical shock, the usershould not attempt to service the appliance beyond that described inthe operating instructions.All other servicing should be referred toqualified service personnel.
For units equipped with externally accessible fuse recepta-cle: Replace fuse with same type and rating only.
Electromagnetic Compatibility
Operation is subject to the following conditions:•This device may not cause harmful interference.•This device must accept any interference received, including interfer-ence that may cause undesired operation.
•Use only shielded interconnecting cables.•Operation of this unit within significant electromagnetic fields shouldbe avoided.
DECLARATION OF CONFORMITY
Manufacturer’s Name: DigiTechManufacturer’s Address: 8760 S. Sandy Parkway
Sandy, Utah 84070, USA
declares that the product:
Product name: Vocal300Note: Product name may be suffixed by the letters EU, JA, NP and UK.
Product option: none
conforms to the following Product Specifications:
Safety: IEC 60065 (1998)EMC: EN 55013 (1990)
EN 55020 (1991)Supplementary Information:
The product herewith complies with the requirements of the Low Voltage Directive 72/23/EEC and the EMCDirective 89/336/EEC as amended by Directive 93/68/EEC.
President of Harman Music Group8760 S. Sandy ParkwaySandy, Utah 84070, USADate: October 10, 2001
European Contact: Your local DigiTech Sales and Service Office orHarman Music Group8760 South Sandy ParkwaySandy, Utah 84070 USAPh: (801) 566-8800
Vocal 300 Manual 11/20/01 8:23 AM Page 2

Table of ContentsIntroduction . . . . . . . . . . . . . . . . . . .1Included Items . . . . . . . . . . . . . . . . . .1Top Panel . . . . . . . . . . . . . . . . . . . . .1Rear Panel . . . . . . . . . . . . . . . . . . . . .2Connecting the Vocal 300 . . . . . . . . .2Mono Operation . . . . . . . . . . . . . . . .2Stereo Operation . . . . . . . . . . . . . . .3Modes and Functions . . . . . . . . . . . . .4Performance Mode . . . . . . . . . . . . . .4Edit Mode . . . . . . . . . . . . . . . . . . . . .5Store Mode . . . . . . . . . . . . . . . . . . . .5Bypass Mode . . . . . . . . . . . . . . . . . . .5Expression Pedal . . . . . . . . . . . . . . . .6Assigning a Parameter . . . . . . . . . . . .6V-Switch/Pedal Calibration . . . . . . . .7
Factory Reset . . . . . . . . . . . . . . . . . .7Effects and Parameters . . . . . . . . . . .8Signal Path . . . . . . . . . . . . . . . . . . . . .8Compressor . . . . . . . . . . . . . . . . . . .8Mic Pre/Voice . . . . . . . . . . . . . . . . . .8Voice Parameters . . . . . . . . . . . . . . .8EQ . . . . . . . . . . . . . . . . . . . . . . . . . .9Noise Gate . . . . . . . . . . . . . . . . . . . .9Mod.Effects . . . . . . . . . . . . . . . . . . . .9Mod Parameters . . . . . . . . . . . . . . .10Delay . . . . . . . . . . . . . . . . . . . . . . . .10Reverb . . . . . . . . . . . . . . . . . . . . . .10Appendix . . . . . . . . . . . . . . . . . . . . .11Preset List . . . . . . . . . . . . . . . . . . . .11Specifications . . . . . . . . . . . . . . . . . .11
WarrantyWe at DigiTech are very proud of our products and back-up each one we sell with the following warranty:
1.The warranty registration card must be mailed within ten days after purchase date to validate thiswarranty.
2. DigiTech warrants this product, when used solely within the U.S., to be free from defects in materials andworkmanship under normal use and service.
3. DigiTech liability under this warranty is limited to repairing or replacing defective materials that showevidence of defect, provided the product is returned to DigiTech WITH RETURN AUTHORIZATION, whereall parts and labor will be covered up to a period of one year.A Return Authorization number may beobtained from DigiTech by telephone.The company shall not be liable for any consequential damage as aresult of the product's use in any circuit or assembly.
4. Proof-of-purchase is considered to be the burden of the consumer.
5. DigiTech reserves the right to make changes in design, or make additions to, or improvements upon thisproduct without incurring any obligation to install the same on products previously manufactured.
6.The consumer forfeits the benefits of this warranty if the product's main assembly is opened and tamperedwith by anyone other than a certified DigiTech technician or, if the product is used with AC voltages outsideof the range suggested by the manufacturer.
7.The foregoing is in lieu of all other warranties, expressed or implied, and DigiTech neither assumes norauthorizes any person to assume any obligation or liability in connection with the sale of this product. In noevent shall DigiTech or its dealers be liable for special or consequential damages or from any delay in theperformance of this warranty due to causes beyond their control.
NOTE:The information contained in this manual is subject to change at any time without notification. Someinformation contained in this manual may also be inaccurate due to undocumented changes in the product oroperating system since this version of the manual was completed.The information contained in this versionof the owner's manual supersedes all previous versions.
Vocal 300 Manual 11/20/01 8:23 AM Page 3
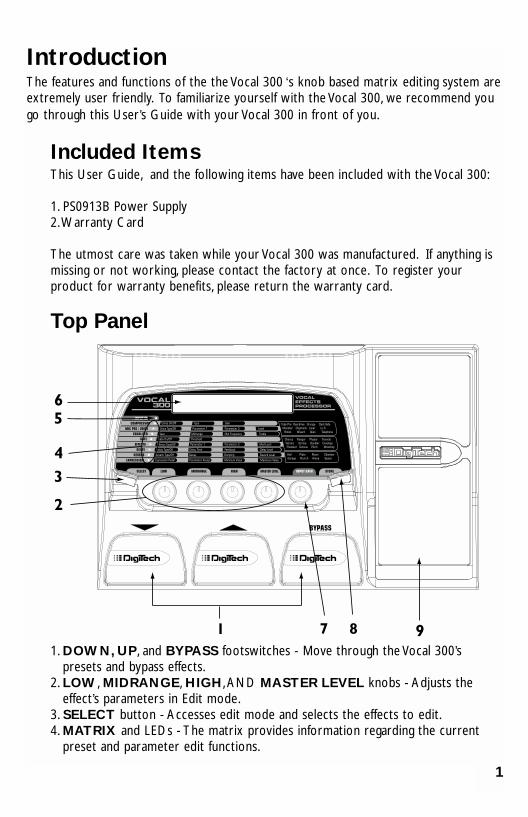
IntroductionThe features and functions of the the Vocal 300 ‘s knob based matrix editing system areextremely user friendly. To familiarize yourself with the Vocal 300, we recommend yougo through this User’s Guide with your Vocal 300 in front of you.
Included ItemsThis User Guide, and the following items have been included with the Vocal 300:
1. PS0913B Power Supply2.Warranty Card
The utmost care was taken while your Vocal 300 was manufactured. If anything ismissing or not working, please contact the factory at once. To register yourproduct for warranty benefits, please return the warranty card.
Top Panel
1. DOWN, UP, and BYPASS footswitches - Move through the Vocal 300’spresets and bypass effects.
2. LOW, MIDRANGE, HIGH,AND MASTER LEVEL knobs - Adjusts theeffect’s parameters in Edit mode.
3. SELECT button - Accesses edit mode and selects the effects to edit.4. MATRIX and LEDs - The matrix provides information regarding the current
preset and parameter edit functions.
1
Vocal 300 Manual 11/20/01 8:23 AM Page 1
5. INPUT CLIP LED - Lights if the incoming signal is distorting.6. DISPLAY - Provides information for the different functions.7. INPUT GAIN knob - Adjusts the input signal level.8. STORE Button - Stores or copies presets to User preset locations.9. EXPRESSION PEDAL - Controls the Vocal 300’s parameters in real time.
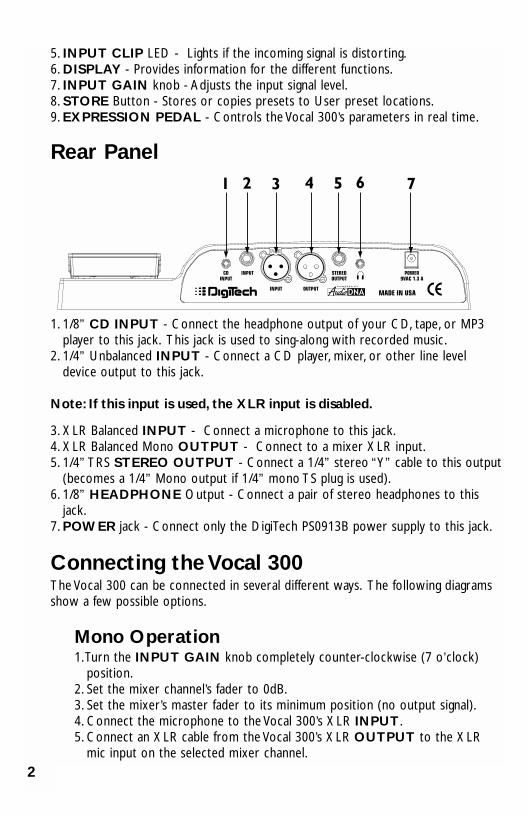
Rear Panel
1. 1/8” CD INPUT - Connect the headphone output of your CD, tape, or MP3player to this jack. This jack is used to sing-along with recorded music.
2. 1/4” Unbalanced INPUT - Connect a CD player, mixer, or other line leveldevice output to this jack.
Note: If this input is used, the XLR input is disabled.
3. XLR Balanced INPUT - Connect a microphone to this jack.4. XLR Balanced Mono OUTPUT - Connect to a mixer XLR input.5. 1/4” TRS STEREO OUTPUT - Connect a 1/4” stereo “Y” cable to this output
(becomes a 1/4” Mono output if 1/4” mono TS plug is used).6. 1/8” HEADPHONE Output - Connect a pair of stereo headphones to this
jack.7. POWER jack - Connect only the DigiTech PS0913B power supply to this jack.
Connecting the Vocal 300The Vocal 300 can be connected in several different ways. The following diagramsshow a few possible options.
Mono Operation1.Turn the INPUT GAIN knob completely counter-clockwise (7 o’clock)
position.2. Set the mixer channel’s fader to 0dB.3. Set the mixer’s master fader to its minimum position (no output signal).4. Connect the microphone to the Vocal 300’s XLR INPUT.5. Connect an XLR cable from the Vocal 300’s XLR OUTPUT to the XLR
mic input on the selected mixer channel.
2
Vocal 300 Manual 11/20/01 8:23 AM Page 2
6.While singing, gradually turn up the Vocal 300’s INPUT GAIN knob untilthe INPUT CLIP LED lights with the strongest signals.
7. Gradually bring the mixer’s master fader up.
Note: It may be necessary to consult your mixer’s owners manualfor the proper mixer setup.
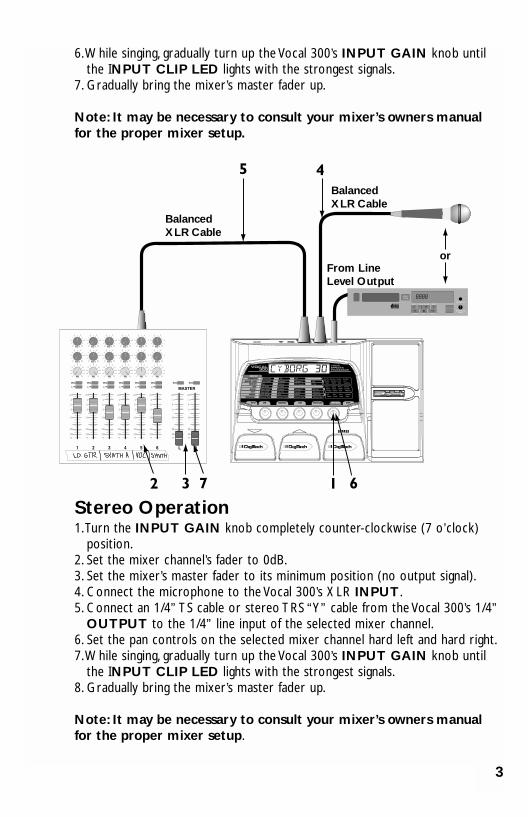
Stereo Operation1.Turn the INPUT GAIN knob completely counter-clockwise (7 o’clock)
position.2. Set the mixer channel’s fader to 0dB.3. Set the mixer’s master fader to its minimum position (no output signal).4. Connect the microphone to the Vocal 300’s XLR INPUT.5. Connect an 1/4” TS cable or stereo TRS “Y” cable from the Vocal 300’s 1/4”
OUTPUT to the 1/4” line input of the selected mixer channel.6. Set the pan controls on the selected mixer channel hard left and hard right.7.While singing, gradually turn up the Vocal 300’s INPUT GAIN knob until
the INPUT CLIP LED lights with the strongest signals.8. Gradually bring the mixer’s master fader up.
Note: It may be necessary to consult your mixer’s owners manualfor the proper mixer setup.
MASTER
orFrom LineLevel Output
BalancedXLR Cable
BalancedXLR Cable
3
Vocal 300 Manual 11/20/01 8:23 AM Page 3

Modes and FunctionsPerformance ModeThe Vocal 300 initially powers up in performance mode.
SELECT Button - Enters edit mode. Each press of this button moves to the nextrow of effects in the matrix. Press and hold this button to return to performancemode.STORE Button - Begins the storing process.INPUT GAIN knob - Sets the input gain for your microphone.LOW, MIDRANGE, HIGH,AND MASTER LEVEL Knobs - These knobscontrol the Bass, Mid Level,Treble, and Master Level of the presets.FOOTSWITCHES – The UP and DOWN footswitches move through the presets(1-40 User and 41-80 Factory). Pressing the BYPASS footswitch bypasses alleffects. While in preset bypass, you can select the next preset using the UP andDOWN footswitches. This preset will then be loaded when bypass is exited.Expression Pedal - Controls the assigned parameter of the current preset.
MASTER
orFrom LineLevel Output
BalancedXLR Cable
1/4" Stereo "Y" Cable
4
Vocal 300 Manual 11/20/01 8:23 AM Page 4
Edit ModeThe Vocal 300 lets you create your own presets, and modify existing presets. Tocreate your own preset, do the following:
1. Select a User or Factory Preset.2. Press the SELECT button. The Matrix’s first effect row LED begins flashing.3. Modify the parameters in the selected row using the LOW, MIDRANGE,
HIGH, and MASTER LEVEL knobs.When changes are made, the Store LEDlights, and the abbreviated parameter name with a space followed by a two digitparameter value is displayed.
4. To move to the next effect in the Matrix, press the SELECT button again.5. Press the STORE button to save your changes.
Note: Pressing the UP or DOWN footswitches returns you toPerformance mode. Pressing the BYPASS footswitch bypasses alleffects.
Store ModeAfter modifying a preset, you must store your settings to one of the 40 UserPreset locations. To store changes to a preset or store a preset to a differentlocation, do the following:
1. Press the STORE button. The Store LED begins blinking on and off, and thefirst character of the name flashes.
2. Use the LOW knob to change the character. Use the MIDRANGE knob tomove to the next character (left or right) in the name.
3. Press the STORE button again. The preset’s name and number are displayed.4. If you want to change where the preset is stored, rotate the MASTER LEVEL
knob to select a new preset location. Only User presets 1-40 can beoverwritten.
5. Press the STORE button a final time to store your changes. Stored followedby the preset name is displayed.
Note: Pressing the SELECT button aborts the storing process.
Bypass ModeThe Vocal 300 can be bypassed so only a clean, unprocessed signal is heard. Tobypass the Vocal 300, do the following:
1. Press the BYPASS footswitch. Bypass appears in the display.2. Press the BYPASS footswitch again to return to performance mode. If a new
preset was selected while in bypass mode, you will exit bypass mode to the newpreset. If a new preset was not selected, you will return to the preset in usebefore you entered bypass mode.
5
Vocal 300 Manual 11/20/01 8:23 AM Page 5
Expression PedalAssigning a ParameterThe Vocal 300 includes a built-in Expression pedal. The Expression pedal isused to control many of the Vocal 300’s effect parameters in real time. Toassign a parameter to the Expression pedal, do the following:
1. Select a User or Factory Preset.2. Press the SELECT button until the Matrix’s last effect row LED begins
flashing.3. Rotate the LOW knob to select the Expression pedal 1,2, or 3.
Note: You can assign three parameters to the Expression pedal perpreset.
4. Rotate the MIDRANGE knob to select the parameter the pedal willcontrol.
5. Rotate the HIGH knob to adjust the minimum value the pedal (toe up)reaches.
6. Rotate the MASTER LEVEL knob to adjust the maximum value the pedal(toe down) reaches.
7. Press the STORE button to store the changes. See page 5 for moreinformation on storing presets.
The following is a list of the parameters that can be assigned to theExpression pedal:Parameter Display Min Value Max ValueVoice Param 1 Varies Varies VariesVoice Param 2 Varies Varies VariesVoice Level Voxlvl 1 99Effect Speed Speed 1 99Effect Amount amount 1 99Effect Level Fx lvl 0 99Effect Mix Fx MIX 0 99Whammy whmamt 1 99Delay Feedback fback 1 99 R-holdDelay In Level Dly in 0 99Delay Out Level Dlyout 0 99Reverb Decay Decay 1 99Reverb In Level Rev in 0 99Reverb Out Level Revout 0 99Volume Pre Volpre ------ ------Volume Post volpst ------ ------
6
Vocal 300 Manual 11/20/01 8:23 AM Page 6
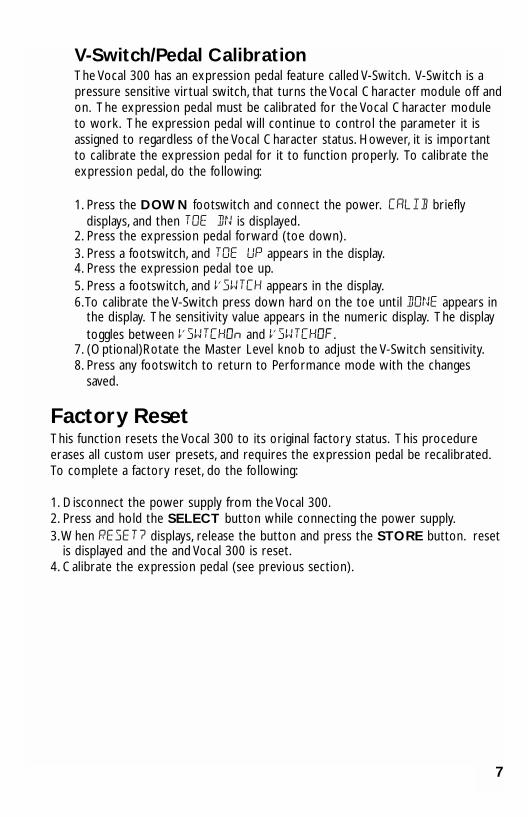
V-Switch/Pedal CalibrationThe Vocal 300 has an expression pedal feature called V-Switch. V-Switch is apressure sensitive virtual switch, that turns the Vocal Character module off andon. The expression pedal must be calibrated for the Vocal Character moduleto work. The expression pedal will continue to control the parameter it isassigned to regardless of the Vocal Character status. However, it is importantto calibrate the expression pedal for it to function properly. To calibrate theexpression pedal, do the following:
1. Press the DOWN footswitch and connect the power. CALIB brieflydisplays, and then TOE DN is displayed.
2. Press the expression pedal forward (toe down).3. Press a footswitch, and TOE UP appears in the display.4. Press the expression pedal toe up.5. Press a footswitch, and VSWTCH appears in the display.6.To calibrate the V-Switch press down hard on the toe until DONE appears in
the display. The sensitivity value appears in the numeric display. The displaytoggles between VSWTCHOn and VSWTCHOf.
7. (Optional)Rotate the Master Level knob to adjust the V-Switch sensitivity.8. Press any footswitch to return to Performance mode with the changes
saved.
Factory ResetThis function resets the Vocal 300 to its original factory status. This procedureerases all custom user presets, and requires the expression pedal be recalibrated.To complete a factory reset, do the following:
1. Disconnect the power supply from the Vocal 300.2. Press and hold the SELECT button while connecting the power supply.3.When reset? displays, release the button and press the STORE button. reset
is displayed and the and Vocal 300 is reset.4. Calibrate the expression pedal (see previous section).
7
Vocal 300 Manual 11/20/01 8:23 AM Page 7
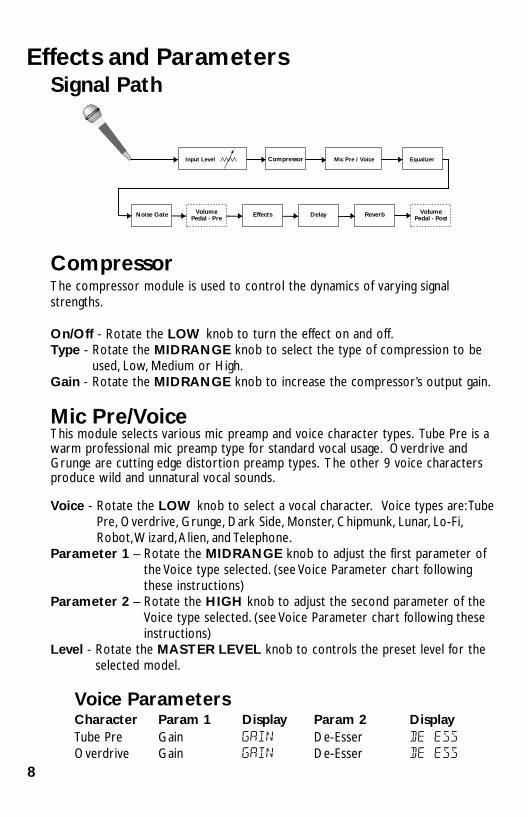
Effects and ParametersSignal Path
Compressor The compressor module is used to control the dynamics of varying signalstrengths.
On/Off - Rotate the LOW knob to turn the effect on and off.Type - Rotate the MIDRANGE knob to select the type of compression to be
used, Low, Medium or High.Gain - Rotate the MIDRANGE knob to increase the compressor’s output gain.
Mic Pre/VoiceThis module selects various mic preamp and voice character types. Tube Pre is awarm professional mic preamp type for standard vocal usage. Overdrive andGrunge are cutting edge distortion preamp types. The other 9 voice charactersproduce wild and unnatural vocal sounds.
Voice - Rotate the LOW knob to select a vocal character. Voice types are:TubePre, Overdrive, Grunge, Dark Side, Monster, Chipmunk, Lunar, Lo-Fi,Robot,Wizard,Alien, and Telephone.
Parameter 1 – Rotate the MIDRANGE knob to adjust the first parameter ofthe Voice type selected. (see Voice Parameter chart followingthese instructions)
Parameter 2 – Rotate the HIGH knob to adjust the second parameter of theVoice type selected. (see Voice Parameter chart following theseinstructions)
Level - Rotate the MASTER LEVEL knob to controls the preset level for theselected model.
Voice Parameters Character Param 1 Display Param 2 DisplayTube Pre Gain gain De-Esser de ess
Overdrive Gain gain De-Esser de ess
Input Level EqualizerMic Pre / VoiceCompressor
Noise Gate Effects Delay Reverb VolumePedal - Post
VolumePedal - Pre
8
Vocal 300 Manual 11/20/01 8:23 AM Page 8
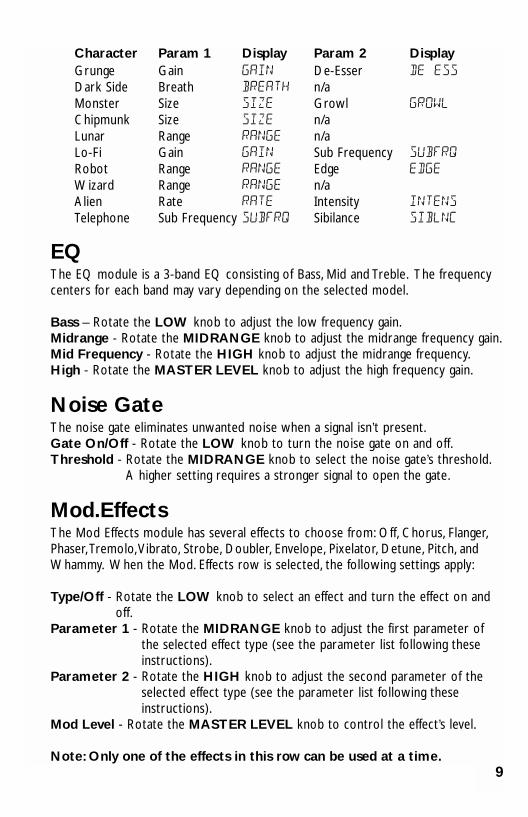
Character Param 1 Display Param 2 DisplayGrunge Gain gain De-Esser de ess
Dark Side Breath breath n/aMonster Size size Growl growl
Chipmunk Size size n/aLunar Range range n/aLo-Fi Gain gain Sub Frequency subfrq
Robot Range range Edge edge
Wizard Range range n/aAlien Rate rate Intensity intens
Telephone Sub Frequency subfrq Sibilance siblnc
EQ The EQ module is a 3-band EQ consisting of Bass, Mid and Treble. The frequencycenters for each band may vary depending on the selected model.
Bass – Rotate the LOW knob to adjust the low frequency gain.Midrange - Rotate the MIDRANGE knob to adjust the midrange frequency gain.Mid Frequency - Rotate the HIGH knob to adjust the midrange frequency.High - Rotate the MASTER LEVEL knob to adjust the high frequency gain.
Noise GateThe noise gate eliminates unwanted noise when a signal isn’t present.Gate On/Off - Rotate the LOW knob to turn the noise gate on and off.Threshold - Rotate the MIDRANGE knob to select the noise gate’s threshold.
A higher setting requires a stronger signal to open the gate.
Mod.EffectsThe Mod Effects module has several effects to choose from: Off, Chorus, Flanger,Phaser,Tremolo,Vibrato, Strobe, Doubler, Envelope, Pixelator, Detune, Pitch, andWhammy. When the Mod. Effects row is selected, the following settings apply:
Type/Off - Rotate the LOW knob to select an effect and turn the effect on andoff.
Parameter 1 - Rotate the MIDRANGE knob to adjust the first parameter ofthe selected effect type (see the parameter list following theseinstructions).
Parameter 2 - Rotate the HIGH knob to adjust the second parameter of theselected effect type (see the parameter list following theseinstructions).
Mod Level - Rotate the MASTER LEVEL knob to control the effect’s level.
Note: Only one of the effects in this row can be used at a time.9
Vocal 300 Manual 11/20/01 8:23 AM Page 9

Mod ParametersEffect Parameter 1 Parameter 2 Mod LevelChorus Speed Depth wet levelFlanger Speed Depth wet/dry mixPhaser Speed Depth wet/dry mixTremolo Speed Depth n/aVibrato Speed Depth n/aStrobe Speed Depth n/aDoubler n/a n/a wet levelEnvelope Range Sensitivity wet/dry mixPixelator Amount Speed wet/dry mixDetune Amount n/a wet levelPitch Amount n/a wet/dry mixWhammy Amount Whammy Amount wet/dry mix
DelayDelay records a portion of the incoming signal, and plays it back a short time later.The recording can repeat just once or several times. The Delay module has threetypes of delay effects: Digital,Analog, and Ping Pong.
Type /Off - Rotate the LOW knob to select the delay type and to turn the delayon and off.
Delay Time - Rotate the MIDRANGE knob to select the delay time.Feedback - Rotate the HIGH knob to select the number of delay repeats and
the repeat hold.Delay Level - Rotate the MASTER LEVEL knob to adjust the delay effect level.
ReverbUsing reverb in recorded program material gives the listener a sense that thematerial is being performed in an actual room or hall. This similarity to actualacoustic space makes reverberation a useful tool in recorded music.Type/Off - Rotate the LOW knob to select 1 of 8 reverb types and to turn the
reverb on and off.Decay - Rotate the MIDRANGE knob to adjust the reverb decay time.Damping - Rotate the HIGH knob to adjust the amount of high frequency
damping in the reverb signal.Reverb Level - Rotate the MASTER LEVEL knob to adjust the effect’s input
level.
10
Vocal 300 Manual 11/20/01 8:23 AM Page 10
Appendix
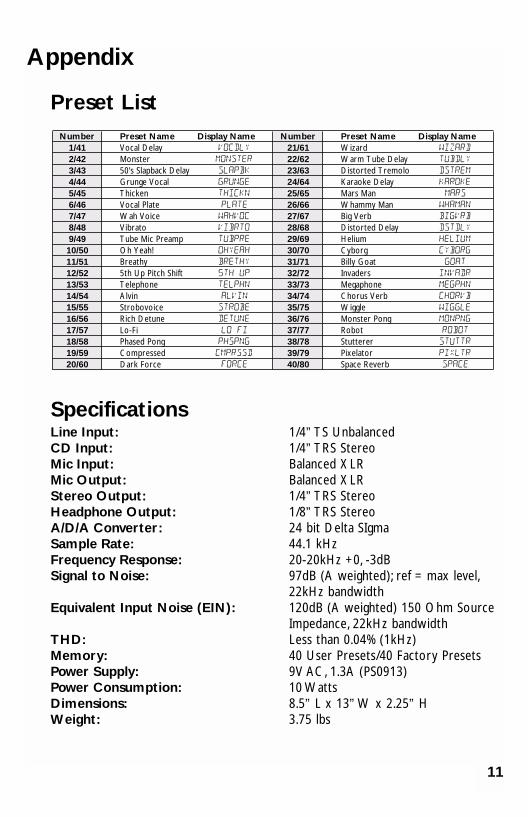
Preset List
SpecificationsLine Input: 1/4” TS UnbalancedCD Input: 1/4” TRS StereoMic Input: Balanced XLR Mic Output: Balanced XLR Stereo Output: 1/4” TRS Stereo Headphone Output: 1/8” TRS StereoA/D/A Converter: 24 bit Delta SIgmaSample Rate: 44.1 kHzFrequency Response: 20-20kHz +0, -3dBSignal to Noise: 97dB (A weighted); ref = max level,
22kHz bandwidthEquivalent Input Noise (EIN): 120dB (A weighted) 150 Ohm Source
Impedance, 22kHz bandwidth THD: Less than 0.04% (1kHz)Memory: 40 User Presets/40 Factory PresetsPower Supply: 9V AC, 1.3A (PS0913)Power Consumption: 10 WattsDimensions: 8.5” L x 13” W x 2.25” HWeight: 3.75 lbs
Number Preset Name Display Name Number Preset Name Display Name1/41 Vocal Delay vocdly 21/61 Wizard wizard
2/42 Monster monster 22/62 Warm Tube Delay tubdly
3/43 50's Slapback Delay slapbk 23/63 Distorted Tremolo dstrem
4/44 Grunge Vocal grunge 24/64 Karaoke Delay karoke
5/45 Thicken thickn 25/65 Mars Man mars
6/46 Vocal Plate plate 26/66 Whammy Man whaman
7/47 Wah Voice wahvoc 27/67 Big Verb bigvrb
8/48 Vibrato vibrto 28/68 Distorted Delay dstdly
9/49 Tube Mic Preamp tubpre 29/69 Helium helium
10/50 Oh Yeah! ohyeah 30/70 Cyborg cyborg
11/51 Breathy brethy 31/71 Billy Goat goat
12/52 5th Up Pitch Shift 5th up 32/72 Invaders invadr
13/53 Telephone telphn 33/73 Megaphone megphn
14/54 Alvin alvin 34/74 Chorus Verb chorvb
15/55 Strobovoice strobe 35/75 Wiggle wiggle
16/56 Rich Detune detune 36/76 Monster Pong monpng
17/57 Lo-Fi lo fi 37/77 Robot robot
18/58 Phased Pong phspng 38/78 Stutterer stuttr
19/59 Compressed cmprssd 39/79 Pixelator pixltr
20/60 Dark Force force 40/80 Space Reverb space
11
Vocal 300 Manual 11/20/01 8:23 AM Page 11

DigiTech8760 S. Sandy Parkway, Sandy, Utah 84070PH (801) 566-8800 FAX (801) 566-7005
International Distribution8760 S. Sandy Parkway, Sandy, Utah 84070
USAPH (801) 566-8800 FAX (801) 566-7005
DigiTech and Vocal 300 are trade marks of the Harman Music Group Inc.
Copyright the Harman Music Group
Printed in the USA 10/2001
Manufactured in the USA
Vocal 300 Owners Manual 18-1316-A
Please visit DigiTech on the World Wide Webat:
http://www.digitech.com
A Harman International Company
Vocal 300 Manual 11/20/01 8:23 AM Page 12