VMware vCenter Server 6.0 Deployment Guide - White Paper ...
100
VMware vCenter Server ™ 6.0 Deployment Guide TECHNICAL WHITE PAPER V 1.0/FEBRUARY 2015/MIKE BROWN
Transcript of VMware vCenter Server 6.0 Deployment Guide - White Paper ...

VMware vCenter Server™ 6.0 Deployment GuideT E C H N I C A L W H I T E P A P E R
V 1 . 0 / F E B R U A R Y 2 0 1 5 / M I K E B R O W N

VMware vCenter Server 6.0 Deployment Guide
T E C H N I C A L W H I T E P A P E R / 2
Table of Contents
Introduction . . . . . . . . . . . . . . . . . . . . . . . . . . . . . . . . . . . . . . . . . . . . . . . . . . . . . . . . . . . . . . . . . . 4
VMware vCenter Server 6.0 Services . . . . . . . . . . . . . . . . . . . . . . . . . . . . . . . . . . . . . . . . . . . . 4
Requirements . . . . . . . . . . . . . . . . . . . . . . . . . . . . . . . . . . . . . . . . . . . . . . . . . . . . . . . . . . . . . . . . . 5
General . . . . . . . . . . . . . . . . . . . . . . . . . . . . . . . . . . . . . . . . . . . . . . . . . . . . . . . . . . . . . . . . . . . . . . .5
Windows Installation . . . . . . . . . . . . . . . . . . . . . . . . . . . . . . . . . . . . . . . . . . . . . . . . . . . . . . . . . . .5
Appliance Deployment . . . . . . . . . . . . . . . . . . . . . . . . . . . . . . . . . . . . . . . . . . . . . . . . . . . . . . . . .6
Reference Architectures . . . . . . . . . . . . . . . . . . . . . . . . . . . . . . . . . . . . . . . . . . . . . . . . . . . . . . . .7
Fresh Embedded Deployment . . . . . . . . . . . . . . . . . . . . . . . . . . . . . . . . . . . . . . . . . . . . . . . . . . 7
Upgrade in Which All vCenter Server Components Are Installed on a Single Machine . . . . 8
Fresh External Deployment . . . . . . . . . . . . . . . . . . . . . . . . . . . . . . . . . . . . . . . . . . . . . . . . . . . .8
Upgrade External vCenter Single Sign-On . . . . . . . . . . . . . . . . . . . . . . . . . . . . . . . . . . . . . .10
Fresh vCenter Single Sign-On High Availability Deployment . . . . . . . . . . . . . . . . . . . . .10
Upgrade of vCenter Single Sign-On High Availability . . . . . . . . . . . . . . . . . . . . . . . . . . . 12
Deploying vCenter Server 6.0 . . . . . . . . . . . . . . . . . . . . . . . . . . . . . . . . . . . . . . . . . . . . . . . . . . 13
Fresh Embedded Deployment . . . . . . . . . . . . . . . . . . . . . . . . . . . . . . . . . . . . . . . . . . . . . . . . .13
Windows Deployment . . . . . . . . . . . . . . . . . . . . . . . . . . . . . . . . . . . . . . . . . . . . . . . . . . . . . .13
vCenter Server Appliance Deployment . . . . . . . . . . . . . . . . . . . . . . . . . . . . . . . . . . . . . . . . .16
Upgrade in Which All vCenter Server Components Are Installed on a Single Machine . . .21
Windows Upgrade . . . . . . . . . . . . . . . . . . . . . . . . . . . . . . . . . . . . . . . . . . . . . . . . . . . . . . . . .21
vCenter Server Appliance Upgrade . . . . . . . . . . . . . . . . . . . . . . . . . . . . . . . . . . . . . . . . . . . .25
Fresh External Platform Services Controller Deployment . . . . . . . . . . . . . . . . . . . . . . . 28
Windows Deployment . . . . . . . . . . . . . . . . . . . . . . . . . . . . . . . . . . . . . . . . . . . . . . . . . . . . . 28
vCenter Server Appliance Deployment . . . . . . . . . . . . . . . . . . . . . . . . . . . . . . . . . . . . . . . . .33
Fresh External vCenter Server Deployment . . . . . . . . . . . . . . . . . . . . . . . . . . . . . . . . . . . . .37
Windows Deployment . . . . . . . . . . . . . . . . . . . . . . . . . . . . . . . . . . . . . . . . . . . . . . . . . . . . . .37
vCenter Server Appliance Deployment . . . . . . . . . . . . . . . . . . . . . . . . . . . . . . . . . . . . . . . . .41
Upgrade External vCenter Single Sign-On . . . . . . . . . . . . . . . . . . . . . . . . . . . . . . . . . . . . . 46
Fresh vCenter Single Sign-On High Availability Deployment . . . . . . . . . . . . . . . . . . . . .53
Windows Deployment . . . . . . . . . . . . . . . . . . . . . . . . . . . . . . . . . . . . . . . . . . . . . . . . . . . . . .53
vCenter Server Appliance Deployment . . . . . . . . . . . . . . . . . . . . . . . . . . . . . . . . . . . . . . . . 60
Upgrade of vCenter Single Sign-On High Availability . . . . . . . . . . . . . . . . . . . . . . . . . . . 68
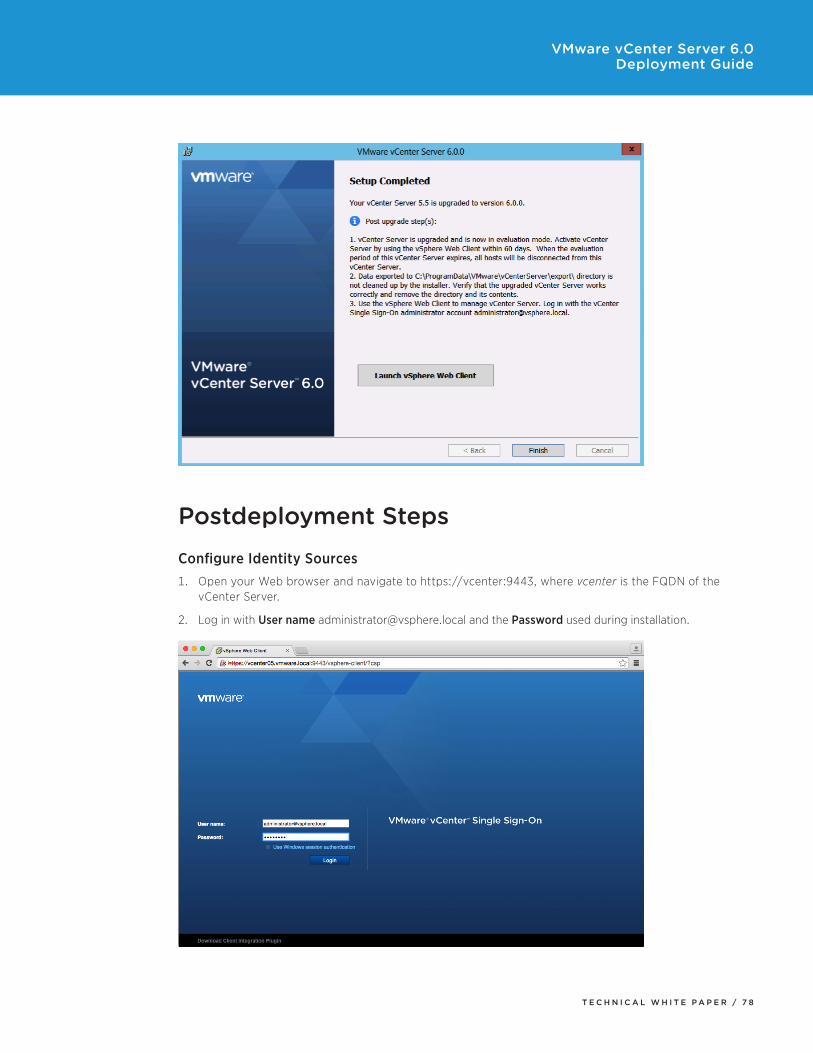
Postdeployment Steps . . . . . . . . . . . . . . . . . . . . . . . . . . . . . . . . . . . . . . . . . . . . . . . . . . . . . . . . 78
Configure Identity Sources . . . . . . . . . . . . . . . . . . . . . . . . . . . . . . . . . . . . . . . . . . . . . . . . . . . .78
License Management . . . . . . . . . . . . . . . . . . . . . . . . . . . . . . . . . . . . . . . . . . . . . . . . . . . . . . . . .82
Global Permissions . . . . . . . . . . . . . . . . . . . . . . . . . . . . . . . . . . . . . . . . . . . . . . . . . . . . . . . . . . 84

VMware vCenter Server 6.0 Deployment Guide
T E C H N I C A L W H I T E P A P E R / 3
Certificate Management . . . . . . . . . . . . . . . . . . . . . . . . . . . . . . . . . . . . . . . . . . . . . . . . . . . . . . 88
Make the VMCA a Subordinate Certificate Authority . . . . . . . . . . . . . . . . . . . . . . . . . . . 88
Appendix . . . . . . . . . . . . . . . . . . . . . . . . . . . . . . . . . . . . . . . . . . . . . . . . . . . . . . . . . . . . . . . . . . . . 90
Configure the F5 BIG-IP Load Balancer . . . . . . . . . . . . . . . . . . . . . . . . . . . . . . . . . . . . . . . 90
Scripted vCenter Server Installations . . . . . . . . . . . . . . . . . . . . . . . . . . . . . . . . . . . . . . . . . . 98
References . . . . . . . . . . . . . . . . . . . . . . . . . . . . . . . . . . . . . . . . . . . . . . . . . . . . . . . . . . . . . . . . . . 99
Additional Resources . . . . . . . . . . . . . . . . . . . . . . . . . . . . . . . . . . . . . . . . . . . . . . . . . . . . . . . . . 99
About the Author . . . . . . . . . . . . . . . . . . . . . . . . . . . . . . . . . . . . . . . . . . . . . . . . . . . . . . . . . . . . 99
T E C H N I C A L W H I T E P A P E R / 4
VMware vCenter Server 6.0 Deployment Guide
IntroductionThe VMware vCenter Server™ 6.0 release introduces new, simplified deployment models. The components that make up a vCenter Server installation have been grouped into two types: embedded and external. Embedded refers to a deployment in which all components—this can but does not necessarily include the database—are installed on the same virtual machine. External refers to a deployment in which vCenter Server is installed on one virtual machine and the Platform Services Controller (PSC) is installed on another. The Platform Services Controller is new to vCenter Server 6.0 and comprises VMware vCenter™ Single Sign-On™, licensing, and the VMware Certificate Authority (VMCA).
Embedded installations are recommended for standalone environments in which there is only one vCenter Server system and replication to another Platform Services Controller is not required. If there is a need to replicate with other Platform Services Controllers or there is more than one vCenter Single Sign-On enabled solution, deploying the Platform Services Controller(s) on separate virtual machine(s)—via external deployment—from vCenter Server is required.
This paper defines the services installed as part of each deployment model, recommended deployment models (reference architectures), installation and upgrade instructions for each reference architecture, postdeployment steps, and certificate management in VMware vSphere 6.0.
VMware vCenter Server 6.0 Services
SERVICE INSTALLED WITH
VMware AFD Service vCenter Server and PSC
VMware Certificate Service PSC
VMware Component Manager vCenter Server and PSC
VMware Content Library Service vCenter Server
VMware Directory Service PSC
VMware ESX Agent Manager vCenter Server
VMware HTTP Reverse Proxy vCenter Server and PSC
VMware Identity Management Service PSC
VMware vCenter Inventory Service vCenter Server
VMware License Service PSC
VMware Message Bus Configuration Service vCenter Server
VMware Performance Charts vCenter Server
VMware Postgres vCenter Server (vCenter Server Appliance, Microsoft Windows if embedded database is chosen)
VMware Security Token Service PSC
VMware Service Control Agent vCenter Server and PSC
VMware Syslog Collector vCenter Server
VMware System and Hardware Health Manager vCenter Server
VMware vAPI Endpoint vCenter Server

T E C H N I C A L W H I T E P A P E R / 5
VMware vCenter Server 6.0 Deployment Guide
SERVICE INSTALLED WITH
VMware vCenter Configuration Service vCenter Server and PSC
VMware vCenter Workflow Manager vCenter Server
VMware VirtualCenter Server vCenter Server
VMware vService Manager vCenter Server
VMware vSphere Auto Deploy Waiter vCenter Server
VMware vSphere ESXi™ Dump Collector vCenter Server
VMware vSphere ESXi Dump Collector Web Service vCenter Server
VMware vSphere Profile-Driven Storage vCenter Server
VMware vSphere Web Client vCenter Server
Table 1. vCenter Server and Platform Services Controller Services
RequirementsGeneralA few requirements are common to both installing vCenter Server on Microsoft Windows and deploying VMware vCenter Server Appliance™. Ensure that all of these prerequisites are in place before proceeding with a new installation or an upgrade.
•DNS–Ensurethatresolutionisworkingforallsystemnamesviafullyqualifieddomainname(FQDN),short name (host name), and IP address (reverse lookup).
•Time–Ensurethattimeissynchronizedacrosstheenvironment.
•Passwords–vCenterSingleSign-OnpasswordsmustcontainonlyASCIIcharacters;non-ASCIIandextended(or high) ASCII characters are not supported.
Windows InstallationInstalling vCenter Server 6.0 on a Windows Server requires a Windows 2008 SP2 or higher 64-bit operating system (OS). Two options are presented: Use the local system account or use a Windows domain account. With a Windows domain account, ensure that it is a member of the local computer’s administrator group and that it has been delegated the “Log on as a service” right and the “Act as part of the operating system” right. This option is not available when installing an external Platform Services Controller.
WindowsinstallationscanuseeitherasupportedexternaldatabaseoralocalPostgreSQLdatabasethatisinstalled with vCenter Server and is limited to 20 hosts and 200 virtual machines. Supported external databasesincludeMicrosoftSQLServer2008R2,SQLServer2012,SQLServer2014,OracleDatabase11g, andOracleDatabase12c.WhenupgradingtovCenterServer6.0,ifSQLServerExpresswasusedinthepreviousinstallation,itwillbereplacedwithPostgreSQL.Externaldatabasesrequirea64-bitDSN.DSNaliasesarenot supported.
When upgrading vCenter Server to vCenter Server 6.0, only versions 5.0 and later are supported. If the vCenter Server system being upgraded is not version 5.0 or later, such an upgrade is required first.
Table2outlinesminimumhardwarerequirementsperdeploymentenvironmenttypeandsizewhenusinganexternaldatabase.IfVMwarevSphereUpdateManager™isinstalledonthesameserver,add125GBofdiskspaceand4GBofRAM.

T E C H N I C A L W H I T E P A P E R / 6
VMware vCenter Server 6.0 Deployment Guide
RESOURCES TINY:UP TO 10 HOSTS/100 VIRTUAL MACHINES OR EXTERNAL PSC
SMALL:UP TO 100 HOSTS/1 ,000 VIRTUAL MACHINES
MEDIUM:UP TO 400 HOSTS/4,000 VIRTUAL MACHINES
LARGE:UP TO 1 ,000 HOSTS/10,000 VIRTUAL MACHINES
CPU 2 4 8 16
Memory 8GB 16GB 24GB 32GB
Disk Space 50GB 10GB(PSC)
100GB 100GB 100GB
Table 2. Minimum Hardware Requirements – Windows Installation
Appliance DeploymentvCenterServerAppliancecanuseeitheralocalPostgreSQLdatabasethatisbuiltintotheappliance,whichisrecommended,oranexternaldatabase.UnlikeWindowssupportforPostgreSQL,vCenterServerAppliancesupportsupto1,000hostsor10,000virtualmachinesatfullvCenterServerscale.SupportedexternaldatabasesincludeOracleDatabase11gandOracleDatabase12c. External database support is being deprecated inthisrelease;thisisthelastreleasethatsupportstheuseofanexternaldatabasewithvCenterServerAppliance.
When deploying vCenter Server Appliance, the target host must be ESXi 5.0 or later. In addition, prechecks suchasconnectivitytoanexternaldatabase,NTPserver,DNSserver,andsoon,areperformedontheclientdeploying the appliance rather than against the target host and destination port group. This does not ensure that all required connectivity is available from the ESXi host and the destination port group of vCenter Server Appliance. Users must ensure that the ESXi host and port group have the required connectivity.
Upgradingispossibleonlyfromversions5.1update3andlater.
Table3outlinesminimumhardwarerequirementsperdeploymentenvironmenttypeandsize.
RESOURCES TINY:UP TO 10 HOSTS/100 VIRTUAL MACHINES OR EXTERNAL PSC
SMALL:UP TO 100 HOSTS/1 ,000 VIRTUAL MACHINES
MEDIUM:UP TO 400 HOSTS/4,000 VIRTUAL MACHINES
LARGE:UP TO 1 ,000 HOSTS/10,000 VIRTUAL MACHINES
CPU 2 4 8 16
Memory 8GB 16GB 24GB 32GB
Disk Space (External PSC)
86GB(vCenter) 30GB(PSC)
106GB 245GB 295GB
Disk Space (Embedded PSC)
116GB 136GB 275GB 325GB
Table 3. Minimum Hardware Requirements – vCenter Server Appliance Deployment

T E C H N I C A L W H I T E P A P E R / 7
VMware vCenter Server 6.0 Deployment Guide
Reference ArchitecturesWe examine the following architectures in this deployment guide:
•Freshembeddeddeployment
•UpgradeinwhichallvCenterServercomponentsareinstalledonasinglemachine
•Freshexternaldeployments
•UpgradewithexternalvCenterSingleSign-On
•FreshvCenterSingleSign-Onhighavailabilitydeployment
•UpgradeofvCenterSingleSign-Onhighavailability
Fresh Embedded DeploymentA fresh, or new, embedded installation is the simplest of all the deployments. In this scenario, vCenter Server and the Platform Services Controller are deployed together onto a single virtual machine.
ThevCenterServerdatabasecanbeeitherlocalorremote.OntheWindowsplatform,thelocalPostgreSQLdatabase is limited to 20 hosts and 200 virtual machines.
Embedded installations are recommended for standalone environments in which there is only one vCenter Server and replication to another Platform Services Controller is not required. If there is a need to replicate with other Platform Services Controllers or there is more than one vCenter Single Sign-On enabled solution, deploying the Platform Services Controller(s) on separate virtual machine(s)—via external deployment—from vCenter Server is required.
vCenterServer
PlatformServices
Controller
vCenter Server Database
vCenter Server Virtual Machine
Figure 1. Embedded Architecture

T E C H N I C A L W H I T E P A P E R / 8
VMware vCenter Server 6.0 Deployment Guide
Upgrade in Which All vCenter Server Components Are Installed on a Single MachineUpgradingvCenterServer5.0orvCenterServerwithvCenterSingleSign-On—thatis,vCenterServer5.1or5.5—installed on the same virtual machine can be accomplished using the embedded deployment method.
All vCenter Server components are upgraded. If upgrading from vCenter Server 5.0, an external Platform Services Controller can be installed or an embedded one can be used. vCenter Single Sign-On in vCenter Server 5.1and5.5isupgradedtoaPlatformServicesController.Inallupgradescenarios,allserviceslistedinTable1areinstalled or upgraded.
The vCenter Server database is upgraded during vCenter Server upgrade. On Windows installations using the embeddedSQLServerExpressdatabase,SQLServerExpressismigratedtothePostgreSQLdatabaseduringthe upgrade.
vCenterServer
vCenterSingle Sign-On
vSphereWeb Client
vCenterInventoryService
vCenter Server Database
vCenter Server Virtual Machine
vCenter Server Database
vCenter Server Virtual Machine
vCenterServer
PlatformServices
Controller
Figure 2. Upgraded Embedded Architecture
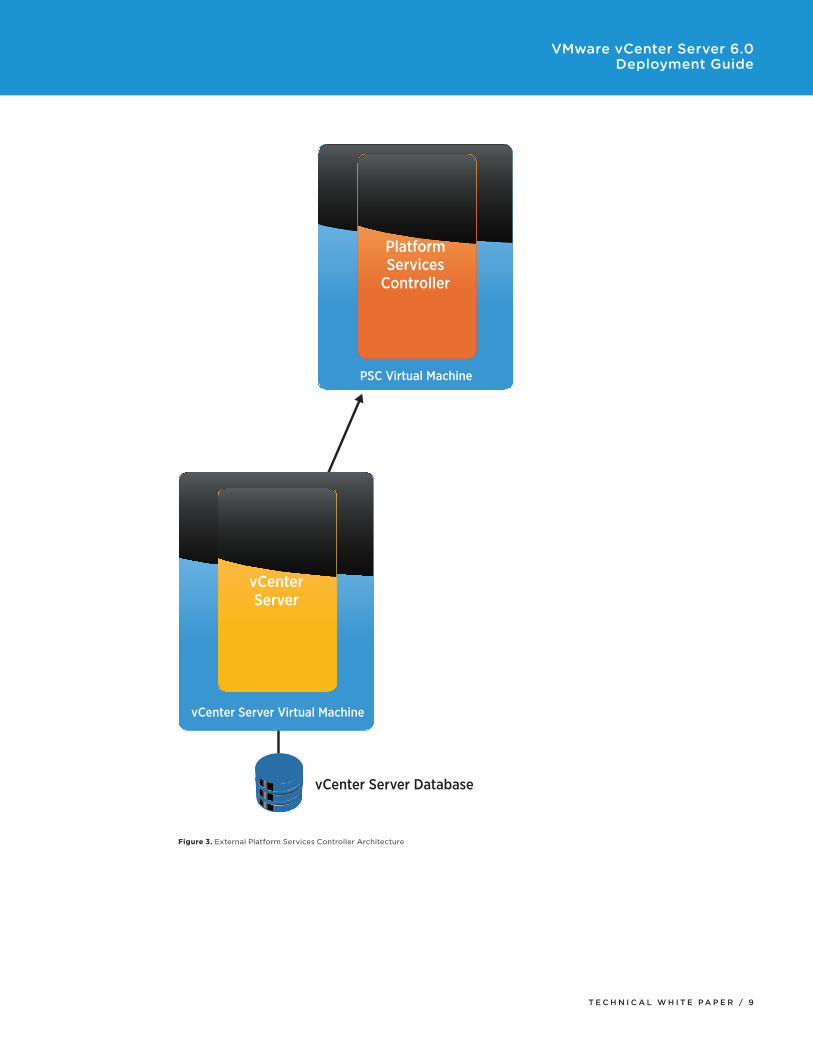
Fresh External DeploymentAfresh,ornew,externaldeploymentinvolvesrunningthedeploymentwizardtwice.Thefirsttimeistodeploythe Platform Services Controller. After this successful deployment, vCenter Server is deployed.
ThevCenterServerdatabasecanbeeitherlocalorremote.OntheWindowsplatform,thelocalPostgreSQLdatabase is limited to 20 hosts and 200 virtual machines.
Deploying the Platform Services Controller externally is recommended for all but standalone vCenter Server systems.
T E C H N I C A L W H I T E P A P E R / 9
VMware vCenter Server 6.0 Deployment Guide
vCenter Server Database
vCenter Server Virtual Machine
PSC Virtual Machine
vCenterServer
PlatformServices
Controller
Figure 3. External Platform Services Controller Architecture

T E C H N I C A L W H I T E P A P E R / 1 0
VMware vCenter Server 6.0 Deployment Guide
Upgrade External vCenter Single Sign-OnWhenupgradingfromvCenterServer5.1or5.5andvCenterSingleSign-OnisdeployedexternallyfromvCenterServer, vCenter Single Sign-On is first upgraded to a Platform Services Controller. After the Platform Services Controller has been deployed, the vCenter Server system can be upgraded.
The vCenter Server database is upgraded during the vCenter Server upgrade. In Windows installations using the embeddedSQLServerExpressdatabase,SQLServerExpressismigratedtothePostgreSQLdatabaseduringthe upgrade.
vCenter Single Sign-On Virtual Machine
vCenterSingle Sign-On
PSC Virtual Machine
PlatformServices
Controller
vCenter Server Database
vCenter Server Virtual Machine
vCenter Server Database
vCenter Server Virtual Machine
vCenterServer
vCenterServer
vCenterInventoryService
vSphereWeb Client
Step 1
Step 2
Figure 4. Upgraded External Platform Services Controller Architecture
Fresh vCenter Single Sign-On High Availability DeploymentA fresh, or new, vCenter Single Sign-On high availability deployment is recommended when there are multiple vCenter Server systems or vCenter Single Sign-On enabled solutions that require a high level of uptime.
When deploying the Platform Services Controller externally for multiple services, availability of the Platform Services Controller must be considered. In some cases, simply having the Platform Services Controller located in a vSphere cluster with VMware vSphere High Availability enabled is sufficient. In other cases, having more than one Platform Services Controller deployed in a highly available architecture is recommended. This requires a network load balancer. In Figure 5, we examine redundant Platform Services Controllers behind a network load balancer.

T E C H N I C A L W H I T E P A P E R / 1 1
VMware vCenter Server 6.0 Deployment Guide
vCenter Server Database
vCenter Server Virtual Machine
vCenterServer
PSC Virtual Machine
PlatformServices
Controller
vCenter Server Database
vCenter Server Virtual Machine
vCenterServer
PSC Virtual Machine
PlatformServices
ControllerReplication
Network Load Balancer
Figure 5. Highly Available Platform Services Controllers

T E C H N I C A L W H I T E P A P E R / 1 2
VMware vCenter Server 6.0 Deployment Guide
Upgrade of vCenter Single Sign-On High AvailabilityUpgrading an existing vCenter Single Sign-On high availability deployment converts vCenter Single Sign-On servers to Platform Services Controllers. vCenter Single Sign-On 5.5 and previous versions do not work with vCenter Server 6.0, so upgrading vCenter Single Sign-On to Platform Services Controller is a prerequisite.
After the Platform Services Controllers are up and running, the load balancer rules must be adjusted to load-balance the Platform Services Controller ports before attempting to upgrade vCenter Server. Session affinity is required based on source address and must-span ports. If vCenter Server initiates communication to the Platform Services Controller on port 443 and is placed on the first Platform Services Controller, all subsequent requests must also go to the first Platform Services Controller.
Upgrading from vCenter Single Sign-On high availability has been tested and validated only when upgrading from vCenter Server 5.5 and when the vCenter Single Sign-On with network load balancer guide is followed to set up the vCenter Single Sign-On high availability environment.
PSC Virtual Machine
PlatformServices
Controller
vCenter ServerVirtual Machine
vCenterServer
PSC Virtual Machine
PlatformServices
ControllerReplication
Network Load Balancer
vCenter Single Sign-OnVirtual Machine
vCenterSingle Sign-On
vCenterSingle Sign-OnReplication
Network Load Balancer
Step 1
Step 2
vCenter Server Database
vCenter Server Virtual Machine
vCenterServer
vCenter Server Database
vCenter Single Sign-OnVirtual Machine
Figure 6. Upgrade of Highly Available Single Sign-On to Highly Available Platform Services Controller

T E C H N I C A L W H I T E P A P E R / 1 3
VMware vCenter Server 6.0 Deployment Guide
Deploying vCenter Server 6.0Fresh Embedded DeploymentWindows Deployment1. Verify all prerequisites.
2. If using a remote database, ensure that a 64-bit DSN has been created. DSN aliases are not supported. This step is not necessary if using the local PostgreSQL database.
3. Mount the vCenter Server 6.0 ISO image.
4. If autorun does not start, execute autorun.exe.
5. Select vCenter Server for Windows and click Install.
6. Click Next.
7. Accept the license agreements.
8. Select Embedded Deployment and click Next.

T E C H N I C A L W H I T E P A P E R / 1 4
VMware vCenter Server 6.0 Deployment Guide
9. Verify that the FQDN is correct and click Next.
10. Enter a password and Site name for vCenter Single Sign-On and click Next.
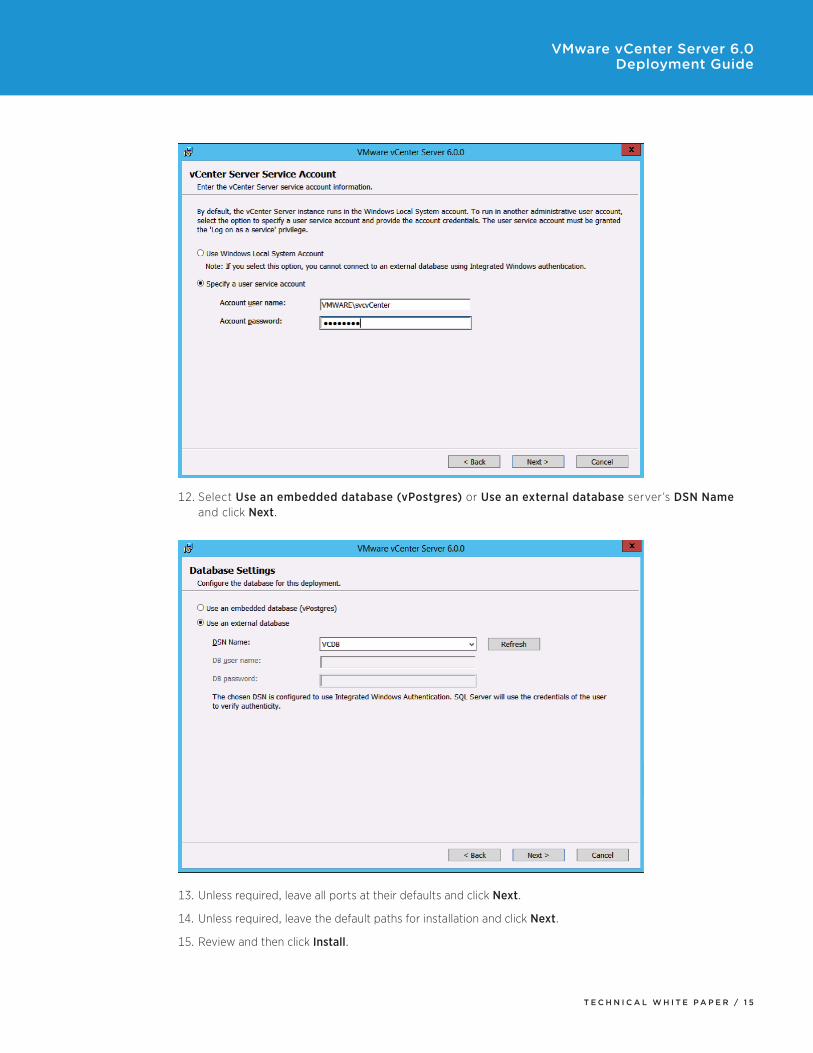
11. Select the local system account or enter the service account user name and password.
T E C H N I C A L W H I T E P A P E R / 1 5
VMware vCenter Server 6.0 Deployment Guide
12. Select Use an embedded database (vPostgres) or Use an external database server’s DSN Name and click Next.
13. Unless required, leave all ports at their defaults and click Next.
14. Unless required, leave the default paths for installation and click Next.
15. Review and then click Install.
T E C H N I C A L W H I T E P A P E R / 1 6
VMware vCenter Server 6.0 Deployment Guide
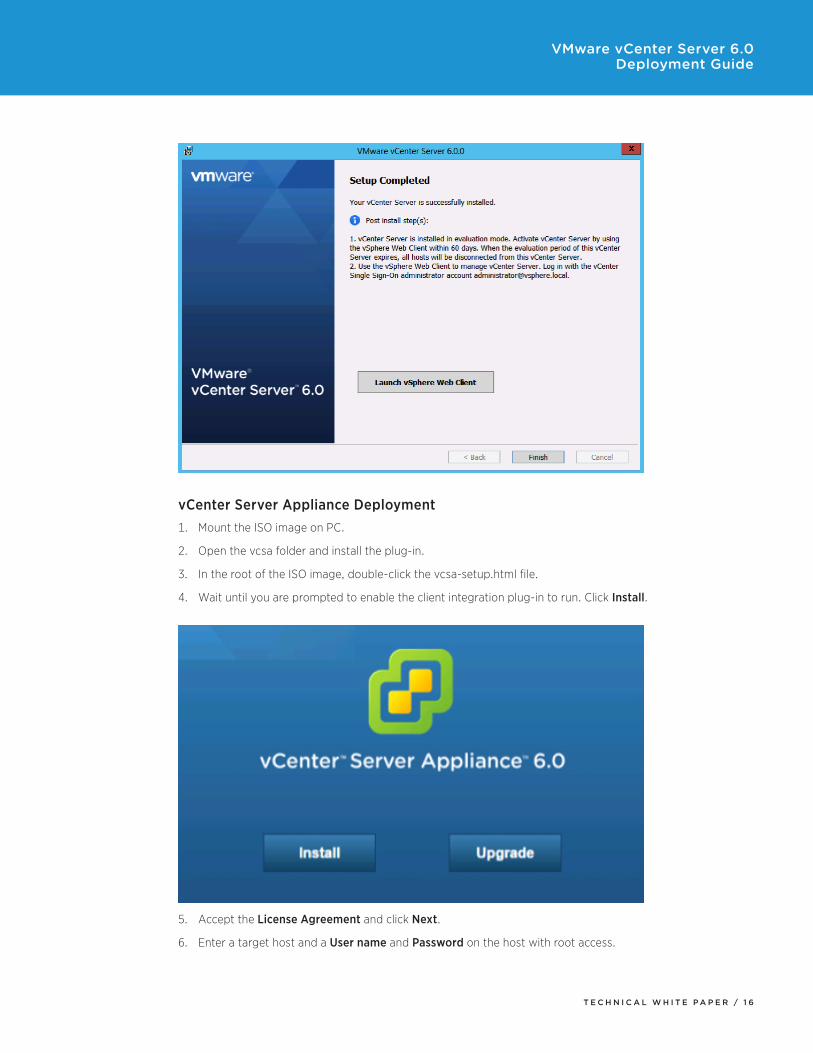
vCenter Server Appliance Deployment1. Mount the ISO image on PC.
2. Open the vcsa folder and install the plug-in.
3. In the root of the ISO image, double-click the vcsa-setup.html file.
4. Wait until you are prompted to enable the client integration plug-in to run. Click Install.
5. Accept the License Agreement and click Next.
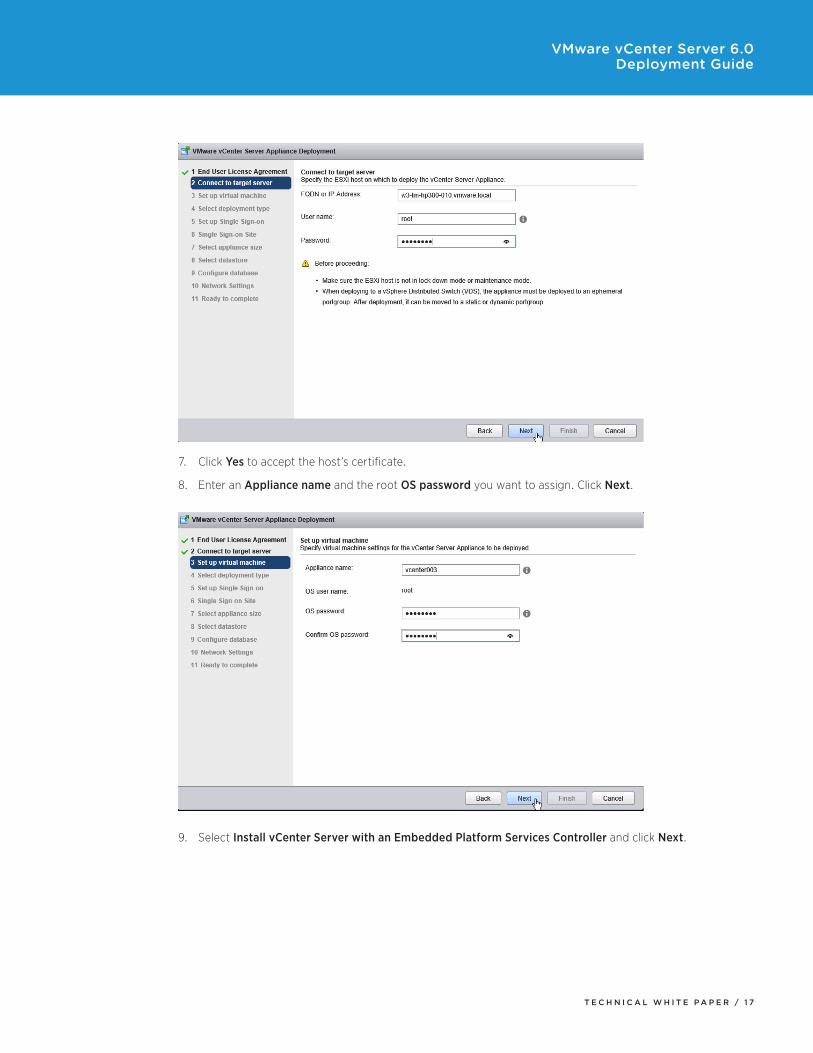
6. Enter a target host and a User name and Password on the host with root access.
T E C H N I C A L W H I T E P A P E R / 1 7
VMware vCenter Server 6.0 Deployment Guide
7. Click Yes to accept the host’s certificate.
8. Enter an Appliance name and the root OS password you want to assign. Click Next.
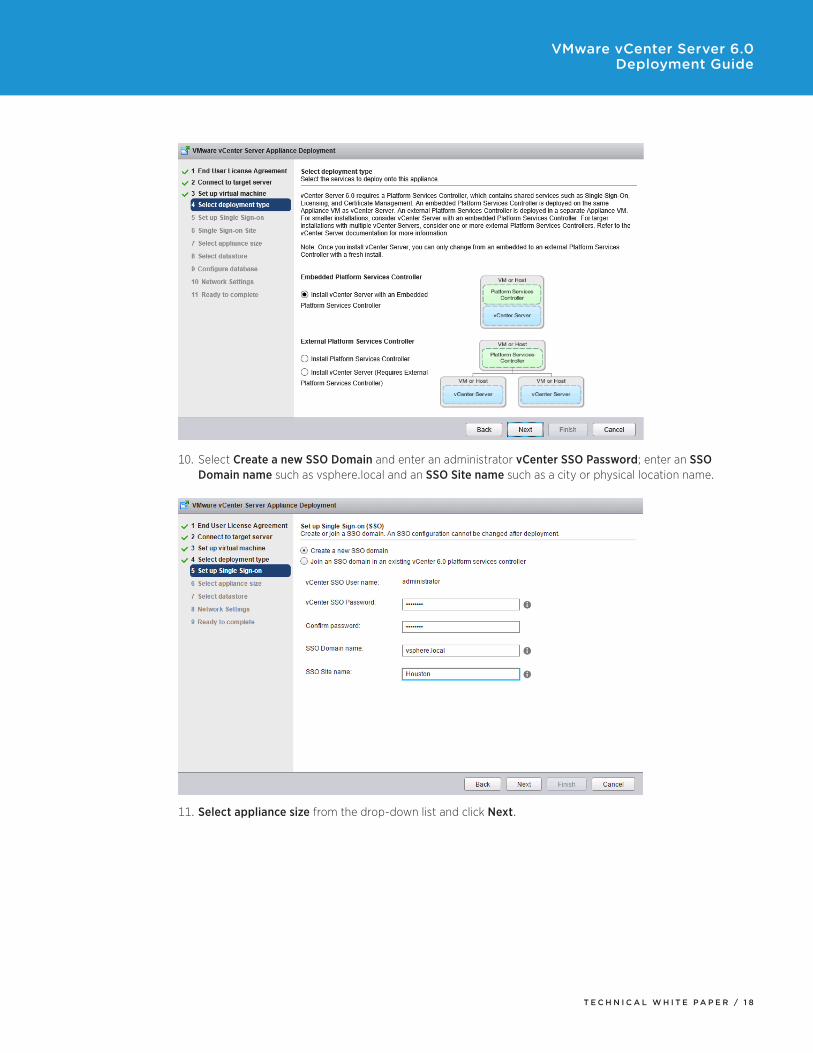
9. Select Install vCenter Server with an Embedded Platform Services Controller and click Next.
T E C H N I C A L W H I T E P A P E R / 1 8
VMware vCenter Server 6.0 Deployment Guide
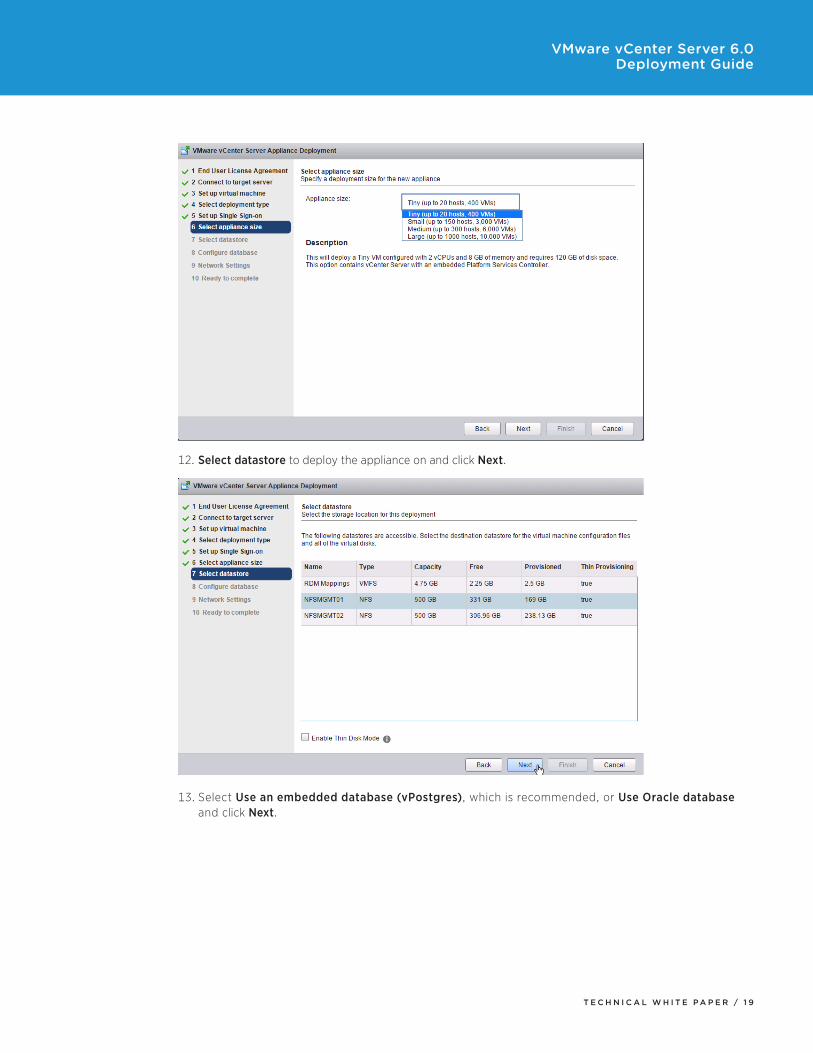
10. Select Create a new SSO Domain and enter an administrator vCenter SSO Password; enter an SSO Domain name such as vsphere.local and an SSO Site name such as a city or physical location name.
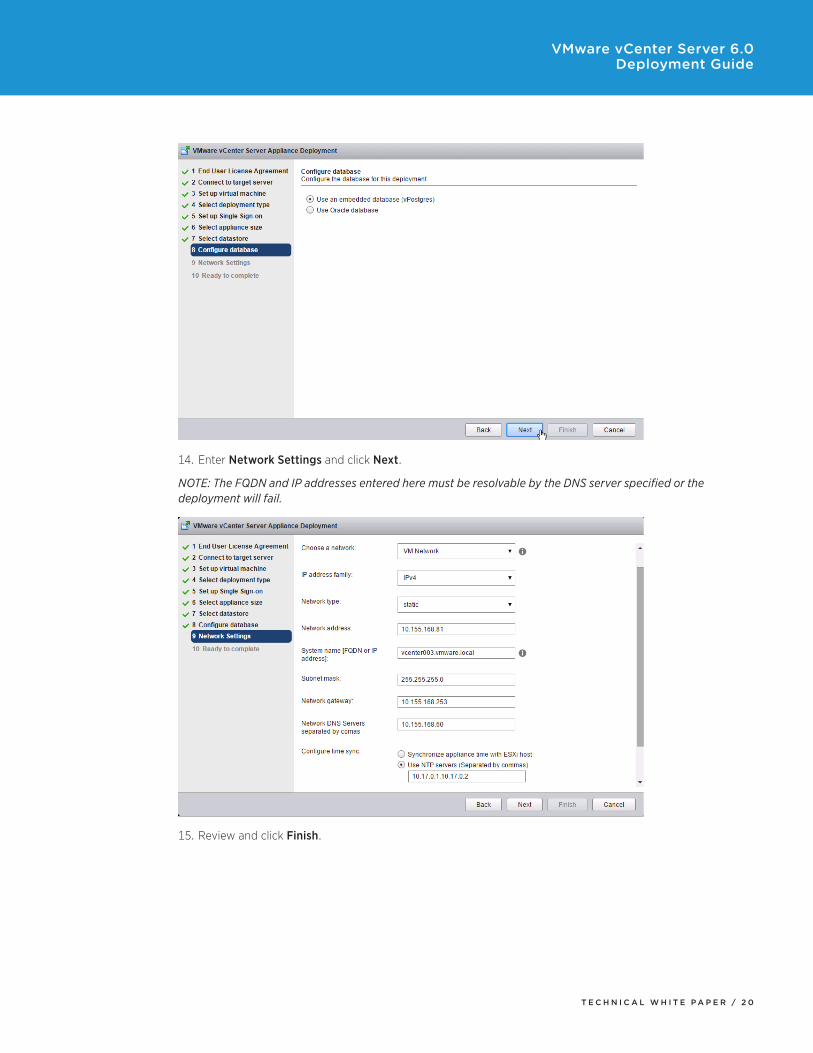
11. Select appliance size from the drop-down list and click Next.
T E C H N I C A L W H I T E P A P E R / 1 9
VMware vCenter Server 6.0 Deployment Guide
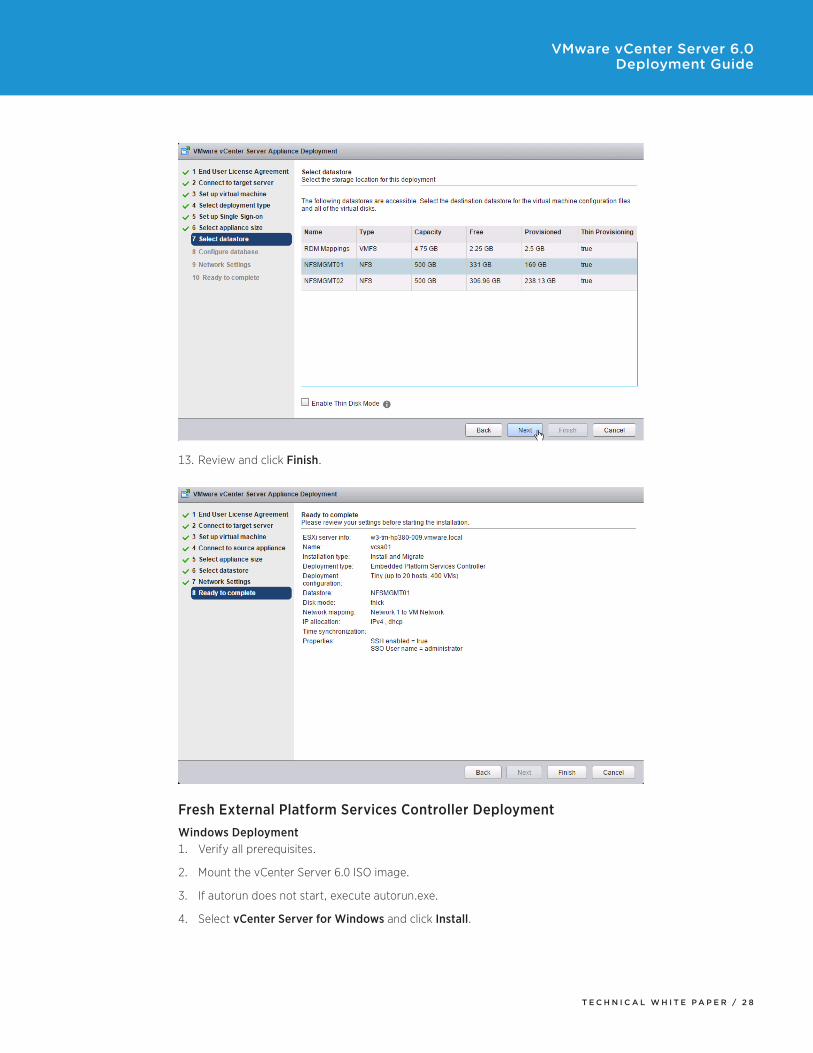
12. Select datastore to deploy the appliance on and click Next.
13. Select Use an embedded database (vPostgres), which is recommended, or Use Oracle database and click Next.
T E C H N I C A L W H I T E P A P E R / 2 0
VMware vCenter Server 6.0 Deployment Guide
14. Enter Network Settings and click Next.
NOTE: The FQDN and IP addresses entered here must be resolvable by the DNS server specified or the deployment will fail.
15. Review and click Finish.

T E C H N I C A L W H I T E P A P E R / 2 1
VMware vCenter Server 6.0 Deployment Guide
Upgrade in Which All vCenter Server Components Are Installed on a Single MachineWindows Upgrade1. Verify all prerequisites.
2. Mount the vCenter Server 6.0 ISO image.
3. If autorun does not start, execute autorun.exe.
4. Select vCenter Server for Windows and click Install.
5. Click Next.
6. Accept the license agreements.
7. Enter the vCenter Single Sign-On password and the service account password if applicable. Click Next.

T E C H N I C A L W H I T E P A P E R / 2 2
VMware vCenter Server 6.0 Deployment Guide
8. Wait for the pre-upgrade checks to complete.
9. Accept the default ports and click Next.

T E C H N I C A L W H I T E P A P E R / 2 3
VMware vCenter Server 6.0 Deployment Guide
10. Accept or change the installation paths as necessary. Click Next.
11. Check the box to verify that you have backed up this vCenter Server and its database. Click Upgrade.

T E C H N I C A L W H I T E P A P E R / 2 4
VMware vCenter Server 6.0 Deployment Guide
12. When completed, click Finish.

T E C H N I C A L W H I T E P A P E R / 2 5
VMware vCenter Server 6.0 Deployment Guide
vCenter Server Appliance Upgrade1. Mount the ISO image on PC.
2. Open the vcsa folder and install the plug-in.
3. In the root of the ISO image, double-click the vcsa-setup.html file.
4. Wait until you are prompted to enable the client integration plug-in to run. Click Upgrade.
5. Click OK to the supported upgrades pop-up.
6. Accept the license agreement and click Next.
7. Enter a target host and a User name and Password on the host with root access.

T E C H N I C A L W H I T E P A P E R / 2 6
VMware vCenter Server 6.0 Deployment Guide
8. Click Yes to accept the host’s certificate.
9. Enter an Appliance name and Enable SSH if required. Click Next.
10. Enter the vCenter Server version, FQDN, Password, vCenter SSO Port (443), ESXi host FQDN, user name, and password. Click Next.

T E C H N I C A L W H I T E P A P E R / 2 7
VMware vCenter Server 6.0 Deployment Guide
11. Select Appliance size from the drop-down list and click Next.
12. Select datastore to deploy the appliance on and click Next.
T E C H N I C A L W H I T E P A P E R / 2 8
VMware vCenter Server 6.0 Deployment Guide
13. Review and click Finish.
Fresh External Platform Services Controller DeploymentWindows Deployment1. Verify all prerequisites.
2. Mount the vCenter Server 6.0 ISO image.
3. If autorun does not start, execute autorun.exe.
4. Select vCenter Server for Windows and click Install.

T E C H N I C A L W H I T E P A P E R / 2 9
VMware vCenter Server 6.0 Deployment Guide
5. Click Next.
6. Accept the license agreements.
7. Select External Deployment Platform Services Controller and click Next.
8. Verify the system name and click Next.

T E C H N I C A L W H I T E P A P E R / 3 0
VMware vCenter Server 6.0 Deployment Guide
9. If this is the first Platform Services Controller, select Create a new vCenter Single Sign-On domain. If this is an additional Platform Services Controller, select Join a vCenter Single Sign-On domain.
a. For a new vCenter Single Sign-On domain, enter a password for the vCenter Single Sign-On administrator, a Domain name such as vsphere.local, and a Site name such as a city or physical building name.
b. To join an existing vCenter Single Sign-On domain, enter the FQDN of an existing Platform Services Controller and the vCenter Single Sign-On administrator’s password. Click Next. Choose a site to join from the drop-down list. Click Next.

T E C H N I C A L W H I T E P A P E R / 3 1
VMware vCenter Server 6.0 Deployment Guide
10. Accept the default ports and click Next.
11. Accept or change the installation paths as necessary. Click Next.
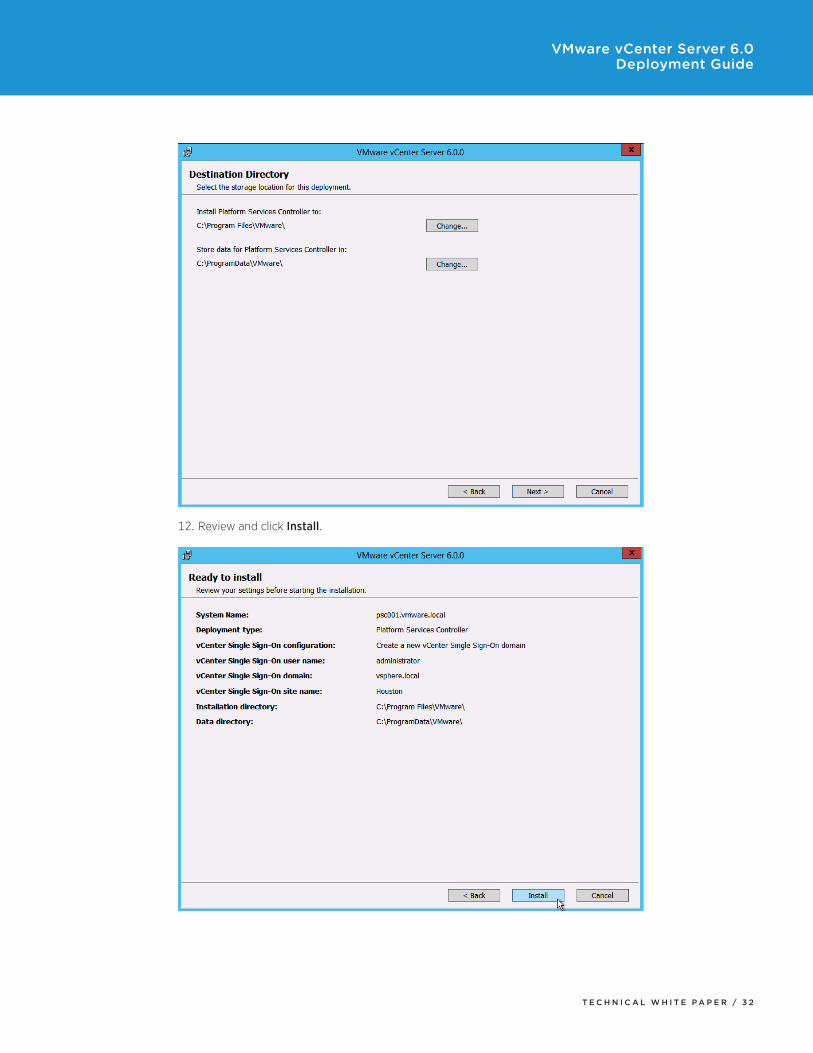
T E C H N I C A L W H I T E P A P E R / 3 2
VMware vCenter Server 6.0 Deployment Guide
12. Review and click Install.

T E C H N I C A L W H I T E P A P E R / 3 3
VMware vCenter Server 6.0 Deployment Guide
vCenter Server Appliance Deployment1. Mount the ISO image on a PC.
2. Open the vcsa folder and install the plug-in.
3. In the root of the ISO image, double-click the vcsa-setup.html file.
4. Wait until you are prompted to enable the client integration plug-in to run. Click Install.
5. Accept the license agreement and click Next.
6. Enter a target host and a User name and Password on the host with root access.
7. Click Yes to accept the host’s certificate.
8. Enter an Appliance name and the root password you want to assign. Click Next.
T E C H N I C A L W H I T E P A P E R / 3 4
VMware vCenter Server 6.0 Deployment Guide
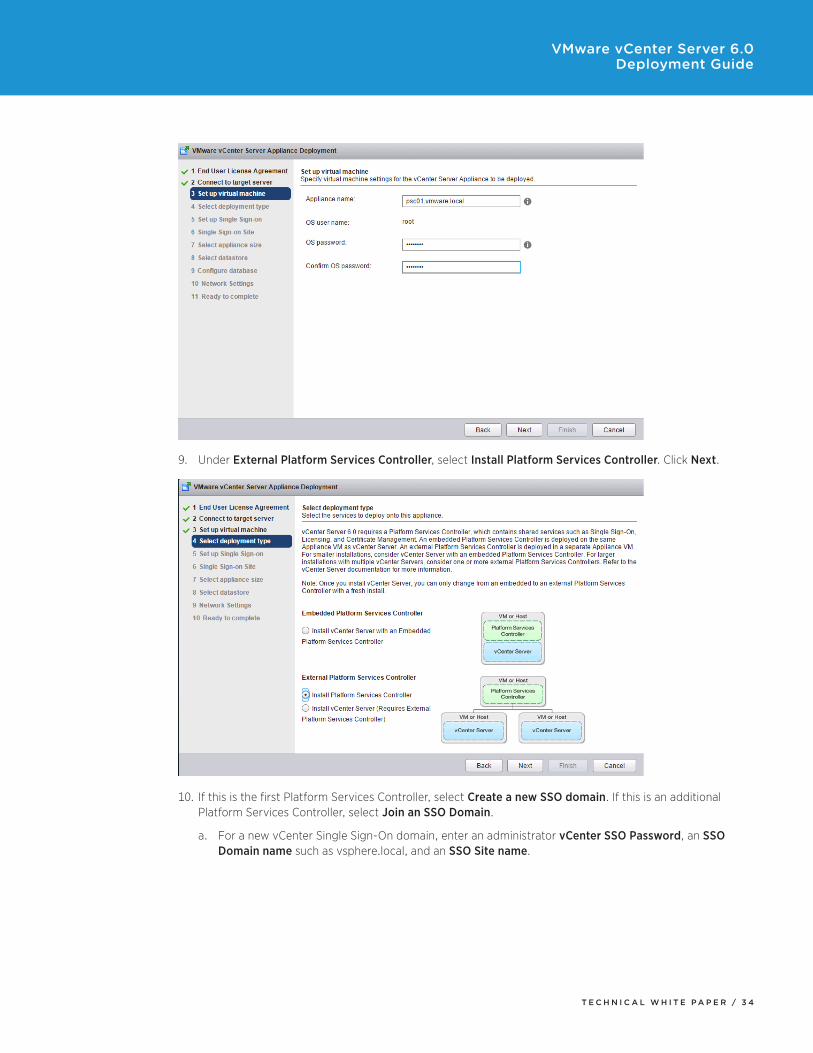
9. Under External Platform Services Controller, select Install Platform Services Controller. Click Next.
10. If this is the first Platform Services Controller, select Create a new SSO domain. If this is an additional Platform Services Controller, select Join an SSO Domain.
a. For a new vCenter Single Sign-On domain, enter an administrator vCenter SSO Password, an SSO Domain name such as vsphere.local, and an SSO Site name.

T E C H N I C A L W H I T E P A P E R / 3 5
VMware vCenter Server 6.0 Deployment Guide
b. To join an existing vCenter Single Sign-On domain, enter the FQDN of an existing Platform Services Controller and the vCenter Single Sign-On administrator’s password. Then click Next. Choose a site to join from the drop-down list. Click Next.
11. Click Next. There is only one appliance size for the Platform Services Controller.
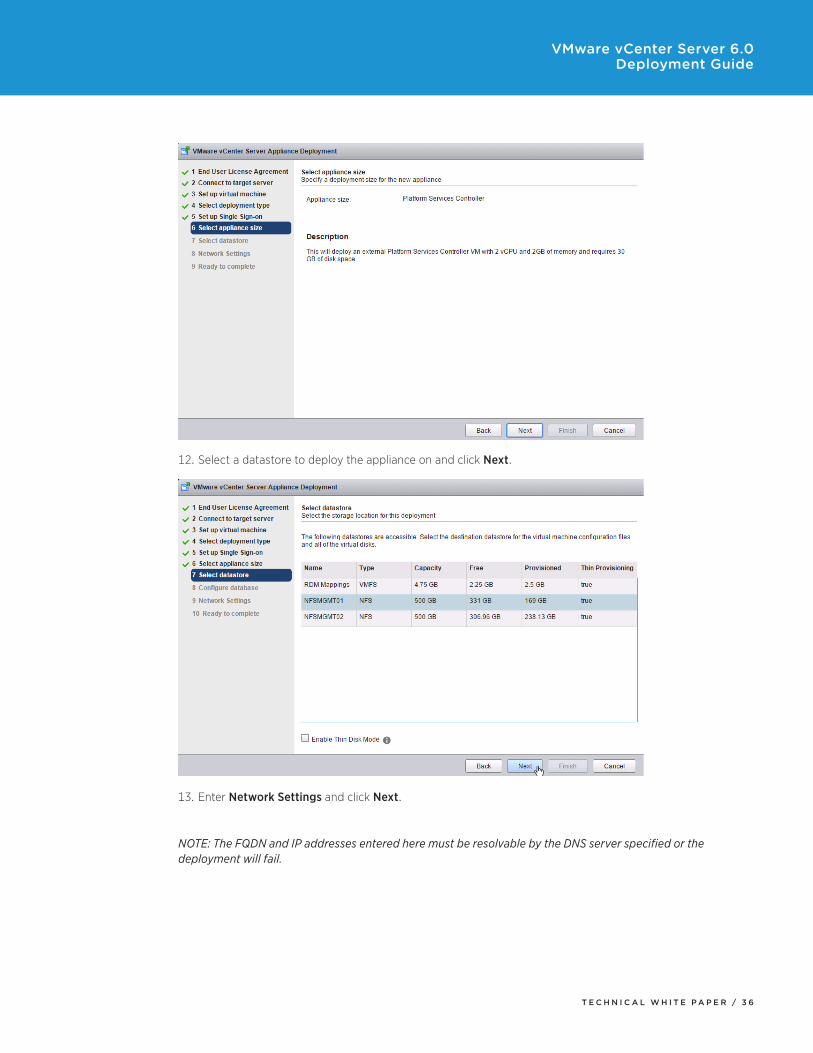
T E C H N I C A L W H I T E P A P E R / 3 6
VMware vCenter Server 6.0 Deployment Guide
12. Select a datastore to deploy the appliance on and click Next.
13. Enter Network Settings and click Next.
NOTE: The FQDN and IP addresses entered here must be resolvable by the DNS server specified or the deployment will fail.

T E C H N I C A L W H I T E P A P E R / 3 7
VMware vCenter Server 6.0 Deployment Guide
14. Review and click Finish.
Fresh External vCenter Server DeploymentWindows Deployment1. Verify all prerequisites.
2. If using a remote database, ensure that a 64-bit DSN has been created. This step is not necessary if using the local PostgreSQL database.
3. Mount the vCenter Server 6.0 ISO image.
4. If autorun does not start, execute autorun.exe.

T E C H N I C A L W H I T E P A P E R / 3 8
VMware vCenter Server 6.0 Deployment Guide
5. Select vCenter Server for Windows and click Install.
6. Click Next.
7. Accept the license agreements.
8. Under External Deployment, select vCenter Server. Click Next.
9. Verify that the FQDN is correct and click Next.
10. Enter the external Platform Services Controller FQDN and vCenter Single Sign-On password. Click Enter.
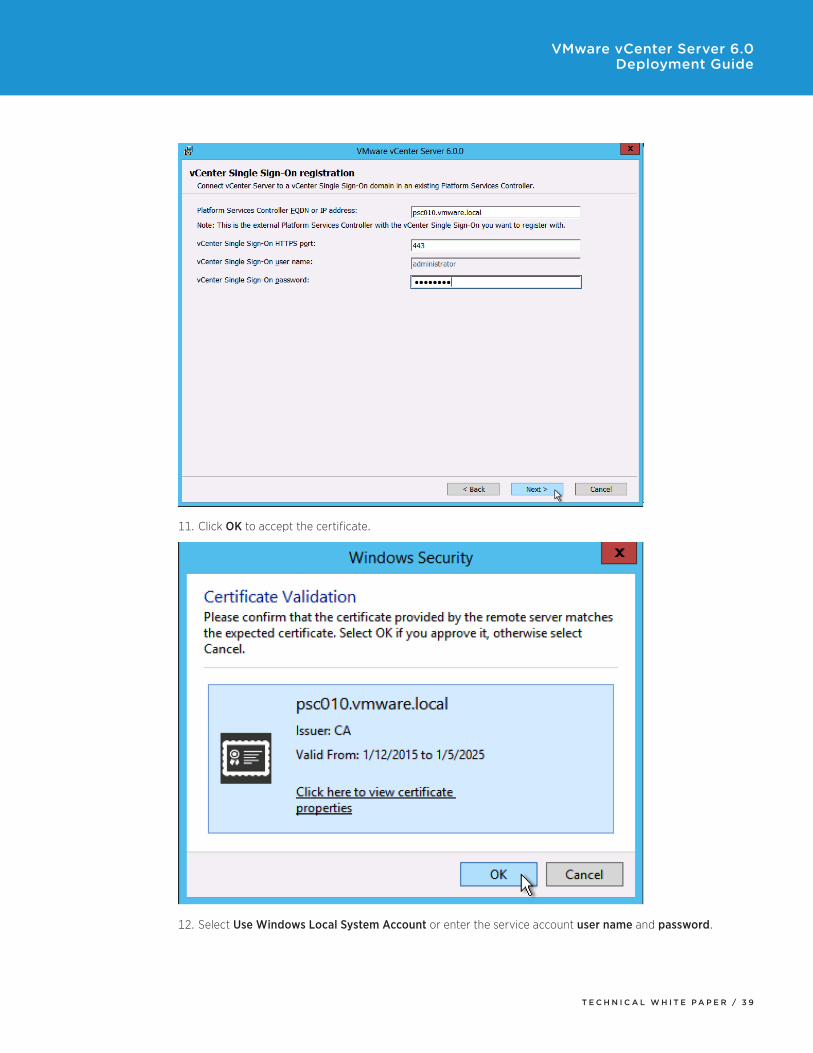
T E C H N I C A L W H I T E P A P E R / 3 9
VMware vCenter Server 6.0 Deployment Guide
11. Click OK to accept the certificate.
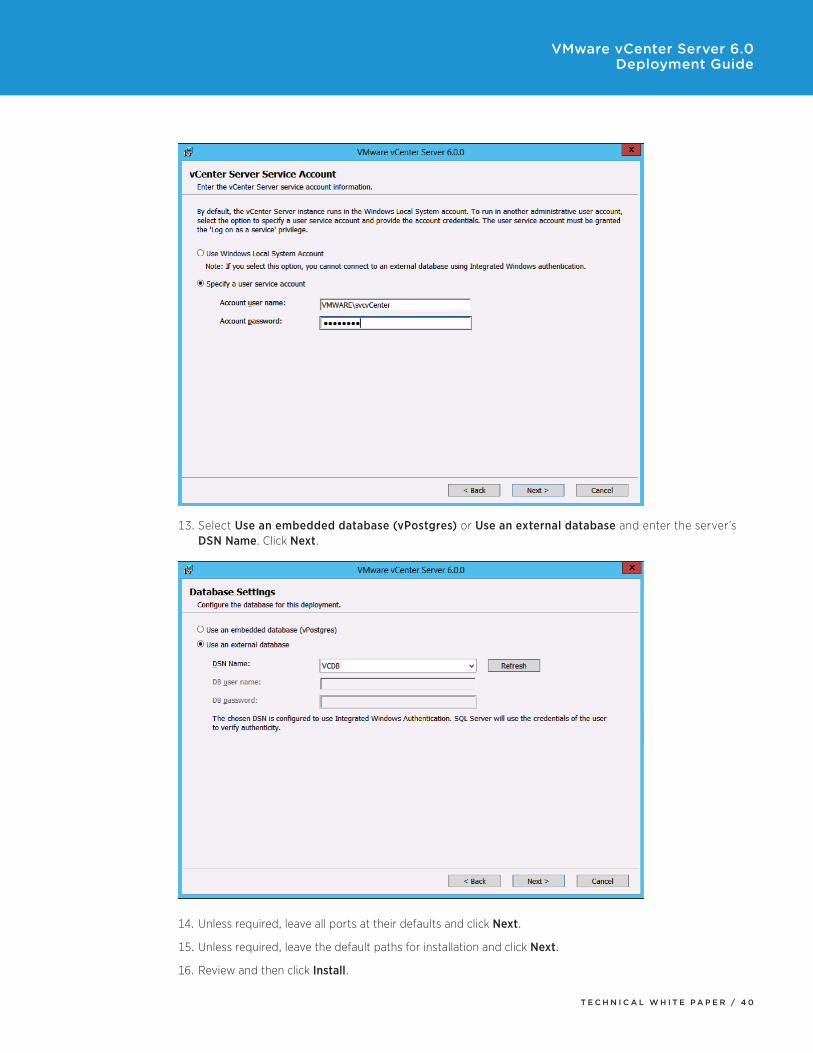
12. Select Use Windows Local System Account or enter the service account user name and password.
T E C H N I C A L W H I T E P A P E R / 4 0
VMware vCenter Server 6.0 Deployment Guide
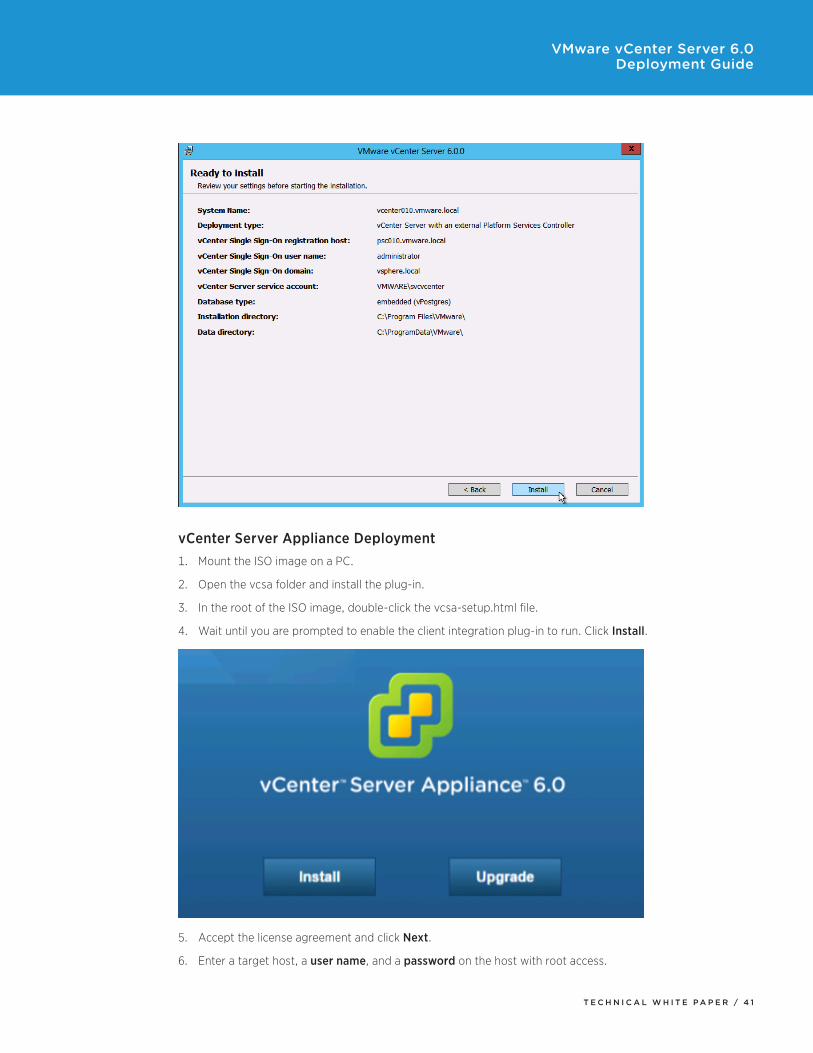
13. Select Use an embedded database (vPostgres) or Use an external database and enter the server’s DSN Name. Click Next.
14. Unless required, leave all ports at their defaults and click Next.
15. Unless required, leave the default paths for installation and click Next.
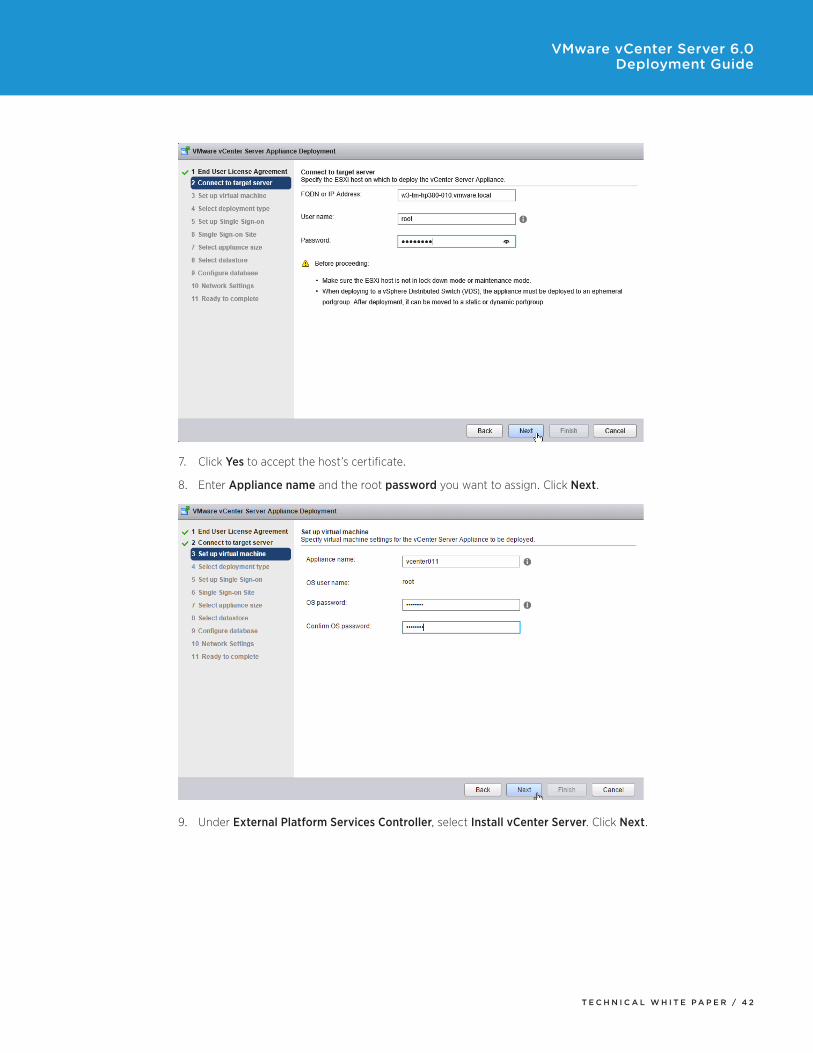
16. Review and then click Install.
T E C H N I C A L W H I T E P A P E R / 4 1
VMware vCenter Server 6.0 Deployment Guide
vCenter Server Appliance Deployment1. Mount the ISO image on a PC.
2. Open the vcsa folder and install the plug-in.
3. In the root of the ISO image, double-click the vcsa-setup.html file.
4. Wait until you are prompted to enable the client integration plug-in to run. Click Install.
5. Accept the license agreement and click Next.
6. Enter a target host, a user name, and a password on the host with root access.
T E C H N I C A L W H I T E P A P E R / 4 2
VMware vCenter Server 6.0 Deployment Guide
7. Click Yes to accept the host’s certificate.
8. Enter Appliance name and the root password you want to assign. Click Next.
9. Under External Platform Services Controller, select Install vCenter Server. Click Next.

T E C H N I C A L W H I T E P A P E R / 4 3
VMware vCenter Server 6.0 Deployment Guide
10. Enter the external Platform Services Controller FQDN and vCenter SSO password. Click Next.
11. Select Appliance size from the drop-down list. Click Next.

T E C H N I C A L W H I T E P A P E R / 4 4
VMware vCenter Server 6.0 Deployment Guide
12. Select datastore to deploy the appliance on. Click Next.
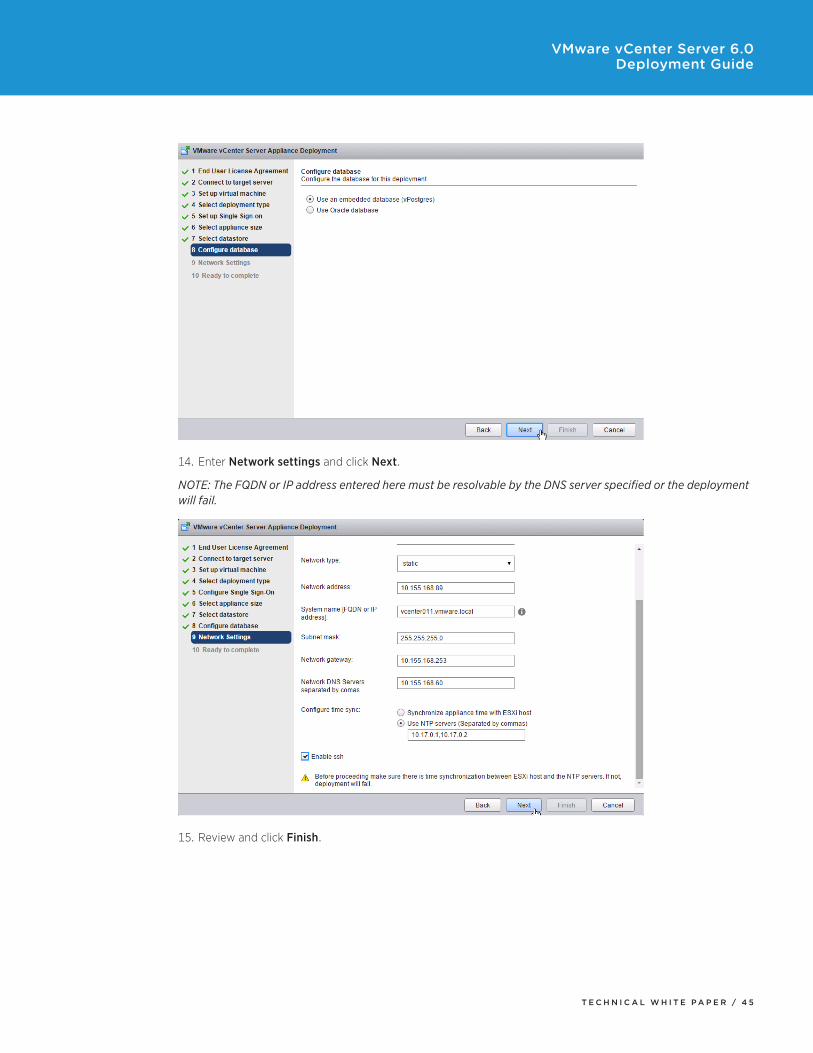
13. Select Use an embedded database (vPostgres), which is recommended, or Use Oracle database. Click Next.
T E C H N I C A L W H I T E P A P E R / 4 5
VMware vCenter Server 6.0 Deployment Guide
14. Enter Network settings and click Next.
NOTE: The FQDN or IP address entered here must be resolvable by the DNS server specified or the deployment will fail.
15. Review and click Finish.

T E C H N I C A L W H I T E P A P E R / 4 6
VMware vCenter Server 6.0 Deployment Guide
Upgrade External vCenter Single Sign-On1. Back up the vCenter Single Sign-On and vCenter Server machines.
2. Log in to the vCenter Single Sign-On machine.
3. Mount the vCenter Server 6.0 ISO image.
4. If autorun does not start, execute autorun.exe.
5. Select vCenter Server for Windows and click Install.
T E C H N I C A L W H I T E P A P E R / 4 7
VMware vCenter Server 6.0 Deployment Guide
6. Click Next.
7. Accept the license agreements.
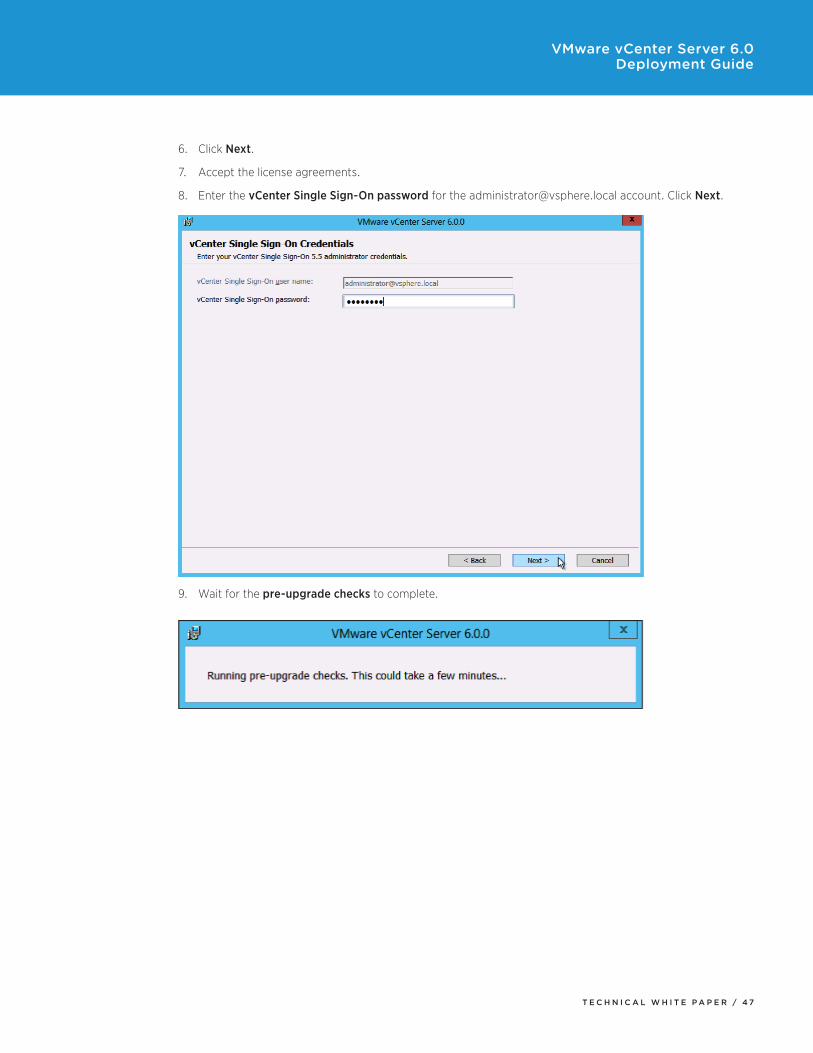
8. Enter the vCenter Single Sign-On password for the [email protected] account. Click Next.
9. Wait for the pre-upgrade checks to complete.

T E C H N I C A L W H I T E P A P E R / 4 8
VMware vCenter Server 6.0 Deployment Guide
10. Accept the default ports and click Next.
11. Select your installation path or take the defaults. Click Next.

T E C H N I C A L W H I T E P A P E R / 4 9
VMware vCenter Server 6.0 Deployment Guide
12. Check I verify that I have backed up this vCenter Single Sign-On machine. Click Upgrade.
13. Click Finish.
14. Log in to the vCenter Server you want to upgrade.
15. Mount the vCenter Server 6.0 ISO image.
16. If autorun does not start, execute autorun.exe.
17. Select vCenter Server for Windows and click Install.
18. Click Next.
19. Accept the license agreements.

T E C H N I C A L W H I T E P A P E R / 5 0
VMware vCenter Server 6.0 Deployment Guide
20. Enter the vCenter Server password for the [email protected] account and the Account password for the service account (if applicable). Click Next.
21. Wait for the pre-upgrade checks to complete.
22. Enter the vCenter Single Sign-On password for the [email protected] account. Click Next.
T E C H N I C A L W H I T E P A P E R / 5 1
VMware vCenter Server 6.0 Deployment Guide
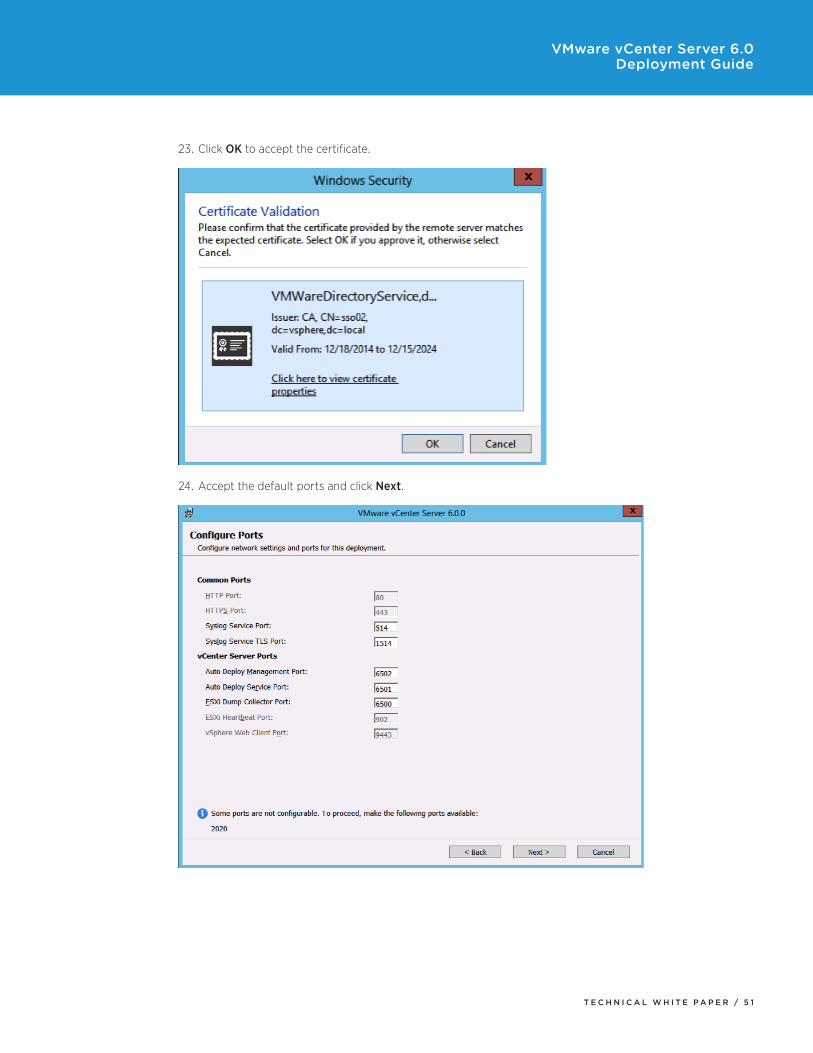
23. Click OK to accept the certificate.
24. Accept the default ports and click Next.

T E C H N I C A L W H I T E P A P E R / 5 2
VMware vCenter Server 6.0 Deployment Guide
25. Accept or change the installation paths as necessary. Click Next.
26. Check the box to verify that you have backed up the vCenter Server and its database. Click Upgrade.
T E C H N I C A L W H I T E P A P E R / 5 3
VMware vCenter Server 6.0 Deployment Guide
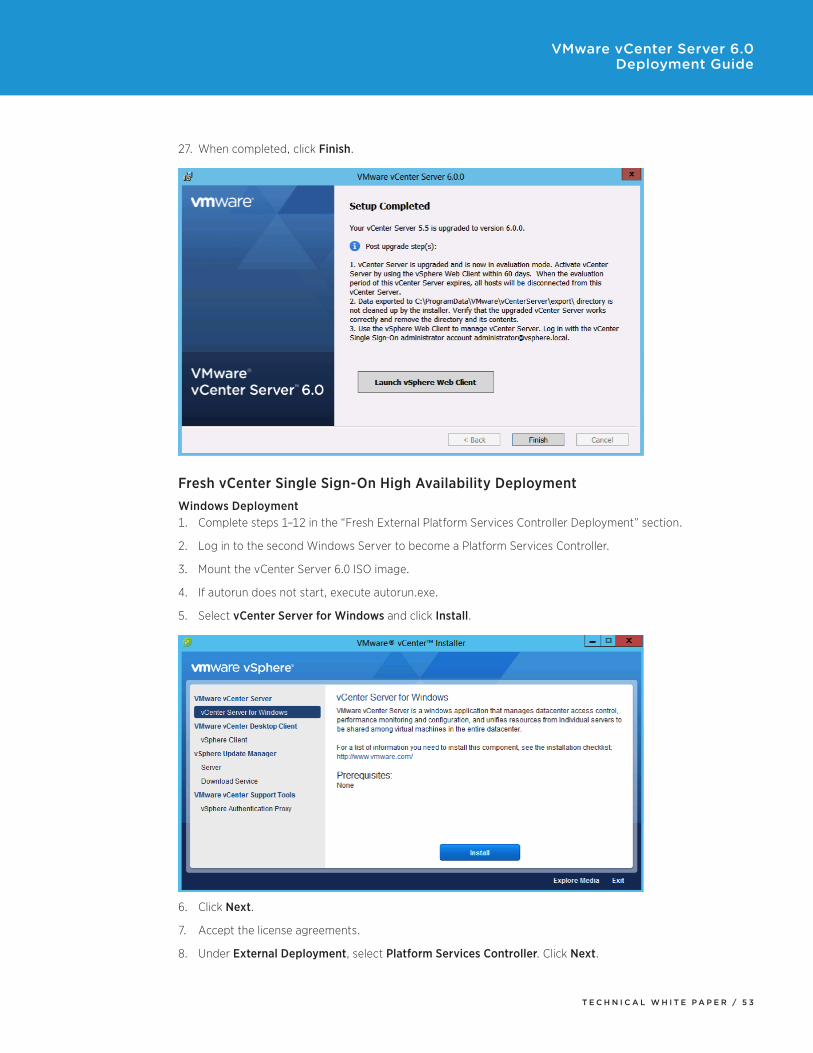
27. When completed, click Finish.
Fresh vCenter Single Sign-On High Availability DeploymentWindows Deployment1. Complete steps 1–12 in the “Fresh External Platform Services Controller Deployment” section.
2. Log in to the second Windows Server to become a Platform Services Controller.
3. Mount the vCenter Server 6.0 ISO image.
4. If autorun does not start, execute autorun.exe.
5. Select vCenter Server for Windows and click Install.
6. Click Next.
7. Accept the license agreements.
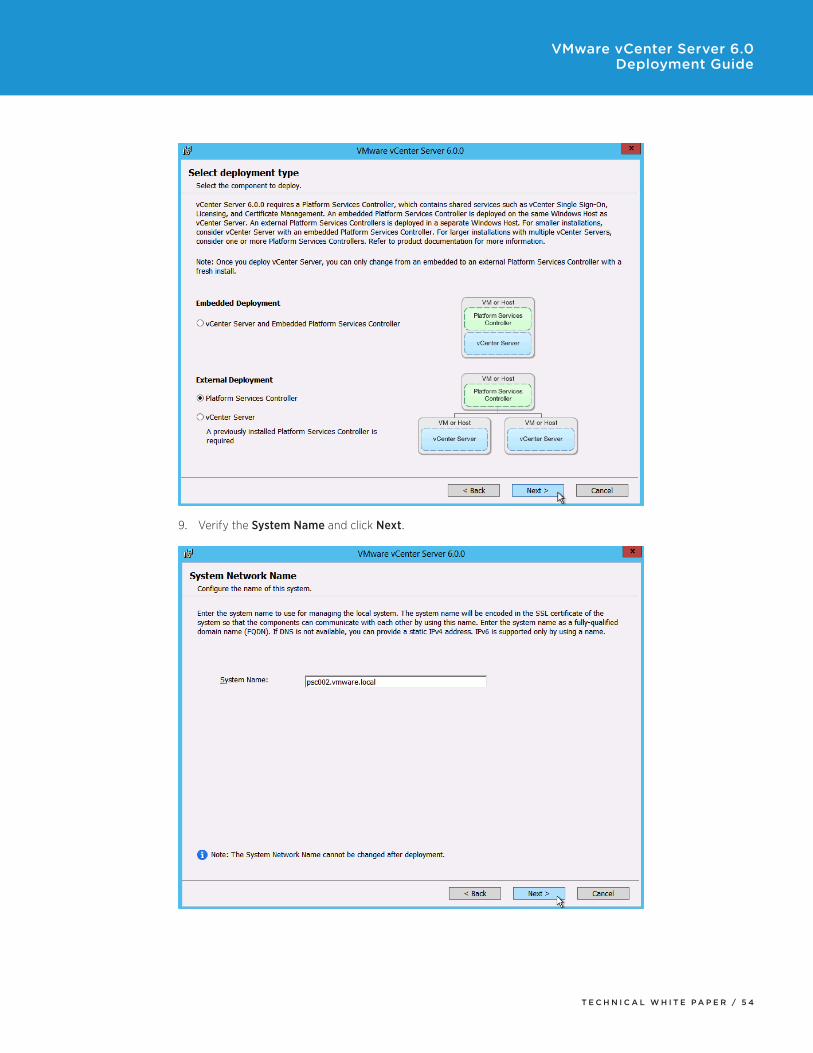
8. Under External Deployment, select Platform Services Controller. Click Next.
T E C H N I C A L W H I T E P A P E R / 5 4
VMware vCenter Server 6.0 Deployment Guide
9. Verify the System Name and click Next.

T E C H N I C A L W H I T E P A P E R / 5 5
VMware vCenter Server 6.0 Deployment Guide
10. Select Join a vCenter Single Sign-On domain and enter the FQDN and password. Click Next.
11. Click OK to accept the certificate from the Platform Services Controller.
T E C H N I C A L W H I T E P A P E R / 5 6
VMware vCenter Server 6.0 Deployment Guide
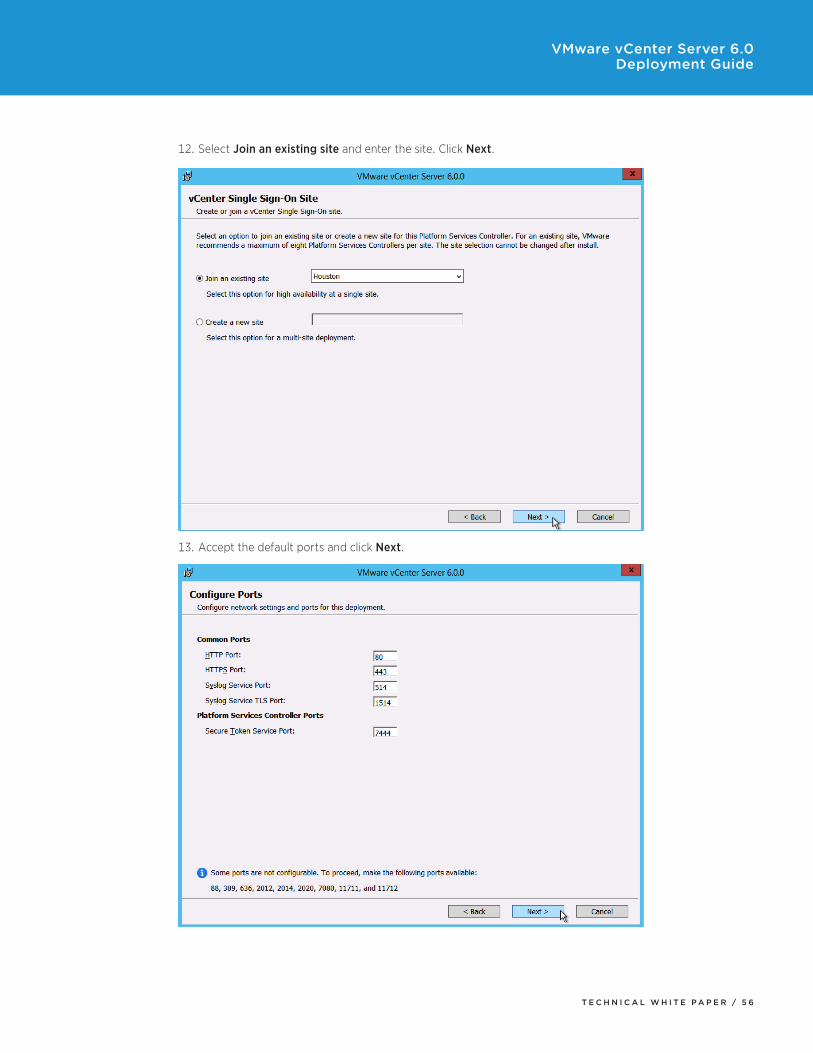
12. Select Join an existing site and enter the site. Click Next.
13. Accept the default ports and click Next.

T E C H N I C A L W H I T E P A P E R / 5 7
VMware vCenter Server 6.0 Deployment Guide
14. Accept or change the installation paths as necessary. Click Next.
15. Review and click Install.

T E C H N I C A L W H I T E P A P E R / 5 8
VMware vCenter Server 6.0 Deployment Guide
16. Log back in to the first Platform Services Controller.
17. Download the vCenter Single Sign-On high availability configuration scripts from the vCenter Server product download page.
18. Extract the vCenter Single Sign-On high availability scripts to c:\sso-ha.
19. Open a command prompt.
20. Add Python to your path by typing:
PATH=%PATH%;%VMWARE_PYTHON_HOME%
21. Change directories to c:\sso-ha.
22. Run:
python gen-lb-cert.py --primary-node --lb-fqdn=loadbalancerFQDN
where loadbalancerFQDNistheFQDNoftheloadbalancer’svirtualIP(VIP)usedforload-balancingthePlatform Services Controllers.
23. Set up your load balancer to balance between the two or more Platform Services Controllers on ports 443, 2012, 2014, 2020, 389, and 636.
a. An SSL certificate (generated earlier and stored in c:\ha) is required for port 443 only.
b. For configuration steps for the F5 BIG-IP, see the appendix in this document.
24.Create a forward and reverse DNS entry for the VIP created to load balance the Platform Services Controller traffic.
25. Log in to the second Platform Services Controller.
T E C H N I C A L W H I T E P A P E R / 5 9
VMware vCenter Server 6.0 Deployment Guide
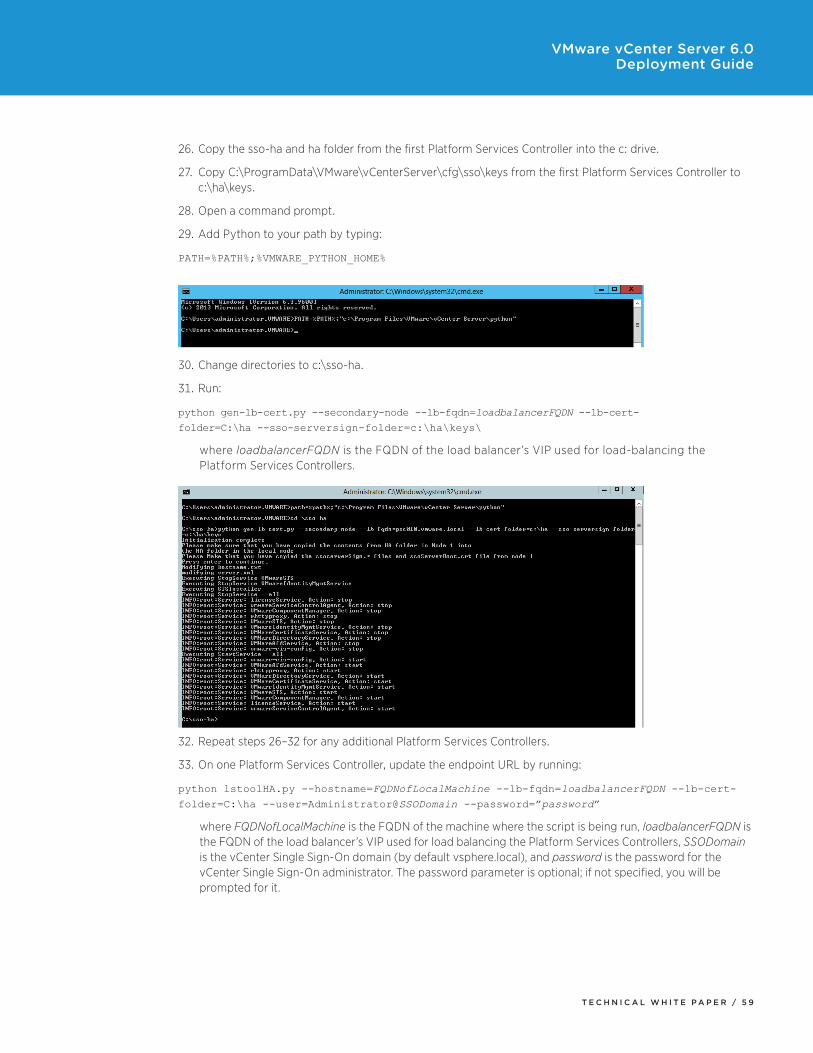
26. Copy the sso-ha and ha folder from the first Platform Services Controller into the c: drive.
27. Copy C:\ProgramData\VMware\vCenterServer\cfg\sso\keys from the first Platform Services Controller to c:\ha\keys.
28. Open a command prompt.
29. Add Python to your path by typing:
PATH=%PATH%;%VMWARE_PYTHON_HOME%
30. Change directories to c:\sso-ha.
31. Run:
python gen-lb-cert.py --secondary-node --lb-fqdn=loadbalancerFQDN --lb-cert-
folder=C:\ha --sso-serversign-folder=c:\ha\keys\
where loadbalancerFQDNistheFQDNoftheloadbalancer’sVIPusedforload-balancingthePlatform Services Controllers.
32.Repeat steps 26–32 for any additional Platform Services Controllers.
33. On one Platform Services Controller, update the endpoint URL by running:
python lstoolHA.py --hostname=FQDNofLocalMachine --lb-fqdn=loadbalancerFQDN --lb-cert-
folder=C:\ha --user=Administrator@SSODomain --password=”password”
where FQDNofLocalMachineistheFQDNofthemachinewherethescriptisbeingrun, loadbalancerFQDN is theFQDNoftheloadbalancer’sVIPusedforloadbalancingthePlatformServicesControllers,SSODomain is the vCenter Single Sign-On domain (by default vsphere.local), and password is the password for the vCenterSingleSign-Onadministrator.Thepasswordparameterisoptional;ifnotspecified,youwillbeprompted for it.
T E C H N I C A L W H I T E P A P E R / 6 0
VMware vCenter Server 6.0 Deployment Guide
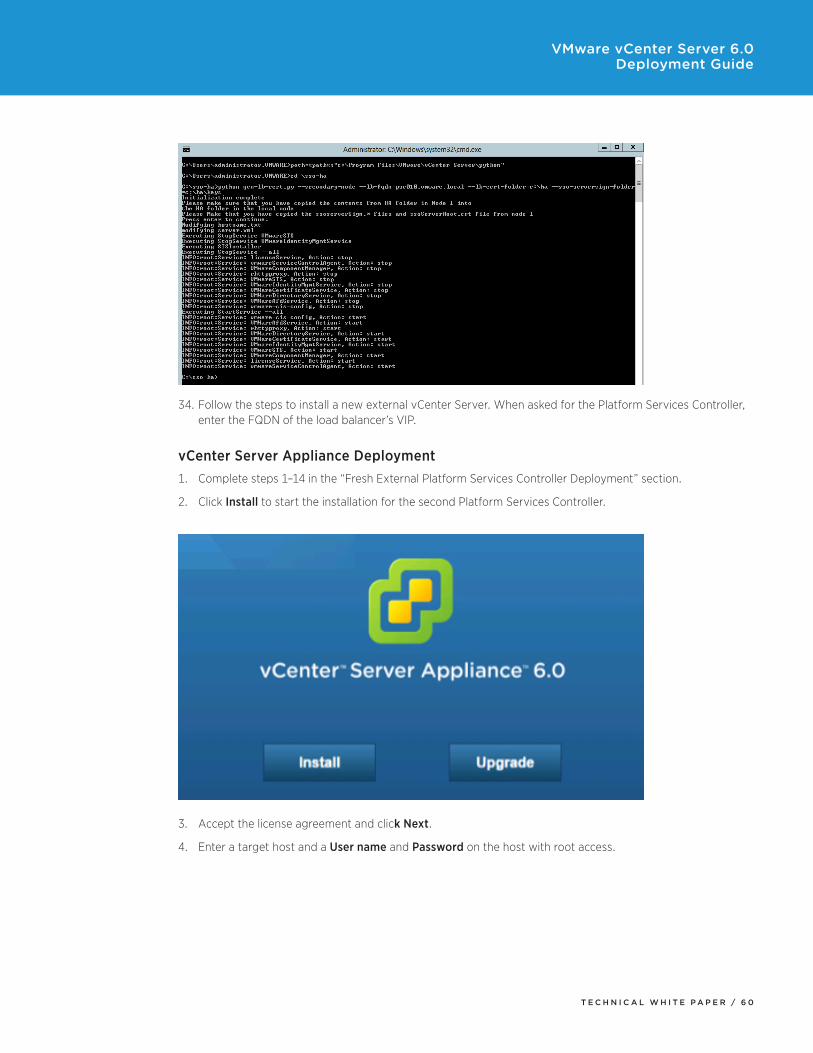
34. Follow the steps to install a new external vCenter Server. When asked for the Platform Services Controller, enter the FQDN of the load balancer’s VIP.
vCenter Server Appliance Deployment1. Complete steps 1–14 in the “Fresh External Platform Services Controller Deployment” section.
2. Click Install to start the installation for the second Platform Services Controller.
3. Accept the license agreement and click Next.
4. Enter a target host and a User name and Password on the host with root access.
T E C H N I C A L W H I T E P A P E R / 6 1
VMware vCenter Server 6.0 Deployment Guide
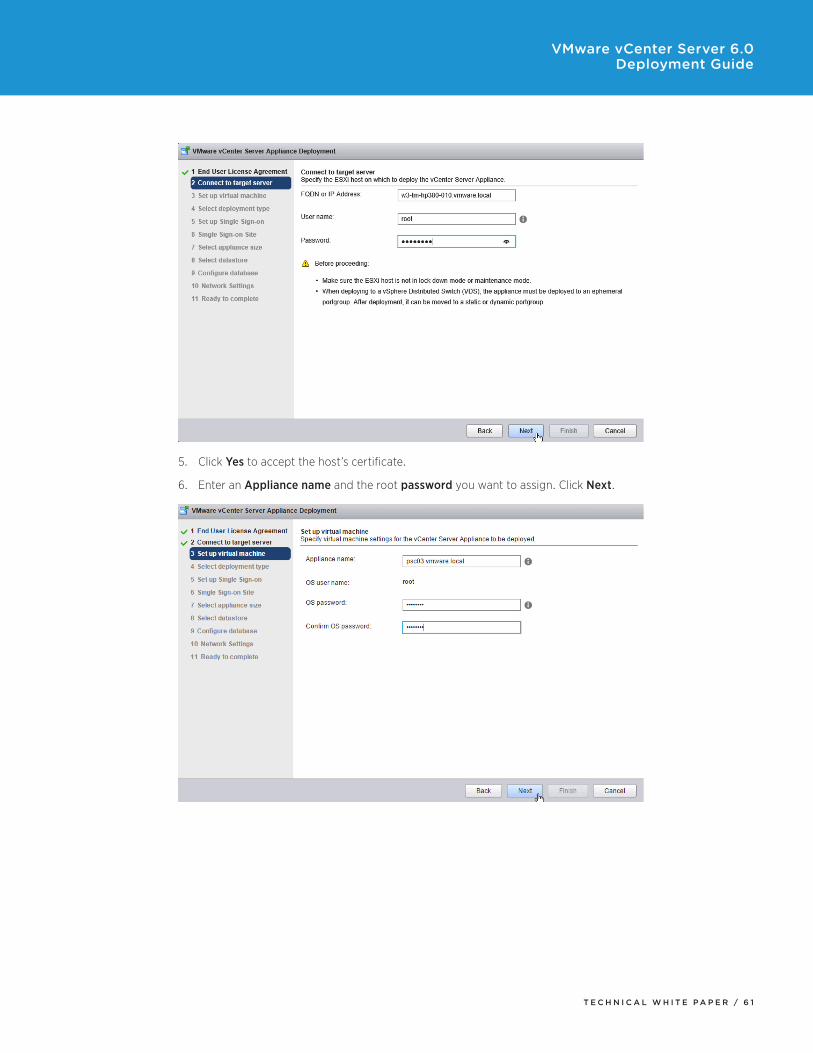
5. Click Yes to accept the host’s certificate.
6. Enter an Appliance name and the root password you want to assign. Click Next.

T E C H N I C A L W H I T E P A P E R / 6 2
VMware vCenter Server 6.0 Deployment Guide
7. Under External Platform Services Controller, select Install Platform Services Controller. Click Next.
8. Select Join an SSO domain and enter the FQDN and password. Click Next.

T E C H N I C A L W H I T E P A P E R / 6 3
VMware vCenter Server 6.0 Deployment Guide
9. Select Join an existing site. Choose the site and click Next.
10. Click Next. There is only one appliance size for the Platform Services Controller.
T E C H N I C A L W H I T E P A P E R / 6 4
VMware vCenter Server 6.0 Deployment Guide
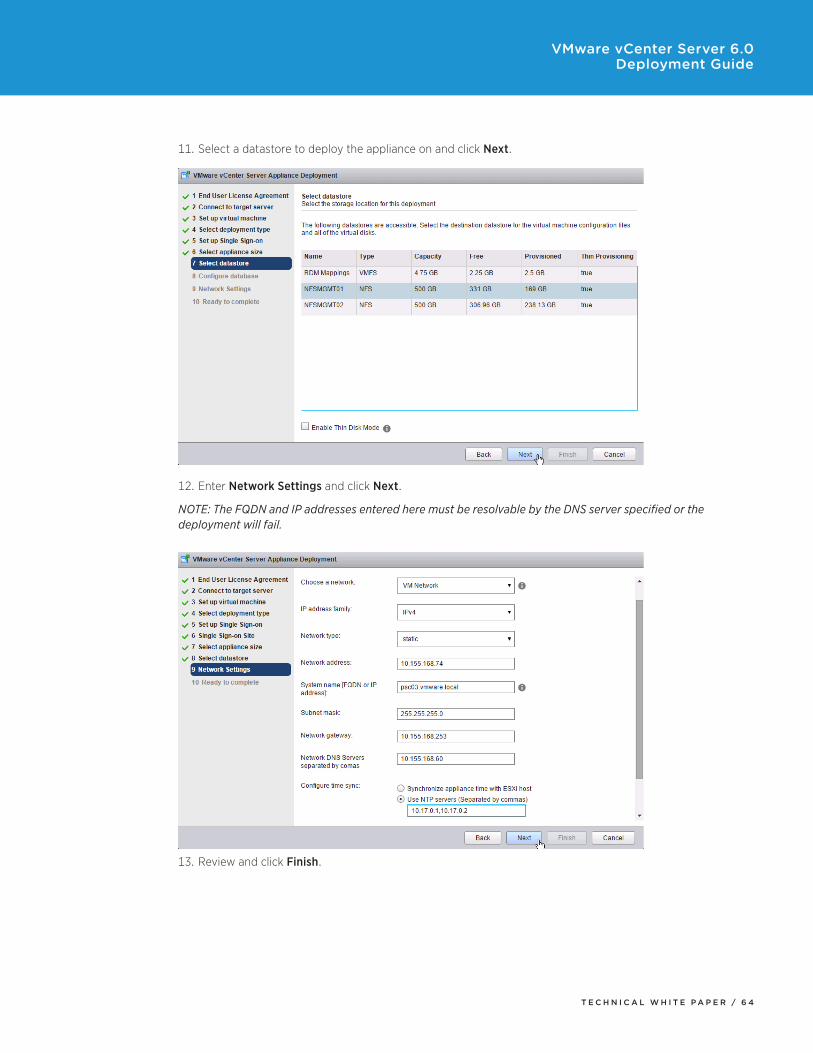
11. Select a datastore to deploy the appliance on and click Next.
12. Enter Network Settings and click Next.
NOTE: The FQDN and IP addresses entered here must be resolvable by the DNS server specified or the deployment will fail.
13. Review and click Finish.

T E C H N I C A L W H I T E P A P E R / 6 5
VMware vCenter Server 6.0 Deployment Guide
14. Connect to the first Platform Services Controller via SSH.
15. Type:
shell.set --enabled True
16. Type:
shell
17. Download the vCenter Single Sign-On high availability configuration scripts from the vCenter Server product download page.
18. Extract the vCenter Single Sign-On high availability scripts to /sso-ha.
19. Change directories to /sso-ha.
20. Run:
python gen-lb-cert.py --primary-node --lb-fqdn=loadbalancerFQDN
where loadbalancerFQDN is the FQDN of the load balancer’s VIP used for load-balancing the Platform Services Controllers.

T E C H N I C A L W H I T E P A P E R / 6 6
VMware vCenter Server 6.0 Deployment Guide
21. Set up your load balancer to balance between the two or more Platform Services Controllers on ports 443, 2012, 2014, 2020, 389, and 636.
a. An SSL certificate (generated earlier) is required for port 443 only.
b. For configuration steps for the F5 BIG-IP, see the appendix in this document.
22.Create a forward and reverse DNS entry for the VIP created to load-balance the Platform Services Controller traffic.
23. Connect to the second Platform Services Controller via SSH.
24. Copy the /sso-ha and /ha folder from the first Platform Services Controller.
25. Copy /etc/vmware-sso/keys/ from the first Platform Services Controller to /ha/keys.
26. Change directories to /sso-ha.
27. Run:
python gen-lb-cert.py --secondary-node --lb-fqdn=loadbalancerFQDN --lb-cert-folder=/ha
--sso-serversign-folder=/ha/keys
where loadbalancerFQDN is the FQDN of the load balancer’s VIP used for load-balancing the Platform Services Controllers.

T E C H N I C A L W H I T E P A P E R / 6 7
VMware vCenter Server 6.0 Deployment Guide
28.Repeat steps 24–28 for any additional Platform Services Controllers.
29. On one Platform Services Controller, update the endpoint URL by running:
python lstoolHA.py --hostname=FQDNofLocalMachine --lb-fqdn=loadbalancerFQDN --lb-cert-
folder=/ha --user=Administrator@SSODomain --password=password
where FQDNofLocalMachine is the FQDN of the machine where the script is being run, loadbalancerFQDN is the FQDN of the load balancer’s VIP used for load-balancing the Platform Services Controllers, SSODomain is the vCenter Single Sign-On domain (by default, vsphere.local), and password is the password for the vCenter Single Sign-On administrator. The password parameter is optional; if not specified, you will be prompted for it.
30. Follow the steps to install a new external vCenter Server. When asked for the Platform Services Controller, enter the FQDN of the load balancer VIP.

T E C H N I C A L W H I T E P A P E R / 6 8
VMware vCenter Server 6.0 Deployment Guide
Upgrade of vCenter Single Sign-On High Availability1. Back up all vCenter Single Sign-On machines.
2. Log in to one of the vCenter Single Sign-On machines in your high availability configuration.
3. Add a host file entry that contains the local machine’s IP address and the FQDN of the load balancer’s VIP.
4. Mount the vCenter Server 6.0 ISO image.
5. If autorun does not start, execute autorun.exe.
6. Select vCenter Server for Windows and click Install.
7. Click Next.
8. Accept the license agreements.
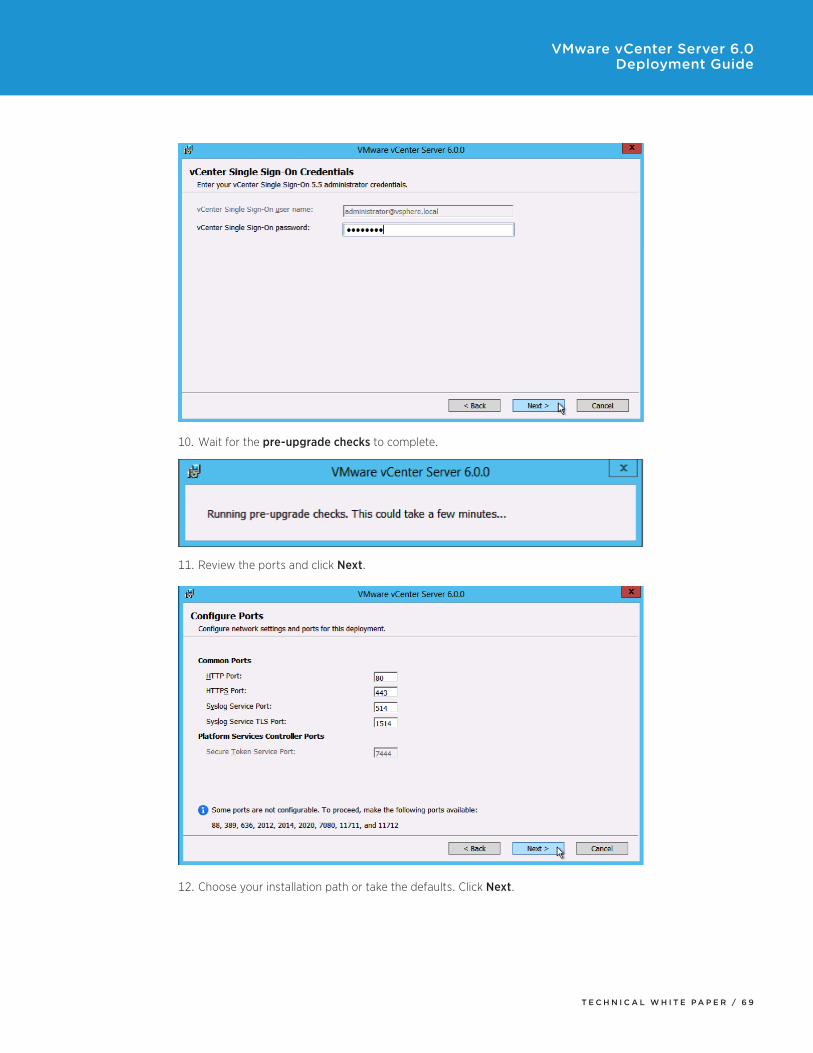
9. Enter the password for the [email protected] account and click Next.
T E C H N I C A L W H I T E P A P E R / 6 9
VMware vCenter Server 6.0 Deployment Guide
10. Wait for the pre-upgrade checks to complete.
11. Review the ports and click Next.
12. Choose your installation path or take the defaults. Click Next.

T E C H N I C A L W H I T E P A P E R / 7 0
VMware vCenter Server 6.0 Deployment Guide
13. Check I verify that I have backed up this Single Sign-On machine. Click Upgrade.
14. Click Finish.
15. Remove the host file entry that was added in step 3.
16.Repeat steps 2–15 on the remainder of the vCenter Single Sign-On machines.
17. Download the vCenter Single Sign-On high availability configuration scripts from the vCenter Server product download page.
18. Extract the vCenter Single Sign-On high availability scripts to c:\sso-ha.
19. Create a folder named HA in the root of c:\.
20. Copy rui.crt, rui.p12 from c:\certs\sso to c:\ha and Root64.cer from c:\certs to c:\ha.

T E C H N I C A L W H I T E P A P E R / 7 1
VMware vCenter Server 6.0 Deployment Guide
21. Rename rui.crt to lb.crt, rui.p12 to lb.p12, and Root64.cer to root.cer.
22. Open a command prompt.
23. Add Python to your path by typing:
PATH=%PATH%;%VMWARE_PYTHON_HOME%
24. Change directories to c:\sso-ha.
25. Run:
python gen-lb-cert.py --upgrade --lb-fqdn=loadbalancerFQDN --root-cert=c:\ha\root.cer
where loadbalancerFQDN is the FQDN of the load balancer’s VIP used for load-balancing vCenter Single Sign-On.
26. When prompted, enter the password for the [email protected] account.
27. Repeat steps 17–26 on the remaining Platform Services Controllers.
28. On one Platform Services Controller in the site, run:
python lstoolHA.py --hostname=FQDNofLocalMachine --lb-fqdn=loadbalancerFQDN --lb-cert-
folder=C:\ha [email protected] --password=”password”
where FQDNofLocalMachine is the FQDN of the Platform Services Controller the command is being run on, loadbalancerFQDN is the FQDN of the load balancer’s VIP used for load-balancing vCenter Single Sign-On, and password is the password for the [email protected] account. The password parameter is optional; if not specified, you will be prompted for it.

T E C H N I C A L W H I T E P A P E R / 7 2
VMware vCenter Server 6.0 Deployment Guide
29.Log in to the load balancer. In this example, we are using an F5 BIG-IP.
30. Create a pool for ports 443, 2012, 2014, 2020, 389, and 636. Set health monitors to use TCP and Load Balancing Method to Round Robin.
When complete, the Pool List should look like this:

T E C H N I C A L W H I T E P A P E R / 7 3
VMware vCenter Server 6.0 Deployment Guide
31. Create a virtual server using the same IP address as the original vCenter Single Sign-On high availability virtual server for each of the new pools. Use TCP for each virtual server. Set Source Address Translation to Auto Map and Default Persistence Profile to Source Address. Assign the client and server SSL profiles created when setting up vCenter Single Sign-On high availability for vCenter Server 5.5 to port 443 only. No other port requires a client or server SSL profile.
When complete, the Virtual Server List should look like this:
32. Edit the source_addr Persistence Policy and check the Match Across Services box.
33. View the Network Map and verify that all services are up (green).
For full configuration instructions of the F5 BIG-IP load balancer, see the appendix.
T E C H N I C A L W H I T E P A P E R / 7 4
VMware vCenter Server 6.0 Deployment Guide
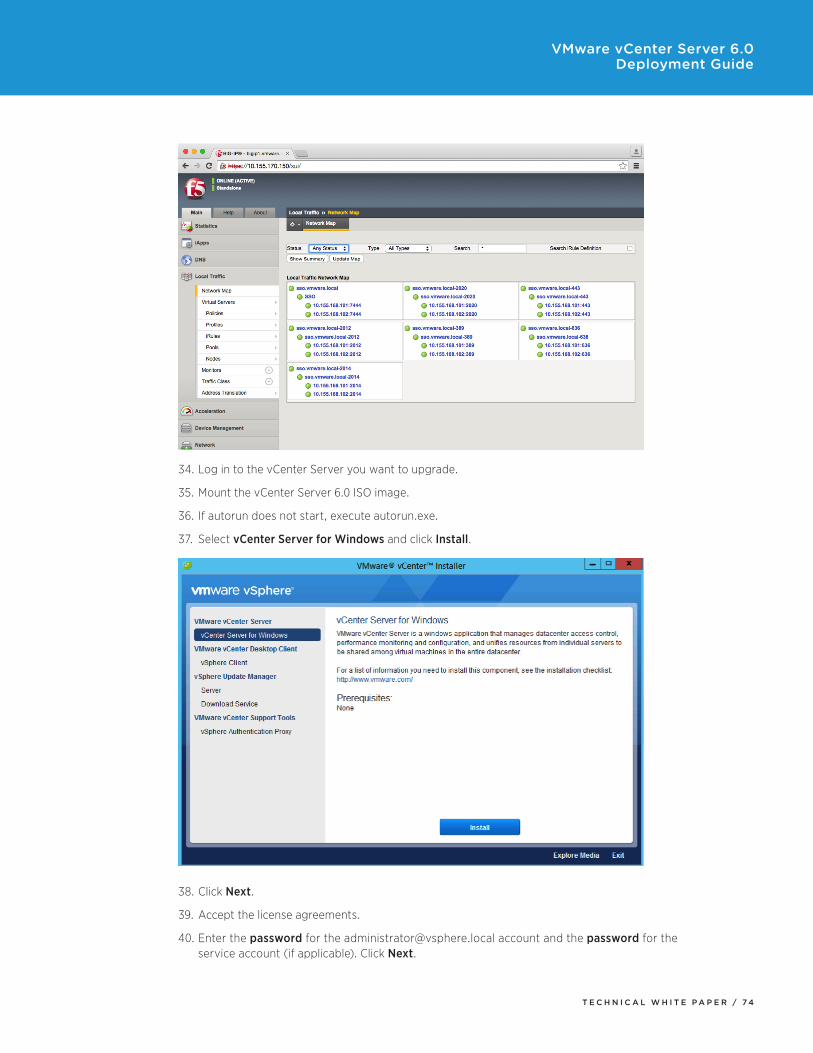
34. Log in to the vCenter Server you want to upgrade.
35. Mount the vCenter Server 6.0 ISO image.
36. If autorun does not start, execute autorun.exe.
37. Select vCenter Server for Windows and click Install.
38. Click Next.
39. Accept the license agreements.
40. Enter the password for the [email protected] account and the password for the service account (if applicable). Click Next.

T E C H N I C A L W H I T E P A P E R / 7 5
VMware vCenter Server 6.0 Deployment Guide
41. Wait for the pre-upgrade checks to complete.
42. Enter the password for the [email protected] account. Click Next.
43. Click OK to accept the certificate.

T E C H N I C A L W H I T E P A P E R / 7 6
VMware vCenter Server 6.0 Deployment Guide
44. Accept the default ports and click Next.
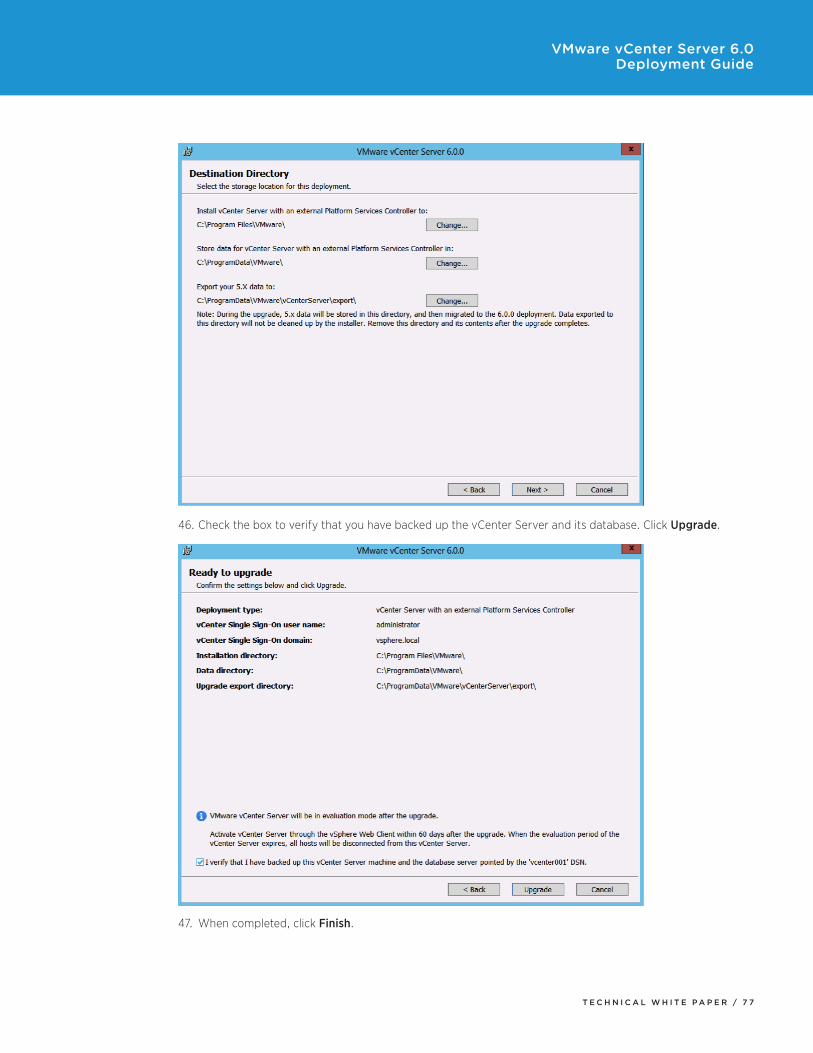
45. Accept or change the installation paths as necessary. Click Next.
T E C H N I C A L W H I T E P A P E R / 7 7
VMware vCenter Server 6.0 Deployment Guide
46. Check the box to verify that you have backed up the vCenter Server and its database. Click Upgrade.
47. When completed, click Finish.
T E C H N I C A L W H I T E P A P E R / 7 8
VMware vCenter Server 6.0 Deployment Guide
Postdeployment StepsConfigure Identity Sources1. Open your Web browser and navigate to https://vcenter:9443, where vcenter is the FQDN of the
vCenter Server.
2. Log in with User name [email protected] and the Password used during installation.

T E C H N I C A L W H I T E P A P E R / 7 9
VMware vCenter Server 6.0 Deployment Guide
3. Click Administration in the left-hand Navigator pane.
4. Click Configuration under vCenter Single Sign-On.
5. Click Identity Sources.
T E C H N I C A L W H I T E P A P E R / 8 0
VMware vCenter Server 6.0 Deployment Guide
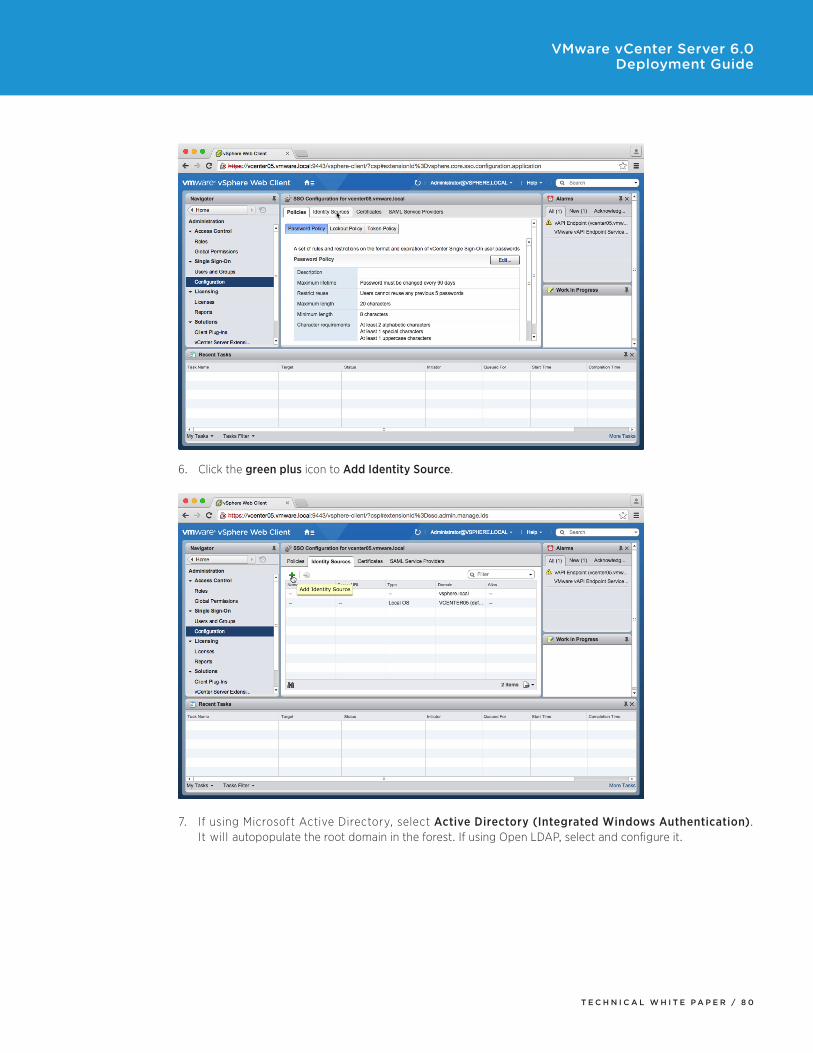
6. Click the green plus icon to Add Identity Source.
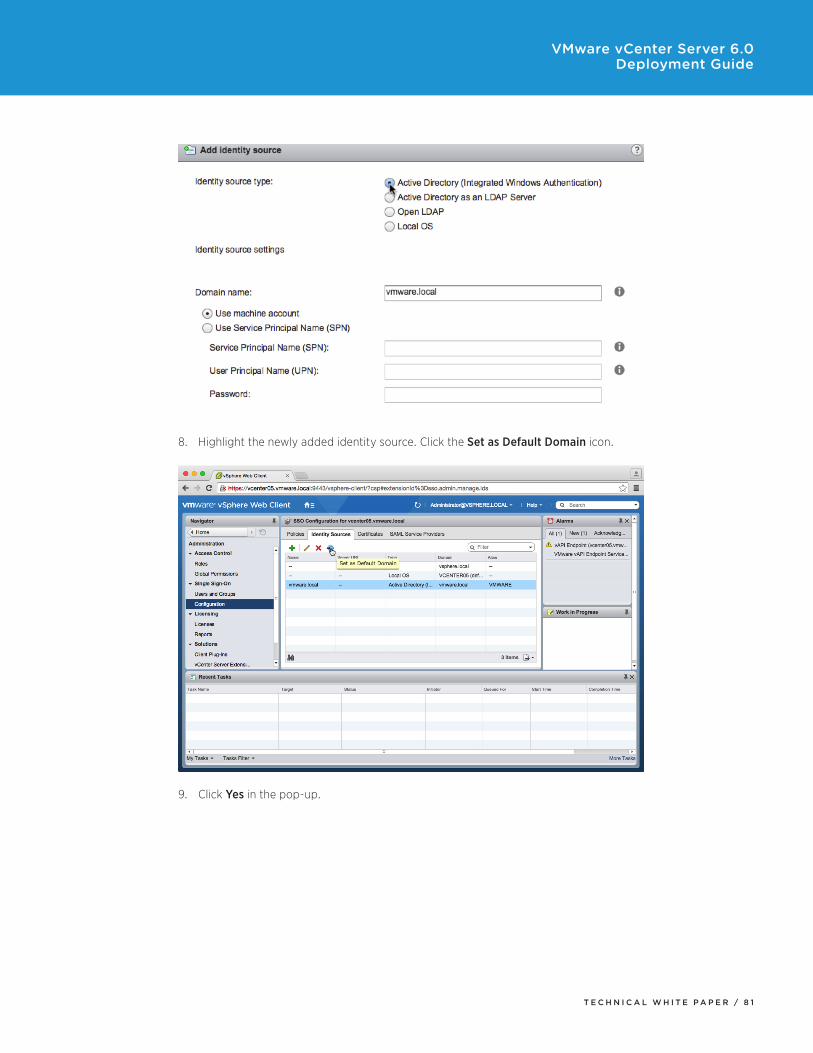
7. If using Microsoft Active Directory, select Active Directory (Integrated Windows Authentication). It will autopopulate the root domain in the forest. If using Open LDAP, select and configure it.
T E C H N I C A L W H I T E P A P E R / 8 1
VMware vCenter Server 6.0 Deployment Guide
8. Highlight the newly added identity source. Click the Set as Default Domain icon.
9. Click Yes in the pop-up.

T E C H N I C A L W H I T E P A P E R / 8 2
VMware vCenter Server 6.0 Deployment Guide
License Management1. Click Licenses in the left-hand Navigator pane.
2. Click Licenses.
3. Click the green plus icon to add your licenses.
T E C H N I C A L W H I T E P A P E R / 8 3
VMware vCenter Server 6.0 Deployment Guide
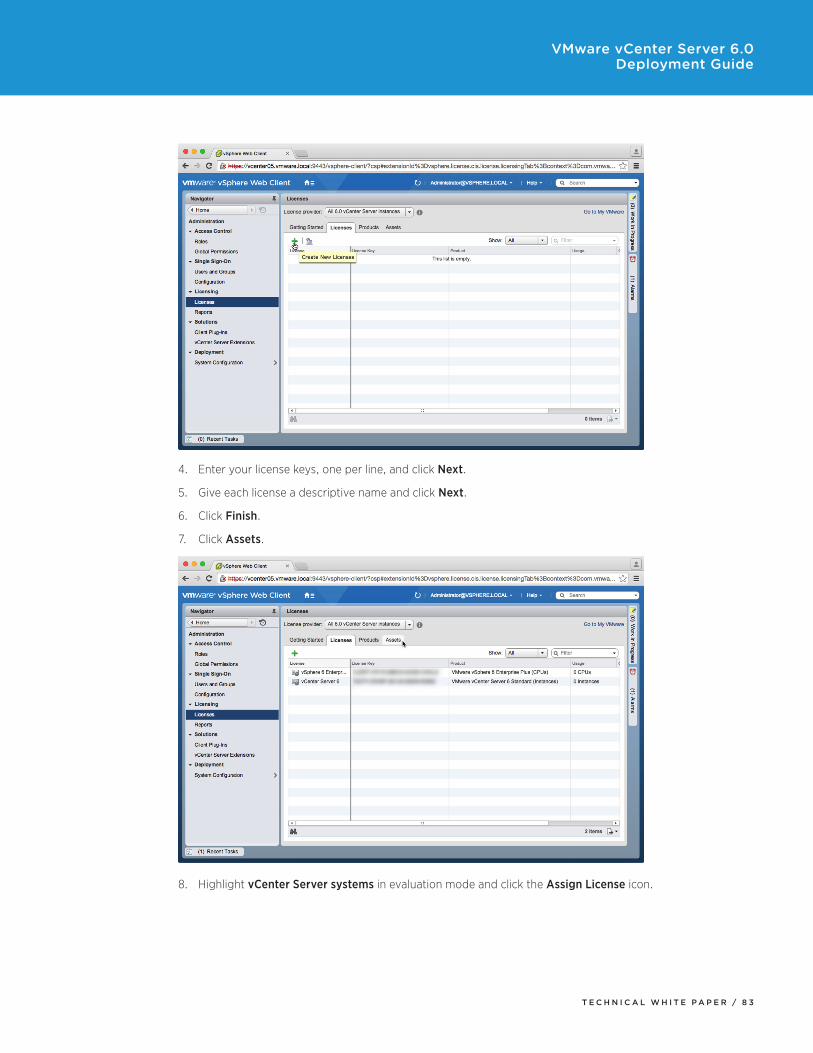
4. Enter your license keys, one per line, and click Next.
5. Give each license a descriptive name and click Next.
6. Click Finish.
7. Click Assets.
7. Click Assets.
8. Highlight vCenter Server systems in evaluation mode and click the Assign License icon.

T E C H N I C A L W H I T E P A P E R / 8 4
VMware vCenter Server 6.0 Deployment Guide
9. Select the vCenter Server license entered earlier and click OK.
Global Permissions1. Click Global Permissions in the left-hand Navigator pane.
2. Click Manage.
3. Click the green plus icon to add a permission.

T E C H N I C A L W H I T E P A P E R / 8 5
VMware vCenter Server 6.0 Deployment Guide
4. Click Add.
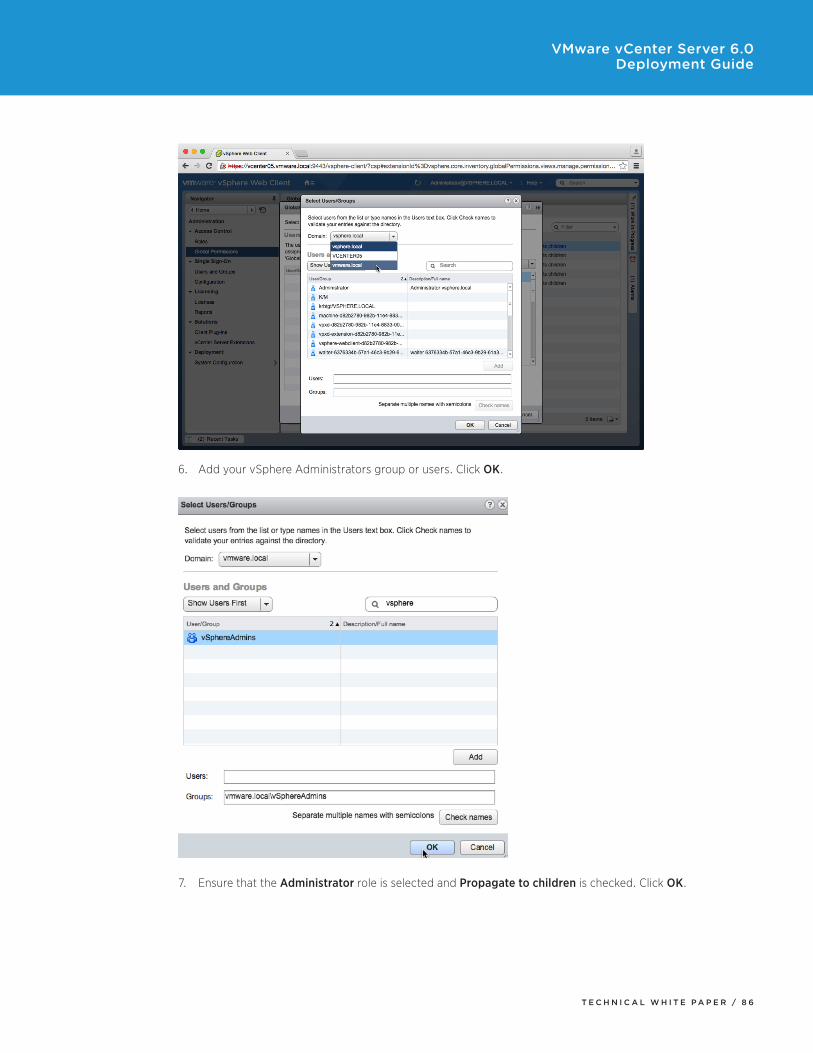
5. Select your Active Directory domain or other identity source you added earlier.
T E C H N I C A L W H I T E P A P E R / 8 6
VMware vCenter Server 6.0 Deployment Guide
6. Add your vSphere Administrators group or users. Click OK.
7. Ensure that the Administrator role is selected and Propagate to children is checked. Click OK.

T E C H N I C A L W H I T E P A P E R / 8 7
VMware vCenter Server 6.0 Deployment Guide
8. You can now log out and back in to vSphere Web Client as an Administrator you just added.

T E C H N I C A L W H I T E P A P E R / 8 8
VMware vCenter Server 6.0 Deployment Guide
Certificate ManagementIn most cases, certificate replacement in vSphere 6.0 is not necessary. This is because the Platform Services Controller contains the VMware Certificate Authority (VMCA), which issues certificate authority (CA) signed certificateswithavalidityperiodof10years.
These certificates are issued to solution users—the users created when a solution such as vCenter Server, vCenterInventoryService,andsoon,isregisteredwithvCenterSingleSign-On—andareutilizedascertificateendpoints. These users are issued certificates instead of individual services. This enables the services associated withasolutionusertoutilizethesamecertificate,substantiallyreducingthenumberofcertificatesrequiredtomanage in the environment.
ESXi hosts are also issued certificates from the VMCA when the hosts are added to the vCenter Server inventory or when vCenter Server is upgraded.
When certificates must be changed—such as when making the VMCA a subordinate of an existing enterprise CA or when generating new solution user certificates after the VMCA mode has changed—the certificate manager utility can be used.
Make the VMCA a Subordinate Certificate Authority1. Log in to the Platform Services Controller.
2. Using openssl, generate a certificate request.
openssl genrsa -out c:\certs\psc001.key 2048
openssl req -new -key c:\certs\psc001.key -out c:\certs\psc001.csr
a. Answer questions to build the request.
b. Submit the request to a CA. Use the subordinate CA template for the request.

T E C H N I C A L W H I T E P A P E R / 8 9
VMware vCenter Server 6.0 Deployment Guide
c. Download the certificate in Base 64 format; save it to c:\certs.
3. Wait at least 24 hours before continuing. The VMCA requires that the certificate have a valid date of at least 24 hours prior.
4. Run certificate-manager from c:\program files\vmware\vCenter Server\bin for Windows installs or /usr/lib/vmware-vmca/bin/certificate-manager for vCenter Server Appliance.
5. Choose option 2: Replace VMCA Root certificate with Custom Signing Certificate and replace all Certificates.
6. Enter the [email protected] password.
7. Answer all questions as you did earlier when creating the certificate request.
8. When asked to provide a valid custom certificate for root, enter the path to the certificate obtained earlier.
9. When asked to provide a valid custom key for root, enter the path to the .key file generated with openssl earlier.
10. Enter Y to continue to replace the certificate.
11.Add the certificate to a Windows Group policy as an intermediate CA. This will enable client machines —such as those using vSphere Web Client—to trust the certificates issued by the VMCA.
T E C H N I C A L W H I T E P A P E R / 9 0
VMware vCenter Server 6.0 Deployment Guide
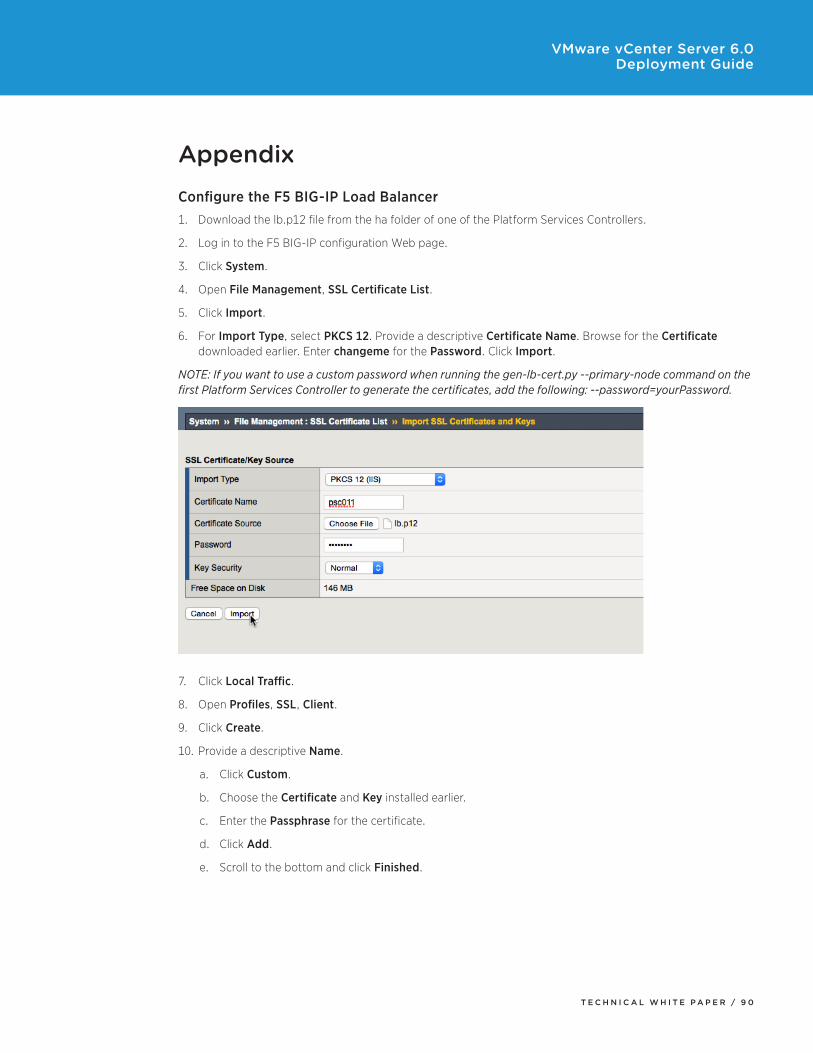
AppendixConfigure the F5 BIG-IP Load Balancer1. Download the lb.p12 file from the ha folder of one of the Platform Services Controllers.
2. Log in to the F5 BIG-IP configuration Web page.
3. Click System.
4. Open File Management, SSL Certificate List.
5. Click Import.
6. For Import Type, select PKCS 12. Provide a descriptive Certificate Name. Browse for the Certificate downloaded earlier. Enter changeme for the Password. Click Import.
NOTE: If you want to use a custom password when running the gen-lb-cert.py --primary-node command on the first Platform Services Controller to generate the certificates, add the following: --password=yourPassword.
7. Click Local Traffic.
8. Open Profiles, SSL, Client.
9. Click Create.
10. Provide a descriptive Name.
a. Click Custom.
b. Choose the Certificate and Key installed earlier.
c. Enter the Passphrase for the certificate.
d. Click Add.
e. Scroll to the bottom and click Finished.
T E C H N I C A L W H I T E P A P E R / 9 1
VMware vCenter Server 6.0 Deployment Guide
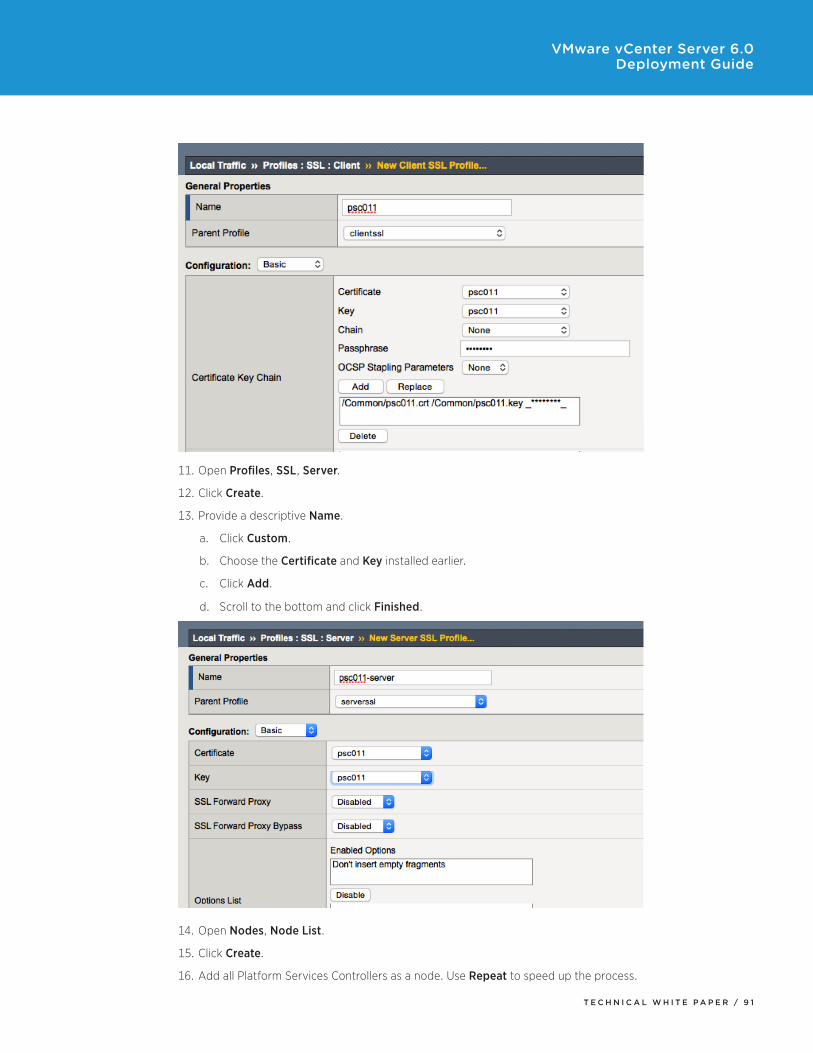
11. Open Profiles, SSL, Server.
12. Click Create.
13. Provide a descriptive Name.
a. Click Custom.
b. Choose the Certificate and Key installed earlier.
c. Click Add.
d. Scroll to the bottom and click Finished.
14. Open Nodes, Node List.
15. Click Create.
16. Add all Platform Services Controllers as a node. Use Repeat to speed up the process.

T E C H N I C A L W H I T E P A P E R / 9 2
VMware vCenter Server 6.0 Deployment Guide
17. Open Pools, Pool List.
18. Click Create.
19. Create six pools, one each for port 443, 2012, 2014, 2020, 389, and 636.
a. All pools have the same Configuration, tcp for monitoring, and Round Robin for Load Balancing Method.
b. Use Repeat to save time: Remove the existing members from the list.

T E C H N I C A L W H I T E P A P E R / 9 3
VMware vCenter Server 6.0 Deployment Guide
20. Open Virtual Servers, Virtual Server List.
21. Click Create.
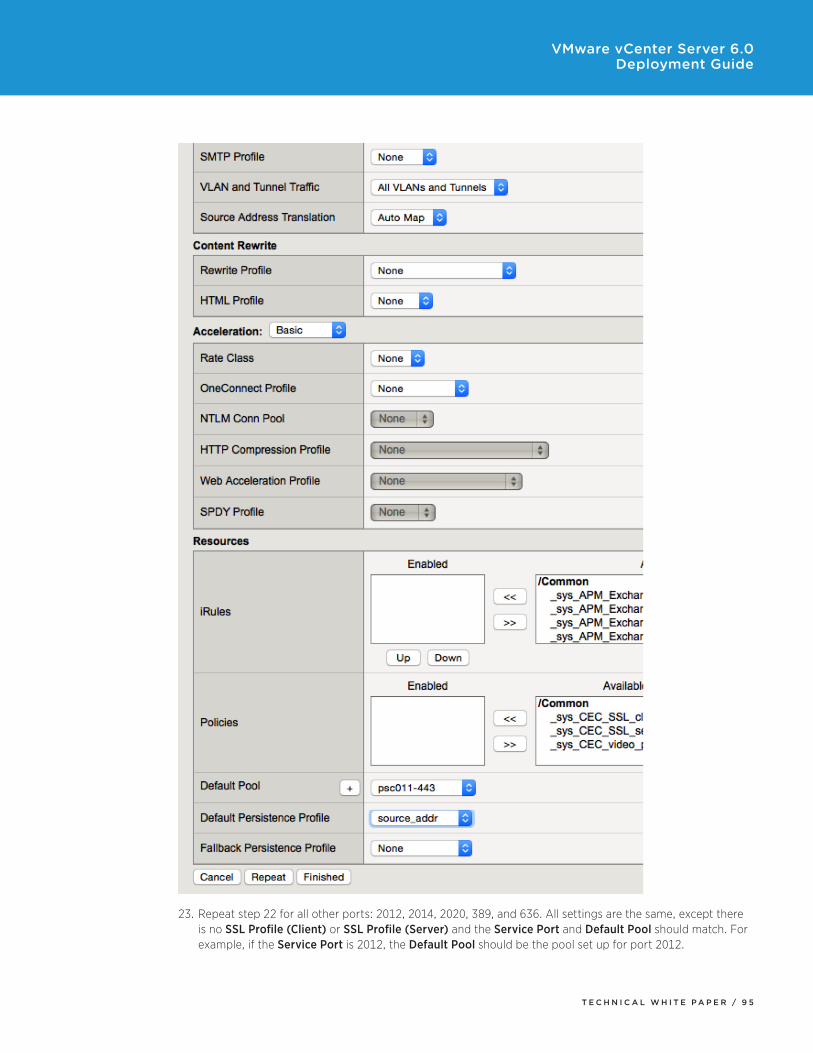
22. All virtual servers—except the one for port 443—have the same configuration.
a. Provide a descriptive Name.
b. Enter the Destination Address.
c. For Service Port, enter 443.
d. For SSL Profile (Client), select the client profile created earlier.
e. For SSL Profile (Server), select the client profile created earlier.
f. For Source Address Translation, select Auto Map.
g. For the Default Pool, select the pool created for port 443.
h. For the Default Persistence Profile, select source_addr.
i. Click Finished.

T E C H N I C A L W H I T E P A P E R / 9 4
VMware vCenter Server 6.0 Deployment Guide
T E C H N I C A L W H I T E P A P E R / 9 5
VMware vCenter Server 6.0 Deployment Guide
23. Repeat step 22 for all other ports: 2012, 2014, 2020, 389, and 636. All settings are the same, except there is no SSL Profile (Client) or SSL Profile (Server) and the Service Port and Default Pool should match. For example, if the Service Port is 2012, the Default Pool should be the pool set up for port 2012.

T E C H N I C A L W H I T E P A P E R / 9 6
VMware vCenter Server 6.0 Deployment Guide
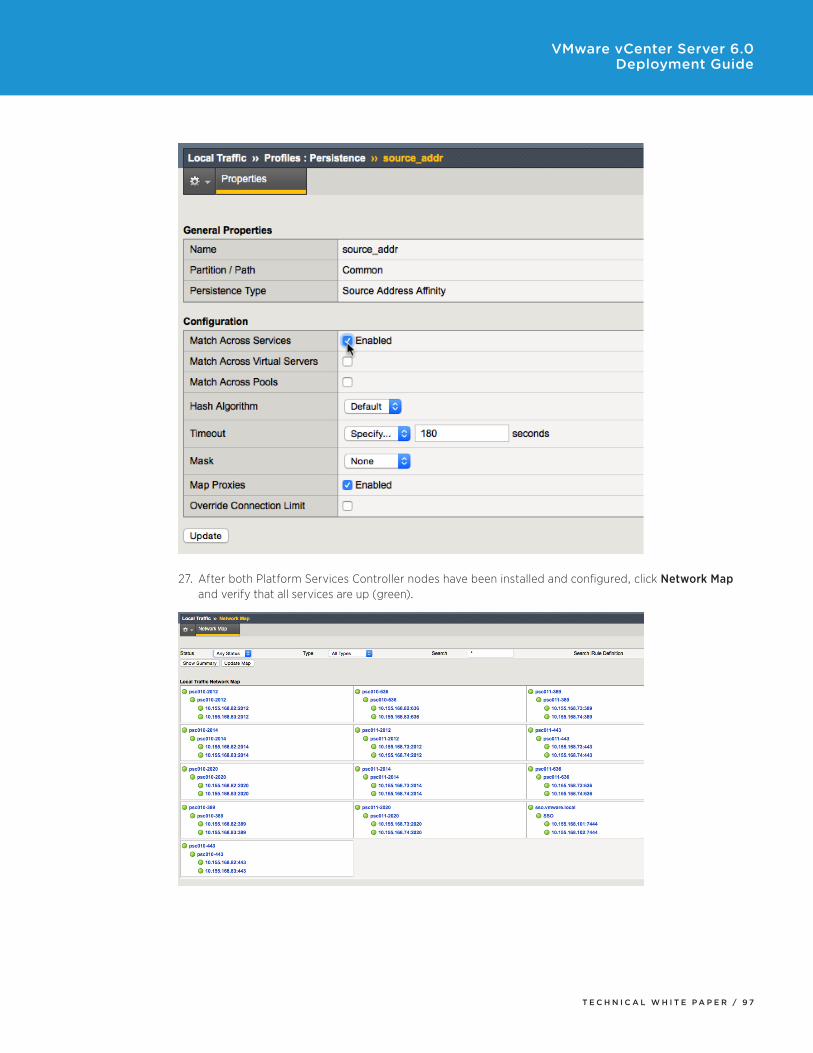
24. Open Profiles, Persistence.
25. Click source_addr.
26. Check Match Across Services and click Update.
T E C H N I C A L W H I T E P A P E R / 9 7
VMware vCenter Server 6.0 Deployment Guide
27. After both Platform Services Controller nodes have been installed and configured, click Network Map and verify that all services are up (green).

T E C H N I C A L W H I T E P A P E R / 9 8
VMware vCenter Server 6.0 Deployment Guide
Scripted vCenter Server InstallationsvCenterServerAppliancecanbedeployedviacustomJSONfilesfromacommandline.TheISOshipswithexamples for deploying an embedded (vCenter Server and Platform Services Controller), management (vCenter Server), and Platform Services Controller appliance.
There are command-line utilities for 64-bit Linux, Mac OS X, and Windows.
ThefollowingisasampleembeddedJSONfile:
{
“__comments”:
[
“WilldeployanembeddedVCSAtohost10intheMGMTCluster”
],
“deployment”:
{
“esx.hostname”:”w3-tm-hp380-010.vmware.local”,
“esx.datastore”:”NFSMGMT01”,
“esx.username”:”root”,
“esx.password”:”VMware1!”,
“deployment.option”:”tiny”,
“deployment.network”:”VMNetwork”,
“appliance.name”:”embedded-node”,
“appliance.thin.disk.mode”:true
},
“vcsa”:
{
“system”:
{
“root.password”:”VMware1!”,
“ssh.enable”:true
},
“sso”:
{
“password”:”VMware1!”,
“domain-name”:”vsphere.local”,
“site-name”:”PaloAlto”
}
}
}
T E C H N I C A L W H I T E P A P E R / 9 9
VMware vCenter Server 6.0 Deployment Guide
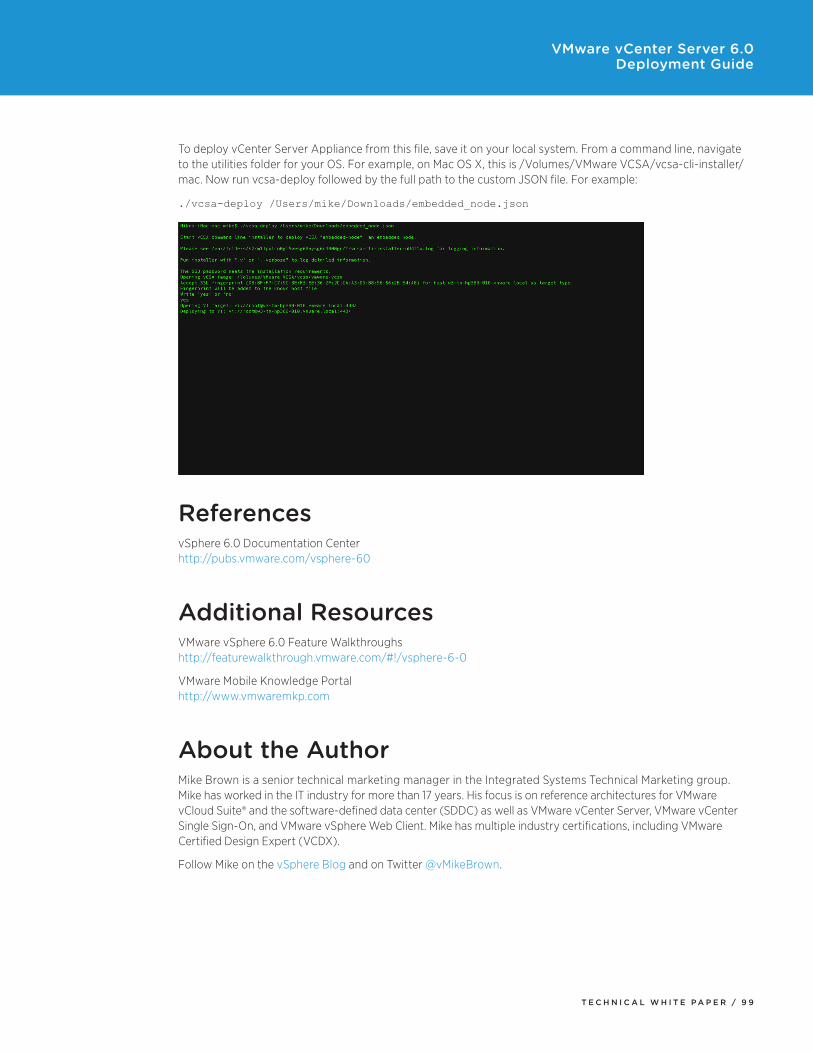
To deploy vCenter Server Appliance from this file, save it on your local system. From a command line, navigate to the utilities folder for your OS. For example, on Mac OS X, this is /Volumes/VMware VCSA/vcsa-cli-installer/mac.Nowrunvcsa-deployfollowedbythefullpathtothecustomJSONfile.Forexample:
./vcsa-deploy /Users/mike/Downloads/embedded_node.json
References vSphere 6.0 Documentation Center http://pubs.vmware.com/vsphere-60
Additional ResourcesVMware vSphere 6.0 Feature Walkthroughs http://featurewalkthrough.vmware.com/#!/vsphere-6-0
VMware Mobile Knowledge Portal http://www.vmwaremkp.com
About the AuthorMike Brown is a senior technical marketing manager in the Integrated Systems Technical Marketing group. MikehasworkedintheITindustryformorethan17years.HisfocusisonreferencearchitecturesforVMwarevCloud Suite® and the software-defined data center (SDDC) as well as VMware vCenter Server, VMware vCenter Single Sign-On, and VMware vSphere Web Client. Mike has multiple industry certifications, including VMware Certified Design Expert (VCDX).
Follow Mike on the vSphere Blog and on Twitter @vMikeBrown.

VMware, Inc. 3401 Hillview Avenue Palo Alto CA 94304 USA Tel 877-486-9273 Fax 650-427-5001 www .vmware .comCopyright © 2015 VMware, Inc . All rights reserved . This product is protected by U .S . and international copyright and intellectual property laws . VMware products are covered by one or more patents listed at http://www .vmware .com/go/patents . VMware is a registered trademark or trademark of VMware, Inc . in the United States and/or other jurisdictions . All other marks and names mentioned herein may be trademarks of their respective companies . Item No: VMW-DG-vCNTR-SRVR-6 .0-USLET-101 Docsource: OIC-FP-1274