VMware Identity Manager Administration - VMware Identity Manager 2 · VMware Identity Manager...
134
VMware Identity Manager Administration VMware Identity Manager 2.7 This document supports the version of each product listed and supports all subsequent versions until the document is replaced by a new edition. To check for more recent editions of this document, see http://www.vmware.com/support/pubs. EN-002105-01
Transcript of VMware Identity Manager Administration - VMware Identity Manager 2 · VMware Identity Manager...

VMware Identity ManagerAdministration
VMware Identity Manager 2.7
This document supports the version of each product listed andsupports all subsequent versions until the document isreplaced by a new edition. To check for more recent editions ofthis document, see http://www.vmware.com/support/pubs.
EN-002105-01

VMware Identity Manager Administration
2 VMware, Inc.
You can find the most up-to-date technical documentation on the VMware Web site at:
http://www.vmware.com/support/
The VMware Web site also provides the latest product updates.
If you have comments about this documentation, submit your feedback to:
Copyright © 2013 – 2016 VMware, Inc. All rights reserved. Copyright and trademark information.
VMware, Inc.3401 Hillview Ave.Palo Alto, CA 94304www.vmware.com

Contents
About VMware Identity Manager Administration 5
1 Working in VMware Identity Manager Administration Console 7
Navigating in the Administration Console 7Identity and Access Management Settings Overview 8
2 Integrating with Your Enterprise Directory 11
Important Concepts Related to Directory Integration 11
3 Integrating with Active Directory 13
Active Directory Environments 13About Domain Controller Selection (domain_krb.properties file) 15Managing User Attributes that Sync from Active Directory 18Permissions Required for Joining a Domain 20Configuring Active Directory Connection to the Service 20Enabling Users to Reset Expired Active Directory Passwords 24Setting up Directory Sync Safeguards 25
4 Integrating with LDAP Directories 27
Limitations of LDAP Directory Integration 27Integrate an LDAP Directory with the Service 28
5 Just-in-Time User Provisioning 33
About Just-in-Time User Provisioning 33Preparing for Just-in-Time Provisioning 34Configuring Just-in-Time User Provisioning 36Requirements for SAML Assertions 36Disabling Just-in-Time User Provisioning 37Deleting a Just-in-Time Directory 38Error Messages 38
6 Configuring User Authentication in
VMware Identity Manager 41Configuring Kerberos for VMware Identity Manager 42Configuring SecurID for VMware Identity Manager 46Configuring RADIUS for VMware Identity Manager 48Configuring a Certificate or Smart Card Adapter for Use with VMware Identity Manager 51Configuring RSA Adaptive Authentication in VMware Identity Manager 54Configure Additional Workspace Identity Providers 56Configuring a Third-Party Identity Provider Instance to Authenticate Users 56Managing Authentication Methods to Apply to Users 58
VMware, Inc. 3

7 Managing Access Policies 63
Configuring Access Policy Settings 64Managing Web-Application-Specific Policies 66Add a Web-Application-Specific Policy 67Configure Custom Access Denied Error Message 68Edit the Default Access Policy 69Enabling Persistent Cookie on Mobile Devices 69
8 Managing Users and Groups 71
User and Group Types 71Manage Groups and Configure Group Rules 72Manage User Entitlements 75About User Names and Group Names 78
9 Managing the Catalog 81
Managing Resources in the Catalog 81Grouping Resource into Categories 89Managing Catalog Settings 90
10 Working in the Administration Console Dashboard 97
Monitor Users and Resource Usage from the Dashboard 97Monitor System Information and Health 98Viewing Reports 98
11 Custom Branded Web Portals 101
Customize Branding in VMware Identity Manager 101Customize Branding for the User Portal 102
12 Integrating AirWatch With VMware Identity Manager 105
Setting up AirWatch for Integration With VMware Identity Manager 105Setting up an AirWatch Instance in VMware Identity Manager 109Enable Unified Catalog for AirWatch 110Configuring User Authentication with AirWatch 111Implementing Authentication with AirWatch Cloud Connector 112Implementing Mobile Single Sign-in Authentication for AirWatch-Managed iOS Devices 115Implementing Mobile Single Sign-on Authentication for Android Devices 123Enable Compliance Checking for AirWatch Managed Devices 129
Index 131
VMware Identity Manager Administration
4 VMware, Inc.

About VMware Identity Manager Administration
VMware Identity Manager Administration provides information and instructions about using andmaintaining the VMware Identity Manager services. With VMware Identity Manager™ you can set up andmanage authentication methods and access policies, customize a catalog of resources for your organization'sapplications and provide secure, multi-device, managed user access to those resources. Such resourcesinclude Web applications, Windows applications captured as ThinApp packages, Citrix-based applications,and View desktop and application pools. VMware Identity Manager provides users with a unifiedexperience and offers your IT department unified security and management for all services and applicationsacross multiple devices.
Intended AudienceThis information is intended for anyone who wants to configure and administer VMware Identity Manager.This information is written for experienced Windows or Linux system administrators who are familiar withvirtual machine technology, identity management, Kerberos, and directory services. Knowledge of othertechnologies, such as VMware ThinApp®, View, Citrix application virtualization, and authenticationmethods, such as RSA SecurID, is helpful if you plan to implement those features.
VMware, Inc. 5

VMware Identity Manager Administration
6 VMware, Inc.

Working in VMware Identity ManagerAdministration Console 1
The VMware Identity Manager administration console provides you with a centralized management consolewith which you can manage users and groups, add resources to the catalog, manage entitlements toresources in the catalog, and set up and manage authentication and access policies.
The key tasks you perform from the administration console is manage user authentication and accesspolicies and entitle users to resources. Other tasks support this key task by providing you with moredetailed control over which users or groups are entitled to which resources under which conditions.
End users can sign in to their apps portal to access work resources, including desktops, browsers, sharedcorporate documents, and a variety of types of applications that you entitle for their use.
This chapter includes the following topics:
n “Navigating in the Administration Console,” on page 7
n “Identity and Access Management Settings Overview,” on page 8
Navigating in the Administration ConsoleThe tasks in the administration console are organized by tabs.
Tab Description
Dashboard The User Engagement dashboard can be used to monitor user and resource usage. This dashboarddisplays information about who signed in, which applications are being used, and how often theyare being used.The System Diagnostics dashboard displays a detailed overview of the health of the service in yourenvironment and other information about the services.You can create reports to track users' and groups' activities, resource and device usage, and auditevents by user.
Users andGroups
In the Users and Groups tab, you can manage and monitor users and groups imported from ActiveDirectory, create new groups, and entitle users and groups to resources.
Catalog The Catalog is the repository for all the resources that you can entitle to users. In the Catalog tab, youcan add Web applications from the cloud application catalog, create a new application, groupapplications into categories, and access information about each resource. On the Catalog Settingspage you can download SAML certificates, manage resource configurations, and customize theappearance of the user portal.
VMware, Inc. 7

Tab Description
Identity & AccessManagement
In the Identity & Access Management tab, you can set up the connector service, apply custombranding for the sign in page and add your logo, enable and manage authentication methods, setpolicies, set up your directory connection to Active Directory, and sync users and groups to thedirectory. You can also configure third-party identity providers.
ApplianceSettings
In the Appliance Settings tab, you can manage the configuration of the appliance, includingconfiguring SSL certificates for the appliance, change the services admin and system passwords, andmanage other infrastructure functions. You can also update the license settings and configure SMTPsettings.
Supported Web Browsers to Access the Administration ConsoleThe VMware Identity Manager administration console is a Web-based application you use to manage yourtenant. You can access the administration console from the following browsers.
n Internet Explorer 11 for Windows systems
n Google Chrome 42.0 or later for Windows and Mac systems
n Mozilla Firefox 40 or later for Windows and Mac systems
n Safari 6.2.8 and later for Mac systems
Note In Internet Explorer 11, JavaScript must be enabled and cookies allowed to authenticate throughVMware Identity Manager.
VMware Identity Manager End User ComponentsUsers can access entitled resources from their My Apps portal.
They can access virtualized Windows applications captured as ThinApp packages from Identity ManagerDesktop .
Table 1‑1. User Client Components
User Component Description Available Endpoints
Workspace ONE User AppsPortal
The apps portal is an agentless web-based application.It is the default interface used when users access anduse their entitled resources with a browser.If an end user has entitled ThinApp applications and ison a Windows computer where the Identity ManagerDesktop application is installed and active, they canview and launch their entitled ThinApp packagesfrom this apps portal.
Web-based apps portal isavailable on all supportedsystem endpoints, such asWindows computers, Maccomputers, iOS devices,Android devices.
Identity Manager Desktop When this program is installed on users' Windowscomputers, they can work with their virtualizedWindows applications captured as ThinApp packages.
Windows computers
Identity and Access Management Settings OverviewFrom the Identity and Access Management tab in the administration console, you can set up and managethe authentication methods, access policies, directory service, and customize the end-user portal andadministration console look and feel.
The following is a description of the setup settings in the Identity and Access Management tab.
VMware Identity Manager Administration
8 VMware, Inc.

Figure 1‑1. Identity and Access Management Setup Pages
Table 1‑2. Identity and Access Management Setup Settings
Setting Description
Setup > Connectors The connector is an on-premises component of the service that you deploy inside yourenterprise network.When you associate a directory with a connector instance, the connector creates a partitionfor the associated directory called a worker. A connector instance can have multipleworkers associated with it. Each worker acts as an identity provider. You define andconfigure authentication methods per worker.The connector syncs user and group data between your enterprise directory and the servicethrough one or more workers.n In the Worker column, select a worker to view the details about the connector and
navigate to the Auth Adapters page to see the status of the available authenticationmethods. For information about authentication, see Chapter 6, “Configuring UserAuthentication in VMware Identity Manager,” on page 41.
n In the Identity Provider column, select the IdP to view, edit, or disable. See “Add andConfigure an Identity Provider Instance,” on page 57.
n In the Associated Directory column, access the directory associated with this worker.Before you can add a new connector, you click Add Connector to generate an activationcode that you paste in the Setup wizard to establish communication with the connector.Join Domain linkn You click Join Domain to join the connector to a specific Active Directory domain. For
example when you configure Kerberos authentication, you must join the ActiveDirectory domain either containing users or having trust relationship with the domainscontaining users.
n When you configure a directory with an Integrated Windows Authentication ActiveDirectory, the connector joins the domain according to the configuration details.
Setup > Custom Branding In the Custom Branding page, you can customize the appearance of the administrationconsole header and sign-in screen. See “Customize Branding in VMware IdentityManager,” on page 101.To customize the end-user Web portal, mobile, and tablet views, go to Catalog > Settings >User Portal Branding. See “Customize Branding for the User Portal,” on page 102.
Setup > User Attributes The User Attributes page lists the default user attributes that sync in the directory, and youcan add other attributes that you can map to Active Directory attributes. See “SelectAttributes to Sync with Directory,” on page 19.
Setup > Network Ranges This page lists the network ranges that you added. You configure a network range to allowusers access through the IP addresses you configured. You can add additional networkranges and you can edit existing ranges. See “Add or Edit a Network Range,” on page 58.
Setup > Auto Discovery Register your email domain to use the auto-discovery service to make it easier for users toaccess their apps portal using Workspace ONE. To configure auto-discovery in your on-premises deployment, you log in to the VMware Identity Manager service as the localadmin and configure your AirWatch ID and password.You then enter the domain toregister.End users can enter their email addresses instead of the organization's URL when theyaccess their apps portal through Workspace ONE.See the Setting up the VMware Workspace ONE App on Devices guide for moreinformation about auto discovery.
Chapter 1 Working in VMware Identity Manager Administration Console
VMware, Inc. 9

Table 1‑2. Identity and Access Management Setup Settings (Continued)
Setting Description
Setup > AirWatch On the AirWatch page, you can set up integration with AirWatch. After integration is setup and saved, you can enable the unified catalog to merge applications set up in theAirWatch catalog to the unified catalog; enable compliance check to verify that manageddevices adhere to AirWatch compliance policies, and enable user password authenticationthrough the AirWatch Cloud Connector (ACC). See Chapter 12, “Integrating AirWatchWith VMware Identity Manager,” on page 105.
Setup > Preferences The Preferences page displays features that the admin can enable. This includesn Persistent cookies can be enabled from this page. See “Enable Persistent Cookie,” on
page 70.n When local users are configured in your service, to show Local Users as a domain
option on the sign in page, enable Show Local Users on the login page.
The following is a description of the settings used to manage the services in the Identity and AccessManagement tab.
Figure 1‑2. Identity & Access Management Manage Pages
Table 1‑3. Identity and Access Management Manage Settings
Setting Description
Manage > Directories The Directories page lists directories that you created. You create one or more directoriesand then sync those directories with your Active Directory deployment. On this page, youcan see the number of groups and users that are synced to the directory and the last synctime. You can click Sync Now, to start the directory sync.See Chapter 3, “Integrating with Active Directory,” on page 13.When you click a directory name, you can edit the sync settings, navigate the IdentityProviders page, and view the sync log.From the directories sync settings page you can schedule the sync frequency, see the list ofdomains associated with this directory, change the mapped attributes list, update the userand groups list that syncs, and set the safeguard targets.
Manage > IdentityProviders
The Identity Providers page lists the identity providers that you configured. The connectoris the initial identity provider. You can add third-party identity provider instances or havea combination of both. The VMware Identity Manager built-in identity provider can beconfigured for authentication.See “Add and Configure an Identity Provider Instance,” on page 57.
Manage > PasswordRecovery Assistant
On the Password Recovery Assistant page, you can change the default behavior when"Forgot password" is clicked on the sign-in screen by the end user.
Manage > Policies The Policies page lists the default access policy and any other Web application accesspolicies you created. Policies are a set of rules that specify criteria that must be met forusers to access their Workspace ONE portal or to launch Web applications that are enabledfor the user. You can edit the default policy and if Web applications are added to thecatalog, and you can add new policies to manage access to these Web applications. See Chapter 7, “Managing Access Policies,” on page 63.
VMware Identity Manager Administration
10 VMware, Inc.

Integrating with Your EnterpriseDirectory 2
You integrate VMware Identity Manager with your enterprise directory to sync users and groups from yourenterprise directory to the VMware Identity Manager service.
The following types of directories are supported.
n Active Directory over LDAP
n Active Directory, Integrated Windows Authentication
n LDAP directory
To integrate with your enterprise directory, you perform the following tasks.
n Specify the attributes that you want users to have in the VMware Identity Manager service.
n Create a directory in the VMware Identity Manager service of the same type as your enterprisedirectory and specify the connection details.
n Map the VMware Identity Manager attributes to attributes used in your Active Directory or LDAPdirectory.
n Specify the users and groups to sync.
n Sync users and groups.
After you integrate your enterprise directory and perform the initial sync, you can update the configuration,set up a sync schedule to sync regularly, or start a sync at any time.
Important Concepts Related to Directory IntegrationSeveral concepts are integral to understanding how the VMware Identity Manager service integrates withyour Active Directory or LDAP directory environment.
ConnectorThe connector, a component of the service, performs the following functions.
n Syncs user and group data from your Active Directory or LDAP directory to the service.
n When being used as an identity provider, authenticates users to the service.
VMware, Inc. 11

The connector is the default identity provider. You can also use third-party identity providers thatsupport the SAML 2.0 protocol. Use a third-party identity provider for an authentication type theconnector does not support, or if the third-party identity provider is preferable based on yourenterprise security policy.
Note If you use third-party identity providers, you can either configure the connector to sync user andgroup data or configure Just-in-Time user provisioning. See the Just-in-Time User Provisioning sectionin VMware Identity Manager Administration for more information.
DirectoryThe VMware Identity Manager service has its own concept of a directory, corresponding to the ActiveDirectory or LDAP directory in your environment. This directory uses attributes to define users and groups.You create one or more directories in the service and then sync those directories with your Active Directoryor LDAP directory. You can create the following directory types in the service.
n Active Directory
n Active Directory over LDAP. Create this directory type if you plan to connect to a single ActiveDirectory domain environment. For the Active Directory over LDAP directory type, the connectorbinds to Active Directory using simple bind authentication.
n Active Directory, Integrated Windows Authentication. Create this directory type if you plan toconnect to a multi-domain or multi-forest Active Directory environment. The connector binds toActive Directory using Integrated Windows Authentication.
The type and number of directories that you create varies depending on your Active Directoryenvironment, such as single domain or multi-domain, and on the type of trust used between domains.In most environments, you create one directory.
n LDAP Directory
The service does not have direct access to your Active Directory or LDAP directory. Only the connector hasdirect access. Therefore, you associate each directory created in the service with a connector instance.
WorkerWhen you associate a directory with a connector instance, the connector creates a partition for the associateddirectory called a worker. A connector instance can have multiple workers associated with it. Each workeracts as an identity provider. You define and configure authentication methods per worker.
The connector syncs user and group data between your Active Directory or LDAP directory and the servicethrough one or more workers.
Important You cannot have two workers of the Active Directory, Integrated Windows Authentication typeon the same connector instance.
VMware Identity Manager Administration
12 VMware, Inc.

Integrating with Active Directory 3You can integrate VMware Identity Manager with your Active Directory deployment to sync users andgroups from Active Directory to VMware Identity Manager.
See also “Important Concepts Related to Directory Integration,” on page 11.
This chapter includes the following topics:
n “Active Directory Environments,” on page 13
n “About Domain Controller Selection (domain_krb.properties file),” on page 15
n “Managing User Attributes that Sync from Active Directory,” on page 18
n “Permissions Required for Joining a Domain,” on page 20
n “Configuring Active Directory Connection to the Service,” on page 20
n “Enabling Users to Reset Expired Active Directory Passwords,” on page 24
n “Setting up Directory Sync Safeguards,” on page 25
Active Directory EnvironmentsYou can integrate the service with an Active Directory environment that consists of a single Active Directorydomain, multiple domains in a single Active Directory forest, or multiple domains across multiple ActiveDirectory forests.
Single Active Directory Domain EnvironmentA single Active Directory deployment allows you to sync users and groups from a single Active Directorydomain.
For this environment, when you add a directory to the service, select the Active Directory over LDAPoption.
For more information, see:
n “About Domain Controller Selection (domain_krb.properties file),” on page 15
n “Managing User Attributes that Sync from Active Directory,” on page 18
n “Permissions Required for Joining a Domain,” on page 20
n “Configuring Active Directory Connection to the Service,” on page 20
VMware, Inc. 13

Multi-Domain, Single Forest Active Directory EnvironmentA multi-domain, single forest Active Directory deployment allows you to sync users and groups frommultiple Active Directory domains within a single forest.
You can configure the service for this Active Directory environment as a single Active Directory, IntegratedWindows Authentication directory type or, alternatively, as an Active Directory over LDAP directory typeconfigured with the global catalog option.
n The recommended option is to create a single Active Directory, Integrated Windows Authenticationdirectory type.
When you add a directory for this environment, select the Active Directory (Integrated WindowsAuthentication) option.
For more information, see:
n “About Domain Controller Selection (domain_krb.properties file),” on page 15
n “Managing User Attributes that Sync from Active Directory,” on page 18
n “Permissions Required for Joining a Domain,” on page 20
n “Configuring Active Directory Connection to the Service,” on page 20
n If Integrated Windows Authentication does not work in your Active Directory environment, create anActive Directory over LDAP directory type and select the global catalog option.
Some of the limitations with selecting the global catalog option include:
n The Active Directory object attributes that are replicated to the global catalog are identified in theActive Directory schema as the partial attribute set (PAS). Only these attributes are available forattribute mapping by the service. If necessary, edit the schema to add or remove attributes that arestored in the global catalog.
n The global catalog stores the group membership (the member attribute) of only universal groups.Only universal groups are synced to the service. If necessary, change the scope of a group from alocal domain or global to universal.
n The bind DN account that you define when configuring a directory in the service must havepermissions to read the Token-Groups-Global-And-Universal (TGGAU) attribute.
Active Directory uses ports 389 and 636 for standard LDAP queries. For global catalog queries, ports3268 and 3269 are used.
When you add a directory for the global catalog environment, specify the following during theconfiguration.
n Select the Active Directory over LDAP option.
n Deselect the check box for the option This Directory supports DNS Service Location.
n Select the option This Directory has a Global Catalog. When you select this option, the server portnumber is automatically changed to 3268. Also, because the Base DN is not needed whenconfiguring the global catalog option, the Base DN text box does not display.
n Add the Active Directory server host name.
n If your Active Directory requires access over SSL, select the option This Directory requires allconnections to use SSL and paste the certificate in the text box provided. When you select thisoption, the server port number is automatically changed to 3269.
VMware Identity Manager Administration
14 VMware, Inc.

Multi-Forest Active Directory Environment with Trust RelationshipsA multi-forest Active Directory deployment with trust relationships allows you to sync users and groupsfrom multiple Active Directory domains across forests where two-way trust exists between the domains.
When you add a directory for this environment, select the Active Directory (Integrated WindowsAuthentication) option.
For more information, see:
n “About Domain Controller Selection (domain_krb.properties file),” on page 15
n “Managing User Attributes that Sync from Active Directory,” on page 18
n “Permissions Required for Joining a Domain,” on page 20
n “Configuring Active Directory Connection to the Service,” on page 20
Multi-Forest Active Directory Environment Without Trust RelationshipsA multi-forest Active Directory deployment without trust relationships allows you to sync users and groupsfrom multiple Active Directory domains across forests without a trust relationship between the domains. Inthis environment, you create multiple directories in the service, one directory for each forest.
The type of directories you create in the service depends on the forest. For forests with multiple domains,select the Active Directory (Integrated Windows Authentication) option. For a forest with a single domain,select the Active Directory over LDAP option.
For more information, see:
n “About Domain Controller Selection (domain_krb.properties file),” on page 15
n “Managing User Attributes that Sync from Active Directory,” on page 18
n “Permissions Required for Joining a Domain,” on page 20
n “Configuring Active Directory Connection to the Service,” on page 20
About Domain Controller Selection (domain_krb.properties file)The domain_krb.properties file determines which domain controllers are used for directories that have DNSService Location (SRV records) lookup enabled. It contains a list of domain controllers for each domain. Theconnector creates the file initially, and you must maintain it subsequently. The file overrides DNS ServiceLocation (SRV) lookup.
The following types of directories have DNS Service Location lookup enabled:
n Active Directory over LDAP with the This Directory supports DNS Service Location option selected
n Active Directory (Integrated Windows Authentication), which always has DNS Service Location lookupenabled
When you first create a directory that has DNS Service Location lookup enabled, a domain_krb.propertiesfile is created automatically in the /usr/local/horizon/conf directory of the virtual machine and is auto-populated with domain controllers for each domain. To populate the file, the connector attempts to finddomain controllers that are at the same site as the connector and selects two that are reachable and thatrespond the fastest.
When you create additional directories that have DNS Service Location enabled, or add new domains to anIntegrated Windows Authentication directory, the new domains, and a list of domain controllers for them,are added to the file.
Chapter 3 Integrating with Active Directory
VMware, Inc. 15
You can override the default selection at any time by editing the domain_krb.properties file. As a bestpractice, after you create a directory, view the domain_krb.properties file and verify that the domaincontrollers listed are the optimal ones for your configuration. For a global Active Directory deployment thathas multiple domain controllers across different geographical locations, using a domain controller that is inclose proximity to the connector ensures faster communication with Active Directory.
You must also update the file manually for any other changes. The following rules apply.
n The domain_krb.properties file is created in the virtual machine that contains the connector. In a typicaldeployment, with no additional connectors deployed, the file is created in theVMware Identity Manager service virtual machine. If you are using an additional connector for thedirectory, the file is created in the connector virtual machine. A virtual machine can only have onedomain_krb.properties file.
n The file is created, and auto-populated with domain controllers for each domain, when you first create adirectory that has DNS Service Location lookup enabled.
n Domain controllers for each domain are listed in order of priority. To connect to Active Directory, theconnector tries the first domain controller in the list. If it is not reachable, it tries the second one in thelist, and so on.
n The file is updated only when you create a new directory that has DNS Service Location lookup enabledor when you add a domain to an Integrated Windows Authentication directory. The new domain and alist of domain controllers for it are added to the file.
Note that if an entry for a domain already exists in the file, it is not updated. For example, if you createda directory, then deleted it, the original domain entry remains in the file and is not updated.
n The file is not updated automatically in any other scenario. For example, if you delete a directory, thedomain entry is not deleted from the file.
n If a domain controller listed in the file is not reachable, edit the file and remove it.
n If you add or edit a domain entry manually, your changes will not be overwritten.
For information on editing the domain_krb.properties file, see “Editing the domain_krb.properties file,” onpage 17.
How Domain Controllers are Selected to Auto-Populate thedomain_krb.properties File
To auto-populate the domain_krb.properties file, domain controllers are selected by first determining thesubnet on which the connector resides (based on the IP address and netmask), then using the ActiveDirectory configuration to identify the site of that subnet, getting the list of domain controllers for that site,filtering the list for the appropriate domain, and picking the two domain controllers that respond the fastest.
To detect the domain controllers that are the closest, VMware Identity Manager has the followingrequirements:
n The subnet of the connector must be present in the Active Directory configuration, or a subnet must bespecified in the runtime-config.properties file. See “Overriding the Default Subnet Selection,” onpage 17.
The subnet is used to determine the site.
n The Active Directory configuration must be site aware.
If the subnet cannot be determined or if your Active Directory configuration is not site aware, DNS ServiceLocation lookup is used to find domain controllers, and the file is populated with a few domain controllersthat are reachable. Note that these domain controllers may not be at the same geographical location as theconnector, which can result in delays or timeouts while communicating with Active Directory. In this case,edit the domain_krb.properties file manually and specify the correct domain controllers to use for eachdomain. See “Editing the domain_krb.properties file,” on page 17.
VMware Identity Manager Administration
16 VMware, Inc.
Sample domain_krb.properties Fileexample.com=host1.example.com:389,host2.example.com:389
Overriding the Default Subnet SelectionTo auto-populate the domain_krb.properties file, the connector attempts to find domain controllers that areat the same site so there is minimal latency between the connector and Active Directory.
To find the site, the connector determines the subnet on which it resides, based on its IP address andnetmask, then uses the Active Directory configuration to identify the site for that subnet. If the subnet of thevirtual machine is not in Active Directory, or if you want to override the automatic subnet selection, you canspecify a subnet in the runtime-config.properties file.
Procedure
1 Log in to the VMware Identity Manager virtual machine as the root user.
Note If you are using an additional connector for the directory, log in to the connector virtualmachine.
2 Edit the /usr/local/horizon/conf/runtime-config.properties file to add the following attribute.
siteaware.subnet.override=subnet
where subnet is a subnet for the site whose domain controllers you want to use. For example:
siteaware.subnet.override=10.100.0.0/20
3 Save and close the file.
4 Restart the service.
service horizon-workspace restart
Editing the domain_krb.properties fileThe /usr/local/horizon/conf/domain_krb.properties file determines the domain controllers to use fordirectories that have DNS Service Location lookup enabled. You can edit the file at any time to modify thelist of domain controllers for a domain, or to add or delete domain entries. Your changes will not beoverridden.
The file is initially created and auto-populated by the connector. You need to update it manually in scenariossuch as the following:
n If the domain controllers selected by default are not the optimal ones for your configuration, edit the fileand specify the domain controllers to use.
n If you delete a directory, delete the corresponding domain entry from the file.
n If any domain controllers in the file are not reachable, remove them from the file.
See also “About Domain Controller Selection (domain_krb.properties file),” on page 15.
Procedure
1 Log in to the VMware Identity Manager virtual machine as the root user.
Note If you are using an additional connector for the directory, log in to the connector virtualmachine.
2 Change directories to /usr/local/horizon/conf.
Chapter 3 Integrating with Active Directory
VMware, Inc. 17

3 Edit the domain_krb.properties file to add or edit the list of domain to host values.
Use the following format:
domain=host:port,host2:port,host3:port
For example:
example.com=examplehost1.example.com:389,examplehost2.example.com:389
List the domain controllers in order of priority. To connect to Active Directory, the connector tries thefirst domain controller in the list. If it is not reachable, it tries the second one in the list, and so on.
Important Domain names must be in lowercase.
4 Change the owner of the domain_krb.properties file to horizon and group to www using the followingcommand.
chown horizon:www /usr/local/horizon/conf/domain_krb.properties
5 Restart the service.
service horizon-workspace restart
Troubleshooting domain_krb.propertiesUse the following information to troubleshoot the domain_krb.properties file.
"Error resolving domain" errorIf the domain_krb.properties file already includes an entry for a domain, and you try to create a newdirectory of a different type for the same domain, an "Error resolving domain" occurs. You must edit thedomain_krb.properties file and manually remove the domain entry before creating the new directory.
Domain controllers are unreachableOnce a domain entry is added to the domain_krb.properties file, it is not updated automatically. If anydomain controllers listed in the file become unreachable, edit the file manually and remove them.
Managing User Attributes that Sync from Active DirectoryDuring the VMware Identity Manager service directory setup you select Active Directory user attributes andfilters to specify which users sync in the VMware Identity Manager directory. You can change the userattributes that sync from the administration console, Identity & Access Management tab, Setup > UserAttributes.
Changes that are made and saved in the User Attributes page are added to the Mapped Attributes page inthe VMware Identity Manager directory. The attributes changes are updated to the directory with the nextsync to Active Directory.
The User Attributes page lists the default directory attributes that can be mapped to Active Directoryattributes. You select the attributes that are required, and you can add other Active Directory attributes thatyou want to sync to the directory. When you add attributes, note that the attribute name you enter is casesensitive. For example, address, Address, and ADDRESS are different attributes.
Table 3‑1. Default Active Directory Attributes to Sync to Directory
VMware Identity Manager Directory Attribute Name Default Mapping to Active Directory Attribute
userPrincipalName userPrincipalName
distinguishedName distinguishedName
employeeId employeeID
VMware Identity Manager Administration
18 VMware, Inc.
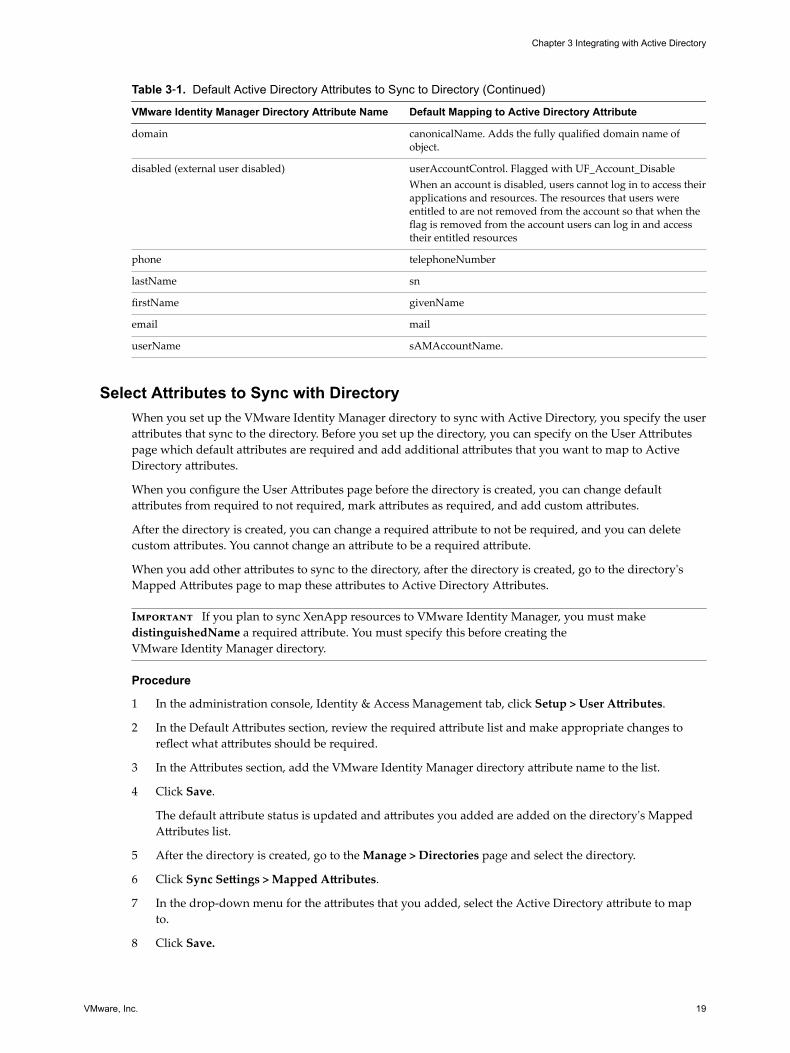
Table 3‑1. Default Active Directory Attributes to Sync to Directory (Continued)
VMware Identity Manager Directory Attribute Name Default Mapping to Active Directory Attribute
domain canonicalName. Adds the fully qualified domain name ofobject.
disabled (external user disabled) userAccountControl. Flagged with UF_Account_DisableWhen an account is disabled, users cannot log in to access theirapplications and resources. The resources that users wereentitled to are not removed from the account so that when theflag is removed from the account users can log in and accesstheir entitled resources
phone telephoneNumber
lastName sn
firstName givenName
email mail
userName sAMAccountName.
Select Attributes to Sync with DirectoryWhen you set up the VMware Identity Manager directory to sync with Active Directory, you specify the userattributes that sync to the directory. Before you set up the directory, you can specify on the User Attributespage which default attributes are required and add additional attributes that you want to map to ActiveDirectory attributes.
When you configure the User Attributes page before the directory is created, you can change defaultattributes from required to not required, mark attributes as required, and add custom attributes.
After the directory is created, you can change a required attribute to not be required, and you can deletecustom attributes. You cannot change an attribute to be a required attribute.
When you add other attributes to sync to the directory, after the directory is created, go to the directory'sMapped Attributes page to map these attributes to Active Directory Attributes.
Important If you plan to sync XenApp resources to VMware Identity Manager, you must makedistinguishedName a required attribute. You must specify this before creating theVMware Identity Manager directory.
Procedure
1 In the administration console, Identity & Access Management tab, click Setup > User Attributes.
2 In the Default Attributes section, review the required attribute list and make appropriate changes toreflect what attributes should be required.
3 In the Attributes section, add the VMware Identity Manager directory attribute name to the list.
4 Click Save.
The default attribute status is updated and attributes you added are added on the directory's MappedAttributes list.
5 After the directory is created, go to the Manage > Directories page and select the directory.
6 Click Sync Settings > Mapped Attributes.
7 In the drop-down menu for the attributes that you added, select the Active Directory attribute to mapto.
8 Click Save.
Chapter 3 Integrating with Active Directory
VMware, Inc. 19

The directory is updated the next time the directory syncs to the Active Directory.
Permissions Required for Joining a DomainYou may need to join the VMware Identity Manager connector to a domain in some cases. For ActiveDirectory over LDAP directories, you can join a domain after creating the directory. For directories of typeActive Directory (Integrated Windows Authentication), the connector is joined to the domain automaticallywhen you create the directory. In both scenarios, you are prompted for credentials.
To join a domain, you need Active Directory credentials that have the privilege to "join computer to ADdomain". This is configured in Active Directory with the following rights:
n Create Computer Objects
n Delete Computer Objects
When you join a domain, a computer object is created in the default location in Active Directory.
If you do not have the rights to join a domain, or if your company policy requires a custom location for thecomputer object, follow these steps to join the domain.
1 Ask your Active Directory administrator to create the computer object in Active Directory, in a locationdetermined by your company policy. Provide the host name of the connector. Ensure that you providethe fully-qualified domain name, for example, server.example.com.
Tip You can see the host name in the Host Name column on the Connectors page in the administrationconsole. Click Identity & Access Management > Setup > Connectors to view the Connectors page.
2 After the computer object is created, join the domain using any domain user account in the VMwareIdentity Manager administration console.
The Join Domain command is available on the Connectors page, accessed by clicking Identity & AccessManagement > Setup > Connectors.
Configuring Active Directory Connection to the ServiceIn the administration console, specify the information required to connect to your Active Directory andselect users and groups to sync with the VMware Identity Manager directory.
The Active Directory connection options are using Active Directory over LDAP or using Active DirectoryIntegrated Windows Authentication. Active Directory over LDAP connection supports DNS ServiceLocation lookup. With Active Directory Integrated Windows Authentication, you configure the domain tojoin.
Prerequisites
n Select the required default attributes and add additional attributes on the User Attributes page. See “Select Attributes to Sync with Directory,” on page 19.
Important If you plan to sync XenApp resources with VMware Identity Manager, you must makedistinguishedName a required attribute. You must make this selection before creating a directory asattributes cannot be changed to be required attributes after a directory is created.
n List of the Active Directory groups and users to sync from Active Directory.
n For Active Directory over LDAP, the information required includes the Base DN, Bind DN, and BindDN password.
Note Using a Bind DN user account with a non-expiring password is recommended.
VMware Identity Manager Administration
20 VMware, Inc.

n For Active Directory Integrated Windows Authentication, the information required includes thedomain's Bind user UPN address and password.
Note Using a Bind DN user account with a non-expiring password is recommended.
n If the Active Directory requires access over SSL or STARTTLS, the Root CA certificate of the ActiveDirectory domain controller is required.
n For Active Directory Integrated Windows Authentication, when you have multi-forest Active Directoryconfigured and the Domain Local group contains members from domains in different forests, makesure that the Bind user is added to the Administrators group of the domain in which the Domain Localgroup resides. If this is not done, these members are missing from the Domain Local group.
Procedure
1 In the administration console, click the Identity & Access Management tab.
2 On the Directories page, click Add Directory.
3 Enter a name for this VMware Identity Manager directory.
Chapter 3 Integrating with Active Directory
VMware, Inc. 21
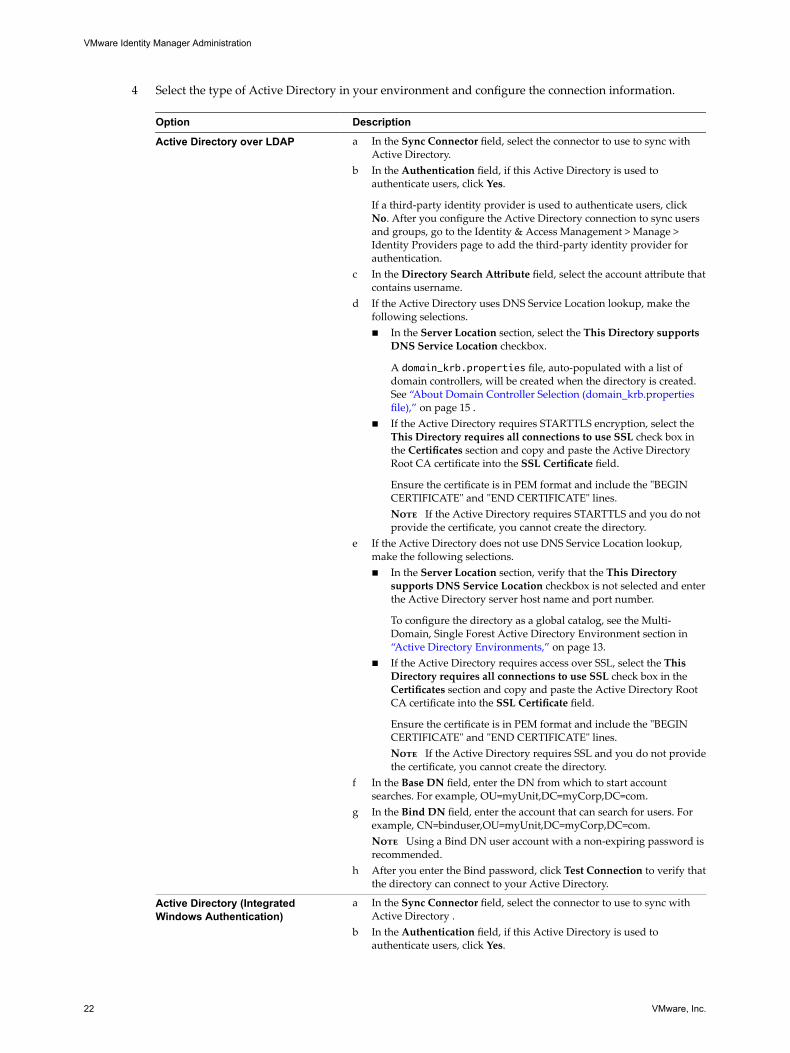
4 Select the type of Active Directory in your environment and configure the connection information.
Option Description
Active Directory over LDAP a In the Sync Connector field, select the connector to use to sync withActive Directory.
b In the Authentication field, if this Active Directory is used toauthenticate users, click Yes.
If a third-party identity provider is used to authenticate users, clickNo. After you configure the Active Directory connection to sync usersand groups, go to the Identity & Access Management > Manage >Identity Providers page to add the third-party identity provider forauthentication.
c In the Directory Search Attribute field, select the account attribute thatcontains username.
d If the Active Directory uses DNS Service Location lookup, make thefollowing selections.n In the Server Location section, select the This Directory supports
DNS Service Location checkbox.
A domain_krb.properties file, auto-populated with a list ofdomain controllers, will be created when the directory is created.See “About Domain Controller Selection (domain_krb.propertiesfile),” on page 15 .
n If the Active Directory requires STARTTLS encryption, select theThis Directory requires all connections to use SSL check box inthe Certificates section and copy and paste the Active DirectoryRoot CA certificate into the SSL Certificate field.
Ensure the certificate is in PEM format and include the "BEGINCERTIFICATE" and "END CERTIFICATE" lines.Note If the Active Directory requires STARTTLS and you do notprovide the certificate, you cannot create the directory.
e If the Active Directory does not use DNS Service Location lookup,make the following selections.n In the Server Location section, verify that the This Directory
supports DNS Service Location checkbox is not selected and enterthe Active Directory server host name and port number.
To configure the directory as a global catalog, see the Multi-Domain, Single Forest Active Directory Environment section in “Active Directory Environments,” on page 13.
n If the Active Directory requires access over SSL, select the ThisDirectory requires all connections to use SSL check box in theCertificates section and copy and paste the Active Directory RootCA certificate into the SSL Certificate field.
Ensure the certificate is in PEM format and include the "BEGINCERTIFICATE" and "END CERTIFICATE" lines.Note If the Active Directory requires SSL and you do not providethe certificate, you cannot create the directory.
f In the Base DN field, enter the DN from which to start accountsearches. For example, OU=myUnit,DC=myCorp,DC=com.
g In the Bind DN field, enter the account that can search for users. Forexample, CN=binduser,OU=myUnit,DC=myCorp,DC=com.Note Using a Bind DN user account with a non-expiring password isrecommended.
h After you enter the Bind password, click Test Connection to verify thatthe directory can connect to your Active Directory.
Active Directory (IntegratedWindows Authentication)
a In the Sync Connector field, select the connector to use to sync withActive Directory .
b In the Authentication field, if this Active Directory is used toauthenticate users, click Yes.
VMware Identity Manager Administration
22 VMware, Inc.

Option DescriptionIf a third-party identity provider is used to authenticate users, clickNo. After you configure the Active Directory connection to sync usersand groups, go to the Identity & Access Management > Manage >Identity Providers page to add the third-party identity provider forauthentication.
c In the Directory Search Attribute field, select the account attribute thatcontains username.
d If the Active Directory requires STARTTLS encryption, select the ThisDirectory requires all connections to use STARTTLS checkbox in theCertificates section and copy and paste the Active Directory Root CAcertificate into the SSL Certificate field.
Ensure the certificate is in PEM format and include the "BEGINCERTIFICATE" and "END CERTIFICATE" lines.
If the directory has multiple domains, add the Root CA certificates forall domains, one at a time.Note If the Active Directory requires STARTTLS and you do notprovide the certificate, you cannot create the directory.
e Enter the name of the Active Directory domain to join. Enter a username and password that has the rights to join the domain. See “Permissions Required for Joining a Domain,” on page 20 for moreinformation.
f In the Bind User UPN field, enter the User Principal Name of the userwho can authenticate with the domain. For example,[email protected] Using a Bind DN user account with a non-expiring password isrecommended.
g Enter the Bind User password.
5 Click Save & Next.
The page with the list of domains appears.
6 For Active Directory over LDAP, the domains are listed with a check mark.
For Active Directory (Integrated Windows Authentication), select the domains that should beassociated with this Active Directory connection.
Note If you add a trusting domain after the directory is created, the service does not automaticallydetect the newly trusting domain. To enable the service to detect the domain, the connector must leaveand then rejoin the domain. When the connector rejoins the domain, the trusting domain appears in thelist.
Click Next.
7 Verify that the VMware Identity Manager directory attribute names are mapped to the correct ActiveDirectory attributes. If not, select the correct Active Directory attribute from the drop-down menu. ClickNext.
8 Click + to select the groups you want to sync from Active Directory to the VMware Identity Managerdirectory.
The Sync nested group members option is enabled by default. When this option is enabled, all theusers that belong directly to the group you select as well as all the users that belong to nested groupsunder it are synced. Note that the nested groups are not synced; only the users that belong to the nestedgroups are synced. In the VMware Identity Manager directory, these users will be members of the top-level group that you selected for sync.
Chapter 3 Integrating with Active Directory
VMware, Inc. 23

If this option is disabled, when you specify a group to sync, all the users that belong directly to thatgroup are synced. Users that belong to nested groups under it are not synced. Disabling this option isuseful for large Active Directory configurations where traversing a group tree is resource and timeintensive. If you disable this option, ensure that you select all the groups whose users you want to sync.
Note When you sync a group, any users that do not have Domain Users as their primary group inActive Directory are not synced.
9 Click Next.
10 Click + to add additional users. For example, enter asCN-username,CN=Users,OU-myUnit,DC=myCorp,DC=com.
To exclude users, create a filter to exclude some types of users. You select the user attribute to filter by,the query rule, and the value.
Click Next.
11 Review the page to see how many users and groups are syncing to the directory and to view the syncschedule.
To make changes to users and groups, or to the sync frequency, click the Edit links.
12 Click Sync Directory to start the sync to the directory.
The connection to Active Directory is established and users and groups are synced from the ActiveDirectory to the VMware Identity Manager directory. The Bind DN user has an administrator role inVMware Identity Manager by default.
What to do next
n If you created a directory that supports DNS Service Location, a domain_krb.properties file was createdand auto-populated with a list of domain controllers. View the file to verify or edit the list of domaincontrollers. See “About Domain Controller Selection (domain_krb.properties file),” on page 15.
n Set up authentication methods. After users and groups sync to the directory, if the connector is alsoused for authentication, you can set up additional authentication methods on the connector. If a thirdparty is the authentication identity provider, configure that identity provider in the connector.
n Review the default access policy. The default access policy is configured to allow all appliances in allnetwork ranges to access the Web browser, with a session time out set to eight hours or to access a clientapp with a session time out of 2160 hours (90 days). You can change the default access policy and whenyou add Web applications to the catalog, you can create new ones.
n Apply custom branding to the administration console, user portal pages and the sign-in screen.
Enabling Users to Reset Expired Active Directory PasswordsYou can allow users to change their Active Directory passwords from the VMware Identity Manager loginpage if the password has expired or if the Active Directory administrator has reset the password, forcing theuser to change the password at the next login.
You can enable this option per directory, by selecting the Allow Change Password option in the DirectorySettings page.
When a user tries to log in with an expired password, the user is prompted to reset the password. The usermust enter the old password as well as the new password. The requirements for the new password aredetermined by the Active Directory password policy. The number of tries allowed also depends on theActive Directory password policy.
VMware Identity Manager Administration
24 VMware, Inc.

Users can reset their Active Directory password from VMware Identity Manager only in the followingscenarios:
n If the password has expired.
n If the Active Directory administrator resets the password in Active Directory, forcing the user to changethe password at the next login.
The following limitations apply.
n If you use additional, external connector virtual appliances, note that the Allow Change Passwordoption is only available with connector version 2016.11.1 and later.
n When a directory is added to VMware Identity Manager as a Global Catalog, the Allow ChangePassword option is not available. Directories can be added as Active Directory over LDAP or IntegratedWindows Authentication, using ports 389 or 636.
n The password of a Bind DN user cannot be reset from VMware Identity Manager, even if it expires orthe Active Directory administrator resets it.
Note Using a Bind DN user account with a non-expiring password is recommended.
n Passwords of users whose login names consist of multibyte characters (non-ASCII characters) cannot bereset from VMware Identity Manager.
Prerequisites
n To enable the Allow Change Password option, you must use a Bind DN user account and must havewrite permissions for Active Directory.
n Port 464 must be open on the domain controller.
Procedure
1 In the administration console, click the Identity & Access Management tab.
2 In the Directories page, select the directory.
3 In the Allow Change Password section, select Enable change password.
4 Enter the Bind DN password in the Bind User Details section, and click Save.
Setting up Directory Sync SafeguardsSync safeguards threshold limits can be configured in the directory to help prevent unintendedconfiguration changes to the users and groups that sync to the directory from Active Directory.
The sync safeguard thresholds that are set limit the number of changes that can be made to the users andgroups when the directory syncs. If any directory safeguard threshold is met, the directory synchronizationstops and a message is displayed on the directory's Sync Log page. When SMTP is configured in theVMware Identity Manager administration console, you receive an email message when synchronization failsbecause of a safeguard violation.
When synchronization fails, you can go to the directory's Sync Settings > Sync Log page to see a descriptionof the type of safeguard violation.
To successfully complete the synchronization, you can either increase the percentage threshold of thesafeguard on the Sync Safeguard settings page, or you can schedule a dry run of the sync and check IgnoreSafeguards. When you select to ignore the safeguard threshold value, the safeguard values are not enforcedfor this sync session only.
Note When directory sync is run the first time, the sync safeguard values are not enforced.
Chapter 3 Integrating with Active Directory
VMware, Inc. 25

Configure Directory Sync SafeguardsConfigure the sync safeguard threshold settings to limit the number of changes that can be made to theusers and groups when the directory syncs.
Procedure
1 To change the safeguards settings, in the Identity & Access Management tab select Manage >Directories.
2 Select the directory to set the safeguards and click Sync Settings
3 Click Safeguards.
4 Set the percentage of changes to trigger the sync to fail.
5 Click Save.
Ignore Safeguard Settings to Complete Syncing to the DirectoryWhen you receive notification that the sync did not complete because of a safeguard violation, to overridethe safeguard setting and complete the sync you can schedule a dry run of the sync and check IgnoreSafeguards.
Procedure
1 In the Identity & Access Management tab select Manage > Directories.
2 Select the directory that did not complete the sync and go to the Sync Log page.
3 To see the type of safeguard violation, in the Sync Details column, click Failed to complete sync. Pleasecheck safeguards.
4 Click OK.
5 To continue the sync without changing the safeguard settings, click Sync Now.
6 On the Review page, select the check box Ignore Safeguards.
7 Click Sync Directory.
The directory sync is run and the safeguard threshold settings are ignored for this sync session only.
VMware Identity Manager Administration
26 VMware, Inc.

Integrating with LDAP Directories 4You can integrate your enterprise LDAP directory with VMware Identity Manager to sync users and groupsfrom the LDAP directory to the VMware Identity Manager service.
This chapter includes the following topics:
n “Limitations of LDAP Directory Integration,” on page 27
n “Integrate an LDAP Directory with the Service,” on page 28
Limitations of LDAP Directory IntegrationThe following limitations currently apply to the LDAP directory integration feature.
n You can only integrate a single-domain LDAP directory environment.
To integrate multiple domains from an LDAP directory, you need to create additionalVMware Identity Manager directories, one for each domain.
n The following authentication methods are not supported for VMware Identity Manager directories oftype LDAP directory.
n Kerberos authentication
n RSA Adaptive Authentication
n ADFS as a third-party identity provider
n SecurID
n Radius authentication with Vasco and SMS Passcode server
n You cannot join an LDAP domain.
n Integration with View or Citrix-published resources is not supported for VMware Identity Managerdirectories of type LDAP directory.
n User names must not contain spaces. If a user name contains a space, the user is synced but entitlementsare not available to the user.
n If you plan to add both Active Directory and LDAP directories, ensure that you do not mark anyattributes required in the User Attributes page, except for userName, which can be marked required.The settings in the User Attributes page apply to all directories in the service. If an attribute is markedrequired, users without that attribute are not synced to the VMware Identity Manager service.
n If you have multiple groups with the same name in your LDAP directory, you must specify uniquenames for them in the VMware Identity Manager service. You can specify the names when you selectthe groups to sync.
n The option to allow users to reset expired passwords is not available.
VMware, Inc. 27

n The domain_krb.properties file is not supported.
Integrate an LDAP Directory with the ServiceYou can integrate your enterprise LDAP directory with VMware Identity Manager to sync users and groupsfrom the LDAP directory to the VMware Identity Manager service.
To integrate your LDAP directory, you create a corresponding VMware Identity Manager directory and syncusers and groups from your LDAP directory to the VMware Identity Manager directory. You can set up aregular sync schedule for subsequent updates.
You also select the LDAP attributes that you want to sync for users and map them toVMware Identity Manager attributes.
Your LDAP directory configuration may be based on default schemas or you may have created customschemas. You may also have defined custom attributes. For VMware Identity Manager to be able to queryyour LDAP directory to obtain user or group objects, you need to provide the LDAP search filters andattribute names that are applicable to your LDAP directory.
Specifically, you need to provide the following information.
n LDAP search filters for obtaining groups, users, and the bind user
n LDAP attribute names for group membership, UUID, and distinguished name
Certain limitations apply to the LDAP directory integration feature. See “Limitations of LDAP DirectoryIntegration,” on page 27.
Prerequisites
n Review the attributes in the Identity & Access Management > Setup > User Attributes page and addadditional attributes that you want to sync. You map the VMware Identity Manager attributes to yourLDAP directory attributes when you create the directory. These attributes are synced for the users in thedirectory.
Note When you make changes to user attributes, consider the effect on other directories in the service.If you plan to add both Active Directory and LDAP directories, ensure that you do not mark anyattributes required except for userName, which can be marked required. The settings in the UserAttributes page apply to all directories in the service. If an attribute is marked required, users withoutthat attribute are not synced to the VMware Identity Manager service.
n A Bind DN user account. Using a Bind DN user account with a non-expiring password isrecommended.
n In your LDAP directory, the UUID of users and groups must be in plain text format.
n In your LDAP directory, a domain attribute must exist for all users and groups.
You map this attribute to the VMware Identity Manager domain attribute when you create theVMware Identity Manager directory.
n User names must not contain spaces. If a user name contains a space, the user is synced but entitlementsare not available to the user.
n If you use certificate authentication, users must have values for userPrincipalName and email addressattributes.
Procedure
1 In the administration console, click the Identity & Access Management tab.
2 In the Directories page, click Add Directory and select Add LDAP Directory.
VMware Identity Manager Administration
28 VMware, Inc.

3 Enter the required information in the Add LDAP Directory page.
Option Description
Directory Name A name for the VMware Identity Manager directory.
Directory Sync and Authentication a In the Sync Connector field, select the connector you want to use tosync users and groups from your LDAP directory to theVMware Identity Manager directory.
A connector component is always available with theVMware Identity Manager service by default. This connector appearsin the drop-down list. If you install multipleVMware Identity Manager appliances for high availability, theconnector component of each appears in the list.
You do not need a separate connector for an LDAP directory. Aconnector can support multiple directories, regardless of whether theyare Active Directory or LDAP directories. For the scenarios in whichyou need additional connectors, see Installing Additional ConnectorAppliances in the VMware Identity Manager Installation Guide.
b In the Authentication field, if you want to use this LDAP directory toauthenticate users, select Yes.
If you want to use a third-party identity provider to authenticate users,select No. After you add the directory connection to sync users andgroups, go to the Identity & Access Management > Manage > IdentityProviders page to add the third-party identity provider forauthentication.
c In the Directory Search Attribute field, specify the LDAP directoryattribute to be used for user name. If the attribute is not listed, selectCustom and type the attribute name. For example, cn.
Server Location Enter the LDAP Directory server host and port number. For the serverhost, you can specify either the fully-qualified domain name or the IPaddress. For example, myLDAPserver.example.com or 100.00.00.0.If you have a cluster of servers behind a load balancer, enter the loadbalancer information instead.
LDAP Configuration Specify the LDAP search filters and attributes thatVMware Identity Manager can use to query your LDAP directory. Defaultvalues are provided based on the core LDAP schema.LDAP Queriesn Get groups: The search filter for obtaining group objects.
For example: (objectClass=group)n Get bind user: The search filter for obtaining the bind user object, that
is, the user that can bind to the directory.
For example: (objectClass=person)n Get user: The search filter for obtaining users to sync.
For example:(&(objectClass=user)(objectCategory=person))Attributesn Membership: The attribute that is used in your LDAP directory to
define the members of a group.
For example: membern Object UUID: The attribute that is used in your LDAP directory to
define the UUID of a user or group.
For example: entryUUIDn Distinguished Name: The attribute that is used in your LDAP
directory for the distinguished name of a user or group.
For example: entryDN
Chapter 4 Integrating with LDAP Directories
VMware, Inc. 29

Option Description
Certificates If your LDAP directory requires access over SSL, select the This Directoryrequires all connections to use SSL and copy and paste the LDAPdirectory server's root CA SSL certificate. Ensure the certificate is in PEMformat and include the "BEGIN CERTIFICATE" and "END CERTIFICATE"lines.
Bind User Details Base DN: Enter the DN from which to start searches. For example,cn=users,dc=example,dc=comBind DN: Enter the user name to use to bind to the LDAP directory.Note Using a Bind DN user account with a non-expiring password isrecommended.Bind DN Password: Enter the password for the Bind DN user.
4 To test the connection to the LDAP directory server, click Test Connection.
If the connection is not successful, check the information you entered and make the appropriatechanges.
5 Click Save & Next.
6 In the Domains page, verify that the correct domain is listed, then click Next.
7 In the Map Attributes page, verify that the VMware Identity Manager attributes are mapped to thecorrect LDAP attributes.
These attributes are synced for users.
Important You must specify a mapping for the domain attribute.
You can add attributes to the list from the User Attributes page.
8 Click Next.
9 In the groups page, click + to select the groups you want to sync from the LDAP directory to theVMware Identity Manager directory.
If you have multiple groups with the same name in your LDAP directory, you must specify uniquenames for them in the groups page.
The Sync nested group users option is enabled by default. When this option is enabled, all the usersthat belong directly to the group you select as well as all the users that belong to nested groups under itare synced. Note that the nested groups are not synced; only the users that belong to the nested groupsare synced. In the VMware Identity Manager directory, these users will appear as members of the top-level group that you selected for sync. In effect, the hierarchy under a selected group is flattened andusers from all levels appear in VMware Identity Manager as members of the selected group.
If this option is disabled, when you specify a group to sync, all the users that belong directly to thatgroup are synced. Users that belong to nested groups under it are not synced. Disabling this option isuseful for large directory configurations where traversing a group tree is resource and time intensive. Ifyou disable this option, ensure that you select all the groups whose users you want to sync.
10 Click Next.
11 Click + to add additional users. For example, enter CN=username,CN=Users,OU=myUnit,DC=myCorp,DC=com.
To exclude users, create a filter to exclude some types of users. You select the user attribute to filter by,the query rule, and the value.
Click Next.
12 Review the page to see how many users and groups will sync to the directory and to view the defaultsync schedule.
To make changes to users and groups, or to the sync frequency, click the Edit links.
VMware Identity Manager Administration
30 VMware, Inc.

13 Click Sync Directory to start the directory sync.
The connection to the LDAP directory is established and users and groups are synced from the LDAPdirectory to the VMware Identity Manager directory. The Bind DN user has an administrator role inVMware Identity Manager by default.
Chapter 4 Integrating with LDAP Directories
VMware, Inc. 31

VMware Identity Manager Administration
32 VMware, Inc.

Just-in-Time User Provisioning 5Just-in-Time user provisioning lets you create users in the VMware Identity Manager service dynamically atlogin time, using SAML assertions sent by a third-party identity provider. Just-in-Time user provisioning isavailable only for third-party identity providers. It is not available for the VMware Identity Managerconnector.
This chapter includes the following topics:
n “About Just-in-Time User Provisioning,” on page 33
n “Preparing for Just-in-Time Provisioning,” on page 34
n “Configuring Just-in-Time User Provisioning,” on page 36
n “Requirements for SAML Assertions,” on page 36
n “Disabling Just-in-Time User Provisioning,” on page 37
n “Deleting a Just-in-Time Directory,” on page 38
n “Error Messages,” on page 38
About Just-in-Time User ProvisioningJust-in-Time provisioning provides another way of provisioning users in the VMware Identity Managerservice. Instead of syncing users from an Active Directory instance, with Just-in-Time provisioning users arecreated and updated dynamically when they log in, based on SAML assertions sent by the identity provider.
In this scenario, VMware Identity Manager acts as the SAML service provider (SP).
Just-in-Time configuration can only be configured for third-party identity providers. It is not available forthe connector.
With a Just-in-Time configuration, you do not need to install a connector on premises as all user creationand management is handled through SAML assertions and authentication is handled by the third-partyidentity provider.
User Creation and ManagementIf Just-in-Time user provisioning is enabled, when a user goes to the VMware Identity Manager service loginpage and selects a domain, the page redirects the user to the correct identity provider. The user logs in, isauthenticated, and is redirected by the identity provider back to the VMware Identity Manager service witha SAML assertion. The attributes in the SAML assertion are used to create the user in the service. Only thoseattributes that match the user attributes defined in the service are used; other attributes are ignored. Theuser is also added to groups based on the attributes, and receives the entitlements that are set for thosegroups.
On subsequent logins, if there are any changes in the SAML assertion, the user is updated in the service.
VMware, Inc. 33

Just-in-Time provisioned users cannot be deleted. To delete users, you must delete the Just-in-Timedirectory.
Note that all user management is handled through SAML assertions. You cannot create or update theseusers directly from the service. Just-in-Time users cannot be synced from Active Directory.
For information about the attributes required in the SAML assertion, see “Requirements for SAMLAssertions,” on page 36.
Just-in-Time DirectoryThe third-party identity provider must have a Just-in-Time directory associated with it in the service.
When you first enable Just-in-Time provisioning for an identity provider, you create a new Just-in-Timedirectory and specify one or more domains for it. Users belonging to those domains are provisioned to thedirectory. If multiple domains are configured for the directory, SAML assertions must include a domainattribute. If a single domain is configured for the directory, a domain attribute is not required in SAMLassertions but if specified, its value must match the domain name.
Only one directory, of type Just-in-Time, can be associated with an identity provider that has Just-in-Timeprovisioning enabled.
Preparing for Just-in-Time ProvisioningBefore you configure Just-in-Time user provisioning, review your groups, group entitlements, and userattribute settings and make changes, if necessary. Also, identify the domains you want to use for the Just-in-Time directory.
Create Local GroupsUsers provisioned through Just-in-Time provisioning are added to groups based on their user attributes andderive their resources entitlements from the groups to which they belong. Before you configure Just-in-Timeprovisioning, ensure that you have local groups in the service. Create one or more local groups, based onyour needs. For each group, set the rules for group membership and add entitlements.
Procedure
1 In the administration console, click the Users & Groups tab.
2 Click Create Group, provide a name and description for the group, and click Add.
3 In the Groups page, click the new group.
4 Set up users for the group.
a In the left pane, select Users in This Group.
b Click Modify Users in This Group and set the rules for group membership.
5 Add entitlements to the group.
a In the left pane, select Entitlements.
b Click Add Entitlements and select the applications and the deployment method for eachapplication.
c Click Save.
VMware Identity Manager Administration
34 VMware, Inc.

Review User AttributesReview the user attributes that are set for all VMware Identity Manager directories in the User Attributespage and modify them, if necessary. When a user is provisioned through Just-in-Time provisioning, theSAML assertion is used to create the user. Only those attributes in the SAML assertion that match theattributes listed in the User Attributes page are used.
Important If an attribute is marked required in the User Attributes page, the SAML assertion mustinclude the attribute, otherwise login fails.
When you make changes to the user attributes, consider the effect on other directories and configurations inyour tenant. The User Attributes page applies to all directories in your tenant.
Note You do not have to mark the domain attribute required.
Procedure
1 In the administration console, click the Identity & Access Management tab.
2 Click Setup and click User Attributes.
3 Review the attributes and make changes, if necessary.
Chapter 5 Just-in-Time User Provisioning
VMware, Inc. 35
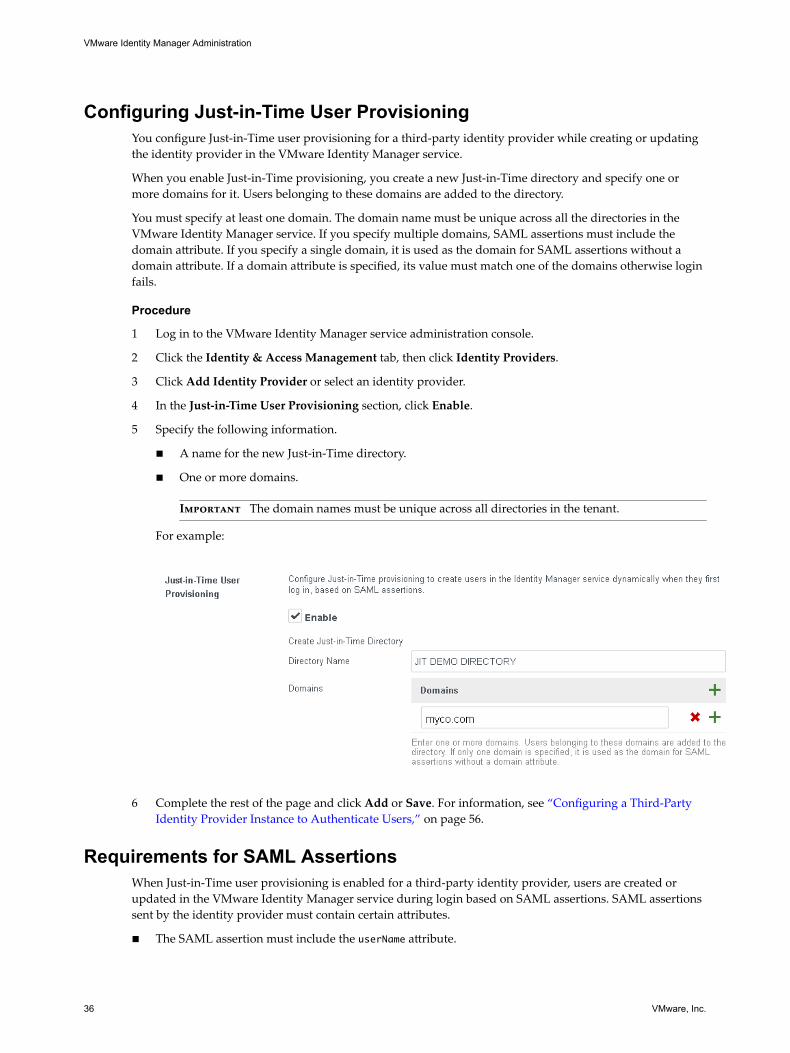
Configuring Just-in-Time User ProvisioningYou configure Just-in-Time user provisioning for a third-party identity provider while creating or updatingthe identity provider in the VMware Identity Manager service.
When you enable Just-in-Time provisioning, you create a new Just-in-Time directory and specify one ormore domains for it. Users belonging to these domains are added to the directory.
You must specify at least one domain. The domain name must be unique across all the directories in theVMware Identity Manager service. If you specify multiple domains, SAML assertions must include thedomain attribute. If you specify a single domain, it is used as the domain for SAML assertions without adomain attribute. If a domain attribute is specified, its value must match one of the domains otherwise loginfails.
Procedure
1 Log in to the VMware Identity Manager service administration console.
2 Click the Identity & Access Management tab, then click Identity Providers.
3 Click Add Identity Provider or select an identity provider.
4 In the Just-in-Time User Provisioning section, click Enable.
5 Specify the following information.
n A name for the new Just-in-Time directory.
n One or more domains.
Important The domain names must be unique across all directories in the tenant.
For example:
6 Complete the rest of the page and click Add or Save. For information, see “Configuring a Third-Party
Identity Provider Instance to Authenticate Users,” on page 56.
Requirements for SAML AssertionsWhen Just-in-Time user provisioning is enabled for a third-party identity provider, users are created orupdated in the VMware Identity Manager service during login based on SAML assertions. SAML assertionssent by the identity provider must contain certain attributes.
n The SAML assertion must include the userName attribute.
VMware Identity Manager Administration
36 VMware, Inc.

n The SAML assertion must include all the user attributes that are marked as required in the VMwareIdentity Manager service.
To view or edit the user attributes in the administration console, in the Identity & Access Managementtab, click Setup and then click User Attributes.
Important Ensure that the keys in the SAML assertion match the attribute names exactly, includingthe case.
n If you are configuring multiple domains for the Just-in-Time directory, the SAML assertion mustinclude the domain attribute. The value of the attribute must match one of the domains configured forthe directory. If the value does not match or a domain is not specified, login fails.
n If you are configuring a single domain for the Just-in-Time directory, specifying the domain attribute inthe SAML assertion is optional.
If you specify the domain attribute, ensure its value matches the domain configured for the directory. Ifthe SAML assertion does not contain a domain attribute, the user is associated with the domain that isconfigured for the directory
n If you want to allow user name updates, include the ExternalId attribute in the SAML assertion. Theuser is identified by the ExternalId. If, on a subsequent login, the SAML assertion contains a differentuser name, the user is still identified correctly, log in succeeds, and the user name is updated in theIdentity Manager service.
Attributes from the SAML assertion are used to create or update users as follows.
n Attributes that are required or optional in the Identity Manager service (as listed in the User Attributespage) are used.
n Attributes that do not match any attributes in the User Attributes page are ignored.
n Attributes without a value are ignored.
Disabling Just-in-Time User ProvisioningYou can disable Just-in-Time user provisioning. When the option is disabled, new users are not created andexisting users are not updated during login. Existing users continue to be authenticated by the identityprovider.
Procedure
1 In the administration console, click the Identity & Access Management tab, then click IdentityProviders.
2 Click the identity provider you want to edit.
3 In the Just-in-Time User Provisioning section, deselect the Enable checkbox.
Chapter 5 Just-in-Time User Provisioning
VMware, Inc. 37

Deleting a Just-in-Time DirectoryA Just-in-Time directory is the directory associated with a third-party identity provider that has Just-in-Time user provisioning enabled. When you delete the directory, all users in the directory are deleted and theJust-in-time configuration is disabled. Because a Just-in-Time identity provider can only have a singledirectory, when you delete the directory, the identity provider can no longer be used.
To enable Just-in-Time configuration for the identity provider again, you will need to create a new directory.
Procedure
1 In the administration console, click the Identity & Access Management tab.
2 In the Directories page, locate the directory you want to delete.
You can identify Just-in-Time directories by looking at the directory type in the Type column.
3 Click the directory name.
4 Click Delete Directory.
Error MessagesAdministrators or end users may see errors related to Just-in-Time provisioning. For example, if a requiredattribute is missing in the SAML assertion, an error occurs and the user is unable to log in.
The following errors can appear in the administration console:
Error Message Solution
If JIT User provisioning is enabled, atleast one directory must be associatedwith identity provider.
There is no directory associated with the identity provider. Anidentity provider with the Just-in-Time provisioning option enabledmust have a Just-in-Time directory associated with it.1 In the Identity & Access Management tab in the administration
console, click Identity Providers and click the identity provider.2 In the Just-in-Time User Provisioning section, specify a
directory name and one or more domains.3 Click Save.A Just-in-Time directory is created.
The following errors can appear on the log-in page:
VMware Identity Manager Administration
38 VMware, Inc.

Error Message Solution
User attribute is missing: name. A required user attribute is missing in the SAML assertionsent by the third-party identity provider. All attributes thatare marked required in the User Attributes page must beincluded in the SAML assertion. Modify the third-partyidentity provider settings to send the correct SAMLassertions.
Domain is missing and cannot be inferred. The SAML assertion does not include the domain attributeand the domain cannot be determined. A domain attributeis required in the following cases:n If multiple domains are configured for the Just-in-Time
directory.n If domain is marked as a required attribute in the User
Attributes page.If a domain attribute is specified, its value must match oneof the domains specified for the directory.Modify the third-party identity provider settings to sendthe correct SAML assertions.
Attribute name: name, value: value. The attribute in the SAML assertion does not match any ofthe attributes in the User Attributes page in the tenant andwill be ignored.
Failed to create or update a JIT user. The user could not be created in the service. Possible causesinclude the following:n A required attribute is missing in the SAML assertion.
Review the attributes in the User Attributes page andensure that the SAML assertion includes all theattributes that are marked required.
n The domain for the user could not be determined.
Specify the domain attribute in the SAML assertionand ensure that its value matches one of the domainsconfigured for the Just-in-Time directory.
Chapter 5 Just-in-Time User Provisioning
VMware, Inc. 39

VMware Identity Manager Administration
40 VMware, Inc.

Configuring User Authentication inVMware Identity Manager 6
VMware Identity Manager supports multiple authentication methods. You can configure a singleauthentication method and you can set up chained, two-factor authentication. You can also use anauthentication method that is external for RADIUS and SAML protocols.
The identity provider instance that you use with the VMware Identity Manager service creates an in-network federation authority that communicates with the service using SAML 2.0 assertions.
When you initially deploy the VMWare Identity Manager service, the connector is the initial identityprovider for the service. Your existing Active Directory infrastructure is used for user authentication andmanagement.
The following authentication methods are supported. You configure these authentication methods from theadministration console.
AuthenticationMethods Description
Password (on-premisedeployment)
Without any configuration after Active Directory is configured, VMware Identity Managersupports Active Directory password authentication. This method authenticates users directlyagainst Active Directory.
Kerberos for desktops Kerberos authentication provides domain users with single sign-in access to their apps portal.Users do not need to sign in again after they sign in to the network.
Certificate (on-premisedeployment)
Certificate-based authentication can be configured to allow clients to authenticate withcertificates on their desktop and mobile devices or to use a smart card adapter forauthentication.Certificate-based authentication is based on what the user has and what the person knows. AnX.509 certificate uses the public key infrastructure standard to verify that a public keycontained within the certificate belongs to the user.
RSA SecurID (on-premise deployment)
When RSA SecurID authentication is configured, VMware Identity Manager is configured asthe authentication agent in the RSA SecurID server. RSA SecurID authentication requires usersto use a token-based authentication system. RSA SecurID is an authentication method forusers accessing VMware Identity Manager from outside the enterprise network.
RADIUS (on-premisedeployment)
RADIUS authentication provides two-factor authentication options. You set up the RADIUSserver that is accessible to the VMware Identity Manager service. When users sign in withtheir user name and passcode, an access request is submitted to the RADIUS server forauthentication.
RSA AdaptiveAuthentication (on-premise deployment)
RSA authentication provides a stronger multi-factor authentication than only user name andpassword authentication against Active Directory. When RSA Adaptive Authentication isenabled, the risk indicators specified in the risk policy set up in the RSA Policy Managementapplication. The VMware Identity Manager service configuration of adaptive authentication isused to determine the required authentication prompts.
VMware, Inc. 41

AuthenticationMethods Description
Mobile SSO (for iOS) Mobile SSO for iOS authentication is used for single sign-on authentication for AirWatch-managed iOS devices. Mobile SSO (for iOS) authentication uses a Key Distribution Center(KDC) that is part of the Identity Manager service. You must initiate the KDC service in theVMware Identity Manager service before you enable this authentication method.
Mobile SSO (forAndroid)
Mobile SSO for Android authentication is used for single sign-on authentication for AirWatch-managed Android devices. A proxy service is set up between the VMware Identity Managerservice and AirWatch to retrieve the certificate from AirWatch for authentication.
Password (AirWatchConnector)
The AirWatch Cloud Connector can be integrated with the VMware Identity Manager servicefor user password authentication. You configure the VMware Identity Manager service to syncusers from the AirWatch directory.
Users are authenticated based on the authentication methods, the default access policy rules, networkranges, and the identity provider instance you configure. After the authentication methods are configured,you create access policy rules that specify the authentication methods to be used by device type. See “Managing Authentication Methods to Apply to Users,” on page 58.
This chapter includes the following topics:
n “Configuring Kerberos for VMware Identity Manager,” on page 42
n “Configuring SecurID for VMware Identity Manager,” on page 46
n “Configuring RADIUS for VMware Identity Manager,” on page 48
n “Configuring a Certificate or Smart Card Adapter for Use with VMware Identity Manager,” onpage 51
n “Configuring RSA Adaptive Authentication in VMware Identity Manager,” on page 54
n “Configure Additional Workspace Identity Providers,” on page 56
n “Configuring a Third-Party Identity Provider Instance to Authenticate Users,” on page 56
n “Managing Authentication Methods to Apply to Users,” on page 58
Configuring Kerberos for VMware Identity ManagerKerberos authentication provides users, who are successfully signed in to their domain, access to their appsportal without additional credential prompts.
Kerberos authentication protocol can be configured in the Identity Manager service for desktops withIntegrated Windows Authentication to secure interactions between users' browsers and the IdentityManager service and for one-touch single sign-in to iOS 9 mobile devices that are managed in AirWatch. Forinformation about Kerberos authentication on iOS 9 devices, see “Implementing Mobile Single Sign-inAuthentication for AirWatch-Managed iOS Devices,” on page 115.
Implementing Kerberos for Desktops with Integrated Windows AuthenticationTo set up Kerberos authentication for desktops, you enable Integrated Windows Authentication to allow theKerberos protocol to secure interactions between users' browsers and the Identity Manager service.
When Kerberos authentication is enabled for desktops, the Identity Manager service validates user desktopcredentials using Kerberos tickets distributed by the Key Distribution Center (KDC) implemented as adomain service in Active Directory. You do not need to directly configure Active Directory to make Kerberosfunction with your deployment.
You must configure the end user Web browsers to send your Kerberos credentials to the service when userssign in. See “Configuring your Browser for Kerberos,” on page 44.
VMware Identity Manager Administration
42 VMware, Inc.

Configure Kerberos Authentication for Desktops with Integrated WindowsAuthenticationTo configure the VMware Identity Manager service to provide Kerberos authentication for desktops, youmust join to the domain and enable Kerberos authentication on the VMware Identity Manager connector.
Procedure
1 In the administration console Identity & Access Management tab, select Setup.
2 On the Connectors page, for the connector that is being configured for Kerberos authentication, clickJoin Domain.
3 On the Join Domain page, enter the information for the Active Directory domain.
Option Description
Domain Enter the fully qualified domain name of the Active Directory. The domain name you enter must bethe same Windows domain as the connector server.
Domain User Enter the user name of an account in the Active Directory that has permissions to join systems tothat Active Directory domain.
DomainPassword
Enter the password associated with the AD Username. This password is not stored byVMware Identity Manager.
Click Save.
The Join Domain page is refreshed and displays a message that you are currently joined to the domain.
4 In the Worker column for the connector click Auth Adapters.
5 Click KerberosIdpAdapter
You are redirected to the identity manager sign in page.
6 Click Edit in the KerberosldpAdapter row and configure the Kerberos authentication page.
Option Description
Name A name is required. The default name is KerberosIdpAdapter. You can change this.
Directory UIDAttribute
Enter the account attribute that contains the user name
EnableWindowsAuthentication
Select this to extend authentication interactions between users' browsers andVMware Identity Manager.
Enable NTLM Select this to enable NT LAN Manager (NTLM) protocol-based authentication only if your ActiveDirectory infrastructure relies on NTLM authentication.
EnableRedirect
Select this if round-robin DNS and load balancers do not have Kerberos support. Authenticationrequests are redirected to Redirect Host Name. If this is selected, enter the redirect host name inRedirect Host Name text box. This is usually the hostname of the service.
7 Click Save.
What to do next
Add the authentication method to the default access policy. Go to the Identity & Access Management >Manage > Policies page and edit the default policy rules to add the Kerberos authentication method to therule in correct authentication order.
Chapter 6 Configuring User Authentication in VMware Identity Manager
VMware, Inc. 43

Configuring your Browser for KerberosWhen Kerberos is enabled, you need to configure the Web browsers to send your Kerberos credentials to theservice when users sign in.
The following Web browsers can be configured to send your Kerberos credentials to the Identity Managerservice on computers running Windows: Firefox, Internet Explorer, and Chrome. All the browsers requireadditional configuration.
Configure Internet Explorer to Access the Web Interface
You must configure the Internet Explorer browser if Kerberos is configured for your deployment and if youwant to grant users access to the Web interface using Internet Explorer.
Kerberos authentication works in conjunction with VMware Identity Manager on Windows operatingsystems.
Note Do not implement these Kerberos-related steps on other operating systems.
Prerequisites
Configure the Internet Explorer browser for each user or provide users with the instructions after youconfigure Kerberos.
Procedure
1 Verify that you are logged into Windows as a user in the domain.
2 In Internet Explorer, enable automatic log in.
a Select Tools > Internet Options > Security.
b Click Custom level.
c Select Automatic login only in Intranet zone.
d Click OK.
3 Verify that this instance of the connector virtual appliance is part of the local intranet zone.
a Use Internet Explorer to access the VMware Identity Manager sign in URL athttps://myconnectorhost.domain/authenticate/.
b Locate the zone in the bottom right corner on the status bar of the browser window.
If the zone is Local intranet, Internet Explorer configuration is complete.
4 If the zone is not Local intranet, add the VMware Identity Manager sign in URL to the intranet zone.
a Select Tools > Internet Options > Security > Local intranet > Sites.
b Select Automatically detect intranet network.
If this option was not selected, selecting it might be sufficient for adding the to the intranet zone.
c (Optional) If you selected Automatically detect intranet network, click OK until all dialog boxesare closed.
d In the Local Intranet dialog box, click Advanced.
A second dialog box named Local intranet appears.
e Enter the VMware Identity Manager URL in the Add this Web site to the zone text box.
https://myconnectorhost.domain/authenticate/
f Click Add > Close > OK.
VMware Identity Manager Administration
44 VMware, Inc.

5 Verify that Internet Explorer is allowed to pass the Windows authentication to the trusted site.
a In the Internet Options dialog box, click the Advanced tab.
b Select Enable Integrated Windows Authentication.
This option takes effect only after you restart Internet Explorer.
c Click OK.
6 Log in to the Web interface to check access.
If Kerberos authentication is successful, the test URL goes to the Web interface.
The Kerberos protocol secures all interactions between this Internet Explorer browser instance andVMware Identity Manager. Now, users can use single sign-on to access their My Apps portal.
Configure Firefox to Access the Web Interface
You must configure the Firefox browser if Kerberos is configured for your deployment and you want togrant users access to the Web interface using Firefox.
Kerberos authentication works in conjunction with VMware Identity Manager on Windows operatingsystems.
Prerequisites
Configure the Firefox browser, for each user, or provide users with the instructions, after you configureKerberos.
Procedure
1 In the URL text box of the Firefox browser, enter about:config to access the advanced settings.
2 Click I'll be careful, I promise!.
3 Double-click network.negotiate-auth.trusted-uris in the Preference Name column.
4 Enter your VMware Identity Manager URL in the text box.
https://myconnectorhost.domain.com
5 Click OK.
6 Double-click network.negotiate-auth.delegation-uris in the Preference Name column.
7 Enter your VMware Identity Manager URL in the text box.
https://myconnectorhost.domain.com/authenticate/
8 Click OK.
9 Test Kerberos functionality by using the Firefox browser to log in to login URL. For example,https://myconnectorhost.domain.com/authenticate/.
If the Kerberos authentication is successful, the test URL goes to the Web interface.
The Kerberos protocol secures all interactions between this Firefox browser instance andVMware Identity Manager. Now, users can use single sign-on access their My Apps portal.
Chapter 6 Configuring User Authentication in VMware Identity Manager
VMware, Inc. 45

Configure the Chrome Browser to Access the Web Interface
You must configure the Chrome browser if Kerberos is configured for your deployment and if you want togrant users access to the Web interface using the Chrome browser.
Kerberos authentication works in conjunction with VMware Identity Manager on Windows operatingsystems.
Note Do not implement these Kerberos-related steps on other operating systems.
Prerequisites
n Configure Kerberos.
n Since Chrome uses the Internet Explorer configuration to enable Kerberos authentication, you mustconfigure Internet Explorer to allow Chrome to use the Internet Explorer configuration. See Googledocumentation for information about how to configure Chrome for Kerberos authentication.
Procedure
1 Test Kerberos functionality by using the Chrome browser.
2 Log in to VMware Identity Manager at https://myconnectorhost.domain.com/authenticate/.
If Kerberos authentication is successful, the test URL connects with the Web interface.
If all related Kerberos configurations are correct, the relative protocol (Kerberos) secures all interactionsbetween this Chrome browser instance and VMware Identity Manager. Users can use single sign-on accesstheir My Apps portal.
Configuring SecurID for VMware Identity ManagerWhen you configure RSA SecurID server, you must add the VMware Identity Manager service informationas the authentication agent on the RSA SecurID server and configure the RSA SecurID server information onthe VMware Identity Manager service.
When you configure SecurID to provide additional security, you must ensure that your network is properlyconfigured for your VMware Identity Manager deployment. For SecurID specifically, you must ensure thatthe appropriate port is open to enable SecurID to authenticate users outside your network.
After you run the VMware Identity Manager Setup wizard and configured your Active Directoryconnection, you have the information necessary to prepare the RSA SecurID server. After you prepare theRSA SecurID server for VMware Identity Manager, you enable SecurID in the administration console.
n Prepare the RSA SecurID Server on page 47The RSA SecurID server must be configured with information about the VMware Identity Managerappliance as the authentication agent. The information required is the host name and the IP addressesfor network interfaces.
n Configure RSA SecurID Authentication on page 47After the VMware Identity Manager appliance is configured as the authentication agent in the RSASecurID server, you must add the RSA SecurID configuration information to the connector.
VMware Identity Manager Administration
46 VMware, Inc.

Prepare the RSA SecurID ServerThe RSA SecurID server must be configured with information about the VMware Identity Managerappliance as the authentication agent. The information required is the host name and the IP addresses fornetwork interfaces.
Prerequisites
n Verify that one of the following RSA Authentication Manager versions is installed and functioning onthe enterprise network: RSA AM 6.1.2, 7.1 SP2 and later, and 8.0 and later. TheVMware Identity Manager server uses AuthSDK_Java_v8.1.1.312.06_03_11_03_16_51 (Agent API 8.1SP1), which only supports the preceding versions of RSA Authentication Manager (the RSA SecurIDserver). For information about installing and configuring RSA Authentication Manager (RSA SecurIDserver), see RSA documentation.
Procedure
1 On a supported version of the RSA SecurID server, add the VMware Identity Manager connector as anauthentication agent. Enter the following information.
Option Description
Hostname The host name of VMware Identity Manager.
IP address The IP address of VMware Identity Manager.
Alternate IP address If traffic from the connector passes through a network address translation(NAT) device to reach the RSA SecurID server, enter the private IP addressof the appliance.
2 Download the compressed configuration file and extract the sdconf.rec file.
Be prepared to upload this file later when you configure RSA SecurID in VMware Identity Manager.
What to do next
Go to the administration console and in the Identity & Access Management tab Setup pages, select theconnector and in the AuthAdapters page configure SecurID.
Configure RSA SecurID AuthenticationAfter the VMware Identity Manager appliance is configured as the authentication agent in the RSA SecurIDserver, you must add the RSA SecurID configuration information to the connector.
Prerequisites
n Verify that RSA Authentication Manager (the RSA SecurID server) is installed and properly configured.
n Download the compressed file from the RSA SecurID server and extract the server configuration file.
Procedure
1 In the administration console Identity & Access Management tab, select Set Up.
2 On the Connectors page, select the Worker link for the connector that is being configured with RSASecurID.
3 Click Auth Adapters and then click SecurIDldpAdapter.
You are redirected to the identity manager sign in page.
4 In the Authentication Adapters page SecurIDldpAdapter row, click Edit.
Chapter 6 Configuring User Authentication in VMware Identity Manager
VMware, Inc. 47

5 Configure the SecurID Authentication Adapter page.
Information used and files generated on the RSA SecurID server are required when you configure theSecurID page.
Option Action
Name A name is required. The default name is SecurIDldpAdapter. You can change this.
EnableSecurID
Select this box to enable SecurID authentication.
Number ofauthenticationattemptsallowed
Enter the maximum number of failed login attempts when using the RSA SecurID token. Thedefault is five attempts.Note When more than one directory is configured and you implement RSA SecurIDauthentication with additional directories, configure Number of authentication attempts allowedwith the same value for each RSA SecurID configuration. If the value is not the same, SecurIDauthentication fails.
ConnectorAddress
Enter the IP address of the connector instance. The value you enter must match the value you usedwhen you added the connector appliance as an authentication agent to the RSA SecurID server. Ifyour RSA SecurID server has a value assigned to the Alternate IP address prompt, enter that valueas the connector IP address. If no alternate IP address is assigned, enter the value assigned to the IPaddress prompt.
Agent IPAddress
Enter the value assigned to the IP address prompt in the RSA SecurID server.
ServerConfiguration
Upload the RSA SecurID server configuration file. First, you must download the compressed filefrom the RSA SecurID server and extract the server configuration file, which by default is namedsdconf.rec.
Node Secret Leaving the node secret field blank allows the node secret to auto generate. It is recommended thatyou clear the node secret file on the RSA SecurID server and intentionally do not upload the nodesecret file. Ensure that the node secret file on the RSA SecurID server and on the server connectorinstance always match. If you change the node secret at one location, change it at the other location.
6 Click Save.
What to do next
Add the authentication method to the default access policy. Go to the Identity & Access Management >Manage > Policies page and edit the default policy rules to add the SecurID authentication method to therule in correct authentication order.
Configuring RADIUS for VMware Identity ManagerYou can configure VMware Identity Manager so that users are required to use RADIUS (RemoteAuthentication Dial-In User Service) authentication. You configure the RADIUS server information on theVMware Identity Manager service.
RADIUS support offers a wide range of alternative two-factor token-based authentication options. Becausetwo-factor authentication solutions, such as RADIUS, work with authentication managers installed onseparate servers, you must have the RADIUS server configured and accessible to the identity managerservice.
When users sign in to their My Apps portal and RADIUS authentication is enabled, a special login dialogbox appears in the browser. Users enter their RADUS authentication user name and passcode in the logindialog box. If the RADIUS server issues an access challenge, the identity manager service displays a dialogbox prompting for a second passcode. Currently support for RADIUS challenges is limited to prompting fortext input.
After a user enters credentials in the dialog box, the RADIUS server can send an SMS text message or email,or text using some other out-of-band mechanism to the user's cell phone with a code. The user can enter thistext and code into the login dialog box to complete the authentication.
VMware Identity Manager Administration
48 VMware, Inc.

If the RADIUS server provides the ability to import users from Active Directory, end users might first beprompted to supply Active Directory credentials before being prompted for a RADIUS authenticationusername and passcode.
Prepare the RADIUS ServerSet up the RADIUS server and then configure the RADIUS server to accept RADIUS requests from theVMware Identity Manager service.
Refer to your RADIUS vendor's setup guides for information about setting up the RADIUS server. Noteyour RADIUS configuration information as you use this information when you configure RADIUS in theservice. To see the type of RADIUS information required to configure VMware Identity Manager go to “Configure RADIUS Authentication in VMware Identity Manager,” on page 49.
You can set up a secondary Radius authentication server to be used for high availability. If the primaryRADIUS server does not respond within the server timeout configured for RADIUS authentication, therequest is routed to the secondary server. When the primary server does not respond, the secondary serverreceives all future authentication requests.
Configure RADIUS Authentication in VMware Identity ManagerYou enable RADIUS authentication and configure the RADIUS settings in VMware Identity Manageradministration console.
Prerequisites
Install and configure the RADIUS software on an authentication manager server. For RADIUSauthentication, follow the vendor's configuration documentation.
You need to know the following RADIUS server information to configure RADIUS on the service.
n IP address or DNS name of the RADIUS server.
n Authentication port numbers. Authentication port is usually 1812.
n Authentication type. The authentication types include PAP (Password Authentication Protocol), CHAP(Challenge Handshake Authentication Protocol), MSCHAP1, MSCHAP2 (Microsoft ChallengeHandshake Authentication Protocol, versions 1 and 2).
n RADIUS shared secret that is used for encryption and decryption in RADIUS protocol messages.
n Specific timeout and retry values needed for RADIUS authentication
Procedure
1 In the administration console Identity & Access Management tab, select Setup.
2 On the Connectors page, select the Worker link for the connector that is being configured for RADIUSauthentication.
3 Click Auth Adapters and then click RadiusAuthAdapter.
You are redirected to the identity manager sign-in page.
4 Click Edit to configure these fields on the Authentication Adapter page.
Option Action
Name A name is required. The default name is RadiusAuthAdapter. You can change this.
Enable RadiusAdapter
Select this box to enable RADIUS authentication.
Chapter 6 Configuring User Authentication in VMware Identity Manager
VMware, Inc. 49

Option Action
Number ofauthenticationattemptsallowed
Enter the maximum number of failed login attempts when using RADIUS to log in. The default isfive attempts.
Number ofattempts toRadius server
Specify the total number of retry attempts. If the primary server does not respond, the service waitsfor the configured time before retrying again.
Radius serverhostname/address
Enter the host name or the IP address of the RADIUS server.
Authentication port
Enter the Radius authentication port number. This is usually 1812.
Accountingport
Enter 0 for the port number. The accounting port is not used at this time.
Authentication type
Enter the authentication protocol that is supported by the RADIUS server. Either PAP, CHAP,MSCHAP1, OR MSCHAP2.
Shared secret Enter the shared secret that is used between the RADIUS server and the VMware Identity Managerservice.
Servertimeout inseconds
Enter the RADIUS server timeout in seconds, after which a retry is sent if the RADIUS server doesnot respond.
Realm Prefix (Optional) The user account location is called the realm.If you specify a realm prefix string, the string is placed at the beginning of the user name when thename is sent to the RADIUS server. For example, if the user name is entered as jdoe and the realmprefix DOMAIN-A\ is specified, the user name DOMAIN-A\jdoe is sent to the RADIUS server. Ifyou do not configure these fields, only the user name that is entered is sent.
Realm Suffix (Optional) If you specify a realm suffix, the string is placed at end of the user name. For example, ifthe suffix is @myco.com, the username [email protected] is sent to the RADIUS server.
Login pagepassphrasehint
Enter the text string to display in the message on the user login page to direct users to enter thecorrect Radius passcode. For example, if this field is configured with AD password first and thenSMS passcode, the login page message would read Enter your AD password first and then SMSpasscode. The default text string is RADIUS Passcode.
5 You can enable a secondary RADIUS server for high availability.
Configure the secondary server as described in step 4.
6 Click Save.
What to do next
Add the RADIUS authentication method to the default access policy. Go to the Identity & AccessManagement > Manage > Policies page and edit the default policy rules to add the RADIUS authenticationmethod in the correct authentication order to the rule.
VMware Identity Manager Administration
50 VMware, Inc.
Configuring a Certificate or Smart Card Adapter for Use withVMware Identity Manager
You can configure x509 certificate authentication to allow clients to authenticate with certificates on theirdesktop and mobile devices or to use a smart card adapter for authentication. Certificate-basedauthentication is based on what the user has (the private key or smart card), and what the person knows(the password to the private key or the smart-card PIN.) An X.509 certificate uses the public keyinfrastructure (PKI) standard to verify that a public key contained within the certificate belongs to the user.With smart card authentication, users connect the smart card with the computer and enter a PIN.
The smart card certificates are copied to the local certificate store on the user's computer. The certificates inthe local certificate store are available to all the browsers running on this user's computer, with someexceptions, and therefore, are available to a VMware Identity Manager instance in the browser.
Note When Certificate Authentication is configured and the service appliance is set up behind a loadbalancer, make sure that the VMware Identity Manager Connector is configured with SSL pass-through atthe load balancer and not configured to terminate SSL at the load balancer. This configuration ensures thatthe SSL handshake is between the connector and the client in order to pass the certificate to the connector.When your load balancer is configured to terminate SSL at the load balancer, you can deploy a secondconnector behind another load balancer to support certificate authentication.
See the VMware Identity Manager Installation and Configuration guide for information about adding asecond connector.
Using User Principal Name for Certificate AuthenticationYou can use certificate mapping in Active Directory. Certificate and smart card logins uses the user principalname (UPN) from Active Directory to validate user accounts. The Active Directory accounts of usersattempting to authenticate in the VMware Identity Manager service must have a valid UPN thatcorresponds to the UPN in the certificate.
You can configure the VMware Identity Manager to use an email address to validate the user account if theUPN does not exist in the certificate.
You can also enable an alternate UPN type to be used.
Certificate Authority Required for AuthenticationTo enable logging in using certificate authentication, root certificates and intermediate certificates must beuploaded to the VMware Identity Manager.
The certificates are copied to the local certificate store on the user's computer. The certificates in the localcertificate store are available to all the browsers running on this user's computer, with some exceptions, andtherefore, are available to a VMware Identity Manager instance in the browser.
For smart-card authentication, when a user initiates a connection to a the VMware Identity Managerinstance, the VMware Identity Manager service sends a list of trusted certificate authorities (CA) to thebrowser. The browser checks the list of trusted CAs against the available user certificates, selects a suitablecertificate, and then prompts the user to enter a smart card PIN. If multiple valid user certificates areavailable, the browser prompts the user to select a certificate.
If a user cannot authenticate, the root CA and intermediate CA might not be set up correctly, or the servicehas not been restarted after the root and intermediate CAs were uploaded to the server. In these cases, thebrowser cannot show the installed certificates, the user cannot select the correct certificate, and certificateauthentication fails.
Chapter 6 Configuring User Authentication in VMware Identity Manager
VMware, Inc. 51

Using Certificate Revocation CheckingYou can configure certificate revocation checking to prevent users who have their user certificates revokedfrom authenticating. Certificates are often revoked when a user leaves an organization, loses a smart card, ormoves from one department to another.
Certificate revocation checking with certificate revocation lists (CRLs) and with the Online Certificate StatusProtocol (OCSP) is supported. A CRL is a list of revoked certificates published by the CA that issued thecertificates. OCSP is a certificate validation protocol that is used to get the revocation status of a certificate.
You can configure both CRL and OCSP in the same certificate authentication adapter configuration. Whenyou configure both types of certificate revocation checking and the Use CRL in case of OCSP failure checkbox is enabled, OCSP is checked first and if OCSP fails, revocation checking falls back to CRL. Revocationchecking does not fall back to OCSP if CRL fails.
Logging in with CRL CheckingWhen you enable certificate revocation, the VMware Identity Manager server reads a CRL to determine therevocation status of a user certificate.
If a certificate is revoked, authentication through the certificate fails.
Logging in with OCSP Certificate CheckingWhen you configure Certificate Status Protocol (OCSP) revocation checking, VMware Identity Managersends a request to an OCSP responder to determine the revocation status of a specific user certificate. TheVMware Identity Manager server uses the OCSP signing certificate to verify that the responses it receivesfrom the OCSP responder are genuine.
If the certificate is revoked, authentication fails.
You can configure authentication to fall back to CRL checking if it does not receive a response from theOSCP responder or if the response is invalid.
Configure Certificate Authentication for VMware Identity ManagerYou enable and configure certificate authentication from the VMware Identity Manager administrationconsole.
Prerequisites
n Obtain the root certificate and intermediate certificates from the CA that signed the certificatespresented by your users.
n (Optional) List of Object Identifier (OID) of valid certificate policies for certificate authentication.
n For revocation checking, the file location of the CRL and the URL of the OCSP server.
n (Optional) OCSP Response Signing certificate file location.
n Consent form content, if a consent form displays before authentication.
Procedure
1 In the administration console Identity & Access Management tab, select Setup.
2 On the Connectors page, select the Worker link for the connector that is being configured.
3 Click Auth Adapters and then click CertificateAuthAdapter.
VMware Identity Manager Administration
52 VMware, Inc.
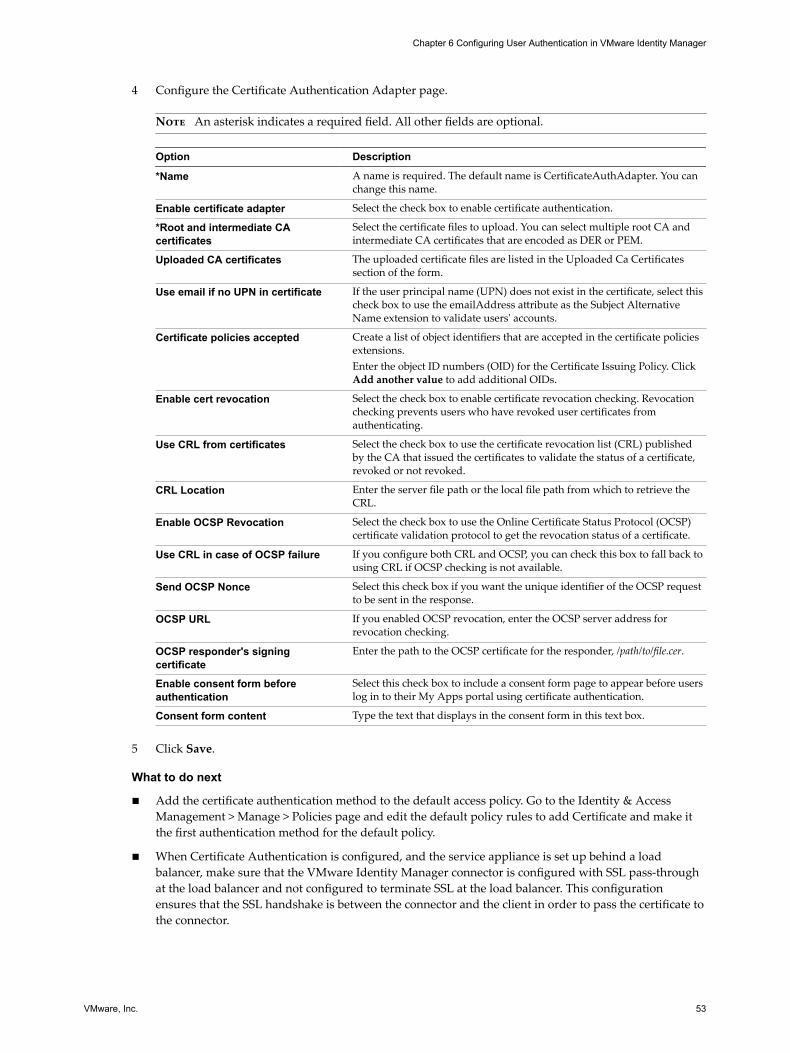
4 Configure the Certificate Authentication Adapter page.
Note An asterisk indicates a required field. All other fields are optional.
Option Description
*Name A name is required. The default name is CertificateAuthAdapter. You canchange this name.
Enable certificate adapter Select the check box to enable certificate authentication.
*Root and intermediate CAcertificates
Select the certificate files to upload. You can select multiple root CA andintermediate CA certificates that are encoded as DER or PEM.
Uploaded CA certificates The uploaded certificate files are listed in the Uploaded Ca Certificatessection of the form.
Use email if no UPN in certificate If the user principal name (UPN) does not exist in the certificate, select thischeck box to use the emailAddress attribute as the Subject AlternativeName extension to validate users' accounts.
Certificate policies accepted Create a list of object identifiers that are accepted in the certificate policiesextensions.Enter the object ID numbers (OID) for the Certificate Issuing Policy. ClickAdd another value to add additional OIDs.
Enable cert revocation Select the check box to enable certificate revocation checking. Revocationchecking prevents users who have revoked user certificates fromauthenticating.
Use CRL from certificates Select the check box to use the certificate revocation list (CRL) publishedby the CA that issued the certificates to validate the status of a certificate,revoked or not revoked.
CRL Location Enter the server file path or the local file path from which to retrieve theCRL.
Enable OCSP Revocation Select the check box to use the Online Certificate Status Protocol (OCSP)certificate validation protocol to get the revocation status of a certificate.
Use CRL in case of OCSP failure If you configure both CRL and OCSP, you can check this box to fall back tousing CRL if OCSP checking is not available.
Send OCSP Nonce Select this check box if you want the unique identifier of the OCSP requestto be sent in the response.
OCSP URL If you enabled OCSP revocation, enter the OCSP server address forrevocation checking.
OCSP responder's signingcertificate
Enter the path to the OCSP certificate for the responder, /path/to/file.cer.
Enable consent form beforeauthentication
Select this check box to include a consent form page to appear before userslog in to their My Apps portal using certificate authentication.
Consent form content Type the text that displays in the consent form in this text box.
5 Click Save.
What to do next
n Add the certificate authentication method to the default access policy. Go to the Identity & AccessManagement > Manage > Policies page and edit the default policy rules to add Certificate and make itthe first authentication method for the default policy.
n When Certificate Authentication is configured, and the service appliance is set up behind a loadbalancer, make sure that the VMware Identity Manager connector is configured with SSL pass-throughat the load balancer and not configured to terminate SSL at the load balancer. This configurationensures that the SSL handshake is between the connector and the client in order to pass the certificate tothe connector.
Chapter 6 Configuring User Authentication in VMware Identity Manager
VMware, Inc. 53

Configuring RSA Adaptive Authentication in VMware Identity ManagerRSA Adaptive Authentication can be implemented to provide a stronger multi-factor authentication thanonly user name and password authentication against Active Directory. Adaptive Authentication monitorsand authenticates user login attempts based on risk levels and policies.
When Adaptive Authentication is enabled, the risk indicators specified in the risk policies set up in the RSAPolicy Management application and the VMware Identity Manager service configuration of adaptiveauthentication are used to determine whether a user is authenticated with user name and password orwhether additional information is needed to authenticate the user.
Supported RSA Adaptive Authentication Methods of AuthenticationThe RSA Adaptive Authentication strong authentication methods supported in the VMware IdentityManager service are out-of-band authentication via phone, email, or SMS text message and challengequestions. You enable on the service the methods of RSA Adaptive Auth that can be provided. RSAAdaptive Auth policies determine which secondary authentication method is used.
Out-of-band authentication is a process that requires an additional verification be sent along with theusername and password. When users enroll in the RSA Adaptive Authentication server, they provide anemail address, a phone number, or both, depending on the server configuration. When additionalverification is required, RSA adaptive authentication server sends a one-time passcode through theprovided channel. Users enter that passcode along with their user name and password.
Challenge questions require the user to answer a series of questions when they enroll in the RSA AdaptiveAuthentication server. You can configure how many enrollment questions to ask and the number ofchallenge questions to present on the login page.
Enrolling users with RSA Adaptive Authentication ServerUsers must be provisioned in the RSA Adaptive Authentication database in order to use adaptiveauthentication for authentication. Users are added to the RSA Adaptive Authentication database when theylog in the first time with their user name and password. Depending on how you configured RSA AdaptiveAuthentication in the service, when users log in, they can be asked to provide their email address, phonenumber, text messaging service number (SMS), or they might be asked to set up responses to challengequestions.
Note RSA Adaptive Authentication does not allow for international characters in user names. If youintend to allow multi-byte characters in the user names, contact RSA support to configure RSA AdaptiveAuthentication and RSA Authentication Manager.
Configure RSA Adaptive Authentication in Identity ManagerTo configure RSA Adaptive Authentication on the service, you enable RSA Adaptive Authentication; selectthe adaptive authentication methods to apply, and add the Active Directory connection information andcertificate.
Prerequisites
n RSA Adaptive Authentication correctly configured with the authentication methods to use forsecondary authentication.
n Details about the SOAP endpoint address and the SOAP user name.
n Active Directory configuration information and the Active Directory SSL certificate available.
VMware Identity Manager Administration
54 VMware, Inc.

Procedure
1 In the administration console Identity & Access Management tab, select Setup.
2 On the Connector page, Workers column, select the link for the connector that is being configured.
3 Click Auth Adapters and then click RSAAAldpAdapter.
You are redirected to the identity manager authentication adapter page.
4 Click the Edit link next to the RSAAAldpAdapter.
5 Select the appropriate settings for your environment.
Note An asterisk indicates a required field. The other fields are optional.
Option Description
*Name A name is required. The default name is RSAAAldpAdapter. You canchange this name.
Enable RSA AA Adapter Select the check box to enable RSA Adaptive Authentication.
*SOAP Endpoint Enter the SOAP endpoint address for integration between the RSAAdaptive Authentication adapter and the service.
*SOAP Username Enter the user name and password that is used to sign SOAP messages.
RSA Domain Enter the domain address of the Adaptive Authentication server.
Enable OOB Email Select this check box to enable out-of-band authentication that sends aonetime passcode to the end user via an email message.
Enable OOB SMS Select this check box to enable out-of-band authentication that sends aonetime passcode to the end user via a SMS text message.
Enable SecurID Select this check box to enable SecurID. Users are asked to enter their RSAtoken and passcode.
Enable Secret Question Select this check box if you are going to use enrollment and challengequestions for authentication.
*Number Enrollment Questions Enter the number of questions the user will need to setup when they enrollin the Authentication Adapter server.
*Number Challenge Questions Enter the number of challenge questions users must answer correctly tologin.
*Number of authentication attemptsallowed
Enter the number of times to display challenge questions to a user trying tolog in before authentication fails.
Type of Directory The only directory supported is Active Directory.
Server Port Enter the Active Directory port number.
Server Host Enter the Active Directory host name.
Use SSL Select this check box if you use SSL for your directory connection. You addthe Active Directory SSL certificate in the Directory Certificate field.
Use DNS Service Location Select this check box if DNS service location is used for directoryconnection.
Base DN Enter the DN from which to start account searches. For example,OU=myUnit,DC=myCorp,DC=com.
Bind DN Enter the account that can search for users. For example ,CN=binduser,OU=myUnit,DC=myCorp,DC=com
Bind Password Enter the password for the Bind DN account.
Search Attribute Enter the account attribute that contains the username.
Directory certificate To establish secure SSL connections, add the directory server certificate tothe text box. In the case of multiple servers, add the root certificate of thecertificate authority.
6 Click Save.
Chapter 6 Configuring User Authentication in VMware Identity Manager
VMware, Inc. 55

What to do next
Add the RSA Adaptive Authentication auth method to the default access policy. Go to the Identity & AccessManagement > Manage > Policies page and edit the default policy rules to add Adaptive Authentication. See “Apply Authentication Methods to Policy Rules,” on page 60.
Configure Additional Workspace Identity ProvidersWhen the VMware Identity Manager connector is initially configured, when you enable the connector toauthenticate users, a Workspace IDP is created as the identity provider and password authentication isenabled.
Additional connectors can be configured behind different load balancers. When your environment includesmore than one load balancer, you can configure a different Workspace identity provider for authenticationin each load balanced configuration. See the Installing Additional Connector Appliances topics in theInstalling and Configuring VMWare Identity Manager Guide.
The different Workspace identity providers can be associated with the same directory or if you havemultiple directors configured, you can select which directory to use.
Procedure
1 In the administration console, Identity & Access Management tab, select Manage > Identity Providers.
2 Click Add Identity Provider and select Create Workspace IDP.
3 Edit the identity provider instance settings.
Option Description
Identity Provider Name Enter a name for this Workspace identity provider instance.
Users Select the VMware Identity Manager directory of the users who canauthenticate using this Workspace identity provider.
Connector(s) Connectors that are not associated with the directory you selected arelisted. Select the connector to associate to the directory.
Network The existing network ranges configured in the service are listed.Select the network ranges for the users based on their IP addresses thatyou want to direct to this identity provider instance for authentication.
4 Click Add.
Configuring a Third-Party Identity Provider Instance to AuthenticateUsers
You can configure a third-party identity provider to be used to authenticate users in theVMware Identity Manager service.
Complete the following tasks prior to using the administration console to add the third-party identityprovider instance.
n Verify that the third-party instances are SAML 2.0 compliant and that the service can reach the third-party instance.
n Obtain the appropriate third-party metadata information to add when you configure the identityprovider in the administration console. The metadata information you obtain from the third-partyinstance is either the URL to the metadata or the actual metadata.
n If just-in-time provisioning is enabled for this identity provider, consider the requirements for SAMLassertions. SAML assertions sent by the identity provider must contain certain attributes. See “Requirements for SAML Assertions,” on page 36.
VMware Identity Manager Administration
56 VMware, Inc.

Add and Configure an Identity Provider InstanceBy adding and configuring identity provider instances for your VMware Identity Manager deployment, youcan provide high availability, support additional user authentication methods, and add flexibility in the wayyou manage the user authentication process based on user IP address ranges.
Prerequisites
n Configure the network ranges that you want to direct to this identity provider instance forauthentication. See “Add or Edit a Network Range,” on page 58.
n Access to the third-party metadata document. This can be either the URL to the metadata or the actualmetadata.
Procedure
1 Log in to the administration console.
2 In the Identity & Access Management tab select Manage > Identity Providers.
3 Click Add Identity Provider and edit the identity provider instance settings.
Form Item Description
Identity ProviderName
Enter a name for this identity provider instance.
SAML Metadata Add the third party IdPs XML-based metadata document to establish trust with theidentity provider.1 Enter the SAML metadata URL or the xml content into the text box.2 Click Process IdP Metadata. The NameID formats supported by the IdP are extracted
from the metadata and added to the Name ID Format table.3 In the Name ID value column, select the user attribute in the service to map to the ID
formats displayed. You can add custom third-party name ID formats and map them tothe user attribute values in the service.
4 (Optional) Select the NameIDPolicy response identifier string format.
Just-in-TimeProvisioning
Configure just-in-time provisioning to create users in the identity manager servicedynamically when they first log in. A JIT directory is created and the attributes in theSAML assertion are used to crate the user in the service. See Chapter 5, “Just-in-Time UserProvisioning,” on page 33.
Users Select the VMware Identity Manager directories of the users who can authenticate usingthis identity provider.
Network The existing network ranges configured in the service are listed.Select the network ranges for the users based on their IP addresses, that you want to directto this identity provider instance for authentication.
AuthenticationMethods
Add the authentication methods supported by the third-party identity provider. Select theSAML authentication context class that supports the authentication method.
Single Sign-OutConfiguration
Enable single sign-out to log users out of their identity provider session when they signout of VMware Identity Manager. If this is not enabled, when users sign out, their identityprovider session is still active.(Optional) If the identity provider supports the SAML single logout profile, leave theRedirect URL text box blank. If the identity provider does not support the SAML singlelogout profile, enter the sign out URL of the identity provider where users are redirectedto when they sign out from VMware Identity Manager.(Optional) If the identity provider supports the SAML single logout profile, leave theRedirect URL Parameter text box blank.If you configured the redirect URL and if you want users to redirect back to theVMware Identity Manager sign in page after being redirected to the identity provider signout URL, enter the parameter name used by the identity provider redirect URL.
Chapter 6 Configuring User Authentication in VMware Identity Manager
VMware, Inc. 57

Form Item Description
SAML SigningCertificate
Click Service Provider (SP) Metadata to see URL to VMware Identity Manager SAMLservice provider metadata URL . Copy and save the URL. This URL is configured whenyou edit the SAML assertion in the third-party identity provider to mapVMware Identity Manager users.
IdP Hostname If the Hostname field displays, enter the hostname where the identity provider isredirected to for authentication. If you are using a non-standard port other than 443, youcan set this as Hostname:Port. For example, myco.example.com:8443.
4 Click Add.
What to do next
n Add the authentication method of the identity provider to the services default policy. See “ApplyAuthentication Methods to Policy Rules,” on page 60.
n Edit the third-party identity provider's configuration to add the SAML Signing Certificate URL that yousaved.
Managing Authentication Methods to Apply to UsersThe VMware Identity Manager service attempts to authenticate users based on the authentication methods,the default access policy, network ranges, and the identity provider instances you configure.
When users attempt to log in, the service evaluates the default access policy rules to select which rule in thepolicy to apply. The authentication methods are applied in the order they are listed in the rule. The firstidentity provider instance that meets the authentication method and network range requirements of the ruleis selected and the user authentication request is forwarded to the identity provider instance forauthentication. If authentication fails, the next authentication method configured in the rule is applied.
You can add rules that specify the authentication methods to be used by device type or by device type andfrom a specific network range. For example, you could configure a rule requiring users that sign in usingiOS devices from a specific network to authenticate using RSA SecurID and another rule that specifies alldevice types signing in from the internal network IP address to authenticate using their password.
Add or Edit a Network RangeCreate Network Ranges to define the IP addresses from which users can log in. You add the network rangesyou create to specific identity provider instances and to access policy rules.
One network range, called ALL RANGES, is created as the default. This network range includes every IPaddress available on the Internet, 0.0.0.0 to 255.255.255.255. Even if your deployment has a single identityprovider instance, you can change the IP address range and add other ranges to exclude or include specificIP addresses to the default network range. You can create other network ranges with specific IP addresesthat you can apply for specific purpose.
Note The default network range, ALL RANGES, and its description, "a network for all ranges," areeditable. You can edit the name and description, including changing the text to a different language, usingthe Edit feature on the Network Ranges page.
Prerequisites
n Define network ranges for your VMware Identity Manager deployment based on your networktopology.
VMware Identity Manager Administration
58 VMware, Inc.

n When View is enabled in the service, you specify the View URL on a per Network Range basis. To add anetwork range when the View module is enabled, take note of the Horizon Client access URL and portnumber for the network range. See View documentation for more information.
See Setting Up Resources in VMware Identity Manager, Providing Access To View Desktop Pools andApplication chapter.
Procedure
1 In the administration console, go to Identity & Access Management tab.
2 Select Setup > Network Ranges.
3 Edit an existing network range or add a new network range.
Option Description
Edit an existing range Click the network range name to edit.
Add a range Click Add Network Range to add a new range.
4 Complete the form.
Form Item Description
Name Enter a name for the network range.
Description Enter a description for the Network Range.
View Pods The View Pods option only appears when the View module is enabled.Client Access URL Host. Enter the correct Horizon Client access URL for the network range.Client Access Port. Enter the correct Horizon Client access port number for the network range.
IP Ranges Edit or add IP ranges until all desired and no undesired IP addresses are included.
What to do next
n Associate each network range with an identity provider instance.
n Associate network ranges with access policy rule as appropriate. See Chapter 7, “Managing AccessPolicies,” on page 63.
Applying the Default Access PolicyThe VMware Identity Manager service includes a default access policy that controls user access to their appsportals and their Web apps. You can edit the policy to change the policy rules as necessary.
When you enable authentication methods other than password authentication, you must edit the defaultpolicy to add the enabled authentication method to the policy rules.
Each rule in the default access policy requires that a set of criteria be met in order to allow user access to theapps portal. You apply a network range, select which type of user can access content and select theauthentication methods to use. See Chapter 7, “Managing Access Policies,” on page 63.
The number of attempts the service makes to login a user using a given authentication method varies. Theservices only makes one attempt at authentication for Kerberos or certificate authentication. If the attempt isnot successful in logging in a user, the next authentication method in the rule is attempted. The maximumnumber of failed login attempts for Active Directory password and RSA SecurID authentication is set to fiveby default. When a user has five failed login attempts, the service attempts to log in the user with the nextauthentication method on the list. When all authentication methods are exhausted, the service issues anerror message.
Chapter 6 Configuring User Authentication in VMware Identity Manager
VMware, Inc. 59
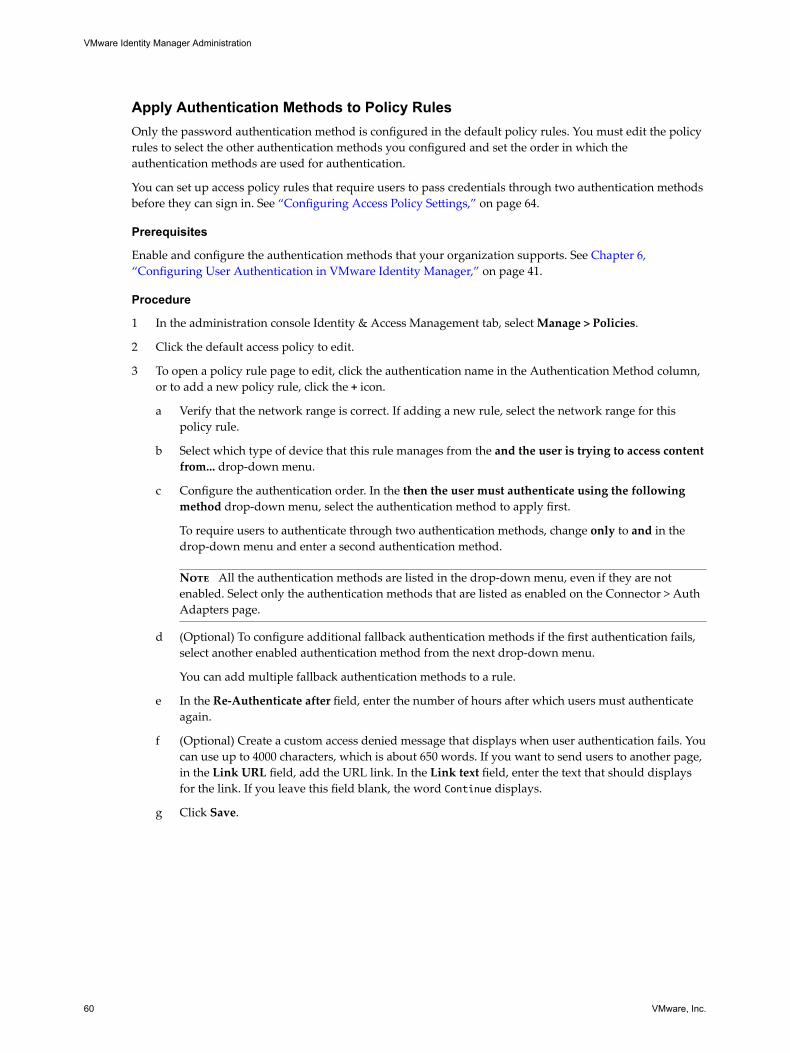
Apply Authentication Methods to Policy RulesOnly the password authentication method is configured in the default policy rules. You must edit the policyrules to select the other authentication methods you configured and set the order in which theauthentication methods are used for authentication.
You can set up access policy rules that require users to pass credentials through two authentication methodsbefore they can sign in. See “Configuring Access Policy Settings,” on page 64.
Prerequisites
Enable and configure the authentication methods that your organization supports. See Chapter 6,“Configuring User Authentication in VMware Identity Manager,” on page 41.
Procedure
1 In the administration console Identity & Access Management tab, select Manage > Policies.
2 Click the default access policy to edit.
3 To open a policy rule page to edit, click the authentication name in the Authentication Method column,or to add a new policy rule, click the + icon.
a Verify that the network range is correct. If adding a new rule, select the network range for thispolicy rule.
b Select which type of device that this rule manages from the and the user is trying to access contentfrom... drop-down menu.
c Configure the authentication order. In the then the user must authenticate using the followingmethod drop-down menu, select the authentication method to apply first.
To require users to authenticate through two authentication methods, change only to and in thedrop-down menu and enter a second authentication method.
Note All the authentication methods are listed in the drop-down menu, even if they are notenabled. Select only the authentication methods that are listed as enabled on the Connector > AuthAdapters page.
d (Optional) To configure additional fallback authentication methods if the first authentication fails,select another enabled authentication method from the next drop-down menu.
You can add multiple fallback authentication methods to a rule.
e In the Re-Authenticate after field, enter the number of hours after which users must authenticateagain.
f (Optional) Create a custom access denied message that displays when user authentication fails. Youcan use up to 4000 characters, which is about 650 words. If you want to send users to another page,in the Link URL field, add the URL link. In the Link text field, enter the text that should displaysfor the link. If you leave this field blank, the word Continue displays.
g Click Save.
VMware Identity Manager Administration
60 VMware, Inc.

4 Click Save.
Chapter 6 Configuring User Authentication in VMware Identity Manager
VMware, Inc. 61

VMware Identity Manager Administration
62 VMware, Inc.

Managing Access Policies 7The VMware Identity Manager policies are a set of rules that specify criteria that must be met for users toaccess their app portal or to launch specified Web applications.
You create the rule as part of a policy. Each rule in a policy can specify the following information.
n The network range, where users are allowed to log in from, such as inside or outside the enterprisenetwork.
n The device type that can access through this policy.
n The order that the enabled authentication methods are applied.
n The number of hours the authentication is valid.
n Custom access denied message.
Note The policies do not control the length of time that a Web application session lasts. They control theamount of time that users have to launch a Web application.
The VMware Identity Manager service includes a default policy that you can edit. This policy controls accessto the service as a whole. See “Applying the Default Access Policy,” on page 59. To control access to specificWeb applications, you can create additional policies. If you do not apply a policy to a Web application, thedefault policy applies.
This chapter includes the following topics:
n “Configuring Access Policy Settings,” on page 64
n “Managing Web-Application-Specific Policies,” on page 66
n “Add a Web-Application-Specific Policy,” on page 67
n “Configure Custom Access Denied Error Message,” on page 68
n “Edit the Default Access Policy,” on page 69
n “Enabling Persistent Cookie on Mobile Devices,” on page 69
VMware, Inc. 63

Configuring Access Policy SettingsA policy contains one or more access rules. Each rule consists of settings that you can configure to manageuser access to their apps portal as a whole or to specified Web applications.
Network RangeFor each rule, you determine the user base by specifying a network range. A network range consists of oneor more IP ranges. You create network ranges from the Identity & Access Management tab, Setup > NetworkRanges page prior to configuring access policy sets.
Each identity provider instance in your deployment links network ranges with authentication methods.When you configure a policy rule, ensure that the network range is covered by an existing identity providerinstance.
You can configure specific network ranges to restrict from where users can log in and access their apps.
Device TypeSelect the type of device that the rule manages. The client types are Web Browser, Identity Manager ClientApp, iOS, Android, Windows 10, Mac OS X, and All device types.
You can configure rules to designate which type of device can access content and all authentication requestscoming from that type of device use the policy rule.
Authentication MethodsIn the policy rule, you set the order the authentication methods are applied. The authentication methods areapplied in the order they are listed. The first identity provider instances that meets the authenticationmethod and network range configuration in the policy is selected, and the user authentication request isforwarded to the identity provider instance for authentication. If authentication fails, the next authenticationmethod in the list is selected. If Certificate authentication is used, this method must be the firstauthentication method in the list.
You can configure access policy rules to require users to pass credentials through two authenticationmethods before they can sign in. If one or both authentication method fails and fallback methods are alsoconfigured, users are prompted to enter their credentials for the next authentication methods that areconfigured. The following two scenarios describe how this authentication chaining can work.
n In the first scenario, the access policy rule is configured to require users to authenticate with theirpassword and with their Kerberos credential. Fallback authentication is set up to require the passwordand the RADIUS credential for authentication. A user enters the password correctly, but fails to enterthe correct Kerberos authentication credential. Since the user entered the correct password, the fallbackauthentication request is only for the RADIUS credential. The user does not need to re-enter thepassword.
n In the second scenario, the access policy rule is configured to require users to authenticate with theirpassword and their Kerberos credential. Fallback authentication is set up to require RSA SecurID and aRADIUS for authentication. A user enters the password correctly but fails to enter the correct Kerberosauthentication credential. The fallback authentication request is for both the RSA SecurID credentialand the RADIUS credential for authentication.
VMware Identity Manager Administration
64 VMware, Inc.

Authentication Session LengthFor each rule, you set the number of hours that this authentication is valid. The re-authenticate after valuedetermines the maximum amount of time users have since their last authentication event to access theirportal or to launch a specific Web application. For example, a value of 4 in a Web application rule gives usersfour hours to launch the web application unless they initiate another authentication event that extends thetime.
Custom Access Denied Error MessageWhen users attempt to sign in and fail because of invalid credentials, misconfiguration or system error, anaccess denied message is displayed. The default message is
Access denied as no valid authentication methods were found.
You can create a custom error message for each access policy rule that overrides the default message. Thecustom message can include text and a link for a call to action message. For example, in a policy rules formobile devices that you want to manage, if a user tries to sign in from an unenrolled device, the customerror message could read
Please enroll your device to access corporate resources by clicking the link at the end of this
message. If your device is already enrolled, contact support for help.
Example Default PolicyThe following policy serves as an example of how you can configure the default policy to control access tothe apps portal and to web applications that do not have a specific policy assigned to them.
The policy rules are evaluated in the order listed in the policy. You can change the order of the rules bydragging and dropping the rule in the Policy Rules section.
1 n For the internal network two authentication methods are configured for the rule, Kerberos andpassword authentication as the fallback method. To access the apps portal from an internalnetwork, the service attempts to authenticate users with Kerberos authentication first, as it is thefirst authentication method listed in the rule. If that fails, users are prompted to enter their ActiveDirectory password. Users log in using a browser and now have access to their user portals for aneight-hour session.
n For access from the external network (All Ranges), only one authentication method is configured,RSA SecurID. To access the apps portal from an external network, users are required to log in withSecurID. Users log in using a browser and now have access to their apps portals for a four-hoursession.
Chapter 7 Managing Access Policies
VMware, Inc. 65

2 This default policy applies to all Web applications that do not have a Web-application-specific policy.
Managing Web-Application-Specific PoliciesWhen you add Web applications to the catalog, you can create Web-application-specific access policies. Forexample, you can create an policy with rules for a Web application that specifies which IP addresses haveaccess to the application, using which authentication methods, and for how long until reauthentication isrequired.
The following Web-application-specific policy provides an example of a policy you can create to controlaccess to specified Web applications.
Example 1 Strict Web-Application-Specific PolicyIn this example, a new policy is created and applied to a sensitve Web application.
1 To access the service from outside the enterprise network, the user is required to log in with RSASecurID. The user signs in using a browser and now has access to the apps portal for a four hour sessionas provided by the default access rule.
2 After four hours, the user tries to launch a Web application with the Sensitive Web Applications policyset applied.
3 The service checks the rules in the policy and applies the policy with the ALL RANGES network rangesince the user request is coming from a Web browser and from the ALL RANGES network range.
The user signed in with the the RSA SecurID authentication method, but the session just expired. Theuser is redirected for re-authentication. The re-authentication provides the user with another four hoursession and the ability to launch the application. For the next four hours, the user can continue tolaunch the application without having to re-authenticate.
VMware Identity Manager Administration
66 VMware, Inc.

Example 2 Stricter Web-Application-Specific PolicyFor a stricter rule to apply to extra sensitive Web applications, you could require re-authentication withSecurId on any device after 1 hour. The following is an example of how this type of policy access rule isimplemented.
1 User logs in from inside the enterprise network using the Kerberos authentication method.
Now, the user can access the apps portal for eight hours, as set up in Example 1.
2 The user immediately tries to launch a Web application with the Example 2 policy rule applied, whichrequires RSA SecurID authentication.
3 The user is redirected to RSA SecurID authentication sign-in page.
4 After the user successfully signs in, the service launches the application and saves the authenticationevent.
The user can continue to launch this application for up to one hour but is asked to re-authenticate afteran hour, as dictated by the policy rule.
Add a Web-Application-Specific PolicyYou can create Web-application-specific policies to manage user access to specific Web applications.
Prerequisites
n Configure the appropriate network ranges for your deployment. See “Add or Edit a Network Range,”on page 58.
n Configure the appropriate authentication methods for your deployment. See Chapter 6, “ConfiguringUser Authentication in VMware Identity Manager,” on page 41.
n If you plan to edit the default policy (to control user access to the service as a whole), configure it beforecreating Web-application-specific policy.
Chapter 7 Managing Access Policies
VMware, Inc. 67

n Add Web applications to the Catalog. At least one Web application must be listed in the Catalog pagebefore you can add a policy.
Procedure
1 In the administration console Identity & Access Management tab, select Manage > Policies.
2 Click Add Policy to add a new policy.
3 Add a policy name and description in the respective text boxes.
4 In the Applies To section, click Select and in the page that appears, select the Web applications that areassociated with this policy.
5 In the Policy Rules section, click + to add a rule.
The Add a Policy Rule page appears.
a Select the network range to apply to this rule.
b Select the type of device that can access the web applications for this rule.
c Select the authentication methods to use in the order the authentication method should be applied.
d Specify the number of hours a Web application session can be open.
e Click Save.
6 Configure additional rules as appropriate.
7 Click Save.
Configure Custom Access Denied Error MessageFor each policy rule, you can create a custom access denied error message that displays when users attemptto sign in and fail because their credentials are invalid.
The custom message can include text and a link to another URL to help users resolve their issues. You canuse up to 4000 characters, which is about 650 words.
Procedure
1 In the administration console Identity & Access Management tab, select Manage > Policies.
2 Click the access policy to edit.
3 To open a policy rule page, click the authentication name in the Authentication Method column for therule to be edited.
4 In the Custom error message text box, type the error message.
5 To add a link to a URL, in the Link text box enter a description of the link and in Link URL enter theURL.
The link is displayed at the end of the custom message. If you do not add text in the Link text box butadd a URL, the text link that displays is
Continue.
6 Click Save.
What to do next
Create custom error messages for other policy rules.
VMware Identity Manager Administration
68 VMware, Inc.

Edit the Default Access PolicyYou can edit the default access policy, which is a pre-existing policy that controls user access to the service asa whole.
You can remove an entire Web-application-specific access policy at anytime. The default access policy ispermanent. You can edit it, but you cannot remove it.
Prerequisites
n Configure the appropriate network ranges for your deployment. See “Add or Edit a Network Range,”on page 58.
n Configure the appropriate authentication methods for your deployment. Chapter 6, “Configuring UserAuthentication in VMware Identity Manager,” on page 41.
Procedure
1 In the administration console Identity & Access Management tab, select Manage > Policies.
2 Click the policy to edit.
3 If this policy should be applied to specific Web applications, click Edit Apps.
4 Select the apps and click Save.
5 In the Policy Rules section, Authentication Method column, select the rule to edit.
The Edit a Policy Rule page appears with the existing configuration displayed.
6 To configure the authentication order, in the then the user must authenticate using the followingmethod drop-down menu, select the authentication method to apply first.
Note All the authentication methods are listed in the drop-down menu, even if they are not enabled.Select only from the authentication methods that are enabled on the Connector > Auth Adapters page.
7 (Optional) To configure a fallback authentication method if the first authentication fails, select anotherenabled authentication method from the next drop-down menu.
You can add multiple fallback authentication methods to a rule.
8 Click Save and click Save again on the Policy page.
The edited policy rule takes effect immediately.
What to do next
If the policy is a Web-application-specific access policy, you can also apply the policy set to the Webapplication in the Catalog page. See “Add a Web-Application-Specific Policy,” on page 67
Enabling Persistent Cookie on Mobile DevicesEnable persistent cookie to provide single sign-in between the system browser and native apps and singlesign-in between native apps when apps use Safari View Controller on iOS devices and Chrome Custom Tabson Android devices.
The persistent cookie stores users' sign-in session details so that users do not need to reenter their usercredentials when they access their managed resources through VMware Identity Manager. The cookietimeout can be configured in the access policy rules you set up for iOS and Android devices.
Note Cookies are vulnerable and susceptible in common browser cookie-theft and cross site script attacks.
Chapter 7 Managing Access Policies
VMware, Inc. 69

Enable Persistent CookieThe persistent cookie stores users' sign-in session details so that users do not need to reenter their usercredentials when accessing their managed resources from their iOS or Android mobile devices.
Procedure
1 In the administration console Identity & Access Management tab, select Setup > Preferences.
2 Check Enable Persistent Cookie.
3 Click Save.
What to do next
To set the persistent cookie session timeout, edit the re-authentication value in the access policy rules for theiOS and Android devices types.
VMware Identity Manager Administration
70 VMware, Inc.

Managing Users and Groups 8You can manage and monitor users and groups, which includes the users and groups imported from ActiveDirectory and groups you create in the VMware Identity Manager service.
In the administration console, the Users & Groups page provides a user-and-group-centric view of theservice. You can view entitlements, group affiliations and workspaces. For example, from the Entitlementspage for a user, you can entitle that user to a resource, and from the Entitlements page of a group, you canentitle that group to a resource. Alternatively, you can take a resource-centric view by using the Catalogpage. For example, from the Entitlements page for a resource, you can entitle that resource to a user orgroup.
This chapter includes the following topics:
n “User and Group Types,” on page 71
n “Manage Groups and Configure Group Rules,” on page 72
n “Manage User Entitlements,” on page 75
n “About User Names and Group Names,” on page 78
User and Group TypesYou manage users and groups from the administration console. You can entitle users and groups toresources and add users to groups that you create.
The users in the directory are users imported from Active Directory. The user base is updated according toyour directory server synchronization schedule.
Groups can be groups imported from Active Directory and groups that you create in theVMware Identity Manager service.
Group Type Description
Active DirectoryServer Groups
In the administration console, a lock icon next to a group name indicates that the group is an ActiveDirectory server group. You cannot edit or delete these groups. Imported Active Directory servergroups are updated in the directory according to your server synchronization schedule.
VMware IdentityManager Groups
You can create groups in administration console Users & Groups tab. You can add a combination ofusers and other groups when you create groups. The groups you add can be either groupd youalready created or groups imported from your Active Directory server. In the administration console,a check box next to a group name indicates that the group is a local group. You can delete thesegroups or edit the users in the group from the administration console.
You can specify which resources the group's members are entitled to access and use. Instead of definingentitlements for each individual user, you can entitle a set of users by entitling the group. A user can belongto multiple groups. For example, if you create a Sales group and a Management group, a sales manager canbelong to both groups. You can specify which policy settings apply to the group's members.
VMware, Inc. 71

Manage Groups and Configure Group RulesYou can create groups, add members to groups, and entitle groups to applications that are in the catalog.
Use groups to entitle more than one user to the same resources at the same time, instead of entitling eachuser individually.
You use group rules to define which users are members of a particular group. A user can belong to multiplegroups. For example, if you create a Sales group and a Management group, a sales manager can be amember of both groups.
Procedure
1 In the administration console, select User & Groups.
2 Click Create Group.
3 Enter the group name and a description of the group. Click Add.
4 After the group is created, return to the Groups page and select the group you created.
5 To add members to the group, select Users in This Group.
6 Click Modify Users in This Group.
7 From the drop-down menu, select how group membership should be granted.
Option Action
Any of the following Grants group membership when any of the conditions for groupmembership are met. This option works like an OR condition. Forexample, if you select Any of the following for the rules Group Is Salesand Group Is Marketing, sales and marketing staff are grantedmembership to this group.
All of the following Grants group membership when all of the conditions for groupmembership are met. This works like an AND condition. For example, ifyou select All of the following for the rules Group Is Sales and EmailStarts With 'western_region', only sales staff in the western region aregranted membership to this group. Sales staff in other regions are notgranted membership.
VMware Identity Manager Administration
72 VMware, Inc.

8 Configure one or more rules for your group. You can nest rules.
Option Action
Group n Select Is to choose a group to associate with this group. Type a groupname in the text box. As you type, a list of group names appears.
n Select Is Not to choose a group to exclude from this group. Type agroup name in the text box. As you type, a list of group namesappears.
Attribute Rules The following rules are available for all attributes, including defaultattributes and any additional custom attributes that your enterpriseconfigured. Examples of attributes are email and phone.Note Rules are not case-sensitive.n Select Matches to grant group membership for directory server entries
that exactly match the criteria you enter. For example, yourorganization might have a business travel department that shares thesame central phone number. If you want to grant access to a travelbooking application for all employees who share that phone number,you can create a rule such as Phone Matches (555) 555-1000.
n Select Does Not Match to grant group membership to all directoryserver entries except those that match the criteria you enter. Forexample, if one of your departments shares a central phone number,you can exclude that department from access to a social networkingapplication by creating a rule such as Phone Does Not Match (555)555-2000. Directory server entries with other phone numbers haveaccess to the application.
n Select Starts With to grant group membership for directory serverentries that start with the criteria you enter. For example, yourorganization's email addresses might begin with the departmentalname, such as [email protected]. If you want to grantaccess to an application to everyone on your sales staff, you can createa rule, such as Email Starts With sales_.
n Select Does Not Start With to grant group membership to all directoryserver entries except those that start with the criteria you enter. Forexample, if the email addresses of your human resources departmentare in the format [email protected], you can deny access toan application by setting up a rule, such as Email Does Not Start Withhr_. Directory server entries with other email addresses have access tothe application.
Any of the following Group membership to be granted when any of the conditions for groupmembership are met for this rule. This is a way to nest rules. For example,you can create a rule that says All of the following: Group Is Sales; Groupis California. For Group is California, Any of the following: Phone StartsWith 415; Phone Starts With 510. The group member must belong to yourCalifornia sales staff and have a phone number that starts with either 415or 510.
All of the following All of the conditions to be met for this rule. This is a way to nest rules. Forexample, you can create a rule that says Any of the following: Group IsManagers; Group is Customer Service. For Group is Customer Service, allof the following: Email Starts With cs_; Phone Starts With 555. The groupmembers can be either managers or customer service representatives, butcustomer service representatives must have an email that starts with cs_and a phone number that starts with 555.
9 (Optional) Specify individual users to add to or exclude from this group by checking the appropriate
check box and typing the user names.
10 Click Next, and click Save.
What to do next
Select Entitlements to add resources for the groups use.
Chapter 8 Managing Users and Groups
VMware, Inc. 73
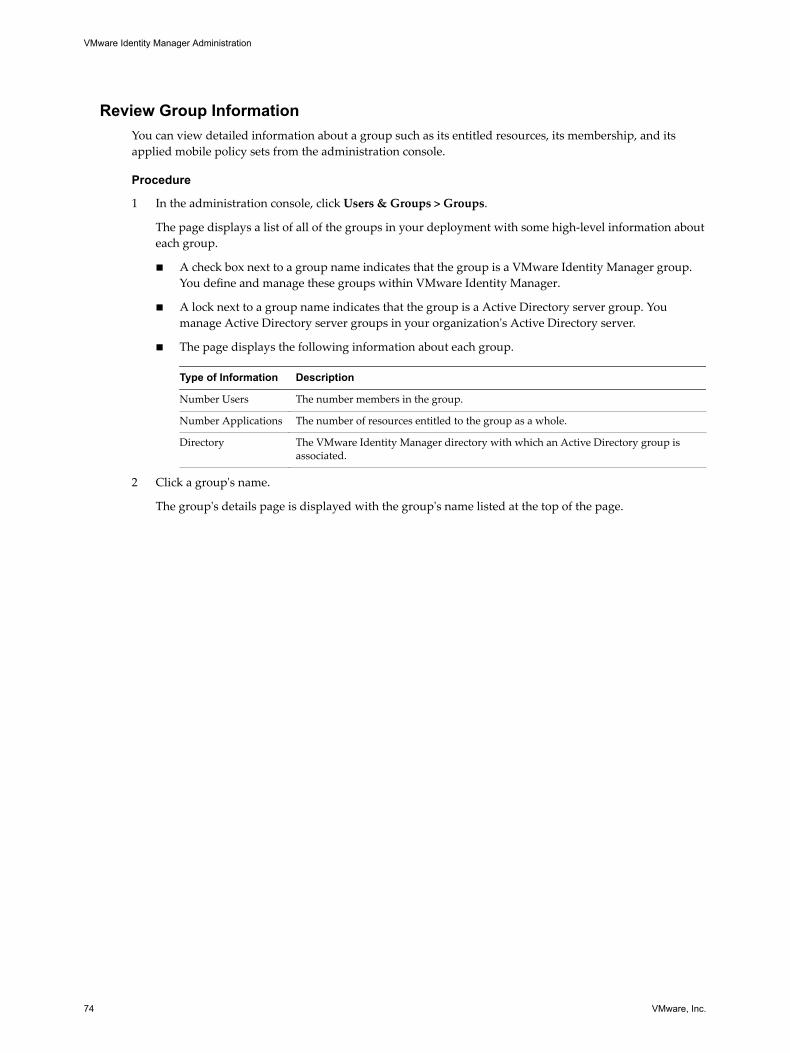
Review Group InformationYou can view detailed information about a group such as its entitled resources, its membership, and itsapplied mobile policy sets from the administration console.
Procedure
1 In the administration console, click Users & Groups > Groups.
The page displays a list of all of the groups in your deployment with some high-level information abouteach group.
n A check box next to a group name indicates that the group is a VMware Identity Manager group.You define and manage these groups within VMware Identity Manager.
n A lock next to a group name indicates that the group is a Active Directory server group. Youmanage Active Directory server groups in your organization's Active Directory server.
n The page displays the following information about each group.
Type of Information Description
Number Users The number members in the group.
Number Applications The number of resources entitled to the group as a whole.
Directory The VMware Identity Manager directory with which an Active Directory group isassociated.
2 Click a group's name.
The group's details page is displayed with the group's name listed at the top of the page.
VMware Identity Manager Administration
74 VMware, Inc.

3 Click the tab that corresponds to the information you want to view.
Option Description
Entitlements The group's Entitlements page is displayed. In this page, you can:n View the list of resources entitled to the users of the group.n Click Add entitlement to entitle the group's users to the individual
resources that are available in your catalog.n Click the name of a listed entitled resource to display that resource's
Edit page.n For resource types that have an Edit button, you can click the button to
entitle or unentitle the group's users to resources of that type or tocustomize the options for each entitled resource. From theEntitlements page, you can make the following changes:n For web applications, click Edit to change the group's entitlements
to the web applications or the type of deployment for the group'sentitled web applications. Select Automatic to have the Webapplication displayed by default in the user portal. Select User-Activated to allow users to add the web application to their user'sMy Apps area from the App Center collection of applicationsavailable.
n For View desktop and application pools, you can view the group'sexisting entitlements to the View pools that are integrated withyour VMware Identity Manager system. Entitlements to Viewdesktop and application pools are configured in the ViewConnection Server instances that are integrated with yourVMware Identity Manager system. You cannot changeentitlements to View pools using the group's Entitlements page.
n For ThinApp packages, click Edit to change the group'sentitlements to the ThinApp packages or the type of deploymentfor the group's entitled ThinApp packages. Select Automatic tohave the ThinApp package displayed by default in the My Appsarea of the user portal. Select User-Activated to allow the users tomanually add the ThinApp package from the App Catalog to theirMy Apps area.
n For Citrix Published Applications, you can view the group'sexisting entitlements to the Citrix-based applications that areintegrated with your VMware Identity Manager system.Entitlements to Citrix-based applications are configured in theCitrix deployments that are integrated with yourVMware Identity Manager system. You cannot changeentitlements to Citrix-based applications using the group'sEntitlements page.
n For resources types that have an Unentitle button, you can click thebutton to remove the group's access to use that specific resource.
Users in this Group The group's membership page is displayed. In this page, you can:n View the list of users that belong to the group.n Click a user's name to display the details page for that user.n Click Modify Users in This Group to view and configure the rules
that define membership to the group. The Modify Users in ThisGroup option is available for VMware Identity Manager groups, butnot for Active Directory server groups.
Manage User EntitlementsYou can manage the entitlements, and view a user's group affiliations and desktop clients from theadministration console Users & Groups tab.
Managing users includes tasks such as entitling users to resources, adding users to the appropriate groupsyou created in the service, and managing the state of users' provisioned workspaces.
Chapter 8 Managing Users and Groups
VMware, Inc. 75

Review User Information in VMware Identity ManagerYou can view detailed information about a user such as the user's entitled resources, group affiliations, andprovisioned desktop systems and mobile devices.
Details to be reviewed include user attributes, including attributes that you configured intheVMware Identity Manager directory. The usefulness of viewing the additional directory attributes for anindividual user depends on how you use such attributes in your deployment. You can use these additionalattributes in the following ways:
n To edit membership of a VMware Identity Manager group. For example, if you use the managerattribute in Active Directory, you can map the manager attribute to VMware Identity Manager. You cancreate a group where the group rules restrict membership to users with the manager attribute in theirVMware Identity Manager user record.
n To enable users to access Web applications with specific attribute requirements. For example, a financialapplication might restrict access to users with the employee ID attribute in theirVMware Identity Manager user record.
Procedure
1 In the administration console, select Users & Groups > Users.
The page displays a list of all users.
2 Click a user's name.
The user's details page is displayed. The user's name, email address, and role are listed along with theapplications they are entitled to.
3 (Optional) To change the role, click User.
You can promote users to the administrator role, allowing them access the VMware Identity Manageradministration console. Individuals assigned the administrator role can still access their app portal fromthe Web as a user. The URL to access the administration console is different than the URL to access theapp portal.
Web Interface Required Role URL Example
administration Administrator https://mycompany.vmwareidentity.com/admin
My Apps portal User https://mycompany.vmwareidentity.com/web
4 (Optional) Click Show More to see attributes assigned to the user.
VMware Identity Manager Administration
76 VMware, Inc.

5 For more information about the user, you can select the following options.
Option Description
Entitlements The user's Entitlements page is displayed. In this page, you can:n View the list of resources entitled to the user.n Click Add entitlement to entitle the user to resources that are available
in your catalog.n Click the name of a listed entitled resource to display that resource's
Edit page. For resource types that have an Edit button, you can clickthe button to entitle or unentitle the user to resources or to customizethe options for each entitled resource. From the Entitlements page, youcan make the following changes:
n n For web applications, click Edit to change the user's entitlementsto the web applications or the type of deployment for each of theuser's entitled web applications. Select Automatic to have the webapplication displayed by default in the user portal. Select User-Activated to allow the user to add the web application to their MyApps area from the App Center collection of applicationsavailable.
n For View desktop and application pools, you can view the user'sexisting entitlements to the View pools that are integrated withyour VMware Identity Manager system. Entitlements to Viewdesktop and application pools are configured in the ViewConnection Server instances that are integrated with yourVMware Identity Manager system. You cannot changeentitlements to View pools using the user's Entitlements page.
n For ThinApp packages, click Edit to change the user's entitlementsto the ThinApp packages or the type of deployment for the user'sentitled ThinApp packages. Select Automatic to have the ThinApppackage displayed by default in the My Apps area of the userportal. Select User-Activated to allow the user to manually add theThinApp package from the App Catalog to the My Apps area.
n For Citrix Published Applications, you can view the user's existingentitlements to the Citrix-based applications that are integratedwith your VMware Identity Manager system. Entitlements toCitrix-based applications are configured in the Citrix deploymentsthat are integrated with your VMware Identity Manager system.You cannot change entitlements to Citrix-based applications usingthe user's Entitlements page.
n For resources types that have an Unentitle button, you can click thebutton to remove the user's access to use that resource.
Note By default, for the table rows that have filled-in entries on this page,the Provisioning Status columns display Not Enabled, and you cannotchange this value.
Group Affiliations A list of the groups to which the user belongs is displayed. You can click agroup's name to display the details page for that group.
Desktop Clients The user's Desktop page is displayed. In this page, you can view thedesktops that have been provisioned, including the current status of theuser's workspace.n For a desktop system, you can click Delete to remove the
corresponding system from VMware Identity Manager. You mightwant to remove a system because the system is lost, stolen, or nolonger in use.
Chapter 8 Managing Users and Groups
VMware, Inc. 77
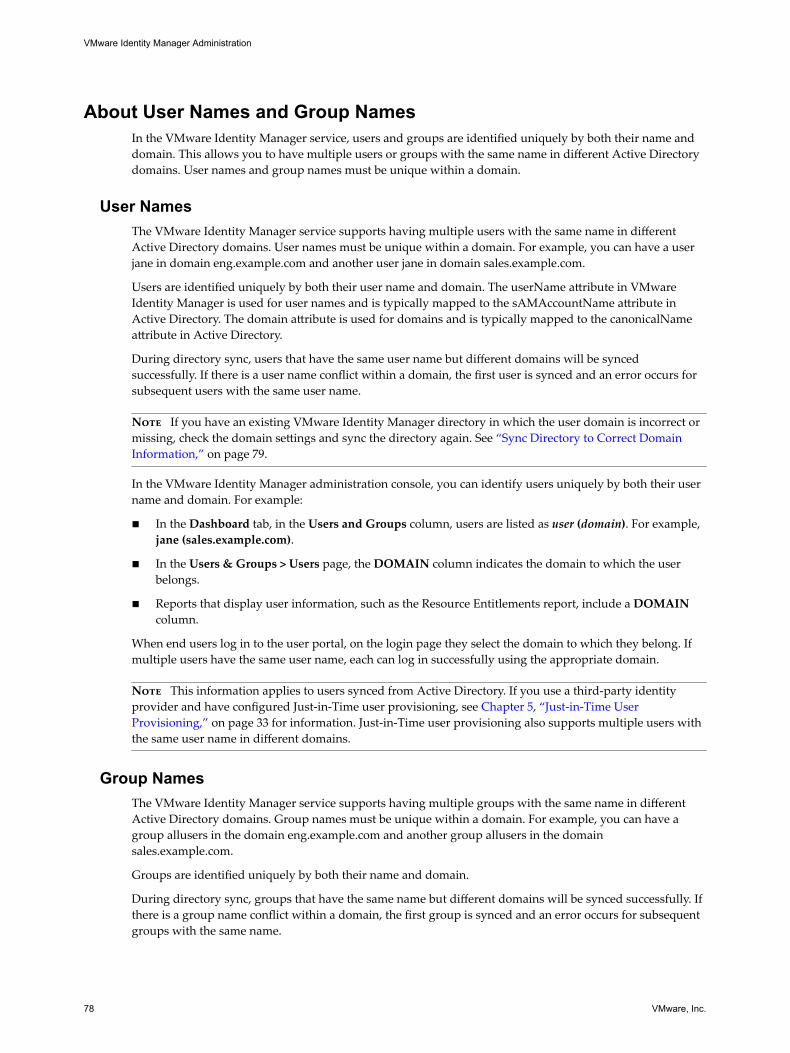
About User Names and Group NamesIn the VMware Identity Manager service, users and groups are identified uniquely by both their name anddomain. This allows you to have multiple users or groups with the same name in different Active Directorydomains. User names and group names must be unique within a domain.
User NamesThe VMware Identity Manager service supports having multiple users with the same name in differentActive Directory domains. User names must be unique within a domain. For example, you can have a userjane in domain eng.example.com and another user jane in domain sales.example.com.
Users are identified uniquely by both their user name and domain. The userName attribute in VMwareIdentity Manager is used for user names and is typically mapped to the sAMAccountName attribute inActive Directory. The domain attribute is used for domains and is typically mapped to the canonicalNameattribute in Active Directory.
During directory sync, users that have the same user name but different domains will be syncedsuccessfully. If there is a user name conflict within a domain, the first user is synced and an error occurs forsubsequent users with the same user name.
Note If you have an existing VMware Identity Manager directory in which the user domain is incorrect ormissing, check the domain settings and sync the directory again. See “Sync Directory to Correct DomainInformation,” on page 79.
In the VMware Identity Manager administration console, you can identify users uniquely by both their username and domain. For example:
n In the Dashboard tab, in the Users and Groups column, users are listed as user (domain). For example,jane (sales.example.com).
n In the Users & Groups > Users page, the DOMAIN column indicates the domain to which the userbelongs.
n Reports that display user information, such as the Resource Entitlements report, include a DOMAINcolumn.
When end users log in to the user portal, on the login page they select the domain to which they belong. Ifmultiple users have the same user name, each can log in successfully using the appropriate domain.
Note This information applies to users synced from Active Directory. If you use a third-party identityprovider and have configured Just-in-Time user provisioning, see Chapter 5, “Just-in-Time UserProvisioning,” on page 33 for information. Just-in-Time user provisioning also supports multiple users withthe same user name in different domains.
Group NamesThe VMware Identity Manager service supports having multiple groups with the same name in differentActive Directory domains. Group names must be unique within a domain. For example, you can have agroup allusers in the domain eng.example.com and another group allusers in the domainsales.example.com.
Groups are identified uniquely by both their name and domain.
During directory sync, groups that have the same name but different domains will be synced successfully. Ifthere is a group name conflict within a domain, the first group is synced and an error occurs for subsequentgroups with the same name.
VMware Identity Manager Administration
78 VMware, Inc.

In the VMware Identity Manager administration console, in the Users & Groups > Groups page, ActiveDirectory groups are listed as groupname@domain. For example, [email protected]. This lets youdistinguish between groups that have the same name. Groups that are created locally in the VMwareIdentity Manager service are listed only by name, for example, allusers.
Sync Directory to Correct Domain InformationIf you have an existing VMware Identity Manager directory in which the user domain is incorrect ormissing, you must check the domain settings and sync the directory again. This is required so that users orgroups that have the same name in different Active Directory domains are synced to the VMware IdentityManager directory successfully and users are able to log in.
Procedure
1 Click the Identity & Access Management > Directories tab.
2 Select the directory, then click Sync Settings and click the Mapped Attributes tab.
3 In the Map Attributes page, verify that the VMware Identity Manager attribute domain is mapped tothe correct attribute name in Active Directory.
The domain attribute is typically mapped to the canonicalName attribute in Active Directory.
The domain attribute does not have to be marked Required.
4 Sync the directory by clicking Save & Sync.
Chapter 8 Managing Users and Groups
VMware, Inc. 79

VMware Identity Manager Administration
80 VMware, Inc.

Managing the Catalog 9The Catalog is the repository of all the resources that you can entitle to users. You add Web applications tothe directly from the Catalog tab. To display the catalog, click the Catalog tab in the administration console.
You add ThinApp packages, View Pools, Horizon Air desktops, and Citrix-based applications to the catalogwith configuration tasks performed outside of the catalog.
On the Catalog page, you can perform the following tasks:
n Add new resources to your catalog.
n View the resources to which you can currently entitle users.
n Access information about each resource in your catalog.
Web applications can be added to your catalog directly from the Catalog page.
Other resource types require you to take action outside the administration console. See the Setting UpResources in VMware Identity Manager for information about setting up resources.
Resource How to See the Resource in Your Catalog
Web application In the admin console Catalog page, select the Web Applications application type.
Virtualized Windowsapplication captured as aThinApp package
Sync ThinApp packages to your catalog from the administration console, Packaged Apps -ThinApp page. In the admin console Catalog page, select the ThinApp Packages applicationtype.
View Desktop Pool Sync View Pools to your catalog from the administration console, View Pools page. In theadmin console Catalog page, select the View Desktop Pools application type.
View Hosted Applications Sync View Hosted Applications to your catalog from the administration console, View Poolspage. In the admin console Catalog page, select the View Hosted Application as theapplication type.
Citrix-based application Sync Citrix-based applications to your catalog from the administration console, PublishedApps - Citrix page. In the admin console Catalog page, select the Citrix PublishedApplications application type.
This chapter includes the following topics:
n “Managing Resources in the Catalog,” on page 81
n “Grouping Resource into Categories,” on page 89
n “Managing Catalog Settings,” on page 90
Managing Resources in the CatalogBefore you can entitle a particular resource to your users, you must populate your catalog with thatresource. The method you use to populate your catalog with a resource depends on what type of resource itis.
VMware, Inc. 81
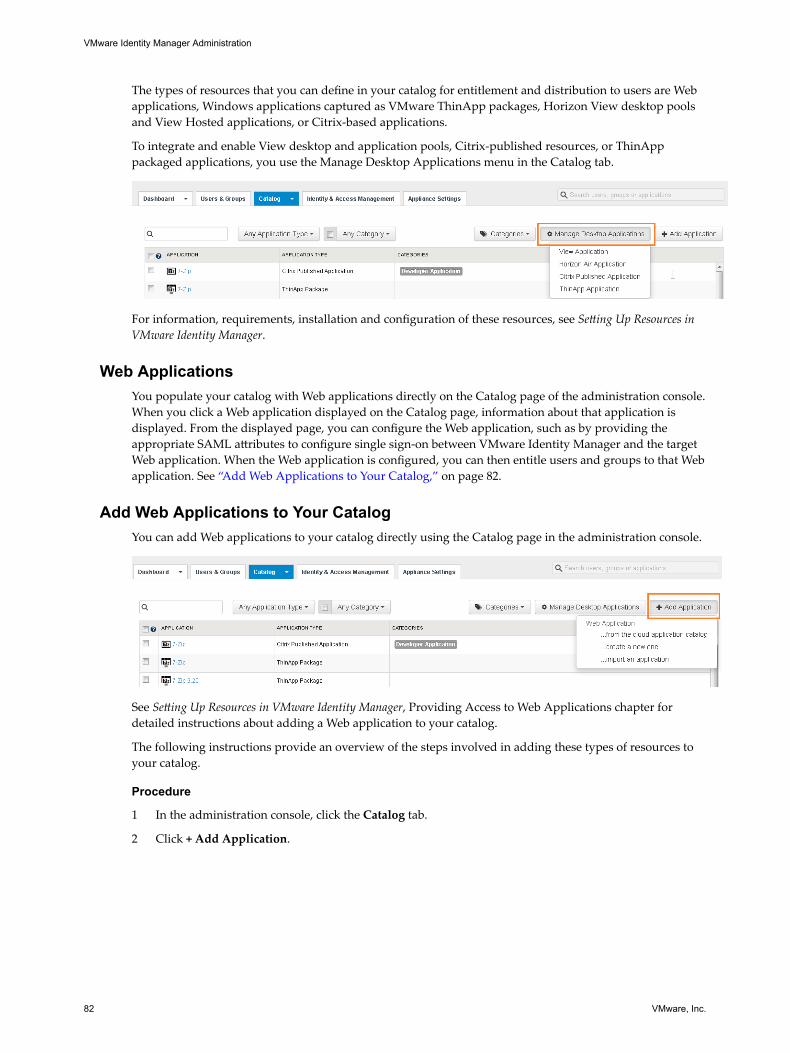
The types of resources that you can define in your catalog for entitlement and distribution to users are Webapplications, Windows applications captured as VMware ThinApp packages, Horizon View desktop poolsand View Hosted applications, or Citrix-based applications.
To integrate and enable View desktop and application pools, Citrix-published resources, or ThinApppackaged applications, you use the Manage Desktop Applications menu in the Catalog tab.
For information, requirements, installation and configuration of these resources, see Setting Up Resources inVMware Identity Manager.
Web ApplicationsYou populate your catalog with Web applications directly on the Catalog page of the administration console.When you click a Web application displayed on the Catalog page, information about that application isdisplayed. From the displayed page, you can configure the Web application, such as by providing theappropriate SAML attributes to configure single sign-on between VMware Identity Manager and the targetWeb application. When the Web application is configured, you can then entitle users and groups to that Webapplication. See “Add Web Applications to Your Catalog,” on page 82.
Add Web Applications to Your CatalogYou can add Web applications to your catalog directly using the Catalog page in the administration console.
See Setting Up Resources in VMware Identity Manager, Providing Access to Web Applications chapter fordetailed instructions about adding a Web application to your catalog.
The following instructions provide an overview of the steps involved in adding these types of resources toyour catalog.
Procedure
1 In the administration console, click the Catalog tab.
2 Click + Add Application.
VMware Identity Manager Administration
82 VMware, Inc.
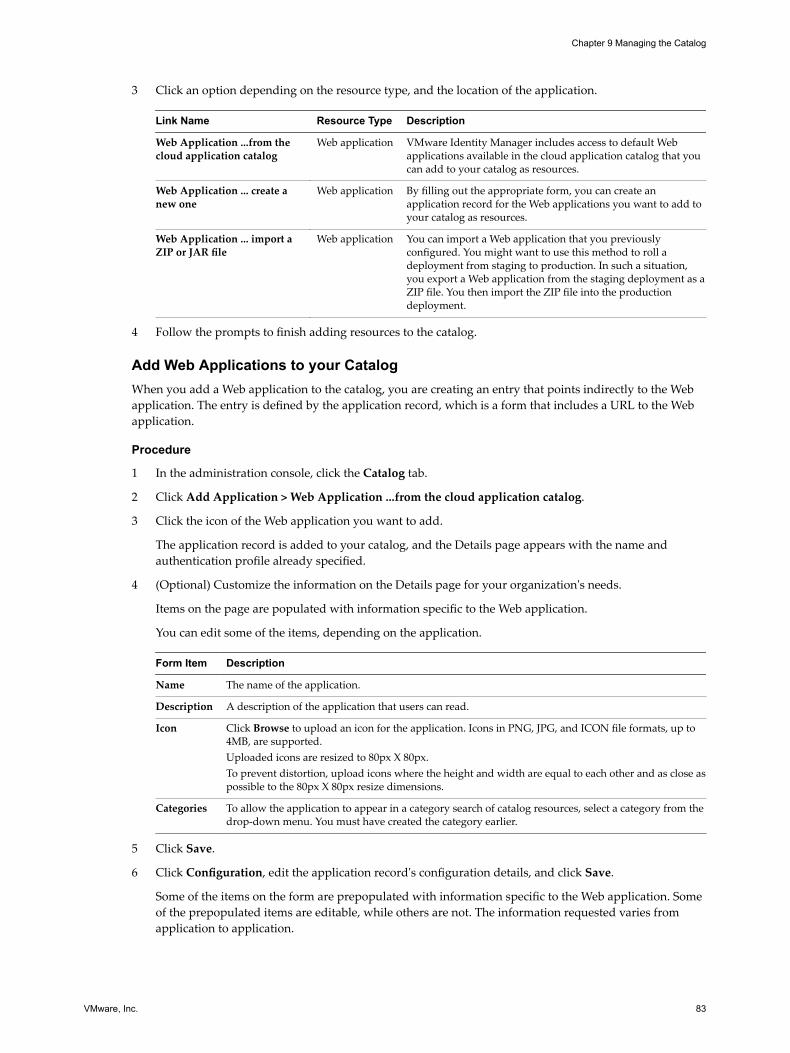
3 Click an option depending on the resource type, and the location of the application.
Link Name Resource Type Description
Web Application ...from thecloud application catalog
Web application VMware Identity Manager includes access to default Webapplications available in the cloud application catalog that youcan add to your catalog as resources.
Web Application ... create anew one
Web application By filling out the appropriate form, you can create anapplication record for the Web applications you want to add toyour catalog as resources.
Web Application ... import aZIP or JAR file
Web application You can import a Web application that you previouslyconfigured. You might want to use this method to roll adeployment from staging to production. In such a situation,you export a Web application from the staging deployment as aZIP file. You then import the ZIP file into the productiondeployment.
4 Follow the prompts to finish adding resources to the catalog.
Add Web Applications to your CatalogWhen you add a Web application to the catalog, you are creating an entry that points indirectly to the Webapplication. The entry is defined by the application record, which is a form that includes a URL to the Webapplication.
Procedure
1 In the administration console, click the Catalog tab.
2 Click Add Application > Web Application ...from the cloud application catalog.
3 Click the icon of the Web application you want to add.
The application record is added to your catalog, and the Details page appears with the name andauthentication profile already specified.
4 (Optional) Customize the information on the Details page for your organization's needs.
Items on the page are populated with information specific to the Web application.
You can edit some of the items, depending on the application.
Form Item Description
Name The name of the application.
Description A description of the application that users can read.
Icon Click Browse to upload an icon for the application. Icons in PNG, JPG, and ICON file formats, up to4MB, are supported.Uploaded icons are resized to 80px X 80px.To prevent distortion, upload icons where the height and width are equal to each other and as close aspossible to the 80px X 80px resize dimensions.
Categories To allow the application to appear in a category search of catalog resources, select a category from thedrop-down menu. You must have created the category earlier.
5 Click Save.
6 Click Configuration, edit the application record's configuration details, and click Save.
Some of the items on the form are prepopulated with information specific to the Web application. Someof the prepopulated items are editable, while others are not. The information requested varies fromapplication to application.
Chapter 9 Managing the Catalog
VMware, Inc. 83

For some applications, the form has an Application Parameters section. If the section exists for anapplication and a parameter in the section does not have a default value, provide a value to allow theapplication to launch. If a default value is provided, you can edit the value.
7 Select the Entitlements, Licensing, and Provisioning tabs and customize the information asappropriate.
Tab Description
Entitlements Entitle users and groups to the application. You can configure entitlements while initiallyconfiguring the application or anytime in the future.
Access Policies Apply an access policy to control user access to the application.
Licensing Configure license tracking. Add license information for the application to track license use inreports.
Provisioning Select a provisioning adapter, if applicable. Currently, a provisioning adapter is available forGoogle Apps. See “Using the Google Apps Provisioning Adapter,” on page 84 for moreinformation.Provisioning provides automatic application user management from a single location.Provisioning adapters allow the Web application to retrieve specific information from theVMware Identity Manager service as required. For example, to enable automatic user provisioningto Google Apps, user account information, such as the user name, first name, and last name mustexist in the Google Apps database. An application might require other information, such as group-membership and authorization-role information.
What to do next
For details about adding user and group entitlements for Web applications, see “Review User Information inVMware Identity Manager,” on page 76.
Using the Google Apps Provisioning AdapterYou can use the Google Apps Provisioning Adapter to automatically provision users in Google from theVMware Identity Manager service. If provisioning is enabled, whenever you entitle a user to Google Appsin the service, the user is also created in Google.
Before enabling provisioning in VMware Identity Manager, you must do the following:
1 Create a Google service account and its credentials.
You will need your service account’s client ID, email address, and private key file to enableprovisioning.
2 After you create the Google service account, enable Google Apps domain-wide delegation.
a In the API Manager Credentials > Create credentials page, click Manage service accounts.
b Click the icon next to your service account and select Edit.
c Select the Enable Google Apps Domain-wide Delegation checkbox, and click Save.
VMware Identity Manager Administration
84 VMware, Inc.

3 Delegate Google Apps domain-wide authority to your service account from the Security > AdvancedSettings > Authentication > Manage API client access page in the Google Admin console. See the Google documentation for more information.
When you delegate domain-wide authority to the service account, enter the following values for theOne or More API Scopes field:https://www.googleapis.com/auth/admin.directory.user.readonly,https://www.googleapis.com/aut
h/admin.directory.user.alias.readonly,https://www.googleapis.com/auth/admin.directory.user.al
ias,https://www.googleapis.com/auth/admin.directory.user,https://www.googleapis.com/auth/admi
n.directory.group.readonly,https://www.googleapis.com/auth/admin.directory.group.member.reado
nly,https://www.googleapis.com/auth/admin.directory.group.member,https://www.googleapis.com/a
uth/admin.directory.group
You can now enable provisioning in the VMware Identity Manager service.
Procedure
1 Log in to the VMware Identity Manager administration console.
2 Click the Catalog tab.
3 Click Google Apps.
4 In the Modify application page, click Provisioning.
5 Enter the following information.
Option Description
Select Adapter Select GoogleAppsProvisioningAdapter.
AdminUsername Your Google Apps administrator user name. Do not include the domainname.For example: admin
ServiceAccount The client email of the service account.You can get the client email from the key file.
Private Key Copy and paste the service account's private key.
DomainName Your company's domain name.For example: example.com
SuspendOnDeprovisioning Select this option if you want users to be suspended in Google when youremove their entitlement to Google Apps.
Enable Provisioning Select this option. For example:
Chapter 9 Managing the Catalog
VMware, Inc. 85

6 Click Test Connection.
If the connection is successful, a "Made a connection to Google service" message appears at the top ofthe page.
7 Click Save.
8 Click the Users tab.
9 Select the attributes with which to provision users in Google by setting values for them.
The following attributes are required, and have default values.
n UserName
n FirstName
VMware Identity Manager Administration
86 VMware, Inc.

n LastName
To set values for the attributes, follow these steps.
a Click Edit mapped values.
b Click Edit next to the attribute and select a value.
n For some attributes, mapped values can be specified per group. For example, the USERNAMEattribute.
Click +ADD to add a group. You can set different values for the groups. The groups are listedin order of precedence and you can change the order by clicking the blue up and down arrows.If a user belongs to more than one group in the list, then the value of the first group to whichthe user belongs is used. The ALL USERS group can be used to set a default value.
The expressions in the VALUE drop-down list are the ones listed in the User Attributes page. Ifyou want to add any expressions to the list, add them to the User Attributes page. You can alsotype in a value directly.
n For some attributes, you can specify multiple values. For example, you can specify multiplephone numbers for the PHONES attribute.
Click +ADD to add another value.
The expressions in the drop-down list are the ones listed in the User Attributes page. If youwant to add any expressions to the list, add them to the User Attributes page. You can alsotype in a value directly.
c Click Queue Changes or Save.
Chapter 9 Managing the Catalog
VMware, Inc. 87

d Edit the other attributes you want to set.
e Click Save.
Provisioning is now enabled. When you entitle a user to Google Apps, if the user does not exist in Google,the user will be created.
Note When you entitle a user to Google Apps, if you set the DEPLOYMENT field value to Automatic, theuser is provisioned immediately. If you set the value to User-Activated, the user is provisioned when theuser adds Google Apps to their My Apps portal.
Adding View Desktop and Hosted ApplicationsYou populate your catalog with View desktop pools and View hosted applications, and you integrate yourVMware Identity Manager deployment with Horizon View.
When you click View Application from the Catalog > Manage Desktop Applications menu, you areredirected to the View Pools page. Select Enable View Pools to add View pods, perform a directory sync forView, and configure the type of deployment the service uses to extend View resources entitlements to users.
After you perform these tasks, the View desktops and hosted applications that you entitled to users withHorizon View are available as resources in your catalog.
You can return to the page at any time to modify the View configuration or to add or remove View pods.
For detailed information about integrating View with VMware Identity Manager, refer to Providing Accessto View Desktops in the Setting Up Resource guide.
Adding Citrix Published ApplicationsYou can use VMware Identity Manager to integrate with existing Citrix deployments and then populateyour catalog with Citrix-based applications.
When you click Citrix Published Application from the Catalog > Manage Desktop Applications menu, youare redirected to the Published Apps - Citrix page. Select Enable Citrix-based Applications to establishcommunication and schedule the synchronization frequency between VMware Identity Manager and theCitrix server farm.
For detailed information about integrating Citrix-published applications with VMware Identity Manager,see Providing Access to Citrix-Published Resources in the Setting Up Resources guide.
VMware Identity Manager Administration
88 VMware, Inc.
Adding ThinApp ApplicationsWith VMware Identity Manager, you can centrally distribute and manage ThinApp packages. You mustenable VMware Identity Manager to locate the repository that stores ThinApp packages and sync thepackages with VMware Identity Manager.
You populate your catalog with Windows applications captured as ThinApp packages by performing thefollowing tasks.
1 If the ThinApp packages to which you want to provide users access do not already exist, createThinApp packages that are compatible with VMware Identity Manager. See the VMware ThinAppdocumentation.
2 Create a network share and populate it with the compatible ThinApp packages.
3 Configure VMware Identity Manager to integrate with the packages on the network share.
When you click ThinApp Application from the Catalog > Manage Desktop Applications menu, you areredirected to the Packaged Apps - ThinApp page. Select Enable packaged applications. Enter the ThinApprepository location and configure the sync frequency.
After you perform these tasks, the ThinApp packages that you added to the network share are now availableas resources in your catalog.
For detailed information about configuring VMware Identity Manager to distribute and manage ThinApppackages, see Providing Access to VMware ThinApp Packages in the Setting Up Resources guide.
Grouping Resource into CategoriesYou can organize resources into logical categories to make it easier for users to locate the resource they needin their My Apps portal workspace.
When you create categories consider your organization's structure, the resource's job function, and type ofresource. You can assign more than one category to a resource. For example, you could create a categorycalled Text Editor and another category called Recommended Resources. Assign Text Editor to all the texteditor resources in your catalog and also assign Recommended Resources to a specific text editor resourceyou would prefer your users to use.
Create a Resource CategoryYou can create a resource category without immediately applying it or you can create and apply a categoryto the resource at the same time.
Procedure
1 In the administration console, click the Catalog tab.
2 To create and apply categories at the same time, select the check boxes of the applications to which toapply the new category.
3 Click Categories.
4 Enter a new category name in the text box.
5 Click Add category....
A new category is created, but not applied to any resource.
6 To apply the category to the selected resources, select the check box for the new category name.
The category is added to the application and is listed in the Categories column.
Chapter 9 Managing the Catalog
VMware, Inc. 89

What to do next
Apply the category to other applications . See “Apply a Category to Resources,” on page 90.
Apply a Category to ResourcesAfter you create a category, you can apply that category to any of the resources in the catalog. You can applymultiple categories to the same resource.
Prerequisites
Create a category.
Procedure
1 In the administration console, click the Catalog tab.
2 Select the check boxes of all the applications to which to apply the category.
3 Click Categories and select the name of the category to apply.
The category is applied to the selected applications.
Remove a Category from an ApplicationYou can disassociate a category from an application.
Procedure
1 In the administration console, click the Catalog tab.
2 Select the check boxes of applications to remove a category.
3 Click Categories.
The categories that are applied to the applications are checked.
4 Deselect the category to be removed from the application and close the menu box.
The category is removed from the application's Categories list.
Delete a CategoryYou can permanently remove a category from the catalog.
Procedure
1 In the administration console, click the Catalog tab.
2 Click Categories.
3 Hover over the category to be deleted. An x appears. Click the x.
4 Click OK to remove the category.
The category no longer appears in the Categories drop-down menu or as a label to any application to whichyou previously applied it.
Managing Catalog SettingsThe Catalog Settings page can be used to manage resources in the catalog, download a SAML certificate,customize the user portal, and set global settings.
VMware Identity Manager Administration
90 VMware, Inc.

Download SAML Certificates to Configure with Relying ApplicationsWhen you configure Web applications, you must copy your organization's SAML-signing certificate andsend them to the relying applications so they can accept user logins from the service. The SAML certificate isused to authenticate user log ins from the service to relying applications, such as WebEx or Google Apps.
You copy the SAML signing certificate and the SAML service provider metadata from the service and editthe SAML assertion in the third-party identity provider to map VMware Identity Manager users.
Procedure
1 Log in to the administration console.
2 In the Catalog tab, select Settings > SAML Metadata.
3 Copy and save the SAML signing certificate that displays.
a Copy the certificate information that is in the Signing Certificate section.
b Save the certificate information to a text file for later use when you configure the third-partyidentity provider instance.
4 Make the SAML SP metadata available to the third party identity provider instance.
a On the Download SAML Certificate page, click Service Provider (SP) metadata.
b Copy and save the displayed information using the method that best suits your organization.
Use this copied information later when you configure the third-party identity provider.
5 Determine the user mapping from the third-party identity provider instance toVMware Identity Manager.
When you configure the third-party identity provider, edit the SAML assertion in the third-partyidentity provider to map VMware Identity Manager users.
NameID Format User Mapping
urn:oasis:names:tc:SAML:1.1:nameid-format:emailAddress
The NameID value in the SAML assertion is mapped to the email addressattribute in VMware Identity Manager.
urn:oasis:names:tc:SAML:1.1:nameid-format:unspecified
The NameID value in the SAML assertion is mapped to the usernameattribute in VMware Identity Manager.
What to do next
Apply the information you copied for this task to configure the third-party identity provider instance.
Disable Prompt for Downloading Helper ApplicationsView desktops, Citrix published apps, and ThinApp resources require the following helper applications beinstalled on the users’ computers or device.
n View desktops use Horizon Client.
n Citrix-published apps require Citrix Receiver.
n ThinApp resources require VMware Identity Manager for Desktops.
Users are asked to download helper applications to their desktop or device the first time they launchapplications from these resources types. You can completely disable this prompt from displaying each timethe resource is launched from the Catalog > Settings > Global Settings page.
Disabling the prompt from display is a good option when computers or devices are managed, and youknow the helper applications are on the user's local image.
Chapter 9 Managing the Catalog
VMware, Inc. 91
Procedure
1 In the administrator console, select Catalog > Settings.
2 Select Global Settings.
3 Select the operating systems that should not ask to launch the helper applications.
4 Click Save.
Creating Clients to Enable Access to Remote ApplicationsYou can create a single client to enable a single application to register with VMware Identity Manager toallow user access to a specific application in the admin console Catalog > Settings page.
The SDK uses OAuth based authentication to connect to VMware Identity Manager. You must create a clientID value and a clientSecret value in the admin console.
Create Remote Access to a Single Catalog ResourceYou can create a client to enable a single application to register with VMware Identity Manager services toallow user access to a specific application.
Procedure
1 In the administration console Catalog tab, select Settings > Remote App Access.
2 On the Clients page, click Create Client.
3 On the Create Client page, enter the following information about the application.
Label Description
Access Type Options are User Access Token or Service Client Token.
Client ID Enter a unique client ID for the resource to be registered with VMware Identity Manager.
Application Select Identity Manager.
scope Select the appropriate scope. When you select NAAPS, OpenID is also selected.
Redirect URI Enter the registered redirect URI.
Advanced Section
Shared Secret Click Generate Shared Secret to generate a secret that is shared between this service and theapplication resource service.Copy and save the client secret to configure in the application setup.The client secret must be kept confidential. If a deployed app cannot keep the secretconfidential, then the secret is not used. The shared secret is not used with Web browser-based apps.
Issue Refresh Token Deselect the checkbox.
Token Type Select Bearer
Token Length Leave the default setting, 32 Bytes.
Issue Refresh Token Check Refresh Token.
Access Token TTL (Optional) Change the Access Token Time-To-Live settings.
Refresh Token TTL (Optional)
User Grant Do not check Prompt users for access.
4 Click Add.
The client configuration is displayed on the OAuth2 Client page, along with the shared secret that wasgenerated.
VMware Identity Manager Administration
92 VMware, Inc.

What to do next
Enter the Client ID and the shared secret in the resources configuration pages. See the applicationdocumentation.
Create Remote Access TemplateYou can create a template to enable a group of clients to register dynamically with theVMware Identity Manager service to allow users access to a specific application.
Procedure
1 In the administration console Catalog tab, select Settings > Remote App Access.
2 Click Templates.
3 Click Create Template.
4 On the Create Template page, enter the following information about the application.
Label Description
Template ID Enter a unique identifies for this resource.
Application Select Identity Manager
scope Select the appropriate scope. When you select NAAPS, OpenID is also selected.
Redirect URI Enter the registered redirect URI.
Advanced Section
Token Type Select Bearer
Token Length Leave the default setting, 32 Bytes.
Issue Refresh Token Check Refresh Token.
Access Token TTL (Optional)
Refresh Token TTL (Optional)
User Grant Do not check Prompt users for access.
5 Click Add.
What to do next
In the resource application set up the VMware Identity Manager service URL as the site that supportsintegrated authentication.
Editing ICA Properties in Citrix Published ApplicationsYou can edit the settings for individual Citrix-published applications and desktops in your VMware IdentityManager deployment from the Catalog > Settings > Citrix Published Application pages.
The ICA Configuration page is configured for individual applications. The ICA properties text boxes forindividual applications are empty until you manually add properties. When you edit the applicationdelivery settings, the ICA properties, of an individual Citrix-published resource, those settings takeprecedence over the global settings.
In the NetScaler Configuration page, you can configure the service with the appropriate settings so thatwhen users launch Citrix based applications, the traffic is routed through NetScaler to the XenApp server.
When you edit the ICA properties in the Citrix Published Applications > Netscaler ICA Configuration tab,the settings apply to application launch traffic that is routed through NetScaler.
Chapter 9 Managing the Catalog
VMware, Inc. 93

For information about configuring ICA properties, see the Configuring NetScaler topic and the EditingVMware Identity Manager Application Delivery Settings for a Single Citrix-Published Resource topic in thedocumentation center.
Reviewing ThinApp AlertsThinApp Application Alerts in the Catalogs, Settings menu, redirects you to Packaged Apps Alerts page.
Any errors that were found when ThinApp packges were synced with VMware Identity Manager are listedon the page.
Enabling Application Approval for Resource UsageConfigure the application approval feature in VMware Identity Manager to help you manage your resourcesusage. Enable Approvals in the Catalog >Settings page and register the callback URI of the approval requesthandler that you installed earlier.
When you add applications that require approval to the catalog, you enable the License approval requiredoption when you add the application to the catalog. Users are required to request an approval to use theapp, which triggers the application approval workflow. Once the request is approved, users can start usingthe app.
You can view the VMware Identity Manager resource usage and resource entitlements reports to see thenumber of approved applications being used.
Set up License Approval and Configure REST API as Approval EngineYou can register your callout REST URI to integrate your application management system with VMwareIdentity Manager to manage resources you make available in the catalog.
Prerequisites
Your application management system configured and the URI available through the callout REST API thatreceives the requests from VMware Identity Manager.
Procedure
1 In the administration console Catalog tab, select Settings > Approvals.
2 Check Enable Approvals.
3 In the Approval Engine drop-down menu, select REST API.
4 Configure the following text boxes.
Option Description
URI Enter the approval request handler URI of the REST API that listens for thecallout requests. The REST API must be accessible from the VMwareIdentity Manager service.
User Name (Optional) If the REST API is on a Web server that requires a user nameand password to access, enter the name here. If no authentication isrequired, you can leave user name and password blank.
VMware Identity Manager Administration
94 VMware, Inc.
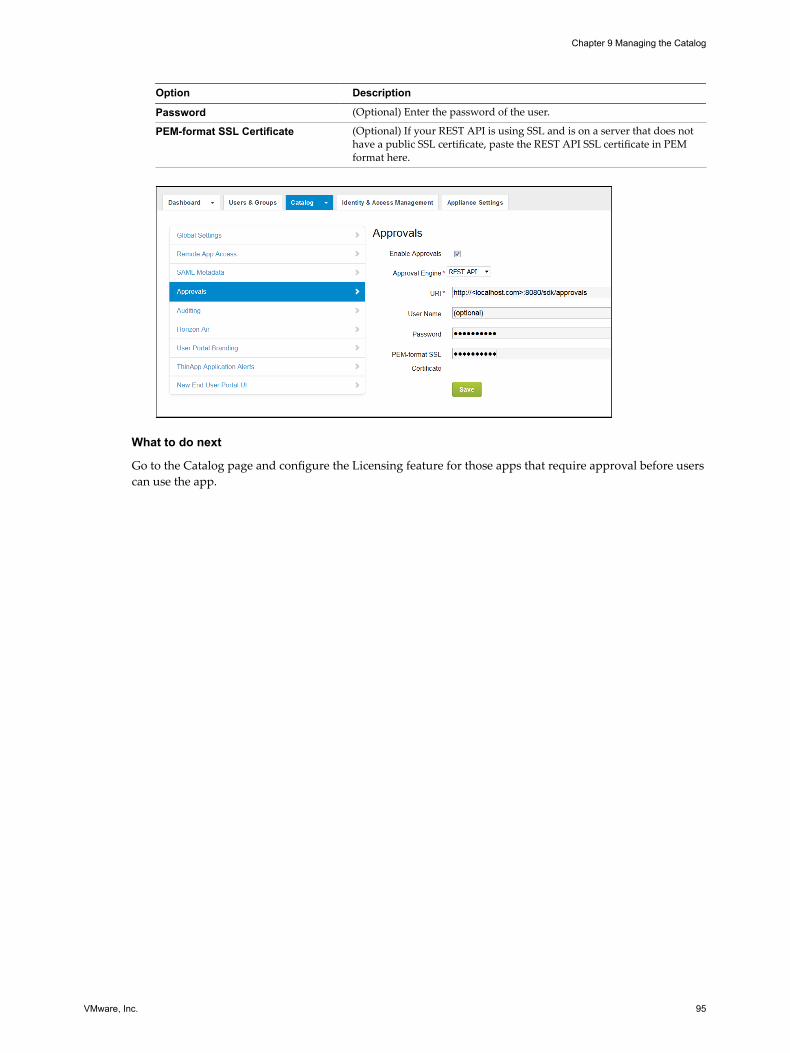
Option Description
Password (Optional) Enter the password of the user.
PEM-format SSL Certificate (Optional) If your REST API is using SSL and is on a server that does nothave a public SSL certificate, paste the REST API SSL certificate in PEMformat here.
What to do next
Go to the Catalog page and configure the Licensing feature for those apps that require approval before userscan use the app.
Chapter 9 Managing the Catalog
VMware, Inc. 95

VMware Identity Manager Administration
96 VMware, Inc.

Working in the AdministrationConsole Dashboard 10
Two dashboards are available in the administration console. The User Engagement dashboard can be usedto monitor users and resource usage. The System Diagnostics dashboard can be used to monitor the healthof the VMware Identity Manager service.
This chapter includes the following topics:
n “Monitor Users and Resource Usage from the Dashboard,” on page 97
n “Monitor System Information and Health,” on page 98
n “Viewing Reports,” on page 98
Monitor Users and Resource Usage from the DashboardThe User Engagement Dashboard displays information about users and resources. You can see who issigned in, which applications are being used, and how often the applications are being accessed. You cancreate reports to track users and group activities and resources usage.
The time that displays on the User Engagement Dashboard is based on the time zone set for the browser.The dashboard updates every one minute.
Procedure
n The header displays the number of unique users that logged in on that day and displays a timeline thatshows the number of daily login events over a seven day period. The Users Logged in Today number issurrounded by a circle that displays the percentage of users that is signed in. The Logins sliding graphdisplays login events during the week. Point to one of the points in the graph to see the number oflogins on that day.
n The Users and Groups section shows the number of user accounts and groups set up inVMware Identity Manager. The most recent users that logged in are displayed first. You can click SeeFull Reports to create an Audit Events report that shows the users who logged in over a range of days.
n The App popularity section displays a bar graph grouped by app type of the number of times that appswere launched over a seven day period. Point to a specific day to see a tool tip showing which type ofapps were being used and how many were launched on that day. The list below the graph displays thenumber of times the specific apps were launched. Expand the arrow on the right to select to view thisinformation over a day, a week, a month or 12 weeks. You can click See Full Reports to create aResource Usage report that shows app, resource type and number of users' activity over a range of time.
n The App adoption section displays a bar graph that shows the percentage of people who opened theapps they are entitled to. Point to the app to see the tool tip that shows the actual number of adoptionsand entitlements.
VMware, Inc. 97

n The Apps launched pie chart displays resources that have been launched as a percentage of the whole.Point to a specific section in the pie chart to see the actual number by type of resources. Expand thearrow on the right to select to view this information over a day, a week, a month or 12 weeks.
n The Clients section shows the number of Identity Manager Desktops being used.
Monitor System Information and HealthThe VMware Identity Manager System Diagnostics Dashboard displays a detailed overview of the health ofthe VMware Identity Manager appliances in your environment and information about the services. You cansee the overall health across the VMware Identity Manager database server, virtual machines, and theservices available on each virtual machine.
From the System Diagnostics Dashboard you can select the virtual machine that you want to monitor andsee the status of the services on that virtual machine, including the version of VMware Identity Managerthat is installed. If the database or a virtual machine is having problems, the header bar displays themachine status in red. To see the problems, you can select the virtual machine that is displayed in red.
Procedure
n User Password Expiration. The expiration dates for the VMware Identity Manager appliance root andremote log in passwords are displayed. If a password expires, go to the Settings page and select VAConfigurations. Open the System Security page to change the password.
n Certificates. The certificate issuer, start date, and end date are displayed. To manage the certificate, go tothe Settings page and select VA Configurations. Open the Install Certificate page.
n Configurator - Application Deployment Status. The Appliance Configurator services information isdisplayed. Web Server Status shows whether the Tomcat Server is running. The Web Application Statusshows whether the Appliance Configurator page can be accessed. The appliance version shows theversion of the VMware Identity Manager appliance that is installed.
n Application Manager - Application Deployment Status. The VMware Identity Manager Applianceconnection status is displayed.
n Connector - Application Deployment Status. The administration console connection status is displayed.When Connection successful is displayed, you can access the administration console pages.
n VMware Identity Manager FQDN. Shows the fully qualified domain name that users enter to accesstheir VMware Identity Manager App portal. The VMware Identity Manager FQDN points to the loadbalancer when a load balancer is being used.
n Application Manager - Integrated Components. The VMware Identity Manager database connection,audit services, and analytics connection information is displayed.
n Connector - Integrated Components. Information about services that are managed from the ConnectorServices Admin pages is displayed. Information about ThinApp, View, and Citrix Published Appresources is displayed.
n Modules. Displays resources that are enabled in VMware Identity Manager. Click Enabled to go to theConnector Services Admin page for that resource.
Viewing ReportsYou can create reports to track users and group activities and resource usage. You can view the reports inthe administration console Dashboard > Reports page.
You can export reports in an comma-separated value (csv) file format.
VMware Identity Manager Administration
98 VMware, Inc.

Table 10‑1. Report Types
Report Description
Recent Activity Recent activity is a report about the actions that users performed while using their MyApps portal for the past day, past week, past month, or past 12 weeks. The activity caninclude user information such as how many unique user logins, how many generallogins and resource information such as number of resources launched, resourceentitlements added. You can click Show Events to see the date, time, and user detailsfor the activity.
Resource Usage Resource usage is a report of all resources in the Catalog with details for each resourceabout the number of users, launches, and licenses. You can select to view the activitiesfor the past day, past week, past month, or past 12 weeks.
Resource Entitlements Resource entitlements is a report by resource that shows the number of users entitled tothe resource, number of launches, and number of licenses used.
Resource Activity The resource activity report can be created for all users or a specific group of users. Theresource activity information lists the user name, the resource entitled to the user andthe date the resource was last accessed, and information about the type of device theuser used to access the resource.
Group Membership Group membership is a lists the members of a group you specify.
Role Assignment Role assignment lists the users that are either API-only administrators oradministrators and their email addresses.
Users Users report lists all the users and provides details about each user, such as the user'semail address, role, and group affiliations.
Concurrent Users Concurrent users report shows the number of user sessions that were opened at onetime and the date and time.
Device Usage The device usage report can show device usage for all users or a specific group ofusers. The device information is listed by individual user and includes the user's name,device name, operating system information, and date last used.
Audit events The audit events report lists the events related to a user you specify, such as user loginsfor the past 30 days. You can also view the audit event details. This feature is useful fortroubleshooting purposes. To run audit events reports, auditing must be enabled in theCatalog > Settings > Auditing page. See “Generate an Audit Event Report,” onpage 99.
Generate an Audit Event ReportYou can generate a report of audit events that you specify.
Audit event reports can be useful as a method of troubleshooting.
Prerequisites
Auditing must be enabled. To verify if it is enabled, in the administration console, go to the Catalog >Settings page and select Auditing.
Procedure
1 In the administration console, select Reports > Audit events
Chapter 10 Working in the Administration Console Dashboard
VMware, Inc. 99

2 Select audit event criteria.
AuditEventCriteria Description
User This text box allows you to narrow the search of audit events to those generated by a specific user.
Type This drop-down list allows you to narrow the search of audit events to a specific audit event type.The drop-down list does not display all potential audit event types. The list only displays event typesthat have occurred in your deployment. Audit event types that are listed with all uppercase letters areaccess events, such as LOGIN and LAUNCH, which do not generate changes in the database. Otheraudit event types generate changes in the database.
Action This drop-down list allows you to narrow your search to specific actions. The list displays events thatmake specific changes to the database. If you select an access event in the Type drop-down list, whichsignifies a non-action event, do not specify an action in the Action drop-down list.
Object This text box allows you to narrow the search to a specific object. Examples of objects are groups,users, and devices. Objects are identified by a name or an ID number.
Date range These text boxes allow you to narrow your search to a date range in the format of "From ___ days agoto ___ days ago." The maximum date range is 30 days. For example, from 90 days ago to 60 days agois a valid range while 90 days ago to 45 days ago is an invalid range because it exceeds the 30 daymaximum.
3 Click Show.
An audit event report appears according to the criteria you specified.
Note At times when the auditing subsystem is restarting, the Audit Events page might display anerror message and not render the report. If you see such an error message about not rendering thereport, wait a few minutes and then try again.
4 For more information about an audit event, click View Details for that audit event.
VMware Identity Manager Administration
100 VMware, Inc.

Custom Branded Web Portals 11You can customize the logos, fonts, and background that appear in various interfaces, such as theadministration console, the user and administrator sign-in screens, the Web view of the apps portal and theWeb view of the apps portal on mobile devices.
You can use the customization tool to match the look and feel of your company's colors, logos and design.
n The browser address tab and the sign in pages are customized from the Identity & Access Management> Setup > Custom Branding pages.
n Add a logo and customize the user Web portal mobile and tablet views from the Catalog > Settings >User Portal Branding pages.
This chapter includes the following topics:
n “Customize Branding in VMware Identity Manager,” on page 101
n “Customize Branding for the User Portal,” on page 102
Customize Branding in VMware Identity ManagerYou can add your company name, product name and favicon to the address bar for the administrationconsole and the user portal and you can customize the sign-in page to set background colors to match yourcompany's colors and logo design.
To add your company logo, go to the Catalog > Settings > User Portal Branding page in the admin console.
Procedure
1 In the administration console Identity & Access Management tab, select Setup > Custom Branding.
2 Edit the following settings in the form as appropriate.
Note If a setting is not listed in the table, that setting is not used and cannot be customized.
Form Item Description
Names and Logos
Company Name The Company Name option applies to both desktops and mobile devices. You can addyour company's name as the title that appears in the browser tab.Enter a new company name over the existing one to change the name.
Product Name The Product Name option applies to both desktops and mobile devices. The product namedisplays after the company name in the browser tab.Enter a product name over the existing one to change the name.
VMware, Inc. 101

Form Item Description
Favicon Add a favicon to the browser tab. This applies to both desktops and mobile devices.The maximum size of the favicon image is 16 x 16px. The format can be JPEG, PNG, GIF,or ICO.Click Upload to upload a new image to replace the current favicon. You are prompted toconfirm the change. The change occurs immediately.
Sign-In Screen
Logo Click Upload to upload a new logo to replace the current logo on the sign-in screens.When you click Confirm, the change occurs immediately.The minimum image size recommended to upload is 350 x 100 px. If you upload imagesthat are larger than 350 x 100 px, the image is scaled to fit 350 x 100 px size. The format canbe JPEG, PNG, or GIF.
Background Color The color that displays for the background of the sign-in screen.Enter the six-digit hexadecimal color code over the existing one to change the backgroundcolor.Select Background Highlight to accent the background color.Select Background Pattern to set the predesigned triangle pattern in the background color.
Box background color The sign-in screen color can customized.Enter the six-digit hexadecimal color code over the existing code.
Login buttonbackground color
The color of the login button can be customized.Enter the six-digit hexadecimal color code over the existing one.
Login button text color The color of the text that displays on the login button can be customized.Enter the six-digit hexadecimal color code over the existing one.
When you customize the sign-in screen, you can see your changes in the Preview before you save yourchanges.
3 Click Save.
Custom branding updates to administration console and sign in pages are applied within five minutes afteryou click Save.
What to do next
Check the appearance of the branding changes in the various interfaces.
Update the appearance of the end user Web portal and mobile and tablet view. See “Customize Branding forthe User Portal,” on page 102
Customize Branding for the User PortalYou can add a logo, change the background colors and add images to customize the end user's Web viewfrom the browser and from their mobile and tablet devices.
Procedure
1 In the VMware Identity Manager administration console Catalogs tab, select Settings > User PortalBranding.
VMware Identity Manager Administration
102 VMware, Inc.

2 Edit the settings in the form as appropriate.
Note Some settings on the User Portal Branding page are no longer used. If a setting is not listed inthis table, that setting is not used and cannot be customized.
Form Item Description
Logo Add a logo to be the banner image at the top of the admin console and user's app portalWeb pages.
The maximum size of the image is 220 x 40 px. The format can be JPEG, PNG or GIF.
Portal (Web View)
Background Color The color that displays for the background of the Web portal screen.Enter a new six-digit hexadecimal color code over the existing one to change thebackground color. The background color changes in the app portal preview screen whenyou type in a new color code. However, if an image is added, the background color mightnot be visible in the preview.Select Background Highlight to accent the background color. If this is enabled, browsersthat support multiple background images show the overlay in the launcher and catalogpages.Select Background Pattern to set the predesigned triangle pattern in the background color.
Name and Icon Color You can select the text color for names listed under the icons on the app portal pages.Enter a hexadecimal color code over the existing one to change the font color.
Lettering effect Select the type of lettering to use for the text on the user's portal screens.
Image (Optional) To add an image to the background on the app portal screen instead of a color, upload animage.
Portal (Mobile and Tablet Views)
Title bar color This is the background color of the banner. Enter a six-digit hexadecimal color code overthe existing one to change the title bar color viewed from the user's app portal or mobiledevice.Select Title Bar pattern to set the predesigned triangle pattern in the title bar color.
Title color Enter a six-decimal hexadecimal color code over the existing one to change the text colorused in the title bar heading.
Use the same valuesfor both the Launcherand the Catalog
If you want to use the same branding design for the App Center screen view as used forthe user's portal screen view on mobile devices, check this box. If you want to design theApp Center screen differently, leave this box unchecked and configure the background,title bar color and title color for the App Center screen.
First-Time User Tour
First-Time User Tour The first time user tour is not available.
3 Click Save.
Custom branding updates are refreshed every 24 hours for the user portal. To push the changes sooner, asthe administrator, open a new tab and enter this URL, substituting your domain name formyco.example.com. https://<myco.example.com>/catalog-portal/services/api/branding?refreshCache=true.
What to do next
Check the appearance of the branding changes in the various interfaces.
Chapter 11 Custom Branded Web Portals
VMware, Inc. 103

VMware Identity Manager Administration
104 VMware, Inc.

Integrating AirWatch With VMwareIdentity Manager 12
AirWatch provides enterprise mobility management for devices and VMware Identity Manager providessingle sign-on and identity management for users.
When AirWatch and VMware Identity Manager are integrated, users from AirWatch enrolled devices canlog in to their enabled apps securely without entering multiple passwords.
When AirWatch is integrated with VMware Identity Manager, you can configure the following integrationswith AirWatch.
n An AirWatch directory that syncs AirWatch users and groups to a directory in VMware IdentityManager service and then set up password authentication through the AirWatch Cloud Connector.
n Single sign-on to a unified catalog containing entitled apps from both AirWatch and VMware IdentityManager managed.
n Single sign-on using Kerberos authentication to iOS 9 devices.
n Access policy rules to check that AirWatch-managed iOS 9 devices are in compliance.
This chapter includes the following topics:
n “Setting up AirWatch for Integration With VMware Identity Manager,” on page 105
n “Setting up an AirWatch Instance in VMware Identity Manager,” on page 109
n “Enable Unified Catalog for AirWatch,” on page 110
n “Configuring User Authentication with AirWatch,” on page 111
n “Implementing Authentication with AirWatch Cloud Connector,” on page 112
n “Implementing Mobile Single Sign-in Authentication for AirWatch-Managed iOS Devices,” onpage 115
n “Implementing Mobile Single Sign-on Authentication for Android Devices,” on page 123
n “Enable Compliance Checking for AirWatch Managed Devices,” on page 129
Setting up AirWatch for Integration With VMware Identity ManagerYou configure settings in the AirWatch admin console to communicate with VMware Identity Managerbefore you configure AirWatch settings in the VMware Identity Manager admin console.
To integrate AirWatch and VMware Identity Manager, the following is required.
n The organization group in AirWatch for which you are configuring VMware Identity Manager isCustomer.
VMware, Inc. 105

n A REST API admin key for communication with the VMware Identity Manager service and a RESTenrolled user API key for AirWatch Cloud Connector password authentication are created at the sameorganization group where VMware Identity Manager is configured.
n API Admin account settings and the admin auth certificate from AirWatch added to the AirWatchsettings in the VMware Identity Manager admin console.
n Active Directory user accounts set up at the same organization group where VMware Identity Manageris configured.
n If end users are placed into a child organization group from where VMware Identity Manager isconfigured after registration and enrollment, User Group mapping in the AirWatch enrollmentconfiguration must be used to filter users and their respective devices to the appropriate organizationgroup.
The following are set up in the AirWatch admin console.
n REST admin API key for communication with the VMware Identity Manager service
n API Admin account for VMware Identity Manager and the admin auth certificate that is exported fromAirWatch and added to the AirWatch settings in VMware Identity Manager
n REST enrolled user API key used for AirWatch Cloud Connector password authentication
Create REST API Keys in AirWatchREST Admin API access and enrolled users access must be enabled in the AirWatch admin console tointegrate VMware Identity Manager with AirWatch. When you enable API access, an API key is generated.
Procedure
1 In the AirWatch admin console, select the Global > Customer-level organization group and navigate toGroups & Settings > All Settings > System > Advanced > API > Rest API.
2 In the General tab, click Add to generate the API key to use in the VMware Identity Manager service.The account type should be Admin.
Provide a unique service name. Add a description, such as AirWatchAPI for IDM.
3 To generate the enrollment user API key, click Add again.
4 In the Account Type drop-down menu, select Enrollment User.
Provide a unique service name. Add a description such as UserAPI for IDM.
VMware Identity Manager Administration
106 VMware, Inc.

5 Copy the two API keys and save the keys to a file.
You add these keys when you set up AirWatch in the VMware Identity Manager admin console.
6 Click Save.
What to do next
Create Admin Account and Certificate in AirWatchAfter the admin API key is created, you add an admin account and set up certificate authentication in theAirWatch admin console.
For REST API certificate-based authentication, a user level certificate is generated from the AirWatch adminconsole. The certificate used is a self-signed AirWatch certificate generated from the AirWatch admin rootcert.
Prerequisites
The AirWatch REST admin API key is created.
Procedure
1 In the AirWatch admin console, select the Global > Customer-level organization group and navigate toAccounts > Administrators > List View.
2 Click Add > Admin.
Chapter 12 Integrating AirWatch With VMware Identity Manager
VMware, Inc. 107

3 In the Basic tab, enter the certificate admin user name and password in the required fields.
Important Make sure the Organization Group shown in the form is the same organization group thatthe Rest API key was created in.
4 Select the Roles tab; choose the current organization group and in the drop-down menu, selectAirWatch Administrator.
5 Select the API tab and in the Authentication field, select Certificates.
6 Enter the certificate password. The password is the same password entered for the admin on the Basictab.
7 Click Generate Client Certificate.
8 Click Save.
The new admin account and the client certificate are created.
9 Select the API tab again and in the Authentication drop-down menu, select Certificates.
The certificates page displays information about the certificate.
VMware Identity Manager Administration
108 VMware, Inc.

10 Enter the password you set in the Certificate Password field, click Export Client Certificate and save thefile.
The client certificate is saved as a .p12 file type.
What to do next
Configure your AirWatch URL settings in the VMware Identity Manager admin console.
Setting up an AirWatch Instance in VMware Identity ManagerAfter you configure the settings in the AirWatch admin console, in the VMware Identity Manager adminconsole Identity & Access Management page, you enter the AirWatch URL; the API key values, and thecertificate. After AirWatch settings are configured, you can enable feature options available with AirWatchintegration.
Add AirWatch Settings to VMware Identity ManagerConfigure AirWatch settings in VMware Identity Manager to integrate AirWatch with VMware IdentityManager and enable the AirWatch feature integration options. The AirWatch API key and the certificate areadded for VMware Identity Manager authorization with AirWatch.
Prerequisites
n AirWatch server URL that the admin uses to log in to the AirWatch admin console.
n AirWatch admin API key that is used to make API requests from VMware Identity Manager to theAirWatch server to setup integration.
n AirWatch certificate file used to make API calls and the certificate password. The certificate file must bein the .p12 file format.
n AirWatch enrolled user API key.
n AirWatch group ID for your tenant, which is the tenant identifier in AirWatch.
Procedure
1 In the VMware Identity Manager administration console, Identity & Access Management tab, clickSetup > AirWatch.
Chapter 12 Integrating AirWatch With VMware Identity Manager
VMware, Inc. 109

2 Enter the AirWatch integration settings in the following fields.
Field Description
AirWatch API URL Enter the AirWatch URL. For example, https://myco.airwatch.com
AirWatch API Certificate Upload the certificate file used to make API calls.
Certificate Password Enter the certificate password.
AirWatch Admin API Key Enter the admin API key value. Example of an API key valueFPseqCSataGcnJf8/Rvahzn/4jwkZENGkZzyc+jveeYs=
AirWatch Enrolled User API Key Enter the enrolled user API key value.
AirWatch Group ID. Enter the AirWatch group ID for the organization group that the API keyand admin account were created in.
3 Click Save.
What to do next
n Enable the feature option Unified Catalog to merge apps set up in the AirWatch catalog to the unifiedcatalog.
n Enable Compliance check to verify that AirWatch managed devices adhere to AirWatch compliancepolicies.
See “Enable Compliance Checking for AirWatch Managed Devices,” on page 129.
Enable Unified Catalog for AirWatchWhen you configure VMware Identity Manager with your AirWatch instance, you can enable the unifiedcatalog which lets end users see all apps that they are entitled to from both VMware Identity Manager andAirWatch.
When AirWatch is not integrated with the unified catalog, end users see only the apps that they are entitledto from the VMware Identity Manager service.
VMware Identity Manager Administration
110 VMware, Inc.

Prerequisites
AirWatch configured in VMware Identity Manager.
Procedure
1 In the administration console, Identity & Access Management tab, click Setup > AirWatch.
2 In the Unified Catalog section on this page, select Enable.
3 Click Save.
What to do next
Notify AirWatch end users about how to access the unified catalog and view their app portal throughVMware Identity Manager.
Configuring User Authentication with AirWatchVMware Identity Manager includes a built-in identity provider that can be configured to provideintegration with AirWatch Cloud Connector (ACC) for password authentication and Built-in Kerberosauthentication for managed iOS 9 devices.
You select the directory to use, the network ranges that you want to direct to the built-in identity providerinstance for authentication, and which authentication methods to enable. You can also enable devicecompliance to be used to manage access with the built-in Kerberos authentication.
You then configure the authentication methods and create access policies to apply to these authenticationmethods.
Configure the Built-in Identity Provider for AuthenticationIn the VMware Identity Manager admin console, configure the built-in identity provider to enable singlesign-on authentication for AirWatch users.
Prerequisites
n AirWatch configured in VMware Identity Manager.
n If using AirWatch Cloud Connector for password authentication, the VMware Identity Managerdirectory set up to sync to the AirWatch directory.
n List of the network ranges that you want to direct to the built-in identity provider instance forauthentication.
Procedure
1 In the Identity & Access Management tab, go to Manage > Identity Providers.
2 Select the identity provider labeled Built-in and configure the identity provider details.
Option Description
Identity Provider Name Enter the name for this built-in identity provider instance.
Users Select the directory that syncs from AirWatch to use the built-in identityprovider.
Chapter 12 Integrating AirWatch With VMware Identity Manager
VMware, Inc. 111

Option Description
Network The existing network ranges configured in the service are listed. Select thenetwork ranges for the users based on their IP addresses that you want todirect to this identity provider instance for authentication.
Authentication Methods Click the gearbox icon for the authentications method to be configured.Make sure the option is enabled in the AirWatch page.Enable the authentication methods for AirWatch users. See “ConfigureAuthentication to the AirWatch Cloud Connector,” on page 114 and “Configure Mobile SSO for iOS Authentication in the Built-in IdentityProvider,” on page 119
3 If you are using Built-in Kerberos authentication, download the KDC issuer certificate to use in the
AirWatch configuration of the iOS device management profile.
4 Click Save.
Implementing Authentication with AirWatch Cloud ConnectorYou can integrate your AirWatch Cloud Connector with the VMware Identity Manager service for userpassword authentication. You can configure the VMware Identity Manager service to sync users from theAirWatch directory instead of deploying a VMware Identity Manager connector.
To implement AirWatch Cloud Connector authentication, you enable AirWatch Cloud Connector PasswordAuthentication in the built-in identity provider page in the VMware Identity Manager admin console.
Note AirWatch Cloud Connector must be configured on AirWatch version 8.3 and later for authenticationwith VMware Identity Manager.
User name and password authentication are integrated into the AirWatch Cloud Connector deployment. Toauthenticate users using other VMware Identity Manager-supported authentication methods, the VMwareIdentity Manager connector must be configured.
Sync Users and Groups from AirWatch Directory to VMware Identity DirectoryYou can configure the VMware Identity Manager settings in the AirWatch admin console to establish aconnection between your organization group's instance of the AirWatch Directory and VMware IdentityManager to sync users and groups to a directory created in the VMware Identity Manager service. Thisdirectory can be used with AirWatch Cloud Connector for password authentication.
Users and groups can initially sync to the VMware Identity Manager directory manually. The periodicalsynchronization is according to the setting of AirWatch sync schedule. When a user or a group is added ordeleted on the AirWatch server. the change is automatically reflected at VMware Identity Manager serviceimmediately.
Prerequisites
n Valid license for VMware Identity Manager.
n VMware Identity Manager local admin name and password.
n Identify custom directory attributes used between AirWatch and the directory service to map with thisconfiguration. See “Managing User Attributes Mapping,” on page 113.
Procedure
1 In the AirWatch admin console, Groups & Settings, All Settings page, select the Global > Customer-levelorganization group and navigate to System > Enterprise Integration >VMware Identity Manager.
VMware Identity Manager Administration
112 VMware, Inc.

2 In the Server section, click Configure.
Note The configuration button is only available when the Directory Services is also configured for thesame organization group. If the Configure button is not visible, you are not in the correct organizationgroup. You can change the organization group in the Global drop-down menu.
3 Enter the VMware Identity Manager settings.
Option Description
URL Enter your tenant VMware URL . For example,https://myco.identitymanager.com.
Admin Username Enter the VMware Identity Manager local admin user name.
Admin Password Enter the VMware Identity Manager local admin user's password.
Directory Enter the name for the VMware Identity Manager directory that is createdin the VMware Identity Manager service.
4 Click Next.
5 Enable custom mapping to configure the user attributes mapping from AirWatch to the VMwareIdentity Manager service.
6 Click Test Connection to verify that the settings are correct.
7 Click Sync Now to manually sync all users and groups to VMware Identity Manager service.
Note To control the system load, manual sync can only be performed four hours after a previous sync.
An AirWatch directory is created in the VMware Identity Manager service and the users and groups aresynced to a directory in VMware Identity Manager.
What to do next
Review the Users and Groups tab in the VMware Identity Manager admin console to verify the user andgroup names are synced.
Managing User Attributes MappingYou can configure the user attribute mapping between the AirWatch directory and theVMware Identity Manager directory.
The User Attributes page in the VMware Identity Manager admin console, Identity & Access Management >Setup >User Attributes page lists the default directory attributes that can be mapped to AirWatch Directoryattributes.
Table 12‑1. Default AirWatch Directory Attributes Mapping
VMware Identity Manager User Attribute Name Default Mapping to AirWatch User Attribute
userPrincipalName userPrincipalName
distinguishedName distinguishedName
employeeID employeeID
domain Domain
disabled (external user disabled) disabled
phone telephoneNumber
lastName lastname*
firstName firstname*
Chapter 12 Integrating AirWatch With VMware Identity Manager
VMware, Inc. 113

Table 12‑1. Default AirWatch Directory Attributes Mapping (Continued)
VMware Identity Manager User Attribute Name Default Mapping to AirWatch User Attribute
email Email*
userName username*
* Required attributes for attribute mapping.
Users missing a required attribute are not synced to VMware Identity Manager.
Configure Authentication to the AirWatch Cloud ConnectorIn VMware Identity Manager, enable password authentication in the AirWatch configuration page and editthe built-in identity provider to enable AirWatch Cloud Connector Password authentication.
Prerequisites
n The built-in identity provider configured.
n AirWatch Cloud Connector set up in AirWatch, version 8.3 or later.
Procedure
1 In the administration console, Identity & Access Management tab, select Setup > AirWatch.
2 In the User Password Authentication through AirWatch Cloud Connector section, select Enable.
3 In the Identity & Access Management tab, go to Manage > Identity Providers.
4 Click the ACC Password gearbox icon.
5 Enable AirWatch Password authentication and set the maximum number of failed log in attempts. Theother fields are pre-populated.
Option Description
Enable AirWatch PasswordAuthentication
Select this checkbox to enable AirWatch password authentication.
AirWatch Admin Console URL Pre-populated with the AirWatch URL you set up on the AirWatchconfiguration page.
AirWatch Enrolled User API Key Pre-populated with the AirWatch user API key that you entered in theAirWatch configuration page.
AirWatch Group ID Pre-populated with the organization group ID that you entered in theAirWatch configuration page.
Number of authentication attemptsallowed
Enter the maximum number of failed login attempts when using AirWatchpassword authentication. No more logins are allowed after the failed loginattempts reach this number. The VMware Identity Manager service tries touse the fallback authentication method if it is configured. The default isfive attempts.
6 Click Save.
7 Click Save on the built-in identity provider page, if you made changes to that page.
What to do next
Configure the default access policy to create rules to use AirWatch password authentication. See Chapter 7,“Managing Access Policies,” on page 63,
VMware Identity Manager Administration
114 VMware, Inc.

Implementing Mobile Single Sign-in Authentication for AirWatch-Managed iOS Devices
For iOS device authentication, VMware Identity Manager uses an identity provider that is built in to theidentity manager service to provide access to Mobile SSO authentication. This authentication method uses aKey Distribution Center (KDC) without the use of a connector or a third-party system. You must initiate theKDC service in the VMware Identity Manager built-in identity provider before you enable Kerberos in theadmin console.
Implementing Mobile SSO authentication for AirWatch-managed iOS 9 devices requires the followingconfiguration steps.
Note Mobile SSO authentication is supported on iOS devices running iOS 9 and later.
n Initialize the Key Distribution Center (KDC) in the VMware Identity Manager appliance. See thePreparing to Use Kerberos Authentication on iOS Devices chapter in the Installation Guide.
n If you are using Active Directory Certificate Services, configure a certificate authority template forKerberos certificate distribution in the Active Directory Certificate Services. Then configure AirWatch touse Active Directory Certificate Authority. Add the Certificate template in the AirWatch admin console.Download the issuer certificate to configure Mobile SSO for iOS.
n If you are using AirWatch Certificate Authority, enable Certificates in the VMware Identity ManagerIntegrations page. Download the issuer certificate to configure Mobile SSO for iOS.
n Configure the built-in identity provider and enable and configure Mobile SSO for iOS authentication inthe VMware Identity Manager administration console.
n Configure the iOS device profile and enable single sign-in from the AirWatch admin console.
Configure Active Directory Certificate Authority in AirWatchTo set up single sign-on authentication to AirWatch managed iOS 9 mobile devices, you can set up a trustrelationship between Active Directory and AirWatch and enable the Mobile SSO for iOS authenticationmethod in VMware Identity Manager.
After you configured the certificate authority and certificate template for Kerberos certificate distribution inthe Active Directory Certificate Services, you enable AirWatch to request the certificate used forauthentication and add the certificate authority to the AirWatch admin console.
Procedure
1 In the AirWatch admin console main menu, navigate to Devices > Certificates > Certificate Authorities.
2 Click Add.
3 Configure the following in the Certificate Authority page.
Note Make sure that Microsoft AD CS is selected as the Authority Type before you start to completethis form.
Option Description
Name Enter a name for the new Certificate Authority.
Authority Type Make sure that Microsoft ADCS is selected.
Protocol Select ADCS as the protocol.
Server Hostname Enter the server hostname URL. Enter the host name in this formathttps://{servername.com}.
Chapter 12 Integrating AirWatch With VMware Identity Manager
VMware, Inc. 115

Option Description
Authority Name Enter the name of the certificate authority that the ADCS end point isconnected to. This name can be found by launching the CertificationAuthority application on the certificate authority server.
Authentication Make sure that Service Account is selected.
Username and Password Enter the user name and password of the AD CS admin account withsufficient access to allow AirWatch to request and issue certificates.
4 Click Save.
What to do next
Configure the Certificate Template in AirWatch.
Configuring AirWatch to use Active Directory Certificate AuthorityYour certificate authority template must be properly configured for Kerberos certificate distribution. In theActive Directory Certificate Services (AD CS), you can duplicate the existing Kerberos Authenticationtemplate to configure a new certificate authority template for the iOS Kerberos authentication.
When you duplicate the Kerberos Authentication template from AD CS, you must configure the followinginformation in the Properties of New Template dialog box.
Figure 12‑1. Active Directory Certificate Services Properties of New Template Dialog Box
n General tab. Enter the Template display name and the Template name. For example iOSKerberos. Thisis the display name that is shown in the Certificate Templates snap-in, Certificates snap-in, andCertification Authority snap-in.
n Subject Name tab. Select Supply in the request radio button. The subject name is supplied byAirWatch when AirWatch requests the certificate.
n Extensions tab. Define the application policies.
n Select Applications Policies and click Edit to add a new application policy. Name this policyKerberos Client Authentication.
n Add the object identifier (OID) as follows: 1.3.6.1.5.2.3.4. Do not change.
n In the Description of Application Policies list delete all policies listed except for the Kerberos ClientAuthentication policy and the Smart Card Authentication policy.
n Security tab. Add the AirWatch account to the list of users that can use the certificate. Set thepermissions for the account. Set Full Control to allow the security principal to modify all attributes of acertificate template, including the permissions for the certificate template. Otherwise, set thepermissions according to your organization's requirements.
Save the changes. Add the template to the list of templates used by the Active Directory CertificateAuthority.
In AirWatch configure the Certificate Authority and add the Certificate Template.
VMware Identity Manager Administration
116 VMware, Inc.

Add Certificate Template in AirWatchYou add the certificate template that associates the certificate authority used to generate the user's certificate.
Prerequisites
Configure the Certificate Authority in AirWatch.
Procedure
1 In the AirWatch admin console, navigate to System > Enterprise Integration > Certificate Authorities.
2 Select the Request Template tab and click Add.
3 Configure the following in the certificate template page.
Option Description
Name Enter the name for the new request template in AirWatch.
Certificate Authority In the drop-down menu, select the certificate authority that was created.
Issuing Template Enter the Microsoft CA certificate template name exactly as you created inAD CS. For example iOSKerberos.
Subject Name After CN=, enter {EnrollmentUser}, where the {} field is the AirWatchlookup value. The text entered here is the Subject of the certificate, whichcan be used to determine who received the certificate.
Private Key Length This private key length matches the setting on the certificate template thatis being used by AD CS. It is usually 2048.
Private Key Type Select the check box for Signing and Encryption.
San Type For the Subject Alternate Name, select User Principal Name. The valuemust be {EnrollmentUser}. If device compliance check is configuredwith Kerberos authentication, you must set a second SAN type to includethe UDID. Select the San type DNS. The value must beUDID={DeviceUid}.
Automatic Certificate Renewal Select the check box to have certificates using this template automaticallyrenewed before their expiration date.
Auto Renewal Period (days) Specify the auto renewal in days.
Enable Certificate Revocation Select the check box to have certificates automatically revoked whenapplicable devices are unenrolled or deleted, or if the applicable profile isremoved.
Chapter 12 Integrating AirWatch With VMware Identity Manager
VMware, Inc. 117

4 Slick Save.
What to do next
In the Identity Provider admin console, configure the built-in identity provider with the Mobile SSO for iOSauthentication method.
Using AirWatch Certificate Authority for Kerberos AuthenticationYou can use the AirWatch Certificate Authority instead of the Active Directory Certificate Authority to setup single sign-on with built-in Kerberos authentication to AirWatch managed iOS 9 mobile devices. You canenable AirWatch Certificate Authority in the AirWatch admin console and export the CA issuer certificatefor use in the VMware Identity Manager service.
The AirWatch Certificate Authority is designed to follow Simple Certificate Enrollment Protocol (SCEP) andis used with AirWatch managed devices that support SCEP. VMware Identity Manager integration withAirWatch uses the AirWatch Certificate Authority to issue certificates to iOS 9 mobile devices as part of theprofile.
The AirWatch Certificate Authority issuer root certificate is also the OCSP signing certificate.
Enable and Export the AirWatch Certificate AuthorityWhen VMware Identity Manager is enabled in AirWatch, you can generate the AirWatch issuer rootcertificate and export the certificate for use with the Mobile SSO for iOS authentication on managed iOS 9mobile devices.
Procedure
1 In the AirWatch admin console, navigate to System > Enterprise Integration > VMware IdentityManager.
2 To enable AirWatch Certificate Authority, the organization group type must be Customer.
Tip To view or change the group type, navigate to Groups & Settings, Groups > OrganizationGroups> Organization Group Details.
VMware Identity Manager Administration
118 VMware, Inc.

3 In the CERTIFICATE section, click Enable.
The page displays the issuer root certificate details.
4 Click Export and save the file.
What to do next
In the VMware Identity Manager admin console, configure Kerberos Authentication in the Built-in IdentityProvider and add the certificate authority issuer certificate.
Configure Mobile SSO for iOS Authentication in the Built-in Identity ProviderTo provide single sign-on to the users' app portal and resources from devices managed by AirWatch, in theVMware Identity Manager admin console enable and configure the Mobile SSO for iOS authenticationmethod in the built-in identity provider in Identity Manager. The built-in identity provider manages theKDC service. When users sign in from their iOS devices, the Mobile SSO for iOS authentication method inthe built-in identity provider is used to authenticate users.
Prerequisites
n Certificate authority PEM or DER file used to issue certificates to users in the AirWatch tenant.
n For revocation checking, the OCSP responder's signing certificate.
Procedure
1 In the administration console, Identity & Access Management tab, select Manage > Identity Providers.
2 Click the identity provider labeled Built-in and configure the identity provider details.
3 In the Authentication Methods section, click the Mobile SSO (for iOS) gear icon.
4 In the KdcKerberosAuthAdapter page configure Kerberos authentication method.
Option Description
Enable KDC Select this check box to enable users to sign in using iOS devices thatsupport Kerberos authentication.
Root and Intermediate CACertificate
Upload the certificate authority issuer certificate file. The file format can beeither PEM or DER.
Uploaded CA Certificate SubjectDNs
The contents of the uploaded certificate file is displayed here. More thanone file can be uploaded and whatever certificates that are included areadded to the list.
Enable OCSP Select the check box to use the Online Certificate Status Protocol (OCSP)certificate validation protocol to get the revocation status of a certificate.
Send OCSP Nonce Select this check box if you want the unique identifier of the OCSP requestto be sent in the response.
OCSP Responder’s SigningCertificate
Upload the OCSP certificate for the responder.When you are using the AirWatch Certificate Authority, the issuercertificate is used as the OCSP certificate. Upload the AirWatch certificatehere as well.
OCSP Responder’s SigningCertificate Subject DN
The uploaded OCSP certificate file is listed here.
Enable Cancel Link When authentication is taking too long, give the user the ability to clickCancel to stop the authentication attempt and cancel the sign-in.When the Cancel link is enabled, Cancel appears at the end of theauthentication error message that displays.
Cancel Message Create a custom message that displays when the Kerberos authentication istaking too long. If you do not create a custom message, the defaultmessage is Attempting to authenticate your credentials.
Chapter 12 Integrating AirWatch With VMware Identity Manager
VMware, Inc. 119

5 Click Save.
6 In the Built-in Identity Provider page, KDC Certificate Export section, click Download Certificate.
Save this certificate to a file that can be access from the AirWatch admin console. You upload thiscertificate when you configure the iOS device profile in AirWatch.
7 Click Save on the built-in identity provider page.
What to do next
n Configure the default policy rule for Kerberos authentication for iOS devices. Make sure that thisauthentication method is the first method set up in the rule.
n Go to the AirWatch admin console and configure the iOS device profile in AirWatch and add the KDCserver certificate issuer certificate from Identity Manager.
Configure Apple iOS Profile in AirWatch Using Active Directory CertificateAuthority and Certificate Template
Create and deploy the Apple iOS device profile in AirWatch to push the Identity Provider settings to thedevice. This profile contains the information necessary for the device to connect to the VMware IdentityProvider and the certificate that the device used to authenticate. Enable single sign-on to allow seamlessaccess without requiring authentication into each app.
Prerequisites
n Mobile SSO for iOS is configured in VMware Identity Manager.
n iOS Kerberos certificate authority file saved to a computer that can be accessed from the AirWatchadmin console.
n Your Certificate Authority and Certificate Template is properly configured in AirWatch.
n List of URLs and application bundle IDs that use Mobile SSO for iOS authentication on iOS devices.
Procedure
1 In the AirWatch admin console, navigate to Devices > Profiles > ListView > Add Profile and selectApple iOS.
2 Configure the General settings and enter the name as iOSKerberos.
3 In the left navigation pane, select Credentials > Configure to configure the credential.
Option Description
Credential Source Select Defined Certificate Authority from the drop-down menu.
Certificate Authority Select the certificate authority from the drop-down menu.
Certificate Template Select the request template that references the certificate authority from thedrop-down menu. This is the certificate template created in Adding theCertificate Template in AirWatch.
4 Click + in the lower right corner of the page again and create a second credential.
5 In the Credential Source drop-down menu, select Upload.
6 Enter a credential name.
VMware Identity Manager Administration
120 VMware, Inc.

7 Click Upload to upload the KDC server root certificate that is downloaded from the Identity & AccessManagement > Manage > Identity Providers > Built-in Identity provider page.
8 In the left navigation pane, select Single Sign-On.
9 Enter the connection information.
Option Description
Account Name Enter Kerberos.
Kerberos Principal Name Click + and select {EnrollmentUser}.
Realm Enter the realm name you used when you initialized KDC in the VMwareIdentity Manager appliance. For example, EXAMPLE.COM
Renewal Certificate Select Certificate#1 from the drop-down menu. This is the definedcertificate authority.
URL Prefixes Enter the URL prefixes that must match to use this account for Kerberosauthentication over HTTP.Enter the VMware Identity Manager server URL ashttps://myco.example.com.
Applications Enter the list of application identities that are allowed to use this sign-on.To perform single sign-on using iOS built-in Safari browser, enter the firstapplication bundle ID as com.apple.mobilesafari. Continue to enterapplication bundle IDs. The applications listed must support SAMLauthentication
10 Click Save & Publish.
When the iOS profile is successfully pushed to users's devices, users can sign in to VMware IdentityManager using the Mobile SSO for iOS authentication method without entering their credentials.
What to do next
Create another profile to configure any other desired features, for example, Web Clips to create icons forWeb Apps that you push from AirWatch to iOS device home pages or the app catalog.
Configure Apple iOS Profile in AirWatch Using AirWatch Certificate AuthorityCreate and deploy the Apple iOS device profile in AirWatch to push the Identity Provider settings to thedevice. This profile contains the information necessary for the device to connect to the VMware IdentityProvider and the certificate that the device uses to authenticate.
Prerequisites
n Built-in Kerberos configured in Identity Manager.
n VMware Identity Manager KDC server root certificate file saved to a computer that can be accessedfrom the AirWatch admin console.
Chapter 12 Integrating AirWatch With VMware Identity Manager
VMware, Inc. 121

n Certificate enabled and downloaded from the AirWatch admin console System > Enterprise Integration> VMware Identity Manager page.
n List of URLs and application bundle IDs that use Built-in Kerberos authentication on iOS devices.
Procedure
1 In the AirWatch admin console, navigate to Devices > Profiles > ListView > Add Profile and selectApple IOS.
2 Configure the profile’s General settings and enter the name of the device as iOSKerberos.
3 In the left navigation pane, select SCEP > Configure to configure the credential.
Option Description
Credential Source Select AirWatch Certificate Authority from the drop-down menu.
Certificate Authority Select the AirWatch Certificate Authority from the drop-down menu.
Certificate Template Select Single Sign On to set the type of certificate that is issued by theAirWatch Certificate Authority.
4 Click Credentials > Configure and create a second credential.
5 In the Credential Source drop-down menu, select Upload.
6 Enter the iOS Kerberos credential name.
7 Click Upload to upload the VMware Identity Manager KDC server root certificate that is downloadedfrom the Identity & Access Management > Manage > Identity Providers > Built-in Identity providerpage.
8 In the left navigation pane, select Single Sign-On.
9 Enter the Connection information.
Option Description
Account Name Enter Kerberos.
Kerberos Principal Name Click + and select {EnrollmentUser}.
Realm Enter the realm name you used when you initialized KDC in the VMwareIdentity Manager appliance. For example, EXAMPLE.COM.
Renewal Certificate Select Certificate#1 from the drop-down menu.
VMware Identity Manager Administration
122 VMware, Inc.
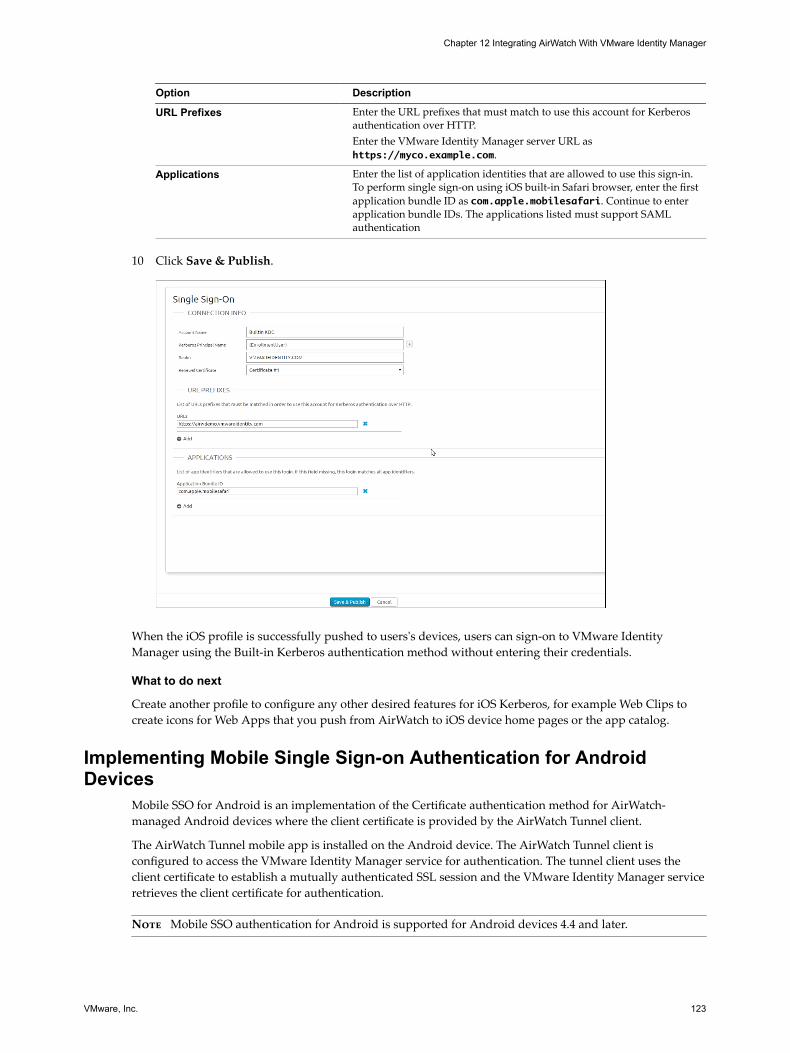
Option Description
URL Prefixes Enter the URL prefixes that must match to use this account for Kerberosauthentication over HTTP.Enter the VMware Identity Manager server URL ashttps://myco.example.com.
Applications Enter the list of application identities that are allowed to use this sign-in.To perform single sign-on using iOS built-in Safari browser, enter the firstapplication bundle ID as com.apple.mobilesafari. Continue to enterapplication bundle IDs. The applications listed must support SAMLauthentication
10 Click Save & Publish.
When the iOS profile is successfully pushed to users's devices, users can sign-on to VMware IdentityManager using the Built-in Kerberos authentication method without entering their credentials.
What to do next
Create another profile to configure any other desired features for iOS Kerberos, for example Web Clips tocreate icons for Web Apps that you push from AirWatch to iOS device home pages or the app catalog.
Implementing Mobile Single Sign-on Authentication for AndroidDevices
Mobile SSO for Android is an implementation of the Certificate authentication method for AirWatch-managed Android devices where the client certificate is provided by the AirWatch Tunnel client.
The AirWatch Tunnel mobile app is installed on the Android device. The AirWatch Tunnel client isconfigured to access the VMware Identity Manager service for authentication. The tunnel client uses theclient certificate to establish a mutually authenticated SSL session and the VMware Identity Manager serviceretrieves the client certificate for authentication.
Note Mobile SSO authentication for Android is supported for Android devices 4.4 and later.
Chapter 12 Integrating AirWatch With VMware Identity Manager
VMware, Inc. 123

Implementing Mobile SSO for Android authentication for AirWatch managed Android devices requiresconfiguring the AirWatch Tunnel in the AirWatch admin console and installing the AirWatch Tunnel serverbefore you configure Mobile SSO for Android in the VMware Identity Manager administration console. TheAirWatch Tunnel service provides per app VPN access to AirWatch managed apps. AirWatch Tunnel alsoprovides proxying traffic from a mobile applications to VMware Identity Manager for single sign-in.
In the AirWatch admin console you configure the following settings.
n Per App Tunnel component in the AirWatch Tunnel. This configuration allows Android devices accessto internal and managed public apps through the AirWatch Tunnel mobile app client.
After the AirWatch Tunnel settings are configured in the admin console, you download the AirWatchTunnel installer and proceed with the installation of the AirWatch Tunnel server.
n Android VPN profile. This profile is used to enable the per app tunneling capabilities for Android.
n Enable VPN for each app that uses the application tunnel functionality from the admin console.
n Create network traffic rules with a list of all the apps that are configured for per app VPN, the proxyserver details, and the VMware Identity Manager URL.
For detailed information about installing and configuring the AirWatch Tunnel, see the VMware AirWatchTunnel Guide on the AirWatch Resources Web site.
Configure AirWatch Tunnel Settings from AirWatch Admin ConsoleYou enable the Per App Tunnel component in the AirWatch Tunnel settings to set up per app tunnellingfunctionality for Android devices. Per app tunneling allows your internal and managed public apps toaccess your corporate resources on an app-by-app basis.
For detailed configuration instructions, see the VMware AirWatch Tunnel Guide on the AirWatch ResourcesWeb site.
Procedure
1 In the AirWatch admin console, navigate to System > Enterprise Integration > AirWatch Tunnel.
2 The first time you configure AirWatch Tunnel, select Configure and follow the configuration wizard.Otherwise, select Override and select the Enable AirWatch Tunnel check box. Then click Configure.
3 In the Configuration Type page, enable Per-App Tunnel (Linux Only). Click Next.
Leave Basic as the deployment model.
4 In the Details page, for the Per-App Tunneling Configuration enter the AirWatch Tunnel server hostname and port. For example, enter as tunnel.example.com. Click Next.
5 In the SSL page, configure the Per-App Tunneling SSL Certificate. To use a public SSL, select the UsePublic SSL Certificate check box. Click Next.
The Tunnel Device Root Certificate is automatically generated.
Note SAN certificates are not supported. Make sure that your cert is issued for the correspondingserver host name or is a valid wildcard certificate for the corresponding domain.
VMware Identity Manager Administration
124 VMware, Inc.

6 In the Authentication page, select the certificate authentication type to use. Click Next.
Option Description
Default Select Default to use the AirWatch issued certificates.
Enterprise CA A drop-down menu listing the certificate authority and certificate templatethat you configured in AirWatch is displayed. You can also upload the rootcertificate of your CA.
If you select Enterprise CA, make sure that the CA template contains the subject name CN=UDID. Youcan download the CA certificates from the AirWatch Tunnel configuration page.
7 Click Next.
8 In the Profile Association page, associate an existing or create a new AirWatch Tunnel VPN profile forAndroid.
If you create the profile in this step, you still must publish the profile. See Configure Android Profile inAirWatch.
9 (Optional) In the Miscellaneous page, enable the access logs for the Per-App Tunnel components. ClickNext.
You must enable these logs before you install the AirWatch Tunnel server.
10 Review the summary of your configuration and click Save.
You are directed to the system settings configuration page.
11 Select the General tab and then select the Download Linux Installer hyperlink.
The installer is a single TAR file used for the installation of the AirWatch Tunnel server.
12 Enter and confirm a certificate password. The password must be a minimum of six characters. and ClickDownload.
The password is used during installation.
13 Click Save.
What to do next
Install the AirWatch Tunnel server. For instructions, see the VMware AirWatch Tunnel Guide on theAirWatch Resources Web site
Configure Per App Tunnel Profile for AndroidAfter you configured and installed the AirWatch Tunnel Per App Tunnel component, you can configure theAndroid VPN profile and add a version to the profile.
Procedure
1 In the AirWatch admin console, navigate to Devices > Profiles > Add Profile and select Android orAndroid for Work.
2 Configure the General settings for Android if they are not already set up.
3 In the left column, select VPN and click Configure.
4 Complete the VPN Connection information.
Option Description
Connection Type Select AirWatch Tunnel.
Connection Name Enter a name for this connect. For example, AndroidSSO Configuration.
Chapter 12 Integrating AirWatch With VMware Identity Manager
VMware, Inc. 125

Option Description
Server The AirWatch Tunnel server URL is automatically entered.
Per-App VPN Rules Select the Per-App VPN Rules check box.
5 Click Add Version.
6 Click Save & Publish.
What to do next
Enable per-app VPN for the Android apps that can be accessed using Mobile SSO for Android. See “EnablePer-App VPN for Android Apps,” on page 126.
Enable Per-App VPN for Android AppsThe Per-App VPN Profile setting is enabled for Android apps that are accessed with VMware IdentityManager Mobile SSO for Android.
Prerequisites
n AirWatch Tunnel configured with the Per-App Tunnel component installed.
n Android VPN profile created.
Procedure
1 In the AirWatch admin console, navigate to Apps & Books > Applications > List View.
2 Select the Internal tab.
3 Select Add Application and add an app.
4 Click Save & Assign.
5 In the Assignment page, select Add Assignment and in the Advanced section Per-App VPN Profiledrop-down menu select the Android VPN profile you created.
6 Click Save & Publish.
Enable Per-App VPN for every Android app that is accessed with Mobile SSO for Android. For moreinformation about adding or editing apps, see the VMware AirWatch Mobile Application ManagementGuide, on the AirWatch Resources Web site.
What to do next
Create the Network Traffic Rules. See “Configure Network Traffic Rules in AirWatch,” on page 126.
Configure Network Traffic Rules in AirWatchConfigure the network traffic rules so that the AirWatch Tunnel client routes traffic to the HTTPS proxy forAndroid devices. You list the Android apps that are configured with the per app VPN option to the trafficrules, and configure the proxy server address and the destination host name.
For detailed information about creating network traffic rules, see the VMware AirWatch Tunnel Guide onthe AirWatch Resources Web site.
Prerequisites
n The AirWatch Tunnel option configured with the per-app tunnel component installed.
n Android VPN profile created.
n Per-App VPN enabled for each Android App that is added to the Network Traffic rules.
VMware Identity Manager Administration
126 VMware, Inc.

Procedure
1 In the AirWatch admin console, navigate to System > Enterprise Integration > AirWatch Tunnel >Network Traffic Rules.
2 Configure the network traffic rules settings as described in the AirWatch Tunnel Guide. Specific to theMobile SSO for Android configuration, in the Network Traffic Rules page configure the followingsettings.
a In the Application column, add the Android apps that are configured with the per app VPNprofile.
b In the Action column, select Proxy and specify the HTTPS proxy information. Enter the VMwareIdentity Manager host name and port. For example login.example.com:5262.
Note If you are providing external access to the VMware Identity Manager host, the firewall port5262 must be opened or port 5262 traffic must be proxied through reverse proxy in the DMZ.
c In the Destination Hostname column, enter your destination VMware Identity Manager host name.For example myco.example.com. The AirWatch Tunnel client routes the traffic to the HTTPS proxyfrom the VMware Identity Manager host name.
3 Click Save.
What to do next
Publish these rules. After the rules are published, the device receives an update VPN profile and theAirWatch Tunnel application is configured to enable SSO.
Go the VMware Identity Manager administration console and configure Mobile SSO for Android in theBuilt-in Identity Provider page. See “Configure Android Single Sign On in the Built-in Identity Provider,” onpage 127.
Configure Android Single Sign On in the Built-in Identity ProviderTo provide single sign-on from AirWatch managed Android devices, you configure Mobile SSO for Androidauthentication in the VMware Identity Manager Built-in identity provider.
For information about configuring the Certificate authentication method, see “Configuring a Certificate orSmart Card Adapter for Use with VMware Identity Manager,” on page 51.
Chapter 12 Integrating AirWatch With VMware Identity Manager
VMware, Inc. 127

Prerequisites
n Obtain the root certificate and intermediate certificates from the CA that was used to enable AirWatchTunnel. If an Enterprise CA was used to enable AirWatch Tunnel, this certificate is the root andintermediate from the Enterprise CA. If AirWatch Tunnel was set up with the default certificate, thiscertificate is exported from the Device Root Certificate settings in the AirWatch Tunnel advancedconfiguration page.
n (Optional) List of Object Identifier (OID) of valid certificate policies for certificate authentication.
n For revocation checking, the file location of the CRL and the URL of the OCSP server.
n (Optional) OCSP Response Signing certificate file location.
Procedure
1 In the administration console, Identity & Access Management tab, select Manage > Identity Providers.
2 Click the identity provider labeled Built-in.
3 Verify that the Users and Network configuration in the built-in identity provider is correct.
If it is not, edit the Users and Network sections as needed.
4 In the Authentication Methods section, click the Mobile SSO (for Android devices) gear icon.
5 In the CertProxyAuthAdapter page, configure the authentication method.
Option Description
Enable Certificate Adapter Select this check box to enable Mobile SSO for Android.
Root and Intermediate CACertificate
Select the certificate files to upload. You can select multiple root CA andintermediate CA certificates that are encoded. The file format can be eitherPEM or DER.
Uploaded CA Certificate SubjectDNs
The contents of the uploaded certificate file is displayed here.
Use email if no UPN in certificate If the user principal name (UPN) does not exist in the certificate, select thischeck box. The emailAddress attribute is used as the Subject AlternativeName extension to validate user accounts.
Certificate policies accepted Create a list of object identifiers that are accepted in the certificate policiesextensions. Enter the object ID number (OID) for the Certificate IssuingPolicy. Click Add another value to add additional OIDs.
Enable Cert Revocation Select the check box to enable certificate revocation checking. Enabling thisfeature prevents users who have revoked user certificates fromauthenticating.
Use CRL from certificates Select the check box to use the certificate revocation list (CRL) publishedby the CA that issued the certificates to validate a certificate's status ofrevoked or not revoked.
CRL Location Enter the server file path or the local file path from which to retrieve theCRL.
Enable OCSP Revocation Select this check box to use the Online Certificate Status Protocol (OCSP)certificate validation protocol to get the revocation status of a certificate.
Use CRL in case of OCSP failure If you configure both CRL and OCSP, you can check this box to fall back tousing CRL if OCSAP checking is not available.
Send OCSP Nonce Select this check box if you want the unique identifier of the OCSP requestto be sent in the response.
OCSP URL If you enabled OCSP revocation, enter the OCSP server address forrevocation checking.
OCSP Responder's SigningCertificate
Enter the path to the OCSP certificate for the responder. Enteras /path/to/file.cer
6 Click Save.
VMware Identity Manager Administration
128 VMware, Inc.

7 Click Save on the built-in identity provider page.
What to do next
Configure the default access policy rule for Mobile SSO for Android. See “Managing AuthenticationMethods to Apply to Users,” on page 58
Note The network range that you use in the policy rule for Mobile SSO for Android should consist of onlythe IP addresses used to receive requests coming from the AirWatch Tunnel proxy server.
Enable Compliance Checking for AirWatch Managed DevicesWhen users enroll their devices through the AirWatch Agent application, samples containing data used toevaluate compliance are sent on a scheduled basis. The evaluation of this sample data ensures that thedevice meets the compliance rules set by the administrator in the AirWatch console. If the device goes out ofcompliance, corresponding actions configured in the AirWatch console are taken.
VMware Identity Manager includes an access policy option that can be configured to check the AirWatchserver for device compliance status when users sign in from the device. The compliance check ensures thatusers are blocked from signing in to an application or using single sign-in to the VMware Identity Managerportal if the device goes out-of-compliance. When the device is compliant again, the ability to sign in isrestored.
For more information about AirWatch compliance policies, see the VMware AirWatch Mobile DeviceManagement Guide, available on the AirWatch Resources Web site.
Configure Access Policy Rule for Compliance CheckingConfigure an access policy rule that requires compliance checking to allow VMware Identity Manager toverify that AirWatch managed devices adhere to AirWatch's device compliance policies. You enableCompliance Check in the Built-in identity provider. When Compliance Check is enabled, you create anaccess policy rule that requires authentication and device compliance verification for devices managed byAirWatch.
The compliance checking policy rule works in an authentication chain with Mobile SSO for iOS, Mobile SSOfor Android, and Certificate cloud deployment. The authentication method to use must precede the devicecompliance option in the policy rule configuration.
Prerequisites
The authentication methods configured in the Built-in identity provider.
Procedure
1 In the administration console, Identity & Access Management tab, select Setup > AirWatch.
2 In the Compliance Check section of the AirWatch page, select Enable.
3 Click Save.
4 In the Identity & Access Management tab, go to Manage > Policies.
5 Select the access policy to edit.
6 In the Policy Rules section, select the policy rule to edit.
7 In the drop-down menu for then the user must authenticate using the following method, click + andselect the authentication method to use.Device Compliance (with AirWatch).
8 In the second drop-down menu for then the user must authenticate using the following method,selectDevice Compliance (with AirWatch).
Chapter 12 Integrating AirWatch With VMware Identity Manager
VMware, Inc. 129

9 (Optional) In the Custom Error Message Message Text text box, create a custom message that displayswhen user authentication fails because of the device is not compliant. In the Custom Error Link textbox, you can add a link in the message.
10 Click Save.
VMware Identity Manager Administration
130 VMware, Inc.

Index
Aaccess events 99access policies
Auth Strength 59Client Type 59minimum authentication score 63, 64, 66network 63, 64, 66Network 59relationship to identity providers 64, 67, 69TTL 59, 64, 66Web-application-specific 66, 67, 69
access denied message, configure 60access policy set, default 67access policy sets
creating 67default 59, 63, 64, 69portal 64, 67Web-application-specific 66, 67, 69
Active Directory Certificate Authority 116Active Directory Global Catalog 13Active Directory
attribute mapping 19deployment 57Integrated Windows Authentication 11integrating 13
Active Directory over LDAP 11, 20add groups 72Add Identity Provider button 57add Active Directory 20add Web app 83additional user attributes 76admin tab descriptions 7administator role, changing 76administration console 7AirWatch
admin account 107certificate 107configure iOS profile 120, 121device compliance check 129enable unified catalog 110
AirWatch Cloud Connector, configure 114AirWatch directory, user attributes 113AirWatch API key 106AirWatch Certificate Authority, OCSP 118AirWatch certificate authority,enable 118
AirWatch Cloud Connector Authentication 112AirWatch Cloud Password Authentication 111AirWatch Tunnel, configure 124AirWatch, configure 105AirWatch, integrating with Identity Manager 105AirWatch,network traffic rules 126AirWatch,setting up in VMware Identity
Manager 109Android authentication, network traffic rules 126android, per-app VPN 126API key 105, 106app popularity 97Apple iOS profile in AirWatch 121appliance status 98application, categories 90applications
mobile 82Web 82
approvals 94attributes
default 18mapping 19
Audit Event report 99authentication
AirWatch Cloud Connector 114per-app VPN for Android apps 126RADIUS 48
authentication chaining 64authentication method 57authentication methods
adding to policy 60relationship to access policies 63, 64, 67, 69RSA Adaptive Authentication 54
authentication error message 68authentication method order 60authentication method,Android, mobile SSO 127authentication, mobile SSO for Android 123authentication,AirWatch Password 111authentication,Android profile 125authentication; AirWatch Cloud Connector 112AWCA 118
Bbranding 101browsers, supported 7
VMware, Inc. 131
browsers for kerberos 44built-in identity provider 111built-in identity provider, configure 111
Ccatalog
add web app 83managing 81
catalog settings, Ciitrix Published Applicatios 93catalog, View 88catalog,Citrix Published Applications 88catalog,ThinApp packages 89categories
applying 90creating 89deleting 90removing 90
certificate authentication, Android 127certificate authority for AirWatch, Kerberos
authentication 115certificate authority, smart card 51certificate template for AirWatch, Kerberos 117challenge questions 54Chrome 46Citrix-published applications, enable 88compliance check with AirWatch 129compliance check in AirWatch 129Configure AirWatch 105configure iOS device profile 120configure AirWatch integration 109configure built-in identity provider 119configure Mobile SSO for Android 127configure RSA Adaptive Authentication 54connector 11Connector 41, 57, 58connectors, activation code 8cookie, persistent 69custom branding, setup 8custom error message 68customize portal page 102
Ddashboard 97database, monitor 98device usage report 98directories, add 8directory
add 11adding 20sync safeguards 25synchronization safeguards 26
directory integration 11
directory server groups 71directory,AirWatch 112disable
Citrix Receiver download 91Horizon Client download 91
disable account 18disable an account 18DNS service location lookup 15, 17domain 20domain_krb.properties file 15, 17
Eenable compliance check 129enable AirWatch Certificate Authority 118enable license approval 94enable persistent cookie 70enable unified catalog 109end user MyApps page 7expired Active Directory passwords 24export AirWatch Certificate Authority 118
FFirefox 45
Gglobal settings, disable helper application 91Google Apps provisioning adapter 84group
add users 72entitle resources 72
Group Membership report 98group names 78, 79groups
Active Directory 71add 72membership report 98viewing information 74Workspace 72
guest users 71
Hhelper application 91
IICA properties 93identity and access management settings 8identity provider
built-in 111Connector 41, 58single logout 57third-party 41, 58, 91Workspace 56
VMware Identity Manager Administration
132 VMware, Inc.

identity providersrelationship to access policies 64third-party 56
identity provider instances, selection 58identity provider selection, configuring 57Integrated Windows Authentication 20Integrating AirWatch 105integrating with Active Directory 13intended audience 5Internet Explorer 44iOS Kerberos authentication 42IP range 58
Jjoin domain, kerberos 43Just-in-Time directory 33, 38Just-in-Time user provisioning
configuring 36deleting directory 38disabling 37error messages 38local groups 34overview 33preparing 34SAML assertions 36user attributes 35
KKerberos
browsers to configure 44built-in 115compliance check 129configure 43configure AirWatch 116Windows authentication 42
kerberos authentication, no connector 119Kerberos, implementing with IWA 42Key Distribution Center 42
LLDAP directories
integrating 27, 28limitations 27
LDAP directory 11license approval 94licensing approval 94
Mmobile view, customize 102mobile applications, resource type 81Mobile SSO for Android, implementing 123Mobile SSO for iOS 115monitor workspace health 98
multi-domain 13
Nnavigating admin console 7network ranges, relationship to access
policies 64, 67, 69network range 57, 58
Oother directory 112out-of-band authentication 54overview, Identity and Access Management
Settings 8
Ppasswords, expired 24per app tunnel profile for Android 125persistent cookie, enable 70policy, editing 69policy rule, compliance check 129policy rules, authentication chaining 64portal page, customize 102preferences, persistent cookie 69proof-of-concept 57provisioning adapters 84
RRADIUS authentication 48RADIUS configuration 49RADIUS server 49re-authenticate session time, configure 60Remote App Access, client 92report
device usage 98resource activity 98roles 98
reports 98resource, license approval 94resource activity report 98Resource Entitlement report 98Resource Usage report 98resources
categories 89, 90entitle to groups 72percentage of types being used 97
REST API 94REST API key 106revocation checking, smart card 52role assignment report 98roles 76RSA Adaptive Authentication, enroll users 54RSA Adaptive Authentication, configure 54RSA SecurID server 47
Index
VMware, Inc. 133
rules 69runtime-config.properties file 17
Ssafeguard 8safeguard settings,ignore 26safeguards, directory synchronization 26safeguards, threshold 25SAML
certificate 91metadata 91third-party identity providers 56
SAML assertions, Just-in-Time 36SecurID, configure 47settings, catalog 90sign in page, customize 101single forest active directory 13single logout, identity provider 57siteaware.subnet property 17smart card authentication 51smart card certificate authority 51smart card certificate revocation 52smart card, configure 52SRV lookup 15, 17sync safeguards, ignore 26sync settings 19system information 98system diagnostics dashboard 98
Ttablet view, customize 102ThinApp alerts 94ThinApp packages, enable 89third-party identity provider 57troubleshooting domain_krb.properties 18
Uunified catalog, enable for AirWatch 110UPN 51user attributes, setup 8user portal, customize 101user role, changing 76User Attributes page 18user attributes, AirWatch directory 113user names 78, 79user store 57userName 78users
Active Directory 71attributes 76user attributes 19viewing information 76
users logged in, number of 97
Users report 98
Vversion 98View, enable 88
WWeb applications 81, 82worker 11Workspace IDP 56workspace images 81Workspaces page 76
VMware Identity Manager Administration
134 VMware, Inc.