VMware ESXi Cookbook - Packt · VMware ESXi Cookbook . VMware vSphere is a key virtualization...
27
VMware ESXi Cookbook Mohammed Raffic Kajamoideen Aravind Sivaraman Chapter No.7 "Securing the ESXi Server and Virtual Machines"
Transcript of VMware ESXi Cookbook - Packt · VMware ESXi Cookbook . VMware vSphere is a key virtualization...
VMware ESXi Cookbook
Mohammed Raffic Kajamoideen
Aravind Sivaraman
Chapter No.7
"Securing the ESXi Server and Virtual Machines"
In this package, you will find: A Biography of the authors of the book
A preview chapter from the book, Chapter NO.7 "Securing the ESXi Server and
Virtual Machines"
A synopsis of the book’s content
Information on where to buy this book
About the Authors Mohammed Raffic Kajamoideen ( ) is a subject matter expert for
VMware virtualization technology and works as a system administrator in VMware Inc.
where he provides high-level technical guidance to support and implement VMware's
virtualization products. He is an author, a technology enthusiast, and a blogger focusing
on virtualization and cloud computing.
He has over six years of high-level knowledge in remote infrastructure services,
consulting, designing, implementing, and troubleshooting VMware virtualization
technology. He is well known for his contribution towards the virtualization community
through his virtualization blog ( ).
He holds many specialized certifications from VMware, Microsoft, and Citrix®, which
includes VCP4, VCP5, VCAP4-DCA, VCAP5-DCA, VCP-Cloud, MCTS-virtualization,
CCA, and MCSA. Prior to joining VMware, he has served other large organizations
such as CGI, Infosys, and Microsoft as a virtualization support engineer and a subject
matter expert.
For More Information: www.packtpub.com/vmware-esxi-5-1-cookbook/book
I would like to thank my wife, Sahana Amreen, and my dear son, Rayyan Mohammed,
for their support and patience throughout this project. Most of the work occurred on
weekends, nights, while on vacation, and other times inconvenient to my family. I would
also like to thank my parents, Kajamoideen and Bazriya Begum, for instilling in me a
love for books and learning from an early age. I must mention my brothers, Iliyas and
Moideen, and my sister, Thasleem, for their moral support throughout this book.
I would also like to thank my mentors, Sunil Patil and Manoj
Ravikumar Nair, for all of their guidance throughout my career. Next
thanks go to my friends and colleagues, Manopriya, Santhosh
Ramamoorthy, Karthik Kannan Solomon, Lingeshwaran, Rajkumar,
Venkatesh, Bhasker, Ajith Devaiah, Retheesh, Giri Ramanaiah,
Ranjith Bolwar, Prakhar, Chetan, Shaik, Raj, Karthik, Suresh, Zaigui,
Alfred, Mark, and Kandy, for providing all the support and friendship
that I needed. Special thanks to my managers, Chanh Chi, Anand S,
and Amit Ambast, for providing me with the support from my
organization to complete this book.
Aravind Sivaraman is a virtualization engineer with over eight years of experience in
the IT industry and for the past five years he has been focused on virtualization solutions,
especially on VMware products. He holds different certifications from VMware,
Microsoft, and Cisco and has been awarded the vExpert for the year 2013. He is a
VMware Technology Network (VMTN) and Experts Exchange contributor and maintains
his personal blog at . He can be followed on
Twitter at
He is also the technical reviewer for the book Troubleshooting vSphere Storage, Mike
Preston, Packt Publishing.
I would like to thank and dedicate this book to my wife Madhu, my
parents, and family members, who are always there for me no matter
what, for all their unconditional support, and for teaching me never to
give up.
For More Information: www.packtpub.com/vmware-esxi-5-1-cookbook/book
VMware ESXi Cookbook VMware vSphere is a key virtualization technology which acts as the base platform for
cloud computing. ESXi 5.1 has been released with a lot of new cool features to
strengthen the virtualization platform. Nowadays, all the enterprises and IT environments
are switching towards virtualization and cloud computing technologies. ESXi is the base
component of cloud computing and it is also called as Cloud OS. VMware ESXi has a
smaller code base and a reliable and secure hypervisor, which is part of the vSphere suite.
Its smaller footprint allows it to be embedded in mainstream physical servers for simpler
and faster deployments. So many users are excited to learn about the VMware
virtualization technology.
VMware ESXi Cookbook focuses on helping you perform your virtual environment
administration using vSphere Web Client. It offers a comprehensive understanding
of new features released with vSphere 5.1 and how it enhances your VMware
virtual environment.
VMware ESXi Cookbook covers a wide variety of day-to-day tasks that need to be
performed by the VMware administrators and also teaches advance level tasks with a
lot of tips and tricks to ease the job of an admin. This book will enable the reader to
configure and administer various features of vSphere including High Availability (HA),
Distributed Resource Scheduler (DRS), Fault Tolerance (FT), vMotion, svMotion,
virtual machine provisioning, Update Manager, and distributed virtual switches. It also
focuses on how vSphere environment can be secured and enabled by the reader and
explains how to monitor the virtual environment using default alarms available with
the vCenter Server.
What This Book Covers Chapter 1, Installing and Configuring ESXi, begins by introducing ESXi, different
vSphere licensing options available, and then explains how to select the right hardware
for deployment. This chapter also covers different deployment methods of the ESXi host
and then moves on to some of the configuration to be done after the host deployment.
Chapter 2, Installing and Using vCenter, chalks out the importance of the vCenter Server
in the vSphere Infrastructure and demonstrates how to plan, install, and configure the
vCenter Server.
Chapter 3, Networking, helps you to the understand the vSphere networking concepts—
both vSphere standard and the distributed switch—then moves on to discuss some of the
more advanced networking configurations available in the distributed switch, and then
ends with the security policies available in vSphere.
For More Information: www.packtpub.com/vmware-esxi-5-1-cookbook/book
Chapter 4, Storage, talks about implementing and configuring various storage options
and optimizing storage using storage I/O control and storage profiles.
Chapter 5, Resource Management and High Availability, helps you understand how to
create and configure various clusters including High Availability (HA), Distributed
Resource Scheduler (DRS), Dynamic Power Management (DPM), and Storage DRS.
Chapter 6, Managing Virtual Machines, teaches you to provision and manage virtual
machines, configure Fault Tolerance for VMs, and understand the methods to use
snapshot, template, and clone.
Chapter 7, Securing the ESXi Server and Virtual Machines, dwells on the subject of
securing ESXi hosts using firewall, configuring AD authentication, and strengthening the
security for virtual machines.
Chapter 8, Performance Monitoring and Alerts, helps you understand how to view
performance graphs and export the graph for future reference. It also teaches you to
configure vCenter alarms and export logs for troubleshooting.
Chapter 9, vSphere Update Manager, educates you on the installation steps for Update
Manager and also explains how to upgrade the ESXi host and virtual machine using
Update Manager.
For More Information: www.packtpub.com/vmware-esxi-5-1-cookbook/book
7Securing the ESXi Server and Virtual
Machines
In this chapter, we will cover the following topics:
Confi guring the ESXi fi rewall
Enabling the Lockdown mode
Managing the ESXi authentication
Managing the ESXi certifi cates
Confi guring logging for virtual machines
Confi guring security settings for virtual machines
IntroductionThe ESXi hypervisor is designed and developed by keeping strong security in mind. ESXi is designed with very limited services and small attack surface compared to the ESX hypervisors. You can even customize the ESXi host to match with the compliance of your organization by performing additional hardening. Virtual machines are like the containers that hold guest operating systems and applications. All virtual machines are isolated from one another. This isolation ensures that multiple virtual machines can run securely while sharing the physical hardware. A virtual machine confi guration fi le can be tweaked to disable unnecessary features and also to improve the security layer of the virtual machine.
For More Information: www.packtpub.com/vmware-esxi-5-1-cookbook/book
Securing the ESXi Server and Virtual Machines
242
Confi guring the ESXi fi rewallThe ESXi fi rewall acts as a fi rewall between the management interface (VMkernel) and the external network. The ESXi fi rewall is enabled by default. The ESXi fi rewall will block incoming and outgoing traffi c except the traffi c for the default services. Internet Control Message Protocol (ICMP), Domain Name System (DNS), and Dynamic Host Confi guration Protocol (DHCP) communications are allowed in the ESXi fi rewall by default.
A Firewall Confi guration fi le called Service.xml is stored at /etc/vmware/firewall/. This fi le contains the fi rewall rules and its relationship with ports and protocols. The supported services and agents that are required to operate the ESXi host are described in the rule-set confi guration fi le.
Getting readyConnect to your VMware vCenter Server using vSphere Web Client and browse to your ESXi host in vSphere Web Client.
How to do it...We'll see a step-by-step procedure on how to confi gure the ESXi fi rewall from vSphere Web Client.
The steps for confi guring the ESXi fi rewall to allow or deny access to services and agents are as follows:
1. Select your ESXi host from the vSphere Web Client.
2. Click on the Manage tab and select the Settings option.
3. Select Security Profi le and click on Edit under the Firewall section. A list of active incoming and outgoing connections with the corresponding fi rewall ports will be displayed in vSphere Web Client.
For More Information: www.packtpub.com/vmware-esxi-5-1-cookbook/book
Chapter 7
243
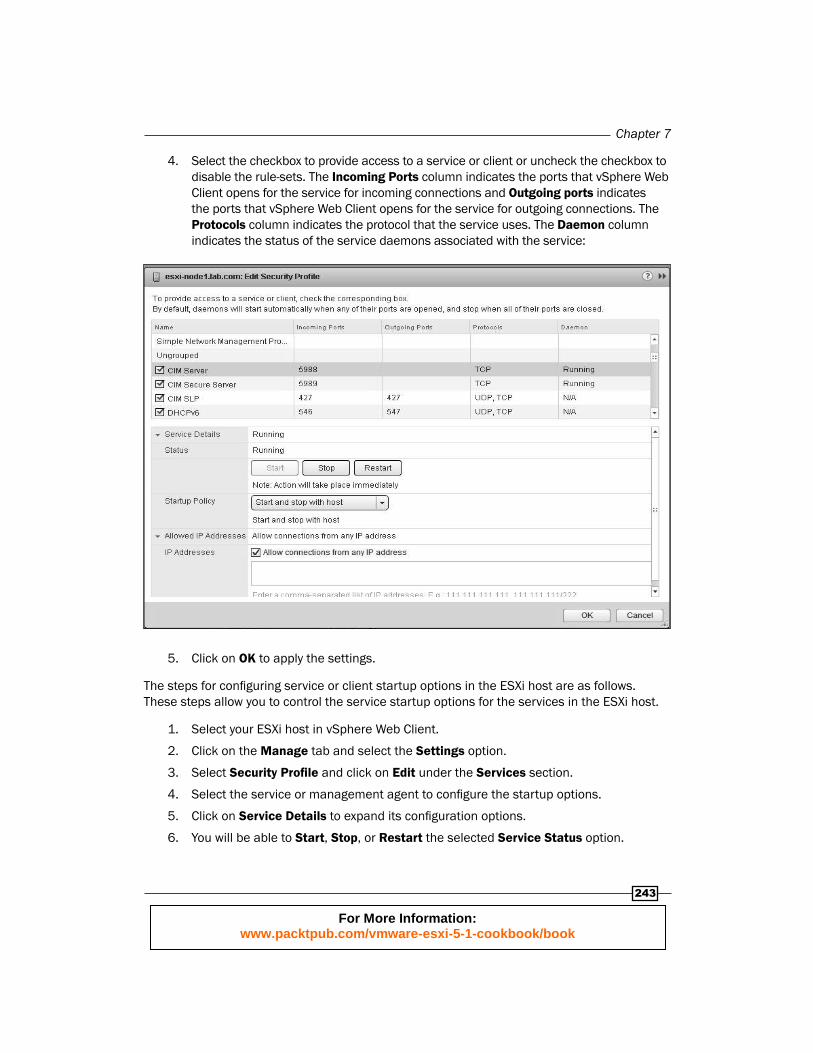
4. Select the checkbox to provide access to a service or client or uncheck the checkbox to disable the rule-sets. The Incoming Ports column indicates the ports that vSphere Web Client opens for the service for incoming connections and Outgoing ports indicates the ports that vSphere Web Client opens for the service for outgoing connections. The Protocols column indicates the protocol that the service uses. The Daemon column indicates the status of the service daemons associated with the service:
5. Click on OK to apply the settings.
The steps for confi guring service or client startup options in the ESXi host are as follows. These steps allow you to control the service startup options for the services in the ESXi host.
1. Select your ESXi host in vSphere Web Client.
2. Click on the Manage tab and select the Settings option.
3. Select Security Profi le and click on Edit under the Services section.
4. Select the service or management agent to confi gure the startup options.
5. Click on Service Details to expand its confi guration options.
6. You will be able to Start, Stop, or Restart the selected Service Status option.
For More Information: www.packtpub.com/vmware-esxi-5-1-cookbook/book
Securing the ESXi Server and Virtual Machines
244
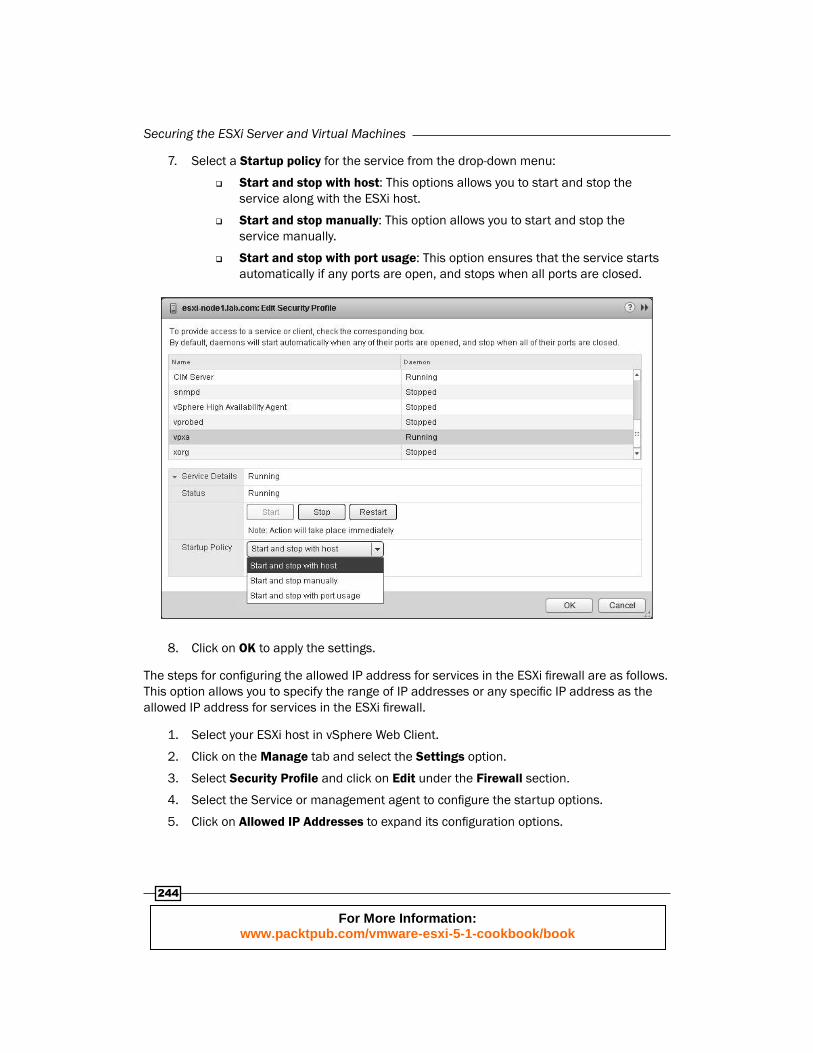
7. Select a Startup policy for the service from the drop-down menu:
Start and stop with host: This options allows you to start and stop the service along with the ESXi host.
Start and stop manually: This option allows you to start and stop the service manually.
Start and stop with port usage: This option ensures that the service starts automatically if any ports are open, and stops when all ports are closed.
8. Click on OK to apply the settings.
The steps for confi guring the allowed IP address for services in the ESXi fi rewall are as follows. This option allows you to specify the range of IP addresses or any specifi c IP address as the allowed IP address for services in the ESXi fi rewall.
1. Select your ESXi host in vSphere Web Client.
2. Click on the Manage tab and select the Settings option.
3. Select Security Profi le and click on Edit under the Firewall section.
4. Select the Service or management agent to confi gure the startup options.
5. Click on Allowed IP Addresses to expand its confi guration options.
For More Information: www.packtpub.com/vmware-esxi-5-1-cookbook/book
Chapter 7
245
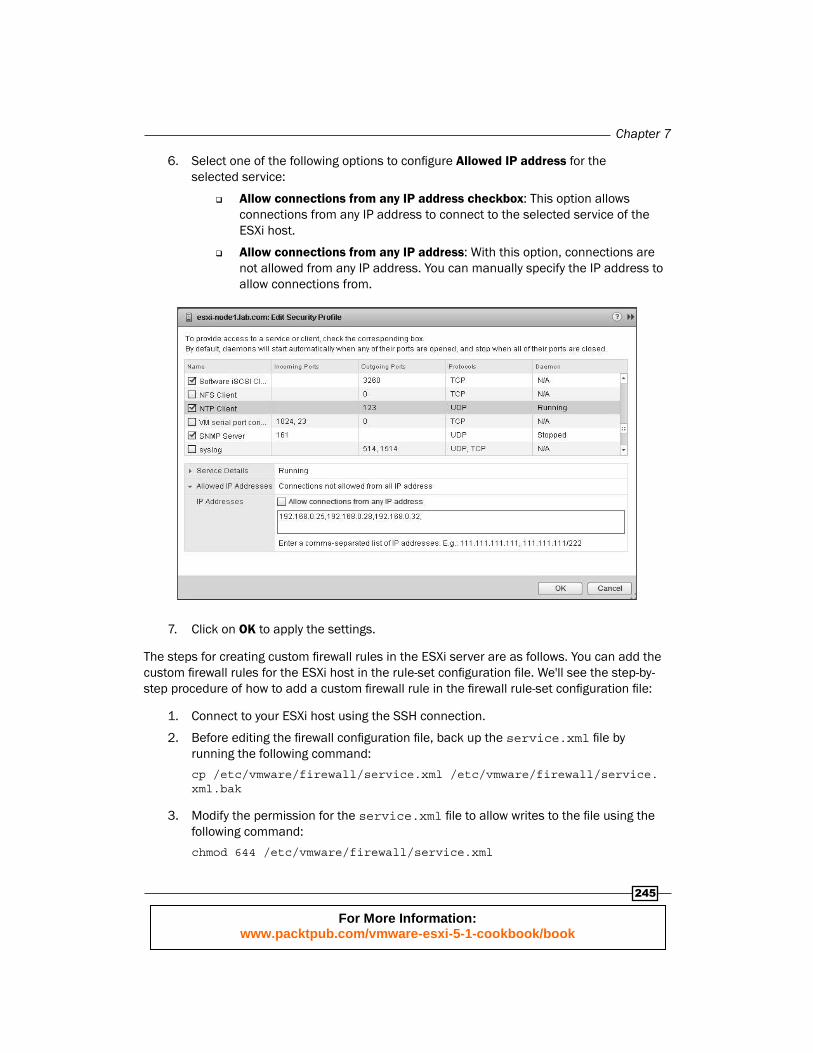
6. Select one of the following options to confi gure Allowed IP address for the selected service:
Allow connections from any IP address checkbox: This option allows connections from any IP address to connect to the selected service of the ESXi host.
Allow connections from any IP address: With this option, connections are not allowed from any IP address. You can manually specify the IP address to allow connections from.
7. Click on OK to apply the settings.
The steps for creating custom fi rewall rules in the ESXi server are as follows. You can add the custom fi rewall rules for the ESXi host in the rule-set confi guration fi le. We'll see the step-by-step procedure of how to add a custom fi rewall rule in the fi rewall rule-set confi guration fi le:
1. Connect to your ESXi host using the SSH connection.
2. Before editing the fi rewall confi guration fi le, back up the service.xml fi le by running the following command:
cp /etc/vmware/firewall/service.xml /etc/vmware/firewall/service.xml.bak
3. Modify the permission for the service.xml fi le to allow writes to the fi le using the following command:
chmod 644 /etc/vmware/firewall/service.xml
For More Information: www.packtpub.com/vmware-esxi-5-1-cookbook/book

Securing the ESXi Server and Virtual Machines
246
4. Edit the service.xml fi le using text editor:
vi /etc/vmware/firewall/service.xml
5. Add the rule for your custom service named Myservice in the service.xml fi le in the following format. The following command is only an example. You can add the rule for your required custom service in the ESXi fi rewall in the following format along with the inbound and outbound ports for your service:
<service id='0033'> <id>Myservice</id> <rule id='0000'> <direction>inbound</direction> <protocol>tcp</protocol> <porttype>dst</porttype> <port>922</port> </rule> <rule id='0001'> <direction>inbound</direction> <protocol>tcp</protocol> <porttype>dst</porttype> <port>933</port> </rule> <enabled>true</enabled> <required>true</required></service>
6. Save the service.xml fi le after the edit.
7. Enter the following command to refresh the fi rewall rules for the changes to take effect:
esxcli network firewall refresh
There's more...The steps for managing the ESXi fi rewall using command line are as follows:
The following is the command to list the status of the fi rewall whether it is enabled or disabled, loaded or not loaded:
esxcli network firewall get
To enable the ESXi fi rewall use the following command:
esxcli network firewall set -e true
To disable the ESXi fi rewall use the following command:
esxcli network firewall set -e false
For More Information: www.packtpub.com/vmware-esxi-5-1-cookbook/book

Chapter 7
247
To load the fi rewall module and rule-set confi guration fi les use the following command:
esxcli network firewall load
To unload the fi rewall module and destroy the fi lters use the following command:
esxcli network firewall unload
To list the rule-sets information use the following command:
esxcli network firewall ruleset list
To enable the specifi c ruleset named ntpclient use the following command :
esxcli network firewall ruleset set -r ntpClient -e true
To disable the specifi c ruleset named ntpclient use the following command:
esxcli network firewall ruleset set -r ntpClient -e false
To confi gure all the allowed IP address for rule-set named ntpclinet, set allowed all IP list to true and set it to false to use the allowed IP list:
esxcli network firewall ruleset set -r ntpClient -a true
esxcli network firewall ruleset set -r ntpClient -a false
To specify the IP address or range of IP address to allow access to the rule-set named ntpclient use the following command:
esxcli network firewall ruleset allowedip add -i 192.168.0.22 -r ntpClient
To list the allowed IP addresses for the specifi c rule-set ntpClient use the following command:
esxcli network firewall ruleset allowedip list -r ntpClient
Enabling the Lockdown modeThe ESXi Lockdown Mode increases the security by preventing all users other than vpxuser to have authentication permission for performing operations against the ESXi host directly. The Lockdown Mode enforces to perform all the operations through vCenter Server. You will not even be able to manage the ESXi host from vSphere CLI commands, from a script, or from VMware Management Assistant (vMA) when Lockdown Mode is enabled. When Lockdown Mode is enabled, external monitoring or management tools might also be unable to retrieve the information of the ESXi hosts that are not managed by the vCenter Server.
For More Information: www.packtpub.com/vmware-esxi-5-1-cookbook/book
Securing the ESXi Server and Virtual Machines
248
Getting readyConnect to your VMware vCenter Server using the vSphere Web Client. Browse to your ESXi host in the vSphere Web Client.
How to do it...We'll see the step-by-step procedure of various methods to enable the ESXi Lockdown mode.
The steps for enabling Lockdown mode in the ESXi host from vSphere Web Client are as follows:
1. Select your ESXi host in the vSphere Web Client.
2. Click on the Manage tab and select the Settings option.
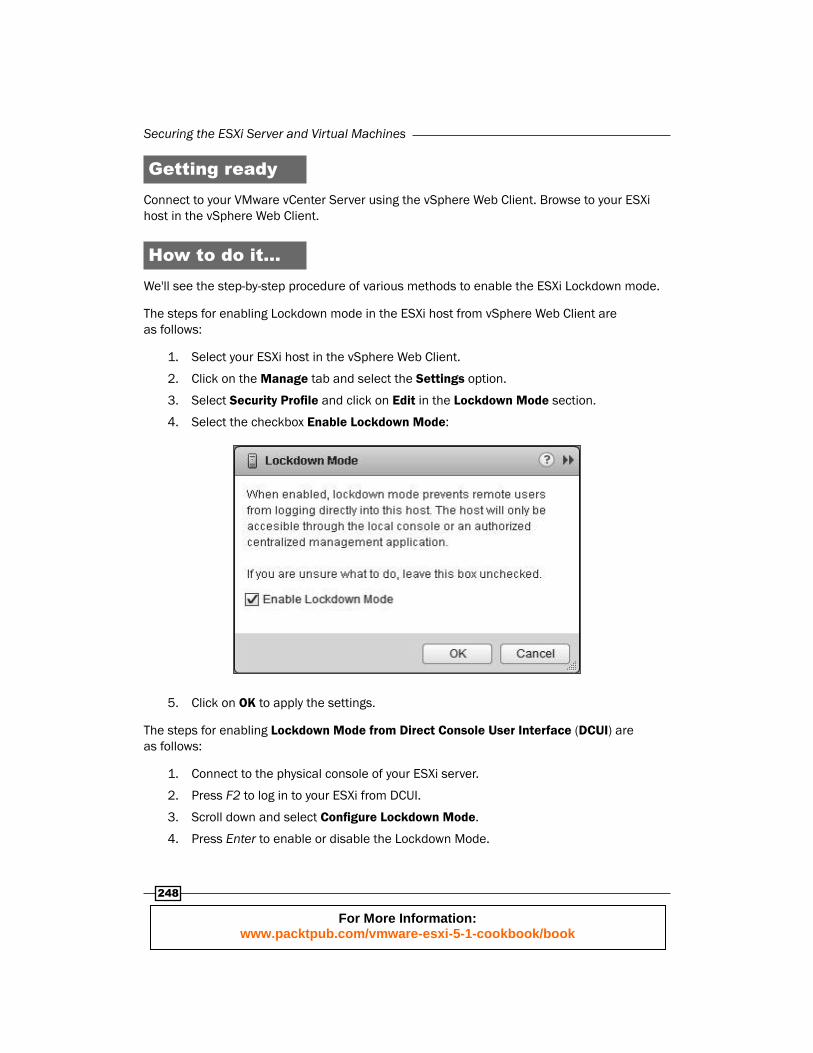
3. Select Security Profi le and click on Edit in the Lockdown Mode section.
4. Select the checkbox Enable Lockdown Mode:
5. Click on OK to apply the settings.
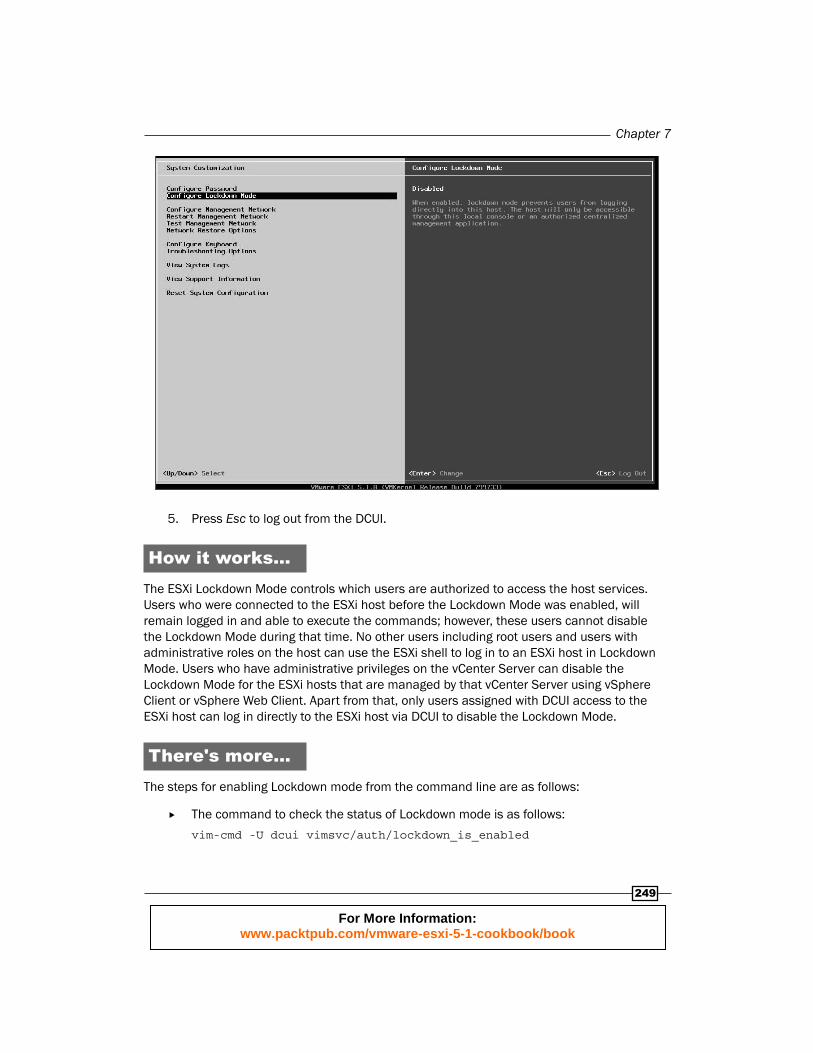
The steps for enabling Lockdown Mode from Direct Console User Interface (DCUI) are as follows:
1. Connect to the physical console of your ESXi server.
2. Press F2 to log in to your ESXi from DCUI.
3. Scroll down and select Confi gure Lockdown Mode.
4. Press Enter to enable or disable the Lockdown Mode.
For More Information: www.packtpub.com/vmware-esxi-5-1-cookbook/book
Chapter 7
249
5. Press Esc to log out from the DCUI.
How it works...The ESXi Lockdown Mode controls which users are authorized to access the host services. Users who were connected to the ESXi host before the Lockdown Mode was enabled, will remain logged in and able to execute the commands; however, these users cannot disable the Lockdown Mode during that time. No other users including root users and users with administrative roles on the host can use the ESXi shell to log in to an ESXi host in Lockdown Mode. Users who have administrative privileges on the vCenter Server can disable the Lockdown Mode for the ESXi hosts that are managed by that vCenter Server using vSphere Client or vSphere Web Client. Apart from that, only users assigned with DCUI access to the ESXi host can log in directly to the ESXi host via DCUI to disable the Lockdown Mode.
There's more...The steps for enabling Lockdown mode from the command line are as follows:
The command to check the status of Lockdown mode is as follows:
vim-cmd -U dcui vimsvc/auth/lockdown_is_enabled
For More Information: www.packtpub.com/vmware-esxi-5-1-cookbook/book
Securing the ESXi Server and Virtual Machines
250
The command to enable the Lockdown mode in the ESXi server is as follows:
vim-cmd -U dcui vimsvc/auth/lockdown_mode_enter
The command to disable the Lockdown mode in the ESXi server is as follows:
vim-cmd -U dcui vimsvc/auth/lockdown_mode_exit
Managing ESXi authenticationHandling user authentication and user permissions of local users of the ESXi host can be managed directly by the ESXi host. vCenter single sign-on cannot handle the authentication of the local user accounts of the ESXi host. Also, you will not be able to create a local user account of the ESXi host from the vCenter Server. You must connect to the ESXi host directly using the vSphere client to create a local user account because the vCenter Server is not aware of the local user account of the ESXi host. However, you can confi gure your ESXi host to authenticate with the Windows Active Directory Domain by joining the ESXi host to the windows domain. This option allows you to maintain the same group of users to be available to the ESXi host and also to the vCenter Server.
Getting readyConnect to your ESXi host directly using the vSphere client.
How to do it...We will take a look at creating local user accounts of the ESXi host and also how to confi gure active directory authentication for the ESXi host.
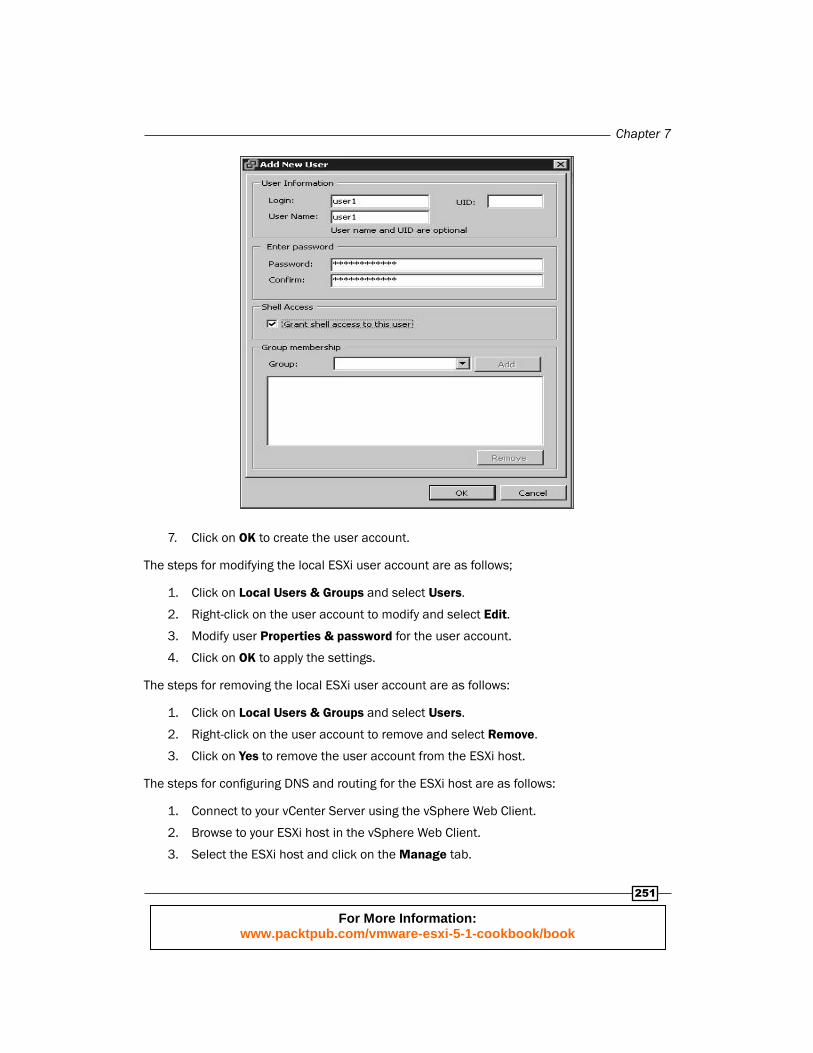
The steps for creating the local ESXi user account is as follows:
1. Click on Local Users & Groups and select Users.
2. Right-click on the empty space and select Add.
3. Enter the login name information for the local user account.
4. Provide the username. The UID is optional.
5. Enter the password for the local user account.
6. Select the checkbox Grant shell access to this user, if you want to provide the user shell access to your ESXi host.
For More Information: www.packtpub.com/vmware-esxi-5-1-cookbook/book
Chapter 7
251
7. Click on OK to create the user account.
The steps for modifying the local ESXi user account are as follows;
1. Click on Local Users & Groups and select Users.
2. Right-click on the user account to modify and select Edit.
3. Modify user Properties & password for the user account.
4. Click on OK to apply the settings.
The steps for removing the local ESXi user account are as follows:
1. Click on Local Users & Groups and select Users.
2. Right-click on the user account to remove and select Remove.
3. Click on Yes to remove the user account from the ESXi host.
The steps for confi guring DNS and routing for the ESXi host are as follows:
1. Connect to your vCenter Server using the vSphere Web Client.
2. Browse to your ESXi host in the vSphere Web Client.
3. Select the ESXi host and click on the Manage tab.
For More Information: www.packtpub.com/vmware-esxi-5-1-cookbook/book
Securing the ESXi Server and Virtual Machines
252
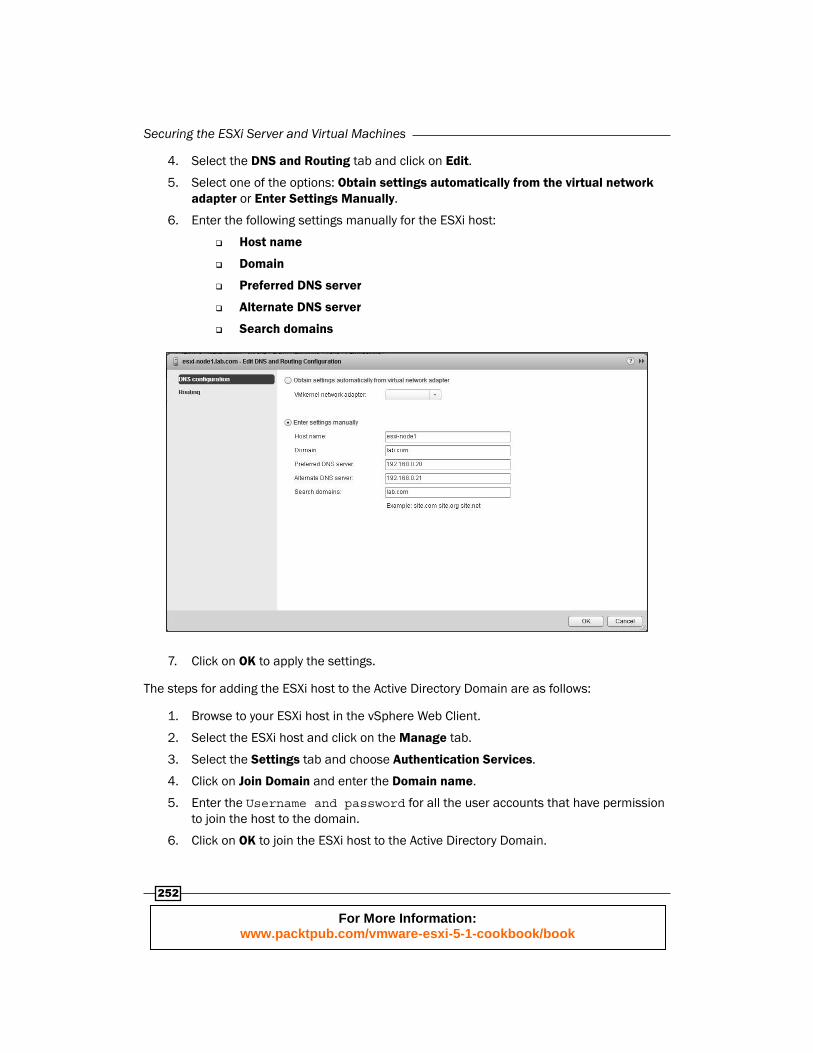
4. Select the DNS and Routing tab and click on Edit.
5. Select one of the options: Obtain settings automatically from the virtual network adapter or Enter Settings Manually.
6. Enter the following settings manually for the ESXi host:
Host name
Domain
Preferred DNS server
Alternate DNS server
Search domains
7. Click on OK to apply the settings.
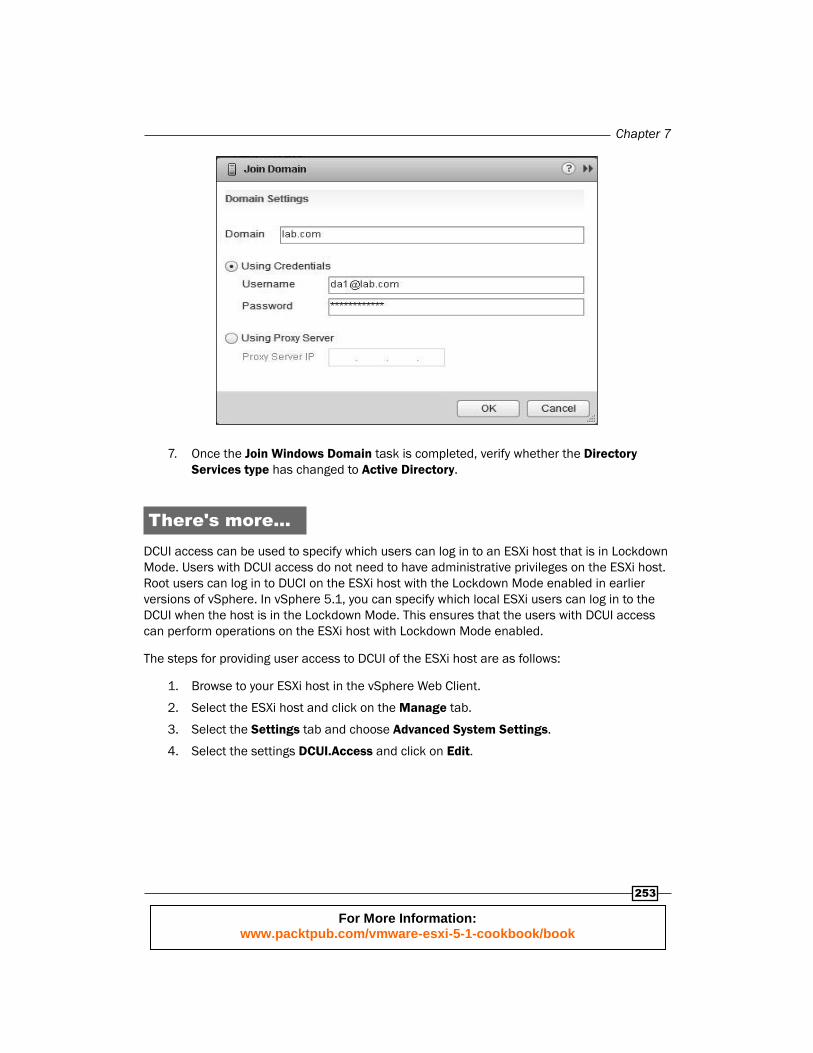
The steps for adding the ESXi host to the Active Directory Domain are as follows:
1. Browse to your ESXi host in the vSphere Web Client.
2. Select the ESXi host and click on the Manage tab.
3. Select the Settings tab and choose Authentication Services.
4. Click on Join Domain and enter the Domain name.
5. Enter the Username and password for all the user accounts that have permission to join the host to the domain.
6. Click on OK to join the ESXi host to the Active Directory Domain.
For More Information: www.packtpub.com/vmware-esxi-5-1-cookbook/book
Chapter 7
253
7. Once the Join Windows Domain task is completed, verify whether the Directory Services type has changed to Active Directory.
There's more...DCUI access can be used to specify which users can log in to an ESXi host that is in Lockdown Mode. Users with DCUI access do not need to have administrative privileges on the ESXi host. Root users can log in to DUCI on the ESXi host with the Lockdown Mode enabled in earlier versions of vSphere. In vSphere 5.1, you can specify which local ESXi users can log in to the DCUI when the host is in the Lockdown Mode. This ensures that the users with DCUI access can perform operations on the ESXi host with Lockdown Mode enabled.
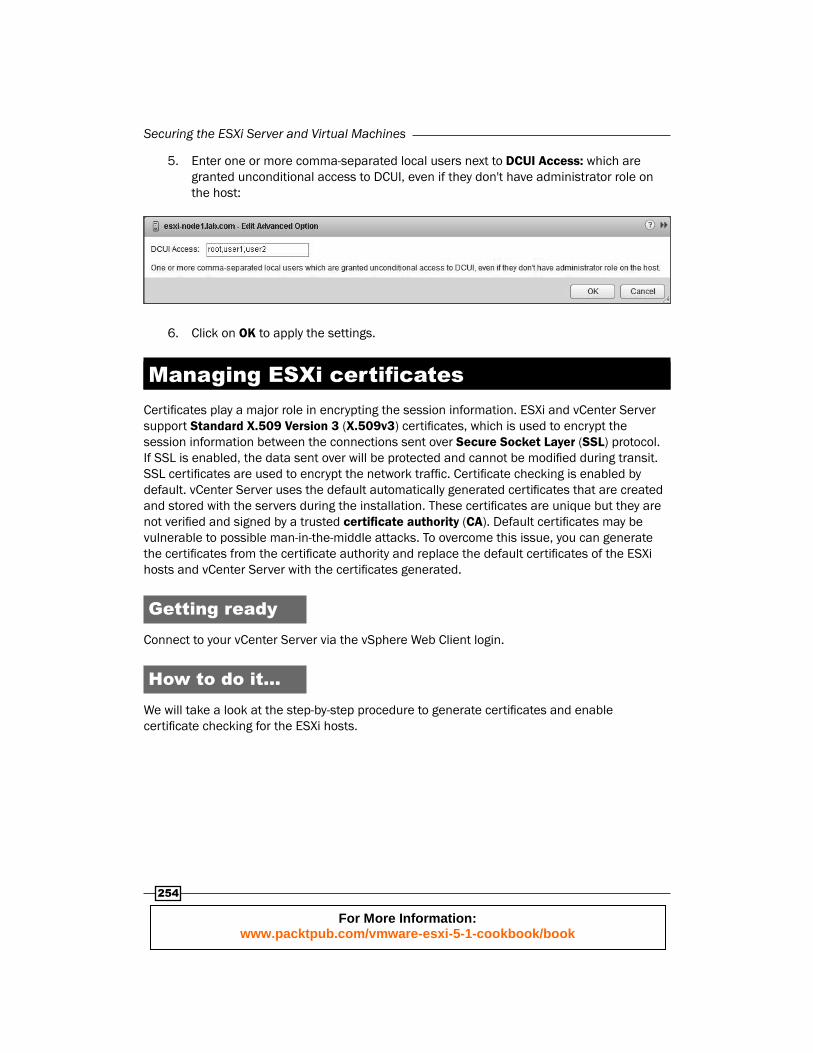
The steps for providing user access to DCUI of the ESXi host are as follows:
1. Browse to your ESXi host in the vSphere Web Client.
2. Select the ESXi host and click on the Manage tab.
3. Select the Settings tab and choose Advanced System Settings.
4. Select the settings DCUI.Access and click on Edit.
For More Information: www.packtpub.com/vmware-esxi-5-1-cookbook/book
Securing the ESXi Server and Virtual Machines
254
5. Enter one or more comma-separated local users next to DCUI Access: which are granted unconditional access to DCUI, even if they don't have administrator role on the host:
6. Click on OK to apply the settings.
Managing ESXi certifi catesCertifi cates play a major role in encrypting the session information. ESXi and vCenter Server support Standard X.509 Version 3 (X.509v3) certifi cates , which is used to encrypt the session information between the connections sent over Secure Socket Layer (SSL) protocol. If SSL is enabled, the data sent over will be protected and cannot be modifi ed during transit. SSL certifi cates are used to encrypt the network traffi c. Certifi cate checking is enabled by default. vCenter Server uses the default automatically generated certifi cates that are created and stored with the servers during the installation. These certifi cates are unique but they are not verifi ed and signed by a trusted certifi cate authority (CA). Default certifi cates may be vulnerable to possible man-in-the-middle attacks. To overcome this issue, you can generate the certifi cates from the certifi cate authority and replace the default certifi cates of the ESXi hosts and vCenter Server with the certifi cates generated.
Getting readyConnect to your vCenter Server via the vSphere Web Client login.
How to do it...We will take a look at the step-by-step procedure to generate certifi cates and enable certifi cate checking for the ESXi hosts.
For More Information: www.packtpub.com/vmware-esxi-5-1-cookbook/book
Chapter 7
255
The steps for generating new certifi cates for the ESXi host are as follows. This option will allow you to regenerate the default ESXi host certifi cates.
1. Connect to your ESXi host using the SSH connection with root credentials.
2. Browse to the location /etc/vmware/ssl using the following command:
cd /etc/vmware/ssl
3. Make sure you have taken a backup of the existing certifi cates by renaming them using the following command:
mv rui.crt backup.rui.crt
mv rui.key backup.rui.key
4. Generate the new certifi cates by executing the following command:
/sbin/generate-certificates
5. Make sure the new certifi cates are generated and verify rui.crt and rui.key exist at /etc/vmware/ssl. Confi rm the timestamp of certifi cates created.
ls -l
6. Restart the ESXi host after new certifi cates are generated.
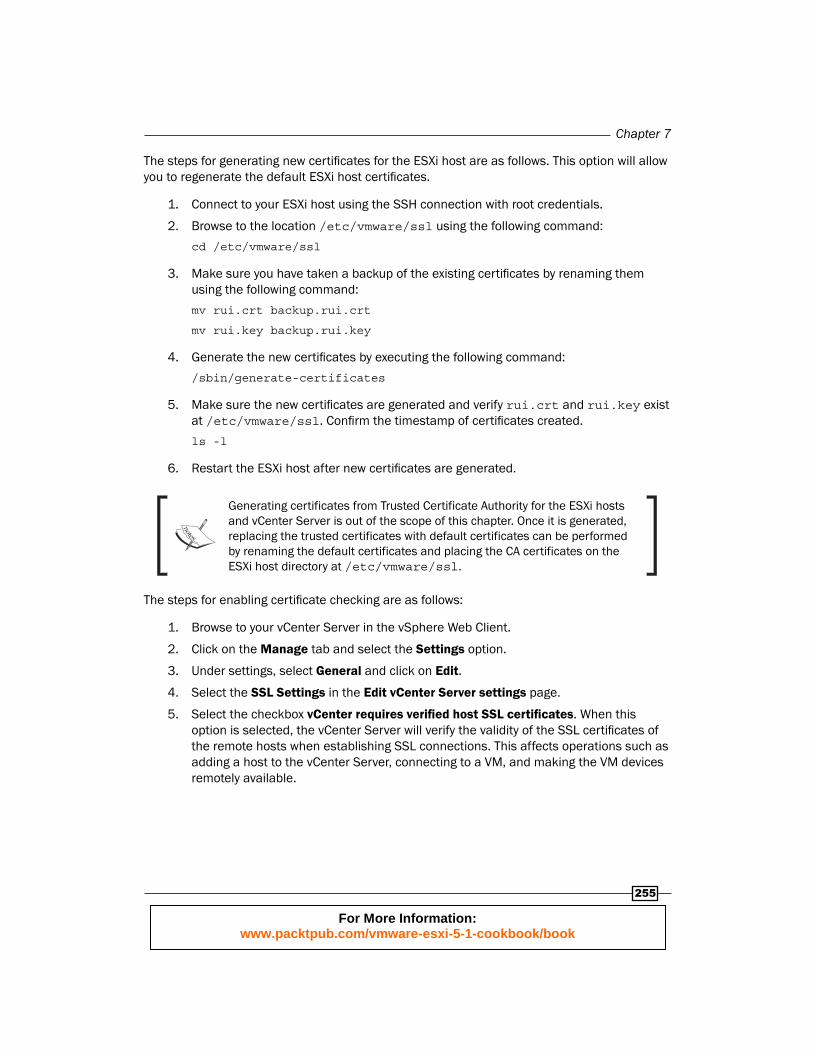
Generating certificates from Trusted Certificate Authority for the ESXi hosts and vCenter Server is out of the scope of this chapter. Once it is generated, replacing the trusted certificates with default certificates can be performed by renaming the default certificates and placing the CA certificates on the ESXi host directory at /etc/vmware/ssl.
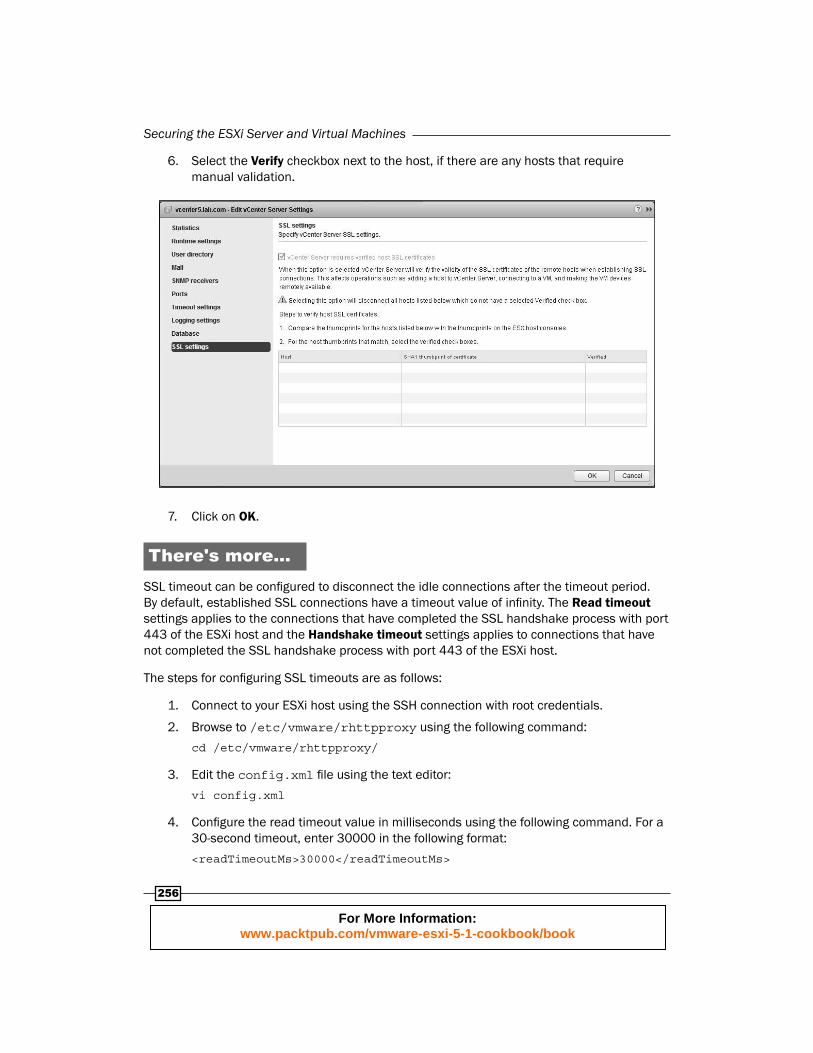
The steps for enabling certifi cate checking are as follows:
1. Browse to your vCenter Server in the vSphere Web Client.
2. Click on the Manage tab and select the Settings option.
3. Under settings, select General and click on Edit.
4. Select the SSL Settings in the Edit vCenter Server settings page.
5. Select the checkbox vCenter requires verifi ed host SSL certifi cates. When this option is selected, the vCenter Server will verify the validity of the SSL certifi cates of the remote hosts when establishing SSL connections. This affects operations such as adding a host to the vCenter Server, connecting to a VM, and making the VM devices remotely available.
For More Information: www.packtpub.com/vmware-esxi-5-1-cookbook/book
Securing the ESXi Server and Virtual Machines
256
6. Select the Verify checkbox next to the host, if there are any hosts that require manual validation.
7. Click on OK.
There's more...SSL timeout can be confi gured to disconnect the idle connections after the timeout period. By default, established SSL connections have a timeout value of infi nity. The Read timeout settings applies to the connections that have completed the SSL handshake process with port 443 of the ESXi host and the Handshake timeout settings applies to connections that have not completed the SSL handshake process with port 443 of the ESXi host.
The steps for confi guring SSL timeouts are as follows:
1. Connect to your ESXi host using the SSH connection with root credentials.
2. Browse to /etc/vmware/rhttpproxy using the following command:
cd /etc/vmware/rhttpproxy/
3. Edit the config.xml fi le using the text editor:
vi config.xml
4. Confi gure the read timeout value in milliseconds using the following command. For a 30-second timeout, enter 30000 in the following format:
<readTimeoutMs>30000</readTimeoutMs>
For More Information: www.packtpub.com/vmware-esxi-5-1-cookbook/book

Chapter 7
257
5. Confi gure the handshake timeout value in milliseconds using the following command. For a 30-second timeout, enter 30000 in the following format:
<handshakeTimeoutMs>30000</handshakeTimeoutMs>
6. Save the changes by pressing ESC and type: wq!.
7. Restart the rhttpproxy process for the changes to take effect using the following command:
/etc/init.d/rhttpproxy restart
Confi guring logging for virtual machinesVirtual machine log fi les are used by virtual machines to write troubleshooting information. Virtual machine log fi les are stored on the same VMFS volumes as the virtual machine fi les are stored. Virtual machines may write a large amount of data to log fi les that can consume a large amount of disk space on the datastores, which leads to the denial of service. This behavior can be controlled by modifying the logging settings of virtual machines.
Getting readyConnect to your vCenter Server via the vSphere Web Client and browse towards your virtual machine in the vSphere Web Client.
How to do it...We will take a look at the step-by-step procedure to confi gure the logging settings of the virtual machine.
The steps for confi guring the virtual machine log fi le and log size limit are as follows:
1. Right-click on your powered off virtual machine and click on Edit Settings.
2. Select the VM Options tab and click on Advanced to expand its confi guration options.
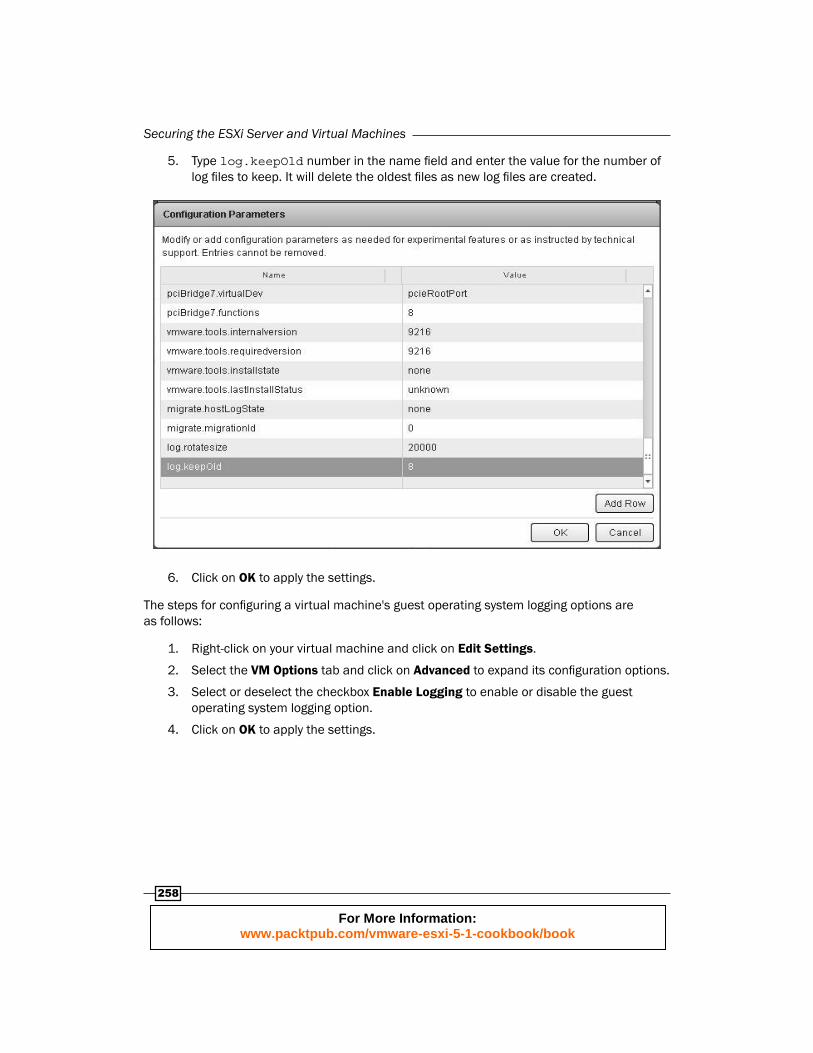
3. Click on Edit Confi gurations and select Add Row.
4. Type log.rotatesize in the name fi eld and enter the value for maximum size of log fi les in bytes. For 200 KB, enter 20000.
For More Information: www.packtpub.com/vmware-esxi-5-1-cookbook/book
Securing the ESXi Server and Virtual Machines
258
5. Type log.keepOld number in the name fi eld and enter the value for the number of log fi les to keep. It will delete the oldest fi les as new log fi les are created.
6. Click on OK to apply the settings.
The steps for confi guring a virtual machine's guest operating system logging options are as follows:
1. Right-click on your virtual machine and click on Edit Settings.
2. Select the VM Options tab and click on Advanced to expand its confi guration options.
3. Select or deselect the checkbox Enable Logging to enable or disable the guest operating system logging option.
4. Click on OK to apply the settings.
For More Information: www.packtpub.com/vmware-esxi-5-1-cookbook/book
Chapter 7
259
How it works...The virtual machine's logging settings can be used to limit the total size and number of log fi les. Normally, a new log fi le of the virtual machine will be created each time you reboot a host and this can end up occupying a large amount of space. You can modify the behavior by limiting the maximum size of the log fi le and also the maximum number of log fi les to create. This ensures that the space utilized by the log fi les of the virtual machines can be kept under control. VMware's recommendation is to save 10 log fi les and limit each to 100 KB. These values are more than enough to capture suffi cient information. If you confi gured the virtual machine with the logging limit, each time an entry is written to a log, the size of the log fi les is checked. If it reaches the limit of maximum log fi le size, the new entry is written to a new log fi le and also once the maximum number of log fi les is reached, the oldest log fi les will be deleted to create new log fi les.
There's more...The steps for confi guring the virtual machine log fi le and log size limit from the command line are as follows:
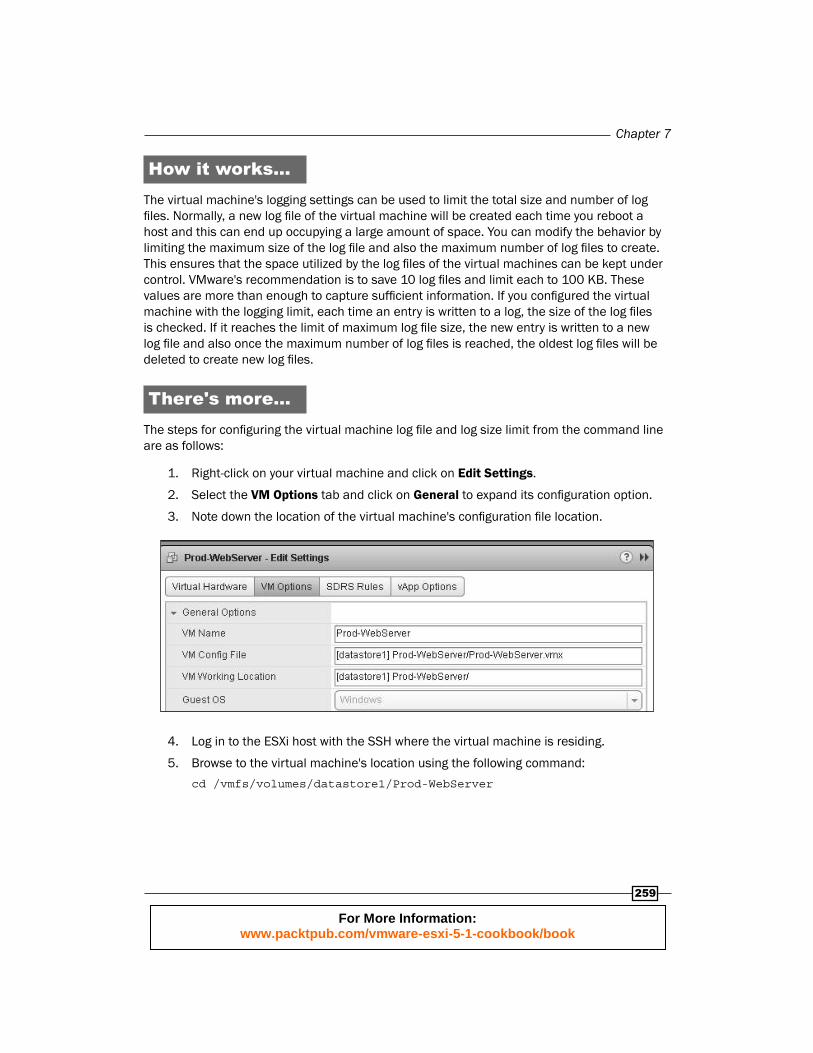
1. Right-click on your virtual machine and click on Edit Settings.
2. Select the VM Options tab and click on General to expand its confi guration option.
3. Note down the location of the virtual machine's confi guration fi le location.
4. Log in to the ESXi host with the SSH where the virtual machine is residing.
5. Browse to the virtual machine's location using the following command:
cd /vmfs/volumes/datastore1/Prod-WebServer
For More Information: www.packtpub.com/vmware-esxi-5-1-cookbook/book
Securing the ESXi Server and Virtual Machines
260
6. Edit the virtual machine .vmx fi le using the following command:
vi Prod-WebServer.vmx
7. Enter the following lines to confi gure the log size and log fi le limit:
log.rotateSize=200000
log.keepOld=8
8. Save your changes and exit the fi le.
Confi guring security settings for virtual machines
Securing virtual machines is necessary in the same way it is for physical servers. Securing a virtual machine using tools including antivirus, anti-spyware, and protection are enabled for the virtual machine. Keep virtual machines up-to-date with the security updates and patches. Apart from that, you can secure the virtual machines against attacks by disabling unnecessary services and features of the virtual machine which are not necessary for the applications or guest applications. You can fi nd the complete details on securing a virtual machine from the vSphere 5.1 Hardening Guide.
Please refer to the following link for vSphere 5.1 Hardening Guide:
http://communities.vmware.com/docs/DOC-22981
Getting readyConnect to your vCenter Server via the vSphere Web Client login and browse to your virtual machine in the vSphere Web Client.
How to do it...We will take a look at the step-by-step procedure to confi gure a few of the important security settings of virtual machines.
The steps for disabling copy and paste operations in the remote console of the virtual machine are as follows:
1. Right-click on your virtual machine and click on Edit Settings.
2. Select VM Options tab and click on Advanced to expand its confi guration options.
3. Click on Edit Confi gurations and select Add Row.
For More Information: www.packtpub.com/vmware-esxi-5-1-cookbook/book

Chapter 7
261
4. Type isolation.tools.copy.disable in the name fi eld and enter the value as True to disable the copy operation.
5. Type isolation.tools.paste.disable in the name fi eld and enter the value as True to disable the paste operation.
6. Click on OK to apply the settings.
The steps for preventing virtual machine disk shrinking are as follows:
1. Right-click on your virtual machine and click on Edit Settings.
2. Select the VM Options tab and click on Advanced to expand its confi guration option.
3. Click on Edit Confi gurations and select Add Row.
4. Type isolation.tools.diskWiper.disable in the name fi eld and enter the value as True.
5. Type isolation.tools.diskShrink.disable in the name fi eld and enter the value as True.
6. Click on OK to apply the settings. You cannot shrink virtual machine disks if a datastore runs out of space when you disable this feature.
There's more...The steps for preventing other users on spying the virtual machine remote console sessions are explained here. More than one user can connect to the virtual machine remote console sessions at a time by default. If more than one user connects to a remote console of the virtual machine, users can observe the actions performed by the other remote console users. These settings can be used to limit the number of remote console connections to the virtual machine:
1. Right-click on your virtual machine and click on Edit Settings.
2. Select VM Options tab and click on Advanced to expand its confi guration options.
3. Click on Edit Confi gurations and select Add Row.
4. Type RemoteDisplay.maxConnections in the name fi eld and enter the value as 1 to limit console sessions of the virtual machine to only one.
5. Click on OK to apply the settings.
For More Information: www.packtpub.com/vmware-esxi-5-1-cookbook/book

Where to buy this book You can buy VMware ESXi Cookbook from the Packt Publishing website:
Free shipping to the US, UK, Europe and selected Asian countries. For more information, please
read our shipping policy.
Alternatively, you can buy the book from Amazon, BN.com, Computer Manuals and
most internet book retailers.
www.PacktPub.com
For More Information: www.packtpub.com/vmware-esxi-5-1-cookbook/book