VMS training manual 06.19 - app.abhct.com · VMS Training Manual Access to Recovery (ATR III) User...
18
VMS Training Manual Access to Recovery (ATR III) User Manual
Transcript of VMS training manual 06.19 - app.abhct.com · VMS Training Manual Access to Recovery (ATR III) User...

VMS Training Manual
Access to Recovery (ATR III)
User Manual

TABLE OF CONTENTS
Table of Contents 2
Basic System Display Information 3
Logging onto VMS 4-5
Search Screen 6-7
Open Registrations/Pending Referrals 8
Accepting a Referral and Starting an Authorization 9
Pg. #
ATR IIII User Manual Revised 6/19/2012 Page 2 of 18
Accepting a Referral and Starting an Authorization 9
Entering Progress Notes 10-11
Entering Service Invoices 12-15
Discharging Clients From Services 16-17
Logging Out/Support 18

The following items appear throughout the system:
Command Buttons:
Clicking the Submit or Save buttons will save the information that has been typed in and move the user to the next step.
In order to print a copy of information entered into a VMS screen, users can click on the printer icon. They will then have a hard copy of the information.
Drop-Down Selection (Combo Box) –used for selecting values from a pre-determined list of allowed values for that field. The value can either be selected by clicking on the arrow at the right end of the Combo Box, or by typing the entry.
Check Box – used when a response to a question is either Yes or No; if checked the response is Yes and if unchecked the response is No. Checkboxes will many times often cause other fields to become enabled and/or required.
Registration/Inquiry Button –brings
BASIC SYSTEM DISPLAY INFORMATION
ATR IIII User Manual Revised 6/20/2012 Page 3 of 18
Text Box – used for entry of free-form text fields, such as names, numbers, and dates. Some text boxes assist the user by showing the format next to the field; for example, numbers should be entered into one of the following formats:
Phone/Fax Number: XXX-XXX-XXXXDate: MM/DD/YYYYDollars: XX.XX
Please note that the system will not spell check your entries. Please enter
information exactly as you want it stored.
Registration/Inquiry Button –brings the user back to the default (home) screen.
Logout Button – ends user’s session and logs out of the VMS.
Back Button –exits from the current screen and returns to the previous screen .
Service Status Button – returns user from the current screen to the list of authorized services

LOGGING ON TO VMS
• Select LOGIN, in the upper right hand corner, then ATR III to log in to the VMS.
To access the ATR III VMS, users will first need to log on to the Internet and go to the Advanced Behavioral Health Web site at www.abhct.com. From this page users can:
ATR IIII User Manual Revised 6/20/2012 Page 4 of 18
• Select RESOURCES, then ATR III to view and print hard-copy documentation, provider alerts and other important ATR III documents.

LOGGING ON TO VMS (continued)
Once a user connects to the ABH Web site and navigates to the ATR III login screen, he or she must enter a User ID and Password. All individual users will receive a unique login and password after completing the “Statement of Rights and Responsibilities” (available in the Resources/Forms section of the ABH website). Once the User ID and password have been entered, click the Log In button.
ATR IIII User Manual Revised 6/20/2012 Page 5 of 18
Occasionally, notices and announcements concerning system changes, maintenance, or service updates will appear on the login screen. Please read these notices and adjust accordingly.
Tip:

SEARCH SCREEN
To Search For Referred Clients:
After a successful login, the user’s
first and last name will display at the
top of the page. The provider’s
contracted service address(es) will
be in the Combo Box beneath the
This is the Default Screen. Once users
log in to the ATRIII VMS (and anytime
they click on Registration/Inquiry) this is
the screen that will be shown.
Users can type in any combination of available
criteria to locate a client and view the status.
ATR IIII User Manual Revised 6/20/2012 Page 6 of 18
be in the Combo Box beneath the
name. Select the specific service
address needed from the provider
drop-down box.

SEARCH SCREEN (CONTINUED)
Report options will be added on an ongoing basis. Two VMS reports are currently
Tip:
After selecting or typing in criteria, click the Search button to receive the results ofyour search. If all criteria fields are left blank and Search is clicked, the VMS willshow all clients linked to the provider location.
Open Registrations: Those clients with current pending referrals.
Active Clients: Those authorized for services with units available to bill.
Inactive Clients: Those whose authorizations either ran out of units or days but were not yet discharged.
Discharged Clients: Those who have completed services with a discharge entered.
Pending Invoice: Those whose invoices have been submitted without a matching progress note.
ATR IIII User Manual Revised 6/20/2012 Page 7 of 18
Report options will be added on an ongoing basis. Two VMS reports are currentlyavailable – ATR III Claims Report and ATR III Referral Outcomes Report.
To run either report, select the provider location from the Combo Box, and enter a date range. The Claims Report will show all claims entered for that site location and during the specific timeframe, along with the claim header ID number, client information, charges, date of entry, user ID, and check number. The Referral Outcomes Report will summarize all referrals made to the agency during the specific time frame as well as the action taken (authorization created, referral closed, client discharged), total units and dollars paid, and the agency’s percentage of authorizations to payments.
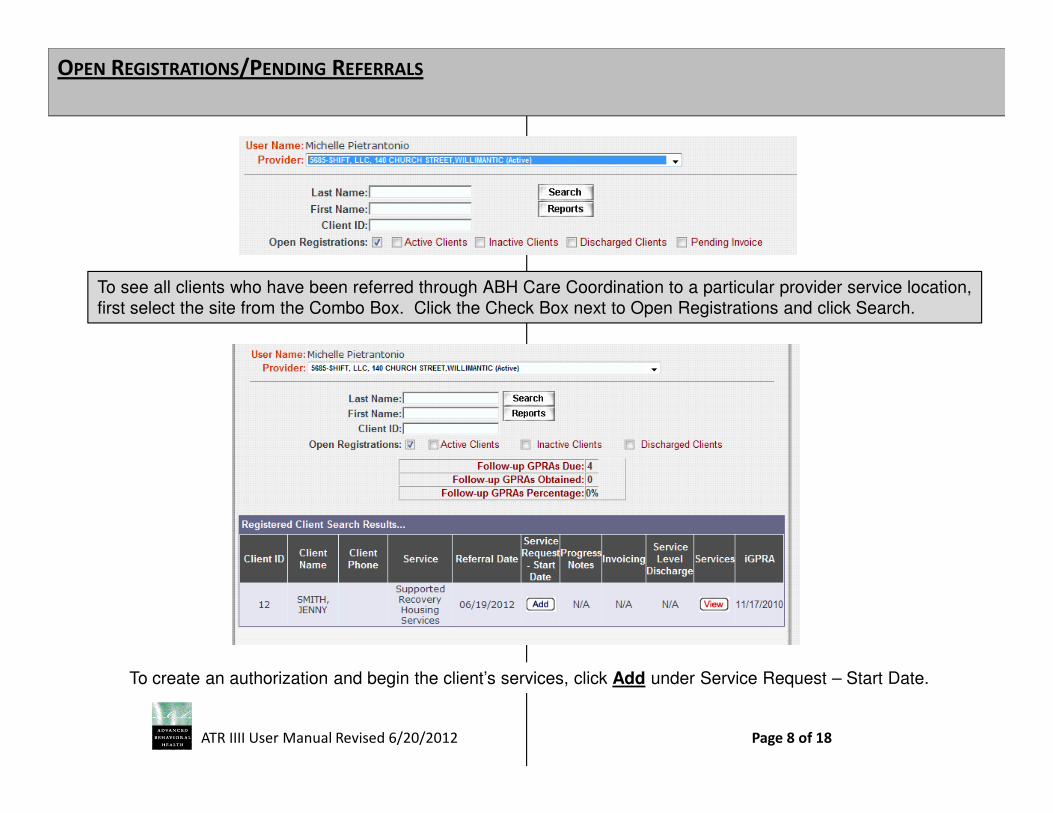
OPEN REGISTRATIONS/PENDING REFERRALS
To see all clients who have been referred through ABH Care Coordination to a particular provider service location,
first select the site from the Combo Box. Click the Check Box next to Open Registrations and click Search.
ATR IIII User Manual Revised 6/20/2012 Page 8 of 18
To create an authorization and begin the client’s services, click Add under Service Request – Start Date.

ACCPETING A REFERRAL AND STARTING AN AUTHORIZATION
Enter the client’s date of birth and the
service start date and click submit. This
should only be done once provider staff
has met with the client and the client has
indicated his or her desire to begin
services.
Once the date of birth and service start
ATR IIII User Manual Revised 6/20/2012 Page 9 of 18
Once the date of birth and service start
date have been entered, the user will
see a confirmation screen explaining
that the authorization will be created. If
there are any limitations (for example,
due to services previously received by
the client), they will be displayed here
as well.

ENTERING PROGRESS NOTES
To enter progress notes, select the location and search by name (you can also do this by clicking on Active Clients and Search to find the
ATR IIII User Manual Revised 6/20/2012 Page 10 of 18
Search to find the client’s name). Next, Click Addunder the Progress Notes column. Progress notes matching an invoice must be entered onto the VMS.
Tip:
A claim will not be released unless the progress note has been entered and matches the invoice.

ENTERING PROGRESS NOTES (CONTINUED)
All fields are required.
Session Date automatically defaults to
today’s date. Type in the correct
session date (if necessary) and select
the start and end times from the combo
boxes. Indicate the person or people
present at the session as well.
Type in the goal being worked on, the
intervention provided, the client’s
response, and the plan or next steps.
Select the point in progress of the goal
from the combo box (Goal Met, Goal
ATR IIII User Manual Revised 6/20/2012 Page 11 of 18
Not Met, In Progress, or Revised).
Please note that these four fields have
a 250-character maximum. Click Save
and repeat this process as necessary to
document all goals discussed during
the session.
Once the user clicks Save, the fields will
clear out and the content of the note will
move to the table below the empty
fields. All progress notes entered by
provider location staff can be viewed
from this screen.

ENTERING SERVICE INVOICES
All service payment claims for
authorized services must be entered
via the VMS. When the client is
displayed, click Add under the
Invoicing column.
All service authorizations assigned
to the provider location will be
displayed. Click the Invoice button
on the right of the screen to enter a
claim.The
authorization
Tip:
ATR IIII User Manual Revised 6/20/2012 Page 12 of 18
Enter the service start and end dates. Units represent the amount of time spent with the client and vary by service type. For Supported Recovery Housing Services, the units will automatically calculate and the VMS will not allow you to bill in excess of 7 units at a time. For all other services, enter the number of units being billed. Click Submit.
authorization
dates and
maximum units
are visible
above and to
the right of the
Prior Invoices table.

ENTERING SERVICE INVOICES (CONTINUED)
There is a shortcut button (Add
Progress Notes) next to the
Submit button on the invoicing
screen. This will take a user
directly to the progress note entry
screen; but please note that
adding a progress note alone
will NOT generate an invoice.
ATR IIII User Manual Revised 6/20/2012 Page 13 of 18
will NOT generate an invoice.
Users must enter a progress note
and an invoice separately in order
to create a claim for payment.
All progress notes that have been
entered against the authorization
being viewed are stored and
visible on the bottom of this
screen.

ENTERING SERVICE INVOICES (CONTINUED)
If no progress note has been
entered onto the VMS for the billed
service date yet, users will see a
message in red reminding them that
a note MUST be entered before a
claim will generate. No payment will
be issued until a complete claim,
including progress note, has been
ATR IIII User Manual Revised 6/20/2012 Page 14 of 18
including progress note, has been
submitted.
Providers may search via the
Pending Invoices check box on the
default screen to locate invoices that
have been submitted with no
corresponding progress note.

Provider staff can view the status
of an invoice submitted. Locate
the client and click the Add button
under Invoicing.
If units remain and are able to be
billed, the Invoice button will still
be visible. If all units have been
billed, the Invoice button will be
replaced by a View button. To
check the status of an invoice,
click the button that corresponds
ENTERING SERVICE INVOICES (CONTINUED)
ATR IIII User Manual Revised 6/20/2012 Page 15 of 18
click the button that corresponds
to the authorization that was billed.
The VMS will display
Acknowledged/Accepted for a
short time after submission.
Once the VMS has adjudicated the claim to the internal ATRIII system, the Status will update with whether the
claim is ready to pay, has been denied, or is pending for progress note entry. Claims may be denied if the
requested timeframe or number of units exceeds the service approval, or if the provider bills outside of the 30-day
timely filing window.
Once the claim has actually been included on a check run, the Paid Date and Check # fields will fill in for provider
reference.

DISCHARGING CLIENTS FROM SERVICES
Provider staff must record all client
discharges on the VMS. Discharges
must be entered when the client
successfully completes ATR services
OR leaves services early.
To enter a discharge, locate the client
and click the Add button under
Service Level Discharge.
ATR IIII User Manual Revised 6/20/2012 Page 16 of 18
All questions in the Service Level
Discharge are required; however,
please note that depending on the
responses given, additional fields
may be required as well. The
Discharge Date defaults to today’s
date, but can be edited to reflect
the actual date of discharge. Select
or type in the appropriate response
for each question then click Save.

DISCHARGING CLIENTS FROM SERVICES (CONTINUED)
The VMS will notify the user if the selected date is not appropriate based on the client’s authorization dates.
Clients should not be discharged on dates that are:
-- prior to the start of the authorization;
-- after the end of the authorization; or
-- prior to the most recent paid service date.
ATR IIII User Manual Revised 6/20/2012 Page 17 of 18
Please note that clients will continue to be included in a
provider’s service caseload maximum until a discharge is
submitted in this manner. Discharges should be submitted
once all billing has been done for the client, as the VMS will
automatically cancel any unpaid units and they will not be
available for invoicing.
Tip:
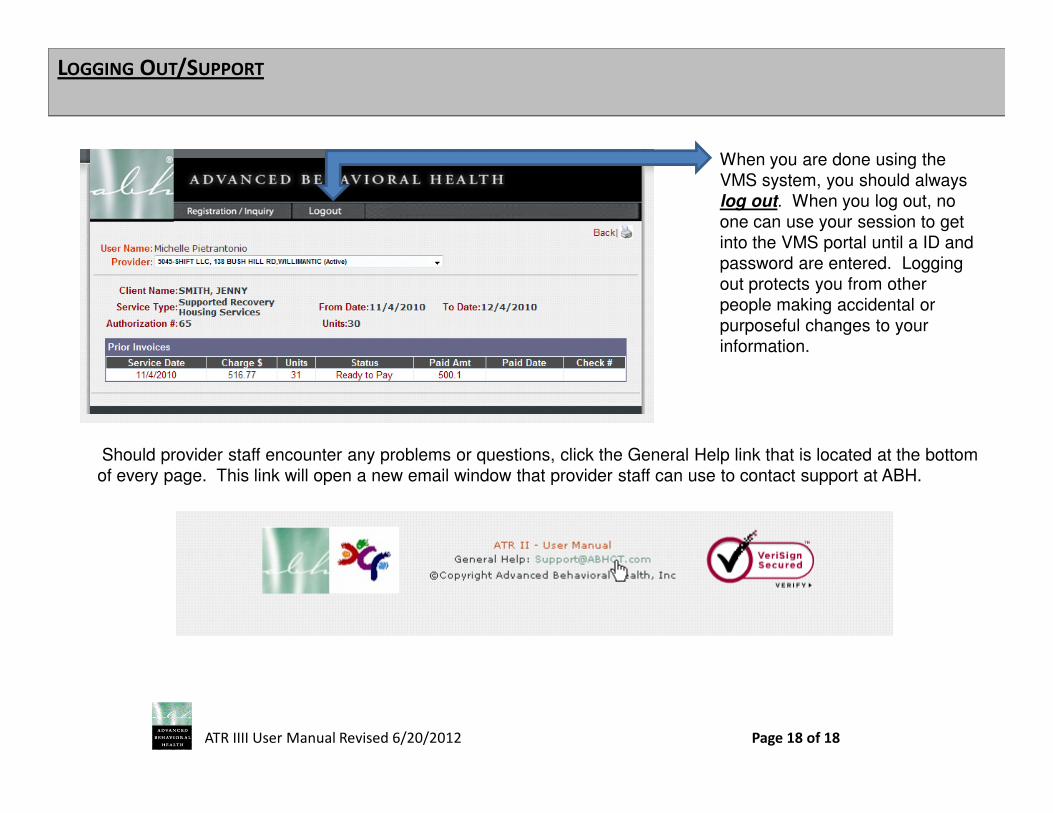
LOGGING OUT/SUPPORT
When you are done using the
VMS system, you should always
log out. When you log out, no
one can use your session to get
into the VMS portal until a ID and
password are entered. Logging
out protects you from other
people making accidental or
purposeful changes to your
information.
ATR IIII User Manual Revised 6/20/2012 Page 18 of 18
Should provider staff encounter any problems or questions, click the General Help link that is located at the bottom
of every page. This link will open a new email window that provider staff can use to contact support at ABH.