Visual Basic Programming Starting Visual Basicteachers2.tulpehocken.org/knoecker/VisBasNotes.pdf ·...
121
Visual Basic Programming 1 Starting Visual Basic 1. Normally, you will have created a shortcut on your desktop to access Visual Basic. If not, access it by using the Start – Programs – Microsoft Visual Basic series of clicks. 2. Upon opening the software, you will see the New Project window. To open a new project, left click the New tab and choose the Standard EXE option. To open an existing project, left click on the Existing tab and browse to choose the project from its storage location (hard drive, diskette, etc.). 3. Left Click the Open button. 3. At this point, the project design window will become visible with the first form already visible. New Tab Existing Tab Standard EXE option Open button
Transcript of Visual Basic Programming Starting Visual Basicteachers2.tulpehocken.org/knoecker/VisBasNotes.pdf ·...
Visual Basic Programming 1
Starting Visual Basic
1. Normally, you will have created a shortcut on your desktop to access Visual Basic.
If not, access it by using the Start – Programs – Microsoft Visual Basic series of
clicks.
2. Upon opening the software, you will see the New Project window.
To open a new project, left click the New tab and choose the Standard EXE
option.
To open an existing project, left click on the Existing tab and browse to choose
the project from its storage location (hard drive, diskette, etc.).
3. Left Click the Open button.
3. At this point, the project design window will become visible with the first form
already visible.
New Tab
Existing Tab
Standard EXE
option
Open button
Visual Basic Programming 2
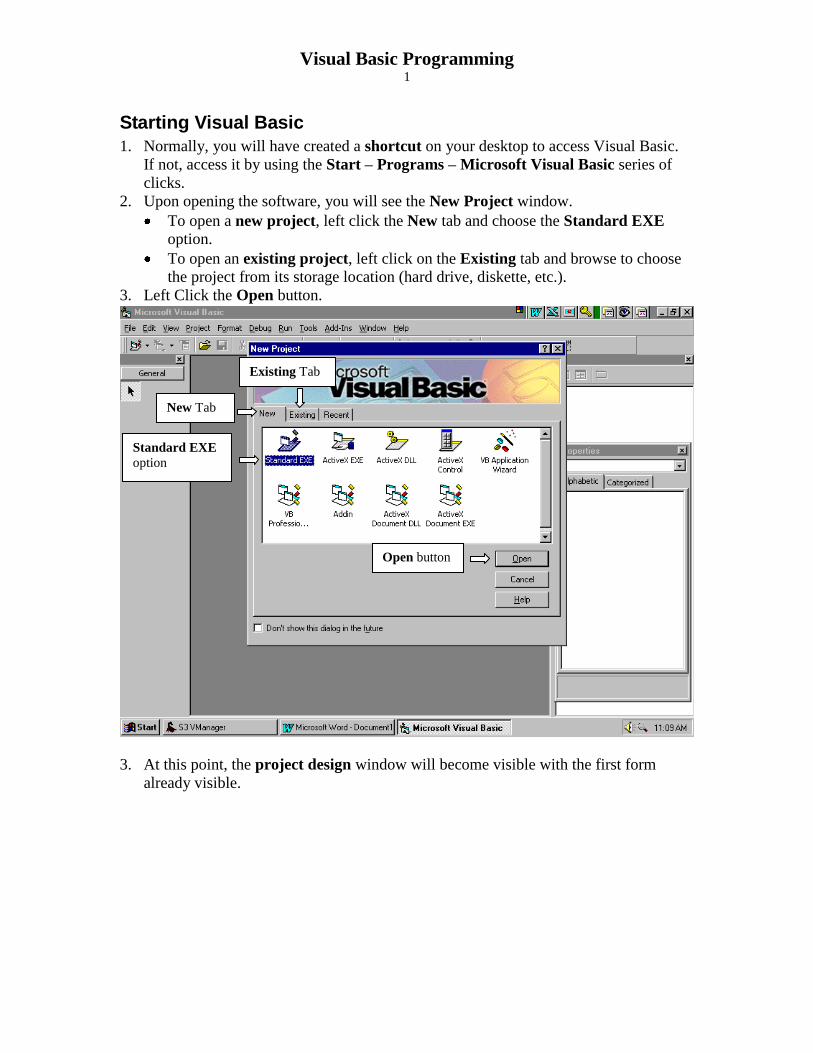
Standard Toolbar
Toolbox
Project Name Form Name Menu Bar Standard
Toolbar
Project Container Window
Form Window
Toolbox
Window
Project
Explorer
Window
Properties
Window
Form Layout Window
Property
Description
Window
Add a
Project
Add a
Form
Menu
Editor
Open a
Project
Save a
Project
Paste
Start
Program
Break
Program
Stop
Program
Highlight Project Explorer,
Properties, Form Layout, Object
Browser, and Toolbox,
respectively

Visual Basic Programming 3
Project Window
Pointer
Label
Frame
Checkbox
Combo Box
H.Scroll Bar
Timer
Dir. List Box
Shape
Image
Picture Box
Text Box
Command Button
Option Button
List Box
V.Scroll Bar
Drive List Box
File List Box
Line
Data
View Code Button
View Object Button
Toggle (Show/Don‟t show) folders button
Project Name and Icon
Form Name and Icon

Visual Basic Programming 4
Programming Prefixes
Prefix Control Prefix Control
ani Animation button hsb Horizontal scroll bar
cbo Combo box img Image
ch3 3D Check box ils Image list
chk Check box lbl Label
clp Picture clip lin Line
cm3 3D Command button lst List box
cmd Command button mci Multimedia MCI
ctr Control (specific type
unknown)
mnu Menu
dat Data opt Option button
dir Directory list box pic Picture box
dlg Common dialog box prg Progress bar
drv Drive list box shp Shape
fil File list box sli Slider
fr3 3D frame spn Spin button
fra Frame tlb Toolbar
frm Form tmr Timer
gpb Group push button tre Tree view
gra Grid txt Text box
grd vtb Vertical scroll bar
File Extensions
.frm = Forms
.vbp = Visual Basic Project
.bas = Module
Visual Basic Programming 5
Forms, Labels, Text Boxes, and Buttons
The form is the vehicle in which all of the tools (Labels, Text Boxes, and Buttons)
reside. It is the master container for a portion of an application and is the application‟s
interface with the user.
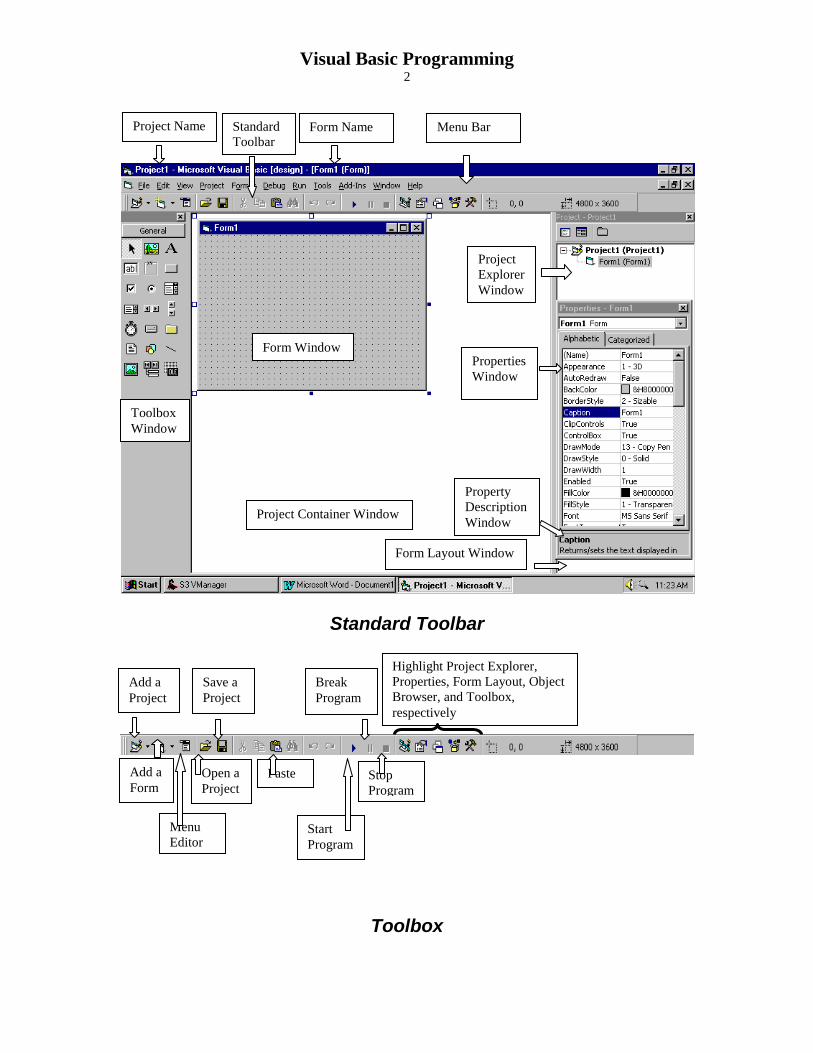
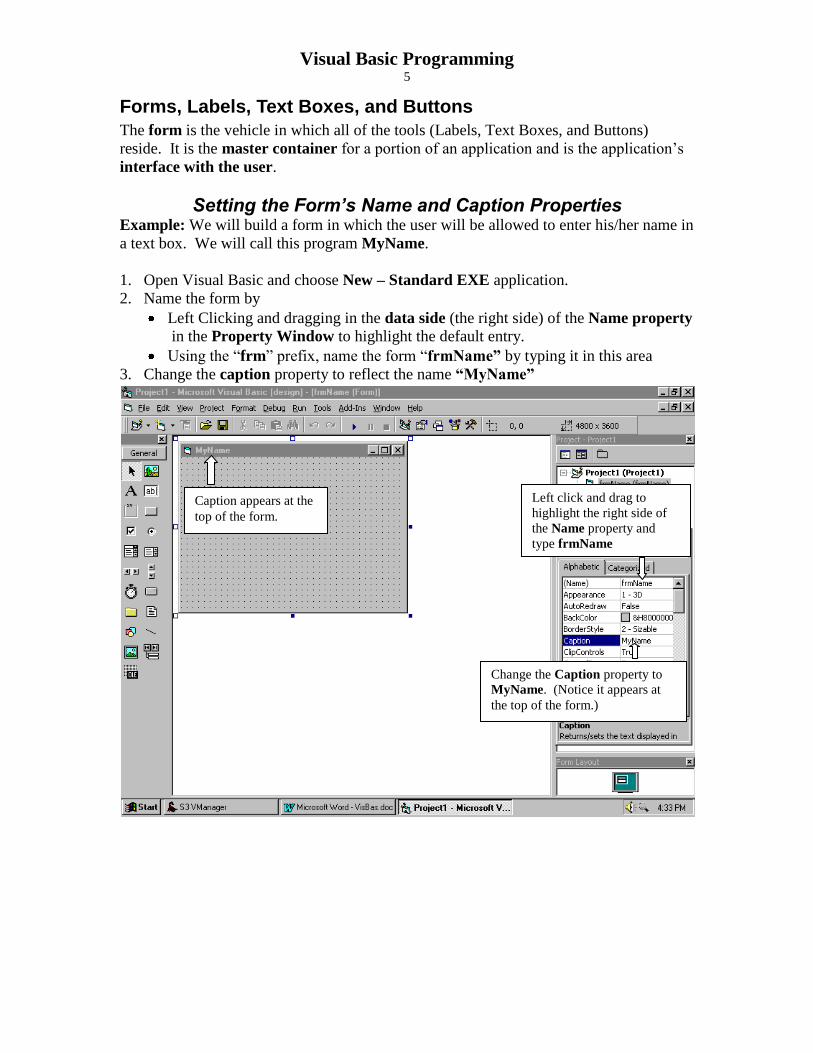
Setting the Form’s Name and Caption Properties Example: We will build a form in which the user will be allowed to enter his/her name in
a text box. We will call this program MyName.
1. Open Visual Basic and choose New – Standard EXE application.
2. Name the form by
Left Clicking and dragging in the data side (the right side) of the Name property
in the Property Window to highlight the default entry.
Using the “frm” prefix, name the form “frmName” by typing it in this area
3. Change the caption property to reflect the name “MyName”
Left click and drag to
highlight the right side of
the Name property and
type frmName
Change the Caption property to
MyName. (Notice it appears at
the top of the form.)
Caption appears at the
top of the form.

Visual Basic Programming 6
Adding a Label to the Form 1. Add a label to the form by
Left Clicking on the Label tool
Place the mouse pointer on the form in the location where you would like to place
the upper left hand corner of the label
Left Click and drag the label onto the form
2. Change the label‟s Name property to “lblMessage”
3. Change the label‟s Caption property to “Please type your name”
Notice how this caption appears inside the label
4. Change the label‟s visible property to False. (This will cause the label to disappear.)
Note: Any tool or object inserted in a form can be moved by dragging it anywhere on the
form. Also, any object can also be resized by dragging on an edit handle in a
highlighted object just as an object in a Word Document or Excel spreadsheet.
Change the
Name option
Change the
Caption option
Caption appears in the
label

Visual Basic Programming 7
Adding a Text Box to the Form 1. Left Click the Text Box tool in the tool window
2. Drag a text box near the bottom of the form
3. Change the Name property of the text box to “txtName”
4. Change the Text property of the text box to a blank (Note that you will have to scroll
down in the properties window to see the text property.
Left click and drag over the default text entry
Press the backspace key or the delete key on the keyboard to remove the default
text
Text
box
tool Delete the default text
property to make the text
box blank No text in the text box
New name appears
in the title window
Visual Basic Programming 8
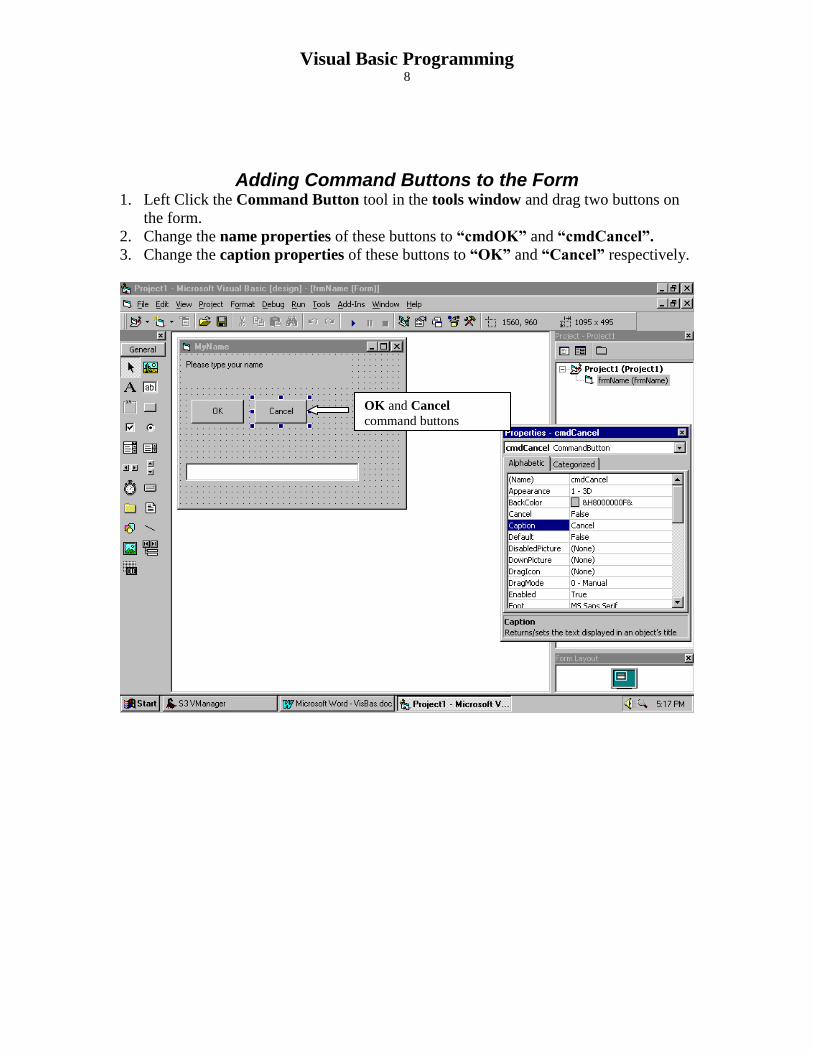
Adding Command Buttons to the Form 1. Left Click the Command Button tool in the tools window and drag two buttons on
the form.
2. Change the name properties of these buttons to “cmdOK” and “cmdCancel”.
3. Change the caption properties of these buttons to “OK” and “Cancel” respectively.
OK and Cancel
command buttons

Visual Basic Programming 9
Adding Code to Objects
We want our program to do the following things:
1. When the user clicks anywhere on the form the label “Please type your name”
should appear.
2. The user should then type his/her name in the text box.
3. The user should then click the OK button and the message “Hello _____” should
appear in the text box with the name the user typed inserted in the line.
4. The user can then click on the Cancel button to leave the program.
Follow these steps to create the application code:
Make the lblMessage Label Visible When the Form is Clicked 1. Left click on the View Code button located at the top of the project window.
2. When the Program Code view appears, click on the down arrow next to the Object
window. (Will probably have the word General there.)
3. When the drop-down menu appears, choose the Form object.
4. Click on the down arrow next to the Procedure window and choose the Click
procedure.
Object Window
Procedure Window

Visual Basic Programming 10
5. When the procedure code for Private Sub Form_Click( ) appears, left click below
this line and indent (space) a couple of spaces and type the text “lblMessage.”
6. As soon as you type the period (.), a drop-down menu of properties will appear.
Scroll to the Visible property and double click to place this property in the code you
are typing.
7. After the Visible property is added to the code, type an equal sign (=). Immediately,
a drop-down list of available values (True or False) appears. Double click on True
to make the text “Please type your name.” appear when the form is clicked on at
run time.
Drop-down list
of values
Completed Code

Visual Basic Programming 11
Code the OK Button to Show the Desired Message in txtName Text Box
1. In the Program Code view, choose the OK command button (cmdOK) from the
Object Window list.
2. Choose the Click procedure from the Procedure drop-down list.
3. The Private sub cmdOK_Click( ) procedure is now ready to code.
4. Type the following code inside the procedure :
txtName.text = “Hello “ & txtName.txt
Code Hints:
“ “ = Whatever is placed inside of quotation marks will be printed
& = Will append a string to another string
5. The code is saying “the Text property of the txtName text box is equal to the
string “Hello “ and its current text.”
6. Run the application by clicking the Run button
7. Exit the application by clicking the close button in the application
window.
X

Visual Basic Programming 12
An Alternate Method
1. Inside the Private sub cmdOK_Click( ) procedure, place the following code:
Dim strName As String
strName = "Hello " & txtName.Text
txtName.Text = strName
Code Hints:
To declare a variable (such as strName), the syntax is as follows:
Dim <Correct Prefix><Name of the Variable> As <Choose type from drop-down list>
Prefixes:
Data
Type
Prefix Example
Boolean bln blnBooleanVariable
Byte byt bytVar
Collection object col colThisObject
Currency cur curMyCost
Date(Time) dtm dtmBirthDate
Double dbl dblThisVar
Error err errThis Err
Integer int intCounter
Long lng lngThisVar
Object obj objCircleOne
Single sng sngThisVar
String str strNameOne
User-defined type udt udtMyUDT
Variant vnt vntThisVar
Example: To declare an integer variable Dim intCounter as Integer
To declare a single precision variable Dim sngValOne as Single
1. Define the variable strName as a string
2. Assign it the value of the contents of
txtName preceded by the string “Hello “
3. Reassign the contents of txtName the
value of strName

Visual Basic Programming 13
Code the Cancel Button to Close the Application 1. In the Program Code view, choose the down arrow in the Objects window.
2. Left Click the cmdCancel object.
3. The Click procedure should appear by default. If not, click the down arrow and
choose Click.
4. Insert the code “Unload Me” in the procedure‟s code section.
Note: The automatic help guide appears telling you to enter an object after the word
“Unload”. The word “Me” refers to the form currently active.
5. Now, when the application is run, it will end by either of two actions:
Left Click the Close Window button at the top right corner of the form
Left Click the Cancel button
Saving a Project
1. When saving a project (program) for the first time, you will be prompted to name
both the project and the form.
2. Name the form the same name as that used in the Name property and use a
recognizable name for the project
First click the File
menu option
Second, choose either the Save Project option (if saving
to the default location) or Save Project As (if saving to
a different location such as the diskette).
Visual Basic Programming 14
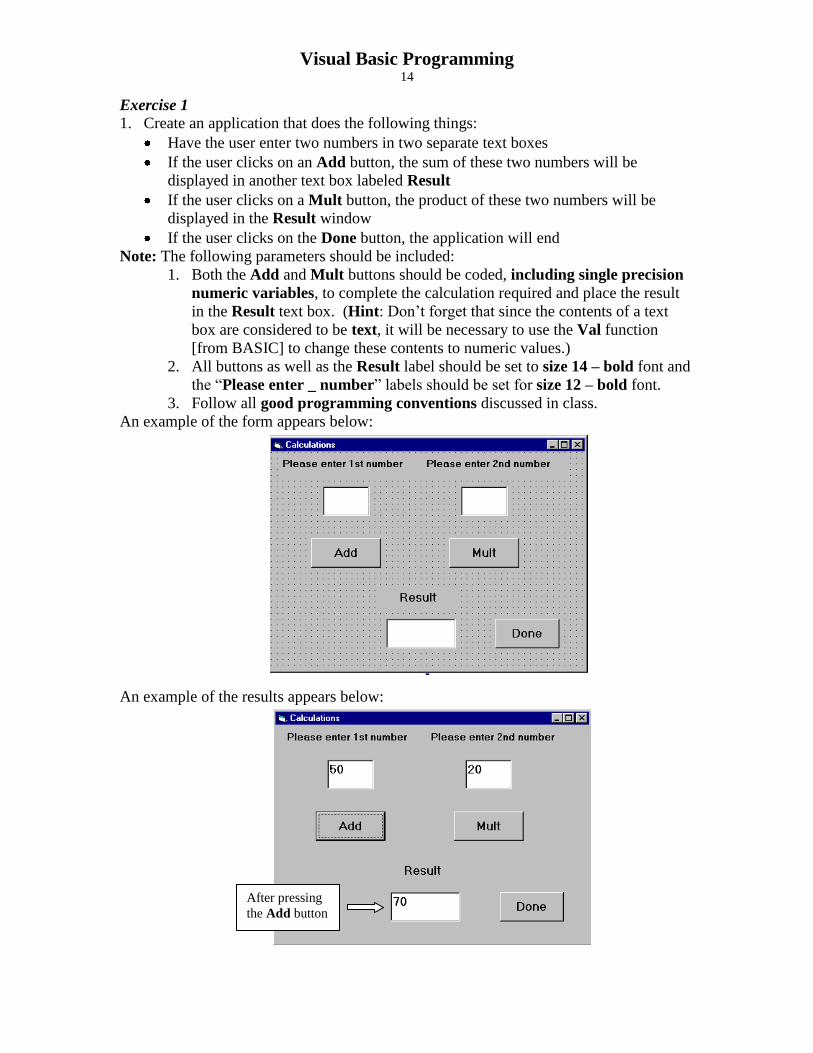
Exercise 1
1. Create an application that does the following things:
Have the user enter two numbers in two separate text boxes
If the user clicks on an Add button, the sum of these two numbers will be
displayed in another text box labeled Result
If the user clicks on a Mult button, the product of these two numbers will be
displayed in the Result window
If the user clicks on the Done button, the application will end
Note: The following parameters should be included:
1. Both the Add and Mult buttons should be coded, including single precision
numeric variables, to complete the calculation required and place the result
in the Result text box. (Hint: Don‟t forget that since the contents of a text
box are considered to be text, it will be necessary to use the Val function
[from BASIC] to change these contents to numeric values.)
2. All buttons as well as the Result label should be set to size 14 – bold font and
the “Please enter _ number” labels should be set for size 12 – bold font.
3. Follow all good programming conventions discussed in class.
An example of the form appears below:
An example of the results appears below:
After pressing
the Add button

Visual Basic Programming 15
Using Assignment to Change Property Values
In exercise #1, we have created an application to either add or multiply two numbers
entered in two separate text boxes. You may want to be certain that numbers have been
entered in both boxes before allowing a calculation to occur. Therefore, it may be
necessary to default the Enabled property for both the add and multiply command
buttons to False until both text boxes have entries. Then, when both text boxes contain
entries, change the enabled property to True. (Please note that the object names referred
to may not be the same as yours, but they will be easy enough to discern).
1. In the project's View Object view, choose the Add command button (cmdAdd) and
change its Enabled property to False.
2. Do the same for the cmdMult command button.
3. This will ensure that both buttons will not be enabled at the project's load time.
4. Return to the Code View and choose the txtNum1 text box object.
5. Choose the Change event and add the following code:
Private Sub txtNum1_Change()
If txtNum2.Text <> "" Then
cmdAdd.Enabled = True
cmdMult.Enabled = True
End If End Sub
6. Do the same with the Change event for the txtNum2 object
Private Sub txtNum2_Change()
If txtNum1.Text <> "" Then
cmdAdd.Enabled = True
cmdMult.Enabled = True
End If End Sub
Note that here, we are checking the
contents of the txtNum2 text box.
Note that here, we are checking the
contents of the txtNum1 text box.

Visual Basic Programming 16
7. The completed code appears below. Note that, every time the text property in either
text box is changed, the other box is checked to be sure that it has an entry in it before
the command buttons are enabled to do the calculations.
8. When this application is loaded, both command buttons are not enabled. But if one
of the text boxes is changed by highlighting its contents and deleting it, the buttons
remain enabled because we are only checking the contents of the other text box, not
the selected one. (Try this by running your application. You could click a calculation
button without re-entering a value in the text box.) Therefor, we need to also check
the contents of the text box in which the editing is taking place.
9. Change the code to appear as it does below.
10. Now, any time one of the text boxes is changed, both command buttons are disabled
and both text boxes are checked for contents.
11. It is now impossible to perform a calculation with one of the text boxes being empty.

Visual Basic Programming 17
Including Image Objects
In our example, we will add a picture between the two text boxes holding the numbers we
have entered. If we choose to add, we will display a plus sign between the numbers. If
we choose to multiply, we will show a multiplication sign between the two numbers.
These pictures can be created using Microsoft Paint and saving each (to your diskette or
personal folder) as a bitmap image. We will call the addition sign Plus.Bmp and we
will call the multiplication sign Mult.Bmp. After creating and saving these pictures,
begin the following procedure.
1. Choose the Image object from the toolbar.
2. Drag a box to the appropriate size and place it between the text boxes.
3. Name the image imgPlus in the properties window.
4. Change the Visible property for the image to False so it will not appear when the
form is loaded.
Image Object
New Image
Object
Name the image
Visual Basic Programming 18
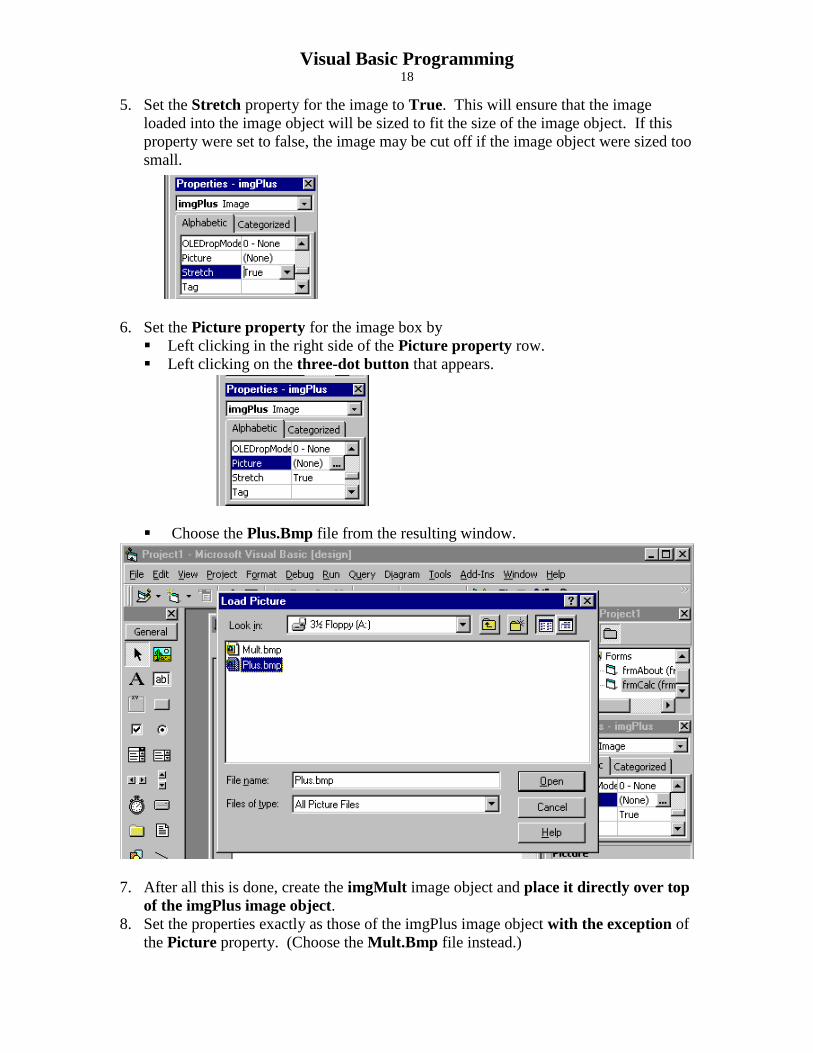
5. Set the Stretch property for the image to True. This will ensure that the image
loaded into the image object will be sized to fit the size of the image object. If this
property were set to false, the image may be cut off if the image object were sized too
small.
6. Set the Picture property for the image box by
Left clicking in the right side of the Picture property row.
Left clicking on the three-dot button that appears.
Choose the Plus.Bmp file from the resulting window.
7. After all this is done, create the imgMult image object and place it directly over top
of the imgPlus image object.
8. Set the properties exactly as those of the imgPlus image object with the exception of
the Picture property. (Choose the Mult.Bmp file instead.)

Visual Basic Programming 19
9. Add the following code to the cmdAdd button click event. This code will cause the
multiplication sign, if it is visible, to be removed and the plus sign to become visible.
Programming Hint: Note the remarks added to the right of the code. These remarks can be added by
preceding each remark with an apostrophe ( ' ).
10. Do the same thing with the cmdMult command button's click event.
11. Add the following code to both the txtNum1 and the txtNum2 text box change event
to remove either sign if any changes are made to the numbers entered.

Visual Basic Programming 20
Review
Object Procedure Property Effect
Form Load Code takes effect when the form is loaded
Click Code executes when form is clicked on
Name Name of the form – frm----
Caption Title in upper left corner of form
Command
Button
Click Code executes when button is clicked
Name Name of command button – cmd----
Caption Text that appears on the face of the button
Enabled Is button available ? True / False
Font Size and style of the caption text
Visible Is button visible when the form loads?
True / False
Label Click Code executes when the label is clicked
on
Change Code executes when the text of the label is
changed
Name Name of the label – lbl-----
Caption Text within the label
Enabled Is label dark (True) or “gray out”(False) ?
Visible Is label visible? True / False
Text Box Change Code executes when contents is changed
Click Code executes when text box is clicked
Name Name of the text box – txt-----
Alignment Position of text – Left, Right, or Centered
Enabled Is text box dark (True) or gray (False)?
Text Text contents of the text box
Visible Is text box visible at run time? True /
False
Image Box Click Code executes when clicked on
Name Name of the image box – img---
Enabled Is box dark (True) or gray (False)?
Picture Picture file to appear in the image box
Stretch Does image shrink or expand to fit the size
of the image box? True / False
Visible Is the box visible at run time? True / False

Visual Basic Programming 21
Exercises
1. Create an application that will print your first name, middle name, and last name in
separate text boxes, depending upon which text box you click on.
2. Create an application that does the following things:
Enter two numbers
Provide command buttons to add the numbers, subtract the second number from
the first number, multiply the numbers, divide the second number into the first
number
Provide a text box to display the result
Provide a “Done” command button to exit the application
3. Create an application that does the following
Provide a command button labeled “Hello”
Provide a command button labeled “Goodbye”
When the “Hello” command button is clicked, have a smiley face (You may have
to create it in MS Paint.) appear and the word “Hello!” appear in a text box on the
form
When the “Goodbye” command button is clicked, have a frowning face appear on
the form and the word “Goodbye!” appear in the text box created above
4. Create an application that does the following
Create three text boxes with three different questions
Create three “answer” text boxes (one for each question)
Provide an “Answer” command button
Show the question in a given text box only when it is clicked on
Show the answer in its answer text box when the “answer” command button is
clicked

Visual Basic Programming 22
Variable Assignments
When creating applications, you will want to manipulate numeric values and store them
in variables. Variables must be dimensioned when created. That is, they must be
assigned a type as well as a name (See page 12 for naming conventions.).
1. At the beginning of the object‟s event code, type the word Dim to start dimensioning
a variable.
2. Next, name the variable according to its correct prefix (i.e. a string variable should
start with the str prefix and an integer variable should start with a int prefix.).
3. Then, add the name.
4. Next, type the word as.
5. Finally, enter the type of variable you are creating.
Example: To create an integer variable named Num1, you would type the following
code – Dim intNum1 as Integer
6. The variable is now ready to receive an integer value within the code.
7. The variable is only recognizable within the subroutine in which it was created.
8. The same variable can be created within a different subroutine without values
crossing over between the subroutines.
9. Variables can be used before being created, but their values at that point are equal to
zero.
In order to not allow a variable to be used before it is
dimensioned, add the Option Explicit command to the general section of the
form module.
Choose the General object from the drop down list
Type the Option Explicit command
Example
Returning to our “Addition and Multiplication” exercise, let‟s assign the values found in
the two text boxes to variables and then, perform the calculation requested.
1. Add the Option Explicit statement to the General portion of the module. (See
above)
General object chosen

Visual Basic Programming 23
2. Change the code for the cmdAdd button‟s click action to the following:
Private Sub cmdAdd_Click()
Dim intNum1 As Integer ' Dimension the intNum1 variable
imgPlus.Visible = True
imgMult.Visible = False
If txtNum1.Text <> "" And txtNum2.Text <> "" Then
intNum1 = Val(txtNum1.Text) + Val(txtNum2.Text)
txtResult.Text = intNum1
End If
End Sub
3. Make a similar change to the cmdMult command button „s click action. (See below)
Private Sub cmdMult_Click()
Dim intNum1 As Integer
imgPlus.Visible = True
imgMult.Visible = False
If txtNum1.Text <> "" And txtNum2.Text <> "" Then
intNum1 = Val(txtNum1) * Val(txtNum2)
txtResult.Text = intNum1
End If
End Sub
4. Notice that, in both the cmdAdd and cmdMult click events, we used the same variable
(intNum1). Because dimensioned variables are local to the event in which they are
created, this will cause no problem.
Note the change to a
multiplication sign

Visual Basic Programming 24
Debugging Using the Immediate Window
As an application is developed, the results of calculations or assignments may not be
exactly what the programmer had in mind. In these cases, it is important for the
programmer to be able to view the results of calculations or assignments as they are
executed within the code. that is the purpose of the Immediate Window.
1. To make the immediate window visible, either press Ctrl + G on the keyboard
simultaneously, or click on View from the main menu and choose Immediate
Window from the drop down list.
2. The Immediate Window will now appear on the Visual Basic Programming Screen
Immediate Window

Visual Basic Programming 25
3. In order to use the immediate window, the term Debug.Print must be inserted next to
the result that it is desired to view.
Example: In our addition / multiplication application, if we wanted to view the
calculation as it occurs in the code for the cmdAdd and cmdMult buttons, we would
add the following code to these events.
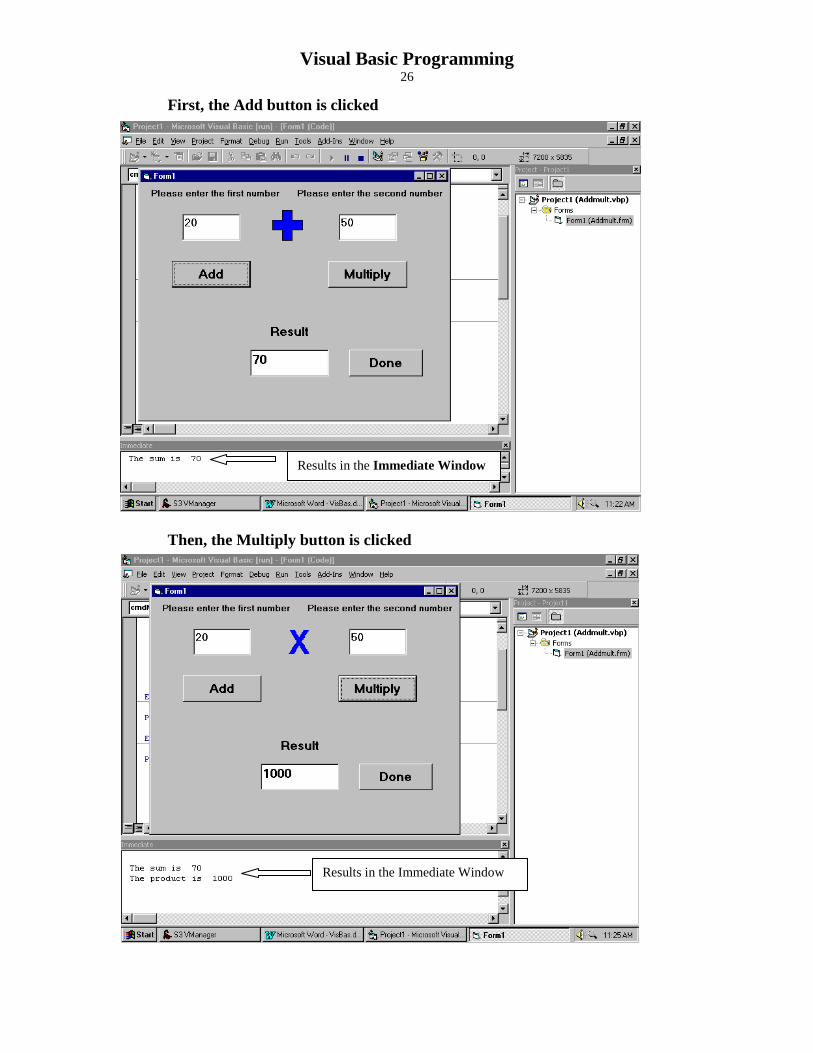
4. When the application is run, any time the code inside the cmdAdd or cmdMult click
events is run, the result of the calculation being performed along with its text
description will appear in the Immediate Window.
5. If we run the application and click the Add button followed by the Multiply button,
the results will appear as depicted on the next page.
The Debug.Print code
is followed by a
descriptive string
(optional) to
differentiate between
the addition and
multiplication
calculations. Next, is a
semicolon ( ; ), followed
by the variable
representing the result
of the calculation.
Visual Basic Programming 26
First, the Add button is clicked
Then, the Multiply button is clicked
Results in the Immediate Window
Results in the Immediate Window
Visual Basic Programming 27
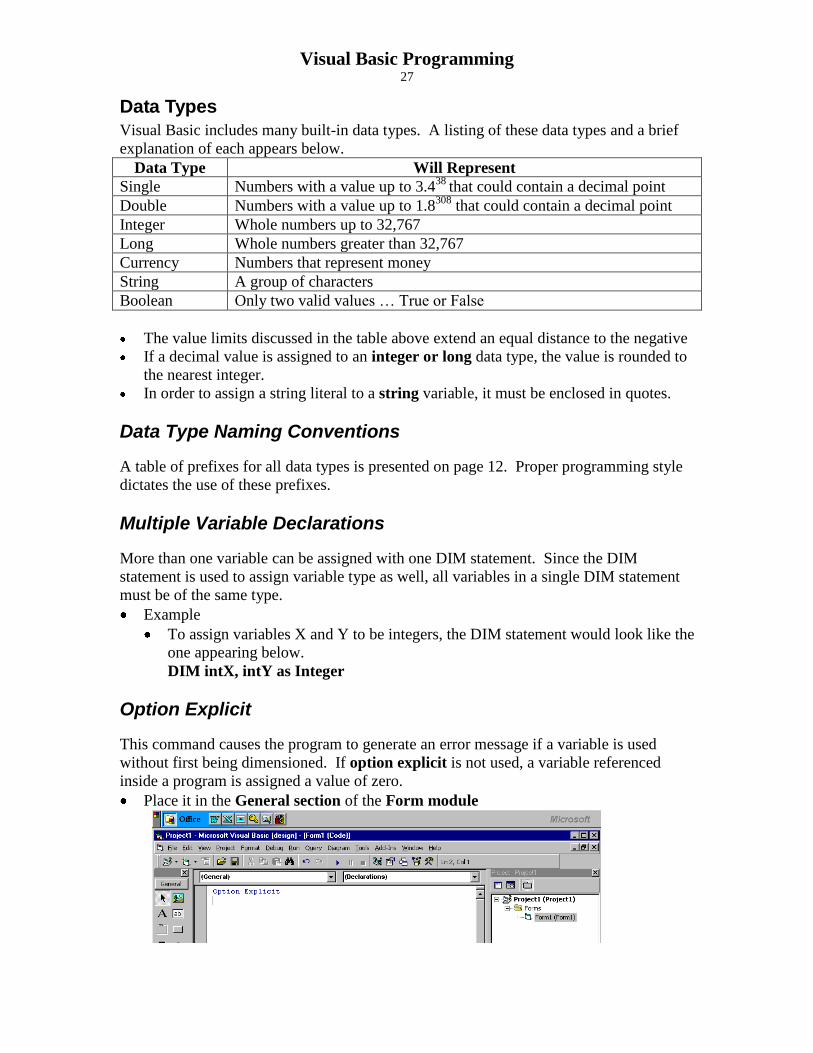
Data Types
Visual Basic includes many built-in data types. A listing of these data types and a brief
explanation of each appears below.
Data Type Will Represent
Single Numbers with a value up to 3.438
that could contain a decimal point
Double Numbers with a value up to 1.8308
that could contain a decimal point
Integer Whole numbers up to 32,767
Long Whole numbers greater than 32,767
Currency Numbers that represent money
String A group of characters
Boolean Only two valid values … True or False
The value limits discussed in the table above extend an equal distance to the negative
If a decimal value is assigned to an integer or long data type, the value is rounded to
the nearest integer.
In order to assign a string literal to a string variable, it must be enclosed in quotes.
Data Type Naming Conventions
A table of prefixes for all data types is presented on page 12. Proper programming style
dictates the use of these prefixes.
Multiple Variable Declarations
More than one variable can be assigned with one DIM statement. Since the DIM
statement is used to assign variable type as well, all variables in a single DIM statement
must be of the same type.
Example
To assign variables X and Y to be integers, the DIM statement would look like the
one appearing below.
DIM intX, intY as Integer
Option Explicit
This command causes the program to generate an error message if a variable is used
without first being dimensioned. If option explicit is not used, a variable referenced
inside a program is assigned a value of zero.
Place it in the General section of the Form module

Visual Basic Programming 28
To make it mandatory that all variables throughout the project must be dimensioned
before being used, set this option as follows:
Choose the Options item from the Tools menu
Then, place a check in the Require Variable Declaration option
Then, click OK
Automatic Type Conversion
If an Integer variable is assigned a value with a decimal point, the value is
automatically rounded to the nearest integer.
If a text box contains a number for its text and that number is used in a calculation,
Visual Basic will automatically change the text version of the number to a
numeric value.
Require Variable Declaration
Option

Visual Basic Programming 29
Modulus Division
Modulus Division returns the remainder of a division. Suppose we want to find out if
273 is divisible by 3.
We perform modulus division (273 mod 3)
If the result is equal to zero, then we know that there is no remainder from that
division. Hence, 273 is divisible by 3.
The code may look like the following:
intremainder = 273 mod 3
If intremainder = 0 then
txtResult.text = “273 is divisible by 3”
Endif
Option Buttons
Option buttons (or Radio buttons) are designed to provide a group of possible responses
from the user, only one of which is permitted at a time. For instance, suppose we want
the user to decide whether to add or multiply the two numbers in our Example 1
calculator project:
The Caption Property assigns the text that labels the option designated by that
particular option button
When the program is run, the option button that is clicked will contain the highlight
and any other option button that was formerly highlighted will lose the highlight.
After setting the code as it appears below, the application will display either the sum
or product of the two numbers, depending upon which control button is highlighted.
Option Button Tool
Name Property
Caption Property

Visual Basic Programming 30
Option Explicit
Private Sub optAdd_Click()
txtAnswer.Text = Val(txtFirst.Text) + Val(txtSecond.Text)
End Sub
Private Sub optMult_Click()
txtAnswer.Text = Val(txtFirst.Text) * Val(txtSecond.Text)
End Sub
Private Sub txtFirst_Change()
optAdd.Enabled = False
optMult.Enabled = False
If txtFirst.Text <> "" And txtSecond.Text <> "" Then
optAdd.Enabled = True
optMult.Enabled = True
End If
End Sub
Private Sub txtSecond_Change()
optAdd.Enabled = False
optMult.Enabled = False
If txtFirst.Text <> "" And txtSecond.Text <> "" Then
optAdd.Enabled = True
optMult.Enabled = True
End If
End Sub
The application will appear as below:
The Value property can be set to true (chosen) or false (not chosen)
The Alignment property can be set to left or right to align the caption on that side
of the option button.

Visual Basic Programming 31
Frames
Frames are used to group option buttons related to the same choice. The application
appears below complete with a frame around the option buttons.
The Caption Property assigns the text to appear at the top of the frame. In this case,
the caption is “Choose an Operation”.
Constants
Values that will not change can be assigned so that they can be used without constantly
having to write the value.
For instance, if we wanted to use the value of Pi as 3.14, we could assign this value to
a constant (PI for example) and use it instead.
The code would look like that below:
Const dblPi As Double = 3.14
Now, whenever the value for Pi is used, we need not type 3.14, we simply need to use
dblPi.
Frame Tool
Caption Property
C

Visual Basic Programming 32
If … Then Statements
The If … Then statement is used when a condition must be tested in order to either
execute or skip a section of code. For instance, suppose the value of the variable intX
must be greater than 10 in order to place the text “Greater Than 10” in the “txtResponse”
text box. The code would appear as below:
If intX > 10 Then
txtResponse.Text = “Greater Than 10”
End If
Note the following aspects of the statement:
The If … Then statement is always ended with the End If section.
The condition tested must be between the If and the Then portion of the statement.
If the condition is True, the code between the If and the End If portion of the
statement will be executed.
If the condition is False, the code between the If and the End If portion of the
statement will not be executed.
Boolean Relational Operators
Operator Meaning
= Equal to < Less than
<= Less than or Equal to
> Greater than
>= Greater than or Equal to
<> Not equal to
Roundoff Errors
Care must be taken when testing equalities involving floating point numbers because the
rounding of these numbers. For instance, rounding off .8 results in a binary form of
0.1100110011 … . Since this number never reaches an end, it must be rounded and will,
therefore not be equal to any finite number unless this math has been done and that
particular number has been used to conduct the test in the IF portion.
If … Then… Else Statements
The “Else” portion of this statement provides a logical alternative to the condition in the
“If” statement, other than simply moving on to the next area of the code. Simply stated,
if the If criteria is true, the Then portion of the statement will execute. Otherwise, the
Else portion will execute.
As with all “If … Then” statements, it is good programming style to indent the code
inside of the If, Then, and Else portions of the code.

Visual Basic Programming 33
Nested If … Then … Else Loops
Additional criteria can be included within a given loop using the Else … If option. For
instance, suppose we wanted to do the following:
1. Have the user place a number in a text box
2. Have a different label appear saying “Large” if the number is greater than 75,
“Medium” if the number is greater than 25 and less than 76, or “Small” if the number
is 25 or less.
3. The above would occur after a command button was clicked
4. We use an “If … Then … Else” statement in the text box‟s change procedure to
either enable or disable the “Calculate” button:
If txtNumber.Text <> “” Then
cmdCalculate.Enabled = True
Else
cmdCalculate.Enabled = False
End If
5. Then, in the cmdCommand button‟s click procedure, we need to use nested “If …
Then … Else” statements to decide which label (Small, Medium, or Large) should
appear: Private Sub cmdCalculate_Click()
If txtNumber.Text > 75 Then
lblSmall.Visible = False
lblMedium.Visible = False
lblLarge.Visible = True
Else
If txtNumber.Text > 25 Then
lblSmall.Visible = False
lblMedium.Visible = True
lblLarge.Visible = False
Else
lblSmall.Visible = True
lblMedium.Visible = False
lblMedium.Visible = False
End If
End If
End Sub
Main If/Then
Nested If/Then

Visual Basic Programming 34
If … Then … ElseIf
This option is usually used to decide between three or more options. It eliminates the
creation of many separate nested If/Then loops.
Changing the application referred to previously, the code would appear as below:
Private Sub cmdCalculate_Click()
If txtNumber.Text > 75 Then
lblSmall.Visible = False
lblMedium.Visible = False
lblLarge.Visible = True
ElseIf txtNumber.Text > 25 Then
lblSmall.Visible = False
lblMedium.Visible = True
lblLarge.Visible = False
Else lblSmall.Visible = True
lblMedium.Visible = False
lblLarge.Visible = False
End If
End Sub
Generating Random Numbers
Random numbers are extremely useful when designing games or computerized study
programs.
The random number generator function is called Rnd.
It will generate a random number within the range 0 through 1
In order to generate numbers within a range of integers, use the following
formula:
(High number – Low number + 1) * Rnd + Low number
For instance, to generate a random number between 5 and 10, the formula
would be (10 –5 +1) * Rnd + 5
= 6 * Rnd + 5
The random numbers generated by the formula above will be real numbers
and not necessarily integers
To be certain that the numbers generated are integers, utilize the Int or Fix
functions.
Int Function The Int function returns an integer less than or equal to its argument.
The integer returned by Int(3.7) is 3
The integer returned by Int(-15.23) is –16
Fix Function The Fix function will truncate or cut off the numbers to the right of the decimal point
The integer returned by Fix(3.7) is 3
The integer returned by Fix(-15.23) is –15
Only one
If/Then
statement
needed Last option usually
only needs “Else”

Visual Basic Programming 35
Randomize Random numbers are generated by seeding the generator with the time from the system
clock in the computer. Running a program to randomly generate numbers will generate
the same random numbers each time until the generator is re-seeded.
The Randomize command should be placed in the Form_Load procedure of the
form in which the generator is run. In this way, new numbers will be generated
each time the form is loaded.
Scope
When a variable is created within a procedure, it is said to be “local” to that procedure.
That is, it cannot be accessed by any other procedure outside of the one in which it was
created. The same is true for constants. These are known as local declarations.
Therefore, the scope of the particular variable or constant is the procedure in which it has
been declared. Since the scope is local, another procedure within the same form module
can use the exact same variable or constant without any problems.
If, on the other hand, the programmer wishes a variable or constant to be recognized
throughout the entire form module, it can be declared as a global declaration. Global
variables and constants are declared in the general section of the form module. They
are declared in the same way as any other variable or constant except that the key word
Private should be used instead of dim when declaring a variable. In the case of a
constant, the key word Private should be used before the keyword Const.
It is always best to avoid using global declarations and stick with local ones. This is
because the programmer runs the risk of using a global variable locally. Dimensioning a
local variable that is the same as a global variable will change the value of the variable
or constant within that procedure.
The following code shows how to declare a global variable and constant

Visual Basic Programming 36
The application will execute as follows:
When the Global button is clicked When the Local button is clicked
Logical Operators
Logical operators are the boolean operators And; Or; Not. They return a value of either
True or False.
Example
If we wanted to enable a command button called cmdCalculate if and only if the
number entered in text box txtNumber is within the range 10 through 30
If Val(txtNumber.Text) > 9 AND Val(txtNumber.Text) < 31 Then
cmdCalculate.Enabled = True
End if
Operator Function
And All conditions must be true in order for the expression to be true
Or Any condition can be true in order for the expression to be true
Not The opposite must be true in order for the expression to be true
Logical operators are most often used in If … Then statements
Message Box
Message boxes provide information to the user as to what he/she may have done wrong
while running an application. They require the user to click an OK button in order to
continue.
For example, the following code:

Visual Basic Programming 37
Will result in the following application when the number is out of range
Password Applications
To password protect your application, you need to make the first form of the application a
password form. It must be coded so that, if the password entered is correct, the next form
will appear and the password form is unloaded.
For example the following code
Results in the following application if the password is incorrect
Note the asterisks as the
user types the password.
This is done by setting the
password textbox
PasswordChar property
to “*”. Any other
character could be used as
well.

Visual Basic Programming 38
Or the following application if the password is correct
Counters
Counters keep track of the number of times an action takes place. For instance, you may
only want to give a user three chances to correctly enter the correct password and then
unload the application. An example of this appears below. Variables are updated by
placing them on both sides of the equal sign (=) and adding or subtracting some value
from the right side. ( For example : intX = intX + 1)
It is important to remember that, if a variable is to be updated in more than one procedure
within the module, it must be declared as a global variable. Also, if the variable‟s value
is used throughout the entire module and it is dimensioned locally, every time the local
procedure is executed the variable is re-dimensioned which will set its value back to
zero.
Global counter variable declaration
Increment the counter variable each time the user
enters the wrong password. Then, check how
many incorrect entries were made.

Visual Basic Programming 39
Check Boxes
Check boxes work exactly the same way as option buttons except for the fact that more
than one can be checked at a time. The important properties are:
Property Definition Options
Name The name by which it is called Use the “chk” prefix
Caption The label next to the individual box Up to the user
Value Its possible settings Set to either checked,
unchecked, or grayed during
design. Changed to
vbChecked, vbUnchecked,
or vbGrayed during runtime.
Alignment Where the box is with respect to the
caption
Left or right of the caption
The Click event is usually coded for each box.
For example, if we wanted a caption to be any combination of bold, underlined, or
italics, we would use the following application:
Here are some of the various results

Visual Basic Programming 40
Printing a Form
Objects have properties and methods. One such method is the PrintForm method which
allows a form to be printed by the printer. Using dot notation, the syntax for this method
is <Name of the form>.PrintForm. In our example, by adding a print button called
cmdPrint, and adding the following code, we can print the form at the printer.
Note the reference to the current form as
“me”. This is the easiest way to refer to
a current form. Alternatively, we could
have said “frmStyles.PrintForm” since
frmStyles is the name of the form to
print.
Visual Basic Programming 41
Do Loops
Do loops execute instructions repeatedly while a given set of criteria is true. The criteria
are acted upon inside the loop so that, eventually, it becomes false. At that time, control
of the code passes from the loop and continues with the code immediately following it.
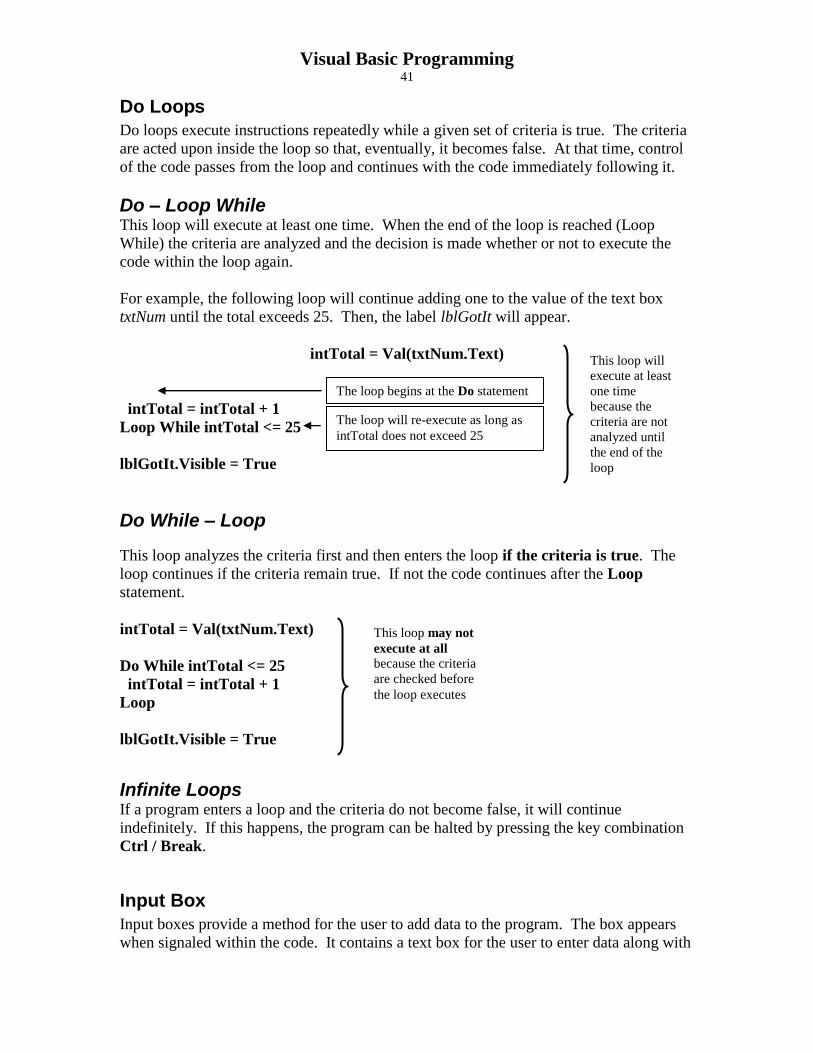
Do – Loop While This loop will execute at least one time. When the end of the loop is reached (Loop
While) the criteria are analyzed and the decision is made whether or not to execute the
code within the loop again.
For example, the following loop will continue adding one to the value of the text box
txtNum until the total exceeds 25. Then, the label lblGotIt will appear.
intTotal = Val(txtNum.Text)
Do
intTotal = intTotal + 1
Loop While intTotal <= 25
lblGotIt.Visible = True
Do While – Loop
This loop analyzes the criteria first and then enters the loop if the criteria is true. The
loop continues if the criteria remain true. If not the code continues after the Loop
statement.
intTotal = Val(txtNum.Text)
Do While intTotal <= 25
intTotal = intTotal + 1
Loop
lblGotIt.Visible = True
Infinite Loops If a program enters a loop and the criteria do not become false, it will continue
indefinitely. If this happens, the program can be halted by pressing the key combination
Ctrl / Break.
Input Box
Input boxes provide a method for the user to add data to the program. The box appears
when signaled within the code. It contains a text box for the user to enter data along with
The loop begins at the Do statement
The loop will re-execute as long as
intTotal does not exceed 25
This loop will
execute at least
one time
because the
criteria are not
analyzed until
the end of the
loop
This loop may not
execute at all because the criteria
are checked before
the loop executes

Visual Basic Programming 42
an OK button. When the OK button is clicked, the data is assimilated into the program as
if it were coded.
Syntax InputBox(“Prompt”,”Title”)
Example To use an input box to assign a value for the caption property of a label called
lblData
lblData.Caption = InputBox(“Please enter the value”,”Input Box for the Label”)
When the OK button is clicked, the caption is assigned the value in the input box
Visual Basic Programming 43
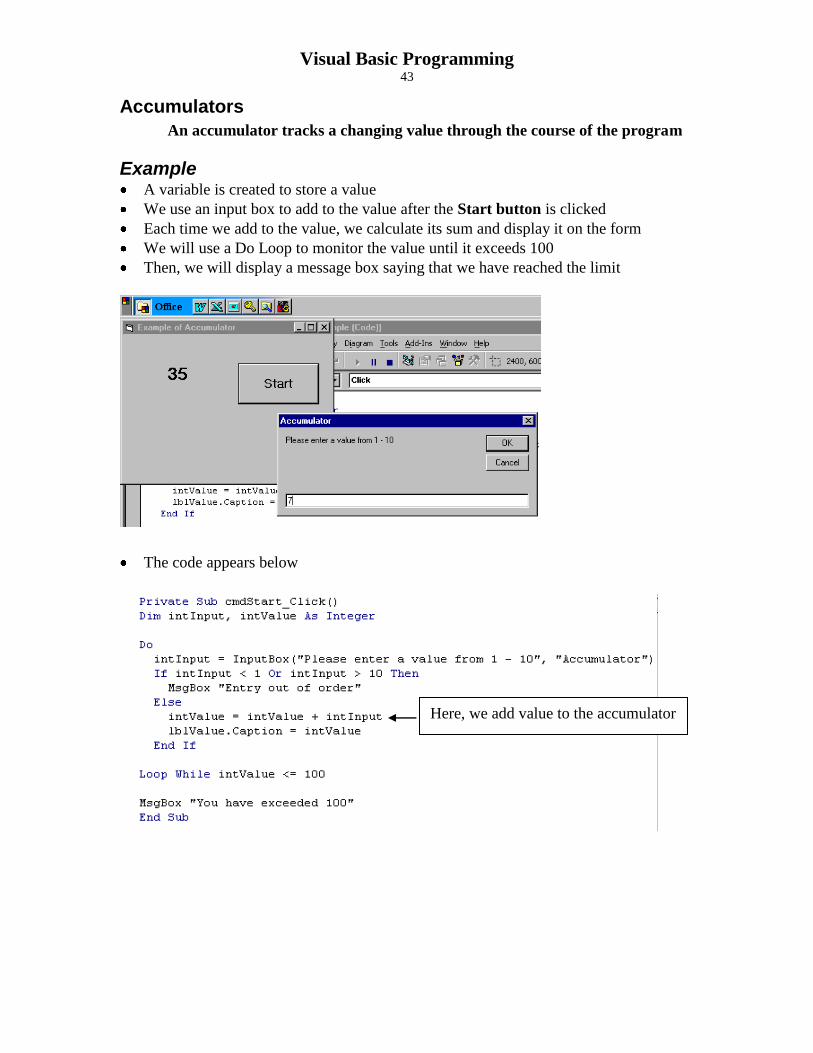
Accumulators
An accumulator tracks a changing value through the course of the program
Example A variable is created to store a value
We use an input box to add to the value after the Start button is clicked
Each time we add to the value, we calculate its sum and display it on the form
We will use a Do Loop to monitor the value until it exceeds 100
Then, we will display a message box saying that we have reached the limit
The code appears below
Here, we add value to the accumulator

Visual Basic Programming 44
String Conversion Functions
String conversion functions are use to change strings to a string of a different form.
LCase Used to convert all of the letters in a string to lower case
Syntax
LCase(String)
Example
strTest = “COMPUTER”
strLCase = LCase(strTest)
The strLCase variable would contain the string “computer”
UCase Changes all lower case letters in a string to upper case
Syntax
UCase(String)
Example
strTest = “Computer”
strUCase = UCase(strTest)
The variable strUCase would contain the string “COMPUTER”
StrConv Converts strings to either upper case (vbUpperCase), lower case (vbLowerCase), or
proper case (first letter of each word is capitalized)(vbProperCase).
Syntax
StrConv(String,Conversion)
Example
strTest = “happy valley”
strNew = StrConv(strTest,vbProperCase)
The string strNew contains the string “Happy Valley”.
Note: The string variable “strTest” could be replaced with the string literal.
strNew = StrConv(“happy valley”,vbProperCase)

Visual Basic Programming 45
Manipulating Strings
Left
Returns a given number of characters in a string starting from the left and reading to the
right.
Syntax
Left(String, Length)
Example
strTest = “Computer”
strTest2 = Left(strTest,4)
Here, the variable strTest2 would contain the string ”Comp”.
Note: The string variable strTest could be replaced with the string literal “Computer”
strTest2 = Left(“Computer”,4)
Right
Returns a given number of characters in a string starting from the given number of
characters in from the right and reading to the right.
Syntax
Right(String, Length)
Example
strTest = “Computer”
strTest2 = Right(strTest,4)
Here, the variable strTest2 would contain the string ”uter”.
Note: The string variable strTest could be replaced with the string literal “Computer”
strTest2 = Right(“Computer”,4)
Mid Function
Returns a string of a number of characters within a main string, starting at a position a
given number of characters from the left, and reading left to right.
Syntax
Mid(String, Start, Length)
Example
strTest = “Computer”
strTest2 = Mid(strTest,4,3)
Here, the variable strTest2 would contain the string ”put”.

Visual Basic Programming 46
Mid Statement
Whereas the Mid function returns a sub-string from the main string. The Mid Statement
is used to replace a portion of a string with another string and is placed to the left of the
equals sign.
Syntax
Mid(String1, Start, Length) = String2
Example
strTest = “Computer”
Mid(strTest,4,2) = “Science”
Here, the variable strTest would contain the string ”CompScter”. The string
strTest was changed by replacing the 2 characters starting at the 4th
character with
the same number of characters (starting at the left) from the string “Science”.
Note: As with all of these functions and statements, any string variable can be
replaced with a string literal or vice versa.
Len Function
Returns a number reflecting the number of characters in a string.
Syntax
Len(String)
Example
strTest = “Computer”
intNumChar = Len(strTest)
Here, the numeric variable intNumChar assumes a value of 8 because the string
“Computer” contains 8 characters.
InStr Function
Compares a portion of a string with a sub-string starting at a given character, to see if
the string contains that sub-string. It will return the number of the character where
the match begins. If the sub-string is not contained in the string, it will return a 0.
Syntax
InStr(Start, String, Sub-string)
Example
strString = “Computer”
strSub = “put”
intNumChar = InStr(3,strString,strSub)
Here, intNumChar equals 4 because “put” occurs at the 4th
character in “Computer”.
If a starting point is
omitted, the search will
begin at the first character
in the string.
Visual Basic Programming 47
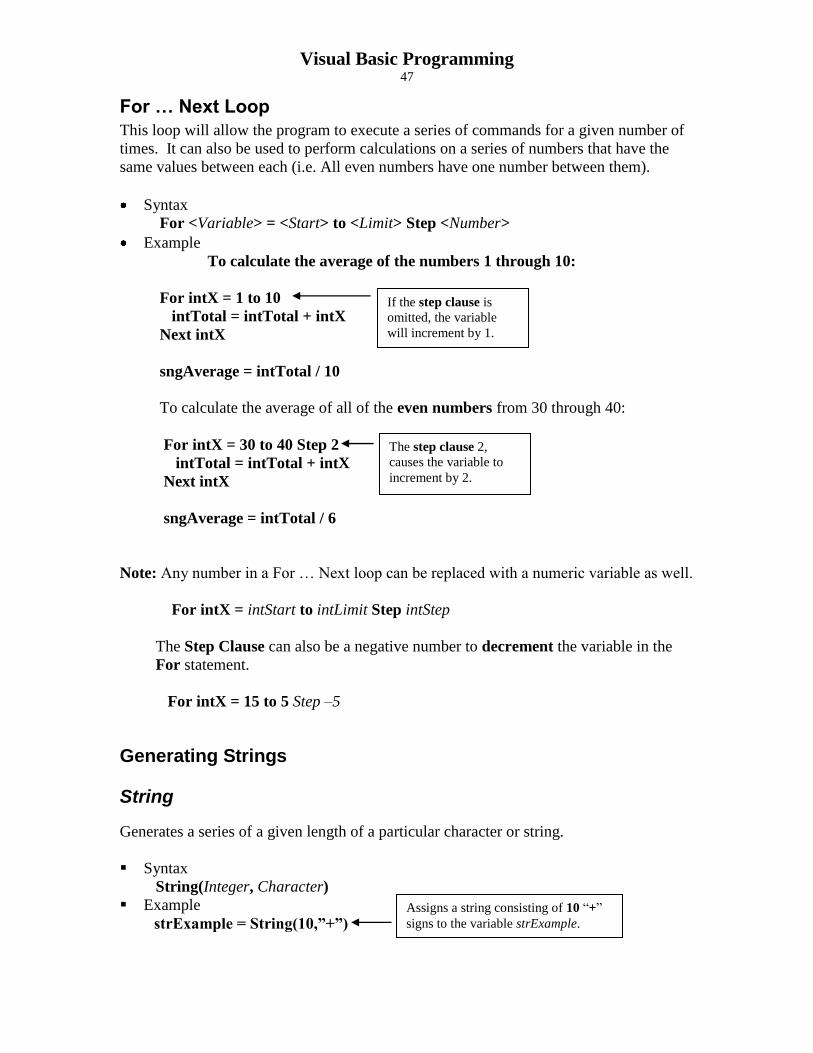
For … Next Loop
This loop will allow the program to execute a series of commands for a given number of
times. It can also be used to perform calculations on a series of numbers that have the
same values between each (i.e. All even numbers have one number between them).
Syntax
For <Variable> = <Start> to <Limit> Step <Number>
Example
To calculate the average of the numbers 1 through 10:
For intX = 1 to 10
intTotal = intTotal + intX
Next intX
sngAverage = intTotal / 10
To calculate the average of all of the even numbers from 30 through 40:
For intX = 30 to 40 Step 2
intTotal = intTotal + intX
Next intX
sngAverage = intTotal / 6
Note: Any number in a For … Next loop can be replaced with a numeric variable as well.
For intX = intStart to intLimit Step intStep
The Step Clause can also be a negative number to decrement the variable in the
For statement.
For intX = 15 to 5 Step –5
Generating Strings
String
Generates a series of a given length of a particular character or string.
Syntax
String(Integer, Character)
Example
strExample = String(10,”+”)
If the step clause is
omitted, the variable
will increment by 1.
The step clause 2,
causes the variable to
increment by 2.
Assigns a string consisting of 10 “+”
signs to the variable strExample.
Visual Basic Programming 48
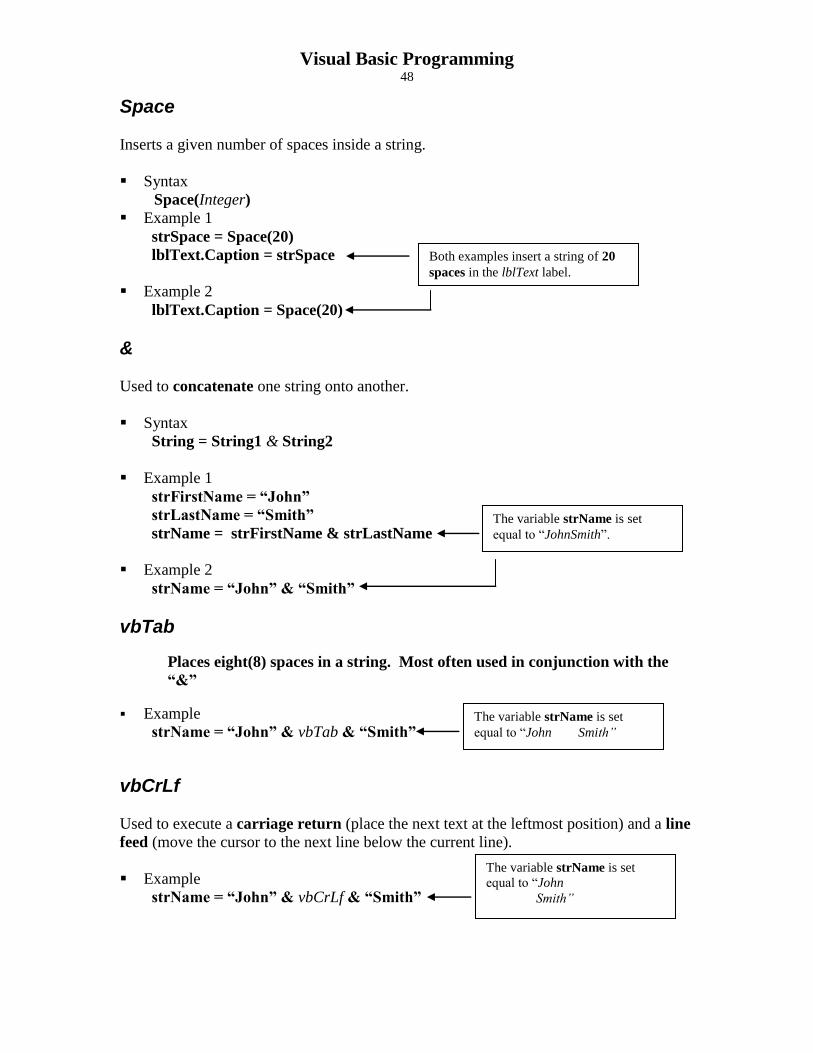
Space
Inserts a given number of spaces inside a string.
Syntax
Space(Integer)
Example 1
strSpace = Space(20)
lblText.Caption = strSpace
Example 2
lblText.Caption = Space(20)
&
Used to concatenate one string onto another.
Syntax
String = String1 & String2
Example 1
strFirstName = “John”
strLastName = “Smith”
strName = strFirstName & strLastName
Example 2
strName = “John” & “Smith”
vbTab
Places eight(8) spaces in a string. Most often used in conjunction with the
“&”
Example
strName = “John” & vbTab & “Smith”
vbCrLf
Used to execute a carriage return (place the next text at the leftmost position) and a line
feed (move the cursor to the next line below the current line).
Example
strName = “John” & vbCrLf & “Smith”
Both examples insert a string of 20
spaces in the lblText label.
The variable strName is set
equal to “JohnSmith”.
The variable strName is set
equal to “John Smith”
The variable strName is set
equal to “John
Smith”
Visual Basic Programming 49
Comparing Strings
Strings can be evaluated with regard to value via each character‟s ASCII code value.
Since the capital letters have a lower value than the lower case letters, the statement
“Zebra” < “apple” is actually true. However, the statement “apple” < “Apple” is false.
The statement “Apple” = “Apple” is true because each character in both strings has the
same ASCII number.
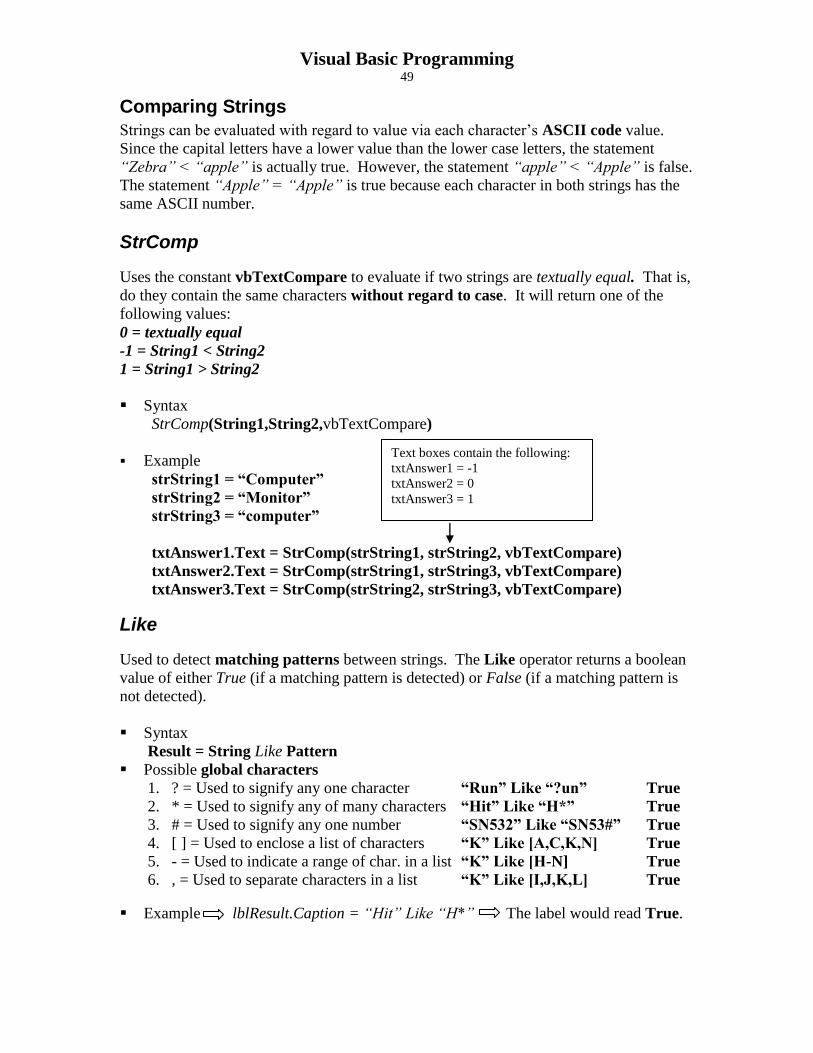
StrComp
Uses the constant vbTextCompare to evaluate if two strings are textually equal. That is,
do they contain the same characters without regard to case. It will return one of the
following values:
0 = textually equal
-1 = String1 < String2
1 = String1 > String2
Syntax
StrComp(String1,String2,vbTextCompare)
Example
strString1 = “Computer”
strString2 = “Monitor”
strString3 = “computer”
txtAnswer1.Text = StrComp(strString1, strString2, vbTextCompare)
txtAnswer2.Text = StrComp(strString1, strString3, vbTextCompare)
txtAnswer3.Text = StrComp(strString2, strString3, vbTextCompare)
Like
Used to detect matching patterns between strings. The Like operator returns a boolean
value of either True (if a matching pattern is detected) or False (if a matching pattern is
not detected).
Syntax
Result = String Like Pattern
Possible global characters
1. ? = Used to signify any one character “Run” Like “?un” True
2. * = Used to signify any of many characters “Hit” Like “H*” True
3. # = Used to signify any one number “SN532” Like “SN53#” True
4. [ ] = Used to enclose a list of characters “K” Like [A,C,K,N] True
5. - = Used to indicate a range of char. in a list “K” Like [H-N] True
6. , = Used to separate characters in a list “K” Like [I,J,K,L] True
Example lblResult.Caption = “Hit” Like “H*” The label would read True.
Text boxes contain the following:
txtAnswer1 = -1
txtAnswer2 = 0
txtAnswer3 = 1

Visual Basic Programming 50
Sub Procedures
Procedures are blocks of code performing a specific task. Event procedures such as
cmdDone_click are referred to as sub procedures. There are two types of sub
procedures.
General Procedures
General procedures are created by the user and break up the code into smaller portions.
Many times, they are used for repetitive operations where the same calculations or
events are programmed to occur throughout a module.
Syntax
Sub ProcedureName( )
Lines of Code
End Sub
Example
Sub ClearLabel ( )
lblName.Caption = “”
End Sub
Call The call command is used to execute a previously created sub procedure.
Syntax
Call SubProcedureName
Example
Private Sub cmdClearLabel_Click( )
Call ClearLabel
End Sub
Note: Sub procedures can call other sub procedures.
Line Continuation Sometimes, a typed line of code may become too long to fit in the code window. To
continue a line of code on the next line without generating an error message, use the
line continuation ( _ ) character.
Example
lblText.Caption = “lblText.Caption & _
“In addition, the previously mentioned item may be taxed at 6%.”

Visual Basic Programming 51
Value Parameters Value parameters are used to pass data from the call statement to the sub procedure.
Syntax
Call SubProcedureName(value parameter, value parameter)
Example
Call AddNumbers(intNum1, intNum2)
Sub AddNumbers(ByVal intVal1, intVal2 as integer)
lblSum.Caption = intVal1 + intVal2
End Sub
The application looks like the form to
the left. It runs like the following:
The user enters a number in each
text box
The user clicks the Calculate button
The sum of the two numbers entered
in the text boxes appears in the label
at the bottom
In the code, the sub procedure Sum
is called in the calculate command
button click procedure.
The values assigned to the int1 and
int2 variables are passes as
arguments to the Sum sub procedure.
The arguments are accepted by the
Sum sub procedure and assigned by
value to the parameters intX and intY
Value parameters
passed to a sub
procedure are
called arguments.
The sub procedure AddNumbers is called
and the values stored in the variables
intNum1 and intNum2 are passed to the
sub procedure.
The sub procedure receives the
values passed by the call
statement and stores them in
intVal1 and intVal2. These two
containers are called parameters.
The parameters containing the values passed are used to
calculate the sum of the values passed and place this data
in the lblSum label.
The ByVal statement means that the
parameter(s) created are value parameters.
Note: Since the Int1 and Int2
arguments have been dimensioned as
integers, the parameters intX and
intY are created by value as integers.

Visual Basic Programming 52
Reference Parameters Reference parameters are created in the same way as value parameters except that,
instead of ByVal, the term used is ByRef. When a parameter is created by value, its
value is stored in a new memory location. When a parameter is created by reference,
the value is stored in the memory location of the argument passed. Reference
parameters cannot accept constants as arguments. Values must be passes as variables.
As with all argument / parameter sets, they are assigned in the same order as they are
received.
It must be remembered, if an argument is passed by reference, its value can be changed
during the course of the sub procedure. This is because the value is accessed via the
argument’s memory location.
We have added a label to list the
value of the int1 variable that is now
created as a global in the general
section
As a value is typed in the first text
box, it is echoed in the new label.
After the Calculate button is clicked,
the value of the parameter intX that
has received the value of int1 in the
Sum sub procedure by reference, is
decreased by 5
The value of int1 is then printed in
the bottom label and its value has
decreased by 5 because its reference
parameter intX has been decreased by
5
We reduce the value of intX by 5
We print the value of int1
The value
of int1 is
reflected in
the change
in intX
because
int1‟s value
was passed
by
reference
Value passed by reference

Visual Basic Programming 53
Documenting Procedures As procedures are created, it is good to document what the job of the procedure is as well
as what will happen after the procedure is run. As with all remarks, each line of
documentation is preceded by an apostrophe („). Below is an example of the Sum
Procedure as created above.
„*********************************************************
„Receives two values from the calling statement and adds them
„
„post : Prints the sum of the two numbers
„*********************************************************
When coded, normally remarks will appear in green text
Static Variables Not only do variables have a scope (Local variables are accessible to only the procedure
in which it is created. Global variables are accessible to every procedure in the module.)
but variables have a lifetime as well. A variable‟s lifetime is the length of time it
remains in memory.
Local variables remain in memory only for the duration of the procedure. Global
variables remain in memory for the duration of the program. A static variable’s scope is
limited to the procedure in which it is created but its lifetime is for the entire program.
It is preferred to use static variables instead of global variables because they will not
interfere with other procedures.
Syntax
Static variable name as variable type

Visual Basic Programming 54
Example
Static intSum as integer
In the program above, a static variable has been created to store the grand total of all
of the sums
It will then print this sum in the new label at the bottom of the form
Static variables are initialized to zero when they are created
A picture of the above application appears below. The calculate button was clicked
for first number values of 10 and then 20.
Note how the intSum variable displayed in the Grand Total label does not zero out
each time the Calculate button is clicked. This is because it was created as a Static
Variable.
If this variable were to be created
as a local variable, the grand
total would be “zeroed out” each
time the Calculate button was
clicked because its life was only
as long as the click procedure.
As a static variable, its life is as
long as the program runs. So, it
will not be recreated each time
the button is clicked.

Visual Basic Programming 55
Function Procedures A function procedure performs a task and returns a value. Visual Basic functions like
Left ( ), Right ( ), and MID ( ) are examples.
Syntax
Function procedure name (ByVal parameter1 as type) As Return type
Statements
End Function
Functions parameters should always be ByVal
The Return Type is the type of a value returned by the function
Functions usually require at least one parameter
Example
In this example, we add a label to
display the running sum multiplied by
10
Each time the Calculate button is
clicked, the Grand Total is multiplied
and displayed in the bottom label
This was accomplished by creating a
function called Times
The code is displayed below
The Times
function is called
to assign a value
to the caption
property
Here is the
Times function

Visual Basic Programming 56
Creating a Function
Choose the Add Procedure option from the Tools
menu
Choose the Function option (Note that
sub procedures can be created this way
too)
Name the function (or sub procedure)
Click OK
Most functions and procedures are public
in scope since they are designed to be called
from any procedure.
Object Parameters Objects can be passed as parameters as well. In our example, we can add another label to
display the sum multiplied by 10. This time, we will call a sub procedure to add the text
to the label caption by passing the label and the value to print to the sub procedure
called Times10.
Example
The new label is located below the Done
button and includes the text “Times 10 Sub
=”
This data is printed to the label lbl10 via a
sub program called Times10 rather than a
function
The code appears below
Here is the code for the sub procedure
The name of the
label is passed
The value to be
printed is passed
Visual Basic Programming 57
Built-in Mathematical Functions
ABS
Returns the absolute value of a number.
Example:
dim intAbVal as integer
intAbVal = 7 – 10
txtAbVal.text = ABS(intAbVal)
In this case, the text box txtAbVal contains a 3
SQR
Returns the square root of a number.
Example:
dim intSqrRoot as integer
intSqrRoot = SQR(25)
txtSqrRoot.text = intSqrRoot
In this case, the text box txtSqrRoot contains a 5
SGN
Returns a 1, -1, or 0 depending upon whether a number or the value of a numeric
variable is positive, negative, or zero respectively.
Example:
dim intSign as integer
intSign = SGN(-7)
txtSign.text = intSign
In this case, the text box txtSign contains a –1
IsNumeric
Evaluates an entity or a variable to see if it is or can be changed to a numeric value.
Visual Basic Programming 58
Example:
dim strVal1, strVal2, strVal3 as string
strVal1 = “5”
strVal2 = “378”
strVal3 = “3+4”
txtVal1.text = isNumeric(strVal1)
txtVal2.text = isNumeric(strVal2)
txtVal3.text = isNumeric(strVal3)
In this case, the text properties of txtVal1, txtVal2, and txtVal3 would contain “True”,
“True”, and ”False” respectively. This is because the neither of the strings “5” nor
“378” contain any characters that cannot be changed to numeric values. TxtVal3, on the
other hand, contains a “+” sign which cannot be changed to a numeric value.
Round Rounds a number to a specified number of decimal places.
Example:
dim dblNum1, dblNum2 as double
dblNum1 = 5.7689372
dblNum2 = 1745.97753
txtRound1.text = ROUND(dblNum1,3)
txtRound2.text = ROUND(dblNum2, -3)
In this case, text box txtRound1 would contain 5.769.
Text Box txtRound2 would contain 1.8. This is because rounding to a negative moves
the decimal point to the left.
Formatting Numeric Output
There are nine different formats that Visual BASIC provides. They are as follows:
Format Example Result
General Number FORMAT(8789,”General Number”) „8789
Currency FORMAT(8789,”Currency”) „$8789.00
Fixed FORMAT(8789,”Fixed”) „8789.00
Standard FORMAT(8789,”Standard”) „8,789.00
Percent FORMAT(89,”Percent”) „8900.00%
Scientific FORMAT(8789,”Scientific”) „8.79E+3
Yes/No FORMAT(1,”Yes/No”) „Yes
True/False FORMAT(0,”True/False”) „False
On/Off FORMAT(1.”On/Off”) „On
The FORMAT function only changes the way a value is displayed, not its value.

Visual Basic Programming 59
Built-in Business Functions
PMT
Returns the periodic payment for an installment loan. An example would be to calculate
the monthly payment for a mortgage loan or a car loan.
Syntax
Pmt(rate, term, principal)
Let‟s say you want to calculate the monthly payment for a car loan with these
characteristics:
Interest rate = 5%
Term = 4 years (48 months)
Principal = $20,000.00
The code for this application can be
found on the next page. It explains how
to configure the code and why it must be
done this way.
The interest
rate is
obtained by
taking the
.05 (5%)
annual
interest rate
and dividing
it by 12 because the payments are monthly and the annual interest rate
covers 12 months.
The term is entered in months because the payments being calculated will be by
the month.
The principal must be multiplied by –1 because it is a loan taken out.

Visual Basic Programming 60
PV
Returns the present value of an investment.
Syntax
PV(rate, term, payment)
Let‟s say that you would like to calculate the total cost of financing a car over a period of
48 months at a 5% annual interest rate for a total of $20,000.00. That is, you would
like to know how much of your payments will go toward interest payments.
The application on the left illustrates the
fact that, if you were to take out a car
loan at 5% interest for a period of 4
years in the amount of $20,000.00, your
payments on interest would be a total
of $2,108.12. The code appears at the
top of the next page.

Visual Basic Programming 61
Note that, at the bottom of the code, the calculations were made in the following way:
1. The total amount paid was calculated by multiplying the monthly payments by the
number of months of the loan.
2. The PV function was then used to calculate the total value of the loan without the
interest.
3. The amount of the loan going to interest was then calculated by subtracting the value
of the loan (#2) from the total amount paid during the term of the loan (#1).
FV
The FV function returns the value of a series of payments invested at a fixed interest rate
over a period of time.
Syntax
FV(rate, term, investment)
Let‟s say that we would like to see how much those monthly payments of $460.59 that
we are paying for our car would earn if we invested them in a Certificate of Deposit at
7% interest instead.
The application and code appears on the next page.

Visual Basic Programming 62
Here, we have discovered that a loan
of $20,000.00 over a 48 month
period at an annual interest rate of
5%, would require payments of
$460.59 per month. We also know
that we will be paying $2,108.12 on
interest alone. Further, if we were to
take our $460.59 and invest it in a
certificate of deposit every month at
an annual interest rate of 7%, we
would, at the end of the 48 months,
realize an investment of $25,428.59.
The code appears below.
The bottom three lines of code create the information regarding the return on the monthly
payments if they would be invested at 7% instead of paid out at 5% annual interest rate.
The sngInvest variable is given a value based upon the interest rate entered in the text
box next to the label “Investment Interest Rate”. The variable sngReturn is calculated
using the FV function and plugging in the rate of investment from the previously
mentioned text box, the term of the loan gotten from the text box next to the “Term of
Loan” label, and the amount of the monthly investment (multiplied by –1).

Visual Basic Programming 63
List Box
List boxes are used to choose a selection from a list of options. It is created using the
List Box tool.
Below is a list of pertinent properties that are used often in conjunction
with this object.
Property Function
Name Uses the prefix “LST” and gives the object a name
List Stores the items contained in the list
Sorted Displays the list contents in alphabetical order
ListCount Used only at run-time, it returns the number of items in the list
Let‟s assume we are creating an application where :
A list box contains a list of names
When one of the names is clicked, it appears in a label saying “Hello ______ “
with the name clicked appearing in the blank line.
1. Create the form and add the list box along with the label.
2. Add the names to the list box at
design time, by using the “List”
property. (See the next page)
Highlight the “List” property
Click the down arrow
Type in the desired names
Events and Methods
Event or Method Function
Click Event When a list item is clicked on
AddItem Adds an item to the list of a list box
Clear Clears the item list of a list box

Visual Basic Programming 64
Below is the code, using the click event, that causes the name clicked on in the list to
appear in the label.
Note that the item in the
list box that was clicked
on is referenced simply as
“lstName”, which is the
name of the list box itself.
Running the application results in the example below:

Visual Basic Programming 65
Now, let‟s give the user the options of adding items to the list or clearing the list by :
1. Adding a command button making a text box appear to enter the name and a
command button to add it to the list.
2. Adding a command button to clear the list.
Now, the application will look like this:
To add a name to the list, click
on “Add a Name” and the
label, textbox, and “Add
Now” command button will
appear. The name can be
entered in the textbox and
when the “Add Now” button
is clicked, the new name is
added to the list. (See below)
Note that when the “Add
Now” button is clicked, the
contents of the text box are
cleared and the three objects that appeared for the purpose of entering a name disappear.
The “Add a Name” button has
been clicked, causing the
label, textbox, and “Add
Now” button to appear.
The name “Barb Wire” has
been typed into the textbox.
When the “Add Now” button
is clicked, the name “Barb
Wire” will be added to the list
in the list box.

Visual Basic Programming 66
Note that, after the “Add
Now” button is clicked, the
name “Barb Wire” appears in
the list and the textbox
contents are cleared. Then,
the label, textbox, and
command button disappear.
The code appears below:
When the “Add a Name”
command button is clicked,
the label, textbox, and “Add
Now” command button
appear.
When the “Add Now”
command button is clicked,
the contents of the textbox
are added to the list box list.
Then, the text box is cleared
and the objects disappear.
(Don‟t forget to code so that
an empty textbox results in a
disabled “Add Now” button.
When the “Clear” command
button is clicked, the list is
cleared.

Visual Basic Programming 67
Combo Box
Combo boxes serve much the same purpose as list boxes except that, depending upon the
style of the combo box, the user can add his/her own entry to the list. Both objects share
the same properties such as Name, List, Sorted, and ListCount. Two additional
properties are available with the combo box:
Property Description
Style Options include dropdown combo, which includes both an item list
and a text box to add items; simple combo, which includes a list that
does not drop down and a text box; and dropdown combo, which
includes a drop-down list only with no text box for user additions.
Text The text that appears in the combo box before any lists are opened.
All of the event methods are similar to the list box with one addition. The change event
is executed when the user changes the contents of the text box.
Example
In this example, we will use a combo box to choose from a list of numbers to multiply by
10. The product will then be added to the label when the list item is clicked.
The text “Choose a #” is the
value of the TEXT
property.
The numbers 0 through 5
have been added to the
LIST property.

Visual Basic Programming 68
When the down arrow is clicked, the list appears.
The user can now choose one of the
numbers from the dropdown list.
When a number is clicked, it
becomes the contents of the text
property. In this case, let‟s click on
the “3” in the dropdown list.
The math is done when the number
is clicked and the caption is added to
the label below.
The code appears below:
The item clicked becomes the combo box‟s TEXT property. Note that the proper prefix
for a combo box is cbo.
Underscore
Also note the underscore after the cboNumbers.Text. It is used to continue a line of
code text in the next line in order to be able to see all of the text without scrolling right.

Visual Basic Programming 69
Application Properties
Focus
Focus is the state of an object when it is chosen to perform some operation from the
keyboard. This can mean that pressing ENTER can perform a click (as in the case of a
command button). It could also mean that a text box has the cursor in it so something
can be typed into it. Focus can be changed by pressing the TAB key.
Below is an example of an application with three text boxes. At this point, there is no
code for any object. Notice how the cursor moves from textbox to textbox with each
press of the TAB key.
Access Key
Perhaps, you would like the user to be able to press a hot key along with the Ctrl key to
accomplish a task. We will add a command button to quit the above application. Its
caption property is “Done” and we want it to work if we press Ctrl/D.

Visual Basic Programming 70
Notice, in the Caption property we have preceded the word “Done” with a “&”. This
character designates the next letter, in this case a “D”, as the hot key to be used along
with the Ctrl key.
Tab Order
As was mentioned above, focus can be changed from one object on a form to another by
pressing the TAB key. The focus shifts, by default, in the order of the objects’
creation. To change the order of the movement of the focus, you need to establish a
TAB ORDER.
In order for an object to be able to receive the focus from a TAB, its TAB STOP
property must be set to True.
Then, the TAB INDEX property can be set. By default, the first object created has a tab
index of 0 and it moves up from there. Below, we will change the tab order of our three
text boxes so that the first text box to receive the focus is the middle one, followed by the
bottom one, and finally, the top one.
Above, the middle text box TabStop property has been set to True and the TabIndex
property has been set to 0.
On the next page, the settings for the other two boxes can be found.
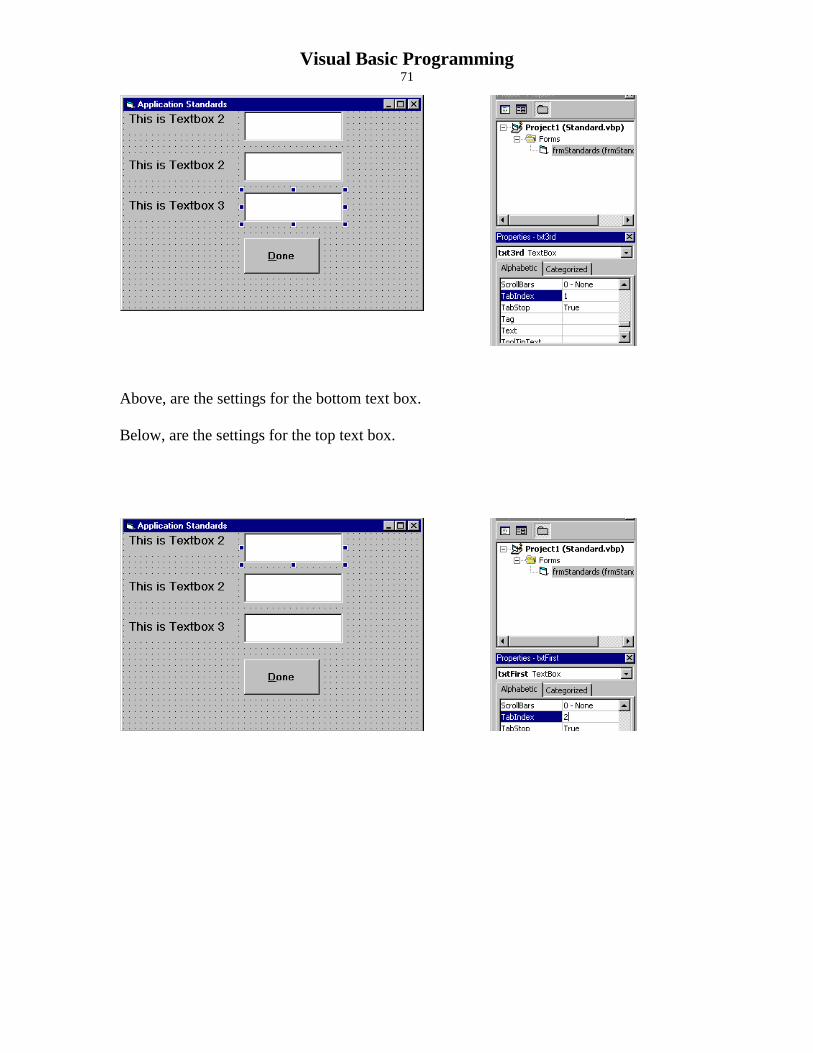
Visual Basic Programming 71
Above, are the settings for the bottom text box.
Below, are the settings for the top text box.

Visual Basic Programming 72
Built-In Trigonometric Functions
SIN Returns the sine of an angle with the angle expressed in radians.
COS Returns the cosine of an angle with the angle expressed in radians.
TAN Returns the tangent of an angle with the angle expressed in radians.
Converting Degrees to Radians In most cases, angles are expressed in degrees. In order to use the trigonometric
functions listed, we first need to convert the degrees of the angle to radians. The formula
is:
Radians = ( / 180 ) * Degrees
So, if we wanted to create an application that generated the sine of a given angle, it would
look like this:
The code for this application appears below.
Note that the calculation for the sine could
not be done until the angle was converted
from degrees to radians.
Constant Pi created
Degrees to radians
Sine of angle calculated
Converting Radians to Degrees
The formula to convert from radians to degrees is:
Degrees = Radians * (180 / )

Visual Basic Programming 73
Note that, in the example on the previous page, was designated as a constant 3.14.
Inverse Trigonometric Functions
ATN Returns the angle in radians that has a given tangent.
Syntax:
ATN(Number)
Here, “Number” is the tangent of a given angle. ATN will return the angle corresponding
to that tangent number.
To use ATN to calculate the ARCSINE of an Angle in Radians Returns the angle in radians that has a given sine. The formula to calculate an angle in
radians that has a sine of dblSine is:
ATN(dblSine / Sqr(-dblSine * dblSine + 1))
To use ATN to calculate the ARCCOSINE of an Angle in Radians Returns the angle in radians that has a given cosine. The formula to calculate an angle
in radians that has a cosine of dblCos is:
ATN(-dblCos * dblCos + 1)) + 2 * ATN(1)
In our previous example, we could add the option to calculate the angle that corresponds
to a given sine.
Logarithmic and Exponential Functions
LOG The LOG function returns the natural logarithm of a number. This is the logarithm of a
number with the base e where e = 2.718282.

Visual Basic Programming 74
Syntax
LOG(number)
Using LOG to Calculate the Logarithm of a Number to A Base The formula to calculate the logarithm of a number to a different base than e is as
follows:
LOG(number) / LOG(base)
The code for this application appears
below. It can be seen that the number 25
with a base of 5 has a logarithm of 2
because 52 is equal to 25.
EXP Returns the natural exponential of a value, or e
x. For instance, EXP(2) = 7.389 which is
e2.

Visual Basic Programming 75
Variable Arrays
The programmer can store more than one value in the same variable through the use of
arrays. For instance, the programmer may want have five employee names he/she may
want to store. Instead of creating a series of variables (i.e. strEmp1, strEmp2, strEmp3,
strEmp4, and strEmp5), it is possible to store the names of all five employees in one
variable array (i.e. strEmp(1), strEmp(2), strEmp(3), strEmp(4), and strEmp(5)).
Array Declaration Variable arrays are created much the same way as normal variables using Dim, Private,
or Static. The only exception is that the number of elements included in the array must
be added to the declaration.
Dim strEmp(5) as String
Upper Bound The upper bound of the array is the highest element number in the array.
Lower Bound The lower bound of the array is the lowest element number in the array. By default, the
lower bound will be zero.
Option Base The lower bound of an array can be set to either 0 or 1 by using the Option Base
statement in the General Section of the form‟s code.
Option Base 1 or Option Base 0
Array Declaration Using Upper and Lower Bounds The array can be declared using both the upper an lower bounds within the element
parenthesis. This eliminates the need to use the Option Base statement.
Dim strEmp(1 to 5) as String
Constants can also be used to declare the upper and lower bounds of an array if they are
of the type Long.
Const lngLowBound as Long = 1
Const lngUpBound as Long = 5
Dim strEmp(lngLowBound to lngUpBound) as String
Array Initialization All numeric array elements are initialized to zero and all string array elements are
initialized to “” or empty.
Array Index Arrays elements are accessed via each element number, also called an index. For
instance, if we wanted to assign the fourth element of the strEmp array to the label
lblEmp, we would do the following:

Visual Basic Programming 76
lblEmp.Caption = strEmp(4)
Array elements can be assigned via the index as well. If we want to assign the second
element of the strEmp array the name “John Jones”, we would do the following:
strEmp(2) = “John Jones”
LBound and UBound Functions These functions return the numeric value of the lower and upper bounds of the array,
respectively.
intLow = LBound(strEmp)
intHigh = HBound(strEmp)
Run-Time Error If a program refers to an array index outside of the lower bound to upper bound range,
you will receive an error message saying: “Subscript out of range.” Subscript is
another word for index.
For … Next
This loop runs a section of code between the FOR and the NEXT statements a given
number of times. For instance, if we wanted to use a For…Next loop to assign names to
each of the five strEmp elements, we would do the following (assuming the lower and
upper bounds are 1 and 5 respectively):
Dim lngIndex as Long
Dim strEmp(1 to 5) as String
For lngIndex = 1 to 5
strEmp(lngIndex) = inputBox(“Please enter the employee’s name”,”Employees”)
Next lngIndex
Array Parameters
Arrays can be passed to functions and sub-procedures by using the array name followed
by an empty set of parenthesis. Arrays must be passed by reference. A single array
element can be passed by reference or by value. If we wanted to pass the strEmp array
to a function that adds the total number of characters in all of the five names:
Function AddChar(ByRef strEmp() As String) As Integer
Dim intIndex, intSum as Integer
For intIndex = 1 to UBound(strEmp)
intSum = intSum + Len(strEmp(intIndex))
Next IntIndex
AddChar = intSum
End Function

Visual Basic Programming 77
Or, to pass a single array element to a sub procedure by value – let‟s calculate the length
of the fifth element:
Sub OneChar(ByVal strName as String)
Dim intLen as Integer
intLen = Len(strName)
lblLength.Caption = “The length of the name is “ & intLen
End Sub
Call OneChar(strEmp(5))
Arrays With Meaningful Indexes
An array‟s index can carry some meaning. For instance, if we wanted to track the
number of times a roll of a die resulted in the numbers 1 through 6, we could create a
numeric array with six elements. Its lower bound would be 1 and its upper bound would
be 6. Each element of the array is initialized to zero. Each time a 3 would come up, we
could increment the element in index 3 by 1 and the same for each of the other 5
elements.
Searching an Array
Arrays can be checked for their contents, one element at a time from the lower bound
through the upper bound in succession (linear search), which is the most common way.
This would best be handled with a loop.
Dynamic Arrays
Dynamic arrays can change in size during the course of the program. For instance, let‟s
say we do not know how many employees names we will enter into our strEmp array.
When we run the program, we need to decide how many elements we will have. First
create the array using the empty parenthesis.
Dim strEmp() as String
ReDim The ReDim statement redimensions the array size during runtime. Before we enter our
first name, we need to redimension the array to accommodate the new elements. Let‟s
say we want to enter 3 names:
ReDim strEmp(1 to 3)
We can now begin entering names into each element.
Sub Procedure
Sub Procedure Call
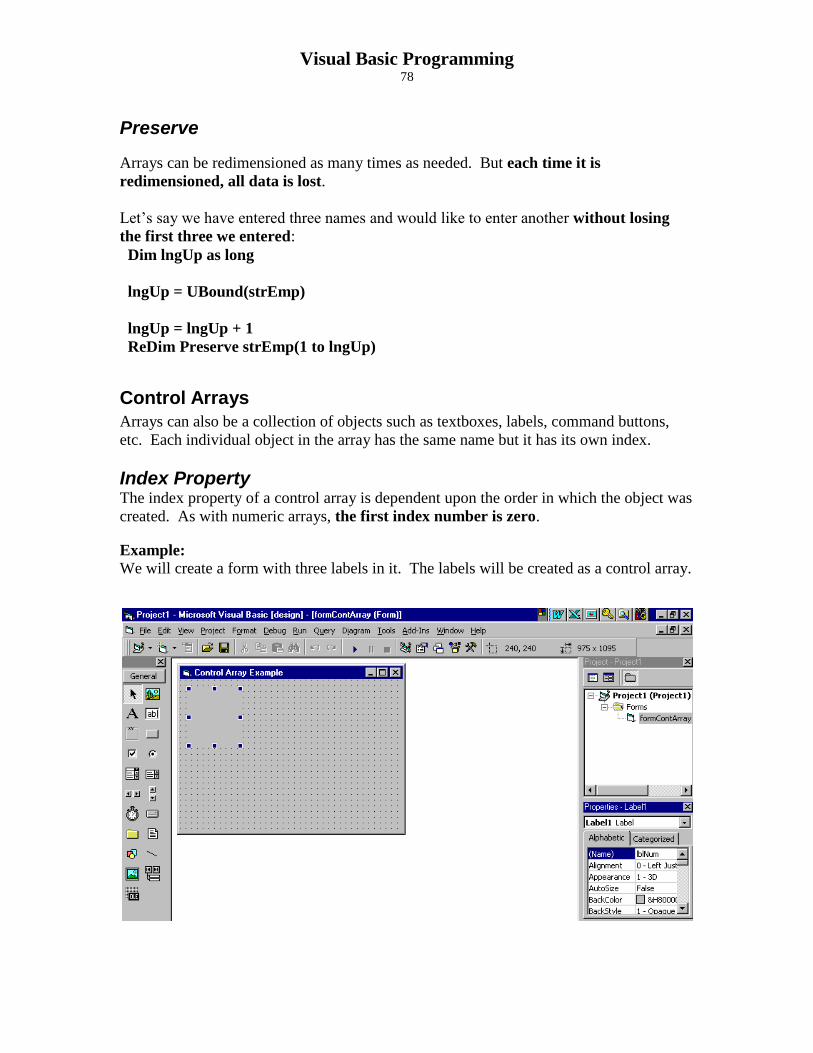
Visual Basic Programming 78
Preserve
Arrays can be redimensioned as many times as needed. But each time it is
redimensioned, all data is lost.
Let‟s say we have entered three names and would like to enter another without losing
the first three we entered:
Dim lngUp as long
lngUp = UBound(strEmp)
lngUp = lngUp + 1
ReDim Preserve strEmp(1 to lngUp)
Control Arrays
Arrays can also be a collection of objects such as textboxes, labels, command buttons,
etc. Each individual object in the array has the same name but it has its own index.
Index Property The index property of a control array is dependent upon the order in which the object was
created. As with numeric arrays, the first index number is zero.
Example: We will create a form with three labels in it. The labels will be created as a control array.

Visual Basic Programming 79
Above, we create a label on the form named lblNum
Below, with the lblNum label selected, we choose the Edit – Copy options
Then, the copied label is pasted into the form by choosing the paste option
At this point, you will receive a message saying that “You already have a control
object named lblNum, do you want to create a control array?”
Choose Yes
The new object will appear in the upper left corner of the form. It can be dragged
into position from there.

Visual Basic Programming 80
Note that the Index property for the new label is set to 1. (The original label‟s index
property is zero).
The new label‟s name is lblNum(1)
The third label can be created the same way.
Add a command button to number each label according to its index property
The code to accomplish the
numbering of the labels appears
below.
Note that we use the intNum variable
in the index parenthesis to choose the
label that we wish to number.
LBound and UBound Properties
The LBound and UBound properties are associated with the lowest and highest index
numbers for all of the objects in the control array. Using these properties, we could
change the code for the previous example to that below:
Note that there is no need
to create a variable for the
For statement. Instead,
we are able to use the
Index property.
Count The count property is the total number of indexes in a control array. In our example, we
have a count property value of 3.

Visual Basic Programming 81
Example: Dim intCount as Integer
intCount = lblNum.Count
Control Arrays as Parameters
Control Arrays can be passed to functions or sub-procedures but must be passed ByRef.
It must also be of the type Object.
Removing an Object From a Control Array
To remove an object from a control array, you must:
1. Change the name of the object
2. Delete its index property
Two Dimensional Arrays
A Matrix is a two dimensional array whose elements can be displayed in a grid of
horizontal rows and vertical columns.
Example: A parking lot can be divided into rows (2) and columns (5). The upper left
space is row1, column 1 (or as computers go, row 0, column
0). It could be assigned to Bob. Therefore, Name(0,0) =
“Bob”. Maybe the middle space (column 2) in the second
row (row 1) is assigned to Mary. Therefore, Name(1,2) =
“Mary”.
Declaring a Matrix
Matrices are declared in the same way as a one dimensional variable array except for the
fact that two dimensions need to be declared. In the previous example, the matrix would
be declared as follows:
Dim strName(1,4) as String
This allows for two rows (0 and 1) and five columns (0 through 4).
Declaring a Matrix Using Upper and Lower Bounds
Another way of declaring the above matrix using its LBound and UBound properties is as
follows:
Dim strName(1 to 2,1 to 5) as String
In this way, we eliminate the somewhat confusing first element of zero.
(0,0)
(0,1)
(0,2)
(0,3)
(0,4)
(1,0)
(1,1)
(1,2)
(1,30
(1,4)

Visual Basic Programming 82
LBound and UBound Functions The LBound and UBound functions are utilized in this manner:
Dim intLowRow, intHighRow, intLowCol, intHighCol as Integer
intLowRow = LBound(strName,1)
intHighRow = UBound(strName,1)
intLowCol = LBound(strName,2)
intHighCol = UBound(strName,2)
Nested For…Next Loops
Data is best “loaded” into two dimensional arrays using a loop within a loop. Let‟s say
we want to use an input box to input names into each parking space:
Dim strName(1 to 2, 1 to 5) as String
Dim intRow, intCol as Integer
For intRow = 1 to 2
For intCol = 1 to 5
strName(intRow,intCol) = InputBox(“Please enter a name”, Input Name)
Next intCol
Next intRow
Note that the column For…Next loop is completely enclosed within the outer row
For…Next loop. A column value is generate for each row value with the row value not
incrementing until all five of the column values have been used.
Dynamic Matrix
As with one dimension arrays, a matrix can be declared as dynamic by using empty
parenthesis in the dimension statement at its creation. The ReDim and Preserve
functions work the same way as with a one dimension array. Thus, additional data space
can be created as more spaces are created.
Note that the row dimension is always
referred to as dimension number 1 and
the column dimension is always
referred to as dimension number 2.

Visual Basic Programming 83
Color
The following objects have color properties: text boxes; labels; option buttons; check
boxes; list boxes; combo boxes; frames; and command buttons. Color properties can be
changed either at run time or design time.
Color Properties at Design Time BackColor
The BackColor property is used to choose the background color of an object.
Note that, in order to change the BackColor property for a command button, you first
need to set its STYLE property to GRAPHICAL.
For example, if we wanted to change the background color of a command button to RED,
we would do the following:
Highlight the
desired
command
button.
Choose the
“STYLE”
property in
properties
window.
Click the down
arrow to the
right.
Choose
“GRAPHICAL”
Choose the
“BackColor”
property from the
properties window.
Click the down
arrow.
Choose the “Palette”
tab.
Choose a color from
the palette.
This color will now
become the button‟s
background color.

Visual Basic Programming 84
ForeColor
The ForeColor property is the color of the text displayed in an object. Note that there is
no ForeColor property for a command button. Below, we will change the ForeColor
of a label to white with its BackColor set to green:
Choose the
object.
Choose the
ForeColor
property from the
properties
window.
Click the down
arrow.
Choose the
palette tab.
Choose the
desired font color
from the palette.
Setting Colors at Run Time
If we were to add two command buttons to the above application so that, when one is
clicked, the BackColor of the label will be green and when the other is clicked, the
BackColor will be red, it would look something like the application below. The code
appears as well.

Visual Basic Programming 85
Built-In Visual Basic Colors Note that Visual Basic provides built-in colors for programming use. They all start with
the constant prefix “vb”. They are as follows:
vbBlack vbBlue vbCyan vbGreen vbMagenta vbRed vbWhite vbYellow
RGB Function
Colors can be “fine tuned” using the RGB function. In this function, the “R” stands for
Red, the “G” stands for green, and the “B” stands for Blue. Each of the three colors is
assigned a value from 0 through 255. The higher the value, the more dominant that color.
The function takes the form RGB(#,#,#) with each number sign having a value as
explained previously. So, to add a purple button to the application above, we would need
to add the following:
Practice Application Using Color
Create the application above and add three more command buttons to change the
BackColor of the label to three other colors. You decide which colors to add. Be sure to
use at least one RGB function. Adjust the RGB values to change hues etc. Become
comfortable with the concept.
Adding Lines to an Application
Lines can be added to an application to set portions of the application apart from other
portions or to embellish the application in other ways.
Additional code including the
RGB function assigning a
RED value of 50, a GREEN
value of 0, and a BLUE value
of 100. This combination
results in a dark purple.

Visual Basic Programming 86
Line Properties Name
The name is used as with all other objects, to designate the object as a definitive object on
the form. Line names should begin with the prefix “lin”. So, for example, if we were to
create a line in a form to separate the top from the bottom, we could name it “linTop”.
BorderColor
The BorderColor property changes the actual color of the line. Here again, the color can
be set at design time as below:
BorderStyle
The BorderStyle of a line is the way it appears on the application. The options available
are transparent (vbTransparent), solid (vbBSSolid), dash (vbBSDash), dot
(vbBSDot), dash-dot (vbBSDashDot), dash-dot-dot (vbBSDashDotDot), and inside
solid (vbBSInsideSolid). These Visual Basic constants are used the same way the color
constants are used except they apply to the BorderStyle property.
At design time, the BorderStyle can be chosen
utilizing the dropdown menu as with colors.
During run-time, the BorderStyle property must
be changed using the Visual Basic constants as
they are listed above.

Visual Basic Programming 87
BorderWidth
The BorderWidth property changes the thickness of the line. This is done via a numeric
value ranging from 1 through 8,192. The higher the number, the thicker the line. Below,
is an example of the choice of line thickness via the BorderWidth property at design time.
The BorderWidth was set at “5”.
Objects and Form BackColor Note that changing the BackColor property of the form will erase all graphics drawn on
the form. Therefore, the BackColor property of the form should be set prior to adding
graphic objects to it.
Adding Shapes to an Application
Shape Property There are a number of shapes that can be chosen as an addition to an application. They
are listed below along with their Visual Basic constant. The items in the Shape column
can be chosen from the Shape Property at design time. The shape can be changed at
run-time utilizing the items listed in the Visual Basic Constant column.
Shape Visual Basic Constant
Rectangle vbShapeRectangle
Oval vbShapeOval
Rounded Rectangle vbShapeRoundedRectangle
Square vbShapeSquare
Circle vbShapeCircle
Rounded Square vbShapeRoundedSquare
Visual Basic Programming 88
Name Property The name for a shape should begin with the prefix “shp”.
BackColor Property This property changes the background color of the shape as with other objects as
discussed previously. The BackColor property can be chosen at design time via the
properties window (see “Color Properties at Design Time”). They can also be changed at
run-time using the Visual Basic color constants or the RGB function.
Note that, when the FillStyle property is set to Solid, or the BackStyle property is set to
Transparent, the BackColor property is ignored.
BackStyle Property The BackStyle property can be set to either opaque or transparent at design time. As
discussed above, if the BackStyle property is set to transparent, the BackColor property is
ignored, basically leaving the shape with an outline only.
The BackStyle property can be changed at run-time by setting it to a value of 0 for
transparent, or 1 for opaque.
BorderColor Property This property sets the color of the outline of the shape. It can be set at design time via the
properties window or at run-time via the Visual Basic constants or the RGB function.
BorderStyle Property The BorderStyle property for a shape is set at design time and at run time as per a line
object. (See the BorderStyle Property in the Line object section)
BorderWidth Property As with the line BorderWidth property, the values range from 1 through 8,192. The
property can be set at design time in the properties window or at run-time. (See the Line
section above).
FillColor Property This property sets the color of the inside of the shape. Even if the FillStyle property is set
to “Solid”, the FillColor property will work. It can be set at design time via the
dropdown menu in the FillColor property section of the Properties window. It can also
be changed at run-time via the Visual Basic constants or RGB function.
FillStyle Property The FillStyle property creates a pattern inside an object. Below are the dropdown menu
options in the FillStyle section of the Properties window along with their Visual Basic
constant counterparts used at run-time.

Visual Basic Programming 89
Style Visual Basic Constant
Solid vbFSSolid
Horizontal Line vbHorizontalLine
Upward Diagonal vbUpwardDiagonal Cross vbCross
Transparent vbFSTransparent
Vertical Line vbVerticalLine
Downward Diagonal vbDownwardDiagonal
Diagonal Cross vbDiagonalCross
When the FillStyle is set to transparent the FillColor property is ignored.
Below is an example of some shapes with various property assignments:
Here is the code to have the user input via an input box, the desired width of the
border.
Private Sub cmdBWidth_Click()
Dim intWidth As Integer
intWidth = 0
Do While intWidth < 1 Or intWidth > 8192
intWidth = InputBox("Enter a width 1 - 8192", "Enter Width")
Loop
shpShape1.BorderWidth = intWidth
End Sub
Depending upon the
command button that
is clicked, the shape
will be either a
rectangle, square,
circle, or oval.
When the Border
Width button is
clicked an input box
allows the user to
choose a border width
(see above).
Option buttons are
provided to choose fill
colors for the object
(remember that the
FillColor property
will be ignored unless
the FillStyle property is set to something other than the default transparent).
The Border Style option buttons allow the user to choose a value for the
BorderStyle property. Note that any style other than solid will not work if the
BorderWidth property is set to anything other than 1.

Visual Basic Programming 90
The Fill Styles option buttons allow the user to choose a value for the FillStyle
property. When this property is set to transparent, the FillColor property is ignored.
The Border Color frame contains option buttons to choose a value for the
BorderColor property.
Below is a sample of how the code may appear:
Chooses a shape
Uses Visual Basic constant to
choose a value for FillColor
Uses the RGB function to
choose a value for
BorderColor
Picture Boxes
With a picture box, you can place graphics and images into your application. Unlike the
image object, the picture box can accommodate either an image or a graphic. The
picture box demands more system resources because it is more versatile.
Picture Property This property assigns an image or graphic file to the picture box. It can
be assigned using the picture property in the properties window at design time. It can
also be assigned at run-time using the following procedure:
Suppose we create a simple drawing and save it to a diskette as “SMILEY.BMP”. This
image was created as a 256-color bitmap image using Microsoft Paint.

Visual Basic Programming 91
To insert this drawing into a picture box at design time, we use the picture property as
below:
Click the triple dot button in the picture property to open the file window.
Browse to find the file
Click on Open
At this point, the picture will appear in the picture box.

Visual Basic Programming 92
It can also be assigned at run-time as follows:
picPicture1.Picture = LoadPicture(“A:\Smiley.BMP”)
BorderStyle Property This property has two options at design time, Fixed Single, or None. Fixed single
provides a somewhat indented appearance as in the picture above. The “None” option
creates a flat look as below:
To set the BorderStyle property at run-time,
the options are 0 for “None” or 1 for “Fixed
Single”.
The code is
picPicture1.BorderStyle = 1
AutoSize Property You will notice that the entire picture does not fit inside the picture box. If the AutoSize
property is set to “True”, the picture box will expand to accommodate the entire picture.
This property can be set to either True or False and can be set at design time or run-time.
Below is the result of setting the property to “True”:

Visual Basic Programming 93
Moving Shapes and Picture Boxes
Shapes and graphics are stored in containers. This container can be either a form or a
picture box. These objects can be moved within their container. Below is a list of the
location properties:
Property Explanation
Left Changes the distance between the left edge of the object and the left
edge of the container
Top Changes the distance between the top edge of the object and the top
edge of the container
Width Changes the width of the object
Height Changes the height of the object
Twips Twips are units of measure (1 inch = 1,440 twips and 1 cm. = 567 twips) that are used in
the Move Method.

Visual Basic Programming 94
Move Method The move method includes arguments to move an object left, top, width, and height in
that order. Moving and object a negative value will move it toward that particular edge
or decrease that particular distance.
Example:
We will animate the jet plane in the form below so that it flies toward the left edge of
the form:
Create the picture box and, using the picture property, insert the jet plane image
Change the picture box‟s BorderStyle property to “None” so it appears more
seamlessly in the form
Add the “Animate” command button and code it like this:
By subtracting the
value of intNum from
the Left property, we
get the effect of
acceleration as the
plane approaches the
left margin. This is
because the value of
intNum increases by
5 each time through the
loop.
By changing the code as
it appears at the left, we
create a more steady
movement. This is
because we subtract 5
twips each time through
the loop instead of
increasing the value as
above.

Visual Basic Programming 95
If we wanted to increase the altitude as we move toward the left, we simply add the
following code to the second example above:
Graphic Methods
Coordinate System Graphic images are positioned via a X and Y coordinate grid. The “X” coordinate is the
distance the object is from the left margin of the container. The “Y” coordinate is the
distance the object is from the top of the container.
Line Method The line method is as follows:
object.Line(x1,y1)-(x2,y2),color,BF
Parts of the Method
Part Explanation
(x1,y1) Indicates the starting point of the line in twips from the left and top
(x2,y2) Indicates the stop point of the line in twips from the left and top
color Indicates the color of the line with Visual Basic color constants
BF “B” indicates that a box should be formed from the coordinates
“F” indicates that the box should be filled in with color
Example:
Note that the line starts 10 twips right of the
left margin of the form and runs 1990 twips
to the right. The line is positioned 500 twips
from the top of the form.

Visual Basic Programming 96
Here, we draw a diagonal line. By adding the
“B” option to the method, we can form a box.
The “F” option will fill the box with blue
color.
Note: If you would like to add one of the
optional values such as a box, but would
not like to designate a color, the color
place must be saved using a comma.
frmMethods.Line(10,500)-(2000,1500),,BF
Circle Method
The Circle Method takes the form:
object.Circle(x,y),radius,color,start,end,aspect ratio
Circle Method
Part Explanation
(x,y) The center point of the circle in twips from the left and top
radius The size of the radius in twips
color Visual Basic color constant for the circle
start Starting point of the arc in Pi-radians (not used for complete circle)
stop ending point of the arc in Pi-radians (not used for complete circle)
aspect ratio Specifies a circle or ellipse
(x,y); radius; color; and aspect ratio are values. Start and stop are values within the range
0 through 2 .

Visual Basic Programming 97
Observe the code below. Each of the command buttons creates the shape above it.
The circle is farthest to the left (note the
“x,y” coordinates of each object).
Note that Visual Basic constants or the
RGB function can be used to designate
color.
The ellipse is created using the aspect
ratio portion. An aspect ratio greater
than 1 will produce a tall ellipse. An
aspect ratio less than 1, will produce a flat
ellipse.
When drawing an arc beginning at the left-
most point of the circle and ending at the right-most point, you would use a beginning
point of (3.14) and an end point of 0.
.
Pset Method The Pset method draws a dot at the prescribed position and included a color option:
Pset (2000,3000),vbGreen
The code above draws a green dot 2000 twips right of the left margin and 3000 twips
below the top margin of the container.
2 (0)
/ 2 (1.57)
(3.14)
3 / 2 (4.71)
(- /2)

Visual Basic Programming 98
PaintPicture Method The PaintPicture method allows a picture existing in one container to be painted into
another container. Below is an example where the picture in the “picPicture1” picture
box is painted into the “picPicture2” picture box.
Note the code below
In this case, the picture placed in the
picPicture1 picture box via its Picture
property is painted into the picPicture2
picture box to its left.
In this case, the picture is positioned 10
twips from the left margin of the picture
box and 10 twips below the top margin of
the picture box.
Cls Method This method clears any graphics inside a container. So to clear the picture in the
“picPicture2” picture box, we would add this code to an “Erase” command button.
picPicture2.Cls
Note the code in the cmdErase command
button. When it is clicked, it clears the
picture from the picPicture2 picture box.

Visual Basic Programming 99
Container Properties Affecting Graphics
AutoRedraw When set to True, the drawn object will appear in the container. When set to False, the
drawn object may not appear.
DrawStyle Changes the style of the outline of the object.
Constant Definition
vbSolid Solid Line
vbDash Dashed Line
vbDot Dotted Line
vbDashDot Combination of dashes and dots
vbDashDotDot One dash followed by two dots
vbInvisible The line is not seen
vbInsideSolid A form of double line
DrawWidth Sets the thickness of the line. The value is expressed in terms of a number ranging from
1 through 32,767. In order for the BorderStyle property to work, the DrawWidth
property must be set to 1 except for solid or inside solid styles.
FillColor Changes the fill color of the object. It is assigned via the Visual Basic constants or RGB
function. (Don‟t forget that the FillStyle must not be set to transparent in order for
FillColor to work).
FillStyle See the previous section on graphic object FillStyle. These options are identical.
ForeColor This property changes the color of the outline for the graphic contained within the
container. It can be assigned, again, using the Visual Basic constants or RGB.

Visual Basic Programming 100
Timer Object
A timer object is used to execute code at specific timed intervals. It is very handy for
animation effects.
Name Property The name of a timer object should begin with the prefix tmr. The Timer Object will
appear on the form in design mode but will not appear at run-time.
Interval Property The amount of time that passes before the Timer event procedure is executed. It is
expressed in milliseconds (1/1000 of a second). So an interval of 1 second would be
expressed as 1000. The acceptable range for this property is 0 through 64,767.
Enabled Property Can be set to either True or False. When the enabled property is set to False, the timer
event will not be called.
Timer Event The timer event occurs after the interval has expired. Following the event, the interval
countdown begins again. Remember that the interval is set in milliseconds.
Below is an example where the picture changes from a smile to a frown and vice versa
every second.
The code for the above application appears on the next page.
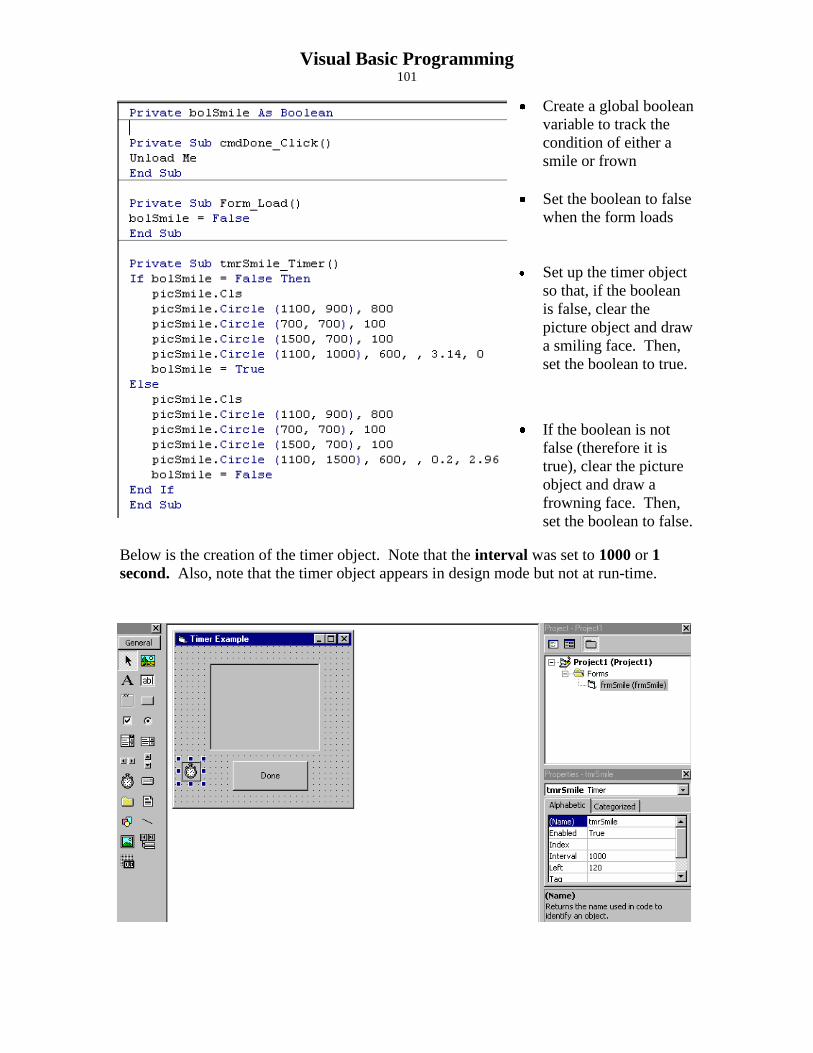
Visual Basic Programming 101
Create a global boolean
variable to track the
condition of either a
smile or frown
Set the boolean to false
when the form loads
Set up the timer object
so that, if the boolean
is false, clear the
picture object and draw
a smiling face. Then,
set the boolean to true.
If the boolean is not
false (therefore it is
true), clear the picture
object and draw a
frowning face. Then,
set the boolean to false.
Below is the creation of the timer object. Note that the interval was set to 1000 or 1
second. Also, note that the timer object appears in design mode but not at run-time.
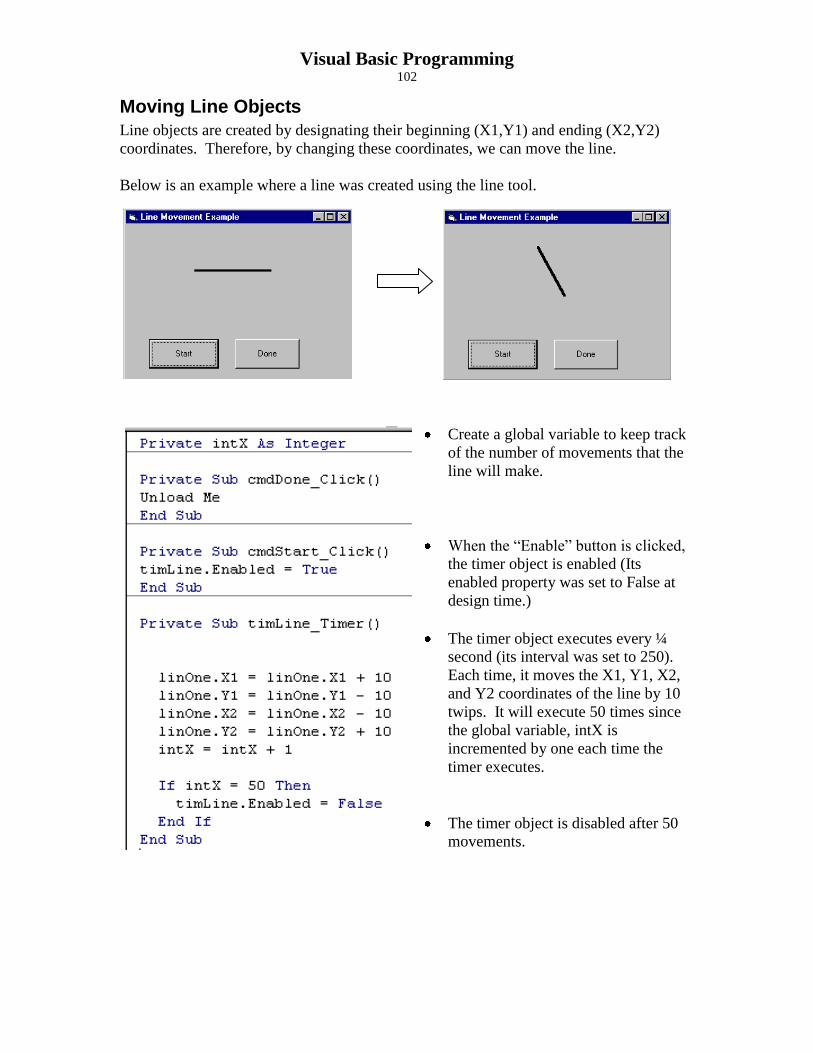
Visual Basic Programming 102
Moving Line Objects
Line objects are created by designating their beginning (X1,Y1) and ending (X2,Y2)
coordinates. Therefore, by changing these coordinates, we can move the line.
Below is an example where a line was created using the line tool.
Create a global variable to keep track
of the number of movements that the
line will make.
When the “Enable” button is clicked,
the timer object is enabled (Its
enabled property was set to False at
design time.)
The timer object executes every ¼
second (its interval was set to 250).
Each time, it moves the X1, Y1, X2,
and Y2 coordinates of the line by 10
twips. It will execute 50 times since
the global variable, intX is
incremented by one each time the
timer executes.
The timer object is disabled after 50
movements.

Visual Basic Programming 103
Animation
Animation effects can be created by making alternating graphic objects‟ visible
properties from true to false. Below is an example of a bouncing ball animation.
The ball will appear to bounce up in the air,
following the path of the picture boxes
inserted in the application as it appears to the
left.
The code for this application appears below:
A global integer variable is created
When the “Bounce” button is clicked,
the timer object is enabled.
The series of ball pictures were
created as an array. The “picBall(0)”
object visible property was set to
“True” at design time. The timer
interval was set to 500 (1/2 second).
Every ½ second, the current picture
box array‟s visible property is set to
False unless it is the last picture
(picBall(6)). Then, the intX variable
is incremented by one and its
corresponding picture array object‟s
visible property is set to true, creating
the illusion of a bouncing ball.

Visual Basic Programming 104
Adding Sound
To add sound to an application, you will need to use the MMControl control. If this tool
is not available on your toolbar, you can add it by following this procedure:
Choose Project from the Menu Bar.
Choose Components from the Drop-down Menu.
Click on Microsoft
Multimedia Control 6.0 to
check it.
Click on OK.
The Multimedia Control
should now be in your
Visual Basic Toolbar.
Name Property
Multimedia objects should begin with the prefix “mmc”.
Device Type This property chooses the type of device that will be needed. Below are a couple of
possibilities regarding sound files:
Control Name Files used
WaveAudio .WAV Files
CDAudio Music From CD
Enabled Property When this property is set to True, the multimedia object can play sounds. When it‟s set
to False, it cannot play sounds.
FileName Property This property chooses the file to be played and can be set at design time or via dot
notation at run-time.
Visible Property This property hides the object if it is set to False and allows it to be seen if it is set to
True.

Visual Basic Programming 105
Using Wav Sounds
You can insert files with a “.WAV” extension by using the OLE object and choosing
“Wav Sound”.
As soon as the OLE object is inserted in the form, the “Insert Object” window opens
and a large number of options appear.
Scroll to Wave Sound
Decide if you want to create the file New (microphone is required) or create it from a
file. Then, click OK.
Creating the Wave File After you click OK, the sound recorder will appear.
Be sure a microphone is connected to
your sound card.
Click the Record Button
Record through the microphone
Close the sound recorder
When you run the application, the
recording will play when the object is
double clicked.
Applying the Wave Sound from a File
Instead of choosing Create New, choose Create From File. At that point, a window
will open allowing you to browse for the desired file.
Record Button
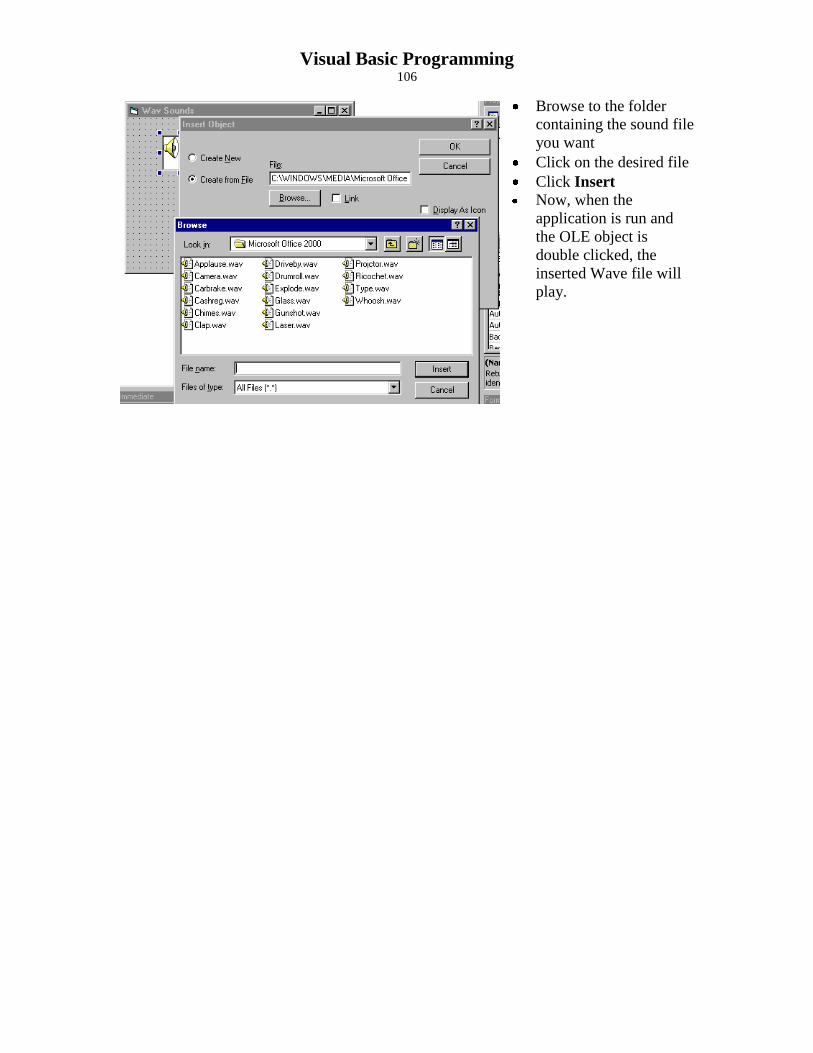
Visual Basic Programming 106
Browse to the folder
containing the sound file
you want
Click on the desired file
Click Insert
Now, when the
application is run and
the OLE object is
double clicked, the
inserted Wave file will
play.

Visual Basic Programming 107
Sequential Access Files
One of the advantages of using arrays to hold data for a program is that it is an extremely
fast way of accessing information that the program may need. The biggest disadvantage
is that, once the program is halted, all of the data in the array is lost. Thus, it is good to
be able to save data permanently on disk for later access and use during subsequent
application runs. This is accomplished via data files.
Most data files are sequential files; that is, data is stored in order from the first item
saved through the last. Access to individual pieces of data (known as records) is done by
moving from record 1 through the last record, using the data in the program, and
accessing the next record.
Opening a File Sequential data files can only be opened for one mode at a time. The possibilities are
Input, Output, or Append.
Mode Direction Code
Input Reads data into
a program
Open <path\file> for input as <file number>
i.e. Open C:\Data\file1 for input as #1
Output
Writes data to a
newly opened
file. If this file
existed before,
it is deleted and
a new, empty
file is created
Open<path\file> for output as<file number>
i.e. Open C:\Data\File1 for output as #1
Append
Writes data to
an existing file
without
deleting it and
re-creating it.
The new data is
added to the
existing data
Open<path\file> for append as<file number>
i.e. Open C:\Data\File1 for append as #1
FreeFile Function
Since it is possible to have more than one file open at a time, it is nice to know, upon
opening the next file, what the next available file number is. FreeFile returns this value.
So, for example, if we already have 2 files open, (numbers 1 and 2) FreeFile will return a
3.
intFNum = FreeFile
Open “C:\Data\thisFile” for input as #intFNum
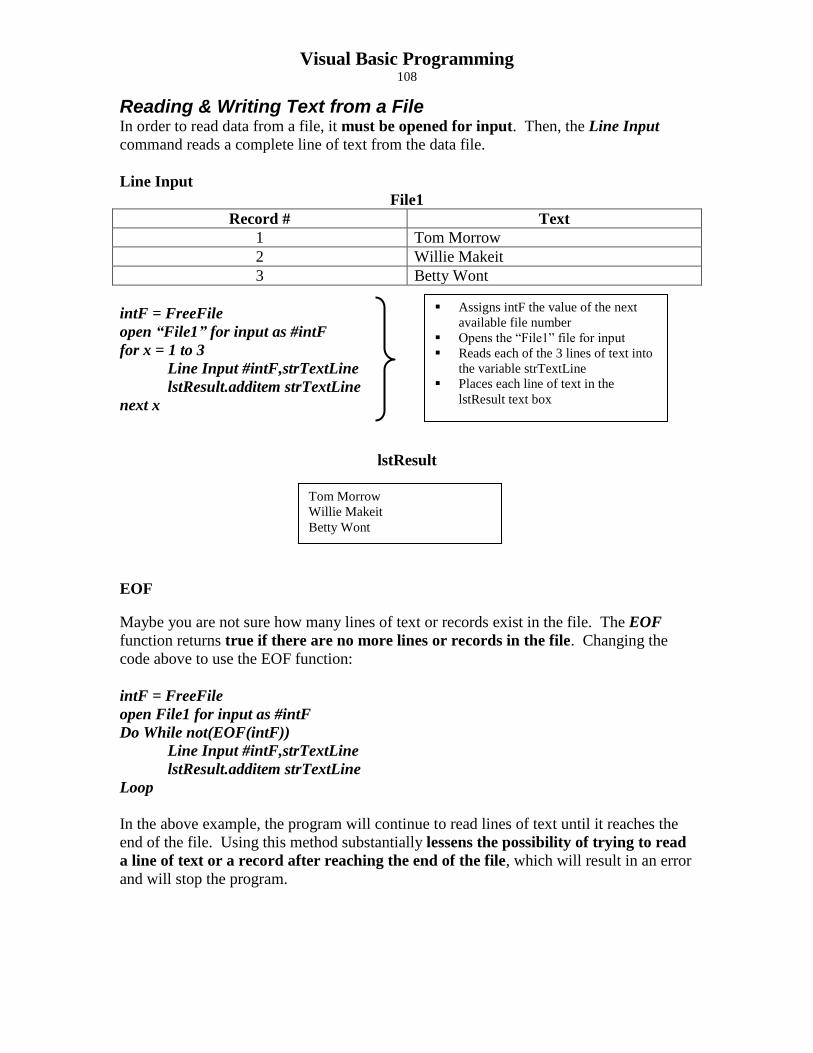
Visual Basic Programming 108
Reading & Writing Text from a File In order to read data from a file, it must be opened for input. Then, the Line Input
command reads a complete line of text from the data file.
Line Input
File1
Record # Text
1 Tom Morrow
2 Willie Makeit
3 Betty Wont
intF = FreeFile
open “File1” for input as #intF
for x = 1 to 3
Line Input #intF,strTextLine
lstResult.additem strTextLine
next x
lstResult
EOF
Maybe you are not sure how many lines of text or records exist in the file. The EOF
function returns true if there are no more lines or records in the file. Changing the
code above to use the EOF function:
intF = FreeFile
open File1 for input as #intF
Do While not(EOF(intF))
Line Input #intF,strTextLine
lstResult.additem strTextLine
Loop
In the above example, the program will continue to read lines of text until it reaches the
end of the file. Using this method substantially lessens the possibility of trying to read
a line of text or a record after reaching the end of the file, which will result in an error
and will stop the program.
Assigns intF the value of the next
available file number
Opens the “File1” file for input
Reads each of the 3 lines of text into
the variable strTextLine
Places each line of text in the
lstResult text box
Tom Morrow
Willie Makeit
Betty Wont
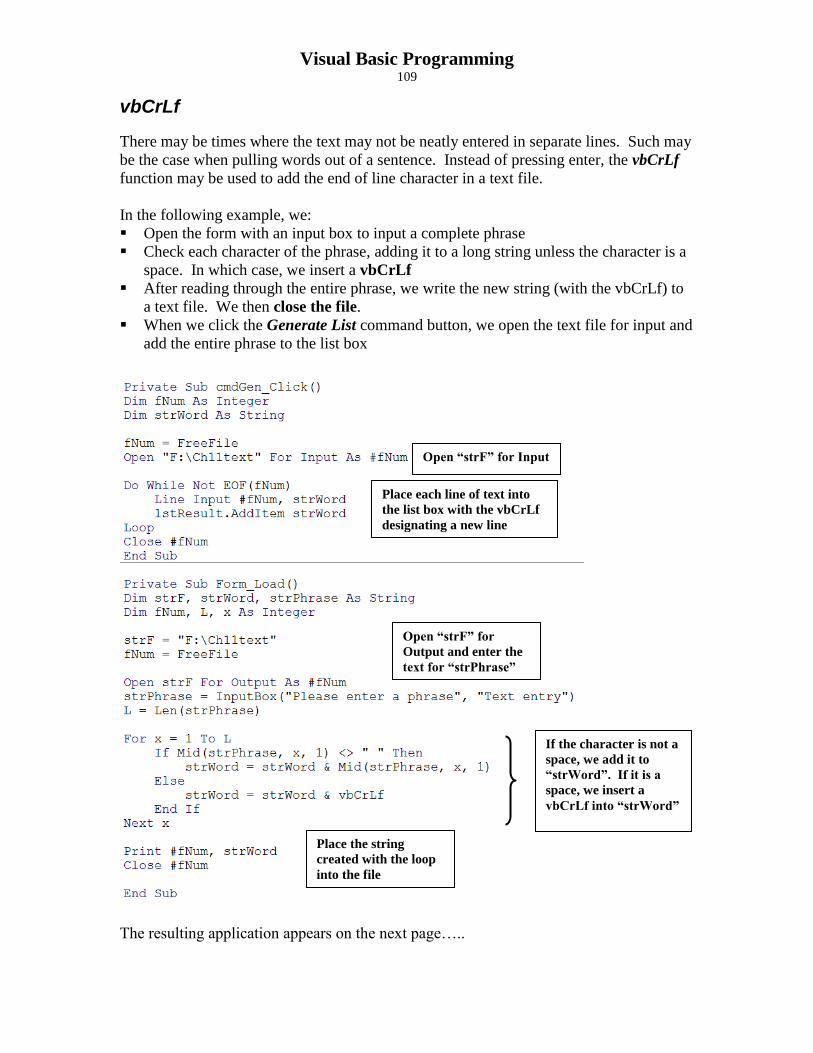
Visual Basic Programming 109
vbCrLf
There may be times where the text may not be neatly entered in separate lines. Such may
be the case when pulling words out of a sentence. Instead of pressing enter, the vbCrLf
function may be used to add the end of line character in a text file.
In the following example, we:
Open the form with an input box to input a complete phrase
Check each character of the phrase, adding it to a long string unless the character is a
space. In which case, we insert a vbCrLf
After reading through the entire phrase, we write the new string (with the vbCrLf) to
a text file. We then close the file.
When we click the Generate List command button, we open the text file for input and
add the entire phrase to the list box
The resulting application appears on the next page…..
If the character is not a
space, we add it to
“strWord”. If it is a
space, we insert a
vbCrLf into “strWord”
Open “strF” for
Output and enter the
text for “strPhrase”
Place the string
created with the loop
into the file
Open “strF” for Input
Place each line of text into
the list box with the vbCrLf
designating a new line

Visual Basic Programming 110
Multi-Line Text Box
Above, we used a list box to show the results. A text box can also be used if its
MultiLine Property is set to true. Then, if multiple lines appear, scroll bars will
automatically appear.
Scroll Bar Properties
Scroll bar properties can be set only if the text box’s MultiLine property is set to true.
At runtime, the options are:
vbSBNone = Scroll bars will not appear
vbHorizontal = Horizontal scroll bar will appear
vbVertical = Vertical scroll bar will appear
As separate lines of text are read from a text file, they can be added to the text box using
the vbCrLf to start a new line
Do while not EOF(1)
Line Input #1,strData
lstListBox.Text = lstListBox.Text & strData & vbCrLf
Loop
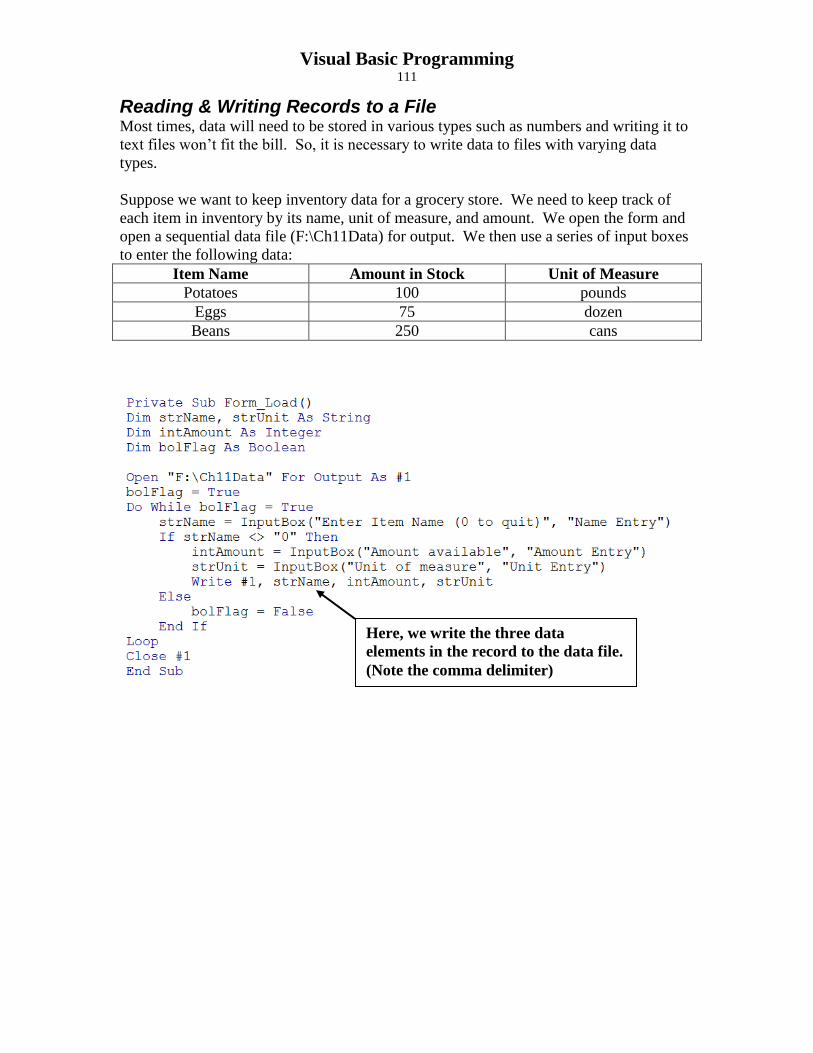
Visual Basic Programming 111
Reading & Writing Records to a File Most times, data will need to be stored in various types such as numbers and writing it to
text files won‟t fit the bill. So, it is necessary to write data to files with varying data
types.
Suppose we want to keep inventory data for a grocery store. We need to keep track of
each item in inventory by its name, unit of measure, and amount. We open the form and
open a sequential data file (F:\Ch11Data) for output. We then use a series of input boxes
to enter the following data:
Item Name Amount in Stock Unit of Measure
Potatoes 100 pounds
Eggs 75 dozen
Beans 250 cans
Here, we write the three data
elements in the record to the data file.
(Note the comma delimiter)

Visual Basic Programming 112
Next, we enter the item searching for in the txtSearch text box and, go through the data
file until we find its name. If we encounter an end of file, we know that the item is not in
the data base.
Closing a Data File Always remember to close the data file before ending the program. Data is cached in
memory when sent to a file. It is only written when the buffer is full or when the file is
closed. So, ending a program without closing could result in lost data.
Here, we check to see if the item
searching for is in the data base.
Data is read from the file
one record at a time.
(Note the comma delimiter)

Visual Basic Programming 113
Appending Data to a File As mentioned before, a data file can be opened without losing all of its contents so that
additional data can be added to it by opening it for append.
Using the code from the previous example, we do this by simply replacing the mode from
output to append.
Open “Ch11Data” for append as #1
Updating and Deleting Records It is now clear that writing and reading data to and from files is pretty much a one-way
street. That is, a file can be opened for output/append or input only. So if we want to
change or delete a record in a file, we need to :
1. Open the original file for input
2. Open a second file for output
3. Read each record from the input file, checking for some key as to which record
we want to change or delete (In our grocery store example, we could look for the
item name.)
a. Write each record that we do not want to change or delete to the output
file
b. Change or delete the record(s) we want and write these new records to the
output file
4. Delete the original (input) file
5. Rename the new (output) file as the original file‟s name
To illustrate the procedure, we examine the following application that:
Opens the “Ch11Data” data file for input
Uses its contents to list all item names in a list box
Allows the user to choose an item from the list
Reads through each record, writing other records to a “temp” file
Places the data from that item‟s record in text boxes for editing
Replaces the edited data for the record into the “temp” file
Finishes reading all of the other data from the original file and writing it to the “temp”
file
Closes both files
Deletes the original file
Renames the “temp” file as the
original

Visual Basic Programming 114
We will change the amount from 75 to 77 and click “Change Record”. Running this
application again reveals the change made to the data.
Here is the code:
Open the “Ch11Data” file for
input and the “temp” file for
output.
Go through all of the records,
placing each record’s item
name in the list box.
The record pointer moves from record to record as it reads
data. Closing the file allows the record pointer to be replaced
at the beginning of the file upon re-opening it.
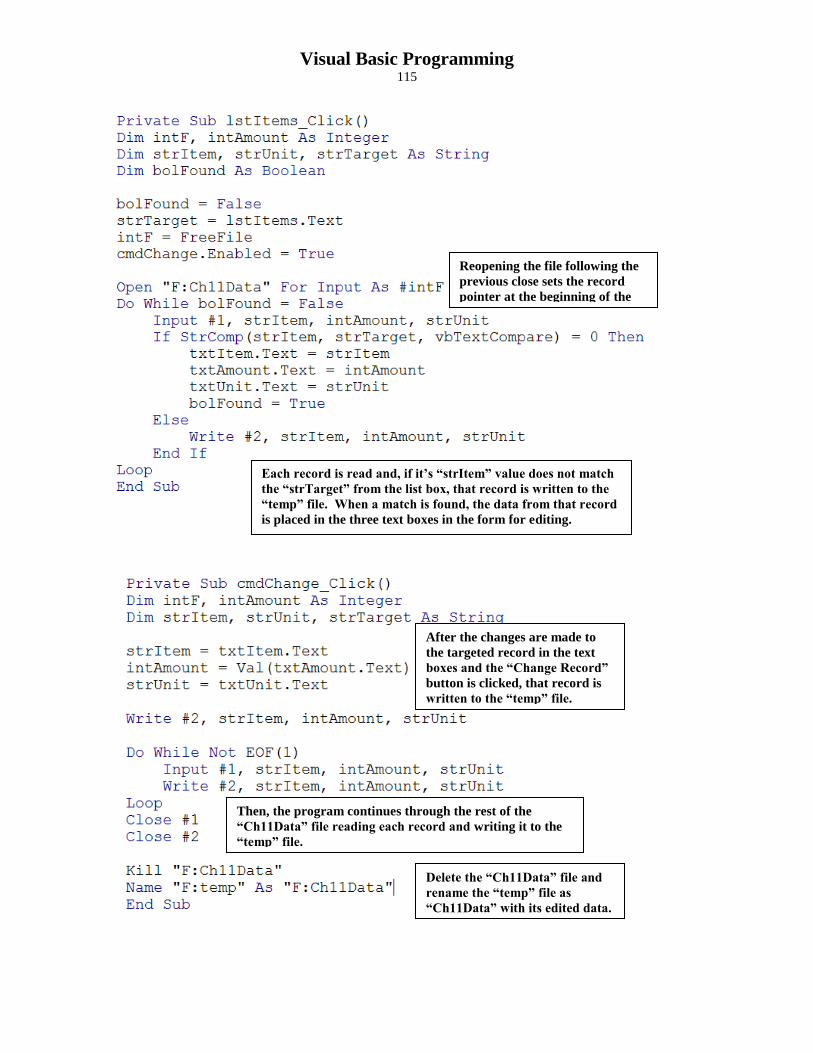
Visual Basic Programming 115
Reopening the file following the
previous close sets the record
pointer at the beginning of the
file.
Each record is read and, if it’s “strItem” value does not match
the “strTarget” from the list box, that record is written to the
“temp” file. When a match is found, the data from that record
is placed in the three text boxes in the form for editing.
After the changes are made to
the targeted record in the text
boxes and the “Change Record”
button is clicked, that record is
written to the “temp” file.
Then, the program continues through the rest of the
“Ch11Data” file reading each record and writing it to the
“temp” file.
Delete the “Ch11Data” file and
rename the “temp” file as
“Ch11Data” with its edited data.

Visual Basic Programming 116
Deleting and Renaming Files At the end of the code in the previous segment, there exists two lines of code – one that
deletes the original “Ch11Data” file followed by one that renames the “temp” file as
“Ch11Data”.
Kill
The Kill command simply deletes the file following it. In the code above, it is deleting
the “Ch11Data” file from the F: drive. The file to be deleted must be closed.
Name
The Name command follows this syntax:
Name <The old file name> As <Its new file name>
So, in the example above, it is renaming “temp” on the F: drive “Ch11Data” on that same
drive. The file to be renamed must be closed and there cannot be another file with the
new name in the same folder.

Visual Basic Programming 117
Starting Visual Basic ...................................................................................................................................... 1
Standard Toolbar ........................................................................................................................................ 2 Toolbox ...................................................................................................................................................... 2 Project Window .......................................................................................................................................... 3
Programming Prefixes .................................................................................................................................... 4 File Extensions ............................................................................................................................................... 4 Forms, Labels, Text Boxes, and Buttons ........................................................................................................ 5
Setting the Form‟s Name and Caption Properties ...................................................................................... 5 Adding a Label to the Form ........................................................................................................................ 6 Adding a Text Box to the Form .................................................................................................................. 7 Adding Command Buttons to the Form ...................................................................................................... 8
Adding Code to Objects ................................................................................................................................. 9 Make the lblMessage Label Visible When the Form is Clicked ................................................................. 9 Code the OK Button to Show the Desired Message in txtName Text Box ...............................................11
An Alternate Method .............................................................................................................................12 Code the Cancel Button to Close the Application .....................................................................................13
Saving a Project .............................................................................................................................................13 Using Assignment to Change Property Values..............................................................................................15 Including Image Objects ................................................................................................................................17 Review ...........................................................................................................................................................20 Variable Assignments ....................................................................................................................................22 Debugging Using the Immediate Window ....................................................................................................24 Data Types .....................................................................................................................................................27
Will Represent .......................................................................................................................................27 Data Type Naming Conventions ...............................................................................................................27 Multiple Variable Declarations..................................................................................................................27 Option Explicit ..........................................................................................................................................27
Automatic Type Conversion ..........................................................................................................................28 Modulus Division ..........................................................................................................................................29 Option Buttons ..............................................................................................................................................29 Frames ...........................................................................................................................................................31 Constants .......................................................................................................................................................31 If … Then Statements ....................................................................................................................................32
Boolean Relational Operators ....................................................................................................................32 Operator .................................................................................................................................................32
Equal to......................................................................................................................................................32 Roundoff Errors .........................................................................................................................................32
If … Then… Else Statements ........................................................................................................................32 Nested If … Then … Else Loops ..................................................................................................................33 If … Then … ElseIf .......................................................................................................................................34
Else ..........................................................................................................................................................34 Generating Random Numbers .......................................................................................................................34
Int Function ...............................................................................................................................................34 Fix Function ..............................................................................................................................................34 Randomize .................................................................................................................................................35
Scope .............................................................................................................................................................35 Logical Operators ..........................................................................................................................................36
Function .................................................................................................................................................36 Message Box .................................................................................................................................................36 Password Applications ..................................................................................................................................37 Counters ........................................................................................................................................................38 Check Boxes ..................................................................................................................................................39 Printing a Form ..............................................................................................................................................40 Do Loops .......................................................................................................................................................41
Visual Basic Programming 118
Do – Loop While .......................................................................................................................................41 intTotal = Val(txtNum.Text) .................................................................................................................41 Do ..........................................................................................................................................................41
Do While – Loop .......................................................................................................................................41 Infinite Loops ............................................................................................................................................41
Input Box .......................................................................................................................................................41 Syntax ........................................................................................................................................................42 Example .....................................................................................................................................................42
Accumulators .................................................................................................................................................43 Example .....................................................................................................................................................43
String Conversion Functions .........................................................................................................................44 LCase .........................................................................................................................................................44 UCase ........................................................................................................................................................44 StrConv ......................................................................................................................................................44 Manipulating Strings .................................................................................................................................45
Left ........................................................................................................................................................45 Right ......................................................................................................................................................45 Mid Function .........................................................................................................................................45 Mid Statement .......................................................................................................................................46 Len Function ..........................................................................................................................................46 InStr Function ........................................................................................................................................46
For … Next Loop ..........................................................................................................................................47 Generating Strings .........................................................................................................................................47
String .........................................................................................................................................................47 Space .........................................................................................................................................................48 & ................................................................................................................................................................48 vbTab .........................................................................................................................................................48 vbCrLf .......................................................................................................................................................48
Comparing Strings .........................................................................................................................................49 StrComp.....................................................................................................................................................49 Like ............................................................................................................................................................49
Sub Procedures ..............................................................................................................................................50 General Procedures ....................................................................................................................................50
Syntax ....................................................................................................................................................50 Example .................................................................................................................................................50
Call ............................................................................................................................................................50 Syntax ....................................................................................................................................................50 Example .................................................................................................................................................50
Line Continuation ......................................................................................................................................50 Example .................................................................................................................................................50
Value Parameters .......................................................................................................................................51 Syntax ....................................................................................................................................................51 Example .................................................................................................................................................51
Reference Parameters ................................................................................................................................52 Documenting Procedures ...........................................................................................................................53 Static Variables ..........................................................................................................................................53
Syntax ....................................................................................................................................................53 Example .................................................................................................................................................54
Function Procedures ..................................................................................................................................55 Syntax ....................................................................................................................................................55 Example .................................................................................................................................................55 Creating a Function ...............................................................................................................................56
Object Parameters ......................................................................................................................................56 Example .................................................................................................................................................56
Built-in Mathematical Functions ...................................................................................................................57 ABS ...........................................................................................................................................................57

Visual Basic Programming 119
SQR ...........................................................................................................................................................57 SGN ...........................................................................................................................................................57 IsNumeric ..................................................................................................................................................57 Round ........................................................................................................................................................58
Formatting Numeric Output ..........................................................................................................................58 Format ...................................................................................................................................................58
Built-in Business Functions ...........................................................................................................................59 PMT ...........................................................................................................................................................59
Syntax ....................................................................................................................................................59 PV ..............................................................................................................................................................60 FV ..............................................................................................................................................................61
List Box .........................................................................................................................................................63 Event or Method ....................................................................................................................................63
Combo Box....................................................................................................................................................67 Property .................................................................................................................................................67
Underscore.....................................................................................................................................................68 Application Properties ...................................................................................................................................69
Focus .........................................................................................................................................................69 Access Key ................................................................................................................................................69 Tab Order ..................................................................................................................................................70 Built-In Trigonometric Functions ..............................................................................................................72 SIN ............................................................................................................................................................72 COS ...........................................................................................................................................................72 TAN ...........................................................................................................................................................72 Converting Degrees to Radians .................................................................................................................72 Converting Radians to Degrees .................................................................................................................72
Inverse Trigonometric Functions ...................................................................................................................73 ATN ...........................................................................................................................................................73 To use ATN to calculate the ARCSINE of an Angle in Radians ..............................................................73 To use ATN to calculate the ARCCOSINE of an Angle in Radians .........................................................73
Logarithmic and Exponential Functions ........................................................................................................73 LOG ...........................................................................................................................................................73 Using LOG to Calculate the Logarithm of a Number to A Base ...............................................................74 EXP ...........................................................................................................................................................74
Variable Arrays .............................................................................................................................................75 Array Declaration ......................................................................................................................................75
Dim strEmp(5) as String ........................................................................................................................75 Upper Bound .............................................................................................................................................75 Lower Bound .............................................................................................................................................75 Option Base ...............................................................................................................................................75
Option Base 1 or Option Base 0 .........................................................................................................75 Array Declaration Using Upper and Lower Bounds..................................................................................75
Dim strEmp(1 to 5) as String .................................................................................................................75 Const lngLowBound as Long = 1 ..........................................................................................................75
Array Initialization ....................................................................................................................................75 Array Index ................................................................................................................................................75 LBound and UBound Functions ................................................................................................................76 Run-Time Error .........................................................................................................................................76
For … Next ....................................................................................................................................................76 Dim lngIndex as Long ...........................................................................................................................76
Array Parameters ...........................................................................................................................................76 Function AddChar(ByRef strEmp() As String) As Integer ...................................................................76
Arrays With Meaningful Indexes ..................................................................................................................77 Searching an Array ........................................................................................................................................77 Dynamic Arrays ............................................................................................................................................77
ReDim .......................................................................................................................................................77

Visual Basic Programming 120
Preserve .....................................................................................................................................................78 Control Arrays ...............................................................................................................................................78
Index Property ...........................................................................................................................................78 LBound and UBound Properties ................................................................................................................80 Count .........................................................................................................................................................80 Control Arrays as Parameters ....................................................................................................................81 Removing an Object From a Control Array ..............................................................................................81
Two Dimensional Arrays ..............................................................................................................................81 Declaring a Matrix .....................................................................................................................................81
Dim strName(1,4) as String ...................................................................................................................81 Declaring a Matrix Using Upper and Lower Bounds ............................................................................81 Dim strName(1 to 2,1 to 5) as String .....................................................................................................81
LBound and UBound Functions ................................................................................................................82 Dim intLowRow, intHighRow, intLowCol, intHighCol as Integer .......................................................82
Nested For…Next Loops ...........................................................................................................................82 Dim intRow, intCol as Integer ...............................................................................................................82
Dynamic Matrix.........................................................................................................................................82 Color ..............................................................................................................................................................83
Color Properties at Design Time ...............................................................................................................83 BackColor ..............................................................................................................................................83 ForeColor...............................................................................................................................................84
Setting Colors at Run Time .......................................................................................................................84 Built-In Visual Basic Colors ......................................................................................................................85 RGB Function ............................................................................................................................................85
Practice Application Using Color ..........................................................................................................85 Adding Lines to an Application.....................................................................................................................85
Line Properties...........................................................................................................................................86 Name .....................................................................................................................................................86 BorderColor ...........................................................................................................................................86 BorderStyle ............................................................................................................................................86 BorderWidth ..........................................................................................................................................87
Objects and Form BackColor ....................................................................................................................87 Adding Shapes to an Application ..................................................................................................................87
Shape Property ..........................................................................................................................................87 Name Property ...........................................................................................................................................88 BackColor Property ...................................................................................................................................88 BackStyle Property ....................................................................................................................................88 BorderColor Property ................................................................................................................................88 BorderStyle Property .................................................................................................................................88 BorderWidth Property ...............................................................................................................................88 FillColor Property ......................................................................................................................................88 FillStyle Property.......................................................................................................................................88
Picture Boxes .................................................................................................................................................90 Picture Property .........................................................................................................................................90 BorderStyle Property .................................................................................................................................92 AutoSize Property .....................................................................................................................................92
Moving Shapes and Picture Boxes ................................................................................................................93 Twips .........................................................................................................................................................93 Move Method ............................................................................................................................................94
Graphic Methods ...........................................................................................................................................95 Coordinate System.....................................................................................................................................95 Line Method ..............................................................................................................................................95 Circle Method ............................................................................................................................................96 Pset Method ...............................................................................................................................................97 PaintPicture Method ..................................................................................................................................98 Cls Method ................................................................................................................................................98

Visual Basic Programming 121
Container Properties Affecting Graphics .......................................................................................................99 AutoRedraw ...............................................................................................................................................99 DrawStyle ..................................................................................................................................................99 DrawWidth ................................................................................................................................................99 FillColor ....................................................................................................................................................99 FillStyle .....................................................................................................................................................99 ForeColor...................................................................................................................................................99
Timer Object................................................................................................................................................100 Name Property .........................................................................................................................................100 Interval Property ......................................................................................................................................100 Enabled Property .....................................................................................................................................100 Timer Event .............................................................................................................................................100
Moving Line Objects ...................................................................................................................................102 Animation ....................................................................................................................................................103 Adding Sound ..............................................................................................................................................104
Name Property .........................................................................................................................................104 Device Type ............................................................................................................................................104 Enabled Property .....................................................................................................................................104 FileName Property ...................................................................................................................................104 Visible Property .......................................................................................................................................104
Using Wav Sounds ......................................................................................................................................105 Creating the Wave File ............................................................................................................................105 Applying the Wave Sound from a File ....................................................................................................105
Sequential Access Files ...............................................................................................................................107 Opening a File .........................................................................................................................................107
FreeFile Function.................................................................................................................................107 Reading & Writing Text from a File .......................................................................................................108
Line Input ............................................................................................................................................108 EOF .....................................................................................................................................................108
vbCrLf .....................................................................................................................................................109 Multi-Line Text Box ................................................................................................................................110
Scroll Bar Properties ............................................................................................................................110 Reading & Writing Records to a File ......................................................................................................111 Closing a Data File ..................................................................................................................................112 Appending Data to a File .........................................................................................................................113 Updating and Deleting Records ...............................................................................................................113 Deleting and Renaming Files ..................................................................................................................116
Kill .......................................................................................................................................................116 Name ...................................................................................................................................................116