VirusScan Enterprise for Linux 2.0.1 Product Guide · PDF file1 Introduction McAfee ®...
96
Product Guide McAfee VirusScan Enterprise for Linux 2.0.1
Transcript of VirusScan Enterprise for Linux 2.0.1 Product Guide · PDF file1 Introduction McAfee ®...

Product Guide
McAfee VirusScan Enterprise for Linux2.0.1

COPYRIGHTCopyright © 2014 McAfee, Inc. Do not copy without permission.
TRADEMARK ATTRIBUTIONSMcAfee, the McAfee logo, McAfee Active Protection, McAfee DeepSAFE, ePolicy Orchestrator, McAfee ePO, McAfee EMM, Foundscore, Foundstone, PolicyLab, McAfee QuickClean, Safe Eyes, McAfee SECURE, SecureOS, McAfee Shredder, SiteAdvisor, McAfee Stinger, McAfee Total Protection, TrustedSource,VirusScan, WaveSecure are trademarks or registered trademarks of McAfee, Inc. or its subsidiaries in the United States and other countries. Othernames and brands may be claimed as the property of others.
Product and feature names and descriptions are subject to change without notice. Please visit mcafee.com for the most current products and features.
LICENSE INFORMATION
License AgreementNOTICE TO ALL USERS: CAREFULLY READ THE APPROPRIATE LEGAL AGREEMENT CORRESPONDING TO THE LICENSE YOU PURCHASED, WHICH SETSFORTH THE GENERAL TERMS AND CONDITIONS FOR THE USE OF THE LICENSED SOFTWARE. IF YOU DO NOT KNOW WHICH TYPE OF LICENSE YOUHAVE ACQUIRED, PLEASE CONSULT THE SALES AND OTHER RELATED LICENSE GRANT OR PURCHASE ORDER DOCUMENTS THAT ACCOMPANY YOURSOFTWARE PACKAGING OR THAT YOU HAVE RECEIVED SEPARATELY AS PART OF THE PURCHASE (AS A BOOKLET, A FILE ON THE PRODUCT CD, OR AFILE AVAILABLE ON THE WEBSITE FROM WHICH YOU DOWNLOADED THE SOFTWARE PACKAGE). IF YOU DO NOT AGREE TO ALL OF THE TERMS SETFORTH IN THE AGREEMENT, DO NOT INSTALL THE SOFTWARE. IF APPLICABLE, YOU MAY RETURN THE PRODUCT TO MCAFEE OR THE PLACE OFPURCHASE FOR A FULL REFUND.
2 McAfee VirusScan Enterprise for Linux 2.0.1 Product Guide

Contents
Preface 7About this guide . . . . . . . . . . . . . . . . . . . . . . . . . . . . . . . . . . 7
Audience . . . . . . . . . . . . . . . . . . . . . . . . . . . . . . . . . . 7Conventions . . . . . . . . . . . . . . . . . . . . . . . . . . . . . . . . . 7
Find product documentation . . . . . . . . . . . . . . . . . . . . . . . . . . . . . . 8
1 Introduction 9What is VirusScan Enterprise for Linux . . . . . . . . . . . . . . . . . . . . . . . . . . 9How the software works . . . . . . . . . . . . . . . . . . . . . . . . . . . . . . . 9Components . . . . . . . . . . . . . . . . . . . . . . . . . . . . . . . . . . . . 10How scanning works . . . . . . . . . . . . . . . . . . . . . . . . . . . . . . . . 11What and when to scan . . . . . . . . . . . . . . . . . . . . . . . . . . . . . . . 11Types of scanning . . . . . . . . . . . . . . . . . . . . . . . . . . . . . . . . . 11Product features . . . . . . . . . . . . . . . . . . . . . . . . . . . . . . . . . . 12
2 Installation and deployment 15System requirements . . . . . . . . . . . . . . . . . . . . . . . . . . . . . . . . 15Install the software on a standalone system . . . . . . . . . . . . . . . . . . . . . . . 16
Install the software with the command line . . . . . . . . . . . . . . . . . . . . 17Install the software in silent mode . . . . . . . . . . . . . . . . . . . . . . . . 19
Install and deploy the software on managed systems . . . . . . . . . . . . . . . . . . . 20Prerequisites . . . . . . . . . . . . . . . . . . . . . . . . . . . . . . . . 21Check in the package manually . . . . . . . . . . . . . . . . . . . . . . . . . 21Install the extensions . . . . . . . . . . . . . . . . . . . . . . . . . . . . . 22Deploy the software . . . . . . . . . . . . . . . . . . . . . . . . . . . . . 22Send an agent wake-up call . . . . . . . . . . . . . . . . . . . . . . . . . . 23
Upgrade the software . . . . . . . . . . . . . . . . . . . . . . . . . . . . . . . . 23Upgrade the software from previous versions on RPM and Debian systems . . . . . . . . 24Upgrade the managed systems using ePolicy Orchestrator . . . . . . . . . . . . . . 24
Test the installation . . . . . . . . . . . . . . . . . . . . . . . . . . . . . . . . . 25Test the on-access scan feature on a standalone system . . . . . . . . . . . . . . . 25Test the on-demand scan feature on a standalone system . . . . . . . . . . . . . . 25Test the on-demand scan on managed system . . . . . . . . . . . . . . . . . . . 26
Uninstall the software . . . . . . . . . . . . . . . . . . . . . . . . . . . . . . . . 26Uninstall the software from a standalone system . . . . . . . . . . . . . . . . . . 27Remove the software from managed systems . . . . . . . . . . . . . . . . . . . 27Remove the software from ePolicy Orchestrator . . . . . . . . . . . . . . . . . . 27
3 Using the interface 29Launch the interface . . . . . . . . . . . . . . . . . . . . . . . . . . . . . . . . 29VirusScan Enterprise for Linux interface . . . . . . . . . . . . . . . . . . . . . . . . . 30
Navigation pane . . . . . . . . . . . . . . . . . . . . . . . . . . . . . . . 30Console . . . . . . . . . . . . . . . . . . . . . . . . . . . . . . . . . . 30Help pane . . . . . . . . . . . . . . . . . . . . . . . . . . . . . . . . . . 30Links bar . . . . . . . . . . . . . . . . . . . . . . . . . . . . . . . . . . 30
McAfee VirusScan Enterprise for Linux 2.0.1 Product Guide 3

Working with the interface . . . . . . . . . . . . . . . . . . . . . . . . . . . . . . 31Expanding and collapsing tables . . . . . . . . . . . . . . . . . . . . . . . . . 31Sorting table columns . . . . . . . . . . . . . . . . . . . . . . . . . . . . . 31Navigating through long tables . . . . . . . . . . . . . . . . . . . . . . . . . 32Modify page settings . . . . . . . . . . . . . . . . . . . . . . . . . . . . . 32Automatically refresh information on pages . . . . . . . . . . . . . . . . . . . . 32Using wizards . . . . . . . . . . . . . . . . . . . . . . . . . . . . . . . . 32Error messages . . . . . . . . . . . . . . . . . . . . . . . . . . . . . . . 33Date and time expression . . . . . . . . . . . . . . . . . . . . . . . . . . . 33
4 Viewing information 35Host summary . . . . . . . . . . . . . . . . . . . . . . . . . . . . . . . . . . 35Scanning summary . . . . . . . . . . . . . . . . . . . . . . . . . . . . . . . . . 36
Scan statistics . . . . . . . . . . . . . . . . . . . . . . . . . . . . . . . . 36Recently detected items . . . . . . . . . . . . . . . . . . . . . . . . . . . . 37Recently scanned items . . . . . . . . . . . . . . . . . . . . . . . . . . . . 37Generate a diagnostic report . . . . . . . . . . . . . . . . . . . . . . . . . . 38
Detected items . . . . . . . . . . . . . . . . . . . . . . . . . . . . . . . . . . 38Analyze the detected items . . . . . . . . . . . . . . . . . . . . . . . . . . . 38Viewing the results . . . . . . . . . . . . . . . . . . . . . . . . . . . . . . 39Export the results for analysis . . . . . . . . . . . . . . . . . . . . . . . . . 40
Viewing system events . . . . . . . . . . . . . . . . . . . . . . . . . . . . . . . 40Analyze the system events . . . . . . . . . . . . . . . . . . . . . . . . . . . 40Export the results for analysis . . . . . . . . . . . . . . . . . . . . . . . . . 41
Scheduled tasks . . . . . . . . . . . . . . . . . . . . . . . . . . . . . . . . . . 41Run a scheduled task immediately . . . . . . . . . . . . . . . . . . . . . . . . 42Modify an existing scheduled task . . . . . . . . . . . . . . . . . . . . . . . . 42Delete an existing scheduled task . . . . . . . . . . . . . . . . . . . . . . . . 43Stop a running task . . . . . . . . . . . . . . . . . . . . . . . . . . . . . . 43
ExtraDAT file details . . . . . . . . . . . . . . . . . . . . . . . . . . . . . . . . 43
5 Setting up schedules 45Using a wizard . . . . . . . . . . . . . . . . . . . . . . . . . . . . . . . . . . . 45Product update schedule . . . . . . . . . . . . . . . . . . . . . . . . . . . . . . . 46
Create a product update schedule . . . . . . . . . . . . . . . . . . . . . . . . 46On-demand scan preferences . . . . . . . . . . . . . . . . . . . . . . . . . . . . . 48
Schedule an on-demand scan . . . . . . . . . . . . . . . . . . . . . . . . . . 48
6 Configuring VirusScan Enterprise for Linux 53General settings . . . . . . . . . . . . . . . . . . . . . . . . . . . . . . . . . . 53
Browser interface . . . . . . . . . . . . . . . . . . . . . . . . . . . . . . 54Log levels . . . . . . . . . . . . . . . . . . . . . . . . . . . . . . . . . . 54Statistics reset . . . . . . . . . . . . . . . . . . . . . . . . . . . . . . . . 55Clearing statistics . . . . . . . . . . . . . . . . . . . . . . . . . . . . . . 55Configure general settings . . . . . . . . . . . . . . . . . . . . . . . . . . . 56Restoration of default configuration settings . . . . . . . . . . . . . . . . . . . . 56
On-access settings configuration . . . . . . . . . . . . . . . . . . . . . . . . . . . 56Anti-virus scanning options . . . . . . . . . . . . . . . . . . . . . . . . . . . 57Exclude paths from scanning . . . . . . . . . . . . . . . . . . . . . . . . . . 58Extension-based scanning . . . . . . . . . . . . . . . . . . . . . . . . . . . 59Anti-virus actions . . . . . . . . . . . . . . . . . . . . . . . . . . . . . . . 61Configure on-access scan settings . . . . . . . . . . . . . . . . . . . . . . . . 61
On-demand settings . . . . . . . . . . . . . . . . . . . . . . . . . . . . . . . . 63Configure on-demand scan settings . . . . . . . . . . . . . . . . . . . . . . . 63
Notifications . . . . . . . . . . . . . . . . . . . . . . . . . . . . . . . . . . . . 65SMTP notifications . . . . . . . . . . . . . . . . . . . . . . . . . . . . . . 65
Contents
4 McAfee VirusScan Enterprise for Linux 2.0.1 Product Guide

Configure SMTP settings . . . . . . . . . . . . . . . . . . . . . . . . . . . . 66Repositories . . . . . . . . . . . . . . . . . . . . . . . . . . . . . . . . . . . . 67
Configure the repository list . . . . . . . . . . . . . . . . . . . . . . . . . . 67Configure the local repository . . . . . . . . . . . . . . . . . . . . . . . . . . 67Configure the proxy settings . . . . . . . . . . . . . . . . . . . . . . . . . . 68
7 Managing the software with ePolicy Orchestrator 71Setting policies within ePolicy Orchestrator . . . . . . . . . . . . . . . . . . . . . . . 71Define policies in ePolicy Orchestrator . . . . . . . . . . . . . . . . . . . . . . . . . 71
Create or modify policies . . . . . . . . . . . . . . . . . . . . . . . . . . . 72Configure general policy settings . . . . . . . . . . . . . . . . . . . . . . . . 72Configure on-access scan policy settings . . . . . . . . . . . . . . . . . . . . . 73Enforce policies . . . . . . . . . . . . . . . . . . . . . . . . . . . . . . . 74
Scheduling tasks . . . . . . . . . . . . . . . . . . . . . . . . . . . . . . . . . . 75Create a product update task . . . . . . . . . . . . . . . . . . . . . . . . . . 75Create an on-demand scanning task . . . . . . . . . . . . . . . . . . . . . . . 76Configure the administrator password . . . . . . . . . . . . . . . . . . . . . . 77
Configure reports . . . . . . . . . . . . . . . . . . . . . . . . . . . . . . . . . . 77Run a default query . . . . . . . . . . . . . . . . . . . . . . . . . . . . . . . . . 78
8 Advanced features 79Lightweight Directory Access Protocol (LDAP) Authentication . . . . . . . . . . . . . . . . 79Substituting variables in notification templates . . . . . . . . . . . . . . . . . . . . . . 80How the quarantine action works . . . . . . . . . . . . . . . . . . . . . . . . . . . 82Recover the quarantined items . . . . . . . . . . . . . . . . . . . . . . . . . . . . 82
9 Troubleshooting 85Frequently asked questions . . . . . . . . . . . . . . . . . . . . . . . . . . . . . . 85
Installation . . . . . . . . . . . . . . . . . . . . . . . . . . . . . . . . . 85Scanning . . . . . . . . . . . . . . . . . . . . . . . . . . . . . . . . . . 85Viruses and detection . . . . . . . . . . . . . . . . . . . . . . . . . . . . . 86General information . . . . . . . . . . . . . . . . . . . . . . . . . . . . . . 87
Error messages . . . . . . . . . . . . . . . . . . . . . . . . . . . . . . . . . . 88Contact information . . . . . . . . . . . . . . . . . . . . . . . . . . . . . . . . . 88
Index 91
Contents
McAfee VirusScan Enterprise for Linux 2.0.1 Product Guide 5

Contents
6 McAfee VirusScan Enterprise for Linux 2.0.1 Product Guide

Preface
This guide provides the information you need to work with your McAfee product.
Contents About this guide Find product documentation
About this guideThis information describes the guide's target audience, the typographical conventions and icons usedin this guide, and how the guide is organized.
AudienceMcAfee documentation is carefully researched and written for the target audience.
The information in this guide is intended primarily for:
• Administrators — People who implement and enforce the company's security program.
• Users — People who use the computer where the software is running and can access some or all ofits features.
ConventionsThis guide uses these typographical conventions and icons.
Book title, term,emphasis
Title of a book, chapter, or topic; a new term; emphasis.
Bold Text that is strongly emphasized.
User input, code,message
Commands and other text that the user types; a code sample; a displayedmessage.
Interface text Words from the product interface like options, menus, buttons, and dialogboxes.
Hypertext blue A link to a topic or to an external website.
Note: Additional information, like an alternate method of accessing anoption.
Tip: Suggestions and recommendations.
Important/Caution: Valuable advice to protect your computer system,software installation, network, business, or data.
Warning: Critical advice to prevent bodily harm when using a hardwareproduct.
McAfee VirusScan Enterprise for Linux 2.0.1 Product Guide 7

Find product documentationAfter a product is released, information about the product is entered into the McAfee online KnowledgeCenter.
Task1 Go to the McAfee ServicePortal at http://support.mcafee.com and click Knowledge Center.
2 Enter a product name, select a version, then click Search to display a list of documents.
PrefaceFind product documentation
8 McAfee VirusScan Enterprise for Linux 2.0.1 Product Guide

1 Introduction
McAfee®
VirusScan®
Enterprise for Linux protects your Linux systems from malware threats and otherpotentially unwanted software.
Contents What is VirusScan Enterprise for Linux How the software works Components How scanning works What and when to scan Types of scanning Product features
What is VirusScan Enterprise for LinuxVirusScan Enterprise for Linux is a security software that protects your Linux systems from malwarethreats, such as viruses, trojan horses, spyware, keyloggers, joke programs, and other potentiallyunwanted software.
Although the Linux operating system is considered a secure environment, the recent trend shows anincrease in threat codes written to attack or exploit security weaknesses in Linux-based systems.
Increasingly, Linux-based systems interact with Windows-based computers. The malware threatsdesigned to target Windows-based systems do not attack Linux systems directly. However, a Linuxserver can harbor the malware, ready to infect any client that connects to it.
The software scans files in two scenarios:
• On-access scan — Scans files for malware threats when you access a file to open or write.
• On-demand scan — Scans files and directories for malware threats in your host systemimmediately or as scheduled.
How the software worksVirusScan Enterprise for Linux runs as a daemon, which is similar to a service in Microsoft Windows. Italso provides an HTTPS-based interface that you can use to configure, manage, and monitor thesoftware.
VirusScan Enterprise for Linux uses Fanotify technology to perform on-access scanning, instead ofusing kernel hooking modules, the technology used in earlier versions. The software does not containany kernel hooking modules in this version.
1
McAfee VirusScan Enterprise for Linux 2.0.1 Product Guide 9
Fanotify is a Linux operating system API that sends notification for file system operations. It also givesthe capability to intercept the file. The software relies on Fanotify to intercept file IO (Input/Output)operations.
The software receives notification on the file writing and reading, then scans files for threats and takesnecessary actions according to the scan settings.
To check the supported operating system for VirusScan Enterprise for Linux 2.0.1, see the SupportedLinux Kernels (operating system) section in the McAfee Knowledgebase article KB75270.
For the Action on timeout option configuration, the default action is Allow Access, and for the Action if an erroroccurs during scanning options configuration, the default action is Block Access. If the action is set to Block, thesoftware blocks the file only in read scanning operation. It does not block the file in write scanningoperation.
The software activities can be monitored and configured through an HTTPS interface. For example, youcan configure what type of files are scanned, and define actions to take for infected files, such ascleaning, deleting, or quarantining. Using the simple and secure web-browser interface, you canmonitor and control malware detection.
The software also maintains a record of files that it recently scanned to avoid repeated scanning.
The software begins to scan files on these events:
• File open — When a file is opened.
• File release — When a file is closed. If a process has multiple references to a file, for example,using dup or a memory mapping, release refers to when the last reference is released.
ComponentsThe software uses a management interface that runs on HTTPS to monitor and control scanning on ahost.
The diagram shows a web browser, connected through a secure HTTPS link to a web monitor service,as a component of the software.
This table explains how the components operate in this simple setup.
Component Function
Scanner Provides anti-malware protection and scans files as instructed by nailsd.
nailsd Communicates between the web monitoring service and the scanner, passinginformation about the anti-virus scans and configuration details.
mon Examines the software activity on the host, and can configure the anti-virus activity.
nailswebd Communicates with a web browser such as Konqueror, using a secure HTTPS link. Aname and password is required for user authentication.
1 IntroductionComponents
10 McAfee VirusScan Enterprise for Linux 2.0.1 Product Guide

How scanning worksVirusScan Enterprise for Linux software contains the McAfee scanning engine and the malwaredefinition DAT files. The scanning engine is a complex data analyzer. The DAT files contain a great dealof information, including thousands of different drivers, each contains detailed instructions on how toidentify malware.
VirusScan Enterprise for Linux depends on the scanning engine and the threat information in the DATfiles to identify malware threats. The scanning engine analyzes files for malware threats, then verifiesfiles with the known threat information stored in the DAT files. McAfee Labs regularly identifies thenew known threat information (signature) and adds it to the DAT files. That is the reason McAfeerecommends you to download the most recent version of DAT file.
For more information on DAT files, see McAfee KnowledgeBase article KB55986.
Once the engine has confirmed the identity of malware, it cleans the object. For example, theanti-malware software can remove an infected macro from a document or delete the malware code inan executable file. If the malware had destroyed data and the file cannot be cleaned or recovered,VirusScan Enterprise for Linux isolates the file so that it cannot be accessed, activated, or infect otherfiles.
What and when to scanThe malware threat can come from infected macros, shared program files, files shared across anetwork, email, disks, or files downloaded from the Internet.
Each McAfee anti-malware software product targets a specific area of vulnerability. McAfeerecommends a multi-tiered approach to provide the full range of malware detection, security, andcleaning capability.
Configure the software according to your environmental needs. Configuring the protection optionsdefines how the software deals with different file types and what it does with infected or suspiciousitems.
Types of scanningThe software scans files in two ways such as on-access scanning and on-demand scanning.
Both these scanning detect the same malware, but they work at different points on the network andon the Linux systems. The types of scanning can take place at different times, and at different stagesin the handling of objects.
On-access scanning
On-access scanning is a real-time scanning that examines objects when the user or system accessesfiles. For example, an on-access scanner examines a file when the user opens it.
When you first install the software, on-access scanning defaults are set but you can configure thesettings as needed. You can set global options that determine how scanning is carried out. The globaloptions include how the scanner deals with different types of object, specifying the actions for infecteditems, and how quarantine and notification are handled.
On-demand scanning
You can run on-demand scan in two ways:
IntroductionHow scanning works 1
McAfee VirusScan Enterprise for Linux 2.0.1 Product Guide 11

• Standard on-demand scan — The user instructs the software to perform a scan. You can run astandard on-demand scan manually.
• Scheduled on-demand scan — The scheduled scan runs automatically at predetermined intervalsas defined.
You can choose to schedule a scan of this type to run after the regular DAT update.
You can run an on-demand scan for many reasons, for example:
• To check a file that has been downloaded from the Internet or obtained from an external source.
• To check if your system is clean, following the DAT update, in case new viruses can be detected.
• To check if your system is clean, following a recent single detection.
Product featuresThe main features of the software are listed here.
General
• Native 64-bit platform support — Supports only 64-bit platforms. All binaries shipped with theproduct are 64-bit. This product cannot be used on 32-bit platforms.
• Fanotify technology — Uses Fanotify technology to perform on-access scanning instead of kernelhooking modules, the technology used in earlier versions. Therefore, this version does not haveany kernel hooks.
Fanotify is enabled in the kernel from the kernel version 2.6.38. This release does not support thedistribution that does not have Fanotify enabled in the kernel, such as RedHat 6.
• 5700 Engine support — Pre-packaged with the latest 5700 engine that provides enhanceddetection capabilities.
Anti-malware scanning
• Protects your system from viruses, trojan horses, spyware, and potentially unwanted programs.
• Supports Novell Storage Services (NSS) and Novell Cluster Services (NCS)
• Supports on-access scanning for local file systems and network volumes.
• Provides an option to include or exclude network-mounted volumes from on-access scanning andon-demand scanning.
• Provides an option to include or exclude archived files from on-access scanning and on-demandscanning.
• Supports regular expression-based exclusions for on-access scanning and on-demand scanningfrom the interface.
• Auto and scheduled updates for scanning engine and detection definition (DAT) files.
Software update and scanning schedule
• Allows you to schedule on-demand scans at your convenient timings.
• Allows you to schedule the scanning engine and detection definition (DAT) files update.
1 IntroductionProduct features
12 McAfee VirusScan Enterprise for Linux 2.0.1 Product Guide

Administration
• Manages and controls systems centrally from a single management console using ePolicyOrchestrator.
• Remote administration using a browser-based interface.
• Secure browser interface with authentication and HTTPS (SSL) support.
Reporting
• Displays real-time statistics for recently scanned items and recently detected threats.
• Creates detailed database for detected items and system events.
• Provides options to query the database by date range or individual field values, for example, virusname. You can export the results to a CSV file.
• Sends email notification for detected items, out of date DAT files, configuration changes, andsystem events.
• Generates diagnostic report for analysis when reporting a problem with the product.
IntroductionProduct features 1
McAfee VirusScan Enterprise for Linux 2.0.1 Product Guide 13

1 IntroductionProduct features
14 McAfee VirusScan Enterprise for Linux 2.0.1 Product Guide

2 Installation and deployment
Install the software on a standalone system, or deploy the software from ePolicy Orchestrator tomanaged Linux systems.
Contents System requirements Install the software on a standalone system Install and deploy the software on managed systems Upgrade the software Test the installation Uninstall the software
System requirementsMake sure that your system meets these minimum requirements, and you have administrator rights.
Component Requirements
Processors • Intel x86_64 architecture-based processor that supports Intel ExtendedMemory 64 technology. (Intel EM64T)
• AMD x86_64 architecture-based processor with AMD 64-bit technology
Memory Minimum: 2 GB RAM
Recommended: 4 GB RAM
Free Disk space Minimum: 1 GB
2
McAfee VirusScan Enterprise for Linux 2.0.1 Product Guide 15

Component Requirements
Operating Systems(64-bit)
• Operating system 64-bit
• SUSE Linux Enterprise Server 11 SP2 64-bit
• SUSE Linux Enterprise Server 11 SP3 64-bit
• Red Hat Enterprise Linux 7.x
• Ubuntu 12.04, 12.10, 13.04, 13.10 64-bit, and 14.04 64-bit.
• Amazon Linux AMI 2014.09 64-bit
• SUSE and Ubuntu on Amazon Elastic Compute Cloud (Amazon EC2)
• Red Hat Enterprise Linux 7 on Amazon Elastic Compute Cloud (Amazon EC2)
• Novell Open Enterprise Server 11 SP1
• CentOS 7.x
• Oracle Enterprise Linux 7.x
This product cannot be used on 32-bit platforms.
• Virtual platforms
• VMware • KVM
• Citrix Xen • Virtual box
• Xen
• Paravirtual environment
• Guest operating system on Xen Hypervisor
McAfeeManagementsoftware
• McAfee ePolicy Orchestrator 4.6
• McAfee ePolicy Orchestrator 5.0
• McAfee ePolicy Orchestrator 5.1
McAfee Agent McAfee Agent 4.8 Patch 2
Install the software on a standalone systemInstall the software on a standalone system manually or in silent mode.
Before you beginVerify that Fanotify is enabled in the kernel:
2 Installation and deploymentInstall the software on a standalone system
16 McAfee VirusScan Enterprise for Linux 2.0.1 Product Guide

1 Login to the Linux system as user root, type uname -r then press Enter. The resultshould be above kernel version 2.6.38
2 Type grep FANOT /boot/config-`uname -r then press Enter. The output shouldmatch as follows:
CONFIG_FANOTIFY=yCONFIG_FANOTIFY_ACCESS_PERMISSIONS=y
Tasks
• Install the software with the command line on page 17The command-line installation prompts you to provide input during the installation.
• Install the software in silent mode on page 19Silent installation installs the software on your Linux systems with the default values.
Install the software with the command lineThe command-line installation prompts you to provide input during the installation.
Tasks
• Install the software on RPM based systems on page 17Download the McAfeeVSEForLinux‑2.0.1.<build_number>.ZIP file from McAfee downloadsite, to install the software on RPM based systems.
• Install the software on Debian based systems on page 18Download the McAfeeVSEForLinux‑2.0.1.<build_number>.ZIP file from the McAfeedownload site, to install the software on debian based systems.
• Install the software on Novell Open Enterprise Server on page 19Install the software on Novell Open Enterprise Server.
Install the software on RPM based systemsDownload the McAfeeVSEForLinux‑2.0.1.<build_number>.ZIP file from McAfee download site, toinstall the software on RPM based systems.
Task
1 Download McAfeeVSEForLinux‑2.0.1.<build_number>.ZIP to a temporary directory and executethese commands in the given sequence:
# unzip McAfeeVSEForLinux-2.0.1.<build_number>.ZIP# cd McAfeeVSEForLinux-2.0.1.<build_number># tar -zxvf McAfeeVSEForLinux-2.0.1.<build_number>-release-full.x86_64.tar.gz# tar -zxvf McAfeeVSEForLinux-2.0.1.<build_number>-release.tar.gz# tar -zxvf McAfeeVSEForLinux-2.0.1.<build_number>-others.tar.gz
2 Install McAfee Runtime:
rpm -ivh MFErt.i686.rpm
3 Install McAfee Agent:
rpm -ivh MFEcma.i686.rpm
4 Confirm that McAfee Agent is running correctly:
/etc/init.d/cma status
Installation and deploymentInstall the software on a standalone system 2
McAfee VirusScan Enterprise for Linux 2.0.1 Product Guide 17

5 Install VirusScan Enterprise for Linux:
bash McAfeeVSEForLinux-2.0.1.<build_number>-installer
6 Answer the questions when prompted. Accept the default values, or type custom values.
7 When prompted to start the VirusScan services, type the default option Y.
8 Confirm that VirusScan Enterprise for Linux is installed and running correctly:
/etc/init.d/nails status
The message The McAfeeVSEForLinux daemon is running: process information followsappears.
Install the software on Debian based systemsDownload the McAfeeVSEForLinux‑2.0.1.<build_number>.ZIP file from the McAfee download site, toinstall the software on debian based systems.
Task1 Download McAfeeVSEForLinux‑2.0.1.<build_number>.ZIP to a temporary directory and execute
these commands in the given sequence:
# unzip McAfeeVSEForLinux-2.0.1.<build_number>.ZIP# cd McAfeeVSEForLinux-2.0.1.<build_number># tar -zxvf McAfeeVSEForLinux-2.0.1.<build_number>-release-full.x86_64.tar.gz# tar -zxvf McAfeeVSEForLinux-2.0.1.<build_number>-release.tar.gz# tar -zxvf McAfeeVSEForLinux-2.0.1.<build_number>-others.tar.gz
2 Install McAfee Runtime:
dpkg -i MFErt.i686.deb
3 Install McAfee Agent:
dpkg -i MFEcma.i686.deb
4 Confirm that McAfee Agent is running correctly:
/etc/init.d/cma status
5 Install VirusScan Enterprise for Linux:
bash McAfeeVSEForLinux-2.0.1.<build_number>-installer
6 Answer the questions when prompted. Accept the default values, or type custom values.
7 When prompted to start the VirusScan services, type the default option Y.
8 Confirm that VirusScan Enterprise for Linux is installed and running correctly:
/etc/init.d/nails status
The message The McAfeeVSEForLinux daemon is running: process information followsappears.
2 Installation and deploymentInstall the software on a standalone system
18 McAfee VirusScan Enterprise for Linux 2.0.1 Product Guide

Install the software on Novell Open Enterprise ServerInstall the software on Novell Open Enterprise Server.
Task1 From the Novell eDirectory server, use iManager to create a user, nails, and a group, nailsgroup.
2 Add the user nails to the group nailsgroup. Enable the user and group using the Linux User Management.
3 Provide nails the user with administrator rights on all NSS volumes.
rights -f /media/nss/<VOL-name> -r s trustee nails.<context>.<tree>
You must provide administrator privileges to the nails user, every time a new NSS volume is created.
4 Download the MFErt.i686.rpm and MFEcma.i686.rpm file.
5 Install McAfee Runtime and McAfee Agent:
rpm -ivh MFErt.i686.rpm
rpm -ivh MFEcma.i686.rpm
6 Install VirusScan Enterprise for Linux:
bash McAfeeVSEForLinux-2.0.1.<build_number>-installer
7 Type nailsgroup for the Linux group for the VirusScan administrator.
8 Type nails for the VirusScan user.
9 Answer the questions when prompted. Accept the default values, or specify your own.
10 When prompted to start the VirusScan services, type the default option Y.
Install the software in silent modeSilent installation installs the software on your Linux systems with the default values.
Tasks• Install the software on RPM and Debian based systems in silent mode on page 19
Install VirusScan Enterprise for Linux on RPM and Debian systems in silent mode.
• Install the software on Novell Open Enterprise Server in silent mode on page 20Install the software on Novell Open Enterprise server in silent mode.
Install the software on RPM and Debian based systems in silent modeInstall VirusScan Enterprise for Linux on RPM and Debian systems in silent mode.
Before you beginBefore installing the software, you must have McAfee Runtime and McAfee Agent alreadyinstalled on the computer.
Installation and deploymentInstall the software on a standalone system 2
McAfee VirusScan Enterprise for Linux 2.0.1 Product Guide 19

Task1 Create a file, nails.options, with the following settings in the root home directory.
SILENT_ACCEPTED_EULA=”yes”SILENT_INSTALLDIR=”/opt/NAI/LinuxShield”SILENT_RUNTIMEDIR=”/var/opt/NAI/LinuxShield”SILENT_ADMIN=”[email protected]”SILENT_HTTPHOST=”0.0.0.0”SILENT_HTTPPORT=”55443”SILENT_MONITORPORT=”65443”SILENT_SMTPHOST=”0.0.0.0”SILENT_SMTPPORT=”25”SILENT_NAILS_USER=”nails”SILENT_NAILS_GROUP=”nailsgroup”SILENT_CREATE_USER=”yes”SILENT_CREATE_GROUP=”yes”SILENT_RUN_WITH_MONITOR=”yes”SILENT_QUARANTINEDIR=”/quarantine”SILENT_START_PROCESSES=”yes”
2 At the command prompt, type the following command:
bash McAfeeVSEForLinux-2.0.1.<build_number>-installer
3 After installation is completed, use the command passwd to assign a password to the user nails.
Install the software on Novell Open Enterprise Server in silent modeInstall the software on Novell Open Enterprise server in silent mode.
Task1 From the Novell eDirectory server, use iManager to create a user, nails and a group, nailsgroup.
2 Add the user nails to the nailsgroup. Enable the user and group using the Linux User Management.
3 Provide nails the user with administrator rights on all NSS volumes.
rights -f /media/nss/<VOL-name> -r s trustee nails.<context>.<tree>
You must provide administrator privileges to the nails user, every time a new NSS volume is created.
4 In the nails.options file, make sure that the following parameters are available:
SILENT_NAILS_USER="nails"SILENT_NAILS_GROUP="nailsgroup"SILENT_CREATE_USER=”no”SILENT_CREATE_GROUP=”no”
5 From the terminal window, type bash McAfeeVSEForLinux-2.0.1.<build number>-installer
6 After performing the installation, use iManager to assign a password to the user nails.
Install and deploy the software on managed systems Install and manage the software using McAfee ePolicy Orchestrator for centralized policyimplementation.
Contents Prerequisites Check in the package manually
2 Installation and deploymentInstall and deploy the software on managed systems
20 McAfee VirusScan Enterprise for Linux 2.0.1 Product Guide

Install the extensions Deploy the software Send an agent wake-up call
PrerequisitesBefore deploying VirusScan Enterprise for Linux on Novell Open Enterprise Server 2.x systems:
1 From the Novell eDirectory server, use iManager to create a user, nails, and a group, nailsgroup.
2 Add the user nails to the group nailsgroup. Enable the user and group using the Linux User Management.
3 Provide nails the user with administrator rights on all NSS volumes. For example: rights -f /media/nss/<VOL-name> -r s trustee nails.<context>.<tree>
You must provide administrative privileges to the nails user, every time a new NSS volume iscreated.
4 Verify that Fanotify is enabled in the kernel:
a Login to the Linux system as user root, type uname -r then press Enter. The result should beabove kernel version 2.6.38
b Type grep FANOT /boot/config-`uname -r then press Enter. The output should match asfollows:
CONFIG_FANOTIFY=yCONFIG_FANOTIFY_ACCESS_PERMISSIONS=y
If the output does not match as shown, contact McAfee Technical Support.
Check in the package manuallyCheck in the VirusScan Enterprise for Linux deployment package to the ePolicy Orchestrator MasterRepository.
Before you beginMake sure that the McAfeeVSEForLinux‑2.0.1.<build_number>‑release‑EPO.zip file isextracted from the package to a temporary location on the ePolicy Orchestrator server.
TaskFor option definitions, click ? in the interface.
1 Log on to the ePolicy Orchestrator server as an administrator.
2 Click Menu | Software | Master Repository, then click Action | Check In Package.
3 On the Check In Package page, for Package type, select Product or Update (.ZIP).
4 Click Browse in File Path, select the file from the temporary location, then click Next.
Select McAfeeVSEForLinux-2.0.1.<build_number>-release-EPO.zip to install the software.Select MSA-LNX_4.8.0_Package.zip to install McAfee Agent.
5 On the Package Options page, select a Branch, select the required options, then click Save.
Installation and deploymentInstall and deploy the software on managed systems 2
McAfee VirusScan Enterprise for Linux 2.0.1 Product Guide 21

Install the extensionsInstall VirusScan Enterprise for Linux extensions using ePolicy Orchestrator.
Install these extensions to enable the features of the product:
• EPOAGENTMETA.ZIP
• LYNXSHLDMETA.ZIP
• LYNXSHLDMETAPARSER.ZIP
TaskFor option definitions, click ? in the interface.
1 Log on to the ePolicy Orchestrator server as an administrator.
2 Click Menu | Software | Extensions.
3 On the Extensions page, click Install Extension.
4 Click Browse, select the extension file, then click OK.
To install the software Help extension, browse for the file help_vsel _201.zip andcheck in the extension. You will find the Help extension under Extensions | McAfee | HelpContent.
Deploy the softwareDeploy VirusScan Enterprise for Linux on client computers using the ePolicy Orchestrator software.
TaskFor option definitions, click ? in the interface.
1 Log on to the ePolicy Orchestrator server as an administrator.
2 Create and download the agent installation package:
a From System Tree, click System Tree Actions | New Systems.
b On How to add systems, select Create and download agent installation package, click Non-Windows in Agent version,select McAfee Agent for Linux 4.8.0 (Current), then click OK.
c From Download file, right-click install, then select Save target as to download the file to your localsystem.
If you are deploying the product on an Ubuntu client system, download the installdeb.sh file toyour local system.
3 From the Linux terminal, execute the following command, to establish a connection betweenePolicy Orchestrator and the Linux client computer:
sh install.sh –i
4 Navigate to System Tree page, then on the Assigned Client Tasks tab, click Actions | New Client Task Assignment.
5 On Task to schedule, select McAfee Agent as the product, select Product Deployment as the task type, thenclick Create New Task under the task name.
2 Installation and deploymentInstall and deploy the software on managed systems
22 McAfee VirusScan Enterprise for Linux 2.0.1 Product Guide

6 To configure the client task, under Client Task Catalog, select Linux 64bit as the target platform, VirusScanEnterprise for Linux 2.0.1.<build number> as the Products and components, Install as the action, a language,then click Save.
To deploy the software with customized settings, copy the nails.options file to the /root and /directory on your Linux client system. For more information on creating the nails.options file, seeSilent installation.
7 Click Next to schedule this task immediately or as needed, Click Next to view the task summary, thenclick a summary, then click Save and send an agent wake-up call. Wait for the deployment task tocomplete.
Send an agent wake-up callSend an agent wake-up call to enforce the policies from ePolicy Orchestrator.For option definitions, click ? in the interface.
Task1 Log on to the ePolicy Orchestrator server as an administrator.
2 Navigate to System Tree, select a group or systems, then select the Computer Names of that group.
3 Click Actions | Agent | Wake Up Agents.
4 For Wake-up call type select Agent Wake-Up Call, then for Randomization select a number of minutes thatthe systems must respond by.
5 Select Get full product properties for the agents to send complete properties instead of only propertiesthat have changed since the last agent-server communication.
6 Click OK.
To see the status of the agent wake-up call, click Menu | Automation | Server Task Log.
Upgrade the softwareVirusScan Enterprise for Linux supports upgrading the software and migrating the configuration fromthe previous versions of the software.
Tasks• Upgrade the software from previous versions on RPM and Debian systems on page 24
Upgrade the software from versions 1.7.1 or 1.9.0 or 2.0 to version 2.0.1.
• Upgrade the managed systems using ePolicy Orchestrator on page 24Upgrade your existing Linux client systems running versions 1.7.1 or 1.9 or 2.0 to version2.0.1, using the ePolicy Orchestrator software.
Installation and deploymentUpgrade the software 2
McAfee VirusScan Enterprise for Linux 2.0.1 Product Guide 23
Upgrade the software from previous versions on RPM andDebian systemsUpgrade the software from versions 1.7.1 or 1.9.0 or 2.0 to version 2.0.1.
Task1 Upgrade McAfee Agent:
• For RPM based systems: rpm -Uvh MFEcma.i686.rpm
• For Debian based systems: dpkg -i MFEcma.i686.deb
2 Confirm that McAfee Agent is running correctly:
/etc/init.d/cma status
3 Upgrade VirusScan Enterprise for Linux:
bash McAfeeVSEForLinux-2.0.1.<build number>-installer
4 Confirm that VirusScan Enterprise for Linux is running correctly:
/etc/init.d/nails status
5 Restart the computer:
reboot
Reboot is required only if you upgrade from versions 1.7.1 or 1.9 to version 2.0.1.
When you upgrade the software, the existing on-access scan settings, on-demand scan settings, andthe exclusions list are migrated.
Upgrade the managed systems using ePolicy Orchestrator Upgrade your existing Linux client systems running versions 1.7.1 or 1.9 or 2.0 to version 2.0.1, usingthe ePolicy Orchestrator software.For option definitions, click ? in the interface.
Task1 Log on to the ePolicy Orchestrator server as an administrator.
2 Check in the packages manually.
For more information, see Check in the package manually.
3 Install the extensions.
For more information, see Install the software extensions.
4 Navigate to the System Tree page. On the Assigned Client Tasks tab, click Actions | New Client Task Assignment.
5 On Task to schedule, select McAfee Agent as the product, select Product Deployment as the task type, thenclick Create New Task under Task Name.
6 To configure the client task, under Client Task Catalog, select Linux 64bit as the target platform, VirusScanEnterprise for Linux 2.0.1.<build number> as the product and component, Install as the action, a language,then click Save.
To upgrade the McAfee Agent on the Linux client system to McAfee Agent 4.8, first add McAfee Agent forLinux 4.8.0.x, then click the + button to add VirusScan Enterprise for Linux 2.0.1.<build_number>to upgrade both McAfee Agent and the product.
2 Installation and deploymentUpgrade the software
24 McAfee VirusScan Enterprise for Linux 2.0.1 Product Guide

7 Click Next to schedule this task immediately or as needed, click Next to view the task summary, clickSave, then send an agent wake-up call. Wait for the deployment task to complete.
8 Restart the client computer:
reboot
Reboot is required only if you upgrade from versions 1.7.1 or 1.9 to version 2.0.1.
Test the installationMcAfee recommends that you test your installation to make sure that the software is installed properlyand can protect your systems.
Tasks• Test the on-access scan feature on a standalone system on page 25
You can test on-access scanning by accessing the European Institute of ComputerAnti-Virus Research (EICAR) standard anti-virus test file.
• Test the on-demand scan feature on a standalone system on page 25Verify the on-demand scanning by accessing the European Institute of Computer Anti-VirusResearch (EICAR) standard anti-virus test file.
• Test the on-demand scan on managed system on page 26Verify that the on-demand scan feature is working on a managed system.
Test the on-access scan feature on a standalone systemYou can test on-access scanning by accessing the European Institute of Computer Anti-Virus Research(EICAR) standard anti-virus test file.Make sure that on-access scanning is disabled in VirusScan Enterprise for Linux On-Access settings.
For option definitions, click ? in the interface.
Task1 From a web-browser, go to: https://<Linux client IP address>:55443.
2 Log on with the user name and password provided during installation.
3 On the On-Access Settings page, click Edit, deselect Enable On-Access scanning, then click Apply.
4 From your browser, go to http://eicar.org.
5 Click ANTI-MALWARE TESTFILE, then click DOWNLOAD.
6 Click an anti-malware test file. For example, eicar.com.txt.
7 From the On-Access Settings page, enable On-Access scanning.
8 Try copying the eicar.com.txt file downloaded to your Linux client's desktop /tmp directory.
You can see that the file is not copied to the target directory and is missing from the desktop. The fileis quarantined and you can see one detected item appears on the Host Summary page.
Test the on-demand scan feature on a standalone systemVerify the on-demand scanning by accessing the European Institute of Computer Anti-Virus Research(EICAR) standard anti-virus test file.Make sure that On-Access scanning is disabled in VirusScan Enterprise for Linux On-Access settings.
Installation and deploymentTest the installation 2
McAfee VirusScan Enterprise for Linux 2.0.1 Product Guide 25

Task1 From your browser, go to http://eicar.org .
2 Click ANTI-MALWARE TESTFILE, click DOWNLOAD, then right-click eicar.com.txt and save the file toyour /tmp directory.
3 From the interface, click Schedule Tasks.
4 Create a new on-demand scan schedule using the option Immediately.
5 Once the scan is complete, see the results of the scan.
You can see that the EICAR test malware is detected in the scan results. You can also view theseresults from Detected Items and System Events page.
Test the on-demand scan on managed systemVerify that the on-demand scan feature is working on a managed system.
Before you beginMake sure that On-Access scanning feature is disabled on your system.
TaskFor option definitions, click ? in the interface.
1 From your managed system, using the browser, go to http://eicar.org .
2 Click ANTI-MALWARE TESTFILE, click DOWNLOAD, then right-click eicar.com.txt and save the file toyour /tmp directory.
3 From the ePolicy Orchestrator, run an on-demand scan using the option Immediately on the managedsystem.
4 Once the scan is complete, see the results of the scan.
You can see that the EICAR test malware is detected in the scan results. You can also view theseresults from Detected Items and System Events page.
Uninstall the softwareRemove the software from standalone Linux systems and remove the software and its relatedextensions from managed Linux systems.
Tasks• Uninstall the software from a standalone system on page 27
You can uninstall the software from your Linux system using the command line.
• Remove the software from managed systems on page 27Create a client task to remove VirusScan Enterprise for Linux from managed systems.
• Remove the software from ePolicy Orchestrator on page 27Remove the software from the ePolicy Orchestrator repository.
2 Installation and deploymentUninstall the software
26 McAfee VirusScan Enterprise for Linux 2.0.1 Product Guide

Uninstall the software from a standalone systemYou can uninstall the software from your Linux system using the command line.
Before you beginYou must have administrator rights to uninstall the software.
Task1 Type the following at the command prompt, then press Enter.
• For RPM based systems:
1 rpm -e McAfeeVSEForLinux
2 rpm -e MFEcma
3 rpm -e MFErt
• For Debian based systems:
1 dpkg --purge mcafeevseforlinux
2 dpkg --purge mfecma
3 dpkg --purge mfert
2 Restart the system.
Remove the software from managed systemsCreate a client task to remove VirusScan Enterprise for Linux from managed systems.
For option definitions, click ? in the interface.
Task1 Log on to the ePolicy Orchestrator server as an administrator.
2 Click Menu | Systems | System Tree.
3 Create a client task in ePolicy Orchestrator. Click Assigned Client Tasks | Actions | New Client TaskAssignment.
4 Schedule a client task in ePolicy Orchestrator. Under Task to schedule, select McAfee Agent as theproduct, select Product Deployment as the task type, then click Create New Task under the task name.
5 Configure the client task in ePolicy Orchestrator. Under Client Task Catalog, select Linux as the targetplatform, VirusScan Enterprise for Linux 2.0.1.<build number> as the product and component, Remove as theaction, select a language, then click Save.
6 Click Next to schedule the task immediately or as needed, click Next to view task summary, click Save,then send an agent wake-up call.
Remove the software from ePolicy OrchestratorRemove the software from the ePolicy Orchestrator repository.
For option definitions, click ? in the interface.
Task1 Log on to the ePolicy Orchestrator server as an administrator.
2 Click Menu | Software | Master Repository to open the Packages in Master Repository page.
Installation and deploymentUninstall the software 2
McAfee VirusScan Enterprise for Linux 2.0.1 Product Guide 27

3 In the Actions column, click the Delete link for VirusScan Enterprise for Linux as the name and 2.0.1 as theversion.
4 Remove the product and reports extensions.
a Click Menu | Software | Extensions, then from the left pane, select VirusScan Enterprise for Linux
b For each extension file, click Remove, select Force removal, bypassing any checks or errors, then click OK.
2 Installation and deploymentUninstall the software
28 McAfee VirusScan Enterprise for Linux 2.0.1 Product Guide

3 Using the interface
Access the interface to define or modify the software configuration, or view information about thesoftware.
Contents Launch the interface VirusScan Enterprise for Linux interface Working with the interface
Launch the interfaceView the interface by specifying the IP address and port number in a supported web browser.
Task1 Open a supported web browser, such as Internet Explorer, Mozilla, or Konqueror, then type the IP
address and port number in this format:
For example: https://server1:55443 or https://192.168.200.200:55443
VirusScan Enterprise for Linux regards server1 and SERVER1 as similar. The browser tries to connectto the port on the Linux host where the VirusScan Enterprise for Linux web-monitoring service runs,and displays the logon page. If your browser or its version is not supported, you see a warningmessage. You can continue to log on, but you might experience problems later with the screen andoperation of features of the interface.
2 Type the default user name nails and the password that you specified during installation, thenclick Log on to open the homepage.
The user name and password is case-sensitive.
On Konqueror browsers, the following message appears: Server certificate failed theauthenticity test... This message appears because the certificate is self-signed. You can ignore thismessage and click Continue.
The Host Summary page displays information such as IP address, DAT and engine version, productversion, files scanned, status, and detected items for the Linux systems.
To return to this page at any time, click Home from the navigation pane on the left side.
3
McAfee VirusScan Enterprise for Linux 2.0.1 Product Guide 29

VirusScan Enterprise for Linux interfaceVirusScan Enterprise for Linux user interface has three areas such as, navigation pane, console, andthe quickhelp pane.
When you launch the software interface, you can see these main areas:
• Left — The navigation pane allows you to visit each page setting.
• Middle — The console displays the available settings for each page you select from the navigationpane.
• Right — The QuickHelp pane displays the Help content.
Navigation paneThe navigation pane appears on left side of the interface. It provides links to view summary reports,schedule scans, update the product, and configure scan settings and notifications. Similar links aregrouped.
The name of the currently selected Linux host appears above the navigation pane as a host name andport number, for example: server1:55443.
The groups of items in the navigation pane menu (View, Schedule, and Configure) refer to this host.
• View — Displays Host Summary, Scanning Summary, Detected Items, System Events, and Scheduled Tasksinformation about the selected host.
• Schedule — Displays Product Update and On-Demand Scan information, where you can set up schedules forrunning on-demand scans and updating the DAT files.
• Configure — Displays General Settings, On-Access Settings, On-Demand Settings, and Notifications information,where you can configure scanning, notification, and repository settings on the selected host.
The navigation pane also includes:
• Home — Displays summary information about the host that is being monitored.
• Show/Hide Quick Help — Displays or hides the Help system which is displayed on the right pane of theinterface.
ConsoleThe console in the middle of the interface displays each page that is selected from the navigationpane.
Help paneThe help pane on the right side of the interface displays basic information about each page displayedthe console area.
You can configure to display or hide the Help, using the Show Quick Help or Hide Quick Help menu options inthe navigation pane.
Links barThe links bar at the top of the interface provides quick access to information or often-used functions.
This bar contains the following links:
• Log off — Closes the current session and navigates to the software logon page.
• Technical Support — Navigates to the McAfee Technical Support page.
3 Using the interfaceVirusScan Enterprise for Linux interface
30 McAfee VirusScan Enterprise for Linux 2.0.1 Product Guide

• Submit a Sample — Displays Instructions for submitting malware samples to McAfee labs.
• Virus Information Library — Links to the malware information library, which provides full informationabout every malware and other potentially unwanted software that VirusScan Enterprise for Linuxcan detect and clean.
• About McAfee VirusScan Enterprise for Linux — Displays product version and license information.
• Resources — Displays contact information.
• Help Topics — Navigates to online Help.
For the web addresses of the links, see Contact information.
Depending on the configuration that your organization requires, some of these links might not beavailable or they can redirect to other locations. For more information, see Advanced features.
Working with the interfaceYou can expand tables, sort details, and modify the page settings.
Expanding and collapsing tablesThe interface contains several tables of information. For convenience, you can expand or collapsesome tables.
The software displays information and the available configuration options in tables.
• Click (Collapse) — To hide the information.
• Click (Expand) — To display the information.
You can collapse and expand tables as needed for better readability, when the interface displaysinformation with more rows.
For example, on the Notifications page, the SMTP Notification and SMTP Settings tables contain many options.You might not be able to view the options in both the tables on a single page. In such cases, you cancollapse the table information that you are not using.
Sorting table columnsThe interface contains several tables. For convenience, you can sort the information using the columntitle.
For example, to sort rows into time order, click the column heading Time. An arrow appears on the rightside of a column heading and indicates the order of the sorting.
^ — The information is displayed in ascending ordering (0–9, A–Z).
v — The information is displayed in descending ordering (9–0, Z–A).
To reverse the order of sorting, click the column heading again.
This action does not refresh or update the contents of a table. The action does not sort all information;it changes the order of the currently displayed rows of information only.
Using the interfaceWorking with the interface 3
McAfee VirusScan Enterprise for Linux 2.0.1 Product Guide 31

Navigating through long tablesIf VirusScan Enterprise for Linux has too much information to display within a page, the interfacedisplays first few rows at a time.
You can use the navigation arrows and numbers that appear at the bottom of the table to display therest of the information.
For example: << 1 2 3 4 5 >>
To increase the number of rows of information that you can view on one page, see General settings.
VirusScan Enterprise for Linux applies a limit to the amount of information that can be viewed overseveral pages. For example, on the Detected Items page and the System Events page, you can view up to 20pages each containing up to 50 rows. You can effectively view more results by using a query to filterthe information.
Modify page settingsYou can change the page settings for several pages in the interface. These pages have an Edit buttonat the top right of the page.For option definitions, click ? in the interface.
Task1 On the navigation pane, under Configure area, click the page you want to modify the settings, then
click Edit.
The Edit button is replaced by other buttons — Apply and Cancel, and in some cases, Defaults, or Reset.
2 Update the fields as needed, then click Apply.
3 While making the changes, if you decide not to proceed, click Cancel.
4 To reset the settings to the defaults, click Reset. When you click Cancel or Defaults, you are promptedto confirm that you want to do this.
Automatically refresh information on pagesThe information on some pages is automatically refreshed every 10 seconds by default.For option definitions, click ? in the interface.
Task1 On the navigation pane, under Configure area, click General Settings, then click Edit.
2 In the Browser Interface table, type the value for Refresh interval (seconds), then click Apply.
To manually refresh these pages at any time, click Refresh at the top of the page.
Using wizardsThe interface uses wizards for completing complex tasks.
Using the Next and Back buttons in the top right corner enables you to move from pane to pane. Youcan also move to any pane by clicking the respective tabs.
To close the wizard and complete the task, click Finish.
3 Using the interfaceWorking with the interface
32 McAfee VirusScan Enterprise for Linux 2.0.1 Product Guide

Error messagesWhen a fault occurs with the interface, a message appears on the current page.
The message typically has the format:
Error code Description
25 Connection failed to host 192.168.255.200
For more information about error messages, see View system events.
Date and time expressionDate and time in the interface are expressed as the local time on the host where the software isrunning.
The time is displayed in 24-hour format, and includes a UTC (Universal Time Co-ordinates) offset. Forexample: May 02, 2013 12:35:00 (-8:00 UTC).
Using the interfaceWorking with the interface 3
McAfee VirusScan Enterprise for Linux 2.0.1 Product Guide 33

3 Using the interfaceWorking with the interface
34 McAfee VirusScan Enterprise for Linux 2.0.1 Product Guide
4 Viewing information
From the View area of the navigation pane, you can view the host summary, scanning summary,detected items, system events, and scheduled tasks information.
Contents Host summary Scanning summary Detected items Viewing system events Scheduled tasks ExtraDAT file details
Host summary The Host Summary page shows the information collected from the server running VirusScan Enterprisefor Linux. The information includes the number of files scanned and the detections.
To view this page, click Host Summary under View in the navigation pane.
For more information about the scanning activity on the host, click the host name in the Host column.The Scanning Summary page contains these details.
Option Definition
Host Displays the name of host that is being monitored. Click the address to view theScanning Summary page for that host.
Status Displays the host status:• active — The host is being monitored.
• connecting, disconnecting — Brief changes of state.
• disconnected — Typically the host has been switched off, or its services are not running.
• on-access disabled — On-access scanning has been disabled on the host.
• on-access enabled — On-access scanning has been enabled on the host.
Files Scanned Displays the number of items scanned since the software was installed, or since thestatistics counters were last reset.
Detected Items Displays the number of detected items since the software was installed or since thestatistics counters were reset. Click the number to navigate to the Detected Items page forthat host.
DAT Version Displays the 8-digit (XXXX.YYYY) version number for the DAT files.
DAT Date Displays the date when the DAT files were created.McAfee regularly provides updated DAT files. If the date is more than a day ago, yourDAT files are not up to date.
4
McAfee VirusScan Enterprise for Linux 2.0.1 Product Guide 35
Option Definition
ExtraDAT McAfee provides an ExtraDAT file to counter specific threats whenever needed. If anExtraDAT file is available, click Yes to navigate to the ExtraDAT page.
Engine Version Displays the scanning engine version. Engines are updated less often than DAT files.
Product Version Displays the product version.
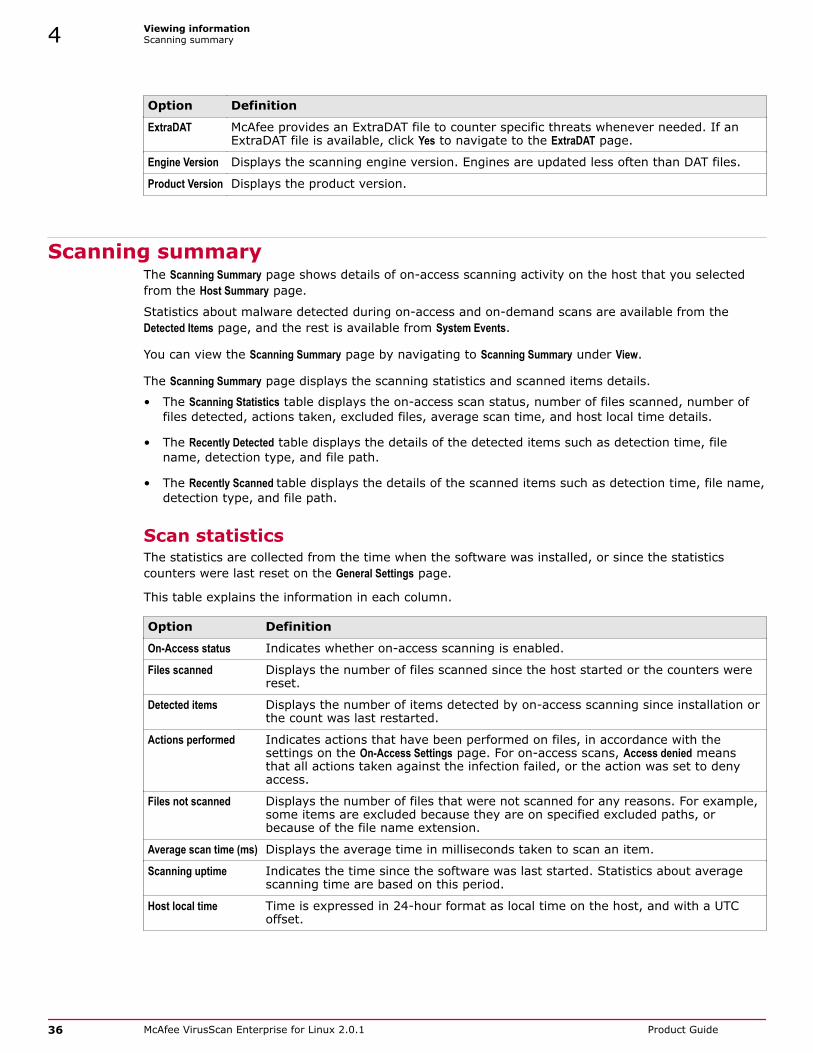
Scanning summaryThe Scanning Summary page shows details of on-access scanning activity on the host that you selectedfrom the Host Summary page.
Statistics about malware detected during on-access and on-demand scans are available from theDetected Items page, and the rest is available from System Events.
You can view the Scanning Summary page by navigating to Scanning Summary under View.
The Scanning Summary page displays the scanning statistics and scanned items details.
• The Scanning Statistics table displays the on-access scan status, number of files scanned, number offiles detected, actions taken, excluded files, average scan time, and host local time details.
• The Recently Detected table displays the details of the detected items such as detection time, filename, detection type, and file path.
• The Recently Scanned table displays the details of the scanned items such as detection time, file name,detection type, and file path.
Scan statisticsThe statistics are collected from the time when the software was installed, or since the statisticscounters were last reset on the General Settings page.
This table explains the information in each column.
Option Definition
On-Access status Indicates whether on-access scanning is enabled.
Files scanned Displays the number of files scanned since the host started or the counters werereset.
Detected items Displays the number of items detected by on-access scanning since installation orthe count was last restarted.
Actions performed Indicates actions that have been performed on files, in accordance with thesettings on the On-Access Settings page. For on-access scans, Access denied meansthat all actions taken against the infection failed, or the action was set to denyaccess.
Files not scanned Displays the number of files that were not scanned for any reasons. For example,some items are excluded because they are on specified excluded paths, orbecause of the file name extension.
Average scan time (ms) Displays the average time in milliseconds taken to scan an item.
Scanning uptime Indicates the time since the software was last started. Statistics about averagescanning time are based on this period.
Host local time Time is expressed in 24-hour format as local time on the host, and with a UTCoffset.
4 Viewing informationScanning summary
36 McAfee VirusScan Enterprise for Linux 2.0.1 Product Guide

Recently detected itemsView the items that are detected recently. This page is continuously updated as files are accessed,then scanned and any malware is detected.
Although a file name appears in the list, the file itself might no longer exist if the software has deletedthe infected file. The following information is displayed under Recently Detected.
Option Description
Time Time when the detection occurred.
File Name Name of the file, excluding its path.
Detected As Name of any virus or other potentially unwanted software. For more information, clickthe name to visit the Virus Information Library.
Detected Type Type of the detected item, such as:• Program — A program (application) such as spyware, remote-access software, or
password cracker.
• Joke — A joke program.
• Test — A test virus such as EICAR.
• Trojan — A trojan horse program.
• Virus — Malware and other types of infection.
User Name of the user who accessed the file.
Process Process that accessed the file.
Path Name of the file, including its full path. For an archive or other file types that act as acontainer, the path can include the name of an item within the archive.
Recently scanned itemsThis information is continuously updated as files are accessed and scanned. The following informationis displayed under Recently Scanned.
Option Description
Time Time when the scanning occurred.
File Name Name of the file, excluding its path.
Detected As Name of any virus or other potentially unwanted software. For more information, clickthe name to visit the Virus Information Library.
This column appears only if a recently scanned file was infected.
Detected Type Type of the detected item, such as:• Program — A program (application) such as spyware, remote-access software, or
password cracker.
• Joke — A joke program.
• Test — A test virus such as EICAR.
• Trojan — A trojan horse program.
• Virus — Malware and other types of infection.
This column appears only if a recently scanned file was infected.
User Name of the user who accessed the file.
Viewing informationScanning summary 4
McAfee VirusScan Enterprise for Linux 2.0.1 Product Guide 37

Option Description
Process Process that accessed the file.
Path Name of the file, including its full path. For an archive or other file types that act as acontainer, the path can include the name of an item within the archive.
If the path name is long, move the horizontal scroll bar to see it all clearly.
Generate a diagnostic reportA diagnostic report contains detailed information that is useful to McAfee support when you contactthem for troubleshooting.For option definitions, click ? in the interface.
Task1 In the Scanning Summary page, click Diagnostic Report. The console displays a list of system events,
configuration details, and other information.
2 Using the browser, you can copy the information for later analysis. Typically, you select Select Allfrom a right-click menu (or Ctrl+A), copy then paste the text as needed.
Detected itemsThe Detected Items page shows a list of items that contained malware or other potentially unwantedsoftware. The range of items that you see can vary because the list depends on how you navigated tothis page.
If you navigate directly to this page from the navigation pane or you select the count of Detected Items inthe Scanning Summary page, you see items detected today by on-access scanning.
If you navigate to this page from a task in the Scheduled Tasks page for an on-demand task, you seeitems detected during the last run of the task.
To view this page, click Detected Items under View in the navigation pane. From this page, you can modifythe view to show information about items detected by on-access scanning or detected by anon-demand scan.
The Detected Items page has two areas:
• Query — Allows you to define criteria to run a query.
• Results — Displays the results of the query you run. If none of the criteria matches, you get amessage No results found.
Analyze the detected itemsUnder Query, you can refine the information that is displayed under Results.
You can examine entries made between, before or after specified dates and times, and you can filterthe information. For example, you can find all occurrences of a particular virus. This feature is useful ifthe software has detected many viruses, and it enables you to analyze trends.
• After a short time, VirusScan Enterprise for Linux updates the information under Results.
4 Viewing informationDetected items
38 McAfee VirusScan Enterprise for Linux 2.0.1 Product Guide

Task1 On the navigation pane, click Detected Items, then select the scan option:
• Click On Access to view information about detections during on-access scanning.
• Click On Demand to view information about detections during on-access scanning.
2 To examine information after a specified date, select from. To examine information before aspecified date, select to. Select the date and time.
3 To examine information between two dates, select both from and to, select the dates and times,then click Find Results.
4 At the where area, select the check boxes to select items such as Path, Results, and User.
The path names are case sensitive.
5 Click Find Results. After a short time, the software displays the updated information in the Resultspage.
Viewing the resultsThe Results table contains several rows and columns. The number of rows is typically is 10.
The Results table contains the following information.
Option Definition
Time Time when the detection occurred.
File Name Name of the file, excluding its path.
Result Result of the scan:• Quarantined
• Quarantine Failed
• Deleted
• Delete Failed
• Cleaned
• Clean Failed
• Renamed
• Renamed Failed
• Detected
• Continue
• Blocked — No cleaning occurs but the software denies further access to the file. Thisoption applies to on-access scans only.
Detected As Name of the malware or other potentially unwanted software. For more information, clickits name to view its details in our Virus Information Library.
Detected Type Type of infection, such as joke, spyware, or trojan.
User Name of the user who accessed the file. This option is not available in the results ofon-demand scans.
Viewing informationDetected items 4
McAfee VirusScan Enterprise for Linux 2.0.1 Product Guide 39
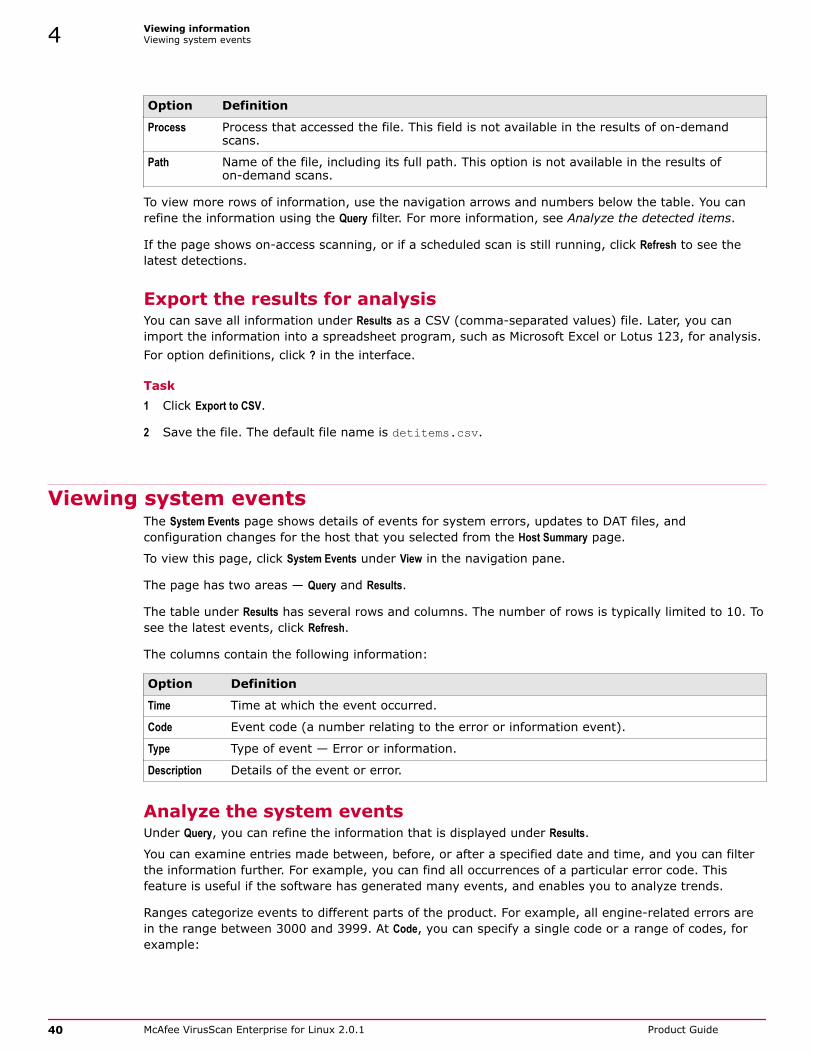
Option Definition
Process Process that accessed the file. This field is not available in the results of on-demandscans.
Path Name of the file, including its full path. This option is not available in the results ofon-demand scans.
To view more rows of information, use the navigation arrows and numbers below the table. You canrefine the information using the Query filter. For more information, see Analyze the detected items.
If the page shows on-access scanning, or if a scheduled scan is still running, click Refresh to see thelatest detections.
Export the results for analysisYou can save all information under Results as a CSV (comma-separated values) file. Later, you canimport the information into a spreadsheet program, such as Microsoft Excel or Lotus 123, for analysis.For option definitions, click ? in the interface.
Task1 Click Export to CSV.
2 Save the file. The default file name is detitems.csv.
Viewing system eventsThe System Events page shows details of events for system errors, updates to DAT files, andconfiguration changes for the host that you selected from the Host Summary page.
To view this page, click System Events under View in the navigation pane.
The page has two areas — Query and Results.
The table under Results has several rows and columns. The number of rows is typically limited to 10. Tosee the latest events, click Refresh.
The columns contain the following information:
Option Definition
Time Time at which the event occurred.
Code Event code (a number relating to the error or information event).
Type Type of event — Error or information.
Description Details of the event or error.
Analyze the system eventsUnder Query, you can refine the information that is displayed under Results.
You can examine entries made between, before, or after a specified date and time, and you can filterthe information further. For example, you can find all occurrences of a particular error code. Thisfeature is useful if the software has generated many events, and enables you to analyze trends.
Ranges categorize events to different parts of the product. For example, all engine-related errors arein the range between 3000 and 3999. At Code, you can specify a single code or a range of codes, forexample:
4 Viewing informationViewing system events
40 McAfee VirusScan Enterprise for Linux 2.0.1 Product Guide

Error Code Description
3000 Only the 3000 code event.
3001 Only the 3001 code event.
3000– All events above and including code event 3000.
–3000 All events up to and including code 3000.
1000–3000 All events between 1000 and 3000, including 1000 and 3000.
For option definitions, click ? in the interface.
Task1 Specify a date and time for information you want to examine.
Using any combination of from and to options, specify a date and time for the information you wantto examine
2 Click Find Results. After a short time, updated information appears under Results.
Export the results for analysisYou can save all information under Results as a CSV (comma-separated values) file, then import theinformation into a spreadsheet program such as Microsoft Excel or Lotus 123, for analysis.
The System Events page shows only a few rows of information, typically 10 at a time. However, the exportincludes all events that match the query specification. The title line of the Results table shows the fullnumber, for example: (101 to 110 of 2359). The more rows included, the longer the export takes.
For option definitions, click ? in the interface.
Task1 Under Query, specify the information you want to view, then click Find Results.
2 Click Export to CSV.
3 Save the file. The default name is sysevents.csv.
Scheduled tasksUpdate the scanning engine and DAT files, or run on-demand scans using schedules.
You can choose these tasks to run immediately, to run once, or to run on a schedule.
You can view this page by clicking Scheduled Tasks under View in the navigation pane.
The Scheduled Tasks page has two areas:
• Task Summaries — shows all tasks that you have scheduled.
• Task Details — shows the status and other details for the selected task.
The Task Summaries table has the following information:
Option Definition
Name Name of the task. To view the details for any task, click its name.
Type Type of task: Update or On-Demand scan.
Viewing informationScheduled tasks 4
McAfee VirusScan Enterprise for Linux 2.0.1 Product Guide 41

Option Definition
Status Status of the task: Idle, Completed, In Progress, or Failed.
Results Result of each task.
To see any more rows of information, use the navigation arrows and numbers below the table.
To see extra information about any task, click its name under Task Summaries.
The Task Details table has the following information:
Option Definition
Status Status of the task: Idle (not started), Completed, Failed, In Progress, or Stopped (by the user).
Next Run Schedule for the task. This option applies to regular tasks only.
Last Run Date and time when the task was last run.
Progress Progress of the task. During an on-demand scan, this field shows the number of filesscanned, and other information such as the number of files that were excluded fromscanning.During an update, this field shows text messages about each stage. Click any blue link tosee messages about this task in the System Events page.
Duration The time taken for the last task, or the elapsed time on the current task.
Results A completed on-demand scan shows as the number of detected items. For moreinformation, click the number to open the Detected Items page.If an update has completed, click to open the System Events page and find more information.
If a failure occurred, click to open the System Events page and find the reason.
The buttons under Task Details enable you to run, stop, modify, or delete the task as needed. To see thelatest status of the tasks, click the Refresh button.
Run a scheduled task immediatelyExecute a scheduled task immediately.For option definitions, click ? in the interface.
Task
1 On the Scheduled Tasks page, click the task name in Task Summaries to display its details under TaskDetails.
2 Under Task Details, click Run Now.
The task runs immediately. The results appear in Results under Task Details.
Modify an existing scheduled taskModify an existing scheduled task. If you no longer need a task but you want to set up a similar task,you can modify the existing task.For option definitions, click ? in the interface.
Task
1 On the Scheduled Tasks page, select the existing task in the Task Summaries table.
2 Under Task Details, click Modify.
3 Make the changes in the When to Scan, What to Scan, and Choose Scan Settings pages, then click Finish.
4 Viewing informationScheduled tasks
42 McAfee VirusScan Enterprise for Linux 2.0.1 Product Guide

Delete an existing scheduled taskUse this task to delete an existing scheduled task. If you no longer need a scheduled task, you candelete it.
Task1 Under Task Summaries, select the task name.
2 Under Task Details, click Delete.
Stop a running taskYou can stop a scheduled task which is running using this option.
Task1 Select the task that you want to stop, then click Stop.
2 This action sets the status to Stopping.
3 Click Stop again. This action sets the status to Stopped.
You can now run or delete the task.
ExtraDAT file detailsAn ExtraDAT is a supplemental malware definition file. McAfee releases the ExtraDAT file in responseto an outbreak of potentially unwanted software, a new malware, or a new variant of an existingmalware.
The Extra DAT page shows information about any ExtraDAT file that is in use on the selected host. Theinformation includes the malware name, and other potentially unwanted software that the ExtraDATfile can detect.
To view this page, click the text — for example Yes(5) — under the ExtraDAT column on the Host Summarypage. If the column contains No, no ExtraDAT file is available for the host, and VirusScan Enterprise forLinux does not display the page.
For information about any malware in the list, click its name to link to our Virus Information Library.
Viewing informationExtraDAT file details 4
McAfee VirusScan Enterprise for Linux 2.0.1 Product Guide 43

4 Viewing informationExtraDAT file details
44 McAfee VirusScan Enterprise for Linux 2.0.1 Product Guide

5 Setting up schedules
Set up schedules to update the product or to schedule an on-demand scan.
From the Schedule area of the navigation pane, you can protect your Linux hosts by running thefollowing tasks regularly:
• Update the product. At least once per day, update the DAT files to ensure that the software canrecognize new viruses and other potentially unwanted software.
• Run an on-demand scan. The software examines files as they are accessed when on-access scanis enabled. For complete security, scan other files that are stored in the system but accessedoccasionally, using the on-demand scan.
McAfee recommends that you schedule the product update and on-demand scan at regular intervals.The product update task keeps the scan engine and DAT file up to date, and periodic on-demand scanensures that all files are scanned for malware threats.
The software enables you to create multiple schedules for running these tasks at regular intervals. Youcan also create a schedule for immediate scan or product update in response to a suspected malwareattack. Using the latest DAT files you can make sure that your hosts are free from the new malwarethreats.
Understanding time differences
It is important to understand how to set up times for scans and updates. Suppose that you are in LosAngeles, using a browser to control a host that is running the software in New York. When youschedule the time and date, it is the local time in New York. The time difference between these twolocations is typically three hours. If you set an on-demand scan to run at midnight, the scan runs atmidnight in New York, and you see the scan results from 9 p.m. in Los Angeles.
Contents Using a wizard Product update schedule On-demand scan preferences
Using a wizardEach type of schedule works in a similar way, using a wizard-like process to make the task easier.
The process leads you through a few pages where you enter the following information:
• When the scan or update will take place
• What to scan or update
• The name of the task
5
McAfee VirusScan Enterprise for Linux 2.0.1 Product Guide 45

Product update scheduleVirusScan Enterprise for Linux depends on information in the DAT files to identify malware.
Without updated information in the DAT file, the software cannot detect new threats or respond tothem effectively. The software that is not using the latest DAT files can compromise your malwareprotection program.
More numbers of malware appear every month. To meet this challenge, McAfee release new DAT filesevery day, incorporating the results of the ongoing research into the characteristics of new malwareand their variants. The update task that is provided with the software makes it easy to take advantageof this service.
This feature allows you to download the latest DAT files or a new scanning engine, using an immediateupdate or a scheduled update.
You can also create an unscheduled update. Here, you provide information about an update but do notattach a schedule to it. You can then run the update at any time, or run it from a command line.
Within your network, you need at least one computer that can download the files from our FTP site.The software can then access the FTP site directly or it can copy files from that computer. For moredetails of the download site, see Contact information.
You can also create an unscheduled update. Here, you provide information about an update but do notattach a schedule to it. You can then run the update at any time.
Within your network, you need at least one system that can download the files from our FTP site. Formore details of the download site, see Contact information. The software can then access the FTP sitedirectly or it can copy files from that system.
Create a product update scheduleVirusScan Enterprise for Linux depends on information in the DAT files to identify malware to protectyour Linux systems from latest threats.
Without updated information in the DAT file, the software cannot detect new threats or respond to themeffectively. The software that is not using the latest DAT files can compromise your malware protectionprogram.
To create a schedule to update the virus definition files or the scanning engine, click Product Updateunder Schedule in the navigation pane.
For option definitions, click ? in the interface.
Task1 Launch the interface.
2 In the Schedule area, click Product Update.
5 Setting up schedulesProduct update schedule
46 McAfee VirusScan Enterprise for Linux 2.0.1 Product Guide
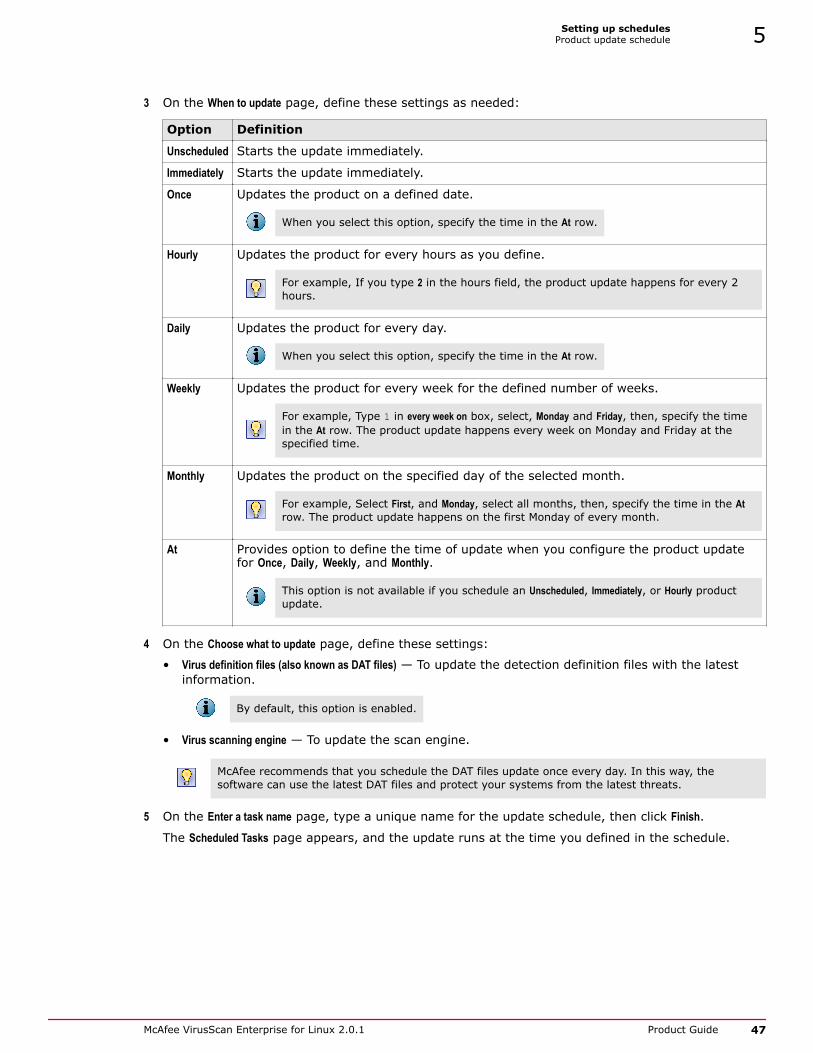
3 On the When to update page, define these settings as needed:
Option Definition
Unscheduled Starts the update immediately.
Immediately Starts the update immediately.
Once Updates the product on a defined date.
When you select this option, specify the time in the At row.
Hourly Updates the product for every hours as you define.
For example, If you type 2 in the hours field, the product update happens for every 2hours.
Daily Updates the product for every day.
When you select this option, specify the time in the At row.
Weekly Updates the product for every week for the defined number of weeks.
For example, Type 1 in every week on box, select, Monday and Friday, then, specify the timein the At row. The product update happens every week on Monday and Friday at thespecified time.
Monthly Updates the product on the specified day of the selected month.
For example, Select First, and Monday, select all months, then, specify the time in the Atrow. The product update happens on the first Monday of every month.
At Provides option to define the time of update when you configure the product updatefor Once, Daily, Weekly, and Monthly.
This option is not available if you schedule an Unscheduled, Immediately, or Hourly productupdate.
4 On the Choose what to update page, define these settings:
• Virus definition files (also known as DAT files) — To update the detection definition files with the latestinformation.
By default, this option is enabled.
• Virus scanning engine — To update the scan engine.
McAfee recommends that you schedule the DAT files update once every day. In this way, thesoftware can use the latest DAT files and protect your systems from the latest threats.
5 On the Enter a task name page, type a unique name for the update schedule, then click Finish.
The Scheduled Tasks page appears, and the update runs at the time you defined in the schedule.
Setting up schedulesProduct update schedule 5
McAfee VirusScan Enterprise for Linux 2.0.1 Product Guide 47

On-demand scan preferencesOn-demand scanning examines the configured directories of your host at convenient times or atregular intervals.
Use on-demand scans to supplement the continuous protection that the on-access scanner offers, orto schedule regular scans.
The software scans files as they are written to or read from disk. During these scans, the installed DATfiles check for any malware or potentially unwanted software within the files.
You can perform a one-time on-demand scan when you want to scan a file or location that you suspectof containing malware. You can perform scheduled scanning activities at convenient times or at regularintervals.
You can also create an unscheduled scan. Here, you provide information about a scan but do notattach a schedule to it. You can then choose to run the scan at any time, or run it from the commandline.
To use this feature, click On-Demand Scan under Schedule in the navigation pane.
Schedule an on-demand scanCreate a schedule to run an on-demand scan on the configured drives of your host system.
Task1 Launch the interface.
2 On the Schedule area, click On-Demand Scan.
3 On When to scan, select the frequency of scan.
Option Definition
Unscheduled Starts the scan immediately.
Immediately Starts the scan immediately.
Once Runs the on-demand scan at the defined date. When you select this option, specifythe time in the At row.
Hourly Runs the on-demand scan for every hour as defined.For example, If you type 2 in the hours field, the scanning happens for every 2 hours.
Daily Runs the on-demand scan for every day.When you select this option, specify the time in the At row.
Weekly Runs the on-demand scan for every week for the defined number of weeks.For example, Type 1 in every week on box, select Monday and Friday, then specify the timein the At row. The scanning happens on every week Monday and Friday in the specifiedtime.
Monthly Runs the on-demand scan on the specified day of the selected month.For example, Select First, and Monday, select all months, then, specify the time in the Atrow. The on-demand scan runs on the first Monday of every month.
At Allows you to define the time to run on-demand scanning for Once, Daily, Weekly, andMonthly.
5 Setting up schedulesOn-demand scan preferences
48 McAfee VirusScan Enterprise for Linux 2.0.1 Product Guide

4 On the What to scan page, define these settings.
• Path — Type the path you want to scan.
• Scan Sub-Directories — Select the box to include the subdirectories of the defined path.
• Add — To add another path for scanning.
You can remove the path from the on-demand scan by clicking Remove button.
If you selected the option to scan the subdirectories and remove the path from on-demandscanning, the software does not perform on-demand scan for either the path or the subdirectories.
Setting up schedulesOn-demand scan preferences 5
McAfee VirusScan Enterprise for Linux 2.0.1 Product Guide 49

5 On the Choose scan settings page, define the scan settings, then click Next.
Option Definition
Decompress archives Scans archived file such as .tar or .tgz files.
The decompression might slow the system performance. Themalware-infected file in an archived file cannot become active until it isextracted.
Perform heuristic virusanalysis
Uses heuristic analysis to identify any potential new macro threats in filescreated by Microsoft Office products.
Perform macro analysis Scans for potential macro threats in files are added.
Decode MIME encodedfiles
Decodes email messages that are typically encoded in Multipurpose InternetMail Extensions MIME format.
Using this option can affect system performance. If your network has otheranti-malware software for handling email threats, you can unselect thisoption. By default, this option is deselected.
Find potentially unwantedprograms
Scans for threat programs such as spyware, remote-access utilities, andpassword crackers.
Find joke programs Joke programs are not harmful. They play tricks such as displaying a hoaxmessage.
This feature only becomes available if you have selected Find potentially unwantedprograms.
Scan files on networkmounted volumes (NFS,CIFS/SMBFS only
Scans NFS, CIFS, or SMBFS volumes for threats. VirusScan Enterprise forLinux treats only NFS, CIFS, or SMBFS volumes as network file systems.When you select this option, the software scans these network-mountedvolume directories and its subdirectories for malware threats. If you unselectthis option, the software does not scan these network-mounted volumes.
If the network-mounted volumes are added to the Paths Excluded from Scanninglist, the software excludes those volumes from scanning, even if scan onnetwork-mounted volumes is selected.
Extension-basedscanning
Indicates how VirusScan Enterprise for Linux handles files that haveextension names (for example, .txt and .exe). By default, VirusScan Enterprisefor Linux scans all files regardless of the file name extension.For more information, see Extension based scanning.
Maximum scan time(seconds)
Stops scanning the file after the number of seconds is reached.This feature prevents large files reducing overall performance, and protectsagainst corrupted files and denial-of-service attacks.
By default, the value is 45 seconds but you can set the value between 10and 300 seconds.
On computers with low-specification hardware, VirusScan Enterprise forLinux might abandon scanning of some large files because of the time taken.In such cases, we recommend that you increase this number.
Quarantine directory Allows you to specify the directory to store the infected files.
5 Setting up schedulesOn-demand scan preferences
50 McAfee VirusScan Enterprise for Linux 2.0.1 Product Guide
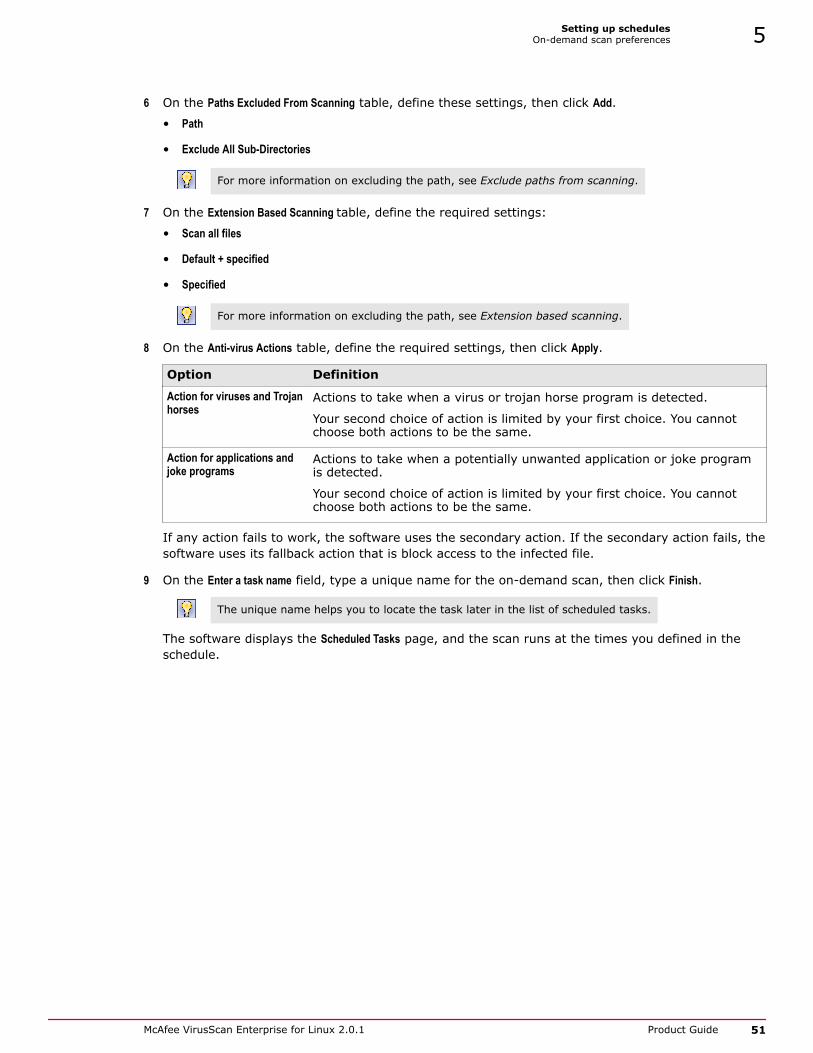
6 On the Paths Excluded From Scanning table, define these settings, then click Add.
• Path
• Exclude All Sub-Directories
For more information on excluding the path, see Exclude paths from scanning.
7 On the Extension Based Scanning table, define the required settings:
• Scan all files
• Default + specified
• Specified
For more information on excluding the path, see Extension based scanning.
8 On the Anti-virus Actions table, define the required settings, then click Apply.
Option Definition
Action for viruses and Trojanhorses
Actions to take when a virus or trojan horse program is detected.
Your second choice of action is limited by your first choice. You cannotchoose both actions to be the same.
Action for applications andjoke programs
Actions to take when a potentially unwanted application or joke programis detected.
Your second choice of action is limited by your first choice. You cannotchoose both actions to be the same.
If any action fails to work, the software uses the secondary action. If the secondary action fails, thesoftware uses its fallback action that is block access to the infected file.
9 On the Enter a task name field, type a unique name for the on-demand scan, then click Finish.
The unique name helps you to locate the task later in the list of scheduled tasks.
The software displays the Scheduled Tasks page, and the scan runs at the times you defined in theschedule.
Setting up schedulesOn-demand scan preferences 5
McAfee VirusScan Enterprise for Linux 2.0.1 Product Guide 51

5 Setting up schedulesOn-demand scan preferences
52 McAfee VirusScan Enterprise for Linux 2.0.1 Product Guide

6 Configuring VirusScan Enterprise forLinux
On installation, VirusScan Enterprise for Linux starts protecting your Linux systems from malware andother potentially unwanted software with the default settings. However, you can modify these settingsas needed.
From the Configure area of the navigation pane, you can configure the following settings for thesoftware:
• Use General Settings to configure browser interface options and log information to reset theconfiguration settings to those at installation time, and to clear the statistics from the softwaredatabase.
• Use On-Access Settings and On-Demand Settings page to specify the scanning options, paths to excludefrom scanning, and actions to take on infected items.
• Use Notifications page to configure SMTP settings.
• Use Repositories page to configure the local repository list, and proxy settings.
Contents General settings On-access settings configuration On-demand settings Notifications Repositories
General settingsFrom the General Settings page, you can change the appearance of pages in the browser interface, thebehavior of logging, and the collection of statistics.
To view the settings, click General Settings under Configure in the navigation pane.
To make any changes to the settings, click Edit. To apply the new settings, click Apply. For moreinformation, see Configure general settings.
The page has two main areas:
• Browser Interface
• Logging
This page has two important buttons:
6
McAfee VirusScan Enterprise for Linux 2.0.1 Product Guide 53

• Clear Statistics
• Reset Defaults
Browser interfaceUnder Browser interface, you can view and change settings such as the refresh interval.
This table explains the available options in each column.
Option Definition
Refresh interval(seconds)
The browser automatically updates the contents of pages such as the ScanningSummary page. By default, the page is refreshed every 10 seconds, but you canchange the interval between 5 and 600 seconds.
Results per page The number of rows to display information in certain pages under Results, namelyin the Detected Items, Scheduled Tasks, and System Events pages can be configured.
By default, 10 rows are displayed in a page, but you can set the number between1 and 50 rows.
Display time UTC offset Wherever time values are displayed — as in scheduled tasks and detections — anoffset value is displayed in UTC form to help you understand any time-zonedifferences.
Show Quick Help onstartup
Displays the web help on the right side area.
Log levelsUse Logging, to view, and change settings such as the level of detail that you require.
The next table explains the information in each column.
6 Configuring VirusScan Enterprise for LinuxGeneral settings
54 McAfee VirusScan Enterprise for Linux 2.0.1 Product Guide

Table 6-1 Option definitions
Option Definition
Detail level Indicates the level of logging information that the software records in its database.Setting the level as High can affect performance and the size the database. Thedefault level is Normal. The available options are• Low — Logs only critical errors and system service start up and shut down
messages.
• Normal — Logs critical errors, system service start up and shut down messages,internal errors such as OAS enable and disable, and crontab actions failedmessages.
• High —Logs additional details such as, events for created quarantiner child, createdcleaner child, and configured with engine and DAT. It also logs critical errors,system service start up and shut down messages, internal errors such as OASenable and disable, and crontab actions failed messages.
McAfee recommends setting the level as Low. Only when you troubleshoot issues, youcan set the level to High to extract complete details.
Additionally log toSYSLOG
Indicates if information logged to the VirusScan Enterprise for Linux database is alsologged to SYSLOG. By default, this option is deselected.
VirusScan Enterprise for Linux logs information in two channels.• Logs information in the software database
• Logs information in SYSLOG
To store the log information in SYSLOG additionally, you can select this option.
Detail level forSYSLOG
This field is only available if Additionally log to SYSLOG is selected.
By default, the level is Low. The available options are Low, Normal, and High.
Limit age of logentries
Indicates information in the log is automatically removed later, based on the age ofthe log entries. By default, this option is selected.
Maximum age of logentries
This field is only available if Limit age of log entries is selected.Limits to the age of entries in the software database to the specified days.
After the specified number of days, old entries are automatically removed to limitthe database size. Maximum age of log entries (days) - By default, the limit is 28days, but you can adjust the limit between 1 and 999 days.
Statistics lastcleared
Indicates when statistics were removed by clicking Clear statistics.
Statistics resetYou can reset the scanning statistics for certain pages.
To reset the statistics, on the General Settings page, click Clear statistics.
The values for Files scanned and Detected items in the Scanning Summary page are reset to zero. Theinformation in the Recently scanned and Recently detected table are reset.
Clearing statisticsYou can clear the scanning statistics for certain pages.
To clear the statistics, click Clear statistics.
Configuring VirusScan Enterprise for LinuxGeneral settings 6
McAfee VirusScan Enterprise for Linux 2.0.1 Product Guide 55
The values for Files scanned and Detected items in the Scanning Summary page are reset to zero. Theinformation in the Recently scanned and Recently detected areas are cleared.
Configure general settingsConfigure the General Settings page for the generic options such as refresh time interval, levels for logdetails, and to clear the statistics.
Task1 Launch the interface.
2 On the Configure area, click General Settings.
3 On the General Settings page, click Edit.
4 On the Browser Interface table, define these settings:
• Refresh Interval (seconds)
• Results per page
5 On the Logging table, define these settings:
• Detail level • Limit age of log entries
• Additionally log to SYSLOG • Maximum age of log entries
• Detail level for SYSLOG
6 Click the Apply button to save the changes.
You can revoke the changes that you have made to this page by clicking the Reset button.
Restoration of default configuration settingsYou can reset all configuration settings to the default settings by clicking Reset Defaults under GeneralSettings.
The general settings restore the default values for these pages:
• On-access settings
• On-demand settings
• Notification settings
• Settings for the browser interface and logging
On-access settings configurationThe On-Access Settings page displays the available configuration to protect your Linux systems wheneveran infected file or other potentially unwanted program is detected. To view this page, click On-AccessSettings under Configure in the navigation pane.
To make any changes to the settings, click Edit. To apply the new settings, click Apply.
For more information, see Configure on-access scan settings.
The On-Access Settings page has these main areas:
6 Configuring VirusScan Enterprise for LinuxOn-access settings configuration
56 McAfee VirusScan Enterprise for Linux 2.0.1 Product Guide

• Anti-virus Scanning Options
• Paths Excluded From Scanning
• Extension-based Scanning
• Anti-virus Actions
Anti-virus scanning optionsThe scanning options determine which types of file the software scans. By default, all these scanningoptions are available, unless stated.
The next table explains the options.
Option Definition
Enable On-Access Scanning Scans files for malware and other potentially unwanted software, whenever afile is accessed.
Decompress archives Scans inside file archives such as .tar or .tgz files.
The decompression can slow the system performance. The malware-infectedfile inside an archive cannot become active until it is extracted.
Find unknown programviruses
Uses heuristic analysis to identify potential new file viruses.
Find unknown macroviruses
Uses heuristic analysis to identify any potential new macro viruses in filescreated by Microsoft Office products.
Decode MIME encoded files Email messages are typically encoded in MIME format.
Using this option can affect system performance. If your network has otheranti-virus software for handling email, you might not require this option.
Find potentially unwantedprograms
These programs might be dangerous but they are not malware. It includesprograms such as spyware, remote-access utilities, and password crackers.
Find joke programs Joke programs are not harmful. They play tricks such as displaying a hoaxmessage. This feature only becomes available if you have selected Findpotentially unwanted programs.
Scan files when writing todisk
Scans the contents of each file when it is closed.
Scan files when readingfrom disk
Scans the contents of each file when it is opened.
Scan files on networkmounted volumes (NFS,CIFS/SMBFS only)
Scans NFS, CIFS, or SMBFS volumes for threats. VirusScan Enterprise forLinux treats only NFS, CIFS, or SMBFS volumes as network file systems.When you select this option, the software scans these network-mountedvolume directories and its subdirectories for malware threats. If you unselectthis option, the software does not scan these network-mounted volumes.
If the network-mounted volumes are added to the Paths Excluded from Scanninglist, the software excludes those volumes from scanning, even if scan onnetwork-mounted volumes is selected.
Configuring VirusScan Enterprise for LinuxOn-access settings configuration 6
McAfee VirusScan Enterprise for Linux 2.0.1 Product Guide 57

Option Definition
Extension-based Scanning Indicates how the software handles files that have extension names (forexample, .txt and .exe). By default, the software scans all files regardless ofthe file name extension.For more information, see Extension based scanning.
Maximum scan time(seconds)
Stops scanning the file after the number of seconds is reached.This feature prevents large files reducing overall performance, and protectsagainst corrupted files and denial-of-service attacks.
By default, this is 45 seconds but may be between 10 and 300 seconds.
On computers with low-specification hardware, the software might abandonscanning of some large files because of the length of time taken. In suchcases, we recommend that you increase this number.
Exclude paths from scanningVirusScan Enterprise for Linux supports excluding specific paths or files (either path or regularexpression format) from being scanned. You can add exclusions for on-access scans and on-demandscans from the interface.
Some shares or paths might not require scanning, or you might prefer not to scan them frequently.For example:
• Directories that contain only plain text files or other file types that are not prone to infection.
• Directories that contain executable files that have file permissions that prevent them beingmodified.
• Directories that contain large archive files and compressed files.
• Directories that contain files already known to be infected (quarantined).
Task1 On the On-Access Settings page under Configure area, click Edit.
2 Under Paths Excluded From Scanning, add the absolute path or regular expression for the file/folder youwant to exclude and click Apply.
For example: directory1 or directory1/subdirectory2
Enter path names in the correct case. Do not use symbolic links. For bind mounts (which appear inmore than one place in the directory), add each path that you want to exclude.
You can use regular expressions to represent the pattern matching within directory names or filenames. See Examples for Regular expression-based exclusions.
3 Under Paths Excluded From Scanning, add the path or regular expression for the file/folder you want toexclude and click Apply.
For example: directory1 or directory1/subdirectory2
Enter path names in the correct case.
You can use regular expressions to represent the pattern matching for directory names or filenames.
4 To exclude the subdirectories from scanning, select the Exclude All Sub-Directories checkbox of that row.
5 From Choose a share from the list below category, select a share.
6 Configuring VirusScan Enterprise for LinuxOn-access settings configuration
58 McAfee VirusScan Enterprise for Linux 2.0.1 Product Guide

6 Type the regular expression under Specify sub-directories (optional) text box. For specific examples, seeExclude paths from scanning.
7 Click Add in that row. An extra row is added to the table.
To remove any exclusion, click Remove in its row.
Examples for regular expression-based exclusions
Regular expression Example
To exclude all files starting with abc available in Documents/xyz folder
xyz/abc.*
To exclude all files with extensions .jar and .VOB underBackups/demo share
demo/.*\.(jar|VOB)$
To exclude all files with extension .mp3 and .mp4 underMusic share
.*\.(mp3|mp4)$
Regular expression Example
To exclude all files starting with abc available in /media/nss
/media/nss/abc.*
To exclude all files starting with "." under /media/nss /media/nss/\..*To exclude all files with extensions ext and abcunder /media/nss
/media/nss/.*\.(ext|abc)
To exclude all users mailboxes folders /home/.*/mailbox/.*To exclude all files and folders starts with abc in themachine
.*/abc.*
To use the regular expressions from ePolicy Orchestrator:
• You should include "/" as the first character. For example: From ePolicyOrchestrator, to exclude all files and folders starting with abc in the machine usethe regular expression: /.*/abc.*
• Ensure that there are no escape sequences included in the regular expression.For example: From ePolicy Orchestrator, to exclude all files starting with "."under /media/nss use the regular expression: /media/nss/..*
Extension-based scanningYou can specify extension names that you want to scan. You can specify extension to scan at the sametime as the software scans the extensions in the default list and the specified list.
This table only becomes visible when you click Edit. However, you can see the chosen setting atExtension Based Scanning in the first table.
If the software is running on a Samba file server that Microsoft Windows users can access, you mightspecify the types of files to scan according to their file extension. However, McAfee recommendsscanning all files wherever possible.
You can specify extension names that you want to scan. Otherwise, you can specify extension namesto scan at the same time as the software scans those in the default list. You cannot remove extensionnames from the default list. But you can build your own list of extension names based on extensionsin the current default list.
The choices available in this area are:
Configuring VirusScan Enterprise for LinuxOn-access settings configuration 6
McAfee VirusScan Enterprise for Linux 2.0.1 Product Guide 59

• Scanning all files
• Default + specified
• Specified
For the list of default files that are scanned when Default + specified option is enabled, see McAfeeKnowledgeBase article KB79626.
Scan all filesYou can scan all files from the configured directories regardless of the file name extension.For option definitions, click ? in the interface.
Task• To scan all files regardless of file name extension, under Extension Based Scanning, select Scan all files
Scan all files is the default settings for On-Access Settings.
Scan default files and specific filesYou can configure the VirusScan Enterprise for Linux to scan the default files and specific type of files.
Task1 Under Extension Based Scanning, select Default + specified.
2 At New, type the file name extension. For example AAA or aaa.
3 Click Add to move the name to the Specified list.
To remove names from the Specified list, select each name, then click Remove:
• To select one name, click the name.
• To select a range of names, click the first, then use Shift+Click to select the last.
• To select several names, use Ctrl+Click.
If a new file name extension is included in the later DAT files, files with that file name extension arealso scanned.
For the list of default file extensions that VirusScan Enterprise for Linux scans when Default + specifiedoption is selected, see McAfee KnowledgeBase article KB79626.
Scan specific filesYou can scan only specific files based on file name extension.
Task1 Under Extension Based Scanning, select Specified.
2 At New, type the file name extension, for example AAA or aaa.
3 Click Add to move the name to the Specified list.
6 Configuring VirusScan Enterprise for LinuxOn-access settings configuration
60 McAfee VirusScan Enterprise for Linux 2.0.1 Product Guide
4 To build a list quickly, click Set Defaults to copy all names from the malware definition files into theSpecified list. You can then modify the Specified list.
The file name extensions in the Specified list do not change automatically. Therefore, if a new filename extension is included in later malware definition files, files with that file name extension willnot be scanned.
To remove names from the Specified list, select each name, then click Remove:
• To select one name, click the name.
• To select a range of names, click the first, then use Shift+Click to select the last.
• To select several names, use Ctrl+Click.
Anti-virus actionsConfigure the software to take various actions when it detects malware or other potentially unwantedsoftware.
The actions are:
• clean — Cleans the infected file by removing the virus code. VirusScan Enterprise for Linux cannotrepair any damage that has occurred to the file. For example, some viruses can modify or erasedata in spreadsheets.
• continue — Reports the detection and continues scanning. This action is only available foron-demand scanning.
• delete — Deletes the infected file.
• deny access — Prevents further access to the infected file. This action is only available for on-accessscanning.
• quarantine — Moves the infected file to the area specified in Quarantine directory. To prevent the spreadof infected files, VirusScan Enterprise for Linux prevents moving a file from a remote file systeminto this area.
• rename — Renames the extension of the infected file, to prevent its accidental use. Renaming isuseful where the file extension such as .exe or .txt determines the application and opens the file.
If the infected file does not contain an extension, the file is renamed with the extension.vir. Forexample, if the original malware file name is EICAR, it is renamed to EICAR.vir
If the infected file contains an extension name other than vir, the first letter of the extension isrenamed with v. For example, the file EICAR.COM is renamed to EICAR.VOM. If EICAR.VOM exists,the file is renamed to EICAR.VIR.
The default primary action for infected files is Clean and the secondary option is Quarantine. However, youcan change the settings as needed.
For more information on configuring Anti-virus actions, see Configure on-access scan settings.
Configure on-access scan settingsVerify the on-access scanning default configurations and make necessary changes in the settings asneeded.
Task1 Launch the interface.
2 On the Configure area, click On-Access Settings.
Configuring VirusScan Enterprise for LinuxOn-access settings configuration 6
McAfee VirusScan Enterprise for Linux 2.0.1 Product Guide 61

3 On the On-Access Settings page, click Edit.
4 On the Anti-virus Scanning Options table, define these settings:
• Enable On-Access Scanning
• Decompress archives
• Find unknown program viruses
• Find unknown macro viruses
• Decode MIME encoded files
• Find potentially unwanted programs
• Find joke programs
• Scan files when writing to disk
• Scan files when reading from disk
• Scan files on network mounted volumes (NFS, CIFS/SMBFS only)
• Extension-based Scanning
• Maximum scan time (seconds)
• Quarantine directory
For details about these options, see anti-virus scanning options.
5 On the Paths Excluded From Scanning table, define the required settings.
For more information on excluding the path, see Exclude path from scanning.
6 On the Extension Based Scanning table, define the required settings:
• Path
• Exclude All Sub-Directories
• Action
For more information on excluding the path, see Extension based scanning.
7 On the Anti-virus Actions table, define the required settings, then click Apply.• Action for viruses and Trojan horses • Action if an error occurs during scanning
• Action for applications and joke programs • Quarantine directory
• Action on time out
For more information about these options, see Anti-virus actions.
If any action fails to work, the software uses the secondary action. If the secondary action fails, thesoftware uses its fallback action that is block access to the infected file.
6 Configuring VirusScan Enterprise for LinuxOn-access settings configuration
62 McAfee VirusScan Enterprise for Linux 2.0.1 Product Guide

On-demand settingsThe On-Demand Settings page shows how the software responds when malware or other potentiallyunwanted software is detected during an on-demand scan.
Settings for on-access scans and on-demand scans are similar.
This page shows the settings that are applied to all new tasks. To change the settings of an existingon-demand scanning task, see Modify an existing scheduled task.
To view this page, click On-Demand Settings under Configure in the navigation pane. To change any settings,click Edit. To apply the new settings, click Apply.
Any on-demand scanning tasks that you previously configured retain their own settings. If you changethe settings in the On-demand Settings page, the changes do not affect the existing on-demand scanningtask that you have already scheduled. The task that you create after changing the On-demand Settings runswith these settings.
Configure on-demand scan settingsConfigure the on-demand scan preferences before you schedule the scan on your Linux systems.
Task1 Launch the interface.
2 On the Configure area, click On-Demand Settings.
3 On the On-Demand Settings page, click Edit.
Configuring VirusScan Enterprise for LinuxOn-demand settings 6
McAfee VirusScan Enterprise for Linux 2.0.1 Product Guide 63

4 On the Anti-virus Scanning Options table, define these settings:
Option Definition
Decompress archives Scans archived file such as .tar or .tgz files.
The decompression might slow the system performance. The malware-infectedfile in an archived file cannot become active until it is extracted.
Find unknownprogram viruses
Uses heuristic analysis to identify potential new file viruses.
Find unknown macroviruses
Uses heuristic analysis to identify any potential new macro threats in filescreated by Microsoft Office products.
Decode MIME encodedfiles
Decodes email messages that are typically encoded in Multipurpose InternetMail Extensions MIME format.
Using this option can affect system performance. If your network has otheranti-malware software for handling email threats, you can unselect this option.
Find potentiallyunwanted programs
Scans for threat programs such as spyware, remote-access utilities, andpassword crackers.
Find joke programs Joke programs are not harmful. They play tricks such as displaying a hoaxmessage.
This feature only becomes available if you have selected Find potentially unwantedprograms.
Scan files on networkmounted volumes(NFS, CIFS/SMBFSonly)
Scans NFS, CIFS, or SMBFS volumes for threats. VirusScan Enterprise forLinux treats only NFS, CIFS, or SMBFS volumes as network file systems. Whenyou select this option, the software scans these network-mounted volumedirectories and its subdirectories for malware threats. If you unselect thisoption, the software does not scan these network-mounted volumes.
If the network-mounted volumes are added to the Paths Excluded from Scanning list,the software excludes those volumes from scanning, even if scan onnetwork-mounted volumes is selected.
Extension basedscanning
Indicates how the software handles files that have extension names (forexample, .txt and .exe). By default, the software scans all files regardless of thefile name extension.For more information, see Extension-based scanning.
Maximum scan time(seconds)
Stops scanning the file after the number of seconds is reached.This feature prevents large files reducing overall performance, and protectsagainst corrupted files and denial-of-service attacks.
By default, the value is 45 seconds but you can set the value between 10 and300 seconds.
On computers with low-specification hardware, the software might abandonscanning of some large files because of the time taken. In such cases, werecommend that you increase this number.
Quarantine directory Type the quarantine directory name, as defined during the installation.
5 On the Paths Excluded From Scanning table, define path and subdirectories you want to exclude.
For more information on excluding the path, see Exclude path from scanning.
6 Configuring VirusScan Enterprise for LinuxOn-demand settings
64 McAfee VirusScan Enterprise for Linux 2.0.1 Product Guide

6 On the Extension Based Scanning table, select one of these options as needed:
• Scan all files
• Default + specified
• Specified
For more information on excluding the path, see Extension based scanning.
7 On the Anti-virus Actions table, define the required settings, then click Apply.
Option Definition
Action for viruses and Trojanhorses
Actions to take when a virus or Trojan-horse program is detected.
Your second choice of action is limited by your first choice. You cannotchoose both actions to be the same.
Action for applications andjoke programs
Actions to take when a potentially unwanted application or joke programis detected.
Your second choice of action is limited by your first choice. You cannotchoose both actions to be the same.
Quarantine directory Name of the quarantine file, as set up at installation time.
If any action fails to work, the software uses the secondary action. If the secondary action fails, thesoftware uses its fallback action that is block access to the infected file.
8 After defining these configurations, schedule the on-demand scanning as needed.
For more information, see Schedule an on-demand scan.
NotificationsFrom the Notifications page, you can specify who receives email notification of events such as virusdetection and changes to the scanning options.
The software sends the email messages using the SMTP email protocol. To view this page, clickNotifications under Configure in the navigation pane. To change the settings, click Edit. After making thechanges, to apply the new settings, click Apply.
SMTP notificationsYou can define the events for which users get alert notifications.
This table explains the available settings.
Table 6-2 Option definitions
Option Definition
Item detected Details of a detection of a virus or other potentially unwanted software. Here, forexample, you can decide whether to issue a notification if any joke programs aredetected.
Out of date Details of out-of-date DAT files.
Here, for example, you can decide whether to notify if DAT files are more than 10days old.
Configuring VirusScan Enterprise for LinuxNotifications 6
McAfee VirusScan Enterprise for Linux 2.0.1 Product Guide 65

Table 6-2 Option definitions (continued)
Option Definition
Configuration change Details of changes to the settings for on-access scanning, notifications, and generalsettings. Changes to the settings for on-demand scans are not notified.
Here, for example, you can decide whether to notify if changes are made to thesettings for on-access scanning.
System events Details of any important events.
Here, for example, you can specify the range of system events or event types forwhich SMTP sends notification.
To enable any notification feature, select its checkbox in the left column under SMTP Notification.
For each type of notification, the software provides a default subject and a message. You can changethese messages to suit your organization. Messages can include substitution variables, such as%hostname% to indicate the host name. To include variables in any message, see Substituting variablesin notification templates.
To restore the default message, click Reset.
Configure SMTP settingsYou can define the list of users who receives notifications about the events specified in SMTP Notifications.
The SMTP Settings table provides options to configure the server, the sender, and the recipient details..
Server Name and port of the server that sends the email message. This is set up during installation.
From Name of the sender. By default, this is the address that was given during installation.
Task1 On the SMTP Settings table, define the Server details. This is set up during installation.
• Name — Name of the server
• Port — Port of the server
• From — Name of the sender. By default, this is the address that was given during installation.
• To — Names of the recipient. For example: [email protected].
2 On the Email field in the From row, type the name of the sender. By default, this is the address thatwas given during installation.
3 On the To row, you can add or remove the list of recipients.
Table 6-3
To Add recipients To remove recipients
1 Type the email address in New. For example:[email protected]
2 Click Add, to move the name to the Recipientlist.
1 Select each name, then click Remove
• To select one name, click the name.
• To select a range of names, click the first, thenuse Shift+Click to select the last.
• To select several names, use Ctrl+Click.
6 Configuring VirusScan Enterprise for LinuxNotifications
66 McAfee VirusScan Enterprise for Linux 2.0.1 Product Guide

RepositoriesA software repository is a storage location where software packages or updates can be retrieved andinstalled on systems.To deliver products and updates throughout your network, McAfee offers several types of repositoriesto create a robust update infrastructure. The repository options provide flexibility to develop anupdating strategy to ensure that your systems stay up to date.
To view this page, click Repositories under Configure in the navigation pane. To change or modify therepository settings, click Edit and to save the new settings, click Apply.
Configure the repository listThe repository list contains the names of all repositories you are managing with the software.The Repository List has details like repository name, type, URL, port, user name and password of theavailable repositories. The repository list includes the location and network credential information thatmanaged systems use to select the repository and retrieve updates. The ePolicy Orchestrator serversends the repository list to the agent during agent-server communication.
Task1 To add, delete or modify the Repository List, click Edit.
2 Type the repository name, type, URL, port number, user name, and password.
You can use the following options:
• Add — To add a repository to the list.
• Delete — To remove the repository from the repository list.
• Move up — To shift up the selected repository one level in the repository list.
• Move down — To shift the selected repository one level down in the repository list.
3 Click Apply — To save the changes, or Cancel to discard the changes.
Configure the local repositoryCreate a local repository and configure it to retrieve software and updates to install on your computer.You can use the local repository to access software and updates if your system can’t connect to theePolicy Orchestrator server or to the Internet.
Before you beginBefore configuring the local repository, you must mirror the McAfee FTP download site tothe local repository directory. To mirror the McAfee FTP download site using the wgetcommand, follow steps 1 to 6.
The following steps are illustrated with the assumption that the connection is available for wget tomirror the McAfee FTP download site. Other methods of mirroring the site works only if directories andfiles are renamed as illustrated.
Task1 Create a local repository directory where you want to mirror the McAfee FTP download site.
For example: /root/LocalRepo
2 At the /root/LocalRepo directory, type the following command:
wget -–mirror ftp://ftp.nai.com/Commonupdater
Configuring VirusScan Enterprise for LinuxRepositories 6
McAfee VirusScan Enterprise for Linux 2.0.1 Product Guide 67

3 From the commonupdater directory, rename the folder current to Current.
4 Rename these files in the commonupdater folder as defined:
• sitestat.xml to SiteStat.xml
• v2datdet.mcs to V2datdet.mcs
• v2datinstall.mcs to V2datinstall.mcs
5 From the Current folder, rename the folder vscandat1000 to VSCANDAT1000.
a From the VSCANDAT1000 folder, rename the folder dat to DAT.
6 Rename these files in the DAT/0000 folder as defined:
• v2datdet.mcs to V2datdet.mcs
• v2datinstall.mcs to V2datinstall.mcs
• pkgcatalog.z to PkgCatalog.z
7 Log on to the local user interface.
8 From the Configure section in the navigation pane, click Repositories.
9 Click Add to include a local repository and define these settings:
• Repository type — Local
• Repository URL — Type the absolute path of the directory. For the given example:
/root/LocalRepo/commonupdater
The Port, Username, and Password details are not required for local repository.
10 Using the Move Up button, move the local repository item to the top of the list.
11 Click Apply.
12 Run the DAT update task to verify.
Configure the proxy settingsTo access an Internet repository, such as the McAfee update sites, the repository uses proxy settingsto retrieve packages.
If your organization uses proxy servers for connecting to the Internet, you can use the proxy settings.
Task1 To configure the Proxy Settings, click Manually configure the proxy.
2 Type the IP address and Port number of the HTTP or FTP server.
You can use the following options:
• Use these settings for all proxy types — Specifies the same IP address and port number for all proxytypes.
• Use authentication for HTTP — Specifies the user name and password of the HTTP server forauthentication.
6 Configuring VirusScan Enterprise for LinuxRepositories
68 McAfee VirusScan Enterprise for Linux 2.0.1 Product Guide
• Use authentication for FTP — Specifies the user name and password of the FTP server forauthentication.
• Specify exceptions — Bypasses a proxy server for specific domains.
3 Click Apply to save the changes or Cancel to discard the changes.
Configuring VirusScan Enterprise for LinuxRepositories 6
McAfee VirusScan Enterprise for Linux 2.0.1 Product Guide 69

6 Configuring VirusScan Enterprise for LinuxRepositories
70 McAfee VirusScan Enterprise for Linux 2.0.1 Product Guide

7 Managing the software with ePolicyOrchestrator
Integrate and manage VirusScan Enterprise for Linux using ePolicy Orchestrator managementsoftware.
McAfee ePolicy Orchestrator provides a scalable platform for centralized policy management andenforcement on your McAfee security products and the systems where they are installed. It alsoprovides comprehensive reporting and product deployment capabilities through a single point ofcontrol.
For instructions about setting up and using ePolicy Orchestrator and McAfee Agent, see the productguide for your version of each product.
Contents Setting policies within ePolicy Orchestrator Define policies in ePolicy Orchestrator Scheduling tasks Configure reports Run a default query
Setting policies within ePolicy OrchestratorThe ePolicy Orchestrator console allows you to enforce policies across groups of computers or on asingle computer.
These policies override configurations set on individual computers. For information regarding policiesand how they are enforced, see the McAfee ePolicy Orchestrator — Product Guide for your productversion.
Before configuring any policies, select the group of computers for which you want to modify thepolicies. You can modify the software policies from the pages and tabs that are available in the detailspane of the ePolicy Orchestrator console. These pages are nearly identical to those you can accessdirectly from the software interface.
After you have modified the appropriate policies and saved the changes for the intended computer orgroup of computers, you are ready to deploy new settings using the McAfee Agent.
Define policies in ePolicy OrchestratorVirusScan Enterprise for Linux policies allow you to configure the features, feature administration, andto log event details.
You can find these policies on the Policy Catalog page for VirusScan Enterprise for Linux 2.0.1 under Product:
7
McAfee VirusScan Enterprise for Linux 2.0.1 Product Guide 71

• General Policies
• On-Access Scanning Policy
These policies override configurations set on individual systems. Configure these policies with yourpreferences, then assign it to groups of the managed systems.
Before configuring any policies, select the group of computers for which you want to modify thepolicies. You can modify the policies from the pages and tabs that are available in the details pane ofthe ePolicy Orchestrator console.
For more information about policies and how they are enforced on managed systems, see the productguide of your version of ePolicy Orchestrator.
Tasks• Create or modify policies on page 72
Create a new policy or modify existing policies for a specific group in the System Tree.• Configure general policy settings on page 72
With general policies settings, you can define the log files settings, SMTP notifications,disable the client user interface.
• Configure on-access scan policy settings on page 73With on-access Scanning policy, you can enable scans, define the directory to store thequarantined files, set maximum scanning time for files, items to scan, type of files to scan,and actions on detected malware.
• Enforce policies on page 74When you have created or modified policies, enforce them to multiple systems that aremanaged by ePolicy Orchestrator.
Create or modify policiesCreate a new policy or modify existing policies for a specific group in the System Tree.
TaskFor option definitions, click ? in the interface.
1 Log on to the ePolicy Orchestrator server as an administrator.
2 From the Policy Catalog, select a Product and Category.
3 Create or modify a policy.
To create a policy To modify a policy
1 Click New Policy.
2 Type the Policy Name.
3 Click OK.
4 Configure the settings.
1 Click the policy you want to modify.
2 Modify the settings.
4 Click Save.
Configure general policy settingsWith general policies settings, you can define the log files settings, SMTP notifications, disable theclient user interface.
You can also create or modify these policies from the System Tree, while assigning policies to selectedsystems. See the product guide for your version of ePolicy Orchestrator for more information.
7 Managing the software with ePolicy OrchestratorDefine policies in ePolicy Orchestrator
72 McAfee VirusScan Enterprise for Linux 2.0.1 Product Guide

TaskFor option definitions, click ? in the interface.
1 Log on to the ePolicy Orchestrator server as an administrator.
2 From the Policy Catalog, select VirusScan Enterprise for Linux 2.0.1 as the product, then select General Policiesas the category.
3 Click New Policy, type a name for the policy, then click OK.
4 On the Troubleshooting tab, define these settings:
In... Define...
Logging detail level • Low — Logs only critical errors and system service start up and shut downmessages.
• Normal — Logs critical errors, system service start up and shut downmessages, internal errors such as OAS enable and disable, and crontabactions failed messages.
• High —Logs additional details such as, events for created quarantiner child, createdcleaner child, and configured with engine and DAT. It also logs critical errors,system service start up and shut down messages, internal errors such as OASenable and disable, and crontab actions failed messages.
McAfee recommends setting the level as Low. Only when you troubleshootissues, you can set the level to High to extract complete details.
Additionally log toSYSLOG
Indicates if information logged to the software database is also logged toSYSLOG.
If you enable this option, define the log detail level for SYSLOG.
Limit age of logentries
Allows the software database to store the log information for the specified days,and removes the old entries automatically after the specified days.
Maximum age of logentries (days)
Sets the default limit to 28 days. You can set the limit between 1 and 999 days.
5 On the Advance tab, define these settings:
In... Define...
Disable client Web UI Disables the client interface that prevents the local user to modify the scanconfiguration settings.
Turn off SMTP Notifications Disables the SMTP notification on client systems.
6 Click Save.
Configure on-access scan policy settingsWith on-access Scanning policy, you can enable scans, define the directory to store the quarantinedfiles, set maximum scanning time for files, items to scan, type of files to scan, and actions on detectedmalware.
You can also create or modify these policies from the System Tree, while assigning policies to selectedsystems. See the product guide for your version of ePolicy Orchestrator for more information.
Managing the software with ePolicy OrchestratorDefine policies in ePolicy Orchestrator 7
McAfee VirusScan Enterprise for Linux 2.0.1 Product Guide 73

TaskFor option definitions, click ? in the interface.
1 Log on to the ePolicy Orchestrator server as an administrator.
2 From the Policy Catalog, select VirusScan Enterprise for Linux 2.0.1 as the product, then select On-AccessScanning Policy as the category.
3 Click New Policy, type a name for the policy, then click OK.
4 On the General tab, define these settings, then click Save.• On-access scan
• Quarantine directory
• Maximum Scan Time
5 On the Detections tab, then define these settings, then click Save.• Scan files
• What to scan
• What not to scan
6 On the Advanced tab, then define these settings, then click Save.• Heuristics
• Non-viruses
• Compressed files
7 On the Actions tab, then define these settings, then click Save.• When Viruses and Trojans are found • If the above action fails
• If the above action fails • If scanning fails
• When Programs and Jokes are found • If scanning times out
Enforce policiesWhen you have created or modified policies, enforce them to multiple systems that are managed byePolicy Orchestrator.
Task1 Log on to the ePolicy Orchestrator server as an administrator.
2 Navigate to System Tree, select a required group or systems, then click the Assigned Policies tab.
3 From the Product drop-down menu, select VirusScan Enterprise for Linux 2.0.1, select the Category, then clickEdit Assignment.
4 Select the policy from the Assigned policy drop-down menu with the appropriate inheritance options,then click Save.
5 Select the systems, then send an agent wake-up call. For instructions on sending an agentwake-up call, see Send an agent wake-up call.
You can create and enforce policies and view reports only after adding the VirusScan Enterprise forLinux extension files.
7 Managing the software with ePolicy OrchestratorDefine policies in ePolicy Orchestrator
74 McAfee VirusScan Enterprise for Linux 2.0.1 Product Guide

Scheduling tasksThe ePolicy Orchestrator software allows you to create, schedule, and maintain client tasks that run onthe managed systems. You can define client tasks for the entire System Tree, a specific group, or anindividual system.
Tasks• Create a product update task on page 75
Schedule automatic updates on the Linux systems.
• Create an on-demand scanning task on page 76Schedule an on-demand scan on the Linux client system using ePolicy Orchestrator.
• Configure the administrator password on page 77Set the VirusScan Enterprise for Linux administrator password on client systems usingePolicy Orchestrator.
Create a product update taskSchedule automatic updates on the Linux systems.
Your software can only provide full protection if you keep it up to date with the latest anti-virusdefinitions DAT files, spam engine, and anti-malware scanning engine.
We recommend that you update DAT files daily, and regularly check the McAfee Labs website for newDAT files.
TaskFor option definitions, click ? in the interface.
1 Log on to the ePolicy Orchestrator server as an administrator.
2 Navigate to System Tree, then select a required group or systems for which you want to create theproduct update task.
3 Click the Assigned Client Tasks tab, click Actions | New Client Task Assignment.
4 In Task to schedule, define these settings, then click Create New Task.• Select McAfee Agent for Product.
• Select Product Update for Task Type.
5 On the Client Task Catalog: New Task McAfee Agent: Product Update page, define these settings, then click Saveto open the Client Task Assignment Builder.• Task Name
• Description
• Package Selection
• Package Type
For package type, select Linux Engine and DAT.
The task that you created is listed under Task Name.
6 Schedule the task that you created, then click Next.
Managing the software with ePolicy OrchestratorScheduling tasks 7
McAfee VirusScan Enterprise for Linux 2.0.1 Product Guide 75

7 On the Schedule page, define these settings, then click Next.• Schedule Status • Start time
• Schedule Type • Task run according to
• Effective Period • Options
8 On the Summary page, verify the configurations you have set.
To make changes in the configurations that you have set, click Back or Schedule.
9 Send an agent wake-up call.
Create an on-demand scanning taskSchedule an on-demand scan on the Linux client system using ePolicy Orchestrator.
Schedule an on-demand scan for your Linux systems to find malware threats, vulnerability, or otherpotentially unwanted code. It can take place immediately, at a scheduled time, or at regular intervals.
TaskFor option definitions, click ? in the interface.
1 Log on to the ePolicy Orchestrator server as an administrator.
2 Navigate to System Tree, then select a required group or systems for which you want to scheduleon-demand scanning.
3 Click the Assigned Client Tasks tab, then select Actions | New Client Task Assignment.
4 In Task to schedule, define these settings, then click Create New Task.1 Select VirusScan Enterprise for Linux 2.0.1 for Product.
2 Select On Demand Scan for Task Type.
5 On the Client Task Catalog : New Task: VirusScan Enterprise for Linux 2.0.1: On-Demand Scan page, type the Task Nameand Description, then click Save.• Task Name
• Description
6 Click the Where tab, on the VirusScan Enterprise for Linux area, define these settings, then click Save.• Where
• Detection
• Advanced
• Actions
The task that you created is listed under Task Name.
7 Schedule the task immediately or as needed, then click Next to view the Summary of the schedule.
8 Click Save.
9 Send an agent wake-up call.
7 Managing the software with ePolicy OrchestratorScheduling tasks
76 McAfee VirusScan Enterprise for Linux 2.0.1 Product Guide

Configure the administrator passwordSet the VirusScan Enterprise for Linux administrator password on client systems using ePolicyOrchestrator.
TaskFor option definitions, click ? in the interface.
1 Log on to the ePolicy Orchestrator server as an administrator.
2 Click Menu | Systems | System Tree, then select a required group or systems for which you want tocreate the change password task.
3 On the Assigned Client Tasks tab, click Actions | New Client Task Assignment
4 Under Task to schedule, select VirusScan Enterprise for Linux 2.0.1 as the product, select Change VSELAdministrator's Password as the task type, then click Create New Task under the task name.
5 On the Client Task Catalog: New Task - VirusScan Enterprise for Linux 2.0.1: Change VSEL Administrator's Password page,define these settings, then click Save.• Task Name
• Description
6 From the Change VSEL Administrator's Password* area, define these settings, then click Save.• Enter old password
• Enter new password
• Re-enter new password
7 Schedule the task immediately or as needed, click Next to view the Summary page, then click Save.
8 Send an agent wake-up call.
Click Edit to change the description or schedule of this task or Delete to remove it.
Configure reportsReports are pre defined values, that query the ePolicy Orchestrator database and generate a graphicaloutput.McAfee ePolicy Orchestrator contains comprehensive querying and reporting capabilities. McAfeeincludes a set of default queries on the left pane. You can create a new query, edit, and manageexisting queries related to the software.
Task1 Log on to the ePolicy Orchestrator server as an administrator.
If the predefined queries on the left side do not serve your purpose, ePolicy Orchestrator enablesyou to create your own queries.
2 To view reports, click Menu | Reporting | Queries & Reports.
3 To create a new query, Click Actions | New.
4 On the left pane, select a Feature Group that the query should retrieve.
5 Select a Result Type, then click Next to open the Chart page.
Managing the software with ePolicy OrchestratorConfigure reports 7
McAfee VirusScan Enterprise for Linux 2.0.1 Product Guide 77

6 Select and accordingly configure a display chart/table and click Next to open the Columns page.
7 Select columns from the Available Columns pane, then click Next to open the Filter page.
8 Specify the criteria by selecting properties and operators to limit the data retrieved by the query.
9 Click Run, then Save to open the Save Query page.
10 Type a Name and Notes (if needed) for the query, then click Save.
Run a default queryYou can run the default query to view the graph with the default data settings.
TaskFor option definitions, click ? in the interface.
1 Log on to the ePolicy Orchestrator server as an administrator.
2 Click Menu | Reporting | Queries. A list of queries appears on the left pane.
3 Select VirusScan Enterprise for Linux under Shared Groups.
4 By default there are two queries:
Query Description
VSEL: VirusScan Enterprise for LinuxCompliance
Shows a graphical display of the compliant and non-compliantLinux systems in the network.
VSEL: VirusScan Enterprise for LinuxThreats
Shows a graphical display of the threat summary and actiontaken on all Linux systems in the network.
Click Run. The graphical output is displayed.
7 Managing the software with ePolicy OrchestratorRun a default query
78 McAfee VirusScan Enterprise for Linux 2.0.1 Product Guide

8 Advanced features
The advanced features of VirusScan Enterprise for Linux help you to use the features effectively.
Contents Lightweight Directory Access Protocol (LDAP) Authentication Substituting variables in notification templates How the quarantine action works Recover the quarantined items
Lightweight Directory Access Protocol (LDAP) AuthenticationVirusScan Enterprise for Linux requires an authenticated user name to access the interface and toconfigure the software. The user can be authenticated from the local system, Active Directory, or froman external database and locations.
The software uses the Pluggable Authentication Module (PAM) subsystem for user authentication.
The software requests the PAM subsystem to authenticate the user by providing the user credential.The PAM subsystem verifies the credentials and confirms results whether the user credential isauthenticated or not.
Before sending the user credential to the PAM subsystem for authentication, the software ensures thatthe user name matches with the name provided during the installation.
When installing the software, the installer prompts you to select the user as an administrator user.
The default user is nails and the default group is nailsgroup.
When you provide the user and group name, the installer checks whether the user exists in thesystem. If the user name does not exist, it creates the user and group in the local system.
When using LDAP authentication, make sure that the user name and user group does not exist in thelocal system. If exists, delete the user name and user group before proceeding.
Authentication from Active Directory
You can authenticate the user and group from the Active Directory.
8
McAfee VirusScan Enterprise for Linux 2.0.1 Product Guide 79

Before installing the software, make sure that:
• The user account is created in the Active Directory or the location from where you want toauthenticate before installing the software.
• The user name and group does not exist in the local system. You can verify it using thesecommands:
• grep [username] /etc/passwd — To verify the user name. A blank reply confirms that the username does not exist.
• grep [groupname] /etc/group — To verify the user group. A blank reply confirms that theuser group does not exist.
• The operating system is able to resolve the user and group authentication. You can verify it usingthese commands:
• getent passwd [username] — To verify the user name. A blank reply confirms that the username does not exist.
• getent [groupname] — To verify the user group. A blank reply confirms that the user groupdoes not exist.
• userdel [username] — To delete the user name, execute this command.
• groupdel [groupname] — To delete the user group, execute this command.
Substituting variables in notification templatesYou can use variable to substitute in a notification.
The notification messages described in Notifications section can use variables that the softwaresubstitutes when sending a message. For example, the template message:
File, %filename% is infected on %hostname%.
becomes
File, example.exe is infected on computer1.
The following table lists all the available variables. Some variables are valid only in particularinstances.
Table 8-1 Substitution variables
Valid for Variable Equivalent field inthe interface
Description
All alerts %hostname% <none> Name of the host on whichVirusScan Enterprise for Linux isinstalled.
All alerts %hostip% <none> IP address of host on whichVirusScan Enterprise for Linux isinstalled.
All alerts %productversion% Host Summary page —Product Version
Version of the product.
Item detected %detectedas% Detected Items page —Detected As
Name of the virus.
8 Advanced featuresSubstituting variables in notification templates
80 McAfee VirusScan Enterprise for Linux 2.0.1 Product Guide

Table 8-1 Substitution variables (continued)
Valid for Variable Equivalent field inthe interface
Description
Item detected %detectedby% Detected Items page —Task
"On-Access" if detected by theon-access process, or name ofthe On-Demand task whichdetected the infection.
Item detected %detectedtime% Detected Items page —Time
Date and time on the local hostfor detected item.
Item detected %detectedtype% Detected Items page —Detected Type
Type of the virus.
Item detected %detectedutc% Detected Items page —Time
Date and time on the local host,with UTC offset in brackets. Forexample: May 02 2008 12:30:12(+5:30 UTC).
Item detected %engineversion% Host Summary page —Engine Version
Version number of the scanningengine.
Item detected %extradatcount% Host Summary page —Extra DAT
Number of signatures in theExtraDAT file.
Item detected %extradatflag% Host Summary page —Extra DAT
Yes or No to indicate if anExtraDAT file is present.
Item detected %filename% Detected Items page —File Name
Name of the file which wasscanned (excluding path).
Item detected %path% Detected Items page —Path
Name of the file which wasscanned (including path).
Item detected %process% Detected Items page —Process
Name of process resulting in thescan.
Item detected %result% Detected Items page —Result
Result of any action taken for thedetected infection.
Item detected %user% Detected Items page —User
Name of user who caused thescan.
Out of date, andItem detected
%datage% <none> Age of the DAT files in days, fromthe VirusScan Enterprise forLinux host date and time.
Out of date, andItem detected
%datdate% Host Summary page —DAT Date
Date when the current DAT fileswere created.
Out of date, andItem detected
%datversion% Host Summary page —DAT Version
Version of the DAT files.
Configurationchange
%configchange% <none> Configuration changes made —modified, on-access detectionenabled, or on-access detectiondisabled.
System events %eventcode% System Events page —Code
Error code for the event.
System events %eventdescription% System Events page —Description
Error description for the event.
System events %eventtime% System Events page —Time
Date and time on the local hostfor event.
Advanced featuresSubstituting variables in notification templates 8
McAfee VirusScan Enterprise for Linux 2.0.1 Product Guide 81

Table 8-1 Substitution variables (continued)
Valid for Variable Equivalent field inthe interface
Description
System events %eventtype% System Events page —Type
Error type for the event.
System events %eventutc% System Events page —Time
Date and time for the event onthe local host, with UTC offset inbrackets. For example: May 022008 12:30:12 (-5:00 UTC).
How the quarantine action worksVirusScan Enterprise for Linux isolates infected files into a quarantine directory.
The processes that the software uses depend on the relative locations of the infected file and thequarantine directory, and on the features of the file system.
In some cases, moving the infected file by copying then deleting is not suitable. In every case, thesoftware works to prevent loss of security and the further spread of malware and other potentiallyunwanted software. The software uses the following techniques to quarantine infected files:
• If the file system supports hard links and the infected file is on the same file system, the softwarecreates a hard link to the quarantine directory, then unlinks the infected file. If the unlink fails, thesoftware unlinks the copy in the quarantine directory, so that only the original infected file remains.
• If the infected file is on a remote file system, the software copies the infected file into thequarantine directory only if the quarantine directory is also on that remote file system. This methodprevents the spread of infection between hosts.
• The software verifies that it can copy the infected file into quarantine directory and that it candelete the file from the quarantine directory. This method prevents creation of a copy of an infectedfile that cannot be deleted.
• If the software cannot delete the original infected file, it deletes the copy of the file in thequarantine directory so that only the original infected file remains.
If the quarantine action fails, the software uses the secondary action. If that action fails, the softwareuses its fallback action. For on-access scanning, the software blocks access to the infected file. Foron-demand scanning, the software reports that the file is infected.
Recover the quarantined itemsYou can recover the quarantined items, only when you are sure that the file is not malware. You cansubmit the quarantined files to McAfee Labs to make sure that the files are not malware.
Before you beginYou must have the root permission to run these commands.
8 Advanced featuresHow the quarantine action works
82 McAfee VirusScan Enterprise for Linux 2.0.1 Product Guide

Task1 Log on from the terminal as root user.
2 List the quarantined files:
/opt/NAI/LinuxShield/bin/nails quarantine --listFor example, if the file malware_sample from the /test directory is quarantined, you get the outputas: /quarantine/QXXXXX.XXXX.XXXXX.XXXX.meta: /test/malware_sample, where each Xrepresents a numeric value.
3 Recover the file:
/opt/NAI/LinuxShield/bin/nails quarantine --recover <meta-file path><destination-file>
The destination file is optional. If you do not specify the destination file, VirusScan Enterprise forLinux restores the file to the directory from where it quarantined.
For example, to recover the QXXXXX.XXXX.XXXXX.XXXX.meta file, execute this command:
/opt/NAI/LinuxShield/bin/nails quarantine --recover /test/Qxxxxx.xxxx.xxxxx.xxxx.meta /home/recover/tested_recovered_fileThis command recovers the QXXXXX.XXXX.XXXXX.XXXX.meta file and stores astested_recovered_file in the /home/recover directory.
After recovering the file, if you access the file and the current DAT detects this file as an infectedfile, it might be moved to the quarantined directory. To avoid quarantining, exclude the file ordirectory from the scanning before accessing the recovered file.
Advanced featuresRecover the quarantined items 8
McAfee VirusScan Enterprise for Linux 2.0.1 Product Guide 83

8 Advanced featuresRecover the quarantined items
84 McAfee VirusScan Enterprise for Linux 2.0.1 Product Guide

9 Troubleshooting
These are tested solutions to known situations that you might encounter when installing or using theproduct.
Contents Frequently asked questions Error messages Contact information
Frequently asked questionsContains troubleshooting information in the form of frequently asked questions.
InstallationThis section helps you with the frequently asked questions related to the software installation.
Where do I find the list of supported browsers?
1From the product's Log on page, click .
2 The supported browsers are listed in the Login Help page.
You can also refer to the product Release Notes — System Requirements section.
ScanningThis section helps you with the frequently asked questions related to on-access and on-demandscanning.
Why are some files being scanned and detected twice since the quarantinedirectory was changed?
The software maintains a cache to record details of files that have been scanned. Changing thequarantine directory flushes the cache. So the software must rescan the file to ensure that itsinformation is up to date.
Some large files are not scanned completely and timed out before completingscanning.
On servers with low-specification hardware, the software abandons scanning of some large filesbecause of the length of time taken. You can increase the time-out value at Maximum scan time on theOn-Access Settings page and the On-Demand Settings page.
9
McAfee VirusScan Enterprise for Linux 2.0.1 Product Guide 85

Why does a file disappear or report "access denied" when an operation (such ascat) is performed on it?The file is infected, and has been cleaned (or deleted or quarantined), or denied access by theon-access scanner. View Detected Items in the browser interface to see if malware was detected in thatfile.
How can I release a file where the on-access scanner has denied access?Add the file to the list of paths excluded (on the On-Access Settings page), or create a directory on thesame file system, and add that directory to the list. Use mv to move the file to the exclusion directory.Because mv is a meta-data change, it does not cause any on-access scanning.
If the software has blocked the file, the file is likely to be infected, and is not scanned again when in anexcluded directory.
Viruses and detection
How can I be sure that the anti-virus software is working?You can test the operation of the anti-virus software by running a test file on any computer where youhave installed the software. The EICAR Standard AntiVirus Test File was developed by the EuropeanInstitute of Computer Anti-virus Research (EICAR), a coalition of anti-virus vendors, as a method fortheir customers to test any anti-virus software.
To test scanning:
1 Open a standard text editor, then type the following character string as one line, with no spaces orline breaks:
X5O!P%@AP[4\PZX54(P^)7CC)7}$EICAR-STANDARD-ANTIVIRUS-TEST-FILE!$H+H*
The line shown above should appear as one line in your text editor window, so be sure to maximizeyour text editor window and delete any line breaks. Also, be sure to type the letter O, not thenumber 0, in the "X5O..." that begins the test message.
If you are reading this manual on your computer, you can copy the line directly from thefile and paste it into your text editor. If you copy the line, be sure to delete any carriagereturns or spaces.
2 Save the file with the name EICAR.COM. The file size will be between 68 and 70 bytes (dependingon end-of-line characters appended by the editor).
3 Upload the EICAR test file to any of the default Shares.When your software scans this file, it reports finding the EICAR test file.
This file is not a virus — it cannot spread or infect other files, or otherwise harm your computer.Delete the file when you have finished testing your scanner to avoid alarming other users.
How can I find out more about the effect of a virus?Visit our website. For more information, see Contact information.
What should I do if I find new malware?If you suspect you have a file that contains malware and the scanning engine does not recognize it,submit a sample to McAfee Labs. Click Submit a Sample on the Links bar to view the McAfeeKnowledgeBase article to submit malware samples.
9 TroubleshootingFrequently asked questions
86 McAfee VirusScan Enterprise for Linux 2.0.1 Product Guide

Where is information about VirusScan Enterprise for Linux recorded?
By default, the software records information about detections, system events, and events related totasks. You can view the information at the Detected Items and System Events pages of the browser-basedinterface. In addition, you can configure logging to SYSLOG from the General Settings page.
What kind of information is recorded?
The recorded information includes the following:
• Detections of viruses and other potentially unwanted software, and the result of any action taken.
• Events such as scanning status and errors.
• Events for specific tasks such as updates to DAT files, and on-demand scanning tasks.
What happens to the log messages if the system logger is not working?
If SYSLOG logging is enabled (from the General Settings page) and syslog has stopped due to a fault, alllog messages are printed on the console. Apart from SYSLOG, VirusScan Enterprise for Linux storeslogs in the event database. You can view the information at the Detected Items and System Events pages ofthe browser-based interface.
General informationThis section helps you with the frequently asked questions such as general information such ascontacting technical support.
How do I contact Technical Support?
See Contact information for the address.
Before speaking to McAfee Technical Support, try to have the following information ready:
• Any additional hardware that is installed.
• The browser being used and its version.
• A diagnostic report. You can produce this:
• In the Scanning Summary page, click Diagnostic Report. You can select all the text, copy it, then pasteit in a text editor.
Where can I obtain the open source code for third-party components?
Open source code is available on the product’s download site. See Contact information.
Server certificate failed the authenticity test
This message appears on browsers during logon, because the certificate is self-signed. You mightignore this message and click Continue.
TroubleshootingFrequently asked questions 9
McAfee VirusScan Enterprise for Linux 2.0.1 Product Guide 87

Error messagesThe software error messages appear on the browser and system events log.
Error messages appear in several forms:
• Messages displayed in the browser, as shown in Understanding error messages section. These arebrowser problems and errors reported by the web server.
• Messages logged in the system events log. For a list of categories of these messages, see the nexttable.
Table 9-1 Error code ranges for System Events log
Range Error Categories Description
3000–3999 Anti-virus Engine errors Errors which occur during scanning or cleaning reportedby the anti-virus engine.
5000–5999 Scan Manager Errors reported by the nailsd process, which controlsthe scanners.
6000–6999 Logging errors Errors reported by the logging subsystem. If the errorlogging system fails, errors are directed to SYSLOG.
7000–7999 Configuration errors Errors found when parsing values in the configurationfiles.
8000–8999 Exclusions and filteringerrors
Errors found when processing the information aboutfiles excluded from scanning, or which extensions toscan.
9000–9999 Monitoring errors Errors reported by the monitoring processes thatprovide administration of the product.
11000–11999 IPC errors Errors reported during inter-process communication.
12000–12999 On-demand scanner errors Errors reported by the on-demand scanner.
13000–13999 Command processor errors Internal errors for the commands used duringinter-process communication.
14000–14999 Anti-virus Engine scanerrors
Errors reported by the anti-virus engine whenprocessing a specific file.
15000–15999 Task Scheduler errors Errors reported by the task scheduler.
16000–16999 SMTP Alerting errors Errors reported by the SMTP alerting component.
Contact informationUse this contact information such as the threat center, download site, technical support, customerservice, and professional services.
McAfee Threat Center
McAfee Labs: http://www.mcafee.com/us/mcafee_labs/index.html
McAfee Threat Center: http://vil.mcafeesecurity.com
McAfee Labs .DAT Notification Service Opt-In: https://secure.mcafee.com/apps/mcafee-labs/dat-notification-signup.aspx
9 TroubleshootingError messages
88 McAfee VirusScan Enterprise for Linux 2.0.1 Product Guide

McAfee download site
Homepage: http://www.mcafee.com/us/downloads/
• Products and Upgrades (requires a valid grant number)
• Product Documentation
• Product Evaluation
• McAfee Beta Program
McAfee Technical Support
Homepage: http://www.mcafee.com/us/support/index.html
KnowledgeBase Search: http://knowledge.mcafee.com
McAfee Technical Support portal (For logon credentials): https://mysupport.mcafee.com/eservice_enu/start.swe
McAfee customer service
Web: http://www.mcafee.com/us/support/index.html or http://www.mcafee.com/us/about/contact/index.html
Phone: +1-888-VIRUS NO or +1-888-847-8766 Monday - Friday, 8 a.m. — 8 p.m., Central Time
McAfee professional services
Enterprise: http://www.mcafee.com/us/enterprise/services/index.html
Small and Medium Business: http://www.mcafee.com/us/smb/services/index.html
TroubleshootingContact information 9
McAfee VirusScan Enterprise for Linux 2.0.1 Product Guide 89

9 TroubleshootingContact information
90 McAfee VirusScan Enterprise for Linux 2.0.1 Product Guide

Index
Aabout this guide 7advanced features 79
agent wake-up callcreate 23
analysisdetected items 38
exporting the results 40, 41
system events 40
anti-virus actionsconfigure 61
on-access settings 61
automatic refreshpage information 32
Bbrowser interface
configure 54
general settings 54
Cclearing statistics
general settings 55
components 10
configurationadministrator password 77
anti-virus actions 61
browser interface 54
extension based scanning 59
general settings 53, 56
local repository 67
on-access policy 73
on-access scanning 61
on-demand scanning 63
paths excluded 58
policy settings 72
proxy settings 68
reports 77
repositories 67
repository list 67
scanning options 57
SMTP notifications 65
SMTP settings 66
configuration: logging 54
configureclear statistics 55
on-access settings 56
on-demand settings 63
consoleinterface 30
contact information 88
conventions and icons used in this guide 7create schedule
run on-demand scan 48
update the product 46
creationon-demand scan task 76
customer service 88
DDAT files
scanning 11
dates and timesdisplaying 33
default configurationresetting 56
default filesextension based scanning 60
delete existingscheduled tasks 43
deploymentprerequisite 21
software 20
deployment softwaremanaged systems 15
detected itemsanalyze 38
export to csv 40
view 38
view results 39
diagnostic reportobtaining 38
scanning summary 38
documentationaudience for this guide 7product-specific, finding 8typographical conventions and icons 7
McAfee VirusScan Enterprise for Linux 2.0.1 Product Guide 91

download site 88
Eerror messages
troubleshoot 88
understanding 33
eventstrigger scanning 9
exporting the resultsdetected items 40
for analysis 40, 41
system events 41
extension based scanningscan specific files 60
extension-based scanningconfigure 59
on-access settings 59
scan all files 60
scan default files 60
scan specific files 60
ExtraDAT filesview 43
Ffiles
extension based scanning 60
frequently asked questionsgeneral information 87
installation 85
scanning 85
troubleshoot 85
viruses and detection 86
Ggeneral information
frequently asked questions 87
general settingsbrowser interface 54
clear statistics 55
configure 53
reset defaults 56
general settings: logging 54
Hhost summary
view 35
howquarantine action works 82
scanning works 11
Iinformation
expanding and collapsing tables 31
information (continued)ExtraDAT files 43
viewing 35
installationextensions 22
frequently asked questions 85
Novell server 19
silent mode 19
standalone system 16
standalone systems 15
SUSE systems 17
testing 25
Ubuntu systems 18
using command line 17
interfaceconsole 30
navigation pane 30
opening 29
quick help pane 30
using 29
introduction 9
KKnowledgeBase 88
LLDAP authentication 79
links bar 30
logging onVirusScan Enterprise for Linux interface 29
logging: general settings 54
long tablesnavigating through 32
Mmalware detection
test on standalone systems 25
managed systemsupgrade 24
McAfee Labs 88
McAfee ServicePortal, accessing 8modify existing
scheduled tasks 42
Nnavigation pane 30
user interface 30
notification templatessubstituting variables 80
notificationsconfigure 65
SMTP notifications 65
SMTP settings 66
Index
92 McAfee VirusScan Enterprise for Linux 2.0.1 Product Guide

notifications (continued)substitution variables 80
Oon-access scan 11
on-access scanningtest on standalone systems 25
on-access settingsanti-virus actions 61
configure 56
extension based scanning 59
paths excluded 58
scanning options 57
on-demand scan 11
testing on managed systems 26
testing on standalone systems 25
on-demand scansrunning 48
schedule 48
on-demand settingsconfigure 63
openinginterface 29
Ppackages
checking in 21
page informationautomatically refresh 32
page settingschanging 32
panenavigation 30
paths excludedconfigure 58
on-access settings 58
policiescreate 72
modify 72
policies setting 71
policyenforcement 74
management 71
processes 10
productconfiguring 53
interact 10
updating 46
product update 46
schedule 46
professional services 88
proxy settingsconfigure 68
repositories 68
Qquarantine action
how it works 82
working of 82
quarantined itemsrecover 82
query 78
quick help pane 30
Rrecently detected items
scanning summary 37
recently scanned itemsscanning summary 37
regular expression basedscanning 58
repositoriesconfigure 67
proxy settings 68
repository list 67
repository listconfigure 67
repositories 67
requirementshardware 15
software 15
reset defaultsconfigure 56
general settings 56
runon-demand scans 48
run immediatelyscheduled tasks 42
running on-demand scancreating a schedule to 48
Sscan specific files
extension based scanning 60
scan typeson-access 11
on-demand 11
scanningDAT files 11
frequently asked questions 85
regular expression based 58
types 11
what and when 11
scanning optionsconfigure 57
on-access settings 57
scanning summarydiagnostic report 38
recently detected items 37
Index
McAfee VirusScan Enterprise for Linux 2.0.1 Product Guide 93

scanning summary (continued)recently scanned items 37
statistics 36
view 36
scanning workshow 11
scheduleon-demand scans 48
product update 46
scheduled tasksdelete existing 43
modify existing 42
run immediately 42
stop 43
stopping 43
view 41
schedulescreate 75
setting up 45
using a wizard 45
ServicePortal, finding product documentation 8setting up
schedules 45
silent installationSUSE systems 19
Silent installationNovell server 20
SMTP notificationsconfigure 65
notifications 65
SMTP settingsconfigure 66
notifications 66
softwareupgrade 23
software removal 27
managed systems 27
software updatescheduling task 75
sorting tables:VirusScan Enterprise for Linux 31
statisticsclear 55
general settings 55
scanning summary 36
stopscheduled tasks 43
substitution variablesnotifications 80
supported browsers 85
system eventsanalyze 40
export to csv 41
view 40
Ttable columns
sort 31
tablescollapsing 31
expanding 31
technical support 88
technical support, finding product information 8threat center 88
time differencesunderstanding 45
troubleshooterror messages 88
VirusScan Enterprise for Linux 85
typesscanning 11
Uunderstanding error messages 33
updateVirusScan Enterprise for Linux 46
updating the productcreating a schedule to 46
user interfacenavigation pane 30
viewing 29
using the interface 29
using wizardsVirusScan Enterprise for Linux 32
Vview
detected items 38
host summary 35
scanning summary 36
scheduled tasks 41
system events 40
user interface 29
VirusScan Enterprise for Linux information 35
view resultsdetected items 39
viruses and detectionfrequently asked questions 86
VirusScan Enterprise for Linuxabout 9advanced features 79
configure 53
contact information 88
logging on 29
product update 46
sorting tables 31
troubleshoot 85
using the interface 29
view information 35
Index
94 McAfee VirusScan Enterprise for Linux 2.0.1 Product Guide

VirusScan Enterprise for Linux (continued)wizards 32
WWebImmune 88
wizardsusing 32, 45
wizards (continued)VirusScan Enterprise for Linux 32
Index
McAfee VirusScan Enterprise for Linux 2.0.1 Product Guide 95

00