VirtualDJ 6 LE TC - Herculests.hercules.com/.../Trim/vdjLE/01_VirtualDJ_6_LE_TC_English.pdf ·...
30
ITALIANO DEUTSCH ESPAÑOL NEDERLANDS ENGLISH FRANÇAIS VirtualDJ 6 LE TC User Manual – 1/30 CONTENTS 1) INTRODUCTION ................................................................................................................ 3 2) SYSTEM REQUIREMENTS ............................................................................................... 3 a) PC ............................................................................................................................... 3 b) Mac ............................................................................................................................. 4 3) HARDWARE SETUP ......................................................................................................... 4 a) Timecode configurations ............................................................................................. 4 i) Timecoded CDs configuration......................................................................... 4 ii) Timecoded vinyl records configuration ........................................................... 7 b) Configuring timecode settings................................................................................... 10 i) Advanced timecode settings ......................................................................... 12 4) VIRTUALDJ 6 LE TC OVERVIEW................................................................................... 13 a) Browser: folders area + files area ............................................................................. 13 b) Deck A....................................................................................................................... 14 c) Timecode settings ..................................................................................................... 15 d) Deck B....................................................................................................................... 16 e) Waveform.................................................................................................................. 17 5) FIRST USE OF VIRTUALDJ 6 LE TC ............................................................................. 17 a) Serial number ............................................................................................................ 17 b) Browser area............................................................................................................. 18 i) Folders area .................................................................................................. 18 ii) Files area ...................................................................................................... 19 iii) BPM (Beats Per Minute) rate of your music files .......................................... 19 iv) Information on music tracks .......................................................................... 20 v) Sorting the music files ................................................................................... 21 vi) Searching ...................................................................................................... 21 6) PLAYING AN AUDIO FILE .............................................................................................. 22 a) Loading and playing an audio file ............................................................................. 22 i) Double-click the file in the browser area ....................................................... 22 ii) Drag and drop ............................................................................................... 22 b) Play and Pause buttons ............................................................................................ 22 c) Supported formats .................................................................................................... 23 i) File extensions .............................................................................................. 23 ii) DRM-protected files ...................................................................................... 23 iii) If you encounter an issue with an audio format ............................................ 23
Transcript of VirtualDJ 6 LE TC - Herculests.hercules.com/.../Trim/vdjLE/01_VirtualDJ_6_LE_TC_English.pdf ·...

ITAL
IANO
DEUT
SCH
ESPA
ÑOL
NEDE
RLAN
DS
ENGL
ISH
FRAN
ÇAIS
VirtualDJ 6 LE TC
User Manual – 1/30
CONTENTS 1) INTRODUCTION ................................................................................................................ 3
2) SYSTEM REQUIREMENTS............................................................................................... 3 a) PC ............................................................................................................................... 3 b) Mac ............................................................................................................................. 4
3) HARDWARE SETUP ......................................................................................................... 4 a) Timecode configurations............................................................................................. 4
i) Timecoded CDs configuration......................................................................... 4 ii) Timecoded vinyl records configuration ........................................................... 7
b) Configuring timecode settings................................................................................... 10 i) Advanced timecode settings ......................................................................... 12
4) VIRTUALDJ 6 LE TC OVERVIEW................................................................................... 13 a) Browser: folders area + files area ............................................................................. 13 b) Deck A....................................................................................................................... 14 c) Timecode settings..................................................................................................... 15 d) Deck B....................................................................................................................... 16 e) Waveform.................................................................................................................. 17
5) FIRST USE OF VIRTUALDJ 6 LE TC ............................................................................. 17 a) Serial number............................................................................................................ 17 b) Browser area............................................................................................................. 18
i) Folders area .................................................................................................. 18 ii) Files area ...................................................................................................... 19 iii) BPM (Beats Per Minute) rate of your music files .......................................... 19 iv) Information on music tracks .......................................................................... 20 v) Sorting the music files ................................................................................... 21 vi) Searching ...................................................................................................... 21
6) PLAYING AN AUDIO FILE .............................................................................................. 22 a) Loading and playing an audio file ............................................................................. 22
i) Double-click the file in the browser area ....................................................... 22 ii) Drag and drop ............................................................................................... 22
b) Play and Pause buttons ............................................................................................ 22 c) Supported formats .................................................................................................... 23
i) File extensions .............................................................................................. 23 ii) DRM-protected files ...................................................................................... 23 iii) If you encounter an issue with an audio format ............................................ 23

VirtualDJ 6 LE TC
d) Previewing and moving within a music track.............................................................23 e) Using a Cue point......................................................................................................23
i) Placing a Cue point .......................................................................................23 7) SETTING THE PITCH ......................................................................................................24
a) Adjusting pitch in timecode mode .............................................................................24 b) Pitch scale .................................................................................................................24 c) Calibrating the pitch...................................................................................................25 d) Pitch controls.............................................................................................................25
i) Pitch fader overview ......................................................................................25 ii) SYNC button in VirtualDJ (= beat-match)......................................................27
ENVIRONMENTAL PROTECTION RECOMMENDATION .......................................................30
User Manual – 2/30

ITAL
IANO
DEUT
SCH
ESPA
ÑOL
NEDE
RLAN
DS
ENGL
ISH
FRAN
ÇAIS
VirtualDJ 6 LE TC
User Manual – 3/30
1) INTRODUCTION VirtualDJ 6 LE TC is a dedicated version of VirtualDJ, developed by Atomix Productions, tailored for Hercules DeeJay TRIM 4&6 and timecoded CDs and/or vinyl records. Atomix Productions and its suppliers retain all intellectual property rights to the software.
The first time you run VirtualDJ 6 LE TC, you are asked to enter a serial number.
This serial number is found on the envelope of your installation CD. This serial number belongs to you: you cannot change it, and you must not share it with any other user of VirtualDJ; otherwise, you won't be able to register on the VirtualDJ website, which will not let you access VirtualDJ service updates, plug-ins, or upgrades. Keep both the CD envelope and the installation CD in a safe place, since both the serial number and the installation CD are required if you re-install your system, or change your computer. The serial number format is xxxx-xxxx-xxxxx / TRIM.
Welcome to VirtualDJ 6 LE TC
This powerful DJ mixing software is adapted to your Hercules DeeJay TRIM 4&6, offering instant access to scratching functions and deep integration of the software with the hardware in the Windows XP®, Vista®, 7™ and Mac OS® environments.
This dedicated version of VirtualDJ requires Hercules DeeJay TRIM 4&6 to be installed and connected to the computer’s USB port. Therefore, before running VirtualDJ 6 LE TC, Hercules DeeJay TRIM 4&6 must be installed and connected to your computer’s USB port.
In Windows XP, Vista and 7: if you see the Hercules DeeJay TRIM 4&6 icon in your taskbar with no red X over it, then the audio interface is properly connected and detected.
If you see the DeeJay TRIM 4&6 icon in your taskbar with a red X over it , this means that your controller is not detected on any of your PC’s USB ports, so running VirtualDJ 6 LE TC is not possible until this red X disappears.
2) SYSTEM REQUIREMENTS
a) PC • Desktop/laptop PC with Intel Pentium 4 / Athlon 2GHz processor or higher • 2GB RAM • Operating system: Microsoft Windows XP, Vista or 7 • USB 2.0 port (high-speed port) • CD-ROM or DVD-ROM drive • 24-bit, 1024x768 video resolution or higher

VirtualDJ 6 LE TC
b) Mac • Desktop/laptop Mac with 2GHz processor or higher • 2GB RAM • Operating system: Mac OS 10.4, 10.5 or 10.6 • USB 2.0 port (high-speed port) • CD-ROM or DVD-ROM drive • 24-bit, 1024x768 video resolution or higher
3) HARDWARE SETUP
a) Timecode configurations 2 different timecode configurations are possible: with CD players, and with vinyl turntables.
i) Timecoded CDs configuration 2 timecoded CDs and 2 audio cables are included in your package, to control Virtual DJ 6 LE TC.
User Manual – 4/30

ITAL
IANO
DEUT
SCH
ESPA
ÑOL
NEDE
RLAN
DS
ENGL
ISH
FRAN
ÇAIS
VirtualDJ 6 LE TC
User Manual – 5/30
The standard setup to mix with timecoded CDs is as follows:
01: Computer (with VirtualDJ Scratch Starter Kit) 02: Hercules DeeJay TRIM 4&6 03: Analog mixer 04: CD player (deck A) 05: CD player (deck B)
1. Connect Deejay TRIM 4&6 to your computer via the USB cable.
2. On DeeJay TRIM 4&6, set the 2 phono/line switches (for inputs 1-2 and inputs 3-4) to the Line position.
3. Place a CD player with a scratch-capable jog wheel to the LEFT of your mixer.
Take one of the two RCA audio cables (2 RCA to 4 RCA), and:
• Connect the cable’s two RCA input connectors (labeled IN) to the CD player’s stereo output plugs (red connector [right channel] to the red plug, white connector [left channel] to the white plug).
• Connect two of the cable’s output connectors (labeled OUT) to inputs 1-2 on your DeeJay TRIM 4&6 (red connector [right channel] to the red plug, white connector [left channel] to the white plug).
If your mixer has 2 stereo inputs:
• Leave the cable’s other two output connectors unplugged.
If your mixer has 4 stereo inputs:
• Connect the cable’s other two output connectors (labeled OUT) to inputs 3-4 (or Stereo 2) on the mixer, and use this channel on your mixer only if you are playing audio CDs (as opposed to timecoded CDs) on your CD player.

VirtualDJ 6 LE TC
4. Place a CD player with a scratch-capable jog wheel to the RIGHT of your mixer.
Take the other RCA audio cable (2 RCA to 4 RCA), and:
• Connect the cable’s two RCA input connectors (labeled IN) to the CD player’s stereo output plugs (red connector [right channel] to the red plug, white connector [left channel] to the white plug).
• Connect two of the cable’s output connectors (labeled OUT) to inputs 3-4 on your DeeJay TRIM 4&6 (red connector [right channel] to the red plug, white connector [left channel] to the white plug).
If your mixer has 2 stereo inputs:
• Leave the cable’s other two output connectors unplugged.
If your mixer has 4 stereo inputs:
• Connect the cable’s other two output connectors (labeled OUT) to inputs 7-8 (or Stereo 4) on the mixer, and use this channel on your mixer only if you are playing audio CDs (as opposed to timecoded CDs) on your CD player.
With a 2-channel mixer:
Note:RCA cables not included
User Manual – 6/30

ITAL
IANO
DEUT
SCH
ESPA
ÑOL
NEDE
RLAN
DS
ENGL
ISH
FRAN
ÇAIS
VirtualDJ 6 LE TC
User Manual – 7/30
With a 4-channel mixer:
Note:“Y” RCA cables included
Note:RCA cables not included
5. Connect your DeeJay TRIM 4&6 outputs 1-2 to your mixer’s inputs 1-2 (audio cable not included: use the cable you normally use to connect your left CD player to the mixer).
6. Connect your DeeJay TRIM 4&6 outputs 3-4 to inputs 3-4 (or Stereo 2) on your 2-stereo-channel mixer, or to inputs 5-6 (or Stereo 3) on your 4-stereo-channel mixer (audio cable not included: use the cable you normally use to connect your right CD player to the mixer).
ii) Timecoded vinyl records configuration 2 timecoded vinyl records are included in your package, to control VirtualDJ 6 LE TC.
The standard setup to mix with timecoded vinyl records is as follows:

VirtualDJ 6 LE TC
01: Computer (with VirtualDJ Scratch Starter Kit) 02: Hercules DeeJay TRIM 4&6 03: Analog mixer 04: Vinyl turntable (deck A) 05: Vinyl turntable (deck B)
1. Connect Deejay TRIM 4&6 to your computer via the USB cable.
2. If your turntables have a ground cable in addition to right (red) and left (white) plugs: on your DeeJay TRIM 4&6, set the 2 phono/line switches (for inputs 1-2 and inputs 3-4) to the Phono position.
If your turntables have no ground cable: on your DeeJay TRIM 4&6, set the 2 phono/line switches (for inputs 1-2 and inputs 3-4) to the Line position.
3. Place a turntable to the LEFT of your mixer.
If your mixer has 2 stereo inputs:
• Connect the 2 RCA connectors on your turntable’s audio cable to inputs 1-2 on your DeeJay TRIM 4&6 (red connector [right channel] to the red plug, white connector [left channel] to the white plug).
If your mixer has 4 stereo inputs:
Take one of the two RCA audio cables (2 RCA [labeled IN] to 4 RCA [labeled OUT]), and two (of four) RCA-to-RCA female adapters, and:
• Connect the cable’s two RCA input connectors (labeled IN) to the turntable’s stereo output plugs, using the RCA-to-RCA female adapters (red connector [right channel] to the red plug, white connector [left channel] to the white plug).
• Connect two of the cable’s output connectors (labeled OUT) to inputs 1-2 on your DeeJay TRIM 4&6 (red connector [right channel] to the red plug, white connector [left channel] to the white plug).
User Manual – 8/30

ITAL
IANO
DEUT
SCH
ESPA
ÑOL
NEDE
RLAN
DS
ENGL
ISH
FRAN
ÇAIS
VirtualDJ 6 LE TC
User Manual – 9/30
• Connect the cable’s other two output connectors (labeled OUT) to inputs 3-4 (or Stereo 2) on the mixer, and use this channel on your mixer only if you are playing audio vinyl records (as opposed to timecoded vinyl records) on your turntable.
4. Place a turntable to the RIGHT of your mixer.
If your mixer has 2 stereo inputs:
• Connect the 2 RCA connectors on your turntable’s audio cable directly to inputs 3-4 on your DeeJay TRIM 4&6 (red connector [right channel] to the red plug, white connector [left channel] to the white plug).
If your mixer has 4 stereo inputs:
Take the other RCA audio cable (2 RCA [labeled IN] to 4 RCA [labeled OUT]), and two (of four) RCA-to-RCA female adapters, and:
• Connect the cable’s two RCA input connectors (labeled IN) to the turntable’s stereo output plugs, using the RCA-to-RCA female adapters (red connector [right channel] to the red plug, white connector [left channel] to the white plug).
• Connect two of the cable’s output connectors (labeled OUT) to inputs 3-4 on your DeeJay TRIM 4&6 (red connector [right channel] to the red plug, white connector [left channel] to the white plug).
• Connect the cable’s other two output connectors (labeled OUT) to inputs 7-8 (or Stereo 4) on the mixer, and use this channel on your mixer only if you are playing audio vinyl records (as opposed to timecoded vinyl records) on your turntable.
With a 2-channel mixer:
Note:RCA cables not included

VirtualDJ 6 LE TC
With a 4-channel mixer:
RCA adapters included
Note:RCA cables not included
Note:“Y” RCA cables included
5. Connect outputs 1-2 on your DeeJay TRIM 4&6 to inputs 1-2 on your mixer (audio cable not included).
6. Connect outputs 3-4 on your DeeJay TRIM 4&6 to inputs 3-4 on your 2-stereo-channel mixer, or to inputs 5-6 on your 4-stereo-channel mixer (audio cable not included).
b) Configuring timecode settings Once you have connected your CD/vinyl record players, mixer and DeeJay TRIM 4&6, you can set up the software.
• Put a timecoded CD in each of your CD players, or a timecoded vinyl record on each of your turntables.
• Launch VirtualDJ 6 LE TC and click the SETUP button.
User Manual – 10/30

ITAL
IANO
DEUT
SCH
ESPA
ÑOL
NEDE
RLAN
DS
ENGL
ISH
FRAN
ÇAIS
VirtualDJ 6 LE TC
User Manual – 11/30
• Select your timecode media format (in the Vinyl field): Timecode CD or Timecode Vinyl.
• Press Play on your CD or vinyl record player and adjust the signal quality. • Verify that the audio input level is sufficient on your Hercules DeeJay TRIM 4&6:
4-channel VU-meter
• Set the VU-meter switch on your DeeJay TRIM 4&6 to display the signal levels for the input channels (in the up position).
VU-meter switch
Preamplifier level control knobs
• If the input signal level lights up across 3 green LEDs on each line of the VU-meters, without lighting up the orange or red LEDs, you then have the perfect input levels: don't change anything.
• If the input signal level is too low (less than 3 green LEDs are lit up) or too high (the orange or red LEDs are lit up), you can adjust the signal level by turning the 2 preamplifier level control knobs on the front of your DeeJay TRIM 4&6.

VirtualDJ 6 LE TC
If the level is always too low or too high, verify that: your CD player or turntable is actually playing a timecoded CD or vinyl record; all audio cables are properly connected; and that the Line/Phono input switches your DeeJay TRIM 4&6 are set to the proper positions.
• Fine-tune the signal quality using the 4 knobs in the VirtualDJ software: Left/Right, Phase/Anti, Gain, Silence.
When the signal Quality reaches 100%, click OK.
i) Advanced timecode settings 100% by following the steps outlined above, you
If you are unable to achieve signal quality ofmust click the Debug… button (as shown below) and try adjusting the various settings until you are able to reach 100% signal quality.
User Manual – 12/30

ITAL
IANO
DEUT
SCH
ESPA
ÑOL
NEDE
RLAN
DS
ENGL
ISH
FRAN
ÇAIS
VirtualDJ 6 LE TC
User Manual – 13/30
4) VIRTUALDJ 6 LE TC OVERVIEW The VirtualDJ 6 LE TC interface can be split up into 5 different sections:
• Browser: folders area + files area • Deck A • Timecode settings • Deck B • Waveform
a) Browser: folders area + files area

VirtualDJ 6 LE TC
In this section, you can browse through your computer or network drive to select the audio files to load onto a deck and mix with. The browser section consists of 2 subsections:
• Folders area (on the left): the area where you choose the folder, drive unit, audio CD, network drive, iTunes folder or virtual folder (a playlist in VirtualDJ),
• Files area (on the right): in this area, you choose the music track you want to load on each deck of the player.
b) Deck A This is the virtual deck on the left. You can:
• Load music files on this deck, • Move within the track, • Play the music file loaded on this deck, • Add a cue point (a bookmark to save a position in the track), • Change the pitch (the playback speed), • View the BPM, pitch variation, elapsed and remaining time.
1. Music tag: Artist name on top, Song name on second line 2. File form overview (the white vertical bar shows the cue point) 3. BPM counter (125.16 BPM = 125.16 Beats Per Minute) 4. Virtual disc: use this disc to scratch, or drag and drop music files onto it to load them 5. Pitch slider: higher = slower / center = default pitch / down = faster 6. Pitch bend: to the left = minus = slower / to the right = plus = faster 7. SYNC (= Beat-match): synchronize this deck with the other deck 8. Play
User Manual – 14/30

ITAL
IANO
DEUT
SCH
ESPA
ÑOL
NEDE
RLAN
DS
ENGL
ISH
FRAN
ÇAIS
VirtualDJ 6 LE TC
User Manual – 15/30
9. Pause 10. CUE: sets the cue point position 11. ELAPSED: elapsed time in the track 12. REMAIN: remaining time in the track 13. GAIN: audio gain of the track 14. KEY: musical key of the track 15. PITCH: current pitch variation, in %
c) Timecode settings The central area gathers the settings for:
• Timecode on/off, • Gain.
There is no mixer in this central area of VirtualDJ 6 LE TC, since VirtualDJ 6 LE TC must be used with an analog mixer, which replaces a software mixer.
1. GAIN on deck A: set the gain using this knob (view the gain in dB in the deck A area) 2. GAIN on deck B: set the gain using this knob (view the gain in dB in the deck B area) 3. Calibration menu

VirtualDJ 6 LE TC
4. Timecode on/off for deck A: ON = control deck A with external player / OFF = control deck A with the Play button in the VirtualDJ software
5. Timecode signal quality for Deck A (if Timecode is ON) 6. Timecode on/off for deck B: ON = control deck B with external player / OFF = control deck B
with the Play button in the VirtualDJ software 7. Timecode signal quality for Deck B (if Timecode is ON) 8. White horizontal bar = actual position in Deck B track 9. Waveform on Deck B 10. Waveform on Deck A 11. White horizontal bar = actual position in Deck A track
d) Deck B This is the virtual deck on the right. You can:
• Load music files on this deck, • Move within the track, • Play the music file loaded on this deck, • Add a cue point (a bookmark to save a position in the track), • Change the pitch (the playback speed), • View the BPM, pitch variation, elapsed and remaining time.
User Manual – 16/30

ITAL
IANO
DEUT
SCH
ESPA
ÑOL
NEDE
RLAN
DS
ENGL
ISH
FRAN
ÇAIS
VirtualDJ 6 LE TC
User Manual – 17/30
e) Waveform This area shows 2 waveforms (1 in blue and 1 in red) for the 2 audio tracks loaded on decks A and B, respectively.
1. Waveforms of 2 audio tracks (blue waveform = track on the left deck, deck A / red waveform =
track on the right deck, deck B) 2. Beat marks: the rectangles and squares below the waveforms show the beats in each track
(rectangle = master beat, square = intermediary beat). Thus, a 4-beat section is displayed with 1 rectangle and 3 squares: blue shapes for the blue waveform, and red shapes for the red waveform)
3. Cue point: bookmark in the track
5) FIRST USE OF VIRTUALDJ 6 LE TC
a) Serial number
The first time you run VirtualDJ 6 LE TC, you are asked to enter a serial number.
This serial number is found on the envelope of your installation CD. This serial number belongs to you: you cannot change it, and you must not share it with any other user of VirtualDJ; otherwise, you won't be able to register on the VirtualDJ website, which will not let you access VirtualDJ service updates, plug-ins, or upgrades. Keep both the CD envelope and the installation CD in a safe place, since both the serial number and the installation CD are required if you re-install your system, or change your computer. The serial number format is xxxx-xxxx-xxxxx / TRIM.

VirtualDJ 6 LE TC
b) Browser area When you run VirtualDJ 6 LE TC for the first time, the browser area displays no music files.
i) Folders area On the left of the browser area, you can see the folders and drive units on your computer: the active folder is highlighted.
1. Active folder: highlighted. 2. Other folders: not highlighted.
Graphic slider to move through the list. 3. 4. Lock/unlock: lock or unlock the split between the folders area and the files area (if the lock is
).
5.
open, the folders area can expand and hide the files area
Add virtual folder button (blue plus sign on a red folder): You can create a virtual folder (which is a playlist) by clicking the button with a blue plus sign on a red folder
, on the top right of the folders area. This virtual folder is an index where you
can add and sort the music files you select, without changing where they are stored in their actual folders.
User Manual – 18/30

ITAL
IANO
DEUT
SCH
ESPA
ÑOL
NEDE
RLAN
DS
ENGL
ISH
FRAN
ÇAIS
VirtualDJ 6 LE TC
User Manual – 19/30
ii) Files area The files area shows the contents of the active folder.
iii) BPM (Beats Per Minute) rate of your music files The BPM rate is the number of beats per minute in the music, which reflects how fast the music
: a pop-up menu prompts you to Scan for BPMs to analyze the BPM of the selected music files.
is:
- a BPM rate below 85 is slow,
- a BPM rate over 130 is fast.
Analyze your music files’ BPM rates The first time you display your list of music files in a DJ software application, the Beats Per Minute rate is not calculated: we strongly recommend that you analyze all of the music files you intend to mix with in advance, so that your browser displays the BPM (Beats Per Minute) rates, to load only music tracks matching the BPM rate you need.
To analyze the music files in a folder, select the music file(s) in the files area and right-click them with your mouse (or Ctrl + mouse click in Mac OS, using a Mac mouse with only 1 button)
Run the BPM analysis in advance, not during a party! The BPM analysis takes time (1 hour for 120 music files), so starting the BPM analysis of your complete library just before a party is a very bad idea. You should therefore carry out the analysis in advance: it’s easy, as you can analyze your complete hard drive and you don't need to remain in front of your computer while VirtualDJ 6 LE TC is analyzing the music files. As the BPM analysis is very CPU-intensive, mixing while VirtualDJ 6 LE TC is analyzing your library is not recommended, since your computer will not respond as fast as it should.
The BPM software analysis is generally accurate, but occasionally the BPM rate calculation is not correct: sometimes the BPM calculated is double or half of the actual BPM rate (the BPM analyzer may count only 1 beat out of 2 within a track, or identify an intermediary sound within a beat as the start of another beat). If your file is not properly analyzed, you can correct it by manually typing in the BPM rate.
VirtualDJ 6 LE TC
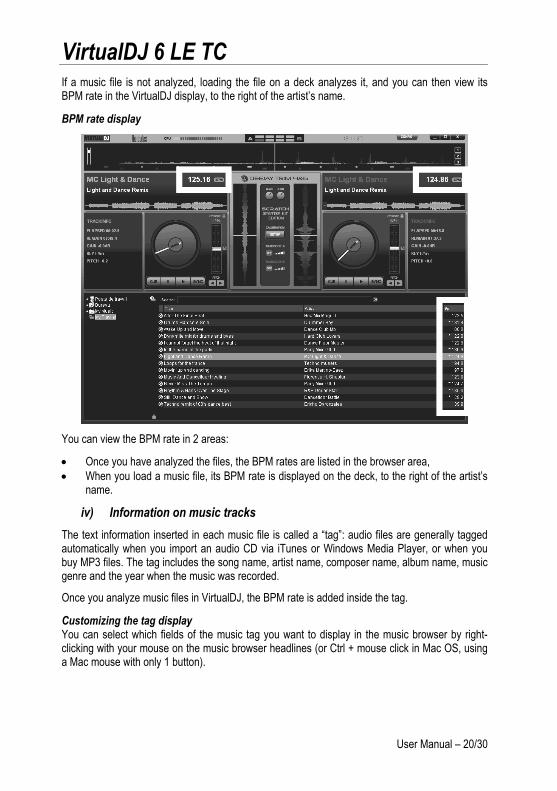
If a music file is not analyzed, loading the file on a deck analyzes it, and you can then view its BPM rate in the VirtualDJ display, to the right of the artist’s name.
BPM rate display
You can view the BPM rate in 2 areas:
• Once you have analyzed the files, the BPM rates are listed in the browser area, is displayed on the deck, to the right of the artist’s
es or Windows Media Player, or when you m name, music
usic was recorded.
e music tag you want to display in the music browser by right-clicking with your mouse on the music browser headlines (or Ctrl + mouse click in Mac OS, using a Mac mouse with only 1 button).
• When you load a music file, its BPM ratename.
iv) Information on music tracks The text information inserted in each music file is called a “tag”: audio files are generally tagged automatically when you import an audio CD via iTunbuy MP3 files. The tag includes the song name, artist name, composer name, albugenre and the year when the m
Once you analyze music files in VirtualDJ, the BPM rate is added inside the tag.
Customizing the tag display You can select which fields of th
User Manual – 20/30
ITAL
IANO
DEUT
SCH
ESPA
ÑOL
NEDE
RLAN
DS
ENGL
ISH
FRAN
ÇAIS
VirtualDJ 6 LE TC
User Manual – 21/30
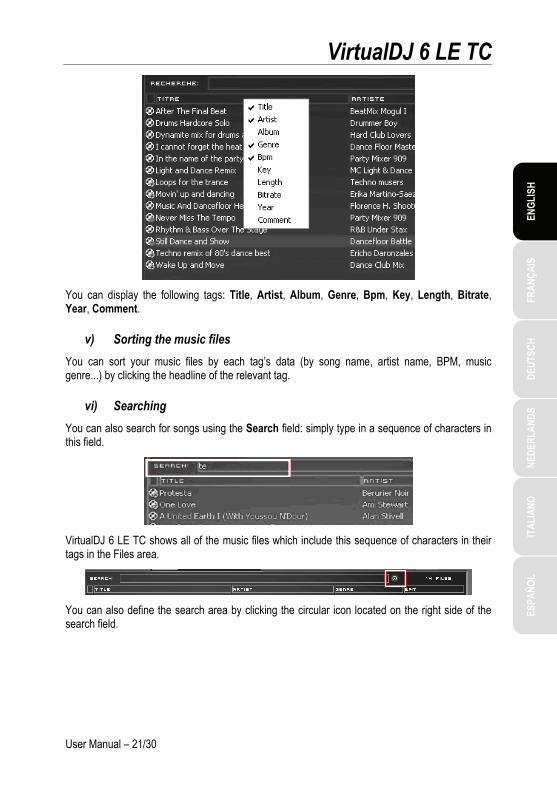
You can display the following tags: Title, Artist, Album, Genre, Bpm, Key, Length, Bitrate, Year, Comment.
v) Sorting the music files You can sort your music files by each tag’s data (by song name, artist name, BPM, music genre...) by clicking the headline of the relevant tag.
vi) Searching You can also search for songs using the Search field: simply type in a sequence of characters in this field.
VirtualDJ 6 LE TC shows all of the music files which include this sequence of characters in their tags in the Files area.
You can also define the search area by clicking the circular icon located on the right side of the search field.

VirtualDJ 6 LE TC
6) PLAYING AN AUDIO FILE
a) Loading and playing an audio file Once you select an audio file in your music browser, there are two ways you can load it on a deck.
i) Double-click the file in the browser area - If a deck is stopped or paused, the file is automatically loaded on that deck.
- If both decks are playing, the file is not loaded.
ii) Drag and drop - Select the file you want to load, and drag and drop it onto its target deck.
When you drag a file, the cursor turns into a disc, with a symbol indicating whether or not you are able to drop the file on the intended deck.
- The following symbol means that you can drop the file on the deck:
- The following symbol means that you are not able to drop the file on the deck (either a song is
already playing on the deck, or the cursor is outside of the deck’s drag and drop area):
If a song is already playing on the deck where you are trying to load a file, you will get a message indicating that a song is playing on that deck, and asking if you are sure you want to stop it. Click Yes or No to confirm or cancel, respectively.
b) Play and Pause buttons In timecode mode, the Play and Pause buttons in the VirtualDJ software are no longer active. You must therefore:
• Press the Play/Pause button on your CD player or turntable to start or stop playing an audio track.
User Manual – 22/30
ITAL
IANO
DEUT
SCH
ESPA
ÑOL
NEDE
RLAN
DS
ENGL
ISH
FRAN
ÇAIS
VirtualDJ 6 LE TC
User Manual – 23/30
c) Supported formats
i) File extensions VirtualDJ 6 LE TC supports most digital audio formats, such as MP3 (PC/Mac), AAC (PC/Mac), AIFF (Mac), WAV (PC), WMA (PC), OGG (PC) and CD-Audio.
ii) DRM-protected files VirtualDJ 6 LE TC cannot play files with DRM protection, so if you have purchased AAC or MP4 files with DRM protection, the solution to play the files in VirtualDJ 6 LE TC is to burn an audio CD with these music files, and then mix using this audio CD instead of the files with DRM protection.
iii) If you encounter an issue with an audio format If you cannot play one of these formats, make sure that the codec for this audio format is installed on your computer. For example, if you cannot play an AAC file, make sure that iTunes is installed on your computer, since the AAC codec is installed by iTunes.
d) Previewing and moving within a music track You can select a music track to preview on your analog mixer, and move within the track to get to the right position.
• Press the Play button for the deck in question on your CD player or turntable, and you can listen to the track on your headphones from its current position.
• Move within the track by turning your timecoded CD or vinyl record. This gives you precise control: move the timecoded CD or vinyl record backwards and forwards, and you will see your position moving in the waveform window.
e) Using a Cue point A Cue point is a bookmark of the position in a music track where playback will begin for your audience. This lets you start playback of the track at precisely the right point, to avoid any interruptions in terms of rhythm.
i) Placing a Cue point With a CD player, you can place a Cue point on the CD player (if the CD player has a Cue button). With a turntable, you have no Cue point.
Once the music file is loaded on a deck, preview it for yourself only (on your headphones) until you get to the position you choose as your Cue point. Then, press the Cue button (on your CD player) at the spot where you want to place the Cue point.

VirtualDJ 6 LE TC
7) SETTING THE PITCH It’s the DJ’s job to provide the audience with music to dance to, which means:
- Selecting music tracks well-suited to the audience, - Maintaining a dancing rhythm with a good ambiance, and avoiding anything which
might interrupt the rhythm, such as gaps in the music or noticeable changes in BPM, - Making transitions between songs easy for dancers. You should always try to
synchronize the next track with the track currently playing, if possible: this synchronization is called beat-matching.
Beat-matching consists of adjusting the playback speed of music track B until the moment the beats (often marked by drums or bass) of this track B play at the same rhythm as the beats of track A, to maintain the same beat during 3 steps:
- When playing track A, - Then, when mixing track B together with track A, with the same rhythm, - When you stop playback of track A and keep only track B playing, the dancers keep
the same dancing rhythm.
If the BPM rates of 2 music tracks are very far one from the other, you can synchronize them by setting the BPM rate of the second music track at half or twice the BPM rate of the first music track, so that the beat of the second music track is played at the same time as 1 beat out of 2 of the first music track, or vice versa. Typically, you can synchronize a 75 BPM music track with another track set at 75 BPM, or with a track set at 150 BPM.
a) Adjusting pitch in timecode mode
In timecode mode, you should not move the pitch faders with your mouse in the VirtualDJ software: the only good way to change the pitch in timecode mode is to adjust the pitch on your turntable or CD player itself.
In timecode mode, if you move the pitch fader in VirtualDJ with your mouse instead of using the fader on your turntable or CD player, the position of the pitch fader in the VirtualDJ software will not correspond to the position of the pitch fader on your physical device, which is very confusing and should therefore be avoided.
Conversely, if you switch off timecode mode, you must use the pitch fader in the VirtualDJ software, and not on your turntable or CD player.
b) Pitch scale In VirtualDJ 6 LE TC, you can set a pitch scale of 6%, 8%, 10%, 12%, 20%, 25%, 33%, 50% or 100%.
User Manual – 24/30

ITAL
IANO
DEUT
SCH
ESPA
ÑOL
NEDE
RLAN
DS
ENGL
ISH
FRAN
ÇAIS
VirtualDJ 6 LE TC
User Manual – 25/30
c) Calibrating the pitch You must set the same pitch scale in VirtualDJ 6 LE TC as on your turntable/CD player;
ualDJ 6 LE TC can be changed by double-clicking the percentage value pitch fader.
tch faders on your turntables or CD players directly in the center position.
er be synchronized with your turntable or CD player. If this occurs, you must reset the pitch faders both in VirtualDJ
ayer, in order to calibrate them once more.
lly restores the pitch to the
lue (the % variation of pitch compared to the audio file’s original speed). Double-clicking the pitch counter changes the pitch
0%, 25%, 33%, 50% and 100%.
he faders in the VirtualDJ software; otherwise, the moves you make using the pitch faders in VirtualDJ won’t fit with the moves you make using the pitch faders on your turntables or CD players).
otherwise, the moves you make using the pitch faders in VirtualDJ won’t fit with the moves you make using the pitch faders on your turntables or CD players.
The pitch scale in Virtdisplayed on top of the
To calibrate the pitch:
- Set the pi- Set the pitch faders for both decks in the VirtualDJ software directly in the center
position.
If you move the pitch fader for a deck in the VirtualDJ software, it will no long
and on your turntable or CD pl
d) Pitch controls The VirtualDJ 6 LE TC software includes 4 controls per deck to control the pitch:
- Pitch fader, - Pitch bend minus and plus buttons (the arrows below the pitch fader): let you adjust the
pitch gradually, - Pitch reset button (to the right of the pitch fader): gradua
audio file’s default value (to a 0.0% pitch variation). - SYNC button (to the right of the Play button in VirtualDJ).
The pitch counter, located above the pitch fader, displays the pitch va
scale between 6%, 8%, 10%, 12%, 2
i) Pitch fader overview The pitch fader slows down/speeds up the music playback.
In timecode mode, you must only move the pitch fader on your turntable or CD player (i.e. you must not use your mouse to move t

VirtualDJ 6 LE TC
Master tempo (on) Pitch scale (12%) Pitch slider area Pitch reset button Pitch slider Pitch bend buttons
Keylock = Master tempo The Keylock icon represents the master tempo function in VirtualDJ 6 LE TC: when the master tempo function is on, moving the pitch fader doesn’t change the tone of the music. This is useful in that it lets you speed up/slow down a track while keeping the same tone, as if the musicians were playing the track faster or slower!
Please note that in some other DJing software applications, keylock does not correspond to master tempo.
Pitch scale The pitch scale is the percentage of speed variation you can achieve with the pitch fader: a pitch scale of 12% means that the pitch fader’s upper position in VirtualDJ corresponds to a 12% slowdown of the music playback, and the pitch fader’s lower position corresponds to a 12% acceleration of the music playback (a 100 BPM rate becomes a 88 BPM rate when moving the fader to the top, and 112 BPM when moving the fader to the bottom).
The pitch scale can be changed by double-clicking the pitch percentage figure displayed on top of the pitch fader in VirtualDJ.
The lower the pitch scale, the higher the precision of the pitch fader: a low pitch scale makes the pitch fader more precise, but limits your choice to music tracks whose BPM is close enough to the BPM of the music already loaded, to be within the pitch scale.
Moving the pitch fader on your turntable/CD player in timecode mode When you move the pitch fader on your turntable or CD player, you can see its action in 4 ways:
• You hear the change in the music’s speed. • The pitch fader moves in the VirtualDJ software. • The BPM counter in VirtualDJ changes. • The scrolling of the music waveform goes slower or faster.
User Manual – 26/30

ITAL
IANO
DEUT
SCH
ESPA
ÑOL
NEDE
RLAN
DS
ENGL
ISH
FRAN
ÇAIS
VirtualDJ 6 LE TC
User Manual – 27/30
Beat marks in VirtualDJ In the VirtualDJ waveform, the start of each beat is marked with a small rectangle or a square below the waveform, called beat marks:
• If the beat marks of both music tracks overlap, the tracks are synchronized. • If the beat marks of both music tracks don't overlap, the tracks are not synchronized.
Pitch bend buttons (pitch bend minus and pitch bend plus) The pitch bend minus and plus buttons slow down/speed up playback of the music track loaded on a deck.
The pitch bend action is not the same as the pitch fader action, as the pitch bend action is temporary: when you release the pitch bend button, the music track’s playback gradually returns to its previous speed. Pitch bend is therefore an “elastic” setting.
Using pitch bend To beat-match 2 music files, you generally:
• Set both music files to the same BPM with the pitch fader; and then • Line up the beats of a track with the beats of the other track by slowing it down or speeding
it up with the pitch bend buttons.
The action of pitch bend in VirtualDJ When you press the pitch bend minus or pitch bend plus buttons:
• You hear a change in the music’s speed. • The scrolling of the track in the waveform goes faster or slower. • However, the VirtualDJ BPM counter remains unchanged.
ii) SYNC button in VirtualDJ (= beat-match)
If you are in timecode mode, you should not use the SYNC button in the VirtualDJ software; otherwise, the pitch setting on your turntable or CD player will no longer correspond to the pitch setting in the software.
Clicking a SYNC button on a deck in the VirtualDJ software instantly synchronizes the beat of the music loaded on this deck with the beat of the music file on the other deck: this beat-matching function is instant and easy.
You can synchronize one music track with another using the SYNC button, as long as the BPM difference between both music tracks is within the limit of the pitch scale. The pitch scale is the

VirtualDJ 6 LE TC
User Manual – 28/30
percentage displayed above the VirtualDJ pitch fader, representing the pitch variation when the fader reaches its upper or lower limits.
To beat-match 2 tracks when their BPM difference exceeds the widest pitch scale (for example, beat-matching a 140 BPM audio track with a 100 BPM audio track, which represents a 40% difference between the two tracks, higher than the widest pitch scale of 33%), you can:
• First, adjust the speed of the reference track: for example, change the 100 BPM track to 110BPM,
• Then, beat-match the incoming 140 BPM track to fit with the new speed of the reference track, 110BPM.

ITAL
IANO
DEUT
SCH
ESPA
ÑOL
NEDE
RLAN
DS
ENGL
ISH
FRAN
ÇAIS
VirtualDJ 6 LE TC
User Manual – 29/30
Trademarks Hercules® is a registered trademark of Guillemot Corporation S.A. VirtualDJ® is a registered trademark of Atomix Productions. Apple®, the Apple logo, Mac OS® and iTunes® are registered trademarks of Apple Computer, Inc. Intel® and Pentium® are registered trademarks of Intel Corporation. WMA®, Microsoft® Windows® XP, Vista and 7 are either registered trademarks or trademarks of Microsoft Corporation in the United States and/or other countries. All other trademarks and brand names are hereby acknowledged and are property of their respective owners. Illustrations not binding. Contents, designs and specifications are subject to change without notice and may vary from one country to another.
Declaration of conformity EC COMPLIANCE NOTICE: this equipment has been tested and found to comply with the limits of the Council Directive 89/336/EEC of 3 May 1989 on the approximation of the laws of the Member States relating to electromagnetic compatibility, amended by Directive 93/68/EEC. In a domestic environment this product may cause radio interference in which case the user may be required to take adequate measures. CANADIAN COMPLIANCE NOTICE: this Class B digital apparatus meets all requirements of the Canadian Interference-Causing Equipment Regulations. USA COMPLIANCE NOTICE: this equipment has been tested and found to comply with the limits for a Class B digital device, pursuant to Part 15 of the FCC rules. Operation is subject to the following two conditions: (1) This device may not cause harmful interference, and (2) This device must accept any interference received, including interference that may cause undesired operation. These limits are designed to provide reasonable protection against harmful interference in a residential installation. This equipment generates, uses and can radiate radio frequency energy and, if not installed and used in accordance with the instructions, may cause harmful interference to radio communications. However, there is no guarantee that interference will not occur in a particular installation. If this equipment does cause harmful interference to radio or television reception, which can be determined by turning the equipment on and off, the user is encouraged to try to correct the interference by one or more of the following measures: - Reorient or relocate the receiving antenna. - Increase the separation between the equipment and receiver. - Connect the equipment into an outlet on a circuit different from that to which the receiver is connected. - Consult the dealer or an experienced radio/TV technician for help.
Copyright © 2009 Guillemot Corporation S.A. All rights reserved. This publication may not be reproduced in whole or in part, summarized, transmitted, transcribed, stored in a retrieval system, or translated into any language or computer language, in any form or by any means, electronic, mechanical, magnetic, photocopying, recording, manual or otherwise, without the prior written permission of Guillemot Corporation S.A.
Disclaimer Guillemot Corporation S.A. reserves the right to make changes to specifications at any time and without notice. The information provided by this document is believed to be accurate and reliable. However, no responsibility is assumed by Guillemot Corporation S.A. either for its use or for the infringement of patents or other rights of third parties resulting from its use. This product may exist in a light or special version for PC integration or other purposes. Certain functions detailed in this manual may not be available in these versions. Wherever possible, a README.TXT will be included on the installation CD-ROM detailing the differences between the supplied product and the product described in the present documentation.
End-user software license Agreement IMPORTANT: please read the Agreement carefully prior to opening and installing the Software. By opening the Software package, you agree to be bound by the terms of this Agreement. The Software enclosed in this package is licensed, not sold, and is only available under the terms of the present license Agreement. If you do not agree with the terms hereafter, you must promptly return the Software within 15 days, together with the entire contents of the box, to the place of purchase. The VirtualDJ software (hereafter named the “Software”) is copyrighted by Atomix Productions. All rights are reserved. The term “Software” refers to all documentation and related material, including drivers, executable programs, libraries and data files. The purchaser is granted a license to use the Software only. The licensee also agrees to be bound by the terms and conditions of the present Agreement concerning copyright and all other proprietary rights for any third party Software, documentation and related material included in the Software package. Atomix Productions reserves the right to terminate this license in the event of failure to comply with any of the terms or conditions laid out in the present Agreement. License: 1. The license is granted to the original purchaser only. The licensee is not permitted to sub-license or lease any of the rights that are hereby
granted. Transfer of the license is permitted, provided that the transferor does not retain any part or copy of the Software and the transferee accepts to be bound by the terms and conditions of the present Agreement.
2. The licensee may only use the Software on a single computer at any time. The machine-readable portion of the Software may be transferred to another computer provided it is previously erased from the first machine and there is no possibility that the Software can be used on more than one machine at any one time.
3. The licensee acknowledges the copyright protection belonging to Atomix Productions. The copyright notice must not be removed from the Software, nor from any copy thereof, nor from any documentation, written or electronic, accompanying the Software.
4. The licensee is granted the right to make one back-up copy of the machine-readable portion of the Software on the condition that all copyright and proprietary notices are also reproduced.
5. Except where the present Agreement expressly permits, the licensee is strictly prohibited from engaging in, nor may he permit third parties to engage in, the following: providing or disclosing the Software to third parties; providing use of the Software in a network, multiple PCs, multi-user or time-sharing arrangement where the users are not individual licensees; making alterations or copies of any kind of the Software; making any attempt to disassemble, de-compile or reverse engineer the Software in any way or form, or engaging in any activity aimed at obtaining underlying information not visible to the user during normal use of the Software; making copies or translations of the User Manual.

VirtualDJ 6 LE TC
User Manual – 30/30
ENVIRONMENTAL PROTECTION RECOMMENDATION
At the end of its working life, this product should not be disposed of with standard household waste, but rather dropped off at a collection point for the disposal of Waste Electrical and Electronic Equipment (WEEE) for recycling. This is confirmed by the symbol found on the product, user manual or packaging. Depending on their characteristics, the materials may be recycled. Through recycling and other forms of processing Waste Electrical and Electronic Equipment, you can make a significant contribution towards helping to protect the environment. Please contact your local authorities for information on the collection point nearest you.