Virtual Scanner Appliance - RAC - InfocentrumThe virtual scanner appliance is a stateless, ......
12
Virtual Scanner Appliance User Guide July 03, 2014
Transcript of Virtual Scanner Appliance - RAC - InfocentrumThe virtual scanner appliance is a stateless, ......
Virtual Scanner ApplianceUser Guide
July 03, 2014
Verity Confidential
Copyright 2012-2014 by Qualys, Inc. All Rights Reserved.
Qualys, the Qualys logo and QualysGuard are registered trademarks of Qualys, Inc. All other trademarks are the property of their respective owners.
Qualys, Inc.1600 Bridge ParkwayRedwood Shores, CA 940651 (650) 801 6100

3
About this guide
Qualys Virtual Scanner Appliance supports the same global scanning capabilities as our physical scanner appliance. The virtual scanner appliance is a stateless, disposable resource which acts as an extension of the Qualys Cloud Platform and is not a separately managed entity. This user guide describes how to get started with using a virtual scanner with your virtualization or cloud platform.
About Qualys
Qualys, Inc. (NASDAQ: QLYS) is a pioneer and leading provider of cloud security and compliance solutions with over 6,700 customers in more than 100 countries, including a majority of each of the Forbes Global 100 and Fortune 100.The Qualys Cloud Platform and integrated suite of solutions help organizations simplify security operations and lower the cost of compliance by delivering critical security intelligence on demand and automating the full spectrum of auditing, compliance and protection for IT systems and web applications. Founded in 1999, Qualys has established strategic partnerships with leading managed service providers and consulting organizations including Accenture, Accuvant, BT, Cognizant Technology Solutions, Dell SecureWorks, Fujitsu, HCL Comnet, InfoSys, NTT, Tata Communications, Verizon and Wipro. The company is also a founding member of the Cloud Security Alliance (CSA)
For more information, please visit www.qualys.com
Qualys Support
Qualys is committed to providing you with the most thorough support. Through online documentation, telephone help, and direct email support, Qualys ensures that your questions will be answered in the fastest time possible. We support you 7 days a week, 24 hours a day. Access support information at www.qualys.com/support/

Get Started
It’s easy to add a Virtual Scanner
You can add a virtual scanner to your account in just a couple minutes. Then you’ll be ready to scan devices and web applications on your internal network. Let’s do it!
The Virtual Scanner option must be turned on for your account. Please contact your Qualys Support or your Technical Account Manager if you would like us to turn on this option for you.
Step 1 - Start the Wizard
Go to Scans > Appliances and select New > Virtual Scanner Appliance
Click Start Wizard ... and we’ll walk you through the steps.
4

Get StartedStep 2 - Download a Virtual Scanner image
Step 2 - Download a Virtual Scanner image
Give your scanner a name and tell us the virtualization platform you’d like to use.
Tell me about the virtualization platforms
Qualys Virtual Scanner Appliance is packaged and qualified for deployment on a variety of virtualization and cloud platforms
Desktop/LaptopVMware Workstation, Player, FusionOracle VirtualBox
Client/ServerVMware vCenter/vSphereCitrix XenServerMicrosoft Hyper-V
CloudAmazon EC2 - ClassicAmazon EC2 - VPC
5

Get StartedStep 2 - Download a Virtual Scanner image
Want help with choosing the right platform?
No problem, just check our Community where you can find all the details about our supported virtualization platforms, configurations and available distributions.
Our best practices and tips
We recommend you check out our best practices and tips for internal scans using the Qualys Virtual Scanner Appliance. Having a look now will help you deploy your virtual scanner quickly and start scanning your network for security issues.
From our Community
Virtual Scanner Appliance - Platform Qualification Matrix
Reference - Virtual Scanner Appliance
From our Community
Best Practices for Internal Scanning
Scanner Appliance - Management Communications
Scanner Appliance - Management Communications - Amazon EC2
6
Get StartedStep 3 - Configure your Virtual Scanner
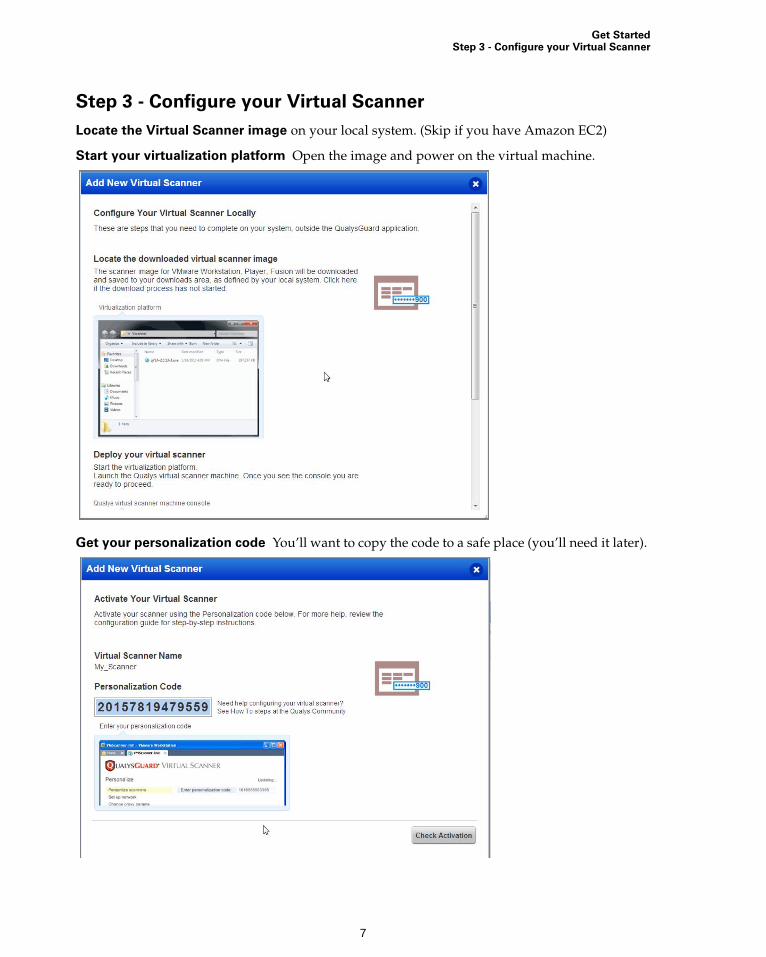
Step 3 - Configure your Virtual Scanner
Locate the Virtual Scanner image on your local system. (Skip if you have Amazon EC2)
Start your virtualization platform Open the image and power on the virtual machine.
Get your personalization code You’ll want to copy the code to a safe place (you’ll need it later).
7
Get StartedStep 3 - Configure your Virtual Scanner
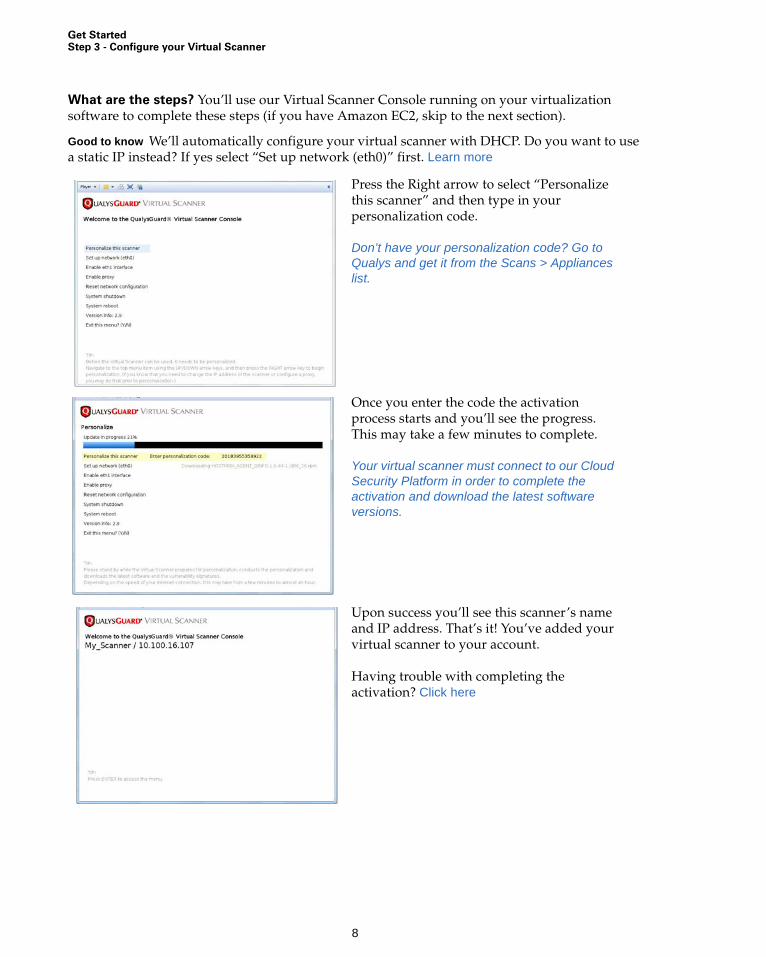
What are the steps? You’ll use our Virtual Scanner Console running on your virtualization software to complete these steps (if you have Amazon EC2, skip to the next section).
Good to know We’ll automatically configure your virtual scanner with DHCP. Do you want to use a static IP instead? If yes select “Set up network (eth0)” first. Learn more
Press the Right arrow to select “Personalize this scanner” and then type in your personalization code.
Don’t have your personalization code? Go to Qualys and get it from the Scans > Appliances list.
Once you enter the code the activation process starts and you’ll see the progress. This may take a few minutes to complete.
Your virtual scanner must connect to our Cloud Security Platform in order to complete the activation and download the latest software versions.
Upon success you’ll see this scanner’s name and IP address. That’s it! You’ve added your virtual scanner to your account.
Having trouble with completing the activation? Click here
8

Get StartedStep 3 - Configure your Virtual Scanner
Want help with configuration? Our Community has helpful articles with recommendations for the various virtualization platforms.
Using Amazon EC2 Be sure to subscribe to the Qualys Virtual Scanner Appliance AMI, then launch the AMI instance. Using the Request Instances Wizard you’ll select EC2 or VPC (for VPC the instance type must be set to “Small” or above).
Under Advanced Instance Options enter the settings as text in the User Data field.
(Required) Enter the Personalization Code for your virtual scanner preceeded by PERSCODE= like this:
PERSCODE=12345678901234
Enter the Proxy server if a Proxy server is used. The format for specifying the Proxy server is user:pass@ip:port, where user is the username, pass is the password, IP is the IP address and port is the port number. If authentication is not used the format is ip:port. The Proxy server is preceeded by PROXY_URL= and it is entered on a separate line like this:
PERSCODE=12345678901234PROXY_URL=domain\user:[email protected]:3128
Under Additional Network Interface you can select a second network interface. The LAN interface services all network traffic by default. If you select a second interface, only scanning traffic is routed through the LAN interface and the additional interface is used for management traffic (job pickup, software updates and health checks).
From our Community
Scanner Appliance FAQs
Configure a virtual scanner using VMware (various products)
Configure a virtual scanner using Microsoft Hyper-V
Configure a virtual scanner using Oracle VirtualBox
Configure a virtual scanner using VMware vSphere (vCenter)
Configure a virtual scanner using a laptop connected to the Internet (MiFi)
9

Get StartedWe recommend one more thing
Under Create Key Pair, select “Proceed without a Key Pair”. This setting is not used by the virtual scanner AMI (if a key pair is selected it is ignored).
Under Configure Firewall, select security groups if groups are required to permit the virtual scanner access to the IP addresses that will be scanned.
Looking for help with EC2? Our best practices and tips are available from our Community.
We recommend one more thing
Check your virtual scanner status. Go to Scans > Appliances, and select your scanner and you’ll see the preview pane.
Tip - It can take a few minutes for the Qualys user interface to get updated after you add a new appliance. Please refresh your browser periodically to ensure that you are seeing the most up to date details.
1 - tells you your virtual scanner is ready. Now you can start internal scans! (Next to this, you’ll see the busy icon is greyed out until you launch a scan using this scanner).
You might want to also check out:
2 - This shows you it’s a virtual appliance.
3 - Latest software versions - these are installed as part of the activation.
4 - The available capacity will be 100% until you launch a scan. You can come back and check this at any time.
From our Community
Configure a virtual scanner using Amazon EC2
Masking Proxy Credentials in Amazon EC2 User Data Field
10

Configuration settings
You might need to customize your configuration, so that your scanner can phone home to our Cloud Security Platform - this is required for successful activation.
Tell me about network settings
There are multiple network settings that you can choose for your virtual scanner, like static IP address, proxy server, and VLAN tag (for 802.1q trunked port). Just enter the network settings using the Virtual Scanner Console (used for all platforms except Amazon EC2).
Having trouble personalizing your scanner? You might need to configure network settings first.
How to use a static IP address
You can choose to configure your appliance with a static IP address instead of DHCP.
- using the Virtual Scanner Console go to the main menu- select “Set up network (eth0)”- press the Right arrow to highlight “Set static IP address on eth0”- press the Right arrow- enter settings
11

Configuration settings
How do I enter settings? Press the Up and Down arrows to select input fields. Press the Right and Left arrows to scroll within a fields. When you are done, select the last item, for example “Configure static IP address on eth0?” and type Y to confirm (or type N to cancel).
Want to configure a static IP using Amazon EC2? Click here
Tell me about these network settings
You’ll notice these menu options in the Virtual Scanner Console.
Enable proxy - Select this option to enter a proxy server configuration, with or without authentication (Basic or NTLM). The proxy server must allo transparent SSL tunneling.
Enable VLAN on eth0 - Select this option if you have connected the LAN interface to a 802.1q trunked port and need your virtual scanner to use VLAN tags on the LAN default network. You’ll enter the VLAN tag number (1-4094) you want to use.
Enable eth1 interface - By default the LAN interface services all network traffic. By selecting this option, all software updates and health checks are routed through the WAN interface and scanning traffic is routed through the LAN interface.
Want to configure network settings using Amazon EC2? Click here
Configure VLANs and static routes
Configuring VLANs and static routes is supported for all virtual scanner distributions, except Amazon EC2/VPC. In Qualys, just go to the appliances list (Scans > Appliances) and edit the appliance settings.
Up to 4094 VLANs and static routes can be added to each virtual scanner appliance, as long as you are using the latest distribution. You’ll have the latest virtual scanner if you’ve deployed it using scanner image qVSA-2.0.13-1 or later. (If you have an older version, you can add up to 99 VLANs and static routes.)
Don’t see these settings? The VLAN trunking feature must be turned on for your account. Please contact Support or your Technical Account Representative if you’d like us to turn it on for you.
Check out our configuration guides
These will help you to configure your virtual scanner on the various supported virtualization platforms.
From our Community
Configure a virtual scanner using VMware (various products)
Configure a virtual scanner using Microsoft Hyper-V
Configure a virtual scanner using Oracle VirtualBox
Configure a virtual scanner using VMware vSphere (vCenter)
Configure a virtual scanner using Amazon EC2
12