REPORT - OFS January 8, 2019 Attachments …... 1 REPORT - OFS January 8, 2019 Attachments ...
Upload
truongtrucCategory
view
216download
0
The ViPi KA3 LLL project (511792-LLP-1-2010-1-GR-KA3-KA3NW) has been partially funded under the Lifelong Learning program, subprogramme KA3 ICT. This document reflects the views only of the author(s), and the Commission cannot be held responsible for any use which may be made of the
information contained therein.
ViPi Basic ICT Skills Training CourseDifferentiated materials for use in pilots at Oak Field School
Types of Computer
There are a number of different types of computers.
Desktop
A desktop computer is used on a desk and is not portable. It consists of a computer, a screen called a monitor, a keyboard, a mouse and often some speakers. The Parts of a Computer are joined together with wires called ‘cables’.
Figure 1 : A desktop computer

Laptop
A laptop computer is a computer designed for portable use. The laptop incorporates the monitor, computer, keyboard, mouse (touchpad) and speakers into a single device (see parts of a computer). The laptop has a battery, which means it can be used without being plugged in to the wall. This battery is charged by means of a power supply. A small laptop is sometimes called a notebook or netpad.
Figure 2 : A laptop computer
All-in-One
An all-in-one PC is a personal computer mounted on the desk like a standard monitor, but with the computer built in to the monitor unit. It must be powered by a power supply. A keyboard and mouse are usually connected to it. All-in-one PCs often have a touch-screen, allowing users to make things happen by touching the screen.
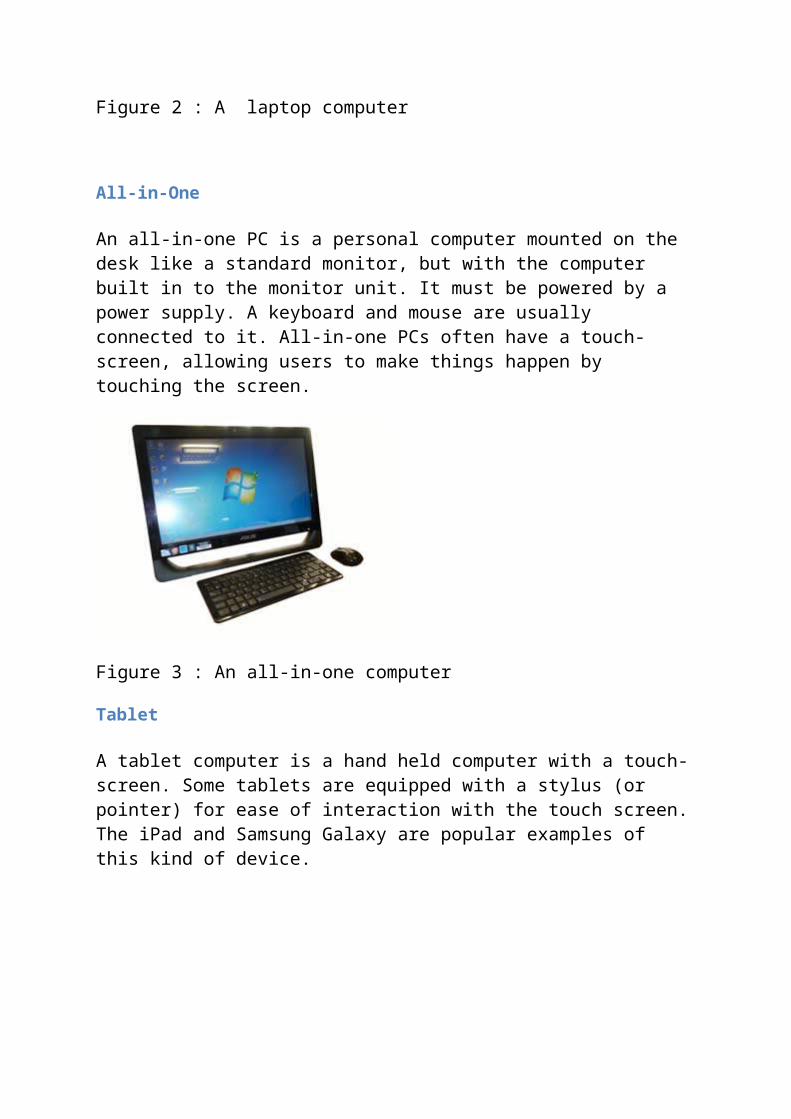
Figure 3 : An all-in-one computer
Tablet
A tablet computer is a hand held computer with a touch-screen. Some tablets are equipped with a stylus (or pointer) for ease of interaction with the touch screen. The iPad and Samsung Galaxy are popular examples of this kind of device.
Figure 4 : A typical tablet computer
Smart Phone
A smart phone is a mobile phone device which can run programs called 'apps'. It usually has a touch-screen. Examples of these phones are iPhones, Android phones and Blackberrys.

Figure 5 : A smart phone
Parts of a Desktop Computer
A desktop computer can be broken down into its key components, which are generally the computer, its monitor, its speakers, its keyboard and its mouse. These are shown below. There are other peripherals which may also be connected.

You can try the printable labelling exercise for this. (See Appendix).
The Monitor
The monitor is the computer’s screen. Some have built in speakers and a few have touch screens. Older versions were big and heavy, but modern monitors use much lighter thinner screens.
The Computer Base
The computer base is a plastic or metal box (See Figure 8). It contains parts of the computer that allow it to work. It usually has a power button and a reset switch on the front. At the rear of the unit there are a number of sockets to which the other parts of the computer and a power cable must be attached. There may also be a power switch at the rear.

At the back of the computer base there are vents to allow it to keep cool and sockets or 'ports' to which various cables are attached to link it to the other computer parts.
The Mouse
The mouse is a device that allows the user to move the pointer on the screen. Moving the mouse moves the pointer. The mouse also has two or more buttons and sometimes a scroll wheel. How to use the mouse is explained in the input devices section, The Mouse and Touchpad.

There are many device types which have the functionality of the mouse but may work in slightly different ways. A summary of types is given below.
- Mechanical mouse: Uses a hard rubber ball to detect movement.
- Optical mouse: Uses light to detect movement.
- Wireless mouse: Works like an optical mouse, but does not need a wire. These mice need batteries.
- A mouse with extra buttons: Some mice have extra buttons which can do extra functions.
- Trackball mouse: Like an upside-down mechanical mouse. Rather than roll the mouse around, you use your thumb or index finger to roll a ball on top of the mouse. It does not move, so it doesn’t need a lot of room, and its cord never gets tangled.
- Stylus mouse: This mouse looks like a pen and draws on a special pad. It is very useful for artistic use.
- Cordless 3-D mouse: This kind of mouse can be pointed at the computer screen like a TV remote. It acts like a Wiimote.
Further information can be found at http://www.dummies.com/how-to/content/the-different-types-of-computer-mice.html)

The Keyboard
The keyboard is a collection of keys with letters numbers and symbols on them for typing text into the computer. Its main functionality is detailed in the inputs section.
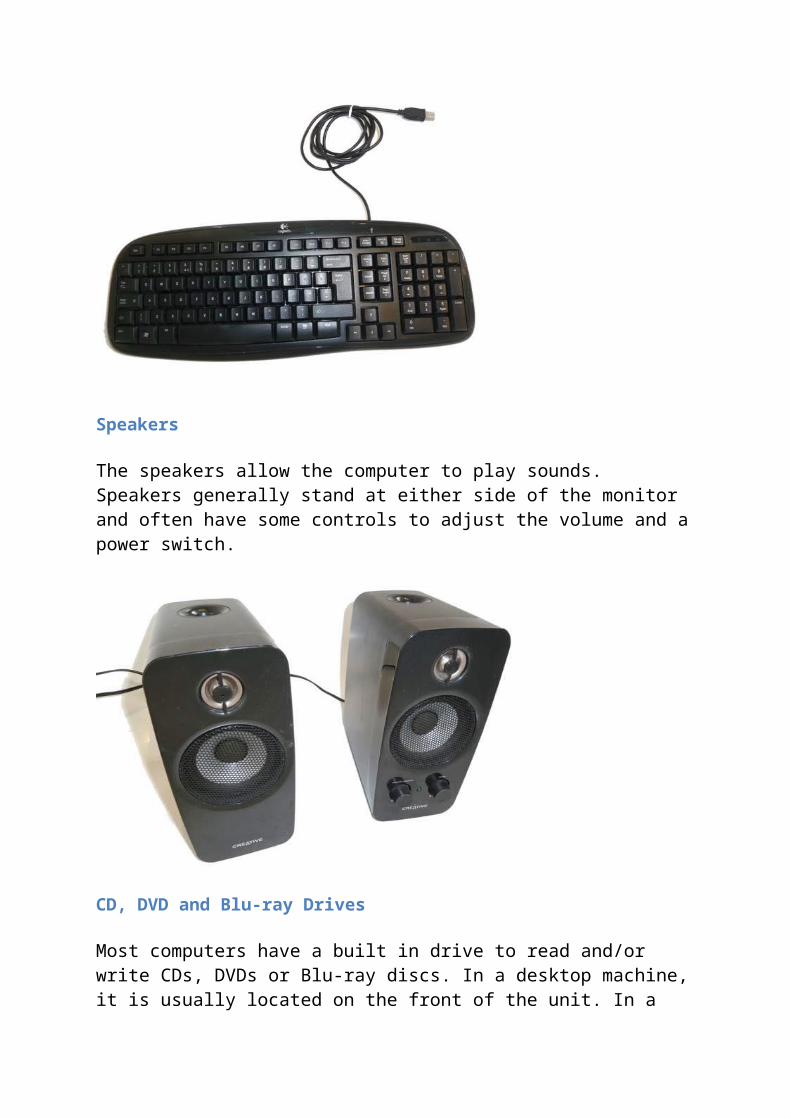
Speakers
The speakers allow the computer to play sounds. Speakers generally stand at either side of the monitor and often have some controls to adjust the volume and a power switch.

CD, DVD and Blu-ray Drives
Most computers have a built in drive to read and/or write CDs, DVDs or Blu-ray discs. In a desktop machine, it is usually located on the front of the unit. In a laptop or all-in-one machine it is often on one of the sides of the machine. The tray is opened by pressing the button on or next to the tray. On inserting the disc they will usually automatically run. The tray may be closed by gently pushing it back in or sometimes by pressing the open/close button again.
Cables and Connections
The parts of a desktop computer are connected up by a series of cables, each of which has a different purpose. The cables need to be correctly plugged in to make the computer work. If the computer is not working, you could ask somebody to check the cables. The picture below shows a selection of cables that you might need including ones for power, connecting the monitor, connecting other peripherals, connecting networks and connecting sound.
Fun Things to Try
You can try the printable labelling exercise for this. (See Appendix).
The Yes/No Quiz Game - quiz 1 - 'Parts of a computer'.
Memobile Game - Matching Pairs (on your Android phone or tablet)
The Laptop
Parts of a Laptop Computer
The laptop contains the main five parts of a desktop computer in one portable unit. It has a monitor, speakers, a computer, a keyboard, and a touch pad pointing device (which works like a mouse). A laptop may also have a microphone and webcam built into it.

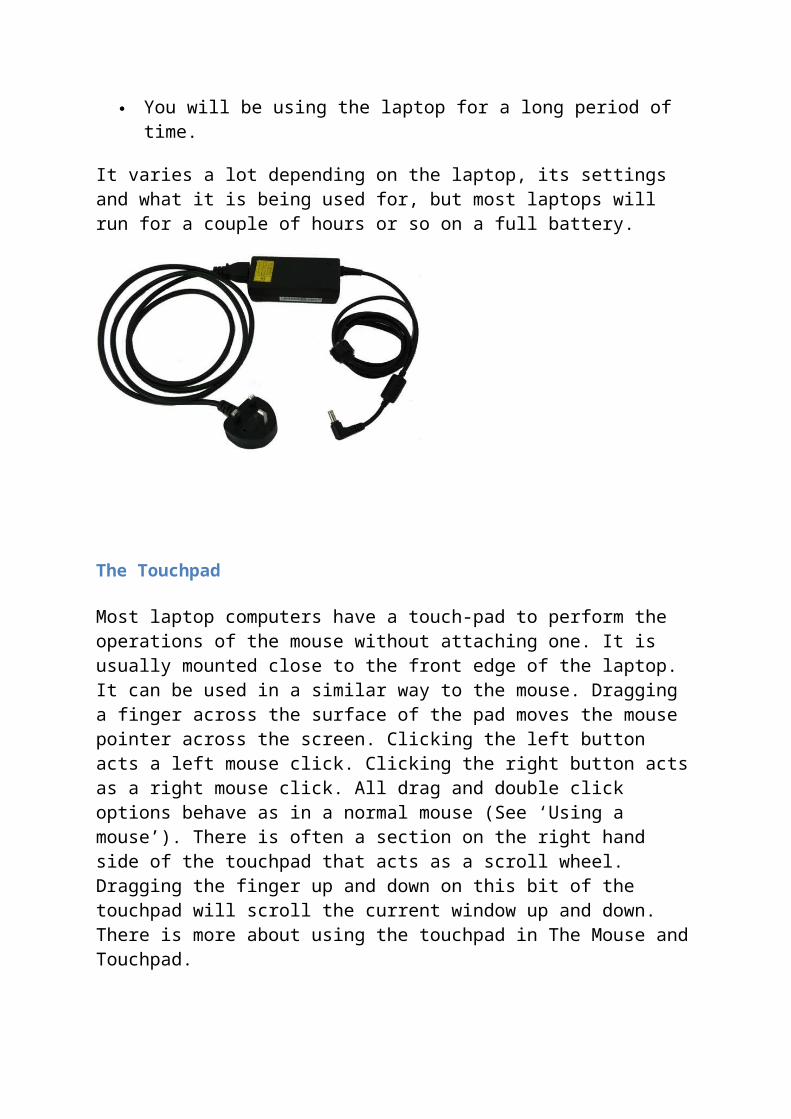
The Power Supply
The power supply acts as a power lead for the laptop, and as a recharger for the laptop’s battery.
Plug in the power supply when:
The battery is low or flat and you want to use the laptop. You want to recharge the battery.
You will be using the laptop for a long period of time.
It varies a lot depending on the laptop, its settings and what it is being used for, but most laptops will run for a couple of hours or so on a full battery.

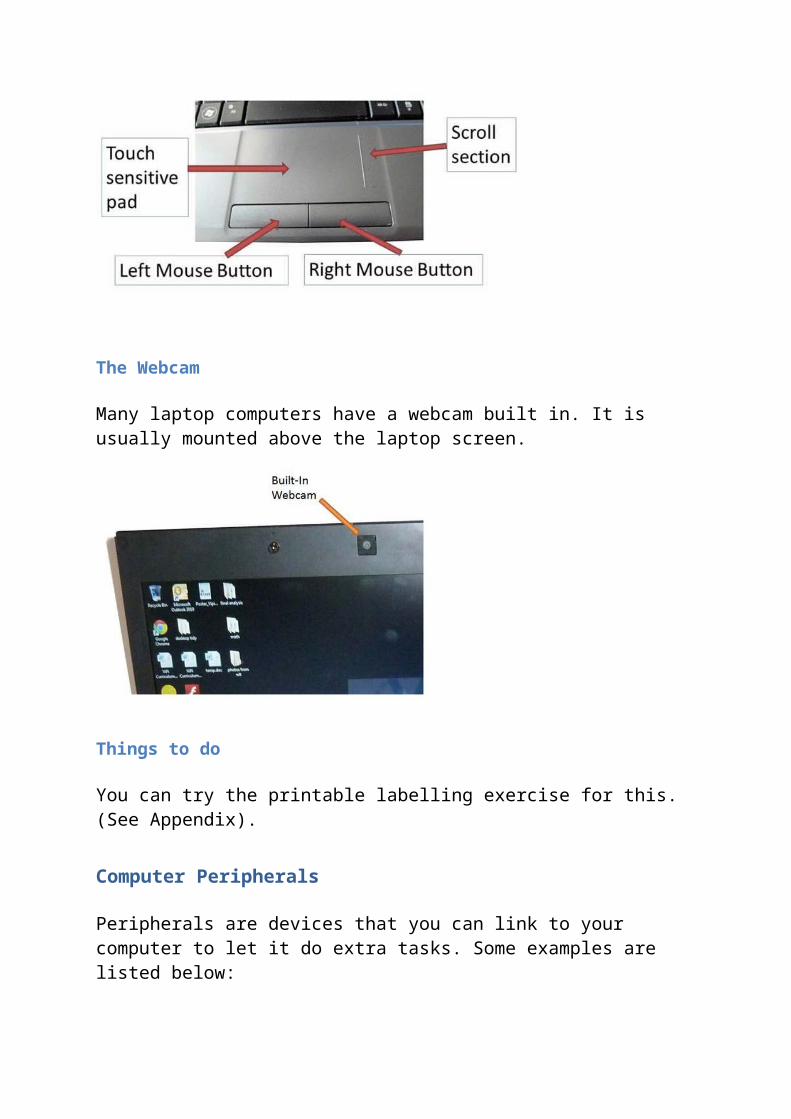
The Touchpad
Most laptop computers have a touch-pad to perform the operations of the mouse without attaching one. It is usually mounted close to the front edge of the laptop. It can be used in a similar way to the mouse. Dragging a finger across the surface of the pad moves the mouse pointer across the screen. Clicking the left button acts a left mouse click. Clicking the right button acts as a right mouse click. All drag and double click options behave as in a normal mouse (See ‘Using a mouse’). There is often a section on the right hand side of the touchpad that acts as a scroll wheel. Dragging the finger up and down on this bit of the touchpad will scroll the current window up and down. There is more about using the touchpad in The Mouse and Touchpad.
The Webcam
Many laptop computers have a webcam built in. It is usually mounted above the laptop screen.

Things to do
You can try the printable labelling exercise for this. (See Appendix).
Computer Peripherals
Peripherals are devices that you can link to your computer to let it do extra tasks. Some examples are listed below:
The Printer
A printer is used to print out copies of documents on paper. Some printers only print in black and white, and some can do colour prints. Some modern printers also have a scanner on them. Printers vary widely in looks.
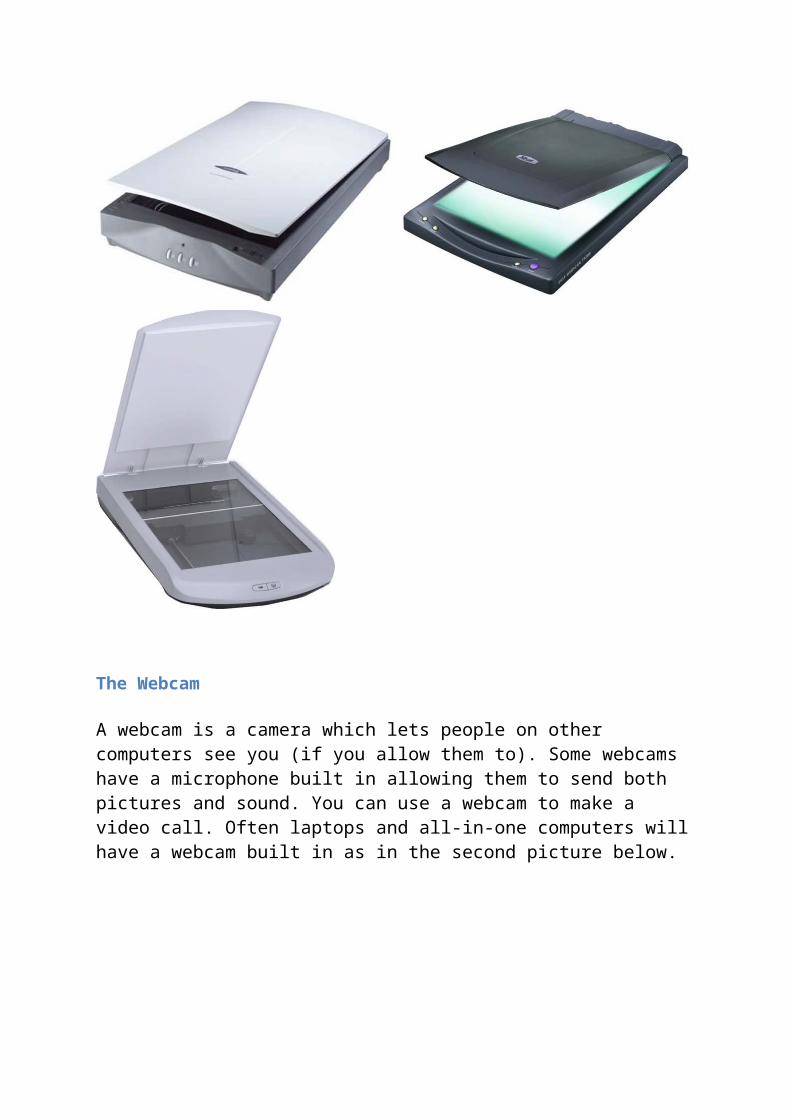
The Scanner
A scanner is used to copy a paper document or picture onto the computer. Some printers also have scanners built into them. You place a picture on the scanner's flat bed, close the lid, and then use the scanning software to capture the picture. The image can then be saved on your computer.
The Webcam
A webcam is a camera which lets people on other computers see you (if you allow them to). Some webcams have a microphone built in allowing them to send both pictures and sound. You can use a webcam to make a video call. Often laptops and all-in-one computers will have a webcam built in as in the second picture below.

The Microphone
A microphone allows you to speak into your computer. This can let you use your voice to control the computer. It is also useful for communication tools where you can speak to people on other computers.
Some microphones stand on the desk or clip to the monitor. Some may be a part of a headphone set. Some computers have a microphone built in.
The Router or Modem
The router or modem lets your computer connect to the internet. Routers and modems may look different to the one in the picture, but they usually have four or more lights on the front which change colour to green when it is connected to the internet.
The router must be connected to a wall socket to connect to the internet. Computers can connect to the router either with a network cable, or by a wireless connection. This gives them a connection to the Internet, and lets you go on the web and to send and receive emails.

The USB stick
A USB stick is useful tool for moving files between computers or for making a back-up of the files and folders (see Files and Folders section) on your computer. If you have a file (which could be a photo, a document, some music or a video) you can save it on the USB stick. Then if you plug the USB stick into a different computer you could see the document there too.
To use it, you take off the lid and then push the metal end of the stick into the USB slot on your computer. Your computer should recognise it after a short while, and it should then appear as an extra drive on your computer where you can save data.

The External Hard Drive
An external hard drive is a useful tool for storing a safe back up of files and folders from your computer. It has lots of space where you can save files. You plug the cable into the USB slot on your computer. Your computer should recognise it after a short while, and it should then appear as an extra drive on your computer where you can save files.
Saving copies of data onto another drive is good, because if something goes wrong with your computer, you can get you important files like your photos, music and documents back.

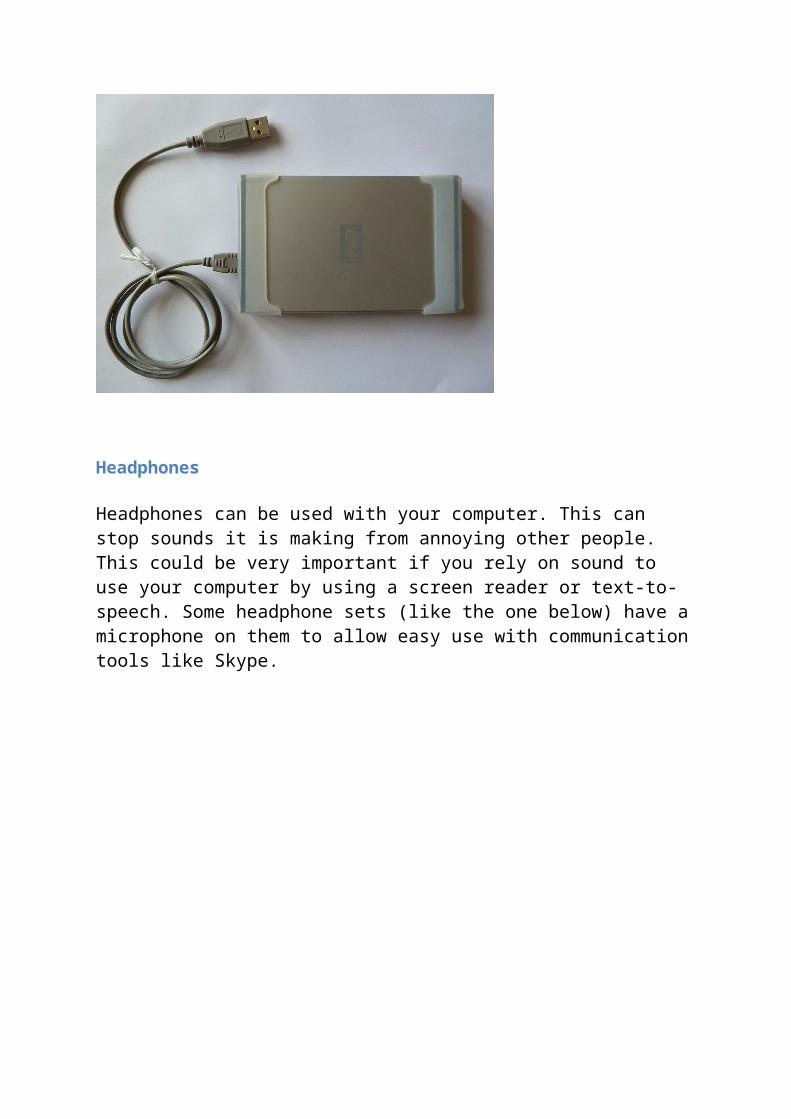
Headphones
Headphones can be used with your computer. This can stop sounds it is making from annoying other people. This could be very important if you rely on sound to use your computer by using a screen reader or text-to-speech. Some headphone sets (like the one below) have a microphone on them to allow easy use with communication tools like Skype.
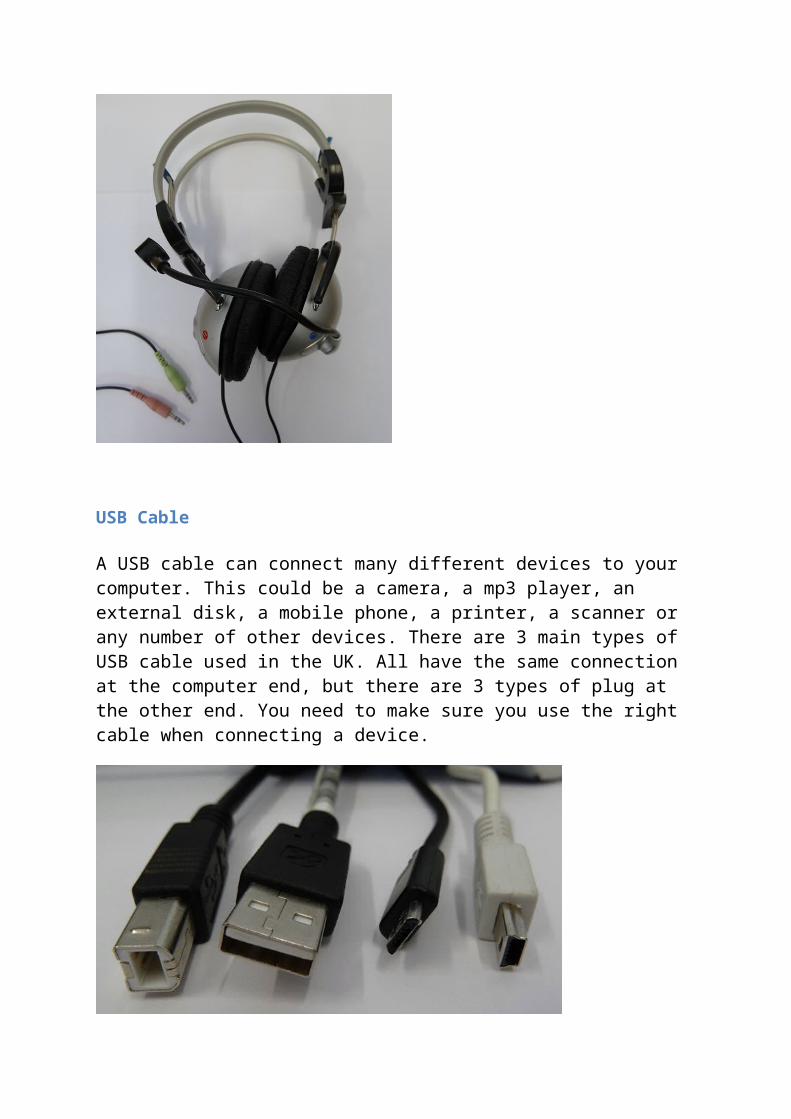
USB Cable
A USB cable can connect many different devices to your computer. This could be a camera, a mp3 player, an external disk, a mobile phone, a printer, a scanner or any number of other devices. There are 3 main types of USB cable used in the UK. All have the same connection at the computer end, but there are 3 types of plug at the other end. You need to make sure you use the right cable when connecting a device.

Fun Things to Try
You could now try:
Play ESCAPOLOGY! - the 'Computer Parts' questions.
Play ROB THE MOB! - the 'computer and its parts'.
The Yes/No Quiz Game - quiz 1 - 'Parts of a computer'.
Memobile Game - Matching Pairs (on your Android phone or tablet)
Turning a computer on and off
The ‘Power’ Button
The first step in turning on a computer is locating the ‘Power’ or ‘On/Off’ button. It will usually have a symbol like the ones on the buttons in the pictures below.
Turning on a Desktop Computer
On a desktop computer, there is one on the monitor and one on the computer base. First press the power button on the monitor. Next press the power button on the computer base. It will probably make a beep and a whirring noise, and some lights/LEDs may come on. On the monitor, you will then see a number of messages flashing on and off as the computer loads up. You need to wait until you see the log in screen.
Turning on a Laptop Computer
To turn on a laptop computer, you will first need to open it. Some laptops will just fold open, others will have a push or sliding clasp holding the laptop closed. To open these you will need to slide the catch or press the button prior to opening the laptop. Next locate the power button, which is usually found between the keys of the keyboard and the display. It will again have a symbol like the ones above on or by it. Press it firmly once. It will probably make a beep and a whirring noise. The monitor and some lights may come on. On the monitor, you will then see a number of messages flashing on and off as the computer loads up. You need to wait until you see the log on screen, or an instruction to press some keys.
Logging On
Often you will need to 'Log On' to a computer in order to use it. This enables it to use your own settings.
Some computers will ask you to press CTRL ALT DELETE to log on. To do this, press and hold down CTRL and ALT with one hand, the press the Delete (or Del) key with the other hand. If you struggle to use both hands see the Keyboard Shortcuts section for further advice on how to turn on 'sticky keys'.
If there is an icon with your log on name as shown below, click it with the mouse, or use the tab and enter keys to highlight and select it.

When it has been selected you should see a box to enter the password if one is required (as below). Enter the password and click the arrow or hit 'enter' to continue.
If there is not an icon with your log on name, there will probably be two text boxes instead. You need to type your username into the first box and your password into the second box.
You must use capital letters and small letters correctly when entering these details.
When you have entered the password, click the log on button or press enter, and the computer should continue to load the software. Now wait until the computer is ready to use.
Turning Off Your Computer
Save your work

Before you turn off the computer close windows you are using by clicking on the ‘x’ in the top right corner (see the Working with Windows section for more details). Save your work if required (there is more on this in the Working with Windows and the Files and Folders sections). The program should close once your work has been saved. Be patient as sometimes closing programs can take a while.
Software Shutdown from the Start menu
Once the applications are closed you can begin shutting down the computer. This is usually done using the mouse, but can also be done with keyboard only.
Using the Mouse to shut down:
In Windows XP, click on 'start' in the task bar (if the task bar is not present move the mouse to the bottom edge of the screen to make it appear).
Clicking the start button brings up the Shut Down button.
Clicking on 'Shut Down' will offer the list of options below. Shut Down should be selected to shut the computer down.

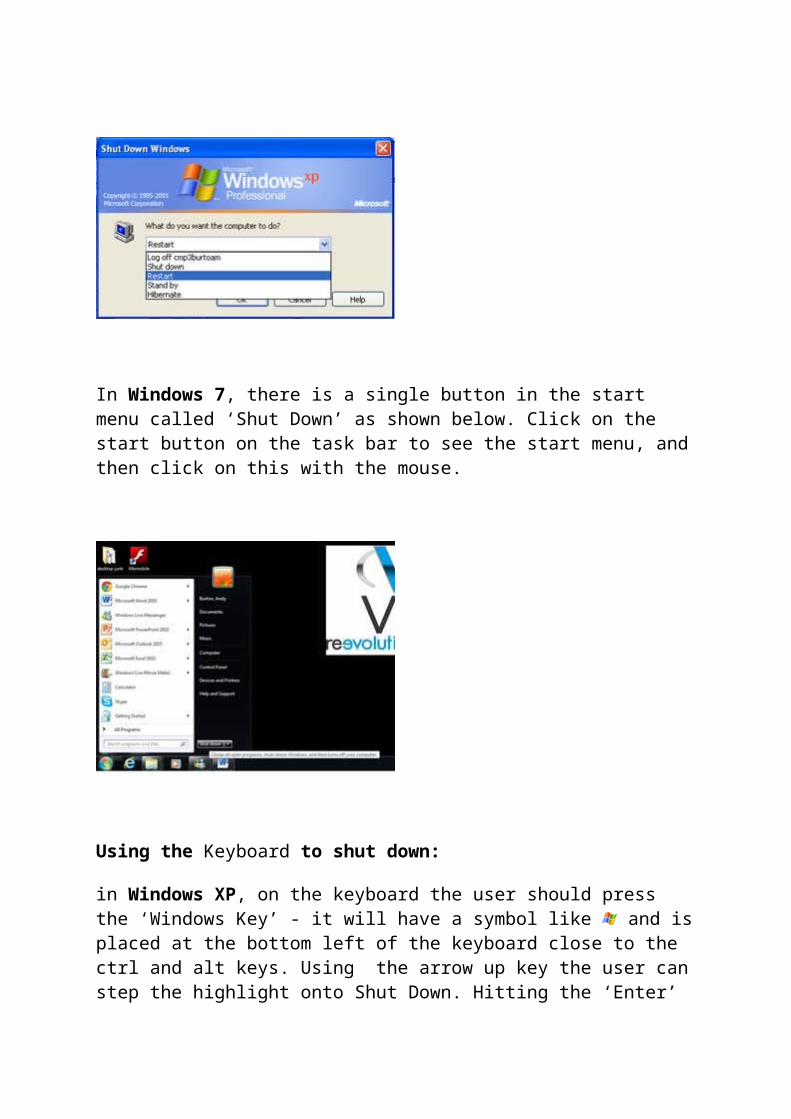
In Windows 7, there is a single button in the start menu called ‘Shut Down’ as shown below. Click on the start button on the task bar to see the start menu, and then click on this with the mouse.
Using the Keyboard to shut down:
in Windows XP, on the keyboard the user should press the ‘Windows Key’ - it will have a symbol like and is placed at the bottom left of the keyboard close to the ctrl and alt keys. Using the arrow up key the user can step the highlight onto Shut Down. Hitting the ‘Enter’ key performs the operation. The up and down arrows move the user through the same dropdown options as described above. The user should select the option ‘Shut Down’, and hit ‘Tab’ to move the focus to the OK button. Hitting ‘Enter’ again will turn the computer off..
In Windows 7, there is a single button in the start menu called ‘Shut Down’ as shown below. You can select it using the Windows key , the arrow keys and then 'enter'.

Turning off the Monitor
After shut down, the computer will in most cases turn off automatically. If it reaches a screen that states ‘It is now safe to switch off your computer’, the power button may be pressed to turn it off.
On a laptop, the built in monitor will also shut down automatically. The monitor on a desktop machine will usually stay on standby, and can be turned off by pressing the power button again. This is the same button as was used to turn it on.
Logging Off
When you have finished a session on the computer, if you do not want to shut it down you should log off. The 'Log Off' option is found in the same menu as the shut down command in Windows XP or it can be accessed from the arrow button next to the shut down command in Windows 7.
Practical Exercise: Start a computer booting with the power button Log in using personal log in details
Log off using the log off button in the start menu
Log in again
Shut down the computer using the Shut down command from the start menu

Fun Things to Try
You could now try:
Memobile game - Starter Kit game (for Android tablets and phones)
The Mouse
Parts of the mouse
A mouse is moved on a desk by your hand. As you move the mouse it moves the pointer on the screen. The mouse will usually have at least two buttons (known as the left and right mouse buttons). It will also often have a scroll wheel between them.

Using a mouse
A) Moving the pointer
To move the pointer on the screen, move the mouse around on the desk.
B) Left Mouse Click
A left mouse click is a single press and release of the left mouse button. It is called a click because of the sound it makes. A left click will usually select an item on the screen.
C) Right Mouse Click
A right mouse click is a single click of the right mouse button. A right mouse click will usually reveal a menu of choices of different things you can do.
D) Double Click
A double click is the term for clicking the left mouse button quickly twice. A double click will select and then activate an action. For example double clicking on a game icon on the desktop makes the game start.
E) Dragging
Dragging is where the user clicks the mouse button and holds it down. The user then moves the mouse across the desk. ‘Dragging’ enables:
an object to be selected and moved across the screen. multiple objects to be selected.
a block of text to be selected.
F) Scrolling
Scrolling is the term used for moving through the contents of a window where the contents do not all fit on your screen. These windows will have 'scroll bars at the side of them'.
It can be done by rolling the scroll wheel on the mouse:
Rolling the scroll wheel away from you will move the document up. Rolling it towards you will move the document down.
You can also drag the scroll bar with your mouse to scroll the page.
It is also possible to scroll by using the scroll lock. To do this:
Click down the mouse wheel once to turn the scroll lock on. (The pointer will change)
Move the mouse forwards or backwards on the table to scroll.
To stop scrolling click the mouse wheel down again.
You can download a printable labelling exercise for this here: exercise_-_mouse_diagram
The Touchpad
Laptop computers have a touchpad which is like a mouse. Rubbing your finger on it moves the mouse pointer. It also has two buttons as in a mouse.
You can download a printable labelling exercise for this here: exercise_-_touchpad
Accessibility assistance for the mouse
In Windows you can make the mouse easier for you to use. This can be done using the ‘accessibility wizard’ available from the accessibility menu under all start menu/programs/accessories, or by pressing the Windows Key and U.

The Available settings are:
Mouse cursor – change the colour or size of the mouse pointer Mouse button settings – switch the mouse for a left handed user
Mouse pointer speed – change the speed of the mouse pointer
Use numeric keyboard instead of a mouse – allows the numeric keyboard to be used as a mouse if you find using a mouse difficult.
Different designs of mouse may increase the ease of use for particular users. A wireless mouse could prevent problems caused by wires, or a track ball could be useful where a user has limited movement.
For more information on Accessibility you can view the Microsoft Accessibility pages.
Fun Things to Try
You could now try:
FLYSWAT! - The flyswat game allows you to practice co-ordination with the mouse and keyboard.
The Keyboard
The Keys
The keyboard is a device designed to allow a user to ‘input’ information into a computer by pressing buttons. It is a device with lots of buttons (or keys). The keys are grouped to make it easier to use the keyboard. The groupings of the keys are shown below:

The letter keys are grouped, and are usually presented in the ‘QWERTY’ format (shown in blue in the picture). Some special keyboards may have the keys in alphabetical order. The long bar below them is called the space bar, which adds a space between typed words.
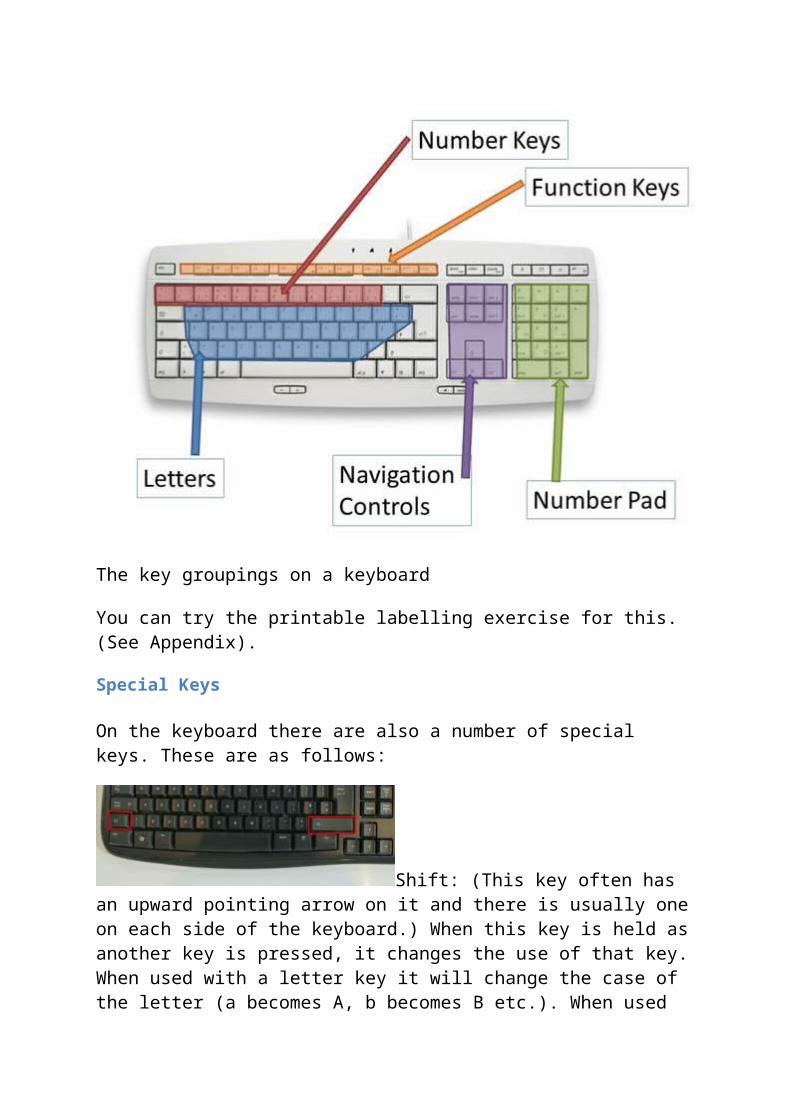
Some keyboards have a number pad to the right (shown the picture in green) which contains the numbers and + - x and ÷. This allows for fast number work. Some keyboards do not have a number pad in order to make the keyboard more compact. This is common on laptops or portable keyboards. All keyboards however have the numbers above the letters (shown in the picture in red). There are a set of navigation keys in the centre of the keyboard (shown in the picture in purple), consisting of arrow keys, home and end, page up and page down, insert and delete.
The key groupings on a keyboard
You can try the printable labelling exercise for this. (See Appendix).
Special Keys
On the keyboard there are also a number of special keys. These are as follows:

Shift: (This key often has an upward pointing arrow on it and there is usually one on each side of the keyboard.) When this key is held as another key is pressed, it changes the use of that key. When used with a letter key it will change the case of the letter (a becomes A, b becomes B etc.). When used with one of the keys with lower and upper options (e.g. ‘{‘ or ‘[‘ ) the upper option will be displayed when holding shift.
Control: (ctrl) This key performs special operations when pressed in conjunction with other keys. The ctrl key allows many useful shortcuts to be performed. Some of the most commonly used are:
CRTL and X – cut CTRL and C – copy
CTRL and V – paste
CTRL and Z – undo
CTRL and A – select all
There are many others (see the page on Keyboard Shortcuts) and the functionality often changes dependent on the program that is being used at the time.

Alt: This is a key used to ‘alternate’ the function of the key. Like SHIFT and CTRL, it is held whist pressing other keys to change what they do. The functions performed by the alt key combinations vary depending on the program being used. Commonly they will allow shortcut (or non-mouse-user access) to menus.
Caps Lock: This key is a way to use shift without holding it down. Press it once and the case of all characters typed will switch. Press it again to switch the case back again. There is often a light on the keyboard which denotes whether or not the caps lock is on. Caps lock can also be used to capitalise letters when a user finds it hard to use both hands.

Windows: The Windows key is a shortcut to the ‘Start menu’ or a means of accessing the menus without using a mouse. It also allows a number of shortcuts relating to the movement and maximising/minimising of windows. Some of these shortcuts are listed in Section 0 ‘Using the Computer’
Tab: Usually denoted by an arrow pointing to the right with a vertical line at the end. The tab key has several uses:
Tab is used for aligning text into a tabular form in a document. It is also used in web browsing to cycle between links in html browsers. Tab
shifts the highlight to the next link. Shift and tab moves the highlight back to the previous link. This is useful for hyperlink selection by non-mouse-users.
Tab is also used to move the highlight around in Windows when navigating without using a mouse.

Enter (or return): There are two enter (sometimes called return, or carriage return) keys. There is one to the right of the letter group, often marked with an arrow pointing down and to the left. There is also one on the bottom right hand side of the number pad – usually marked ‘enter’. Both keys generally perform the same function, which is usually to finish an entry and perform a process. It is often the keyboard equivalent of clicking an OK button with the mouse. When using a word processing package, the enter key will act as a carriage return – beginning a new paragraph.
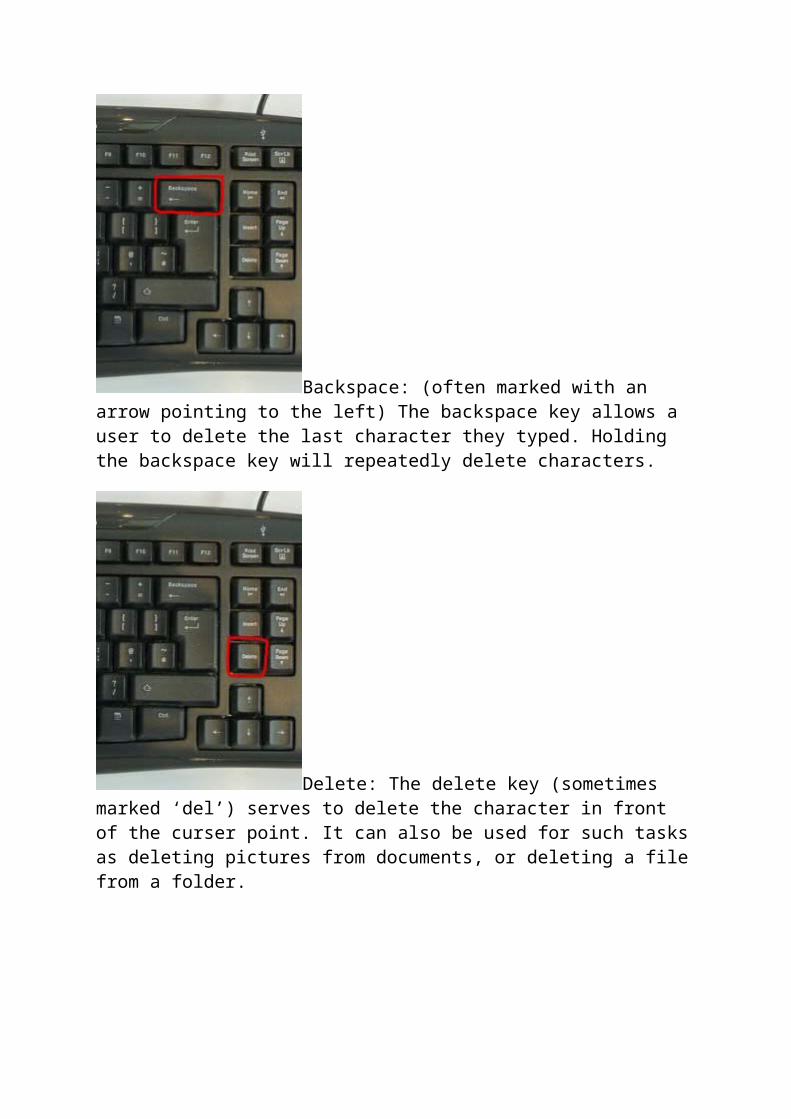
Backspace: (often marked with an arrow pointing to the left) The backspace key allows a user to delete the last character they typed. Holding the backspace key will repeatedly delete characters.
Delete: The delete key (sometimes marked ‘del’) serves to delete the character in front of the curser point. It can also be used for such tasks as deleting pictures from documents, or deleting a file from a folder.
Escape: (sometimes labelled ‘esc’) the escape key is a shortcut for closing a popup window. It is often the keyboard version of pressing an exit, no, quit or cancel button. It is also used as a keyboard shortcut for the stop button in many html browsers.
There are also twelve function keys across the top of a standard keyboard, which allow the user to perform shortcuts to functions (these are shown in orange in Figure 34). An example of this in windows is the F1 button which typically calls up the help system for the current application.
A number of more accessible keyboard options are available, including large text, large keys, high contrast, colour coded keyboards and simplified keyboards.
Assistive keyboard approaches
In Windows XP the way the keyboard works can be changed to suit particular users. The changes can be made using the ‘accessibility wizard’ available from ‘start menu / All Programs/ Accessories/ Accessibility’ or by pressing the Windows Key + U together.
In Windows 7, these changes can be made using the ‘Ease of Access Centre’ which is located under ‘start menu/All Programs/accessories/Ease of Access/Make the keyboard easier to use’ or by pressing the Windows Key + U together and then selecting ‘Make the keyboard easier to use’.
Sticky Keys
Press keys in combinations one at a time - helps with the use of shift, ctrl alt and windows keys.
Shortcut: press shift 5 times : StickyKeys on or off.

Filter Keys
Ignore repeated keystrokes – prevents you accidentally pressing a key too many times.
Shortcut: Right SHIFT + DOWN ARROW (turns filterKeys on or off)
Toggle Keys
Play sound on pressing caps lock, number lock, or scroll lock – prevents accidental pressing of the lock keys
Shortcut: Hold NumLock key for 5 seconds : (turns ToggleKeys on or off )
Mouse Keys
Use numeric keyboard instead of a mouse – allows the numeric keyboard to double up as a mouse
Shortcut: Left ALT + Left SHIFT + NumLock (turns MouseKeys on or off)
Extra Keyboard Help (Windows XP only)
Displays extra keyboard help whenever it is available, useful to non-mouse users.
Turn on by checking the checkbox in accessibility options.
On Screen Keyboard
There is an on-screen keyboard available for use where physical disability prevents the use of a physical keyboard. A capture of the on-screen keyboard is shown below. In Windows 7 the On-Screen Keyboard is available through the ‘Ease of Access Centre’. This can be accessed by pressing the Windows Key + U together, and then selecting ‘Start On-Screen Keyboard’. In Windows XP, the On-Screen Keyboard can be turned on from ‘start menu/All Programs/Accessories/Accessibility/On-Screen Keyboard’. A useful shortcut in Windows XP is also Windows Key + U which brings up the Utility Manager with

controls for the On-Screen Keyboard, Narrator and Magnifier. There is also a setting in the Utility Manager to run these at start up.
A screen capture of the Windows 7 on-screen keyboard
Keyboard Navigation - In Windows applications pressing 'F10' will bring up a number of shortcuts on the 'ribbon' along the top of Microsoft applications. The shortcuts displayed can then be typed to access the various functions of the ribbon. The two images belos show this in action in Microsoft Outlook. Pressing F10 shows the shortcust in the first image to jump between tabs. The in the second image, V has been pressed to access the View tab, and the shortcuts within there are also displayed. It is a useful way to access all features of the ribbon using just the keyboard.
Scanning Keyboards - A scanning on-screen keyboard can be used with a switch controller to allow users with limited physical movement to be able to type accurately onto a computer. Scanning keyboards such as the Windows 7 On-screen Keyboard, and the ‘Tecla’ scanning keyboard for Android, operate by means of scanning through the keys. First the keyboard scans down highlighting each row at a predetermined interval (approximately 1s). The user hits the switch when the row containing the character they want is highlighted. The software then scans along the row highlighting each key in turn. The user hits the switch to trigger the key they want.

More info on Tecla for Android.
Speech Recognition – From the release of Windows Vista, speech recognition has been built into Windows and allows a user to control the machine, and to type using voice (speech-to-text or STT). Some of the more recent smart phones have similar tools inbuilt to allow voice commands and dictation or quick internet searching by means of voice (For example Siri on iPhone and Evi on Android). Speech recognition requires a microphone, and can be found from ‘start menu/Control Panel/Ease of Access/Speech Recognition’ in Windows 7. It is not available by default with Windows XP.
For more information on Accessibility you can check out the Microsoft Accessibility pages.
Practical Exercise:
In an open notepad window:
Type a short sentence such as ‘Hello, my name is Andy.’ Hit return to go to the next line
Type another short sentence such as ‘ I live in Nottingham.’
Move the cursor to the end of the word Andy by your choice of mouse or keyboard methods
Delete Andy and replace it with Dave.
Fun Things to Try
You could now try:
FLYSWAT! - The flyswat game allows you to practice co-ordination with the mouse and keyboard.
Keyboard Shortcuts
How to use keyboard shortcuts
Many of the shortcuts require the pressing of 2 keys at the same time.

This is done by first pressing the modifier key (SHIFT, CTRL or ALT) and holding it down, followed with a press and release of the shortcut key, and finally releasing the modifier key.
If you find this difficult, you can use 'Sticky Keys'. To turn this mode on press shift 5 times. And then press OK when the popup box appears. You will now be able to use the shortcuts by pressing one key after the other - for example, copy would be: Press CTRL and release it and then press C.
Below are some useful general shortcuts...
Keyboard shortcuts for use with Windows:
F1 : opens ‘Help’ files
CTRL + ALT + DELETE : Bring up log off /task manager options
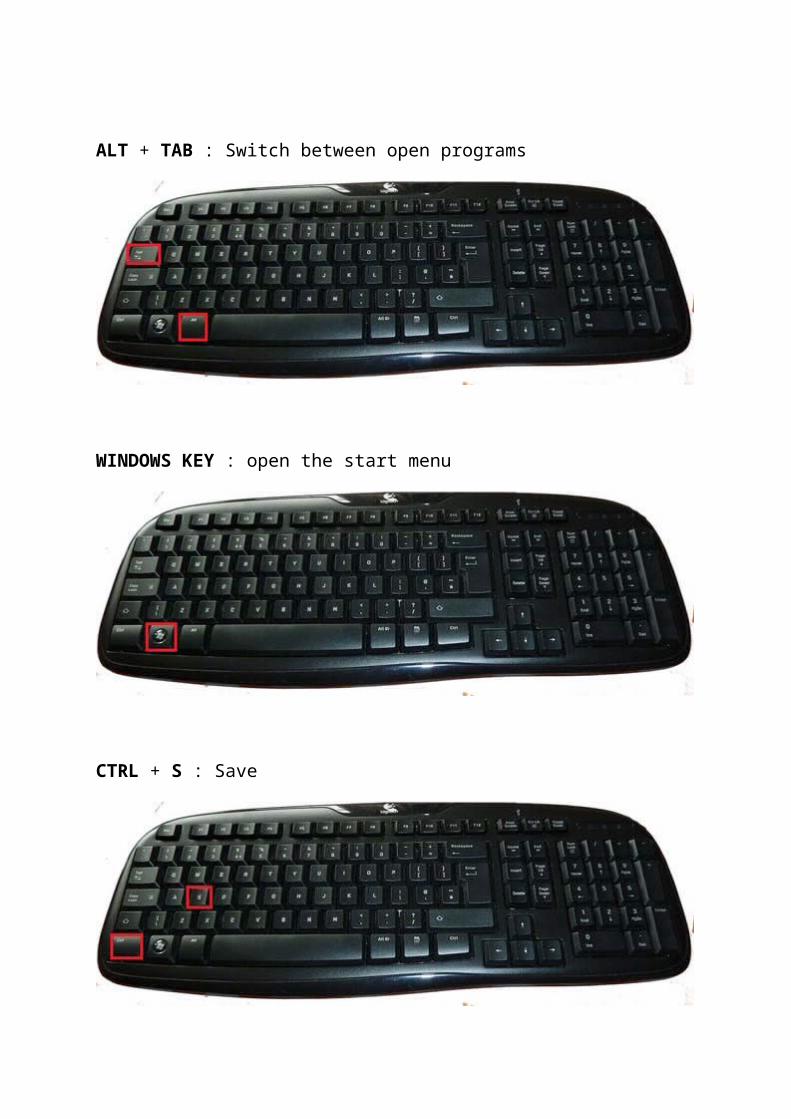
ALT + TAB : Switch between open programs
WINDOWS KEY : open the start menu
CTRL + S : Save

Shortcuts useful in Programs:
CTRL + A : Select All
CTRL + C : Copy
CTRL + X : Cut

CTRL + V : Paste
CTRL + Z : Undo
CTRL + Y : Redo
CTRL + P : Print
Formatting Text
CTRL + B : Make text bold like this

CTRL + I : Make text italic like this
CTRL + U : Underline text like this
Folder and Explorer shortcuts:
To copy a file
- Press and hold down either CTRL key while you drag the file to another folder.

Extra shortcuts using the special Windows keys:
Windows Key + E : Open Windows Explorer
Windows Key + F : Find files or folders
Windows Key + D: minimise windows to show the desktop
Windows Key +TAB :Cycle through taskbar buttons
Windows Key + U: Open the ‘Ease of Access Centre’
Application Key : shows a shortcut menu for the selected item

Useful Shortcuts for KEYBOARD only users
F10 : Activates menu bar options (gives good access to menu commands from the keyboard)
SHIFT + F10 : Opens a shortcut menu on the selected item (similar to a right click of the mouse)
ALT + DOWN ARROW : Open a dropdown list
ALT + SPACE BAR : Displays menu allowing window manipulations (restore, minimise, maximise, close, move or resize the window)
ALT + ‘an underlined letter from a program menu’ : Opens that menu
CTRL + F brings up the find window
Fun Things to Try
You could now try:
Play ROB THE MOB! - the 'Keyboard Shortcuts' section.
Memobile Game - 'Press... and Action' (for Android tablets and phones)
Touchscreens
About Touchscreens
Some PCs and all-in-one computers, and in particular mobile devices such as smartphones and tablet computers, have a touchscreen. A touchscreen can detect a touch on its display. This allows direct interaction with the display without needing a mouse or track ball type device.
Ways to use a Touchscreen
In use, a touch screen works similarly to a mouse. The touchscreen is usually set to these standard options, although you can often change this if required:
Touch the screen = Left Mouse Click Touch the screen twice quickly = Double Left Click
Touch the screen and hold = Right Mouse Click
Touch and drag finger on screen = Click and Drag
Touch and flick up/down/left/right = Scroll Page Up/Down/Left/Right (a flick is a short drag in that direction followed by a release.
Some touchscreens can recognise more than one touch at a time. On multi-touch devices there are further possibilities, including:
Touch with finger and thumb and bring them together (pinch)= Zoom Out Touch with finger and thumb and drag them apart (spread)= Zoom In
Touch with one finger then a second = Right Click

Diagrams showing the modes of interaction with a touchscreen (Original works by Rachel Glaves. Converted to Pencil by Frédéric Vandaele. URL: http://evoluspencil.googlecode.com/files/touchscreen.zip)
Fun Things to Try
You could now try:
Memobile Game (on your Android phone or tablet) - Playing this game will let you practice using a touchscreen device
Display Settings
Windows Settings
In windows you can alter the appearance of the pages you view. It is possible to increase the size of text in title bars, dropdowns and menus across your Windows programs. In Windows 7 this setting can be accessed by selecting ‘Control Panel’

from the Start Menu and then selecting ‘Display’. You will be presented with radio buttons for smaller, medium or larger text as shown below.
The Display control panel item in Windows 7 showing the text size radio buttons
This is done in Windows XP from the ‘Display Properties’ ‘Appearance’ tab. To access this, right click on the desktop background and then select the appearance tab. There is a dropdown here which has the options ‘normal’, ‘Large Fonts’ and ‘Extra Large Fonts’ as shown below.

The display properties appearance box in Windows XP showing the font size dropdown
Application Specific Settings
Some applications allow you to switch settings to within them to make the page clearer by zooming either the window (text and graphics are enlarged) or the text size (text only is enlarged).
Window Zoom
Within the View menu of many applications you will find the zoom level. Increasing the zoom percentage will make the text and images larger, decreasing the zoom percentage will make the text and images smaller. Within a web browser window, you can use the view or settings menu or by using CTRL + + will zoom in, and CTRL + - will zoom out.
Internet Explorer provides these settings under the Page/Zoom menu
Google Chrome provides these settings under the spanner (customise and control) menu

Mozilla Firefox provides these controls under the View/Zoom menu.
Font Size
It is also possible in some browsers to zoom the text without zooming other content.
Internet explorer provides these setting under the Page/Text Size menu.
Google Chrome Provides these settings under the spanner (customise and control)/Options/Under The Bonnet/Web Content/Font Size option.
Mozilla Firefox provides these controls under View/Zoom/Zoom Text Only. This is a toggle which switches the normal zoom control to zoom text only when checked.
Practical Exercise: Open the control panel from the start menu Select display options
Change the font size
Change it back if required
Sound Settings
Adjustment of Volume/Mute from Software
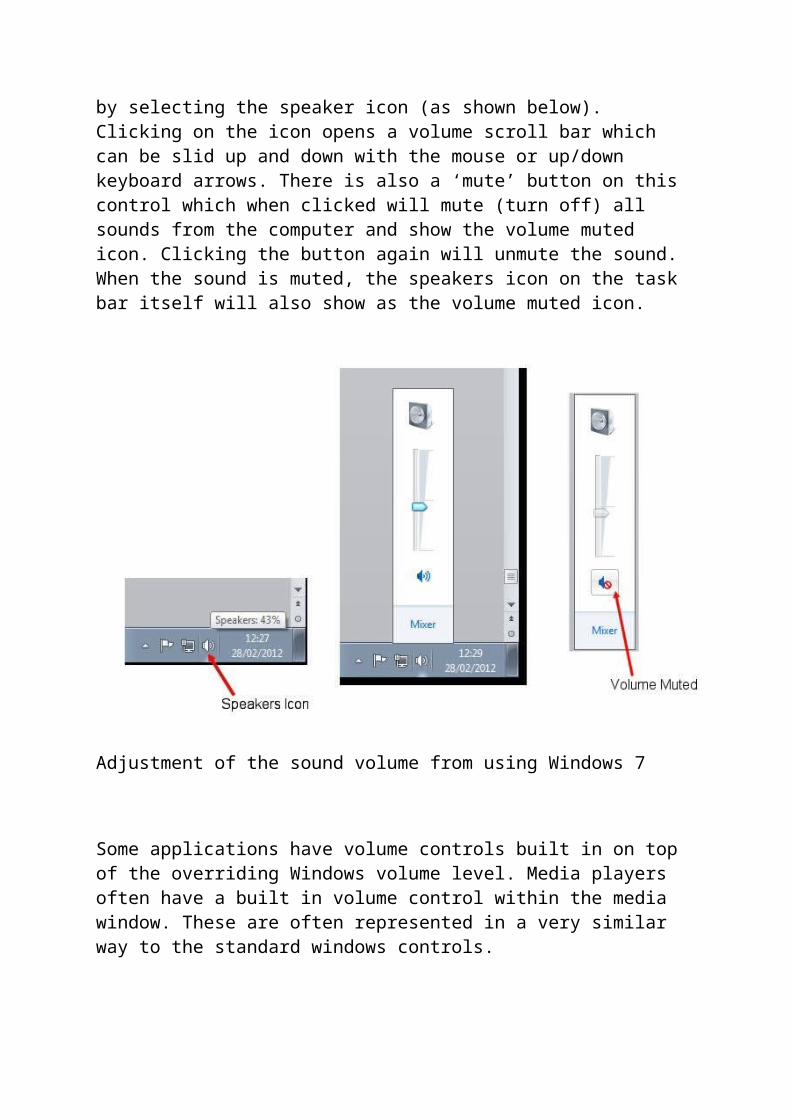
To adjust the volume using the software, you can access the control from the task bar. The volume is controlled by selecting the speaker icon (as shown below). Clicking on the icon opens a volume scroll bar which can be slid up and down with the mouse or up/down keyboard arrows. There is also a ‘mute’ button on this control which when clicked will mute (turn off) all sounds from the computer and show the volume muted icon. Clicking the button again will unmute the sound. When the sound is muted, the speakers icon on the task bar itself will also show as the volume muted icon.

Adjustment of the sound volume from using Windows 7
Some applications have volume controls built in on top of the overriding Windows volume level. Media players often have a built in volume control within the media window. These are often represented in a very similar way to the standard windows controls.
Adjustment of the Volume Using the Controls on the Speakers
Most speakers have a volume dial in them to make the sound louder or quieter. If the volume is up on the speakers and you cannot hear the sound, it is worth checking that the sound is not muted or turned very low in the task bar settings.

Some typical PC speakers with a volume control knob on the front of the right hand speaker.
Practical exercise: Open the volume slider from the task bar using the mouse or keyboard Adjust the slider
Mute the sound
Unmute the sound
Both Windows 7 and Windows XP have some accessibility features. The quickest way to open them is to use this shortcut: Windows Key and U.
Accessibility options
Accessing the settings in Windows XP
To access the ‘Utility Manger’ in Windows XP, press the Windows Key + U (This brings up the dialogue boxes shown below). This allows access to the Narrator, Magnifier and On-screen Keyboard functionality.

The Utility Manager brought up by Windows Key + U in Windows XP
IN Windows XP, use ‘Start/Control Panel/Accessibility Options’ to access further accessibility aids, such as Keyboard settings, sound settings, high contrast mode, mouse settings etc. There is also an Accessibility Wizard which allows you to configure Windows XP to suit your needs. Find this under ‘Start/Control Panel/Accessibility Options/Configure Windows to work with your vision, hearing and mobility needs’.
Accessibility options accessed on a Windows XP machine
Accessing the settings in Windows 7
To access the ‘Ease of Access Center’ in Windows 7 go to ‘start menu/Accessories/Accessibility/Ease of Access Centre’, or by pressing the Windows Key + U. This will bring up the dialogue shown in Figure 39. The dialogue is accompanied by audio narration of its content. Its main options are to start the Magnifier, Narrator and High Contrast functions.

The 'Ease of Access Centre' window in Windows 7
The Accessibility Tools
The Screen Magnifier
The Screen Magnifier when opened places a strip at the top of the screen where a larger version of part of the screen (initially following the mouse pointer) is displayed.
A screen magnifier in use – showing the magnifier strip at the top of the display
Microsoft Narrator
The Narrator – also started from the ease of access menu – will read aloud the screen contents in focus, and also voice the inputs used from the keyboard.
High Contrast
High contrast settings are available from the Ease of Access Centre, and can be set up to a user’s personal preference using the ‘Personalization’ window. The theme can then be turned on and off with the shortcut ‘Left ALT + Left Shift + PrintScreen’ or using the check box in the Ease of Access Centre. There are a selection of high contrast themes available in Windows 7 with variations of white on black, black on white and with different colour variations. There are also options to change the desktop icons, mouse pointers and task bar settings available from the Personalisation window.
Text-to-speech programs
Although not provided by default with a Windows installation, there are many bespoke text-to-speech (or TTS) applications available varying from free to expensive with a multitude of voices, accents, languages and settings. For a user that relies on audio output such a program may be a worthwhile addition.

For further information on free text to speech software, the following resources may be useful:
http://www.naturalreaders.com/index.htm http://www.dyslexia.com/helpread.htm
Screen readers
Again, although not provided in a Windows installation by default, it is worth mentioning in this course that additional Screen Reader software is available commercially. Screen readers are even more versatile than Text-to-speech programs providing additional functionality through shortcuts to allow different modes of use. They aim to both identify and interpret what is (or would be displayed) on-screen. The interpretation is imparted on the user via text-to-speech. Screen readers can be of use in situations where the user is blind, visually impaired, has a learning disability, or cannot read.
Examples of screen readers shipped with some specific operating systems are: Microsoft Narrator, VoiceOver, EmacSpeak, Yasr, SpeakUp and Gnome ORCA. Open source applications include NVDA (Non-Visual Desktop Access) and Linux Screen Reader. There are also commercial packages – which are more widely used – such as JAWS, Window-Eyes, Dolphin and ZoomText Magnifier/Reader.
Refreshable Braille displays
For Braille readers there is the possibility of using a refreshable Braille display. Although expensive and limited to low numbers of Braille cells (18-40) these displays can allow screen reader output to be displayed in Braille.

In Windows there are a many keyboard shortcuts that can be used. They can be used for changing how windows look, or opening programs and files. Some work the same in Windows and in programs (like Microsoft Word or LibreOffice’s Writer). Some only work with a particular software package.
Using the Computer
What is the Desktop?
The background of your computer screen when you have no program windows open is called the 'desktop'. It will usually contain a number of shortcut icons. These are often arranged on the left of the screen as can be seen in the example desktop shown below, but may be placed anywhere on the desktop.

A desktop showing a number of shortcut icons (on the left hand side) which can be used to open programs, files and folders.
What do the Desktop Icons do?
Double clicking these icons with the mouse is the quickest way to open a program or file on your computer. The programs you use most regularly should have a shortcut on your desktop.
What is the Task Bar?
The task bar is another fast way of opening a program, or switching between programs. The task bar is usually found at the bottom of the screen, although it can be repositioned at the sides or top.
A screen shot of the desktop with the task bar visible
How do I open the Task Bar?
Some computers are set so that the task bar is visible all the time, but on others you have to reveal it by either:
Pressing the Windows key on the keyboard, or Dragging the mouse to the bottom of the screen (or the edge of the screen
where it has been repositioned).
What can I do from the Task Bar?
The task bar gives access to a number of items:
The start menu (see the next page for details!) Panels representing programs that are already open. Clicking on the
outlook icon for example would show or hide the Outlook window. In order to bring an open program to the foreground of your desktop, simply click on it on the task bar.
The time and date can be found on the right hand side.

A speakers icon – which gives access to the volume control and mute control in order to quickly adjust the computer’s sound settings (see Sound Settings).
A battery icon (laptops only) - which will tell you how much charge your battery has, and whether or not it is currently plugged in.
Other shortcuts – there may be other shortcuts on the task bar allowing access to controls or programs.
When you hover the mouse over an item on the task bar, it will often display some more information about what it is. If, for example it is an open program, it will display a small picture of the open application. In you hover over the speakers icon, you get a summary of the current volume. On a laptop, hovering over the battery icon will tell you how much charge is left in your battery.
What is the Start Menu?
The Start menu contains shortcuts to:
run programs, access the folder system,
access the control panel,
access printers,
access the help and support.

A capture of the desktop with the task bar and start menu visible
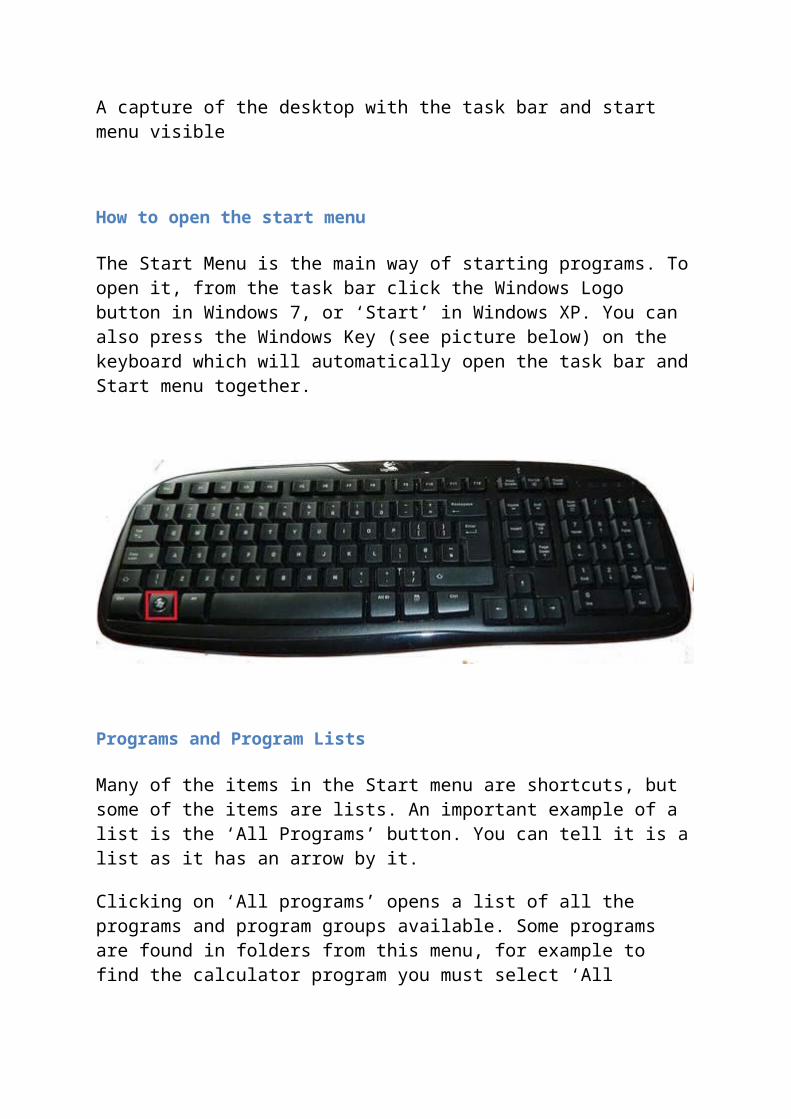
How to open the start menu
The Start Menu is the main way of starting programs. To open it, from the task bar click the Windows Logo button in Windows 7, or ‘Start’ in Windows XP. You can also press the Windows Key (see picture below) on the keyboard which will automatically open the task bar and Start menu together.

Programs and Program Lists
Many of the items in the Start menu are shortcuts, but some of the items are lists. An important example of a list is the ‘All Programs’ button. You can tell it is a list as it has an arrow by it.
Clicking on ‘All programs’ opens a list of all the programs and program groups available. Some programs are found in folders from this menu, for example to find the calculator program you must select ‘All Programs’ and then ‘Accessories’ where you will find the calculator shortcut.
Fun Things to Try
You can try the printable labelling exercise for desktop features. (See Appendix).
Working with Windows
What are Windows?
Windows are the containers for the programs you have running on your desktop. You can switch between them so that the ones you want are visible and the ones you do not want to see are hidden or closed. You can run more than one program and therefore have more than one window open at a time. Clicking on a part of a window brings that window to the front.
An example of a window

Closing a window
To close a window you must click on the ‘x’ icon in the top right hand corner. Doing this will close the window and exit the program running in it. If you have unsaved work, you will be prompted to save it before the program closes.
Changing the Size of a Window
Make a window bigger - To maximise the window (which will make window to fill the screen) click on the square icon next to the x. In a maximised window this icon will then change to a ‘restore down’ icon (two boxes one in front of the other)
Make a window smaller - Clicking the 'restore down' icon in a maximised window (two boxes one in front of the other) will cause the window to return to its previous size.
Hiding a window - To minimise the window click on the line icon next to the restore/maximise icon. Doing this hides the window but keeps it open in the task bar.
Unhiding a window - In order to show a hidden window, you click it on the task bar.
ALT + SPACE BAR is a useful shortcut here, as it displays a menu allowing window manipulations (restore, minimise, maximise, close, move or resize the window)
Moving a Window
To move a window, the user needs to click and drag on the title bar of the window.
Resizing a Window
Windows can be resized by clicking on the borders of the window and dragging.

Dropdown Menus
Many windows will have a list of dropdown menus at the top of the page below the title bar. In teh example case we have File, Edit Format, View and Help. Clicking these opens further menu options in a dropdown list.
Scroll Bars
Often the contents of a window are too long or wide for the available screen area, and in such cases a scroll bar often appears on the right hand side and/or bottom of the window (as shown below). In the example case the content can be viewed by clicking on and dragging the scroll bars with the mouse, using the arrow keys on the keyboard, or by using the scroll wheel on the mouse.
A window showing scroll bars due to oversized content
Practical Exercise: Using Windows Open the ‘Notepad’ application from the start menu in accessories Type some words in the window
Minimise the window to the task bar
Open the ‘Paint’ application from the start menu in accessories
Minimise it to the task bar
Re-open the Notepad window from the task bar
Maximise the Notepad window

Restore the notepad window back down.
Save the text (.txt) file you have created to the desktop.
Close the notepad window
Re-open the paint window
Close the paint window.
Files and Folders
What are files and folders
It is important to have some understanding of files and folder structures. In Windows 7, your files will be saved mostly by default in the ‘Libraries’ folders available from the Windows Start menu (in Windows 7 they are called Documents, Music, Pictures and Videos). In Windows XP the files are mostly saved by default in the folders ‘My Documents’, ‘My Music’ and ‘My Pictures’. Within these folders, we can create sub folders. This can be done by right clicking in any open folder and selecting new and then folder. Clicking twice (slowly – not a double click!) on the name of the folder you have created will allow you to rename it. You can also rename a folder by using the function key + ‘F2’. You can then move files into the folder by dragging them onto it.
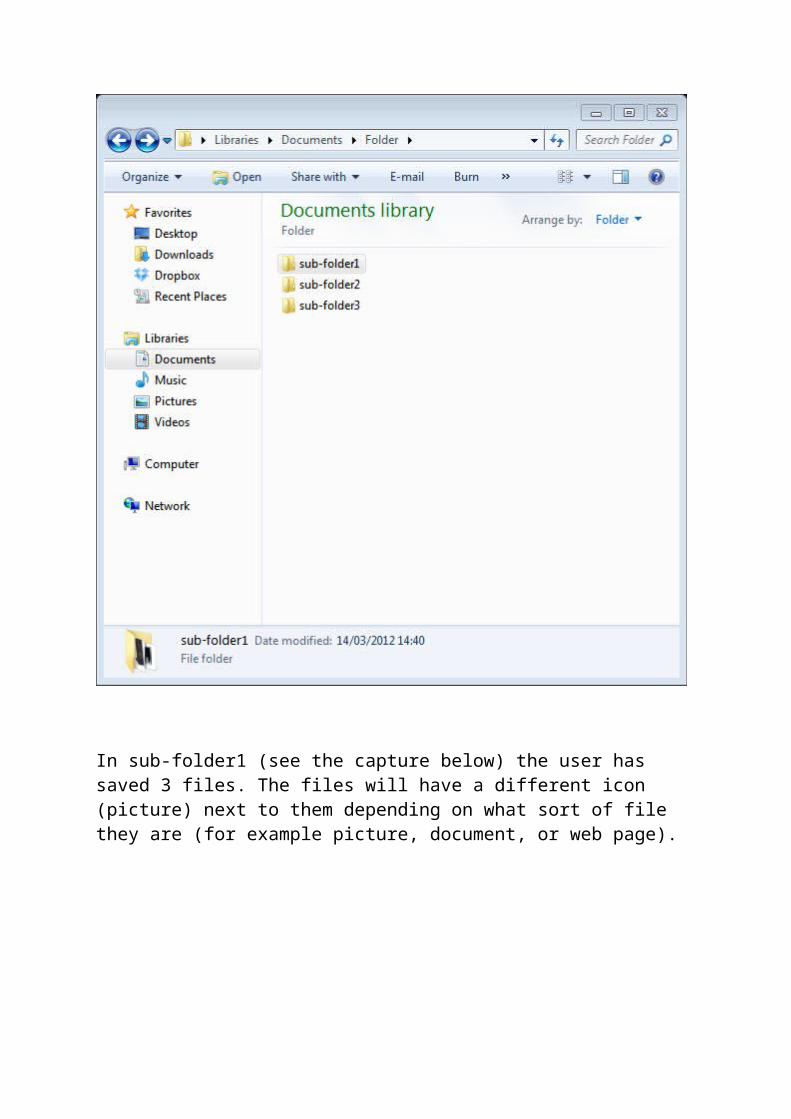
In the capture below, the user has created a folder called ‘Folder’ in his documents folder. In this the user has created three sub-folders (called sub-folder1, sub-folder2 and sub-folder3). We can see that folders are shown with a yellow folder icon.

In sub-folder1 (see the capture below) the user has saved 3 files. The files will have a different icon (picture) next to them depending on what sort of file they are (for example picture, document, or web page).

If the view is changed (by right clicking on the white space within the folder and selecting from the view menu) to medium, large or extra-large icons, the user gets a preview of the contents of the folders, as can be seen in the capture below.

Windows can be set up to show what are known as file extensions. These are the (usually 3 or four character) suffixes that come after the dot in the file name. .Jpg is the example given in the Files and Folders example, which is an image file. The file types are often denoted by the icon which represents the file. The icon may be specific to the file type, or to the application associated with that fille. By default in Windows you can't see the file type, but it is possible to make it display. The setting to show file extensions can be found from start menu/control panel/folder options/ and in the View tab uncheck the ‘Hide extensions for known file types’ box.
Types of files
There follows a list of some common extensions and images of their icons:
Text files and documents

– these are documents that may be edited in a word processor or notepad type application.
Microsoft Word documents - have the extensions: .doc or .docx
plain text file. Have the extension: .txt
Adobe portable document format. Have the extension: .pdf
Spreadsheets and databases
– these are files created by a spreadsheet or database program such as Microsoft Excel or Microsoft Access
Microsoft Excel spreadsheet. Have the extensions: .xls or .xlsx
Web pages
– these are internet page files
Web pages. (hypertext markup language). Have the extensions: .htm or .html, htmls or .xhtml
These files will be represented by an icon representing your default browser. The ones above are how it would look with Internet Explorer, Firefox and Chrome as the browser.
Images and pictures
– these are image files, they may be photos, logos, graphs or charts, clip art etc..

bitmap (uncompressed image file). Have the extension: .bmp
compressed image. Have the extension .jpg
Compressed image (graphical interchange format file) Have the extension: .gif
Sound and music files
– these may be music files, system sounds, audio recordings etc.
compressed music file extension: .mp3
uncompressed (lossless) sound file. extension: .wav
Windows Media audio format sound file. Extension: .wma
Video files
– these are video and sound combined, the likes of tv programs, films, and camcorder recordings. There are many different formats for this type of file.
Windows Media video file. Extension: wmv
Standard video file. Extension: .mpg
audio/video interleave file Extension: .avi
Program files
– these are 'executable' files which means they are programs that can run on your machine. You should be wary of running any files with these extensions if they have come from an untrusted source such as email or internet.
Windows executable file Extension: .exe
Often a program file will have an icon of its own incorporated with it and so it will not look like the icon above.
Moving and Copying Files
It is important to be able to easily find your files on your computer, and to enable this it is important to be able to store your files in a neat and tidy structure. To achieve this it helps us to be able to move files around and group them together in folders. There are several ways to achieve moving files:
Moving and copying with the mouse
Moving files and folders with the mouse can be achieved using a process of ‘drag and drop’ (described in The Mouse and Touchpad section). Firstly the user needs to open the location of the file they want to copy or move. Secondly the user needs to open the location they want the file to end up. To move the file to the new location the user must first select the file by clicking on it, and then drag the file over the new location, and drop it there.
To move several files, first select them by either:
1. select them one at a time whilst holding CTRL2. to select many files in a list select the top one, hold Shift and then select
the bottom one (this will select the top and bottom files and all files in between).
3. Drag the mouse over the files you want to select

Once all the files are selected, perform a drag and drop on the group. To create a copy of the file in the new folder and to leave the original in the original folder, hold CRTL when you drop the files.
Dragging and dropping a file (file1.jpg) from its current location to a new desired location
Moving and copying using ‘cut’, ‘copy’ and ‘paste’
If preferred, moving and copying files can be performed using cut, copy and paste commands, or their shortcuts CTRL + X, CTRL + C and CTRL + V respectively (see Keyboard Shortcuts). First the files that are required to be moved must be selected using the mouse or the keyboard as described in the previous section. Next the user presses CTRL + C to copy the files or CTRL + X to move the files. The user then selects the location to which the files need to be moved. CTRL + V will complete the copy or cut by pasting.
Deleting (and undeleting) Files and the Recycle Bin
Files can be deleted from a directory by first selecting, and then pressing either:
1. Delete key2. Right click the mouse on the file and select ‘Delete’ from the menu.
3. CTRL + D
All of the above will prompt the user ‘Do you really want to delete the file?’. A Yes reply will move the file to the ‘Recycle Bin’.
A no reply will cancel the action. A file that has been moved to the recycle bin can be retrieved by double clicking the ‘Recycle Bin’ icon on the desktop, right clicking on the file that was deleted and selecting ‘Restore’. The item will reappear where it was deleted from. The recycle bin can be emptied to permanently remove files from the machine and to free up disk space. This is done by Right clicking on the Recycle Bin and selecting ‘Empty Recycle Bin’ from the menu. This action will permanently delete all of the items currently in the recycle bin.
Backing up data
It is generally a good idea to back up your important data. Computer disks can become damaged over time, or by impact or fire, and sometimes data gets corrupted and becomes unreadable. It is sensible therefore to make copies of important files (known as backing up files) onto a separate disk, external drive (USB hard drive or USB stick, see Computer Peripherals) or a network or cloud drive on a regular basis.
Some desktop computers will have multiple disks in them where files can be stored on both to ensure protection from a disk failure. A portable drive stored in a different location, or the use of a network drive will protect also from local environment hazards such as flooding or fire which could destroy all local drives.
The Help System
Windows Help
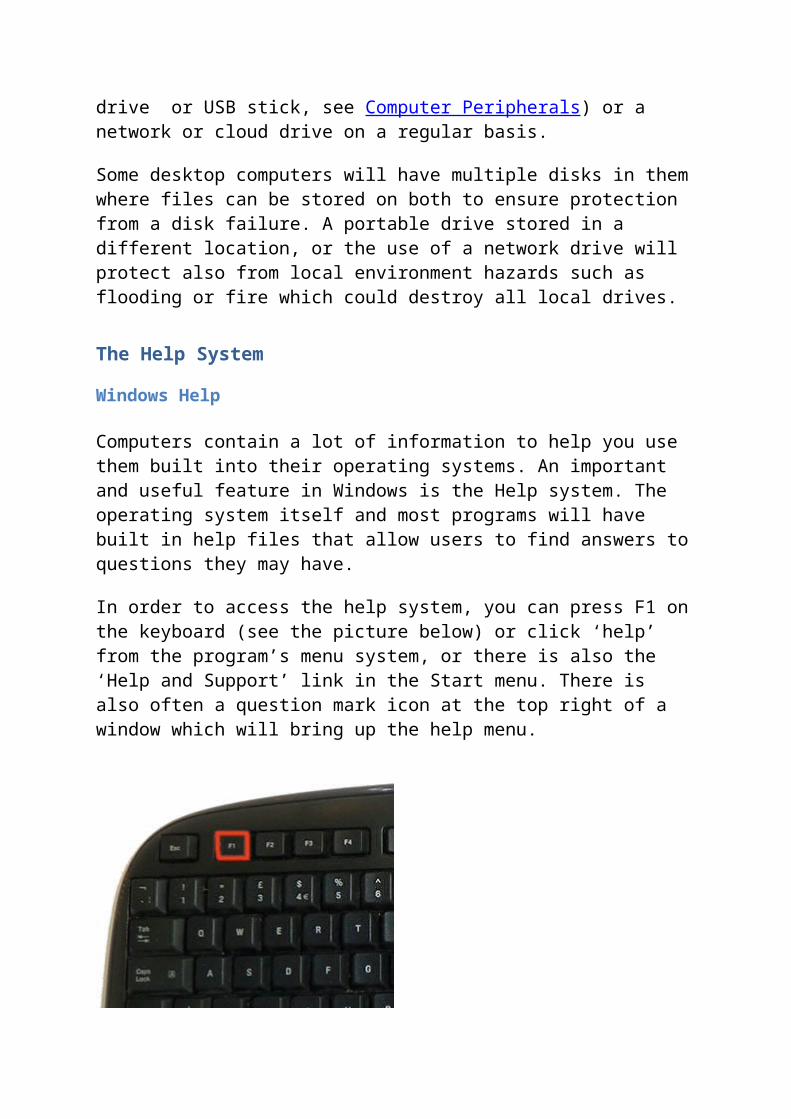
Computers contain a lot of information to help you use them built into their operating systems. An important and useful feature in Windows is the Help system. The operating system itself and most programs will have built in help files that allow users to find answers to questions they may have.
In order to access the help system, you can press F1 on the keyboard (see the picture below) or click ‘help’ from the program’s menu system, or there is also the ‘Help and Support’ link in the Start menu. There is also often a question mark icon at the top right of a window which will bring up the help menu.

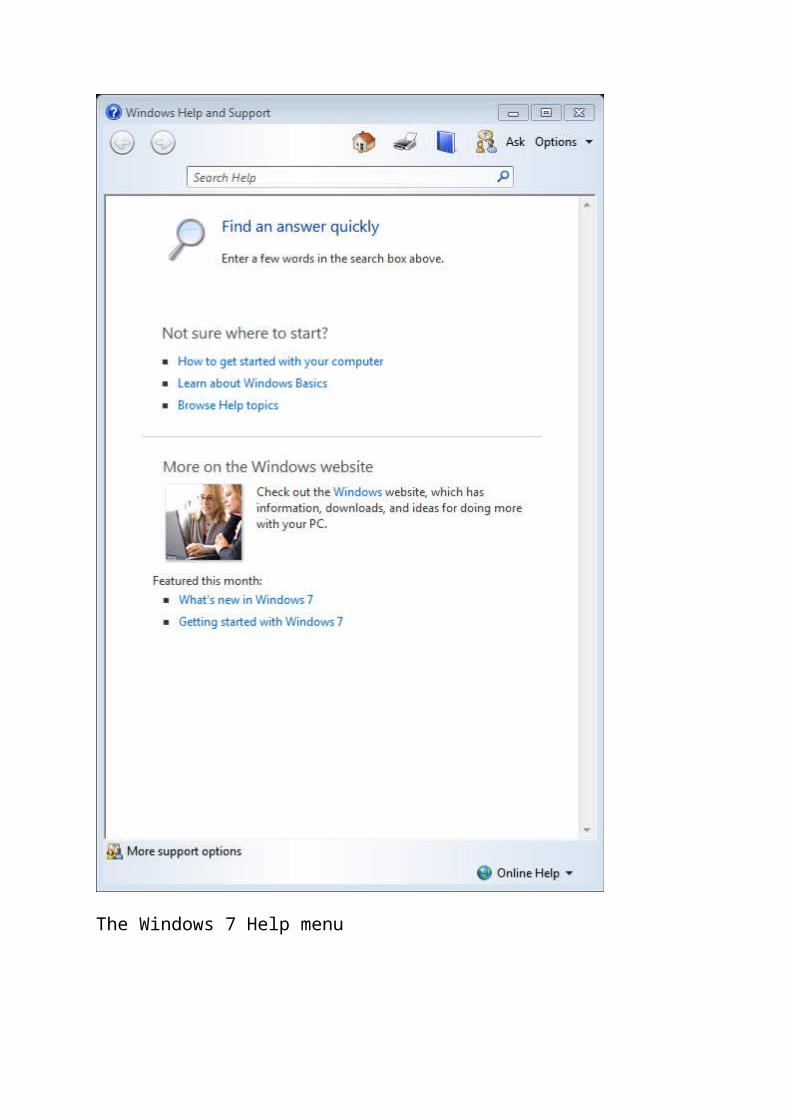
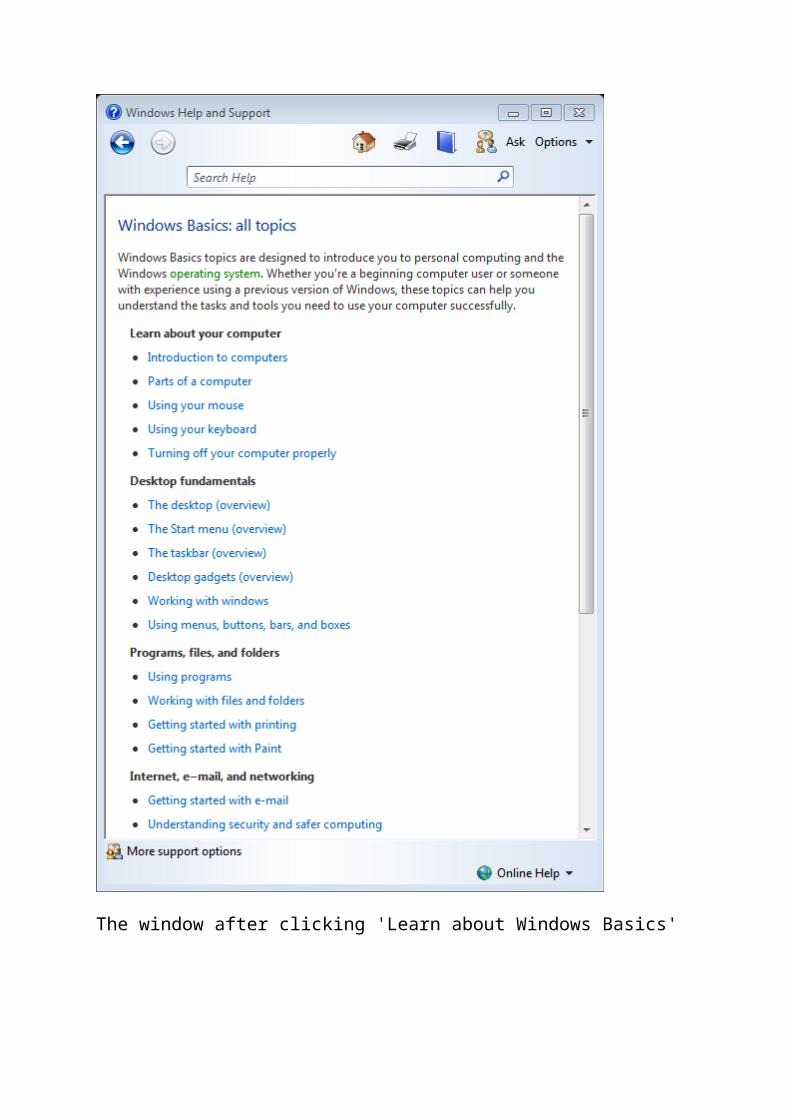
If you click first on the desktop background it will bring up general Windows help (as shown in the screen grabs below). One of the first links it brings up is that of ‘Learn about Windows Basics’ (in Windows 7) and ‘Windows Basics’ in Windows XP. This help section provides a lot of information very relevant to this course, and provides hands on practice and experience in using the features of Windows. It is great extra material to familiarise yourself further with using a PC.
When you open the help system there is usually a list of menu options and also a search bar. If you type a query into the search bar and press return – or click on the magnifying glass, the help system will search for results that will help you. You may also navigate to the correct area of help by double clicking the links provided in the help menus

The Windows 7 Help menu
The window after clicking 'Learn about Windows Basics'
The Windows XP Help system window
Specific Program Help
If you press F1 whilst using a program it will bring up help files for that specific program. There will also often be a question mark icon at the top right of the window which will open the help files for that program.
Fun Things to Try
You could now try:
ESCAPOLOGY! - the 'Using the Computer' questions.

Play ROB THE MOB! - the 'Using the Computer' section.
The Yes/No Quiz Game - quiz 2 - 'Using a computer'.
Memobile Game - 'Press... and Action' (on your Android phone or tablet)
Browsing the Web
Web Browsing Applications
There are a number of web browsers available for free. The most common web browsers and their icons are shown below.
Microsoft Internet Explorer
Google Chrome
Mozilla Firefox
Lynx

Opera
Safari
Starting a web browser
A web browser can be launched by:
Double clicking on its icon on the desktop Clicking on its 'quick launch icon' if available in the task bar
Clicking on its entry in the start menu
Parts of a Browser Window
The web browser used here is Internet Explorer 9 as most computers come with it on them. Many other web browsers are similar. The picture, below, shows the browser window with the most important parts numbered. Your browser may not have all of these sections visible. It is possible to hide and unhide them by right clicking on the title bar.

The different sections in a page of a Web browser, with numbers and red boxes.
1. Back and Forward buttons2. Address bar
3. Refresh
4. Stop loading
5. Home
6. Favourites
7. Browser Tabs
8. Menu Bar
9. Command Bar
10.Favourites Bar
11.Scroll bar
12.Status bar showing zoom level

Navigation via URL and domain names
In order to start web browsing (navigating through the pages in the Internet) you need to enter an Internet address in the address bar (box 2 in the picture above). An internet address is known as a URL (Uniform Resource Locator). A URL is the address of the page on the Internet. For example, the URL of the Google search engine is http://www.google.com.
You can type the URL directly in the address bar or use copy and paste if you have the text on screen. Simply click on the address bar, drag over any text in there (or use the shortcut CTRL + L) and press delete to clear it. Then type the new website. You do not have to type the http:// prefix since browsers will add it when you type only the domain name e.g. www.google.com.
Hyperlinks
A hyperlink, or link for short, is another way to move between web pages. Hyperlinks move you to a new page when you click them (or tab to them and press ENTER). Links can be text or pictures and they move you to a new place on the web. When you come across a link or an image that is set as a hyperlink, your cursor will change shape and become a hand pointer . All you have to do is a single left click and you will be directed to the linked webpage. If you find it hard to use the mouse, you can step through all the links on the page by pressing the TAB key.
Links sometimes open in the page you are in, sometimes they open in a new tab, and sometimes they open in a new browser window.
Use of back and forward button
Every time you move to another page the browser gives you the option to go back to the previous page you were viewing. To do this, you must click on the arrow pointing left (called the back button - box 1 in the picture above). If you click the back arrow now it will take you back to the fox link. You will then see

that the forward arrow becomes active and you can click that to come back here. Try it! If you would like to move back again, you can keep on clicking back until you reach the page your browser was on when you opened it. When you move back through your already visited pages, you can move forward again to the most recent pages. This is done with a single click on the arrow pointing right, named the forward button (also in box 1 in the picture).
Browsing history
If you want to revisit a page that you opened on a previous day, and you do not remember its address, you can use the useful feature called the history list. History is a list with all the pages that you have visited recently. In Internet Explorer 9, to find the history list, click on the command bar and choose Explorer History, as shown in below.
The history list should now appear at the left of the screen as below.

A single click on day will reveal the websites visited that day and you can visit them again without having to remember all the details. The number of days remembered by the history can be changed in the internet options settings.
Favourites feature
Another feature of browsers is the favourites (or bookmarks) list. This list lets you save important links that you use often or want to be able to find again quickly.
To add a link as a Favourite, click on the five pointed star icon at the top right of the browser page (shown below).
This opens a dropdown with a button marked 'Add to Favourites' and giving access to 3 tabs, favourites, feeds and history. If you click add to favourites you can add the page you are currently viewing to the list. If you want to access a page already

in the list you just click on it. It is very useful to save all of the pages you visit regularly like this. You can then get to them quickly using the Favourites menu.
Reload and stop loading buttons
If, for any reason, a website stops loading its content, you can make it refresh. This is done by clicking the refresh button highlighted in red in the image below. You can also make a refresh happen by pressing the function key 'F5' on the keyboard.
In the same way you can stop a website from loading by clicking the stop button (which is the 'x' symbol next to the refresh symbol). You can also press 'Esc' to do this.
Some hyperlinks open the link in a new browser tab. You can move between the different tabs by clicking on their name at the top of the browser window. The browser window below has 3 tabs open. They are shown highlighted by a red box. Clicking on each tab opens it. Clicking on the small square grey box at the right hand end of the tabs will open a new tab.
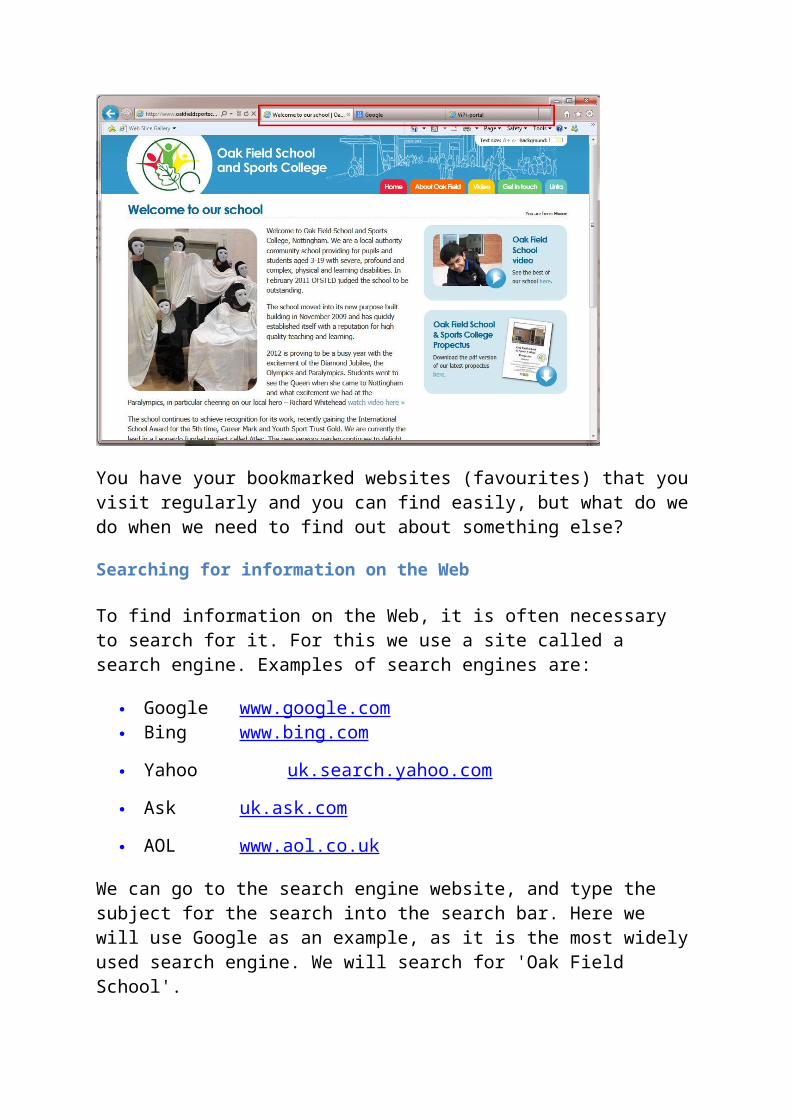
You have your bookmarked websites (favourites) that you visit regularly and you can find easily, but what do we do when we need to find out about something else?

Searching for information on the Web
To find information on the Web, it is often necessary to search for it. For this we use a site called a search engine. Examples of search engines are:
Google www.google.com Bing www.bing.com
Yahoo uk.search.yahoo.com
Ask uk.ask.com
AOL www.aol.co.uk
We can go to the search engine website, and type the subject for the search into the search bar. Here we will use Google as an example, as it is the most widely used search engine. We will search for 'Oak Field School'.
As we type the words the webpage changes and it begins to predict what we are searching for.
At this point, having typed 'oak fiel' it has found the phrase we want to search for. To save time we can scroll down to the correct one with the arrow keys and click enter, or click it with the mouse.
Or we can type the full phrase and click the magnifying glass button.

The search will result in a list of links. Often the top one is the best, but we can choose others from those presented.
There are a number of additional options too. If we wanted to find a picture (or 'image') we could click on images in the black bar at the top. This then provides a list of small images (known as 'thumbnails'). If we click on them we can get the full size version.
We can also use this search to find maps of places, videos and news by using some of the other options from the black top bar.
Printing a web page
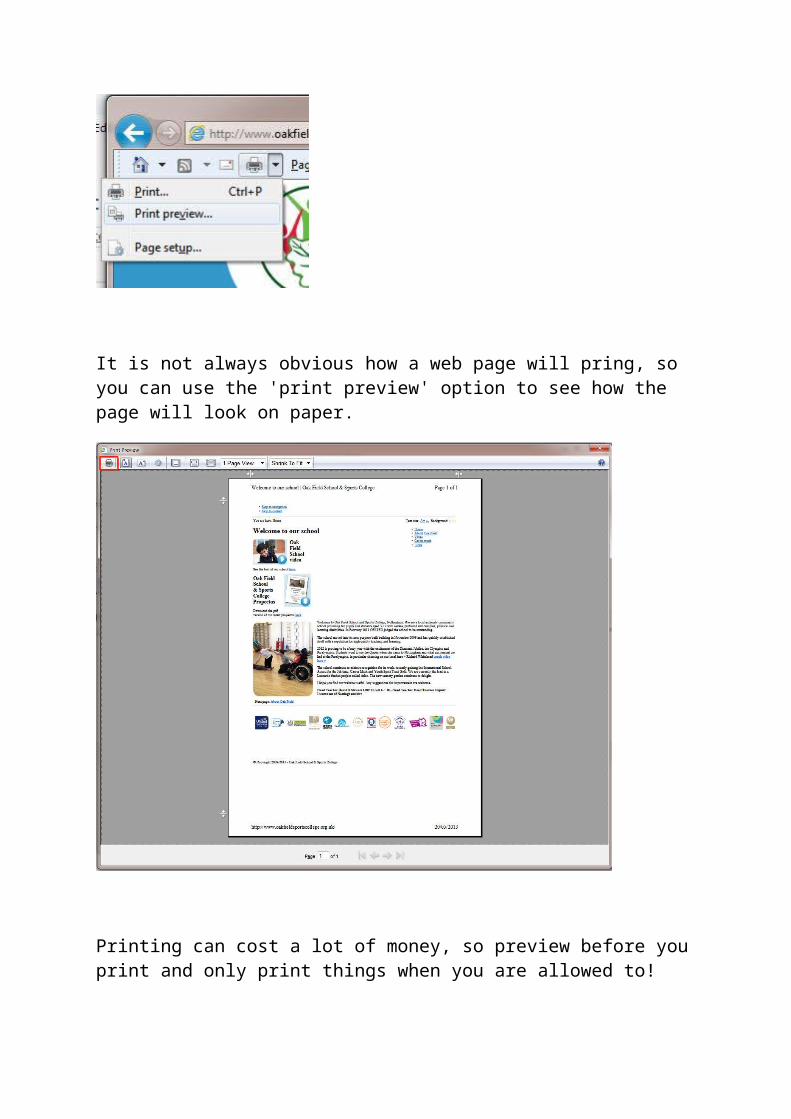
In order to print a web page directly from internet web browser you must first make sure your printer is connected and turned on. Then you choose the Print option from the command bar (higlighted in red below) and the printing should begin. If the browser does not have a shortcut for printing you can do so from the menu bar. Select File Print and the menu of your printer should pop up to click on print. There is also the option to right click on the web page and select print from the dropdown menu that appears there.
Clicking on the arrow next to the print button gives more options. A useful one is 'Print Preview'. This lets you see what the web page will look like on paper before printing it out.
It is not always obvious how a web page will pring, so you can use the 'print preview' option to see how the page will look on paper.

Printing can cost a lot of money, so preview before you print and only print things when you are allowed to!
Fun Things to Try
You could now try:
Play ESCAPOLOGY! - the 'Going Online - Web Browsing' questions.
The Yes/No Quiz Game - quiz 3 - 'Using the Internet'.
Using the web and emails can expose you to dangers. Here are some key things that you should always remember:

Being Safe Online
Keep Personal Information Safe
You should not give out personal information online.
This includes your:
real name, email address,
phone number,
passwords.
People Are Not Always Who They Say They Are
People may lie about who they are or about other things. They may for example lie about their age. When chatting online it is best to stivk to your real friends and family.
Never Meet Alone
Meeting people you met online can be dangerous! Only ever meet with somebody you met onine with your parents present. Remember people you meet online are strangers - even if you have chatted online many times before.
Be Careful About Opening Files
Accepting emails, instant messages, or opening files, pictures or texts from people you don't know can cause problems. They may have viruses (bad programs that can break your computer) or they may be nasty messages.
Tell Someone You Trust
If something you see online or in an email or message makes you feel uncomfortable - tell a parent, carer or somebody you trust. Also tell somebody if you - or someone you know- is being bullied online.
Safe Searching
Make sure someone you trust has set up your search page to give Safe Search results.

Links
There are loads of great websites with information and games about how to stay safe online.
Just some of them are listed below. They are well worth a look...
Think You Know http://www.thinkuknow.co.uk/ - a site with lots of information for different age groups about online safety.
Safety Land http://www.att.com/Common/images/safety/game.html - a game to test your knowledge of online safety.
BBC Stay Safe http://www.bbc.co.uk/cbbc/topics/stay-safe - The BBC has made a list of useful games and fun pages to teach you about online safety.
Beat Bullying http://www.beatbullying.org/ - a site to help you beat bullying, whether it is you or someone you know being bullied.
KidSmart http://www.kidsmart.org.uk/ - another site with lots of information and fun ways to learn about internet safety, this time aimed at 3 to 11 year olds.
NetSmartz http://www.netsmartzkids.org/ - a site with games, videos, and other activities to help you learn
NSTeens http://www.nsteens.org - Find out about web safety using videos, games and finding out about other people's real life experiences.
Fun Things to Try
You could now try:
ESCAPOLOGY! - the 'Going Online - Safety' questions.
ROB THE MOB! - the 'Web Browsing and Security'.

The Yes/No Quiz Game - quiz 5 - 'Staying Safe'.
Safe Searching
Get Your Settings Right
You can make sure that your search results only contain child friendly content by: Setting up safe search. In Google You click on the settings button at the bottom right of the page (highlighted below in red). And from the pop up menu select the 'Search Settings' option.
Then in the safe search filters options, check the Filter Explicit Results box (this should then have a tick in the box).

Searching in Google now should be a safer experience with Google filtering out any unsafe results before you see them.
Be Specific
When searching for something with a search engine, in order to see the most relevant results you should type a specific search string. This means if you are trying to find out about the orbit of the planet mercury, you should not type 'planet' or 'mercury' or 'orbit' you should type 'planet mercury orbit'. This will then return the most relevant search items for your search, and will be much less likely to lead you to see unexpected or unwanted results.
Keyboard Shortcuts for the Web
Internet Browser Shortcuts:
If you use the web but and your preferred method of input is the keyboard, You may find the following information useful:
F5 : refresh current page (also CTRL + R)

TAB : cycles down from the URL bar to each link, dropdown or text input box on a web page.
SHIFT +TAB : cycles back up the links, dropdowns and text input boxes
CTRL + TAB : switches between open tabs

CTRL + + : Zooms in
CTRL + - : Zooms out
CTRL + N : opens a new window

CTRL + T : Opens a new tab
ENTER : Selects the current link or dropdown or enters text inputted
CTRL + W : closes the current tab

CTRL + P : Print
CTRL + D : Add a bookmark
CTRL + H : Show search history
CTRL + J : Show downloads
DisclaimerThe ViPi KA3 LLL project (511792-LLP-1-2010-1-GR-KA3-KA3NW) has been partially funded under the
Lifelong Learning program, subprogramme KA3 ICT. This document reflects the views only of the author(s), and the Commission cannot be held responsible for any use which may be made of the
information contained therein.


Appendix Printable Labelling Exercises - Keyboard
s

Appendix Printable Labelling Exercises – Laptop

Appendix Printable Labelling Exercises – Mouse
Appendix Printable Labelling Exercises – Desktop Ports

Appendix Printable Labelling Exercises – Desktop Parts

Appendix Printable Labelling Exercises – Desktop Features

Appendix Printable Labelling Exercises – Touch Pad Features