VIP-Service Quick-Start - vvg.info · Electric riveters are dan-English | 33 gerous if they are...
31
CORDLESS RIVETING TOOL Deutsch English Français Español Originalbetriebsanleitung Original operating instructions Manuel d’utilisation d’origine Instrucciones originales de uso VIP-Service Quick-Start: DE >> Seite 12 GB >> Page 39 FR >> Page 67 ES >> Página 95 www.vvg.info/rivsmart-service
Transcript of VIP-Service Quick-Start - vvg.info · Electric riveters are dan-English | 33 gerous if they are...
CORDLESS RIVETING TOOL
DeutschEnglishFrançaisEspañol
OriginalbetriebsanleitungOriginal operating instructions Manuel d’utilisation d’origineInstrucciones originales de uso
VIP-Service Quick-Start:
DE >> Seite 12GB >> Page 39FR >> Page 67ES >> Página 95
www.vvg.info/rivsmart-service

2 |
M M
N
O
H
G
F J
h
l2
d
B
R S
E
A
I
H
G
Q
l1
b
T;U
V
F
K
M
P
| 3
IV.III.
I. II.
VI.V.
BV A
IV
I
B;A21 3
21 3
P
54
3
English | 31
English
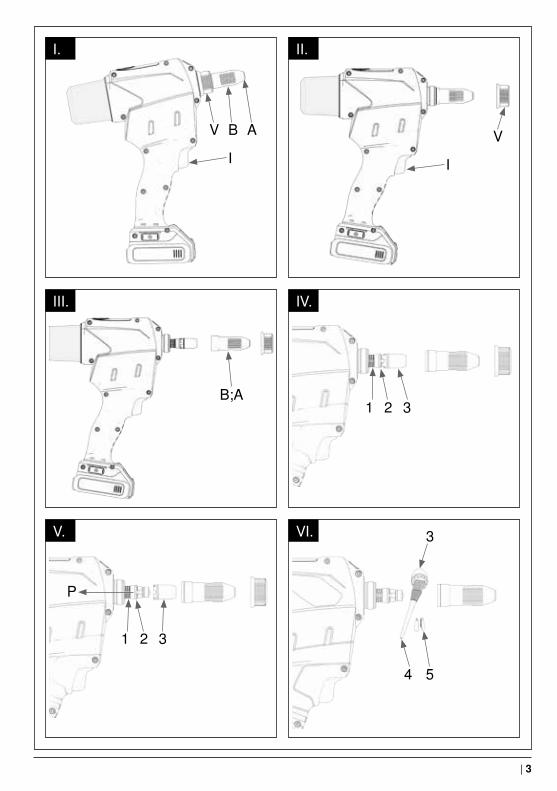
SCOPE OF DELIVERY
1. RivSmart riveter (P)2. Mouthpiece box with mouthpieces3. Stud collector (E)4. Stud securing cap (J)5. Belt clip (O)6. Rivet application plate (N)7. 12 V battery with state-of-charge indicator
(optionally with two batteries) (F)8. Universal quick charger 220V ~ 12/16/20V9. Connecting cable with IEC power connector10. Operating manual11. SD card (R)12. L-Boxx (optionally in cardboard package)
with inlay
DESCRIPTION OF THE RIVSMART
A MouthpieceB Front sleeveV Union nut (available in various colours)I TriggerH LED for illumination of the riveting point (flashes as a warning)G Button for locking the batteryQ Charge state indicatorO Belt clipN Rivet application plateM Screw for attachment of O and NK Rubberised handleE Stud collector with locking functionU Arrow keysT OK keyS OLED displayR SD card slot / SD cardP RivSmart riveterJ Stud securing capF Battery
SAFETY PRECAUTIONS
EXPLANATION OF THE SYMBOLS / PICTOGRAMS IN THE SAFETY PRECAU-TIONS
This symbol draws attention to that fact that hazards exist for the life and health of persons.
Caution! Important safety precau-tion or directive that must be strictly observed in order to avoid the risk of personal injury or machine damage!
Wear protective goggles!
Before commissioning, read and observe the operating instructions and safety precautions!
Remove the mains plug
General points to be observed
SAFETY PRECAUTIONS
GENERAL SAFETY PRECAUTIONS
Read all the safety precautions and instructions. Store all safety precautions and instructions in a safe place for future reference.
Failure to observe safety precautions and instructions can result in electric shock, fire and/or serious injuries.
SAFETY AT THE PLACE OF WORK
Keep your place of work clean and well illuminated. Untidiness or inadequately illuminated places of work can result in accidents.
Do not work with the electric riveter in potentially explosive atmospheres where they may be inflam-mable liquids, gases or dusts. Electric riveters gen-
32 | English
erate sparks that could ignite the dusts or vapours.Keep children and other persons away when work-ing with the electric riveter. If distracted, you may lose control over the riveter.
ELECTRICAL SAFETY
The plug of the electric riveter must fit properly into the plug socket. The plug must not be modified in any way. Do not use adapter plugs in conjunction with earthed electric riveters. Non-modified plugs and matching plug sockets reduce the risk of an electric shock.
Avoid physical contact with earthed surfaces such as those of pipes, heaters, cookers and refrigera-tors. There is an increased risk of electric shock if your body is earthed.
Keep electric riveters away from water or rain. The ingress of water into an electric riveter increases the risk of an electric shock.
Do not misuse the cable, e.g. for carrying the elec-tric riveter, for hanging up the riveter or for pulling the plug out of the plug socket. Keep the cable away from heat, oil, sharp edges or moving equip-ment parts. Damaged or twisted cables increase the risk of an electric shock.
When using an electric riveter outdoors, use only extension leads that are also suitable for outdoor use. The use of an extension lead that is suitable for outdoor use reduces the risk of an electric shock.If the use of the electric riveter in a damp environ-ment is unavoidable, use a residual current circuit breaker. Use of a residual current circuit breaker reduces the risk of an electric shock.
PERSONAL SAFETY
Be careful, pay attention to what you are doing and work sensibly when using an electric riveter.
Do not use an electric riveter when you are tired or under the influence of drugs, alcohol or medication. One moment of inattention when working with the electric riveter can result in serious injuries.
Wear personal protective equipment and use protective goggles at all times. The wearing of personal protective equipment such as a dust mask, non-slip safety
shoes, a helmet or ear protectors, depending on the type and application of the electric riveter,
educes the risk of injuries.
Avoid inadvertent starting of the electric riveter. En-sure that the electric riveter is switched off before connecting it to the power supply and/or attaching the battery (F), picking it up or carrying it. Having your finger on the trigger when carrying the electric riveter, or connecting the electric riveter to the pow-er supply switched on can lead to accidents.
Remove the setting tools or wrenches before switching on the electric riveter. A tool or wrench connected to a rotating part of the electric riveter can result in injuries.
Avoid abnormal body postures.
Ensure a secure footing and maintain your balance at all times. This will enable you to control the electric riveter in unexpected situations.
Wear suitable clothing. Do not wear loose clothing or jewellery. Keep hair, clothing and gloves away from moving parts. Loose clothing, jewellery or long hair can become entangled in moving parts.
If the stud collectors can be fitted, ensure that they are properly connected and used correctly. By-passing of the safety switch is prohibited.
OPERATION AND HANDLING OF THE ELECTRIC RIVETER
Do not overload the tool. Use the proper electric riveter for your work. You will work better and safer in the specified performance range by using the
appropriate electric riveter.Do not use an electric riveter whose trigger is defective. An electric riveter that can no longer be switched on or off is dangerous and must be repaired.
Remove the plug from the plug socket and/or remove the battery (F) before making adjustments to the tool, changing accessories or putting the tool away. This
precautionary measure prevents any unintentional starting of the electric riveter.
Keep the electric riveter out of the reach of children when not in use. Do not allow persons to use the tool who are not familiar with it or who have not read these instructions. Electric riveters are dan-

English | 33
gerous if they are used by inexperienced persons.
Service electric riveters with care. Check that moving parts function correctly and do not jam, and that parts are not broken or damaged in such a way that the function of the electric riveter is impaired.
Have damaged parts repaired before using the tool. Many accidents are caused by poorly serviced electric riveters.
Use electric riveter, accessories, attachments, etc. only as described in these instructions. Give consideration to the working conditions and the work to be carried out. The use of electric riveters for other than the intended applications can lead to dangerous situations.
OPERATION AND HANDLING OF THE BATTERY
Charge the battery (F) only in chargers recommended by the manufacturer. There is a risk of fire if a charger designed for a given type of battery is
used with other batteries.
Use only the specified batteries in the electric rivet-ers. The use of other batteries can lead to injuries and the risk of fire.Keep the battery not in use (F) away from paper clips, coins, keys, nails, screws or other small metal objects that could cause bridging of the contacts. A short circuit between the battery contacts can cause burns or a fire.
If improperly used or damaged, liquid can escape from the battery (F). Avoid contact with this liquid. In the event of acci-dental contact, wash off with water. If the liquid gets into the eyes, obtain additional medical assistance. Escaping battery liquid can cause skin irritation or burns.
SERVICE
Have your electric riveter repaired only by qualified specialist personnel and only with original spare parts. This will ensure that the safety of the electric riveter is
maintained.
TECHNICAL DATA
RivSmart 12V
Nom. blind rivet working range [Ø mm]
2.4 - 5.0
Max. stud diameter [mm] 3.1
Riveter weight incl. battery [kg]
1.35
Total stroke [mm] 20
Drive (DC / BLDC) BLDC
Tensile force [N] 8,500
Sound emissions LpA / K // LWA / K [dB]
<75 / 3 // <80 / 3
Vibrations ah / K [m/s²] < 2.5 / 1.5
Service interval [number of rivets] / months
300,000 / 18 months
Battery [V] 12
Battery [Ah] 2.0
Battery cells [number] 3
Battery weight [kg] 0.24
Battery working temperature [°C]
-5 to 45
Charger input voltage [V AC / Hz]
100 to 240 / 50 to 60
Charger output voltage [V DC] 7.0 to 21
Charger output current [Ah] 4
Charger working temperature [°C]
0 to 40
Charger charging time to 90 % / 100 % [min]
22 / 30
Charger weight without cable [kg]
0.55
DIMENSIONS OF THE RIVETER
RivSmart 12 Vd [mm] 21
l1 [mm] 64
l2/3 [mm] 240/185
h [mm] 275
b [mm] 68

34 | English
THE OLED DISPLAY AND KEYPAD
SD CARD
Leave the SD card (R) in the riveter (P) at all times. The SD card (R) must not be inserted into or removed from the riveter (P) as long as the battery (F) is installed!
The SD card (R) could otherwise be destroyed and with it your data!
There are 2 file types on the SD card supplied in the RivSmart. One or more CSV files and a TXT file.
The process stamp of the RivSmart is stored in the CSV file. A CSV file has a maximum storage capacity of 12210 process stamps. If more than
12210 process stamps are saved to the SD card, a new CSV file with consecutive number will be created.
The following data are stored in the CSV file: serial number, date, time, counter, error message, DMSD evaluation and the job.
The TXT file forms part of the file system and is important for writing the process stamp to the SD card. Please do not delete this file!
WiFi symbol appears when WiFi is active
SD card symbolappears when an SD
card is inserted
Batteryindicates the
battery charge state
Status linesTimeDate Info lines
for states, results and warnings
Function symbols
OK key:1. Hold for 2 seconds
to call up the Setup menu
2. Press briefly to switch to the next menu page
3. Cancel messages and
warnings
Arrow keys:
Left / right to navigate to the
menu items
Up / down to change the
values

English | 35
FUNCTION SYMBOLS
COMMISSIONING
UNPACKING AND INSPECTION
The RivSmart (P) is delivered either in a card-board box or in the L-Boxx. In both cases there is a plastic inlay in the cardboard box or in the L-Boxx to hold the various parts. Please check the scope of delivery
• L-Boxx or optionally cardboard box• Plastic inlay• Riveter (P) with 4.0 mm mouthpiece (A) pre-in-
stalled• Micro SD card (R) installed in the riveter• Stud collector (short) (E)• Mouthpiece box with mouthpieces 2.4 and
3.0/3.2 and 4.8/5.0 mm (A)• Belt clip (O) with screw and rivet application
plate with screw (N)• Stud securing cap (J) (blind screw connection)
for riveting without stud collector (E)• One or two 12 V batteries (F), depending on
scope of order• Charger• Connecting cable with IEC power connector for
the charger
CHARGER / CHARGING BATTERIES
The battery (F) is partially charged on delivery. In order to ensure the full performance of the battery (F), charge the battery (F) completely in the charger
before the first use. Observe the notes on the state of charge on the charger. The Li ion battery (F) can be recharged at any time without shortening its service life. Interruption of the charging cycle does not damage the battery (F). Connect the charger to a plug socket using the cable supplied. Push the battery (F) carefully and without force into the holder. Remove the battery (F) in the same way. The universal quick charger charges all Rivdom PLUS batteries (F) with the voltages 12 / 16 / 20 V in 30 minutes; the batteries are 90 % charged after approx. 22 minutes. Observe the corresponding indicators on your charger. The cells used for the Li ion batteries (F) of the Rivdom riveters are high quality and state-of-the-art. The optimum charging and discharging temperature for the Li ion cells is 25 °C.
• Use only the connecting cable with IEC power connector supplied. Different national versions are available.
Sound warning ON Sound Poke-Yoke ON Sound keys ON Sound warning + Poke-Yoke ON Sound keys + Poke-Yoke ON
Sound keys + warning ON Sound keys + warning + Poke-Yoke ON Automatic light 10 sec Torch light 180 sec
Automatic reversing Manual reversing P/Y auto trip P/Y manual trip
Service ON Clamping jaws service ON DMSD (Lite) ON Stud monitoring ON Counter ON Job (Lite) ON
36 | English
• Attention: Ensure that the mains plug fits in your plug socket. Do not use force.
• When the charger has been connected to the mains power supply, the LEDs of the charger light up green and white.
• Now push the battery onto the charger from the rear. LED 2 now changes from white to flashing RED.
• When the LEDs have a steady GREEN and RED light, you can take the battery from the charger.
• Charge only Rivdom PLUS batteries (F).• Charge only in a temperature range between 0
and 40 °C.
STUD HOLDER
The RivSmart (P) is equipped with a safety switch, the “stud holder”, and thus conforms also to the Machinery Directive. This prevents the riveter being used without stud collector (E). Never operate the riveter without stud collector (E) or stud secur-ing cap (J). Never bypass the safety switch. The stud collector (E) must be completely screwed on before the riveter can be put into operation. If this is not the case, the trigger is blocked and a warning sounds and an error message appears on the OLED display. If you have to work in confined spaces, the stud securing cap (J) can be fitted instead of the stud collector (E). When working with stud securing cap (J), hold the riveter with the mouthpiece (A) facing downwards after each set rivet to ensure that the sheared mandrel drops out of the riveter to the front. Do not use fixed or retainer mouthpieces (A) together with the stud securing cap (J). This would result in damage to the riveter (P)!
BELT CLIP
Attach the belt clip (O) to the foot of the riveter (P) using the screw (M). A corresponding thread and two slots (L) are recessed in the foot of the housing on both sides of the riveter (P). Check at regular intervals that the clip (O) is still securely attached, otherwise retighten the screw (M).
RIVET APPLICATION PLATE
In order to allocate the riveter (P) to a department, a product or a rivet, write the details on the rivet application plate (N) and attach the plate to the riveter (P).
SCREW ON STUD COLLECTOR
The stud collector (E) must be completely screwed on before the riveter (P) can be put into operation. If this is not the case, the trigger (I) is blocked and a warning sounds and an error message appears on the OLED display (S). Screw on the stud collec-tor (E) supplied!
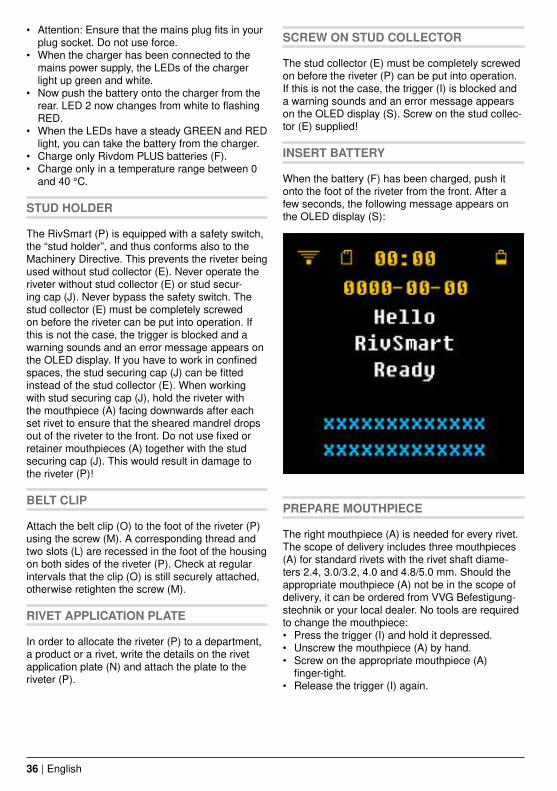
INSERT BATTERY
When the battery (F) has been charged, push it onto the foot of the riveter from the front. After a few seconds, the following message appears on the OLED display (S):
PREPARE MOUTHPIECE
The right mouthpiece (A) is needed for every rivet. The scope of delivery includes three mouthpieces (A) for standard rivets with the rivet shaft diame-ters 2.4, 3.0/3.2, 4.0 and 4.8/5.0 mm. Should the appropriate mouthpiece (A) not be in the scope of delivery, it can be ordered from VVG Befestigung-stechnik or your local dealer. No tools are required to change the mouthpiece:• Press the trigger (I) and hold it depressed.• Unscrew the mouthpiece (A) by hand.• Screw on the appropriate mouthpiece (A)
finger-tight.• Release the trigger (I) again.
English | 37
WORKING WITH THE RIVSMART
The RivSmart (P) is now ready for operation on the basis of the factory settings.Before you start work, however, we recommend that you familiarise yourself with the setup menu in order to adapt the riveter (P) exactly to your individual requirements. For example, you should set the date and time correctly so that the time and date stamp are correct on your documentation. This is performed automatically if you use the app regularly.
You can make the riveter settings yourself via the RivSmart app using an iOS or Android smart-phone/tablet or directly at the riveter (P). Note that the functions DMSD Lite, admin & DMSD password, Job Lite, clamping jaw service, illumina-tion time and further functions can only be set and activated by using the RivSmart app.
Use of the RivSmart app also brings you additional benefits such as the VIP service and a warranty extension!
38 | English
HOW DO I GET THE VIP SERVICE AND 36 MONTH WARRANTY?
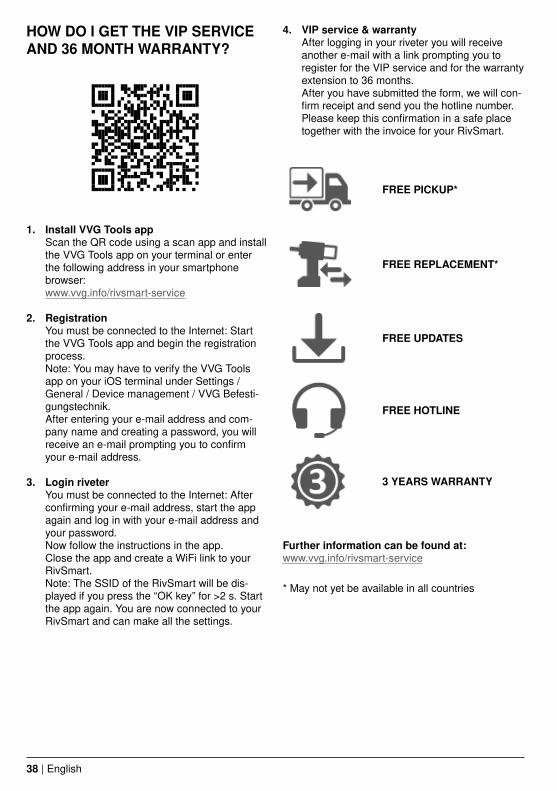
1. Install VVG Tools app Scan the QR code using a scan app and install the VVG Tools app on your terminal or enter the following address in your smartphone browser: www.vvg.info/rivsmart-service
2. Registration You must be connected to the Internet: Start the VVG Tools app and begin the registration process. Note: You may have to verify the VVG Tools app on your iOS terminal under Settings / General / Device management / VVG Befesti-gungstechnik. After entering your e-mail address and com-pany name and creating a password, you will receive an e-mail prompting you to confirm your e-mail address.
3. Login riveter You must be connected to the Internet: After confirming your e-mail address, start the app again and log in with your e-mail address and your password. Now follow the instructions in the app. Close the app and create a WiFi link to your RivSmart. Note: The SSID of the RivSmart will be dis-played if you press the “OK key” for >2 s. Start the app again. You are now connected to your RivSmart and can make all the settings.
4. VIP service & warranty After logging in your riveter you will receive another e-mail with a link prompting you to register for the VIP service and for the warranty extension to 36 months. After you have submitted the form, we will con-firm receipt and send you the hotline number. Please keep this confirmation in a safe place together with the invoice for your RivSmart.
FREE PICKUP*
FREE REPLACEMENT*
FREE UPDATES
FREE HOTLINE
3 YEARS WARRANTY
Further information can be found at: www.vvg.info/rivsmart-service
* May not yet be available in all countries

English | 39
THE SETUP MENU
The “Work Ready” screen is the working mask. In addition to the function symbols, it also shows the date and time as well as information on the select-ed functions, such as counter, DMSD Lite or job. From the “Work Ready” screen, you can switch at any time to the setup menu by holding the “OK key” (T) depressed (>2 s) and entering a password. You can switch between the figures using the left and right arrow keys (U). The values can then be set by pressing the up and down arrow keys (U). Hold the “OK key” (T) depressed again (>2 s) to quit the setup menu at any time.
The standard administrator code is 1234. The admin code can only be changed via the app.After entering the admin code, press the “OK key” (T) briefly to call up the setup menu.
SSID: WiFi name of this riveterROM: Firmware version of this riveterS/N: Serial number of this riveterThis information is helpful if you have questions about your riveter.
The complete setup menu is shown on the follow-ing pages.
The various languages can be set in the “Lan-guage” screen:
1. EN = English2. DE = German3. FR = French4. ES = Spanish
Confirm your selection with the “OK key” (T) or quit the setup menu by holding the “OK key” (T) depressed (>2 s).

40 | English
The individual counters can be activated or deacti-vated and reset in the “Counter” screen.Various statistics can be called up in the app on the basis of the counters.
Confirm your selection with the “OK key” (T) or quit the setup menu by holding the “OK key” (T) depressed (>2 s).
The sounds of keyboard and warnings can be acti-vated or deactivated in the “Sound” screen.
Confirm your selection with the “OK key” (T) or quit the setup menu by holding the “OK key” (T) depressed (>2 s).
In the “Return Mode” screen you can set whether the riveter moves back to the front starting position after setting the rivet by releasing the trigger or au-tomatically after the shearing of the rivet mandrel.
Confirm your selection with the “OK key” (T) or quit the setup menu by holding the “OK key” (T) depressed (>2 s).

English | 41
The current time and date can be set in the “Date & Time” screen.
When you use the app, the RivSmart uses the time set on your smartphone / tablet.
Confirm your selection with the “OK key” (T) or quit the setup menu by holding the “OK key” (T) depressed (>2 s).
The various light functions can be set in the “Light” screen.1. Automatic illumination of the riveting point with standby after approx. 30 sec.2. Torch function, switches off after approx. 180 sec.
The times can be set individually in the app.
Confirm your selection with the “OK key” (T) or quit the setup menu by holding the “OK key” (T) depressed (>2 s).
The WiFi function can be activated or deactivated in the “WiFi” screen.WiFi: ON / OFF
The WiFi SSID is displayed here again for informa-tion.
Confirm your selection with the “OK key” (T) or quit the setup menu by holding the “OK key” (T) depressed (>2 s).

42 | English
The riveter can be calibrated under “Calibration”.
Ensure that there is no rivet in the mouthpiece and no rivet stud in the clamping jaws. During calibration, the RivSmart performs a dummy stroke (riveting process without rivet) to rule out faults caused e.g. by wear or different ambient condi-tions, and can detect exactly whether a riveting stroke or dummy stroke was performed. Accuracy is thus increased and faults are prevented. We re-commend that this calibration is performed at least once a day when using the DMSD Lite version, depending on the intensity of use and changes in the ambient conditions.
Confirm your selection with the “OK key” (T) or quit the setup menu by holding the “OK key” (T) depressed (>2 s).
WARNING MESSAGES
On the RivSmart the force, stroke, stud collector and job are monitored by means of various sensors and counters. Error messages or activities are always displayed in red and the trigger is deactivat-
ed. The error has to be acknowledged by pressing the “OK key” (T) before the trigger (I) is activated again.
This message is displayed when a job has been completed, i.e. the required number of rivets have been set correctly.
The “OK key” (T) has to be pressed before the next job can be started.
The job settings can be made in the app.
Various job statistics are also displayed via the app.

English | 43
The warning message “Mark Rivet” prompts you to mark the rivet and then to continue riveting in order to finish the job.
In this case the set rivet is not counted. Remove the faulty rivet and set it again.
Acknowledge the error message by pressing the “OK key” (T).
The warning message “Replace Rivet” prompts you to remove the rivet, e.g. by drilling out the faulty rivet, and then to continue riveting in order to finish the job.
In this case the set rivet is not counted. Remove the faulty rivet and set it again.
Acknowledge the error message by pressing the “OK key” (T).
The warning message “Abort Job” prompts you to end the job.
This part is then discarded without riveting being completed.
Acknowledge the error message by pressing the “OK key” (T) to start a new job.
44 | English
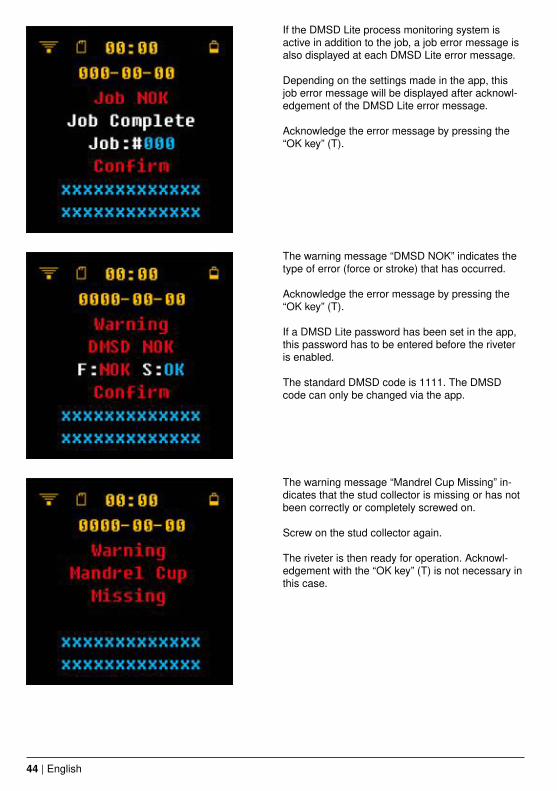
If the DMSD Lite process monitoring system is active in addition to the job, a job error message is also displayed at each DMSD Lite error message.
Depending on the settings made in the app, this job error message will be displayed after acknowl-edgement of the DMSD Lite error message.
Acknowledge the error message by pressing the “OK key” (T).
The warning message “DMSD NOK” indicates the type of error (force or stroke) that has occurred.
Acknowledge the error message by pressing the “OK key” (T).
If a DMSD Lite password has been set in the app, this password has to be entered before the riveter is enabled.
The standard DMSD code is 1111. The DMSD code can only be changed via the app.
The warning message “Mandrel Cup Missing” in-dicates that the stud collector is missing or has not been correctly or completely screwed on.
Screw on the stud collector again.
The riveter is then ready for operation. Acknowl-edgement with the “OK key” (T) is not necessary in this case.

English | 45
The warning message “Mandrel Cup Full” indicates that the stud collector needs to be emptied.
Unscrew the stud collector and empty it. The coun-ter is automatically reset to “0”. Screw on the stud collector again.
The riveter is then ready for operation. Acknowl-edgement with the “OK key” (T) is not necessary in this case.
The standard setting is 150 rivet studs. This setting can be changed in the app – Caution! Overfilling can result in damage to the riveter.
The warning message “Service Jaws” indicates that the clamping jaws need to be serviced or replaced.
The settings are made in the app, depending on the stud material of the rivet.
Acknowledge the error message by pressing the “OK key” (T) and carry out the service as de-scribed in the manual.
If riveting can no longer be performed in one stroke, the clamping jaws need to be replaced.
When the warning message “Service Tool” ap-pears, your RivSmart has set 300,000 rivets.
Acknowledge the error message by pressing the “OK key” (T).
The RivSmart should now be sent to a service centre for inspection.
You can continue to work, but the service message appears every time you attach the battery.
Note the failure to have the inspection carried out can result in damage to the riveter and loss of warranty claims.
46 | English
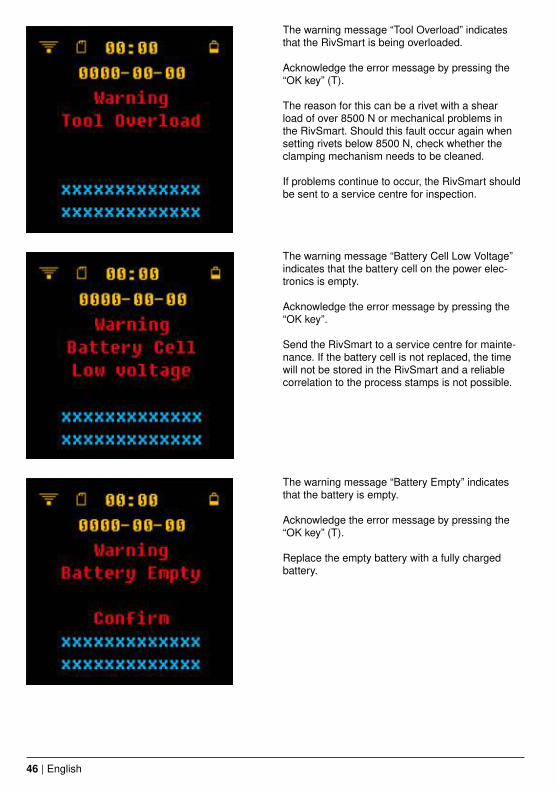
The warning message “Tool Overload” indicates that the RivSmart is being overloaded.
Acknowledge the error message by pressing the “OK key” (T).
The reason for this can be a rivet with a shear load of over 8500 N or mechanical problems in the RivSmart. Should this fault occur again when setting rivets below 8500 N, check whether the clamping mechanism needs to be cleaned.
If problems continue to occur, the RivSmart should be sent to a service centre for inspection.
The warning message “Battery Cell Low Voltage” indicates that the battery cell on the power elec-tronics is empty.
Acknowledge the error message by pressing the “OK key”.
Send the RivSmart to a service centre for mainte-nance. If the battery cell is not replaced, the time will not be stored in the RivSmart and a reliable correlation to the process stamps is not possible.
The warning message “Battery Empty” indicates that the battery is empty.
Acknowledge the error message by pressing the “OK key” (T).
Replace the empty battery with a fully charged battery.

English | 47
The warning message “Battery Pack Temp High” indicates that the battery is being overloaded.
Acknowledge the error message by pressing the “OK key” (T).
The RivSmart can operate in a temperature range from -5 to 45 °C.
If the battery is used at ambient temperatures outside this range or the range is exceeded due to overload, the riveter switches off.
Cool the battery!
The warning message “PCB Temp High” indicates that the RivSmart is being overloaded.
Acknowledge the error message by pressing the “OK key” (T).
The RivSmart can operate in a temperature range from -5 to 45 °C.
If the battery is used at ambient temperatures outside this range or the range is exceeded due to overload, the riveter switches off.
Cool the riveter and the battery!
The warning message “PCB Temp Low” indicates that the RivSmart is too cold.
Acknowledge the error message by pressing the “OK key” (T).
The RivSmart can operate in a temperature range from -5 to 45 °C.
If the battery is used at ambient temperatures outside this range or the range is exceeded due to overload, the riveter switches off.
Warm the riveter and the battery!

48 | English
MAINTENANCE AND SERVICE
SERVICING AND CHANGING THE CLAMP-ING JAWS
Depending on the mandrel material, shear force and surface finish, the clamping jaws have to be cleaned and replaced at regular intervals.
Changing and servicing the clamping jaws requires no tools.
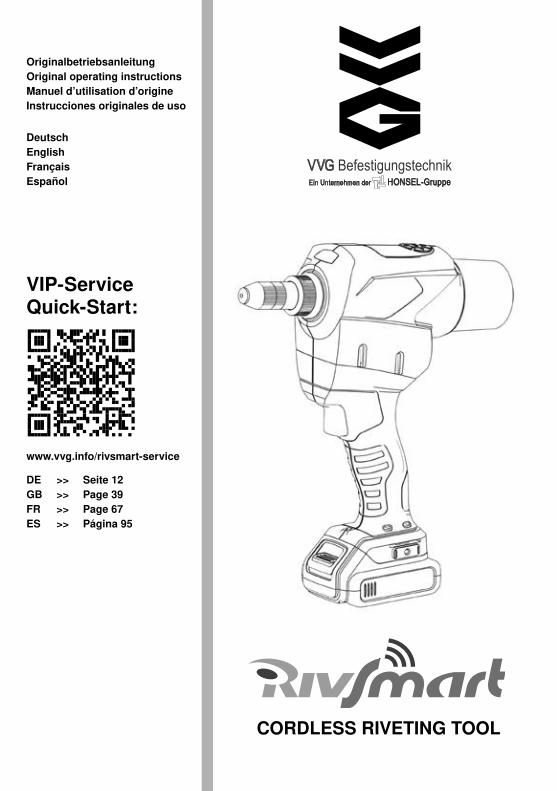
I To change the clamping jaws, press trigger (I) and hold it depressed. With the other hand, loosen union nut (V) connecting front sleeve (B) and mouthpiece (A).
II Remove union nut (V) and release trigger (I).III Remove front sleeve (B) together with mouth-
piece (A).IV Clamping sleeve (3) is held by a spring-loaded
(1) fastener (2).V Push fastener (2) towards riveter housing (P)
and unscrew clamping sleeve (3).VI Remove clamping jaws (5) from clamping
sleeve (3). Thoroughly clean the inside and outside of clamping jaws (5) and clamping sleeve (3). Always replace a complete set of worn clamping jaws (5). Grease the inside of clamping sleeve (3) lightly with pressure-resist-ant grease using a brush (4).
Install clamping jaws (5) in the clamping sleeve again and fit the clamping mechanism again in the reverse order.
Important note: Screw on the clamping sleeve up to the first slight resistance.Let go of the quick release mechanism and unscrew the clamping sleeve again until the quick release mechanism engages.
RIVETER SERVICE
In order to ensure proper and safe operation of the riveter, it should be sent to a service centre either directly or via your dealer. The terms of the warran-ty extension must be observed.
What? Who? When?Visual inspec-tion of the riveter
Operator Daily
Battery charge state
Operator Daily
Calibration Operator Daily, when working with DMSD Lite
Cleaning and greasing the clamping mechanism
Operator Between 1,000 and 10,000, depending on the rivet type
Changing the clamping jaws
Operator When the rivet can no longer be set in one stroke
Changing the mouthpiece
Operator Every 25,000 to 50,000 rivets
Inspection VVG Service 300,000 or 18 months
BATTERY
The battery (F) has a latch (G) on the front side. To insert or remove the battery, press the latch (G) downwards and push the battery (F) into the riveter foot or pull it out.Use the battery (F) in the riveter only in the speci-fied temperature range between -5 and 45 °C.Charge the battery (F) only in a temperature range between 0 and 40 °C.Use only the approved charger.Never short-circuit the battery (F).If the battery (F) shows signs of visible damage, do not use it any longer.Keep the battery (F) away from moisture and liquids.Dispose of the battery (F) in the proper manner.
BATTERY STORAGE
Protect the battery (F) from moisture and liquids. Store the battery (F) only in the optimum tempera-ture range between -30 °C and 25 °C. The battery (F) can be stored as follows without recharging:Storage period between -30 ~ 25 °C – 1.5 yearsStorage period between -30 ~ 45 °C – 3 monthsStorage period between -30 ~ 60 °C – 1 monthDo not leave the battery (F) in the car, e.g. in the summer.A significantly shorter operating time after recharg-

English | 49
ing indicates that the battery (F) is worn out and has to be replaced.Observe the instructions on disposal.
BATTERY DISPOSAL
Li ion: Do not throw the battery (F) into the domes-tic waste, fire or water. Batteries (F) are collected and recycled or disposed of in an eco-friendly manner.For EU countries only:In accordance with Directive 91/157/EEC, defective or old batteries (F) must be recycled.Batteries (F) that can no longer be used can be returned to your dealer or directly to the manufac-turer.
DISPOSAL OF RIVETER AND QUICK CHARGER
Electric riveters, chargers, accessories and packagings should be recycled in an eco-friendly manner.For EU countries only:Do not throw electric riveters into the domestic waste!In accordance with European Directive 2002/96/EC on Waste Electrical and Electronic Equipment and its implementation in national law, electric riveters must be collected separately and recycled in an eco-friendly manner at the end of their useful life.
FUNCTIONS IN DETAIL
ADMIN CODE
The RivSmart (P) has two PIN code levels. These serve to ensure safe operation of the riveter.
The first level brings you to the setup menu. The standard password for the admin code is 1234. This password can be changed in the app.
At the second level, acknowledgement of an error in the process monitoring system (DMSD) is only possible with the input of the PIN code, i.e. if the PIN code is not entered, the riveter remains deacti-vated. The DMSD code is 1111. This function and the changing of the password can be carried out in the app.
DATE AND TIME
Date and time can be changed in the setup menu. If the app is used, the riveter (P) automatically uses the time set on your smartphone / tablet. If
time and date are not set correctly, they will not appear correctly on the display and the date and time stamp will not be saved correctly on the SD card (R).
COUNTERS
The RivSmart (P) has various counters.
Totaliser: This counter counts the total number of rivets set. It cannot be deleted. When using the app, various statistics can be called up here.
Individual counter: This counter can be activated and reset in the setup menu and in the app.
JOB LITE
The Job Lite function serves to check whether all the rivets have been set in a part. When the number of rivets set in the setup menu or the app is reached, the riveter (P) stops and has to be reac-tivated by pressing the “OK key” (T). If the Job Lite function is used together with the DMSD function, you can select in the app whether, in the event of a DMSD error,
• the rivet is to be marked by the worker for later inspection / correction and the job is continued,
• the rivet is to be immediately drilled out by the worker and a new rivet set and the job is contin-ued (the faulty rivet is not counted),
• the part is discarded for later repair and the job is stopped.
If you have to work with rivets of different length in a part or you have different clamping forces when working in Job and DMSD mode, you have to set the stroke tolerance (and possibly also the force tolerance) higher (100 %).
SOUND
The sounds of the keys (T) (U) and warning mes-sages can be activated and deactivated individually in the setup menu and in the app.

50 | English
MANUAL / AUTOMATIC RETURN
Pressing the trigger (I) activates the riveter. In manual return mode, the riveter (P) is activated as long as the trigger (I) is pressed. When the riveter (P) reaches its end position, it stops until the trigger is released.
In automatic return mode, the trigger (I) only has to be pressed once. The stroke is then performed automatically. The return stroke starts on detection of the rivet break-off or when the end position is reached. Both modes can be set in the setup menu and in the app.
SERVICE
CLAMPING JAWS / RIVET STUD MATERI-AL
The riveter (P) has a warning function for clamping jaw service. For this it is important that the material of the rivet studs (!!) (not of the sleeve) is select-ed in the setup menu or the app. When the set number of rivets is reached, a warning message for clamping jaw service is displayed. The clamping jaw mechanism should then be cleaned (see “Servicing and changing the clamping jaws”) and the clamping jaws replaced, if necessary. As rivet studs of the same material can differ, depending on the manufacturer and rivet type, it is possible in the app to set the service intervals individually according to the material.
STUD COLLECTOR (E) / STUD COUNTER
The stud collector (E) is equipped with an elec-tronic contact. This prevents the riveter being used without stud collector (E).
Never operate the riveter (P) without the stud collector (E) and never bypass the safety switch. Risk of injury!
If you need to use the riveter (P) without stud collector (E) for space reasons, you can fit the stud securing cap (J) instead of the stud collector and discharge the rivet studs from the riveter to the front.
Never operate the riveter with stud securing cap (J) and retainer mouthpiece (A) at the same time. The rivet studs could then not be discharged to either the
front or the rear. This would cause serious damage to the riveter!
If the stud collector (E) or stud securing cap (J) is not fitted correctly, a warning message appears on the display (S).A warning message also appears when the stud collector (E) is full. The limit is set to 150 rivet studs; this value can be changed in the app. Every time you remove the stud collector (E), it must be emptied as removing the stud collector resets the counter to zero.
Do not overfill the stud collector (E). This would cause serious damage to the riveter!
A larger stud collector (E) is available for longer rivet studs.
RIVETER
The riveter (P) has a service counter that sig-nals when the riveter needs to be serviced. This warning appears every time you fit the battery (F) and can only be reset by a service station as part of a service routine. Contact your nearest service station for further information.
LANGUAGE
Languages currently available in the riveter (P) and the app are English, German, French and Spanish. The language can be selected in the setup menu and in the app.
LIGHT
Via the light function you can switch between riveting point illumination (H) that is active only during operation of the riveter (P) and the torch function.
Riveting point illumination (H) goes out together with the riveter after 30 seconds’ inactivity.
With the torch function, the LED remains on for 3 minutes.

English | 51
DMSD LITE / DMSD HR
As standard the riveter (P) has a force/stroke mon-itoring system (DMSD Lite) and is therefore able to document the riveting operations performed. For this the SD card (R) must be in the riveter.
Attention: The SD card (R) must not be inserted into or removed from the riveter as long as the bat-tery (F) is installed. The SD card could otherwise be destroyed and with it your data!
The difference between DMSD Lite and DMSD HR lies in the measuring methods for the force and stroke, and hence in the precision.
The precision of the force measurement with DMSD Lite is +/- 20 % and for the stroke measure-ment +/- 12 %. Depending on the application and rivet, you can change the tolerance when setting up the DMSD.
If you have to work with rivets of different length in a part or you have different clamping forces when working in Job and DMSD mode, you have to set the stroke tolerance (and possibly also the force tolerance) higher (100 %).
WIFI
The WiFi function allows you to connect the riveter (P) to your smartphone. You can manage all your riveters (P) in the app, but can only connect to one riveter at a time.
A router link is in preparation.
An interface to your company network can be programmed individually.
SMARTPHONE OS
The VVG Tool app is available for the following terminals and operating systems:
• iPhone 5 and higher, iPad 2 and higher, iOS from Version 8.2 and higher and
• Android from Version 4.0 and higher.

52 | English
RIVSMART CONTROL-CENTER
The “RivSmart Control Center” can be reached via the VVG homepage.
www.vvg.info/rivsmart-service
Login:
Use the login data of the RivSmart app to login to the Control Center.
Riveter overview:
After logging in, the user receives a direct overview of the riveters linked to the account (e-mail). At this point you get a direct overview of the riveters with S/N code (serial number), MAC address (mobile device identity), active time (activation time), active address (place for theft protection), unbind option (separate the riveter from the account), share option (enable riveter for other accounts) and share list (overview of the enables for the riveter).

English | 53
Enable riveter:
A click on the button “Share” in the line of the riveter to be enabled opens a box in which an e-mail ad-dress can be entered.
This e-mail address corresponds to the account (sub-user /share user) for whom the riveter is to be ena-bled. In the event that the sub-user / share user already has a registered RivSmart account, it is sufficient to enter the e-mail address and to confirm it by clicking the “Confirm” button.
Revoke riveter enable:
Clicking on the small arrow in the column “Share List” opens the list of sub-users / share users.
In the line that is now displayed under “User name” is a list of the accounts with access authorisation. The date of this enable is displayed under “Share Date”. Clicking the “Cancel” button under the heading “Option” allows the enable for every single share user to be revoked at any time.

54 | English
To complete this step, click “Confirm” to confirm or “Cancel” to leave the enable active.
Forgotten password:
If you forget the password (access data for the app), you can enter the registered e-mail address of the app and click “Help, I forgot my password”.
Resetting of the password is thus initiated. In the process, an e-mail is sent to the registered e-mail address.

English | 55
This procedure ensures that only persons with access to the e-mail account can reset the password. The e-mail received contains a link marked “here”. Click on this link to confirm that you wish to reset the password and you will be forwarded to the next step. If you have not requested the “Reset password” or made the request inadvertently, you can ignore this e-mail and continue to work normally!
The homepage is displayed on which you can reset the password. Here you have to enter a new password in the box under “New Password” and enter the new password again for confirmation under “Confirm Password”. Clicking “Reset” saves the new password.(The second input of the new password is intended to prevent inadvertent typing errors.)
Successful changing of the password is con-firmed with a corresponding message.
56 | English
EG-KONFORMITÄTSERKLÄRUNG EG-RL 2006/42/EG ANHANG II 1A
The manufacturer:
VVG-Befestigungstechnik GmbH & CoFriedrich-Wöhler-Str. 4424536 NeumünsterGermanyTel.: +49(0)4321-967171
declares hereby that the following product:
Product designation:RivSmart 12V
complies with the following relevant regulations:
• EC Machinery Directive 2006/42/EC, includ-ing amendments and supplements
• EMC Directive 2014/30/EU, including amend-ments
If the machine is modified without our knowledge and consent, this EC Declaration of Conformity will be voided.
Most important applied harmonised standards:DIN EN ISO 12100 Safety of machinery – General principles for designEN 60745-1:2009+A11:2010 Electric motor-op-erated hand-held tools – Safety – Part 1: General requirements
Name of documentation officer: Thorsten LangeAddress of documentation officer: see address of manufacturer
Neumünster, 2017-04-05
________________________________________ Frank-Michael Struck(Managing Director)
EG-KONFORMITÄTSERKLÄRUNG EG-RL 2006/42/EG ANHANG II 1A
The manufacturer:
VVG-Befestigungstechnik GmbH & CoFriedrich-Wöhler-Str. 4424536 NeumünsterGermanyTel.: +49(0)4321-967171
declares hereby that the following product:
Product designation:Universal Quick Charger 220 V ~ 12/16/20 V
complies with the following relevant regulations:
• EU Low Voltage Directive 2006/95/EU• EMC Directive 2004/108/EC, including
amendments
If the device is modified without our knowledge and consent, this EC Declaration of Conformity will be voided.
Most important applied harmonised standards:EN 60335-1: 2012+A11:2014 Household and sim-ilar electrical appliances – Safety – Part 1: General requirements
Most important applied national standards and specifications:Product Safety Act, 9th Product Safety Ordi-nance, 1st Product Safety Ordinance, EMC Act, EN 60335-2-29: 2004, EN 62233: 2008, EN 55014-1: 2006 + A1: 2009 + A2: 2011, EN 55014-2: 1997 + A1: 2001 + A2: 2008, EN 61000-3-2: 2006 + A1: 2009 + A2: 2009, EN 61000-3-3: 2013
Name of documentation officer: Thorsten LangeAddress of documentation officer: see address of manufacturer
Neumünster, 2017-04-05
________________________________________ Frank-Michael Struck(Managing Director)
56 | English


VVG Befestigungstechnik GmbH & Co Friedrich-Wöhler-Str.4424536 NeumünsterGERMANY
fon + 49 (0) 4321 9671 71 fax + 49 (0) 4321 9671 96mail [email protected]
www.vvg.infowww.vvg.fr