· Web viewMethods of washing vary with each rope manufacturer, so it is always advisable to...
72
Module C Skills Handbook Overview This handbook has been developed to serve as an instructional resource for instructors and students. Evaluators will use this document as a reference while evaluating skills during training and examinations. It has been determined that the skills contained in this document are necessary to meet the objective of NFPA 1001 2008 edition. Each skill has been laid out in the following format Name and Objective Directions Equipment/Materials List Task List While this serves as a solid guideline that will cover the vast majority as written it is understood that there may be times that adjustments to the equipment and materials list and the task steps will be necessary to complete the objectives. Adjustments may be required if the host department does not have the exact equipment as listed. In this instance an alternative piece of equipment may be used as long as the intent of the objective is met. It may also be necessary to adjust the task steps based on equipment, procedures or manufacturers recommendations. In the event that an adjustment is necessary during training or testing, documentation of the adjustment should be made in the comment section of the students check off sheet. The intent of this document is to ensure that all persons who achieve certification have met the minimum NFPA Standard. All persons seeking certification must demonstrate all skills contained in this document. This is true even if the student is not required to perform the skill at his/her fire department. For instance, your jurisdiction does not have any structures that employ the use of sprinklers; therefore your fire department does not train on sprinkler systems. You will still be required to complete all the sprinkler skills contained in this document. It will be the responsibility of the Lead Instructor to schedule the use of facilities and/or assemble all props necessary to ensure
Transcript of · Web viewMethods of washing vary with each rope manufacturer, so it is always advisable to...
Module C Skills HandbookOverview
This handbook has been developed to serve as an instructional resource for instructors and students. Evaluators will use this document as a reference while evaluating skills during training and examinations. It has been determined that the skills contained in this document are necessary to meet the objective of NFPA 1001 2008 edition. Each skill has been laid out in the following format
Name and Objective Directions Equipment/Materials List Task List
While this serves as a solid guideline that will cover the vast majority as written it is understood that there may be times that adjustments to the equipment and materials list and the task steps will be necessary to complete the objectives. Adjustments may be required if the host department does not have the exact equipment as listed. In this instance an alternative piece of equipment may be used as long as the intent of the objective is met. It may also be necessary to adjust the task steps based on equipment, procedures or manufacturers recommendations. In the event that an adjustment is necessary during training or testing, documentation of the adjustment should be made in the comment section of the students check off sheet.
The intent of this document is to ensure that all persons who achieve certification have met the minimum NFPA Standard. All persons seeking certification must demonstrate all skills contained in this document. This is true even if the student is not required to perform the skill at his/her fire department. For instance, your jurisdiction does not have any structures that employ the use of sprinklers; therefore your fire department does not train on sprinkler systems. You will still be required to complete all the sprinkler skills contained in this document. It will be the responsibility of the Lead Instructor to schedule the use of facilities and/or assemble all props necessary to ensure that training on all skills are completed. To assist with this we have identified skills that may be difficult to complete by providing guidance that will ensure compliance. The guidance is located on the identified skill sheet. In addition we are recommending the follow actions be taken to provide students with quality instruction and a positive learning experience;
Determine your resource needs and identify where you can get themo Propso Bookso Instructorso Evaluators
o Your District Fire Training Council is a good starting point with this
Conduct skill sessions at a training center Small classes should combine with neighboring fire departments this
will help with ensuring the necessary resources are available
Once the students have successfully demonstrated a skill the instructor shall sign off.
The following skill sheets have been identified and have special instructions or specific guidance;
M-9 ExtinguishersM-29 Forcible Entry (Window)M-30 Forcible Entry (Stud Wall)M-46 Hydrants M-47 Drop TankM-62 Exterior AttackM-63 Turn Off UtilitiesM-64 Interior AttackM-65 Vehicle FireM-67 Ground Cover FireM-68 Sprinkler Control ValveM-69 Stop the Flow from a Sprinkler HeadM-70 Connect to a FDCM-72 Salvage Cover FoldM-74 Salvage Cover RollM-78 Locate and Extinguish Hidden FiresM-84 Service Test Fire Hose
If you find that you are unable to complete any skills you must contact the IDHS Training Staff and provide justification. Your justification will be taken into consideration and further direction will be given at that time. It is critical to preplan your courses to avoid last minute problems. Failure to obtain a prop will not excuse you from completing any of the required skills but will result in delaying the completion of the class.The skill sheets in this document are used as a reference for the practical skills examination. Students will be instructed to complete a series of evolutions that may include any of the skill sheets contained in this document. At no time will a student be asked to perform a skill that is not listed.
ExtinguishersM-9
Operate a dry chemical (ABC) extinguisher. (NFPA® 1001, 5.3.16)
Operate a carbon dioxide (CO2) extinguisher. (NFPA® 1001, 5.3.16)
Operate a stored pressure water extinguisher. (NFPA® 1001, 5.3.16)
DirectionsFor this skills evaluation checklist, students will operate a dry chemical extinguisher and extinguish a small incipient Class B fire. Inform students of the importance of following all safety policies and procedures when working with live fire, especially flammable liquids. For this skills evaluation checklist, students you will operate a carbon dioxide extinguisher on a simulated Class C fire. Inform students of the importance of following all safety policies and procedures when working with live fire.For this skills evaluation checklist, students will operate a stored pressure water extinguisher and extinguish a small incipient Class A fire. Inform students of the importance of following all safety policies and procedures when working with live fire.**During training the use of all extinguishers must be covered, however students are required to perform skills associated with one extinguisher for certification. Lead Instructors will communicate what extinguisher was utilized to the Lead Evaluator. The Lead Evaluator will ensure that this extinguisher is used during the skills evaluation. **
Equipment & Materials Personal protective clothing
and SCBA Stored pressure water extinguisher Small Class A Fire
Dry chemical (ABC) extinguisher
Carbon Dioxide Extinguisher
Small Class B fire or simulated Class B fire
Small Class C Fire

Skills Evaluation Checklist
Task Steps –Dry Chemical1. Size up class B fire, ensuring that it is safe to fight with an
extinguisher.2. Pull pin at top of extinguisher to break the inspection band.3. Test to ensure proper operation.
a. Point nozzle horn in safe directionb. Discharge very short test burst
4. Carry extinguisher to within stream reach of fire.a. Escape route identifiedb. Uprightc. Upwind of fire
5. Aim nozzle toward base of fire.6. Discharge extinguishing agent
a. Squeeze handleb. Sweep slowly back and forth across entire width of firec. Avoid splashing liquid fuels
7. Cover entire area with dry chemical until fire is completely extinguished.
8. Back away from the fire area.9. Tag extinguisher for recharge and inspection.
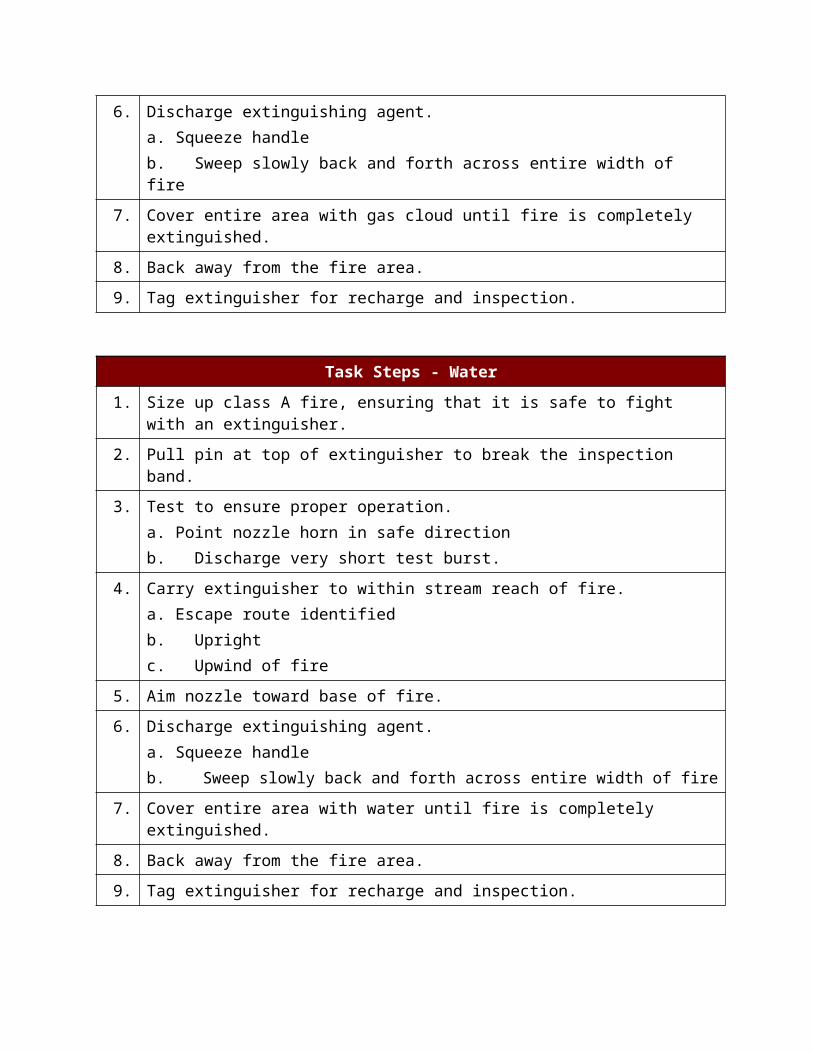
Task Steps – CO21. Size up electrical fire, ensuring that it is safe to fight with an
extinguisher.2. Pull pin at top of extinguisher to break the inspection band.3. Test to ensure proper operation.
a. Point nozzle horn in safe directionb. Discharge very short test burst
4. Carry extinguisher to within stream reach of fire.a. Escape route identifiedb. Upright

c. Upwind of fire5. Aim nozzle toward base of fire.6. Discharge extinguishing agent.
a. Squeeze handleb. Sweep slowly back and forth across entire width of fire
7. Cover entire area with gas cloud until fire is completely extinguished.8. Back away from the fire area.9. Tag extinguisher for recharge and inspection.
Task Steps - Water1. Size up class A fire, ensuring that it is safe to fight with an
extinguisher.2. Pull pin at top of extinguisher to break the inspection band.3. Test to ensure proper operation.
a. Point nozzle horn in safe directionb. Discharge very short test burst.
4. Carry extinguisher to within stream reach of fire.a. Escape route identifiedb. Uprightc. Upwind of fire
5. Aim nozzle toward base of fire.6. Discharge extinguishing agent.
a. Squeeze handleb. Sweep slowly back and forth across entire width of fire
7. Cover entire area with water until fire is completely extinguished.8. Back away from the fire area.9. Tag extinguisher for recharge and inspection.
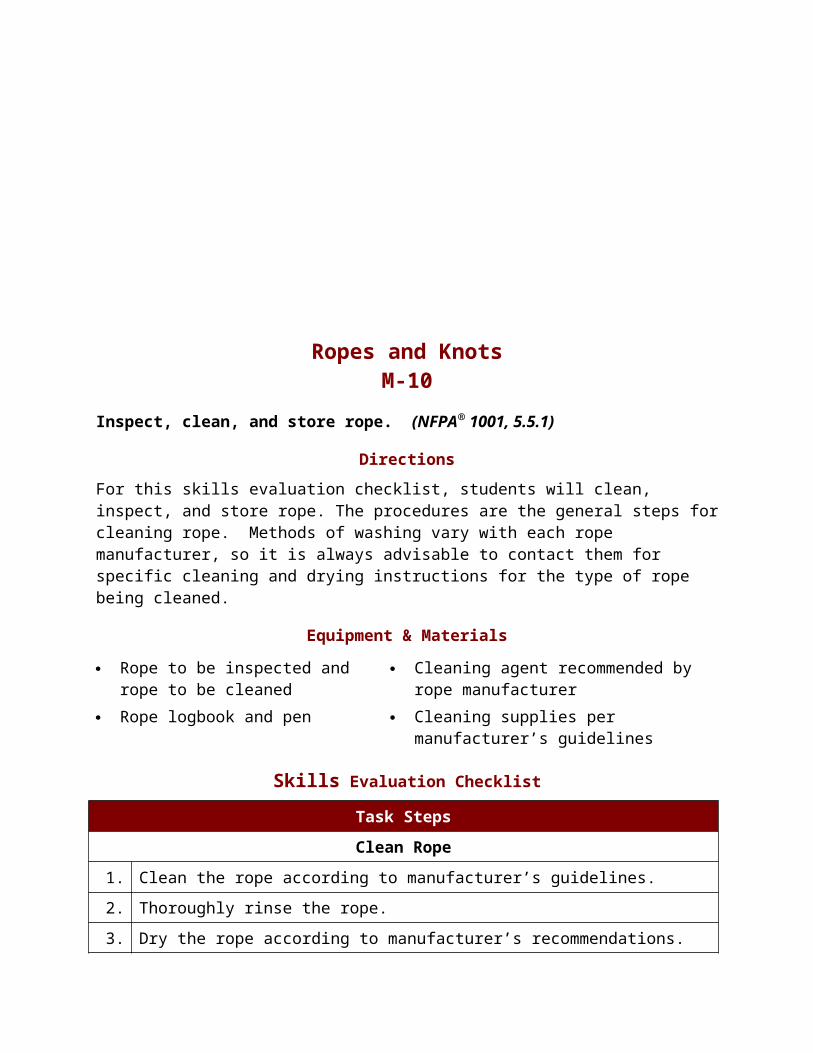
Ropes and KnotsM-10
Inspect, clean, and store rope. (NFPA® 1001, 5.5.1)
DirectionsFor this skills evaluation checklist, students will clean, inspect, and store rope. The procedures are the general steps for cleaning rope. Methods of washing vary with each rope manufacturer, so it is always advisable to contact them for specific cleaning and drying instructions for the type of rope being cleaned.
Equipment & Materials Rope to be inspected and rope
to be cleaned Cleaning agent recommended by
rope manufacturer Rope logbook and pen Cleaning supplies per manufacturer’s
guidelines
Skills Evaluation Checklist
Task StepsClean Rope
1. Clean the rope according to manufacturer’s guidelines.2. Thoroughly rinse the rope.3. Dry the rope according to manufacturer’s recommendations.
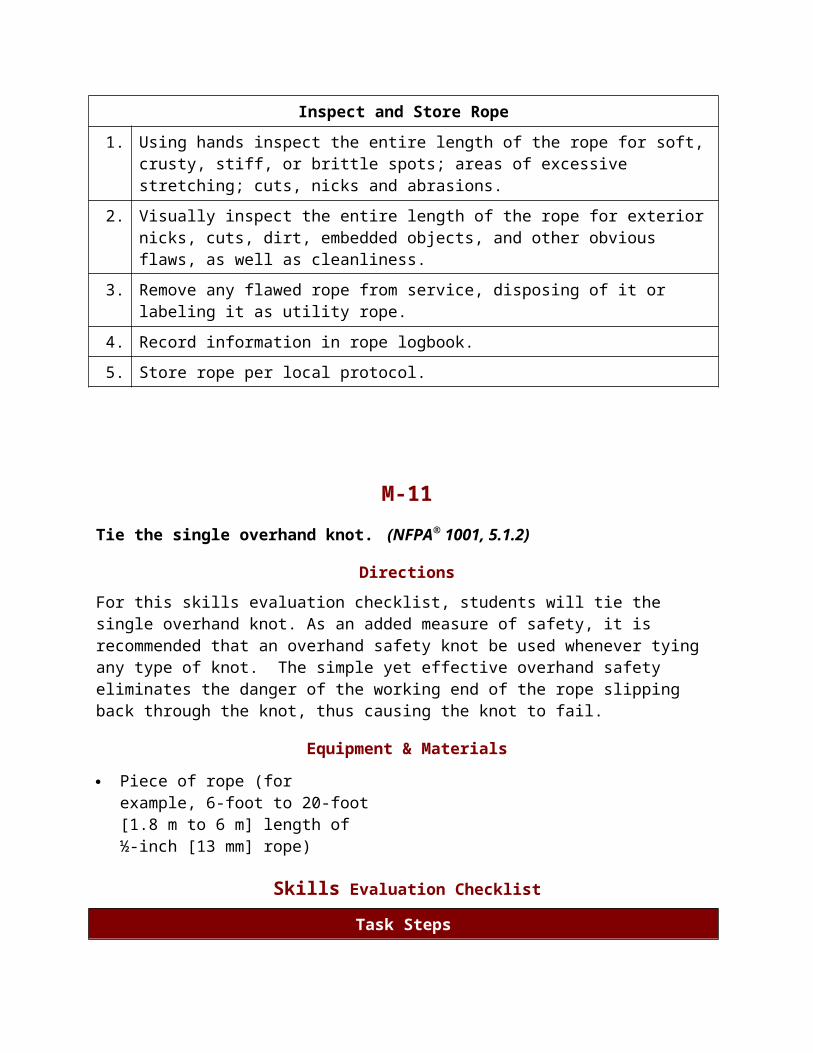
Inspect and Store Rope
1. Using hands inspect the entire length of the rope for soft, crusty, stiff, or brittle spots; areas of excessive stretching; cuts, nicks and abrasions.
2. Visually inspect the entire length of the rope for exterior nicks, cuts, dirt, embedded objects, and other obvious flaws, as well as cleanliness.
3. Remove any flawed rope from service, disposing of it or labeling it as
utility rope.4. Record information in rope logbook.5. Store rope per local protocol.
M-11Tie the single overhand knot. (NFPA® 1001, 5.1.2)
DirectionsFor this skills evaluation checklist, students will tie the single overhand knot. As an added measure of safety, it is recommended that an overhand safety knot be used whenever tying any type of knot. The simple yet effective overhand safety eliminates the danger of the working end of the rope slipping back through the knot, thus causing the knot to fail.
Equipment & Materials Piece of rope (for example, 6-
foot to 20-foot [1.8 m to 6 m] length of ½-inch [13 mm] rope)
Skills Evaluation Checklist
Task Steps1. Form a loop in the rope.2. Insert the end of the rope through the loop.3. Dress the knot by pulling on both ends of the rope at the same time.
M-12Tie a bowline. (NFPA® 1001, 5.1.2)
DirectionsFor this skills evaluation checklist, students will tie a bowline knot. The bowline is an important knot in the fire service, sharing a degree of acceptance in both life safety and utility applications. The bowline is easily untied and is a good knot for forming a single loop that will not constrict the object around which it is placed.
Equipment & Materials Piece of rope (for example, 6-
foot to 20-foot [1.8 m to 6 m] length of ½-inch [13 mm] rope)
Skills Evaluation Checklist
Task Steps1. Select enough rope to form the size of the loop desired.2. Form an overhand loop in the standing part.3. Pass the working end upward through the loop.4. Pass the working end over the top of the loop under the standing part.5. Bring the working end completely around the standing part and down
through the loop.6. Pull the knot snugly into place, forming an inside bowline with the
working end on the inside of the loop.7. Secure the bowline with an overhand safety.

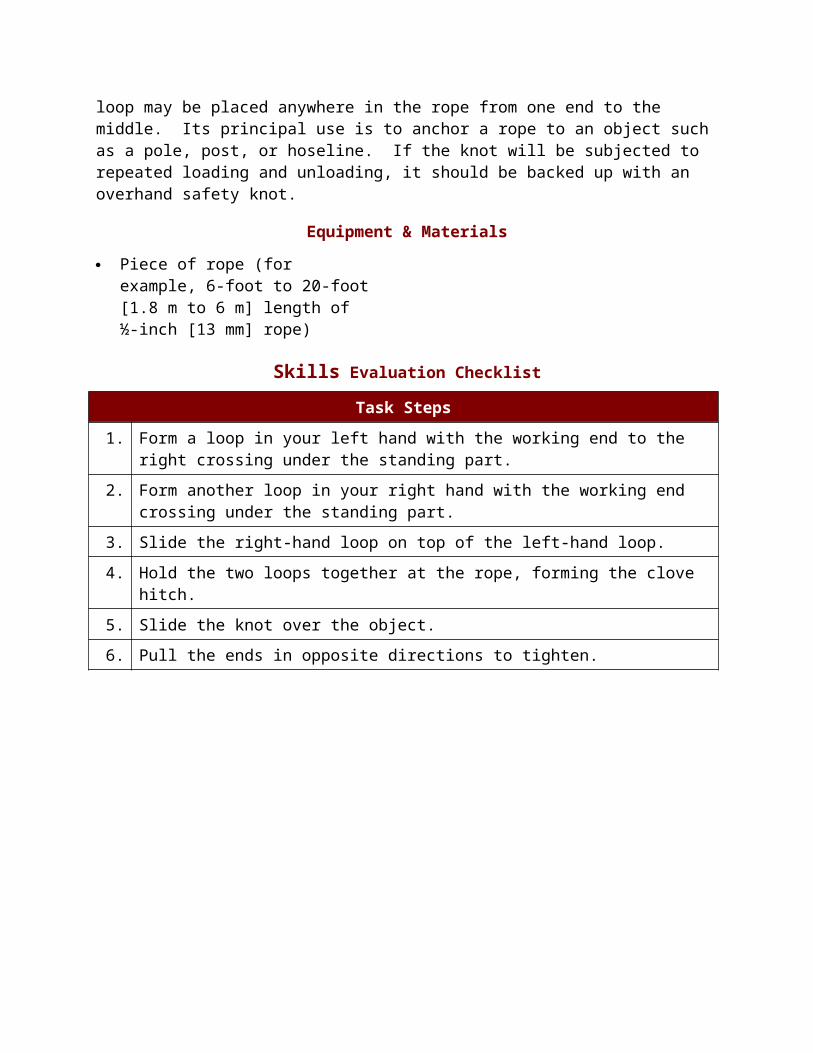
M-13Tie a clove hitch. (NFPA® 1001, 5.1.2)
DirectionsFor this skills evaluation checklist, students will tie a clove hitch. The clove hitch is essentially two half hitches. Its loop may be placed anywhere in the rope from one end to the middle. Its principal use is to anchor a rope to an object such as a pole, post, or hoseline. If the knot will be subjected to repeated loading and unloading, it should be backed up with an overhand safety knot.
Equipment & Materials Piece of rope (for example, 6-
foot to 20-foot [1.8 m to 6 m] length of ½-inch [13 mm] rope)
Skills Evaluation Checklist
Task Steps1. Form a loop in your left hand with the working end to the right
crossing under the standing part.2. Form another loop in your right hand with the working end crossing
under the standing part.3. Slide the right-hand loop on top of the left-hand loop.4. Hold the two loops together at the rope, forming the clove hitch.5. Slide the knot over the object.6. Pull the ends in opposite directions to tighten.

M-14Tie a clove hitch around an object. (NFPA® 1001, 5.1.2)
DirectionsFor this skills evaluation checklist, students will tie a clove hitch around an object. Because the open clove hitch cannot be slipped onto an object with no free end (such as the center of a hoseline), this method is used on objects with no free end or with a distant free end.
Equipment & Materials Piece of rope (for example, 6-
foot to 20-foot [1.8 m to 6 m] length of ½-inch [13 mm] rope)
Skills Evaluation Checklist
Task Steps1. Make one complete loop around the object, crossing the working end
over the standing part.2. Complete the round turn about the object just above the first loop as
shown.3. Pass the working end under the upper wrap, just above the cross.4. Set the hitch by pulling.
M-15Tie a figure eight. (NFPA® 1001, 5.1.2)
DirectionsFor this skills evaluation checklist, students will tie a figure eight. A figure-eight knot is stronger than a bowline, easy to tie and untie, inspect, and keep neat. There are several variations of the figure-eight knot commonly used in the rescue service.
Equipment & Materials Piece of rope (for example, 6-
foot to 20-foot [1.8 m to 6 m] length of ½-inch [13 mm] rope)
Skills Evaluation Checklist
Task Steps1. Make a loop in the rope.2. Pass the working end completely around the standing part.3. Insert the end of the rope back through the loop.4. Dress the knot by pulling on both the working end and standing part of
the rope at the same time.

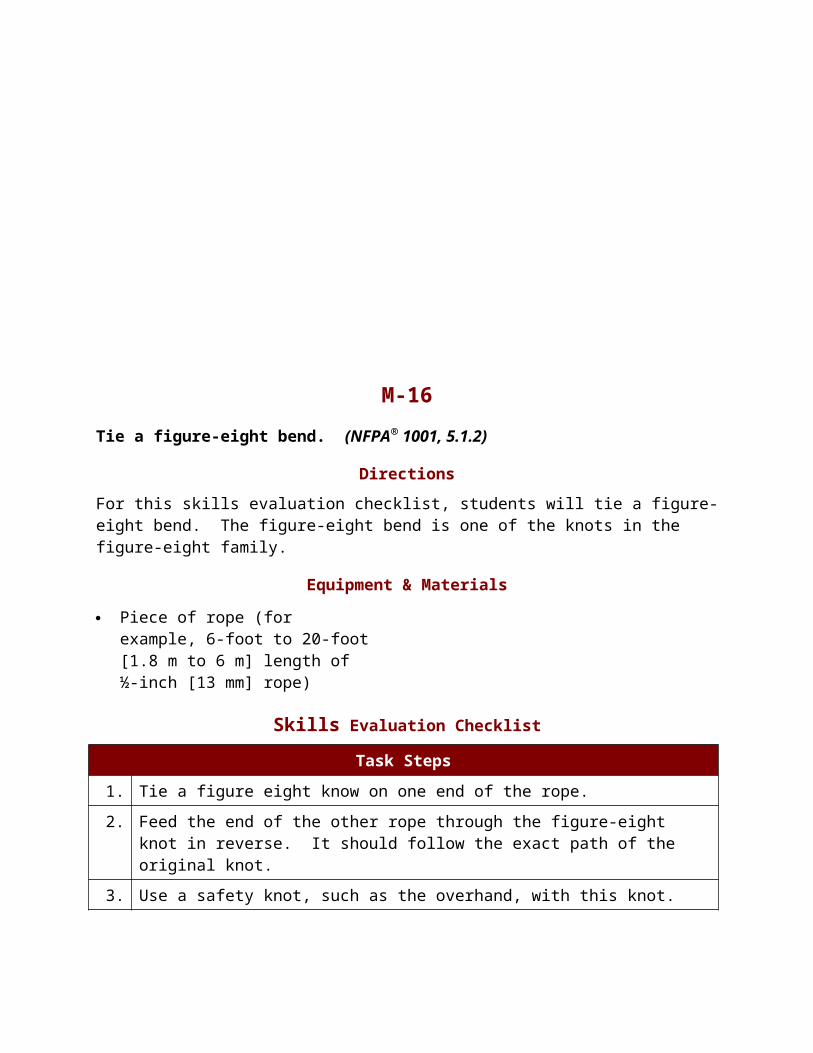
M-16Tie a figure-eight bend. (NFPA® 1001, 5.1.2)
DirectionsFor this skills evaluation checklist, students will tie a figure-eight bend. The figure-eight bend is one of the knots in the figure-eight family.
Equipment & Materials Piece of rope (for example, 6-
foot to 20-foot [1.8 m to 6 m] length of ½-inch [13 mm] rope)
Skills Evaluation Checklist
Task Steps1. Tie a figure eight know on one end of the rope.2. Feed the end of the other rope through the figure-eight knot in
reverse. It should follow the exact path of the original knot.3. Use a safety knot, such as the overhand, with this knot.

M-17Tie a figure eight on a bight. (NFPA® 1001, 5.1.2)
DirectionsFor this skills evaluation checklist, students will tie a figure eight on a bight. The figure eight on a bight is a good way to tie a loop in either the middle or the end of a rope. It is tied by forming a bight in either the end of the rope or at any point along its length, and then tying a simple figure-eight with the doubled part of the rope (bight). Because it can be tied in the middle of the rope or used for a loop in the rope to which other lines or equipment can be attached, it is used for both an anchoring attachment and a harness tie-in.
Equipment & Materials Piece of rope (for example, 6-
foot to 20-foot [1.8 m to 6 m] length of ½-inch [13 mm] rope)
Skills Evaluation Checklist
Task Steps1. Form a bight in the working end of the rope.2. Pass it over the standing part to form a loop.3. Pass the bight under the standing part and then over the loop and
down through it; this forms the figure eight.4. Extend the bight through the knot to whatever size working loop is
needed.5. Dress the knot.
M-18Hoist an axe. (NFPA® 1001, 5.1.2)
Hoist a pike pole. (NFPA® 1001, 5.1.2)
DirectionsFor this skills evaluation checklist, students will hoist an axe. The procedure for attaching and hoisting an axe is the same for either a pick-head axe or a flat-head axe.
Equipment & Materials One 50-foot (6 m to 12 m)
length of utility rope Pike Pole
Axe
Skills Evaluation Checklist
Task Steps - Axe1. Lower an appropriate length of rope from the intended destination of
the axe.2. Tie a clove hitch using the method shown in Skill Sheet M-13.
NOTE: If the rope has a loop in the end, the loop may be used instead of a clove hitch.
3. Slide the clove hitch down the ace handle to the axe head.a. The excess running end of the rope becomes the guideline
4. Loop the working end of the rope around the head of the ace and back up the handle.
5. Tie a half-hitch on the handle a few inches (millimeters) above the clove hitch.
6. Tie another half-hitch at the butt end of the handle.
Task Steps – Pike Pole1. Lower an appropriate length of rope from the intended destination of
the pike pole.2. Secure the rope to the pike pole toward the end of the handle using a
clove hitch.a. Pike is pointing upwards.
3. Leave enough excess running end so that it becomes the guideline.4. Tie a half-hitch or approved knot around the pike pole in the middle of
the handle.5. Tie a second half-hitch or approved knot around the pike pole under
the pike hook.6. Hoist the pike pole.
a. Clear hoist area of personnelb. Pull running end of ropec. Use guideline to clear obstacles

M-19Hoist a dry hoseline. (NFPA® 1001, 5.1.2)
DirectionsFor this skills evaluation checklist, students will hoist a dry hoseline. Hoisting hose is probably the safest way to get hoselines to upper levels. As with advancing hose up a ladder, it is easier and safer to hoist a dry hoseline.
Equipment & Materials One 50-foot (6 m to 12 m)
length of utility rope Hose roller
50-foot (15 m) length of 2½-inch (65 mm) hose
Skills Evaluation Checklist
Task Steps1. Lower an appropriate length of rope from the intended destination of
the hoseline.2. Fold the nozzle end of the hoseline back over the rest of the hose so
that an overlap of 4 to 5 feet (1.2 m to 1.5 m) is formed.3. Tie a clove hitch with an overhand safety knot, around the tip of the
nozzle and the hose it is folded against so that they are lashed together.
4. Place a half-hitch on the doubled hose about 12 inches (300 mm) from the loop end.
M-20Hoist a charged hoseline. (NFPA® 1001, 5.1.2)
DirectionsFor this skills evaluation checklist, students will hoist a charged hoseline. Whenever possible, charged hoselines should be bled of pressure before being hoisted because hoisting a dry hoseline is safer than hoisting a charged line. However, charged lines may be hoisted. Hoist charged lines nozzle-up, and be careful not to damage a coupling or the nozzle as the hoseline is being raised.
Equipment & Materials One 50-foot (6 m to 12 m)
length of utility rope Hose roller
2½-inch (65 mm) charged hoseline with attached 2½-inch (65 mm) nozzle
Skills Evaluation Checklist
Task Steps1. Lower an appropriate length of rope from the intended destination of
the hoseline.2. Tie a clove hitch, with an overhand safety knot, around the hose about
1 foot (0.3 m) below the coupling and nozzle.3. Pass a bight through the nozzle handle and loop it over the nozzle so
that the rope holds the nozzle shut while it is being hoisted.4. Tie a half-hitch around the nozzle to take the strain off the handle.

RescueM-21
Conduct a primary search. (NFPA® 1001, 5.3.9)
DirectionsFor this skills evaluation checklist, students will conduct a primary search. Students must work with other students as a team during this skill. Remind students to always follow the policies and procedures of your organization.
Equipment & Materials Full protective clothing with
SCBA Building to be searched
Skills Evaluation Checklist
Task StepsConduct a Primary Search
1. Confirm order with officer to conduct primary search.a. Establish search pattern to be used
2. Size up structure to be searched.a. Hazards presentb. Construction type and featuresc. Potential escape routesd. Fire and smoke conditions
3. Search the structure using established search pattern.a. Cursory search of likely victim areasb. Call out for victimsc. Maintain team integrity and communicationd. Work from fire area to exteriore. Maintain situational awareness
4. Identify rooms that have been searched.5. Remove any victims.
a. Inform officer of victim(s) 6. Exit building when search is complete or when conditions dictate.

7. Report to officer completion of primary search.8. List considerations and steps necessary to complete a secondary
search.

M-22Demonstrate the incline drag. (NFPA® 1001, 5.3.9)
DirectionsFor this skills evaluation checklist, students will demonstrate the incline drag. The incline drag is used by one rescuer to move a victim down a stairway or incline. It is very useful for moving an unconscious victim.
Equipment & Materials Full protective clothing with
SCBA
Skills Evaluation Checklist
Task Steps1. Turn the victim (if necessary) so that the victim is supine.2. Kneel at victim’s head.3. Support the victim’s head and neck.
NOTE: If head or neck injuries are suspected, provide appropriate support for head during movement.
4. Lift the victim’s upper body into a sitting position.5. Reach under the victim’s arms.6. Grasp the victim’s wrists.7. Stand. The victim can now be eased down a stairway or ramp to
safety.
M-23Demonstrate the webbing drag. (NFPA® 1001, 5.3.9)
DirectionsFor this skills evaluation checklist, students will demonstrate the webbing drag.
Equipment & Materials Full protective clothing with
SCBA Webbing
Skills Evaluation Checklist
Task Steps1. Place the victim on his or her back.2. Slide the large webbing loop under victim’s head and chest so the loop
is even with their arm pits.a. Position the victim’s arms so that they are outside the webbingb. Form a large loop around the victim’s torso at the chest level
3. Pull the top of the large loop over the victim’s head so that it is just past their head.
4. Reach down through the large loop and under the victim’s back and grab the webbing.
5. Pull the webbing up and through the loop so that each webbing loop is drawn snugly around the victim’s shoulders.a. Victim’s arms next to the bodyb. Webbing placed high on shoulders close to the neck
6. Adjust hand placement on the webbing to support the victim’s head.a. Move hands toward head to provide more support
7. Drag the victim to safety by pulling on the webbing loop.
M-24Exit a hazardous area. (NFPA® 1001, 5.3.5)
Rescue a Firefighter (NFPA® 1001, 5.3.9)
Select tools for forcible entry (NFPA® 1001, 6.3.2(B))
DirectionsFor this skills evaluation checklist, students will exit a hazardous area. Students must work together as a team to complete this skill.
**This skill is to be accomplished in an obscured visibility environment using either simulated smoke, total darkness or facepiece covers**
Equipment & Materials Full protective clothing with
SCBA Smoke Machine
Area or structure to be exited
Skills Evaluation Checklist
Task Steps1. Size up environment.
a. Hazards presentb. Changing conditionsc. Status of team
2. Determine that immediate exit by team is required.a. Immediate threat to life safety existsb. Communicate need to exit to team members
3. Exit structure or hazardous area following guideline or hose.a. Maintain team integrity and communicationb. Maintain situational awarenessc. Monitor level of breathing air in SCBA cylinder
4. Move to safe area after exiting structure or hazardous area.a. Maintain use of SCBA and PPE while hazards are present

5. Notify officer of situation using local procedures.a. Request assistance if required
Task Steps – Rescue a Firefighter1. Size up situation.
a. Hazards presentb. Changing conditionsc. Status of downed firefighter (LUNAR)
2. Collect all necessary equipment.a. Forcible entry toolsb. Spare SCBA/Cylinderc. Guideline
3. Confirm order to enter the structure.a. Maintain team integrity and communicationb. Maintain situational awarenessc. Monitor level of breathing air in SCBA cylinder
4. Enter the structure.a. Maintain team integrity and communicationb. Maintain situational awarenessc. Monitor level of breathing air in SCBA cylinderd. Move to last known locatione. Listen for PASS alarm
5. Once the downed firefighter is located.a. Evaluate the condition of the firefighters SCBA b. Evaluate the medical condition of the firefighterb. Call for assistance if necessaryc. Notify command of the status
6. If firefighter is ambulatory assist him/her out of the hazard zone.7. If the firefighter is unconscious or non-ambulatory.
a. Assess the status of his/her SCBA (replace SCBA/cylinder as necessary)b. Quickly remove the firefighter from the hazard area using an appropriate drag or carry c. Monitor level of breathing air in SCBA cylinder

8. Move to safe area after exiting structure or hazardous area.a. Maintain use of SCBA and PPE while hazards are presentb. Transfer care of Firefighter to EMS using local procedures
9. Notify officer of situation using local procedures.a. Request assistance if required

M-25Illuminate the emergency scene. (NFPA® 1001, 5.3.17)
DirectionsFor this skills evaluation checklist, students will illuminate a scene as indicated or marked off. Equipment and materials used in your department may differ slightly from this skill sheet. Always follow the manufacturer’s instructions when using any equipment.
Equipment & Materials Personal protective clothing Power cords (twist lock, waterproof) Power generator or alternate
power source Ground fault circuit interrupters
(GFCI) on all outlets Portable lights Power outlet adapters Appropriate equipment
operation and service manuals
Skills Evaluation Checklist
Task Steps1. Start generator per manufacturer’s guidelines.2. Connect power cords to a power source. Reset ground fault interrupter
devices as necessary.3. Choose proper portable light for assigned task.4. Extend power cords to the area that needs illumination and connect to
the portable light.a. Avoid pulling power cords over sharp objects or around tight
bends that may cause damage to cord5. Position portable light on stable surface and out of main traffic area so
that work area is illuminated and firefighter’s vision is not interrupted.6. Turn off generator per manufacturer’s instructions.7. Dismantle lighting equipment and return to proper storage.
a. Allow all equipment to cool before returning to storageb. Disconnect cords at connections, not by pulling on cordsc. Rewind cords and inspecting for damage
d. Lift all equipment properly to avoid back strain
Forcible EntryM-26
Clean, inspect, and maintain hand/power tools and equipment. (NFPA® 1001, 5.5.1)
DirectionsFor this skills evaluation checklist, students will clean, inspect, and maintain various hand tools. Every department has unique tools and equipment. This is merely a basic guide to common procedures. Tools needing maintenance will be placed on a salvage cover. Students should select one tool at a time and clean and dry each tool thoroughly before proceeding to inspection and maintenance so that the cleaning can reveal any maintenance needs. Remind students to always follow the manufacturer’s instructions when using any equipment.
Equipment & Materials Personal protective clothing
(may include hearing and eye protection)
Salvage cover
Maintenance tools such as files, wrenches, screwdrivers, hammers, etc.
Cutting tools
Maintenance supplies appropriate for the types of tools used, such as: steel wool, sandpaper, machine oil, lubricating oil, mild detergent, degreaser, shop towels, boiled linseed oil (wooden handles), paint, brushes, scrub pads, buckets, water.
Pushing/pulling tools
Striking tools Prying tools Appropriate equipment
operation and service manuals Gas powered positive pressure fan or
portable power plant
Skills Evaluation Checklist
Hand Tool Task Steps

Tool Cleaning1. Wash tools with mild detergent or per manufacturer’s guidelines. Rinse
and wipe dry. a. Do not soak wooden handles in water because it will cause the
wood to swellTool Inspection
2. Inspect tool handles for cracks, splinters, or other damage.3. Inspect tool head for tightness.4. Inspect working surface for dullness, damage, chips, cracks, or metal
fatigue.5. Notify officer of any problems identified so that corrective actions can
be taken.And
Power Tool Task StepsTool Cleaning
1. Clean tools according to manufacturer’s guidelines.Tool Inspection
2. Inspect tools for damage.3. Inspect parts for tightness and function.
a. Ensure that all guards are functional and in place.b. Check all electrical components for cuts or other damage.
4. Inspect working surface for damage or wear.Tool Maintenance
5. Change a cutting blade on a power tool.a. Check blades for damage or wear.b. Replace blades that are damaged or worn.
6. Check fuel level in all power tools and fill as necessary.a. Use correct fuel type.b. Ensure that fuel is fresh.
7. Check oil level in all tools and fill as necessary.8. Start all power tools and keep them running.
a. Ensure power tools will start manually.b. Ensure battery packs are fully charged.
9. Tag a tool that is out of service.
a. Place appropriate notification on the tool.b. Communicate the situation with officer.
M-27Force entry through an inward-swinging door — Two-firefighter method (NFPA® 1001, 5.3.4)
DirectionsFor this skills evaluation checklist, students will force entry through an inward-swinging door using the two-firefighter method. Although various forcible entry tools can be used to force doors, this skill sheet uses the Halligan bar and flat head axe.
Equipment & Materials Appropriate protective clothing
(safety goggles and/or face shield)
Flat head axe
Halligan bar Locking pliers, chain and/or utility rope (optional)
Skills Evaluation Checklist
Task Steps1. Assemble all necessary tools and equipment2. Transport tools to the entry location and prepare for use3. Firefighter #2: Checks door for heat and ensures it is safe to enter.4. Firefighter #1: Place the fork of a Halligan bar just above or below the
lock with the bevel side of the fork against the door.5. Firefighter #1: Angle the tool slightly up or down.6. Firefighter #2: Strike the tool with the back side of a flat-head axe.7. Firefighter #2: Drive the forked end of the tool past the interior
doorjamb.8. Firefighter #1: Move the bar slowly perpendicular to the door being
forced to prevent the fork from penetrating the interior doorjamb.9. Firefighter #1: Make sure the fork has penetrated between the door
and the doorjamb.
10. Firefighter #1: Exert pressure on the tool toward the door, forcing it open.
M-28Force entry though an outward-swinging door — Wedge-end method. (NFPA® 1001, 5.3.4)
DirectionsFor this skills evaluation checklist, students will force entry through an inward-swinging door using the wedge-end method. Although various forcible entry tools can be used to force doors, this skill sheet uses the Halligan bar and flat head axe.
Equipment & Materials Appropriate protective clothing
(safety goggles and/or face shield)
Flat head axe
Halligan bar Locking pliers, chain and/or utility rope (optional)
Skills Evaluation Checklist
Task Steps1. Assemble all necessary tools and equipment2. Transport tools to the entry location and prepare for use3. Firefighter #2: Checks door for heat and ensures it is safe to enter.4. Firefighter #1: Place the wedge end of the Halligan bar just above or
below the lock.a. If there are two locks, place the wedge between the locks
5. Firefighter #2: Strike the tool using a flat-head axe on the surface behind the wedge, driving the wedge into the space between the door and the jamb.
6. Firefighter #1: Pry down and out with the fork end of the tool.a. Make sure the wedge is sufficiently driven into the space
M-29Force entry through a window (glass pane). (NFPA® 1001, 5.3.4)
DirectionsFor this skills evaluation checklist, students will force entry through a window. This skill covers only typical window construction that has glass panes. Remind students to never break glass with their hands, gloved or ungloved. Also, remind students firefighters should take special precautions when breaking windows above the ground floor to prevent falling glass hazards to citizens and firefighters below. When forcing entry into a fire building, firefighters must wear SCBA. Therefore, it is recommended that students wear SCBA for this training exercise.
**Other materials may be simulated in the place of glass as long as the material is fastened to the window prop and will produce a similar affect as breaking glass. Possible solutions can be Saran® wrap, Styrofoam® or wood attached by Velcro strips. **
Equipment & Materials Protective clothing and SCBA Forcible entry prying tool Window prop
Skills Evaluation Checklist
Task Steps1. Assemble all necessary tools and equipment2. Transport tools to the entry location and prepare for use3. Size up the situation.
a. Try window firstb. Evaluate window construction and locking method

4. Break the window glass.a. (Multiple-paned window) Lowest pane of glassb. (Single-paned window) At top of panec. To avoid losing control of the tool, do not use excessive forced. Keep hands and the tool handle above the point of impacte. Use the tool to clean all the broken glass out of the frame once the glass has been broken
M-30Force entry through a wood-framed wall (Type V construction) with hand tools (NFPA® 1001, 5.3.4)
DirectionsFor this skills evaluation checklist, students will force entry through a wall. Using power tools, firefighters will cut an inspection hole, locate a wall stud, and remove enough material so that a firefighter may pass through. When removing wall studs, consideration should be given to structural integrity and utility location. Students must wear SCBA for this training exercise.**This skill should be accomplished by a team of 2 or more. **
Equipment & Materials Protective clothing and SCBA Forcible entry tools (pick head
axe, flat head axe and Halligan, etc.)
Wall prop Short pike pole
Skills Evaluation Checklist
Task Steps1. Assemble all necessary tools and equipment2. Transport tools to the entry location and prepare for use3. Size up the situation.
a. Wall construction evaluatedb. Locations of utilities considered
4. Confirm with Command that utilities are off.5. Remove wall covering and locate stud.6. Cut an inspection hole (small triangle).
7. Make cut utilizing inspection hole.8. Increase size of hole to allow the passage of firefighter (stud may be
removed, if necessary).9. Remove wall and insulation material with hand tool and place out of
traffic area.10. Using hand tool, push inward and remove interior wall covering.11. Exit area through the opening made.
Fire ControlM-62
Attack a structure fire: Exterior attack. (NFPA® 1001, 5.3.8)
DirectionsFor this skills evaluation checklist, students will attack a structure fire from a defensive mode. Students should be wearing full PPE and SCBA during this skill. Inform each firefighter of their position and tasks to perform. A safety officer should check each student’s gear before they enter the danger zone.
Ensure firefighter safety at all times during this training evolution. Before proceeding with live fire training evolutions, read and adhere to NFPA 1403®, Standard on Live Fire Training Evolutions. Have students repeat this exercise, rotating the hoseline duties so that each student has a chance to perform on the nozzle. It is not recommend to actually create a fully involved structure fire for this training evolution. **Live fire can be simulated during the performance of this skill. **
Equipment & Materials Full protective clothing
including SCBA Accountability system
Burn building or acquired structure that is compliant with NFPA® 1403
Hand tools (axe, Halligan, pike poles)
One 1½-inch (38 mm) or larger charged attack line equipped with a fog nozzle
Hand light
One 1½-inch (38 mm) or larger charged backup line supplied from a second water source

Skills Evaluation ChecklistTask Steps
1. Confirm order with officer to attack fire.2. Don all PPE prior to entering the hot zone.
a. Breathe from SCBA3. Check nozzle pattern prior to approaching structure.4. Advance the hose near the structure.
a. All firefighters on same side of hose5. Extinguish the fire with an indirect pattern through a window or door.
a. Direct fire stream at ceiling and move stream back and forth until fire is extinguished
6. Maintain situational awareness.7. Inform officer that fire is extinguished.
a. Full PPE and SCBA protection is worn until clear of hot zone
M-63Turn off building utilities. (NFPA® 1001, 5.3.18)
*Note* If training props are not available, simulation is permitted as long as students assemble the necessary equipment and can satisfactorily explain the process on live utility equipment.
DirectionsFor this skills evaluation checklist, students will turn off building utilities. You should inform students they are at a structure fire and they are assigned the task of shutting off building utilities. All team members should fully don PPE and SCBA and be well out of the hot zone.
Equipment & Materials Full protective clothing
including SCBA Hand tools
Training prop that simulates electrical, gas, and water utilities
Skills Evaluation ChecklistTask Steps
1. Confirm order with officer to turn off utilities.2. Assess for related hazards.3. Locate and shut off electricity at main service panel.4. Locate natural gas meter and/or LPG/CNG storage tank/cylinder and
shut off.5. Locate water meter box and shut off water meter.6. Report to officer completion of assigned task.
M-64Attack a structure fire: Interior attack. (NFPA® 1001, 5.3.10)
DirectionsFor this skills evaluation checklist, a team of firefighters, while wearing full PPE and SCBA, will attack a structure fire. Inform each student of their positions for this evaluation.
Ensure firefighter safety at all times during this training evolution. Before proceeding with live fire training evolutions, read and adhere to NFPA 1403®, Standard on Live Fire Training Evolutions. Have students repeat this exercise, rotating the hoseline duties so that each student has a chance to perform on the nozzle.
**In the above-grade fire attack Step 6: If the fire is in a high-rise or a multi-story commercial structure, the fire attack may be from a standpipe connection. If your training center does not have a below grade facility you can use the second story as grade level and the ground floor as the below grade**
**When performing this skill sheet, students will also complete the steps outlined on skill sheet M-53 Advance the preconnected flat hose load (NFPA® 1001, 5.3.10) and, Advance a line into a structure. (NFPA® 1001, 5.3.10)**
Equipment & Materials Full protective clothing and
SCBA for all firefighters Ventilation tools and equipment
Class A live fire building Rescue and lighting equipment Hand lines(One 1½ inch (38 mm) or larger charged back-up line, supplied
Salvage and overhaul tools and equipment

from second water source, with fog nozzle. One 1½ inch (38 mm) or large charged attack line equipped with fog nozzle and supplied from separate water source.) Portable radios Accountability system Forcible entry tools Apparatus Two separate water sources
Skills Evaluation Checklist
Task StepsGrade Level Fire Attack
1. Confirm order with officer to attack fire.2. Prior to entry, check nozzle pattern and bleed air from hoseline.3. Size up environment for hazards (backdraft, flashover etc...) 4. Extinguish burning fascia, boxed cornices, or other doorway overhangs
as necessary before entering.5. Advance hoseline into the structure.
a. At signal from officerb. All firefighters on same side of hosec. Leave one firefighter at each 90-degree turn to assist in advancing
hose (if available)d. Approach fire from unburned side
6. Maintain situational awareness.7. Extinguish fire with a direct, indirect, or combination attack as directed
by officer.8. Report to officer completion of assigned task.
Task StepsAbove Grade Fire Attack
1. Confirm order with officer to attack fire.2. Prior to entry, check nozzle pattern and bleed air from hoseline.

3. Size up environment for hazards.4. Extinguish burning fascia, boxed cornices, or other doorway overhangs
as necessary before entering.5. Advance hoseline into the structure.
a. At signal from officerb. Adequate firefighters to advance line to upper fire floorc. Leave one firefighter at each 90-degree turn to assist in advancing
hose.d. Approach fire from unburned side.
6. Advance hoseline up stairwell to fire floor.a. If possible, lay extra hoseline in stairwell above fire floor
7. Maintain situational awareness.8. Extinguish fire with a direct, indirect, or combination attack as directed
by officer.a. All firefighters on same side of hoseb. Approach fire from unburned side.
9. Report to officer completion of assigned task.
Task StepsBelow Grade Fire Attack
1. Confirm order with officer to attack fire.2. Prior to entry check nozzle pattern and bleed air from hoseline.3. Size up environment for hazards.4. Extinguish burning fascia, boxed cornices, or other doorway overhangs
as necessary before entering. Ventilate the basement before entry.5. Advance hoseline into the structure.
a. At signal from officerb. All firefighters on same side of hosec. Leave one firefighter at each 90-degree turn to assist in advancing
hose.d. Approach fire from unburned side.
6. Advance hoseline down stairwell into the basement.a. Evaluate fire conditions including stability of stairwell prior to
advancing.b. Coordinate attack with ventilation.
c. Maintain contact with other firefighters.d. Advance down stairwell quickly to limit exposure to heated gases and smoke.
7. Maintain situational awareness.8. Extinguish fire with a direct, indirect, or combination attack as directed
by officer.9. Report to officer completion of assigned task.
M-65Attack a passenger vehicle fire. (NFPA® 1001, 5.3.7)
DirectionsFor this skills evaluation checklist, students will a attack a passenger vehicle fire. The simulation of an actual car fire will be permitted if the AHJ does not have a suitable prop, however the students must show competency in the approach and fire stream skills during the evolution. Students should be wearing full PPE during this skill. Inform each firefighter of their position. A safety officer should check each student’s gear before they enter the danger zone. Inform students of the following guidelines for vehicle fires: Wear full protective clothing, including SCBA. Use at least a 1½-inch (38 mm) attack line as booster lines do not provide
the protection or rapid cooling needed. Attack from the upwind, uphill side as soon as possible. Deploy a backup line as soon as possible. Avoid the hazards associated with vehicle fires: catalytic converter,
interior components, air bag (SRS or SIPS), shock-absorber bumpers, hollow driveshafts, hatchback supports, tires, saddle fuel tanks, alternative fuel tanks, hazardous materials.
Ensure firefighter safety at all times during this training evolution. Before proceeding with live fire training evolutions, read and adhere to NFPA 1403®, Standard on Live Fire Training Evolutions, exterior props. Have students repeat this exercise, rotating the hoseline duties so that each student has a chance to perform on the nozzle. In step 5 the fire attack should begin with passenger compartment if on fire. If not, attack fire in engine compartment first.
**Due to restrictions it is not necessary to use a car for the completion of this skill. A car prop can be used. It is also suitable to simulate the live fire portion of this skill. However, approach and fire stream skills must still be accomplished. If possible, conduct this skill prior to conducting extrication skills using the same cars. However, it is not recommended to have live fire involving the cars that are to be used for the extrications. **
Equipment & Materials Full protective clothing
including SCBA One 1½-inch (38 mm) or larger
charged backup line supplied from a second water source
Training passenger vehicle stripped of any safety hazards according to NFPA® 1403
One 1½-inch (38 mm) or larger charged attack line equipped with a fog nozzle
Vehicle fire, fueled, set up, and monitored according to NFPA® 1403
Wheel chocks
Halligan tool Apparatus Two separate water sources
Skills Evaluation ChecklistTask Steps
1. Confirm order with officer to attack passenger vehicle fire. Perform scene size up (block traffic if necessary, check for power lines, type of fuel, spills and other hazards)
2. Lay out attack line for fire attack (1 ½” or larger).a. Use appropriate personal protective clothing including SCBAb. Select appropriate hoseline and nozzlec. Select appropriate hand tool(s)
3. Charge attack line.a. Bleed air from hoselineb. Select moderate fog pattern

Task Steps4. Advance attack line to vehicle.
a. Approach from upwind and uphill if possibleb. Size up scene for hazards (verbalize)c. Use fog pattern for personnel protection
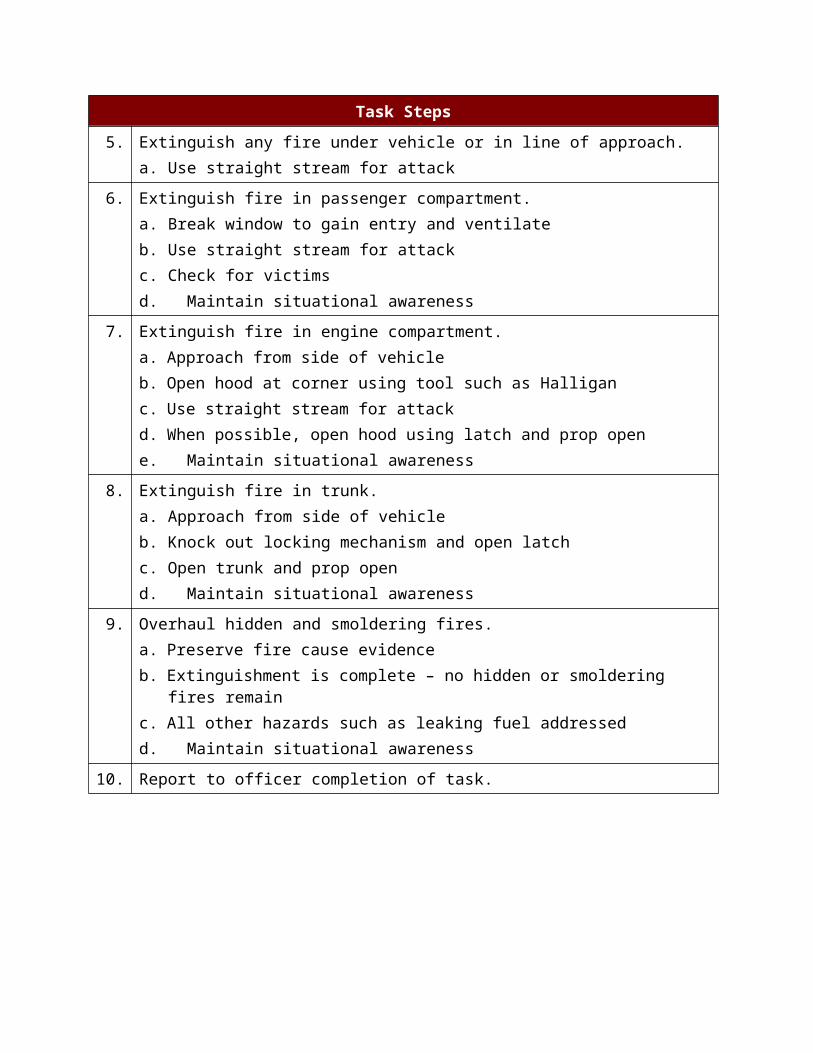
5. Extinguish any fire under vehicle or in line of approach.a. Use straight stream for attack
6. Extinguish fire in passenger compartment.a. Break window to gain entry and ventilateb. Use straight stream for attackc. Check for victimsd. Maintain situational awareness
7. Extinguish fire in engine compartment.a. Approach from side of vehicleb. Open hood at corner using tool such as Halliganc. Use straight stream for attackd. When possible, open hood using latch and prop opene. Maintain situational awareness
8. Extinguish fire in trunk.a. Approach from side of vehicleb. Knock out locking mechanism and open latchc. Open trunk and prop opend. Maintain situational awareness
9. Overhaul hidden and smoldering fires.a. Preserve fire cause evidenceb. Extinguishment is complete – no hidden or smoldering fires remainc. All other hazards such as leaking fuel addressedd. Maintain situational awareness
10. Report to officer completion of task.
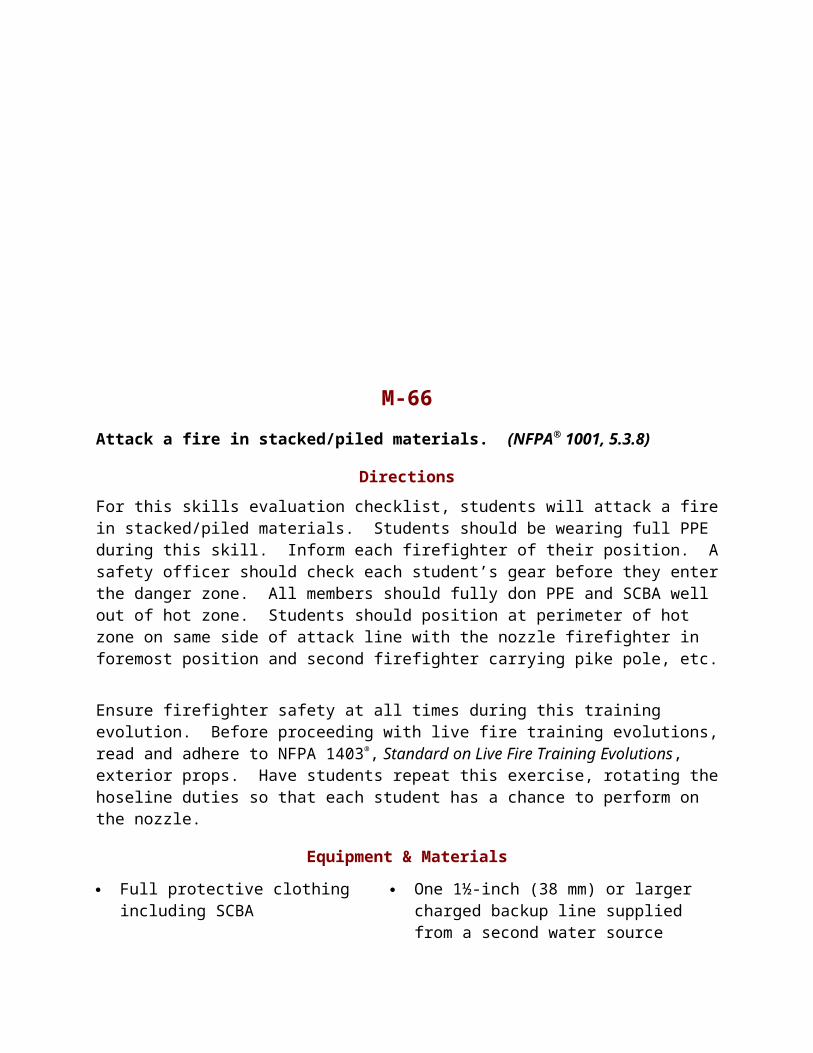
M-66Attack a fire in stacked/piled materials. (NFPA® 1001, 5.3.8)
DirectionsFor this skills evaluation checklist, students will attack a fire in stacked/piled materials. Students should be wearing full PPE during this skill. Inform each firefighter of their position. A safety officer should check each student’s gear before they enter the danger zone. All members should fully don PPE and SCBA well out of hot zone. Students should position at perimeter of hot zone on same side of attack line with the nozzle firefighter in foremost position and second firefighter carrying pike pole, etc.
Ensure firefighter safety at all times during this training evolution. Before proceeding with live fire training evolutions, read and adhere to NFPA 1403®, Standard on Live Fire Training Evolutions, exterior props. Have students repeat this exercise, rotating the hoseline duties so that each student has a chance to perform on the nozzle.
Equipment & Materials Full protective clothing
including SCBA One 1½-inch (38 mm) or larger
charged backup line supplied from a second water source
Training prop or simulated stack fire
Hand tools (long pike poles, axes, trash hooks)
One 1½-inch (38 mm) or larger charged attack line equipped with a fog nozzle
Two separate water sources
Apparatus
Skills Evaluation Checklist

Task Steps1. Confirm order with officer to attack fire.2. Size up environment for hazards.
a. Identify and verbalize collapse zoneb. Work outside of collapse zonec. Identify any inherent threats
3. Check nozzle pattern and bleed air from hoseline.4. Check for threat to exposures and cool as necessary.5. Advance to position to make fire attack.6. Extinguish fire with straight stream.
a. Evaluate extinguishment efforts and ensure penetrationb. Break up material as necessary to assist with extinguishment
efforts7. Overhaul debris using pike pole or trash hook and evaluate for
complete extinguishment.8. Attempt to determine origin.8. Report to officer completion of assigned task.

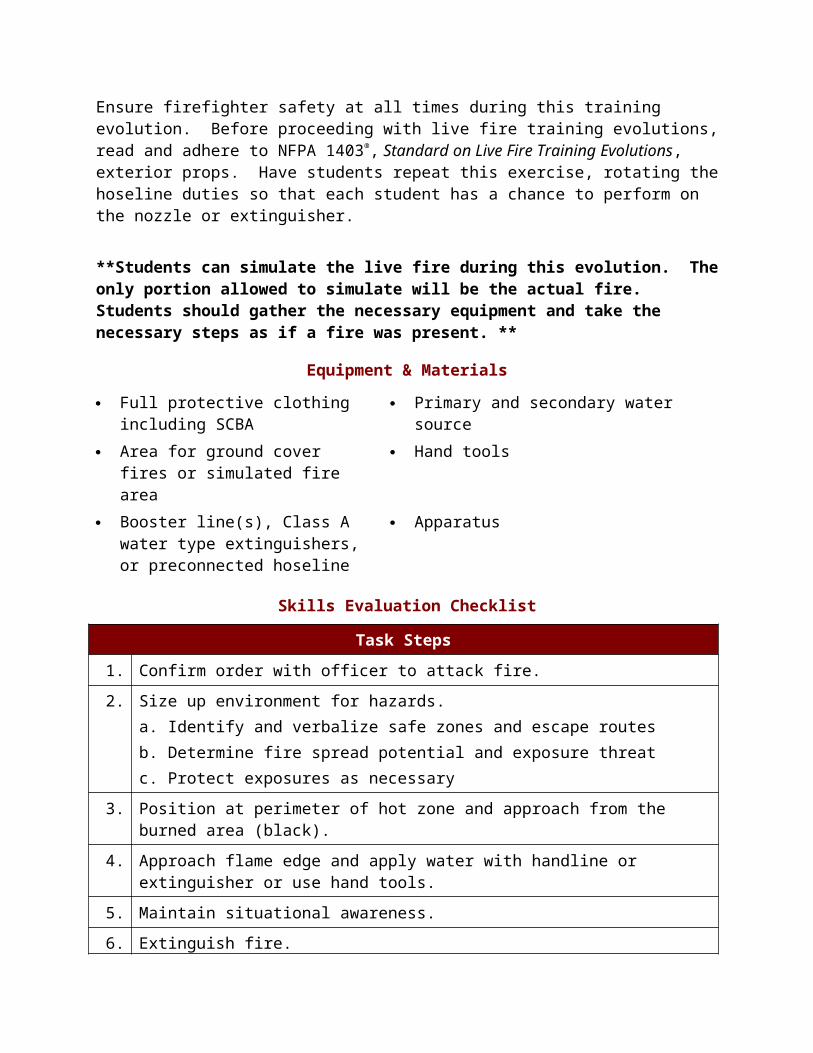
M-67Attack a ground cover fire. (NFPA® 1001, 5.3.19)
DirectionsFor this skills evaluation checklist, students will attack a ground cover fire. Students should be wearing full PPE (wildland gear or bunker gear only) during this skill. Inform each firefighter of their position. A safety officer should check each student’s gear before they enter the hot zone. All members should don PPE well out of hot zone.
Ensure firefighter safety at all times during this training evolution. Before proceeding with live fire training evolutions, read and adhere to NFPA 1403®, Standard on Live Fire Training Evolutions, exterior props. Have students repeat this exercise, rotating the hoseline duties so that each student has a chance to perform on the nozzle or extinguisher.
**Students can simulate the live fire during this evolution. The only portion allowed to simulate will be the actual fire. Students should gather the necessary equipment and take the necessary steps as if a fire was present. **
Equipment & Materials Full protective clothing
including SCBA Primary and secondary water source
Area for ground cover fires or simulated fire area
Hand tools
Booster line(s), Class A water type extinguishers, or preconnected hoseline
Apparatus
Skills Evaluation Checklist
Task Steps1. Confirm order with officer to attack fire.2. Size up environment for hazards.
a. Identify and verbalize safe zones and escape routesb. Determine fire spread potential and exposure threatc. Protect exposures as necessary
3. Position at perimeter of hot zone and approach from the burned area (black).
4. Approach flame edge and apply water with handline or extinguisher or use hand tools.
5. Maintain situational awareness.6. Extinguish fire.
a. Maintain communication with officerb. Monitor weatherc. Monitor fire and smoke conditions
7. Mop up hot spots.8. Exit hazard area to safe zone.9. Report to officer completion of assigned task.
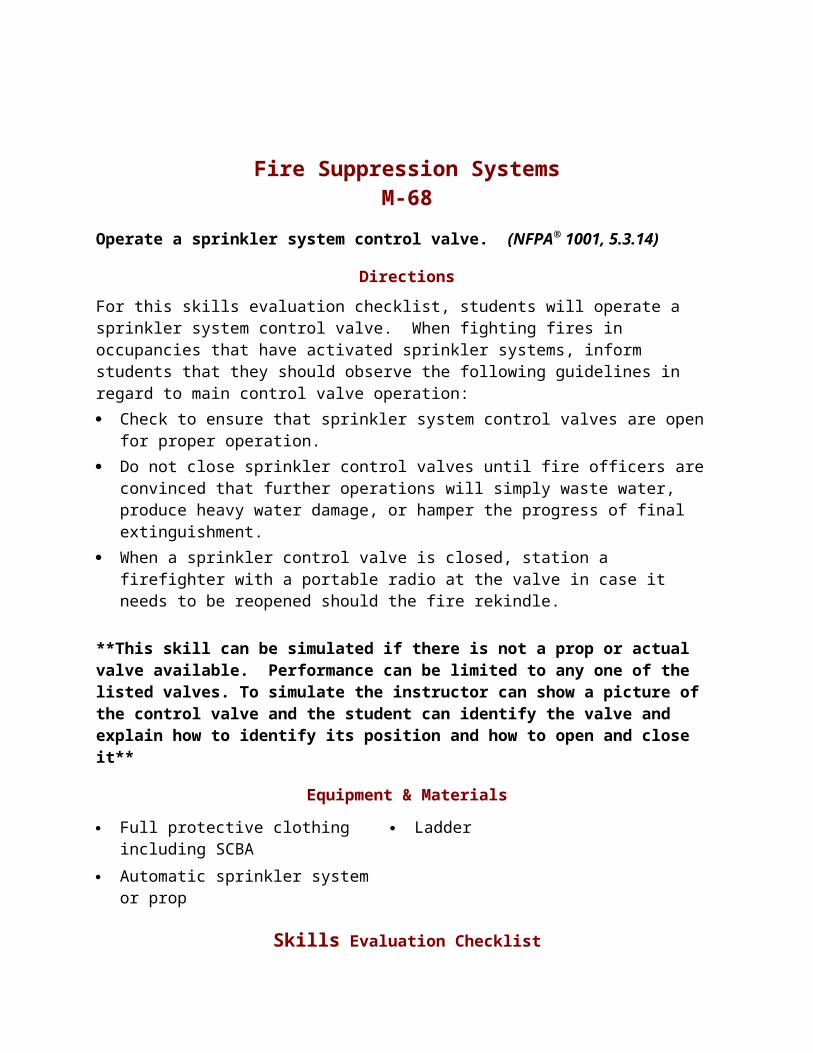
Fire Suppression SystemsM-68
Operate a sprinkler system control valve. (NFPA® 1001, 5.3.14)
DirectionsFor this skills evaluation checklist, students will operate a sprinkler system control valve. When fighting fires in occupancies that have activated sprinkler systems, inform students that they should observe the following guidelines in regard to main control valve operation: Check to ensure that sprinkler system control valves are open for proper
operation. Do not close sprinkler control valves until fire officers are convinced that
further operations will simply waste water, produce heavy water damage, or hamper the progress of final extinguishment.
When a sprinkler control valve is closed, station a firefighter with a portable radio at the valve in case it needs to be reopened should the fire rekindle.
**This skill can be simulated if there is not a prop or actual valve available. Performance can be limited to any one of the listed valves. To simulate the instructor can show a picture of the control valve and the student can identify the valve and explain how to identify its position and how to open and close it**
Equipment & Materials Full protective clothing
including SCBA Ladder
Automatic sprinkler system or prop
Skills Evaluation Checklist

Task StepsOS&Y
1. Confirm order with officer to operate valve.2. Close the OS&Y valve by turning it clockwise until the valve is fully
closed and the stem is flush with the wheel.3. Open the OS&Y valve by turning it counterclockwise until fully opened.4. Back off the OS&Y valve one-quarter turn clockwise.
Task StepsPIV
1. Confirm order with officer to operate valve.2. Unlock the PIV wrench from the PIV body.3. Position the PIV wrench on stem nut.4. Close the PIV valve, turning it clockwise slowly until the target window
indicates CLOSED or SHUT.5. Open the PIV valve, turning it counterclockwise until fully open and
target window indicates OPEN.6. Back off the PIV valve, turning it clockwise one-quarter turn ensuring
that the target window remains OPEN.7. Replace and lock the wrench onto the PIV body.

M-69Manually stop the flow of water from a sprinkler. (NFPA® 1001, 5.3.14)
DirectionsFor this skills evaluation checklist, students will manually stop the flow of water from a sprinkler. Considerable time may elapse from the moment a sprinkler head is activated until authorization to close the main sprinkler valve is received. However, it is dangerous to prematurely close the main valve before complete extinguishment is certain. To prevent extensive water damage, the firefighter can plug individual heads that are no longer needed for fire extinguishment.
Wooden wedges or sprinkler tongs are commonly used to plug sprinklers. Sprinkler tongs are generally more effective in stopping the water flow than are wedge stops. If properly applied, the rubber or neoprene stopper on the tongs permits no dripping from a plugged sprinkler head. However, due to the way sprinkler tongs are constructed, they are not as conveniently carried in a pocket as are wedge-shaped sprinkler stops.
**This skill must be physically preformed and not simulated. If you do not have sprinkler prop available, contact your district training council for assistance. **
Equipment & Materials Full protective clothing
including SCBA Activated sprinkler system or prop
Wedge-shaped sprinkler stop Note: Wedges can have a band of rubber placed on them to improve
Ladder
their operation
Skills Evaluation Checklist
Task StepsWedge
1. Place and climb ladder safely to within reach of the sprinkler.2. Insert the wedges between the sprinkler arms, flat sides against
sprinkler.3. Drive the wedges into the sprinkler with the heel of hand until water
flow stops.
M-70Connect hoseline to a sprinkler system FDC. (NFPA® 1001, 5.3.14)
DirectionsFor this skills evaluation checklist, students will connect a hoseline to a sprinkler system FDC. The most effective way for the fire department to handle what could become a serious fire loss is to give proper support to a sprinkler system. Inform students to remember the following guidelines when connecting:Connect to the FDC (earliest arriving pumper) in accordance with the pre-incident plan. Check to ensure that sprinkler system control valves are open for proper
operation. Make a maximum effort to supply adequate water to the sprinkler system:
Limit the use of direct hoselines from sprinkler system water supply system.
Establish a second water supply for hoselines if necessary. Observe the discharge of sprinklers in the area of the fire and maintain
pressure at the pumper to adequately serve the needs of the sprinkler system.
Improve the discharge from the sprinklers as necessary by increasing the pressure on the system.
Do not close sprinkler control valves until fire officers are convinced that further operations will simply waste water, produce heavy water damage, or hamper the progress of final extinguishment.
When a sprinkler control valve is closed, station a firefighter with a portable radio at the valve in case it needs to be reopened should the fire rekindle.
Do not disconnect pumpers until after extinguishment has been determined by a thorough overhaul.
Do not leave the premises until the sprinkler system has been restored to service by a representative of the occupant who is qualified to perform work on sprinkler systems.
**If the jurisdiction does not have a working FDC a Siamese appliance can be placed on a pumper and used in place of an FDC. **
Equipment & Materials Full protective clothing Adjustable spanner wrench Two connected lengths of 2½-
inch (65 mm) hose or LDH Hydrant wrench
Sprinkler system or wye on side of engine if sprinkler system isn’t available.
Double male appliances (if required)
Extra gaskets
Skills Evaluation Checklist
Task Steps1. Confirm order with officer to connect line.2. Extend hoselines to sprinkler connection or wye.4. Remove caps from fire department connection.5. Inspect the fire department connection for debris.6. Connect hoselines to FDC and pumper. 7. Tighten connections with spanner wrench.8. Report to officer completion of assigned task.

Loss ControlM-71
Clean, inspect, and repair a salvage cover. (NFPA® 1001, 5.5.1)
DirectionsFor this skills evaluation checklist, students will clean, inspect, and repair a salvage cover. Prior to performing the skill students should gather all necessary cleaning equipment.
Equipment & Materials Cleaning supplies Salvage cover Scrub brush Chalk or marker
Skills Evaluation Checklist
Task Steps1. Wash salvage cover with clean water and detergent by using a scrub
brush.2. Rinse thoroughly with clean water.3. Hang to dry.

4. Inspect salvage cover.a. Firefighters: Raise salvage cover at each cornerb. Firefighter: Inspect underneath of cover for light coming through,
holes, or tears5. Mark holes with chalk or marker.6. Patch according to manufacturer or departmental guidelines.
M-72Roll a salvage cover for a one-firefighter spread. (NFPA® 1001,
5.3.14)
DirectionsFor this skills evaluation checklist, students will roll a salvage cover for a one-firefighter spread.
Equipment & Materials Salvage cover
Skills Evaluation ChecklistObjective 12: Roll a salvage cover for a one-firefighter spread.
**Two firefighters must make initial folds to reduce the width of the cover to form this roll. Steps 1 through 8 are performed simultaneously by both firefighters on opposite sides of the cover. Steps 9 through 12 may be performed by both firefighters who are stationed at the same end of the roll. **
Task Steps
1. Grasp the cover with the outside hand midway between the center and the edge to be folded.
2. Place the other hand on the cover as a pivot midway between the outside hand and the center.
3. Bring the fold over to the center of the cover. This creates an inside fold (center) and an outside fold.
4. Grasp the cover corner with the outside hand.5. Place the other hand as a pivot on the cover over the outside fold.6. Bring this outside edge over to the center, and place it on top of and in
line with the previously placed first fold.7. Fold the other half of the cover in the same manner by using Steps 1
through 6.8. Straighten the folds if they are not straight.9. Fold over about 12 inches (300 mm) at each end of the cover to make
clean, even ends for the completed roll.10. Start the roll by rolling and compressing one end into a tight compact
roll; roll toward the opposite end.11. Tuck in any wrinkles that form ahead of the roll as the roll progresses.12. Secure the completed roll with inner tube bands or straps.

M-73Spread a rolled salvage cover: One-firefighter method. (NFPA® 1001, 5.3.14)
DirectionsFor this skills evaluation checklist, students will spread a rolled salvage cover using the one-firefighter method.
Equipment & Materials Rolled salvage cover
Skills Evaluation Checklist
Task Steps1. Cluster furniture/objects to be covered2. Start at one end of the object to be covered.3. Unroll a sufficient amount to cover the end.4. Unroll toward the opposite end and let the rest of the roll fall into place
at the other end.
5. Stand at one end.6. Grasp the open edges where convenient, one edge in each hand.7. Open the sides of the cover over the object by snapping both hands up
and out.8. Open the other end of the cover over the object in the same manner.9. Tuck in all loose edges at the bottom.
M-74Fold a salvage cover for a one-firefighter spread. (NFPA® 1001,
5.3.14)
DirectionsFor this skills evaluation checklist, students will fold a salvage cover for a one-firefighter spread. Students must work with another student to perform this skill. Inform each student of the specific steps they are to perform.
Equipment & Materials Salvage cover
Skills Evaluation Checklist**Two firefighters must make initial folds to reduce the width of the cover. Steps 1 through 7 are performed simultaneously by both firefighters on opposite sides of the cover. Steps 8 through 13 may be performed by both firefighters who are stationed at the same end of the fold. **
Task Steps
1. Grasp the cover with the outside hand midway between the center and the edge to be folded.
2. Place the other hand on the cover as a pivot midway between the outside hand and the center.
3. Bring the fold over to the center of the cover. This will create an inside fold (center) and an outside fold.
4. Grasp the cover corner with the outside hand.5. Place the other hand as a pivot on the cover over the outside fold.6. Bring this outside edge over to the center, and place it on top of and in
line with the previously placed first fold.7. Fold the other half of the cover in the same manner by using Steps 1
through 6.8. Straighten the folds if they are not straight.9. Grasp the same end of the cover, with the cover folded to reduce
width.10. Bring this end to a point just short of the center.11. Use one hand as a pivot and bring the folded end over and place on
top of the first fold.12. Fold the other end of the cover toward the center, leaving about 4
inches (100 mm) between the two folds.13. Place one fold on top of the other for the completed fold; the space
between the folds now serves as a hinge.

M-75Spread a folded salvage cover: One-firefighter method. (NFPA® 1001, 5.3.14
DirectionsFor this skills evaluation checklist, students will spread a folded salvage cover using the one-firefighter method.
Equipment & Materials Folded salvage cover Object(s) to be covered
Skills Evaluation Checklist
Task Steps1. Cluster furniture/objects to be covered2. Lay the folded cover on top of and near the center of the object to be
covered.3. Separate the cover at the first fold.4. Select either end and continue to unfold the salvage cover by
separating the next fold.5. Unfold this same end toward the end of the object to be covered.6. Grasp the end of the cover near the center with both hands to prevent
the corners from falling outward.7. Bring the end of the cover into position over the end of the object
being covered.8. Unfold the other end of the cover in the same manner over the object.9. Stand at one end.
10. Grasp the open edges where convenient, one edge in each hand.11. Open the sides of the cover over the object by snapping both hands up
and out.12. Open the other end of the cover over the object in the same manner.13. Tuck in all loose edges at the bottom.
M-76Construct a water chute with pike poles. (NFPA® 1001, 5.3.14)
DirectionsFor this skills evaluation checklist, students will construct a water chute with pike poles.
Equipment & Materials Salvage cover Pike poles
Skills Evaluation Checklist
Task Steps1. Open the salvage cover.2. Lay the cover flat at the desired location.3. Place pike poles at opposite edges of the salvage cover with the pike
extending off the end of the cover.

4. Roll the edges over the pike poles toward the middle until there is a 3-foot (1 m) width between the rolls.
5. Turn the cover over, keeping the folds in place.6. Place the chute to collect and channel water.7. Extend the other end out a door or window.
M-77Construct a catchall. (NFPA® 1001, 5.3.14)
DirectionsFor this skills evaluation checklist, students will construct a catchall.
Equipment & Materials Salvage cover
Skills Evaluation Checklist
Task Steps1. Open the salvage cover.2. Lay the cover flat at the desired location.3. Roll the sides inward approximately 3 feet (1 m).4. Lay the ends of the side rolls over at a 90-degree angle to form the
corners of the basin.5. Roll one end into a tight roll on top of the side roll and form a projected

flap.6. Lift the edge roll.7. Tuck the end roll to lock the corners.8. Roll the other end in a like manner.9. Lock the corners.
M-78Locate and extinguish hidden fires. (NFPA® 1001, 5.3.13)
DirectionsFor this skills evaluation checklist, students will use hand tools to remove wall and ceiling materials to look for hidden fires. Students should be wearing full PPE during this skill. Inform each student of their position. A safety officer should check each student’s gear before they enter the danger zone.
Ensure firefighter safety at all times during this training evolution. Before proceeding with live fire training evolutions, read and adhere to NFPA 1403®, Standard on Live Fire Training Evolutions. Have students repeat this exercise, rotating duties so that each student has a chance to perform these tasks.
** Verbal simulation of this skill will be permitted. It is recommended to complete this at the same time as interior attack skills. **
Equipment & Materials Full protective clothing and
SCBA for all firefighters One 1½-inch (38 mm) or larger
charged backup line supplied from a second water source
Training prop that simulates hidden fires
Hand tools such as pike poles and axes
One 1½-inch (38 mm) or larger charged attack line equipped with a fog nozzle
Carryall or bucket for debris
Skills Evaluation Checklist
Task Steps1. Confirm order with officer to overhaul.2. Locate area(s) with potential hidden or smoldering fire.
a. Use heat detector or thermal imaging deviceb. Observe fire area to detect smoking or smoldering materials:
watch, listen, feel.c. Observe burn and smoke patternsd. Wear appropriate personal protective equipment, including
respiratory protection3. Remove ceiling, wall, floor covering and insulation.
a. Begin with area closest to hidden or smoldering fireb. Overhaul area until unburned structural materials are visiblec. Recognize and preserve signs of origin and arsond. Minimize damage when possible
4. Extinguish hidden and smoldering fires with small handline.a. Use minimal water for extinguishmentb. Complete extinguishment – no hidden or smoldering fires remainc. Remove stuffed materials such as mattresses from structure and
overhaul outsided. Cover building openings as necessary (walls floors, doors and roofs)
5. Report to officer completion of assigned task.