· Web viewCROWD FUNDING INSTALLATION GUIDE Theme Control Panel Setting Plugin Installation Right...
44
CROWD FUNDING INSTALLATION GUIDE Theme Control Panel Setting Plugin Installation Right after the theme was activated, a notification at the top of the screen will suggest continuing with the installation of the plugins recommended for getting the best out of your theme. Follow steps to install: Step 1 Click Begin installing plugins and select the plugins you need to install from the list.
Transcript of · Web viewCROWD FUNDING INSTALLATION GUIDE Theme Control Panel Setting Plugin Installation Right...

CROWD FUNDING INSTALLATION GUIDE
Theme Control Panel Setting
Plugin Installation
Right after the theme was activated, a notification at the top of the screen will suggest continuing with the installation of the plugins recommended for getting the best out of your theme.
Follow steps to install:
Step 1 Click Begin installing plugins and select the plugins you need to install from the list.
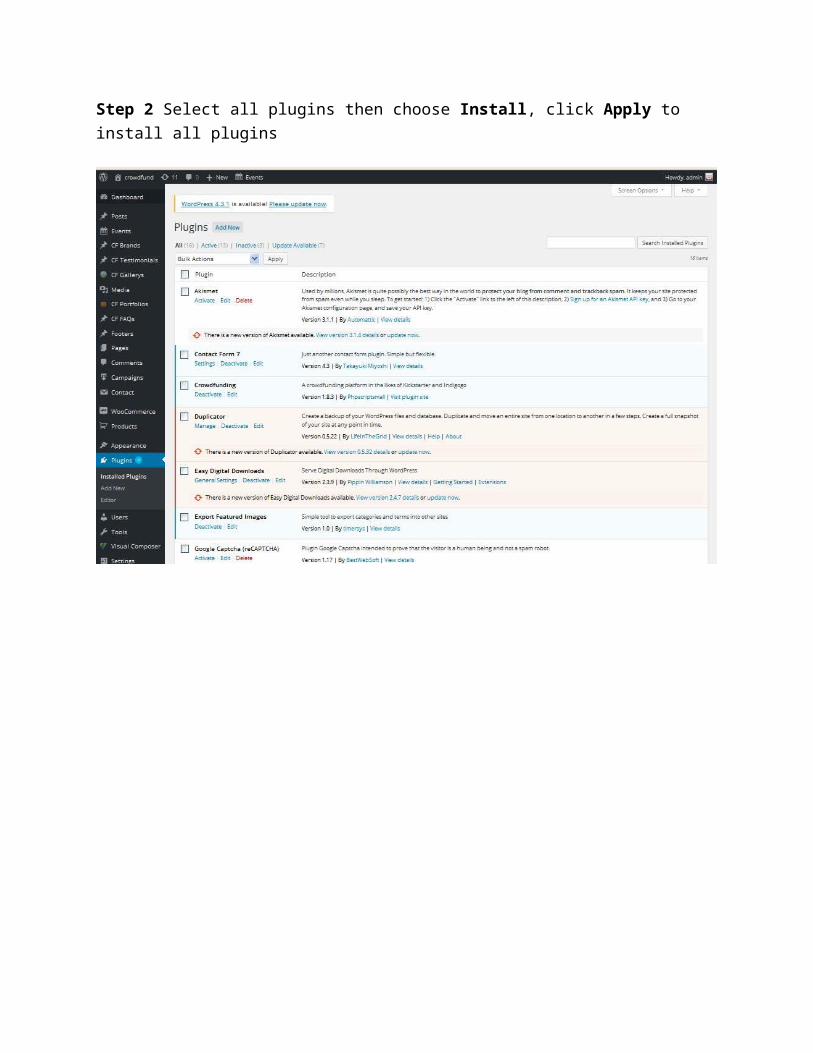
Step 2 Select all plugins then choose Install, click Apply to install all plugins

Step 3 After installing all plugins, select Active them and click Apply
Some plugins are used in the theme
1. Contact Form 7: Allow you create contact forms.2. MailChimp : to use newsletter function3. Revolution Slider: premium responsive slider.4. WPBakery Visual Composer: powerful visual composer to create page
layout.5. WooCommerce: The Shop engine for your WordPress site.6. Easy Digital Download: enable to download serve digital easily7. The Events Calendar: let you easily share your events.

Data Demo Installation:
Manual Installation
Before installing data demo, you need to set up image sizes.
1. How to set up the Image Sizes
These settings affect the actual dimensions of your product images in the shop pages. You can skip this step in case you’re starting a new website and your WordPress installation is fresh, but if you’re switching from another theme and you already have products in your store, you need to make sure the WooCommerce image sizes are the correct ones for your newly installed theme.
a. Navigate to WooCommerce → Settings → Products and find the “Product Image Sizes” section at the bottom of the page.Update those values with the following this image for Unity theme.
b. If your site has image with another size. To see the changes after you update the image sizes, you need to re-generate the images by using Regen.Thumbnails Plugin
- Go to Plugins Tab then search and install Regen.Thumbnails plugin
- Navigate to Tools → Regen.Thumbnails then re-generate your images

2. Importing the Demo Data - XML File
The Unity theme comes with importable demo data, such as pages, products blog posts, portfolio items, etc, to help you get started in case you’re running on a fresh WordPress installation.
Step 1: From the WordPress admin area go to Tools >> Import and click on the WordPress link.

Step 2: You can import all of our demo by one step
Step 3: Assign Authors

Step 4: Set a page as Home PageAfter importing Dummy Data you need to set default Home page for your site, from your WordPress dashboard, navigate to Settings → Reading.Select “A static page” and choose “Dummy Homepage” as the Front Page.
Save change then Homepage data sample will be set.

3. Import Revolution Slider
From the WordPress admin area go to Revolution Slider >> Import Slider and select Slider file on our package.

Widgets Setting:
Go to Admin Panel -> Appearance -> Widgets.You can see all our widgets, easy to configure by drag and drop Widgets to sidebar.Then you can use sidebars to position you want. Even you can use sidebar for MegaMenu.
More over you can search and add more plugins for your purpose by searching on the internet.

Menu Setting:
The following steps will guide you to define your menus by using the WordPress menu editor and Opal Megamenu.
Opal MegaMenu is a user-friendly, highly customizable responsive Mega Menu WordPress plugin to create Menu.
In each menu, you can add as many items you need: links, pages, posts, custom links, and shop categories, direct links to products, internal or external link even sidebars
1. Use WordPress menu editor
a. Main Menu
- Navigate to Appearance → Menus and click the “Create a new menu” link.
- Enter a name for it the “Menu Name” box and click the Create Menu button.You can add as many items you need. Drag and drop to set sub menu or position of them.

Before leaving, set Theme Locations to assign menu then don’t forget to click the Save Menu button.

b. Top Header menu.
Setting like image:

c. Manage Locations
- That tab allows you set menu location you want.

Home Page Setting:You can quickly build a home page using Visual Composer for WordPress that is drag and drop frontend and backend page builder plugin that will save you tons of time working on the site content. You will be able to take full control over your WordPress site, build any layouts you can imagine – no programming knowledge required
From your Dashboard admin Navigate to Pages - Select All Pages to see all page then click edit one page you want - Select Add New to create new pageOne page always includes a lot of parts like Header, Main Page, Widget Sidebar and Footer. In that section we guide you create Main page by using Visual Composer.
How to use Visual Composer:
1. Classic Mode.
You can insert code on table then Home page will be created automatically.

2. Backend Editor Mode
Drag and drop elements you need to build your page layout.
Moreover Opal team provides to you more elements to create your shop page easier. They are Wpo Elements and Opal Elements

Using Visual Composer -> Click Add element -> Select WPO Elements -> Choose Elements you want

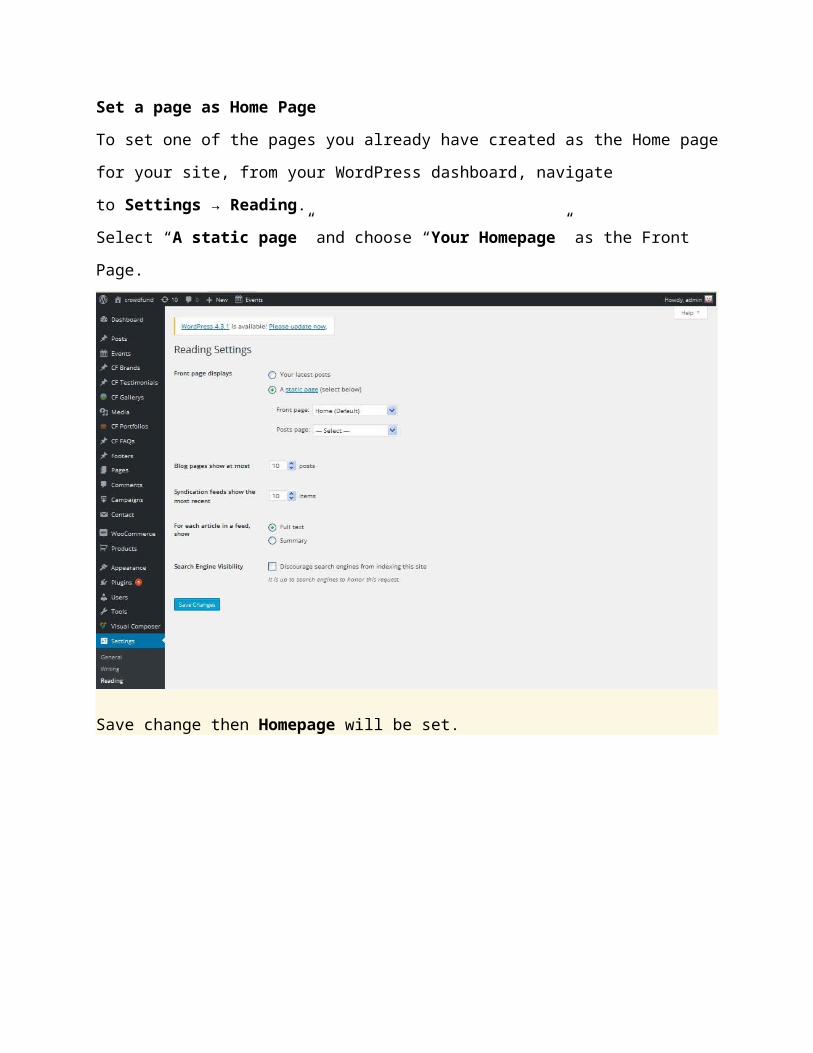
Set a page as Home PageTo set one of the pages you already have created as the Home page for your site, from your WordPress dashboard, navigate to Settings → Reading.Select “A static page” and choose “Your Homepage” as the Front Page.
Save change then Homepage will be set.
Blog Page Setting:
You can choose style of blog page for your website and then fill full of information for this blog page and add featured image
Remember to choose Template Blog

Contact Page Setting:
From your Dashboard admin Navigate to Pages - Select All Pages to see all pages then click edit one page you want - Select Add New to create new page.Use Visual Composer to drag and drop element you want. For Contact Page, need Google Maps, Text Block and Contact Form 7

a. Google Maps
Enter your location then find it.

b. Contact Form- From Dashboard -> Navigate to Contact and create new Contact like this. Then select that form to Contact Form 7 element on Contact Page
WooCommerce Page Setting
WooCommerce Page allows you to display and sell products professionally. It gives you a lot of options and fills all information in all the items

Footer Setting:
Opal Team creates a new way to build your footer. Using Visual Composer for footer builder that can help you create unlimited Footers like your idea. and you can select Footer type by go to Customize -> Footer Settings.
1. Using Default Footer
Front-end look like:

b. Back-end setting:
- Navigate to Appearance >> Widgets- Select Sidebar Footer 1, 2, 3, 4Import Custom Menu to display menu link (remember you need to create menu first)

2. Using Visual ComposerUsing Footer Creator to build Crows funding Theme
Front-end look like:
Back-end setting:

For example we guide you create Footer Default
For parallax part, go to the next section to know more how to set parallax.
After create Footer style. Please go to Customize -> Footer Setting Tab then choose Footer you want to display.

Testimonials Setting:
Go to Dashboard, choose Opal Testimonials and you can edit them as you want or add a new testimonial

Besides you can use WPO Testimonials Setting to edit information of this page by adding this element

Brands Setting:
Step 1: Go to Opal Brands from Dashboard then create Brands
Simply, you only enter brand link that you want to add for your website

Step 2: Drag WPO Brands elements by using Visual Composer on page you want to display it.
You can choose some setting like title, number of brands....

Newsletter Setting:
We are using MailChimp for WP plugin for Newsletter subscribe. You can read more about MailChimp
How to set:Navigate to Appearance >> MailChimp for WP from your admin Dashboard

Source:<div class="form-style-1"> <div class="description"> <span class="title">Sign up to newsletter</span> <span class="desc">To receive updates</span> <span class="content">Sign up to get exclusive offers from our favorite brands and to be well up in the news.</span> </div><div class="input-form"> <input id="mc4wp_email" class="form-control" name="EMAIL" required="required" type="email" placeholder="" /></div> <div class="button-submit"> <input class="btn btn-outline-inverse btn-outline-sm" type="submit" value="Subcribe" /> </div>
After creating from your plugin. You must set position to display.
Go to Appearance -> Widgets then drag mailchimp to Sidebar Newsletter or use Visual Composer to drag and drop...For Unity Theme, after drag to sidebar, you need to call it to display on home page by go to home page > add new element Widget sidebar > choose Newsletter sidebar to display

Events Post Setting:
Unity Theme has an other specific page with other themes of Opal, it is Events Post Setting
You fill full of information The Event Calendar & the Event Location Details & Cost for your event
For Example:
Besides you can add Events Categories

Campaign Post Setting:
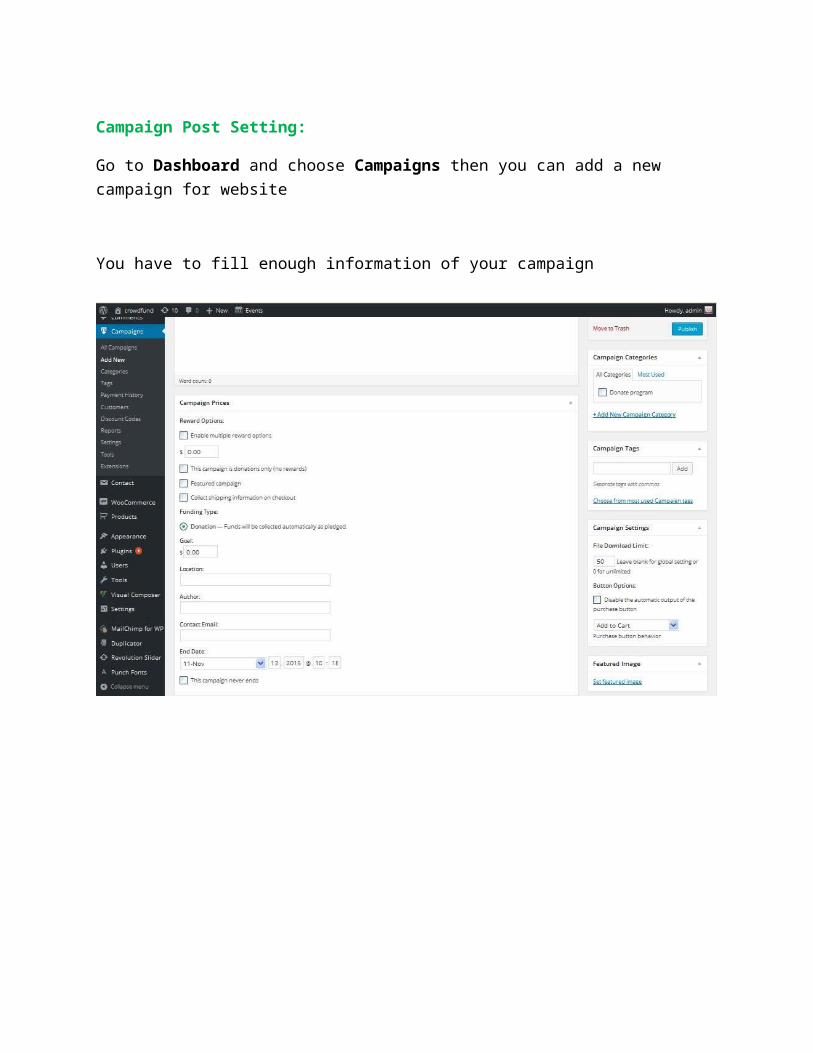
Go to Dashboard and choose Campaigns then you can add a new campaign for website
You have to fill enough information of your campaign
Customization:
Opal Theme brings all of our setting to Customize default of WordPress and make it customize to be powerful theme options that helps you easily take control over the appearance of your site, by allowing you to upload your logo, style the theme with your custom unlimited colors, turn features on and off, without having to write any codes.
To access go to your admin Dashboard Navigate to Appearance >> Customize

1. General Tab: Manage general setting like your logo, favicon,2. Themes and Layouts Setting: Manage layouts of theme, headerYou can select custom theme profile which is created from Live Theme Editor. Or click on "Create Profile Now"Live Theme Editor is great and powerly module to customize your theme by Opal themes. Opal themes developed the back-end control tools that allow customizing your theme. You can change unlimited color item, color text, color background, and almost item in your theme... Powerful option panel which allows you to change not only elements colors, but also change theme's backgrounds, upload your own full size image background or your own pattern!- Navigate to Appearance → Live Theme Editor in your WordPress admin dashboard to create custom theme profile.

Follow our video guide to know how to customize Live Theme Editor for developer:3. WooCommerce: Setting options for WooCommerce. You can choose layout of Archive page and Single product page from Layout Setting, enable quick view, cart and more settings from here.

4. Portfolio Setting: manage setting of Portfolio in your website

5. Blog Setting: manage blog setting

6. Footer Setting: Manage setting of Footer in your website

7. Events Post Setting: Allow you to customize events page you want

8. Campaign Post Setting: Manage Campaign page

9. Live Theme Editor: Manage all color of background, header, footer, image in your website. You can change them as you want

10. Megamenu Editor1. You can add Widgets beside available Widgets in your
website
2. You can customize Megamenu by inserting widgets for this category and remember to save it