tutorials.render-test.comtutorials.render-test.com/worddocs/Tornado.docx · Web viewClick the black...
20
Tornado Path Follow Space Warps In this tutorial we will be looking at the use of spline path as a guide for our particle systems. By manipulating the path and the particles together we can come up with some organized chaos for our particles. First we will need a path for our particles. If our goal is something that resembles a twister, then perhaps the creation of a helix is in order. The helix is found on your create tab, under the shapes button. Draw out a quick helix in your Top viewport, and then go to your modify tab to adjust its settings. 1
Transcript of tutorials.render-test.comtutorials.render-test.com/worddocs/Tornado.docx · Web viewClick the black...

TornadoPath Follow Space Warps
In this tutorial we will be looking at the use of spline path as a guide for our particle systems. By manipulating the path and the particles together we can come up with some organized chaos for our particles.
First we will need a path for our particles. If our goal is something that resembles a twister, then perhaps the creation of a helix is in order.
The helix is found on your create tab, under the shapes button.
Draw out a quick helix in your Top viewport, and then go to your modify tab to adjust its settings.
Make the Radius 1: 30.0Radius 2: 5.0Height: 300.0Turns: 20.0
1

As always these settings will change based on your own project needs, but for this tutorial match my settings so there are no surprises.You should now have a spiral line in the shape of a funnel.
It is upside down for a good reason. When creating a helix the "start point" of the line, or the very first vertex in the line is always created where the line starts at Radius 1. This means that our particles are going to be following our helix, but they will always start at this point. So we want the fat end of our funnel to be where the particles will begin following the line. The simplest method is to simply create the funnel as we have upside down, and then flip it 180 degrees so that the start point of our helix is on top.
Grab your rotate tool and go down to the bottom of your screen and in the XYZ coordinates below the timeline, type 180 in the X: field and hit enter.
Your helix should rotate 180 degrees around the X axis and should now have the fat end of the funnel at the top and the point end at the bottom. Now just move your helix using the Move tool so that the skinny end is near ground level.
2
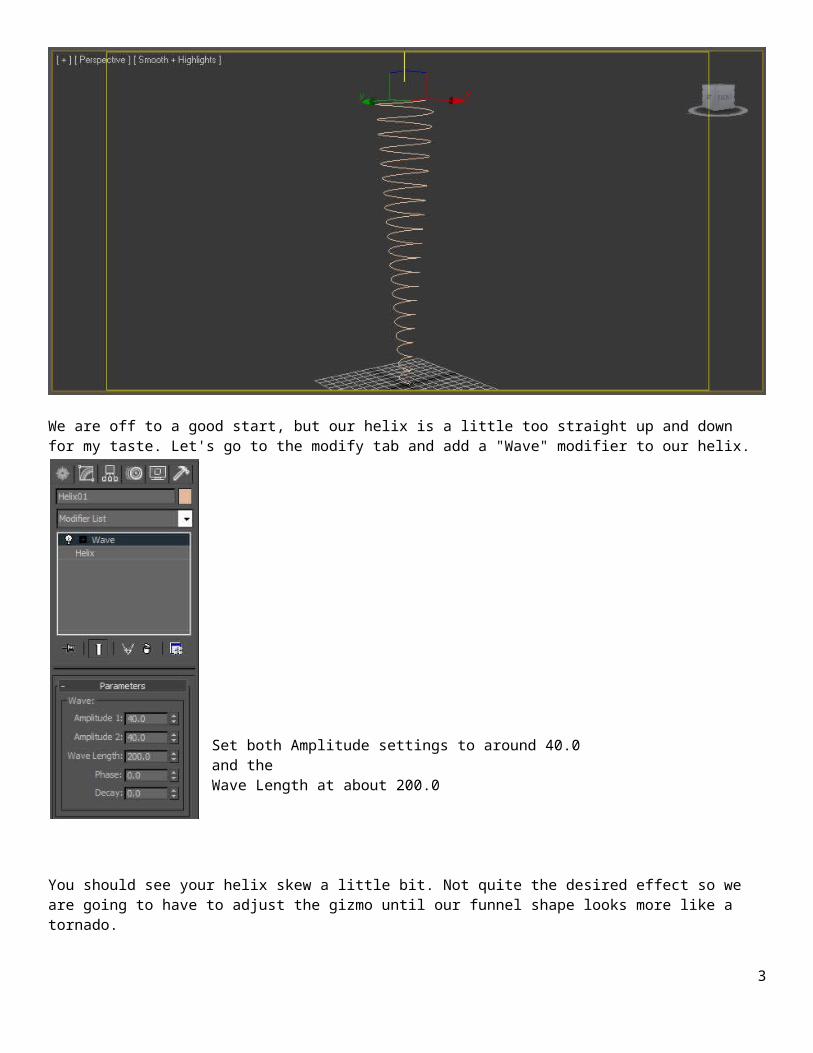
We are off to a good start, but our helix is a little too straight up and down for my taste. Let's go to the modify tab and add a "Wave" modifier to our helix.
Set both Amplitude settings to around 40.0and the Wave Length at about 200.0
You should see your helix skew a little bit. Not quite the desired effect so we are going to have to adjust the gizmo until our funnel shape looks more like a tornado.
Click the black square with the grey + sign in it next to the Wave Modifier in the Modifier stack to open up the Wave Modifiers sub object selections.
3

------------>
Select the Wave Modifier's Gizmo, and then go get your Rotate tool.
Down in the bottom where our XYZ coordinates are again, type in 90 in the X: field and hit enter.
The gizmo should rotate 90 degrees and the wave modifiers true effects should be seen in your perspective viewport.
Make sure to unselect the Gizmo in your Wave Modifier and take a look at your results.
4

The orange wave gizmo now shoots off to the side of our tornado, and the amplitude of the waves goes up and down along the z axis of our helix. Giving it a more fluid shape to our funnel. This can and should be animated along with our particle system.
Click the Time Configuration button in the bottom right corner of the 3DS Max window.
Then change the End time to 500 to give us some extratimeline frames to work with.
Turn on your Auto Key -
Move the timeline scrubber to frame 500, and then go back to your Wave modifier settings.At frame number 500, change the Phase: number to 2.0
This should create two keyframes on your timeline for you, one at 0 and one at 500. Turn your Auto Key off, and press the play button to see the results. Your helix should now slowly move back and forth along the wavelength of our modifier giving it a little more character.
This movement combined with the movement of our particles is going to create the full effect of our funnel cloud.
Now we can create our particle system!
On the create tab, under the Geometry button. Find Particle Systems in the Drop Down Menu.5

--------------->
Here it is important to note that this can really be done with any of these particle systems. If you have a preference or a different effect in mind, by all means try using them all. For now we will start with a Snow particle system as it is a very simple system to start with.
Click on snow and in your Front viewport, drag out a snow particle system near the beginning of our helix spline.
6
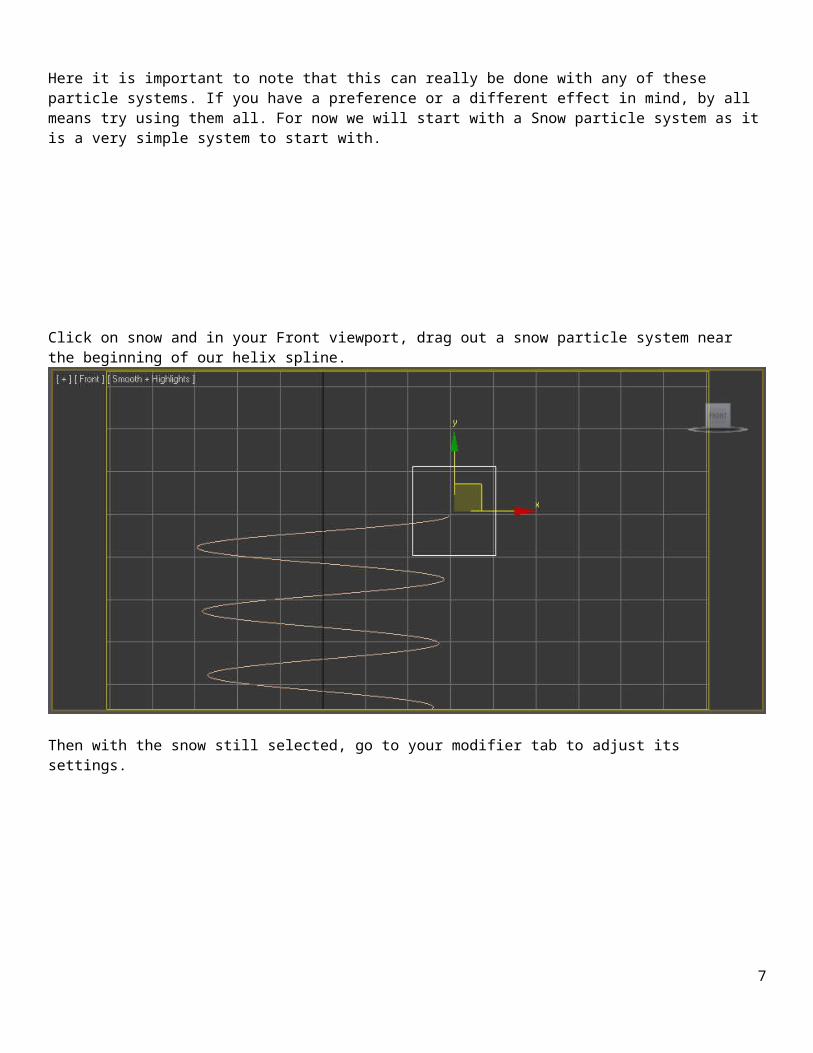
Then with the snow still selected, go to your modifier tab to adjust its settings.
As always, it is important to note that with different sized paths, and projects that all these settings will need changed as well to fit your project. For this one I have plotted out some decent numbers for our vortex.
The Viewport and Render counts are how many particles will be seen in both your real time rendered viewports and your final rendered movie. If your computer runs a
7

little slower than top of the line, you may want to have a smaller number in your viewport than your final render count. If you have a nice computer, then you can match them. Just know that the final number is the one that will be rendered. In this case our Render count is at 10,000. I have set the viewport count to half of that so my computer doesn't have to work as hard to process the real time changes.
Flake Size I have set to 6, which will give us some fairly large faces to work with.Speed I left at the default of 10, as well as the 2.0 variation.
Mark the Ticks radial button.
And the Triangle button, as we don't want a snowflake tornado.
The timing is important, we want our emitter to start right off the bat, and have our funnel cloud travel down the helix we have created as a path. Start at frame 0, and give the particles a life of 90 frames. This means the particles will be active for 90 frames and then die out after that.
The Emitter size might need changed based on how far spread you want your particles. I've left mine at 20x20 here, but always remember that if your particles are looking too confined to the path that you can increase this size as well.
Now that we've set up our particles we can add in our all important Path Follow space warp.
On the create tab, find the spacewarps button. It looks like 3 wavy lines, or as one of my students calls it ... the Bacon button.
8

Drag out a Path follow icon in your scene, it really does not matter where it is located as long as you have something to select and modify the settings with.
Then once you have created it (a cube with some wavy lines in it) you can select it and go over to the modify tab to adjust its settings and add the helix to it as the path.
On the modify tab you'll see all the settings that go along with the space warp. The most important of which is the large button at the top of the settings that says pick shape object. Click to turn it on, then click on your Helix in your scene.
Your Helix will show up as the Current Path Object: when you have successfully added it to our space warp.
9

Set up your Motion Timing settings:
Start Frame: 0 This is where the particles will start following the spline path we have set.Travel Time: 100 - This is how long it will take the particles to travel from the start of the path to the end of the path. In our case 100 frames to reach the ground.Variation: 10%. This will help break up the particles a bit more and spread them out so they don't follow the line too close or we'd just have a spiral of particles instead of a tornado.Last Frame: It is important to set this to the last frame in your animation: 500. If you leave it at the default you may notice your particles will immediately stop following the line at frame 100. Which will destroy your tornado, but it can however give you a fun sort of explode away from the line effect as well.
Set your Stream Swirl: to .02. This can give your particles a bit of an extra swirl but setting it too high may have undesired results.Set the variation to 100% to allow the particles more freedom as to which direction they swirl.
Then mark the Bidirectional radial button to let them go in both directions.
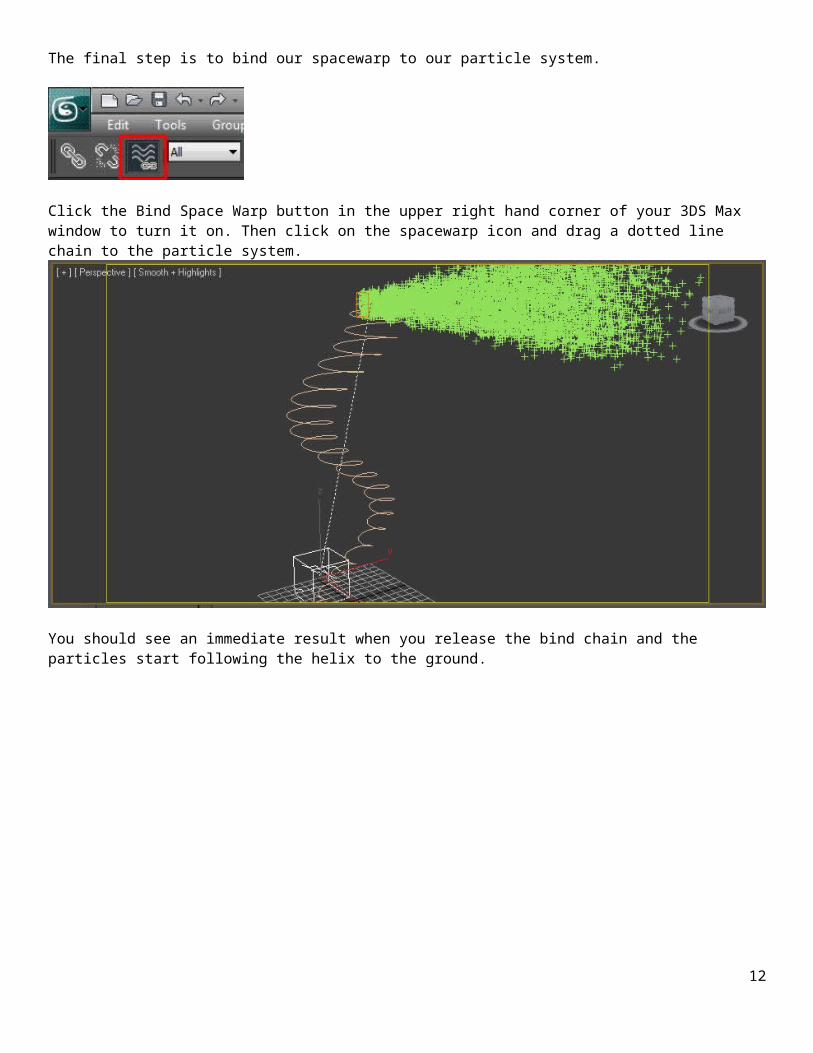
The final step is to bind our spacewarp to our particle system.
Click the Bind Space Warp button in the upper right hand corner of your 3DS Max window to turn it on. Then click on the spacewarp icon and drag a dotted line chain to the particle system.
10

You should see an immediate result when you release the bind chain and the particles start following the helix to the ground.
11
When we render we can see our triangles are following the helix and all its curves, but they still look like triangles.
We need to give our particles a texture, and then use motion blur to get that whispier effect like clouds caught in a blender.
Select your Snow particles and right click to bring up the quad menu. Find Object Properties and click it from the list.
12

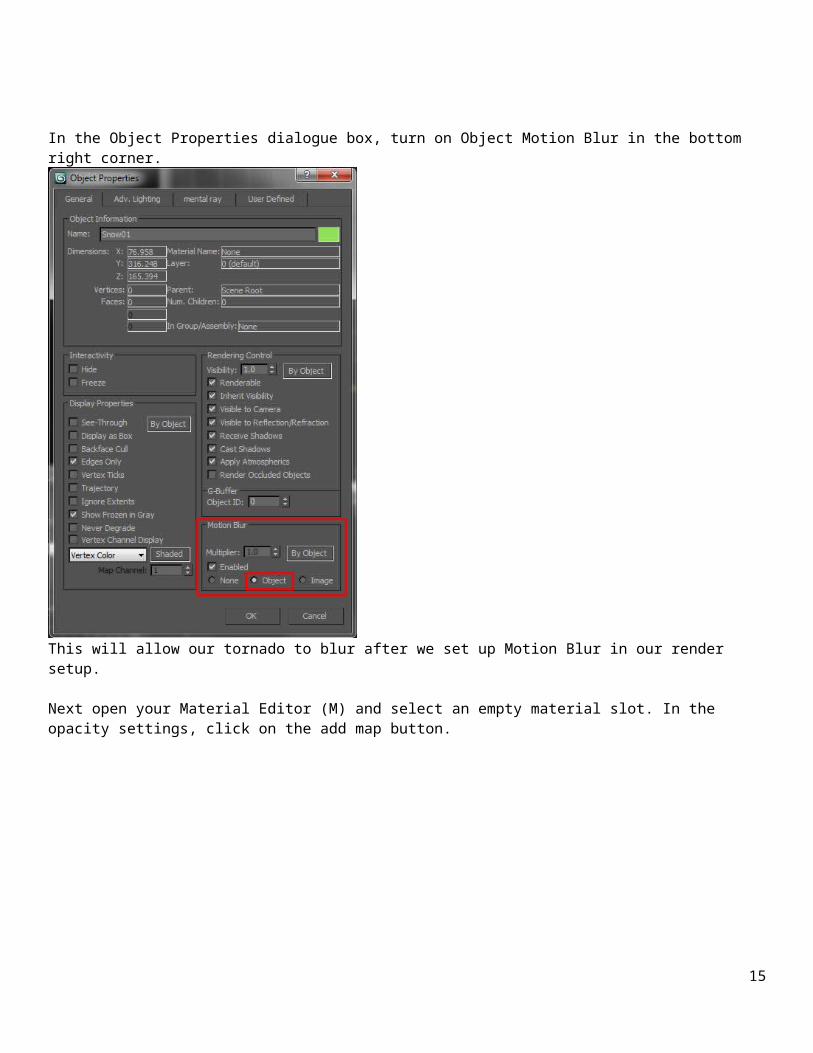
In the Object Properties dialogue box, turn on Object Motion Blur in the bottom right corner.
This will allow our tornado to blur after we set up Motion Blur in our render setup.
Next open your Material Editor (M) and select an empty material slot. In the opacity settings, click on the add map button.
13

Select "Smoke" from the list of maps that it brings up for you.
14
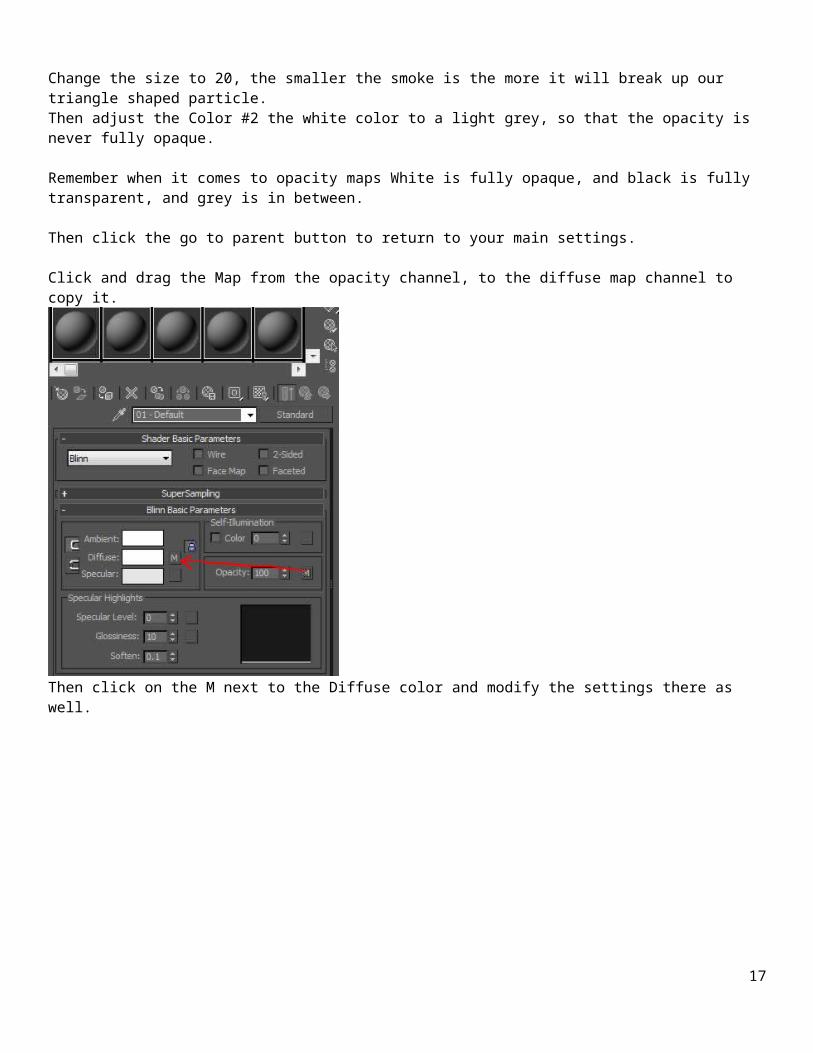
Change the size to 20, the smaller the smoke is the more it will break up our triangle shaped particle. Then adjust the Color #2 the white color to a light grey, so that the opacity is never fully opaque.
Remember when it comes to opacity maps White is fully opaque, and black is fully transparent, and grey is in between.
Then click the go to parent button to return to your main settings.
Click and drag the Map from the opacity channel, to the diffuse map channel to copy it.
Then click on the M next to the Diffuse color and modify the settings there as well.
15

Change the colors to be a darker grey for #1, and a solid white for #2. This will make the areas of the smoke that are not fully transparent to show up a little better. This might need changed depending on the background your tornado is up against.
This one works pretty well against one that is kind of a light grey on a cloudy day background. If you are up against a black background you might want to make the greys lighter colored, and vice versa on a light background you might need darker greys.The larger the contrast between the two colors, the more range your texture has and the more it can help break up the triangular shape of the particles, so experiment a little. If you want a purple tornado, then here is where you would want to change the colors between light and dark shades of purple etc.
Once you are finished, hit the go to parent button to return to the main texture settings and then assign your texture to the Snow particle system.
Then go to your Render Setup dialogue.
If you have mental ray renderer assigned then the motion blur settings can get a little tricky. Your scenes will look better overall especially once you add textures and lighting for a final effect.
You can find your motion blur settings on the Renderer Tab, along with anti-aliasing settings etc.
Once on the renderer tab, scroll down the list of settings until you find the Motion Blur settings under Camera Effects.Click the checkbox to activate the motion blur and do a test render of your tornado. It will take a little longer to render this time as it is having to calculate what is moving and how much it is going to blur.
16
If you find that the particles are being stretched a blurred too much, then you'll want to reduce the settings in your motion blur in the renderer setup.
Experiment with the motion blur settings until you find one that works best for your needs.
You might also need to go back and give your tornado some more particles if 10,000 is looking a little sparse. Try upping the numbers gradually until you satisfied with the results.
Add lighting, some scenery, and textures until you are happy with your tornado.
This idea can be used to create anything where the particles may need to follow a path so think creatively and don't stop at just twisters!
17