
vibe Documentation - media.readthedocs.org · vibe Documentation, Release 0.3.1 Vibe is a...
41
vibe Documentation Release 0.3.1 Matt Khan Jun 10, 2017
-
Upload
nguyenkhue -
Category
Documents
-
view
281 -
download
0
Transcript of vibe Documentation - media.readthedocs.org · vibe Documentation, Release 0.3.1 Vibe is a...

vibe DocumentationRelease 0.3.1
Matt Khan
Jun 10, 2017


Contents:
1 What is vibe? 31.1 How can you use it? . . . . . . . . . . . . . . . . . . . . . . . . . . . . . . . . . . . . . . . . . . . 3
2 Installation 52.1 Bill of Materials . . . . . . . . . . . . . . . . . . . . . . . . . . . . . . . . . . . . . . . . . . . . . 52.2 Prerequisites . . . . . . . . . . . . . . . . . . . . . . . . . . . . . . . . . . . . . . . . . . . . . . . 62.3 Installing the Recorder . . . . . . . . . . . . . . . . . . . . . . . . . . . . . . . . . . . . . . . . . . 62.4 Installing the Analyser . . . . . . . . . . . . . . . . . . . . . . . . . . . . . . . . . . . . . . . . . . 10
3 Configuration 133.1 Recorder . . . . . . . . . . . . . . . . . . . . . . . . . . . . . . . . . . . . . . . . . . . . . . . . . 133.2 Analyser . . . . . . . . . . . . . . . . . . . . . . . . . . . . . . . . . . . . . . . . . . . . . . . . . 14
4 User Guide 154.1 Configure . . . . . . . . . . . . . . . . . . . . . . . . . . . . . . . . . . . . . . . . . . . . . . . . . 154.2 Target . . . . . . . . . . . . . . . . . . . . . . . . . . . . . . . . . . . . . . . . . . . . . . . . . . . 164.3 Measure . . . . . . . . . . . . . . . . . . . . . . . . . . . . . . . . . . . . . . . . . . . . . . . . . 194.4 Analyse . . . . . . . . . . . . . . . . . . . . . . . . . . . . . . . . . . . . . . . . . . . . . . . . . . 22
5 Troubleshooting 255.1 Recorder . . . . . . . . . . . . . . . . . . . . . . . . . . . . . . . . . . . . . . . . . . . . . . . . . 25
6 Developer Notes 276.1 Internal Design . . . . . . . . . . . . . . . . . . . . . . . . . . . . . . . . . . . . . . . . . . . . . . 27
7 Release Process 317.1 Building for Local Testing . . . . . . . . . . . . . . . . . . . . . . . . . . . . . . . . . . . . . . . . 317.2 Test Plan . . . . . . . . . . . . . . . . . . . . . . . . . . . . . . . . . . . . . . . . . . . . . . . . . 34
8 Indices and tables 37
i

ii

vibe Documentation, Release 0.3.1
Vibe is a measurement and analysis suite for random vibration.
It is aimed at, but not limited to, a particular niche within the home theatre community that wants to investigate the“tactile response” of their system.
Contents: 1

vibe Documentation, Release 0.3.1
2 Contents:

CHAPTER 1
What is vibe?
Vibe is a software suite that allows you to;
• connect multiple devices to a single data capture and analysis service
• choose which sensors to collect data from (accelerometer and/or gyro)
• specify various important parameters such as sample rate and sensor sensitivity
• organise captured data into named measurements
• analyse that data to obtain a view on typical metrics like PSD and linear spectrum
• do all the above via an easy to use web ui
1.1 How can you use it?
vibe is made up of 2 separate components
1.1.1 Analyser
The analyser provides a user interface for all functionality and controls the assorted measurement devices.
The analyser is a pure python3 app so can run on Windows or Linux.
Its functions include:
• specifying the configuration of the measurement system (sample rate, sensitivity)
• ensuring that all connected recorders are at that target (or marked as invalid if not)
• scheduling measurements
• collecting and storing measurement data
• analysing data
• providing a UI
3
vibe Documentation, Release 0.3.1
1.1.2 Recorder
A recorder is directed to collect data from a connected sensor by the analyser.
The recorder is a pure python3 app so theoretically can run on Windows or Linux. Practically speaking it runs on theraspberry pi and supports the MPU6050 IMU only.
Its functions include:
• managing the connected IMU
• pushing its current state to the analyser and responding to instructions from the analyser
• recording data and sending it to the analyser
4 Chapter 1. What is vibe?

CHAPTER 2
Installation
2.1 Bill of Materials
2.1.1 Recorder
• a Raspberry Pi model with wireless connectivity, this means the pi3 or pi zero w
• an rpi case that lets you access the GPIO pins, e.g. the pibow
• a Micro SD Card
– the rpi supports SDHC cards and the maximum size supported is 32GB
– if the rpi is used for this purpose only, a large card is not really necessary though the price differencebetween a small card and a large card is pretty small
– maximum read/write speed is about 25MB/s so there is no point spending on UHS3 cards
– therefore buy any reputable class 10 card such as this sandisk
• 1 MPU-6050 IMU per rpi
• i2c cables
• a lightweight but secure mounting mechanism for attaching the board to the seat, I use foam tape
2.1.2 Analyser
• any old computer with a network connection should do (including the rpi)
5

vibe Documentation, Release 0.3.1
2.2 Prerequisites
2.2.1 Install an SSH Client
SSH is secure shell, it’s a standard way to securely login to a remote (*nix) host. You will need this to manage yourrpi because an rpi runs linux.
Linux users should need no introduction to this.
MacOS users can familiarise themselves with the terminal app
Windows users have to install a 3rd party client
Android users can consider an app like connectbot or one of the many options on the play store
iOS users no doubt have something appropriate in their app store (sample google search).
2.2.2 (Optional) Install an SCP Client
scp means secure copy, it is a way to copy a file over a ssh connection. This may come in useful to get files to andfrom your rpi.
Note that you can scp via a terminal so if you ssh from a shell (the command line in windows speak) then you can alsoscp from that shell. Some users may prefer a graphical, explorer like, interface though such as WinSCP.
2.3 Installing the Recorder
2.3.1 Setting up your rpi
These instructions use raspbian as the default rpi distro but any linux distro that has rpi support should work just fine.The only real requirements are python 3.4+.
General reference installation instructions are available at https://www.raspberrypi.org/documentation/setup/ andshould be used as your main reference. This doc will just highlight the specific points we need to get running with therecorder.
1. Install raspbian onto your sd card
2. Assemble your rpi, plug in your sd card and connect up to a monitor
3. Boot up, you should be faced with a plain text login screen
4. Login as pi
5. Open raspi-config
• choose option 1 to provide access to the whole sd card
• choose option 2 to change your password
• choose option 7 and enable both ssh (so you can login remotely) and i2c (so it can talk to your MPU6050)
6. if you have more than 1 rpi then consider renaming your pi
7. (Optional) Configure your rpi for passwordless ssh access
8. Connect to your wireless network, the instructions below are tested on the rpi3
• open /etc/network/interfaces, it should contain:
6 Chapter 2. Installation

vibe Documentation, Release 0.3.1
auto loiface lo inet loopback
iface eth0 inet manual
allow-hotplug wlan0iface wlan0 inet manual
wpa-conf /etc/wpa_supplicant/wpa_supplicant.confallow-hotplug wlan1iface wlan1 inet manual
wpa-conf /etc/wpa_supplicant/wpa_supplicant.conf
• edit /etc/wpa_supplicant/wpa_supplicant.conf in your editor of choice to look like the following:
ctrl_interface=DIR=/var/run/wpa_supplicant GROUP=netdevupdate_config=1network={
ssid="<YOUR SSID>"psk="<YOUR PASSWORD"
}
• restart the networking service (or just reboot)
• from a different machine, use your SSH client to check you can connect to the rpi from another machine via ssh:
$ ssh pi@swoop
The programs included with the Debian GNU/Linux system are free software;the exact distribution terms for each program are described in theindividual files in /usr/share/doc/*/copyright.
Debian GNU/Linux comes with ABSOLUTELY NO WARRANTY, to the extentpermitted by applicable law.Last login: Wed Mar 1 22:35:38 2017 from 192.168.1.123pi@swoop:~ $
7. Update raspbian to bring everything up to date
8. (Optional) Allocate a static IP to your rpi and add it to your hosts file on your main PC
9. (Optional) Set a new hostname for your rpi
2.3.2 Wiring up the MPU6050
1. disconnect your rpi from the screen and powerdown
2. connect your MPU6050, remember to wire as per this wiring example
3. boot up
4. install i2c-tools:
$ sudo apt install i2c-tools
5. follow the i2c section of this guide, if everything is functioning correctly the result should be:
$ i2cdetect -y 10 1 2 3 4 5 6 7 8 9 a b c d e f
00: -- -- -- -- -- -- -- -- -- -- -- -- --
2.3. Installing the Recorder 7

vibe Documentation, Release 0.3.1
10: -- -- -- -- -- -- -- -- -- -- -- -- -- -- -- --20: -- -- -- -- -- -- -- -- -- -- -- -- -- -- -- --30: -- -- -- -- -- -- -- -- -- -- -- -- -- -- -- --40: -- -- -- -- -- -- -- -- -- -- -- -- -- -- -- --50: -- -- -- -- -- -- -- -- -- -- -- -- -- -- -- --60: -- -- -- -- -- -- -- -- 68 -- -- -- -- -- -- --70: -- -- -- -- -- -- -- --pi@swoop:~ $
2.3.3 Installing vibe-recorder
ssh into your rpi and:
$ ssh pi@myrpi$ sudo apt install python3 python3-venv python3-pip libyaml-dev$ mkdir python$ cd python$ python3 -m venv recorder$ cd recorder$ . bin/activate$ pip install vibe-recorder
If all has gone well then you should now be able to do the following and see:
$ ./bin/recorderLoading config from /home/pi/.vibe/recorder.ymlInitialising http logger to log data to http://127.0.0.1:8080Loading smbus 1Reactor reactor is starting
Open a browser and enter the IP or hostname of your rpi and port 10002, e.g. http://192.168.1.1:10002/api/1/devices,you should see some plain text output like:
[{"gyroSens": 500, "gyroEnabled": false, "name": "mpu6050", "failureCode": null,→˓"accelerometerSens": 2, "accelerometerEnabled": true, "samplesPerBatch": 125,→˓"status": "INITIALISED", "fs": 500}]
Stay in your ssh client and move onto...
2.3.4 Configuring vibe-recorder
1. Shutdown the running instance by pressing ctrl+c two or three times, you should see lots of noise in the logslike:
* Running on http://0.0.0.0:10002/ (Press CTRL+C to quit)^C^CException ignored in: <module 'threading' from '/usr/lib/python3.4/threading.→˓py'>Traceback (most recent call last):File "/usr/lib/python3.4/threading.py", line 1294, in _shutdown
t.join()File "/usr/lib/python3.4/threading.py", line 1060, in join
self._wait_for_tstate_lock()File "/usr/lib/python3.4/threading.py", line 1076, in _wait_for_tstate_lock
elif lock.acquire(block, timeout):
8 Chapter 2. Installation

vibe Documentation, Release 0.3.1
KeyboardInterrupt(recorder) pi@swoop:~/python/recorder $
2. open the default configuration file in an editor:
$ cd ~/.vibe$ nano recorder.yml
3. refer to the configuration guide for full details of the contents
4. edit the target: line and provide the IP address of the computer you intend to run the analyser on
5. edit the host: field and provide an IP address or hostname which resolves to this device
6. (optional if using a single rpi, mandatory if using more than 1) edit the name field under accelerometers
7. repeat the recorder startup test from the last section to verify the application still starts as expected
2.3.5 (Optional) Starting vibe-recorder on bootup
This is optional but recommended, it ensures the recorder app starts automatically whenever the rpi boots up andmakes sure it restarts automatically if it ever crashes.
We will achieve this by creating and enabling a systemd service.
1. Create a file vibe-recorder.service in the appropriate location for your distro (e.g. /etc/systemd/system/for debian):
[Unit]Description=vibe recorderAfter=network.target
[Service]Type=simpleUser=myuserWorkingDirectory=/home/myuserExecStart=/home/myuser/python/recorder/bin/recorderRestart=alwaysRestartSec=1
[Install]WantedBy=multi-user.target
2. enable the service and start it up:
$ sudo systemctl enable vibe-recorder.service$ sudo service vibe-recorder start$ sudo journalctl -u vibe-recorder.service
-- Logs begin at Sat 2017-04-01 15:05:26 BST, end at Thu 2017-04-13 17:58:23 BST.→˓--Apr 13 17:54:44 mypi systemd[1]: Started vibe recorder.Apr 13 17:54:45 mypi recorder[21414]: Loading config from /home/myuser/.vibe/→˓recorder.ymlApr 13 17:54:45 mypi recorder[21414]: Reactor analyser is starting
3. reboot and repeat step 2 to verify the recorder has automatically started
2.3. Installing the Recorder 9

vibe Documentation, Release 0.3.1
2.4 Installing the Analyser
2.4.1 Running on Linux
Login to your linux box and:
$ ssh pi@myrpi$ sudo apt install python3 python3-venv python3-pip libyaml-dev libsndfile1$ mkdir python$ cd python$ python3 -m venv analyser$ cd analyser$ . bin/activate# pip doesn't order dependencies properly so you have to install these two manually→˓first$ pip install wheel$ pip install numpy$ pip install vibe-analyser
If you are installing this on the rpi then expect this to take a pretty long time (i.e. leave it going overnight).
Now start it up:
$ cd python/analyser$ ./bin/analyser
and open your browser and visit http://youranalyserhost:8080, you should see
Warning: If you have specified a hostname in the recorder.yml config, and don’t have a local domain nameresolution service, you will need to add the rpi hostnames into /etc/hosts on the analyser server
10 Chapter 2. Installation
vibe Documentation, Release 0.3.1
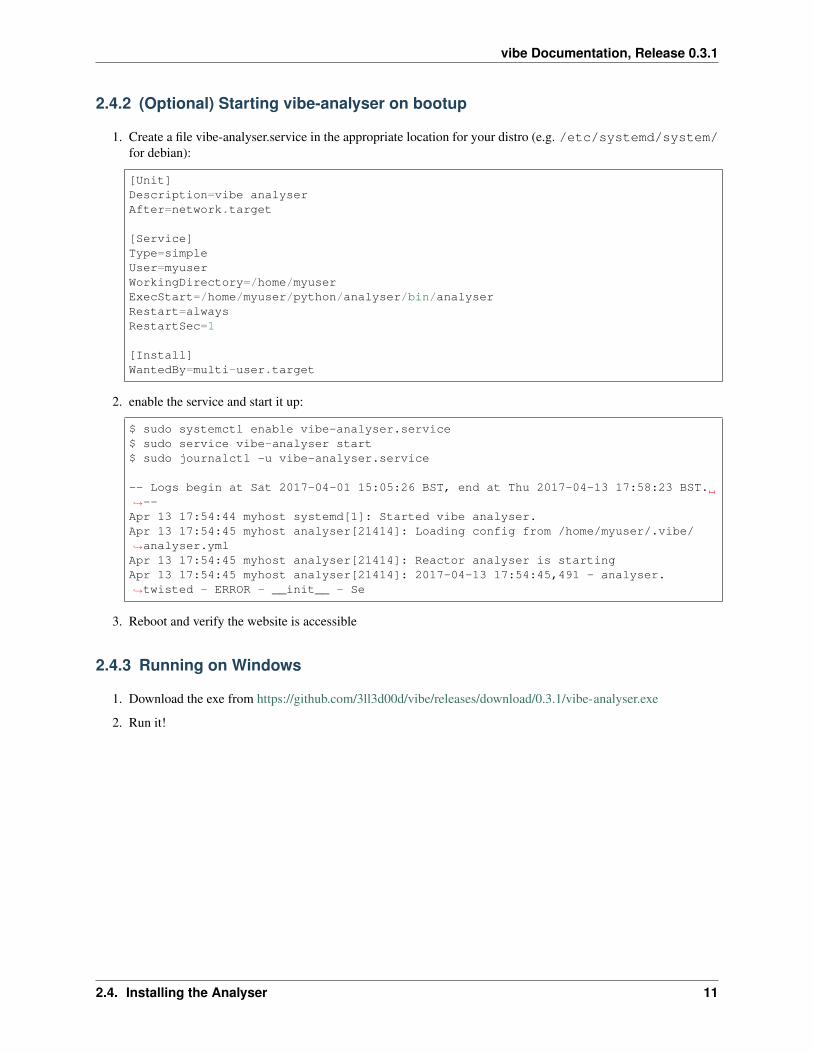
2.4.2 (Optional) Starting vibe-analyser on bootup
1. Create a file vibe-analyser.service in the appropriate location for your distro (e.g. /etc/systemd/system/for debian):
[Unit]Description=vibe analyserAfter=network.target
[Service]Type=simpleUser=myuserWorkingDirectory=/home/myuserExecStart=/home/myuser/python/analyser/bin/analyserRestart=alwaysRestartSec=1
[Install]WantedBy=multi-user.target
2. enable the service and start it up:
$ sudo systemctl enable vibe-analyser.service$ sudo service vibe-analyser start$ sudo journalctl -u vibe-analyser.service
-- Logs begin at Sat 2017-04-01 15:05:26 BST, end at Thu 2017-04-13 17:58:23 BST.→˓--Apr 13 17:54:44 myhost systemd[1]: Started vibe analyser.Apr 13 17:54:45 myhost analyser[21414]: Loading config from /home/myuser/.vibe/→˓analyser.ymlApr 13 17:54:45 myhost analyser[21414]: Reactor analyser is startingApr 13 17:54:45 myhost analyser[21414]: 2017-04-13 17:54:45,491 - analyser.→˓twisted - ERROR - __init__ - Se
3. Reboot and verify the website is accessible
2.4.3 Running on Windows
1. Download the exe from https://github.com/3ll3d00d/vibe/releases/download/0.3.1/vibe-analyser.exe
2. Run it!
2.4. Installing the Analyser 11

vibe Documentation, Release 0.3.1
12 Chapter 2. Installation

CHAPTER 3
Configuration
Each application is configured by a single file which is located in the configuration directory, this defaults to${HOME}/.vibe but can be overridden by setting the VIBE_CONFIG_HOME environment variable before startup.
3.1 Recorder
The recorder config lives in recorder.yml, it is a yaml document and contains the following options:
accelerometers:- fs: 500
handler: local logio:busId: 1type: smbus
name: mpu6050type: mpu6050
debug: falsedebugLogging: falsehandlers:- name: remote
target: http://127.0.0.1:10001type: post
host: arkanoidport: 10002useAsyncHandler: true
The configuration file is generated with sensible default values at startup.
All options are overrideable but only the following options make any sense to change;
• accelerometers/name - this is the name of the device shown in the UI, it must be unique across allconnected devices
• handlers/target - set to the IP:port of your analyser process
13

vibe Documentation, Release 0.3.1
• host - set to an ip or hostname that will resolve to this device, if using a hostname then remember to add theIP of this device to the analyser service
• debugLogging - write more detailed logging to the log file, useful if investigating odd behaviour underdirection of a developer
3.2 Analyser
The analyser config lives in analyser.yml, it is a yaml document and contains the following options:
dataDir: C:\Users\Matt\.vibe\datadebug: falsedebugLogging: falsehost: megatronport: 8080targetState:
accelerometerEnabled: trueaccelerometerSens: 4fs: 500gyroEnabled: truegyroSens: 500samplesPerBatch: 125
useTwisted: true
The configuration file is generated with sensible default values at startup.
All options are overrideable but only the following options make any sense to change;
• dataDir - set to the directory you want measurements to be recorded to, by default this goes in the config dir
• all options under targetState - these control the default state of the measurement system, this is onlyrelevant until https://github.com/3ll3d00d/vibe/issues/9 is fixed
• host and port - the port the analyser listens on, must agree with the value entered in the recorder handlers/target option
• debugLogging - write more detailed logging to the log file, useful if investigating odd behaviour underdirection of a developer
14 Chapter 3. Configuration
CHAPTER 4
User Guide
The UI has 4 screens. A video demo is available on youtube
4.1 Configure
The configure screen is split into 2 sections.
1. The Measurement Devices panel shows the currently connected sensors.
2. The Target State panel allows the user to change the current state of the system.
The system ensures that all sensors are kept in the same state based on the values set in the Target State pane. Thegreen checkboxes in the Measurement Devices panel indicate that the sensor is in the specified Target State.
15

vibe Documentation, Release 0.3.1
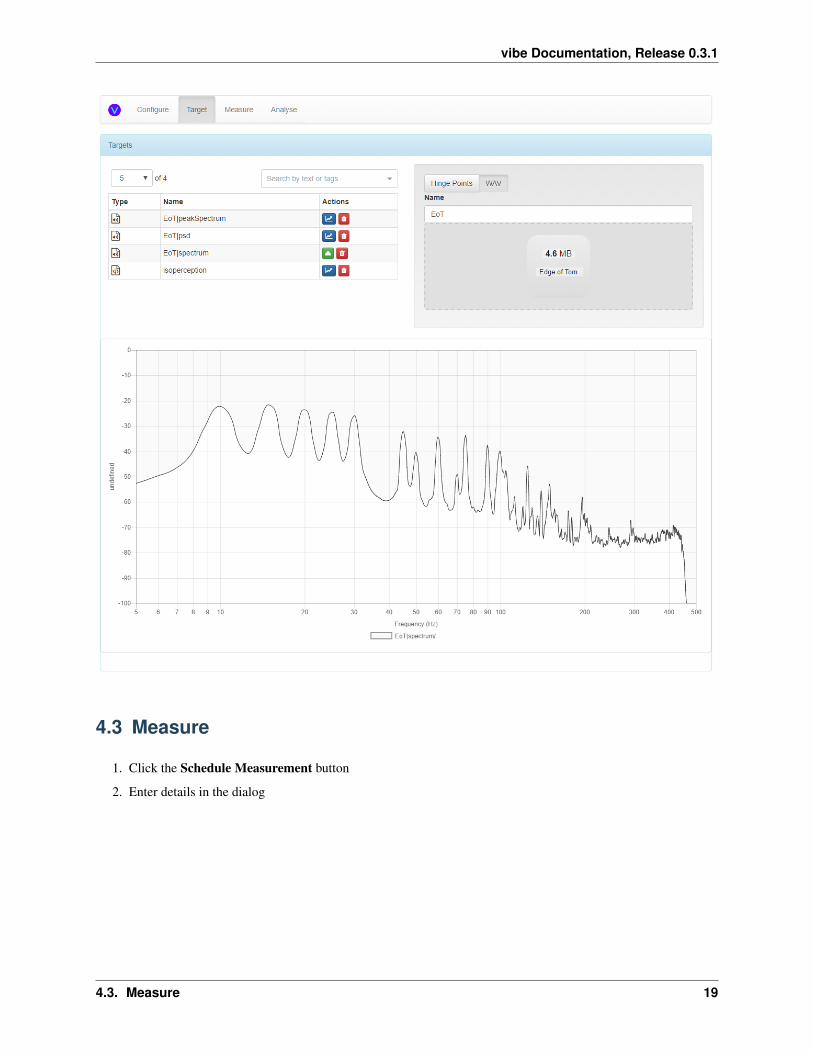
4.2 Target
The target screen allows the user to define target responses using 2 methods
1. Manually entered hinge points
2. WAV upload
Curves can be viewed and deleted using the buttons in each row.
4.2.1 Hinge Points
1. Enter a name and at least 2 hinge points in dB<space>frequency format
2. click preview to examine the curve
3. click add to save it
16 Chapter 4. User Guide

vibe Documentation, Release 0.3.1
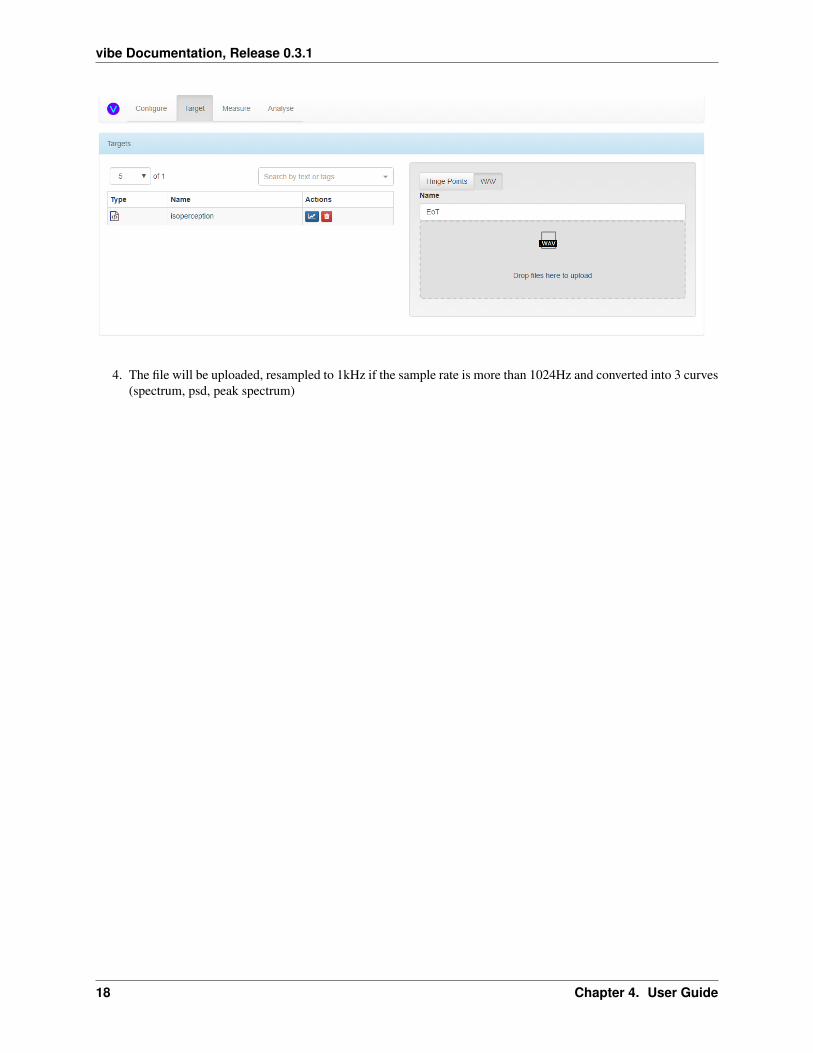
4.2.2 WAV Upload
1. Click the WAV button
2. Enter a name
3. Drag a mono wav file into the dropbox
4.2. Target 17
vibe Documentation, Release 0.3.1
4. The file will be uploaded, resampled to 1kHz if the sample rate is more than 1024Hz and converted into 3 curves(spectrum, psd, peak spectrum)
18 Chapter 4. User Guide
vibe Documentation, Release 0.3.1
4.3 Measure
1. Click the Schedule Measurement button
2. Enter details in the dialog
4.3. Measure 19

vibe Documentation, Release 0.3.1
3. Click Go! and click outside the modal to close it
4. The measurement should show as scheduled or in progress (depending on the delay entered)
5) The measurement should complete successfully and the time series data can be viewed using the chart button. Noteyou can click the series names in the chart to show or hide the selected series. The data shown is either
• raw: the raw measured data
• tilt: low passed to isolate gravity and thus indicates the orientation of the sensor
• vibe: high passed to remove gravity and thus indicates the actual vibration
20 Chapter 4. User Guide

vibe Documentation, Release 0.3.1
6. The measurement can be deleted using the dustbin icon
4.3.1 Handling Failed Measurements
If the measurement fails for any reason, the status turns red. Tap the devices cell to bring up a table showing thereported reason for fail. There may not be a reason shown however, in which case you have to log onto the rpi andreview the log files.
A common reason for failure is an overflow. This means the rpi was not able to read data from the FIFO fast enough.
4.3. Measure 21

vibe Documentation, Release 0.3.1
This means you either need to reduce the sample rate or increase the rpi i2c bus speed.
4.4 Analyse
1. Select measurements and target curves via the dropdowns at the top of the screen
2. Click the play button to load data into the graph
3. Click the eject button to unload data from the graph
4. Click plus or minus to add a new dataset or remove an existing one
Note that the graph sets scales automatically according to the ranges of the selected data sets. The autoscaling can beoverridden using the provided control.s
5. Select a reference series to show each selected measurement as a delta against that reference series
22 Chapter 4. User Guide

vibe Documentation, Release 0.3.1
4.4. Analyse 23

vibe Documentation, Release 0.3.1
24 Chapter 4. User Guide

CHAPTER 5
Troubleshooting
5.1 Recorder
5.1.1 FileNotFoundError: [Errno 2] No such file or directory: ‘/dev/i2c-1’
If the recorder is started on a system that does not have a device connected to i2c-1, i.e. the MPU6050 is not connectedcorrectly, then the recorder will fail to start with a message that looks like:
$ ./bin/recorderInitialising http logger to log data to http://127.0.0.1:10001Loading smbus 1Traceback (most recent call last):
File "./bin/recorder", line 7, in <module>from recorder.app import main
File "/home/matt/python/test/lib/python3.5/site-packages/recorder/app.py", line 16,→˓in <module>
cfg = Config()File "/home/matt/python/test/lib/python3.5/site-packages/recorder/common/config.py",
→˓ line 14, in __init__self.recordingDevices = self._loadRecordingDevices()
File "/home/matt/python/test/lib/python3.5/site-packages/recorder/common/config.py",→˓ line 94, in _loadRecordingDevices
[self.createDevice(deviceCfg) for deviceCfg in self.config['accelerometers']]}File "/home/matt/python/test/lib/python3.5/site-packages/recorder/common/config.py",
→˓ line 94, in <listcomp>[self.createDevice(deviceCfg) for deviceCfg in self.config['accelerometers']]}
File "/home/matt/python/test/lib/python3.5/site-packages/recorder/common/config.py",→˓ line 79, in createDevice
io = smbus_io(busId)File "/home/matt/python/test/lib/python3.5/site-packages/recorder/common/smbus_io.py
→˓", line 13, in __init__self.bus = SMBus(bus=busId)
File "/home/matt/python/test/lib/python3.5/site-packages/smbus2/smbus2.py", line→˓132, in __init__
25

vibe Documentation, Release 0.3.1
self.open(bus)File "/home/matt/python/test/lib/python3.5/site-packages/smbus2/smbus2.py", line
→˓142, in openself.fd = os.open("/dev/i2c-{}".format(bus), os.O_RDWR)
FileNotFoundError: [Errno 2] No such file or directory: '/dev/i2c-1'
Go back to the installation guide and check configuration and wiring.
5.1.2 Measurements fail due to overflows
This means the rpi is unable to read data from the sensor via i2c as fast as the device is logging it. This means youneed to either
1. reduce the amount of data collected (reduce sample rate, turn off a sensor)
2. increase the i2c bus speed
26 Chapter 5. Troubleshooting

CHAPTER 6
Developer Notes
6.1 Internal Design
6.1.1 Managing Measurement Device Configuration
UI --- TargetState json ---> Analyser --- reactor --- TargetState json ---> Device
• Measurement devices are configurable with respect to sample rate, sensitivity and which sensors are active.
• This configuration is held by instances of the TargetState class and which is accessible via the singletonTargetStateProvider.
UI -> Analyser
Updates arrive via the /devices endpoint which accepts PATCHes to 1-n attributes, for example
{"fs": 400,"accelerometerEnabled": false
}
will set the target fs to 400 and disable the accelerometer.
Analyser -> Recorder
When the UI updates the target state, the /devices handler merges the incoming json with the existing target stateand passes a REACH_TARGET_STATE request to the (single threaded) reactor for each registered device.
This request compares the target state against the current known state of the device and issues a PATCH request, usingthe same TargetState class marshalled to json, to the device URL if a change is required AND the device is in anINITIALISED state.
27

vibe Documentation, Release 0.3.1
6.1.2 Device Registration
Devices are responsible for registering with the analyser via the /devices/<deviceId> endpoint. The payload isa json marshalled using recordingDeviceFields from the underlying Accelerometer instance. The device“pings” this payload to the analyser every x seconds.
On receipt of this payload, a target state update is triggered by the analyser to ensure newly connected recorders areshifted from their default state to the current system state.
6.1.3 Making Measurements
UI --- json ---> analyser --- json ---> device
UI -> Analyser
Measurements are scheduled by the UI using the /measurements/<measurementId> endpoint. This accepts ajson payload such as:
{"duration": 10,"delay": 1,"description": "yet another calibration"
}
which directs the system to schedule a new measurement using the current target state configuration. This convertsthe given arguments into an absolute time to allow each recording device to start at the scheduled time (NB: assumesdevices are synchronized using NTP or similar for good results).
Analyser -> Recorder
The analyser schedules a measurement using a PUT to the /devices/<deviceId>/measurements/<measurementId> endpoint. This accepts a json payload similar to that sent UI -> Analyser
{"duration": 10,"at": 20170115_120114
}
The recorder creates a ScheduledMeasurement in response and schedules it for execution at the given time. Itmaintains this with a corresponding ScheduledMeasurementStatus along with the time the state transitionoccurred.
This data is accessible via a GET to the /devices/<deviceId>/measurements/<measurementId> end-point.
Recorder -> Analyser
When a recording starts, the recorder issues a PUT to the /measurements/<measurementId>/<deviceName> endpoint to signal that the analyser should prepare to record the data.
Once a recording starts, the recorder bundles data into batch size packets (as per the samplesPerBatch at-tribute from the TargetState) and sends them in json format to the /measurements/<measurementId>/<deviceName>/data endpoint.
28 Chapter 6. Developer Notes

vibe Documentation, Release 0.3.1
On successful completion, the recorder issues a PUT to the /measurements/<measurementId>/<deviceName>/complete endpoint.
Alternatively if the recording fails for any reason, a PUT is issued to the /measurements/<measurementId>/<deviceName>/fail endpoint.
Handling Data
The analyser stores data in the directory structure:
datadir/<measurement_name>/
metadata.json<device_name>/
data.outstats.json
metadata.json contains the data from RecordedMeasurement which covers a description of the data alongwith the device state.
data.out contains the data in csv format
stats.json contains execution statistics from the device.
6.1.4 Data Analysis
TODO
6.1. Internal Design 29

vibe Documentation, Release 0.3.1
30 Chapter 6. Developer Notes

CHAPTER 7
Release Process
7.1 Building for Local Testing
7.1.1 Linux
1. execute the release script with the current branch:
$ ./release.sh master
2. verify the release completes correctly and results in new binaries in /tmp/output:
**** Copying to /tmp/output - ****$ ls -la /tmp/output/total 13676drwxr-xr-x 2 matt matt 4096 Mar 5 10:29 .drwxrwxrwt 14 root root 7823360 Mar 5 10:32 ..-rw-r--r-- 1 matt matt 3056312 Mar 5 10:29 vibe_analyser-0.1.2+10.gba0843b-py3-→˓none-any.whl-rw-r--r-- 1 matt matt 3042988 Mar 5 10:29 vibe-analyser-0.1.2+10.gba0843b.tar.→˓gz-rw-r--r-- 1 matt matt 28058 Mar 5 10:28 vibe_recorder-0.1.2+10.gba0843b-py3-→˓none-any.whl-rw-r--r-- 1 matt matt 37796 Mar 5 10:28 vibe-recorder-0.1.2+10.gba0843b.tar.→˓gz
3. install the recorder to the test rpi and start it up:
scp /tmp/output/vibe-recorder-*tar.gz pi@rpi:/tmp/ssh pi@rpi <<EOFcd python/recorder. bin/activatepip install /tmp/vibe-recorder-*tar.gzif [[ $? -eq 0 ]]then
31
vibe Documentation, Release 0.3.1
PID=$(pgrep "recorder")[[ -n ${PID} ]] && kill -9 ${PID}./bin/recorder > /tmp/recorder.log 2>&1 &if pgrep "recorder" > /dev/nullthen
echo "Recorder is running"else
echo "Recorder startup FAIL!!"fi
fiEOF
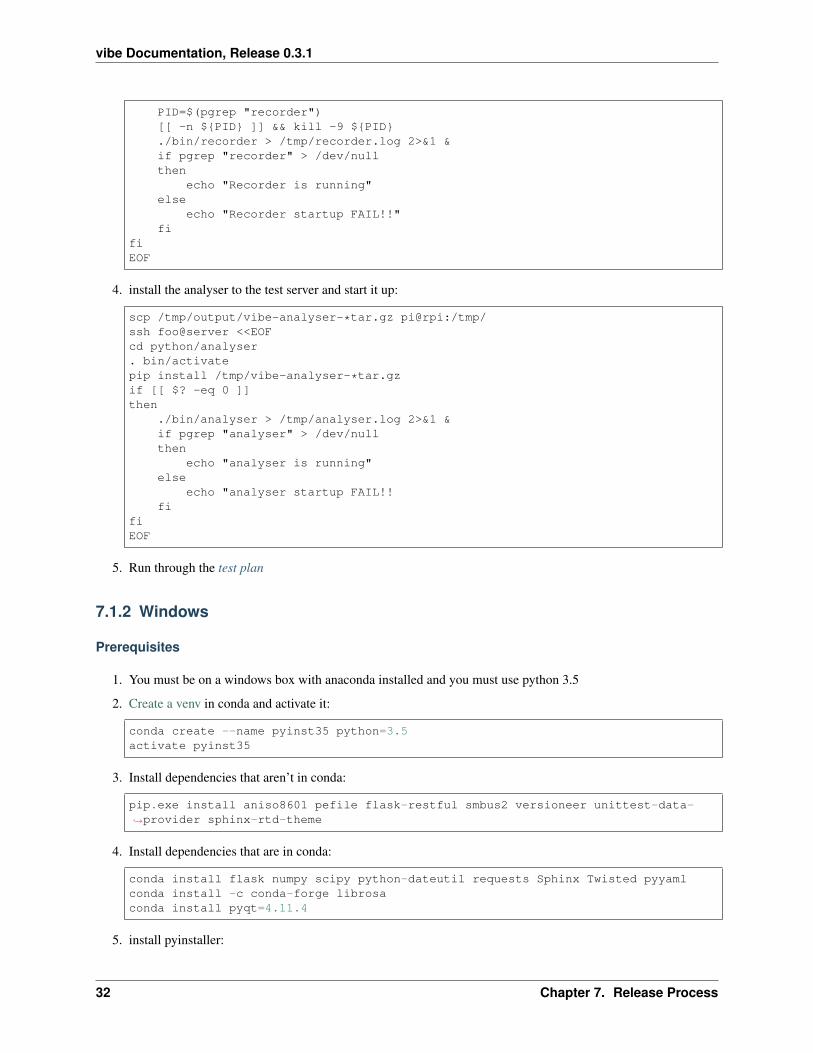
4. install the analyser to the test server and start it up:
scp /tmp/output/vibe-analyser-*tar.gz pi@rpi:/tmp/ssh foo@server <<EOFcd python/analyser. bin/activatepip install /tmp/vibe-analyser-*tar.gzif [[ $? -eq 0 ]]then
./bin/analyser > /tmp/analyser.log 2>&1 &if pgrep "analyser" > /dev/nullthen
echo "analyser is running"else
echo "analyser startup FAIL!!fi
fiEOF
5. Run through the test plan
7.1.2 Windows
Prerequisites
1. You must be on a windows box with anaconda installed and you must use python 3.5
2. Create a venv in conda and activate it:
conda create --name pyinst35 python=3.5activate pyinst35
3. Install dependencies that aren’t in conda:
pip.exe install aniso8601 pefile flask-restful smbus2 versioneer unittest-data-→˓provider sphinx-rtd-theme
4. Install dependencies that are in conda:
conda install flask numpy scipy python-dateutil requests Sphinx Twisted pyyamlconda install -c conda-forge librosaconda install pyqt=4.11.4
5. install pyinstaller:
32 Chapter 7. Release Process

vibe Documentation, Release 0.3.1
conda install -c acellera pyinstaller=3.2.3
6. fix pyinstaller incompatibilities
• remove the python 3.6 specific files from <CONDA-ENV-DIR>\Lib\site-packages\jinja2 (as perhttps://github.com/pallets/jinja/issues/655)
• move the import pkg_resources statement in <CONDA-ENV-DIR>\Lib\site-packages\librosa\util\files.py into the function that uses it
• update release\resampy_pyinst from <CONDA-ENV-DIR>\Lib\site-packages\resampy\dataif necessary
• replace the implementation of load_filter in resampy\filters.py with the implementation belowand remove the import pkg_resources:
# hack in pyinstaller supportif getattr(sys, 'frozen', False):
data = np.load(os.path.join(sys._MEIPASS, 'resampy_filters', os.path.extsep.→˓join([filter_name, 'npz'])))else:
fname = os.path.join('data',os.path.extsep.join([filter_name, 'npz']))
import pkg_resourcesdata = np.load(pkg_resources.resource_filename(__name__, fname))
return data['half_window'], data['precision'], data['rolloff']
TODO: replace this hack with a pyinstaller runtime hook
7.1.3 Build
1. Generate a spec:
pyi-makespec -F -n vibe-analyser --exclude-module pkg_resources --hidden-→˓import=cython --additional-hooks-dir=.\release\hooks backend\src\analyser\app.py
2. manually add the following (though adjust the path for your env dir) after a.binaries in exe = EXE:
Tree('vibe-ui\\build', prefix='ui'),Tree('release\\resampy_pyinst', prefix='resampy_filters'),Tree('C:\\Users\\Matt\\Anaconda3\\envs\\vibe35\\Lib\\site-packages\\_soundfile_→˓data', prefix='_soundfile_data'),
It should now look like this:
a = Analysis(['backend\\src\\analyser\\app.py'],pathex=['C:\\Users\\Matt\\github\\vibe\\backend\\src'],binaries=None,datas=None,hiddenimports=['cython'],hookspath=['.\\release\\hooks'],runtime_hooks=[],excludes=['pkg_resources', 'PyQt4'],win_no_prefer_redirects=False,win_private_assemblies=False,cipher=block_cipher)
pyz = PYZ(a.pure, a.zipped_data,
7.1. Building for Local Testing 33
vibe Documentation, Release 0.3.1
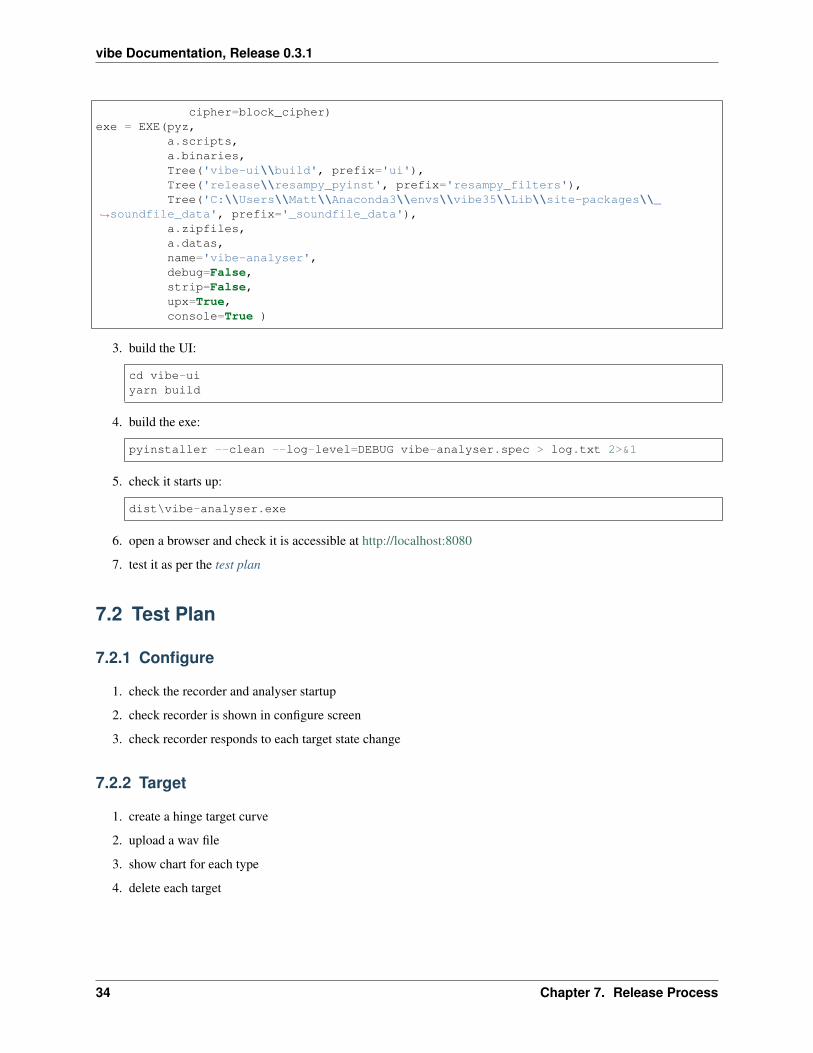
cipher=block_cipher)exe = EXE(pyz,
a.scripts,a.binaries,Tree('vibe-ui\\build', prefix='ui'),Tree('release\\resampy_pyinst', prefix='resampy_filters'),Tree('C:\\Users\\Matt\\Anaconda3\\envs\\vibe35\\Lib\\site-packages\\_
→˓soundfile_data', prefix='_soundfile_data'),a.zipfiles,a.datas,name='vibe-analyser',debug=False,strip=False,upx=True,console=True )
3. build the UI:
cd vibe-uiyarn build
4. build the exe:
pyinstaller --clean --log-level=DEBUG vibe-analyser.spec > log.txt 2>&1
5. check it starts up:
dist\vibe-analyser.exe
6. open a browser and check it is accessible at http://localhost:8080
7. test it as per the test plan
7.2 Test Plan
7.2.1 Configure
1. check the recorder and analyser startup
2. check recorder is shown in configure screen
3. check recorder responds to each target state change
7.2.2 Target
1. create a hinge target curve
2. upload a wav file
3. show chart for each type
4. delete each target
34 Chapter 7. Release Process

vibe Documentation, Release 0.3.1
7.2.3 Measure
1. schedule a measurement
• verify measure screen updates as the measurement completes
• verify chart link is shown
• verify chart link shows the time series chart
• check each tab shows data
• check series can be turned on and off
2. schedule another measurement
• verify it completes
3. delete a measurement
• verify measurement is deleted
• refresh page, check measurement is no longer present
4. schedule a measurement that fails
• verify measurement ends up showing in red
• check analysis button not shown
7.2.4 Analyse
1. analyse multiple measurements
• go straight to analyse tab
• add multiple (more than 2) measurement paths
• check they all show up
• eject a single path, check graph axes are reset
• reinject a single path, check graph updates and axes reset
2. add a target curve
• check it displays
• move the target up and down
3. remove a path from the 1st/2nd/last positions
4. set a reference curve
• check the references update
5. remove the path containing the reference
• check the reference is reset
7.2. Test Plan 35

vibe Documentation, Release 0.3.1
36 Chapter 7. Release Process

CHAPTER 8
Indices and tables
• genindex
• modindex
• search
37