Version 7.2 Release 1 USER HELP - XCharge · Version 7.2 Release 1 . USER HELP . Updated July 2,...
168
Version 7.2 Release 1 USER HELP Updated July 2, 2013
-
Upload
phungthuan -
Category
Documents
-
view
232 -
download
0
Transcript of Version 7.2 Release 1 USER HELP - XCharge · Version 7.2 Release 1 . USER HELP . Updated July 2,...
Version 7.2 Release 1 USER HELP
Updated July 2, 2013
Updated July 2, 2013 XCharge 7.2 Release 1 Help Page 2 of 168
COPYRIGHT INFORMATION © Copyright 2013 - Accelerated Payment Technologies, Inc. All rights reserved worldwide. This manual, as well as the software described in it, is furnished under license and may only be used or copied in accordance with the terms of such license. This manual may contain technical inaccuracies or typographical errors. Changes are periodically made to the information herein and are incorporated in new editions of the publication. The information in this manual is for informational use only, and is subject to change without notice. Accelerated Payment Technologies, Inc. is a registered ISO and MSP of HSBC Bank, National Association, Buffalo, NY and a Registered Independent Sales Organization for Synovus Bank, Columbus, GA.

Updated July 2, 2013 XCharge 7.2 Release 1 Help Page 3 of 168
CONTACT INFORMATION MERCHANT SALES: (800) 637-8268
• New merchant accounts. CUSTOMER CARE: (800) 338-6614
• Existing merchant account support • Statements and deposits • Changes to existing merchant accounts • Technical Support
PARTNER PROGRAMS: (800) 637-8268
• New and existing partnerships SUPPORT HOURS OF OPERATION Our hours are as follows: Technical Support Monday - Friday: 5:00 am - 5:00 pm Pacific time Saturday: 7:30 am - 4:00 pm Pacific time Sunday: Emergency Voicemail Support for merchants unable to transact Account Maintenance Monday - Friday: 6:00 am - 5:00 pm Pacific time

Updated July 2, 2013 XCharge 7.2 Release 1 Help Page 4 of 168
TABLE OF CONTENTS
Contact Information ______________________________________________________________________ 3
Overview _______________________________________________________________________________ 7
Setup Procedures - XCharge Client _________________________________________________________ 8
The XCharge Client Interface _____________________________________________________________________ 9
Recommended Settings _________________________________________________________________________ 11 XCharge Setup - General Options ________________________________________________________________ 12
The Multi-User Tab ____________________________________________________________________________ 12 The Receipts Tab _____________________________________________________________________________ 13 The Printing Tab ______________________________________________________________________________ 14 The Devices Tab ______________________________________________________________________________ 15 The Lists Tab ________________________________________________________________________________ 17 The Display Tab ______________________________________________________________________________ 18 The General Tab ______________________________________________________________________________ 19
XCharge Setup - Credit Cards ____________________________________________________________________ 20 The General Tab ______________________________________________________________________________ 20 The Transactions Tab __________________________________________________________________________ 21
XCharge Setup - Gift Cards ______________________________________________________________________ 22
XCharge Setup - PIN Pad Device Setup ____________________________________________________________ 23 MagTek IPAD ________________________________________________________________________________ 24 MagTek IPAD SC _____________________________________________________________________________ 25 Ingenico 3070 ________________________________________________________________________________ 26 Ingenico 6550/6780 ___________________________________________________________________________ 27 VeriFone MX 800 Series ________________________________________________________________________ 28 VeriFone PINPad 1000 _________________________________________________________________________ 30 VeriFone SC 5000 ____________________________________________________________________________ 31 VeriFone Vx 810 ______________________________________________________________________________ 32
Setup Procedures - XCharge Server _______________________________________________________ 33
The XCharge Server Interface ____________________________________________________________________ 34 The XCharge Server File Menu __________________________________________________________________ 35
XCharge Server Utilities _________________________________________________________________________ 36 GPN AP Not Captured Utility ____________________________________________________________________ 36 Convert Transaction Files to v6 __________________________________________________________________ 36 Purge Credit Card Numbers _____________________________________________________________________ 36 Encryption Key Management ____________________________________________________________________ 36 Import Database Transactions ___________________________________________________________________ 37 Convert to XWeb Processor _____________________________________________________________________ 37 Export Alias Conversion Mapping _________________________________________________________________ 37
Recommended Settings _________________________________________________________________________ 38
XCharge Server Setup - General Options __________________________________________________________ 42 The Server Tab _______________________________________________________________________________ 42 The Logging Tab ______________________________________________________________________________ 45 The Security Tab ______________________________________________________________________________ 46 The Update Tab ______________________________________________________________________________ 49 The Backup Tab ______________________________________________________________________________ 49 The Scheduled Reporting Tab ___________________________________________________________________ 50
XCharge Server Setup - Credit Cards ______________________________________________________________ 51 The General Tab ______________________________________________________________________________ 51 The Scanning Tab _____________________________________________________________________________ 52 The Processor Options Tab _____________________________________________________________________ 53 The Connection Tab ___________________________________________________________________________ 55

Updated July 2, 2013 XCharge 7.2 Release 1 Help Page 5 of 168
TABLE OF CONTENTS
XCharge Server Setup - Gift Cards ________________________________________________________________ 57 The Transactions Tab __________________________________________________________________________ 57 The Connection Tab ___________________________________________________________________________ 58
Transaction Processing _________________________________________________________________ 60
Processing Transactions with the XCharge Client ___________________________________________________ 61
Processing Credit Cards ________________________________________________________________________ 62 Processing a Credit Card Purchase _______________________________________________________________ 62 Processing a Credit Card Return _________________________________________________________________ 64 Processing a Credit Card Force __________________________________________________________________ 66 Processing a Credit Card Pre-Authorization _________________________________________________________ 69 Processing a Credit Card Adjustment ______________________________________________________________ 71 Processing a Credit Card Void ___________________________________________________________________ 72
Processing Debit Cards _________________________________________________________________________ 73 Processing a Debit Card Purchase ________________________________________________________________ 73 Processing a Debit Card Return __________________________________________________________________ 75
Processing Gift Cards __________________________________________________________________________ 77 Processing a Gift Card Issue ____________________________________________________________________ 77 Processing a Gift Card Redeem __________________________________________________________________ 79 Processing a Gift Card Return ___________________________________________________________________ 81 Processing a Gift Card Adjustment ________________________________________________________________ 83 Processing a Gift Card Void _____________________________________________________________________ 85 Processing a Gift Card Balance Inquiry ____________________________________________________________ 86 Processing a Gift Card Replace Account ___________________________________________________________ 87 Processing a Gift Card Combine Accounts _________________________________________________________ 89
Processing Checks ____________________________________________________________________________ 91 Processing a Check Sale _______________________________________________________________________ 91 Processing a Check Credit ______________________________________________________________________ 94 Processing a Check Verification __________________________________________________________________ 95
Processing EBT Cards __________________________________________________________________________ 96 Processing an EBT Sale ________________________________________________________________________ 96 Processing an EBT Return ______________________________________________________________________ 98 Processing an EBT Force Voucher ______________________________________________________________ 100 Processing an EBT Cash Benefit Sale ____________________________________________________________ 102
Transaction Settlement _________________________________________________________________ 104
Updated July 2, 2013 XCharge 7.2 Release 1 Help Page 6 of 168
TABLE OF CONTENTS
Reporting ____________________________________________________________________________ 105
Credit, Debit & EBT Card Reports _______________________________________________________________ 106 Transaction Detail ____________________________________________________________________________ 106 Transaction Totals ___________________________________________________________________________ 108 Credit Card Totals ____________________________________________________________________________ 109 CC Totals By Day ____________________________________________________________________________ 110 CC Totals By Processing Account _______________________________________________________________ 111 Settlement __________________________________________________________________________________ 112
Check Reports _______________________________________________________________________________ 113 Checks Detail _______________________________________________________________________________ 113
Gift Card Reports _____________________________________________________________________________ 114 Gift Transaction Detail ________________________________________________________________________ 114 Gift Activity _________________________________________________________________________________ 115 Gift Totals By Day ____________________________________________________________________________ 116
Offline Reports _______________________________________________________________________________ 117 Outage ____________________________________________________________________________________ 117 Offline Transactions __________________________________________________________________________ 118
Transaction Lookup ___________________________________________________________________ 119
Additional Information _________________________________________________________________ 121
Frequently Asked Questions ____________________________________________________________________ 122 How can I void a credit card transaction? __________________________________________________________ 122 How can I adjust the amount of a credit card transaction? _____________________________________________ 122 How can I return money to a credit card in my history? _______________________________________________ 122 Where can I find more information on PCI compliance? ______________________________________________ 123 How can I determine if a transaction was processed? ________________________________________________ 123 What needs to be allowed in my firewall for XCharge to function? ______________________________________ 123 How can I obtain a Voice Authorization? __________________________________________________________ 124 What do the common coded responses mean and how do I proceed after receiving them? __________________ 125
XCharge System Requirements _________________________________________________________________ 126 Operating System ____________________________________________________________________________ 126 Other Software ______________________________________________________________________________ 126 Hardware Requirements _______________________________________________________________________ 126 Optional Hardware ___________________________________________________________________________ 127
XWeb Response Codes ________________________________________________________________________ 128
Gift Card Response Codes _____________________________________________________________________ 132
XCheck Standard Entry Class Codes _____________________________________________________________ 133 Definitions, Requirements & Merchant Responsibilities by SEC ________________________________________ 133 Transaction Capabilities by SEC ________________________________________________________________ 137
AVS & CSC Response Codes ___________________________________________________________________ 138 AVS Response Codes ________________________________________________________________________ 138 CSC Response Codes ________________________________________________________________________ 138
XCharge Release Notes ________________________________________________________________________ 139
Updated July 2, 2013 XCharge 7.2 Release 1 Help Page 7 of 168
OVERVIEW
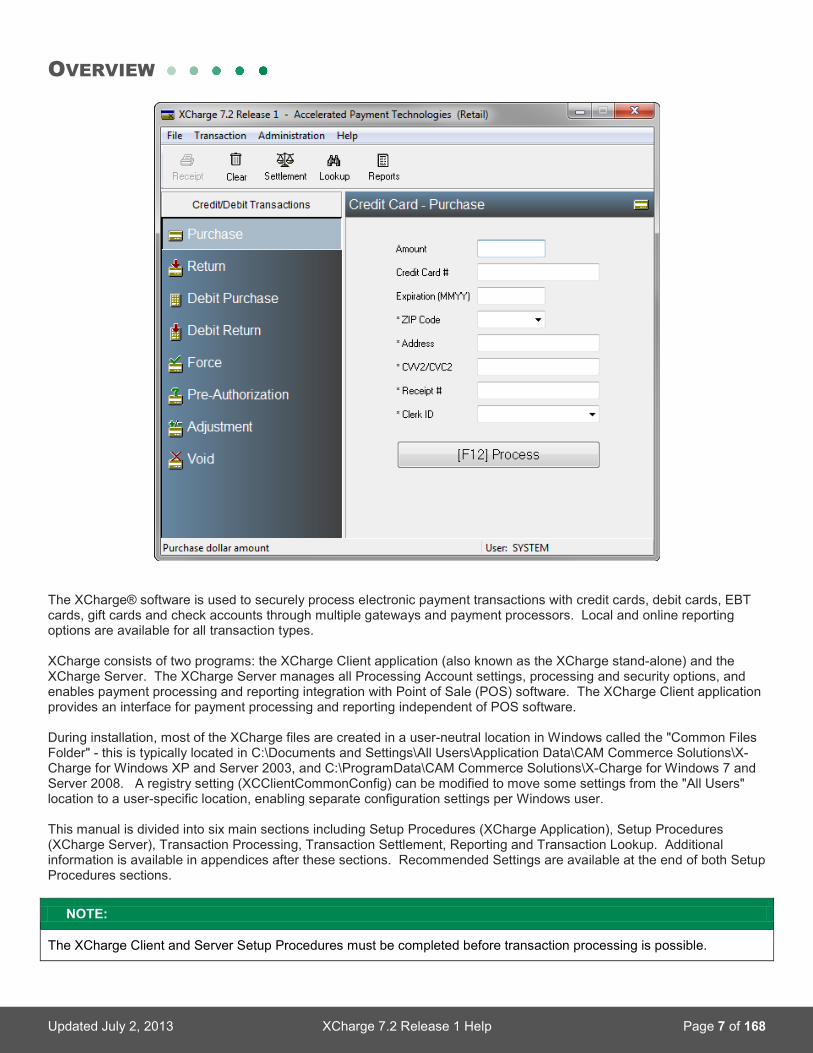
The XCharge® software is used to securely process electronic payment transactions with credit cards, debit cards, EBT cards, gift cards and check accounts through multiple gateways and payment processors. Local and online reporting options are available for all transaction types. XCharge consists of two programs: the XCharge Client application (also known as the XCharge stand-alone) and the XCharge Server. The XCharge Server manages all Processing Account settings, processing and security options, and enables payment processing and reporting integration with Point of Sale (POS) software. The XCharge Client application provides an interface for payment processing and reporting independent of POS software. During installation, most of the XCharge files are created in a user-neutral location in Windows called the "Common Files Folder" - this is typically located in C:\Documents and Settings\All Users\Application Data\CAM Commerce Solutions\X-Charge for Windows XP and Server 2003, and C:\ProgramData\CAM Commerce Solutions\X-Charge for Windows 7 and Server 2008. A registry setting (XCClientCommonConfig) can be modified to move some settings from the "All Users" location to a user-specific location, enabling separate configuration settings per Windows user. This manual is divided into six main sections including Setup Procedures (XCharge Application), Setup Procedures (XCharge Server), Transaction Processing, Transaction Settlement, Reporting and Transaction Lookup. Additional information is available in appendices after these sections. Recommended Settings are available at the end of both Setup Procedures sections.
NOTE:
The XCharge Client and Server Setup Procedures must be completed before transaction processing is possible.

Updated July 2, 2013 XCharge 7.2 Release 1 Help Page 8 of 168
SETUP PROCEDURES - XCHARGE CLIENT The XCharge Client application can be used to configure settings, generate reports, and process transactions in the direct standalone interface - outside of your Business Management Software (BMS). This section will go over all the options available in the XCharge Client application, and then walk through configuring the most commonly used options. It is recommended to choose the Save button in the upper-left after changing any settings and before proceeding to another window.
The XCharge Client Interface _____________________________________________________________________ 9
Recommended Settings _________________________________________________________________________ 11
XCharge Setup - General Options ________________________________________________________________ 12 The Multi-User Tab ____________________________________________________________________________ 12 The Receipts Tab _____________________________________________________________________________ 13 The Printing Tab ______________________________________________________________________________ 14 The Devices Tab ______________________________________________________________________________ 15 The Lists Tab ________________________________________________________________________________ 17 The Display Tab ______________________________________________________________________________ 18 The General Tab ______________________________________________________________________________ 19
XCharge Setup - Credit Cards ____________________________________________________________________ 20 The General Tab ______________________________________________________________________________ 20 The Transactions Tab __________________________________________________________________________ 21
XCharge Setup - Gift Cards ______________________________________________________________________ 22
XCharge Setup - PIN Pad Device Setup ____________________________________________________________ 23 MagTek IPAD ________________________________________________________________________________ 24 MagTek IPAD SC _____________________________________________________________________________ 25 Ingenico 3070 ________________________________________________________________________________ 26 Ingenico 6550/6780 ___________________________________________________________________________ 27 VeriFone MX 800 Series ________________________________________________________________________ 28 VeriFone PINPad 1000 _________________________________________________________________________ 30 VeriFone SC 5000 ____________________________________________________________________________ 31 VeriFone Vx 810 ______________________________________________________________________________ 32

Updated July 2, 2013 XCharge 7.2 Release 1 Help Page 9 of 168
THE XCHARGE CLIENT INTERFACE The XCharge Client application can be used to configure settings, generate reports, and process transactions in the direct standalone interface - outside of your Business Management Software (BMS).
This section will go over all the options available in the XCharge Client application, and then walk through configuring the most commonly used options. It is recommended to choose the Save button in the upper-left after changing any settings and before proceeding to another window. The options configured here will affect the XCharge Client application and transaction processing in BMS using the XpressLink integration method. None of these settings will affect BMS that integrates with XCharge using methods other than XpressLink. To open XCharge: double-choose the XCharge desktop icon, or choose the Windows Start button, select Programs or All Programs, select the X-Charge folder, then select and choose XCharge.
To access the XCharge Client Setup window, choose File, then Setup. There are three setup categories listed along the left side of the screen: General Options, Credit Cards, and Gift Cards.
NOTE:
You must log in to XCharge to access any options. The default User Name is system and the default Password is also system, but this password must be changed before transaction processing is possible. For more information on XCharge Security, please see the XCharge Server Setup - General Options topic.

Updated July 2, 2013 XCharge 7.2 Release 1 Help Page 10 of 168
THE XCHARGE CLIENT INTERFACE (CONTINUED) 1. Menu Bar: almost all features within
the XCharge interface can be accessed from the Menu Bar.
a. Within the File Menu, the options to Print Receipt for the most recent transaction, enter XCharge Setup, launch the XCharge Server (for XCharge Server PCs only), Log Off, Change Password, View Voice Auth (Force) Credentials), and Exit can be found.
b. The Transaction Menu contains options to set the Transaction Category and Type, and displays the keyboard shortcuts that can be used to quickly switch to any Transaction Type or to Process a transaction. The option to select a Processing Account is also found here.
c. The Administration Menu contains options to open the XCharge Reports, Transaction Lookup, and Settlement windows.
d. Within the Help Menu, you will find links to help documentation and other resources. 2. Ribbon Menu: shortcuts to commonly-used XCharge features are available here.
a. The Receipt button will become available after a transaction is processed and approved, and can be used to print as many receipts as desired.
b. The Clear button will clear the XCharge Transaction Input fields. c. Buttons to launch the Settlement, Lookup, and Reports windows are also available here.
3. Transaction Category Menu: all Transaction Types are organized within one of five categories, which can be selected from this menu by selecting the currently active Transaction Category.
a. This menu item is located directly below the Receipt button in the upper-left corner of the XCharge Client application.
4. Transaction Type Menu: all available Transaction Types belonging to the currently selected Transaction Category are displayed on the far left of the XCharge Client application.
a. The list of available Transaction Types shown here depends on the Transaction Types available to the User currently logged in to XCharge, and can be limited further by some XCharge Client Setup options.
5. Transaction Input Fields: the fields presented here can be populated by hardware such as PIN pad devices, or by manually typing the desired values in, depending on the type of field. Choose the [F12] Process button or press the F12 key on your keyboard to process the transaction.
a. Fields that cannot be entered by hand will appear disabled ("grayed out") b. Any field with an asterisk (*) are not required by the XCharge Client, but can still be used as desired. These
fields can be set to required within the XCharge Client Setup options. 6. Status Bar: information pertaining to the currently select field in the XCharge Client is displayed in the lower-left
corner, and the User currently logged in to XCharge is displayed in the lower-right corner.

Updated July 2, 2013 XCharge 7.2 Release 1 Help Page 11 of 168
RECOMMENDED SETTINGS These steps will walk you through the most commonly configured options for the XCharge Client application and skip over options that are not commonly changed. These steps may not cover everything for all users - for information on all available options please read through all of the following pages under Setup Procedures - XCharge Client.
1. Open XCharge and log in. 2. Choose File, then Setup. 3. On the Multi-User tab, the current selection should be
correct (this is typically configured during installation). 4. Choose the Receipts tab from the top. 5. For Receipt Printer, select the printer you would like to
use for receipts printed from XCharge. 6. Set the number of Receipt Copies to automatically print
after processing. In order to save paper, many users choose to leave this option set to 0 - there is a "Receipt" button in the upper-left corner of the XCharge Client application that can be used to print receipts as desired.
7. Enter the business name you would like to appear in the XCharge Client application and on the XCharge receipts in the Rcpt Store Name field.
8. Enter the address information in the Rcpt Address, City, State and ZIP fields that you would like to appear on the XCharge receipts. If you would like a phone number to print, enter it on the Address Line 1 field and enter the address on the Address Line 2 field.
9. If you would like XCharge to print a return or other store police on the XCharge receipts, enter it into the Policy field.
10. Choose the Printing tab from the top of the window. 11. If you have specific setup instructions for this tab then configure these settings as instructed. Otherwise, the Raw
Printing option should be used for most 40-column receipt printers and the Standard Windows Printing option should be used for virtually all other receipt and report printers.
12. If you have a PIN pad device (including signature capture devices with PIN input capability), choose the Devices tab and refer to the instructions found on the XCharge Setup - General Options topic.
13. If you have a Magnetic Stripe Reader (MSR, or card reader), choose the Card Reader Device Setup button and select your card reader device. This step can be skipped if you are using a non-encrypted "Keyboard Emulation" MSR, or an MSR integrated with your PIN pad device.
14. If you have a Check Scanner device to configure, choose the Check Scanner Device Setup button from the Devices tab. The most commonly used devices are "RDM" scanners - select this or your device from the Check Scanner Device drop-down menu and then choose OK.
15. Choose the Save button in the upper-left corner, then Exit and close the XCharge Client application before proceeding.
NOTE:
The options configured here only apply to transactions processed directly in the XCharge Client application. These options will not affect transactions processed from Business Management Software (BMS) unless the XpressLink integration method is used. If you are not sure if XpressLink is used, please contact Accelerated Payment Technologies or your BMS provider. Example: if the Receipt Copies setting is set to 0, then XCharge will not print receipts automatically when transactions are processed from XCharge or BMS using XpressLink, but other BMS receipts will still print according to the BMS settings.

Updated July 2, 2013 XCharge 7.2 Release 1 Help Page 12 of 168
XCHARGE SETUP - GENERAL OPTIONS To access these options, log in to XCharge and choose File, then Setup. From the XCharge - Setup window, choose General Options from the Setup Categories menu. Options here are organized under seven different tabs. The Multi-User Tab The Multi-User tab is used to designate this copy of XCharge as the Server, or to configure the Client settings. Single User/Server This option is selected on the XCharge Server computer. In a multiple workstation environment, typically one computer will have this option selected and the others will be set to Client. The XCharge Server options such as security, Processing Accounts, etc. can only be configured on an XCharge Server computer. Client This option is selected on additional workstations. One computer must be configured as "Single User/Server" and it is that computer's IP Address/Computer Name and Port that should be entered here.
NOTE:
Connections to the XCharge Server must not pass through the Internet or other unsecure networks. It is recommended to use the Computer Name (hostname) of the XCharge Server PC instead of the IP Address when possible. The Port is 26 by default. To determine the hostname of the XCharge Server PC:
1. From the XCharge Server PC, open the command prompt (Start, Run, then type CMD). 2. From the command prompt, type hostname and press the Enter key. 3. The hostname of the PC should be displayed directly above the flashing cursor (usually the shortest line).

Updated July 2, 2013 XCharge 7.2 Release 1 Help Page 13 of 168
XCHARGE SETUP - GENERAL OPTIONS (CONTINUED) The Receipts Tab The Receipts tab is used to set up receipt information. When XCharge is used as a stand-alone system, the Receipts window is where you set up your receipt printer, define the number of transaction receipts to print, and enter the policy information that you want printed on each receipt. When XCharge is integrated with your Business Management Software (BMS), these settings will control printing if the XpressLink integration is used, otherwise the receipts will print based on the receipt settings defined in your BMS. Receipts Printer Select the drop-down menu to select the Windows printer used for printing receipts from XCharge. The printer must be properly installed in Windows before it will appear in the list. Receipt Copies Enter the number of Receipt Copies you want printed for each transaction. You can also use the up and down arrow buttons to set the number of copies. Canadian debit transactions require two receipts, one for the merchant and one for the customer. If this field is set to zero, a copy of the receipt will display for the clerk to copy the information manually for the customer. Receipts are printed for both approved and declined Canadian debit transactions. Rcpt Store Name, Address, City, State, ZIP Code Enter the name of the store you want printed on the receipt in the Rcpt Store Name edit box. Continue entering the information you want to print on the receipt in the Rcpt Address Line 1, Rcpt Address Line 2, Rcpt City, Rcpt State, and Rcpt Zip edit boxes. If you would like your phone number to print on the receipt, the "Address Line 1" edit box can be used for this. Default Language The Default Language for receipt printing is English. Click on the down arrow button and select "French" or "English & French", if necessary. This language option does not affect Canadian debit receipts which are controlled by a language code in the card swipe data. Check Return Fee Enter your fee for returned checks. Click on the ? icon to view a list of US states and associated fees that you may choose from. Check Support Phone For XCheck merchants, enter the phone number for your customers to contact you for check inquiries. Policy Enter any policy information (store policy, return policy, etc.) you want printed at the bottom of the receipt. Prompt before printing multiple Receipts This option is enabled by default. If you do not want to be prompted before a second receipt is printed, select the option box to deselect it. Print Tip Line This option is enabled by default. If you do not want a tip line to print on the receipt, select the option box to deselect it.
NOTE:
The tip line only prints when credit card pre-authorization is used.
Updated July 2, 2013 XCharge 7.2 Release 1 Help Page 14 of 168
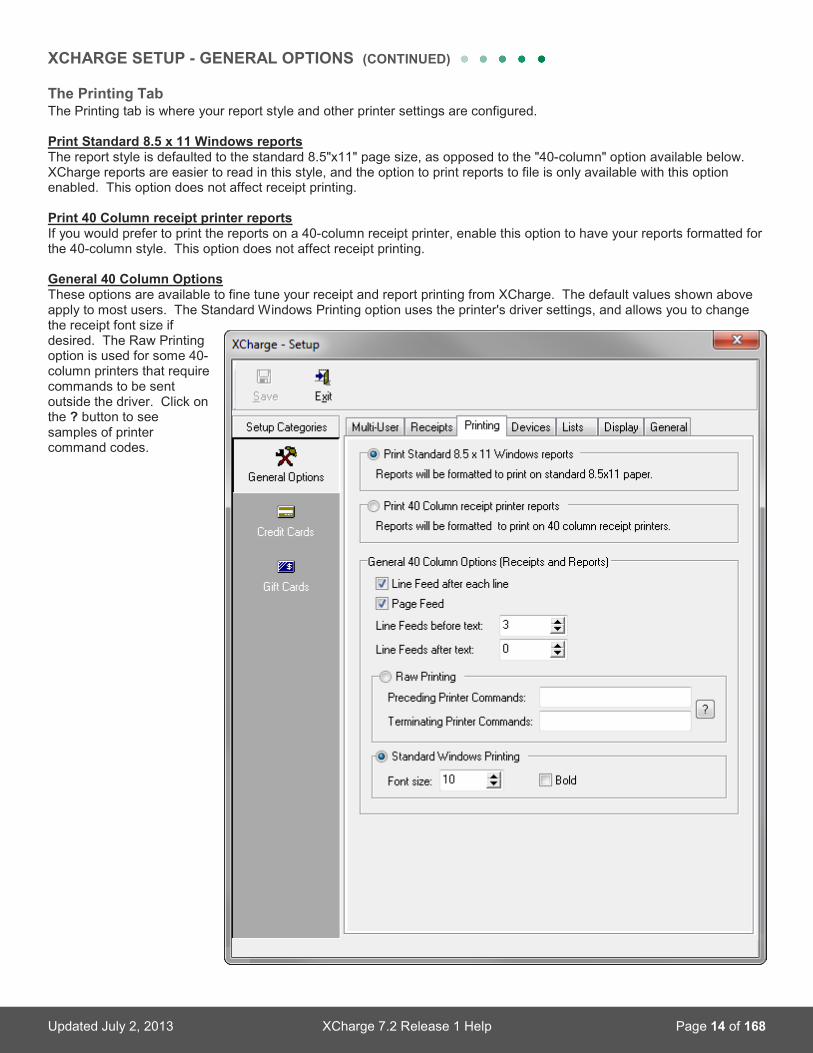
XCHARGE SETUP - GENERAL OPTIONS (CONTINUED) The Printing Tab The Printing tab is where your report style and other printer settings are configured. Print Standard 8.5 x 11 Windows reports The report style is defaulted to the standard 8.5"x11" page size, as opposed to the "40-column" option available below. XCharge reports are easier to read in this style, and the option to print reports to file is only available with this option enabled. This option does not affect receipt printing. Print 40 Column receipt printer reports If you would prefer to print the reports on a 40-column receipt printer, enable this option to have your reports formatted for the 40-column style. This option does not affect receipt printing. General 40 Column Options These options are available to fine tune your receipt and report printing from XCharge. The default values shown above apply to most users. The Standard Windows Printing option uses the printer's driver settings, and allows you to change the receipt font size if desired. The Raw Printing option is used for some 40-column printers that require commands to be sent outside the driver. Click on the ? button to see samples of printer command codes.

Updated July 2, 2013 XCharge 7.2 Release 1 Help Page 15 of 168
XCHARGE SETUP - GENERAL OPTIONS (CONTINUED) The Devices Tab From the Devices tab, you can configure your PIN pad or signature capture devices, your Magnetic Stripe Reader (MSR), and your Check Scanner device. Basic setup instructions for most PIN pad devices can be found under the XCharge Setup - PIN Pad Device Setup topic.
PIN Pad/Signature Capture Settings These settings are used to configure your PIN pad (or signature capture with PIN input capability) device.
• PIN Pad Device Setup: choosing this button will open the Debit PIN Pad Setup window where your PIN pad device is configured. See the XCharge Setup - Debit PIN Pad Setup topic for basic setup instructions for most devices.
• Configured PIN Pad Device: the currently selected device name is displayed here. • Device Tipping Options: these options are available for specific Canadian debit PIN pads only. See the
XCharge Setup - Debit PIN Pad Setup topic for more details. • Canadian Debit Options: these options are available for specific Canadian debit PIN pads only. See the
XCharge Setup - Debit PIN Pad Setup topic for more details. • Prompt For/Save Signature: enable this option if you have a supported signature capture device configured in
XCharge and you want the XCharge Client to store the digital signature along with the transaction. • Display Signature: enable this option if Prompt For/Save Signature is enabled and you want the XCharge
Client to display the digital signature before saving it.

Updated July 2, 2013 XCharge 7.2 Release 1 Help Page 16 of 168
XCHARGE SETUP - GENERAL OPTIONS (CONTINUED) Card Readers This section is used to configure Magnetic Stripe Readers (MSR) for XCharge. Legacy non-encrypted "Keyboard Emulation" card readers do not need to be configured in XCharge here, only Human Interface Device (HID) and/or encrypted MSRs. Choose the Card Reader Device Setup button to open the Card Reader Device Setup window.
• Non-Encrypted Card Reader Devices: if a non-encrypted HID card reader is to be used, select the supported device from the HID Card Reader Device drop-down menu here. If additional settings are needed for your device, they will appear in the window just below the selected device.
• Encrypted Card Reader Devices: if an encrypted card reader (HID or Keyboard Emulation) is to be used, select the supported device from the Card Reader Device drop-down menu. If additional settings are needed for your device, they will appear in the window just below the selected device.
Check Reader/Scanner This section is used to configure devices for scanning check images or reading MICR codes for merchants enrolled with XCheck. Choose the Check Scanner Device Setup button to open the Check Scanner Device Setup window. The default option is "No Device Selected." Choose the drop-down box and select Magtek MICR devices, Digital Check Scanners or RDM scanners if you are using one of these devices. For the Magtek MICR devices you must specify the Comm port used. Choose the OK button to save your changes or Cancel to return to the Devices setup tab without saving your changes here.
• The Frank Check option can be enabled for the RDM scanners if you would like XCharge to print a "VOID" frank on the check when the check is scanned.
• The Keyboard Emulation MICR Scanner Support option can be enabled if needed for your Check Scanner device.
Encrypted Reader - No keyboard entry in Account and Expiration fields Enable this option if you are using an encrypted card reader device and you wish to disable the ability to manually enter sensitive card data in the XCharge Client using the computer keyboard (or through other non-encrypted means). Some devices, like the MagTek IPAD, allow you to manually key-in sensitive data on the encrypted device instead of using the computer keyboard.

Updated July 2, 2013 XCharge 7.2 Release 1 Help Page 17 of 168
XCHARGE SETUP - GENERAL OPTIONS (CONTINUED) The Lists Tab The Lists tab will display previously used Clerk IDs and ZIP Codes. You can add or remove any entries from these lists. Clerk List Any previously used Clerk ID will appear on this list, unless removed. Any Clerk ID listed here can be reused in the XCharge Client quickly because it will appear in the drop-down menu and the autocomplete. ZIP Code List Like the Clerk List, the ZIP Code List displays all previously used ZIP codes, and any items listed here are available in the XCharge Client from the drop-down menu and the autocomplete.

Updated July 2, 2013 XCharge 7.2 Release 1 Help Page 18 of 168
XCHARGE SETUP - GENERAL OPTIONS (CONTINUED) The Display Tab The Display tab lets you customize the colors that display in the XCharge Client application. Selecting distinct colors will make it easier to quickly identify which transaction type is active. Colors Each of the four transaction types can have a unique color configuration. To change the colors, choose the Edit button next to the transaction type desired: Credit Card Transactions, Gift Card Transactions, EBT Transactions and Check Transactions.
Edit Choose this button to open the Edit Display Colors window, where the colors can be configured.
NOTE:
Although you can edit the colors for any of the transaction types, only the transaction types available to the selected processor and enabled for the logged in user will be displayed from the Transaction Menu in XCharge.

Updated July 2, 2013 XCharge 7.2 Release 1 Help Page 19 of 168
XCHARGE SETUP - GENERAL OPTIONS (CONTINUED) The General Tab The General tab is where the Auto-Logout and Virtual Keyboard options are configured. Auto-Logout Enable this option to have the XCharge Client application require another login after a set amount of idle time. Enter the auto-logout time in minutes directly into the option box or use the up and down arrow buttons. Virtual Keyboard This feature was designed with touch-screen users in mind. Enable this option to get the integrated virtual keyboard in the XCharge Client application. If enabled, a "ten-key" style virtual keyboard will display when a number field is selected, and a full "QWERTY" style virtual keyboard will display when a test field in selected.

Updated July 2, 2013 XCharge 7.2 Release 1 Help Page 20 of 168
XCHARGE SETUP - CREDIT CARDS To access these options, log in to XCharge and choose File, then Setup. From the XCharge - Setup window, choose Credit Cards from the Setup Categories menu. Options here are organized under two different tabs. The General Tab The General tab is where some of the XCharge Client application interface options pertaining to credit card processing can be modified. Required/Optional Fields Disabled by default, these options can be enabled to require the entry of any desired fields before processing credit and debit card transactions. Any options that are not required will have an asterisk (*) displayed next to the respective field from the XCharge Client.
• Require ZIP Code: if enabled, the ZIP code associated with the credit card must be entered for manually keyed transactions (not needed if the card is swiped).
• Require Address: if enabled, the house number associated with the credit card must be entered for manually keyed transactions (not needed if the card is swiped).
• Require CVV2/CVC2: if enabled, the card verification value/code (also called the Card Security Code, or CSC) on the credit card must be entered for manually keyed transactions (not needed if the card is swiped).
• Require Receipt Number: if enabled, the Receipt Number field cannot be left blank before processing.
• Require Clerk ID: if enabled, the Clerk ID field cannot be left blank before processing.
• Require Check Name On Account: if enabled, the Name On Acct field cannot be left blank before processing check transactions.
Credit Card Swipe Delay The swipe delay determines the number of milliseconds XCharge will wait before parsing the swipe data. If set too low, some of the card data may be misread (you may receive an "invalid card #" or "invalid track" error). If set too high, you may have an excessive pause before you are able to process the transaction. The default value is 2000 milliseconds (2 seconds). Prompt for Processing Account at Startup If enabled, a prompt to select the Processing Account will appear after logging in. The prompt will only appear if multiple Processing Accounts are configured and available to the user logging in. Prompt for Processing Account before Processing Transaction If enabled, a prompt to select the Processing Account will appear after choosing F12 - Process. The prompt will only appear if multiple Processing Accounts are configured and available to the user logging in.
NOTE:
Although these options can be set to "required," the data entered when processing is not verified for accuracy. If a credit card number is manually keyed into XCharge and the ZIP/Address/CSC is not entered, you may be charged a higher rate for the transaction.

Updated July 2, 2013 XCharge 7.2 Release 1 Help Page 21 of 168
XCHARGE SETUP - CREDIT CARDS (CONTINUED) The Transactions Tab The Transactions tab is where some transaction types and options can be enabled or disabled for the XCharge Client application. Check Verification The Check Verification option here refers to the legacy "Global Payments Check Driver's License (DL)" service only, and is displayed here for backwards compatibility. All XCheck transactions are configured within the XCharge Server Setup interface. Debit Card Debit Card Transactions are enabled in the XCharge Client application by default. In order to process PIN-based debit transactions, it is required to be enrolled for debit and to have a PIN pad device configured. If this option is disabled then the "Debit Purchase" and "Debit Return" options will not appear under Credit/Debit Transactions. Tipping Tip field support is only available through the Global Canada processor with a PIN pad device configured. This option is disabled by default. Enabling this option will add a "Tip Amount" field to debit and/or credit card purchases, depending on the settings configured on the Devices tab (under the General Options Setup Category).

Updated July 2, 2013 XCharge 7.2 Release 1 Help Page 22 of 168
XCHARGE SETUP - GIFT CARDS
To access these options, log in to XCharge and choose File, then Setup. From the XCharge - Setup window, choose Gift Cards from the Setup Categories menu. All options here are under a single tab. The General tab is where some of the fields for gift card processing can be toggled from optional to required. Required/Optional Fields Disabled by default, these options can be enabled to require the entry of any desired fields before processing gift card transactions. Any options that are not required will have an asterisk (*) displayed next to the respective field from the XCharge Client application.
• Require Receipt Number: if enabled, the Receipt Number field cannot be left blank before processing. • Require Clerk ID: if enabled, the Clerk ID field cannot be left blank before processing.

Updated July 2, 2013 XCharge 7.2 Release 1 Help Page 23 of 168
XCHARGE SETUP - PIN PAD DEVICE SETUP To configure PIN pad (including signature capture + PIN pad combo) devices, log in to XCharge and choose File, then Setup. From the XCharge - Setup window, choose General Options from the Setup Categories menu and then select the Devices tab from the top of the window. From the Devices tab, choose the PIN Pad Device Setup button to display the Debit PIN Pad Setup window. Setup instructions for most devices can be found below.
Copyright Information MagTek and the MagTek logo are either trademarks or registered trademarks of MagTek in the United States and/or other countries. All features and specifications about MagTek products and services are subject to change without notice. Ingenico and the Ingenico logo are either trademarks or registered trademarks of Ingenico in the United States and/or other countries. All features and specifications about Ingenico products and services are subject to change without notice. VeriFone and the VeriFone logo are either trademarks or registered trademarks of VeriFone in the United States and/or other countries. All features and specifications about VeriFone products and services are subject to change without notice. All other trademarks or brand names are the properties of their respective holders.
Updated July 2, 2013 XCharge 7.2 Release 1 Help Page 24 of 168
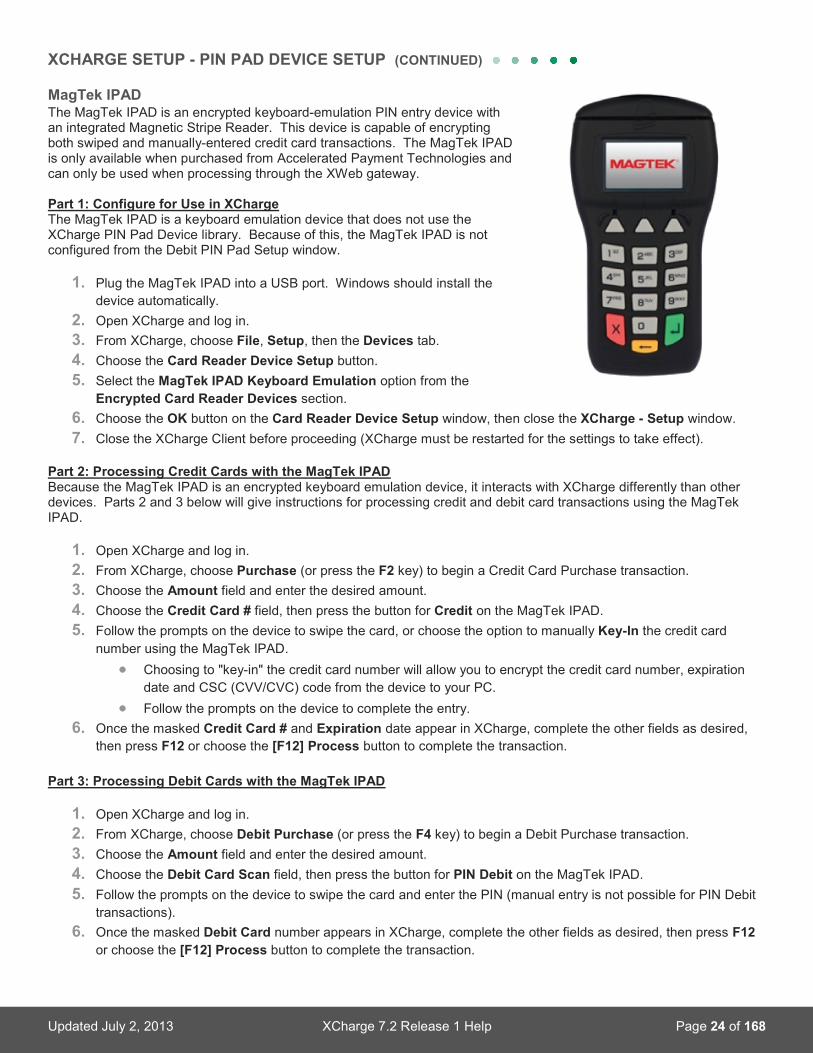
XCHARGE SETUP - PIN PAD DEVICE SETUP (CONTINUED) MagTek IPAD The MagTek IPAD is an encrypted keyboard-emulation PIN entry device with an integrated Magnetic Stripe Reader. This device is capable of encrypting both swiped and manually-entered credit card transactions. The MagTek IPAD is only available when purchased from Accelerated Payment Technologies and can only be used when processing through the XWeb gateway. Part 1: Configure for Use in XCharge The MagTek IPAD is a keyboard emulation device that does not use the XCharge PIN Pad Device library. Because of this, the MagTek IPAD is not configured from the Debit PIN Pad Setup window.
1. Plug the MagTek IPAD into a USB port. Windows should install the device automatically.
2. Open XCharge and log in. 3. From XCharge, choose File, Setup, then the Devices tab. 4. Choose the Card Reader Device Setup button. 5. Select the MagTek IPAD Keyboard Emulation option from the
Encrypted Card Reader Devices section. 6. Choose the OK button on the Card Reader Device Setup window, then close the XCharge - Setup window. 7. Close the XCharge Client before proceeding (XCharge must be restarted for the settings to take effect).
Part 2: Processing Credit Cards with the MagTek IPAD Because the MagTek IPAD is an encrypted keyboard emulation device, it interacts with XCharge differently than other devices. Parts 2 and 3 below will give instructions for processing credit and debit card transactions using the MagTek IPAD.
1. Open XCharge and log in. 2. From XCharge, choose Purchase (or press the F2 key) to begin a Credit Card Purchase transaction. 3. Choose the Amount field and enter the desired amount. 4. Choose the Credit Card # field, then press the button for Credit on the MagTek IPAD. 5. Follow the prompts on the device to swipe the card, or choose the option to manually Key-In the credit card
number using the MagTek IPAD. • Choosing to "key-in" the credit card number will allow you to encrypt the credit card number, expiration
date and CSC (CVV/CVC) code from the device to your PC. • Follow the prompts on the device to complete the entry.
6. Once the masked Credit Card # and Expiration date appear in XCharge, complete the other fields as desired, then press F12 or choose the [F12] Process button to complete the transaction.
Part 3: Processing Debit Cards with the MagTek IPAD
1. Open XCharge and log in. 2. From XCharge, choose Debit Purchase (or press the F4 key) to begin a Debit Purchase transaction. 3. Choose the Amount field and enter the desired amount. 4. Choose the Debit Card Scan field, then press the button for PIN Debit on the MagTek IPAD. 5. Follow the prompts on the device to swipe the card and enter the PIN (manual entry is not possible for PIN Debit
transactions). 6. Once the masked Debit Card number appears in XCharge, complete the other fields as desired, then press F12
or choose the [F12] Process button to complete the transaction.

Updated July 2, 2013 XCharge 7.2 Release 1 Help Page 25 of 168
XCHARGE SETUP - PIN PAD DEVICE SETUP (CONTINUED) MagTek IPAD SC The MagTek IPAD SC is an encrypted HID signature capture device with PIN entry capabilities and an integrated Magnetic Stripe Reader. This device is capable of encrypting both swiped and manually-entered credit card transactions. The MagTek IPAD SC is only available when purchased from Accelerated Payment Technologies and can only be used when processing through the XWeb gateway. Part 1: Configure for Use in XCharge
1. Plug the MagTek IPAD SC into a USB port. Windows should install the device automatically.
2. Open XCharge and log in. 3. From XCharge, choose File, Setup, then the Devices tab. 4. Choose the PIN Pad Device Setup button, then select MagTek IPAD
SC from the PIN Pad Device drop-down menu. 5. Choose the Test button... after a few seconds the PIN pad should
prompt you to enter a PIN. 6. Enter any 4 digits, then press Enter on the PIN pad... you should
receive a Success! message within XCharge. 7. Choose OK from the confirmation window, then OK on the PIN Pad
Device Setup window, then Exit the XCharge - Setup window. Part 2: Processing Credit Cards with the MagTek IPAD SC Parts 2 and 3 below will give instructions for processing credit and debit card transactions using the MagTek IPAD SC.
1. Open XCharge and log in. 2. From XCharge, choose Purchase (or press the F2 key) to begin a Credit Card Purchase transaction. 3. Choose the Amount field and enter the desired amount. 4. Leave the Credit Card # and Expiration date fields empty. 5. Complete the other fields as desired, then press F12 or choose the [F12] Process button to initialize the MagTek
IPAD SC. 6. Choose the option for Credit on the MagTek IPAD SC when prompted. 7. Follow the prompts on the device to swipe the card, or choose the Cancel button in XCharge to manually Key-In
the credit card number using the MagTek IPAD SC. • Choosing to "key-in" the credit card number will allow you to encrypt the credit card number, expiration
date and CSC (CVV/CVC) code from the device to your PC. • Follow the prompts on the device to complete the entry. • Once the masked Credit Card # and Expiration date appear in XCharge, complete the other fields as
desired, then press F12 or choose the [F12] Process button to complete the transaction. Part 3: Processing Debit Cards with the MagTek IPAD SC
1. Open XCharge and log in. 2. From XCharge, choose Debit Purchase (or press the F4 key) to begin a Debit Purchase transaction. 3. Choose the Amount field and enter the desired amount. 4. Leave the Debit Card Scan field empty. 5. Complete the other fields as desired, then press F12 or choose the [F12] Process button to initialize the MagTek
IPAD SC. 6. Choose the option for Debit on the MagTek IPAD SC when prompted. 7. Follow the prompts on the device to swipe the card and enter the PIN (manual entry is not possible for PIN Debit
transactions).

Updated July 2, 2013 XCharge 7.2 Release 1 Help Page 26 of 168
XCHARGE SETUP - PIN PAD DEVICE SETUP (CONTINUED) Ingenico 3070 The Ingenico 3070 is a PIN entry device with an integrated Magnetic Stripe Reader. This device has a monochrome 128x64 display with a replaceable logo that displays when idle. Part 1: Device Installation
1. Open XCharge and log in. 2. From XCharge, choose File, then Setup. 3. Right-click on the Save button and choose Browse Common Files
Folder. 4. Open the PINPadDevice folder. 5. Open the IngenicoInstall folder. 6. Run the OPOS for the Ingenico iSeries.exe installer. 7. Plug the Ingenico 3070 into a USB port. Windows should prompt you to
install the drivers. 8. The drivers are located in the Common Files
Folder\PINPadDevice\Ingenico 3070\Drivers\ directory. 9. If you did not reboot after installing XCharge and/or the PIN pad device
installer, reboot now. 10. Open the Windows Device Manager and expand the Ports section. (You can access the Device Manager from
Start, Run, then type devmgmt.msc). 11. Note the COM number assigned to the Ingenico 3070, then close the Device Manager.
Part 2: Configure for Use in XCharge:
1. Open XCharge and log in. 2. From XCharge, choose File, Setup, then the Devices tab. 3. Choose the PIN Pad Device Setup button, then select Ingenico 3070 from the PIN Pad Device drop-down
menu. 4. From the COM Port drop-down menu, choose the COM/serial port number found in the Device Manager from
step #11 above. 5. Unless the forms are already loaded, choose the Load Forms to Device button. This may take several minutes,
and the PIN pad screen may scroll through different images while loading. 6. Choose the Test button... after a few seconds the PIN pad should prompt you to enter a PIN. 7. Enter any 4 digits, then press Enter on the PIN pad... you should receive a Success! message within XCharge. 8. Choose OK from the confirmation window, then OK on the PIN Pad Device Setup window, then Exit the
XCharge - Setup window.
NOTE:
The Common Files Folder is a user-neutral directory in Windows. The location of this directory depends on the version of Windows installed:
• The default Common Files Folder location for Windows XP and similar OS's is C:\Documents and Settings\All Users\Application Data\CAM Commerce Solutions\X-Charge\.
• The default Common Files Folder location for Windows 7 and similar OS's is C:\ProgramData\CAM Commerce Solutions\X-Charge\.
• The Application Data and ProgramData folders are hidden in Windows by default.

Updated July 2, 2013 XCharge 7.2 Release 1 Help Page 27 of 168
XCHARGE SETUP - PIN PAD DEVICE SETUP (CONTINUED) Ingenico 6550/6780 The Ingenico 6550 and 6780 devices are both signature capture devices with PIN entry capabilities and an integrated Magnetic Stripe Reader. The 6550 model has a 240x160 black and white display, and the 6780 model has a 320x234 color display - both with replaceable logos that display when idle. These devices also support the slide show feature that can be configured in XCharge. Part 1: Device Installation
1. Open XCharge and log in. 2. From XCharge, choose File, then Setup. 3. Right-click on the Save button and choose Browse Common
Files Folder. 4. Open the PINPadDevice folder. 5. Open the IngenicoInstall folder. 6. Run the OPOS for the Ingenico iSeries.exe installer. 7. Plug the Ingenico 6550 or 6780 into a USB port and a power
outlet. Windows should install two Human Interface Devices automatically.
8. If you did not reboot after installing XCharge and/or the PIN pad device installer, reboot now.
Part 2: Configure for Use in XCharge
1. Open XCharge and log in. 2. From XCharge, choose File, Setup, then the Devices tab. 3. Choose the PIN Pad Device Setup button, then select Ingenico 6550 or Ingenico 6780 from the PIN Pad
Device drop-down menu. 4. Unless the forms are already loaded, choose the Load Forms to Device button. This may take several minutes,
and the PIN pad screen may scroll through different images while loading. 5. Choose the Test button... after a few seconds the PIN pad should prompt you to enter a PIN. 6. Enter any 4 digits, then press Enter on the PIN pad... you should receive a Success! message within XCharge. 7. Choose OK from the confirmation window, then OK on the PIN Pad Device Setup window, then Exit the
XCharge - Setup window.
NOTE:
The forms that will be loaded are stored under Common Files Folder\PINPadDevice\, then the respective Ingenico folder. By choosing this option, you will replace any forms/images already on the Ingenico 6550 or 6780.

Updated July 2, 2013 XCharge 7.2 Release 1 Help Page 28 of 168
XCHARGE SETUP - PIN PAD DEVICE SETUP (CONTINUED) VeriFone MX 800 Series As of this writing, all of the VeriFone MX 800 models are supported in XCharge. Each of the MX 800 devices are signature capture devices with PIN entry capabilities and an integrated Magnetic Stripe Reader.
Part 1: Device Installation for 32-Bit Operating Systems
1. Open XCharge and log in. 2. From XCharge, choose File, then Setup. 3. Right-click on the Save button and choose Browse Common Files Folder. 4. Open the PINPadDevice folder. 5. Open the VeriFone Mx folder corresponding to your device (e.g. "VeriFone Mx 880"). 6. Run the 32BitInstall.bat file to install the VeriFone MX drivers. 7. Plug the VeriFone MX device into a USB port and into a power outlet. Windows should install the device
automatically. 8. If you did not reboot after installing XCharge and/or the PIN pad device installer, reboot now. 9. Proceed to Part 3 below to configure the device in XCharge.
NOTE:
The device installation steps vary depending on the operating system (OS) used. Part 1 covers the steps for installing the device with a 32-bit OS, and Part 2 is for a 64-bit OS. It is not necessary to follow both Parts 1 and 2.

Updated July 2, 2013 XCharge 7.2 Release 1 Help Page 29 of 168
XCHARGE SETUP - PIN PAD DEVICE SETUP (CONTINUED) VeriFone MX 800 Series Part 2: Device Installation for 64-Bit Operating Systems
1. Plug the VeriFone MX device into a USB port and into a power outlet. Windows should prompt you to install the
device drivers. 2. When prompted, point the Windows hardware wizard to the usb_64bit_driver folder for your device. The path to
this folder will vary depending on the device and operating system used. See the NOTE above on determining the correct path.
3. If you did not reboot after installing XCharge and/or the PIN pad device installer, reboot now. 4. Proceed to Part 3 below to configure the device in XCharge.
Part 3: Configure for Use in XCharge
1. Open the Windows Device Manager and expand the Ports section. (You can access the Device Manager from Start, Run, then type devmgmt.msc).
2. Note the COM number assigned to the Mx800 Family POS Terminal, then close the Device Manager. 3. Open XCharge and log in. 4. From XCharge, choose File, Setup, then the Devices tab. 5. Choose the PIN Pad Device Setup button, then select the VeriFone Mx device you are using from the PIN Pad
Device drop-down menu. 6. From the COM Port drop-down menu, choose the COM/serial port number found in the Device Manager (from
step #2 directly above). 7. Choose the Test button to initialize the device, then follow the prompts on the screen of the MX 800 series device
to complete the test. 8. Choose OK from the confirmation window, then OK on the PIN Pad Device Setup window, then Exit the
XCharge - Setup window.
NOTE:
The drivers are located under the Common Files Folder, then the PINPadDevice folder, then the VeriFone Mx folder corresponding to your device. The Common Files Folder is a user-neutral directory in Windows. The location of this directory depends on the version of Windows installed:
• The default Common Files Folder location for Windows XP and similar OS's is C:\Documents and Settings\All Users\Application Data\CAM Commerce Solutions\X-Charge\.
• The default Common Files Folder location for Windows 7 and similar OS's is C:\ProgramData\CAM Commerce Solutions\X-Charge\.
• The Application Data and ProgramData folders are hidden in Windows by default. Example #1: the path to the correct 64-bit device drivers for a VeriFone MX 880 on Windows 7 is
C:\ProgramData\CAM Commerce Solutions\X-Charge\PINPadDevice\VeriFone Mx 880\usb_64bit_driver. Example #2: the path to the correct 64-bit device drivers for a VeriFone MX 850 on Windows XP is
C:\Documents and Settings\All Users\Application Data\CAM Commerce Solutions\X-Charge\PINPadDevice\VeriFone Mx 850\usb_64bit_driver.

Updated July 2, 2013 XCharge 7.2 Release 1 Help Page 30 of 168
XCHARGE SETUP - PIN PAD DEVICE SETUP (CONTINUED) VeriFone PINPad 1000 The VeriFone PINPad 1000, also called the 1000SE, is a basic PIN entry device with a monochrome display.
Part 1: Device Installation (for USB models only - RS-232 models skip this part)
1. Open XCharge and log in. 2. From XCharge, choose File, then Setup. 3. Right-click on the Save button and choose Browse Common Files Folder. 4. Open the PINPadDevice folder. 5. Open the PINPad 1000 folder.
a. If your Windows System Type is 32-bit, run the 32BitInstall.bat file. b. If your Windows System Type is 64-bit, run the installpp1000se.exe
file. c. If you don't know what your Windows System Type is, open your
Windows Control Panel, then open the System applet and look for "System type." 6. Plug the VeriFone 1000 into a USB port. Windows should install the device automatically. 7. Open the Windows Device Manager and expand the Ports section. (You can access the Device Manager from
Start, Run, then type devmgmt.msc). 8. Note the COM number assigned to the PP1000se, then close the Device Manager.
Part 2: Configure for Use in XCharge
1. Open XCharge and log in. 2. From XCharge, choose File, Setup, then the Devices tab. 3. Choose the PIN Pad Device Setup button, then select VeriFone PINPad 1000 from the PIN Pad Device drop-
down menu. 4. From the COM Port drop-down menu, choose the COM/serial port number where the device is plugged in (for
USB connections, found in the Device Manager from step #9 above). 5. Choose the Test button to initialize the device, then follow the prompts on the screen of the VeriFone 1000 to
complete the test. 6. Choose OK from the confirmation window, then OK on the PIN Pad Device Setup window, then Exit the
XCharge - Setup window.
NOTE:
The installation steps vary for the connection type used. VeriFone 1000SE models are available with RS-232 (serial port) or USB connections. A supported USB-Serial adapter is also available from Accelerated Payment Technologies, and if used the instructions for the RS-232 model should be followed. There are no installation steps for the RS-232 models - simply plug the VeriFone 1000 into the serial port and into a power outlet.

Updated July 2, 2013 XCharge 7.2 Release 1 Help Page 31 of 168
XCHARGE SETUP - PIN PAD DEVICE SETUP (CONTINUED) VeriFone SC 5000 The VeriFone SC 5000 is a PIN entry device (for Canadian debit only) with an integrated Magnetic Stripe Reader and a monochrome display.
1. Plug the VeriFone SC 5000 into the serial port and a power outlet. 2. Open XCharge and log in. 3. From XCharge, choose File, Setup, then the Devices tab. 4. Choose the PIN Pad Device Setup button and select the VeriFone SC 5000 from the PIN Pad Device drop-
down menu. 5. From the COM Port drop-down menu, choose the COM/serial port number where the device is plugged in. 6. Choose the Test button to initialize the device, then follow the prompts on the screen of the VeriFone SC 5000 to
complete the test. 7. Choose OK from the confirmation window, then OK on the PIN Pad Device Setup window, then Exit the XCharge
- Setup window.
NOTE:
The VeriFone SC 5000 requires a unique Processing Account configured in the XCharge Server per unit. For assistance with obtaining and configuring your Canadian debit Processing Account, please contact Accelerated Payment Technologies. Canadian debit also requires a receipt printer to be configured in XCharge. Please refer to the instructions for configuring "Receipts" and "Printing" on the XCharge Setup - General Options topic, or refer to the "Recommended Settings" on the Setup Procedures - XCharge Client topic.

Updated July 2, 2013 XCharge 7.2 Release 1 Help Page 32 of 168
XCHARGE SETUP - PIN PAD DEVICE SETUP (CONTINUED) VeriFone Vx 810 The VeriFone Vx 810 is a PIN entry device (for Canadian debit only) with an integrated Magnetic Stripe Reader and a monochrome display.
1. Plug the VeriFone Vx 810 into a serial port and a power outlet. 2. Open XCharge and log in. 3. From XCharge, choose File, Setup, then the Devices tab. 4. Choose the PIN Pad Device Setup button and select the VeriFone Vx 810 from the PIN Pad Device drop-down
menu. 5. From the COM Port drop-down menu, choose the COM/serial port number where the device is plugged in. 6. Enter the Processing Account Terminal ID into the Merchant ID field (this should match the Processing Account
Terminal ID configured for this device in the XCharge Server). 7. If this is the first time setting up the device with the designated "Merchant ID" then a Key Change is necessary to
load it on the device: a. Choose the OK button from the PIN Pad Device Setup window, then Exit the XCharge - Setup window. b. From XCharge, return to the Setup window by choosing File, Setup, then the Devices tab. c. Choose the Key Change button. d. Choose the PIN Pad Device Setup button to
continue. 8. Choose the Test button to initialize the device, then
follow the prompts on the screen of the VeriFone Vx 810 to complete the test.
9. Choose OK from the confirmation window, then OK on the PIN Pad Device Setup window, then Exit the XCharge - Setup window.
NOTE:
The VeriFone Vx 810 requires a unique Processing Account configured in the XCharge Server per unit. For assistance with obtaining and configuring your Canadian debit Processing Account, please contact Accelerated Payment Technologies. Canadian debit also requires a receipt printer to be configured in XCharge. Please refer to the instructions for configuring "Receipts" and "Printing" on the XCharge Setup - General Options topic, or refer to the "Recommended Settings" on the Setup Procedures - XCharge Client topic.

Updated July 2, 2013 XCharge 7.2 Release 1 Help Page 33 of 168
SETUP PROCEDURES - XCHARGE SERVER The XCharge Server contains all of the Processing Account settings for processing all transaction types. Typically one XCharge Server will be configured and running per store, regardless of the number of Processing Accounts used or the number of workstations processing transactions. From the XCharge Server window, you can view server activity, access many XCharge Server Utilities, and enter XCharge Server Setup to configure your processing options. This section will describe the features found within the XCharge Server interface, and then walk through configuring the most commonly used options. You can open the XCharge Server from the system tray icon (the card with an X: ) or from the XCharge Client application by choosing File, then XCharge Server.
The XCharge Server Interface ____________________________________________________________________ 34
XCharge Server Utilities _________________________________________________________________________ 36 Recommended Settings _________________________________________________________________________ 38
XCharge Server Setup - General Options __________________________________________________________ 42 The Server Tab _______________________________________________________________________________ 42 The Logging Tab ______________________________________________________________________________ 45 The Security Tab ______________________________________________________________________________ 46 The Update Tab ______________________________________________________________________________ 49 The Backup Tab ______________________________________________________________________________ 49 The Scheduled Reporting Tab ___________________________________________________________________ 50
XCharge Server Setup - Credit Cards ______________________________________________________________ 51 The General Tab ______________________________________________________________________________ 51 The Scanning Tab _____________________________________________________________________________ 52 The Processor Options Tab _____________________________________________________________________ 53 The Connection Tab ___________________________________________________________________________ 55
XCharge Server Setup - Gift Cards ________________________________________________________________ 57 The Transactions Tab __________________________________________________________________________ 57 The Connection Tab ___________________________________________________________________________ 58
Updated July 2, 2013 XCharge 7.2 Release 1 Help Page 34 of 168
THE XCHARGE SERVER INTERFACE
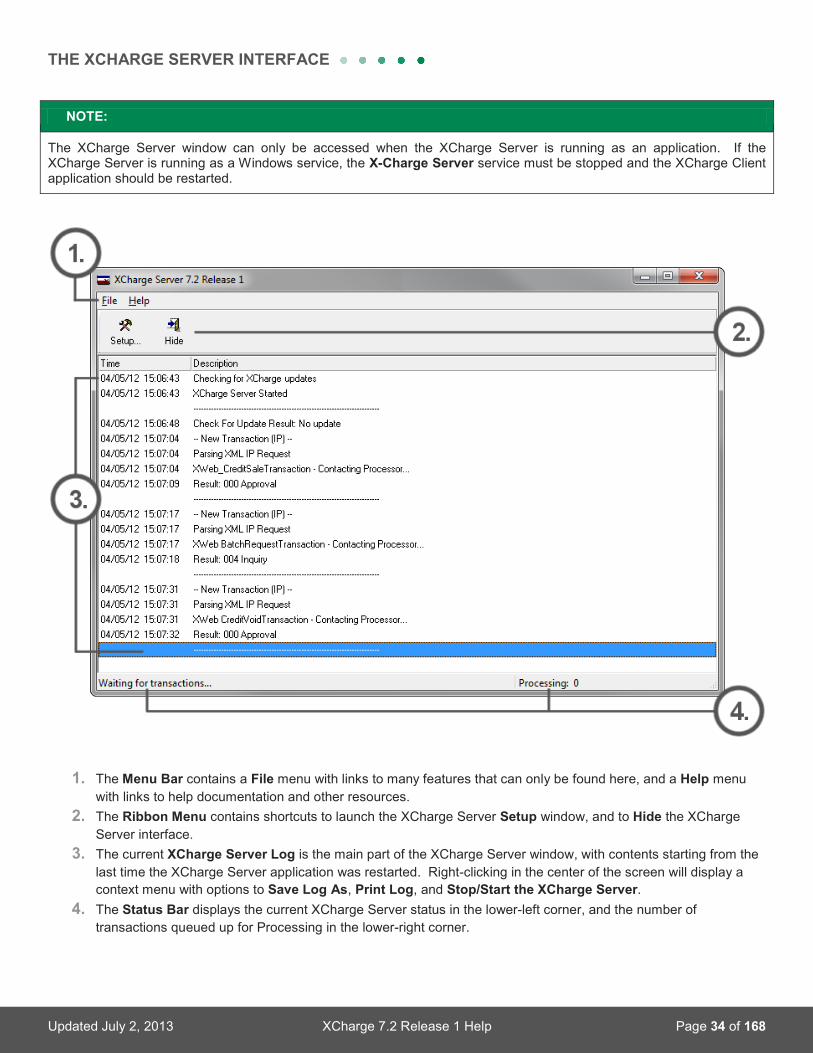
1. The Menu Bar contains a File menu with links to many features that can only be found here, and a Help menu with links to help documentation and other resources.
2. The Ribbon Menu contains shortcuts to launch the XCharge Server Setup window, and to Hide the XCharge Server interface.
3. The current XCharge Server Log is the main part of the XCharge Server window, with contents starting from the last time the XCharge Server application was restarted. Right-clicking in the center of the screen will display a context menu with options to Save Log As, Print Log, and Stop/Start the XCharge Server.
4. The Status Bar displays the current XCharge Server status in the lower-left corner, and the number of transactions queued up for Processing in the lower-right corner.
NOTE:
The XCharge Server window can only be accessed when the XCharge Server is running as an application. If the XCharge Server is running as a Windows service, the X-Charge Server service must be stopped and the XCharge Client application should be restarted.

Updated July 2, 2013 XCharge 7.2 Release 1 Help Page 35 of 168
THE XCHARGE SERVER INTERFACE (CONTINUED) The XCharge Server File Menu Save Log As Selecting this option allows you to save the contents of the currently displayed server log to file. Print Log Allows the currently displayed server log to be printed. Setup Launches the XCharge Server Setup window (covered by all other topics in this section). Processor Opens the XCharge Processor window where the Credit Card and Gift Card processor gateways can be selected. Credit card processing accounts are created to work with one processor gateway only, so this option should not be used without the aid of Accelerated Payment Technologies. Backup Allows creating a zipped copy of the essential XCharge Server data for restoration. The following files will be saved in a zip archive:
• BINRange.xdb - database with the Bank Identification Number table for identifying standard credit cards vs FSA cards.
• CAMCommerce.ini - connection settings for processing IIAS transactions. • Concord.ini - connection settings for the Concord EFSNet Credit Card
Processor gateway. • DMCom.ini - connection settings for Gift Card Processing. • gpnhda.ini - connection settings for the Global Payments Credit Card
Processor gateway. • Offline.xdb - database with encrypted transaction data stored when Offline
Mode is enabled. • security.excfg - encrypted file with various Processing Account and security
settings. • sigimages.xdb - database with signature images associated with credit
transaction history. • tran.xdb - database with credit, debit, gift and check transaction history. • TranCentral.ini - connection settings for Transaction Central ACH. • xcharge.ini - settings for the local XCharge Client application. • xchrgsrv.ini - various XCharge Server settings not found in other files. • XWeb.ini - connection settings for the XWeb Credit Card Processor gateway.
Restore Restores a previously created backup. Hide Closes the XCharge Server window (will stay running in the system tray). Utilities Provides access to the many XCharge Server Utilities (see below for more information).
Updated July 2, 2013 XCharge 7.2 Release 1 Help Page 36 of 168
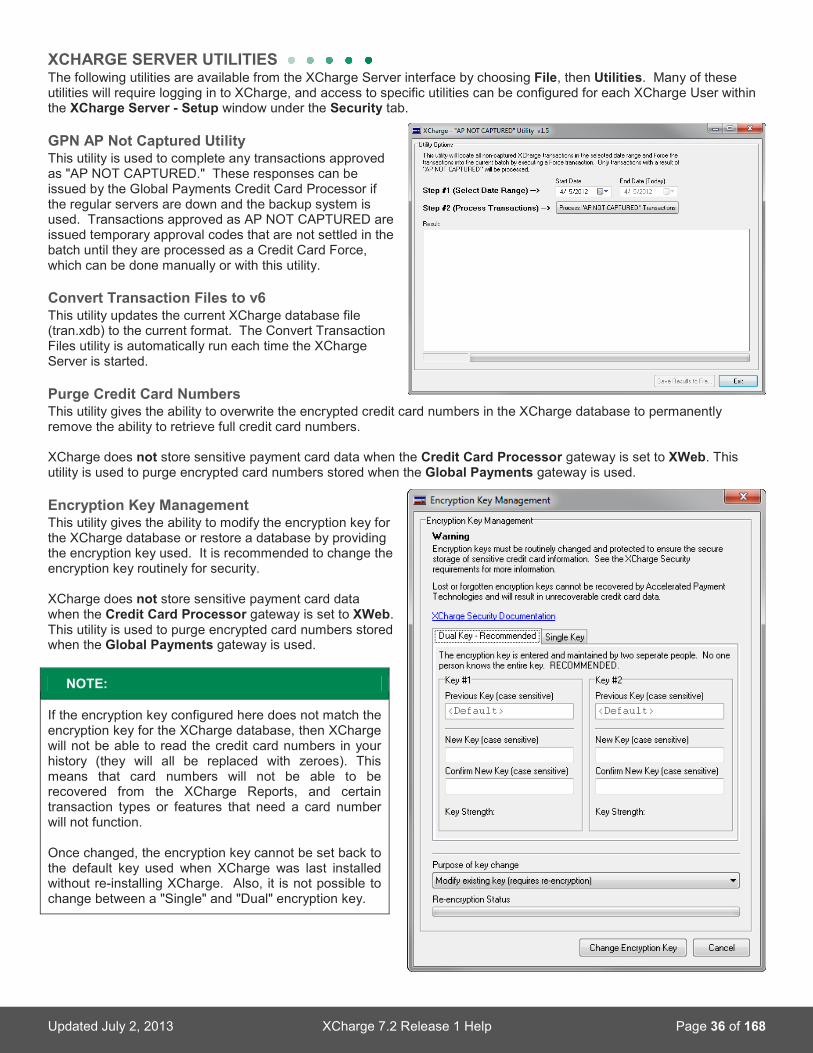
XCHARGE SERVER UTILITIES The following utilities are available from the XCharge Server interface by choosing File, then Utilities. Many of these utilities will require logging in to XCharge, and access to specific utilities can be configured for each XCharge User within the XCharge Server - Setup window under the Security tab. GPN AP Not Captured Utility This utility is used to complete any transactions approved as "AP NOT CAPTURED." These responses can be issued by the Global Payments Credit Card Processor if the regular servers are down and the backup system is used. Transactions approved as AP NOT CAPTURED are issued temporary approval codes that are not settled in the batch until they are processed as a Credit Card Force, which can be done manually or with this utility. Convert Transaction Files to v6 This utility updates the current XCharge database file (tran.xdb) to the current format. The Convert Transaction Files utility is automatically run each time the XCharge Server is started. Purge Credit Card Numbers This utility gives the ability to overwrite the encrypted credit card numbers in the XCharge database to permanently remove the ability to retrieve full credit card numbers. XCharge does not store sensitive payment card data when the Credit Card Processor gateway is set to XWeb. This utility is used to purge encrypted card numbers stored when the Global Payments gateway is used. Encryption Key Management This utility gives the ability to modify the encryption key for the XCharge database or restore a database by providing the encryption key used. It is recommended to change the encryption key routinely for security. XCharge does not store sensitive payment card data when the Credit Card Processor gateway is set to XWeb. This utility is used to purge encrypted card numbers stored when the Global Payments gateway is used.
NOTE:
If the encryption key configured here does not match the encryption key for the XCharge database, then XCharge will not be able to read the credit card numbers in your history (they will all be replaced with zeroes). This means that card numbers will not be able to be recovered from the XCharge Reports, and certain transaction types or features that need a card number will not function. Once changed, the encryption key cannot be set back to the default key used when XCharge was last installed without re-installing XCharge. Also, it is not possible to change between a "Single" and "Dual" encryption key.

Updated July 2, 2013 XCharge 7.2 Release 1 Help Page 37 of 168
XCHARGE SERVER UTILITIES (CONTINUED) Import Database Transactions This utility gives the ability to merge an XCharge database (tran.xdb) with the currently used copy. The database selected for import must be formatted for the current version, and must not contain any identical transaction information. To import a database from a previous version of XCharge:
1. Rename the currently used database in the History folder (e.g. from tran.xdb to newtran.xdb). 2. Copy or move the older database into the History folder. 3. Run the Convert Transaction Files to v6 utility to update the older database. 4. Run the Import Database Transactions utility and select the original database renamed in step #1.
Convert to XWeb Processor This utility will attempt to enroll the currently configured Global Payments Processing Account with the XWeb gateway and remove the local storage of all sensitive credit card data. If a feature not supported by the XWeb gateway is detected to be in use, the conversion will not proceed. If an XWeb account is already configured in the XCharge Server, the option to select the desired Global Payments Processing Account with the desired XWeb ID will be provided. Aliases for credit cards processed within the past 180 days (in the local database) will be created at the XWeb gateway, and any existing credit card aliases in the XCharge Data Archive Vault will be "mapped" to new XWeb aliases. This mapping is stored in the local XCharge database, so it is imperative that regular backups are created to prevent data loss!
Export Alias Conversion Mapping This utility will export the credit card alias "mapping" processed during an XWeb Conversion (more info above). The alias mapping list will indicate the association between the originally created credit card aliases and the ones used at the XWeb gateway. This file can be kept as a reference or backup, and it can be used to update the aliases on file with your Business Management Software, if supported.

Updated July 2, 2013 XCharge 7.2 Release 1 Help Page 38 of 168
RECOMMENDED SETTINGS These steps will walk you through the most commonly configured options for the XCharge Server and skip over options that are not commonly changed. These steps may not cover everything for all users - for information on all available options please read through all of the following topics under Setup Procedures - XCharge Server. Many of these recommended settings are not enabled in XCharge by default in order to limit the changes made to your system during installation.
1. Open the XCharge Server Setup window. a. Open XCharge and log in. a. Choose File, then XCharge Server. b. From the XCharge Server window, choose the Setup button in the upper-left and log in. c. If required by your Business Management Software (BMS), check the box for Enable file based request
files and set the Transaction Folder as needed. If this folder is to be used over a Local Area Network, ensure that it is shared with the proper permissions.
2. Choose the Save button in the far
upper-left, then choose the Logging tab from the top of the screen. a. Change the Logging Detail Level to
"High." b. Check the box for Save Log Detail to
File.

Updated July 2, 2013 XCharge 7.2 Release 1 Help Page 39 of 168
RECOMMENDED SETTINGS (CONTINUED)
3. Choose the Save button in the far upper-left, then choose the Security tab from the top of the screen. a. Assuming that the system user is selected, choose
the Modify button at the bottom of the screen. b. Change the Password, then re-enter your
password in the Confirm Password box. Ensure the Password Strength indicator detects a "Strong" password.
c. Review and modify any of the XCharge Client/Server Options - choose Select All at the bottom of each column if you would like the "system administrator" account to have full access to all features.
d. Choose the Advanced tab toward the top of the screen.
e. Check the box for Allow user to change password.
f. Check the box for Require strong password strength.
g. Choose the OK button at the bottom of the screen.
h. Choose the Add button at the bottom of the screen. i. Enter a User Name for any individual needing access to XCharge. j. Enter a Password for this user, then re-enter the password in the Confirm Password box. Ensure the
Password Strength indicator detects a "Strong" password. k. Review and modify any of the XCharge Client/Server Options - all options are disabled by default, and only
options necessary to this user should be enabled. l. Choose the Advanced tab toward the top of the screen. m. Check the box for Allow user to change password. n. Check the box for Require strong password strength. o. Choose the OK button at the bottom of the screen. p. Repeat steps 4.h. through 4.o. to create additional users as needed.
NOTE:
Access to the XCharge Server Setup option should only be given to the highest-level users as access to the XCharge Server - Setup screen includes access to modify these options for any user! All Processing Accounts are accessible to users by default. After adding any Processing Accounts, come back to this screen to remove access as desired.
NOTE:
If your BMS requires a specific XCharge User Name and Password to be created for XpressLink integration then the Allow user to change password and other options under the Advanced tab should be disabled. If your BMS is able to store any User Name and Password configured in XCharge, then these Advanced options should remain enabled and the Password should be updated in the BMS every 90 days when changed in XCharge.

Updated July 2, 2013 XCharge 7.2 Release 1 Help Page 40 of 168
RECOMMENDED SETTINGS (CONTINUED)
4. Choose the Save button in the far upper-left, then choose the Backup tab from the top of the screen. a. Check the box for Enable Daily Backup. b. Set the Run Backup at time as needed. Ideally this
time should be after the last transaction of the day is processed, but before the PC is shut down. If the PC is left on overnight, 1:00am is a good time for most users.
c. Change the Backup Folder to an offsite directory if possible (e.g. a network or external hard drive). If no offsite directory is available, ensure that the XCBackup.zip file is regularly copied to an offsite directory.
5. Choose the Save button in the far upper-left,
then choose the Credit Cards button on the left side of the screen. a. If ACH Setup information from a Transaction Central
account needs to be configured, or if your BMS requires legacy ACH emulation for your XCheck account, choose the ACH Setup button. Otherwise, proceed to step #7 below.
b. To configure a Transaction Central ACH account, enter the Merchant ID and Reg Key values into their respective boxes.
c. To enable legacy ACH emulation for XCheck, choose the ACH Processor drop-down menu and select "XWeb."
d. Choose the OK button at the bottom when done.
6. Choose the Save button in the far upper-left, then choose the Processor Options tab from the top of the screen. a. If your BMS uses IIAS technology, choose the
Setup button for FSA/IIAS Transactions. Check the boxes for Enable IIAS/FSA Transactions and Automatically update BIN table, then choose OK.
b. Check the box to Enable XCharge Client Partial Approval Support (unless already enabled).
c. If XCheck setup information needs to be configured, choose the Setup button for XCheck Options. Otherwise, proceed to step #8 below.
d. From the XCheck window, check the box next to any Supported Check Entry Types enabled on your account.
e. Change the Default Sale or Authorization Entry Type to the SEC code you would like displayed in XCharge by default for Check Sale transactions.
f. Change the Default Credit Entry Type to the SEC code you would like displayed in XCharge by default for Check Credit transactions.
g. Check the box for Verify Check Sale Transactions if Check Verification is enabled on your XCheck account.
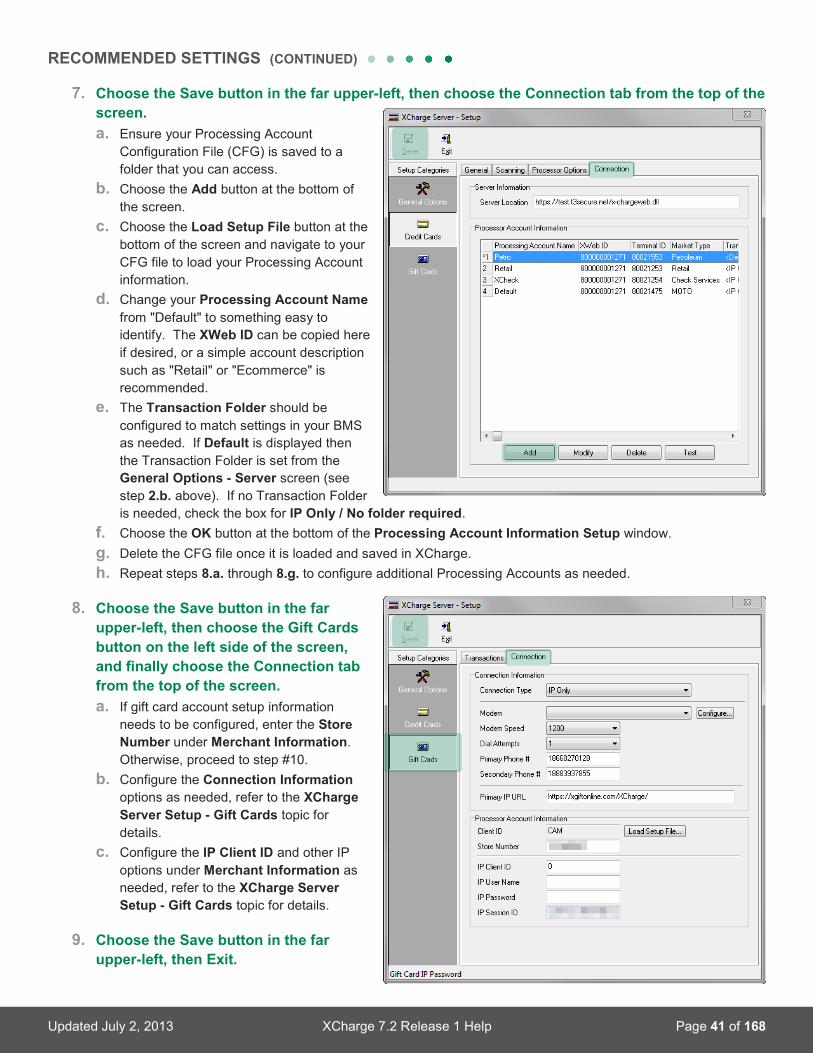
Updated July 2, 2013 XCharge 7.2 Release 1 Help Page 41 of 168
RECOMMENDED SETTINGS (CONTINUED)
7. Choose the Save button in the far upper-left, then choose the Connection tab from the top of the screen. a. Ensure your Processing Account
Configuration File (CFG) is saved to a folder that you can access.
b. Choose the Add button at the bottom of the screen.
c. Choose the Load Setup File button at the bottom of the screen and navigate to your CFG file to load your Processing Account information.
d. Change your Processing Account Name from "Default" to something easy to identify. The XWeb ID can be copied here if desired, or a simple account description such as "Retail" or "Ecommerce" is recommended.
e. The Transaction Folder should be configured to match settings in your BMS as needed. If Default is displayed then the Transaction Folder is set from the General Options - Server screen (see step 2.b. above). If no Transaction Folder is needed, check the box for IP Only / No folder required.
f. Choose the OK button at the bottom of the Processing Account Information Setup window. g. Delete the CFG file once it is loaded and saved in XCharge. h. Repeat steps 8.a. through 8.g. to configure additional Processing Accounts as needed.
8. Choose the Save button in the far
upper-left, then choose the Gift Cards button on the left side of the screen, and finally choose the Connection tab from the top of the screen. a. If gift card account setup information
needs to be configured, enter the Store Number under Merchant Information. Otherwise, proceed to step #10.
b. Configure the Connection Information options as needed, refer to the XCharge Server Setup - Gift Cards topic for details.
c. Configure the IP Client ID and other IP options under Merchant Information as needed, refer to the XCharge Server Setup - Gift Cards topic for details.
9. Choose the Save button in the far
upper-left, then Exit.

Updated July 2, 2013 XCharge 7.2 Release 1 Help Page 42 of 168
XCHARGE SERVER SETUP - GENERAL OPTIONS To access these options, log in to XCharge and choose File, then XCharge Server. From the XCharge Server window, choose the Setup button and log in again. From the XCharge Server - Setup window, choose General Options from the Setup Categories menu. Options here are organized under six different tabs. The Server Tab The Server tab is where the Startup Options, XCharge Server Port number and Transaction Folder options are all configured. Startup Selecting the Startup Options button will display a window where the XCharge Server Startup Options can be configured:
• Do not Auto-Start: with this option selected, the XCharge Server will not start automatically when Windows starts and you have logged in to Windows. This option is not recommended unless you would like to manually start XCharge on the server PC before processing transactions from any workstation.
• Auto-Start when a user logs in to Windows (Recommended): this is the option selected by default for the XCharge Server PC. With this option selected the XCharge Server will start automatically after a user logs into Windows. Once the user logs out of Windows, the XCharge Server will close along with the rest of the user applications. This is the recommended option for most installations.
• Auto-Start when Windows starts before a user logs in (Advanced): with this option selected, the XCharge Server will start as a Windows service when Windows starts, before any users log into Windows. This is the recommended option for server installations where the server PC is not used to process transactions and is generally logged out of Windows.
IP Transaction Requests This section will display any Local IP Addresses for reference, and allow you to change the Port number used to communicate with the XCharge Client application. Port 26 is used by default.
NOTE:
When the XCharge Server runs as a service, the XCharge Server window will not launch when selecting File, XCharge Server from the XCharge Client application, and the XCharge Server icon will not be visible in the Windows system tray. To manually start and stop the XCharge Server, the Windows Services tool should be used. To configure any XCharge Server options, the XCharge Server service should be stopped, and then the XCharge Client application should be restarted - this will run the XCharge Server as an application.

Updated July 2, 2013 XCharge 7.2 Release 1 Help Page 43 of 168
XCHARGE SERVER SETUP - GENERAL OPTIONS (CONTINUED) Transaction Folder The XCharge Transaction Folder is disabled by default for security. If needed to communicate with your Business Management Software (BMS), this feature can be enabled and configured to any folder accessible with read/write access by the XCharge Server.
• Enable file based request files: select this box to turn the Transaction Folder on. For "Open Integration" versions of XCharge, this displays whether the file-based transaction files and Transaction Folders are enabled or not, but cannot be toggled here. For additional information on this feature, please refer to page 5 of the XCharge 7.2 PA-DSS Implementation Guide, available from the XCharge Help menu under the Security option.
• The default Transaction Folder is C:\Program Files\X-Charge\LocalTran - enter a new path or choose the "..." button to browse to the desired Transaction Folder for the default Processing Account.
Auto Offline Processing Auto Offline Processing allows transactions to process during network outages. Transactions are stored securely and processed when connectivity is restored. Choosing the Auto Offline Options button will open the Auto Offline Options window. Enable Auto-Offline Processing Toggles the ability to enable Auto Offline Processing for any processing accounts configured within XCharge. Processing Account Settings Each processing account configured within XCharge is displayed here, along with the currently configured Auto Offline Options. Select the Processing Account desired to configure the below options. Processing Account Displays the name of the currently selected Processing Account. Enabled Toggles the Auto Offline Processing feature for the selected Processing Account. Offline Approval Limit Any transactions processed in Offline Mode will be approved by the Auto Offline Processing feature for the selected Processing Account if the transaction amount is equal to or less than the value set here. Any transaction processed for an amount greater than the value set here will be declined, and Voice Authorization information will be displayed. If a Voice Authorization is obtained, the transaction can be submitted as a Credit Card Force while Offline Processing is still enabled. See Frequently Asked Questions - How can I obtain a Voice Authorization? for additional information. Voice Auth Phone # The Voice Authorization phone number(s) for the selected Processing Account will be displayed here, if available. The Query XWeb for Settings button can be used to check for updated information. Update The Update button is used to apply changed to the Enabled and Offline Approval Limit fields for the Processing Account selected.

Updated July 2, 2013 XCharge 7.2 Release 1 Help Page 44 of 168
XCHARGE SERVER SETUP - GENERAL OPTIONS (CONTINUED) XCharge Client Settings If the option to Switch the XC Client to the Force Transaction after receiving a "Please Voice Authorize the Transaction" response is enabled, then XCharge will automatically present the Credit Card - Force transaction window after steps to obtain Voice Authorization Credentials are displayed and the OK button is selected. This occurs when Offline Processing is enabled and a credit card transaction for an amount greater than the Offline Approval Limit is attempted.
Email Address Email notifications will be sent to this address when offline transactions are declined or partially approved after an offline event. No cardholder or account sensitive data will be included in the emails. Offline Health Status The Status will display "Healthy" if the connections between the XCharge Server, the XWeb gateway, and the Payment Processor are functional. Any other Status will indicate connectivity issues. OK Choose the OK button to close the Auto Offline Options window and save your settings. The Offline Mode Terms window will be displayed if Auto Offline Processing is being enabled on a Processing Account for the first time. Auto Offline Processing can only be enabled on a Processing Account if the Offline Mode Terms are accepted. Cancel Closes the Auto Offline Options window without saving any changes. Query XWeb for Settings Connects to the XWeb gateway to obtain Auto Offline Processing settings for all configured Processing Accounts. Select this button to update the Voice Auth Phone #s information.
NOTE:
When calling for a Voice Authorization, payment processing credentials for your specific processing account will need to be entered over the phone. To look up the Voice Authorization phone numbers along with the processing credentials, open the XCharge Client application, choose the File menu, then choose View Voice Auth (Force) Credentials. You will be prompted to log in, and only users granted access to this feature will be able to view the Voice Authorization information.

Updated July 2, 2013 XCharge 7.2 Release 1 Help Page 45 of 168
XCHARGE SERVER SETUP - GENERAL OPTIONS (CONTINUED) The Logging Tab The Logging tab is where the detail level and saved copies of the XCharge Server log can be configured. Detail By default, the Logging Detail Level is set to Low - Transaction List. With this option selected, only basic information concerning transaction processing is displayed in the XCharge Server window (or saved in the log file, if enabled). For more detailed information concerning transaction processing, along with other XCharge Server activity, change the Logging Detail Level to High - All details. Here is a sample of low detail logging:
05/12/11 15:38:57 Checking for XCharge updates 05/12/11 15:38:57 XCharge Server Started -------------------------------------------------------------------------- 05/12/11 15:39:01 Check For Update Result: No update 05/12/11 15:39:32 XWeb_CreditSaleTransaction - Contacting Processor... 05/12/11 15:39:44 Result: 001 Decline -------------------------------------------------------------------------- 05/12/11 15:40:19 XWeb BatchRequestTransaction - Contacting Processor... 05/12/11 15:40:23 Result: 004 Inquiry --------------------------------------------------------------------------
Here is a sample of high detail logging:
05/12/11 15:59:04 Checking for XCharge updates 05/12/11 15:59:04 XCharge Server Started -------------------------------------------------------------------------- 05/12/11 15:59:07 Check For Update Result: No update 05/12/11 15:59:13 -- New Transaction (IP) -- 05/12/11 15:59:13 Parsing XML IP Request 05/12/11 15:59:13 XWeb_CreditSaleTransaction - Contacting Processor... 05/12/11 15:59:18 Result: 001 Decline -------------------------------------------------------------------------- 05/12/11 15:59:32 -- New Transaction (IP) -- 05/12/11 15:59:32 Parsing XML IP Request 05/12/11 15:59:32 XWeb BatchRequestTransaction - Contacting Processor... 05/12/11 15:59:34 Result: 004 Inquiry
Log File By default, the XCharge Server log is only visible from the XCharge Server window and is not saved to file. If you select the Save Log Detail to File box then the XCharge Server log will be saved to the file name and location specified in the Log File box, and these details will keep appending to the file unless it is manually edited.

Updated July 2, 2013 XCharge 7.2 Release 1 Help Page 46 of 168
XCHARGE SERVER SETUP - GENERAL OPTIONS (CONTINUED) The Security Tab The Security tab is where all of the XCharge Security settings are configured. XCharge Security must be enabled and the default password must be changed before transaction processing is permitted. For security and auditing purposes, it is recommended to configure a unique user account for every individual that will be logging into XCharge, and it is recommended to only enable features that are needed by each user. It is also recommended to use strong passwords that are set to expire to ensure they are routinely changed. Enable User Security This option is enabled by default - Enable User Security must be selected in order to change any other security settings, and it must be selected in order to process transactions. The list of user names already configured will be displayed in the center of the screen in alphanumeric order, along with a check box indicating if the user names are Enabled or set to Administrator. Choose the Add button to add a new user. User Name Enter the desired user name here.
• The user name can contain letters, numbers, spaces and special characters, totaling a maximum of 15 characters in length.
• The letters used are not case sensitive.
• A user name cannot be modified once saved, but users can be added and deleted as desired.
Password Enter the password for this user name here.
• The password can contain letters, numbers, spaces and special characters, totaling a maximum of 28 characters in length.
• The letters used are not case sensitive. • The password can be changed from this screen at any time, and with the Allow user to change password
option enabled (see below) it can be changed from the XCharge Client application. • According to the Payment Card Industry's Data Security Standards (PCI DSS), secure strong passwords must be
used. This screen will not enforce a strong password by default, but a Password Strength indicator is visible to the right of the password field, and this indicator will state whether the currently entered password is "Weak", "Medium" or "Strong".
• Choosing the Password Strength link will open a copy of the XCharge Security Implementation document. Confirm Password When entering a password, you must re-enter it in this field to confirm accuracy.

Updated July 2, 2013 XCharge 7.2 Release 1 Help Page 47 of 168
XCHARGE SERVER SETUP - GENERAL OPTIONS (CONTINUED) Security tab The security tab on the User Security Settings window is where XCharge features can be enabled or disabled for each user. It is recommended to only enable the features needed for each user. There are three categories of options, each with a Select All and Select None button at the bottom that can be used to save time.
• XCharge Client Options: any option enabled here will be accessible to the user logged in to the XCharge Client
application. Disabling any of these options will either cause the option to be missing from the XCharge Client or grayed out (disabled).
• XCharge Server Options: when the use of one of these features is attempted from the XCharge Server, a user name and password must be provided to continue. Logging in with a user name and password that does not have access to the respective feature will cause the "Access Denied" message to appear. Access to the Setup option should only be given to the highest-level users as access to the XCharge Server Setup window includes access to modify these options for any user!
• Processing Accounts: each Processing Account configured in the XCharge Server will be listed here, with ALL listed on top. If ALL is selected then all Processing Accounts will be accessible from the XCharge Client. Restricting access to the Processing Accounts necessary to each user is recommended to prevent processing on the wrong Processing Account by mistake.
• Unlock: the Unlock button will only appear for users with the Administrator flag when an XCharge user account becomes "locked." User accounts will become locked for 30 minutes after 6 consecutive unsuccessful login attempts are made.

Updated July 2, 2013 XCharge 7.2 Release 1 Help Page 48 of 168
XCHARGE SERVER SETUP - GENERAL OPTIONS (CONTINUED) Advanced tab The Advanced tab contains additional options to ensure user security.
• Allow user to change password: with this option enabled, users can change their passwords from the XCharge Client application by logging into XCharge and choosing File, then Change Password.
• Require strong password strength: this option is recommended but disabled by default. If enabled, XCharge will only permit secure strong passwords to be used. This option is only available when the Allow user to change password option is also enabled. For more information on secure passwords, please see the XCharge Security Implementation document by choosing the Password Strength link on the User Security Settings window.
• Require password change after 90 days: when Require strong password strength is enabled, a password expiration period can be set here. An expiration period of 90 days or less is recommended, setting this to 0 will disable the password expiration feature.
Copy The Copy button at the bottom of the User Security Settings window will open a window where you can select an existing user name, and copy the settings from that user. Using the Copy feature is the only way to add or remove the Administrator flag on a user. An Administrator user name cannot be deleted, has access to all Processing Accounts by default, and has the ability to unlock user accounts (a user account will be locked for 30 minutes after 6 failed login attempts). To add the Administrator flag to a user:
1. Ensure that you have at least one user already set as an Administrator (the "system" user is the only Administrator by default).
2. Add a new user or Modify the user you want to set as an Administrator. 3. Choose the Copy button at the bottom of the User Security Settings window. 4. Select a user that is currently set as an Administrator from the list. 5. Choose the OK button, then continue configuring the user as desired.
To remove the Administrator flag from a user:
1. Ensure that you have at least one user already created without the Administrator flag.
2. Modify the user you want to remove as an Administrator. 3. Choose the Copy button at the bottom of the User Security Settings window. 4. Select a user that is currently not set as an Administrator from the list. 5. Choose the OK button, then continue configuring the user as desired.

Updated July 2, 2013 XCharge 7.2 Release 1 Help Page 49 of 168
XCHARGE SERVER SETUP - GENERAL OPTIONS (CONTINUED) The Update Tab The Update tab contains settings to help keep your copy of XCharge up to date and secure. Auto Check For Update The default time set here is randomized at the time of installation to be between 12:00am and 6:00am. If the XCharge Server is running at the time set here, it will check for critical security updates. These updates are downloaded but not automatically installed - instead, a message is displayed on the XCharge Server PC to notify you that a security update is ready for installation. Email Address The email address saved here is where critical security update information will be sent. The Backup Tab The Backup tab is where the XCharge Daily Backup options are configured. XCharge Backups can be manually created and restored from the XCharge Server, or Daily Backups can be configured here. The XCharge Backup feature will save a "zipped" file containing the XCharge database, Processing Account information, security and other settings. This feature is not turned on by default, but saving regular backups is recommended. Enable Daily Backup With this option enabled, XCharge will save a new backup every day at the configured time as long as the XCharge Server is running at that time. Run Backup at Set the time for the Daily Backup to run here. It is recommended to set a time before or after transaction processing takes place, and while the PC is running. For example, if the PC is turned off each night at midnight, then setting a time of 1:00am is not recommended. Backup Folder Set the path where the Daily Backups should be saved by manually entering the path here or selecting the "..." button and browsing to the desired folder. The folder can be on the local PC, on an accessible folder across the network, or even on a removable storage device. If a folder on the local PC is selected, it is recommended to routinely copy the XCharge backups to a removable storage device or other location off the PC (in case something happens to the PC). Append Date/Time to backup file name With this option disabled, each Daily Backup file will be created as XCBackup.zip and will be overwritten each day (only the most recent copy will be saved in the Backup Folder). With this option selected, the backup file name will include the date and time when the Daily Backup is run, and no previous backups will be erased by XCharge.

Updated July 2, 2013 XCharge 7.2 Release 1 Help Page 50 of 168
XCHARGE SERVER SETUP - GENERAL OPTIONS (CONTINUED) The Scheduled Reporting Tab The Scheduled Reporting tab is where all Scheduled Report Printing options are configured. Scheduled Report Printing is a feature that automates the printing of your XCharge Reports on a routine basis. The XCharge Server must be running at the time set for Scheduled Report Printing or else that day’s reports will be skipped. Enable Scheduled Report Printing Select this option to turn the Scheduled Report Printing feature on. Run Reports at Set the time in which XCharge should automatically print your reports. Reports The Reports section here is where specific Reports are selected for Scheduled Report Printing, the # of Days on Report, and the number of Copies of each report to print. If the number of days is set to 2 or higher, then the current day along with consecutive days in the past will be printed, regardless of activity present or missing on those days. Days of Week By default, all days of the week are selected for printing. If you would like to exclude Scheduled Report Printing on certain days of the week, uncheck the desired options here. Printer Use the drop-down menu to select the Windows printer to be used for Scheduled Report Printing.
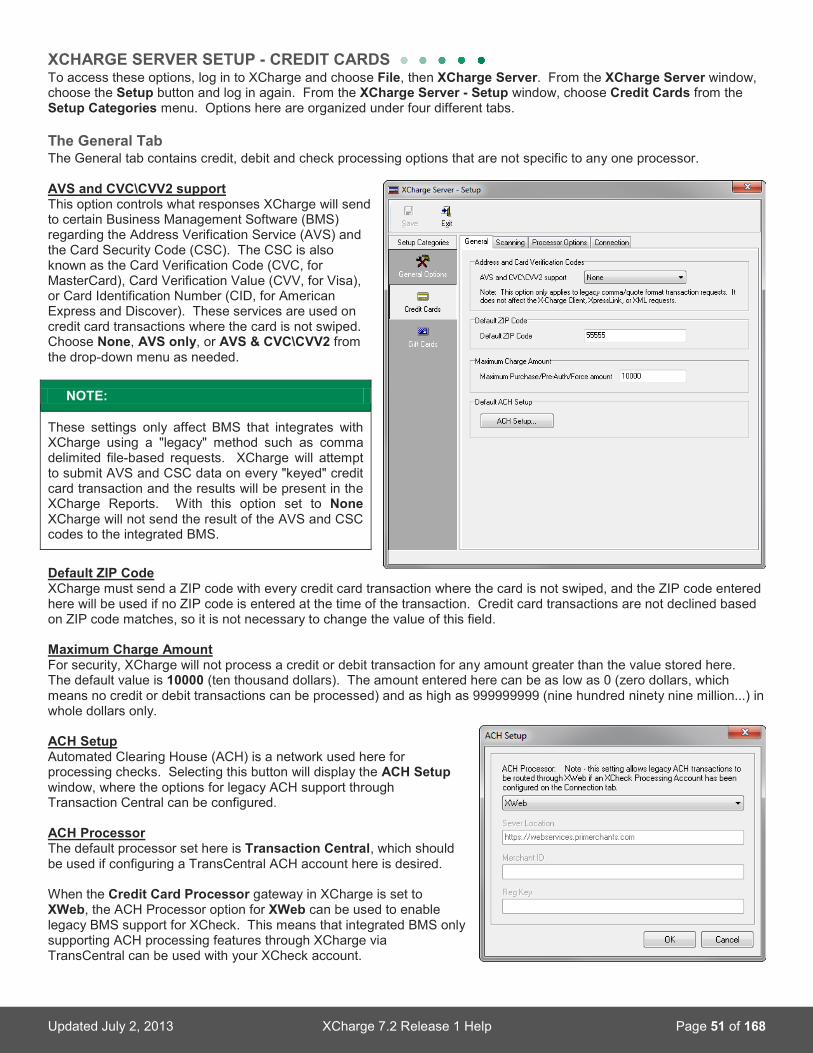
Updated July 2, 2013 XCharge 7.2 Release 1 Help Page 51 of 168
XCHARGE SERVER SETUP - CREDIT CARDS To access these options, log in to XCharge and choose File, then XCharge Server. From the XCharge Server window, choose the Setup button and log in again. From the XCharge Server - Setup window, choose Credit Cards from the Setup Categories menu. Options here are organized under four different tabs. The General Tab The General tab contains credit, debit and check processing options that are not specific to any one processor. AVS and CVC\CVV2 support This option controls what responses XCharge will send to certain Business Management Software (BMS) regarding the Address Verification Service (AVS) and the Card Security Code (CSC). The CSC is also known as the Card Verification Code (CVC, for MasterCard), Card Verification Value (CVV, for Visa), or Card Identification Number (CID, for American Express and Discover). These services are used on credit card transactions where the card is not swiped. Choose None, AVS only, or AVS & CVC\CVV2 from the drop-down menu as needed.
Default ZIP Code XCharge must send a ZIP code with every credit card transaction where the card is not swiped, and the ZIP code entered here will be used if no ZIP code is entered at the time of the transaction. Credit card transactions are not declined based on ZIP code matches, so it is not necessary to change the value of this field. Maximum Charge Amount For security, XCharge will not process a credit or debit transaction for any amount greater than the value stored here. The default value is 10000 (ten thousand dollars). The amount entered here can be as low as 0 (zero dollars, which means no credit or debit transactions can be processed) and as high as 999999999 (nine hundred ninety nine million...) in whole dollars only. ACH Setup Automated Clearing House (ACH) is a network used here for processing checks. Selecting this button will display the ACH Setup window, where the options for legacy ACH support through Transaction Central can be configured. ACH Processor The default processor set here is Transaction Central, which should be used if configuring a TransCentral ACH account here is desired. When the Credit Card Processor gateway in XCharge is set to XWeb, the ACH Processor option for XWeb can be used to enable legacy BMS support for XCheck. This means that integrated BMS only supporting ACH processing features through XCharge via TransCentral can be used with your XCheck account.
NOTE:
These settings only affect BMS that integrates with XCharge using a "legacy" method such as comma delimited file-based requests. XCharge will attempt to submit AVS and CSC data on every "keyed" credit card transaction and the results will be present in the XCharge Reports. With this option set to None XCharge will not send the result of the AVS and CSC codes to the integrated BMS.

Updated July 2, 2013 XCharge 7.2 Release 1 Help Page 52 of 168
XCHARGE SERVER SETUP - CREDIT CARDS (CONTINUED) The Scanning Tab The Scanning tab displays the currently configured Credit Card Sentinel Characters and allows the modification of these settings as needed.
Credit Card Sentinel Characters The sentinel characters are part of the track data read by XCharge when a card is scanned, and they tell XCharge where the individual tracks begin and end. XCharge is designed to work with models of Magnetic Stripe Readers (MSRs) that are already configured with the sentinel characters defined by default (as shown here). If desired, the sentinel characters can be manually edited here.
Auto detect Choose this button to open a swipe window where you can swipe a card to automatically detect the sentinel characters being transmitted. This will not work for MSRs configured for HID mode.
NOTE:
It is not recommended to modify these settings. Many MSRs are able to be reprogrammed to format swipe data in a way that works with XCharge, and it is advised to change the settings on the MSR instead of XCharge if needed.

Updated July 2, 2013 XCharge 7.2 Release 1 Help Page 53 of 168
XCHARGE SERVER SETUP - CREDIT CARDS (CONTINUED) The Processor Options Tab The Processor Options tab contains various options that determine how XCharge communicates with your payment processor. Allow Duplicate Transactions The XWeb gateway will detect duplicate transactions and reject them based on the time range configured at XWeb, which can be from one to sixty minutes. With the Allow duplicate transactions option enabled here, XCharge will override these settings and allow duplicate transactions to be processed. A duplicate transaction will be rejected if it meets these criteria:
• The transaction type is a Credit Card Purchase, Credit Card Force, Credit Card Pre-Authorization Completion, Debit Card Purchase, Debit Card Return, EBT Sale, EBT Return, EBT Voucher, or EBT Cash Benefit Sale.
• The transaction contains the same account (card) number as another approved transaction of the same dollar amount within a certain amount of time (defined at the XWeb gateway).
• The "Allow duplicate transactions" option is not enabled in the XCharge Server Setup.
FSA/IIAS Transactions XCharge is able to process Flexible Spending Account (FSA) cards, and for those requiring the Inventory Information Approval System (IIAS) technology, the setup options are configured here. Enable IIAS/FSA Transactions Enable this option to turn on the IIAS feature. With IIAS enabled, XCharge will transmit the separate RX, IIAS and grand total amounts required by some FSA card issuers. Automatically update BIN table In order for XCharge to determine if a certain credit card is an FSA card, a Bank Identification Number (BIN) lookup needs to be performed during the transaction. With this option enabled, XCharge will update the BIN table once a week to stay up to date with newly issued FSA cards. An Update Now button is also available to update the BIN table at any time (requires internet connection).

Updated July 2, 2013 XCharge 7.2 Release 1 Help Page 54 of 168
XCHARGE SERVER SETUP - CREDIT CARDS (CONTINUED) Partial Approvals A partial approval is an approval on a credit card or debit card transaction for less than the amount requested. For example, if a credit card only has $20.00 available and a transaction for $30.00 is attempted, it is possible to receive an approval to charge the available $20.00 (the remaining $10.00 would be charged to another card, etc). XCharge supports partial approvals on credit card and debit card transactions as long as partial approvals are enabled on the transaction. Business Management Software (BMS) integrating with XCharge is able to turn this on, as is the XCharge Client application. If the Enable XCharge Client Partial Approval Support option is selected then partial approvals are possible when processing from the XCharge Client directly. This option is enabled by default since it is a requirement in some circumstances. XCheck Options The XCheck Options, such as which SEC codes (entry types) are supported, are configured here by choosing the Setup button. An XCheck Processing Account must be configured on the Connection tab to correspond with your XCheck account for these settings to take effect. Supported Check Entry Types Mark the check boxes for each Supported Check Entry Type (SEC code) enabled on your XCheck account that you wish to process. For descriptions and details concerning the Check Entry Types, please refer to the XCheck Standard Entry Class Codes topic under the Additional Information section. Default Sale or Authorization Entry Type Select the Check Entry Type you would like to be selected by default when selecting Check Sale from XCharge. Default Credit Entry Type Select the Check Entry Type you would like to be selected by default when selecting Check Credit from XCharge. Verify Check Sale Transactions Select this option if you would like XCharge to perform a Check Verification transaction automatically before each Check Sale. Check Verification must be enabled on your account for this transaction type to work.

Updated July 2, 2013 XCharge 7.2 Release 1 Help Page 55 of 168
XCHARGE SERVER SETUP - CREDIT CARDS (CONTINUED) The Connection Tab The Connection tab contains the primary settings to configure your XCharge Processing Accounts managed on XWeb. Server Information The Server Location is configured to the correct XWeb gateway by default and should not be modified without instructions from Accelerated Payment Technologies. Processing Account Information The main part of the screen is where all of the currently configured Processing Accounts are displayed. There are six columns with Merchant Information shown here:
• Processing Account Row #: the first column shows the row numbering, which is only used on this window. The Processing Accounts are ordered here by date/time modified (the most recently created or modified Processing Account appears at the bottom of the list. An asterisk (*) is displayed next to the Processing Account Row # for the original Processing Account.
• Processing Account Name: the Processing Account Name field (alphanumeric, maximum of 30 characters) is displayed in place of other Processing Account Information for security and simplicity. Processing Accounts are sorted in the XCharge Client application and XCharge Reports based on the Processing Account Name. Business Management Software (BMS) that stores Processing Account Information will use the Processing Account Name identifier.
• XWeb ID: also known as the XWID - this is the main XWeb account number associated with your Processing Account. Multiple Terminal IDs may share the same XWeb ID to consolidate online reporting, if desired.
• Terminal ID: also known as the TID or XWeb TID - each unique Terminal Identifier should be not be configured in more than one XCharge Server as it is directly linked to your Processing Account.
• Market Type: available options are Retail, Mail Order/Telephone Order (MOTO), Ecommerce, Restaurant, and Check Services - the Market Type setting in XCharge is used for reference and should be configured to match settings at the XWeb gateway and your integrated BMS.
• Transaction Folder: available for certain BMS integrations, the Transaction Folder can be set to a specific directory or disabled if not needed. If disabled, IP Only will be shown here. The first Processing Account is set to Default unless modified, which means it will use the Transaction Folder defined under the General Options - Server tab.
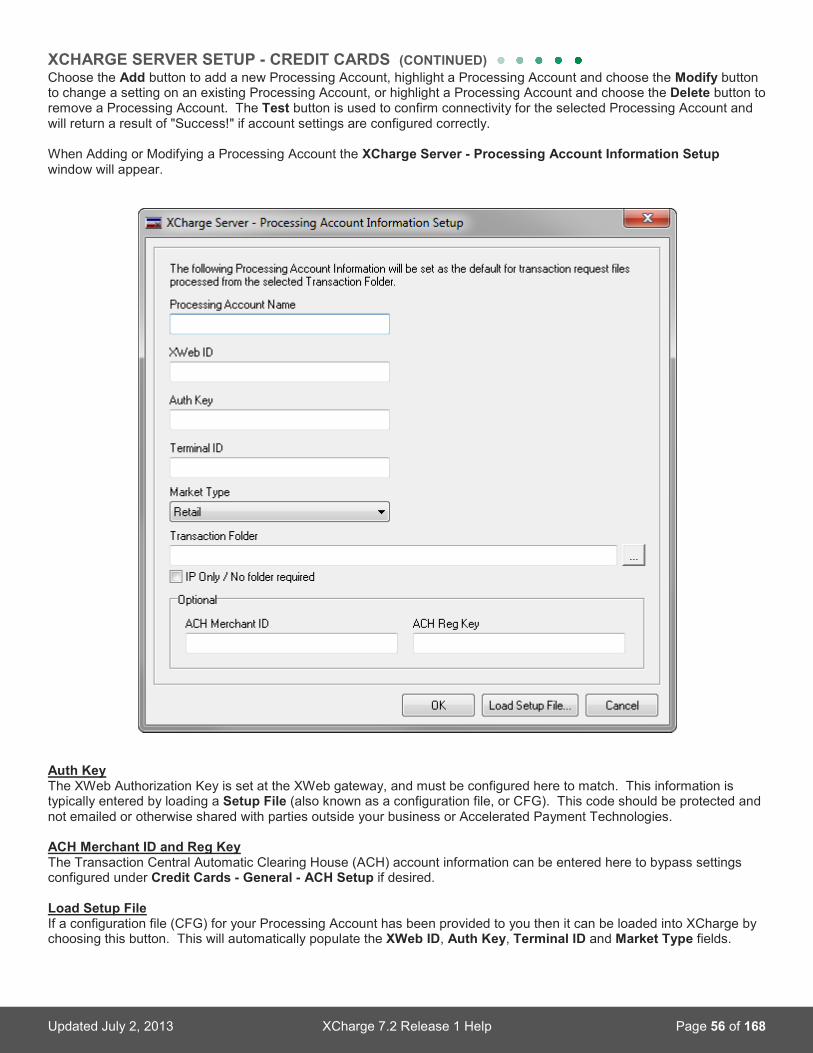
Updated July 2, 2013 XCharge 7.2 Release 1 Help Page 56 of 168
XCHARGE SERVER SETUP - CREDIT CARDS (CONTINUED) Choose the Add button to add a new Processing Account, highlight a Processing Account and choose the Modify button to change a setting on an existing Processing Account, or highlight a Processing Account and choose the Delete button to remove a Processing Account. The Test button is used to confirm connectivity for the selected Processing Account and will return a result of "Success!" if account settings are configured correctly. When Adding or Modifying a Processing Account the XCharge Server - Processing Account Information Setup window will appear.
Auth Key The XWeb Authorization Key is set at the XWeb gateway, and must be configured here to match. This information is typically entered by loading a Setup File (also known as a configuration file, or CFG). This code should be protected and not emailed or otherwise shared with parties outside your business or Accelerated Payment Technologies. ACH Merchant ID and Reg Key The Transaction Central Automatic Clearing House (ACH) account information can be entered here to bypass settings configured under Credit Cards - General - ACH Setup if desired. Load Setup File If a configuration file (CFG) for your Processing Account has been provided to you then it can be loaded into XCharge by choosing this button. This will automatically populate the XWeb ID, Auth Key, Terminal ID and Market Type fields.

Updated July 2, 2013 XCharge 7.2 Release 1 Help Page 57 of 168
XCHARGE SERVER SETUP - GIFT CARDS To access these options, log in to XCharge and choose File, then XCharge Server. From the XCharge Server window, choose the Setup button and log in again. From the XCharge Server - Setup window, choose Gift Cards from the Setup Categories menu. Options here are organized under two different tabs. The Transactions Tab The Gift Card Transactions tab displays the current batch and item number information, and contains the security setting for the Maximum Gift Amount. Gift Batch Numbers The Current Batch Number and Current Batch Reference Numbers are displayed here.
• Batch Number: this number increases as gift card batches are settled. Since settlements are not needed for gift card transactions, this number typically stays at 1.
• Batch Reference Number: this is the number of gift card transactions in the current batch. • Modify: choosing this button gives access to manually edit the Current Batch Number and Current Batch
Reference Number values. Modifying the current Gift Card Batch Number can cause data corruption and reporting problems. The Gift Card Batch Number and Batch Reference Number should only be modified when the current Batch Reference Number is 0. It is recommended that the current Gift Card Batch be settled before the numbers are modified. This option should not be used without the aid of Accelerated Payment Technologies.
Maximum Gift Amount For security, XCharge will not process a gift card transaction for any amount greater than the value stored here. The default value is 10000 (ten thousand dollars). The amount entered here can be as low as 0 (zero dollars, which means no gift card transactions can be processed) and as high as 999999999 (nine hundred ninety nine million...) in whole dollars only.
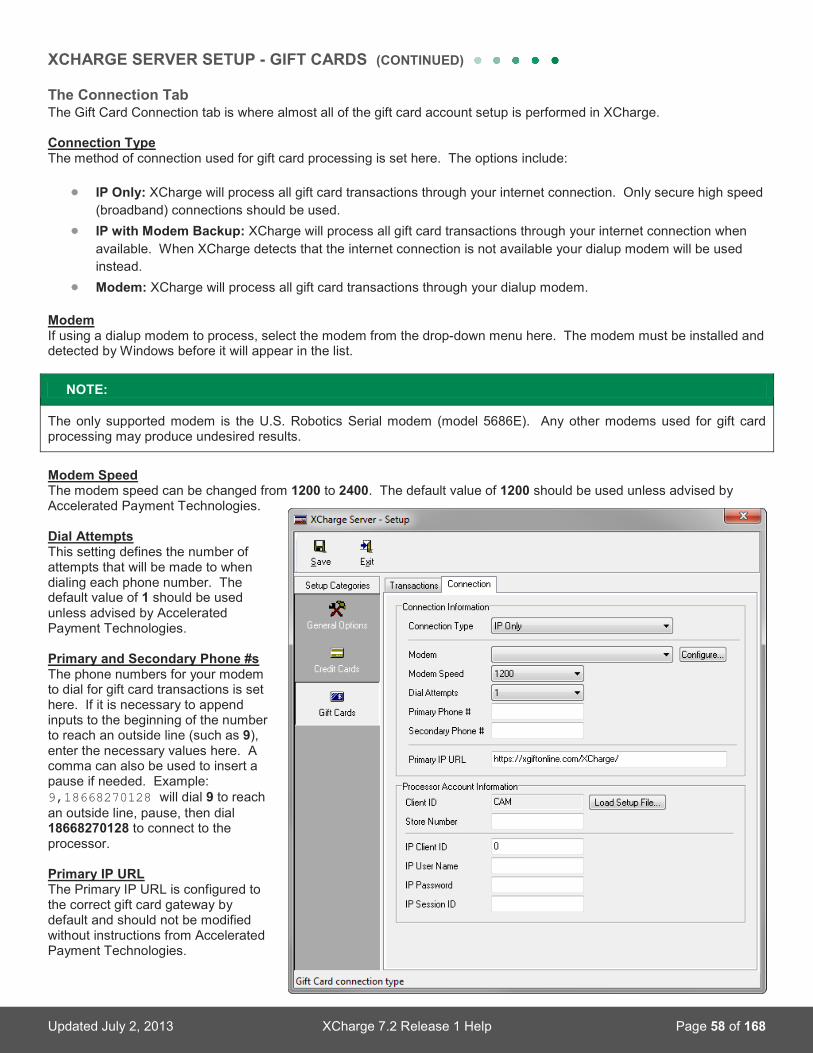
Updated July 2, 2013 XCharge 7.2 Release 1 Help Page 58 of 168
XCHARGE SERVER SETUP - GIFT CARDS (CONTINUED) The Connection Tab The Gift Card Connection tab is where almost all of the gift card account setup is performed in XCharge. Connection Type The method of connection used for gift card processing is set here. The options include:
• IP Only: XCharge will process all gift card transactions through your internet connection. Only secure high speed (broadband) connections should be used.
• IP with Modem Backup: XCharge will process all gift card transactions through your internet connection when available. When XCharge detects that the internet connection is not available your dialup modem will be used instead.
• Modem: XCharge will process all gift card transactions through your dialup modem. Modem If using a dialup modem to process, select the modem from the drop-down menu here. The modem must be installed and detected by Windows before it will appear in the list.
Modem Speed The modem speed can be changed from 1200 to 2400. The default value of 1200 should be used unless advised by Accelerated Payment Technologies. Dial Attempts This setting defines the number of attempts that will be made to when dialing each phone number. The default value of 1 should be used unless advised by Accelerated Payment Technologies. Primary and Secondary Phone #s The phone numbers for your modem to dial for gift card transactions is set here. If it is necessary to append inputs to the beginning of the number to reach an outside line (such as 9), enter the necessary values here. A comma can also be used to insert a pause if needed. Example: 9,18668270128 will dial 9 to reach an outside line, pause, then dial 18668270128 to connect to the processor. Primary IP URL The Primary IP URL is configured to the correct gift card gateway by default and should not be modified without instructions from Accelerated Payment Technologies.
NOTE:
The only supported modem is the U.S. Robotics Serial modem (model 5686E). Any other modems used for gift card processing may produce undesired results.
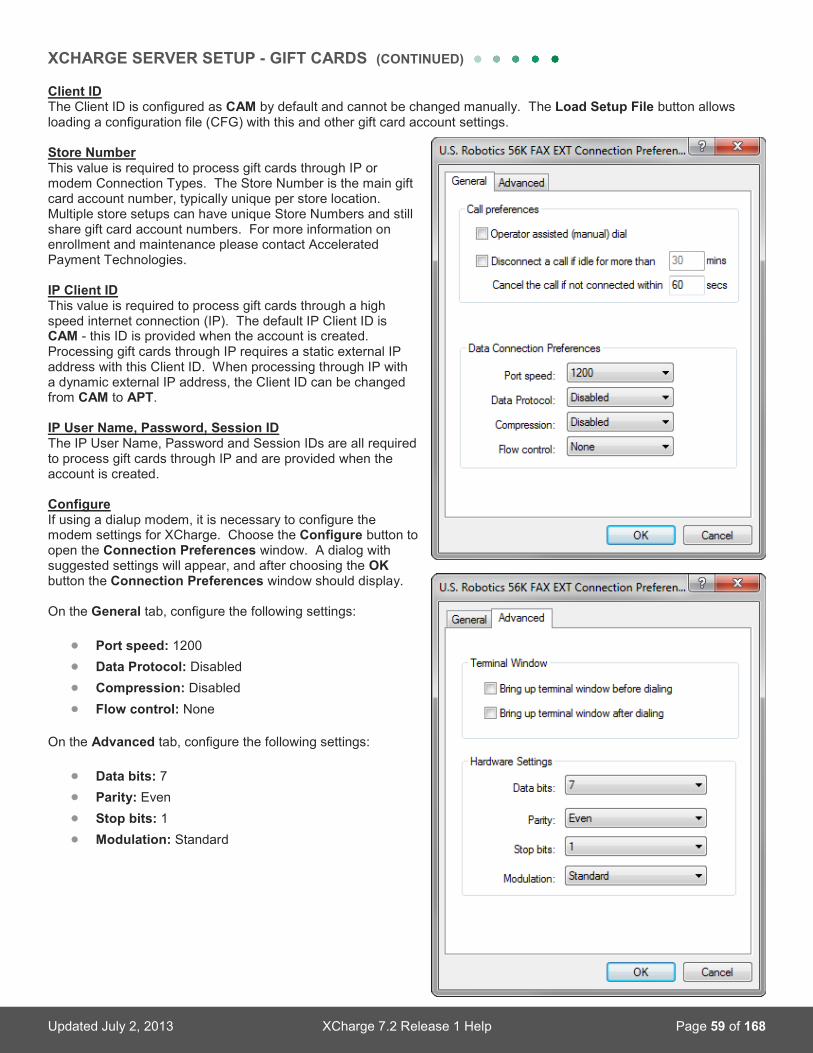
Updated July 2, 2013 XCharge 7.2 Release 1 Help Page 59 of 168
XCHARGE SERVER SETUP - GIFT CARDS (CONTINUED) Client ID The Client ID is configured as CAM by default and cannot be changed manually. The Load Setup File button allows loading a configuration file (CFG) with this and other gift card account settings. Store Number This value is required to process gift cards through IP or modem Connection Types. The Store Number is the main gift card account number, typically unique per store location. Multiple store setups can have unique Store Numbers and still share gift card account numbers. For more information on enrollment and maintenance please contact Accelerated Payment Technologies. IP Client ID This value is required to process gift cards through a high speed internet connection (IP). The default IP Client ID is CAM - this ID is provided when the account is created. Processing gift cards through IP requires a static external IP address with this Client ID. When processing through IP with a dynamic external IP address, the Client ID can be changed from CAM to APT. IP User Name, Password, Session ID The IP User Name, Password and Session IDs are all required to process gift cards through IP and are provided when the account is created. Configure If using a dialup modem, it is necessary to configure the modem settings for XCharge. Choose the Configure button to open the Connection Preferences window. A dialog with suggested settings will appear, and after choosing the OK button the Connection Preferences window should display. On the General tab, configure the following settings:
• Port speed: 1200 • Data Protocol: Disabled • Compression: Disabled • Flow control: None
On the Advanced tab, configure the following settings:
• Data bits: 7 • Parity: Even • Stop bits: 1 • Modulation: Standard

Updated July 2, 2013 XCharge 7.2 Release 1 Help Page 60 of 168
TRANSACTION PROCESSING Information on specific transaction type availability is available under each topic available below. See the topics covering Setup Procedures - XCharge Client and Setup Procedures - XCharge Server for more information. For information on the various response codes, refer to the Additional Information topics and the end of this document. This section discusses the various types of transactions that the XCharge Client application can process, including regular Credit Cards, Debit Cards, Gift Cards, EBT Cards and Checks.
Processing Transactions with the XCharge Client ___________________________________________________ 61
Processing Credit Cards ________________________________________________________________________ 62
Processing Debit Cards _________________________________________________________________________ 73
Processing Gift Cards __________________________________________________________________________ 77
Processing Checks ____________________________________________________________________________ 91
Processing EBT Cards __________________________________________________________________________ 96

Updated July 2, 2013 XCharge 7.2 Release 1 Help Page 61 of 168
PROCESSING TRANSACTIONS WITH THE XCHARGE CLIENT When processing transactions in the XCharge Client application, the desired transaction type is first selected. All of the transaction types available are organized into five categories in the XCharge Client: Credit/Debit, Gift, Check and EBT. The various transaction types will be available after logging into the XCharge Client depending on the XCharge Client and Server settings, and the XCharge Client Options enabled under XCharge Security for the user currently logged in. Information on specific transaction type availability is available under each topic available below. See the topics covering Setup Procedures - XCharge Client and Setup Procedures - XCharge Server for more information. For information on the various response codes, refer to the Additional Information parent section. Within the XCharge Client, you can toggle the transaction category by choosing the Transaction menu, or by choosing the transaction category button toward the upper-left of the window (the currently selected transaction category is displayed).
NOTE:
• The instructions covered in this section do not apply to transactions processed from your integrated Business Management Software (BMS).
• Transactions processed in the XCharge Client application directly will not be automatically recorded in your integrated BMS.
• If multiple Processing Accounts are configured for the user logged in, you must select the desired Processing Account by choosing Transaction, Processing Account, then selecting the Processing Account desired. XCharge can also prompt you to select the desired Processing Account after logging in or after choosing [F12] Process if either option is enabled in the XCharge Setup options.
• Any field marked with an asterisk (*) is optional unless it has been set as required in the XCharge Setup options.

Updated July 2, 2013 XCharge 7.2 Release 1 Help Page 62 of 168
PROCESSING CREDIT CARDS Credit Cards can be processed from the XCharge Client application in many ways, and all transaction types for credit cards are grouped together within XCharge under the Credit/Debit Transactions category. Information on specific transaction type availability is available under each topic available below. See the topics covering Setup Procedures - XCharge Client and Setup Procedures - XCharge Server for more information. For information on the various response codes, refer to the Additional Information section. Processing a Credit Card Purchase A Credit Card Purchase transaction is used to obtain funds from a credit card account. XCharge will attempt to receive a sale authorization from the credit card issuer, and once approved the transaction will enter the current batch. Once the batch is settled, the credit and debit card transactions are submitted to the credit card processor for deposit (or withdrawal). This transaction type is available within XCharge as long as the option is enabled for the user currently logged in, and can be selected in any of the following ways:
• Select Credit Card Transactions from the transaction category menu, then choose Purchase from the far left. • Select the Transaction menu, then select Credit/Debit Card Transactions, then choose Purchase. • Press the F2 key on your keyboard.
To process a Credit Card Purchase in XCharge:
1. Enter the dollar amount into the Amount field. • Enter the full amount including dollars, a decimal point, and cents. • Ensure the decimal point is in the correct place!
2. In the Credit Card # field, enter the credit card number.
• When this field is selected, you will be prompted to swipe the credit card. • You can either swipe the credit card using your Magnetic Stripe Reader (MSR), or manually enter the
credit card number. • Once the card number is
entered and another field is selected, the Primary Account Number (PAN - digits after the first six and before the last four) will be masked if a valid credit card number is detected.
• If a PIN pad or signature capture device with an integrated MSR is used, this step can be skipped. XCharge will prompt you to swipe the credit card after Process is selected.
• If you do not have the credit card number and would like to select a credit card from your transaction history, see Frequently Asked Questions for more information.
Updated July 2, 2013 XCharge 7.2 Release 1 Help Page 63 of 168
PROCESSING CREDIT CARDS (CONTINUED) Processing a Credit Card Purchase (continued)
3. In the Expiration field, enter the credit card expiration date in MMYY format. • This will be entered for you if the credit card is swiped.
4. For manually keyed transactions, enter the billing ZIP code for the credit card.
• This is not used for swiped transactions. • This field is optional unless set to Required in the XCharge Client Setup window, but is recommended for
keyed transactions.
5. For manually keyed transactions, enter the billing Address number for the credit card. • This is not used for swiped transactions. • This field is optional unless set to Required in the XCharge Client Setup window, but is recommended for
keyed transactions.
6. For manually keyed transactions, enter the CVV2/CVC2 number on the credit card. • The Card Verification Value is a 3-digit number on the back of Visa-issued credit cards. • The Card Verification Code is a 3-digit number on the back of MasterCard-issued credit cards. • The Card Identification Number (similar to CVV/CVC) is the 3-digit number on the back of Discover-
issued credit cards, or a 4-digit number on the front of American Express-issued credit cards. • This is not used for swiped transactions. • This field is optional unless set to Required in the XCharge Client Setup window, but is recommended for
keyed transactions.
7. Enter the Receipt # for the transaction. • A Receipt # can contain letters, numbers, spaces and special characters (not including a comma),
totalling a maximum of 25 characters long. The letters used are not case-sensitive. • Receipt #s are used for your reference only and are not verified by XCharge, however they can be used
to sort XCharge Reports or search for transactions in the Transaction Lookup window. • This field is optional unless set to Required in the XCharge Client Setup window.
8. Enter the Clerk ID for the transaction.
• A Clerk ID can contain letters, numbers, spaces and special characters (not including a comma), totalling a maximum of 20 characters long. The letters used are not case-sensitive.
• Clerk IDs are used for your reference only and are not verified by XCharge, however they can be used to sort XCharge Reports or search for transactions in the Transaction Lookup window.
• This field is optional unless set to Required in the XCharge Client Setup window.
9. Press F12 or choose the [F12] Process button. • XCharge will process the transaction and return a response. • If approved, a receipt may print and a message with the response will be displayed, based on the options
configured.

Updated July 2, 2013 XCharge 7.2 Release 1 Help Page 64 of 168
PROCESSING CREDIT CARDS (CONTINUED) Processing a Credit Card Return A Credit Card Return transaction is used to process a refund or otherwise credit funds to a credit card account. XCharge will attempt to submit the refund request to the credit card processor and receive an approval, and once approved the transaction will enter the current batch. Once the batch is settled the credit and debit card transactions are submitted to the credit card processor for deposit (or withdrawal). This transaction type is available as long as the option is enabled for the user currently logged in, and can be selected in any of the following ways:
• Select Credit Card Transactions from the transaction category menu, then choose Return from the far left. • Select the Transaction menu, then select Credit/Debit Card Transactions, then choose Return. • Press the F3 key on your keyboard.

Updated July 2, 2013 XCharge 7.2 Release 1 Help Page 65 of 168
PROCESSING CREDIT CARDS (CONTINUED) To process a Credit Card Return in XCharge:
1. Enter the dollar amount into the Amount field. • Enter the full amount including dollars, a decimal point, and cents. • Ensure the decimal point is in the correct place!
2. In the Credit Card # field, enter the credit card number.
• When this field is selected, you will be prompted to swipe the credit card. • You can either swipe the credit card using your Magnetic Stripe Reader (MSR), or manually enter the
credit card number. • Once the card number is entered and another field is selected, the Primary Account Number (PAN - digits
after the first six and before the last four) will be masked if a valid credit card number is detected. • If a PIN pad or signature capture device with an integrated MSR is used, this step can be skipped.
XCharge will prompt you to swipe the credit card after Process is selected. • If you do not have the credit card number and would like to select a credit card from your transaction
history, see Frequently Asked Questions for more information.
3. In the Expiration field, enter the credit card expiration date in MMYY format. • This will be entered for you if the credit card is swiped.
4. Enter the Receipt # for the transaction.
• A Receipt # can contain letters, numbers, spaces and special characters (not including a comma), totalling a maximum of 25 characters long. The letters used are not case-sensitive.
• Receipt #s are used for your reference only and are not verified by XCharge, however they can be used to sort XCharge Reports or search for transactions in the Transaction Lookup window.
• This field is optional unless set to Required in the XCharge Client Setup window.
5. Enter the Clerk ID for the transaction. • A Clerk ID can contain letters, numbers, spaces and special characters (not including a comma), totalling
a maximum of 20 characters long. The letters used are not case-sensitive. • Clerk IDs are used for your reference only and are not verified by XCharge, however they can be used to
sort XCharge Reports or search for transactions in the Transaction Lookup window. • This field is optional unless set to Required in the XCharge Client Setup window.
6. Press F12 or choose the [F12] Process button.
• XCharge will process the transaction and return a response. • If approved, a receipt may print and a message with the response will be displayed, based on the options
configured.

Updated July 2, 2013 XCharge 7.2 Release 1 Help Page 66 of 168
PROCESSING CREDIT CARDS (CONTINUED) Processing a Credit Card Force A Credit Card Force transaction is used to obtain funds from a credit card account. XCharge will not attempt to receive any authorization from the credit card issuer - instead, the Approval Code must be obtained separately and submitted with the transaction, and once approved the transaction will enter the current batch. Once the batch is settled the credit and debit card transactions are submitted to the credit card processor for deposit (or withdrawal). Approval Codes may be obtained from a previous transaction such as a pre-authorization or voice authorization. When using the Credit Card Force transaction type to complete a previous Credit Card Pre-Authorization, the transaction type is submitted and reported as a Pre-Authorization Completion. For information on obtaining a voice authorization, refer to Frequently Asked Questions. Separate steps for processing a Credit Card Force and Credit Card Pre-Authorization Completion will be provided below. This transaction type is available for as long as the option is enabled for the user currently logged in, and can be selected in any of the following ways:
• Select Credit Card Transactions from the transaction category menu, then choose Force from the far left. • Select the Transaction menu, then select Credit/Debit Card Transactions, then choose Force. • Press the F6 key on your keyboard.
Updated July 2, 2013 XCharge 7.2 Release 1 Help Page 67 of 168
PROCESSING CREDIT CARDS (CONTINUED) To process a Credit Card Force in XCharge:
1. Enter the dollar amount into the Amount field. • Enter the full amount including dollars, a decimal point, and cents. • Ensure the decimal point is in the correct place!
2. In the Credit Card # field, enter the credit card number.
• When this field is selected, you will be prompted to swipe the credit card. • You can either swipe the credit card using your Magnetic Stripe Reader (MSR), or manually enter the
credit card number. • Once the card number is entered and another field is selected, the Primary Account Number (PAN - digits
after the first six and before the last four) will be masked if a valid credit card number is detected. • If a PIN pad or signature capture device with an integrated MSR is used, this step can be skipped.
XCharge will prompt you to swipe the credit card after Process is selected. • If you do not have the credit card number and would like to select a credit card from your transaction
history, see Frequently Asked Questions for more information.
3. In the Expiration field, enter the credit card expiration date in MMYY format. • This will be entered for you if the credit card is swiped.
4. Enter the Approval Code.
• Approval Codes must be obtained from your credit card processor, or from the card issuer with your processor's permission.
• Approval Codes are six characters in length, and may contain a combination of numbers and letters.
5. Enter the Receipt # for the transaction. • A Receipt # can contain letters, numbers, spaces and special characters (not including a comma),
totalling a maximum of 25 characters long. The letters used are not case-sensitive. • Receipt #s are used for your reference only and are not verified by XCharge, however they can be used
to sort XCharge Reports or search for transactions in the Transaction Lookup window. • This field is optional unless set to Required in the XCharge Client Setup window.
6. Enter the Clerk ID for the transaction.
• A Clerk ID can contain letters, numbers, spaces and special characters (not including a comma), totalling a maximum of 20 characters long. The letters used are not case-sensitive.
• Clerk IDs are used for your reference only and are not verified by XCharge, however they can be used to sort XCharge Reports or search for transactions in the Transaction Lookup window.
• This field is optional unless set to Required in the XCharge Client Setup window.
7. Press F12 or choose the [F12] Process button. • XCharge will process the transaction and return a response. • If approved, a receipt may print and a message with the response will be displayed, based on the options
configured.

Updated July 2, 2013 XCharge 7.2 Release 1 Help Page 68 of 168
PROCESSING CREDIT CARDS (CONTINUED) To process a Credit Card Pre-Authorization Completion in XCharge:
1. Choose the Search button to the right of the Approval Code field.
2. From the Item Number Lookup Window, select the desired transaction, then choose the OK button.
• The Amount, Credit Card #, Expiration and Approval Code fields will be automatically populated with the values from the Credit Card Pre-Authorization (pre-auth) transaction.
• Only approved pre-auths from the last thirty days will appear on this list. • Any pre-auth that has already been "Forced" (completed) will be displayed in green with a strikethrough.
3. Review the Amount and modify the dollar amount if needed.
• This is sometimes necessary when adding tips. The Amount entered here is what will be processed in the final transaction, so this should include the transaction total PLUS the tip.
• Enter the full dollar amount into the Amount field, including dollars, a decimal point, and cents. • Ensure the decimal point is in the correct place!
4. Enter the Receipt # for the transaction.
• A Receipt # can contain letters, numbers, spaces and special characters (not including a comma), totalling a maximum of 25 characters long. The letters used are not case-sensitive.
• Receipt #s are used for your reference only and are not verified by XCharge, however they can be used to sort XCharge Reports or search for transactions in the Transaction Lookup window.
• This field is optional unless set to Required in the XCharge Client Setup window.
5. Enter the Clerk ID for the transaction. • A Clerk ID can contain letters, numbers, spaces and special characters (not including a comma), totalling
a maximum of 20 characters long. The letters used are not case-sensitive. • Clerk IDs are used for your reference only and are not verified by XCharge, however they can be used to
sort XCharge Reports or search for transactions in the Transaction Lookup window. • This field is optional unless
set to Required in the XCharge Client Setup window.
6. Press F12 or choose the [F12]
Process button. • XCharge will process the
transaction and return a response.
• If approved, a receipt may print and a message with the response will be displayed, based on the options configured.

Updated July 2, 2013 XCharge 7.2 Release 1 Help Page 69 of 168
PROCESSING CREDIT CARDS (CONTINUED) Processing a Credit Card Pre-Authorization A Credit Card Pre-Authorization transaction is used to obtain authorization to obtain funds from a credit card account. XCharge will attempt to receive a sale authorization from the credit card issuer, and once approved the transaction can later be "forced" or "completed" to enter the current batch. Credit Card Pre-Authorization transactions do not enter the current batch automatically - for information on completing a Pre-Authorization see the Processing a Credit Card Pre-Authorization Completion topic above. Credit Card Pre-Authorization receipts will print with a tip line if the Print Tip Line option (enabled by default) is enabled under the Receipts tab in the XCharge Client Setup window. This transaction type is available as long as the option is enabled for the user currently logged in, and can be selected in any of the following ways:
• Select Credit Card Transactions from the transaction category menu, then choose Pre-Authorization from the far left.
• Select the Transaction menu, then select Credit/Debit Card Transactions, then choose Pre-Authorization. • Press the F7 key on your keyboard.
To process a Credit Card Pre-Authorization in XCharge:
1. Enter the dollar amount into the Amount field. • Enter the full amount including dollars, a decimal point, and cents. • Ensure the decimal point is in the correct place!
2. In the Credit Card # field, enter the credit card number.
• When this field is selected, you will be prompted to swipe the credit card. • You can either swipe the credit card using your Magnetic Stripe Reader (MSR), or manually enter the
credit card number. • Once the card number is
entered and another field is selected, the Primary Account Number (PAN - digits after the first six and before the last four) will be masked if a valid credit card number is detected.
• If a PIN pad or signature capture device with an integrated MSR is used, this step can be skipped. XCharge will prompt you to swipe the credit card after Process is selected.
• If you do not have the credit card number and would like to select a credit card from your transaction history, see Frequently Asked Questions for more information.

Updated July 2, 2013 XCharge 7.2 Release 1 Help Page 70 of 168
PROCESSING CREDIT CARDS (CONTINUED) Processing a Credit Card Pre-Authorization (continued)
3. In the Expiration field, enter the credit card expiration date in MMYY format. • This will be entered for you if the credit card is swiped.
4. For manually keyed transactions, enter the billing ZIP code for the credit card.
• This is not used for swiped transactions. • This field is optional unless set to Required in the XCharge Client Setup window, but is recommended for
keyed transactions.
5. For manually keyed transactions, enter the billing Address number for the credit card. • This is not used for swiped transactions. • This field is optional unless set to Required in the XCharge Client Setup window, but is recommended for
keyed transactions.
6. For manually keyed transactions, enter the CVV2/CVC2 number on the credit card. • The Card Verification Value is a 3-digit number on the back of Visa-issued credit cards. • The Card Verification Code is a 3-digit number on the back of MasterCard-issued credit cards. • The Card Identification Number (similar to CVV/CVC) is the 3-digit number on the back of Discover-
issued credit cards, or a 4-digit number on the front of American Express-issued credit cards. • This is not used for swiped transactions. • This field is optional unless set to Required in the XCharge Client Setup window, but is recommended for
keyed transactions.
7. Enter the Receipt # for the transaction. • A Receipt # can contain letters, numbers, spaces and special characters (not including a comma),
totalling a maximum of 25 characters long. The letters used are not case-sensitive. • Receipt #s are used for your reference only and are not verified by XCharge, however they can be used
to sort XCharge Reports or search for transactions in the Transaction Lookup window. • This field is optional unless set to Required in the XCharge Client Setup window.
8. Enter the Clerk ID for the transaction.
• A Clerk ID can contain letters, numbers, spaces and special characters (not including a comma), totalling a maximum of 20 characters long. The letters used are not case-sensitive.
• Clerk IDs are used for your reference only and are not verified by XCharge, however they can be used to sort XCharge Reports or search for transactions in the Transaction Lookup window.
• This field is optional unless set to Required in the XCharge Client Setup window.
9. Press F12 or choose the [F12] Process button. • XCharge will process the transaction and return a response. • If approved, a receipt may print and a message with the response will be displayed, based on the options
configured.
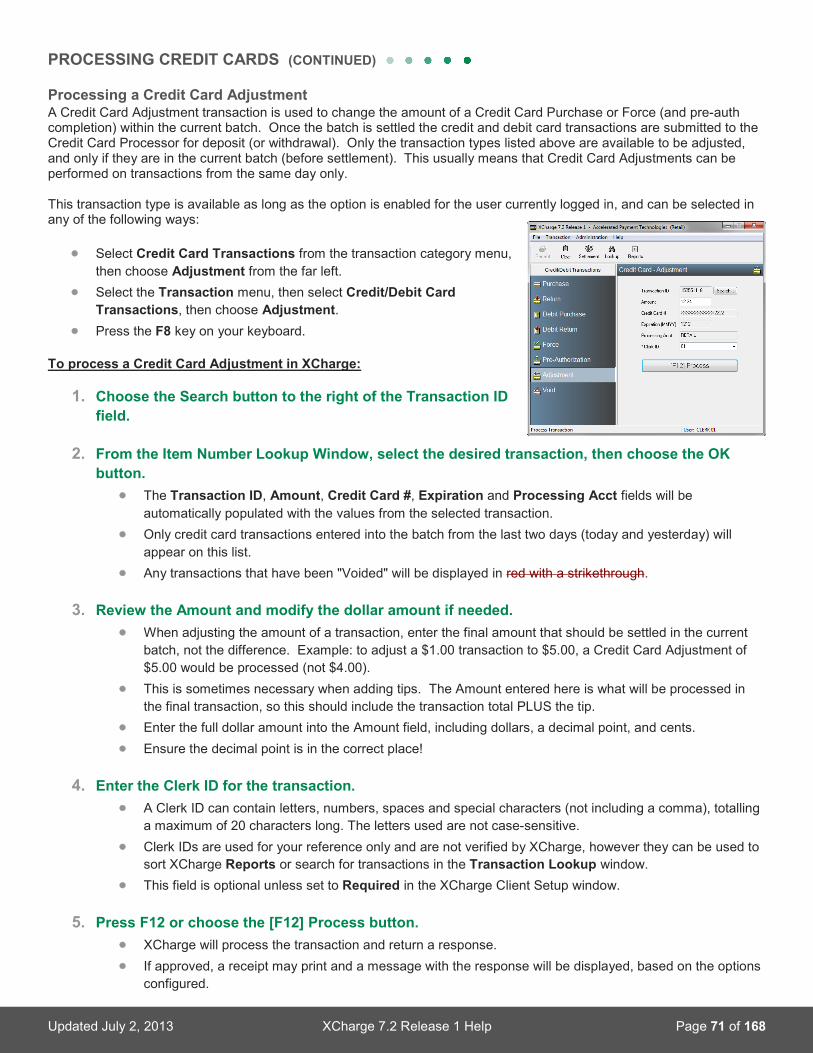
Updated July 2, 2013 XCharge 7.2 Release 1 Help Page 71 of 168
PROCESSING CREDIT CARDS (CONTINUED) Processing a Credit Card Adjustment A Credit Card Adjustment transaction is used to change the amount of a Credit Card Purchase or Force (and pre-auth completion) within the current batch. Once the batch is settled the credit and debit card transactions are submitted to the Credit Card Processor for deposit (or withdrawal). Only the transaction types listed above are available to be adjusted, and only if they are in the current batch (before settlement). This usually means that Credit Card Adjustments can be performed on transactions from the same day only. This transaction type is available as long as the option is enabled for the user currently logged in, and can be selected in any of the following ways:
• Select Credit Card Transactions from the transaction category menu, then choose Adjustment from the far left.
• Select the Transaction menu, then select Credit/Debit Card Transactions, then choose Adjustment.
• Press the F8 key on your keyboard. To process a Credit Card Adjustment in XCharge:
1. Choose the Search button to the right of the Transaction ID field.
2. From the Item Number Lookup Window, select the desired transaction, then choose the OK
button. • The Transaction ID, Amount, Credit Card #, Expiration and Processing Acct fields will be
automatically populated with the values from the selected transaction. • Only credit card transactions entered into the batch from the last two days (today and yesterday) will
appear on this list. • Any transactions that have been "Voided" will be displayed in red with a strikethrough.
3. Review the Amount and modify the dollar amount if needed.
• When adjusting the amount of a transaction, enter the final amount that should be settled in the current batch, not the difference. Example: to adjust a $1.00 transaction to $5.00, a Credit Card Adjustment of $5.00 would be processed (not $4.00).
• This is sometimes necessary when adding tips. The Amount entered here is what will be processed in the final transaction, so this should include the transaction total PLUS the tip.
• Enter the full dollar amount into the Amount field, including dollars, a decimal point, and cents. • Ensure the decimal point is in the correct place!
4. Enter the Clerk ID for the transaction.
• A Clerk ID can contain letters, numbers, spaces and special characters (not including a comma), totalling a maximum of 20 characters long. The letters used are not case-sensitive.
• Clerk IDs are used for your reference only and are not verified by XCharge, however they can be used to sort XCharge Reports or search for transactions in the Transaction Lookup window.
• This field is optional unless set to Required in the XCharge Client Setup window.
5. Press F12 or choose the [F12] Process button. • XCharge will process the transaction and return a response. • If approved, a receipt may print and a message with the response will be displayed, based on the options
configured.

Updated July 2, 2013 XCharge 7.2 Release 1 Help Page 72 of 168
PROCESSING CREDIT CARDS (CONTINUED) Processing a Credit Card Void A Credit Card Void transaction is used to remove a Credit Card Purchase, Return, or Force (and pre-auth completion) from the current batch. When possible, it is usually desirable to process a Credit Card Void to cancel a previous sale instead of processing a Credit Card Return. Only the transaction types listed above are available to be voided, and only if they are in the current batch (before settlement). This usually means that Credit Card Voids can be performed on transactions from the same day only. This transaction type is available as long as the option is enabled for the user currently logged in, and can be selected in any of the following ways:
• Select Credit Card Transactions from the transaction category menu, then choose Void from the far left.
• Select the Transaction menu, then select Credit/Debit Card Transactions, then choose Void.
• Press the F9 key on your keyboard. To process a Credit Card Void in XCharge:
1. Choose the Search button to the right of the Transaction ID field.
2. From the Item Number Lookup
Window, select the desired transaction, then choose the OK button.
• The Transaction ID, Amount, Credit Card #, Expiration and Processing Acct fields will be automatically populated with the values from the selected transaction.
• Only credit card transactions entered into the batch from the last two days (today and yesterday) will appear on this list.
• Any transaction that has already been "Voided" will be displayed in red with a strikethrough.
3. Review the transaction details to confirm the correct transaction has been loaded.
4. Enter the Clerk ID for the transaction. • A Clerk ID can contain letters, numbers, spaces and special characters (not including a comma), totalling
a maximum of 20 characters long. The letters used are not case-sensitive. • Clerk IDs are used for your reference only and are not verified by XCharge, however they can be used to
sort XCharge Reports or search for transactions in the Transaction Lookup window. • This field is optional unless set to Required in the XCharge Client Setup window.
5. Press F12 or choose the [F12] Process button.
• XCharge will process the transaction and return a response. • If approved, a receipt may print and a message with the response will be displayed, based on the options
configured.

Updated July 2, 2013 XCharge 7.2 Release 1 Help Page 73 of 168
PROCESSING DEBIT CARDS Debit Cards requiring the entry of a PIN can be processed from the XCharge Client application from the Credit/Debit Transactions category. Information on specific transaction type availability is available under each topic available below. See the topics covering Setup Procedures - XCharge Client and Setup Procedures - XCharge Server for more information. For information on the various response codes, refer to the Additional Information section.
Processing a Debit Card Purchase A Debit Card Purchase transaction is used to obtain funds from a debit card account. XCharge will attempt to receive a sale authorization from the debit card issuer, and once approved the transaction will enter the current batch. Once the batch is settled the credit and debit card transactions are submitted to the credit card processor for deposit (or withdrawal). Although debit card transactions must be settled in a batch for merchant payment, debit card holders are debited for approved Debit Card Purchase transactions immediately, and these transactions cannot be voided. This transaction type is available within XCharge as long as the option is enabled for the user currently logged in, and if the Enable Debit Card Transactions option is not disabled under the Credit Cards - Transactions tab in the XCharge Client Setup. This transaction type can be selected in any of the following ways:
• Select Credit Card Transactions from the transaction category menu, then choose Debit Purchase from the far left.
• Select the Transaction menu, then select Credit/Debit Card Transactions, then choose Debit Purchase. • Press the F4 key on your keyboard.
NOTE:
You must be enrolled in debit processing on your Processing Account for these transactions to process successfully. If a debit transaction is attempted without this service enabled, you may receive an "UNAUTHORIZED" or other error. A properly configured debit PIN pad device supported by XCharge and encrypted for your Processing Account is also necessary to process debit transactions. For information on configuring your PIN pad device, refer to XCharge Setup - PIN Pad Device Setup.

Updated July 2, 2013 XCharge 7.2 Release 1 Help Page 74 of 168
PROCESSING DEBIT CARDS (CONTINUED) To process a Debit Card Purchase in XCharge:
1. Enter the dollar amount into the Amount field. • Enter the full amount including dollars, a decimal point, and cents. • Ensure the decimal point is in the correct place!
2. Enter the Cash Back Amount, if desired.
• Any amount entered here will increase the total amount debited from the debit card account, but will be recorded as a separate amount on the XCharge receipt for your records.
• If "cash back only" is desired, it is possible to enter an Amount (above the Cash Back Amount field) of 0.
3. In the Debit Card Scan field, enter the debit card number.
• When this field is selected, you will be prompted to swipe the debit card. • You must swipe the debit card using your Magnetic Stripe Reader (MSR) - manually entering the number
is not permitted for Debit Card Purchase transactions. • Once the card number is entered, the Primary Account Number (PAN - digits after the first six and before
the last four) will be masked if a valid debit card number is detected. • If a PIN pad or signature capture device with an integrated MSR is used, this step can be skipped.
XCharge will prompt you to swipe the debit card after Process is selected.
4. Enter the Receipt # for the transaction. • A Receipt # can contain letters, numbers, spaces and special characters (not including a comma),
totalling a maximum of 25 characters long. The letters used are not case-sensitive. • Receipt #s are used for your reference only and are not verified by XCharge, however they can be used
to sort XCharge Reports or search for transactions in the Transaction Lookup window. • This field is optional unless set to Required in the XCharge Client Setup window.
5. Enter the Clerk ID for the transaction.
• A Clerk ID can contain letters, numbers, spaces and special characters (not including a comma), totalling a maximum of 20 characters long. The letters used are not case-sensitive.
• Clerk IDs are used for your reference only and are not verified by XCharge, however they can be used to sort XCharge Reports or search for transactions in the Transaction Lookup window.
• This field is optional unless set to Required in the XCharge Client Setup window.
6. Press F12 or choose the [F12] Process button. • The configured PIN pad device should prompt the customer to enter their PIN. • After the customer enters their PIN, XCharge will process the transaction and return a response. • If approved, a receipt may print and a message with the response will be displayed, based on the options
configured. • For Canadian Debit, a receipt will be printed for any approved or declined Debit Card Purchase
transaction.

Updated July 2, 2013 XCharge 7.2 Release 1 Help Page 75 of 168
PROCESSING DEBIT CARDS (CONTINUED) Processing a Debit Card Return A Debit Card Return transaction is used to process a refund or otherwise credit funds to a debit card account. XCharge will attempt to receive a credit authorization from the debit card issuer, and once approved the transaction will enter the current batch. Once the batch is settled the credit and debit card transactions are submitted to the credit card processor for deposit (or withdrawal). Although debit card transactions must be settled in a batch for merchant payment, debit card holders are credited for approved Debit Card Return transactions immediately, and these transactions cannot be voided.
This transaction type is available within XCharge as long as the option is enabled for the user currently logged in, and if the Enable Debit Card Transactions option is not disabled under the Credit Cards - Transactions tab in the XCharge Client Setup. This transaction type can be selected in any of the following ways:
• Select Credit Card Transactions from the transaction category menu, then choose Debit Return from the far left.
• Select the Transaction menu, then select Credit/Debit Card Transactions, then choose Debit Return. • Press the F5 key on your keyboard.
NOTE:
Debit Card Return transactions are disabled on many Processing Accounts by default for security.

Updated July 2, 2013 XCharge 7.2 Release 1 Help Page 76 of 168
PROCESSING DEBIT CARDS (CONTINUED) To process a Debit Card Return in XCharge:
1. Enter the dollar amount into the Amount field. • Enter the full amount including dollars, a decimal point, and cents. • Ensure the decimal point is in the correct place!
2. In the Debit Card Scan field, enter the debit card number.
• When this field is selected, you will be prompted to swipe the debit card. • You must swipe the debit card using your Magnetic Stripe Reader (MSR) - manually entering the number
is not permitted for Debit Card Return transactions. • Once the card number is entered, the Primary Account Number (PAN - digits after the first six and before
the last four) will be masked if a valid debit card number is detected. • If a PIN pad or signature capture device with an integrated MSR is used, this step can be skipped.
XCharge will prompt you to swipe the debit card after Process is selected.
3. Enter the Receipt # for the transaction. • A Receipt # can contain letters, numbers, spaces and special characters (not including a comma),
totalling a maximum of 25 characters long. The letters used are not case-sensitive. • Receipt #s are used for your reference only and are not verified by XCharge, however they can be used
to sort XCharge Reports or search for transactions in the Transaction Lookup window. • This field is optional unless set to Required in the XCharge Client Setup window.
4. Enter the Clerk ID for the transaction.
• A Clerk ID can contain letters, numbers, spaces and special characters (not including a comma), totalling a maximum of 20 characters long. The letters used are not case-sensitive.
• Clerk IDs are used for your reference only and are not verified by XCharge, however they can be used to sort XCharge Reports or search for transactions in the Transaction Lookup window.
• This field is optional unless set to Required in the XCharge Client Setup window.
5. Press F12 or choose the [F12] Process button. • The configured PIN pad device should prompt the customer to enter their PIN. • After the customer enters their PIN, XCharge will process the transaction and return a response. • If approved, a receipt may print and a message with the response will be displayed, based on the options
configured. • For Canadian Debit, a receipt will be printed for any approved or declined Debit Card Return transaction.

Updated July 2, 2013 XCharge 7.2 Release 1 Help Page 77 of 168
PROCESSING GIFT CARDS Electronic Gift Cards can be processed from the XCharge Client application in many ways, and all transaction types for gift cards are grouped together within XCharge under the Gift Transactions category. Information on specific transaction type availability is available under each topic available below. See the topics covering Setup Procedures - XCharge Client and Setup Procedures - XCharge Server for more information. For information on the various response codes, refer to the Additional Information section.
Processing a Gift Card Issue A Gift Card Issue transaction is used to activate a new gift card with the specified amount, or to increase the balance of the account. This is the standard transaction that is used when a gift card is sold to a customer. This transaction type is available within XCharge as long as the option is enabled for the user currently logged in, and can be selected in any of the following ways:
• Select Gift Card Transactions from the transaction category menu, then choose Issue from the far left. • Select the Transaction menu, then select Gift Card Transactions, then choose Issue. • Press the Alt+I keys on your keyboard.
NOTE:
You must be enrolled in a gift card processing account from Accelerated Payment Technologies to process electronic gift cards with XCharge. For additional information, please contact Accelerated Payment Technologies.
Updated July 2, 2013 XCharge 7.2 Release 1 Help Page 78 of 168
PROCESSING GIFT CARDS (CONTINUED) To process a Gift Card Issue in XCharge:
1. Enter the dollar amount into the Amount field. • Enter the full amount including dollars, a decimal point, and cents. • Ensure the decimal point is in the correct place!
2. In the Account # field, enter the gift card account number.
• When this field is selected, you will be prompted to swipe the gift card. • You can either swipe the gift card using your Magnetic Stripe Reader (MSR), or manually enter the gift
card account number. • Once the account number is entered and another field is selected, part of the gift card account number
will be masked. • If a PIN pad or signature capture device with an integrated MSR is used, this step can be skipped.
XCharge will prompt you to swipe the gift card after Process is selected.
3. Enter the Receipt # for the transaction. • A Receipt # can contain letters, numbers, spaces and special characters (not including a comma),
totalling a maximum of 25 characters long. The letters used are not case-sensitive. • Receipt #s are used for your reference only and are not verified by XCharge, however they can be used
to sort XCharge Reports or search for transactions in the Transaction Lookup window. • This field is optional unless set to Required in the XCharge Client Setup window.
4. Enter the Clerk ID for the transaction.
• A Clerk ID can contain letters, numbers, spaces and special characters (not including a comma), totalling a maximum of 20 characters long. The letters used are not case-sensitive.
• Clerk IDs are used for your reference only and are not verified by XCharge, however they can be used to sort XCharge Reports or search for transactions in the Transaction Lookup window.
• This field is optional unless set to Required in the XCharge Client Setup window.
5. Press F12 or choose the [F12] Process button. • XCharge will process the transaction and return a response. • If approved, a receipt may print and a message with the response will be displayed, based on the options
configured.

Updated July 2, 2013 XCharge 7.2 Release 1 Help Page 79 of 168
PROCESSING GIFT CARDS (CONTINUED) Processing a Gift Card Redeem A Gift Card Redeem transaction is used to redeem the stored value in a gift card account and decrement the account balance by the amount specified. This is the standard transaction that is used when a gift card is presented as tender by a customer. This transaction type is available as long as the option is enabled for the user currently logged in, and can be selected in any of the following ways:
• Select Gift Card Transactions from the transaction category menu, then choose Redeem from the far left. • Select the Transaction menu, then select Gift Card Transactions, then choose Redeem. • Press the Alt+P keys on your keyboard.

Updated July 2, 2013 XCharge 7.2 Release 1 Help Page 80 of 168
PROCESSING GIFT CARDS (CONTINUED) To process a Gift Card Redeem in XCharge:
1. Enter the dollar amount into the Amount field. • Enter the full amount including dollars, a decimal point, and cents. • Ensure the decimal point is in the correct place!
2. In the Account # field, enter the gift card account number.
• When this field is selected, you will be prompted to swipe the gift card. • You can either swipe the gift card using your Magnetic Stripe Reader (MSR), or manually enter the gift
card account number. • Once the account number is entered and another field is selected, part of the gift card account number
will be masked. • If a PIN pad or signature capture device with an integrated MSR is used, this step can be skipped.
XCharge will prompt you to swipe the gift card after Process is selected.
3. Enter the Receipt # for the transaction. • A Receipt # can contain letters, numbers, spaces and special characters (not including a comma),
totalling a maximum of 25 characters long. The letters used are not case-sensitive. • Receipt #s are used for your reference only and are not verified by XCharge, however they can be used
to sort XCharge Reports or search for transactions in the Transaction Lookup window. • This field is optional unless set to Required in the XCharge Client Setup window.
4. Enter the Clerk ID for the transaction.
• A Clerk ID can contain letters, numbers, spaces and special characters (not including a comma), totalling a maximum of 20 characters long. The letters used are not case-sensitive.
• Clerk IDs are used for your reference only and are not verified by XCharge, however they can be used to sort XCharge Reports or search for transactions in the Transaction Lookup window.
• This field is optional unless set to Required in the XCharge Client Setup window.
5. Press F12 or choose the [F12] Process button. • XCharge will process the transaction and return a response. • If approved, a receipt may print and a message with the response will be displayed, based on the options
configured.

Updated July 2, 2013 XCharge 7.2 Release 1 Help Page 81 of 168
PROCESSING GIFT CARDS (CONTINUED) Processing a Gift Card Return A Gift Card Return transaction is used to activate a new gift card with the specified amount, or to increase the balance of an existing account. A Gift Card Return works just like a Gift Card Issue, except it is meant specifically for In-House Return transactions (e.g. for issuing store credit instead of cash or a Credit Card Return). This transaction type is available for as long as the option is enabled for the user currently logged in, and can be selected in any of the following ways:
• Select Gift Card Transactions from the transaction category menu, then choose Return from the far left. • Select the Transaction menu, then select Gift Card Transactions, then choose Return. • Press the Alt+R keys on your keyboard.

Updated July 2, 2013 XCharge 7.2 Release 1 Help Page 82 of 168
PROCESSING GIFT CARDS (CONTINUED) To process a Gift Card Return in XCharge:
1. Enter the dollar amount into the Amount field. • Enter the full amount including dollars, a decimal point, and cents. • Ensure the decimal point is in the correct place!
2. In the Account # field, enter the gift card account number.
• When this field is selected, you will be prompted to swipe the gift card. • You can either swipe the gift card using your Magnetic Stripe Reader (MSR), or manually enter the gift
card account number. • Once the account number is entered and another field is selected, part of the gift card account number
will be masked. • If a PIN pad or signature capture device with an integrated MSR is used, this step can be skipped.
XCharge will prompt you to swipe the gift card after Process is selected.
3. Enter the Receipt # for the transaction. • A Receipt # can contain letters, numbers, spaces and special characters (not including a comma),
totalling a maximum of 25 characters long. The letters used are not case-sensitive. • Receipt #s are used for your reference only and are not verified by XCharge, however they can be used
to sort XCharge Reports or search for transactions in the Transaction Lookup window. • This field is optional unless set to Required in the XCharge Client Setup window.
4. Enter the Clerk ID for the transaction.
• A Clerk ID can contain letters, numbers, spaces and special characters (not including a comma), totalling a maximum of 20 characters long. The letters used are not case-sensitive.
• Clerk IDs are used for your reference only and are not verified by XCharge, however they can be used to sort XCharge Reports or search for transactions in the Transaction Lookup window.
• This field is optional unless set to Required in the XCharge Client Setup window.
5. Press F12 or choose the [F12] Process button. • XCharge will process the transaction and return a response. • If approved, a receipt may print and a message with the response will be displayed, based on the options
configured.
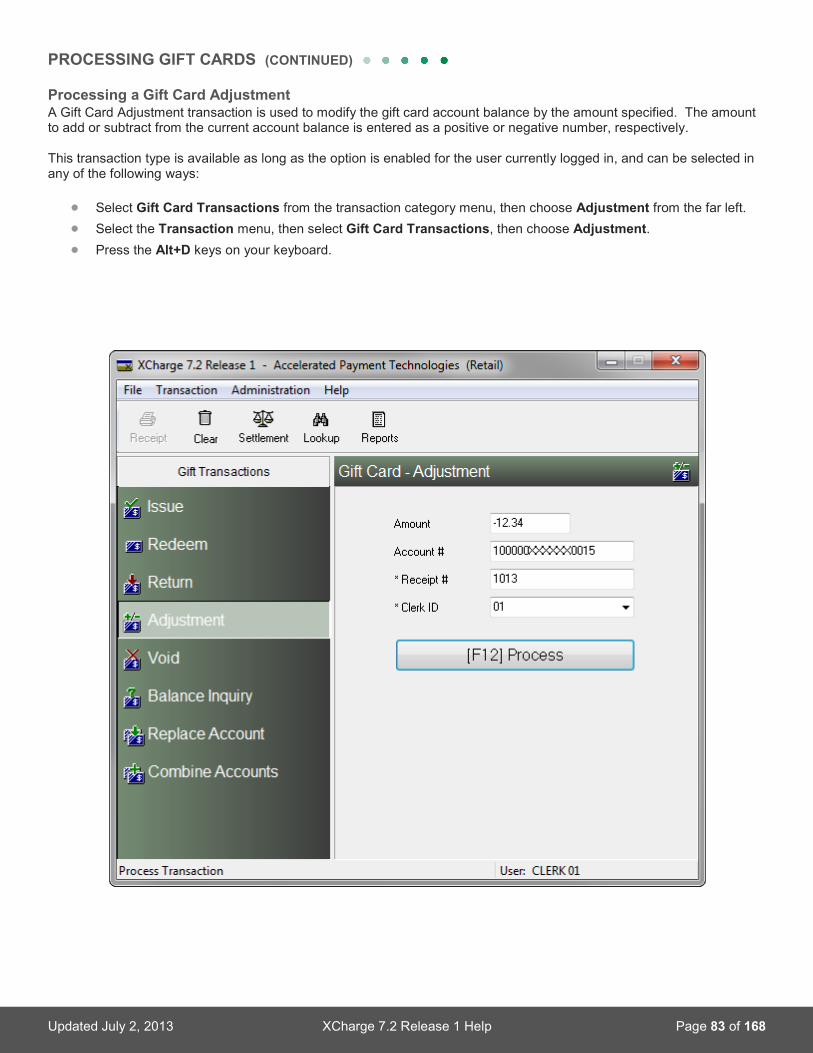
Updated July 2, 2013 XCharge 7.2 Release 1 Help Page 83 of 168
PROCESSING GIFT CARDS (CONTINUED) Processing a Gift Card Adjustment A Gift Card Adjustment transaction is used to modify the gift card account balance by the amount specified. The amount to add or subtract from the current account balance is entered as a positive or negative number, respectively. This transaction type is available as long as the option is enabled for the user currently logged in, and can be selected in any of the following ways:
• Select Gift Card Transactions from the transaction category menu, then choose Adjustment from the far left. • Select the Transaction menu, then select Gift Card Transactions, then choose Adjustment. • Press the Alt+D keys on your keyboard.

Updated July 2, 2013 XCharge 7.2 Release 1 Help Page 84 of 168
PROCESSING GIFT CARDS (CONTINUED) To process a Gift Card Adjustment in XCharge:
1. Enter the dollar amount into the Amount field. • Enter the full amount to be added or subtracted frm the current account balance including dollars, a
decimal point, and cents. • Ensure the decimal point is in the correct place! • To increase the account balance, enter a positive number (e.g. +10.00 or just 10.00). • To decrease the account balance, enter a negative number (e.g. -10.00). If a negative amount is entered
that would result in decreasing the account balance beyond $0.00 then the transaction will be rejected as "Amount Incorrect."
2. In the Account # field, enter the gift card account number.
• When this field is selected, you will be prompted to swipe the gift card. • You can either swipe the gift card using your Magnetic Stripe Reader (MSR), or manually enter the gift
card account number. • Once the account number is entered and another field is selected, part of the gift card account number
will be masked. • If a PIN pad or signature capture device with an integrated MSR is used, this step can be skipped.
XCharge will prompt you to swipe the gift card after Process is selected.
3. Enter the Receipt # for the transaction. • A Receipt # can contain letters, numbers, spaces and special characters (not including a comma),
totalling a maximum of 25 characters long. The letters used are not case-sensitive. • Receipt #s are used for your reference only and are not verified by XCharge, however they can be used
to sort XCharge Reports or search for transactions in the Transaction Lookup window. • This field is optional unless set to Required in the XCharge Client Setup window.
4. Enter the Clerk ID for the transaction.
• A Clerk ID can contain letters, numbers, spaces and special characters (not including a comma), totalling a maximum of 20 characters long. The letters used are not case-sensitive.
• Clerk IDs are used for your reference only and are not verified by XCharge, however they can be used to sort XCharge Reports or search for transactions in the Transaction Lookup window.
• This field is optional unless set to Required in the XCharge Client Setup window.
5. Press F12 or choose the [F12] Process button. • XCharge will process the transaction and return a response. • If approved, a receipt may print and a message with the response will be displayed, based on the options
configured.

Updated July 2, 2013 XCharge 7.2 Release 1 Help Page 85 of 168
PROCESSING GIFT CARDS (CONTINUED) Processing a Gift Card Void A Gift Card Void transaction is used to reverse the action of a previous Gift Card Issue, Redeem, Return or Adjustment transaction. For the transaction types listed above, a Gift Card Void can be processed on any transaction in your history within the same batch. The gift card batch number can be controlled from the XCharge Server Setup and in most cases will never change. This transaction type is available as long as the option is enabled for the user currently logged in, and can be selected in any of the following ways:
• Select Gift Card Transactions from the transaction category menu, then choose Void from the far left. • Select the Transaction menu, then select Gift Card Transactions, then choose Void. • Press the Alt+V keys on your keyboard.
To process a Gift Card Void in XCharge:
1. Choose the Search button to the right of the Transaction ID field.
2. In the Gift Card Item Number Lookup Window, select the desired transaction, then choose the OK button.
• The Transaction ID, Amount and Account # fields will be automatically populated with the values from the selected transaction.
• Only Gift Card Issue, Redeem, Return and Adjustment transactions from the current batch will appear on this list.
• If a transaction that has already been "Voided" is selected and processed then the transaction will be rejected as "Cannot void."
3. Review the transaction details to confirm the correct transaction has been loaded.
4. Enter the Clerk ID for the transaction.
• A Clerk ID can contain letters, numbers, spaces and special characters (not including a comma), totalling a maximum of 20 characters long. The letters used are not case-sensitive.
• Clerk IDs are used for your reference only and are not verified by XCharge, however they can be used to sort XCharge Reports or search for transactions in the Transaction Lookup window.
• This field is optional unless set to Required in the XCharge Client Setup window.
5. Press F12 or choose the [F12] Process
button. • XCharge will process the transaction
and return a response. • If approved, a receipt may print and a
message with the response will be displayed, based on the options configured.

Updated July 2, 2013 XCharge 7.2 Release 1 Help Page 86 of 168
PROCESSING GIFT CARDS (CONTINUED) Processing a Gift Card Balance Inquiry A Gift Card Balance Inquiry transaction is used to query the current account balance for an existing gift card. This transaction type is available as long as the option is enabled for the user currently logged in, and can be selected in any of the following ways:
• Select Gift Card Transactions from the transaction category menu, then choose Balance Inquiry from the far left.
• Select the Transaction menu, then select Gift Card Transactions, then choose Balance Inquiry. • Press the Alt+B keys on your keyboard.
To process a Gift Card Balance Inquiry in XCharge:
1. In the Account # field, enter the gift card account number. • When this field is selected, you will be prompted to swipe the gift card. • You can either swipe the gift card using your Magnetic Stripe Reader (MSR), or manually enter the gift
card account number. • Once the account number is entered and another field is selected, part of the gift card account number
will be masked. • If a PIN pad or signature capture device with an integrated MSR is used, this step can be skipped.
XCharge will prompt you to swipe the gift card after Process is selected.
2. Enter the Clerk ID for the transaction. • A Clerk ID can contain letters, numbers, spaces and special characters (not including a comma), totalling
a maximum of 20 characters long. The letters used are not case-sensitive. • Clerk IDs are used for your reference only and are not verified by XCharge, however they can be used to
sort XCharge Reports or search for transactions in the Transaction Lookup window. • This field is optional unless
set to Required in the XCharge Client Setup window.
3. Press F12 or choose the [F12]
Process button. • XCharge will process the
transaction and return a response.
• If approved, a receipt may print and a message with the response will be displayed, based on the options configured.

Updated July 2, 2013 XCharge 7.2 Release 1 Help Page 87 of 168
PROCESSING GIFT CARDS (CONTINUED) Processing a Gift Card Replace Account A Gift Card Replace Account transaction is used to move the balance from one gift card account to another. The balance from the "Old Account" is moved to the "New Account", and the old gift card account is closed. A Gift Card Replace Account transaction is just like a Gift Card Combine Accounts transaction, except the "New Account" must be a previously unused gift card account. This transaction type is available as long as the option is enabled for the user currently logged in, and can be selected in any of the following ways:
• Select Gift Card Transactions from the transaction category menu, then choose Replace Account from the far left.
• Select the Transaction menu, then select Gift Card Transactions, then choose Replace Account. • Press the Alt+E keys on your keyboard.

Updated July 2, 2013 XCharge 7.2 Release 1 Help Page 88 of 168
PROCESSING GIFT CARDS (CONTINUED) To process a Gift Card Replace Account in XCharge:
1. In the Old Account # field, enter the gift card account number to be closed. • When this field is selected, you will be prompted to swipe the gift card. • You can either swipe the gift card using your Magnetic Stripe Reader (MSR), or manually enter the gift
card account number. • Once the account number is entered and another field is selected, part of the gift card account number
will be masked. • If a PIN pad or signature capture device with an integrated MSR is used, this step can be skipped.
XCharge will prompt you to swipe the gift card after Process is selected.
2. In the New Account # field, enter the gift card account number to receive the balance from the "Old Account."
3. Enter the Receipt # for the transaction.
• A Receipt # can contain letters, numbers, spaces and special characters (not including a comma), totalling a maximum of 25 characters long. The letters used are not case-sensitive.
• Receipt #s are used for your reference only and are not verified by XCharge, however they can be used to sort XCharge Reports or search for transactions in the Transaction Lookup window.
• This field is optional unless set to Required in the XCharge Client Setup window.
4. Enter the Clerk ID for the transaction. • A Clerk ID can contain letters, numbers, spaces and special characters (not including a comma), totalling
a maximum of 20 characters long. The letters used are not case-sensitive. • Clerk IDs are used for your reference only and are not verified by XCharge, however they can be used to
sort XCharge Reports or search for transactions in the Transaction Lookup window. • This field is optional unless set to Required in the XCharge Client Setup window.
5. Press F12 or choose the [F12] Process button.
• XCharge will process the transaction and return a response. • If approved, a receipt may print and a message with the response will be displayed, based on the options
configured.

Updated July 2, 2013 XCharge 7.2 Release 1 Help Page 89 of 168
PROCESSING GIFT CARDS (CONTINUED) Processing a Gift Card Combine Accounts A Gift Card Combine Accounts transaction is used to combine the balance of two gift card accounts into one. The balance from the "Old Account" is moved to the "New Account", and the old gift card account is closed. A Gift Card Combine Accounts transaction is just like a Gift Card Replace Account transaction, except the "New Account" must have already been issued. This transaction type is available as long as the option is enabled for the user currently logged in, and can be selected in any of the following ways:
• Select Gift Card Transactions from the transaction category menu, then choose Combine Accounts from the far left.
• Select the Transaction menu, then select Gift Card Transactions, then choose Combine Accounts. • Press the Alt+C keys on your keyboard.
Updated July 2, 2013 XCharge 7.2 Release 1 Help Page 90 of 168
PROCESSING GIFT CARDS (CONTINUED) To process a Gift Card Combine Accounts in XCharge:
1. In the Old Account # field, enter the gift card account number to be closed. • When this field is selected, you will be prompted to swipe the gift card. • You can either swipe the gift card using your Magnetic Stripe Reader (MSR), or manually enter the gift
card account number. • Once the account number is entered and another field is selected, part of the gift card account number
will be masked. • If a PIN pad or signature capture device with an integrated MSR is used, this step can be skipped.
XCharge will prompt you to swipe the gift card after Process is selected.
2. In the New Account # field, enter the gift card account number to receive the balance from the "Old Account."
3. Enter the Receipt # for the transaction.
• A Receipt # can contain letters, numbers, spaces and special characters (not including a comma), totalling a maximum of 25 characters long. The letters used are not case-sensitive.
• Receipt #s are used for your reference only and are not verified by XCharge, however they can be used to sort XCharge Reports or search for transactions in the Transaction Lookup window.
• This field is optional unless set to Required in the XCharge Client Setup window.
4. Enter the Clerk ID for the transaction. • A Clerk ID can contain letters, numbers, spaces and special characters (not including a comma), totalling
a maximum of 20 characters long. The letters used are not case-sensitive. • Clerk IDs are used for your reference only and are not verified by XCharge, however they can be used to
sort XCharge Reports or search for transactions in the Transaction Lookup window. • This field is optional unless set to Required in the XCharge Client Setup window.
5. Press F12 or choose the [F12] Process button.
• XCharge will process the transaction and return a response. • If approved, a receipt may print and a message with the response will be displayed, based on the options
configured.

Updated July 2, 2013 XCharge 7.2 Release 1 Help Page 91 of 168
PROCESSING CHECKS XCharge is able to process paper check conversions and other transactions from check accounts using XCheck. Steps for processing a check transactions from various sources (called Check Entry Types or Standard Entry Classes) are provided below. For more information Check Entry Type descriptions, capabilities and merchant responsibilities, refer to XCheck Standard Entry Class Codes under the Additional Information section.
Processing a Check Sale A Check Sale transaction is used to obtain funds from a check account through XCheck. Check Sale transactions can be used to convert a paper check to an electronic payment. A Check Sale can also be used to enter a check account and routing number obtained over the phone, internet, or through a pre-arranged agreement with the customer. This transaction type is available within XCharge as long as the option is enabled for the user currently logged in and an XCheck Processing Account is configured within the XCharge Server Setup. The various Check Type options can be enabled or disabled from the XCharge Server Setup Processor Options tab. This transaction type can be selected in any of the following ways:
• Select Check Transactions from the transaction category menu, then choose Check Sale from the far left. • Select the Transaction menu, then select Check Transactions, then choose Check Sale. • Press the Shift+F2 keys on your keyboard.
NOTE:
A properly configured Check Scanner or MICR reader device supported by XCharge is necessary to process paper check conversions. For information on configuring your Check Scanner device, refer to XCharge Setup - General Options. About Accelerated Intelligent Routing (AIR): for merchants using a Check Scanner for conversion of paper checks, transactions will be routed to the Check21 network if they do not qualify for submission via the ACH network. This maximizes the acceptance of checks for electronic processing. Check21 requires a scanned image. If you are using MICR readers to process check transactions, then those transactions will be routed as ACH only - they will not qualify for Check21.

Updated July 2, 2013 XCharge 7.2 Release 1 Help Page 92 of 168
PROCESSING CHECKS (CONTINUED) To process a Check Sale from a paper check in XCharge:
1. Select the appropriate Check Type. • For a paper check received in the mail, choose ARC - Accts Receivable. • For a paper check presented in person to be processed later, choose BOC - Back Office Conversion. • For a paper check presented in person to be processed immediately (with the customer present), choose
POP - Point of Purchase. • If the desired Check Type is not available, ensure you are enrolled for the desired type and that it is
enabled in XCheck Options window under the XCharge Server Setup Processor Options tab.
2. Enter the dollar amount into the Amount field. • Enter the full amount including dollars, a decimal point, and cents. • Ensure the decimal point is in the correct place!
3. Enter the Receipt # for the transaction.
• A Receipt # can contain letters, numbers, spaces and special characters (not including a comma), totalling a maximum of 25 characters long. The letters used are not case-sensitive.
• Receipt #s are used for your reference only and are not verified by XCharge, however they can be used to sort XCharge Reports or search for transactions in the Transaction Lookup window.
• This field is optional unless set to Required in the XCharge Client Setup window.
4. Enter the Clerk ID for the transaction. • A Clerk ID can contain letters, numbers, spaces and special characters (not including a comma), totalling
a maximum of 20 characters long. The letters used are not case-sensitive. • Clerk IDs are used for your reference only and are not verified by XCharge, however they can be used to
sort XCharge Reports or search for transactions in the Transaction Lookup window. • This field is optional unless set to Required in the XCharge Client Setup window.
5. Press F12 or choose the [F12] Process button.
• XCharge should prompt you to scan the check. • After the check is scanned, XCharge will process the transaction and return a response. • If the check information is misread, manual corrections to the Routing #, Account # or Check # fields
can be made. • For approved and declined transactions, a receipt may print and a message with the response will be
displayed, based on the options configured.

Updated July 2, 2013 XCharge 7.2 Release 1 Help Page 93 of 168
PROCESSING CHECKS (CONTINUED) To process a Check Sale from check account information (check not present) in XCharge:
1. Select the appropriate Check Type. • For a payment from a consumer (personal) check account, choose PPD - Prearranged Pay. • For a payment from a corporate (business) check account, choose CCD - Corp Credit/Debit. • For a payment received over the internet, choose WEB - Internet Entry. • For a payment received over the phone, choose TEL - Telephone Entry. • If the desired Check Type is not available, ensure you are enrolled for the desired type and that it is
enabled in XCheck Options window under the XCharge Server Setup Processor Options tab.
2. Enter the dollar amount into the Amount field. • Enter the full amount including dollars, a
decimal point, and cents. • Ensure the decimal point is in the correct
place!
3. Enter the check account information into the Routing # and Account # fields.
4. Enter the Name On Account.
• Enter the customer's Name On Acct, up to 22 characters in length.
5. Enter the Receipt # for the transaction.
• A Receipt # can contain letters, numbers, spaces and special characters (not including a comma), totalling a maximum of 25 characters long. The letters used are not case-sensitive.
• Receipt #s are used for your reference only and are not verified by XCharge, however they can be used to sort XCharge Reports or search for transactions in the Transaction Lookup window.
• This field is optional unless set to Required in the XCharge Client Setup window.
6. Enter the Clerk ID for the transaction. • A Clerk ID can contain letters, numbers, spaces and special characters (not including a comma), totalling
a maximum of 20 characters long. The letters used are not case-sensitive. • Clerk IDs are used for your reference only and are not verified by XCharge, however they can be used to
sort XCharge Reports or search for transactions in the Transaction Lookup window. • This field is optional unless set to Required in the XCharge Client Setup window.
7. Press F12 or choose the [F12] Process button.
• XCharge will process the transaction and return a response. • For approved and declined transactions, a receipt may print and a message with the response will be
displayed, based on the options configured.
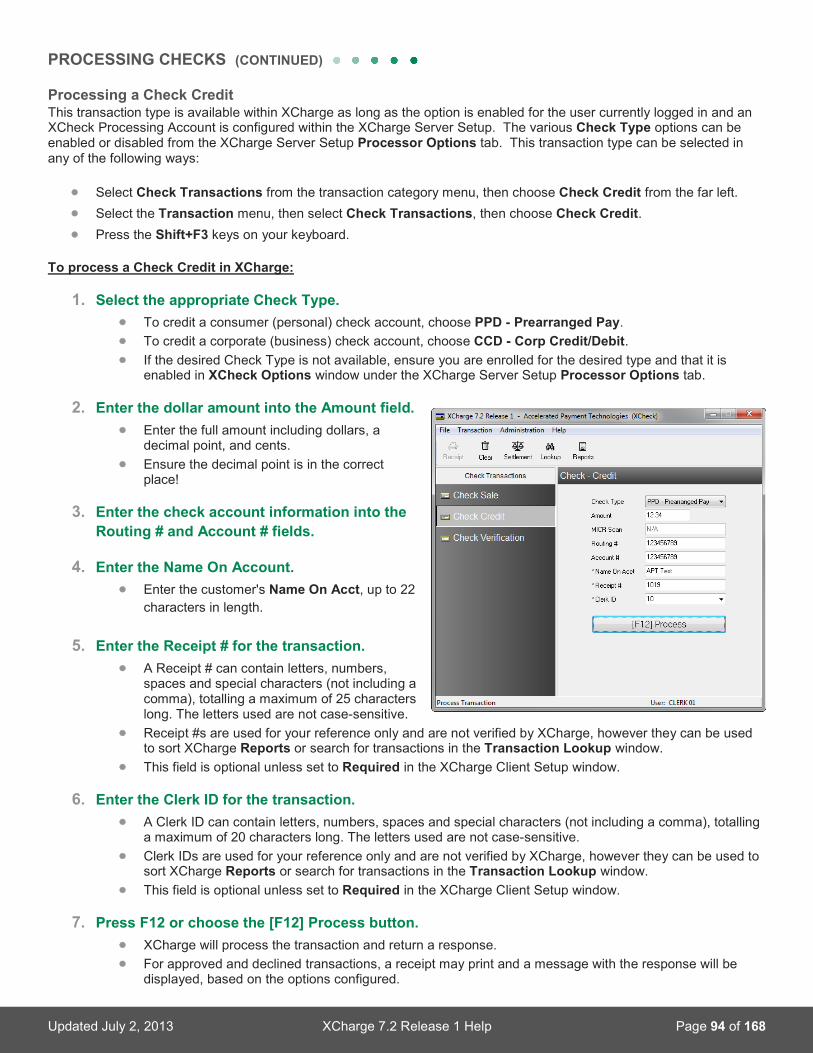
Updated July 2, 2013 XCharge 7.2 Release 1 Help Page 94 of 168
PROCESSING CHECKS (CONTINUED) Processing a Check Credit This transaction type is available within XCharge as long as the option is enabled for the user currently logged in and an XCheck Processing Account is configured within the XCharge Server Setup. The various Check Type options can be enabled or disabled from the XCharge Server Setup Processor Options tab. This transaction type can be selected in any of the following ways:
• Select Check Transactions from the transaction category menu, then choose Check Credit from the far left. • Select the Transaction menu, then select Check Transactions, then choose Check Credit. • Press the Shift+F3 keys on your keyboard.
To process a Check Credit in XCharge:
1. Select the appropriate Check Type. • To credit a consumer (personal) check account, choose PPD - Prearranged Pay. • To credit a corporate (business) check account, choose CCD - Corp Credit/Debit. • If the desired Check Type is not available, ensure you are enrolled for the desired type and that it is
enabled in XCheck Options window under the XCharge Server Setup Processor Options tab.
2. Enter the dollar amount into the Amount field. • Enter the full amount including dollars, a
decimal point, and cents. • Ensure the decimal point is in the correct
place!
3. Enter the check account information into the Routing # and Account # fields.
4. Enter the Name On Account.
• Enter the customer's Name On Acct, up to 22 characters in length.
5. Enter the Receipt # for the transaction.
• A Receipt # can contain letters, numbers, spaces and special characters (not including a comma), totalling a maximum of 25 characters long. The letters used are not case-sensitive.
• Receipt #s are used for your reference only and are not verified by XCharge, however they can be used to sort XCharge Reports or search for transactions in the Transaction Lookup window.
• This field is optional unless set to Required in the XCharge Client Setup window.
6. Enter the Clerk ID for the transaction. • A Clerk ID can contain letters, numbers, spaces and special characters (not including a comma), totalling
a maximum of 20 characters long. The letters used are not case-sensitive. • Clerk IDs are used for your reference only and are not verified by XCharge, however they can be used to
sort XCharge Reports or search for transactions in the Transaction Lookup window. • This field is optional unless set to Required in the XCharge Client Setup window.
7. Press F12 or choose the [F12] Process button.
• XCharge will process the transaction and return a response. • For approved and declined transactions, a receipt may print and a message with the response will be
displayed, based on the options configured.

Updated July 2, 2013 XCharge 7.2 Release 1 Help Page 95 of 168
PROCESSING CHECKS (CONTINUED) Processing a Check Verification This transaction type is available within XCharge as long as the option is enabled for the user currently logged in and an XCheck Processing Account is configured within the XCharge Server Setup. The various Check Type options can be enabled or disabled from the XCharge Server Setup Processor Options tab. This transaction type can be selected in any of the following ways:
• Select Check Transactions from the transaction category menu, then choose Check Verification from the far left.
• Select the Transaction menu, then select Check Transactions, then choose Check Verification.
• Press the Shift+F4 keys on your keyboard. To process a Check Verification in XCharge:
1. Enter the dollar amount into the Amount field. • Enter the full amount including dollars, a decimal point,
and cents. • Ensure the decimal point is in the correct place!
2. Enter the check account information into the Routing
#, Account # and Check # fields. • If a Check Scanner or MICR reader device is used for a paper check, this step can be skipped. XCharge
will prompt you to scan the check after Process is selected.
3. Enter the Driver's License State into the DL# State field. • Either manually enter the two-letter state abbreviation corresponding to the customer's Driver's License,
or select the desired state from the drop-down menu.
4. In the Drivers License # field, enter the customer's Driver's License code.
5. Enter the Receipt # for the transaction. • A Receipt # can contain letters, numbers, spaces and special characters (not including a comma),
totalling a maximum of 25 characters long. The letters used are not case-sensitive. • Receipt #s are used for your reference only and are not verified by XCharge, however they can be used
to sort XCharge Reports or search for transactions in the Transaction Lookup window. • This field is optional unless set to Required in the XCharge Client Setup window.
6. Enter the Clerk ID for the transaction.
• A Clerk ID can contain letters, numbers, spaces and special characters (not including a comma), totalling a maximum of 20 characters long. The letters used are not case-sensitive.
• Clerk IDs are used for your reference only and are not verified by XCharge, however they can be used to sort XCharge Reports or search for transactions in the Transaction Lookup window.
• This field is optional unless set to Required in the XCharge Client Setup window.
7. Press F12 or choose the [F12] Process button. • XCharge will process the transaction and return a response. • For approved and declined transactions, a receipt may print and a message with the response will be
displayed, based on the options configured.

Updated July 2, 2013 XCharge 7.2 Release 1 Help Page 96 of 168
PROCESSING EBT CARDS Electronic Benefits Transfer (EBT) cards can be processed from the XCharge Client application in many ways, and all transaction types for EBT cards are grouped together within XCharge under the EBT Transactions category. Information on specific transaction type availability is available under each topic available below. See the topics covering Setup Procedures - XCharge Client and Setup Procedures - XCharge Server for more information. For information on the various response codes, refer to the Additional Information section.
Processing an EBT Sale An EBT Sale transaction is used to obtain funds from an Electronic Benefits Transfer account. XCharge will attempt to receive a sale authorization from the card issuer, and once approved the transaction will enter the current batch. Once the batch is settled the credit, debit and EBT card transactions are submitted to the credit card processor for deposit (or withdrawal). Although EBT card transactions must be settled in a batch for merchant payment, EBT card holders are debited for approved EBT Sale transactions immediately, and these transactions cannot be voided. This transaction type is available within XCharge as long as the option is enabled for the user currently logged in, and can be selected in any of the following ways:
• Select EBT Transactions from the transaction category menu, then choose EBT Sale from the far left. • Select the Transaction menu, then select EBT Transactions, then choose EBT Sale. • Press the Shift+F7 keys on your keyboard.
NOTE:
You must be enrolled in EBT processing on your Processing Account for these transactions to process successfully. A properly configured debit PIN pad device supported by XCharge and encrypted for your Processing Account is also necessary to process EBT transactions. For information on configuring your PIN pad device, refer to XCharge Setup - PIN Pad Device Setup.

Updated July 2, 2013 XCharge 7.2 Release 1 Help Page 97 of 168
PROCESSING EBT CARDS (CONTINUED) To process an EBT Sale in XCharge:
1. Enter the dollar amount into the Amount field. • Enter the full amount including dollars, a decimal point, and cents. • Ensure the decimal point is in the correct place! • "Cash Back" is not permitted with this transaction type.
2. In the EBT Card Scan field, enter the EBT card number.
• When this field is selected, you will be prompted to swipe the EBT card. • You must swipe the EBT card using your Magnetic Stripe Reader (MSR) - manually entering the number
is not permitted for EBT Sale transactions. • Once the card number is entered, the Primary Account Number (PAN - digits after the first six and before
the last four) will be masked if a valid EBT card number is detected. • If a PIN pad or signature capture device with an integrated MSR is used, this step can be skipped.
XCharge will prompt you to swipe the EBT card after Process is selected.
3. Enter the Receipt # for the transaction. • A Receipt # can contain letters, numbers, spaces and special characters (not including a comma),
totalling a maximum of 25 characters long. The letters used are not case-sensitive. • Receipt #s are used for your reference only and are not verified by XCharge, however they can be used
to sort XCharge Reports or search for transactions in the Transaction Lookup window. • This field is optional unless set to Required in the XCharge Client Setup window.
4. Enter the Clerk ID for the transaction.
• A Clerk ID can contain letters, numbers, spaces and special characters (not including a comma), totalling a maximum of 20 characters long. The letters used are not case-sensitive.
• Clerk IDs are used for your reference only and are not verified by XCharge, however they can be used to sort XCharge Reports or search for transactions in the Transaction Lookup window.
• This field is optional unless set to Required in the XCharge Client Setup window.
5. Press F12 or choose the [F12] Process button. • The configured PIN pad device should prompt the customer to enter their PIN. • After the customer enters their PIN, XCharge will process the transaction and return a response. • If approved, a receipt may print and a message with the response will be displayed, based on the options
configured.

Updated July 2, 2013 XCharge 7.2 Release 1 Help Page 98 of 168
PROCESSING EBT CARDS (CONTINUED) Processing an EBT Return An EBT Return transaction is used to process a refund or otherwise credit funds to an Electronic Benefits Transfer account. XCharge will attempt to receive a credit authorization from the card issuer, and once approved the transaction will enter the current batch. Once the batch is settled the credit, debit and EBT card transactions are submitted to the credit card processor for deposit (or withdrawal). Although EBT card transactions must be settled in a batch for merchant payment, EBT card holders are credited for approved EBT Return transactions immediately, and these transactions cannot be voided.
This transaction type is available within XCharge as long as the option is enabled for the user currently logged in, and can be selected in any of the following ways:
• Select EBT Transactions from the transaction category menu, then choose EBT Return from the far left. • Select the Transaction menu, then select EBT Transactions, then choose EBT Return. • Press the Shift+F8 keys on your keyboard.
NOTE:
EBT Return transactions are disabled on many Processing Accounts by default for security.

Updated July 2, 2013 XCharge 7.2 Release 1 Help Page 99 of 168
PROCESSING EBT CARDS (CONTINUED) To process an EBT Return in XCharge:
1. Enter the dollar amount into the Amount field. • Enter the full amount including dollars, a decimal point, and cents. • Ensure the decimal point is in the correct place!
2. In the EBT Card Scan field, enter the EBT card number.
• When this field is selected, you will be prompted to swipe the EBT card. • You must swipe the EBT card using your Magnetic Stripe Reader (MSR) - manually entering the number
is not permitted for EBT Return transactions. • Once the card number is entered, the Primary Account Number (PAN - digits after the first six and before
the last four) will be masked if a valid EBT card number is detected. • If a PIN pad or signature capture device with an integrated MSR is used, this step can be skipped.
XCharge will prompt you to swipe the EBT card after Process is selected.
3. Enter the Receipt # for the transaction. • A Receipt # can contain letters, numbers, spaces and special characters (not including a comma),
totalling a maximum of 25 characters long. The letters used are not case-sensitive. • Receipt #s are used for your reference only and are not verified by XCharge, however they can be used
to sort XCharge Reports or search for transactions in the Transaction Lookup window. • This field is optional unless set to Required in the XCharge Client Setup window.
4. Enter the Clerk ID for the transaction.
• A Clerk ID can contain letters, numbers, spaces and special characters (not including a comma), totalling a maximum of 20 characters long. The letters used are not case-sensitive.
• Clerk IDs are used for your reference only and are not verified by XCharge, however they can be used to sort XCharge Reports or search for transactions in the Transaction Lookup window.
• This field is optional unless set to Required in the XCharge Client Setup window.
5. Press F12 or choose the [F12] Process button. • The configured PIN pad device should prompt the customer to enter their PIN. • After the customer enters their PIN, XCharge will process the transaction and return a response. • If approved, a receipt may print and a message with the response will be displayed, based on the options
configured.

Updated July 2, 2013 XCharge 7.2 Release 1 Help Page 100 of 168
PROCESSING EBT CARDS (CONTINUED) Processing an EBT Force Voucher An EBT Force Voucher transaction (also referred to as an EBT Force or a Voucher Clear) is used to clear an EBT voucher in order to obtain funds from an Electronic Benefits Transfer account. This transaction type can be used if the EBT network is not available. XCharge will not attempt to receive any authorization from the card issuer - instead, the Approval Code must be obtained separately and submitted with the transaction, and once approved the transaction will enter the current batch. Once the batch is settled the credit, debit and EBT card transactions are submitted to the credit card processor for deposit (or withdrawal). For EBT Force Voucher transactions, you must call the number on the voucher or the back of the card to obtain a verbal authorization of a "manual voucher" clear. This transaction type is available within XCharge as long as the option is enabled for the user currently logged in, and can be selected in any of the following ways:
• Select EBT Transactions from the transaction category menu, then choose EBT Force Voucher from the far left.
• Select the Transaction menu, then select EBT Transactions, then choose EBT Force (Voucher Clear). • Press the Shift+F10 keys on your keyboard.
Updated July 2, 2013 XCharge 7.2 Release 1 Help Page 101 of 168
PROCESSING EBT CARDS (CONTINUED) To process an EBT Force Voucher in XCharge:
1. Enter the dollar amount into the Amount field. • Enter the full amount including dollars, a decimal point, and cents. • Ensure the decimal point is in the correct place!
2. In the Card # field, enter the EBT card number.
• When this field is selected, you will be prompted to swipe the EBT card. • You can either swipe the EBT card using your Magnetic Stripe Reader (MSR), or manually enter the EBT
card number. • Once the card number is entered, the Primary Account Number (PAN - digits after the first six and before
the last four) will be masked if a valid EBT card number is detected. • If a PIN pad or signature capture device with an integrated MSR is used, this step can be skipped.
XCharge will prompt you to swipe the EBT card after Process is selected.
3. In the Expiration field, enter the EBT card expiration date in MMYY format. • This will be entered for you if the EBT card is swiped.
4. Enter the Approval Code
• Approval Codes must be obtained by calling the number on the voucher or the back of the EBT card.
5. Enter the Voucher Serial #.
6. Enter the Receipt # for the transaction. • A Receipt # can contain letters, numbers, spaces and special characters (not including a comma),
totalling a maximum of 25 characters long. The letters used are not case-sensitive. • Receipt #s are used for your reference only and are not verified by XCharge, however they can be used
to sort XCharge Reports or search for transactions in the Transaction Lookup window. • This field is optional unless set to Required in the XCharge Client Setup window.
7. Enter the Clerk ID for the transaction.
• A Clerk ID can contain letters, numbers, spaces and special characters (not including a comma), totalling a maximum of 20 characters long. The letters used are not case-sensitive.
• Clerk IDs are used for your reference only and are not verified by XCharge, however they can be used to sort XCharge Reports or search for transactions in the Transaction Lookup window.
• This field is optional unless set to Required in the XCharge Client Setup window.
8. Press F12 or choose the [F12] Process button. • XCharge will process the transaction and return a response. • If approved, a receipt may print and a message with the response will be displayed, based on the options
configured.

Updated July 2, 2013 XCharge 7.2 Release 1 Help Page 102 of 168
PROCESSING EBT CARDS (CONTINUED) Processing an EBT Cash Benefit Sale An EBT Cash Benefit Sale transaction is used to obtain funds from an Electronic Benefits Transfer account. XCharge will attempt to receive a sale authorization from the card issuer, and once approved the transaction will enter the current batch. Once the batch is settled the credit, debit and EBT card transactions are submitted to the credit card processor for deposit (or withdrawal). Although EBT card transactions must be settled in a batch for merchant payment, EBT card holders are debited for approved EBT Cash Benefit Sale transactions immediately, and these transactions cannot be voided. An EBT Cash Benefit Sale transaction is just like a regular EBT Sale, except "Cash Back" is permitted. This transaction type is available within XCharge as long as the option is enabled for the user currently logged in, and can be selected in any of the following ways:
• Select EBT Transactions from the transaction category menu, then choose EBT Cash Benefit Sale from the far left.
• Select the Transaction menu, then select EBT Transactions, then choose EBT Cash Benefit Sale. • Press the Shift+F11 keys on your keyboard.

Updated July 2, 2013 XCharge 7.2 Release 1 Help Page 103 of 168
PROCESSING EBT CARDS (CONTINUED) To process an EBT Cash Benefit Sale in XCharge:
1. Enter the dollar amount into the Amount field. • Enter the full amount including dollars, a decimal point, and cents. • Ensure the decimal point is in the correct place!
2. Enter the Cash Back Amount, if desired.
• Any amount entered here will increase the total amount debited from the EBT card account, but will be recorded as a separate amount on the XCharge receipt for your records.
• If "cash back only" is desired, it is possible to enter an Amount (above the Cash Back Amount field) of 0.
3. In the EBT Card Scan field, enter the EBT card number. • When this field is selected, you will be prompted to swipe the EBT card. • You must swipe the EBT card using your Magnetic Stripe Reader (MSR) - manually entering the number
is not permitted for EBT Sale transactions. • Once the card number is entered, the Primary Account Number (PAN - digits after the first six and before
the last four) will be masked if a valid EBT card number is detected. • If a PIN pad or signature capture device with an integrated MSR is used, this step can be skipped.
XCharge will prompt you to swipe the EBT card after Process is selected.
4. Enter the Receipt # for the transaction. • A Receipt # can contain letters, numbers, spaces and special characters (not including a comma),
totalling a maximum of 25 characters long. The letters used are not case-sensitive. • Receipt #s are used for your reference only and are not verified by XCharge, however they can be used
to sort XCharge Reports or search for transactions in the Transaction Lookup window. • This field is optional unless set to Required in the XCharge Client Setup window.
5. Enter the Clerk ID for the transaction.
• A Clerk ID can contain letters, numbers, spaces and special characters (not including a comma), totalling a maximum of 20 characters long. The letters used are not case-sensitive.
• Clerk IDs are used for your reference only and are not verified by XCharge, however they can be used to sort XCharge Reports or search for transactions in the Transaction Lookup window.
• This field is optional unless set to Required in the XCharge Client Setup window.
6. Press F12 or choose the [F12] Process button. • The configured PIN pad device should prompt the customer to enter their PIN. • After the customer enters their PIN, XCharge will process the transaction and return a response. • If approved, a receipt may print and a message with the response will be displayed, based on the options
configured.

Updated July 2, 2013 XCharge 7.2 Release 1 Help Page 104 of 168
TRANSACTION SETTLEMENT All Credit, Debit and EBT Card, as well as XCheck transactions must be entered into a Batch which must be Settled before final submission to the XWeb gateway and payment processors. This Settlement process must be completed before deposits are made into any Processing Accounts.
To access the Settlement window in XCharge, choose the Settlement button at the top of the screen. Force This option will "force" the current batch closed and complete a settlement for the Processing Account selected. If your Processing Account is not configured for automatic settlement at the XWeb gateway, then this option must be used to settle transactions at least every 48 hours after live processing (daily is recommended). Using the Review option to confirm the current batch totals is recommended before using the Force option. Review Choosing this option will process a Settlement Totals Review for the Processing Account selected, and the current batch totals will be displayed. The Settlement Totals Review can be printed or saved as a text file. Exit Closes the Settlement window. Processing Account Any credit card Processing Account (displayed as the Processing Account Name) accessible to the currently logged in user can be selected from this drop-down menu to perform settlement options. The Processing Account displayed here will be used to process any option selected above.
NOTE:
The Settlement process can be automated at the XWeb gateway if desired. This option is used by most XCharge merchants and is normally set to 1:00am ET by default. The automated Settlement time can be set within any hour slot desired (e.g. between 10:00pm and 11:00pm, or between 12:00am and 1:00am), or disabled. Neither the XCharge software or your PC need to be running at this time for Settlement to occur - the process is handled entirely at the XWeb gateway. To confirm or change the Settlement options configured on your Processing Account, please contact Accelerated Payment Technologies.

Updated July 2, 2013 XCharge 7.2 Release 1 Help Page 105 of 168
REPORTING This section describes the various summary and detail level reporting available in the XCharge Client application, with examples of each report type. To access the XCharge Reports window, choose the Reports button from the XCharge Client. Separate Credit Card and Gift Card Reports are available by selecting the desired option on the far left side of the screen. The XCharge Reports will be formatted to print Standard 8.5 x 11 Windows reports or 40 Column receipt printer reports depending on which option is selected under the General Options - Printing tab in the XCharge Setup window. If "Standard 8.5 x 11 Windows reports" is selected, the option to print XCharge Reports to a variety of file types (.txt, .csv, .pdf, etc.) will be available as well. A Scheduled Report Printing feature is also available to automate the process of printing reports. To configure these options, refer to the General Options - Scheduled Reporting tab in the XCharge Server Setup.
Credit, Debit & EBT Card Reports _______________________________________________________________ 106 Transaction Detail ____________________________________________________________________________ 106 Transaction Totals ___________________________________________________________________________ 108 Credit Card Totals ____________________________________________________________________________ 109 CC Totals By Day ____________________________________________________________________________ 110 CC Totals By Processing Account _______________________________________________________________ 111 Settlement __________________________________________________________________________________ 112
Check Reports _______________________________________________________________________________ 113 Checks Detail _______________________________________________________________________________ 113
Gift Card Reports _____________________________________________________________________________ 114 Gift Transaction Detail ________________________________________________________________________ 114 Gift Activity _________________________________________________________________________________ 115 Gift Totals By Day ____________________________________________________________________________ 116
Offline Reports _______________________________________________________________________________ 117 Outage ____________________________________________________________________________________ 117 Offline Transactions __________________________________________________________________________ 118

Updated July 2, 2013 XCharge 7.2 Release 1 Help Page 106 of 168
CREDIT, DEBIT & EBT CARD REPORTS All reporting on payment card transactions, aside from gift cards, can be found under multiple tabs within the Credit Cards Report Category, selected by default on the far left. All of these XCharge Reports share the following features: Load The Load button must be used before transaction details will be displayed on the screen. The Load button must be used again after changing the Date/Batch Range, Processing Account, or Sort Field options. Print Displays the print options window for printing the currently loaded report. The XCharge Reports will be formatted to print Standard 8.5 x 11 Windows reports or 40 Column receipt printer reports depending on which option is selected under the General Options - Printing tab in the XCharge Setup window. If "Standard 8.5 x 11 Windows reports" is selected, the option to print XCharge Reports to a variety of file types (.txt, .csv, .pdf, etc.) will be available as well. Preview Displays a Preview of the currently loaded report as it will be printed. Exit Closes the XCharge Reports window. Transaction Detail The Transaction Detail Report can display detailed information about Credit, Debit and EBT Cards, as well as Check transactions for the Processing Account selected. This report can also be filtered by a date or batch number range. Date Range, Start/End These fields allow you to set the Date Range used to filter report results. The current day is selected by default, and preset Date Ranges are available by using the drop-down menu currently displaying Today - or a Date Range can be manually entered. To change this filtering option from Date Range to Batch Number(s), choose the down arrow next to "Date Range" and choose "Batch Number(s)." This allows you to enter a single Batch Number, comma-separated Batch Numbers, or a range of Batch Numbers separated by a hyphen (-). Processing Account If multiple Processing Accounts are available to the user currently logged in, this drop-down menu will appear. Choosing this menu will display the Processing Account Names for all Processing Accounts available. Sort Fields The Transaction Detail Report is sorted chronologically by default, but manually selecting a Sort Field from this drop-down menu can change the main sort order, and will enable the Sort Field #2 drop-down menu for secondary sorting options. Using the Sort Field #2 option will enable the Sort Field #3 drop-down menu for tertiary sorting options. Hide Partial Reversals A Partial Reversal is a Pre-Authorization Completion transaction that was processed for a lower amount than the original Pre-Authorization. When this happens, it is possible for the "Pre-Authorization", "Pre-Authorization Completion" and "Partial Reversal" transactions to all appear on the same report. If desired, these lines can be hidden from the Transaction Detail Report and the amount from any Partial Reversal transaction will be displayed on the Pre-Authorization Completion line.
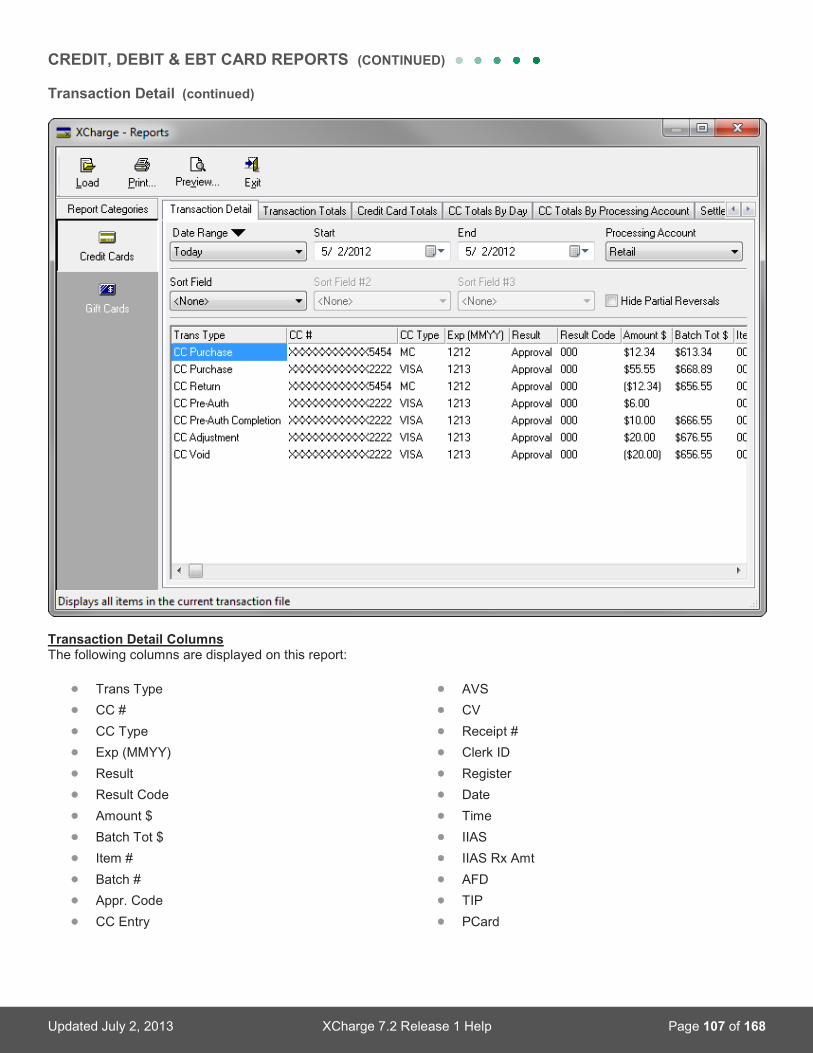
Updated July 2, 2013 XCharge 7.2 Release 1 Help Page 107 of 168
CREDIT, DEBIT & EBT CARD REPORTS (CONTINUED) Transaction Detail (continued)
Transaction Detail Columns The following columns are displayed on this report:
• Trans Type • CC # • CC Type • Exp (MMYY) • Result • Result Code • Amount $ • Batch Tot $ • Item # • Batch # • Appr. Code • CC Entry
• AVS • CV • Receipt # • Clerk ID • Register • Date • Time • IIAS • IIAS Rx Amt • AFD • TIP • PCard
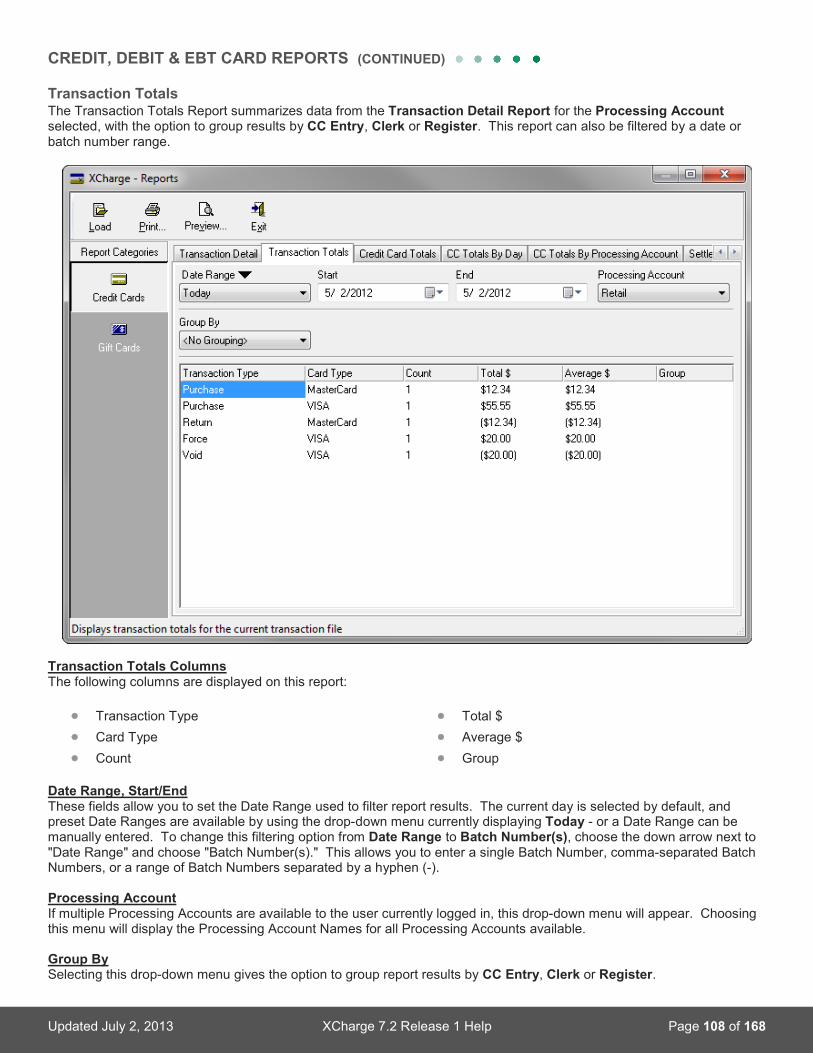
Updated July 2, 2013 XCharge 7.2 Release 1 Help Page 108 of 168
CREDIT, DEBIT & EBT CARD REPORTS (CONTINUED) Transaction Totals The Transaction Totals Report summarizes data from the Transaction Detail Report for the Processing Account selected, with the option to group results by CC Entry, Clerk or Register. This report can also be filtered by a date or batch number range.
Transaction Totals Columns The following columns are displayed on this report:
• Transaction Type • Card Type • Count
• Total $ • Average $ • Group
Date Range, Start/End These fields allow you to set the Date Range used to filter report results. The current day is selected by default, and preset Date Ranges are available by using the drop-down menu currently displaying Today - or a Date Range can be manually entered. To change this filtering option from Date Range to Batch Number(s), choose the down arrow next to "Date Range" and choose "Batch Number(s)." This allows you to enter a single Batch Number, comma-separated Batch Numbers, or a range of Batch Numbers separated by a hyphen (-). Processing Account If multiple Processing Accounts are available to the user currently logged in, this drop-down menu will appear. Choosing this menu will display the Processing Account Names for all Processing Accounts available. Group By Selecting this drop-down menu gives the option to group report results by CC Entry, Clerk or Register.
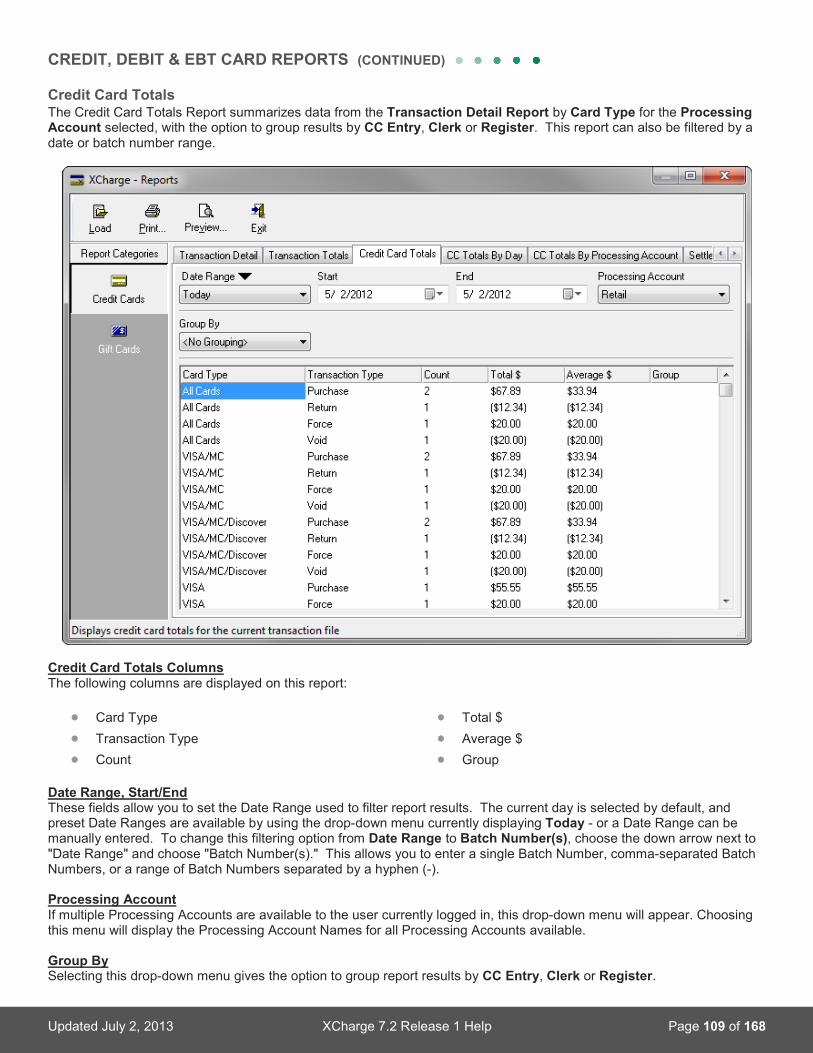
Updated July 2, 2013 XCharge 7.2 Release 1 Help Page 109 of 168
CREDIT, DEBIT & EBT CARD REPORTS (CONTINUED) Credit Card Totals The Credit Card Totals Report summarizes data from the Transaction Detail Report by Card Type for the Processing Account selected, with the option to group results by CC Entry, Clerk or Register. This report can also be filtered by a date or batch number range.
Credit Card Totals Columns The following columns are displayed on this report:
• Card Type • Transaction Type • Count
• Total $ • Average $ • Group
Date Range, Start/End These fields allow you to set the Date Range used to filter report results. The current day is selected by default, and preset Date Ranges are available by using the drop-down menu currently displaying Today - or a Date Range can be manually entered. To change this filtering option from Date Range to Batch Number(s), choose the down arrow next to "Date Range" and choose "Batch Number(s)." This allows you to enter a single Batch Number, comma-separated Batch Numbers, or a range of Batch Numbers separated by a hyphen (-). Processing Account If multiple Processing Accounts are available to the user currently logged in, this drop-down menu will appear. Choosing this menu will display the Processing Account Names for all Processing Accounts available. Group By Selecting this drop-down menu gives the option to group report results by CC Entry, Clerk or Register.
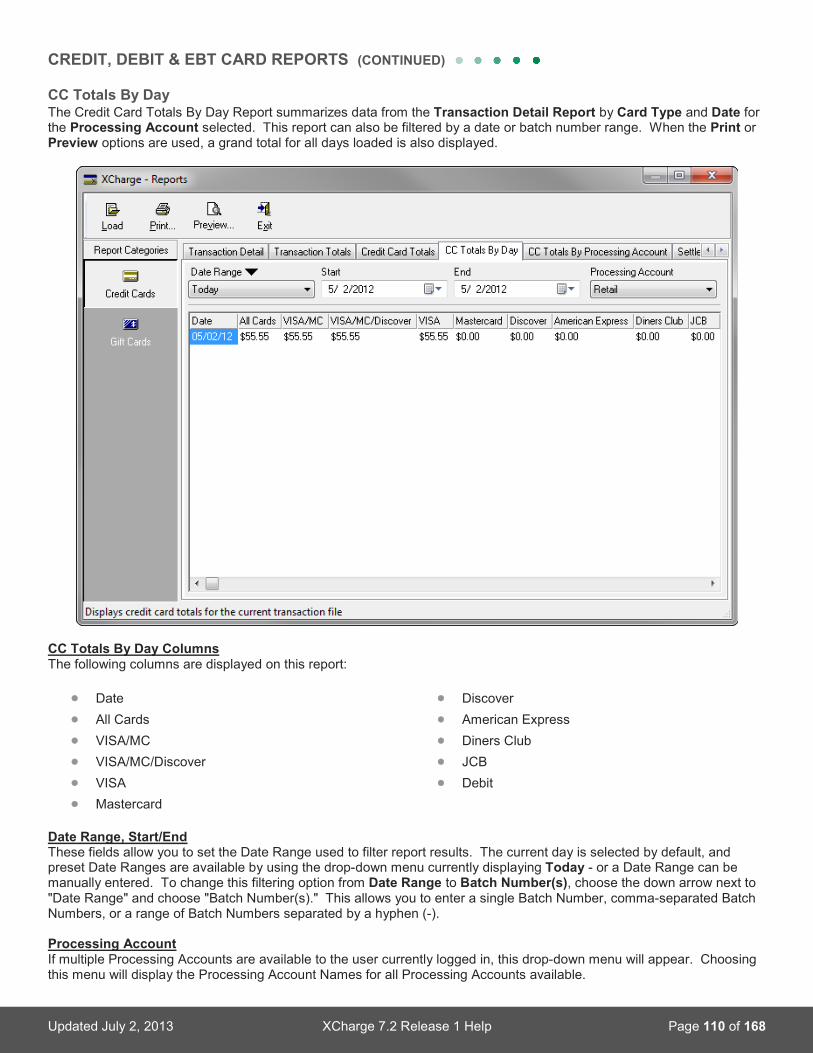
Updated July 2, 2013 XCharge 7.2 Release 1 Help Page 110 of 168
CREDIT, DEBIT & EBT CARD REPORTS (CONTINUED) CC Totals By Day The Credit Card Totals By Day Report summarizes data from the Transaction Detail Report by Card Type and Date for the Processing Account selected. This report can also be filtered by a date or batch number range. When the Print or Preview options are used, a grand total for all days loaded is also displayed.
CC Totals By Day Columns The following columns are displayed on this report:
• Date • All Cards • VISA/MC • VISA/MC/Discover • VISA • Mastercard
• Discover • American Express • Diners Club • JCB • Debit
Date Range, Start/End These fields allow you to set the Date Range used to filter report results. The current day is selected by default, and preset Date Ranges are available by using the drop-down menu currently displaying Today - or a Date Range can be manually entered. To change this filtering option from Date Range to Batch Number(s), choose the down arrow next to "Date Range" and choose "Batch Number(s)." This allows you to enter a single Batch Number, comma-separated Batch Numbers, or a range of Batch Numbers separated by a hyphen (-). Processing Account If multiple Processing Accounts are available to the user currently logged in, this drop-down menu will appear. Choosing this menu will display the Processing Account Names for all Processing Accounts available.
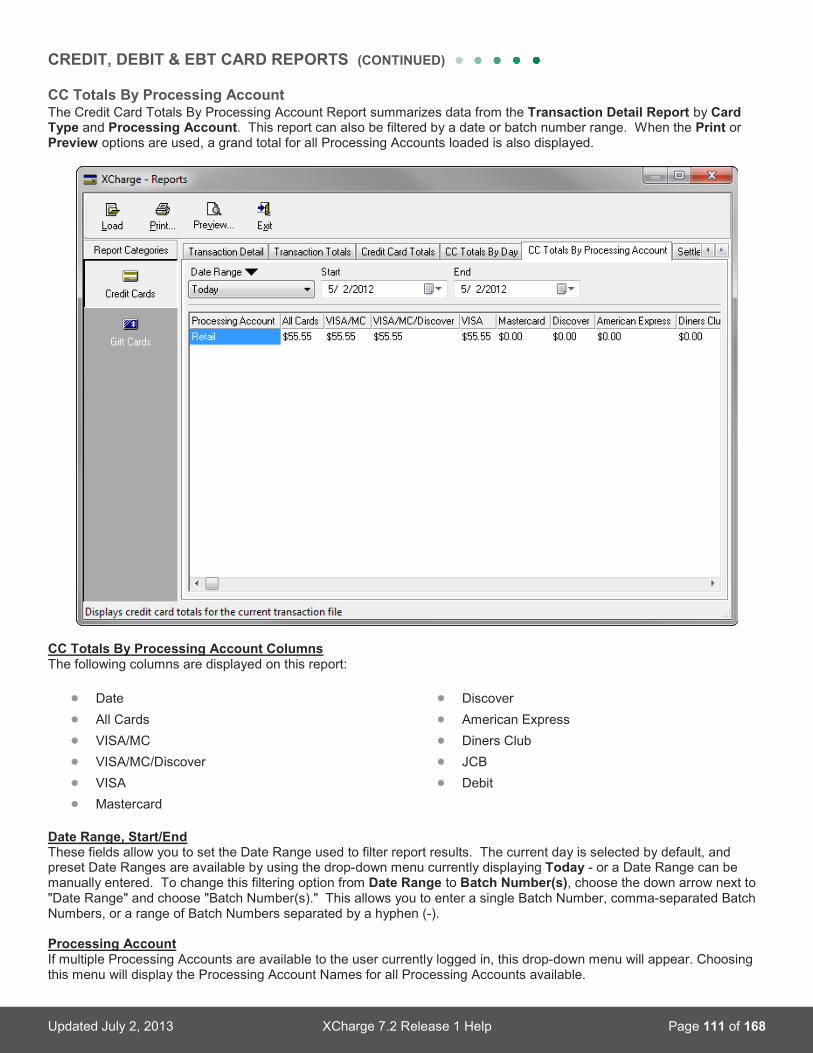
Updated July 2, 2013 XCharge 7.2 Release 1 Help Page 111 of 168
CREDIT, DEBIT & EBT CARD REPORTS (CONTINUED) CC Totals By Processing Account The Credit Card Totals By Processing Account Report summarizes data from the Transaction Detail Report by Card Type and Processing Account. This report can also be filtered by a date or batch number range. When the Print or Preview options are used, a grand total for all Processing Accounts loaded is also displayed.
CC Totals By Processing Account Columns The following columns are displayed on this report:
• Date • All Cards • VISA/MC • VISA/MC/Discover • VISA • Mastercard
• Discover • American Express • Diners Club • JCB • Debit
Date Range, Start/End These fields allow you to set the Date Range used to filter report results. The current day is selected by default, and preset Date Ranges are available by using the drop-down menu currently displaying Today - or a Date Range can be manually entered. To change this filtering option from Date Range to Batch Number(s), choose the down arrow next to "Date Range" and choose "Batch Number(s)." This allows you to enter a single Batch Number, comma-separated Batch Numbers, or a range of Batch Numbers separated by a hyphen (-). Processing Account If multiple Processing Accounts are available to the user currently logged in, this drop-down menu will appear. Choosing this menu will display the Processing Account Names for all Processing Accounts available.

Updated July 2, 2013 XCharge 7.2 Release 1 Help Page 112 of 168
CREDIT, DEBIT & EBT CARD REPORTS (CONTINUED) Settlement The Settlement Report displays details from the Transaction Detail Report with additional Settlement information for the Processing Account selected. This report can also be filtered by a date or batch number range. Settlement Columns The following columns are displayed on this report:
• CC # • Exp • CCType • Appr Code • Date • Settle Date • Clerk
• Settle Clerk • Register • Settle Register • Amount $ • Settle Amt $ • Settle Diff $
Options Settled Transactions or Non-Settled Transactions can be selected from this drop-down menu to filter the transaction results.
• Settled Transactions: with this option selected, only the transactions that have entered a batch for settlement are displayed. This includes purchases, pre-auth completions, forces, and returns. Adjustments are paired with their original transactions, and voids will remove a transaction from the report.
• Non-Settled Transactions: with this option selected, only the approved transactions that have yet to enter a batch for settlement are displayed. This includes pre-authorizations that have not yet been completed.
• Purchases not settled until adjusted: with this checkbox selected, the behavior of the above two options is slightly modified. Credit card purchase transactions will not be considered complete ("settled") unless an associated adjustment transaction is detected. This is useful for merchants who regularly process adjustment transactions to all purchases in order to add a tip amount - with this option enabled, purchases that have already been adjusted will appear when Settled Transactions is selected, and purchases that have yet to be adjusted will appear when Non-Settled Transactions is selected.
Date Range, Start/End These fields allow you to set the Date Range used to filter report results. The current day is selected by default, and preset Date Ranges are available by using the drop-down menu currently displaying Today - or a Date Range can be manually entered. To change this filtering option from Date Range to Batch Number(s), choose the down arrow next to "Date Range" and choose "Batch Number(s)." This allows you to enter a single Batch Number, comma-separated Batch Numbers, or a range of Batch Numbers separated by a hyphen (-). Processing Account If multiple Processing Accounts are available to the user currently logged in, this drop-down menu will appear. Choosing this menu will display the Processing Account Names for all Processing Accounts available. Group By Selecting this drop-down menu gives the option to group report results by Clerk or Register.

Updated July 2, 2013 XCharge 7.2 Release 1 Help Page 113 of 168
CHECK REPORTS Merchants enrolled in an XCheck account can view details on all check transactions using the Checks Detail tab within the XCharge Reports window. This tab is found within the Credit Cards Report Category, selected by default on the far left, and shares these features with the other Credit Cards Reports: Load The Load button must be used before transaction details will be displayed on the screen. The Load button must be used again after changing the Date/Batch Range or Processing Account options. Print Displays the print options window for printing the currently loaded report. The XCharge Reports will be formatted to print Standard 8.5 x 11 Windows reports or 40 Column receipt printer reports depending on which option is selected under the General Options - Printing tab in the XCharge Setup window. If "Standard 8.5 x 11 Windows reports" is selected, the option to print XCharge Reports to a variety of file types (.txt, .csv, .pdf, etc.) will be available as well. Preview Displays a Preview of the currently loaded report as it will be printed. Exit Closes the XCharge Reports window. Checks Detail The Checks Detail Report will display detailed information on all check transactions for merchants enrolled in with XCheck account. Checks Detail Columns The following columns are displayed on this report:
• Tran Type • Routing No • Account • Check No • Amount
• Resp Code • Clerk • Receipt • Date • Time
Date Range, Start/End These fields allow you to set the Date Range used to filter report results. The current day is selected by default, and preset Date Ranges are available by using the drop-down menu currently displaying Today - or a Date Range can be manually entered. To change this filtering option from Date Range to Batch Number(s), choose the down arrow next to "Date Range" and choose "Batch Number(s)." This allows you to enter a single Batch Number, comma-separated Batch Numbers, or a range of Batch Numbers separated by a hyphen (-). Processing Account Name If multiple Processing Accounts are available to the user currently logged in, this drop-down menu will appear. Choosing this menu will display the Processing Account Names for all Processing Accounts available.

Updated July 2, 2013 XCharge 7.2 Release 1 Help Page 114 of 168
GIFT CARD REPORTS Merchants enrolled in an XGift account can view details on all gift card transactions under multiple tabs within the Gift Cards Report Category, selected by choosing Gift Cards on the far left of the XCharge Reports window. All of these XCharge Reports share the following features: Load The Load button must be used before transaction details will be displayed on the screen. The Load button must be used again after changing the Date/Batch Range, Processing Account, or Sort Field options. Print Displays the print options window for printing the currently loaded report. The XCharge Reports will be formatted to print Standard 8.5 x 11 Windows reports or 40 Column receipt printer reports depending on which option is selected under the General Options - Printing tab in the XCharge Setup window. If "Standard 8.5 x 11 Windows reports" is selected, the option to print XCharge Reports to a variety of file types (.txt, .csv, .pdf, etc.) will be available as well. Preview Displays a Preview of the currently loaded report as it will be printed. Exit Closes the XCharge Reports window. Gift Transaction Detail The Gift Transaction Detail Report can display detailed information about each Gift Card transaction processed. This report can also be filtered by a date or batch number range. Gift Transaction Detail Columns The following columns are displayed on this report:
• Tran Type • Resp Code • Account • Exp • Amount $ • Prev Balance $ • Curr Balance $ • Batch # • Batch Ref #
• Date • Time • Input Type • Trans ID • Register • Clerk • Receipt • Custom • Comment
Date Range, Start/End These fields allow you to set the Date Range used to filter report results. The current day is selected by default, and preset Date Ranges are available by using the drop-down menu currently displaying Today - or a Date Range can be manually entered. To change this filtering option from Date Range to Batch Number(s), choose the down arrow next to "Date Range" and choose "Batch Number(s)." This allows you to enter a single Batch Number, comma-separated Batch Numbers, or a range of Batch Numbers separated by a hyphen (-). Sort Fields The Transaction Detail Report is sorted chronologically by default, but manually selecting a Sort Field from this drop-down menu can change the main sort order, and will enable the Sort Field #2 drop-down menu for secondary sorting options. Using the Sort Field #2 option will enable the Sort Field #3 drop-down menu for tertiary sorting options.

Updated July 2, 2013 XCharge 7.2 Release 1 Help Page 115 of 168
GIFT CARD REPORTS (CONTINUED) Gift Activity The Gift Activity Report summarizes data from the Gift Transaction Detail Report for the gift card Account Number specified. This report can also be filtered by a date or batch number range.
Gift Activity Columns The following columns are displayed on this report:
• Account • Date • Time
• Clerk • Tran Type • Amount
Date Range, Start/End These fields allow you to set the Date Range used to filter report results. The current day is selected by default, and preset Date Ranges are available by using the drop-down menu currently displaying Today - or a Date Range can be manually entered. To change this filtering option from Date Range to Batch Number(s), choose the down arrow next to "Date Range" and choose "Batch Number(s)." This allows you to enter a single Batch Number, comma-separated Batch Numbers, or a range of Batch Numbers separated by a hyphen (-). Account # Entering a gift card account number here and choosing Load will filter results by that Account #.

Updated July 2, 2013 XCharge 7.2 Release 1 Help Page 116 of 168
GIFT CARD REPORTS (CONTINUED) Gift Totals By Day The Gift Totals By Day Report summarizes data from the Gift Transaction Detail Report by Transaction Type and Date. This report can also be filtered by a date or batch number range. When the Print or Preview options are used, a grand total for all days loaded is also displayed.
Gift Totals By Day Columns The following columns are displayed on this report:
• Date • Issue • Redeem • Return
• Adjust • Void • Total
Date Range, Start/End These fields allow you to set the Date Range used to filter report results. The current day is selected by default, and preset Date Ranges are available by using the drop-down menu currently displaying Today - or a Date Range can be manually entered. To change this filtering option from Date Range to Batch Number(s), choose the down arrow next to "Date Range" and choose "Batch Number(s)." This allows you to enter a single Batch Number, comma-separated Batch Numbers, or a range of Batch Numbers separated by a hyphen (-).

Updated July 2, 2013 XCharge 7.2 Release 1 Help Page 117 of 168
OFFLINE REPORTS All reporting on XCharge Offline Processing can be found under two tabs within the Credit Cards Report Category, selected by default on the far left. All of these XCharge Reports share the following features: Load The Load button must be used before transaction details will be displayed on the screen. The Load button must be used again after changing the Date/Batch Range, Processing Account, or sort field options. Print Displays the print options window for printing the currently loaded report. The XCharge Reports will be formatted to print Standard 8.5 x 11 Windows reports or 40 Column receipt printer reports depending on which option is selected under the General Options - Printing tab in the XCharge Setup window. If "Standard 8.5 x 11 Windows reports" is selected, the option to print XCharge Reports to a variety of file types (.txt, .csv, .pdf, etc.) will be available as well. Preview Displays a Preview of the currently loaded report as it will be printed. Exit Closes the XCharge Reports window. Outage The XCharge Outage Report works in conjunction with the Auto Offline Processing feature to record instances where the XCharge Server has enabled or disabled Offline Mode.
Outage Columns The following columns are displayed on this report:
• Date/Time • Outage Status • Detail Date Range, Start/End These fields allow you to set the Date Range used to filter report results. The current day is selected by default, and preset Date Ranges are available by using the drop-down menu currently displaying Today - or a Date Range can be manually entered.
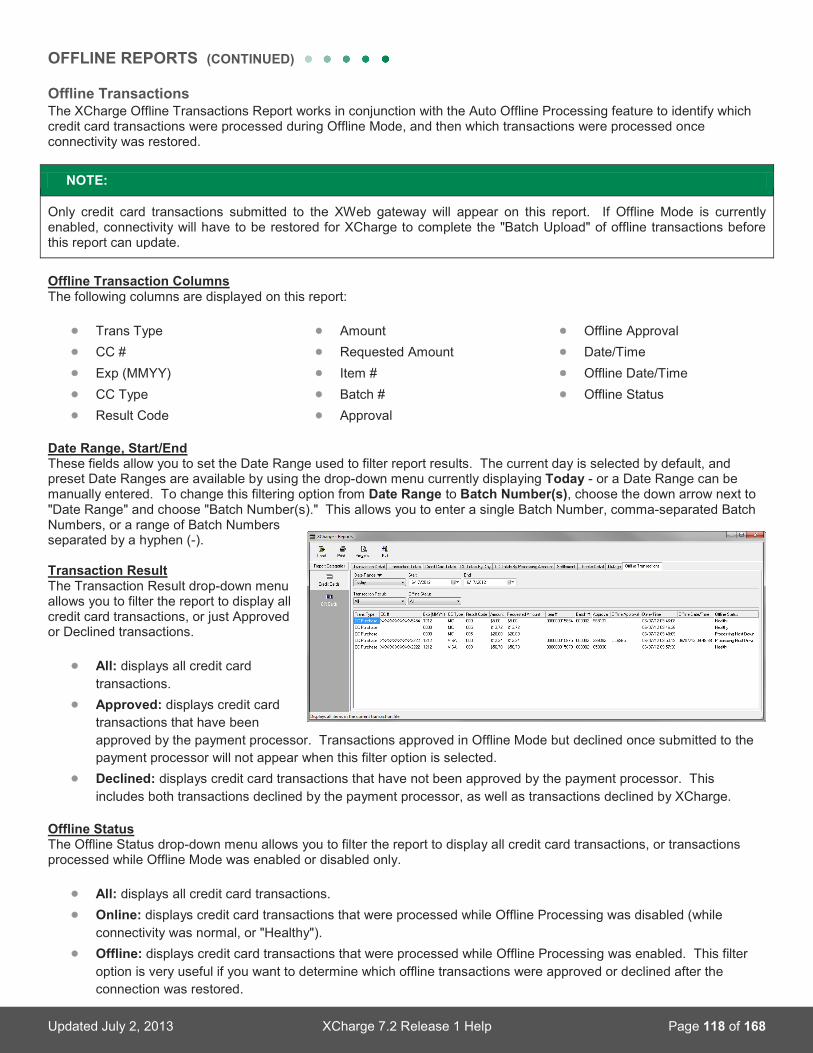
Updated July 2, 2013 XCharge 7.2 Release 1 Help Page 118 of 168
OFFLINE REPORTS (CONTINUED) Offline Transactions The XCharge Offline Transactions Report works in conjunction with the Auto Offline Processing feature to identify which credit card transactions were processed during Offline Mode, and then which transactions were processed once connectivity was restored.
Offline Transaction Columns The following columns are displayed on this report:
• Trans Type • CC # • Exp (MMYY) • CC Type • Result Code
• Amount • Requested Amount • Item # • Batch # • Approval
• Offline Approval • Date/Time • Offline Date/Time • Offline Status
Date Range, Start/End These fields allow you to set the Date Range used to filter report results. The current day is selected by default, and preset Date Ranges are available by using the drop-down menu currently displaying Today - or a Date Range can be manually entered. To change this filtering option from Date Range to Batch Number(s), choose the down arrow next to "Date Range" and choose "Batch Number(s)." This allows you to enter a single Batch Number, comma-separated Batch Numbers, or a range of Batch Numbers separated by a hyphen (-). Transaction Result The Transaction Result drop-down menu allows you to filter the report to display all credit card transactions, or just Approved or Declined transactions.
• All: displays all credit card transactions.
• Approved: displays credit card transactions that have been approved by the payment processor. Transactions approved in Offline Mode but declined once submitted to the payment processor will not appear when this filter option is selected.
• Declined: displays credit card transactions that have not been approved by the payment processor. This includes both transactions declined by the payment processor, as well as transactions declined by XCharge.
Offline Status The Offline Status drop-down menu allows you to filter the report to display all credit card transactions, or transactions processed while Offline Mode was enabled or disabled only.
• All: displays all credit card transactions. • Online: displays credit card transactions that were processed while Offline Processing was disabled (while
connectivity was normal, or "Healthy"). • Offline: displays credit card transactions that were processed while Offline Processing was enabled. This filter
option is very useful if you want to determine which offline transactions were approved or declined after the connection was restored.
NOTE:
Only credit card transactions submitted to the XWeb gateway will appear on this report. If Offline Mode is currently enabled, connectivity will have to be restored for XCharge to complete the "Batch Upload" of offline transactions before this report can update.
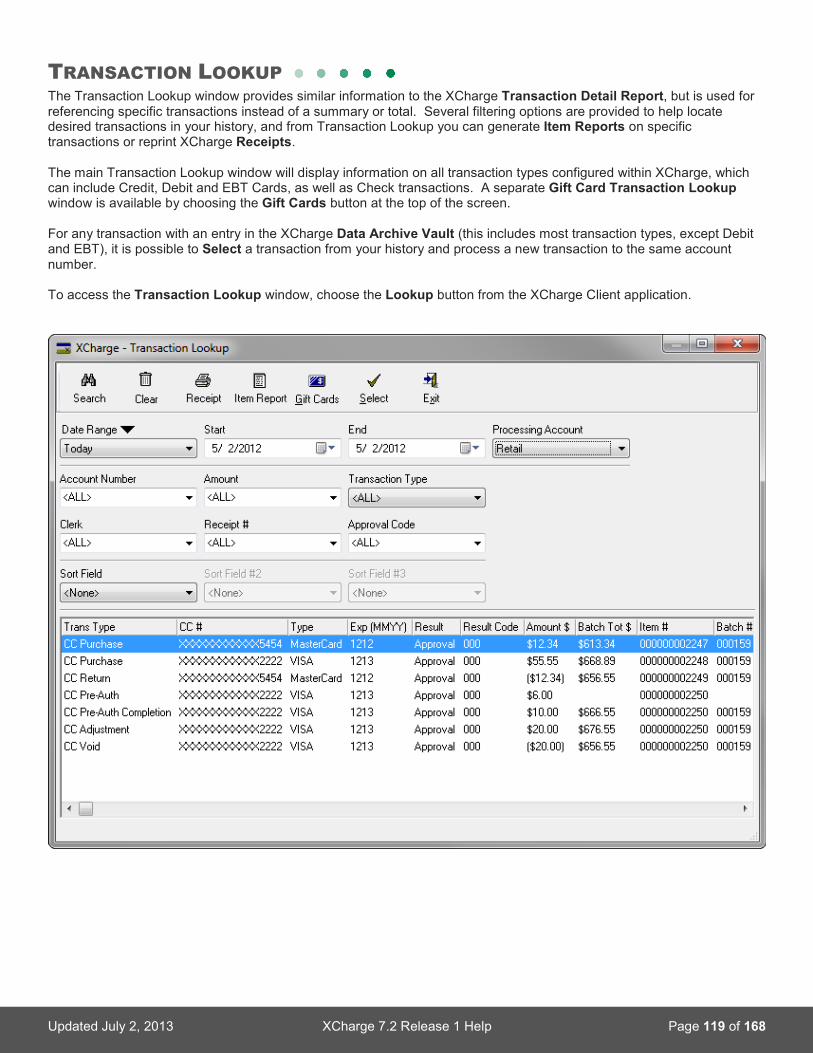
Updated July 2, 2013 XCharge 7.2 Release 1 Help Page 119 of 168
TRANSACTION LOOKUP The Transaction Lookup window provides similar information to the XCharge Transaction Detail Report, but is used for referencing specific transactions instead of a summary or total. Several filtering options are provided to help locate desired transactions in your history, and from Transaction Lookup you can generate Item Reports on specific transactions or reprint XCharge Receipts. The main Transaction Lookup window will display information on all transaction types configured within XCharge, which can include Credit, Debit and EBT Cards, as well as Check transactions. A separate Gift Card Transaction Lookup window is available by choosing the Gift Cards button at the top of the screen. For any transaction with an entry in the XCharge Data Archive Vault (this includes most transaction types, except Debit and EBT), it is possible to Select a transaction from your history and process a new transaction to the same account number. To access the Transaction Lookup window, choose the Lookup button from the XCharge Client application.

Updated July 2, 2013 XCharge 7.2 Release 1 Help Page 120 of 168
TRANSACTION LOOKUP (CONTINUED) Search The Search button must be used to update the results on the screen after any filtering options are used. Transactions from the current day will be displayed once the Transaction Lookup window is first opened. Clear Select this option to clear all filtering options and reset the Transaction Lookup window. Receipt Displays a receipt reprint preview for the currently selected transaction. Only approved transaction are able to generate receipts in most cases. Item Report Displays an Item Report print preview for the currently selected transaction, containing all the details on the Transaction Lookup window. If your integrated Business Management Software supports saving signature images via XCharge, or if the option to Prompt For/Save Signature is enabled in the XCharge Client Setup, then the Item Report will display the stored signature image related to the selected transaction. Gift Cards Launches the Gift Card Transaction Lookup window. Select Attempts to load the Data Archive Vault Alias for the currently selected transaction to the account number field in the XCharge Client. This "Lookup Select" feature enables you to process a new transaction to an account in your transaction history by preparing the transaction type in the XCharge Client, then Selecting the account number in this window. Exit Closes the XCharge Transaction Lookup window. Date Range, Start/End These fields allow you to set the Date Range used to filter report results. The current day is selected by default, and preset Date Ranges are available by using the drop-down menu currently displaying Today - or a Date Range can be manually entered. To change this filtering option from Date Range to Batch Number(s), click on the down arrow next to "Date Range" and choose "Batch Number(s)." This allows you to enter a single Batch Number, comma-separated Batch Numbers, or a range of Batch Numbers separated by a hyphen (-). Processing Account If multiple Processing Accounts are available to the user currently logged in, this drop-down menu will appear. Choosing this menu will display the Processing Account Names for all Processing Accounts available. Filter Fields Entering an Account Number, Amount, Transaction Type, Clerk, Receipt # or Approval Code into the respective fields allows filtering the Transaction Lookup results. Sort Fields The Transaction Detail Report is sorted chronologically by default, but manually selecting a Sort Field from this drop-down menu can change the main sort order, and will enable the Sort Field #2 drop-down menu for secondary sorting options. Using the Sort Field #2 option will enable the Sort Field #3 drop-down menu for tertiary sorting options.

Updated July 2, 2013 XCharge 7.2 Release 1 Help Page 121 of 168
ADDITIONAL INFORMATION
Frequently Asked Questions ____________________________________________________________________ 122
XCharge System Requirements _________________________________________________________________ 126
XWeb Response Codes ________________________________________________________________________ 128
Gift Card Response Codes _____________________________________________________________________ 132
XCheck Standard Entry Class Codes _____________________________________________________________ 133
AVS & CSC Response Codes ___________________________________________________________________ 138 XCharge Release Notes ________________________________________________________________________ 139

Updated July 2, 2013 XCharge 7.2 Release 1 Help Page 122 of 168
FREQUENTLY ASKED QUESTIONS How can I void a credit card transaction? A void will cancel a credit card (not including PIN-based debit) transaction processed on the current batch, which usually means the same day only. To void a transaction from XCharge:
1. Open the XCharge icon from your desktop and login. 2. Choose the Void option from the left side of the screen. 3. Choose the Search button to the right. 4. Select the desired transaction. All credit card transactions from the current and previous day should be displayed
in chronological order. 5. Choose the OK button to load the transaction to the screen. 6. Verify the details match the desired transaction, then choose F12-Process to complete the void.
How can I adjust the amount of a credit card transaction? Like a void, an adjustment will change the amount of a credit card transaction processed on the current batch. To adjust a transaction from XCharge:
1. Open the XCharge icon from your desktop and login. 2. Choose the Adjustment option from the left side of the screen. 3. Choose the Search button to the right. 4. Select the desired transaction. All credit card transactions from the current and previous day should be displayed
in chronological order. 5. Choose the OK button to load the transaction to the screen. 6. Manually enter the full amount (including a decimal point) you would like to adjust the transaction to (no math
involved, just enter the FINAL amount you want to go through). 7. Verify the details match the desired transaction, then choose F12-Process to complete the adjustment.
How can I return money to a credit card in my history? You can return funds to a credit card directly in XCharge if the card is on hand or if you have the full credit card number. This can be done without the full credit card number starting in XCharge version 7.1 Release 1. If you have the card on hand or the full card number:
1. Open the XCharge icon from your desktop and login. 2. Choose the Return option from the left side of the screen. 3. In the Amount field, manually enter the full return amount (including a decimal point). 4. In the Credit Card field, you can either swipe the card or manually enter the full card number. 5. The Receipt and Clerk ID fields are usually optional. 6. When ready, choose F12-Process to complete the return.
If you do not have the card:
1. Open the XCharge icon from your desktop and login. 2. Choose the Return option from the left side of the screen. 3. Choose the Lookup button at the top of the screen. 4. Use the filters (such as date range) and the Search button to locate the credit card desired. 5. Choose the Select button at the top of the screen. The credit card token ("alias") should be visible on the Return
screen in place of the credit card number and expiration date. 6. In the Amount field, manually enter the full return amount (including a decimal point). 7. The Receipt and Clerk ID fields are usually optional. 8. When ready, choose F12-Process to complete the Return.

Updated July 2, 2013 XCharge 7.2 Release 1 Help Page 123 of 168
FREQUENTLY ASKED QUESTIONS (CONTINUED) Where can I find more information on PCI compliance? http://acceleratedpay.com/security.php How can I determine if a transaction was processed?
1. Open the XCharge icon from your desktop and login. 2. Choose the Reports button at the top of the screen. 3. Select the date range desired at the top of the screen (today should be selected by default) and then choose the
Load button in the upper-left. 4. All transactions processed within the date range should appear on the screen now. If a transaction does not
appear on the report, it most likely did not get processed. 5. Any transaction that was approved or declined may appear on the report, so it is important to note the Result and
Result Code (5th and 6th columns). 6. If you are unsure if the transaction was approved, you can check the Batch Total column (to the right of the
Amount column) to confirm the total at the time of this transaction. 7. The Batch Total should have changed since the previous transaction if it was approved, for most transaction
types. What needs to be allowed in my firewall for XCharge to function? This depends on the firewall and other security measures in place on your PCs and network. Many PCs use firewall software that may automatically allow XCharge to function, or may require a rule or exception. More secure networks may require port forwarding or IP/URL "white-listing" for XCharge to communicate with servers outside of your network. Configuring your firewall software and network settings is beyond the scope of this guide and should be handled by your network administrator, and below is a list of things that person may be interested in. XCharge executables that should be "allowed" through firewall software:
• XCharge.exe: this is the XCharge "Client" software, which may need to communicate with an XCharge Server on another PC within your local network.
• XChrgSrv.exe: this is the XCharge "Server", which is the main component of XCharge that communicates over the internet to process your transactions.
• XCSecurityService.exe: parts of the XCharge Security functions required by the XCharge Server are processed by the XCSecurityService.
• XCUpgrade.exe: if the "check for update" feature is used, this program will check online for an important update. Ports that should be available to XCharge for external use:
• 443: for SSL communication over the internet. • 29716: for transactions processed through XWeb. • 11508: for gift card transactions processed through XGift. • 8417: for gift card transactions processed through Profit Point.
IP addresses and URLs that should be accessible to XCharge:
• 207.38.117.196: for transactions processed through XWeb. • 216.7.182.196: for transactions processed through XWeb. • 63.240.140.198: for transactions processed through XWeb. • 63.240.140.205: for transactions processed through XWeb. • igusproda.globalpay.com: for transactions processed through GPN. • igusprodb.globalpay.com: for transactions processed through GPN. • xgiftonline.com: for gift card transactions processed through XGift. • rewardforloyalty.com: for gift card transactions processed through Profit Point.

Updated July 2, 2013 XCharge 7.2 Release 1 Help Page 124 of 168
FREQUENTLY ASKED QUESTIONS (CONTINUED) How can I obtain a Voice Authorization? A Voice Authorization is an approval code from your credit card processor given over the phone. The Voice Authorization system can be used if you are unable to process live credit card transactions (if your internet connection is down, for example) or if a live transaction is declined with a code indicating that a Voice Authorization is needed to approve the transaction.
Voice Authorizations should only be obtained from your Credit Card Processor. An approval code received directly from a cardholder or card issuer may not be accepted by your processor for payment. Your Processing Account information will need to be entered over the phone for Visa, MasterCard and Discover Voice Authorizations (American Express does not require this information). If you need assistance confirming your Processing Account information, contact Accelerated Payment Technologies. Credit Card Processor: Global Payments, Card Type: Visa, MasterCard and Discover
1. Call 800-944-1111 x1. 2. Enter your Bank ID number when prompted. 3. Enter your Processing Account Terminal ID when prompted. 4. Enter other information as prompted. 5. Record the six character approval code. 6. Imprint the credit card - the full credit card number, expiration date, amount and approval code will be needed
when processing the credit card force. Credit Card Processor: TransFirst, Card Type: Visa, MasterCard and Discover
1. Call 800-941-0188 x1 if your Processing Account Merchant ID begins with a "3", or 800-314-6888 x1 if your Merchant ID begins with a "5."
2. Enter your Processing Account Merchant ID when prompted. 3. Enter other information as prompted. 4. Record the six character approval code. 5. Imprint the credit card - the full credit card number, expiration date, amount and approval code will be needed
when processing the credit card force. Credit Card Processor: Total Merchant Services, Card Type: Visa, MasterCard and Discover
1. Call 800-944-1111 x1. 2. Enter your Bank ID number when prompted. 3. Enter your Processing Account Terminal ID when prompted. 4. Enter other information as prompted. 5. Record the six character approval code. 6. Imprint the credit card - the full credit card number, expiration date, amount and approval code will be needed
when processing the credit card force. Credit Card Processor: (any), Card Type: American Express
1. Call 800-528-2121. 2. Enter or read the credit card number. 3. Enter or read the amount of the transaction. 4. Record the six character approval code. 5. Imprint the credit card - the full credit card number, expiration date, amount and approval code will be needed
when processing the credit card force.
NOTE:
A Voice Authorization is used to issue an approval code, but the transaction must still be processed through the XCharge software before it enters your batch. This means that before you can be paid for a transaction with a Voice Authorization, the approval code given over the phone must be entered into XCharge or your Business Management Software! For information on processing a Credit Card Force, see Transaction Processing - Processing Credit Cards.

Updated July 2, 2013 XCharge 7.2 Release 1 Help Page 125 of 168
FREQUENTLY ASKED QUESTIONS (CONTINUED) What do the common coded responses mean and how do I proceed after receiving them?
Common XCharge Response Codes
Code Verbiage Description
000 AP 12345X The transaction was approved! An alphanumeric authorization code is usually presented with the message. In some cases the Address Verification Service (AVS) and/or Card Security Code (CSC/CVV/CVC) responses may be included as well. The transaction should be completed as usual, with a printed receipt if applicable.
001/005 Declined The transaction was declined by the card issuer. There could be many reasons for a decline, but the issuer is not sending the reason with this response. It is best to take another card or form of tender in this case. If the cardholder wants to know the reason for the decline, they can call the number on the back of their card to inquire with the issuer.
813 AP DUPE The transaction was declined by the processor because it is a duplicate. This card has already been charged by your Processing Account for the same amount within a defined time period. If you intended to charge the card more than once, you may need to bypass the AP DUPE by changing the amount of this transaction. If you only intended to charge the card once then this message is letting you know it has gone through one time already, so you should not accept another payment.
002 CALL XX The transaction was declined by the card issuer, but they have requested you call for a voice authorization. Calling for an authorization is optional, so you can treat this as a 001/005 Decline if desired. If you would like to get a voice authorization, steps are available under the previous question in the FAQ.
004 PIC UP The transaction was declined by the card issuer, and the card has been flagged for suspicious activity. The card issuer is requesting you call the number on the back of the card for more information.
1020 Connection Timed Out XCharge is unable to process transactions over your internet connection. Check your internet connection first. If your internet connection is down then you will receive this response until it is back up. If the internet connection is up, further troubleshooting is needed.
H1722 No Extended Error Description Available
XCharge is unable to process transactions due to an internet connection failure. Your internet connection is likely working, but had an outage at some point and XCharge has not recovered. Reboot the XCharge Server PC if possible, or at least restart XCharge and the XCharge Server icon in your system tray to recover.
Updated July 2, 2013 XCharge 7.2 Release 1 Help Page 126 of 168
XCHARGE SYSTEM REQUIREMENTS Operating System XCharge is supported in both 32-bit and 64-bit environments, however some peripherals you may choose to use with XCharge may have different system requirements. XCharge may be installed on any of the following Microsoft Windows Operating Systems:
• Windows 2000 • Windows XP • Windows Server 2003 • Windows Vista • Windows Server 2008 • Windows 7
Other Software Additionally, the following software may be required for XCharge or specific features to function.
• XCSOAP: XCharge SOAP/XML installer, for Concord merchants. • XCClient: XCharge XCClient.dll installer, for use with Business Management Software that requires XCClient.dll. • OPOS for Ingenico: for use with Ingenico devices - included with XCharge installations but not automatically
installed. • VeriFone drivers: for use with some Verifone devices - included with XCharge installations but not automatically
installed. Hardware Requirements XCharge does not have strict PC hardware requirements - following the recommended system requirements for your operating system is generally sufficient. In addition to those basic requirements, XCharge may require the following:
• Available Hard Drive space: 100 MB is recommended, not including installation media. • Video: XGA (1024x768) or higher resolution is recommended for XCharge Reports. • Broadband Internet Connection: XCharge requires a high-speed internet connection for all but the legacy
processing features (dialup processing may be available in some situations, but is not recommended). • Available USB or RS-232 (serial) ports may be needed by some peripherals such as MSRs or PIN Pads.
Updated July 2, 2013 XCharge 7.2 Release 1 Help Page 127 of 168
XCHARGE SYSTEM REQUIREMENTS (CONTINUED) Optional Hardware The following list of hardware is optional for additional functionality with XCharge, and may be obtained from Accelerated Payment Technologies or your Business Management Software provider. Supported encrypted Magnetic Stripe Readers (MSRs):
• Magtek Dynamag (must be purchased from Accelerated Payment Technologies) • Magtek IPAD (must be purchased from Accelerated Payment Technologies) • Magtek IPAD SC (must be purchased from Accelerated Payment Technologies)
Supported MSRs without encryption:
• Magtek Mini Swipe Reader (USB models, such as 21040110) Supported PIN Pad Devices:
• Ingenico 3070 • VeriFone PINPad 1000se
Supported PIN Pad Devices with integrated MSRs:
• Magtek IPAD (must be purchased from Accelerated Payment Technologies) • VeriFone SC5000 (for use with Canadian processors only) • VeriFone Vx 810 (for use with Canadian processors only)
Supported PIN Pad Devices with integrated MSRs and signature capture devices:
• Magtek IPAD SC (must be purchased from Accelerated Payment Technologies) • HHP 3100 • HHP TT8500 • HHP TT8501 • HHP TT8810 • Ingenico 6550 • Ingenico 6780 • VeriFone MX 800 series
Supported Check Scanner Devices:
• Magtek MICR scanner • RDM check image scanner
Dialup modem for backup (not supported by XWeb, XGift or Concord):
• US Robotics Serial Modem (5686e) USB-Serial adapter for modem and some PIN pads:
• ATEN USB-Serial adapter Printers:
• 40-column receipt/report printers (XCharge formats receipts for this size): virtually any printer that can be installed and used within Windows should work, but the DYMO LabelWriter 450 Turbo is recommended.
• 8.5" x 11" report printers (XCharge prints reports for this size by default): virtually any printer that can be installed and used within Windows should work for XCharge Reports and Receipts, but Receipts will be formatted for smaller (40-column) printers.
Updated July 2, 2013 XCharge 7.2 Release 1 Help Page 128 of 168
XWEB RESPONSE CODES These tables list the Response Codes that may be returned when processing with the Credit Card Processor configured to XWeb. The XCharge Error Codes are returned for unsuccessful transactions caused by a connection or account configuration issue. The XWeb Response Codes are sent from the XWeb gateway to XCharge and may appear on the XCharge Reports. These response codes may also appear on your screen in XCharge or your Business Management Software (BMS).
XCharge Error Codes
Code Verbiage Description
1020 Connection Timed Out XCharge is unable to process transactions over your internet connection. Check your internet connection first. If your internet connection is down then you will receive this response until it is back up. If the internet connection is up, further troubleshooting will be needed.
1021 Could not detect a Modem
XCharge is unable to process transactions over your modem connection because a modem is not currently configured. This response may indicate that no connection settings have been configured.
1028 Unknown Error The Processing Account Terminal ID or other credentials are invalid. This response may indicate that the Processing Account is not configured correctly in XCharge or BMS, or if the Processing Account information is not valid.
1029 All Routes Bad XCharge is unable to process transactions over your modem connection. A modem is configured, but is unable to connect due to the modem or phone line setup. This response may indicate that no dial tone is available.
1722 No Extended Error Description Available
XCharge is unable to process transactions due to an internet connection failure. Your internet connection is likely working, but had an outage at some point and XCharge has not recovered. Reboot the XCharge Server PC if possible, or at least restart XCharge and the XCharge Server icon in your system tray to recover.
XWeb Response Codes
Code Verbiage Description
000 Approval The transaction was approved.
001 Decline The transaction was declined, no specific decline reason was given.
002 Call A Voice Authorization is requested. For more information on Voice Auths see Additional Information - Frequently Asked Questions.
003 Success Batch settled successfully.
004 Inquiry Batch inquiry successful.
005 Alias Success A payment account (e.g. credit card) Alias was created successfully and the number has been stored on the gateway for future use.
007 Partial Approval Transaction was approved, but not for the entire amount. This response is only possible with "Partial Approval Support" is enabled, which is mandated in many circumstances. The "Approved Amount" should be returned with the response, and the balance may need to be paid with another card or other form of tender.
008 Report Complete This is the standard response for a successful report retrieval from the XWeb gateway.

Updated July 2, 2013 XCharge 7.2 Release 1 Help Page 129 of 168
XWeb Response Codes
Code Verbiage Description
009 Auto Decline The transaction was declined due to an AVS or CSC mismatch. The AVS (Address Verification System, house number and/or ZIP code verification for keyed transactions) or CSC (Card Security Code, also known as the CVV, CVC or CID) is set to "required" for keyed transactions at the XWeb gateway, but the value(s) entered did not match the value(s) on file. The reason for the decline may be specified.
010 Invalid Expiration Date Expiration date entered is incorrect.
011 Check Submitted This is the standard response for a successful Check Sale or Check Credit transaction.
012 Check Approval This is the standard response for an approved Check Verification transaction.
013 Check Decline This is the standard response for a declined Check Verification transaction.
014 Check Warning This message can indicate that the Check Verification service is currently unavailable for the configured XCheck Processing Account. The reason for the warning may be specified.
015 Check Error This occurs when there is a physical problem with the check and the check can not be read.
016 Check Transaction Amount Limit Exceeded
The amount attempted on the Check Sale or Check Credit transaction exceeds the maximum amount configured on the XCheck Processing Account. This does not pertain to the "Maximum Charge Amount" setting in the XCharge Server Setup.
017 Check Daily Amount Limit Exceeded
The total amount of all the transactions for that day has exceeded the pre-set limit configured on the XCheck Processing Account. The amount limit can be adjusted via the DCS ACHeck21 Global Gateway.
018 Check Monthly Amount Limit Exceeded
The total amount of all the transactions for that month has exceeded the pre-set limit configured on the XCheck Processing Account. The amount limit can be adjusted via the DCS ACHeck21 Global Gateway.
019 RDFI Not Qualified To Participate
The bank on which the check was written (as indicated by the Routing Number) cannot participate in the ACH system. The most common reasons for this response are: using a test check, or the check is from an institution that is no longer in business.
020 Corporate Customer Advises Not Authorized
This response code indicates that the check is written on a corporate account and is therefore not eligible to be processed via ACH. Note that this is an ACH-only error - if an image is available, the item could be processed via Check21.
021 Check Not Previously Authorized
Indicates that the attempted check transaction cannot be completed until a successful Check Verification transaction is completed first.
022 Ineligible Transaction For ACH Network
The check that was entered can not be processed through the ACH network.
025 BIN Lookup Success Standard response for a successful BIN Lookup transaction.
800 Parsing Error Unable to parse the XML request sent.
801 Maximum Request Data Exceeded Error
The XML request exceeds the 2048-byte maximum size.
802 Duplicate Field Error The XML request had more than one copy of a particular field. The field causing the error may be specified.

Updated July 2, 2013 XCharge 7.2 Release 1 Help Page 130 of 168
XWeb Response Codes
Code Verbiage Description
803 Improper DLL Error Unrecognized DLL name. This can be caused by a wrong URL entered into the "Server Location" setting under XCharge Server Setup, Credit Cards, Connection.
804 Specification Version Error
XML error, the Specification Version field is set incorrectly.
805 Authentication Error The XWeb ID, Auth Key or Terminal ID fields are incorrect (check for leading and trailing spaces if they appear to match those on file). The field causing the error may be specified.
806 Production Merchant Set Up Error
The Mode was incorrectly sent. This can happen when trying to process on the Production server with a Development or Test Mode Processing Account.
807 Test Merchant Set Up Error
The Mode was incorrectly sent. This can happen when trying to process on the Test server with a Development or Production Mode Processing Account.
808 Development Merchant Set Up Error
The Mode was incorrectly sent. This can happen when trying to process on the Development server with a Production or Test Mode Processing Account.
809 Required Field Not Sent Error
A field that is required for this transaction type was not sent. The field causing the error may be specified.
810 Inconsistent Conditional Field Error
A field that does not have to be sent was sent in the wrong context. The field causing the error may be specified.
811 Improper Field Data Error
A field sent to the XWeb gateway was not formatted correctly. This could pertain to Processing Account Information configured in XCharge or BMS, or card information. The field causing the error may be specified.
812 Unrecognized Name / Tag Error
The XML tag sent is not in the API.
813 Duplicate Transaction Error
A transaction was run for the same amount on the same card within a certain time limit. The duplicate checking time is set on the XWeb gateway, usually between 1 and 60 minutes.
814 Invalid Reference Error The Transaction ID used for a Void, Return, etc. is invalid.
815 Transaction Already Voided
The Transaction ID used for a Void was already voided.
816 Transaction Already Captured
The Transaction ID used for a Capture of an Authorized charge was already used and the transaction has been Captured.
817 Empty Batch The batch is empty and cannot settle. You cannot settle an empty batch.
818 Merchant Locked For Settlement
The Processing Account is in the process of being settled/batched. Wait a moment and try again.
819 Merchant Locked for Maintenance
The Processing Account is locked for database or server maintenance. Wait a moment and try again.
820 Temporary Service Outage - Retry Transaction
The XWeb gateway itself may be down. Wait a moment and try again.

Updated July 2, 2013 XCharge 7.2 Release 1 Help Page 131 of 168
XWeb Response Codes
Code Verbiage Description
823 Invalid Account Data A field sent to the XWeb gateway appears invalid (correctly formatted but not on file). This could pertain to Processing Account Information configured in XCharge or BMS, or card information. The field causing the response may be specified.
824 Industry Mismatch Error
The Processing Account is configured with the incorrect Market Type. This can occur if XCharge or BMS is not configured with the same Market Type as the XWeb gateway.
828 Card Type Not Supported
The card type (Visa, MasterCard, American Express, etc.) for the attempted transaction is not enabled at the XWeb gateway.
829 Card Code Required The Card Security Code (CSC, also known as the CVV, CVC or CID) is set to "required" for keyed transactions at the XWeb gateway, but was not sent.
830 Address Required The address (house number, part of the Address Verification System) is set to "required" for keyed transactions at the XWeb gateway, but was not sent.
831 ZIP Code Required The ZIP code (part of the Address Verification System) is set to "required" for keyed transactions at the XWeb gateway, but was not sent.
832 Encoded Data Format Error
Encoded format of check image file could not be read or was not submitted when expected.
833 Check Services Image Error - MICR and Amount cannot be read
The attempted paper check scan failed. When this occurs you should have the option to manually enter the check information or rescan the check.
834 Check Services Image Error - MICR cannot be read
The attempted paper check scan failed. When this occurs you should have the option to manually enter the check information or rescan the check.
835 Check Services Image Error - Amount cannot be read
The attempted paper check scan failed. When this occurs you should have the option to manually enter the check information or rescan the check.
900 TSYS Error Error thrown by Processor TSYS: XWeb is setup correctly, but the card or other value submitted is incorrect. SERV NOT ALLOWED usually indicates a Decline, Failure CV indicates the Card Type is not supported (e.g. AMEX needs to be enabled), and Failure HV indicates an error on the account setup in XWeb.
901 Processor Error Can be Global or TSYS errors (900 Global Payments Error: or 900 TSYS Error:) are returned on transactions if a processor setting is not configured correctly. This can occur if the card or transaction type is not enabled on the Processing Account at the processor end.
903 DCS Error These errors are returned on transactions if a processor setting is not configured correctly. This can occur if the transaction type is not enabled on the XCheck Processing Account at the processor end. The reason for the error may be specified (e.g. NoValidationActionsSetup for Check Verification).

Updated July 2, 2013 XCharge 7.2 Release 1 Help Page 132 of 168
GIFT CARD RESPONSE CODES These response codes are sent from the Gift Card Processor to XCharge and will appear on the XCharge Gift Transaction Detail Report.
Gift Card Response Codes
Code Verbiage Description
0000 Gift Card Balance The Balance Inquiry transaction completed successfully.
0007 Field edit error(s) Indicates one or more of the following edit failures. Specific field errors are noted by an "E" in the associated field flag.
0008 Unrecognized client, store, or terminal.
Used to indicate that the specified client, store, or terminal is not supported.
0011 Error in processing - try again. Used to report a general processing error.
0014 Account number not found. Used to define that the input account is either not in the system, is not yet activated or is not a legal value.
0015 Illegal Account number Used to define that the input account is either not in the system, is not yet activated or is not a legal value.
0019 Unrecognized store Used to indicate that the specified store is not supported.
0025 Unrecognized terminal Used to indicate that the specified terminal is not supported.
0041 Amount out of limit Used to specify that the amount given is outside defined limits.
0042 Amount incorrect Used to define the specified amount for a pre-denominated account is incorrect or if there is not enough balance available for adjustment.
0043 Incorrect transaction Used to indicate that the transaction can not be voided.
0044 Can not Void Specified transaction can no longer be voided.
0045 Approved Used to signify that the previous transaction was successfully processed.
0046 Approved with additional balance. Used to signify that the previous transaction approved with additional balance available.
0047 Approved with at least one of the multiple account numbers rejected.
Used to signify that the previous transaction approved but at least one (but not all) account number was not accepted.
0048 Approved multiple issuance Used to signify that the multiple issuance was accepted but actual issuance to the accounts is being done as a background operation with results to be reported on batch closeout reply.
0049 Duplicate transmission A duplicate record was received.
0050 Illegal Redemption Method The specified redemption method is not recognized.

Updated July 2, 2013 XCharge 7.2 Release 1 Help Page 133 of 168
XCHECK STANDARD ENTRY CLASS CODES XCheck provides the ability to process checks through multiple networks using multiple Standard Entry Class (SEC) codes. The different SEC codes (also referred to as "Check Types" within XCharge) define the type of check used, how the check information is presented, and other details of the transaction. Two tables are provided below for details on SEC "Definitions, Requirements and Merchant Responsibilities" and "Transaction Capabilities" regarding check processing.
Definitions, Requirements & Merchant Responsibilities by SEC
SEC Description Authorization Requirements & Merchant Responsibilities
Accounts Receivable: used to process a one-time electronic Check Sale from a paper consumer check received via the mail or a drop box. • A check reading device must be
used to capture the routing number, account number and serial number from the paper check.
• Specific verbiage must be posted and provided to the customer notifying that their check may be converted to an electronic payment.
• The difference between ARC and POP is that ARC can result from a mailed check whereas POP is in-person.
• The Check Sale amount must be $25,000.00 or less.
• Checks with an "On-Us" field are processed via Check21 (as opposed to ACH).
• The merchant must provide notice to the customer with the following (or substantially similar) verbiage: o "When you (the customer) provide a check as payment, you
authorize us either to use information from your check to make a one-time electronic funds transfer from your account or to process the payment as a check transaction."
• Must use a scanner to read check info, hand entering information is allowed for corrections only.
• A scanned copy of the check must be retained for two years. o Must be able to present this copy within 10 Banking Days of
request from the ODFI. o The XCheck processor will store a copy of each image
submitted by a merchant. To produce a scanned copy of a check, if needed, contact Accelerated Payment Technologies.
• Must provide a clearly stated option for a customer to opt-out of the Check Sale. o If a customer opts out, the check no longer authorizes
payment. • If processed electronically as an ARC entry, the merchant must
not present the paper check for payment.
NOTE:
A properly configured Check Scanner or MICR reader device supported by XCharge is necessary to process paper check conversions. For information on configuring your Check Scanner device, refer to XCharge Setup - General Options. About Accelerated Intelligent Routing (AIR): for merchants using a Check Scanner for conversion of paper checks, transactions will be routed to the Check21 network if they do not qualify for submission via the ACH network. This maximizes the acceptance of checks for electronic processing. Check21 requires a scanned image. If you are using MICR readers at point of sale, those transactions will be routed as ACH only - they will not qualify for Check21.

Updated July 2, 2013 XCharge 7.2 Release 1 Help Page 134 of 168
XCHECK STANDARD ENTRY CLASS CODES (CONTINUED) Definitions, Requirements & Merchant Responsibilities by SEC (continued)
SEC Description Authorization Requirements & Merchant Responsibilities
Back Office Conversion: used to process a one-time electronic Check Sale from a paper consumer check presented in person, but not for immediate processing. • A check reading device must be used to capture
the routing number, account number and serial number from the paper check.
• Specific verbiage must be posted and provided to the customer notifying that their check may be converted to an electronic payment.
• Unlike ARC entries, a BOC requires the customer to be present. Unlike POP entries, a BOC is not processed while the customer is present.
• The check must be completed and signed by customer.
• The Check Sale amount must be $25,000.00 or less.
• Checks with an "On-Us" field are processed via Check21 (as opposed to ACH).
• The merchant must provide notice to the customer with the following (or substantially similar) verbiage: o "When you (the customer) provide a check as
payment, you authorize us either to use information from your check to make a one-time electronic funds transfer from your account or to process the payment as a check transaction."
• Must use a scanner to read check info, hand entering information is allowed for corrections only.
• A scanned copy of the check must be retained for two years. o Must be able to present this copy within 10
Banking Days of request from the ODFI. o The XCheck processor will store a copy of each
image submitted by a merchant. To produce a scanned copy of a check, if needed, contact Accelerated Payment Technologies.
• If processed electronically as a BOC entry, the merchant must not present the paper check for payment.
Point of Purchase: used to process a one-time electronic Check Sale from a paper consumer check presented in person. • A check reading device must be used to capture
the routing number, account number and serial number from the paper check.
• Specific verbiage must be posted and provided to the customer notifying that their check may be converted to an electronic payment.
• The customer must sign a receipt once the Check Sale is completed. o The paper check is then voided and
returned to the customer. • The Check Sale amount must be $25,000.00 or
less. • Checks with an "On-Us" field are processed via
Check21 (as opposed to ACH).
• The merchant must provide notice to the customer with the following (or substantially similar) verbiage: o "When you (the customer) provide a check as
payment, you authorize us either to use information from your check to make a one-time electronic funds transfer from your account or to process the payment as a check transaction."
• Must use a scanner to read check info, hand entering information is allowed for corrections only.
• A scanned copy of the check must be retained for two years. o Must be able to present this copy within 10
Banking Days of request from the ODFI. o The XCheck processor will store a copy of each
image submitted by a merchant. To produce a scanned copy of a check, if needed, contact Accelerated Payment Technologies.
• The scanned and “Voided” check is returned to the customer.
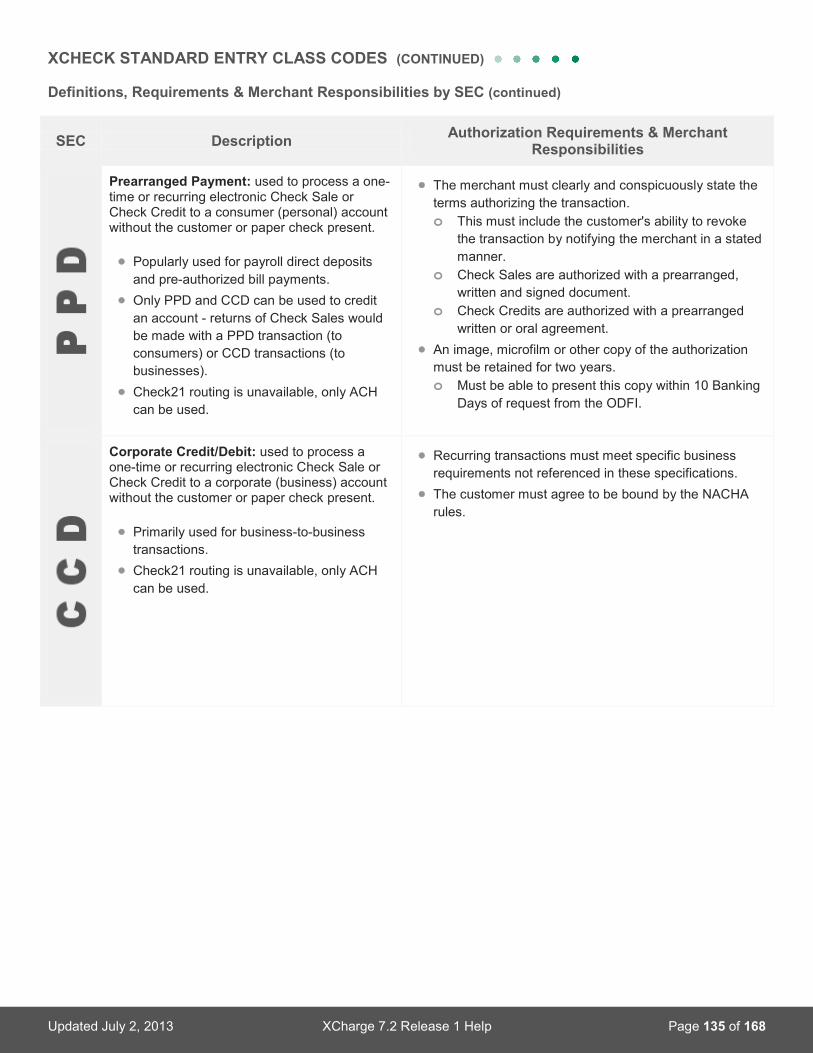
Updated July 2, 2013 XCharge 7.2 Release 1 Help Page 135 of 168
XCHECK STANDARD ENTRY CLASS CODES (CONTINUED) Definitions, Requirements & Merchant Responsibilities by SEC (continued)
SEC Description Authorization Requirements & Merchant Responsibilities
Prearranged Payment: used to process a one-time or recurring electronic Check Sale or Check Credit to a consumer (personal) account without the customer or paper check present. • Popularly used for payroll direct deposits
and pre-authorized bill payments. • Only PPD and CCD can be used to credit
an account - returns of Check Sales would be made with a PPD transaction (to consumers) or CCD transactions (to businesses).
• Check21 routing is unavailable, only ACH can be used.
• The merchant must clearly and conspicuously state the terms authorizing the transaction. o This must include the customer's ability to revoke
the transaction by notifying the merchant in a stated manner.
o Check Sales are authorized with a prearranged, written and signed document.
o Check Credits are authorized with a prearranged written or oral agreement.
• An image, microfilm or other copy of the authorization must be retained for two years. o Must be able to present this copy within 10 Banking
Days of request from the ODFI.
Corporate Credit/Debit: used to process a one-time or recurring electronic Check Sale or Check Credit to a corporate (business) account without the customer or paper check present. • Primarily used for business-to-business
transactions. • Check21 routing is unavailable, only ACH
can be used.
• Recurring transactions must meet specific business requirements not referenced in these specifications.
• The customer must agree to be bound by the NACHA rules.
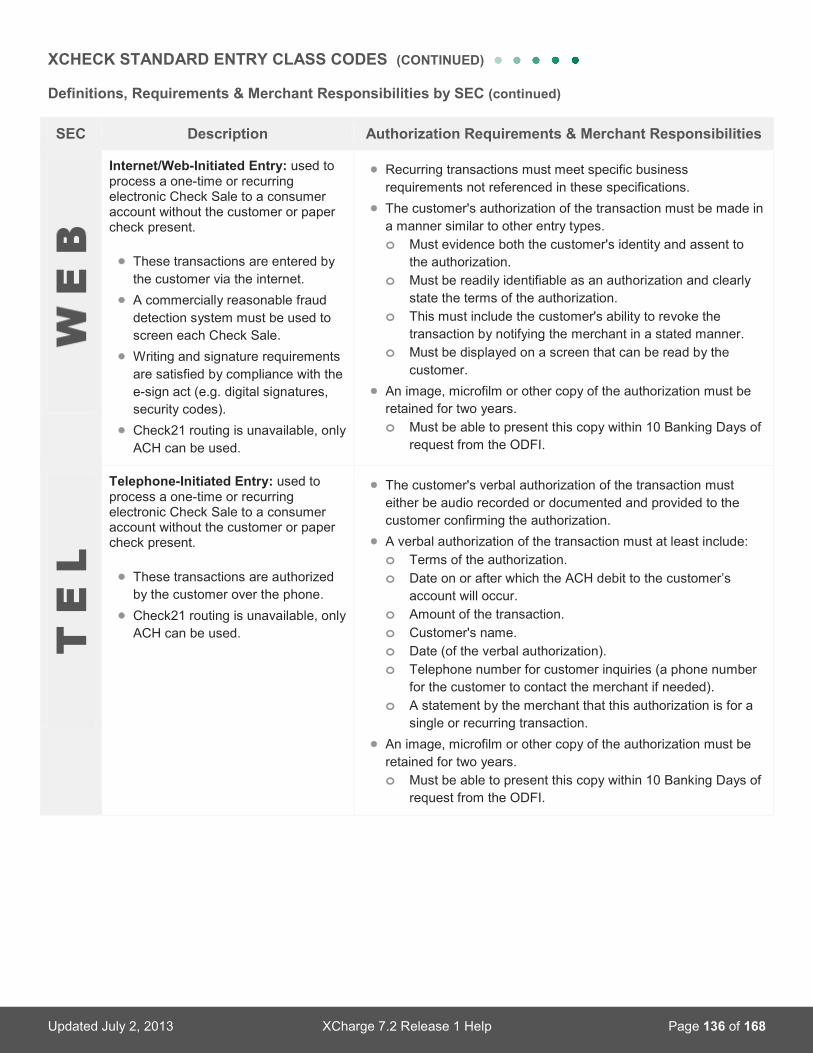
Updated July 2, 2013 XCharge 7.2 Release 1 Help Page 136 of 168
XCHECK STANDARD ENTRY CLASS CODES (CONTINUED) Definitions, Requirements & Merchant Responsibilities by SEC (continued)
SEC Description Authorization Requirements & Merchant Responsibilities
Internet/Web-Initiated Entry: used to process a one-time or recurring electronic Check Sale to a consumer account without the customer or paper check present. • These transactions are entered by
the customer via the internet. • A commercially reasonable fraud
detection system must be used to screen each Check Sale.
• Writing and signature requirements are satisfied by compliance with the e-sign act (e.g. digital signatures, security codes).
• Check21 routing is unavailable, only ACH can be used.
• Recurring transactions must meet specific business requirements not referenced in these specifications.
• The customer's authorization of the transaction must be made in a manner similar to other entry types. o Must evidence both the customer's identity and assent to
the authorization. o Must be readily identifiable as an authorization and clearly
state the terms of the authorization. o This must include the customer's ability to revoke the
transaction by notifying the merchant in a stated manner. o Must be displayed on a screen that can be read by the
customer. • An image, microfilm or other copy of the authorization must be
retained for two years. o Must be able to present this copy within 10 Banking Days of
request from the ODFI.
Telephone-Initiated Entry: used to process a one-time or recurring electronic Check Sale to a consumer account without the customer or paper check present. • These transactions are authorized
by the customer over the phone. • Check21 routing is unavailable, only
ACH can be used.
• The customer's verbal authorization of the transaction must either be audio recorded or documented and provided to the customer confirming the authorization.
• A verbal authorization of the transaction must at least include: o Terms of the authorization. o Date on or after which the ACH debit to the customer’s
account will occur. o Amount of the transaction. o Customer's name. o Date (of the verbal authorization). o Telephone number for customer inquiries (a phone number
for the customer to contact the merchant if needed). o A statement by the merchant that this authorization is for a
single or recurring transaction. • An image, microfilm or other copy of the authorization must be
retained for two years. o Must be able to present this copy within 10 Banking Days of
request from the ODFI.

Updated July 2, 2013 XCharge 7.2 Release 1 Help Page 137 of 168
XCHECK STANDARD ENTRY CLASS CODES (CONTINUED) Transaction Capabilities by SEC
Check Present Check Not Present
ARC BOC POP PPD CCD WEB TEL
AIR Compatible X X X
Credits Allowed X X
Recurring X X X X
Consumer X X X X X X
Business X
Mail X In-Person X X
Other Contract X X
Web-Based X Telephone X
Any cell marked with an "X" indicates that the corresponding capability (row) is supported by the SEC code (column)

Updated July 2, 2013 XCharge 7.2 Release 1 Help Page 138 of 168
AVS & CSC RESPONSE CODES AVS Response Codes The Address Verification Service (AVS) helps to prevent fraudulent activity on credit card accounts. The street address and postal code are verified against the address and postal code on file. Below is a table that explains the AVS Response Codes passed back from the payment processor.
AVS Response Codes
For U.S. Credit Cards For Non-U.S. Credit Cards
Code Description Code Description
A Match - street address only, not ZIP code. B Match - street address only, no postal code.
E Error C No match - street address and postal code.
M Match - street address and ZIP code. D Match - street address and postal code.
N No match - street address and ZIP code. F Match - street address and postal code (UK only).
R Retry, system unavailable or timed out. G Global Unavailable
S Service not supported. I International Unavailable
U AVS Unavailable M Match - street address and postal code.
W Match - 9-digit ZIP code, not street address. P Match - postal code only, not street address.
X Match - street address and 9-digit ZIP code.
Y Match - street address and 5-digit ZIP code.
Z Match - 5-digit ZIP code, not street address.
CSC Response Codes The Card Security Code is a 3 or 4-digit value that is located on the back of the credit card in the signature panel or, for American Express, on the front of the card on the right above the embossed card number. This numeric value – Card Verification Value for Visa, Card Verification Code for MasterCard and Card Identification Code for American Express and Discover – helps the card issuer prevent fraud and helps the merchant reduce liability.
CSC Response Codes for All Credit Cards
Code Description Code Description
M Match U Unavailable
N No Match S Service Not Supported
P Not Processed X No Response

Updated July 2, 2013 XCharge 7.2 Release 1 Help Page 139 of 168
XCHARGE RELEASE NOTES
XCharge 7.2 Release 1 SP7 July 2013
Area Description
Security, Enhancement • XCharge now uses XWeb to process BIN lookups when the processor is set to XWeb, instead of relying on a local BIN database. This enables the ability to use encrypted card readers with FSA and other card types that were not previously available.
• XCharge has been updated to use the XWeb 3.5 API. • The XCharge Remove Desktop Support Help menu item has been updated to
connect to support.x-charge.com.
XCharge Client, Enhancement • The Check Name on Account field is now available for use within the XCharge Client.
XCharge Server, Enhancement • Removed the test fleet options from XCharge.
XCharge Installation, Enhancement • XWeb is now selected as the default processor when XCharge is initially installed.
Reports, Enhancement • The Store Name field configured for XCharge receipts is now displayed on Item Reports.
XpressLink Integration, Enhancement • The Check Name on Account field is now available for use with the XpressLink API.
• Added new transaction type DEBITORCREDITPURCHASE. This transaction type will prompt the user to swipe a payment card, and then automatically determine if the swiped card is capable of being processed as a credit card (signature) transaction, a debit card (PIN) transaction, or both. This transaction type eliminates the need to determine whether a credit or debit transaction should be selected when accepting a payment.
Other Integration, Enhancement • The Check Name on Account field is now available for use with the XCT2 and XCTN APIs.
XCharge Client, Bug Fix • Updated the XCharge Client to suppress the signature prompt for any PIN-entry or check transactions.
• Fixed initial XCharge receipts to display a negative amount for any return transactions, as already displayed on reprinted receipts.
XCharge Server, Bug Fix • Removed the null option from the "Default Sale or Authorization Entry Type" menu on the XCheck Setup window.
• It is no longer possible to save the XCheck Setup window options if the "Default Sale..." or "Default Credit Entry Type" selected is not also enabled as a Supported Check Entry Type.
XCharge Installation, Bug Fix • Fixed the XCharge installer for Windows 8 so .NET 2.0 is no longer needed, and a prompt to install .NET 3.5 is provided if needed.
XpressLink Integration, Bug Fix • Fixed issue preventing archive vault add transactions from completing when using the MagTek IPAD with the "no keyboard entry" option enabled.

Updated July 2, 2013 XCharge 7.2 Release 1 Help Page 140 of 168
XCharge 7.2 Release 1 SP7 July 2013
Area Description
Other Integration, Bug Fix • Fixed issue causing XCharge to return "Invalid Credit Card #" when processing transactions via XCTransaction2 while the XCharge Server is running as a service.
XCharge 7.2 Release 1 SP6a May 2013
Area Description
PINPad, Bug Fix • Fixed issue causing the MagTek IPAD PIN Data Block and PIN Key Block values to be transposed in the PPD library response.
• Fixed issue preventing the MagTek IPAD SC to reset after a bad swipe.
XpressLink Integration, Bug Fix • Fixed issue preventing results to be returned for credit card pre-authorization transactions processed via XpressLink DLL when the duplicate card prompt is displayed.
7.2 Release 1 SP6 January 2013
Area Description
XCharge Client, Enhancement • Added ability to prompt for and save signatures for Credit Card Force transactions where no Pre-Authorization is detected (Voice Authorizations).
PINPad, Enhancement • Added 64-bit OS support for USB models of the VeriFone 1000 PIN Pad. • Added the new XCharge.Common library to consolidate card data handling
and validation. • Added the new PINPadDevice2.dll .NET library.
XCharge Client, Bug Fix • Fixed issue preventing XCharge from reading data from the MagTek IPAD KBE correctly when the option to prevent keyboard entry is enabled.
XCharge Server, Bug Fix • XCharge now rejects bad card data where one track is valid and the other is not.
XCharge Installation, Bug Fix • Added SQLite3.dll back into the XCharge installers.
Other Integration, Bug Fix • Fixed issue causing transactions submitted via XCT2 to be rejected if TotalAmount is blank.
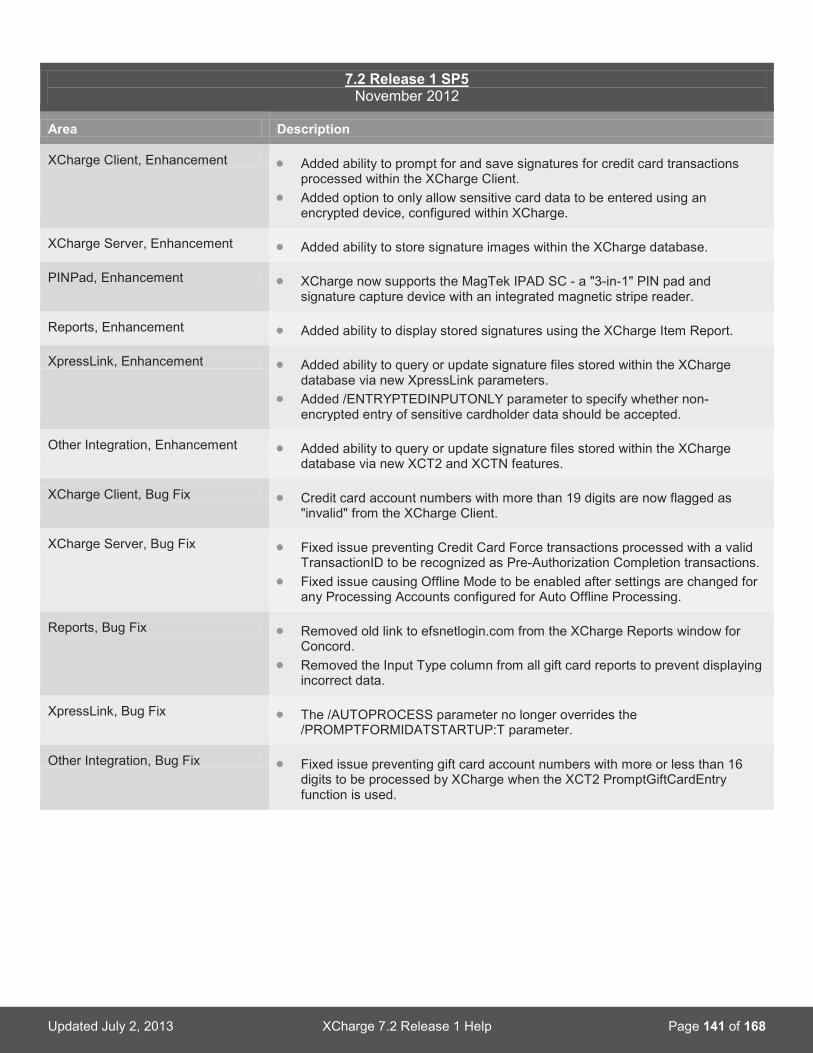
Updated July 2, 2013 XCharge 7.2 Release 1 Help Page 141 of 168
7.2 Release 1 SP5 November 2012
Area Description
XCharge Client, Enhancement • Added ability to prompt for and save signatures for credit card transactions processed within the XCharge Client.
• Added option to only allow sensitive card data to be entered using an encrypted device, configured within XCharge.
XCharge Server, Enhancement • Added ability to store signature images within the XCharge database.
PINPad, Enhancement • XCharge now supports the MagTek IPAD SC - a "3-in-1" PIN pad and signature capture device with an integrated magnetic stripe reader.
Reports, Enhancement • Added ability to display stored signatures using the XCharge Item Report.
XpressLink, Enhancement • Added ability to query or update signature files stored within the XCharge database via new XpressLink parameters.
• Added /ENTRYPTEDINPUTONLY parameter to specify whether non-encrypted entry of sensitive cardholder data should be accepted.
Other Integration, Enhancement • Added ability to query or update signature files stored within the XCharge database via new XCT2 and XCTN features.
XCharge Client, Bug Fix • Credit card account numbers with more than 19 digits are now flagged as "invalid" from the XCharge Client.
XCharge Server, Bug Fix • Fixed issue preventing Credit Card Force transactions processed with a valid TransactionID to be recognized as Pre-Authorization Completion transactions.
• Fixed issue causing Offline Mode to be enabled after settings are changed for any Processing Accounts configured for Auto Offline Processing.
Reports, Bug Fix • Removed old link to efsnetlogin.com from the XCharge Reports window for Concord.
• Removed the Input Type column from all gift card reports to prevent displaying incorrect data.
XpressLink, Bug Fix • The /AUTOPROCESS parameter no longer overrides the /PROMPTFORMIDATSTARTUP:T parameter.
Other Integration, Bug Fix • Fixed issue preventing gift card account numbers with more or less than 16 digits to be processed by XCharge when the XCT2 PromptGiftCardEntry function is used.

Updated July 2, 2013 XCharge 7.2 Release 1 Help Page 142 of 168
7.2 Release 1 SP4 September 2012
Area Description
Security, Enhancement • XCharge now saves XCTransaction2 hashes to an encrypted file so duplicate card checks can still be performed even if XCTransaction2.dll is unloaded between transactions.
XCharge Server, Enhancement • The option to "Enable file based request files" can once again be toggled from the XCharge Server interface directly, for "Locked" (non-OI) versions of XCharge only.
XCharge Client, Bug Fix • Credit Card Returns are no longer displayed on the Adjustment Item Number Lookup window (these transactions cannot be adjusted).
• XCharge payment account Aliases (XCAccountIDs) are now excluded from the "previous 10 transactions" duplicate card check.
• Gift Card Replace Account and Combine Accounts transactions no longer appear within the Item Number Lookup window when attempting to process a Gift Card Void transaction (these Gift Card transactions cannot be voided).
• The duplicate card check prompt event is now recorded in the XCClient logs.
XCharge Server, Bug Fix • The Gift Card Processor now correctly indicates "XGift" when XGift is configured within the XCharge Server.
• Fixed issue causing each validation error to appear twice in the XCharge Server log.
XCharge Installation, Bug Fix • The XCharge installer will now remove any old "X-Charge" installation entries from the Registry.
XpressLink Integration, Bug Fix • Fixed issue causing the "previous 10 transactions" duplicate card prompt to appear twice during the same transaction.
• Fixed issue causing the "Invalid Amount" prompt to appear multiple times when an invalid amount is sent via XpressLink.
Other Integration, Bug Fix • Fixed issue preventing Credit Card Voids from completing successfully using XCTransaction2 with XCharge 7.2R1SP3.
7.2 Release 1 SP3
August 2012
Area Description
XCharge Server, Bug Fix • Removed duplicate Internet Health Check status entries from the Server.log file.
XCharge Installation, Bug Fix • XCharge now installs sqlite3.dll at the beginning of the installation.
Reports, Bug Fix • Removed duplicate Internet Down status from the Outage Report.
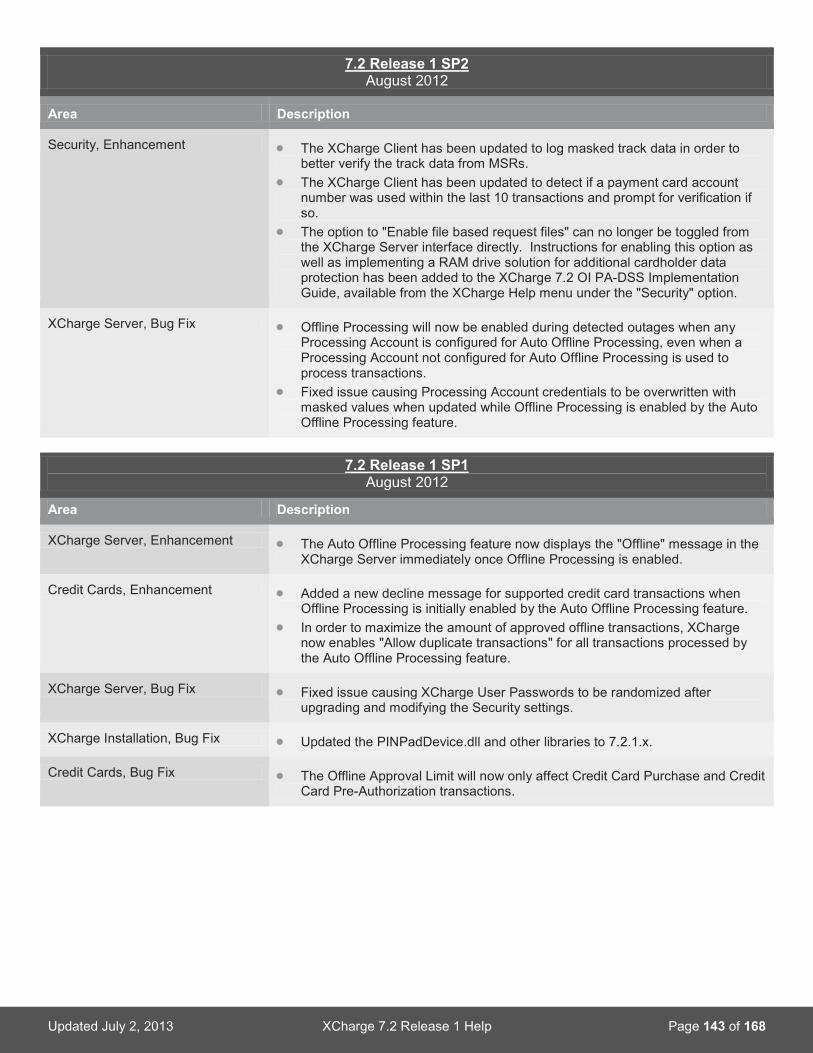
Updated July 2, 2013 XCharge 7.2 Release 1 Help Page 143 of 168
7.2 Release 1 SP2 August 2012
Area Description
Security, Enhancement • The XCharge Client has been updated to log masked track data in order to better verify the track data from MSRs.
• The XCharge Client has been updated to detect if a payment card account number was used within the last 10 transactions and prompt for verification if so.
• The option to "Enable file based request files" can no longer be toggled from the XCharge Server interface directly. Instructions for enabling this option as well as implementing a RAM drive solution for additional cardholder data protection has been added to the XCharge 7.2 OI PA-DSS Implementation Guide, available from the XCharge Help menu under the "Security" option.
XCharge Server, Bug Fix • Offline Processing will now be enabled during detected outages when any Processing Account is configured for Auto Offline Processing, even when a Processing Account not configured for Auto Offline Processing is used to process transactions.
• Fixed issue causing Processing Account credentials to be overwritten with masked values when updated while Offline Processing is enabled by the Auto Offline Processing feature.
7.2 Release 1 SP1
August 2012
Area Description
XCharge Server, Enhancement • The Auto Offline Processing feature now displays the "Offline" message in the XCharge Server immediately once Offline Processing is enabled.
Credit Cards, Enhancement • Added a new decline message for supported credit card transactions when Offline Processing is initially enabled by the Auto Offline Processing feature.
• In order to maximize the amount of approved offline transactions, XCharge now enables "Allow duplicate transactions" for all transactions processed by the Auto Offline Processing feature.
XCharge Server, Bug Fix • Fixed issue causing XCharge User Passwords to be randomized after upgrading and modifying the Security settings.
XCharge Installation, Bug Fix • Updated the PINPadDevice.dll and other libraries to 7.2.1.x.
Credit Cards, Bug Fix • The Offline Approval Limit will now only affect Credit Card Purchase and Credit Card Pre-Authorization transactions.

Updated July 2, 2013 XCharge 7.2 Release 1 Help Page 144 of 168
7.2 Release 1 July 2012
Area Description
Security, Enhancement • Added options to control access to Fleet transactions: Fleet - Purchase, Fleet - Pre-Authorization, Fleet - Force.
• Added "Auto Offline Processing" - a new feature for XWeb merchants that can detect any local or remote credit card processing connectivity issues and automatically transition from regular "online" processing to Offline Processing and back. Transactions processed while Offline Processing is enabled will be approved based on the settings configured within XCharge and automatically submitted to the processor when connectivity is restored. This enhancement includes a new configuration window, security settings, and many XCharge Client enhancements including new Reports.
• The option to automatically enable "Manual Offline Processing" for the Global Payments gateway has been removed. The ability to manually enabled Offline Processing from the XCharge Server is still available.
XCharge Client, Enhancement • The XCharge Client window will display a notification indicating that "Offline Processing is Enabled" when activated by the new Auto Offline Processing feature (XWeb only).
XCharge Server, Enhancement • Fleet transaction processing is now enabled for testing through the XWeb development gateway (Server Location).
• XCharge checks the connection between the local PC, XWeb, and other location to determine the connection "Health Status" when then new Auto Offline Processing feature is enabled (XWeb only).
Credit Cards, Enhancement • Credit Card transactions processed while Offline Processing is enabled by the Auto Offline Processing feature will initially be approved with an Approval Code beginning with "OL" to indicate this. The XCharge Transaction Lookup window will record the transaction with the real Approval Code from the card issuer, and this is what will appear on receipts reprinted from XCharge.
Fleet Cards, Enhancement • XCharge now supports the following Fleet card types: FleetOne, Fleetwide, Fuelman, GasCard (Fleetwide), MasterCard Fleet, Visa Fleet, Voyager, Wright Express.
• XCharge performs a BIN Lookup on cards for Fleet transactions, which is used to determine the Fleet processing field prompts that are presented.
• Fleet-specific fields, including Product line items, are now supported for all Fleet transaction types. The Fleet Product Amounts submitted are not validated against the Fleet transaction total amount.
• Added Fleet Product Alias Support. Within the XCharge Server Setup, it is possible to import, export and manually edit a list of Fleet Product Code "Aliases" to be associated with the Fleet Industry Product Codes used by XCharge and XWeb.
Reports, Enhancement • The Item Number Lookup windows now include these columns with Fleet transaction details: Fleet Prods, Fleet Driv ID, Fleet Veh ID, Fleet Odom.
• XCharge Lookup now includes these columns to track Fleet transaction details: Fleet Prods, Fleet Driv ID, Fleet Veh ID, Fleet Odom, Fleet ID No.
• XCharge Reports now include Fleet card and transaction types within the various reporting tabs.
XpressLink, Enhancement • Fleet processing is now supported through XpressLink (only), using these new /TRANSACTIONTYPE parameters: FLEETPURCHASE, FLEETPREAUTH, FLEETFORCE.
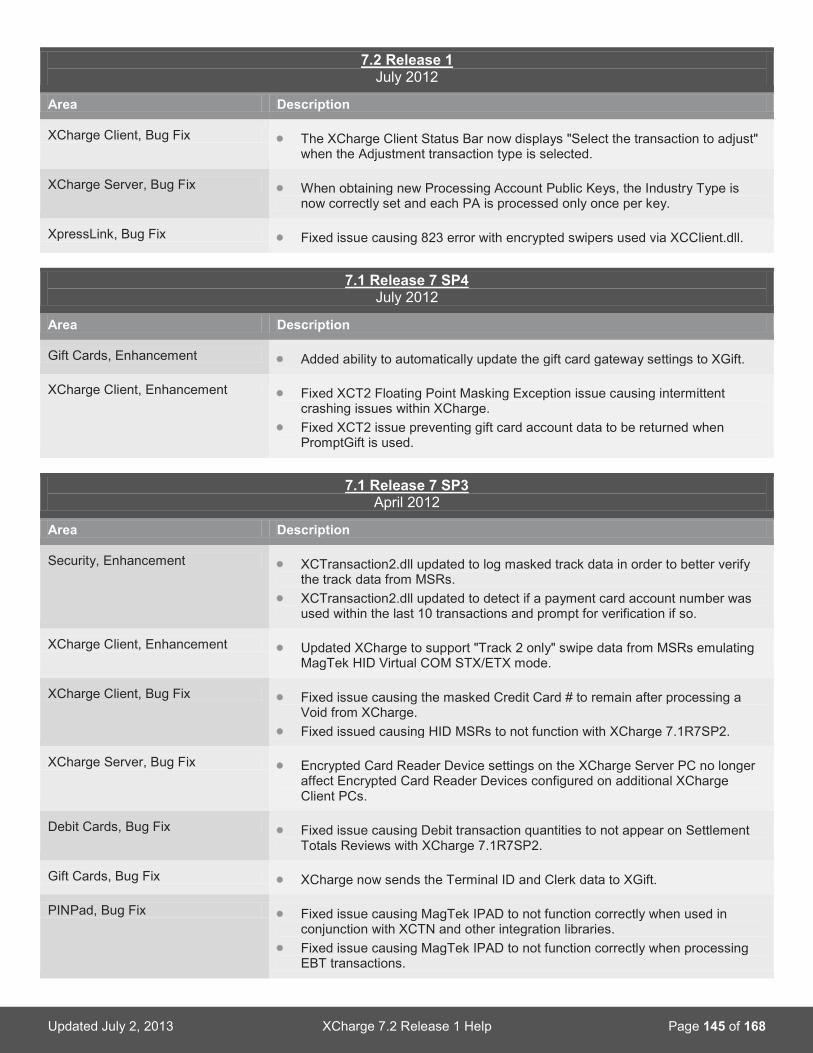
Updated July 2, 2013 XCharge 7.2 Release 1 Help Page 145 of 168
7.2 Release 1 July 2012
Area Description
XCharge Client, Bug Fix • The XCharge Client Status Bar now displays "Select the transaction to adjust" when the Adjustment transaction type is selected.
XCharge Server, Bug Fix • When obtaining new Processing Account Public Keys, the Industry Type is now correctly set and each PA is processed only once per key.
XpressLink, Bug Fix • Fixed issue causing 823 error with encrypted swipers used via XCClient.dll.
7.1 Release 7 SP4
July 2012
Area Description
Gift Cards, Enhancement • Added ability to automatically update the gift card gateway settings to XGift.
XCharge Client, Enhancement • Fixed XCT2 Floating Point Masking Exception issue causing intermittent crashing issues within XCharge.
• Fixed XCT2 issue preventing gift card account data to be returned when PromptGift is used.
7.1 Release 7 SP3
April 2012
Area Description
Security, Enhancement • XCTransaction2.dll updated to log masked track data in order to better verify the track data from MSRs.
• XCTransaction2.dll updated to detect if a payment card account number was used within the last 10 transactions and prompt for verification if so.
XCharge Client, Enhancement • Updated XCharge to support "Track 2 only" swipe data from MSRs emulating MagTek HID Virtual COM STX/ETX mode.
XCharge Client, Bug Fix • Fixed issue causing the masked Credit Card # to remain after processing a Void from XCharge.
• Fixed issued causing HID MSRs to not function with XCharge 7.1R7SP2.
XCharge Server, Bug Fix • Encrypted Card Reader Device settings on the XCharge Server PC no longer affect Encrypted Card Reader Devices configured on additional XCharge Client PCs.
Debit Cards, Bug Fix • Fixed issue causing Debit transaction quantities to not appear on Settlement Totals Reviews with XCharge 7.1R7SP2.
Gift Cards, Bug Fix • XCharge now sends the Terminal ID and Clerk data to XGift.
PINPad, Bug Fix • Fixed issue causing MagTek IPAD to not function correctly when used in conjunction with XCTN and other integration libraries.
• Fixed issue causing MagTek IPAD to not function correctly when processing EBT transactions.

Updated July 2, 2013 XCharge 7.2 Release 1 Help Page 146 of 168
7.1 Release 7 SP3 April 2012
Area Description
XpressLink, Bug Fix • Fixed issue causing 823 error with encrypted swipers used via XCClient.dll.
Other Integration, Bug Fix • Fixed XCTransaction2 issue causing EBT Cash Benefit Approvals to be returned as an error message.
7.1 Release 7 SP2
December 2011
Area Description
Security, Enhancement • The XCharge Server now restricts the values that can be entered into the XWeb "Server Location" and Global Payments "Primary/Secondary URL" fields.
XCharge Client, Bug Fix • Fixed issue from 7.1R7 causing voided transactions to appear in the Item Number Lookup window without red/strikethrough formatting.
• Fixed issue from 7.1R7 with filtering the Item Number Lookup window by the selected Processing Account Name.
XCharge Server, Bug Fix • The "Cannot focus a disabled or invisible window" message is no longer displayed when an invalid Backup folder is configured in the XCharge Server.
Reports, Bug Fix • Fixed issue where transactions processed in XCharge version 7.1R3 failed to load in the Reports after upgrading. This fix will restore the older Reports.
• Fixed issue from 7.1R7SP1 causing XCharge Client installations (as opposed to Server installations) to display transactions from more than the selected Processing Account Name in the Reports.
• Fixed issue from 7.1R7SP1 causing Reports printed from the "Scheduled Report Printing" to print without transaction data.
XpressLink, Bug Fix • Fixed issue causing ARCHIVEVAULTQUERY transactions to return "809 Required Field Not Sent Error: Industry" in some circumstances.
• Fixed issue causing Void transactions sent via XpressLink with the Transaction ID to fail with an 824 Industry error.
Other Integration, Bug Fix • Fixed issue from 7.1R7SP1 causing transactions sent from POS to XCharge without a Processing Account Name specified to be processed under the default Processing Account.
7.1 Release 7 SP1 September 2011
Area Description
Gift Cards, Enhancement • Added new Gift Card processing log to the "Common Files Folder"\DM folder.
XpressLink, Enhancement • Added a "Transaction not completed - X-Charge is already running" response for XpressLink DLL and EXE to indicate when XpressLink cannot launch due to another instance already running.

Updated July 2, 2013 XCharge 7.2 Release 1 Help Page 147 of 168
7.1 Release 7 SP1 September 2011
Area Description
Gift Cards, Bug Fix • Fixed issue causing Gift Card Replace transactions to submit the same values for the Old and New Account numbers.
• Restored ability to void Gift Card transactions from the Item Number Lookup window on XCharge Client workstations.
EBT Cards, Bug Fix • When processing an EBT Sale transaction from XCharge or XpressLink, the '" is not a valid floating point value' error message is no longer returned on successful transactions.
PINPad Device, Bug Fix • The PIN Pad Device options group box no longer shifts when "Verifone PINPad 1000" is selected on the Debit PIN Pad Setup window.
Reports, Bug Fix • Fixed issue causing transactions from XWeb accounts sharing the same XWeb ID to appear with the wrong grouping in the "CC Totals by Processing Account" report.
• Updated the "CC Totals by Processing Account" printed report name from "CC Totals by MID."
• The XCharge Transaction Detail Report no longer prints with the Processing Account Names next to the transactions.
XpressLink, Bug Fix • The /SMARTAUTOPROCESS XpressLink parameter now works for EBT Return transactions.
• Fixed typo on the "Archive Check Vault - Delete" XpressLink window.
7.1 Release 7 August 2011
Area Description
Security, Enhancement • Added support for encrypted card reader devices.
Debit Cards, Enhancement • Added support for Partial Approvals on Debit Purchase transactions.
XCharge Integration, Enhancement • Added support for Check Status Query and Return Check Reports through the XpressLink, XCTransaction2 and XCTransaction.NET integration methods.
XCharge Client, Bug Fix • The "Credit Card #" and Gift Card "Account #" fields are now locked and "grayed out" when processing a Void from XCharge.
• Gift Cards or Canadian Debit Cards mistakenly swiped into a Credit Card or EBT field using a Keyboard Emulation MSR are now parsed and masked even though they are invalid for these transaction types.
• Entering a Port number outside of the accepted range when configuring the XCharge Client Settings will now produce a specific error indicating the issue.
• Updated the error message produced when attempting to settle an empty batch with Global Payments. The updated message is "Empty Batch. Inv Bal/Setl."

Updated July 2, 2013 XCharge 7.2 Release 1 Help Page 148 of 168
7.1 Release 7 August 2011
Area Description
XCharge Server, Bug Fix • Processing Account Names are now stored without case-sensitivity in order to prevent "Invalid Processing Account" errors based on using the wrong case.
• The XCharge Server now warns that the "Local and Remote XCharge Clients must restart for changes to take effect" when the Global Payments "Settlement Type" is changed.
• XWeb Conversions will now complete successfully when converting Retail Processing Accounts where transactions were processed as "MOTO."
XCharge Installation, Bug Fix • Revised the warning message displayed during installation when XCharge detects Terminal Services to include a reference to "Install Application on Terminal Server" for Server 2008.
Gift Cards, Bug Fix • Replaced all references to "Datamark" with "ProfitPoint."
Reports, Bug Fix • The duplicate "Discover" entries have been removed from the XCharge Transaction Totals Report.
XPressLink, Bug Fix • XCharge will now process "/TRANSACTIONTYPE:REVERSAL" as Voids when the Credit Card Processor is set to XWeb in order to fix the "Decline: Reversal transaction not supported by X-Web" error.
• The /LOCKTRANTYPE parameter now works with the new XCharge Client transaction menus.
XCTransaction.NET Integration, Bug Fix
• Fixed issue causing "Invalid Approval Code" to be returned when Credit Cards are swiped into the CreditCardForceDialog.
7.1 Release 6 SP2
June 2011
Area Description
Security, Enhancement • The Processing Account Name is now used instead of the Global Payments Terminal ID when processing Credit Card Adjustment or Credit Card Void transactions from the XCharge Client.
Documentation, Enhancement • Appendix B - "XWeb Response Codes" expanded to include XCheck-related results and others.
• Appendix E - "XCheck Entry Types" Transaction Capabilities by Entry Type table expanded to note transactions authorized by "Other Contract."
XCharge Client, Bug Fix • Removed the ability to configure Global Payments Check Verification transactions from XCharge Client Setup unless Global Payments is the defined Credit Card Processor.
• Updated references to "Merchant ID" for accuracy and clarity. "Processing Account" is used for most references to Processing Account Information such as Merchant IDs, Terminal IDs, etc. Updated references to "Processing Account" in the XCharge Client, Setup and Reports windows.
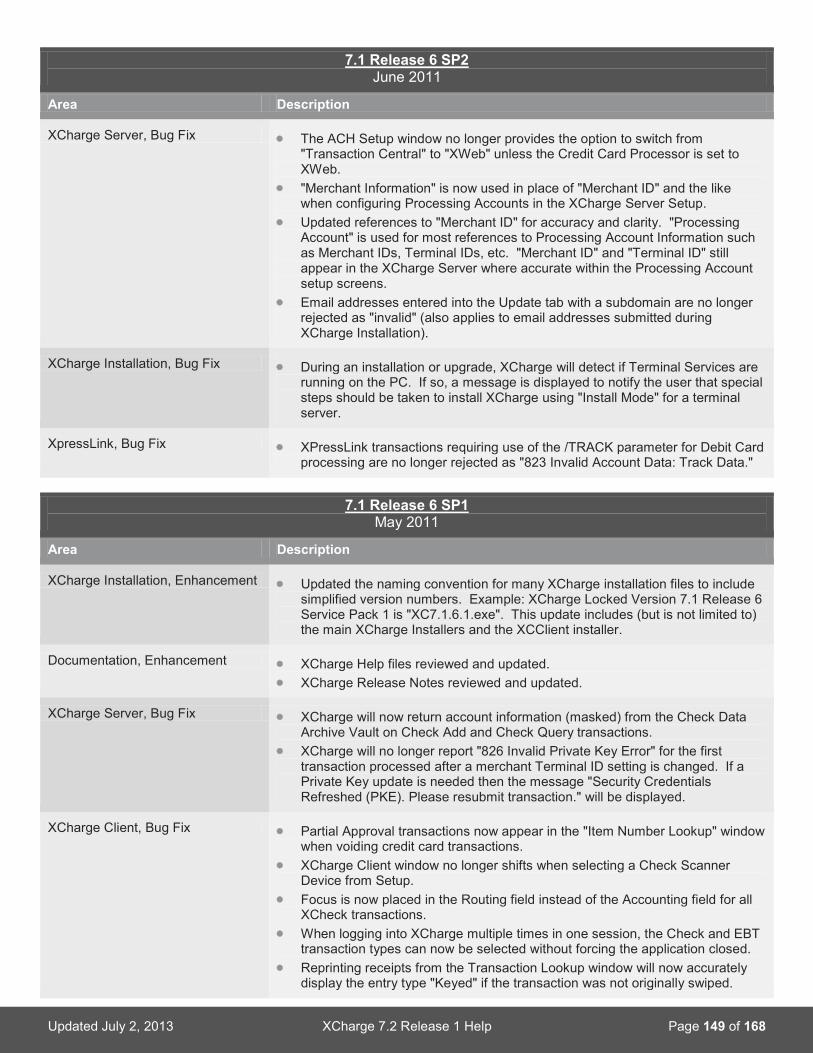
Updated July 2, 2013 XCharge 7.2 Release 1 Help Page 149 of 168
7.1 Release 6 SP2 June 2011
Area Description
XCharge Server, Bug Fix • The ACH Setup window no longer provides the option to switch from "Transaction Central" to "XWeb" unless the Credit Card Processor is set to XWeb.
• "Merchant Information" is now used in place of "Merchant ID" and the like when configuring Processing Accounts in the XCharge Server Setup.
• Updated references to "Merchant ID" for accuracy and clarity. "Processing Account" is used for most references to Processing Account Information such as Merchant IDs, Terminal IDs, etc. "Merchant ID" and "Terminal ID" still appear in the XCharge Server where accurate within the Processing Account setup screens.
• Email addresses entered into the Update tab with a subdomain are no longer rejected as "invalid" (also applies to email addresses submitted during XCharge Installation).
XCharge Installation, Bug Fix • During an installation or upgrade, XCharge will detect if Terminal Services are running on the PC. If so, a message is displayed to notify the user that special steps should be taken to install XCharge using "Install Mode" for a terminal server.
XpressLink, Bug Fix • XPressLink transactions requiring use of the /TRACK parameter for Debit Card processing are no longer rejected as "823 Invalid Account Data: Track Data."
7.1 Release 6 SP1
May 2011
Area Description
XCharge Installation, Enhancement • Updated the naming convention for many XCharge installation files to include simplified version numbers. Example: XCharge Locked Version 7.1 Release 6 Service Pack 1 is "XC7.1.6.1.exe". This update includes (but is not limited to) the main XCharge Installers and the XCClient installer.
Documentation, Enhancement • XCharge Help files reviewed and updated. • XCharge Release Notes reviewed and updated.
XCharge Server, Bug Fix • XCharge will now return account information (masked) from the Check Data Archive Vault on Check Add and Check Query transactions.
• XCharge will no longer report "826 Invalid Private Key Error" for the first transaction processed after a merchant Terminal ID setting is changed. If a Private Key update is needed then the message "Security Credentials Refreshed (PKE). Please resubmit transaction." will be displayed.
XCharge Client, Bug Fix • Partial Approval transactions now appear in the "Item Number Lookup" window when voiding credit card transactions.
• XCharge Client window no longer shifts when selecting a Check Scanner Device from Setup.
• Focus is now placed in the Routing field instead of the Accounting field for all XCheck transactions.
• When logging into XCharge multiple times in one session, the Check and EBT transaction types can now be selected without forcing the application closed.
• Reprinting receipts from the Transaction Lookup window will now accurately display the entry type "Keyed" if the transaction was not originally swiped.

Updated July 2, 2013 XCharge 7.2 Release 1 Help Page 150 of 168
7.1 Release 6 SP1 May 2011
Area Description
XCharge Installation, Bug Fix • Updated the copy of XCClient.dll installed with XCharge to fix the path to CheckReaderHost.exe – fixes the "CheckReaderHost application not found" error.
XCTranNet2 Integration, Bug Fix • Updated the XCTranNet2.dll library to parse swipe data ending with a question mark but without a terminating carriage return for Credit Card Purchase transactions.
7.1 Release 6
April 2011
Area Description
XCharge Client, Enhancement • Updated the XCharge Client interface with new transaction menus and group headers.
• Added a new interface for setting the client colors on the Setup Display tab. • New Check Scanner setup options on XCharge Setup Devices tab. • A new window, "X-Charge File Versions", lists the version numbers of all
modules installed with XCharge. This window is available from the "About" window by choosing "File Version Information."
XCharge Server, Enhancement • Enhanced Global primary/secondary URL rollover logic to rollover under some circumstances even when a connection is made with the host and a response is received.
• New Check Services setup screen in XCharge Server Setup on the XWeb Processor Options tab.
Checks, Enhancement • Added support for new XWeb Check (XCheck) services with the following transaction types: Check Sale, Check Credit, Check Verification.
EBT Cards, Enhancement • Added EBT support with the following transaction types: EBT Sale, EBT Return, EBT Force Voucher, EBT Cash Benefit Sale.
PINPad, Enhancement • The OPOS for Ingenico installer is no longer launched from the PINPadDevice installer, dramatically reducing installation time.
• Because the PINPadDevice installer is launched by the main XCharge installer, the installation and upgrade times for XCharge are also dramatically reduced.
Reports, Enhancement • The Transaction Lookup screen now supports searching for account number by the last 4 digits.
XpressLink, Enhancement • Added the following features: /CHECKMICR, /CHECKACCOUNT, /CHECKROUTING, /CHECKNO, /CHECKFRONTIMAGEFILE, /CHECKBACKIMAGEFILE, /LOCKCHECKMICR, /LOCKCHECKACCOUNT, /LOCKCHECKROUTING, /LOCKCHECKNO, /LOCKCHECKIMAGE.
• New Transactions Types: EBTSALE, EBTCASHBENEFIT, EBTRETURN, EBTFORCE, CHECKSALE, CHECKCREDIT, CHECKVERIFY.

Updated July 2, 2013 XCharge 7.2 Release 1 Help Page 151 of 168
7.1 Release 5 SP5 March 2011
Area Description
Security, Enhancement • The alias value returned from XWeb is now masked in the IPTxRx log.
XCharge Server, Enhancement • ArchiveVaultUpdate and ArchiveVaultDelete work on local ID’s created with either XWeb processor or Global processor.
XCharge Client, Bug Fix • When a function is called, that function will finish before the program will allow it to be called again.
XCharge Server, Bug Fix • After an XWeb conversion, switching the processor back to Global will now allow Settlement when the server is set for Merchant Initiated Settlement.
• File based transactions will no longer receive Invalid Expiration Date. • Data Archive Vault allows update clearing the Improper Field Data Error.
Gift Cards, Bug Fix • Using XCTranID will no longer fail attempting gift card voids.
7.1 Release 5 SP4
February 2011
Area Description
XCharge Server, Enhancement • Added support for Global Canada Bank ID 032700. • XCharge will look up the old merchant Terminal ID after a TID-swap.
XCharge Installation, Enhancement
• Enhanced Installer to alert user if the install/upgrade is being executed without the necessary administrator rights.
XCharge Client, Bug Fix • When Prompt for Merchant ID is used, the second through the end of the list of Merchant IDs will no longer receive an "826 Private Key Error."
Reports, Bug Fix • Canadian debit cards will report as the correct card type and not only VISA. • Fixed issue with voids not totaling correctly on the CC Totals by Day report.
7.1 Release 5 SP3
December 2010
Area Description
Reports, Enhancement • XCharge now updates the database during a TID swap with the new Terminal ID so transactions processed on the old TID are still available.
Gift Cards, Enhancement • An invalid card swipe will prompt for the card swipe again.
XCharge Client, Bug Fix • If CVV2 is set to required, it is not required for Data Archive Vault entries.
XCharge Server, Bug Fix • When running Data Archive Vault Delete or Data Archive Vault Update, the Account ID will be found.
• XCharge now checks if the new TID already exists and if so does not proceed with a TID swap.

Updated July 2, 2013 XCharge 7.2 Release 1 Help Page 152 of 168
7.1 Release 5 SP3 December 2010
Area Description
Gift Cards, Bug Fix • XCharge is no longer masking gift card digits when passed to the processor. • Modem transactions are processing normally.
PINPad, Bug Fix • "Cannot focus a disabled or invisible window" when DISPLAYSIGNATURE parameter is not used has been fixed.
Reports, Bug Fix • Fixed issue causing a decimal point misplacement in Transaction Lookup for Concord merchants.
• CC Totals by Day report and CC Totals by MID report display the same information on the printed report and on the screen grid.
7.1 Release 5 SP2
December 2010
Area Description
XCharge Server, Enhancement • TID swaps available when checking for update.
XCharge Client, Bug Fix • Fixed issue causing the Old Terminal ID to be printed on XCharge receipts after a TID swap.
• The Tip line is now only printed when the tip is greater than $0.00.
Reports, Enhancement • The following fields are now correctly displaying in the Lookup screen on a client: IIAS Amount, AFD, Tip Amount, Alias.
7.1 Release 5 SP1
November 2010
Area Description
XCharge Server, Enhancement • A "Stop" button has been added to the XWeb conversion window. To resume, restart the conversion and the process will continue from where it was last stopped. Multiple stops and restarts are supported.
PCCharge Emulation Requests, Enhancement
• Added support to search for previous Purchases and perform and Adjustment.
7.1 Release 5 October 2010
Area Description
Security, Enhancement • Confirm password option was added to the security screen.
XCharge Client, Enhancement • The adjustment window now clears automatically after an adjustment transaction, regardless if the transaction was hand keyed or selected from search.
• XCharge will retrieve the public keys for the XCharge Clients even if the Client has not been started.
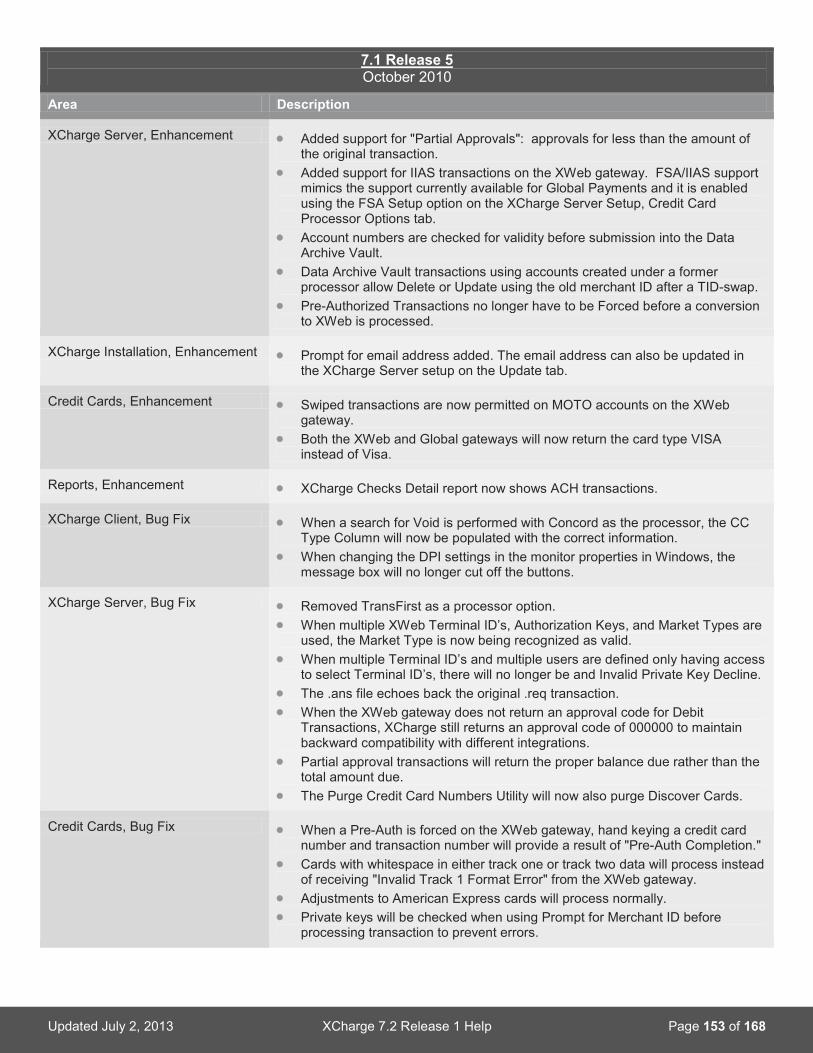
Updated July 2, 2013 XCharge 7.2 Release 1 Help Page 153 of 168
7.1 Release 5 October 2010
Area Description
XCharge Server, Enhancement • Added support for "Partial Approvals": approvals for less than the amount of the original transaction.
• Added support for IIAS transactions on the XWeb gateway. FSA/IIAS support mimics the support currently available for Global Payments and it is enabled using the FSA Setup option on the XCharge Server Setup, Credit Card Processor Options tab.
• Account numbers are checked for validity before submission into the Data Archive Vault.
• Data Archive Vault transactions using accounts created under a former processor allow Delete or Update using the old merchant ID after a TID-swap.
• Pre-Authorized Transactions no longer have to be Forced before a conversion to XWeb is processed.
XCharge Installation, Enhancement • Prompt for email address added. The email address can also be updated in the XCharge Server setup on the Update tab.
Credit Cards, Enhancement • Swiped transactions are now permitted on MOTO accounts on the XWeb gateway.
• Both the XWeb and Global gateways will now return the card type VISA instead of Visa.
Reports, Enhancement • XCharge Checks Detail report now shows ACH transactions.
XCharge Client, Bug Fix • When a search for Void is performed with Concord as the processor, the CC Type Column will now be populated with the correct information.
• When changing the DPI settings in the monitor properties in Windows, the message box will no longer cut off the buttons.
XCharge Server, Bug Fix • Removed TransFirst as a processor option. • When multiple XWeb Terminal ID’s, Authorization Keys, and Market Types are
used, the Market Type is now being recognized as valid. • When multiple Terminal ID’s and multiple users are defined only having access
to select Terminal ID’s, there will no longer be and Invalid Private Key Decline. • The .ans file echoes back the original .req transaction. • When the XWeb gateway does not return an approval code for Debit
Transactions, XCharge still returns an approval code of 000000 to maintain backward compatibility with different integrations.
• Partial approval transactions will return the proper balance due rather than the total amount due.
• The Purge Credit Card Numbers Utility will now also purge Discover Cards.
Credit Cards, Bug Fix • When a Pre-Auth is forced on the XWeb gateway, hand keying a credit card number and transaction number will provide a result of "Pre-Auth Completion."
• Cards with whitespace in either track one or track two data will process instead of receiving "Invalid Track 1 Format Error" from the XWeb gateway.
• Adjustments to American Express cards will process normally. • Private keys will be checked when using Prompt for Merchant ID before
processing transaction to prevent errors.
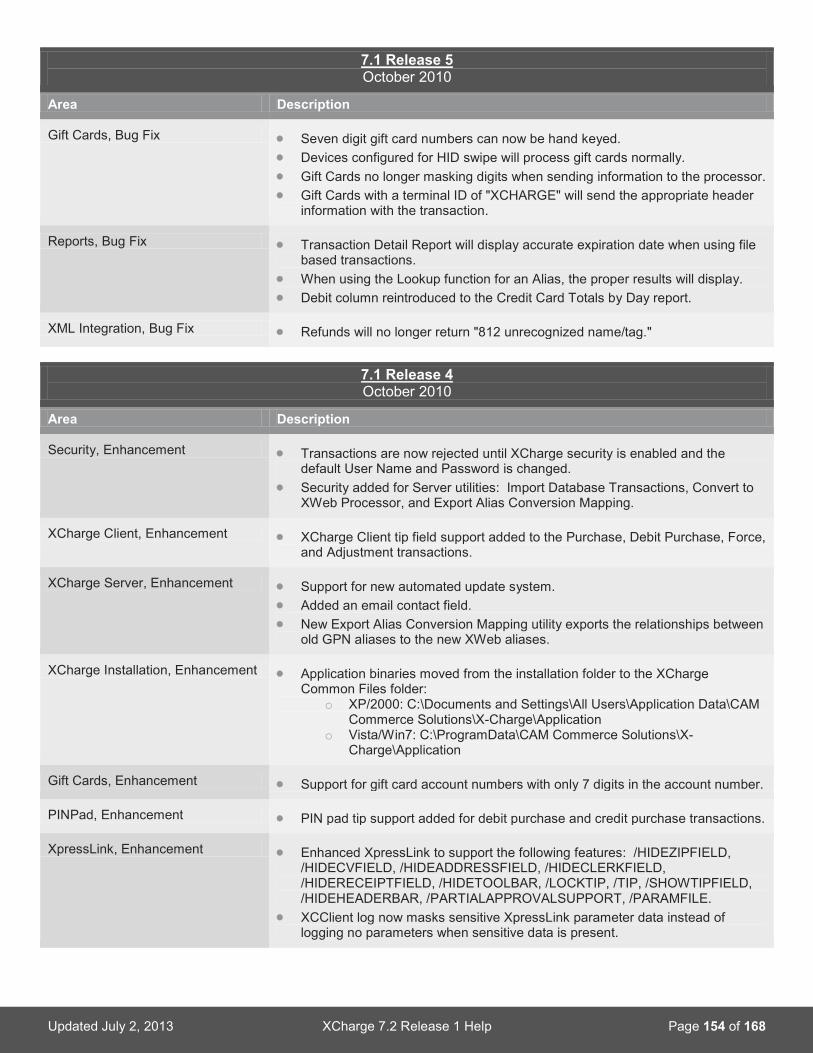
Updated July 2, 2013 XCharge 7.2 Release 1 Help Page 154 of 168
7.1 Release 5 October 2010
Area Description
Gift Cards, Bug Fix • Seven digit gift card numbers can now be hand keyed. • Devices configured for HID swipe will process gift cards normally. • Gift Cards no longer masking digits when sending information to the processor. • Gift Cards with a terminal ID of "XCHARGE" will send the appropriate header
information with the transaction.
Reports, Bug Fix • Transaction Detail Report will display accurate expiration date when using file based transactions.
• When using the Lookup function for an Alias, the proper results will display. • Debit column reintroduced to the Credit Card Totals by Day report.
XML Integration, Bug Fix • Refunds will no longer return "812 unrecognized name/tag."
7.1 Release 4 October 2010
Area Description
Security, Enhancement • Transactions are now rejected until XCharge security is enabled and the default User Name and Password is changed.
• Security added for Server utilities: Import Database Transactions, Convert to XWeb Processor, and Export Alias Conversion Mapping.
XCharge Client, Enhancement • XCharge Client tip field support added to the Purchase, Debit Purchase, Force, and Adjustment transactions.
XCharge Server, Enhancement • Support for new automated update system. • Added an email contact field. • New Export Alias Conversion Mapping utility exports the relationships between
old GPN aliases to the new XWeb aliases.
XCharge Installation, Enhancement • Application binaries moved from the installation folder to the XCharge Common Files folder:
o XP/2000: C:\Documents and Settings\All Users\Application Data\CAM Commerce Solutions\X-Charge\Application
o Vista/Win7: C:\ProgramData\CAM Commerce Solutions\X-Charge\Application
Gift Cards, Enhancement • Support for gift card account numbers with only 7 digits in the account number.
PINPad, Enhancement • PIN pad tip support added for debit purchase and credit purchase transactions.
XpressLink, Enhancement • Enhanced XpressLink to support the following features: /HIDEZIPFIELD, /HIDECVFIELD, /HIDEADDRESSFIELD, /HIDECLERKFIELD, /HIDERECEIPTFIELD, /HIDETOOLBAR, /LOCKTIP, /TIP, /SHOWTIPFIELD, /HIDEHEADERBAR, /PARTIALAPPROVALSUPPORT, /PARAMFILE.
• XCClient log now masks sensitive XpressLink parameter data instead of logging no parameters when sensitive data is present.
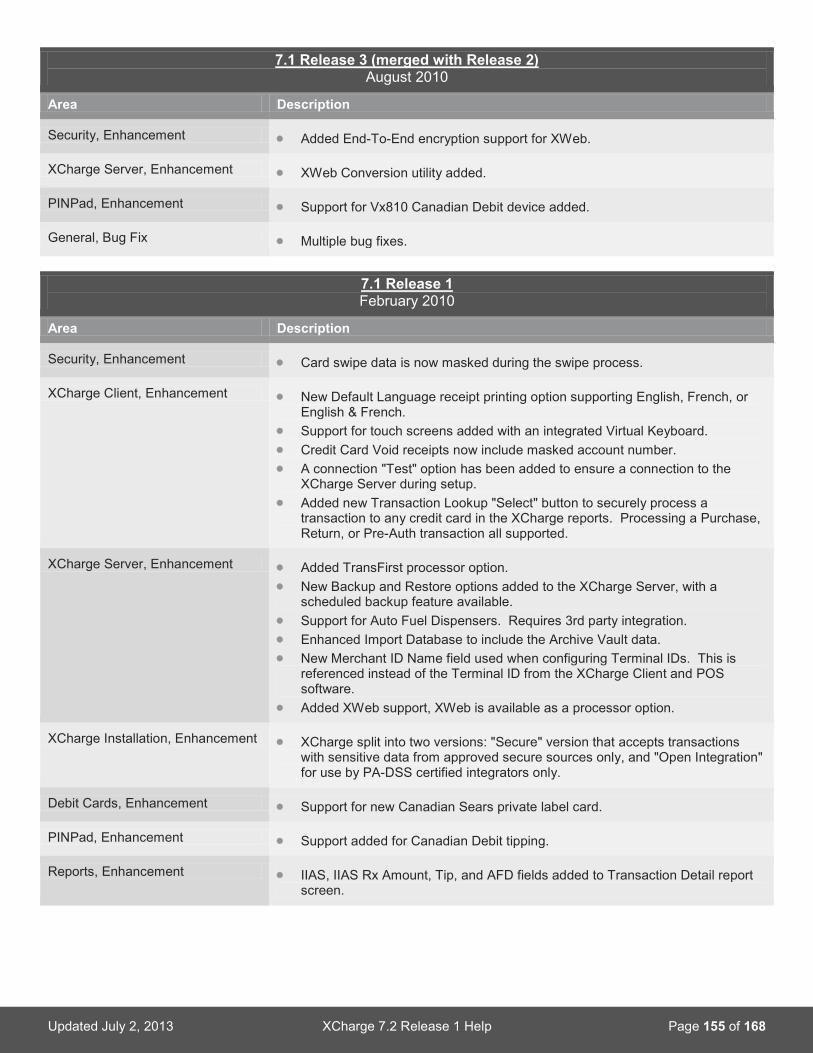
Updated July 2, 2013 XCharge 7.2 Release 1 Help Page 155 of 168
7.1 Release 3 (merged with Release 2) August 2010
Area Description
Security, Enhancement • Added End-To-End encryption support for XWeb.
XCharge Server, Enhancement • XWeb Conversion utility added.
PINPad, Enhancement • Support for Vx810 Canadian Debit device added.
General, Bug Fix • Multiple bug fixes.
7.1 Release 1 February 2010
Area Description
Security, Enhancement • Card swipe data is now masked during the swipe process.
XCharge Client, Enhancement • New Default Language receipt printing option supporting English, French, or English & French.
• Support for touch screens added with an integrated Virtual Keyboard. • Credit Card Void receipts now include masked account number. • A connection "Test" option has been added to ensure a connection to the
XCharge Server during setup. • Added new Transaction Lookup "Select" button to securely process a
transaction to any credit card in the XCharge reports. Processing a Purchase, Return, or Pre-Auth transaction all supported.
XCharge Server, Enhancement • Added TransFirst processor option. • New Backup and Restore options added to the XCharge Server, with a
scheduled backup feature available. • Support for Auto Fuel Dispensers. Requires 3rd party integration. • Enhanced Import Database to include the Archive Vault data. • New Merchant ID Name field used when configuring Terminal IDs. This is
referenced instead of the Terminal ID from the XCharge Client and POS software.
• Added XWeb support, XWeb is available as a processor option.
XCharge Installation, Enhancement • XCharge split into two versions: "Secure" version that accepts transactions with sensitive data from approved secure sources only, and "Open Integration" for use by PA-DSS certified integrators only.
Debit Cards, Enhancement • Support for new Canadian Sears private label card.
PINPad, Enhancement • Support added for Canadian Debit tipping.
Reports, Enhancement • IIAS, IIAS Rx Amount, Tip, and AFD fields added to Transaction Detail report screen.
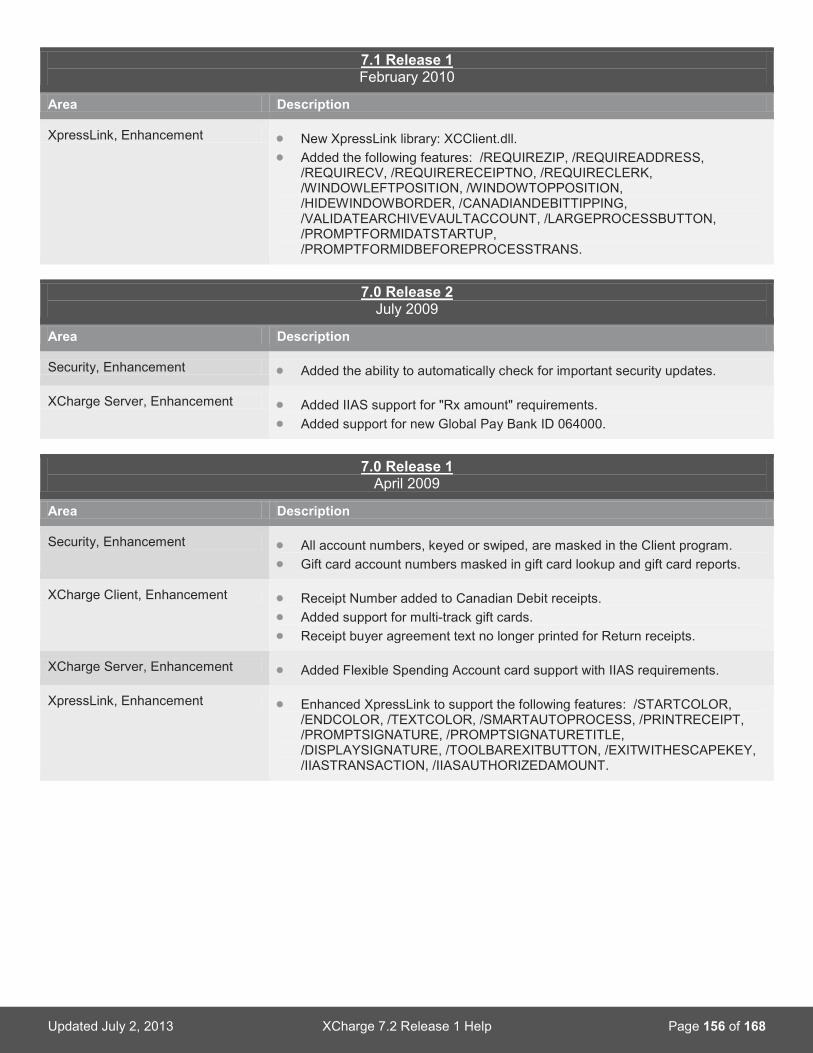
Updated July 2, 2013 XCharge 7.2 Release 1 Help Page 156 of 168
7.1 Release 1 February 2010
Area Description
XpressLink, Enhancement • New XpressLink library: XCClient.dll. • Added the following features: /REQUIREZIP, /REQUIREADDRESS,
/REQUIRECV, /REQUIRERECEIPTNO, /REQUIRECLERK, /WINDOWLEFTPOSITION, /WINDOWTOPPOSITION, /HIDEWINDOWBORDER, /CANADIANDEBITTIPPING, /VALIDATEARCHIVEVAULTACCOUNT, /LARGEPROCESSBUTTON, /PROMPTFORMIDATSTARTUP, /PROMPTFORMIDBEFOREPROCESSTRANS.
7.0 Release 2
July 2009
Area Description
Security, Enhancement • Added the ability to automatically check for important security updates.
XCharge Server, Enhancement • Added IIAS support for "Rx amount" requirements. • Added support for new Global Pay Bank ID 064000.
7.0 Release 1
April 2009
Area Description
Security, Enhancement • All account numbers, keyed or swiped, are masked in the Client program. • Gift card account numbers masked in gift card lookup and gift card reports.
XCharge Client, Enhancement • Receipt Number added to Canadian Debit receipts. • Added support for multi-track gift cards. • Receipt buyer agreement text no longer printed for Return receipts.
XCharge Server, Enhancement • Added Flexible Spending Account card support with IIAS requirements.
XpressLink, Enhancement • Enhanced XpressLink to support the following features: /STARTCOLOR, /ENDCOLOR, /TEXTCOLOR, /SMARTAUTOPROCESS, /PRINTRECEIPT, /PROMPTSIGNATURE, /PROMPTSIGNATURETITLE, /DISPLAYSIGNATURE, /TOOLBAREXITBUTTON, /EXITWITHESCAPEKEY, /IIASTRANSACTION, /IIASAUTHORIZEDAMOUNT.

Updated July 2, 2013 XCharge 7.2 Release 1 Help Page 157 of 168
7.0 Release 0 April 2009
Area Description
Security, Enhancement • Added option to disable file based request file support, enabled by default. • User Security feature redone with unlimited users and additional features. • User Security enabled by default. • New auto-logout feature added to Client Setup. • Account expiration dates encrypted in database. • Enhanced the XCharge Client to support encrypted XML data. • Enhanced XML answer files to return masked account number, expiration, and
account type. • Enhanced XpressLink result file to return masked account, expiration, account
type, and decline/error description when applicable. • Enhanced Account Archive Vault to always return the masked account
number, expiration, and account type. • Added support for Market Types within configuration files. • Support for dual knowledge encryption keys.
XCharge Client, Enhancement • Only IP communications with XML request files are sent to the XCharge Server.
• XCharge Client swipe delay default set to 500ms. • New "Prompt before printing multiple Receipts" option in XCharge client to
optionally prompt before printing a second receipt, enabled by default. • Debit transactions enabled by default in the XCharge Client.
XCharge Server, Enhancement • Enhanced Account Archive Vault to support PURGEDATE value and ARCHIVEDUPLICATES option (Allow, Reject, UseExisting).
• Added Account Archive Vault support for the new XC_CCARCHIVE_QUERY transaction.
• New maximum gift amount setting for gift Issue, Redeem, and Return transactions.
• Enhanced Canadian Debit Purchase and Return to support "Allow duplicate transactions" option.
• New support for XCTRANSACTIONID, including support for Offline mode. • Removed check verification type "Telecheck."
Reports, Enhancement • New Report option added: Settlement. • Updated the CC Totals, CC Totals by Day, and CC Totals by MID reports to
total Discover transactions with VISA and MC. • Added Scheduled Reporting option to print a configurable number of copies of
each report desired.
XpressLink, Enhancement • Added the following new features: /HIDEMAINWINDOW, /ALLOWDUPLICATES, /RECURRING, /HIDEMAINMENU, /MARKETTYPE, /TRANSACTIONTYPE:VOID, /TRANSACTIONTYPE:ADJUSTMENT, /TRANSACTIONTYPE:GIFTVOID, /TRANSACTIONTYPE:ARCHIVEVAULTADD, /TRANSACTIONTYPE:ARCHIVEVAULTUPDATE, /TRANSACTIONTYPE:ARCHIVEVAULTDELETE, /TRANSACTIONTYPE:ARCHIVEVAULTQUERY, /XCACCOUNTID:, /LOCKXCACCOUNTID, /ARCHIVEPURGEDATE:, /ARCHIVEDUPLICATES:, /LOCKXCTRANSACTIONID, /ARCHIVEADDOPTION1:, /ARCHIVEADDOPTION2:, /ARCHIVEADDOPTION3:, /LOCKAPPROVALCODESEARCH.

Updated July 2, 2013 XCharge 7.2 Release 1 Help Page 158 of 168
7.0 Release 0 April 2009
Area Description
XML requests, Enhancement • New ALLOWDUPLICATES option allows AP DUPE override on specific transactions.
6.2 Release 7
July 2009
Area Description
Security, Enhancement • Added the ability to automatically check for important security updates.
XCharge Server, Enhancement • Added support for new Global Pay Bank ID 064000.
6.2 Release 6
September 2008
Area Description
Security, Enhancement • The XCharge configuration files are no longer copied to transaction folders. • The XCharge transaction folders are no longer required.
XCharge Client, Enhancement • Added support for the MagTek USB HID Magnetic Stripe Reader (MSR). • Moved PIN Pad device setup to General Options, Devices. • Added support for custom printer codes for 40 column receipt printing. • Receipt "Store Policy" field enhanced to support unlimited lines.
XCharge Server, Enhancement • Added Offline Processing support for gift card transactions. • Faster Global Gateway transaction processing.
Debit Cards, Enhancement • Validate and correct invalid Canadian debit card language codes.
XML IP requests, Enhancement • Enhanced 3rd-party XML IP request handling.
XpressLink, Bug Fix • Fixed XpressLink issue which caused the result file to not include BALANCE and ADDITIONALFUNDSREQUIRED values for gift card transactions.
6.2 Release 5
April 2008
Area Description
XML IP Requests, Enhancement • Added support for a 3rd-party XML IP request format that does not require an EOT character.
XpressLink, Bug Fix • Fixed XML formatting issue in the XpressLink XML result file. • Fixed issue which caused CA Debit reversal transactions to be returned as
successful in the XpressLink result file.
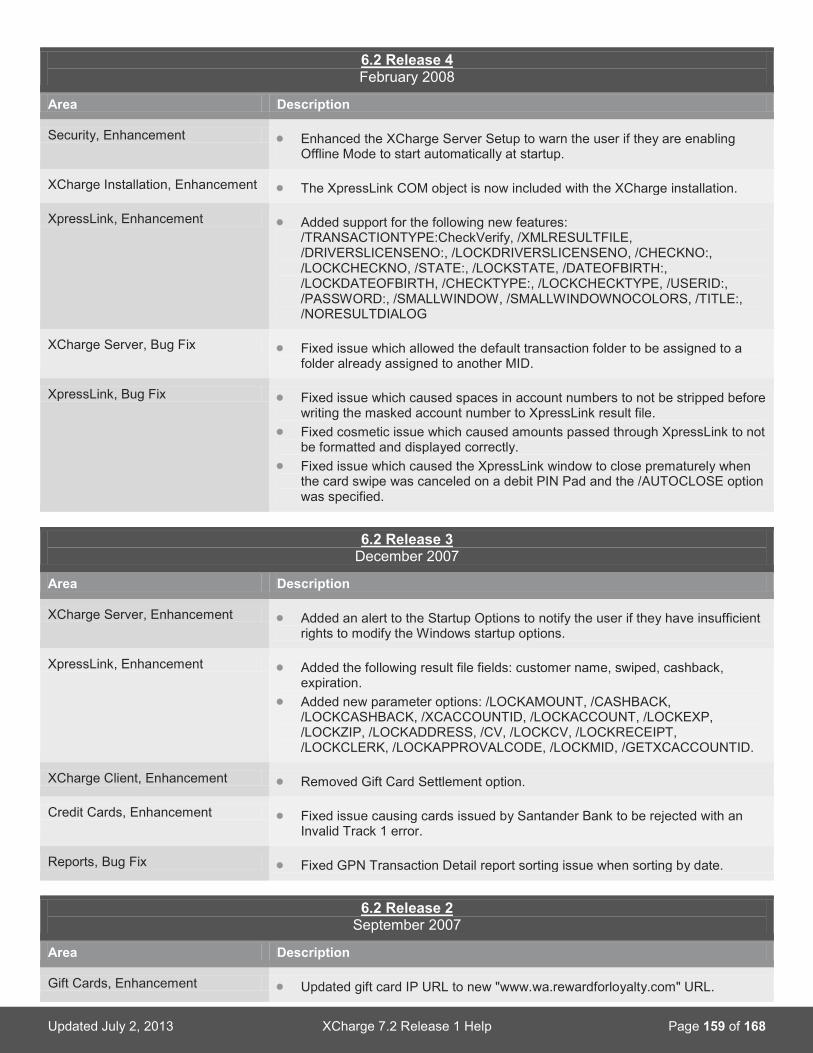
Updated July 2, 2013 XCharge 7.2 Release 1 Help Page 159 of 168
6.2 Release 4 February 2008
Area Description
Security, Enhancement • Enhanced the XCharge Server Setup to warn the user if they are enabling Offline Mode to start automatically at startup.
XCharge Installation, Enhancement • The XpressLink COM object is now included with the XCharge installation.
XpressLink, Enhancement • Added support for the following new features: /TRANSACTIONTYPE:CheckVerify, /XMLRESULTFILE, /DRIVERSLICENSENO:, /LOCKDRIVERSLICENSENO, /CHECKNO:, /LOCKCHECKNO, /STATE:, /LOCKSTATE, /DATEOFBIRTH:, /LOCKDATEOFBIRTH, /CHECKTYPE:, /LOCKCHECKTYPE, /USERID:, /PASSWORD:, /SMALLWINDOW, /SMALLWINDOWNOCOLORS, /TITLE:, /NORESULTDIALOG
XCharge Server, Bug Fix • Fixed issue which allowed the default transaction folder to be assigned to a folder already assigned to another MID.
XpressLink, Bug Fix • Fixed issue which caused spaces in account numbers to not be stripped before writing the masked account number to XpressLink result file.
• Fixed cosmetic issue which caused amounts passed through XpressLink to not be formatted and displayed correctly.
• Fixed issue which caused the XpressLink window to close prematurely when the card swipe was canceled on a debit PIN Pad and the /AUTOCLOSE option was specified.
6.2 Release 3
December 2007
Area Description
XCharge Server, Enhancement • Added an alert to the Startup Options to notify the user if they have insufficient rights to modify the Windows startup options.
XpressLink, Enhancement • Added the following result file fields: customer name, swiped, cashback, expiration.
• Added new parameter options: /LOCKAMOUNT, /CASHBACK, /LOCKCASHBACK, /XCACCOUNTID, /LOCKACCOUNT, /LOCKEXP, /LOCKZIP, /LOCKADDRESS, /CV, /LOCKCV, /LOCKRECEIPT, /LOCKCLERK, /LOCKAPPROVALCODE, /LOCKMID, /GETXCACCOUNTID.
XCharge Client, Enhancement • Removed Gift Card Settlement option.
Credit Cards, Enhancement • Fixed issue causing cards issued by Santander Bank to be rejected with an Invalid Track 1 error.
Reports, Bug Fix • Fixed GPN Transaction Detail report sorting issue when sorting by date.
6.2 Release 2
September 2007
Area Description
Gift Cards, Enhancement • Updated gift card IP URL to new "www.wa.rewardforloyalty.com" URL.

Updated July 2, 2013 XCharge 7.2 Release 1 Help Page 160 of 168
6.2 Release 2 September 2007
Area Description
XCharge Server, Bug Fix • Fixed issue that caused some IP requests to the XCharge Server to be ignored.
• Fixed issue that caused the gift card modem backup to not successfully switch back to IP.
6.2 Release 1
September 2007
Area Description
XCharge Server, Bug Fix • Fixed issue that caused the Global Gateway license to not be correctly set when changing the default MID with a configuration file.
• Fixed issue that caused HDACom.exe to consume high CPU resources when idle.
XCharge Installation, Bug Fix • Fixed data conversion issue that caused pre-6.0 data to not be automatically converted to the new 6.x format. This issue only affected upgrades to 6.2 R0.
• Fixed installation issue that caused PINPadDevice.dll to not be installed correctly.
XML Integration, Bug Fix • Fixed Debit XML response to include <RESULT_APPROVALCODE>. • Fixed issue causing XML hold files to not be deleted.
6.2 Release 0 August 2007
Area Description
Security, Enhancement • The default "Max Charge Amount" changed to $10,000. • Enhanced the XCharge Security Service to detect and delete request files
when the XCharge Server is not running.
XCharge Client, Enhancement • New font size option for 40-column receipts and reports printed using 'Standard Windows printing'.
• New XCharge Client Display options. • A signature line is now printed on Adjustment receipts. • Added new Print Tip Line option to for receipts. • Added support for Windows user-specific XCharge Client configuration files. • New XCharge Client support for multiple Merchant IDs. The active merchant
ID is selected from the Transaction menu.
XCharge Server, Enhancement • New Import Database utility in XCharge Server adds the ability to import and merge the transactions from another database file to the current one.
• Added support for duplicate transactions with Force and Pre-Auth Completion transaction types.
• Added support for Transaction Central ACH Debit and ACH Credit transactions.
• Added new Data Repository feature. • Added support for Canadian ZIP codes.
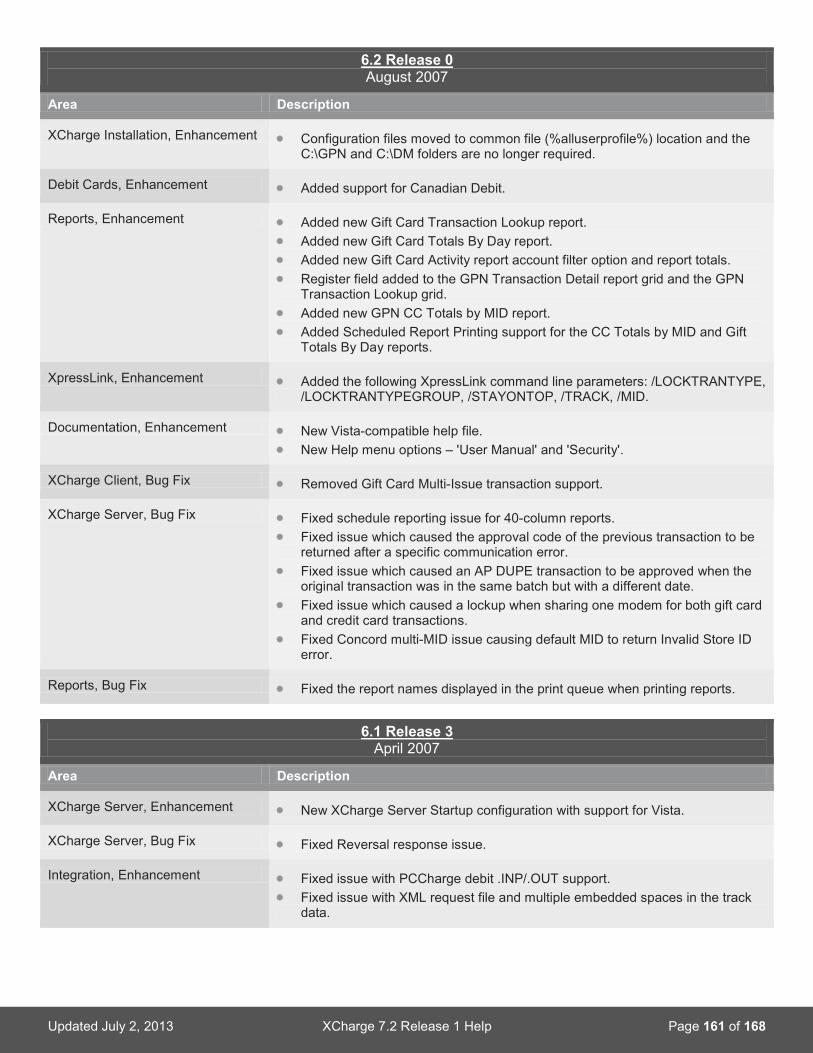
Updated July 2, 2013 XCharge 7.2 Release 1 Help Page 161 of 168
6.2 Release 0 August 2007
Area Description
XCharge Installation, Enhancement • Configuration files moved to common file (%alluserprofile%) location and the C:\GPN and C:\DM folders are no longer required.
Debit Cards, Enhancement • Added support for Canadian Debit.
Reports, Enhancement • Added new Gift Card Transaction Lookup report. • Added new Gift Card Totals By Day report. • Added new Gift Card Activity report account filter option and report totals. • Register field added to the GPN Transaction Detail report grid and the GPN
Transaction Lookup grid. • Added new GPN CC Totals by MID report. • Added Scheduled Report Printing support for the CC Totals by MID and Gift
Totals By Day reports.
XpressLink, Enhancement • Added the following XpressLink command line parameters: /LOCKTRANTYPE, /LOCKTRANTYPEGROUP, /STAYONTOP, /TRACK, /MID.
Documentation, Enhancement • New Vista-compatible help file. • New Help menu options – 'User Manual' and 'Security'.
XCharge Client, Bug Fix • Removed Gift Card Multi-Issue transaction support.
XCharge Server, Bug Fix • Fixed schedule reporting issue for 40-column reports. • Fixed issue which caused the approval code of the previous transaction to be
returned after a specific communication error. • Fixed issue which caused an AP DUPE transaction to be approved when the
original transaction was in the same batch but with a different date. • Fixed issue which caused a lockup when sharing one modem for both gift card
and credit card transactions. • Fixed Concord multi-MID issue causing default MID to return Invalid Store ID
error.
Reports, Bug Fix • Fixed the report names displayed in the print queue when printing reports.
6.1 Release 3
April 2007
Area Description
XCharge Server, Enhancement • New XCharge Server Startup configuration with support for Vista.
XCharge Server, Bug Fix • Fixed Reversal response issue.
Integration, Enhancement • Fixed issue with PCCharge debit .INP/.OUT support. • Fixed issue with XML request file and multiple embedded spaces in the track
data.
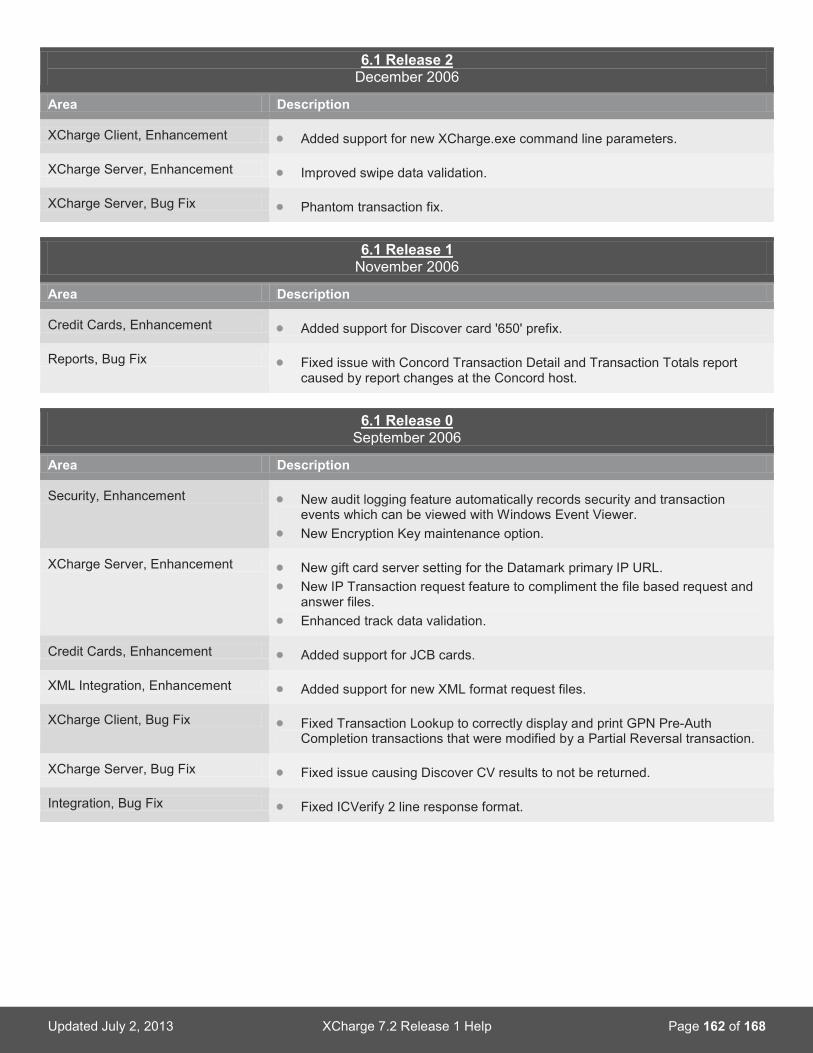
Updated July 2, 2013 XCharge 7.2 Release 1 Help Page 162 of 168
6.1 Release 2 December 2006
Area Description
XCharge Client, Enhancement • Added support for new XCharge.exe command line parameters.
XCharge Server, Enhancement • Improved swipe data validation.
XCharge Server, Bug Fix • Phantom transaction fix.
6.1 Release 1
November 2006
Area Description
Credit Cards, Enhancement • Added support for Discover card '650' prefix.
Reports, Bug Fix • Fixed issue with Concord Transaction Detail and Transaction Totals report caused by report changes at the Concord host.
6.1 Release 0
September 2006
Area Description
Security, Enhancement • New audit logging feature automatically records security and transaction events which can be viewed with Windows Event Viewer.
• New Encryption Key maintenance option.
XCharge Server, Enhancement • New gift card server setting for the Datamark primary IP URL. • New IP Transaction request feature to compliment the file based request and
answer files. • Enhanced track data validation.
Credit Cards, Enhancement • Added support for JCB cards.
XML Integration, Enhancement • Added support for new XML format request files.
XCharge Client, Bug Fix • Fixed Transaction Lookup to correctly display and print GPN Pre-Auth Completion transactions that were modified by a Partial Reversal transaction.
XCharge Server, Bug Fix • Fixed issue causing Discover CV results to not be returned.
Integration, Bug Fix • Fixed ICVerify 2 line response format.

Updated July 2, 2013 XCharge 7.2 Release 1 Help Page 163 of 168
6.0 Release 4 July 2006
Area Description
XCharge Server, Bug Fix • Fixed issue which caused pre-auth transactions to be completed with a force instead of a pre-auth completion when the approval code contained only 5 digits.
• Fixed issue which caused Pre-Auth Completion transactions to not be converted correctly to the 6.0 format.
Reports, Bug Fix • Fixed issue with the Concord Transaction Totals report caused by report format changes at the Concord host.
6.0 Release 3
April 2006
Area Description
Gift Cards, Bug Fix • Fixed critical issue which caused IP gift card redeem transactions on a card with an existing balance of 0.00 to be approved.
Reports, Bug Fix • Fixed issue which caused schedule reports to print with no report data.
6.0 Release 2 March 2006
Area Description
XCharge Server, Enhancement • Changed IP URL for Datamark gift card IP transaction processing to match server modifications at Datamark.
Gift Cards, Bug Fix • Fixed issue which caused gift card balances of $0.00 to be returned as a 'blank' amount.
Reports, Bug Fix • Fixed issue that caused scheduled reports to not print to a selected printer if the printer name contained a space.
6.0 Release 1 February 2006
Area Description
Security, Enhancement • All Transaction file data moved to History\tran.xdb. All old transaction files backed up and encrypted for security.
• Added new option to automatically shutdown the XCharge Server when the XCharge client closes.
• Added the ability to run the XCharge Server as a service. This must be manually enabled from Windows Services.
• New XCharge Server utility adds the ability to purge credit card numbers from the database.
• New "Enable All MIDs at Client" Security option. • Added enforcement of Max Charge Amount on all credit card transactions.

Updated July 2, 2013 XCharge 7.2 Release 1 Help Page 164 of 168
6.0 Release 1 February 2006
Area Description
XCharge Client, Enhancement • New Force Search option allows CC or approval number to be entered before clicking Search, causing the search screen to automatically locate the transaction with a matching CC or approval number.
• Added Settlement and Settlement Review support in the XCharge Client when running as a remote client. Requires enabling security and enabling the security option for the user.
• Reports supported in XC Client when running as remote client. Requires enabling security and enabling the security option for the user.
• Transaction Lookup supported in XC Client when running as a remote client. Requires enabling security and enabling the security option for the user.
• Receipts print in Merchant Copy/Customer Copy order if configured to automatically print two or more copies.
• Pre-Authorization receipts now print with tip line and total line. • Force, Adjustment, and Void searches at a client are no longer limited to
transaction data in the open batch. • Gift Void search screen enhanced with new search options. • General program speed enhancements. • New Credit Card Swipe Delay option allows modification of the delay before
XCharge processes a credit card swipe.
XCharge Server, Enhancement • Transaction requests now processed in order of creation, independent of the transaction folder in which they are created.
• Default track number set back to track 1 in support of international cards. • Accepts ZIP codes with a dash, such as 12345-1234.
Checks, Enhancement • Unused check verification types removed from setup – JBS, Global Checks MICR, Scan Drivers License, Scan Full MICR, Scan Partial MICR, Telecredit, and World Check.
Reports, Enhancement • New 'Hide Partial Reversals' option in GPN Transaction Detail report. When enabled, partial reversals are hidden and the force amount is displayed with the partial reversal amount.
• Settlement Report sums Total amount for all credit card and debit transactions. • Batch Total calculated for GPN Partial Reversal transactions in Transaction
Detail report. • Batch Total amount not displayed in GPN Transaction Detail report for Pre-
Auths or declined transactions. • New report scheduling option in the XCharge Server. • XCharge reports can now be automated by starting XCharge.exe with specific
command line parameters.
Other Integration, Enhancement • Added support for PCCharge .INP/.OUT request files. • Added support for CA (Food authorize) request file format. • Added support for CT (Food add tip – force) request file format. • Added support for new settlement request file.

Updated July 2, 2013 XCharge 7.2 Release 1 Help Page 165 of 168
6.0 Release 1 February 2006
Area Description
XCharge Server, Bug Fix • Fixed issue with invalid CVV result code. • Fixed 6.0 beta range check error caused when two duplicate pre-auth and pre-
auth completions are executed. Affected 6.0 beta only. • Fixed 6.0 beta INV AMT MATCH error caused when a partial reversal fails and
XC attempts to void and reissue the pre-auth completion. Affected 6.0 beta only.
• Fixed Error that occurred during Windows shutdown when XCharge was still running.
• Fixed issue which caused transactions to be rejected by some Banks for swiped transactions.
Debit Cards, Bug Fix • Removed debit void support.
5.0 Release 6 October 2005
Area Description
XCharge Server, Enhancement • Fixed issue with multiple Merchant IDs on separate Bank IDs being forced to share the default MIDs Bank ID.
• Fixed issue causing XC_REPORT request files to always return report data for the default Concord Store ID.
• Made a modification to help avoid additional locking issues between the XCharge Server and other programs attempting to print.
Reports, Bug Fix • Fixed issue causing GPN CC Totals By Day debit amount to not print on 40 column reports.
5.0 Release 5 August 2005
Area Description
Reports, Bug Fix • Fixed GPN reporting issue affecting totals, caused when partial reversals are declined but still have a 006 approval code.
5.0 Release 4
July 2005
Area Description
Security, Enhancement • Credit card number masked in all report, search, and lookup screens. • Security option added to disable masking credit card number in GPN Item
Detail report. • Account numbers in local EFSNet tran files are now encrypted. • The transaction backup files are now encrypted for security.
XCharge Client, Enhancement • Receipts printed with "(Debit)" after card type if a debit transaction. • Support for non-default short date format and date separator settings in
Regional Options.

Updated July 2, 2013 XCharge 7.2 Release 1 Help Page 166 of 168
5.0 Release 4 July 2005
Area Description
Credit Cards, Enhancement • Pre-Auth completion used to complete Force transactions. Force transaction still used for voice authorizations (when a previous matching pre-auth is not located).
Documentation, Enhancement • Release notes now included with XCharge installations.
XCharge Client, Bug Fix • Fixed "Invalid Credit Card Number" error when processing debit transactions with the XC client program.
XCharge Server, Bug Fix • Fixed GPN modem communication issue resulting in declined messages such as "000050715165429 OK".
• Fixed VPN connection problem that caused XC to prompt for port number.
Reports, Bug Fix • Fixed GPN Transaction Detail Report sorting issue.
5.0 Release 3
June 2005
Area Description
Security, Enhancement • Added support for the new Global Gateway SSL certificate.
XCharge Server, Enhancement • XCharge now detects duplicate force transactions (same account/approval#) in the same batch and voids the first Force transaction before processing the second force transaction.
• XCharge will not attempt a partial reversal (if applicable) if the Force transaction fails.
Reports, Enhancement • Credit card transaction lookup screen enhanced with new search feature.
XCharge Client, Enhancement • Fixed bug in parsing of swipe data to better handle malformed swipes.
XCharge Server, Bug Fix • Fixed Gateway primary and secondary URL that would prevent roll over to the secondary address if an error occurred while connecting to the primary address.
• Fixed HDACom issue causing corrupted merchant data to occasionally be written to the transaction file on Void transactions.
• Fixed issue where voids failed if the receipt field contained option register information (<REGISTER>-<RECEIPTNO>).
• Fixed void request file issue which caused XCharge to not find the debit transaction to void.
5.0 Release 2
April 2005
Area Description
XCharge Client, Enhancement • Added support for multiple transaction folders. • Added support for Windows XP themes.

Updated July 2, 2013 XCharge 7.2 Release 1 Help Page 167 of 168
5.0 Release 2 April 2005
Area Description
XCharge Server, Enhancement • Enhanced logic that keeps more than one server from running at once, now works across Terminal Services sessions.
XCharge Client, Bug Fix • Fixed Access Violation that occurred when starting XCharge when the registry key HKEY_LOCAL_MACHINE\SOFTWARE\Microsoft\Windows\CurrentVersion\Run was empty.
XCharge Server, Bug Fix • Fixed issue that would prevent the XCharge Server from shutting down when selecting 'Exit' from the right-click system tray menu.
• Fixed issue where Offline Mode answer files were formatted incorrectly. Offline Mode now returns transaction as approved, formatted as "YApprovedOffline".
• Fixed XC_REPORT answer file problem. The first line is now followed by a <CR><LF> instead of <LF><CR>.
5.0 Release 1 March 2005
Area Description
Security, Enhancement • Transaction files converted to new format. Additional information is now stored and CC numbers are encrypted in the transaction file.
• Offline Mode data is now encrypted.
XCharge Server, Enhancement • Global multiple merchant support based on transaction folders. • Global Void, report, lookup, and settle by Merchant ID. • Out of order item numbers caused by incorrect timestamp returned from Global
is now handled in XCharge to allow correct sorting for reporting.
Credit Cards, Enhancement • Force of VISA Pre-Auth for amount less than original pre-auth Forces the transaction for the original Pre-Auth amount and performs a Partial Reversal to the new Force amount.
XCharge Server, Bug Fix • Force transaction sends data correctly linking it to the original Pre-Auth transaction.
• "000000" approval code on declined transactions following a successful Debit transaction fixed (see out of order item number issue).
• Buffer overflow error fixed in HDACom. • Multi-line batch request files no longer are renamed to *.bak file. Error file
(*.err) now correctly created with declined transactions.
Updated July 2, 2013 XCharge 7.2 Release 1 Help Page 168 of 168
2436 West 700 South · Pleasant Grove, UT 84062 888.427.2260
www.acceleratedpay.com