
Palm Beach County and ABA Public Space Recycling Pilot Project.

1
HandWallet
Version 4.08 Palm Pilot devices
Last Update: 29 June 2005
User Manual
MediaVision Computer Tech. Ltd. All Rights Reserved

2
TABLE OF CONTENTS
1. Quick start ................................................................................................. 8 2. Introduction................................................................................................ 9
A. What is the HandWallet software?...............................................................9 B. Who should use HandWallet? .....................................................................9 C. How can I save money with HandWallet? ...................................................9 D. How to use this manual?..............................................................................12
3. Installation ............................................................................................... 13 A. Minimum requirements ................................................................................13 B. Downloading ................................................................................................13 C. Palm sync using InstallTool .........................................................................14 D. Initial operation on Palm ..............................................................................15 E. Problems during installation time or initial operation ...................................18 F. Update software...........................................................................................20 G. Uninstall .......................................................................................................20
4. General Review....................................................................................... 22 5. Data ......................................................................................................... 23
A. Accounts (Means of payment) .....................................................................23 B. Actions .........................................................................................................30 C. Payments – statement portfolio ...................................................................57 D. Categories....................................................................................................62 E. Persons ........................................................................................................66 F. Vendors........................................................................................................68 G. Clear Filters..................................................................................................69 H. Erase All.......................................................................................................69
1. Analyst..................................................................................................... 70 A. Categories Pie .............................................................................................70 B. Categories Bar .............................................................................................71 C. Persons Pie..................................................................................................71 D. Categories Report (summary report) ...........................................................71 E. Budget Status ..............................................................................................72 F. Balances ......................................................................................................73 G. Forecast .......................................................................................................73
2. Tools........................................................................................................ 74 A. Swap Credit Card.........................................................................................74 B. Online Upgrade............................................................................................79 C. Options.........................................................................................................80 D. System Status..............................................................................................94 E. Import ...........................................................................................................97 F. Export...........................................................................................................102 G. My Web Site.................................................................................................110
3. Financial menu ($)................................................................................. 112 A. Rates............................................................................................................112 B. Stock Quotes................................................................................................113 C. Index values.................................................................................................114 D. Interest values..............................................................................................115 E. Goods (Merchandise) values.......................................................................116 F. Yields ...........................................................................................................117 G. Compare Yields ...........................................................................................118
3
H. My Favorites.................................................................................................119 4. Help ....................................................................................................... 125 A. This Screen..................................................................................................125 B. General ........................................................................................................125 C. Online Help ..................................................................................................126 D. About............................................................................................................127 E. Additional help options.................................................................................127
5. Miscellaneous........................................................................................ 128 A. Connecting a Palm device to the Internet....................................................128 B. Backup .........................................................................................................131

4
LIST OF ILLUSTRATIONS
Illustration No. Page No.
ILLUSTRATION 1 - Transferring the software to Palm – a single installation file ............................................................................................................ 14
ILLUSTRATION 2 - Installation in case you select the ZIP file ..................... 15 ILLUSTRATION 3 – Initial operation ............................................................. 15 ILLUSTRATION 4 – Welcome to HandWallet ............................................... 16 ILLUSTRATION 5 – Terms & Conditions ...................................................... 16 ILLUSTRATION 6 – Selecting the country .................................................... 16 ILLUSTRATION 7 – Selecting the interface language .................................. 17 ILLUSTRATION 8 – Selecting the main currency ......................................... 17 ILLUSTRATION 9 – The initial screen (the actions screen).......................... 17 ILLUSTRATION 10 – Malfunction – Illegible menu ....................................... 18 ILLUSTRATION 11 – Malfunction – Illegible menu ....................................... 18 ILLUSTRATION 12 – Changing the menu language .................................... 19 ILLUSTRATION 13 – Missing elements for activating HandWallet............... 20 ILLUSTRATION 14 – Deleting HandWallet ................................................... 20 ILLUSTRATION 15 – Deleting HandWallet - confirmation............................ 21 ILLUSTRATION 16 – Defining a new account .............................................. 23 ILLUSTRATION 17 – Defining a new account – fields.................................. 24 ILLUSTRATION 18 – A new account – credit card ....................................... 25 ILLUSTRATION 19 – A new account – Internet............................................ 26 ILLUSTRATION 20 – A new account– the Internet – Bank HaPoalim.......... 27 ILLUSTRATION 21 – A new account – the Internet – Bank Leumi............... 27 ILLUSTRATION 22 – A new account – the Internet – Bank Discount .......... 28 ILLUSTRATION 23 – Account view fields ..................................................... 29 ILLUSTRATION 24 – Defining a new action ................................................. 30 ILLUSTRATION 25 – Defining a new action – initial screen ......................... 31 ILLUSTRATION 26 – New action – What...................................................... 31 ILLUSTRATION 27 – A new action – What – Refining ................................. 31 ILLUSTRATION 28 – A new action – What – Continuing to refine ............... 32 ILLUSTRATION 29 – A new action – What – Category selection................. 32 ILLUSTRATION 30 – A new action – Entering a sum................................... 32 ILLUSTRATION 31 – New action – Entering an additional category............ 33 ILLUSTRATION 32 – New action – Quantity and price per quantity............. 33 ILLUSTRATION 33 – Action – Clicking on the “More” button ....................... 35 ILLUSTRATION 34 – New action – Vendor / Customer................................ 36 ILLUSTRATION 35 – New action – Checks.................................................. 37 ILLUSTRATION 36 – New action – Customer credit card ............................ 38 ILLUSTRATION 37 – New action – Receipt, invoice and VAT ..................... 40 ILLUSTRATION 38 – New action – Timing ................................................... 41 ILLUSTRATION 39 – New action – Timing ................................................... 42 ILLUSTRATION 40 – New action – Who....................................................... 43 ILLUSTRATION 41 – New action – Who – Continued.................................. 43 ILLUSTRATION 42 – New action – Who – Continued.................................. 44 ILLUSTRATION 43 – New action – Who – Two people................................ 44

5
ILLUSTRATION 44 – New action – Discount................................................ 45 ILLUSTRATION 45 – New action – Interest .................................................. 46 ILLUSTRATION 46 – New action – Interest margin...................................... 46 ILLUSTRATION 47 – New action – Linkage ................................................. 47 ILLUSTRATION 48 – New action – Linkage to an Index .............................. 47 ILLUSTRATION 49 – New action – Linkage – Foreign currency linkage ..... 48 ILLUSTRATION 50 – New action – Exchange rate....................................... 49 ILLUSTRATION 51 – New action – Exchange rate....................................... 49 ILLUSTRATION 52 – New action – Action status ......................................... 50 ILLUSTRATION 53 – Personal fields – Empty list ........................................ 51 ILLUSTRATION 54 – Personal fields – after adding fields ........................... 51 ILLUSTRATION 55 – Filtering the actions – Expenses only......................... 52 ILLUSTRATION 56 – Filtering the actions – Finding check # ....................... 52 ILLUSTRATION 57 – Sort actions................................................................. 53 ILLUSTRATION 58 – Currency view ............................................................. 53 ILLUSTRATION 59 – Actions total ................................................................ 53 ILLUSTRATION 60 – Fast action .................................................................. 54 ILLUSTRATION 61 – New fast action ........................................................... 54 ILLUSTRATION 62 – Fast action – new category......................................... 54 ILLUSTRATION 63 – Fast action – select category....................................... 55 ILLUSTRATION 64 – Fast action – select category....................................... 55 ILLUSTRATION 65 – Fast action – save changes........................................ 55 ILLUSTRATION 66 – Fast action – creating new action............................... 56 ILLUSTRATION 67 – Fast action – category selected automatically ........... 56 ILLUSTRATION 68 – Statement ................................................................... 57 ILLUSTRATION 69 – Statement – payment selection .................................. 58 ILLUSTRATION 70 – Statement – Creating / modifying a payment ............. 58 ILLUSTRATION 71 – Statement – New balance .......................................... 60 ILLUSTRATION 72 – Category tree .............................................................. 62 ILLUSTRATION 73 – New category.............................................................. 63 ILLUSTRATION 74 – Budget......................................................................... 64 ILLUSTRATION 75 – Categories - personal fields........................................ 64 ILLUSTRATION 76 – Persons....................................................................... 66 ILLUSTRATION 77 – Defining a new person................................................ 66 ILLUSTRATION 78 – Vendors....................................................................... 68 ILLUSTRATION 79 – New vendor................................................................. 68 ILLUSTRATION 80 – Expenses pie .............................................................. 70 ILLUSTRATION 81 – Income pie .................................................................. 70 ILLUSTRATION 82 – Income bar.................................................................. 71 ILLUSTRATION 83 – Persons pie................................................................. 71 ILLUSTRATION 84 – Summary report .......................................................... 72 ILLUSTRATION 85 – Summary report -- itemization .................................... 72 ILLUSTRATION 86 – Budget status.............................................................. 72 ILLUSTRATION 85 – Balances list................................................................ 73 ILLUSTRATION 88 – Forecast ...................................................................... 73 ILLUSTRATION 89 – Connection to a printer-integrated card reader .......... 74 ILLUSTRATION 90 – Entering the sum of clearance.................................... 75 ILLUSTRATION 91 – Clearing - Entering payments and categories ............ 75 ILLUSTRATION 92 – Transmission of credit card clearing........................... 75 ILLUSTRATION 93 – Clearing without a credit card – Enter card number... 77

6
ILLUSTRATION 94 – Clearing without a credit card - Entering the month up to which, card is valid .............................................................................. 77
ILLUSTRATION 95 – Clearing without a credit card -Entering the year up to which, card is valid .................................................................................. 77
ILLUSTRATION 96 – Clearing without a credit card – Entering CVV........... 78 ILLUSTRATION 97 – Clearing without a credit card – Entering the ID number
................................................................................................................. 78 ILLUSTRATION 98 – Online purchasing....................................................... 79 ILLUSTRATION 99 – Options........................................................................ 80 ILLUSTRATION 100 – Color of heading ....................................................... 83 ILLUSTRATION 101 – Color of windows ...................................................... 84 ILLUSTRATION 102 – Original keyboard...................................................... 89 ILLUSTRATION 103 – HW Keyboard ........................................................... 89 ILLUSTRATION 104 – System Status........................................................... 94 ILLUSTRATION 105 – Import – select source of data .................................. 97 ILLUSTRATION 106 – Import – pre defined import ...................................... 97 ILLUSTRATION 107 – Import – select application........................................ 98 ILLUSTRATION 108 – From which memo would you like to import data? ... 98 ILLUSTRATION 109 – What would you like to import?................................. 98 ILLUSTRATION 110 – Import format ............................................................ 99 ILLUSTRATION 111 – Import fields .............................................................. 99 ILLUSTRATION 112 – Import of actions ..................................................... 100 ILLUSTRATION 113 – Import finished ........................................................ 100 ILLUSTRATION 112 – Import – Save import definitions?........................... 100 ILLUSTRATION 115 – Import – Import definitions were saved .................. 101 ILLUSTRATION 116 – Export – new or pre-defined ................................... 102 ILLUSTRATION 117 – What would you like to export?............................... 102 ILLUSTRATION 118 – Export – My favorites finance ................................. 104 ILLUSTRATION 119 – Export payments – Selecting account .................... 104 ILLUSTRATION 120 – Export – Selecting the currency.............................. 104 ILLUSTRATION 121 – Selecting the index ................................................. 105 ILLUSTRATION 122 – Export – Selecting the interest................................ 105 ILLUSTRATION 123 – Export – Selecting the stock ................................... 105 ILLUSTRATION 124 – Export – Selecting the goods.................................. 106 ILLUSTRATION 125 – Export – Selecting the goods.................................. 106 ILLUSTRATION 126 – Export – Application selection ................................ 106 ILLUSTRATION 127 – Export – Select the memo to which data is exported
............................................................................................................... 107 ILLUSTRATION 128 – Export to email– email address .............................. 107 ILLUSTRATION 129 – Export – Selection of fields ..................................... 107 ILLUSTRATION 130 – Export – Selecting the format ................................. 108 ILLUSTRATION 131 – Export – Export finished successfully..................... 108 ILLUSTRATION 132 – Export – Save export definitions?........................... 108 ILLUSTRATION 133 – Export – Export definitions were saved .................. 109 ILLUSTRATION 134 – My Internet site 1 .................................................... 110 ILLUSTRATION 135 – My Internet site 2 .................................................... 110 ILLUSTRATION 136 – My Web site – Entering a coupon .......................... 110 ILLUSTRATION 137 – My Web site – Data synchronization ...................... 111 ILLUSTRATION 138 – My Web site – My data ........................................... 111 ILLUSTRATION 139 – Exchange rates....................................................... 112

7
ILLUSTRATION 140 – Press “New” to define exchange rates ................... 112 ILLUSTRATION 141 – Selecting stocks...................................................... 113 ILLUSTRATION 142 – Index selection........................................................ 114 ILLUSTRATION 143 – NASDAQ index values ........................................... 114 ILLUSTRATION 144 – Selecting the interest .............................................. 115 ILLUSTRATION 145 – Goods ..................................................................... 116 ILLUSTRATION 146 – Yields ...................................................................... 117 ILLUSTRATION 147 – Compare Yields ...................................................... 118 ILLUSTRATION 148 – My Favorites ........................................................... 119 ILLUSTRATION 149 – New Currency ......................................................... 119 ILLUSTRATION 150 – New Currency ......................................................... 119 ILLUSTRATION 151 – New Index............................................................... 120 ILLUSTRATION 152 – New Index............................................................... 120 ILLUSTRATION 153 – New Interest............................................................ 120 ILLUSTRATION 154 – New Interest............................................................ 120 ILLUSTRATION 155 – New Stock............................................................... 121 ILLUSTRATION 156 – New Stock............................................................... 121 ILLUSTRATION 157 – New Goods ............................................................. 121 ILLUSTRATION 158 – New Goods ............................................................. 122 ILLUSTRATION 159 – New Stock market................................................... 122 ILLUSTRATION 160 – New Stock market................................................... 122 ILLUSTRATION 161 – New Economic News Site ...................................... 123 ILLUSTRATION 162 – New Economic News Site ...................................... 123 ILLUSTRATION 163 – New Rate type ........................................................ 123 ILLUSTRATION 164 – New Rate type ........................................................ 123 ILLUSTRATION 165 – New Country ........................................................... 124 ILLUSTRATION 166 – New Country ........................................................... 124 ILLUSTRATION 167 – Help – “This screen" ............................................... 125 ILLUSTRATION 168 – Help – “General" ..................................................... 125 ILLUSTRATION 169 – Help on the web (Internet) ...................................... 126 ILLUSTRATION 170 – Help on the web– Asking a question ...................... 126 ILLUSTRATION 171 – Help on the web – Updating your e-mail ................ 126 ILLUSTRATION 170 – Help on the web – End ........................................... 127 ILLUSTRATION 173 – About....................................................................... 127
8
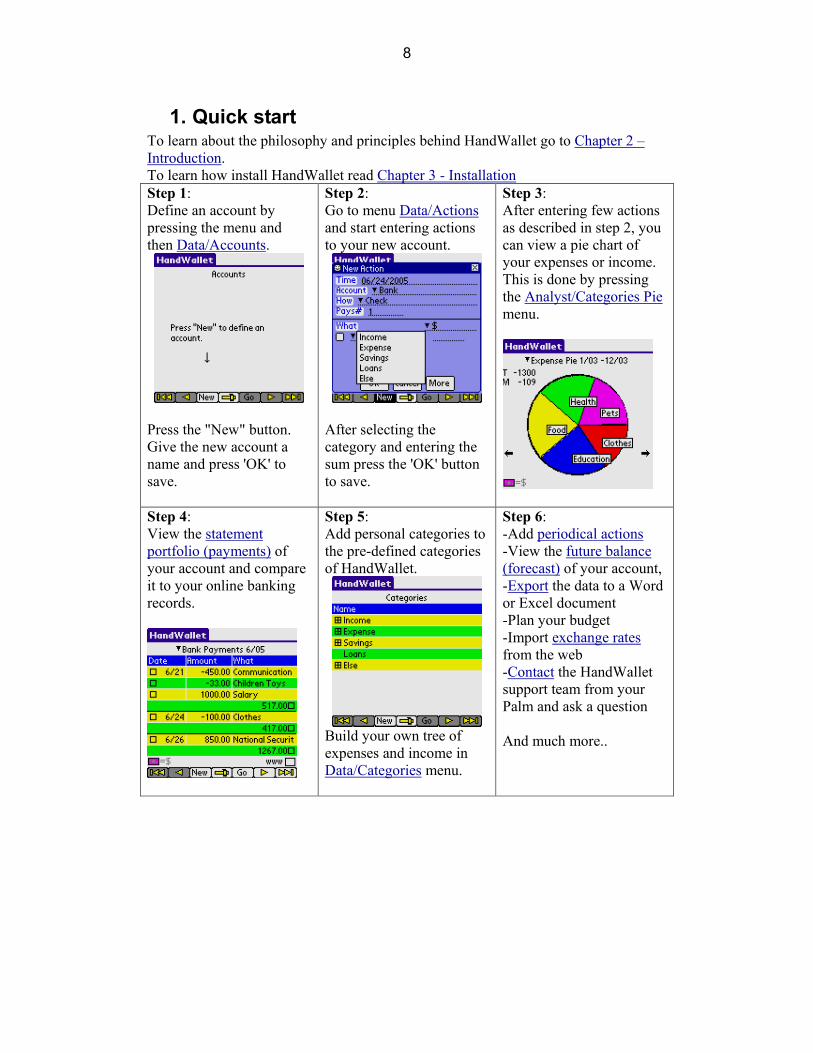
1. Quick start To learn about the philosophy and principles behind HandWallet go to Chapter 2 – Introduction. To learn how install HandWallet read Chapter 3 - Installation Step 1: Define an account by pressing the menu and then Data/Accounts.
Press the "New" button. Give the new account a name and press 'OK' to save.
Step 2: Go to menu Data/Actions and start entering actions to your new account.
After selecting the category and entering the sum press the 'OK' button to save.
Step 3: After entering few actions as described in step 2, you can view a pie chart of your expenses or income. This is done by pressing the Analyst/Categories Pie menu.
Step 4: View the statement portfolio (payments) of your account and compare it to your online banking records.
Step 5: Add personal categories to the pre-defined categories of HandWallet.
Build your own tree of expenses and income in Data/Categories menu.
Step 6: -Add periodical actions -View the future balance (forecast) of your account, -Export the data to a Word or Excel document -Plan your budget -Import exchange rates from the web -Contact the HandWallet support team from your Palm and ask a question And much more..
9
2. Introduction
A. What is the HandWallet software?
The HandWallet software is a unique, advanced and sophisticated finance software. Its goal is to assist you in managing all your finances using a hand held computer. With the help of HandWallet you will be able to follow all your expenses and earnings, manage a personal budget and manage all your bank accounts and credit cards – while having full control over all sums expected to either be added or deducted.
B. Who should use HandWallet?
The HandWallet software is intended for all people interested in having control over their financial matters. HandWallet is specifically adjusted for students, families and the self-employed.
C. How can I save money with HandWallet?
Our financial behavior is continually motivated by two conflicting forces: the temptation to buy and spend money as opposed to the fear that the money will run out. HandWallet will allow you to get to know yourself better, to understand and to balance the two forces within yourself and to bring you to a state of better personal equilibrium between these two forces. Using this program you will have more income available, and you will perform your expenses in a more efficient manner. The result of both of these is "more money", or in other words a better state of personal equilibrium. Although this will not bring you happiness (we believe that happiness is an internal matter that doesn't depend on anything, certainly not on material things) yet it will enable you to enjoy the purchasing process more and will vacate your time for more important occupations than arguing with your bank clerk. The temptation to buy…
The perpetual need to spend money is easy to understand. It stems from a number of reasons at the foundation of which lies the world of prosperity that we live in, the Western culture in whose lap we were brought up, the plentiful advertisements that overwhelm us and the competitive and comparative side of out characters. The first step is to understand the temptation to buy and not to deny it. The temptation to buy is both good and natural. It proves that something is important for you and attracts you. You can be a computer freak (who is "dying" to play with the newest model that has just come out onto the market) or a swell kid (who is "dying" to try on the most modern line of swimsuits that just appeared on the fashion channel). You might be a
10
restaurant lover (facing a special restaurant) or an insect collector (facing a rare find) . . . It will appear accompanied by a number of sentences, such as "I have to have it" "That's exactly what I was looking for", and this will usually also be accompanied by a silencing of the other force: "We received some money not long ago", "I can afford it", "We restricted ourselves last month, we deserve a purchase now". The Fear that the Money will Run Out
This is also easy to understand. It stems (how surprising!) from that same world of prosperity, that same Western culture and those same advertisements, credit sales and sophisticated sales methods. Once, when we used to make a living from agriculture, we knew exactly what we had. Today we are forced to cope with an assortment of abstract and confusing terms: credit, interest, overdraft, fund, linkage... and that only misleads, and even pressurizes. Once we have understood the impulse to buy, the second step is to understand the fear that the money will run out and not to deny it. This fear is realistic. The money is after all finite: it doesn't matter how many payments you have been allowed, they all have to be paid in the end. It doesn't matter what loan you have received, your situation now (if you don't alter anything) is only more difficult because in addition to your regular expenses you also have to repay it . . . It doesn't matter what your incomes are - since your expenses and level of lifestyle are always more or less in accordance. It also doesn't matter what your status is and to what extent you are established - you will always be accompanied by this same feeling, with regard to different things and different sums. What should you do? HandWallet is the answer!
Let's increase the amount of money - By locating all the mistakes, the duplicate payments and the fraudulent dealing that may be taking place on our credit cards. By the use of preferable means of payment for each action. By supervision of all the bodies (and people) who owe us money. It may be the refund of travel expenses from an employer, the correction of a mistake in a telephone bill or simply money that you lent. By forgoing the expenses that are found to be expensive and don't provide us with satisfaction. By postponing expenses that at the present time are liable to cause a problem in our balance of payments (and also to hamper the pleasure to be derived from that same expense). And for those lovers of formulas amongst us - if (F: Fun) is the amount of pleasure that we derive from the expense and (P: Price) is the price for that expense, we aspire to an expense that gives us maximum F (fun) for a minimum P (price).

11
Examples? With pleasure!: An unnecessary payment that is debited to our credit card gives us a high P (high price) and nil F (no pleasure). Unless we are masochistic . . . It is worth making purchases in the supermarket with the use of purchase vouchers (that give a discount and decrease the P) without altering the F (the taste of the strawberries remains the same no matter how you pay). The purchase of a dress in three payments will create a deficit in our current account for another two months (that means excess interest and consequently an increase in the - P - the cost of the dress). Should we forgo it? Not at all . . . just wait a couple of days until the beginning of the month and thus postpone the payment and prevent the problem. I do this anyway. Why do I need HandWallet?
Perhaps. But you work hard at it. And you fight with yourself. In other words you are not objective because of the two forces having a running battle inside of you. There are many little tips that you haven't thought about. The Media Vision company employs a staff of experts in order to lessen your purchase costs and calculates complex computations for you (such as interests, charges, exchange rates) that may influence your decisions. In addition the company collects and pays for advice from other users from all over the world and provides this to you for free. You are not alone . . . we place a professional tool at your disposal that will precisely and faithfully keep you updated with regard to your financial situation. Is your husband really convinced (or in other words does he "internalize" this) when you scold him and tell him that this month the money is going to end? You're not sure. With HandWallet you have the proof at your finger tips. Does this mean that now I'll have to enter every penny I spend into my
palm computer?
Of course not. Small expenses that do not accumulate (its worthwhile, at least at first, to check this) are usually not significant (a small P) and therefore they will not cause any significant saving. It's up to you to decide what to enter and what not. Moreover, most of the expenses will be directly updated from the Internet sites of the various banks and credit cards, and all that is left to do is only to affirm them and to attribute them to a category (if you wish to do so). This action takes a few minutes every month and it replaces going over the data sheets that you receive by post, as you would do anyway.

12
From what date should I begin to insert data?
Historical activities can be introduced (starting from 1950 if you have records) but we wouldn't recommend this. Begin the use from the beginning of the month or alternatively from today. Record the purchase at the supermarket, the fuelling at the fuel station or the account for the mobile phone and you will already know what your wages "go" on. After about a fortnight of data input, you will already have an expansive graphic picture that should reveal interesting (and in some cases surprising) things to you about your expenses. Life is Complicated. There are postponed payments, there are
discounts on credit cards. Sometimes I make purchases abroad. Do
you provide support for all of this? Yes, yes and again yes! With the help of HandWallet you can insert a postponed event, an event involving payments, a postponed event of payments, a periodic event once a month (such as a wage), a period event for another period of time, transfers of monies from one account to another, discounts, special charges, an event in foreign currency (including the potential for various currency conversions), payments with constant interest, payments with variable interest, linkage of various kinds etc. .
D. How to use this manual?
The HandWallet software is complex. It includes a large number of characteristics and options. There is no need to get to know all options in order to use this software and benefit from it – it is rather the opposite that is true. The HandWallet software as well as this manual are designed in a way that makes it possible to “get to know things” easily and operate this software even without mastering all details and capabilities. We recommend reading the general review (Chapter #3) thoroughly as well as the introduction to each item of the chapter dealing with “information” and “diagnostics”. Later on, one should read whenever necessary the detailed information by using the table of contents at the beginning of this manual or the key at the end of it.
Attention! HandWallet is distributed and sold in several versions to different target populations. Some versions do not include all functions described in this manual. It is recommended to check at the site which function can be included in each version, and whenever necessary – to upgrade the version you have.

13
3. Installation
A. Minimum requirements
HandWallet is designed to run on PDA’s (personal Digital Assistant) running one of the following operating systems:
Palm OS Win CE Symbian
This manual provides guidance only for the software installation and operation regarding Palm Pilot computers. If you have another type of PDA, please review the appropriate manual.
The minimum requirement necessary for the smooth functioning of this software is that the operating system version would be 3.1 or higher. If you are unsure regarding the operating system of your Palm device, please turn to the vendor where you purchased the Palm device.
In addition to that, the software uses an add-in to the operating system called Booster by the AppForge Company, version 4.0 or higher. For your convenience, Booster is included in the installation of HandWallet. It can also be downloaded from the site of AppForge Company free of charge: http://www.appforge.com/ If you have already installed Booster on your computer, the HandWallet installation will check its version. If the existing Booster is of a version older than 4.0, the installation would update the Booster to this version. If the existing Booster is of a version more advanced than 4.0, it will remain unchanged. HandWallet itself requires ~600 KB available on the palm computer (not including data and language support).
B. Downloading
HandWallet can be downloaded from the product site: http://www.handwallet.com/ Go to the download page or type this URL: http://www.handwallet.com/csl/downloadpage.asp There are 3 options for downloading the software: A single installation file including Booster A zip file A single installation file without Booster
Select the first option (the recommended option) if Booster is not installed on your Palm computer (and/or if you are not sure whether or not it exists) and if your available memory is beyond 1MB. Select the second option if Booster is not installed on your Palm computer and if you have less than MB1 available memory. Please note: this option does not save more memory unless it is at the installation stage. (*) It is therefore recommended to use

14
this option only if for some reason you were unable to install the software through the single installation file or if the memory you have available is less than 1MB. Select the third option if you have installed Booster of version 4.0 upwards or if you wish to update the HandWallet version that is already installed on your Palm computer. After selecting the right file, a downloading window will open up. Please make a note of where this file is saved for the purpose of transferring it (through synchronization) later on to the Palm.
C. Palm sync using InstallTool
HandWallet software is transferred to Palm through the regular InstallTool. In case you select the first option – the single installation file You should double-click on this file (HandWallet-Install.prc). The file will appear on InstallTool as a “candidate” for synchronization with the Palm.
ILLUSTRATION 1 - Transferring the software to Palm – a single installation file
You should click on the “Done” button on the screen right hand side. Then place the Palm in the synchronization cradle and proceed to perform the synchronization.
In case you select the second option – the ZIP file, you should first open the zip file (HandWallet-Files.zip) with the help of a zip software, for example: WinZip, which can be downloaded free of charge from the following site: http://www.winzip.com
15
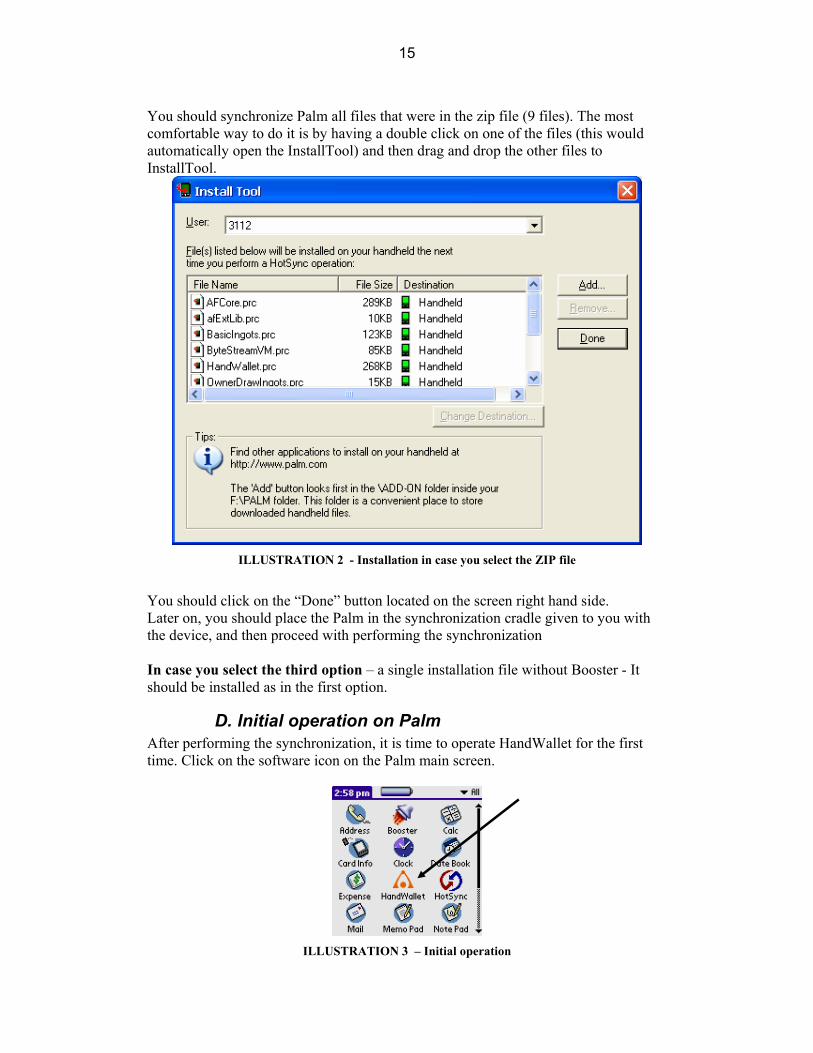
You should synchronize Palm all files that were in the zip file (9 files). The most comfortable way to do it is by having a double click on one of the files (this would automatically open the InstallTool) and then drag and drop the other files to InstallTool.
ILLUSTRATION 2 - Installation in case you select the ZIP file
You should click on the “Done” button located on the screen right hand side. Later on, you should place the Palm in the synchronization cradle given to you with the device, and then proceed with performing the synchronization In case you select the third option – a single installation file without Booster - It should be installed as in the first option.
D. Initial operation on Palm
After performing the synchronization, it is time to operate HandWallet for the first time. Click on the software icon on the Palm main screen.
ILLUSTRATION 3 – Initial operation

16
When you operate the software for the first time, you see a Wizard that lets you define a number of initial parameters such as the interface language and the main currency you will be working with. The Wizard interface language is English only and it appears only upon the first operation of the software or when updating future versions. The first screen appearing upon operation of the software is the greeting screen:
ILLUSTRATION 4 – Welcome to HandWallet
You should click on the right arrow to continue. You should read carefully the terms & conditions and click on the right arrow if you agree to these conditions and are interested in continuing to use the software.
ILLUSTRATION 5 – Terms & Conditions
Please select the country you live in.
ILLUSTRATION 6 – Selecting the country

17
Please select the software interface language. For your attention: you can make your selection in any foreign language even if you do not have that language installed on your handheld computer. In this case, the software will operate fully in the foreign language you selected (including the keyboard) except for the menus that could appear illegible. In case you do not have the selected foreign language on your handheld computer and the menus are indeed illegible, it is possible to change only the menu language into English – as will be explained later.
ILLUSTRATION 7 – Selecting the interface language
Select the currency you frequently work with and click on the right arrow to continue.
ILLUSTRATION 8 – Selecting the main currency
The system is producing files that will serve you later on. This is a one-time operation and it can take several seconds. This is the end of HandWallet initial operation. You are on the action screen, which is the first screen that will come up whenever you operate HandWallet.
ILLUSTRATION 9 – The initial screen (the actions screen)

18
E. Problems during installation time or initial operation
While performing the synchronization
In case you have no available space in your handheld computer, you may receive an error message. If you attempt to install the single installation file, perform the following operations: Delete the installation file from your hand held computer. Download the zip file from the site (2nd option) and repeat the installation process. Illegible menu
The installation has been correctly completed. You selected a language different from
English but you receive an illegible menu.
ILLUSTRATION 10 – Malfunction – Illegible menu
This usually occurs when you do not have the selected language installed on your hand held computer and you selected it during start wizard. You can change the menu language to “English” and continue to work using the your language (except for the menus). Select the menu that is second from the left and then – the 3rd line.
ILLUSTRATION 11 – Malfunction – Illegible menu

19
Click on the right arrow at the bottom of the screen to move to the next group of definitions and double click on the “menu language” line. Change the default from “according to the language” to “English”.
ILLUSTRATION 12 – Changing the menu language
The menus will appear from now on (and in every future operation of the software) in English. In case you purchase foreign language support for your handheld PDA, you will be able to change this feature in the future. The installation crashes in the middle with the message “Error in Procedure
CreatePDBFile” .
This kind of failure (malfunction) tends to repeat itself in a small number of Palm 505 and Palm 515 models that run support in a foreign languages (for example: Hebrew of the Har’el Company). It is caused by some kind of collision between the Booster operating system extension and that language. The AppForge Company, manufacturer of Booster and the Har’el Company are trying to identify the reasons for this kind of malfunctioning, which affects a large number of software programs in different ways. It is possible to make the Hebrew of Har’el temporarily inactive. Following the initial operation of HandWallet it is possible to return the Har’el Hebrew to a regular work situation and work with HandWallet without any additional problems. The software does not come up and it sends a message saying that a certain
component is missing.
The Booster used by HandWallet is, in fact, a collection of elements. Sometimes, not all the required elements exist in your hand held computer. The best way to deal with this problem is to re-install HandWallet. It is also possible to download only the Booster directly from the site of AppForge Company.
20
ILLUSTRATION 13 – Missing elements for activating HandWallet
Attention: A new installation of HandWallet and/or installation of Booster do not delete the existing data, but in any case, it is recommended to perform a data backup prior to installation. A new installation of HandWallet overrides the previous installation, and it therefore does not take double space.
F. Update software
Once in a while, the MediaVision Company releases a new version for the HandWallet software. Performing a software update is done exactly as a new installation of HandWallet. The system identifies that an update is performed and it does not delete the existing data. Attention: Prior to performing an update, it is recommended to perform a complete backup of the data and the old software as explained in this manual.
G. Uninstall
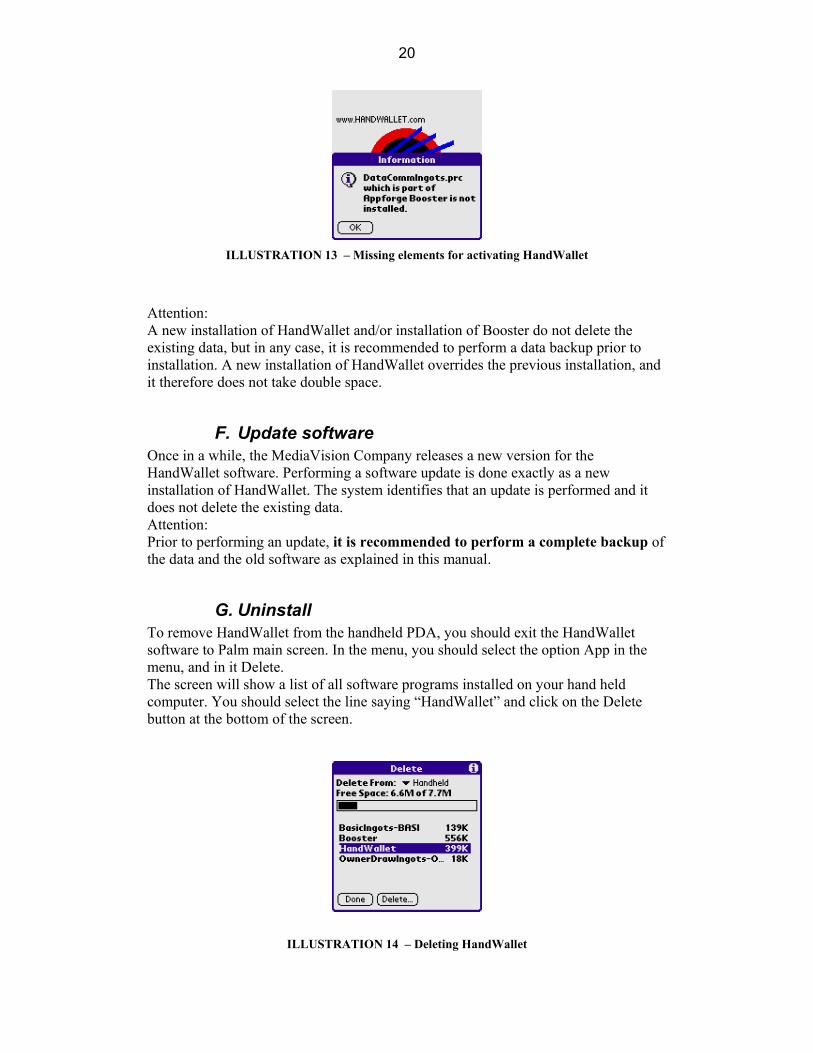
To remove HandWallet from the handheld PDA, you should exit the HandWallet software to Palm main screen. In the menu, you should select the option App in the menu, and in it Delete. The screen will show a list of all software programs installed on your hand held computer. You should select the line saying “HandWallet” and click on the Delete button at the bottom of the screen.
ILLUSTRATION 14 – Deleting HandWallet

21
A question will appear asking whether you really wish to delete the software. A click on the “Yes” button will delete HandWallet as well as all data from your Palm.
ILLUSTRATION 15 – Deleting HandWallet - confirmation
Attention: HandWallet software makes use of the operating system add-in called Booster developed by the AppForge Company. For your convenience, this add-in comes as part of HandWallet installation. To remove the Booster element from the operating system, you should continue to delete the following applications as well: BasicIngots-BASIC DataCommIngots Booster OwnerDrawIngots The removal of these elements is not recommended since there are many programs (in addition to HandWallet) that use them.

22
4. General Review HandWallet includes 5 modules: The Data module: It is used for entering and viewing personal monetary (financial) data, such as actions, payments, means of payment (accounts) etc, Tools module: It serves for performing different functions regarding the financial data, such as the import and export of data, downloading and uploading data from the web, and adjustment of different parameters of the software. Analyst module: It is used to receive a description of the financial situation and executive summary reports regarding the data entered into the software. Use the analyst options to find out what the money was spent on, what your sources of income are and how they are distributed, meeting or not meeting your personal budget, your expected future cash flow and more. Finance module ($): It is used to enter and view general financial information, such as exchange rates between foreign currencies, stock rates, interest rates and financial indexes. This information has an impact on actions you feed into the system (for example: overseas purchases in foreign currency). Help module: It is used to receive general or specific help on the screen you see at any given time.

23
5. Data
A. Accounts (Means of payment)
‘Accounts’ is a general name for bank accounts, credit cards, cash or any other means of payment. One of the prevailing uses of HandWallet is a follow-up of means of payment: their current balance, what kind of actions were done with them in the past and what actions will be done in the future. The definition of the means of payment is performed through a data/accounts menu. The options existing on the screen are: Definition of a new account. Edit (modify) an account. Duplicate an account. View the Statement portfolio of an account. Delete an account. Change the view fields in the screen Add personal filed to the account details
New account
To define a new account, you should click on the “New” button at the bottom of the screen. In case the account has not yet been defined in the system, the software will guide you in defining the account by an appropriate message and an arrow.
ILLUSTRATION 16 – Defining a new account
It is possible to define an unlimited number of accounts (depending on the memory available on the hand held computer). After clicking on “New”, the following screen will appear:

24
ILLUSTRATION 17 – Defining a new account – fields
Click on the lined area of each field to feed (enter) data according to the following specification: Name (required field): Each account has a name, which serves as a reference to it in the future. The name of an account can be any combination of numbers and letters. Two different accounts should not be given the same name. Currency : All accounts are executed in a certain currency. This does not prevent us from performing actions with the same account in other currencies as well. But these actions will be exchanged to the currency of your account. It is possible to add currencies that are not build-in HandWallet in the $/my favorites menu. Type: This could be a bank account, a credit card, cash or a merchant account. A merchant account is one used by business owners for the purpose of clearing customer credit cards. In case we use several currencies, you should use an account of the “cash” type for each currency. It is possible to define credit cards and merchant accounts only after we have defined at least one bank account or one cash account. Activated: Feed “Yes” (default) for accounts currently being used. Feed “No” for an account which is no longer in use but that you still wish to have in the system for follow-up purposes. Num : Your bank account number (in case account is of the bank account type). The credit card number (in case the account is of the credit card type). The merchant number (in case the account is of the merchant account) given to you by the credit card company. This data remains encoded in the software database. It is not mandatory to enter this data. But it could be used to perform synchronization with the Internet sites of banks and credit card companies as well as direct payment from the device. The “cash” account has no number. Terminal Number:

25
This data exists only in merchant accounts. This is the terminal number you received for the purpose of credit card clearance. It is recommended to define a separate merchant account for each credit card company you work with. In this case, it is possible to define the same terminal number to all accounts. Credit limit : The maximum overdraft when a bank account is involved. The maximum accumulative amount of purchases when a credit card is involved. Remark: Free text. You can use it for feeding additional information regarding your account (for example: the name and telephone number of the bank clerk handling your account). The “more” button: This button appears several times within the software and it takes you to a screen including additional details. When adding a new means of payment, the “more” button will appear when a balance account, a credit card account or a merchant account are entered (“cash” does not have any additional details). A new account– Credit Card
If we enter a credit card, then after clicking on “more”, the following fields will appear:
ILLUSTRATION 18 – A new account – credit card
Payoff:
The payoff mechanism used for this card by HandWallet. The options are: -Automatic, every month. The total sum all transactions done with this card will be deducted from the "Balance Account" once a month. -Manually. No sums are deducted automatically. You will have to manually enter "money transfer" payments to pay for your credit cards transactions. Balance account (required field):
The means of payment (usually a bank account) from which the credit card amount is deducted. Balance day (required field):
The day of the month when the credit card is “deducted”. The default is 1 (first day of the month).
26
Extra credit days:
This field is not common in some countries, since credit cards are usually deducted on the day of payment. In some countries, credit cards are not deducted on the day of payment (due date) but rather a few days (or even up to two weeks) later. Thus, for example, a transaction made on the 30th of the month will be deducted on the 15th of the following month, and on the 1st o the month. In this case, the field “additional days of credit” should be updated to 15. Valid until (required field):
The last day the credit card can be used as appears on the card. Credit card type:
Is this credit card local or international? Pay abroad:
The form of payment by credit card abroad. The “More” button will take us to additional details regarding the means of payment. A new account – Internet
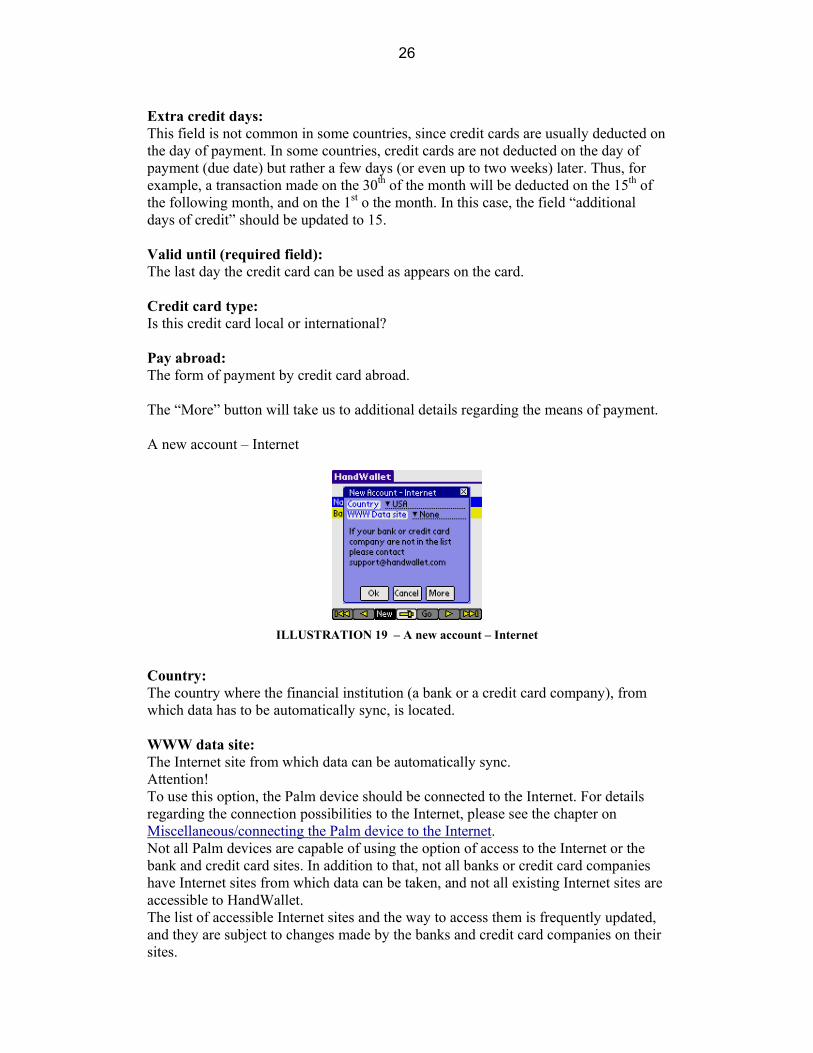
ILLUSTRATION 19 – A new account – Internet
Country:
The country where the financial institution (a bank or a credit card company), from which data has to be automatically sync, is located. WWW data site:
The Internet site from which data can be automatically sync. Attention! To use this option, the Palm device should be connected to the Internet. For details regarding the connection possibilities to the Internet, please see the chapter on Miscellaneous/connecting the Palm device to the Internet. Not all Palm devices are capable of using the option of access to the Internet or the bank and credit card sites. In addition to that, not all banks or credit card companies have Internet sites from which data can be taken, and not all existing Internet sites are accessible to HandWallet. The list of accessible Internet sites and the way to access them is frequently updated, and they are subject to changes made by the banks and credit card companies on their sites.

27
Moreover, sync data through the Internet depends on linking to the Internet and on the availability of the bank and/or credit card servers. The Media Vision Company is not responsible in any way to the availability of data or its accuracy. This service is experimental, and it should be treated accordingly. In case you choose to perform automatic synchronizations with a specific bank or credit card company, you will have to give additional data you have depending on the bank or credit card company. Thus, for example, to receive data from Bank HaPoalim, you would have to provide a user code, identity card (identity number) and a password.
ILLUSTRATION 20 – A new account– the Internet – Bank HaPoalim
To get data from Bank Leumi, it is required to provide the user identification, the identifying field and the password.
ILLUSTRATION 21 – A new account – the Internet – Bank Leumi
To get data from Bank Discount, it is required to provide the ID number, branch number, the account number and the password.
28
ILLUSTRATION 22 – A new account – the Internet – Bank Discount
It is required to feed the appropriate identification details exactly the way they are fed when connecting to the bank or to the credit card company in a regular Internet browser. In some cases it is necessary to pay attention to upper/lower case letters. After feeding the identification details, it is possible to check the connection (log on) to the bank or the credit card company by clicking on the “Check Connection” button. Attention! The “Check Connection” button does not actually take the data but it rather connects (links) to the Internet site of the bank or the credit card company. It verifies the possibility to log into the account. Update frequency: Getting data from a bank or a credit card company can be periodically done. Please use this parameter to define the frequency (in minutes) you would like to connect to the bank to get data. Attention! Due to limitations of the PalmOS operating system, getting the data through the Internet (web) is possible only when the HandWallet software is active. The automatic sync of data will stop upon exiting the HandWallet software and will be immediately renewed upon entering the software. In case the software has not been active for a longer period of time defined in the “frequency update” parameter, the sync will be performed immediately after activating the software. Edit (modify) account
To modify existing account, you should click on it twice or select it by a single click and then select the “Edit” option from the list of options that will appear. When you edit the account, the screen displays will be the same as in the definition of a new account. Saving the changes will be performed only following a click on “OK”. To cancel the changes, click “Cancel” or move to the software menu for another option without clicking on “OK”. Attention! Making changes in accounts of the “credit card” or “merchant account” types could create situations that are complex for managing the account and follow-up of payments. Thus, for example, changing the credit card balance day (due date) will not change the payments already existing in the system. But editing (following this kind of change) of one of the actions on the credit card, will create the payment on the new date. If you are unsure, it is possible to define the same credit card one more time, and turn the previous account to “inactive”.
Duplicating an account
To duplicate an account select it by a single click and then select ‘Duplicate’ from the list of options that will appear. Duplicating an account will create another account with the same name and definitions. The new created account will be empty: no actions, payments or balances associated with the original account will be duplicated.

29
View the Statement portfolio of an account
This will jump to the ‘Data/Payments’ screen of the account, showing all the transactions and balances of the account.
Deleting account
To delete an account existing in the system, you should select it by a single click and then select “Del” option” from the list of options that will appear. The system’s default is to request user confirmation prior to deleting the account. The screen will display the question: “Are you sure?” To confirm the deletion, click on “Yes”. It is possible to avoid the request for confirmation by updating the option “Verify deletion” on the tools/options screen. Change the view fields in the screen To change the view fields of the accounts screen press the 'Options' button at the bottom of the page and select "View fields".
ILLUSTRATION 23 – Account view fields
Now select the fields you want to see on the screen (appears on the left side of the screen) Personal fields: In this screen you can edit any extra personal fields (fields related to Accounts that are not build in HandWallet). By default, the list of personal fields is empty. To add personal fields close the Actions window and select the ‘Options’ button at the button of the page.

30
B. Actions
Actions are financial transactions that create one or more payments (a flow of money). For example: the purchase of something, receiving a salary every month, paying off a loan etc. The most common transaction we perform with HandWallet is the addition of new actions. The definition of actions is performed by using the data/actions menu. The options available on the screen are as follows: Definition of a new action. Edit (modify) an action. Deletion of an action. Duplicating of an action. Filtering the actions list. Navigation – Go to actions of a specific year/month/day
New action
To define a new action, click on the “New” button at the bottom of the screen. In case actions have not yet been defined in the system, the software will guide you in defining an action with the help of a message and arrow.
ILLUSTRATION 24 – Defining a new action
It is possible to define an unlimited number of actions (depending on the PDA memory available). Attention! It is impossible to define actions within the system as long as at least one means of payment (account) has been entered. To learn how to feed means of payment into the system, please refer to data/accounts. It is impossible to feed actions within the system if categories are not defined (the system has built-in categories). To learn how to define categories, please refer to data/categories. After clicking on “New”, the following screen display will appear:
31
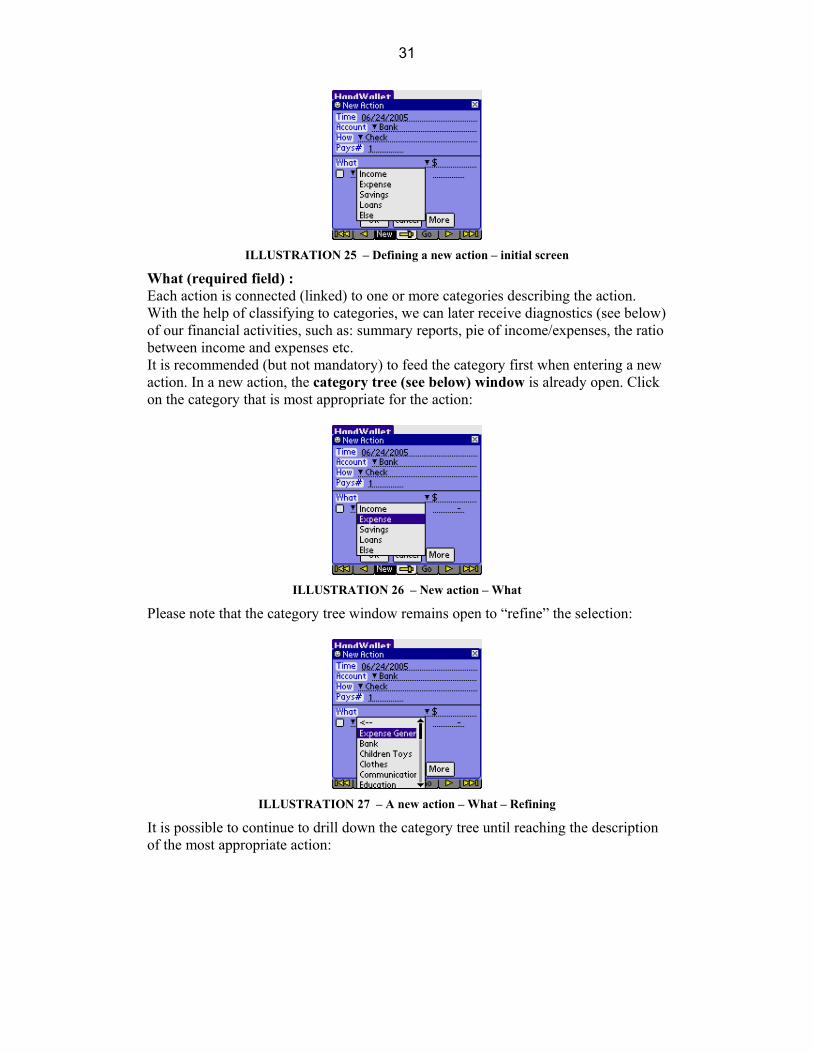
ILLUSTRATION 25 – Defining a new action – initial screen
What (required field ) :
Each action is connected (linked) to one or more categories describing the action. With the help of classifying to categories, we can later receive diagnostics (see below) of our financial activities, such as: summary reports, pie of income/expenses, the ratio between income and expenses etc. It is recommended (but not mandatory) to feed the category first when entering a new action. In a new action, the category tree (see below) window is already open. Click on the category that is most appropriate for the action:
ILLUSTRATION 26 – New action – What
Please note that the category tree window remains open to “refine” the selection:
ILLUSTRATION 27 – A new action – What – Refining
It is possible to continue to drill down the category tree until reaching the description of the most appropriate action:

32
ILLUSTRATION 28 – A new action – What – Continuing to refine
ILLUSTRATION 29 – A new action – What – Category selection
Every category selected displays the option selected earlier marked by the word “General”. Select “General” if you do not wish to provide any further detail or if the existing additional detail refining does not meet your needs. In case you selected the “general” category or in case there is no additional refining, the category tree is closed and there is a requirement to fill in the sum.
ILLUSTRATION 30 – A new action – Entering a sum
Sum:
Click the action sum near the category selected. You can enter a sum including a decimal point. Please note that an expense should be clicked as a negative (minus) sum and an income – as a positive sum. The minus sign will automatically be added to categories of the type “Expenses” (please see the category tree below) as in our example. In case an income is involved, nothing is added and it means that a positive sum is involved. In certain categories (for example: categories of the type “other”) the software program is unable to know whether negative or positive sums are involved. The rule
33
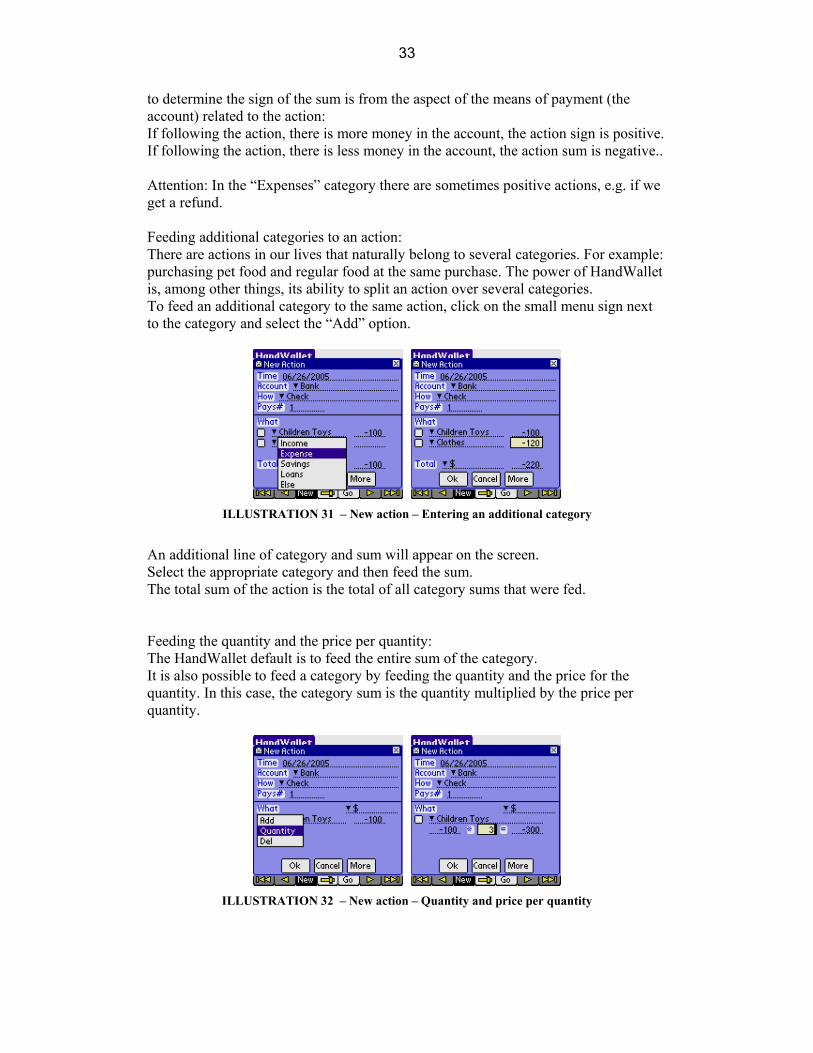
to determine the sign of the sum is from the aspect of the means of payment (the account) related to the action: If following the action, there is more money in the account, the action sign is positive. If following the action, there is less money in the account, the action sum is negative.. Attention: In the “Expenses” category there are sometimes positive actions, e.g. if we get a refund. Feeding additional categories to an action: There are actions in our lives that naturally belong to several categories. For example: purchasing pet food and regular food at the same purchase. The power of HandWallet is, among other things, its ability to split an action over several categories. To feed an additional category to the same action, click on the small menu sign next to the category and select the “Add” option.
ILLUSTRATION 31 – New action – Entering an additional category
An additional line of category and sum will appear on the screen. Select the appropriate category and then feed the sum. The total sum of the action is the total of all category sums that were fed. Feeding the quantity and the price per quantity: The HandWallet default is to feed the entire sum of the category. It is also possible to feed a category by feeding the quantity and the price for the quantity. In this case, the category sum is the quantity multiplied by the price per quantity.
ILLUSTRATION 32 – New action – Quantity and price per quantity
34
For example: Painters using this software to follow-up on their purchases of paint would define the price per kilogram paint of a certain type (e.g. $10). When they buy this paint, they would feed the quantity purchased (e.g. 20 kg.). In this case, the category sum would be $200. Time (required field):
The date of action. The default for this field is the current date. Please note that the action date could be different from the payment dates for this action. It is possible to feed actions that took place in the past (starting from 1950) as well as actions that will take place in the future. Account (required field):
The means of payment (see above) used to pay for the action – in case of an expense, or in the case of income – the means of payment into which the money was entered. It is mandatory to feed an account in each action. The default for this field is the last account used or the only account existing (if only one exists). How:
The form of payment. The possible values in this field are in accordance with the type of the account involved in the action. Thus, for example, with a bank account, it is possible to pay by: Check ATM (Automatic Machine Teller) Paper (form / document)- Paper Tel (Telephone) - Tel Internet - Internet An ATM feeding is really a shortcut to two activities: the transfer of money from the “bank account” means of payment to the “cash” means of payment, and then payment by this cash. Pays#:
The default is that the action is performed by one installment. Please change this value to the number of installments scheduled for the action. In case the number of installments is greater than 1, it is possible to make a note of the first installment, which could be different from the rest of the installments. The rest of the installments (except for the first installment) are equal. The total of all installments is equal to the sum of the action. The “more” button : This button appears several times in this software, and it takes you to a screen showing additional details. A new action – additional details: Subject: A large number of additional details can be added to actions. To make orientation easier, you should select the relevant subject among the following: Vendor / customer + remark Checks

35
Customer credit card Tax / Invoice / Receipt Timing Consumption Partners Discount Interest Linkage Exchange rate (it will appear only if you enter actions in a currency different
from the currency your account is in) Action status Personal fields
ILLUSTRATION 33 – Action – Clicking on the “More” button
36
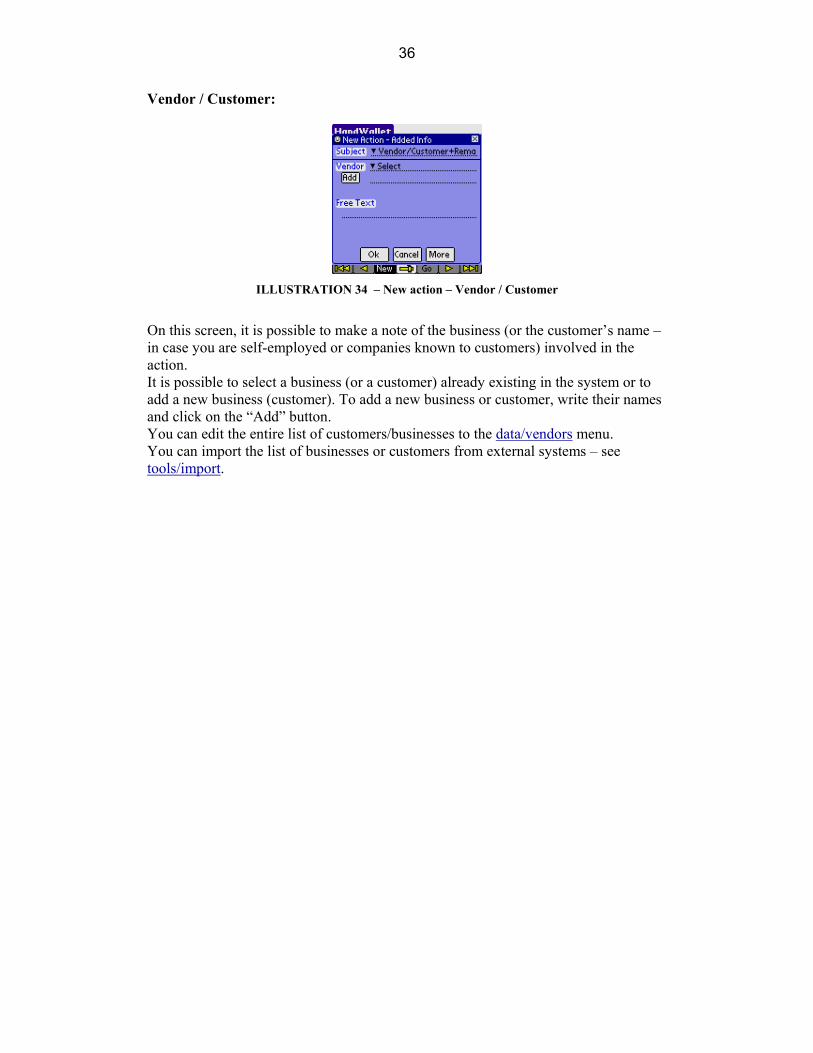
Vendor / Customer:
ILLUSTRATION 34 – New action – Vendor / Customer
On this screen, it is possible to make a note of the business (or the customer’s name – in case you are self-employed or companies known to customers) involved in the action. It is possible to select a business (or a customer) already existing in the system or to add a new business (customer). To add a new business or customer, write their names and click on the “Add” button. You can edit the entire list of customers/businesses to the data/vendors menu. You can import the list of businesses or customers from external systems – see tools/import.
37
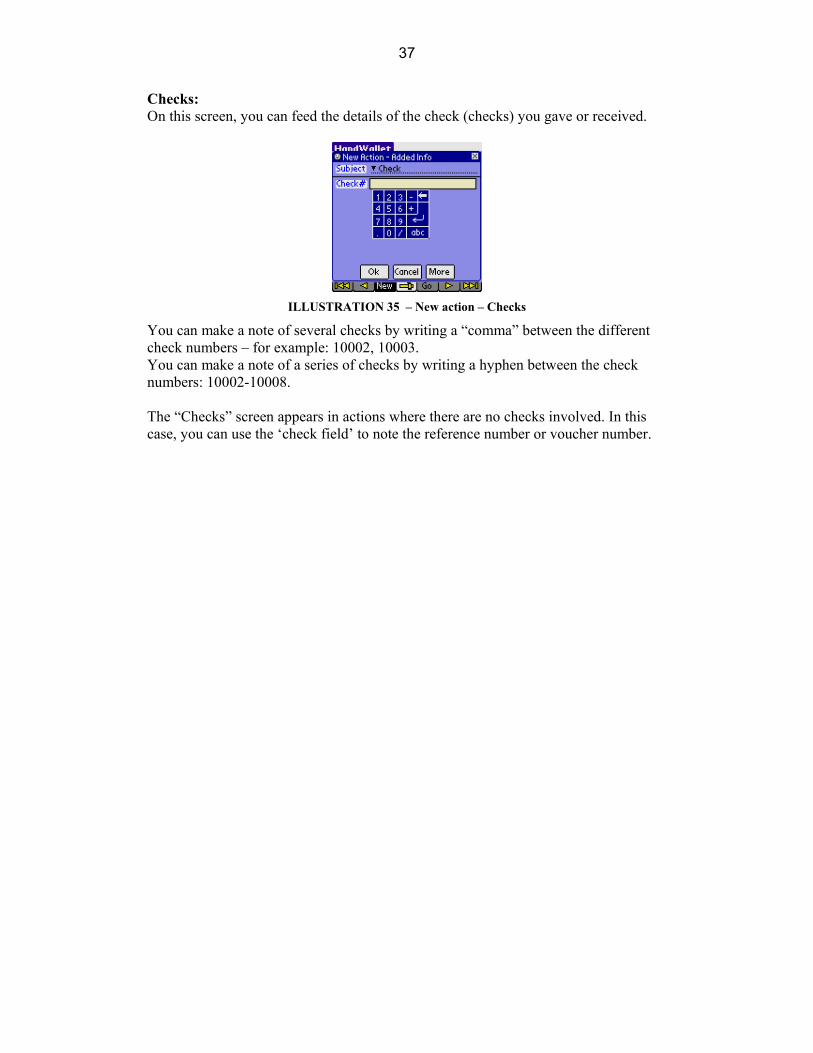
Checks: On this screen, you can feed the details of the check (checks) you gave or received.
ILLUSTRATION 35 – New action – Checks
You can make a note of several checks by writing a “comma” between the different check numbers – for example: 10002, 10003. You can make a note of a series of checks by writing a hyphen between the check numbers: 10002-10008. The “Checks” screen appears in actions where there are no checks involved. In this case, you can use the ‘check field’ to note the reference number or voucher number.
38
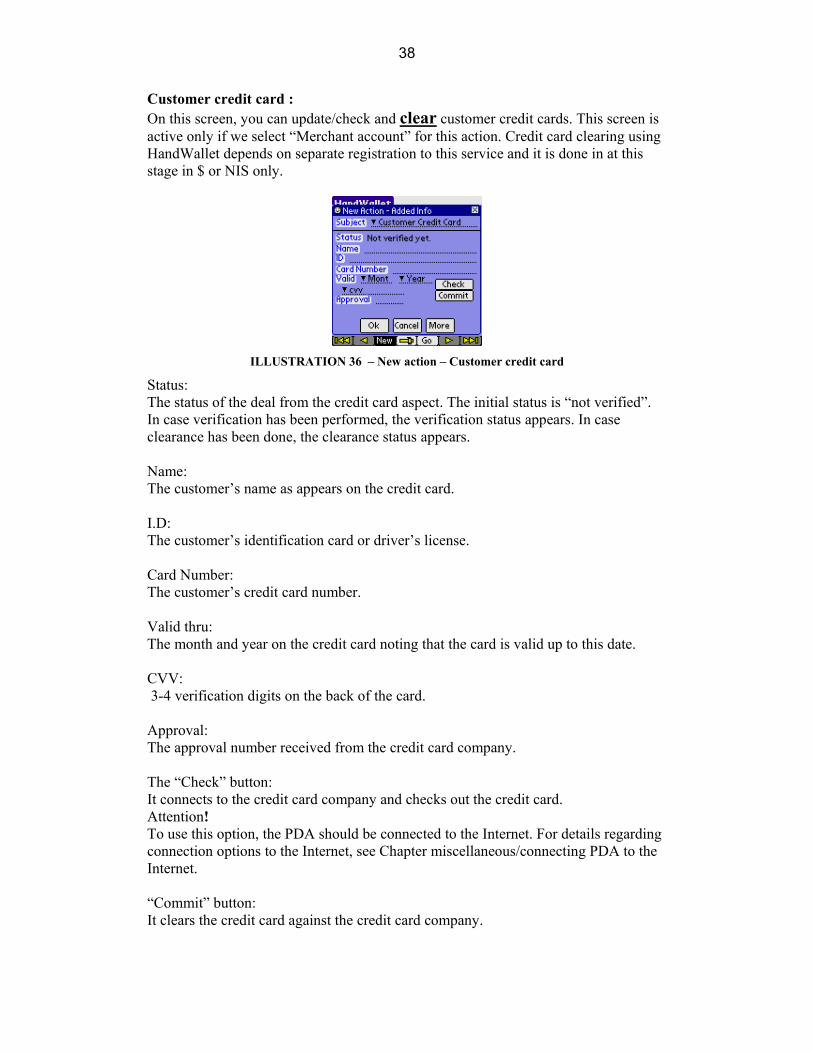
Customer credit card :
On this screen, you can update/check and clear customer credit cards. This screen is active only if we select “Merchant account” for this action. Credit card clearing using HandWallet depends on separate registration to this service and it is done in at this stage in $ or NIS only.
ILLUSTRATION 36 – New action – Customer credit card
Status: The status of the deal from the credit card aspect. The initial status is “not verified”. In case verification has been performed, the verification status appears. In case clearance has been done, the clearance status appears. Name: The customer’s name as appears on the credit card. I.D: The customer’s identification card or driver’s license. Card Number: The customer’s credit card number. Valid thru: The month and year on the credit card noting that the card is valid up to this date. CVV: 3-4 verification digits on the back of the card. Approval: The approval number received from the credit card company. The “Check” button: It connects to the credit card company and checks out the credit card. Attention! To use this option, the PDA should be connected to the Internet. For details regarding connection options to the Internet, see Chapter miscellaneous/connecting PDA to the Internet. “Commit” button: It clears the credit card against the credit card company.

39
To use this option, the PDA has to be connected to the web. For details regarding the connection possibilities, see the chapter miscellaneous/connecting PDA to the Internet.

40
Tax, Invoice, Receipt:
On this screen you can make a note of the receipts (one or more), invoices (one or more) and the VAT percentage of the action. You can also indicate the month and year the invoice is related to. At a later date, you can export this data to external software programs, such as accounting software.
ILLUSTRATION 37 – New action – Receipt, invoice and VAT
Attention: You can set the default VAT percentage in the Tools / options / VAT percentage menu.

41
Timing:
ILLUSTRATION 38 – New action – Timing
On this screen you can determine whether a one-time action is involved or a periodical one (an action repeating itself every set period of time). HandWallet software supports actions repeating themselves: Every week Biweekly Every month (e.g. salaries) Every two months (e.g. municipality taxes) Every quarter Every half-year Every year Attention: An installment action cannot be cyclical.

42
Consumption: In this screen you can specify the period related to this action. Using this advanced option you can manage your transactions according to the real time you consume them, without any connection to the date you purchase or the date (dates) you pay.
ILLUSTRATION 39 – New action – Timing
The default consumption for each action is the purchasing month. Pay attention that all graphs in the software reflect consumption and not the purchasing date or the pay day (dates). For example, if you purchase a 1200$ car insurance in Jan 2004, pay for it using 4 installments (300$ each) and consume it from Jan 2004 to Dec 2004 (12 month), 100$ will appear in the "Analyst/Categories pie", "Analyst/Categories Bar", "Analyst/Categories report" etc. every month during the year.

43
Partners: On this screen you can link an action to different people. This link is necessary when you wish to track settling of accounts between partners, for example: students sharing an apartment. Another advantage of linking actions to people is when you wish to know how much money each one of them is spending and on what they are spending it. This can be done when HandWallet is used by a group of people (e.g. a family or a company) and not just one person. You can link actions to people only if people are defined in the system. To define people (persons) use the Data/Persons menu (see below). If people are still not defined, you will see the screen below:
ILLUSTRATION 40 – New action – Who
In case one or more people are already defined, you will see the screen below:
ILLUSTRATION 41 – New action – Who – Continued
Select the person you wish to relate to the action, and make a note of the related sum and percentage:

44
ILLUSTRATION 42 – New action – Who – Continued
A 100% relation (as in the illustration above) means that the entire action is related to the same person. A 50% relation means that only half of the action is related. We can use a 50% relation when two partners sharing expenses purchase something that is used by both of them. In this case, we will define both people:
ILLUSTRATION 43 – New action – Who – Two people
Later on, it will be possible to receive reports and graphic diagnostics presenting the different actions in a cross-section of people.

45
Discount: It is possible to make a note of whether we received/give a special discount (or whether a special tax should be added).
ILLUSTRATION 44 – New action – Discount
A discount should be marked as a negative number (for example, a 10% discount should be marked as “-10” (minus 10). An addition (e.g. a 3% commission) should be marked as a positive number “3”. Attention - The action price on the action screen will not change as result of marking the discount or commission percentage. The change will show on the statements presenting the monetary transactions.
46
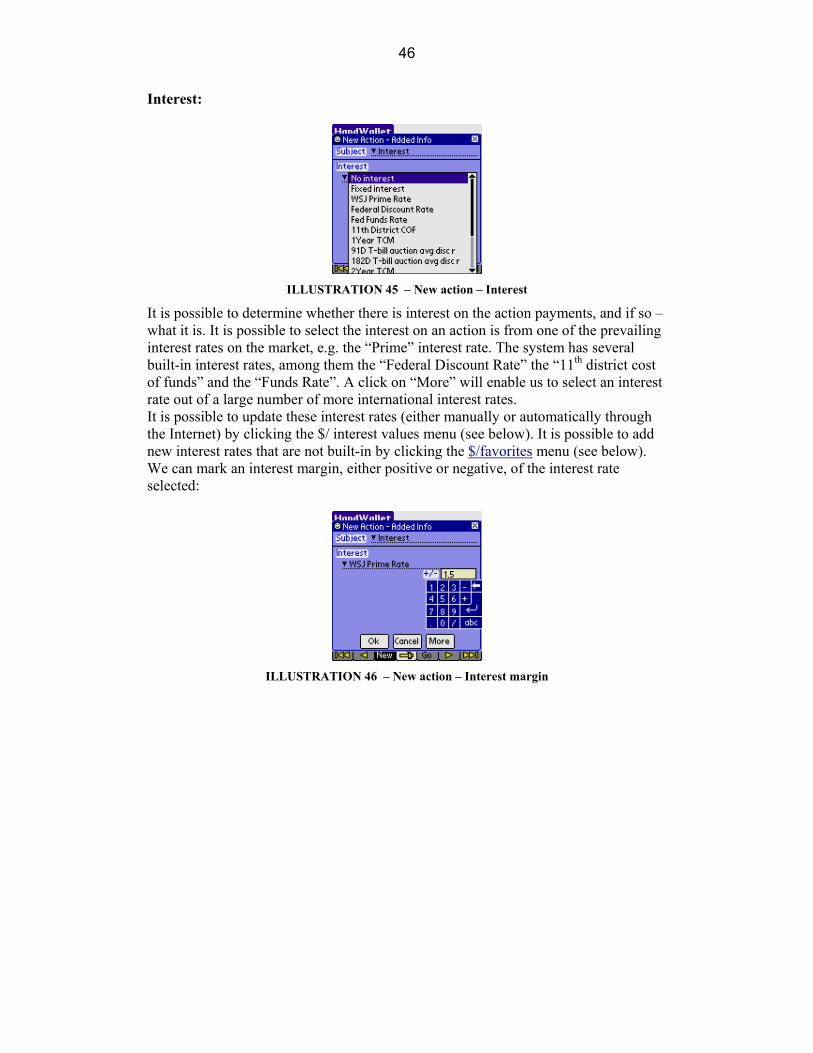
Interest:
ILLUSTRATION 45 – New action – Interest
It is possible to determine whether there is interest on the action payments, and if so – what it is. It is possible to select the interest on an action is from one of the prevailing interest rates on the market, e.g. the “Prime” interest rate. The system has several built-in interest rates, among them the “Federal Discount Rate” the “11th district cost of funds” and the “Funds Rate”. A click on “More” will enable us to select an interest rate out of a large number of more international interest rates. It is possible to update these interest rates (either manually or automatically through the Internet) by clicking the $/ interest values menu (see below). It is possible to add new interest rates that are not built-in by clicking the $/favorites menu (see below). We can mark an interest margin, either positive or negative, of the interest rate selected:
ILLUSTRATION 46 – New action – Interest margin

47
Amounts linkage: You can determine whether the action payments are linked to any index (see below) and/or any currency:
ILLUSTRATION 47 – New action – Linkage
Linkage to an index: The system includes a built-in set of indexes organized by countries, including the DOW, NASDAQ and S&P 500. It is possible to add new indexes using the financial menu ($)/favorites. You can update the index values (either manually or automatically from the Internet) in the financial menu ($)/index values.
ILLUSTRATION 48 – New action – Linkage to an Index
In the linkage to the index, the base index should be noted. You can make a note of any value or select a date. In case a date was selected (default), linkage will be done according to the index rate fed into the system in proximity to this date. Linkage to foreign currency: The system includes a number of useful foreign currencies including the American Dollar, the Euro, English Pound, Japanese Yen and more. You can add new currencies using the financial menu ($)/favorites. You can update the exchange rate values (either manually or automatically from the Internet) in the financial menu ($)/exchange rates.

48
ILLUSTRATION 49 – New action – Linkage – Foreign currency linkage
In foreign currency linkage, you should make a note of the base rate and the type of the exchange rate. You can enter any value or select a date. In case a date was selected (default), linkage will be done according to the exchange rate fed into the system in proximity to this date. Important comment: Please note that it is possible to integrate (combine) all financial parameters together. For example: an action with the Japanese Yen carrying a “Libor” interest rate with an 80% linkage to the consumer price index and 20% linkage to the American dollar, and having a 35% discount.
49
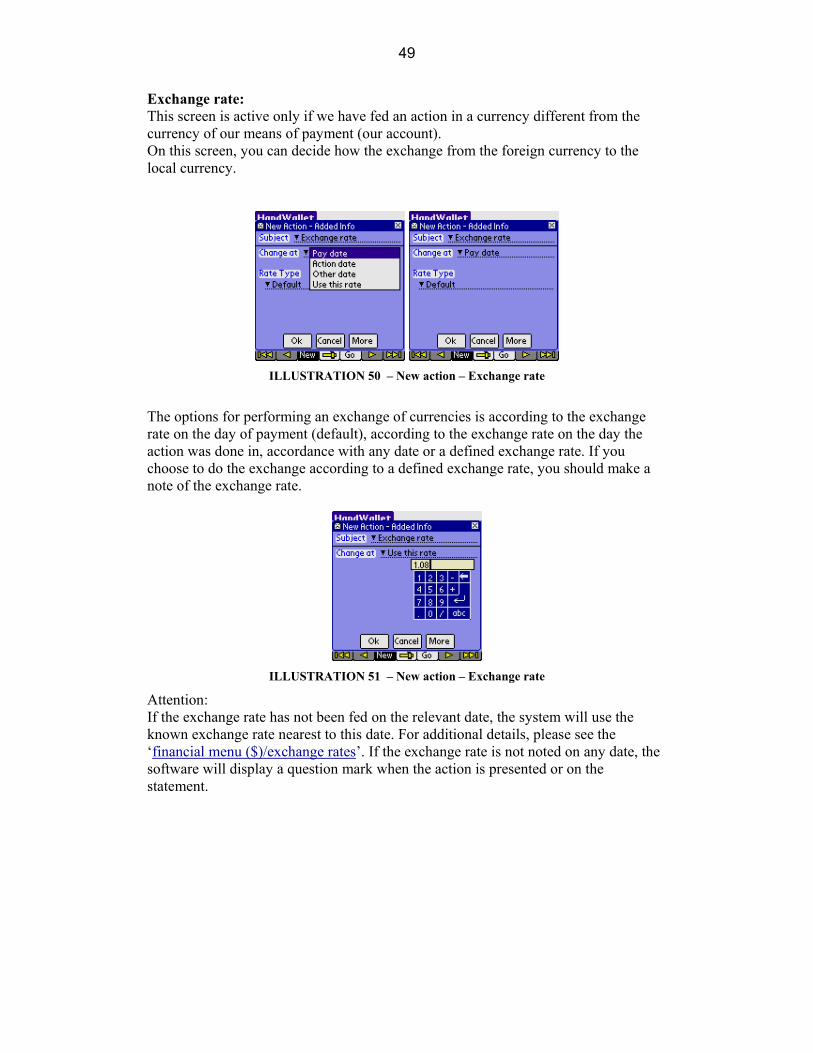
Exchange rate:
This screen is active only if we have fed an action in a currency different from the currency of our means of payment (our account). On this screen, you can decide how the exchange from the foreign currency to the local currency.
ILLUSTRATION 50 – New action – Exchange rate
The options for performing an exchange of currencies is according to the exchange rate on the day of payment (default), according to the exchange rate on the day the action was done in, accordance with any date or a defined exchange rate. If you choose to do the exchange according to a defined exchange rate, you should make a note of the exchange rate.
ILLUSTRATION 51 – New action – Exchange rate
Attention: If the exchange rate has not been fed on the relevant date, the system will use the known exchange rate nearest to this date. For additional details, please see the ‘financial menu ($)/exchange rates’. If the exchange rate is not noted on any date, the software will display a question mark when the action is presented or on the statement.

50
Action Status: This screen is used for displaying general information regarding the action.
ILLUSTRATION 52 – New action – Action status
The action number is an automatic unique number (a number not repeating itself) used as identification for the action. The action status (open or closed) provides an indication as to the state of the action. The status date notes the date when the status has last been changed. Verified Payments presents the number of payments in this action that were approved (either manually or automatically by synchronization with the bank or the credit card company). Approving the payments manually will be done on the ‘Data/Payments’ menu.

51
Personal fields: In this screen you can edit any extra personal fields (fields related to Actions that are not build in HandWallet). By default, the list of personal fields is empty.
ILLUSTRATION 53 – Personal fields – Empty list
To add personal fields close the Actions window and select the ‘Options’ button at the button of the page.
ILLUSTRATION 54 – Personal fields – after adding fields

52
Edit (modify) action
To modify an action existing in the system, you should click on it twice or select it by one click and then select the “Edit” option from the list of options that will appear. The screen displays appearing when editing an action will be the same as the ones appearing when a new action is defined. Saving the changes will be performed only after clicking on “OK”. To cancel the changes, click on “Cancel” or move on to another option on the software menu. Delete action
To delete an action existing in the system, you select it by one click and then a select the “Del” option from the list of options that will appear. The system’s default is to request the user’s confirmation prior to deleting actions. The question “Are you sure?” will be displayed on the screen. To confirm the deletion, click on “Yes”. You can avoid the confirmation request by updating the “Verify deletion” on the tools/options screen. Duplicate action To duplicate an action existing in the system, you select it by one click and then a select the “Duplicate” option from the list of options that will appear. Filtering the Actions list: You can filter the action list by selecting a specific category at the top of the screen. For example, you can decide to see only your expenses, or only your health expenses.
ILLUSTRATION 55 – Filtering the actions – Expenses only
You can continue filtering the actions list by selecting the 'Go' button at the button of the page.
ILLUSTRATION 56 – Filtering the actions – Finding check #

53
Navigation in the action list: You can move forewords or backwards in the list of actions by pressing the arrows at the bottom of the page. You can jump to a specific year, month or day by pressing the 'Go' button at the bottom. Sort actions: You can change the sort of the action by pressing the 'Time' column.
ILLUSTRATION 57 – Sort actions
Change currency view: You can view your actions in any currency you like. If your currency is not defined in the system you can add it in the $/My favorites menu.
ILLUSTRATION 58 – Currency view
Totals: You can see the total sum of all actions or a specific category by pressing the 'Options' button at the bottom of the page and then 'Total':
ILLUSTRATION 59 – Actions total

54
To see totals for a period of time go to menu Analyst/ Categories report. Fast actions: Fast actions are template of actions that repeat themselves often. This may include multi categories actions or actions that we use every day. By defining a fast action we can create such an action in one click, without the need to navigate each time through the categories tree. To define a fast action select the 'Options' button at the button of the page and then 'Fast action':
ILLUSTRATION 60 – Fast action
The first stage of defining a new "Fast Action" is to give it a name. This name will be used as a future reference for creating such an action in the future.
ILLUSTRATION 61 – New fast action
The second stage of creating a new fast action is to select the categories that will be included in this action. Select the 'New Category' option and then press the right arrow.
ILLUSTRATION 62 – Fast action – new category

55
Browse through the categories tree until you reach the relevant category. Then press the right arrow to continue.
ILLUSTRATION 63 – Fast action – select category
Mark 'Yes' or 'No' if you want to see special forms price or quantity for this category and press the right arrow to continue.
ILLUSTRATION 64 – Fast action – select category
Now save your fast action.
ILLUSTRATION 65 – Fast action – save changes
Whenever you press the 'New' button in the 'Actions' screen, you can now select the 'Fast Actions' you defined.

56
ILLUSTRATION 66 – Fast action – creating new action
By selecting a pre-defined fast action, HandWallet will create all categories automatically.
ILLUSTRATION 67 – Fast action – category selected automatically

57
C. Payments – statement portfolio
The statement screen allows us to follow the actual payments made in each one of our accounts, similarly to the statements received from banks and credit card companies. Statements displayed on HandWallet are easy to work with and they include a large number of advantages, which regular printed statements do not include: The possibility to move with ease from one account to another. The option to browse through the months both forward and backward. The option to quickly reach a certain year or month. The option to make a note next to each payment whether it has been paid. The option to skip (not to make a note) certain lines on a statement without
losing the statement accuracy. The option to provide information on each payment. The option to get data into/out of files and other applications.
The options existing on the statement screen : ן Definition of a new payment or balance. Edit (change) a payment or a balance. Deletion of a payment or balance. Confirmation of a payment or balance. Navigation – Go to payments or balance of a specific year/month/day.
New payment
To define a new payment click the “New” button at the bottom of the screen, and select “payment”. If means of payment (accounts) are still undefined in the system, the software will guide you in defining an account by exhibiting an appropriate message + arrow.
ILLUSTRATION 68 – Statement
It is recommended to define a new action rather than a new payment, since an action includes more information (an action automatically creates one or more payments). Edit payment
To modify a payment that exists in the system, click twice or select it with a single click and then click the “Edit” option from the list of options that will appear.
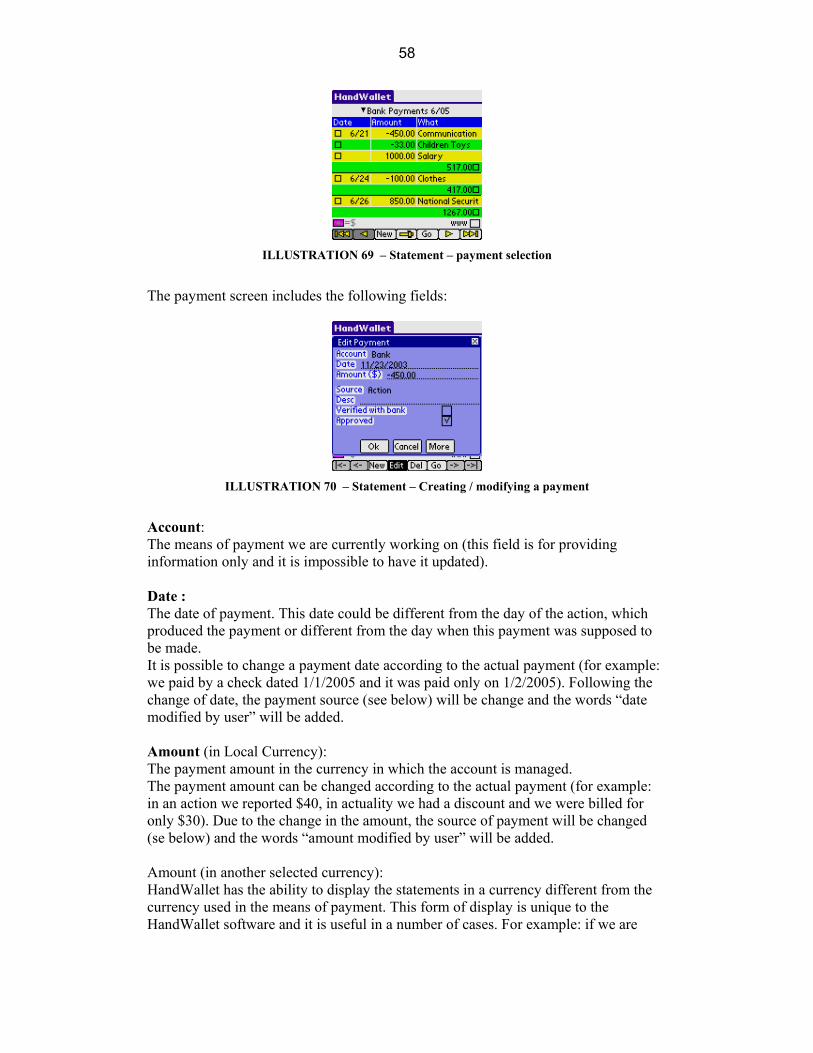
58
ILLUSTRATION 69 – Statement – payment selection
The payment screen includes the following fields:
ILLUSTRATION 70 – Statement – Creating / modifying a payment
Account: The means of payment we are currently working on (this field is for providing information only and it is impossible to have it updated). Date : The date of payment. This date could be different from the day of the action, which produced the payment or different from the day when this payment was supposed to be made. It is possible to change a payment date according to the actual payment (for example: we paid by a check dated 1/1/2005 and it was paid only on 1/2/2005). Following the change of date, the payment source (see below) will be change and the words “date modified by user” will be added. Amount (in Local Currency): The payment amount in the currency in which the account is managed. The payment amount can be changed according to the actual payment (for example: in an action we reported $40, in actuality we had a discount and we were billed for only $30). Due to the change in the amount, the source of payment will be changed (se below) and the words “amount modified by user” will be added. Amount (in another selected currency): HandWallet has the ability to display the statements in a currency different from the currency used in the means of payment. This form of display is unique to the HandWallet software and it is useful in a number of cases. For example: if we are

59
overseas and wish to see our account (originally managed in $) converted into Euros or if we have an account in foreign currency and wish to see it in $. This field will be displayed only if we select a currency display that is different from the currency used in the means of payment. The information displayed in this field is provided for information purposes only, and it is impossible to change it. Source : From where this payment is received. The possible values for this field are: From user – payment entered manually by the user. Action – payment created following an action. A comment could be added that the date, sum or both were manually updated. Internet – A payment entered into the system as result of synchronization with one of the bank sites or the credit card companies’ sites (see below). Description: Free unstructured wording. You can enter different comments regarding payments that cannot be entered anywhere else. Verification with the bank: Indication whether the data is verified and confirmed with the bank and the credit card companies. Verification can be executed manually or by the software. In case the payment arrives following synchronization with one of the bank or credit card companies’ sites, this field will be marked as “Yes” automatically. Approved: There is indication as to whether payment has been executed. In case the payment is based on an action, this field will be marked as “Yes” automatically. Important Notice: Changing the payment amount does not affect statistics – they are determined by the action only. It is, therefore, recommended to correct the action (this will automatically affect the payment). Delete payment
To delete a payment existing in the system, we have to select it by clicking once and then clicking the “Del” option from the list of options that will appear. The system’s default is the request of confirmation by the user prior to deleting the payment. The question “Are you sure?” will appear on the screen. To confirm (affirm) the deletion click “Yes”. It is possible to avoid the confirmation request by updating the option “check deletion” on the tools/options screen. New balance
To define a new balance, you should click on the “New” button at the bottom of the screen and select “Balance”. In case accounts have not been defined in the system, the software will guide you in defining an account through a message and an arrow.
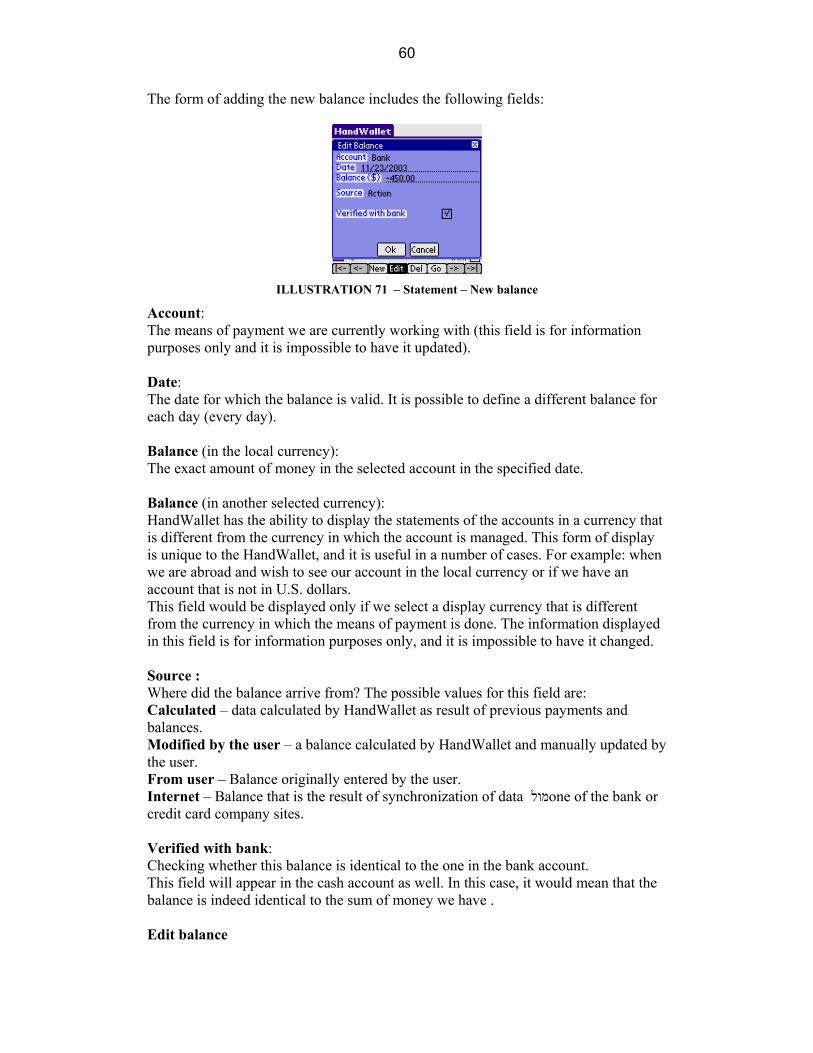
60
The form of adding the new balance includes the following fields:
ILLUSTRATION 71 – Statement – New balance
Account: The means of payment we are currently working with (this field is for information purposes only and it is impossible to have it updated). Date: The date for which the balance is valid. It is possible to define a different balance for each day (every day). Balance (in the local currency): The exact amount of money in the selected account in the specified date. Balance (in another selected currency): HandWallet has the ability to display the statements of the accounts in a currency that is different from the currency in which the account is managed. This form of display is unique to the HandWallet, and it is useful in a number of cases. For example: when we are abroad and wish to see our account in the local currency or if we have an account that is not in U.S. dollars. This field would be displayed only if we select a display currency that is different from the currency in which the means of payment is done. The information displayed in this field is for information purposes only, and it is impossible to have it changed. Source : Where did the balance arrive from? The possible values for this field are: Calculated – data calculated by HandWallet as result of previous payments and balances. Modified by the user – a balance calculated by HandWallet and manually updated by the user. From user – Balance originally entered by the user. Internet – Balance that is the result of synchronization of data מול one of the bank or credit card company sites. Verified with bank: Checking whether this balance is identical to the one in the bank account. This field will appear in the cash account as well. In this case, it would mean that the balance is indeed identical to the sum of money we have . Edit balance
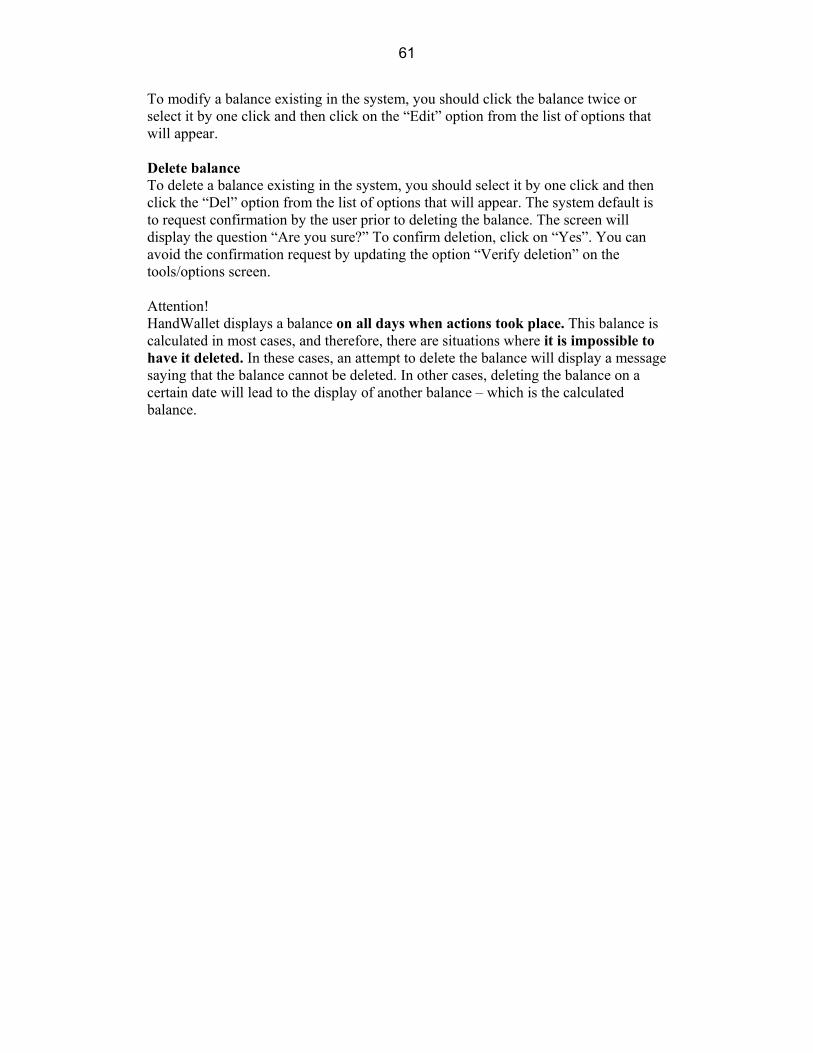
61
To modify a balance existing in the system, you should click the balance twice or select it by one click and then click on the “Edit” option from the list of options that will appear. Delete balance
To delete a balance existing in the system, you should select it by one click and then click the “Del” option from the list of options that will appear. The system default is to request confirmation by the user prior to deleting the balance. The screen will display the question “Are you sure?” To confirm deletion, click on “Yes”. You can avoid the confirmation request by updating the option “Verify deletion” on the tools/options screen. Attention! HandWallet displays a balance on all days when actions took place. This balance is calculated in most cases, and therefore, there are situations where it is impossible to have it deleted. In these cases, an attempt to delete the balance will display a message saying that the balance cannot be deleted. In other cases, deleting the balance on a certain date will lead to the display of another balance – which is the calculated balance.

62
D. Categories
The category screen makes it possible for us to see and update the list of categories defined in the system. Every action is related to one or more categories. The categories are organized in the shape of a tree. Each level of the tree lists the details of the level above it. For example: under the “Expenses” category, there is a category called “Leisure”. There is a category under “Leisure” called “Vacation”. Under it there is another sub-category called “Hotels” and so on. When feeding an action, it is possible to determine the accuracy level we wish to achieve. For example, certain people will find it sufficient to note a certain action as an “Expense”. Others would also like to know the distinction between expenses, and they will therefore note “Leisure” while the third group of people would also like to know how expenses are distributed within the leisure area, and they will therefore, feed “Vacation”. The decision as to how much detail to provide regarding the categories and how to organize them is up to the user. .
ILLUSTRATION 72 – Category tree
The category tree of HandWallet is a basic tree for starting and can be easily changed and personalized. It is possible to delete categories that are of no interest to us, add new categories, change the structure of the tree, i.e. to transfer categories from one place to another, and more. Business users can use the category tree as an entire product tree. This product tree is, in fact, a price list, since it is possible to note the default price, the default currency and the default quantity next to each category. The options available on the category screen: Define a new category. Edit (modify) a category. Delete a category. Navigate – Moving on the category tree forward, backward, up and down.
New category
To define a new category, you should click on the “New” button at the bottom of the screen. In case categories have not yet been defined in the system, HandWallet will guide you in defining categories through a message and an arrow.

63
The following screen will appear after clicking on the “new” button:
ILLUSTRATION 73 – New category
Name (required field): Category name. How would this category be called in the system? A name can be any combination of letters and numbers. Main Category : Is this category, a sub-category of another category in the tree? Leaving this field vacant will indicate that the new category is one of the main categories of the tree (income, expenses, savings etc.). Description : Free text. Enter words that help you understand what exactly the category includes or any other comment. Category Sign : While entering a new action we sometimes enter positive sums and sometimes negative ones. For convenience purposes, the system makes it possible to determine the default sign of the sum. The possibilities are: The same as the main category (recommended). The sign ( + or - ) is according to the sign of the main category. (+) The category will always appear with a positive sign. (-) The category will always appear with a negative sign. Undefined. Default money : With the help of the fields of ‘default money’, ‘default currency’ and ‘default quantity’, it is possible to build a product tree price list for the use of sales people out of the office. The default sum is the automatic sum that will appear when a category is selected upon entering an action. It is possible to change this sum at each action. Default currency : The currency in which the default sum is quoted. In case of a currency different from our currency, HandWallet will perform the exchange currency (in case it has the exchange rate or an approximation). Default quantity :
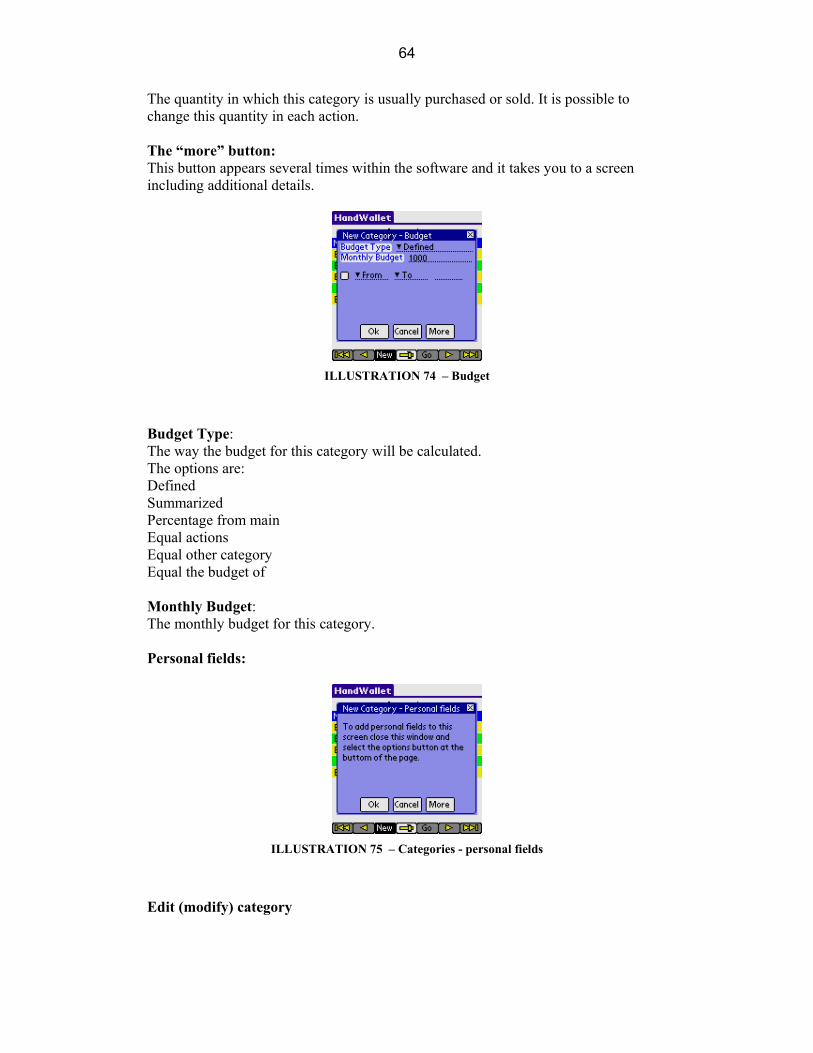
64
The quantity in which this category is usually purchased or sold. It is possible to change this quantity in each action. The “more” button: This button appears several times within the software and it takes you to a screen including additional details.
ILLUSTRATION 74 – Budget
Budget Type: The way the budget for this category will be calculated. The options are: Defined Summarized Percentage from main Equal actions Equal other category Equal the budget of Monthly Budget: The monthly budget for this category. Personal fields:
ILLUSTRATION 75 – Categories - personal fields
Edit (modify) category
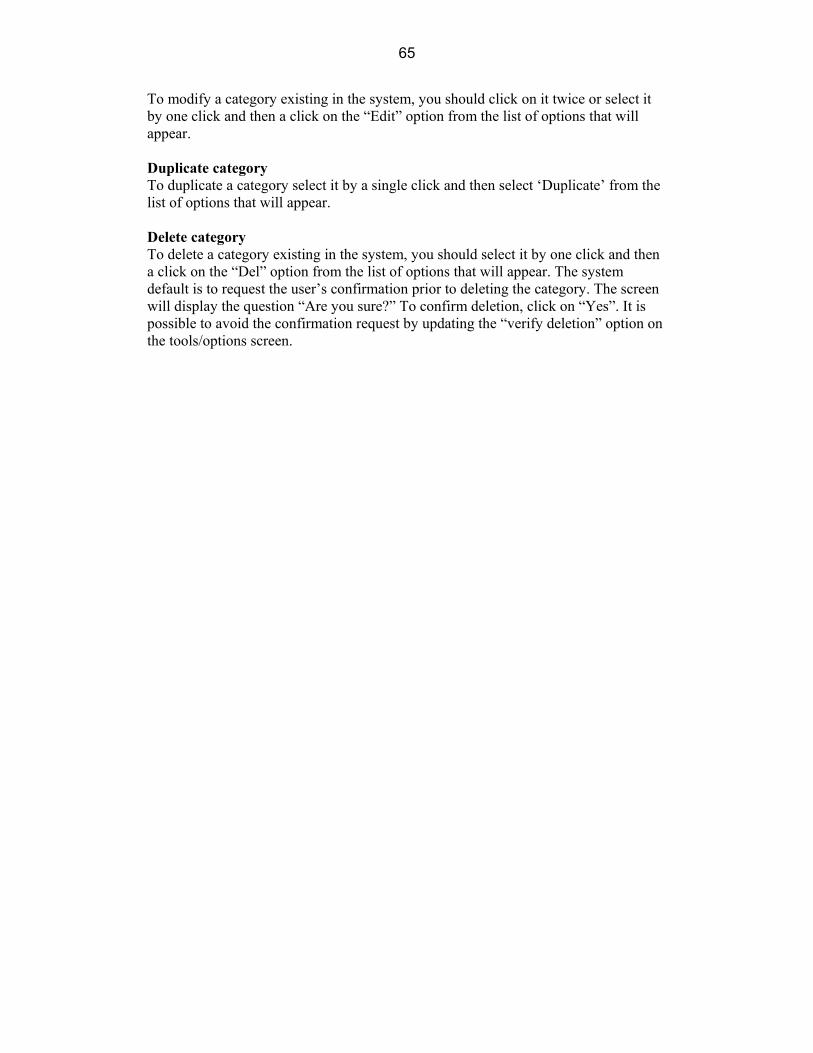
65
To modify a category existing in the system, you should click on it twice or select it by one click and then a click on the “Edit” option from the list of options that will appear. Duplicate category To duplicate a category select it by a single click and then select ‘Duplicate’ from the list of options that will appear. Delete category
To delete a category existing in the system, you should select it by one click and then a click on the “Del” option from the list of options that will appear. The system default is to request the user’s confirmation prior to deleting the category. The screen will display the question “Are you sure?” To confirm deletion, click on “Yes”. It is possible to avoid the confirmation request by updating the “verify deletion” option on the tools/options screen.
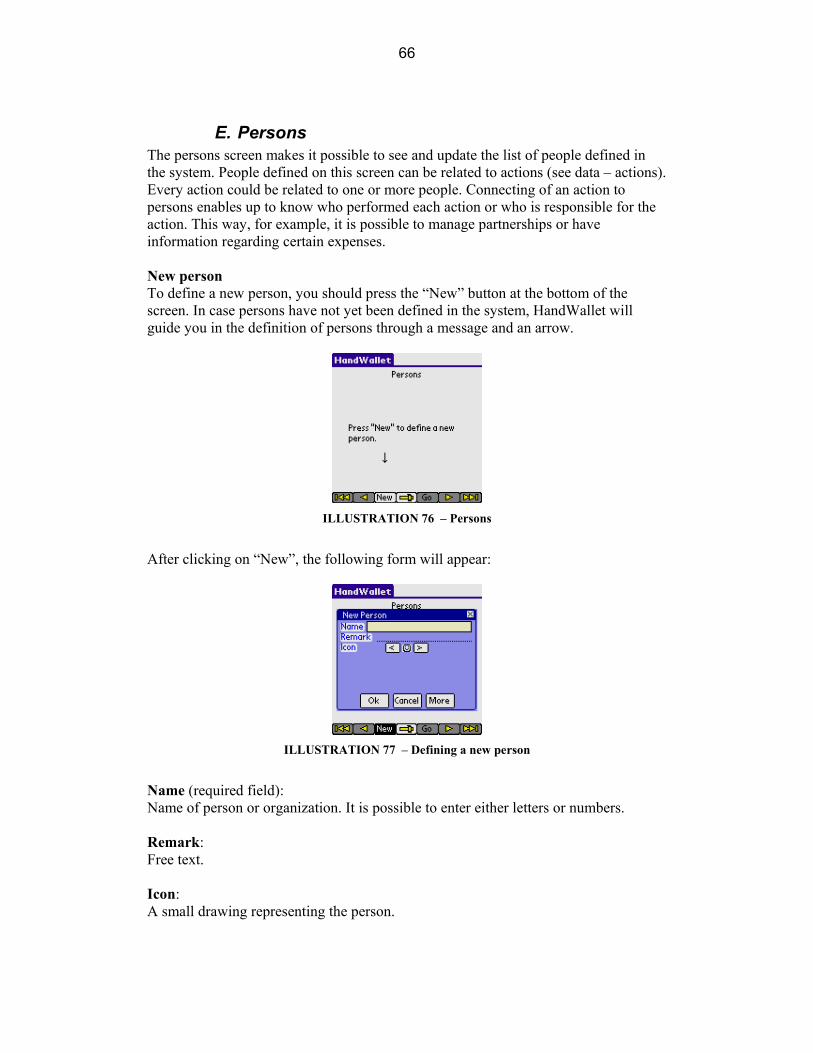
66
E. Persons
The persons screen makes it possible to see and update the list of people defined in the system. People defined on this screen can be related to actions (see data – actions). Every action could be related to one or more people. Connecting of an action to persons enables up to know who performed each action or who is responsible for the action. This way, for example, it is possible to manage partnerships or have information regarding certain expenses. New person
To define a new person, you should press the “New” button at the bottom of the screen. In case persons have not yet been defined in the system, HandWallet will guide you in the definition of persons through a message and an arrow.
ILLUSTRATION 76 – Persons
After clicking on “New”, the following form will appear:
ILLUSTRATION 77 – Defining a new person
Name (required field): Name of person or organization. It is possible to enter either letters or numbers. Remark: Free text. Icon: A small drawing representing the person.

67
Edit person
To modify the details of a person existing in the system, click on him/her twice or select him/her by one click and then press the “Edit” option from the list of options that will appear. Delete person
To delete a person existing in the system, select him/her by one click, and then press the “Del” option from the list of options that will appear. The system default is to request the user’s confirmation prior to the deletion of persons. The screen will display the question “Are you sure?” To confirm the deletion, click on “Yes”. You can avoid the confirmation request by updating the “Verify deletion” option on the tools/options screen.
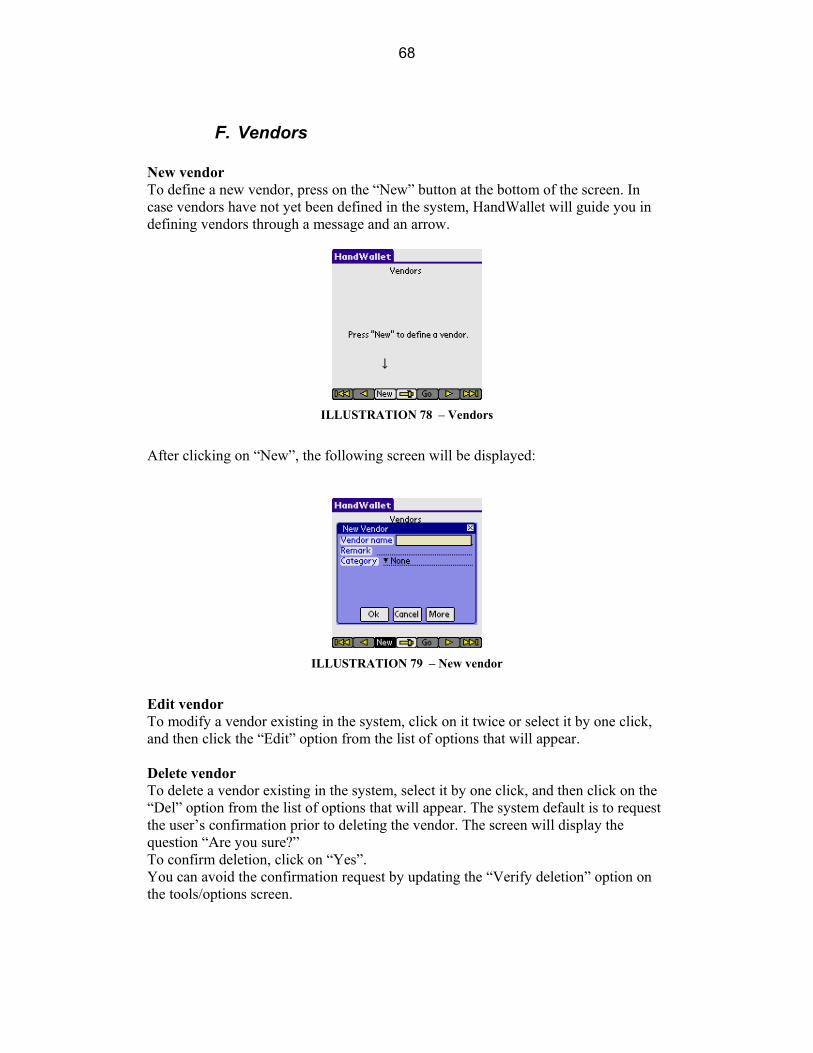
68
F. Vendors
New vendor
To define a new vendor, press on the “New” button at the bottom of the screen. In case vendors have not yet been defined in the system, HandWallet will guide you in defining vendors through a message and an arrow.
ILLUSTRATION 78 – Vendors
After clicking on “New”, the following screen will be displayed:
ILLUSTRATION 79 – New vendor
Edit vendor
To modify a vendor existing in the system, click on it twice or select it by one click, and then click the “Edit” option from the list of options that will appear.
Delete vendor
To delete a vendor existing in the system, select it by one click, and then click on the “Del” option from the list of options that will appear. The system default is to request the user’s confirmation prior to deleting the vendor. The screen will display the question “Are you sure?” To confirm deletion, click on “Yes”. You can avoid the confirmation request by updating the “Verify deletion” option on the tools/options screen.
69
G. Clear Filters
This option cancels the filters currently defined in the system. Filters are causing that only part of the information entered into the system will be displayed. We use filters in order to focus on specific information or as a tool for searching (reaching) information. The filters existing in the system are as follows: The action screen – You can display only actions belonging to a certain category and not all actions. Forecast – You can display a forecast based on all accounts or only on a specific account.
H. Erase All
This option deletes all data currently existing in the system.

70
1. Analyst The “Analyst” menu helps in receiving summary and management data regarding our financial status. The different diagnostic options help us learn on what our money is spent on and the ratio between our different expenses, our sources of income and the way they are distributed, what we can expect in the future regarding our finances and more.
A. Categories Pie
The category pie displays the distribution of our expenses or income at a certain period of time. Looking at the expense diagram, we can learn on what our money was spent.
ILLUSTRATION 80 – Expenses pie
Looking at the income diagram, we can learn what our income sources are:
ILLUSTRATION 81 – Income pie
We can receive more details on categories by selecting the relevant category in the heading. We can change the starting or the ending point of a period that we wish to learn about by clicking on the dates in the heading.
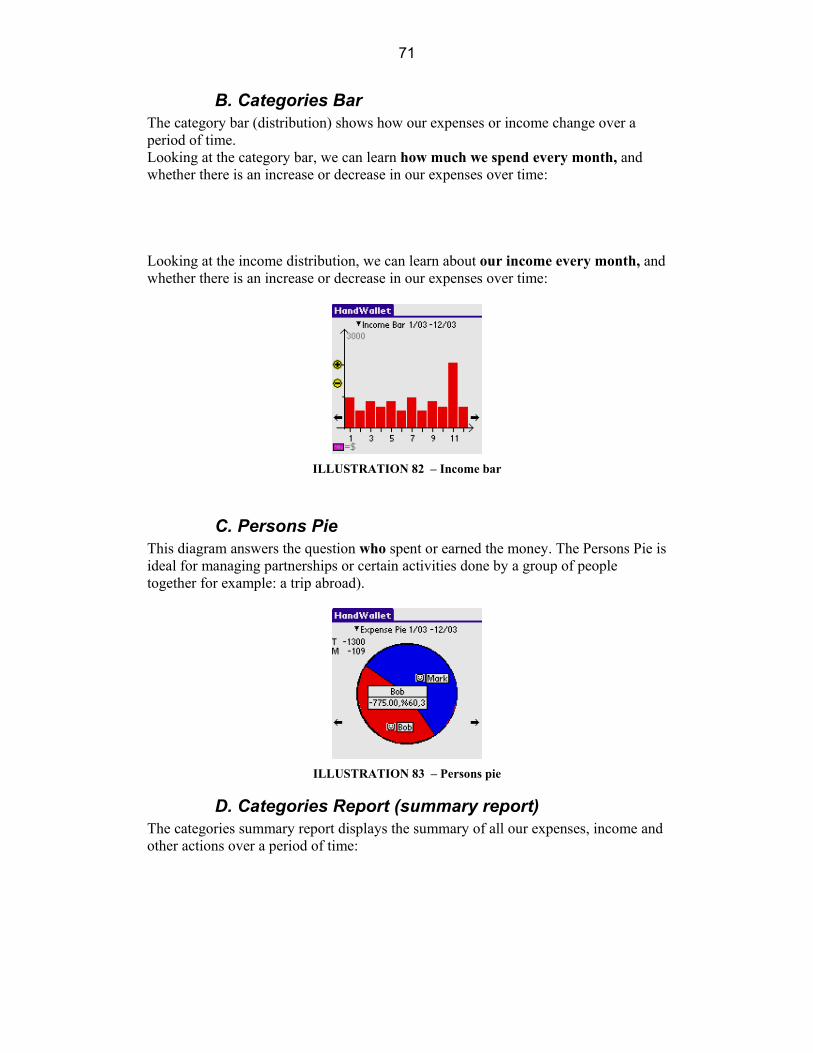
71
B. Categories Bar
The category bar (distribution) shows how our expenses or income change over a period of time. Looking at the category bar, we can learn how much we spend every month, and whether there is an increase or decrease in our expenses over time: Looking at the income distribution, we can learn about our income every month, and whether there is an increase or decrease in our expenses over time:
ILLUSTRATION 82 – Income bar
C. Persons Pie
This diagram answers the question who spent or earned the money. The Persons Pie is ideal for managing partnerships or certain activities done by a group of people together for example: a trip abroad).
ILLUSTRATION 83 – Persons pie
D. Categories Report (summary report)
The categories summary report displays the summary of all our expenses, income and other actions over a period of time:

72
ILLUSTRATION 84 – Summary report
It is possible to receive additional details in each category (if there is this kind of itemizing) by clicking the (+) sign at the left side of the category.
ILLUSTRATION 85 – Summary report -- itemization
It is possible to change the starting or ending date of the period we relate to, by clicking on the starting or ending date at the heading. The shortest period of time that can be selected is one month. There is no limit on the length of the period of time (it is also possible to select a period greater than a year).
E. Budget Status
This diagram displays your position in regard to the budget objectives you set for yourself.
ILLUSTRATION 86 – Budget status

73
F. Balances
Analyst/Balances option displays the balance in all means of payment (accounts) that the system has on a specific date. There is a ‘total line’ at the bottom of the screen, which includes the ‘total balance’ in all accounts. Please note that the ‘total line’ includes all accounts, even accounts that are not on the display page.
ILLUSTRATION 87 – Balances list
G. Forecast
The forecast screen displays current or future cash flow. With the help of this forecast, it is possible to see graphically how much money we will have in a specific means of payment (account) or in all means of payment. This way it is possible to make financial decisions based on our ability to pay.
ILLUSTRATION 88 – Forecast
You can move forward in the forecast by clicking on the right arrow at the bottom of the screen or move back in time by clicking on the left arrow. You can change the forecast scale by clicking on the (+) and (-) on the screen left hand side.
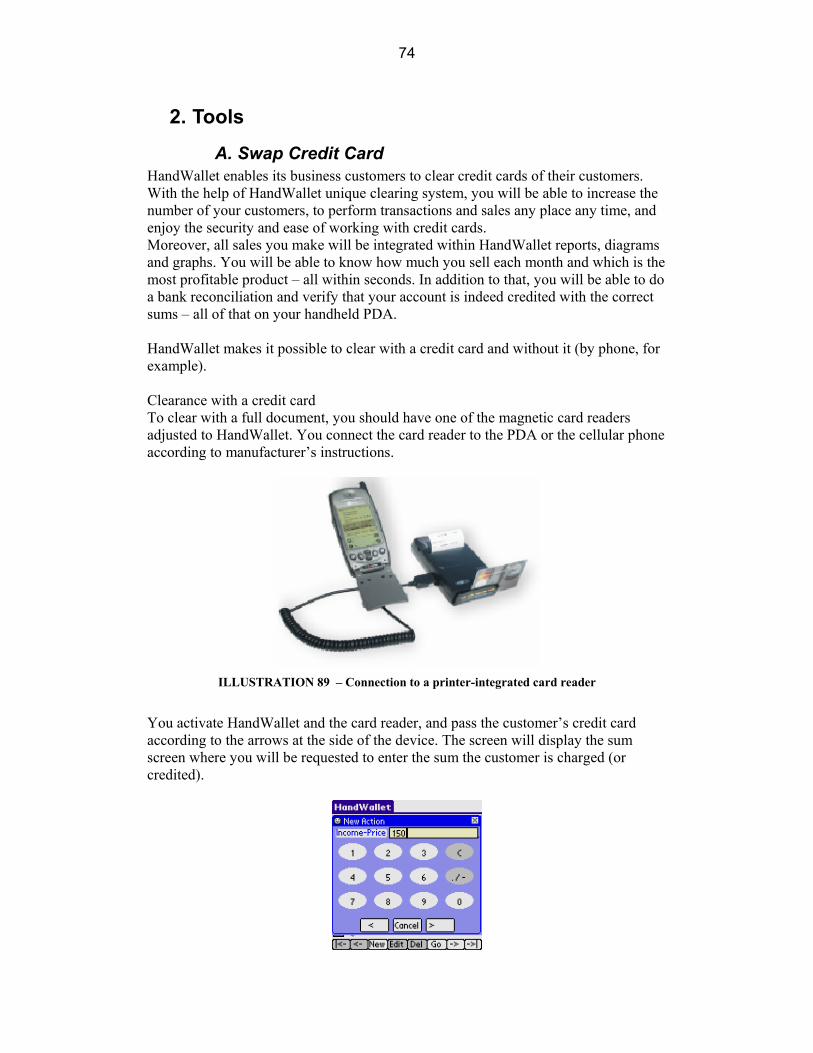
74
2. Tools
A. Swap Credit Card
HandWallet enables its business customers to clear credit cards of their customers. With the help of HandWallet unique clearing system, you will be able to increase the number of your customers, to perform transactions and sales any place any time, and enjoy the security and ease of working with credit cards. Moreover, all sales you make will be integrated within HandWallet reports, diagrams and graphs. You will be able to know how much you sell each month and which is the most profitable product – all within seconds. In addition to that, you will be able to do a bank reconciliation and verify that your account is indeed credited with the correct sums – all of that on your handheld PDA. HandWallet makes it possible to clear with a credit card and without it (by phone, for example). Clearance with a credit card To clear with a full document, you should have one of the magnetic card readers adjusted to HandWallet. You connect the card reader to the PDA or the cellular phone according to manufacturer’s instructions.
ILLUSTRATION 89 – Connection to a printer-integrated card reader
You activate HandWallet and the card reader, and pass the customer’s credit card according to the arrows at the side of the device. The screen will display the sum screen where you will be requested to enter the sum the customer is charged (or credited).

75
ILLUSTRATION 90 – Entering the sum of clearance
Please note that you can change this screen according to your personal preferences. If you usually sell one of 3 products, you will be able to define three screens – one for each product (see below the definition of the clearing screens). After entering the sum, click the lower right arrow to continue.
ILLUSTRATION 91 – Clearing - Entering payments and categories
On this screen, you can define the number of payments of the transaction (deal) (the default is one payment). It is also possible to change the deal category (important for the statistical reports and diagrams). If you built the previous screens well, it would be reasonable to assume that you will not have to change anything on this screen. Following the updates, click the right arrow to continue.
ILLUSTRATION 92 – Transmission of credit card clearing
At this point, the system contacts the ABS and validates the customer’s credit card. There is an indication regarding the success or the lack of it regarding the deal within 2-3 seconds. The transaction status will change to one of the following possibilities: Transaction accepted. The customer’s credit card will be charged and the transaction is saved at the HandWallet database for follow-up. Call Credit Card Company.

76
It is necessary to receive telephone confirmation from the credit card company with which clearing is required. After receiving the phone confirmation, enter the appropriate field and press the “Commit” key for renewed clearing. Not approved. The credit card company will not honor the transaction. The customer does not pay and there will be no charge. Card blocked. The card presented to you was stolen and should be confiscated. The customer does not pay and there will be no charge. Card stolen. The card presented to you is stolen and should be confiscated. The customer does not pay and there will be no charge. Credit card faked. The card presented to you is counterfeit and should be confiscated. The customer does not pay and there will be no charge. Wrong CVV or ID. This message will appear if you made an error in entering the CVV or the identification of the card owner. You should make the correction and press the “Commit” button for renewed clearing. Wrong card number. Should be corrected and then press the “Commit” button for renewed clearing. Card not valid. The customer’s credit card is invalid. The customer does not pay and there will be no charge. First payment wrong. This message will appear in an installment transaction when the first payment is too low or too high. Return to the previous screen, correct the sum of the first payment and do the clearing again. Amount too high. The transaction should be divided into two or more separate transactions. In this stage you cannot accept credit card in this currency. As of the time of writing this manual, you can clear only in NIS or dollars. Please correct the currency on the previous screen, adjust the sums according to the exchange rate and try to clear again. Error/Error HW Wait a few seconds and try again. In case there is repeated malfunction, please contact our support team.

77
Clearing without swapping the credit card If you do not have a magnetic card reader, you can still receive credit cards from customers through clearing with a missing document. To clear with a missing document, enter the ‘Tools/credit card clearing’ menu. First, you enter the customer credit card number:
ILLUSTRATION 93 – Clearing without a credit card – Enter card number
To move to the next screen, press the right arrow at the bottom of the screen. Enter the month of the customer’s card validity:
ILLUSTRATION 94 – Clearing without a credit card - Entering the month up to which, card is
valid
To move on to the next screen, press the right arrow at the bottom of the screen. Enter the year of the customer’s card validity:
ILLUSTRATION 95 – Clearing without a credit card -Entering the year up to which, card is
valid

78
To move on to the next screen, press the right arrow at the bottom of the screen In some cases, the credit card company requires to enter the CVV and the card owner’s ID in transactions without a credit card. If you need a screen for entering the CVV, mark this option in ‘Tools/Options/Credit Card Clearance’. In case this option is marked as “Yes”, the following screen will appear:
ILLUSTRATION 96 – Clearing without a credit card – Entering CVV
If the option “ID screen” is marked as “Yes” on ‘Tools/Options/Credit Card Clearing’, you will be required at this point, to enter the card owner’s ID.
ILLUSTRATION 97 – Clearing without a credit card – Entering the ID number
Following the series of these screens, the screens of the number of installments and connecting to the credit card company will appear as in clearing with a credit card.

79
B. Online Upgrade
This option makes it possible in some models to purchase a license for HandWallet. In models where online purchasing is still unavailable, the latest version will be displayed. Occasional use of this option will ensure working with the latest version available.
ILLUSTRATION 98 – Online purchasing

80
C. Options
This screen displays different parameters, which can be adjusted or defined in the system.
ILLUSTRATION 99 – Options
A double click on any option (or a single click and then a click on “Edit”) makes it possible to change the option according to the user’s personal preferences. The options are divided into categories: Regional settings Look and colors Behavior Approvals Keyboard Security Swap credit cards Import Export Licensing You may select the relevant category by pressing the combo box in the title (default selection – show all categories).

81
Regional settings options: Home currency : This parameter determines which currency will be the common one used in HandWallet. Language:
What will the software interface language be? HandWallet supports local languages even without installing these languages (except for the menus). If the menu is illegible, change the “Menu Language” parameter to “English”. Menu language : What will the language of the software menus be? HandWallet supports local languages even without installing these languages (except for the menus). If the menu is illegible, change the “Menu Parameter” to “English”. Reverse input : Should input entered by the user be reversed? Possible values are: Yes No According to the language use Nonworking day : In some countries there are six business days a week. Payment done on the day of rest will be postponed to the following day. This parameter makes it possible to determine whether the country you live in, has a day where no financial activity takes place, and if so – what day it is. Holidays system : In some countries there is no financial activity on holidays. Payment due on a holiday will be postponed to the following day. This parameter makes it possible to determine whether the country you live in, has any financial activity on holidays, and if there is none – then what holiday system should be taken into consideration. Vat : This parameter is used to determine the VAT percentage in use. It is possible to define different VAT percentages to each action whenever necessary.
My country: The country you live in. This parameter affects many system defaults like banks, interest etc.
Default rate: The currency rate type used if no specific rate type is mentioned.
Reverse menu: Should the text in the menu be reversed?

82
Reverse import: Should text fields be revered while importing?
Reverse export: Should text fields be reversed while exporting?
Menu encoding: The encoding system of the menu when using a language different than English.
I/E encoding: The text encoding in import and export when using a language different than English. Options are: ASCII Unicode Text encoding: The encoding system when using a language different than English. Options are: Automatic ASCII Unicode Reverse text: Is text for languages written from right to left stored in logical or virtual way?

83
Look & Colors options:
Color : Should colors be used on colored PDAs? People with vision problems or color blindness could possible prefer black-and-white display, which could be clearer. Highlight lines : Should even rows be displayed in bold print on the screens? Highlight color 1 : If the display is colored, then what color should be used to highlight the odd rows on the screens? Highlight color 2: If the display is colored, what color should be used to highlight the even rows on the screens? Show headline : Should the field names be displayed in the heading of the different screens? Headline color : The color of heading (in case the heading is displayed) on the different screens.
ILLUSTRATION 100 – Color of heading
Show frame : Should there be dividing lines displayed on the screens? Frame color : The color of the dividing lines (in case they are displayed) on different screens. Windows top color : In case display is colored - the color to be used for the heading and the different window frames.

84
ILLUSTRATION 101 – Color of windows
Bars color : In case display is colored -- the color to be used for the columns in the category and forecast graphs. Exceed color : In case display is colored – the color to be used for the overdraft in the forecasted graph. Background : Should there be a background picture on the different screens? At this point, this field is active only on PDAs using WinCE or Symbian. Keyboard color 1 : The background color of the HW-type keyboard. Keyboard color 2 : The lettering color on the HW-type keyboard.
Windows color: The background color of the windows.
Windows text color: The text color in the windows. Win label color: The color of the labels in the windows.
Win label shape:
The shape of the labels in the windows.
Win lines color:
The color of the fields lines in the windows.
Text color:
Future text color: The color of the text of the future transactions in the payments screen.

85
Form font name: The type of font used in the screens.
Form font size: The size of font used in the screens.
Windows font name: The type of fonts used in the windows.
Windows font size: The size of font used in the windows.
Num font name: The type of font used for numbers and dates.
Num font size: The size of font used for numbers and dates.
Buttons font name: The type of font used in the buttons.
Buttons font size: The size of font used in the buttons.
Win label text color: The color of the labels in the windows.

86
Behavior options: :
Minimum pie slice : What is the minimum size (in degrees) of a section on the pie diagram displaying words? Bar scale : Should the breakdown scale and forecast scale be automatically updated according to the sums displayed, or should a fixed scale be used. Start forecast day : The forecast graph (see diagnostics/forecast) displayed at a resolution of two half months. This parameter determines on which days of the month, sampling of the balance will be done. Thus, for example, if the start forecast day is 1, the forecast balance will be determined according to the balance on the 1st and the 15th of the month. Keep pays period : This parameter determines to which period ahead, payments or cyclical actions should be calculated. The only option on this version is “Unlimited”.
Date format : How to enter dates on the screen headings. The possibilities are: Date-time picker List Action sort: How to sort the records in the Data / Actions screen. Finance sort: How to sort the financial data. Recalc statistics: Recalculate the statistic data in the reports and diagrams.
F.Point actions: Show exact amounts in the actions screen. Recalc payments: This will recreate all payments in the system according to the actions. Internet policy: When to connect the Internet and download data?
Actions shown info: The information presented in the "What" field in the actions screen.
Payments shown info: The information presented in the "What" field in the payments screen.

87
Payments date format: The format of the date in the payments screen.
Restore defaults: Restore all the options original defaults.
Opening screen: The first screen when we run HandWallet.
Proxy server: The address of the proxy server, if such a server is in use.
Proxy port: The port of the proxy server, if such a server is in use.
Auto create actions: While receiving data from the bank or credit card site, should HandWallet create an action? 0% - always 100% - only if HandWallet is totally sure how to classify the action.
Communication closed: Is the communication closed after importing data from the web? Mark "No" if you have any problems importing data.
Show total payments: Should we summarize and present the total sum of payments for each action in the Actions screen?

88
Approvals options: :
Ask Check Pay: Should there be a request for the user’s confirmation each time a payment is approved? Payment confirmation is a common action performed on the “Statement” screen. Change this option to “Yes” if you want the software to request your confirmation every time you confirm (approve) a payment. Ask Check Balance: Should there be a request for the user’s confirmation each time a balance is confirmed? Balance confirmation is a common action performed on the “Statement” screen. Change this option to “Yes” if you want the software to request your confirmation (approval) each time you confirm (approve) a payment. Ask Delete: Should there be a request for user’s confirmation each time data is deleted? Sort categories : Should the category tree be sort again in alphabetical order after entering a new category? Ask recalc payments: Whether to ask on not to ask when we change an action with approved/modified payments?

89
Keyboard options: :
Keyboard type: The type of virtual keyboard used when entering text. The existing possibilities are: Original keyboard HandWallet keyboard Use a keyboard of HW type if foreign language support is not installed on your PDA or if the foreign language support does not interface with the software.
ILLUSTRATION 102 – Original keyboard
ILLUSTRATION 103 – HW Keyboard
Popup keyboard : Should a virtual keyboard be displayed whenever the user enters a text field? Keyboard color 1 : The background color of the HW-type keyboard. Keyboard color 2 : The lettering color on the HW-type keyboard.

90
Security options: :
Ask password: Should there be a password request upon entering the software? HandWallet could hold sensitive data such as credit card numbers, bank account numbers etc. It is therefore recommended to add password protection that would be displayed at any entrance to the software. This way, even if your PDA is lost or stolen, it would not be possible to activate the software without your approval. Password: The password used in case the “Ask Password” parameter points to “Yes”.

91
Swap credit cards options: : Print Chit : Should a note be printed after accepting a customer credit card? Options are "Always", "Never" and "Ask" Chit Language: The language of the note. Options are "Same" and "English"
Chit Title: The title of the note.
Ask CVV: Ask for CVV while swapping a customer credit card? Options are "Yes" or "No".
Ask ID: Ask for ID while swapping a customer credit card? Options are "Yes" or "No".
Enable CC Swap : Enable / disable swapping a customer credit card from a device. Options are "Yes" or "No".
Com Pos : The COM port of the swapping POS device.

92
Import Export options: : I/E Separator: Text separator between fields while importing to or exporting from sequential files. The default value is the character "|" Export File Format: The format of the export file. Options are "ASCII" or "UNICODE" Import Date Format: The format of date fields we import. Must include mm, dd and yy or yyyy. Export Date Format: The format of date fields we export. May include mm, dd, yy or yyyy.
Export From: The earliest date of the data we export.
Export Until: The latest date of the data we export.

93
Licensing Options: :
User profile : User's status. This parameter helps to fit various defaults and settings to the user needs. License : A license is required to benefit from HandWallet advanced options. This license can be obtained at the company site: http://www.handwallet.com/
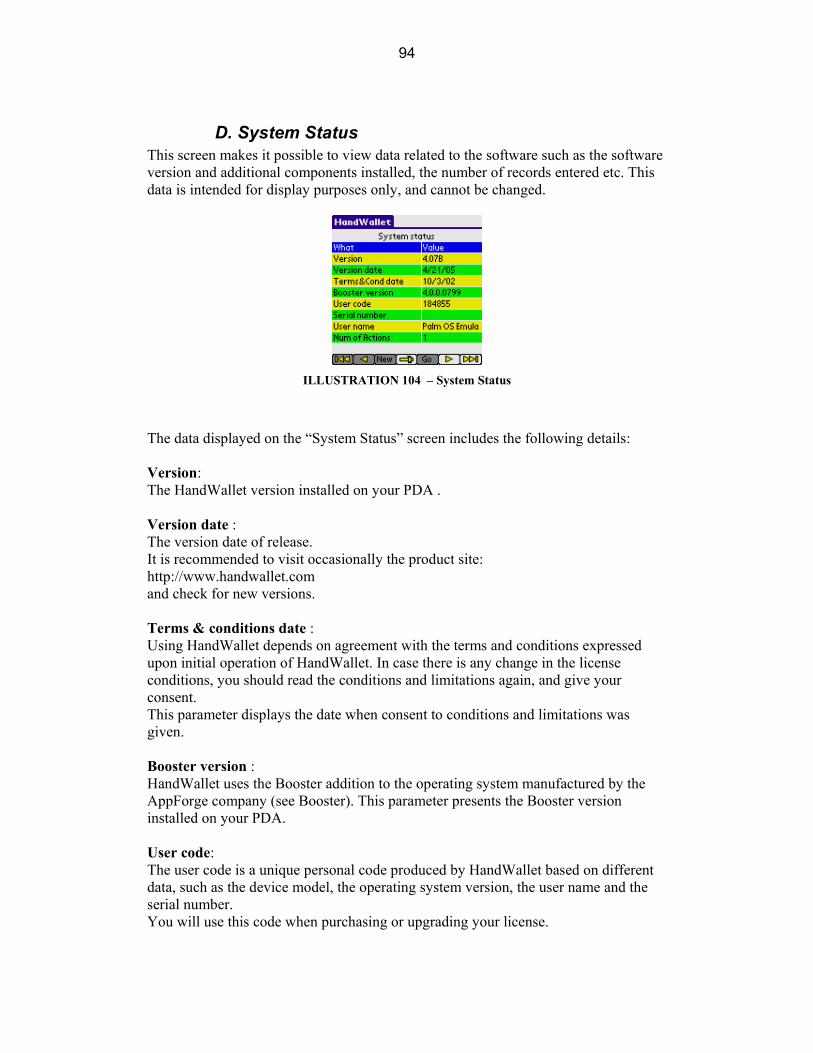
94
D. System Status
This screen makes it possible to view data related to the software such as the software version and additional components installed, the number of records entered etc. This data is intended for display purposes only, and cannot be changed.
ILLUSTRATION 104 – System Status
The data displayed on the “System Status” screen includes the following details: Version: The HandWallet version installed on your PDA . Version date : The version date of release. It is recommended to visit occasionally the product site: http://www.handwallet.com and check for new versions. Terms & conditions date : Using HandWallet depends on agreement with the terms and conditions expressed upon initial operation of HandWallet. In case there is any change in the license conditions, you should read the conditions and limitations again, and give your consent. This parameter displays the date when consent to conditions and limitations was given. Booster version : HandWallet uses the Booster addition to the operating system manufactured by the AppForge company (see Booster). This parameter presents the Booster version installed on your PDA. User code: The user code is a unique personal code produced by HandWallet based on different data, such as the device model, the operating system version, the user name and the serial number. You will use this code when purchasing or upgrading your license.
95
Serial number: Some PDA devices have a built-in serial number. This number is unique to your device – there is no other device carrying this serial number. The serial number is involved in the security mechanism integrated in HandWallet in order to ensure that your license is legal. User name : The user name in HotSync operation. Num of actions: The number of actions currently in the system . This number may include also deleted actions. To remove deleted actions select the 'Num of actions' line and then the 'Compress' option. Num of payments: The number of payments currently in the system. Num of balances: The number of balances currently in the system. Num of accounts: Number of accounts currently defined in the system. Num of persons : The number of people currently defined in the system. Num of categories : The number of categories currently defined in the system. Action categories The number of categories per action defined in the system. Action persons The number of persons per action defined in the system. Vendors The number of vendors currently defined in the system. Payments until: The latest date up to which, transactions within the system are calculated (it is impossible to enter transactions or actions of a later date). Balances until: The latest date up to which, balances within the system are calculated (it is impossible to enter balances of a later date). Heap free (bytes) : The extent of available memory (in bytes) in the system. A decrease in the memory available could cause problems in the appropriate functioning of HandWallet

96
License type: HandWallet is marketed with a number of license types. This data displays the license type of the software installed on your PDA . Valid until: Some licenses for operating HandWallet are for only a limited period of time. This data displays until when the license you have is valid. Coupon value : Certain options in the software can be activated for a fee. Payment of this fee is done through the purchase of a coupon at the product site. This characteristic displays the coupon value still unused .

97
E. Import
HandWallet supports import of data from external programs for different purposes. It is possible to import data to HandWallet from any accounting software supporting the export of data. The import process is accompanied by a wizard, which can assist in the selection of different options. You can continue to the next stage in the wizard by clicking on the right arrow at the bottom of the window or go back by clicking on the left arrow. You can close the import wizard at any stage by pressing the X on the window upper right hand side, or by selecting another option on the menu. Data import includes 6 major stages: Selecting the source of data we want to import from (an application, from the web or a pre-defined import) Selecting the program where the data is imported from Selecting the file from which the import will be executed Selecting the type of data imported Selecting the import format Selecting the fields to be imported The first stage if to select the source of data we want to import from.
ILLUSTRATION 105 – Import – select source of data
By default, there are no pre-defined imports in the system. If you try to select a pre-defined import at this stage you will get this screen:
ILLUSTRATION 106 – Import – pre defined import
Select "From application" and press the right arrow.
98
The second stage of the import wizard is to select the application to import data from. You can move data from other programs on Palm and/or on desktop PC's into the Memo Pad.
ILLUSTRATION 107 – Import – select application
If you select 'Memo Pad' you will be asked to select the memo in which the data is stored.
ILLUSTRATION 108 – From which memo would you like to import data?
The Third stage in the import wizard is selecting the type of data imported:
ILLUSTRATION 109 – What would you like to import?
You can import: Accounts (Means of payment) Vendors Actions Categories Favorite finances (user defined currencies, user defined indexes etc.) Balances Persons
99
Statements Exchange rates Index values Interest rates Stock values
Forth stage: Select the format of the data stored in the file (in some cases, the system will automatically identify the format).
ILLUSTRATION 110 – Import format
Fifth stage: Make a note of the fields and the field order in the file from which you import data (in some cases, the system will automatically identify the fields).
ILLUSTRATION 111 – Import fields
In contrast to the export option, where you can select any combination of fields you wish and even repeat a certain field a number of times – in the import of certain data, there are required fields. For example: when importing actions – making a note of the date is required.
100
ILLUSTRATION 112 – Import of actions
At the end of the import, there is a message regarding the number of records read and the number of records imported.
ILLUSTRATION 113 – Import finished
Sixth stage: Select whether you want to save the import for future use.
ILLUSTRATION 114 – Import – Save import definitions?
If you select 'Yes' you will be asked to give the import a name. This name will be used as a future reference to run the import next time, without going through all definitions again.

101
ILLUSTRATION 115 – Import – Import definitions were saved
Import tips: 1. Importing data from anther software is always a complicated task. This is not typical just to HandWallet – it is in general a problematic situation. Usually the import process will not work in the first try. Thus, if you are trying to add records to existing data it is strongly recommended to backup first your information.
2. When importing a sequential file it is important to view the file first and to see what delimiter (I/E Separator) is in use. A delimiter is a special character that separates between fields. The default delimiter used by HandWallet is the character "|". However, you may change this in Tools/Options/Import Export.
3. HandWallet supports both importing from ASCII and UNICODE data-sources. However, in some cases the program might not recognize correctly the type of file you are trying to import.
4. Trying to import data that includes dates might be problematic, since there are several ways to represent a date field. You may control the date format in Tools/Options/Import Export.
5. In any case you couldn't import data to HandWallet please contact our support team. See the chapter Help/Additional help options in this manual.
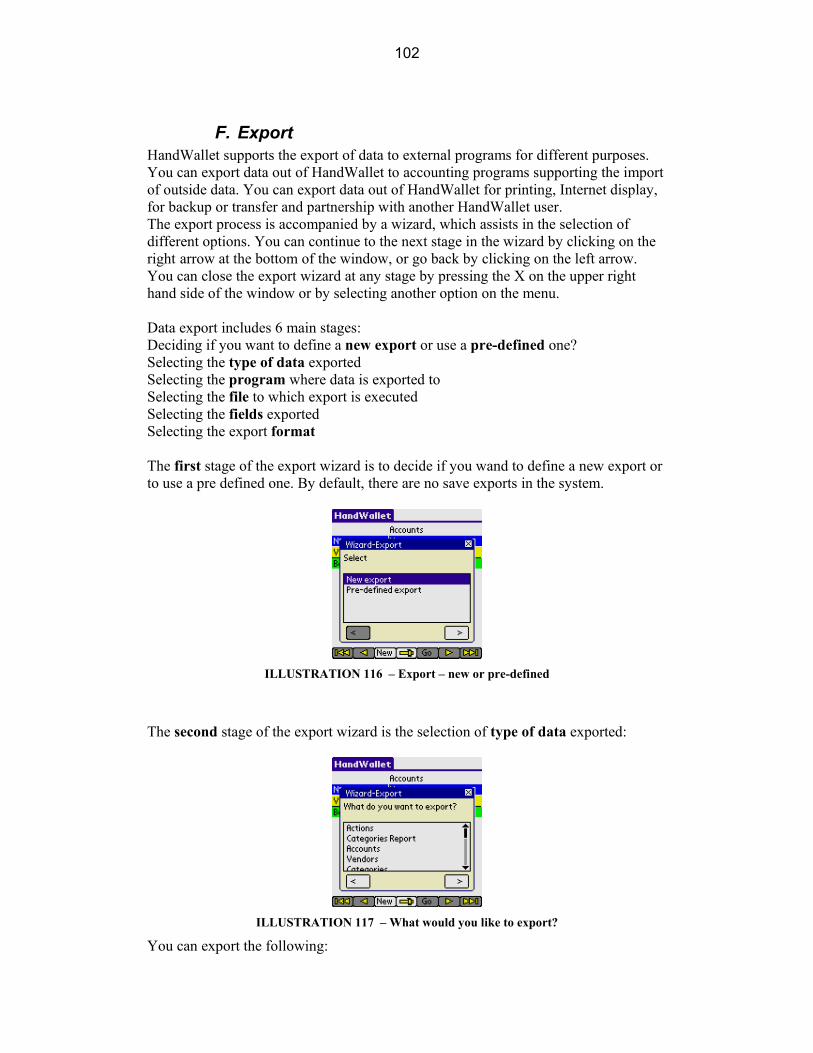
102
F. Export
HandWallet supports the export of data to external programs for different purposes. You can export data out of HandWallet to accounting programs supporting the import of outside data. You can export data out of HandWallet for printing, Internet display, for backup or transfer and partnership with another HandWallet user. The export process is accompanied by a wizard, which assists in the selection of different options. You can continue to the next stage in the wizard by clicking on the right arrow at the bottom of the window, or go back by clicking on the left arrow. You can close the export wizard at any stage by pressing the X on the upper right hand side of the window or by selecting another option on the menu. Data export includes 6 main stages: Deciding if you want to define a new export or use a pre-defined one? Selecting the type of data exported Selecting the program where data is exported to Selecting the file to which export is executed Selecting the fields exported Selecting the export format The first stage of the export wizard is to decide if you wand to define a new export or to use a pre defined one. By default, there are no save exports in the system.
ILLUSTRATION 116 – Export – new or pre-defined
The second stage of the export wizard is the selection of type of data exported:
ILLUSTRATION 117 – What would you like to export?
You can export the following:

103
Actions Categories report Means of payment (accounts) Vendors Categories Favorite finances Balances Persons Statements (payments) Exchange rates Index values Interest rates Stock values Goods values Yields Export of actions: Select this option to export actions. You will be directed to the third stage – selecting of a program. You may export only part of your actions by changing the 'Export from' and 'Export until' fields in Tools/Options. Export of categories report: Select this option to export the Analyst/Categories report. You will be directed to the third stage – selecting of a program. Export of accounts: Select this option to export the accounts (means of payments) that are defined in the system. This will export just a list of accounts; to export the account statement select "Export payments". Export of vendors: Select this option to export the list of vendors defined in the system. You will be directed to the third stage – selecting of a program Export of categories: Select this option to export the categories defined in the system. You will be directed to the third stage – selecting of a program Export of favorites finance: Select this option to export favorites finance (currencies, indexes, interests, rate types, stocks etc) that are defined in the system. You will be asked to select what type of data you want to export:

104
ILLUSTRATION 118 – Export – My favorites finance
Export of balances: Select this option to export the balances of all accounts in a specific date. Export of persons: Select this option to export the persons defined in the system. Statement export (payments) : Select this option to export payments and balances of a specific account. Before you continue to the third stage (selecting of a program) you will need to select the account (means of payment) you would like to export out of the accounts defined in the system.
ILLUSTRATION 119 – Export payments – Selecting account
Exchange rate export : Select the source currency and the target currency:
ILLUSTRATION 120 – Export – Selecting the currency
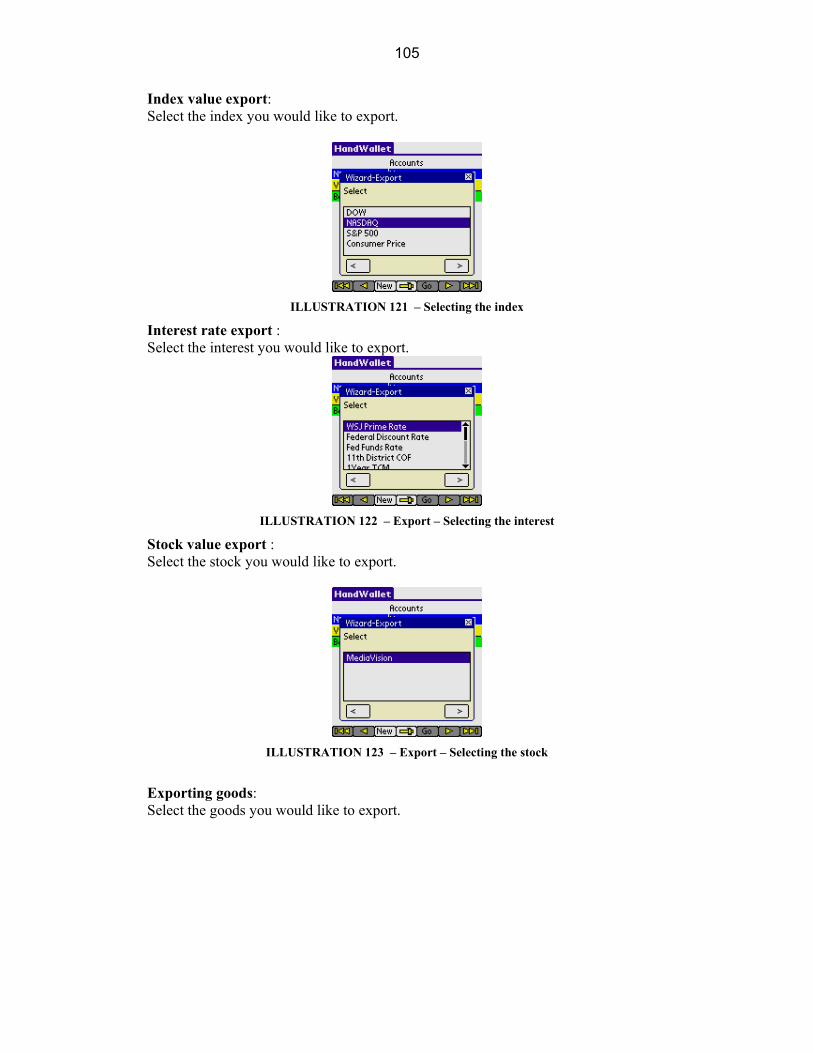
105
Index value export: Select the index you would like to export.
ILLUSTRATION 121 – Selecting the index
Interest rate export : Select the interest you would like to export.
ILLUSTRATION 122 – Export – Selecting the interest
Stock value export : Select the stock you would like to export.
ILLUSTRATION 123 – Export – Selecting the stock
Exporting goods: Select the goods you would like to export.
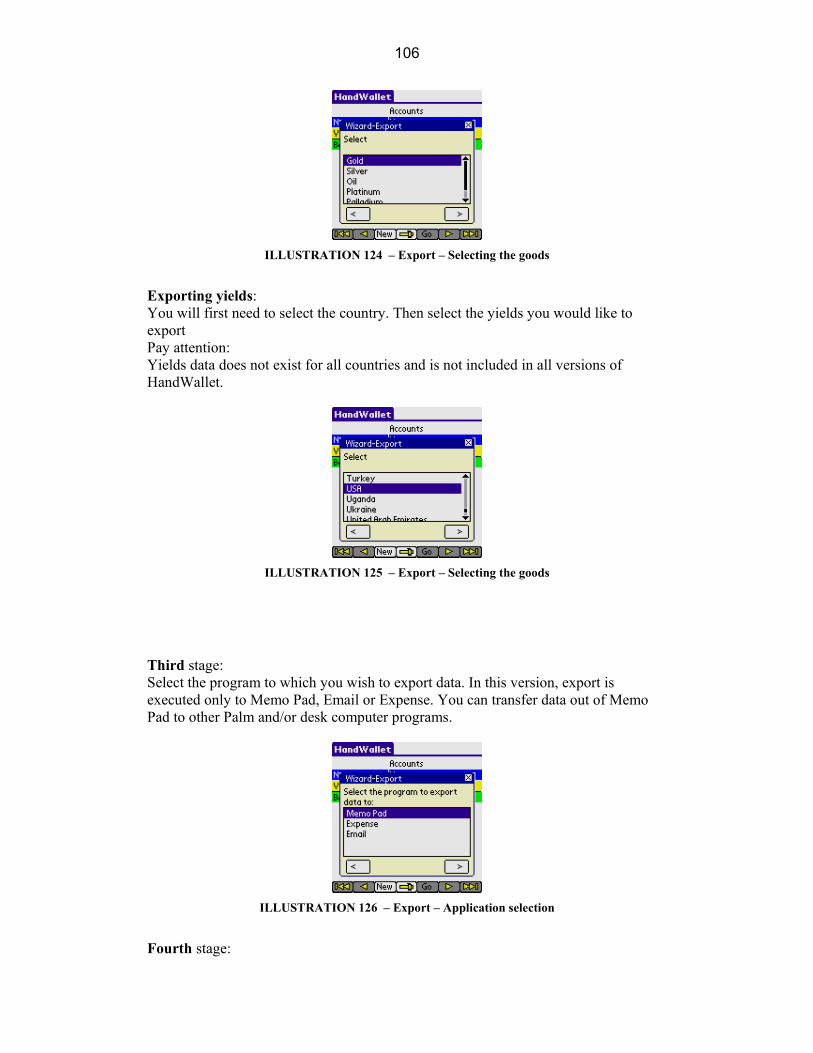
106
ILLUSTRATION 124 – Export – Selecting the goods
Exporting yields: You will first need to select the country. Then select the yields you would like to export Pay attention: Yields data does not exist for all countries and is not included in all versions of HandWallet.
ILLUSTRATION 125 – Export – Selecting the goods
Third stage: Select the program to which you wish to export data. In this version, export is executed only to Memo Pad, Email or Expense. You can transfer data out of Memo Pad to other Palm and/or desk computer programs.
ILLUSTRATION 126 – Export – Application selection
Fourth stage:
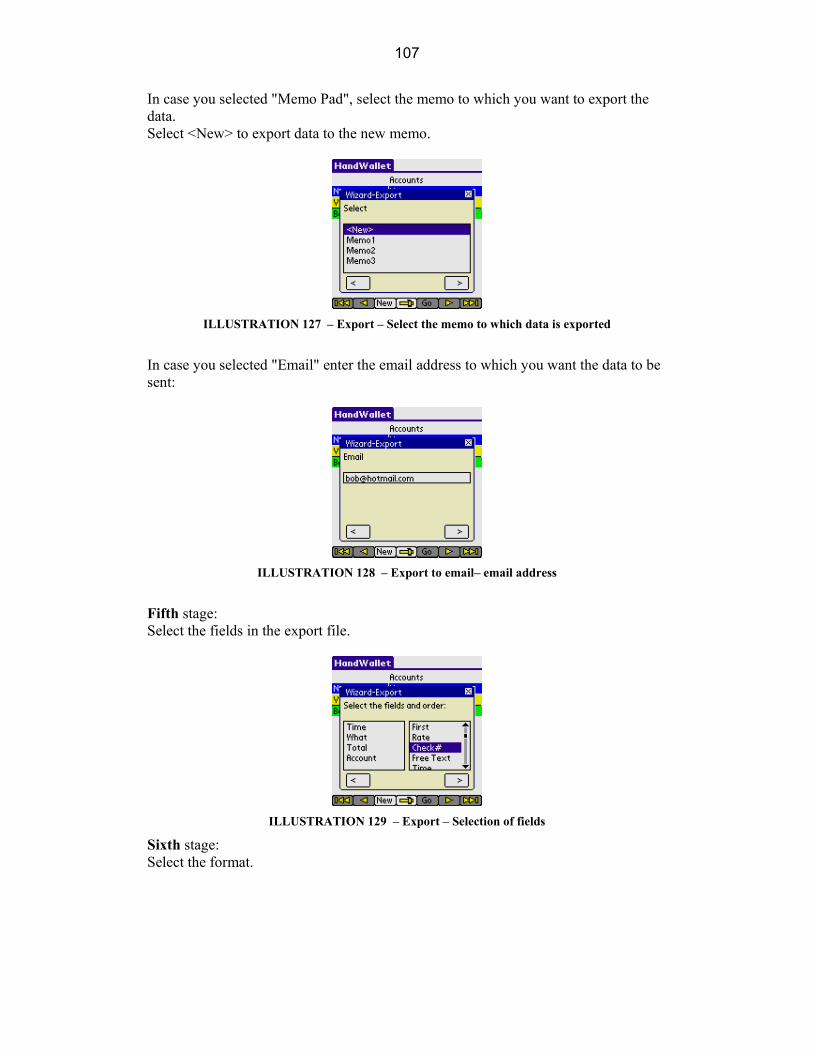
107
In case you selected "Memo Pad", select the memo to which you want to export the data. Select <New> to export data to the new memo.
ILLUSTRATION 127 – Export – Select the memo to which data is exported
In case you selected "Email" enter the email address to which you want the data to be sent:
ILLUSTRATION 128 – Export to email– email address
Fifth stage: Select the fields in the export file.
ILLUSTRATION 129 – Export – Selection of fields
Sixth stage: Select the format.
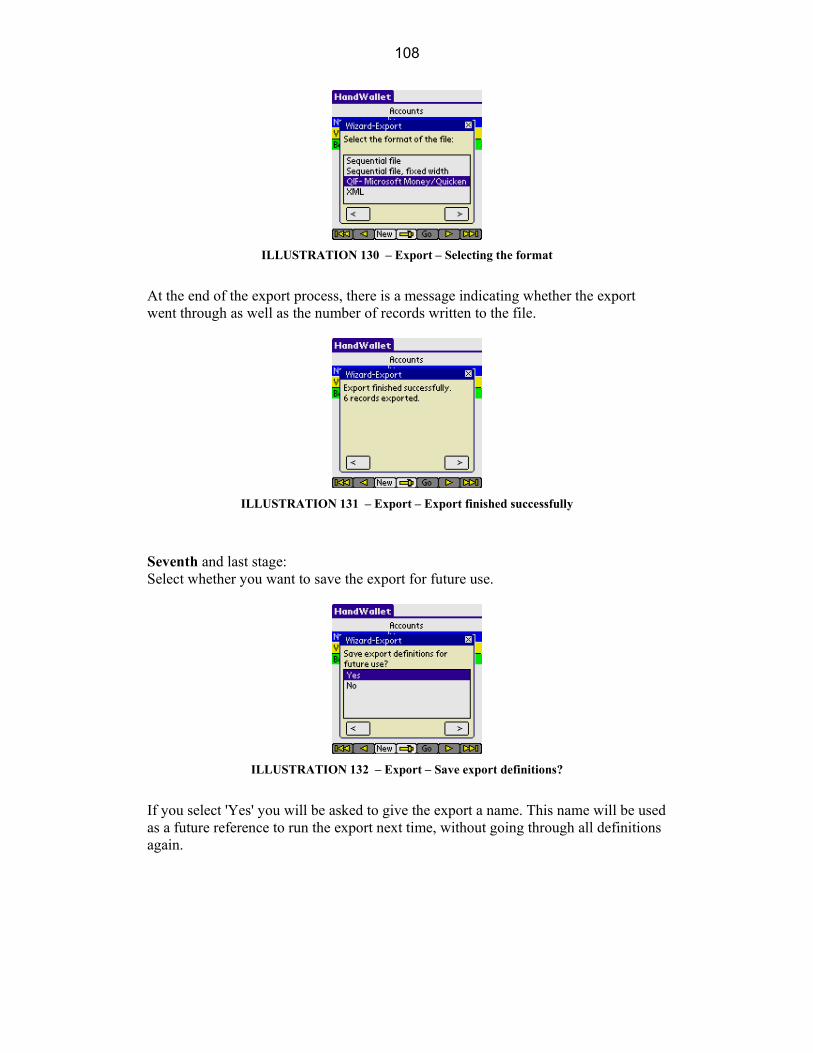
108
ILLUSTRATION 130 – Export – Selecting the format
At the end of the export process, there is a message indicating whether the export went through as well as the number of records written to the file.
ILLUSTRATION 131 – Export – Export finished successfully
Seventh and last stage: Select whether you want to save the export for future use.
ILLUSTRATION 132 – Export – Save export definitions?
If you select 'Yes' you will be asked to give the export a name. This name will be used as a future reference to run the export next time, without going through all definitions again.
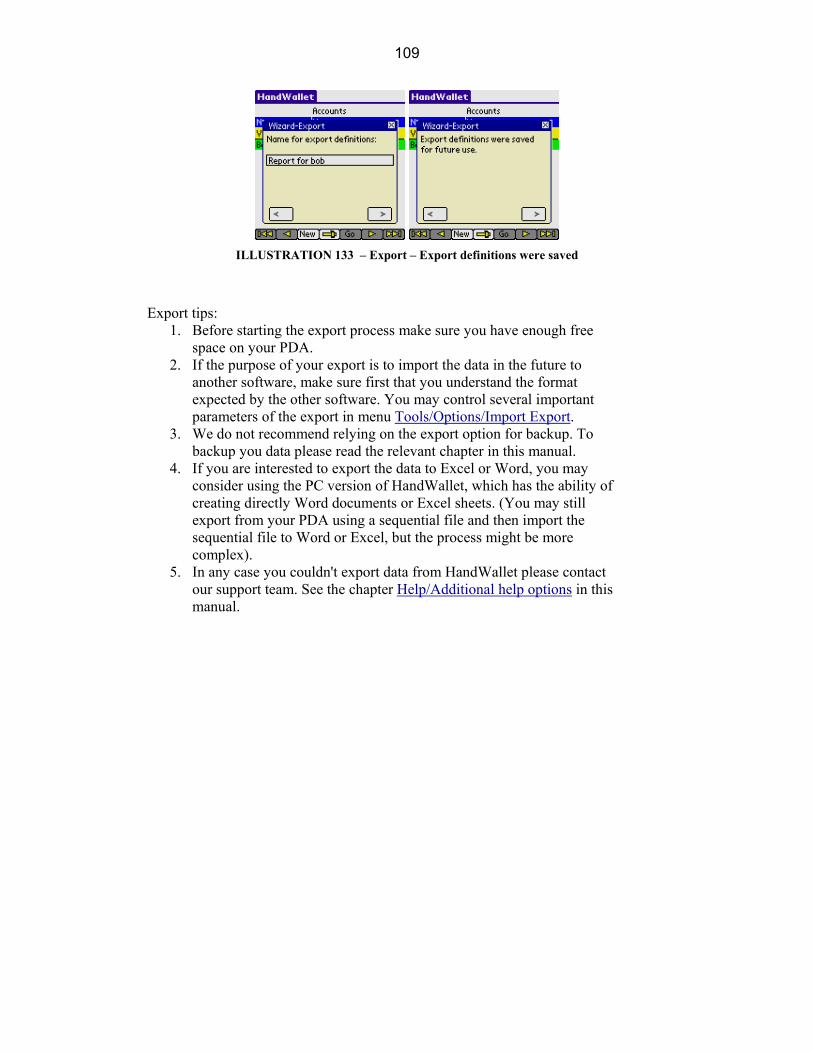
109
ILLUSTRATION 133 – Export – Export definitions were saved
Export tips: 1. Before starting the export process make sure you have enough free space on your PDA.
2. If the purpose of your export is to import the data in the future to another software, make sure first that you understand the format expected by the other software. You may control several important parameters of the export in menu Tools/Options/Import Export.
3. We do not recommend relying on the export option for backup. To backup you data please read the relevant chapter in this manual.
4. If you are interested to export the data to Excel or Word, you may consider using the PC version of HandWallet, which has the ability of creating directly Word documents or Excel sheets. (You may still export from your PDA using a sequential file and then import the sequential file to Word or Excel, but the process might be more complex).
5. In any case you couldn't export data from HandWallet please contact our support team. See the chapter Help/Additional help options in this manual.
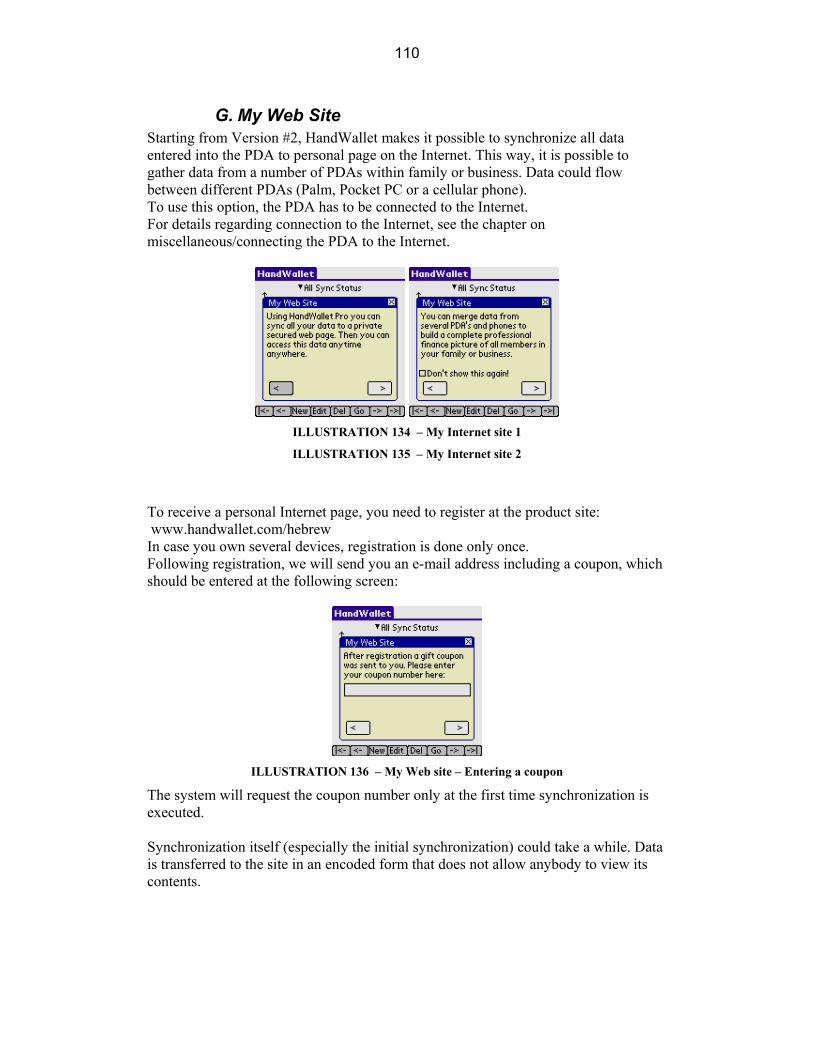
110
G. My Web Site
Starting from Version #2, HandWallet makes it possible to synchronize all data entered into the PDA to personal page on the Internet. This way, it is possible to gather data from a number of PDAs within family or business. Data could flow between different PDAs (Palm, Pocket PC or a cellular phone). To use this option, the PDA has to be connected to the Internet. For details regarding connection to the Internet, see the chapter on miscellaneous/connecting the PDA to the Internet.
ILLUSTRATION 134 – My Internet site 1
ILLUSTRATION 135 – My Internet site 2
To receive a personal Internet page, you need to register at the product site: www.handwallet.com/hebrew In case you own several devices, registration is done only once. Following registration, we will send you an e-mail address including a coupon, which should be entered at the following screen:
ILLUSTRATION 136 – My Web site – Entering a coupon
The system will request the coupon number only at the first time synchronization is executed. Synchronization itself (especially the initial synchronization) could take a while. Data is transferred to the site in an encoded form that does not allow anybody to view its contents.

111
ILLUSTRATION 137 – My Web site – Data synchronization
Following the synchronization process, you can view the data at this Internet site: www.handwallet.com/hebrew
ILLUSTRATION 138 – My Web site – My data
You can view actions, accounts, categories, persons, vendors and finances.

112
3. Financial menu ($)
A. Rates
This screen displays the exchange rates between two different currencies. This information assists in entering actions in foreign currency (through the ‘data/actions’ screen) or in linking repeated actions to the exchange rate of a specific currency. Select the two currencies exchange rates you wish to view or update:
ILLUSTRATION 139 – Exchange rates
After selecting two different currencies, you can view, add or change the exchange rates. If the exchange rates between the two currencies have not yet been defined within the system, the following guideline will be displayed:
ILLUSTRATION 140 – Press “New” to define exchange rates
Downloading exchange rates automatically from the Internet: HandWallet makes it possible to automatically download exchange rates from the Internet. To select this option, mark the square next to the www at the bottom of the screen. To use this feature, the PDA should be connected to the Internet. For details regarding connection to the Internet, please refer to the chapter on Miscellaneous/Connecting the PDA to the Internet.
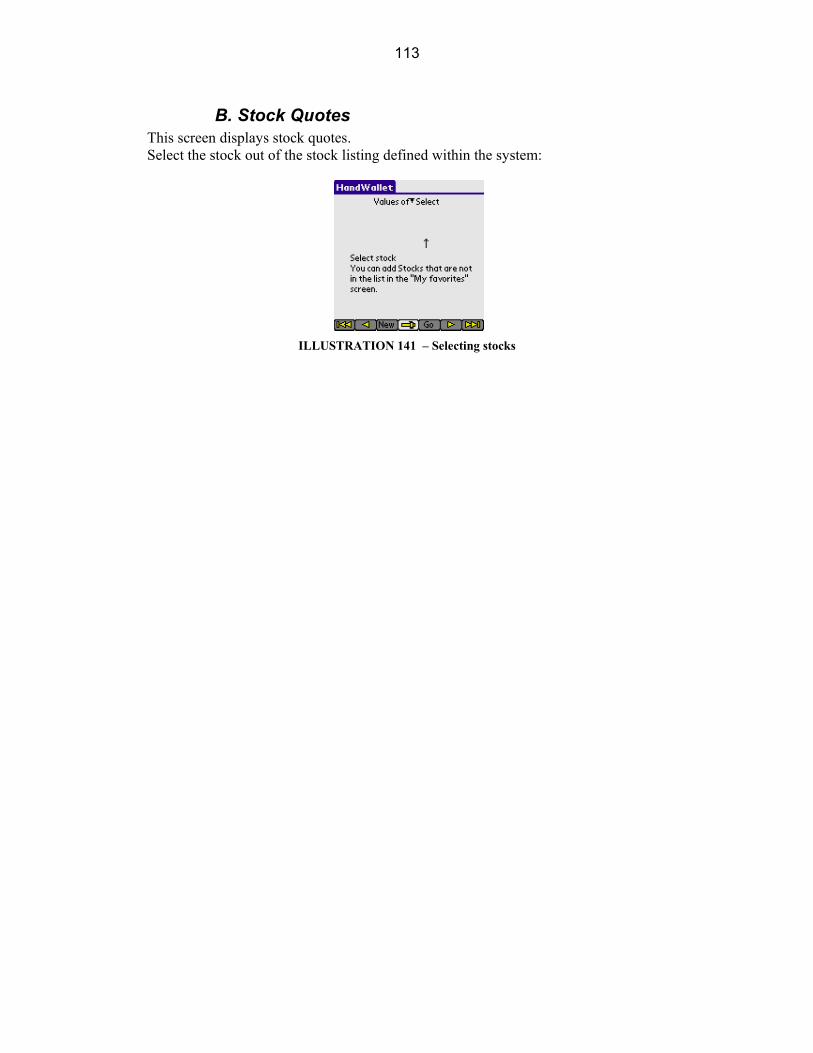
113
B. Stock Quotes
This screen displays stock quotes. Select the stock out of the stock listing defined within the system:
ILLUSTRATION 141 – Selecting stocks
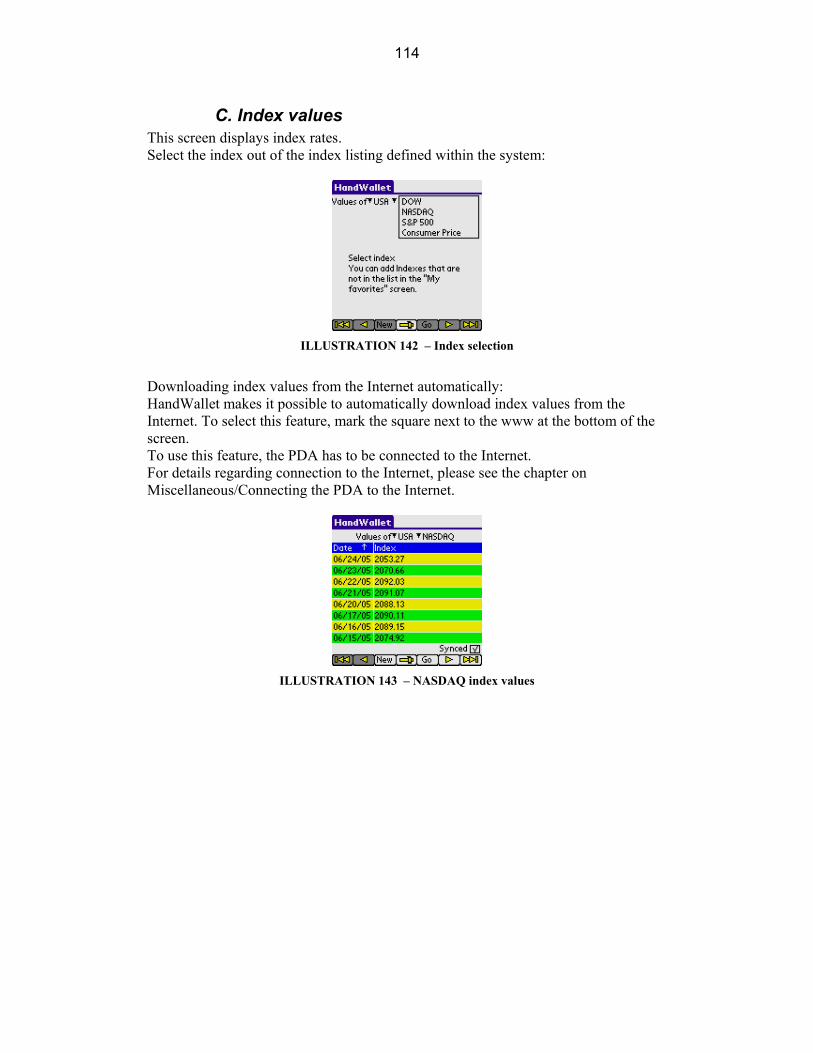
114
C. Index values
This screen displays index rates. Select the index out of the index listing defined within the system:
ILLUSTRATION 142 – Index selection
Downloading index values from the Internet automatically: HandWallet makes it possible to automatically download index values from the Internet. To select this feature, mark the square next to the www at the bottom of the screen. To use this feature, the PDA has to be connected to the Internet. For details regarding connection to the Internet, please see the chapter on Miscellaneous/Connecting the PDA to the Internet.
ILLUSTRATION 143 – NASDAQ index values
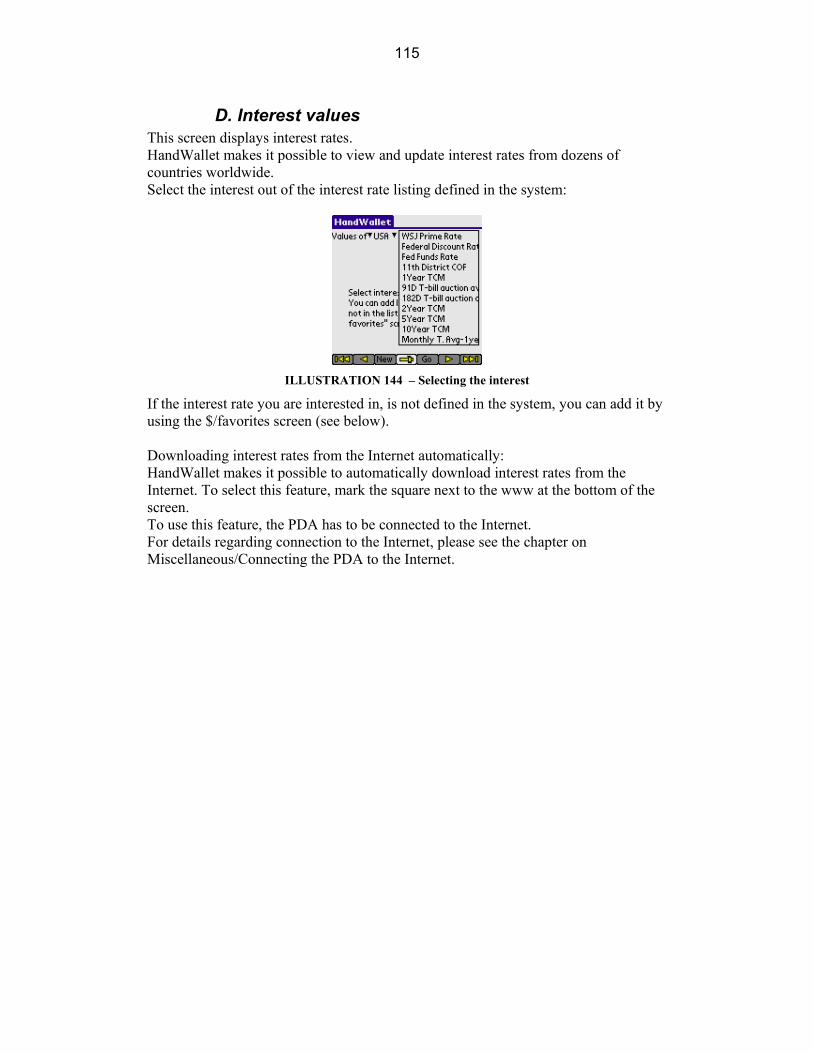
115
D. Interest values
This screen displays interest rates. HandWallet makes it possible to view and update interest rates from dozens of countries worldwide. Select the interest out of the interest rate listing defined in the system:
ILLUSTRATION 144 – Selecting the interest
If the interest rate you are interested in, is not defined in the system, you can add it by using the $/favorites screen (see below). Downloading interest rates from the Internet automatically: HandWallet makes it possible to automatically download interest rates from the Internet. To select this feature, mark the square next to the www at the bottom of the screen. To use this feature, the PDA has to be connected to the Internet. For details regarding connection to the Internet, please see the chapter on Miscellaneous/Connecting the PDA to the Internet.

116
E. Goods (Merchandise) values
This screen displays the value of goods. Select the goods out of the list of goods defined in the system. If the goods you are interested in, are not defined in the system, you can add additional goods to the ‘My favorites’ screen.
ILLUSTRATION 145 – Goods
Downloading goods quotes from the Internet automatically: HandWallet makes it possible to automatically download goods quotes from the Internet. To select this feature, mark the square next to the www at the bottom of the screen. To use this feature, the PDA has to be connected to the Internet. For details regarding connection to the Internet, please see the chapter on Miscellaneous/Connecting the PDA to the Internet.
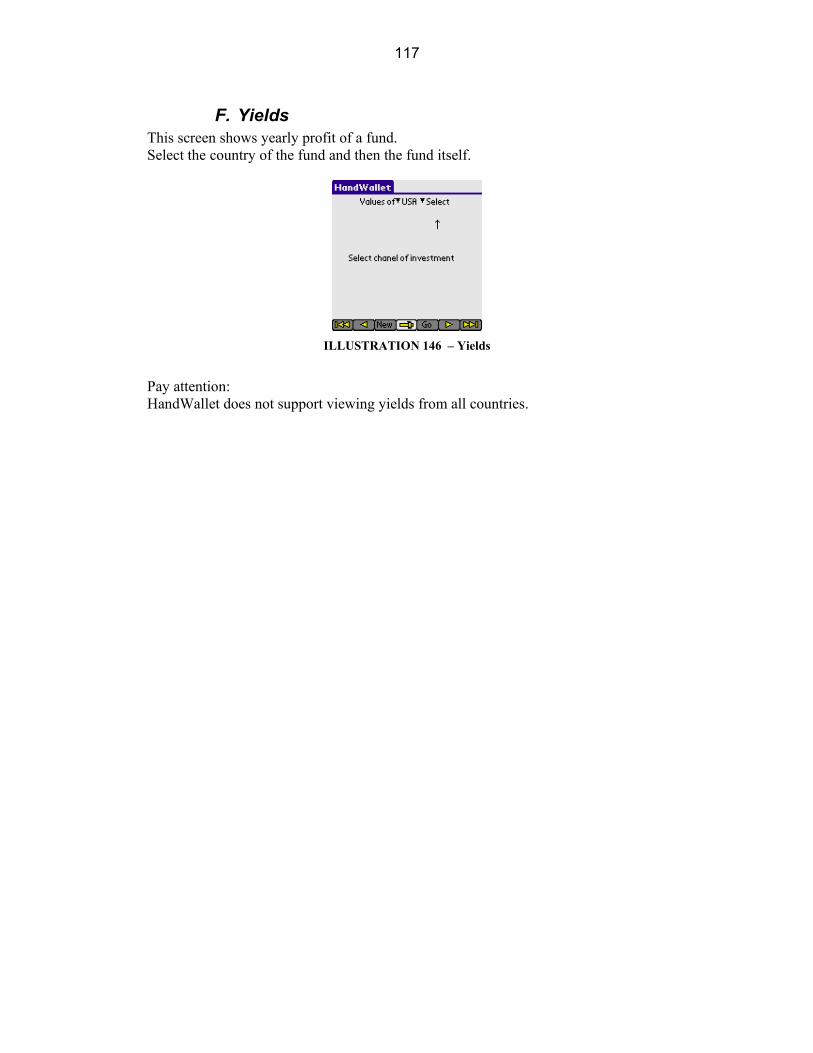
117
F. Yields
This screen shows yearly profit of a fund. Select the country of the fund and then the fund itself.
ILLUSTRATION 146 – Yields
Pay attention: HandWallet does not support viewing yields from all countries.

118
G. Compare Yields
This screen shows comparison yields of funds. Select the country of the funds and then the funds group.
ILLUSTRATION 147 – Compare Yields
Pay attention: HandWallet does not support viewing yields from all countries.
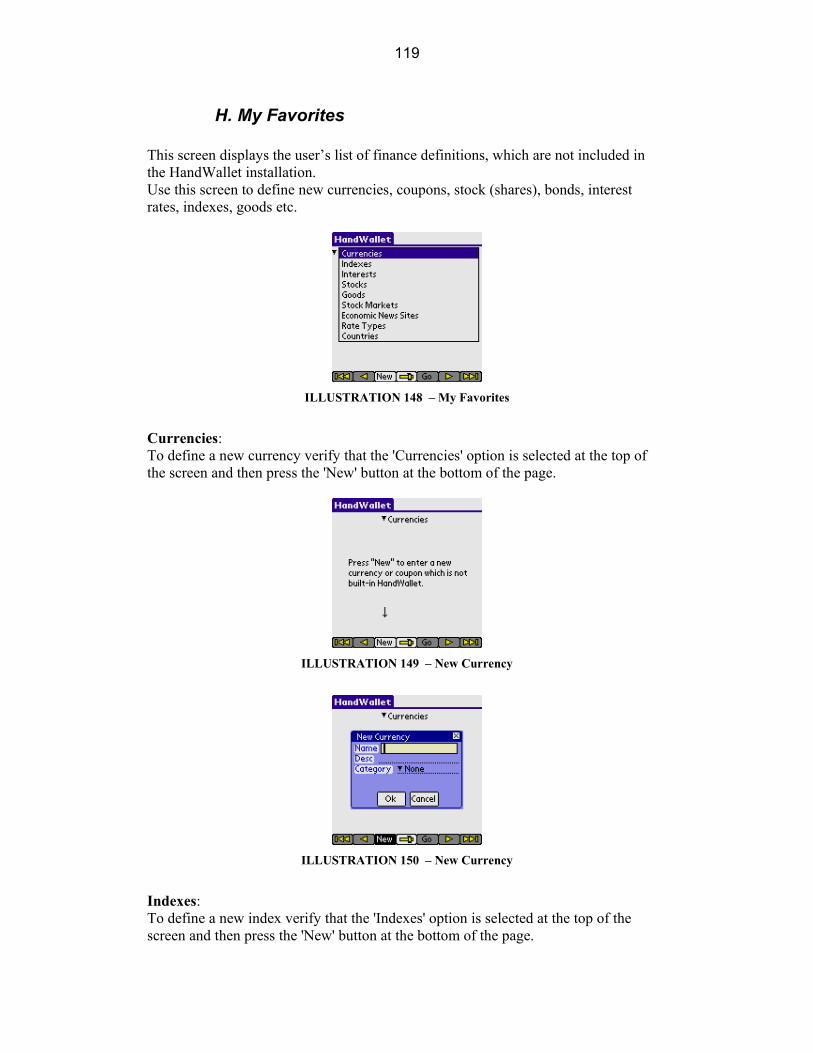
119
H. My Favorites
This screen displays the user’s list of finance definitions, which are not included in the HandWallet installation. Use this screen to define new currencies, coupons, stock (shares), bonds, interest rates, indexes, goods etc.
ILLUSTRATION 148 – My Favorites
Currencies: To define a new currency verify that the 'Currencies' option is selected at the top of the screen and then press the 'New' button at the bottom of the page.
ILLUSTRATION 149 – New Currency
ILLUSTRATION 150 – New Currency
Indexes: To define a new index verify that the 'Indexes' option is selected at the top of the screen and then press the 'New' button at the bottom of the page.

120
ILLUSTRATION 151 – New Index
ILLUSTRATION 152 – New Index
Interests: To define a new interest verify that the 'Interests' option is selected at the top of the screen and then press the 'New' button at the bottom of the page.
ILLUSTRATION 153 – New Interest
ILLUSTRATION 154 – New Interest
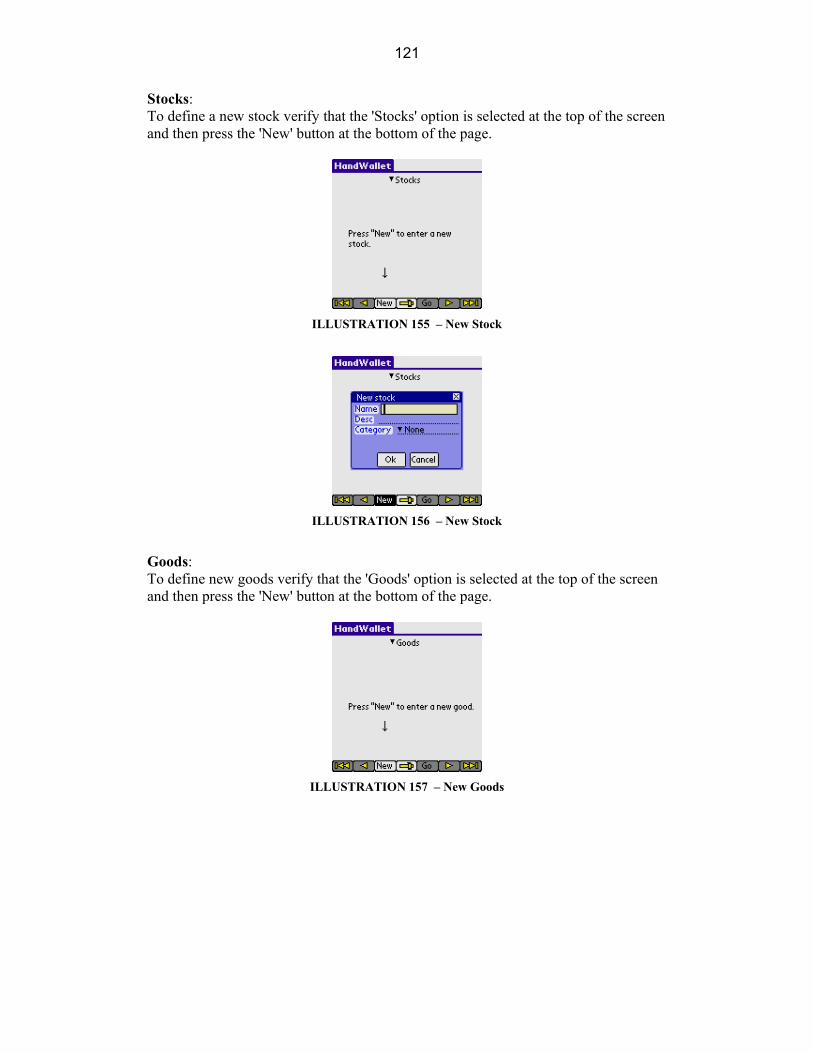
121
Stocks: To define a new stock verify that the 'Stocks' option is selected at the top of the screen and then press the 'New' button at the bottom of the page.
ILLUSTRATION 155 – New Stock
ILLUSTRATION 156 – New Stock
Goods: To define new goods verify that the 'Goods' option is selected at the top of the screen and then press the 'New' button at the bottom of the page.
ILLUSTRATION 157 – New Goods
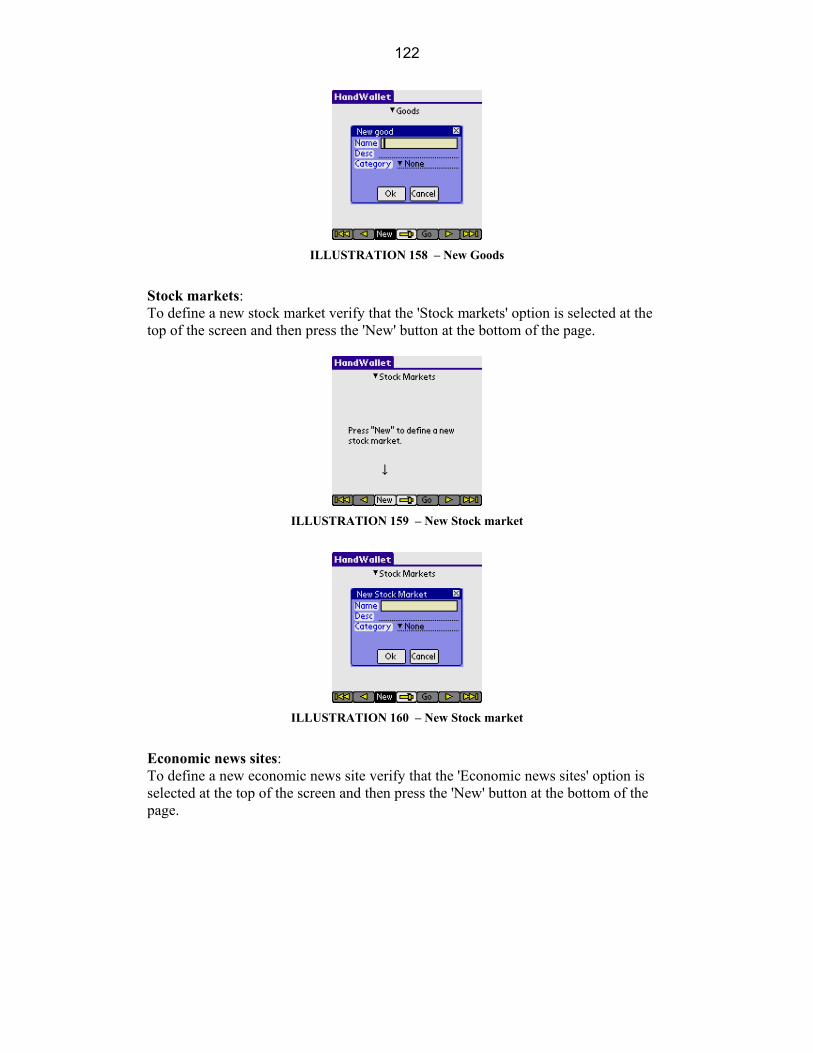
122
ILLUSTRATION 158 – New Goods
Stock markets: To define a new stock market verify that the 'Stock markets' option is selected at the top of the screen and then press the 'New' button at the bottom of the page.
ILLUSTRATION 159 – New Stock market
ILLUSTRATION 160 – New Stock market
Economic news sites: To define a new economic news site verify that the 'Economic news sites' option is selected at the top of the screen and then press the 'New' button at the bottom of the page.
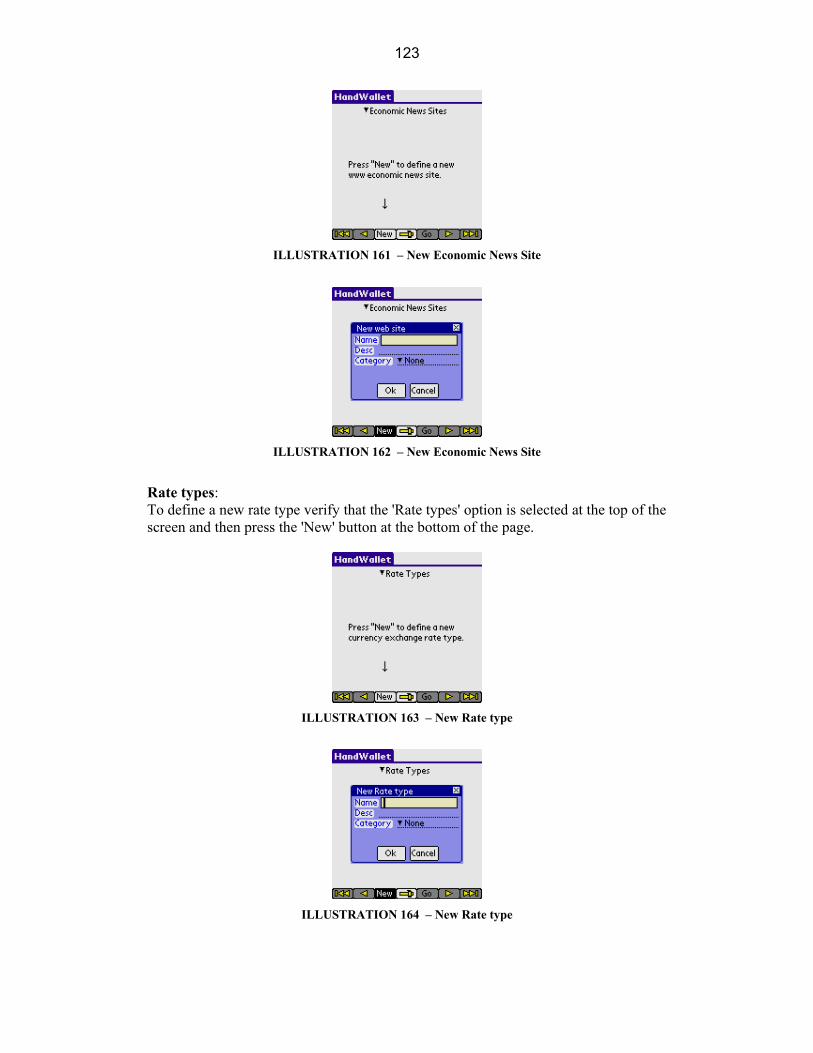
123
ILLUSTRATION 161 – New Economic News Site
ILLUSTRATION 162 – New Economic News Site
Rate types: To define a new rate type verify that the 'Rate types' option is selected at the top of the screen and then press the 'New' button at the bottom of the page.
ILLUSTRATION 163 – New Rate type
ILLUSTRATION 164 – New Rate type

124
Countries: To define a new country verify that the 'Countries' option is selected at the top of the screen and then press the 'New' button at the bottom of the page.
ILLUSTRATION 165 – New Country
ILLUSTRATION 166 – New Country

125
4. Help In addition to this manual, Hand Wallet provides an extensive amount of help integrated within the menus, the screens and throughout the operation of the software. There is also a support team at your disposal. You can call in regard to any subject you wish through the product site www.handwallet.com Select the ‘support/ask question’ option. Answers are usually given within several hours.
A. This Screen
The ‘help/this screen’ window displays specific help according to the screen or activity we are currently doing. For example: when updating certain data or adding new data, you can receive a detailed listing of all fields on the screen, and a short explanation regarding each field.
ILLUSTRATION 167 – Help – “This screen"
You can move forward on the window by clicking the right hand arrow at the window heading. You can move back by clicking the left hand arrow. Closing the help window is done by clicking the X on the right hand side of the window.
B. General
The ‘help/general’ window displays general guidelines for operating the software and working with it. You can display the ‘help/general’ window out of any screen or activity with the software.
ILLUSTRATION 168 – Help – “General"

126
C. Online Help
To use this feature, the PDA as to be connected to the Internet. For details regarding connection to the Internet, please see the chapter on Miscellaneous/Connecting the PDA to the Internet. By selecting this feature, you can ask the HandWallet support team for help.
ILLUSTRATION 169 – Help on the web (Internet)
ILLUSTRATION 170 – Help on the web– Asking a question
ILLUSTRATION 171 – Help on the web – Updating your e-mail
In case you have already asked a question in the past your email is saved, so you will need to type it only once.
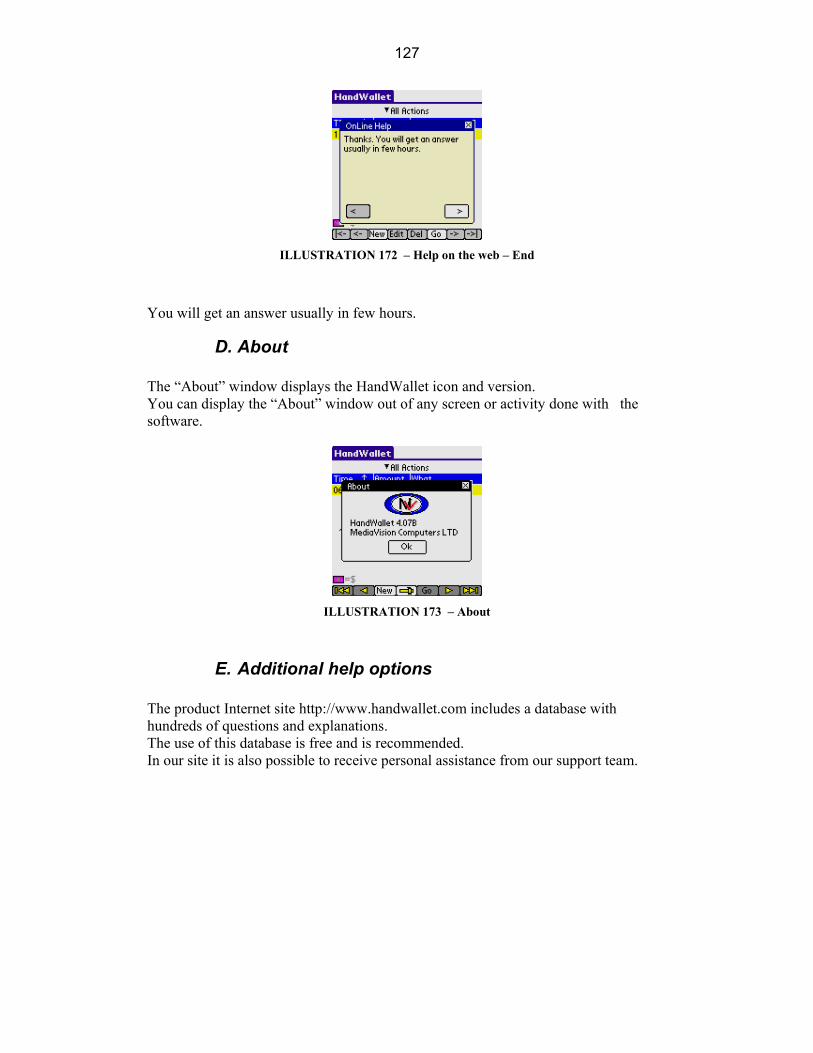
127
ILLUSTRATION 172 – Help on the web – End
You will get an answer usually in few hours.
D. About
The “About” window displays the HandWallet icon and version. You can display the “About” window out of any screen or activity done with the software.
ILLUSTRATION 173 – About
E. Additional help options
The product Internet site http://www.handwallet.com includes a database with hundreds of questions and explanations. The use of this database is free and is recommended. In our site it is also possible to receive personal assistance from our support team.
128
5. Miscellaneous
A. Connecting a Palm device to the Internet
HandWallet is a sophisticated program that helps users receive updated information. In addition to that, HandWallet helps users to perform advanced financial activities when they are out of the office. To fully utilize these advanced features, your PDA has to be connected to the Internet. HandWallet supports five Internet connection types: 1. Built-in PDA connection. 2. Connection through an external cellular modem or through a cellular phone and adapter.
3. Connection through the infrared interface. 4. Connection through Wireless LAN. 5. Connection through your desktop PC.
A short explanation regarding each of these connections:
1. Built-in PDA connection. The majority of the new PDAs being sold have a built-in cellular connection (usually a GSM connection). If you still do not have a PDA, it is recommended to check whether the PDA you intend to purchase already includes a cellular interface.
2. Connection through an external cellular modem or through a cellular phone. Most of the cellular companies offer integrated plans including a cellular modem + Internet surfing that are compatible with the majority of the existing PDA models.
3. Connection through the infrared interface. You can use your PDA infrared interface to connect to the Internet. In this case, you have to use a PC or a cellular phone with infrared interface. For additional information regarding the connection, we recommend contacting your PDA vendor.
4. Connection through Wireless LAN. 5. Connection through your desktop PC. Internet Connection Using a USB Interface: Use connectivity software, such as Softick PPP (USB Version), and follow the installation instructions. For additional information: see the product site/technical information/connecting the PDA to the Internet. Internet Connection Using a Serial Cable: Stage I: Make sure that your desktop PC is connected to the Internet Stage II: Download a software which enables connecting the Palm to the Internet using a serial cable, such as: Mocha W32 PPP.
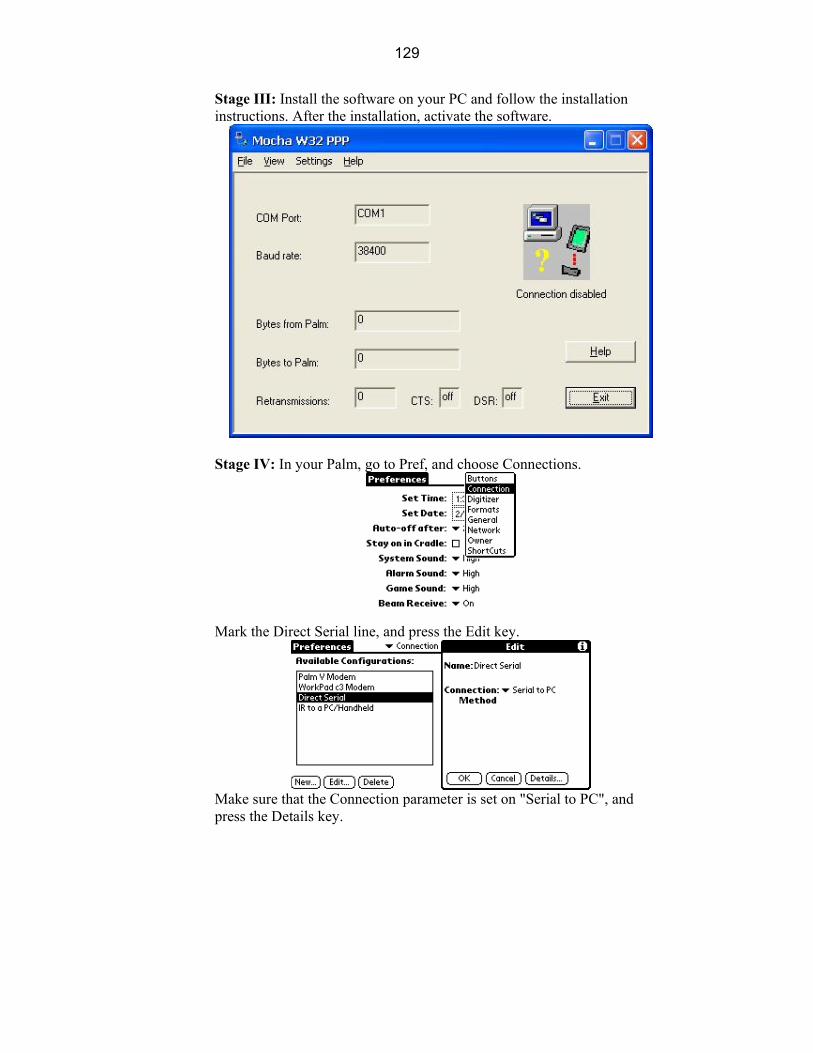
129
Stage III: Install the software on your PC and follow the installation instructions. After the installation, activate the software.
Stage IV: In your Palm, go to Pref, and choose Connections.
Mark the Direct Serial line, and press the Edit key.
Make sure that the Connection parameter is set on "Serial to PC", and press the Details key.

130
In this screen you should define the connection speed. Various models enable various connection speeds. Make sure that the speed you are choosing is identical to the speed of your PC connection software. Recommended speed is 38,400 bps. Stage V: If you left the Pref application, return to it, choose Network.
Then press Connect. Last Stage: Leave the "Pref" application and activate HandWallet. For additional information: see the product site/technical information/connecting the PDA to the Internet.

131
B. Backup
You can backup all data entered into HandWallet and load it at a later time whenever needed. We recommend performing this kind of backup once in a while, since there is usually important information involved. The backup process is simple, requiring little space and it can be done instantly, as described below: Following a regular synchronization, all data files of HandWallet are copied into the PC backup directory. This directory is located at the hard disk in a directory called PALM within a sub-directory named after the user and within a sub-directory called backup. For example: if my user name is David, my backup directory would usually be c:\palm\david\backup. Data files in the folder have the suffix PDB. These files should be copied to a safe place. When you wish to load the software backup, all that needs to be done is to reach the location where the data files are saved and transfer them with the regular InstallTool to the PDA. The backup files will override (delete) the existing data files on the PDA and will replace them. The software will come up with the backup data.

132
Index
$
$ menu.................................................................. 112
A
About.................................................................... 127 Account.................................................................. 23 Account - credit card.............................................. 25 Account - currency................................................. 24 Account - delete ..................................................... 29 Account - duplicate ................................................ 28 Account - modify ................................................... 28 Account - more button ........................................... 25 Account - name ...................................................... 24 Account - personal fields ....................................... 29 Account - type........................................................ 24 Account - view fields ............................................. 29 Account - view statement portfolio ....................... 29 Account num.......................................................... 24 Accounts - export ................................................. 103 Accounts - general ................................................. 23 Action .................................................................... 30 Action - checks....................................................... 37 Action - consumption............................................. 42 Action - delete........................................................ 52 Action - discount.................................................... 45 Action - duplicate................................................... 52 Action - fast action................................................. 54 Action - interest...................................................... 46 Action - modify...................................................... 52 Action - new........................................................... 30 Action - partners..................................................... 43 Action - personal fields.......................................... 51 Action - tax, invoice, receipt.................................. 40 Action - timing ....................................................... 41 Action - total .......................................................... 53 Action - vendor/customer ...................................... 36 Action categories (number of) ............................... 95 Action number........................................................ 50 Action persons (number of) ................................... 95 Action sort.............................................................. 86 Action Status .......................................................... 50 Actions ................................................................... 30 Actions - currency view......................................... 53 Actions - export.................................................... 103 Actions - filtering................................................... 52 Actions - navigating............................................... 53 Actions - sort .......................................................... 53 Actions shown info ................................................ 86 Activated (account) ................................................ 24 Amount (of payment)............................................. 58 Amounts linkage .................................................... 47 Analyst menu ........................................................ 70 Approval options.................................................... 88 ASCII ................................................................... 101 Ask Check Balance ................................................ 88 Ask check Pay........................................................ 88 Ask CVV................................................................ 91 Ask Delete.............................................................. 88 Ask ID .................................................................... 91 Ask password ......................................................... 90
Ask recalc payments...............................................88 ATM .......................................................................34 Auto create actions .................................................87
B
Background.............................................................84 Backup..................................................................131 Balance...................................................................57 Balance - delete ......................................................61 Balance - edit..........................................................60 Balance account......................................................25 Balance day ............................................................25 Balances..................................................................73 Balances - export ..................................................104 Balances until .........................................................95 Bar scale .................................................................86 Bars color................................................................84 BasicIngots .............................................................21 Behavior options.....................................................86 Biweekly action......................................................41 Booster........................................................13, 15, 21 Booster version.......................................................94 Budget Status..........................................................72 Budget type.............................................................64 Buttons font name ..................................................85 Buttons font size.....................................................85
C
Categories ...............................................................62 Categories - export ...............................................103 Categories Bar ........................................................71 Categories Pie.........................................................70 Categories Report ...................................................71 Categories report - export.....................................103 Category - delete ....................................................65 Category - more button ..........................................64 Category description ..............................................63 Category name........................................................63 Category sign..........................................................63 Check......................................................................34 Check connection button........................................28 Checks ....................................................................37 Chit language..........................................................91 Chit title ..................................................................91 Clear Filters ............................................................69 Color .......................................................................83 COM POS...............................................................91 Communication closed...........................................87 Compare Yields....................................................118 Consumption ..........................................................42 Countries...............................................................124 Coupon value..........................................................96 CreatePDAFile .......................................................19 Credit card ..............................................................25 Credit card type ......................................................26 Credit limit..............................................................25 Currenciesy...........................................................119 Currency view ........................................................53 Customer.................................................................36 Customer credit card ..............................................38

133
D
Data menu ............................................................. 23 DataCommIngotsr.................................................. 21 Date (of payment) .................................................. 58 Date format............................................................. 86 Default currency (of a category)............................ 63 Default money (of a category)............................... 63 Default quantity (of a category)............................. 63 Default rate............................................................. 81 Delete action .......................................................... 52 Delete balance ........................................................ 61 Delete category ...................................................... 65 Delete person.......................................................... 67 Delete vendor ......................................................... 68 Discount ................................................................. 45 Duplicate account................................................... 28 Duplicate action ..................................................... 52 Duplicate category ................................................. 65
E
Economic news sites ............................................ 122 Edit action .............................................................. 52 Enable CC Swap .................................................... 91 Erase All................................................................. 69 Error in procedure CreatePDBFile ........................ 19 Every week............................................................. 41 Exceed color........................................................... 84 Exchange rate......................................................... 49 Exchange rates - export........................................ 104 Export ................................................................... 102 Export date format ................................................. 92 Export file format................................................... 92 Export from ............................................................ 92 Export until ............................................................ 92 Extra credit days..................................................... 26
F
F. Point actions....................................................... 86 Fast actions............................................................. 54 Favorites finance - export .................................... 103 Finance sort ............................................................ 86 Financial Menu .................................................... 112 Forecast .................................................................. 73 Form font name...................................................... 85 Form font size ........................................................ 85 Frame color ............................................................ 83 Future text color ..................................................... 84
G
General review ....................................................... 22 Goods ................................................................... 121 Goods - export...................................................... 105 Goods values ........................................................ 116
H
Headline color ........................................................ 83 Heap free ................................................................ 95 Help...................................................................... 125
Help - About .........................................................127 Help - Additional options.....................................127 Help - Online Help ...............................................126 Help - This Screen................................................125 Highlight Color 1 ...................................................83 Highlight Color 2 ...................................................83 Highlight lines ........................................................83 Holidays system .....................................................81 Holydays.................................................................81 Home currency .......................................................81
I
I/E encoding ...........................................................82 I/E Separator...........................................................92 Illegible menu.........................................................18 Import .....................................................................97 Import date format..................................................92 Import Export options ............................................92 Index .....................................................................132 Index - export .......................................................105 Index Values.........................................................114 Indexes..................................................................119 Infrared .................................................................128 Installation ..............................................................13 Interest ....................................................................46 Interest - export ....................................................105 Interest values.......................................................115 Interests.................................................................120 Internet policy.........................................................86 Introduction ..............................................................9 Invoice ....................................................................40
K
Keep pays period ....................................................86 Keyboard ................................................................89 Keyboard color 1 ..............................................84, 89 Keyboard color 2 ..............................................84, 89 Keyboard options ...................................................89 Keyboard type ........................................................89
L
Language ................................................................81 License....................................................................93 License Type ..........................................................96 Linkage ...................................................................47 List of illustrations ...................................................4 Looks & Colors options .........................................83
M
Main Category........................................................63 Means of payment ..................................................23 Means of payment - ATM......................................34 Means of payment - Internet ..................................34 Means of payment - Paper......................................34 Means of payment - Tel .........................................34 Menu.......................................................................81 Menu encoding .......................................................82 Menu Language......................................................81 Minimum pie slice..................................................86 Minimum requirements ..........................................13

134
Mocha................................................................... 128 Monthly budget ...................................................... 64 More button (accounts) .......................................... 25 More button (actions)............................................. 34 More button (categories)........................................ 64 My Country ............................................................ 81 My Favorites ........................................................ 119 My favorites countries ......................................... 124 My favorites currencies ....................................... 119 My favorites economic news sites....................... 122 My favorites goods .............................................. 121 My favorites indexes............................................ 119 My favorites interest ............................................ 120 My favorites rate types ........................................ 123 My favorites stock markets.................................. 122 My favorites stocks .............................................. 121 My Web Site ........................................................ 110
N
New account........................................................... 23 New action ............................................................. 30 New balance........................................................... 59 New category ......................................................... 62 New country ......................................................... 124 New currency ....................................................... 119 New economic news site...................................... 122 New goods............................................................ 121 New index ............................................................ 119 New interest ......................................................... 120 New payment ......................................................... 57 New person ............................................................ 66 New rate type ....................................................... 123 New stock............................................................. 121 New stock market ................................................ 122 New vendor ............................................................ 68 Nonworking day..................................................... 81 Num font name....................................................... 85 Num font size ......................................................... 85 Num of accounts .................................................... 95 Num of actions ....................................................... 95 Num of balances..................................................... 95 Num of categories .................................................. 95 Num of payments ................................................... 95 Num of persons ...................................................... 95
O
Online Help .......................................................... 126 Online Upgrade ...................................................... 79 Opening screen....................................................... 87 Options .................................................................. 80 Options - Approvals............................................... 88 Options - Behavior ................................................. 86 Options - Import Export......................................... 92 Options - Keyboard................................................ 89 Options - Licensing................................................ 93 Options - Look & Colors ....................................... 83 Options - Regional settings.................................... 81 Options - Security .................................................. 90 Options - Swap credit cards ................................... 91 OwnerDrawIngots.................................................. 21
P
Palm OS..................................................................13 Partners ...................................................................43 Password.................................................................90 Pay abroad (with credit card) .................................26 payment .................................................................57 Payment - Delete ....................................................59 Payment shown info ...............................................86 Payments.................................................................57 Payments - export.................................................104 Payments date format .............................................87 Payments until ........................................................95 Payoff......................................................................25 Pays #......................................................................34 Periodical action .....................................................41 Personal fields ........................................................51 Persons....................................................................66 Persons - export ....................................................104 Persons Pie..............................................................71 Popup keyboard......................................................89 PPP........................................................................128 Prime.......................................................................46 Print chit .................................................................91 Problems during installation ..................................18 Proxy port ...............................................................87 Proxy server............................................................87
Q
Quarter ....................................................................41
R
Rate types .............................................................123 Rates .....................................................................112 Recalc payments.....................................................86 Recalc statistics ......................................................86 Receipt ....................................................................40 Regional settings ....................................................81 Restore defaults ......................................................87 Reverse export........................................................82 Reverse import .......................................................82 Reverse input ..........................................................81 Reverse menu .........................................................81 Reverse text ............................................................82
S
Save money ..............................................................9 Security...................................................................90 Serial Cable ..........................................................128 Serial number .........................................................95 Show frame.............................................................83 Show headline ........................................................83 Show total payments ..............................................87 Softick PPP...........................................................128 Sort actions .......................................................53, 86 Sort Categories .......................................................88 Sort of finance data ................................................86 Source (of balance).................................................60 Source (of payment) ...............................................59 Start forecast day ....................................................86 Statement - export ................................................104

135
Statement portfolio................................................. 57 Stock markets ....................................................... 122 Stock Quotes ........................................................ 113 Stock quotes - export ........................................... 105 Stocks ................................................................... 121 Swap credit card..................................................... 74 Swap credit cards options ...................................... 91 Symbian.................................................................. 13 System Status........................................................ 94
T
Tax.......................................................................... 40 Terminal number.................................................... 24 Terms & Conditions date ....................................... 94 Text color ............................................................... 84 Text encoding......................................................... 82 This Screen........................................................... 125 Timing .................................................................... 41 Tools menu............................................................ 74
U
Unicode .................................................................. 82 UNICODE............................................................ 101 Uninstall ................................................................. 20 Update .................................................................... 20 USB ...................................................................... 128 User code................................................................ 94 User name............................................................... 95 User Profile ............................................................ 93
V
Valid until (credit card) ..........................................26 Valid until (license)................................................96 VAT..................................................................40, 81 VAT percentage .....................................................81 Vendor ....................................................................36 Vendors...................................................................68 Vendors - export ...................................................103 Vendors (number of) ..............................................95 Version ...................................................................94 Version date............................................................94
W
Win CE ...................................................................13 Win label text color ................................................85 Windows color .......................................................84 Windows font name ...............................................85 Windows font size..................................................85 Windows text color ................................................84 Windows top color .................................................83 Wizard - import ......................................................97 WWW data site ......................................................26
Y
Yields....................................................................117 Yields - export ......................................................106