
Version 2018.6 ReadMeresources.avid.com/SupportFiles/attach/MediaCentral...Avid ® MediaCentral |...
38
Avid ® MediaCentral | Cloud UX Panel for Adobe Premiere Pro CC Version 2018.6 ReadMe Important Information Avid ® recommends that you read all the information in this ReadMe file thoroughly before installing or using any new software release. Search the Avid Knowledge Base at http://www.avid.com/learn-and-support for the most up-to-date ReadMe file, which contains the latest information that might have become available after the documentation was published. Revision History Contents About MediaCentral | Cloud UX Panel for Adobe Premiere Pro CC . . . . . . . . . . . . . . . . . . . . . . . . . . . 2 Installing MediaCentral | Cloud UX Panel for Adobe Premiere Pro CC (Windows) . . . . . . . . . . . . . . 15 Installing MediaCentral | Cloud UX Panel for Adobe Premiere Pro CC (macOS) . . . . . . . . . . . . . . . . 17 Configuring the MediaCentral | Cloud UX Panel for Adobe Premiere Pro CC . . . . . . . . . . . . . . . . . . 19 Working with the MediaCentral | Cloud UX Panel for Adobe Premiere Pro CC . . . . . . . . . . . . . . . . . 26 Legal Notices . . . . . . . . . . . . . . . . . . . . . . . . . . . . . . . . . . . . . . . . . . . . . . . . . . . . . . . . . . . . . . . . . . . . . 37 Date Revised Changes Made September 10, 2018 Added topic “Troubleshooting: Missing Premiere-Specific Actions” July 26, 2018 First publication
Transcript of Version 2018.6 ReadMeresources.avid.com/SupportFiles/attach/MediaCentral...Avid ® MediaCentral |...

Avid® MediaCentral | Cloud UX Panel for Adobe Premiere Pro CC Version 2018.6 ReadMe
Important Information
Avid® recommends that you read all the information in this ReadMe file thoroughly before installing or using any new software release.
Search the Avid Knowledge Base at http://www.avid.com/learn-and-support for the most up-to-date ReadMe file, which contains the latest information that might have become available after the documentation was published.
Revision History
Contents
About MediaCentral | Cloud UX Panel for Adobe Premiere Pro CC . . . . . . . . . . . . . . . . . . . . . . . . . . . 2
Installing MediaCentral | Cloud UX Panel for Adobe Premiere Pro CC (Windows) . . . . . . . . . . . . . . 15
Installing MediaCentral | Cloud UX Panel for Adobe Premiere Pro CC (macOS). . . . . . . . . . . . . . . . 17
Configuring the MediaCentral | Cloud UX Panel for Adobe Premiere Pro CC . . . . . . . . . . . . . . . . . . 19
Working with the MediaCentral | Cloud UX Panel for Adobe Premiere Pro CC. . . . . . . . . . . . . . . . . 26
Legal Notices. . . . . . . . . . . . . . . . . . . . . . . . . . . . . . . . . . . . . . . . . . . . . . . . . . . . . . . . . . . . . . . . . . . . . 37
Date Revised Changes Made
September 10, 2018 Added topic “Troubleshooting: Missing Premiere-Specific Actions”
July 26, 2018 First publication

About MediaCentral | Cloud UX Panel for Adobe Premiere Pro CC
2
About MediaCentral | Cloud UX Panel for Adobe Premiere Pro CC
Adobe Premiere Pro users can now access the power of the Avid MediaCentral Platform from within Premiere Pro using a dedicated panel, the MediaCentral | Cloud UX Panel for Adobe Premiere Pro CC. The panel enables a roundtrip workflow with Avid’s asset management systems by connecting an Adobe Premiere Pro editor to Avid MediaCentral | Production Management and MediaCentral | Asset Management.
Editors working in Adobe Premiere Pro can access production assets and associated metadata across Production Management and Asset Management systems using MediaCentral Cloud UX. They can import and edit MediaCentral Cloud UX basic and advanced sequences in a variety of Adobe supported formats directly from Avid shared-storage workspaces. Using the MediaCentral | Cloud UX Panel for Adobe Premiere Pro CC, Premiere Pro editors can also export the active sequence from Adobe Premiere to MediaCentral Production Management or MediaCentral Asset Management in the format and resolution of choice.
For more information, see the following topics:
• “Components Overview” on page 3
• “Known Limitations” on page 4
• “Obtaining the MediaCentral | Cloud UX Panel for Adobe Premiere Pro CC Installer” on page 5
• “Installing MediaCentral | Cloud UX Panel for Adobe Premiere Pro CC (Windows)” on page 15
• “Installing MediaCentral | Cloud UX Panel for Adobe Premiere Pro CC (macOS)” on page 17
• “Configuring the MediaCentral | Cloud UX Panel for Adobe Premiere Pro CC” on page 19
• “Working with the MediaCentral | Cloud UX Panel for Adobe Premiere Pro CC” on page 26
For the latest information on MediaCentral Cloud UX, see the following documentation page of the Avid Knowledge Base:
http://avid.force.com/pkb/articles/en_US/readme/MediaCentral-CloudUX-v2018-Documentation

About MediaCentral | Cloud UX Panel for Adobe Premiere Pro CC
3
Components Overview
The MediaCentral | Cloud UX Panel for Adobe Premiere Pro CC v2018.6 is used to connect the following products:
• Adobe Premiere Pro CC v12 (Release 2018)
• Avid MediaCentral Cloud UX v2018.6
Note the following options:
For compatibility information, see the “Compatibility Matrix for MediaCentral | Cloud UX” on the Avid Knowledge Base:
Avid Audio and Video Compatibility Charts
For the latest information on Avid ISIS and Avid NEXIS documentation, see the following documentation page of the Avid Knowledge Base:
Avid ISIS Documentation
Avid NEXIS Documentation
For the latest information on MediaCentral Ingest documentation, see the MediaCentral Ingest documentation page of the Avid Knowledge Base:
MediaCentral Ingest v2017 and 2018 Documentation and Qualified AMA Plugins
Localized User Interface
The MediaCentral | Cloud UX Panel for Adobe Premiere Pro CC currently only provides an English user interface.
Product Comment
MediaCentral | Asset Management
MediaCentral Asset Management v2018.6 provides the required process to export sequences from Adobe Premiere to Asset Management folders through MediaCentral Cloud UX.
MediaCentral | Production Management
For the format families directly supported by Adobe Premiere, MediaCentral Production Management (formerly Interplay Production) v3.8 and higher can be used. Additional shotlist-only format support may be available, depending on the capabilities and version of Adobe Premiere and Production Management. See “MediaCentral | Production Management Compatibility Validation and Limitations” on page 13.
The MediaCentral | Cloud UX Panel for Adobe Premiere Pro CC is compatible with Production Management v3.8 and higher.
MediaCentral | Ingest To use advanced functionality that is available when a MediaCentral Ingest system is installed, Avid recommends using the latest version 2018.6 of MediaCentral Ingest. The minimal version to support the MediaCentral | Cloud UX Panel for Adobe Premiere Pro CC is Media Director v1.5. See “Enabling MediaCentral | Ingest Based Options” on page 7.
Avid ISIS or NEXIS Client Manager
Needed if assets and sequences that are stored on Avid shared storage are to be used.

About MediaCentral | Cloud UX Panel for Adobe Premiere Pro CC
4
Known Limitations
The MediaCentral | Cloud UX Panel for Adobe Premiere Pro CC has the following limitations when working with formats in native Avid format (OP-Atom):
• When connecting to Production Management, in-place editing is only possible with the format families listed in “MediaCentral | Production Management Compatibility Validation and Limitations” on page 13. Note that a current Premiere incompatibility with certain AVC-I formats created by Avid may affect the ability to use AVC-I as a format.
• For in-place editing, the MediaCentral | Cloud UX Panel for Adobe Premiere Pro CC passes the Avid asset metadata (AAF) directly to Premiere Pro. The Adobe Panel fully supports only simple sequences even though more sequence detail may come across for suitable sequences.
• Access to clips that are being recorded (referred to as growing files, in-progress clips, or EWC) is not supported.
For formats not supported by Premiere in OP-Atom wrappers (for example, XDCAM HD), media is rewrapped to MXF OP-1a and the AAF metadata is converted to an XML shotlist if the optional MediaCentral Ingest service is available. The following limitations apply:
• AAF information is simplified with a focus on bringing as much media as possible across to Premiere. Depending on the complexity of the original sequence, the “simplified” sequence created by the Convert feature may differ significantly from the source sequence. For example, for sequences with multiple video tracks, all video segments will be grouped on a single video track in the shotlist. Effects and more complex structures will be discarded. At the other end of the spectrum, source sequences that already resemble a shotlist should transfer largely unaltered.
• The shotlist conversion function supports sequences, master clips, and subclips. The clip format generated by Avid Capture is not supported; also any EWC scenario or access to growing source files is not supported.
• The Convert option does not support converting from segmented source clips. Source clips need to have a single piece of media covering the entire span of the clip for OP-1a conversion to be possible. For example, you cannot convert Avid Airspeed segmented recordings or AMA-generated spanning source clips if the time span to convert includes a segment boundary.
• OP-1a conversion is limited to a subset of native Avid formats. Some formats that are supported in Production Management (for example, ProRes) cannot be rewrapped to MXF OP-1a, or are not supported in Premiere. Media will be converted partially, using a handle length that can be configured in the MediaCentral Ingest option.
• Conversion to OP-1a (using the Avid MediaCentral Ingest option) is a sequential operation. Multiple Adobe workstations can request conversions in parallel, but an individual conversion process is sequential. While the conversion is in progress, the MediaCentral Cloud UX panel in Premiere Pro will be unavailable, showing the progress dialog. You can, however, continue to work in Premiere while the conversion is in progress.
• Converting from native Avid formats to OP-1a can be a time consuming process. Depending on the media format, conversion can be two through five time faster than real time so a 10-minute master clip will require minutes to convert. Sequences with many cuts and short segments will further increase the time required for conversion. Take this into account when planning your workflows.
• When sequences are transferred from Production Management workgroups using the Convert option, the sequence parameters are not transferred. Converted sequences are created in Premiere using Premiere’s default settings, such as NTSC DV. Clips that do not match the sequence

About MediaCentral | Cloud UX Panel for Adobe Premiere Pro CC
5
default format may appear incorrectly framed and show incorrect aspect ratios. To correct this, use Premiere’s Sequence settings menu item to set up the sequence according to the desired working settings, which should usually match your source clip format.
• The Convert feature is designed as fallback for short sequences containing media that Premiere cannot import directly. Attempting to convert large and complex sequences can be very time consuming and is not recommended.
• The MediaCentral | Cloud UX Panel for Adobe Premiere Pro CC does not clean up intermediate results such as exported timelines or Avid sequences converted to OP-1a. Administrators are required to clean up the exchange shares on a regular basis. For assets converted to OP-1a, Avid recommends using the Premiere project manager to consolidate and archive the required OP-1a media before deleting. Since configuration of the exchange share is possible on a per-client basis, Avid recommends setting up an individual sub-folder for every client on the exchange share to simplify management of incoming and outgoing media.
Obtaining the MediaCentral | Cloud UX Panel for Adobe Premiere Pro CC Installer
The MediaCentral | Cloud UX Panel for Adobe Premiere Pro CC installer is available from the Avid Download Center. After you have logged into the Download Center, download the following:
• MediaCentral_Panel_for_Adobe_Premiere_Pro_CC_2018.6_Win.zip (Windows)
• MediaCentral_Panel_for_Adobe_Premiere_Pro_CC_2018.6_Mac.dmg (macOS)
n If the MediaCentral | Cloud UX Panel for Adobe Premiere Pro CC installer is not available through the Download Center, contact your Avid representative to obtain the necessary software.
Overview: How to Get the MediaCentral | Cloud UX Panel for Adobe Premiere Pro CC Running
Getting the MediaCentral | Cloud UX Panel for Adobe Premiere Pro CC running includes the following:
1. Installing MediaCentral Cloud UX and, if Asset Management based options are to be used, installing the Asset Management module.
2. Installing MediaCentral Ingest and creating the Adobe Premiere Default profile if MediaCentral Ingest based options are to be used. See “Enabling MediaCentral | Ingest Based Options” on page 7.
3. Enabling MediaCentral Asset Management features if Asset Management based options are to be used. See “Enabling MediaCentral | Asset Management Based Options” on page 11.
4. Installing a Trusted Certificate on Adobe Premiere workstations. See “Installing Trusted Certificates” on page 19.
5. Making sure that the Adobe Media Encoder is installed on the Adobe Premiere workstations.
6. Installing the MediaCentral | Cloud UX Panel for Adobe Premiere Pro CC on Adobe Premiere workstations. See “Installing MediaCentral | Cloud UX Panel for Adobe Premiere Pro CC (Windows)” on page 15 and “Installing MediaCentral | Cloud UX Panel for Adobe Premiere Pro CC (macOS)” on page 17.

About MediaCentral | Cloud UX Panel for Adobe Premiere Pro CC
6
7. Configuring Asset Management and MediaCentral Ingest Settings on Adobe Premiere workstations. See “Configuring the MediaCentral | Asset Management and MediaCentral | Ingest Settings” on page 20.
8. Defining Path Mappings on Adobe Premiere workstations (macOS only). See “Defining Path Mappings (macOS Only)” on page 23.
9. (If assets and sequences are stored on the Avid shared storage) Installing the Avid ISIS or NEXIS Client Manager on Adobe Premiere workstations.
Metadata Access
The MediaCentral | Cloud UX Panel for Adobe Premiere Pro CC supports editing in place and requires direct file access. When loading an asset from MediaCentral Cloud UX to your Projects panel in Adobe Premiere Pro:
• Asset Management Assets are directly loaded from the shared store into your project.
• Asset Management sequences are saved as an XML shotlist into your Projects root folder (for example, C:\Users\<Username>\Documents\adobe\Premiere Pro\<version>).
• Production Management assets and sequences are loaded using their AAF. The AAF is stored in the Projects root folder (for example, C:\Users\<Username>\Documents\adobe\Premiere Pro\<version>).
Assets and sequences that are stored on the Avid shared storage require you to have the Avid ISIS or NEXIS Client Manager installed to get file access.
Required Media Exchange Share
The Export to MediaCentral functionality requires an UNC shared folder which can be accessed by the Adobe Premiere workstations and the MediaCentral Ingest (for Production Management) and Asset Management server (for Asset Management integration). This UNC shared folder is used to exchange media files between workstations and the server. The workstations and the server need read/write permissions on the shared folder.
Avid recommends setting up the file system structure to resemble the exchange mechanism that is used, as shown in the following example:
Folder Description
Premiere To Asset Management
Target folder for the workstation to write the result of the encoding job for an export to Asset Management. This folder is selected in the Configuration Settings dialog box, section MediaCentral | Asset Management Configuration. See “Configuring the MediaCentral | Asset Management and MediaCentral | Ingest Settings” on page 20.
This folder is only used if Fast Track is disabled. For Fast Track mode, the destination folder needs to point to the HIRES carrier of the Asset Management system. See “Enabling Fast Track Mode for MediaCentral | Asset Management” on page 12.
Premiere To Production Target folder for the workstation to write the result of the encoding job for an export to Production Management. This folder is selected in the Configuration Settings dialog box, in the section MediaCentral | Ingest Configuration. Avid recommends setting individual sub-folders per client machine to simplify media management.

About MediaCentral | Cloud UX Panel for Adobe Premiere Pro CC
7
Enabling MediaCentral | Ingest Based Options
The MediaCentral | Cloud UX Panel for Adobe Premiere Pro CC offers advanced functionality that is available when an Avid MediaCentral Ingest system is installed:
• The MediaCentral | Cloud UX Panel for Adobe Premiere Pro CC can use MediaCentral Ingest to create simplified versions of MediaCentral sequences or master clips and compatible media for formats where the original media cannot be used directly in Adobe Premiere Pro. See “Setting Compatibility Options for MediaCentral | Production Management Assets During Import” on page 32.
• The MediaCentral | Cloud UX Panel for Adobe Premiere Pro CC can send the active Adobe Premiere sequence back to MediaCentral. See “Exporting the Active Sequence from Adobe Premiere to MediaCentral | Cloud UX” on page 34.
File Access
The MediaCentral | Cloud UX Panel for Adobe Premiere Pro CC requires file access from the Adobe workstation in the following form:
• A network share accessible to every participating Adobe Premiere Pro client system and the MediaCentral Ingest server. This share needs to have sufficient space available for exchanging converted media and metadata based on a project or user based directory structure that the MediaCentral Ingest administrator can define.
• If the Premiere Pro editor and MediaCentral Ingest are not in the domain, the user will need to add network credentials for the MediaCentral Ingest to Windows Credential Manager to ensure the “Convert” feature works properly.
• For direct access to Avid media, any workstation running the MediaCentral | Cloud UX Panel for Adobe Premiere Pro CC requires an Avid NEXIS client with UNC network access to the workspaces used by MediaCentral.
Overview: How to Install the MediaCentral | Ingest Option
Perform the following steps to set up the MediaCentral Ingest option for MediaCentral | Cloud UX Panel for Adobe Premiere Pro CC:
1. Download the MediaCentral Ingest Profile Installer to your MediaCentral Ingest server.
2. Create the Adobe Premiere Default profile and/or the Adobe Premiere 'Edit While Capture' profile (requires MediaCentral Ingest Profile Installer v2.2.1 or higher).
3. Complete the MediaCentral | Cloud UX Panel for Adobe Premiere Pro CC configuration, as described in “Configuring the MediaCentral | Asset Management and MediaCentral | Ingest Settings” on page 20.
Downloading and Installing the MediaCentral | Ingest Profile Installer
The MediaCentral Ingest Profile Installer is available from the MediaCentral Ingest software download page and can either be installed on the MediaCentral Ingest machine itself, or any other Windows client machine that has network access to the MediaCentral Ingest backend.
MediaCentral To Premiere Target for the MediaCentral Ingest system to write the results of an “Outgest to Adobe Premiere” for importing.
Folder Description

About MediaCentral | Cloud UX Panel for Adobe Premiere Pro CC
8
The MediaCentral Ingest Profile Installer enables you to create the Adobe Premiere Default and Adobe Premiere 'Edit While Capture' profile for use with Adobe Premiere Pro. To create the Adobe Premiere 'Edit While Capture' profile, you need to download the MediaCentral Ingest Profile Installer v2.2.1 or higher.
To download the installer:
1. Open a browser.
2. Type the MediaCentral Ingest host name or IP address.
The MediaCentral Ingest web interface opens.
3. Click the Installers link.
4. Click the MediaCentral Ingest Drop Utility for Windows or MacOS installers link.
5. Click the download link for MediaCentral Ingest Profile Installer.
6. Download and start the installer.
7. Follow the system prompts to complete the installation.
Creating the Adobe Premiere Default Profile
Before the MediaCentral Ingest option can be used with Adobe Premiere Pro, the Adobe Premiere Default profile and/or the Adobe Premiere 'Edit While Capture' profile must once be created by a MediaCentral Ingest administrator using the MediaCentral Ingest Profile Installer.
The following procedure assumes that the MediaCentral Ingest Profile Installer software has been installed on the MediaCentral Ingest server itself, and the user is connected using a local or Remote Desktop session.
To create the Adobe Premiere Default profile:
1. On your MediaCentral Ingest server, select Start > All Programs > Avid > Utilities > MediaCentral Ingest Profile Installer.
The MediaCentral Ingest Profile Installer opens.

About MediaCentral | Cloud UX Panel for Adobe Premiere Pro CC
9
2. Type the MediaCentral Ingest host name or IP address in the MediaCentral Ingest Host field.
3. Select Adobe Premiere Default Profile or Adobe Premiere 'Edit While Capture' Profile from the Default Profile Type drop-down list.
4. Click Create Default Profile or Create Adobe Premiere 'Edit While Capture' Profile.
5. Click Close to close the MediaCentral Ingest Profile Installer.
The Adobe Premiere Default profile or the Adobe Premiere 'Edit While Capture' profile is enabled and can be selected in the Configuration Settings dialog box. See “Configuring the MediaCentral | Asset Management and MediaCentral | Ingest Settings” on page 20. If you want to create additional profiles for use with Adobe Premiere Pro, copy and modify the Adobe Premiere profile in the MediaCentral Ingest Drop Utility.
Enabling the Convert Feature
For formats not supported by Premiere in OP-Atom wrappers (for example, XDCAM HD), the MediaCentral | Cloud UX Panel for Adobe Premiere Pro CC offers a “Convert” option. This option converts Avid AAF metadata to a simple XML representation that is handed over to Adobe Premiere Pro. Media is converted to the MXF OP-1a container format. See “MediaCentral | Production Management Compatibility Validation and Limitations” on page 13.
As a MediaCentral Ingest administrator, you have to enable the Convert feature in MediaCentral Ingest System Administrator.
To enable the Convert feature:
1. Open an Internet Explorer browser.
2. Do one of the following:
t If you are using Media Director v1.5 or 1.6, navigate to the following page to go directly to the Media Director Workflow Foundation Administrator:
http://<engine name>:12400/MediaDirectorAdminSuite/Login.aspx
t If you are using MediaCentral Ingest v2.1 or higher, navigate to the MediaCentral Ingest web page http://<engine name> and click the Administrator link.
The MediaCentral | Ingest Administrator Login page opens.
3. Provide the credentials and click Login.
4. Click the “System Administrator” link to open the System Administrator.
5. Select MediaDirector from the “Select a profile” list and click the Toggles section.
6. Set the value of the OUTGEST-TO-FCP key to “true.”

About MediaCentral | Cloud UX Panel for Adobe Premiere Pro CC
10
Enabling the Preserve Timecode for Sequence Imported from Premiere Feature
When you export the active sequence in Adobe Premiere to Production Management, MediaCentral Ingest imports the rendered timeline to MediaCentral Cloud UX using the selected Adobe import profile. See “Exporting the Active Sequence from Adobe Premiere to MediaCentral | Cloud UX” on page 34.
If you have configured the Adobe Default profile to create a sequence of the ingested clip in the Post Processing step, by default the timecode delivered from Adobe Premiere is overwritten by a default value of the MediaCentral Ingest AMA job. If you want to preserve the timecode delivered by Adobe Premiere, a MediaCentral Ingest administrator has to enable the preserve timecode feature in MediaCentral Ingest System Administrator.
Note that the preserve timecode feature is not supported when the Adobe Premiere 'Edit While Capture' profile is used during the import because the Post Processing step is skipped.
To enable the preserve timecode feature:
1. Open the System Administrator.
2. Select MediaDirector from the “Select a profile” list and click the WorkflowFoundation section.
3. Set the value of the CreateSequenceUseSourceTCProfileTags key to “PPRO.”

About MediaCentral | Cloud UX Panel for Adobe Premiere Pro CC
11
Enabling MediaCentral | Asset Management Based Options
The MediaCentral | Cloud UX Panel for Adobe Premiere Pro CC offers advanced functionality that is available when an Avid Asset Management system is installed:
• The MediaCentral | Cloud UX Panel for Adobe Premiere Pro CC can import media natively to Adobe Premiere Pro. See “Importing Assets from MediaCentral | Cloud UX” on page 31.
• The MediaCentral | Cloud UX Panel for Adobe Premiere Pro CC can export sequences from Adobe Premiere to Asset Management folders through MediaCentral Cloud UX. See “Exporting the Active Sequence from Adobe Premiere to MediaCentral | Cloud UX” on page 34.
File Access
The MediaCentral | Cloud UX Panel for Adobe Premiere Pro CC requires file access from the Adobe workstation in the following form:
• If Fast Track mode is disabled: A network share accessible to every participating Adobe Premiere Pro client system and the Asset Management server. This share needs to have sufficient space available for exchanging converted media and metadata based on a project or user based directory structure that the Asset Management administrator can define.
• If Fast Track mode is enabled: Any workstation running the MediaCentral | Cloud UX Panel for Adobe Premiere Pro CC requires write access to the HIRES carrier used by Asset Management. Avid recommends creating a dedicated sub-folder on the HIRES carrier that is used as the destination folder to avoid granting write access to the entire HIRES carrier.
• For direct access to Avid media, any workstation running the MediaCentral | Cloud UX Panel for Adobe Premiere Pro CC requires read access to the HIRES carrier used by Asset Management.
Enabling Proxy Creation for Exports to MediaCentral | Asset Management
You can export the active sequence that is open in Adobe Premiere to MediaCentral Cloud UX. The MediaCentral | Cloud UX Panel for Adobe Premiere Pro CC then triggers the check in. For Asset Management, the Import Folder process starts and imports the sequence to MediaCentral Cloud UX. See “Exporting the Active Sequence from Adobe Premiere to MediaCentral | Cloud UX” on page 34.
To playback the imported sequence and display thumbnails in MediaCentral Cloud UX, a proxy needs to be created and the video analysis needs to be started. As an Asset Management administrator, you have to enable both features in Asset Management Administrator.
To enable proxy creation and video analysis:
1. Open an Internet Explorer browser.
2. Navigate to the following page to open Control Center: https://<AssetManagement server name>:9911/ControlCenter/web/
3. Provide the Control Center credentials and click Login, and then click the Administrator button on the Control Center’s Dashboard view.
The Administrator Login page opens.
4. Provide the credentials and click Login.
5. Click the System Administrator link to open the System Administrator.
6. Select MAM_Foundation from the “Select a profile” list and click the ImportFolder/ImportProfiles/Premiere/_Attributes section.
7. Set the value of the IMPORT_DO_CREATE_PROXY key to “1.”

About MediaCentral | Cloud UX Panel for Adobe Premiere Pro CC
12
8. Set the value of the IMPORT_DO_VIDEO_ANALYSIS key to “1.”
9. Select WorkflowEngineWS_1 from the “Select a profile” list and click the Refresh Component Configuration button.
Enabling Fast Track Mode for MediaCentral | Asset Management
The Adobe Panel supports Fast Track workflows for Asset Management. By default, Fast Track mode is disabled. Enabling Fast Track mode includes the following steps:
• Asset Management: Retrieving the UNC path of the HIRES carrier in Essence Management Administrator.
• Adobe Panel: Entering the UNC path of the HIRES carrier in the Configuration Settings dialog box and selecting the Enable Fast Track Mode check box. See also “Configuring the MediaCentral | Asset Management and MediaCentral | Ingest Settings” on page 20.
To enable Fast Track mode:
1. Open Control Center.
2. Open Administrator from within Control Center.
3. On the Administrator overview page, click the Essence Management Administrator link.
4. In Essence Management Administrator, click the Essence Server tab and in the “Select EssenceServer” column, select EssenceServerDiskWS_1.
5. In the Select Pool column, select HIRES and click the Edit button.
The Edit pool dialog box opens.
6. Check or copy the path of the HIRES carrier shown in the Pool URL field.

About MediaCentral | Cloud UX Panel for Adobe Premiere Pro CC
13
You need to enter this path in the Destination Folder field of the MediaCentral Cloud UX Configuration Settings dialog box.
7. In Adobe Premiere Pro CC, select Window > Extensions > Avid MediaCentral Cloud UX.
The Avid MediaCentral Cloud UX sign-in screen opens.
8. Click the Open Configuration Settings button on the top-right corner of the MediaCentral Cloud UX sign-in screen.
The Configuration Settings dialog box opens.
9. Go to the MediaCentral | Asset Management Configuration group box and set the following:
a. Paste or type the path of the HIRES carrier (retrieved in step 6) in the Destination Folder text box.
b. Select the Enable Fast Track Mode check box.
MediaCentral | Production Management Compatibility Validation and Limitations
Adobe Premiere can play back and edit the following format families as Avid Atom from Avid shared storage directly into a timeline:
When importing clips or sequences from Production Management, the MediaCentral | Cloud UX Panel for Adobe Premiere Pro CC attempts to check the asset for compatibility with Adobe Premiere. If the format of the selected assets is incompatible with Adobe Premiere or the MediaCentral | Cloud UX Panel for Adobe Premiere Pro CC cannot determine the format of the selected asset, users can set compatibility options. See “Setting Compatibility Options for MediaCentral | Production Management Assets During Import” on page 32.
Trademark Owner Format Family Formats
Panasonic, Sony DV based, DV-DIF DV, DVCPRO, DVCPRO HD
Avid DNxHD DNxHD
Panasonic AVC-Intra AVC-I 50, AVC-I 100

About MediaCentral | Cloud UX Panel for Adobe Premiere Pro CC
14
Try Native
This option directly imports Avid metadata (AAF) to Adobe Premiere Pro. Premiere Pro directly accesses the Avid (OP-Atom) media on Avid NEXIS shared storage. The following limitations apply:
• Only OP-Atom media that is supported by Adobe Premiere can be accessed directly for playback and editing. Other native Avid media formats not supported by Adobe Premiere will not be found during import, and Adobe Premiere opens the Link Media dialog box, allowing you to cancel the import or set the missing media offline.
• Avid metadata is generally preserved to the extent Adobe Premiere has a matching feature. Premiere preserves, for example, track layout, timeline edit locations, and simple effects; Avid effects that have no equivalent in Premiere are replaced by placeholders.
• Note that Premiere will attempt to access the current resolution of the selected asset. If an asset cannot be imported natively due to its current resolution, you might be able to use your Avid editor for relinking to a resolution supported in Premiere before exporting the asset.
Convert
This option converts Avid AAF metadata to a simple XML representation that is handed over to Adobe Premiere Pro. Media is converted to the MXF OP-1a container format. The following limitations apply:
• Sequences will be simplified to pure shot lists if the sequence structure allows a direct translation. For more complex sequences, for example those containing multiple video tracks, video segments are arranged on a single video track to ensure that at least the video portions are accessible while sacrificing the original timeline structure. Audio segments remain on their original tracks.
• Media will be rewrapped to MXF OP-1a for any native Avid format supported by MediaCentral Ingest for this operation. Audio is added to the MXF file as PCM tracks. Adobe Premiere supports a broad range of formats in OP-1a containers; for a specific format to be handed over to Adobe Premiere as OP-1a, compatibility on both sides is required.
• For the Convert function, emphasis is on importing as much media as possible in a Premiere compatible format. Sequence integrity is only maintained to the extent possible; for example, multiple video layers will be grouped sequentially on the XML timeline.
• Imports will take some time during which the MediaCentral | Cloud UX Panel for Adobe Premiere Pro CC is blocked but users can continue to work in Premiere.
• Not all Avid formats can be imported. Consult the MediaCentral Ingest and Adobe documentation to identify the formats supported by both products.
• Imported XML and MXF files are not automatically managed since Premiere uses them as media sources. Administrators must manage the exchange folder, and it is recommended to use Premiere’s Project Manager to consolidate projects and the pertinent media to a long term storage location once the project is finished.

Installing MediaCentral | Cloud UX Panel for Adobe Premiere Pro CC (Windows)
15
Installing MediaCentral | Cloud UX Panel for Adobe Premiere Pro CC (Windows)
Perform the following procedures on each computer where you want to use the MediaCentral | Cloud UX Panel for Adobe Premiere Pro CC. Note that Adobe Premiere Pro CC must already be installed.
n During the installation, the installer needs to connect to Adobe to verify the Adobe Premiere Pro software. Therefore, your computer needs to be connected to a network, which has Internet access. Offline installation is not supported by Adobe. When the installation is complete, you can disconnect if your company policy requires a closed network environment.
See the following topics:
• Installing the MediaCentral | Cloud UX Panel for Adobe Premiere Pro CC (Windows)
• Uninstalling the MediaCentral | Cloud UX Panel for Adobe Premiere Pro CC (Windows)
Installing the MediaCentral | Cloud UX Panel for Adobe Premiere Pro CC (Windows)
Run the MediaCentral | Cloud UX Panel for Adobe Premiere Pro CC installer on all required Adobe Premiere Pro workstations, as described in the following procedure.
To install the Adobe Panel:
1. Unzip and copy the installer to a folder of your choice on your computer (for example, C:\Temp).
2. Double-click the MediaCentral_Panel_for_Adobe_Premiere_Pro_CC _Setup.exe.
The Avid MediaCentral | Cloud UX Panel for Adobe Premiere Pro CC setup window and then the Welcome window open.
3. Click Next.
The License Agreement window opens.

Installing MediaCentral | Cloud UX Panel for Adobe Premiere Pro CC (Windows)
16
4. Select the jurisdiction and “Yes, I accept the terms in the license agreement” and click Next. If you do not accept the license agreement, the installation terminates.
The Ready to Install the Program window opens.
5. Click Install.
A window that displays the installation progress opens. When the installation is complete, the InstallShield Wizard Completed window opens.
6. Click Finish.
The MediaCentral | Cloud UX Panel for Adobe Premiere Pro CC is installed to the Adobe installation directory.
Uninstalling the MediaCentral | Cloud UX Panel for Adobe Premiere Pro CC (Windows)
You have the following options to uninstall the MediaCentral | Cloud UX Panel for Adobe Premiere Pro CC:
• When you run the same version of the installer that was used to install the MediaCentral | Cloud UX Panel for Adobe Premiere Pro CC, the installer offers a Remove option.
• Remove the MediaCentral | Cloud UX Panel for Adobe Premiere Pro CC from the Control Panel.
To uninstall the Adobe Panel from the control panel:
1. Click Start > Control Panel > Programs and Features.
2. Select Avid MediaCentral | Cloud UX Panel for Adobe Premiere Pro CC and then select Uninstall.
3. Click Yes in the Programs and Features prompt that opens.
The MediaCentral | Cloud UX Panel for Adobe Premiere Pro CC is removed from your local workstation.

Installing MediaCentral | Cloud UX Panel for Adobe Premiere Pro CC (macOS)
17
To uninstall the Adobe Panel using the installer:
1. Double-click the MediaCentral_Panel_for_Adobe_Premiere_Pro_CC _Setup.exe.
The Avid MediaCentral | Cloud UX Panel for Adobe Premiere Pro CC window and then the Welcome window open.
2. Click Next.
The Program Maintenance window opens.
3. Select Remove and click Next.
The Remove the Program window opens.
4. Click Remove.
The Uninstalling the Avid MediaCentral | Cloud UX Panel for Adobe Premiere Pro CC window that displays the uninstallation progress opens. When the uninstallation is complete, the InstallShield Wizard Completed dialog opens.
5. Click Finish.
Installing MediaCentral | Cloud UX Panel for Adobe Premiere Pro CC (macOS)
Perform the following procedures on each computer where you want to use the MediaCentral | UX Panel for Adobe Premiere Pro CC. Note that Adobe Premiere Pro must already be installed.
n During the installation, the installer needs to connect to Adobe to verify the Adobe Premiere Pro software. Therefore, your computer needs to be connected to a network, which has Internet access. Offline installation is not supported by Adobe. When the installation is complete, you can disconnect if your company policy requires a closed network environment.
See the following topics:
• Installing the MediaCentral | Cloud UX Panel for Adobe Premiere Pro CC (macOS)
• Uninstalling the MediaCentral | Cloud UX Panel for Adobe Premiere Pro CC (macOS)
Installing the MediaCentral | Cloud UX Panel for Adobe Premiere Pro CC (macOS)
Run the MediaCentral | Cloud UX Panel for Adobe Premiere Pro CC installer on all required Adobe Premiere Pro workstations, as described in the following procedure.
To install the Adobe Panel:
1. Copy the installer to a folder of your choice on your computer.
2. Double-click MediaCentral_Panel_for_Adobe_Premiere_Pro_Mac.dmg.
The Avid MediaCentral | Cloud UX Panel for Adobe Premiere Pro CC installer opens.
3. Double-click MediaCentral Cloud UX Panel.
The Introduction window opens.
4. Click Continue.
The License window opens.

Installing MediaCentral | Cloud UX Panel for Adobe Premiere Pro CC (macOS)
18
5. Select the language and click Continue.
The License Agreement box opens.
6. Click Agree. If you disagree, the installation terminates.
The Installation Type window opens.
7. (Optional) Click Change Install Location to select a installation location other than the preset default location.
8. Click Install.
A password confirmation prompt opens.
9. Type your password and click Install Software.
During installation, the Installation windows shows information on the installation progress. When the installation is complete, the Summary window opens and shows “The installation was successful.”
10. Click Close.
The MediaCentral | Cloud UX Panel for Adobe Premiere Pro CC is installed to the Adobe installation directory.
Uninstalling the MediaCentral | Cloud UX Panel for Adobe Premiere Pro CC (macOS)
Uninstall the MediaCentral | Cloud UX Panel for Adobe Premiere Pro CC, as described in the following procedure.
To uninstall the Adobe Panel:
1. Open the Finder > Applications > Avid_Uninstallers.
2. Double-click MediaCentral | Cloud UX Panel for Adobe Premiere Pro CC Uninstaller.
The Adobe Panel Uninstaller opens.
3. Click Uninstall.
4. Type your password in the Install Helper dialog box that opens and click Install Helper.
Uninstallation starts. When uninstallation is finished, the “Uninstallation finished successfully” messages is shown.
5. Click Quit.

Configuring the MediaCentral | Cloud UX Panel for Adobe Premiere Pro CC
19
Configuring the MediaCentral | Cloud UX Panel for Adobe Premiere Pro CC
Perform the following procedures on each computer where you want to use the MediaCentral | Cloud UX Panel for Adobe Premiere Pro CC:
• Installing Trusted Certificates
• Configuring the MediaCentral | Asset Management and MediaCentral | Ingest Settings
• Understanding the Local Configuration File
• Defining Path Mappings (macOS Only)
• Understanding Log Files
• Troubleshooting: Missing Premiere-Specific Actions
Installing Trusted Certificates
MediaCentral Cloud UX Services requires a valid certificate that must be trusted, otherwise the underlying Browser engine blocks any call to that system.
For Windows, make sure that the certificate of the MediaCentral Cloud UX system is imported locally into the “Trusted Root Certificate Authorities” and “Trusted Publishers” store.
For macOS, make sure that the following settings of the certificate are set to “Always Trust”:
• Secure Sockets Layer (SSL)
• Time Stamping
• X.509 Basic Policy
To check if the certificate is valid, use Google Chrome and verify that the connection to the server is not shown as insecure.
A “Login failed” message is shown on the sign-in screen when you try to sign in to the Avid MediaCentral Cloud UX extension but the trusted certificate is missing.

Configuring the MediaCentral | Cloud UX Panel for Adobe Premiere Pro CC
20
Configuring the MediaCentral | Asset Management and MediaCentral | Ingest Settings
You can export the active sequence that is open in Adobe Premiere to MediaCentral. For Production Management, MediaCentral Ingest imports the encoded file. For Asset Management, a Import Folder is triggered to import the encoded file.
To use the export feature, you must provide settings for MediaCentral Ingest and Asset Management connection, such as the preset file and destination folder, in a configuration settings dialog box. The information provided in the Configuration Settings dialog box is written to the local configuration file “MediaCentralCloudUXPanel.json.”
The default Encoder Preset settings point to the system presets of Adobe Media Encoder v12.
Note that the configuration settings of the MediaCentral Cloud UX Panel for Premiere Pro are only accessible on the MediaCentral Cloud UX sign-in screen. If you are already signed in, you need to sign out of MediaCentral Cloud UX. Since there is no dedicated sign out option, you need to close the MediaCentral Cloud UX Panel. When the panel is reopened, the configuration section will be accessible.
To configure MediaCentral Asset Management and MediaCentral Ingest settings:
1. Click the Open Configuration Settings button on the top-right corner of the MediaCentral Cloud UX sign-in screen.
The Configuration Settings dialog box opens.
Version OS Path
Adobe Media Encoder v12 Mac /Applications/Adobe Media Encoder CC 2018/Adobe Media Encoder CC 2018.app/Contents/MediaIO/systempresets
Windows C:\Program Files\Adobe\Adobe Media Encoder CC 2018\MediaIO\systempresets

Configuring the MediaCentral | Cloud UX Panel for Adobe Premiere Pro CC
21
2. Go to the MediaCentral | Ingest Configuration group box and set the following:
- Host: Type the MediaCentral Ingest host name.
- Profile: Select the MediaCentral Ingest profile you want to use on your Adobe Premiere Pro workstation for exporting the active sequence through MediaCentral Cloud UX. The profile determines the format and the clip name that will be used when a rendered timeline is sent back through MediaCentral Cloud UX as a new master clip. The list shows all MediaCentral Ingest profiles that are configured by your MediaCentral Ingest administrator for use with the MediaCentral | Cloud UX Panel for Adobe Premiere Pro CC.
To enable ingesting while the render process is still ongoing, select the Adobe Premiere 'Edit While Capture' profile. By default, this profile is configured to ingest in the Edit While Capture mode into MediaCentral Ingest. To disable this feature, set the Edit While Capture mode for this profile to “disabled” using the Profile Editor of the MediaCentral Ingest Drop Utility.
- Encoder Preset: Click the Open button. In the Select Encoder Preset dialog box that opens, select the encoder preset file that is to be used for encoding the active sequence from Adobe Premiere. If you want to use a preset other than the default preset, export the preset from Adobe Media Encoder, as described in the following procedure.
For the Adobe Premiere 'Edit While Capture' profile, only the encoder presets grouped in Adobe Premiere Pro CC as “MXF Op1a” are supported.

Configuring the MediaCentral | Cloud UX Panel for Adobe Premiere Pro CC
22
- Destination Folder: Click the Open button. In the Choose Folder dialog box that opens, select the shared folder into which Adobe Media Encoder will write the encoded files and from which the encoded files will be exported to Production Management folders in MediaCentral Cloud UX.
3. Go to the MediaCentral | Asset Management Configuration group box and set the following:
- Encoder Preset: Click the Open button. In the Select Encoder Preset dialog box that opens, select the encoder preset file that is to be used for encoding the active sequence from Adobe Premiere. If you want to use a preset other than the default preset, export the preset from Adobe Media Encoder, as described in the following procedure.
- Destination Folder: Click the Open button. In the Choose Folder dialog box that opens, select the shared folder into which Adobe Media Encoder will write the encoded files and from which the encoded files will be exported to Asset Management folders in MediaCentral Cloud UX.
n To work with Fast Track mode, the Destination folder must point to the HIRES carrier of the Asset Management system. See “Enabling Fast Track Mode for MediaCentral | Asset Management” on page 12.
- Enable Fast Track Mode: To enable checking in Asset Management sequences as soon as the encoding job has reached 5% progress, select the Enable Fast Track Mode check box. If the check box is not selected, the check in is triggered when the encoding job is finished.
4. Click OK to close the Configuration Settings dialog box and save the settings.
To export Adobe Media Encoder presets:
1. Open Adobe Media Encoder.
2. In the Preset Browser, select the preset you want to export.
3. Right-click the preset and select Export Presets.
4. Type a name for the preset file and save the *.epr file to a destination from which it can be opened in the Configuration Settings dialog box.
Understanding the Local Configuration File
The MediaCentral | Cloud UX Panel for Adobe Premiere Pro CC creates a local configuration file “MediaCentralCloudUXPanel.json” that resides in your Adobe Premiere Pro profile folder.
• Windows: C:\Users\<Username>\Documents\Adobe\Premiere Pro\<version>\Profile-<Username>
• macOS: /Users/<Username>/Documents/Adobe/Premiere Pro/<version>/Profile-<Username>
The configuration file provides information on the last used connection and path mappings.
Element Entry Description
userSettings Configuration information saved per user and host. Currently, the “userSettings” are not evaluated.
hostName Name of the host used for signing-in to MediaCentral Cloud UX.
userName User name used for signing-in to MediaCentral Cloud UX.

Configuring the MediaCentral | Cloud UX Panel for Adobe Premiere Pro CC
23
Defining Path Mappings (macOS Only)
The current version of the MediaCentral | Cloud UX Panel for Adobe Premiere Pro CC supports simple path mappings. Path mapping is required on macOS workstations to load assets and sequences correctly. Path mappings are stored in the local configuration file that resides in your Adobe Premiere Pro profile folder.
n The path mappings must comply with the local mount points.
To create a path mapping:
1. Click the Open Configuration settings button on the top-right corner of the MediaCentral Cloud UX sign-in screen.
The Configuration Settings dialog box opens.
mdConfig currently “null”; placeholder for future enhancement
mamConfig currently “null”; placeholder for future enhancement
pathMap currently “null”; placeholder for future enhancement
lastUserName The last entered user name used for signing-in to MediaCentral Cloud UX.
recentHostNames The last entered host names (up to 5 entries) that are shown in the Server selection drop-down box on the MediaCentral Cloud UX sign-in screen.
pathMap Lists the paths that are to be mapped.
• “from”: Specifies the UNC path to a UNC share
• “to”: Specifies the local path mapping
See “Defining Path Mappings (macOS Only)” on page 23.
mdConfig hostName The MediaCentral Ingest host name.
folder Destination folder used for exporting sequences from Adobe Premiere to Production Management folders in MediaCentral Cloud UX.
profileId ID of the MediaCentral Ingest profile used for checking in the sequence from Adobe Premiere.
profileTag Type of the MediaCentral Ingest profile.
presetPath Path to the used Adobe Media Encoder preset file.
valid Results of the configuration settings validation check. If “false,” you cannot check in the active sequence from Adobe Premiere to MediaCentral.
mamConfig folder Destination folder used for exporting sequences from Adobe Premiere to Asset Management folders in MediaCentral Cloud UX.
presetPath Path to the used Adobe Media Encoder preset file.
enableFTA Defines if fast track mode is enabled or not.
Element Entry Description

Configuring the MediaCentral | Cloud UX Panel for Adobe Premiere Pro CC
24
2. Go to the Path Mappings group box and set an “original path=local path” entry in the following form:
\\<server>\<shared folder>=/Volumes/<shared folder>
Set an entry for Asset Management and one for ISIS or NEXIS shared storage.
Example:
\\kl-nas004\MAMSTORE=/Volumes/MAMSTORE
\\mun-vtli2k\mpi_filebox2=/Volumes/mpi_filebox2
3. Click OK to close the Configuration Settings dialog box and save the path mapping.
Understanding Log Files
You can check a number of log files if the installation is not successful, or if you want to verify that the installation was successful.
Installer Logs
You can examine the following log files for information about the MediaCentral | Cloud UX Panel for Adobe Premiere Pro CC installation.
• MediaCentralPanelPlugin.log (Windows) / MediaCentralPremiereProConnector.log (macOS): Is created by the installer and contains information about the installed Adobe Connector.
If the installation was successful, the log file lists the installed extensions for all installed Adobe products. If the installation failed, the log file displays “Failed to install, status =” and an error code. For an explanation of the error codes, see http://www.adobeexchange.com/resources/19#errors
• (Windows only) Avid_MediaCentral_UX_Connector_for_Adobe_Premiere_Pro_CC.log: Is created by the Windows installer and contains information about the installation procedure.
You can search for the following text string: “Installation success or error status:” If the returned error code is “0,” then the installation was successful. If a different error code is returned then the installation failed.
Installer log files are saved in the following directory:
• Windows: %appdata%\(Usually: C:\Users\<Username>\AppData\Roaming\)
• macOS: /Library/Application Support/Avid/MediaCentral | Cloud UX Panel for Adobe Premiere Pro CC/
Connector Log
The MediaCentral | Cloud UX Panel for Adobe Premiere Pro CC writes messages to a log file “com.avid.central.cloudux.adobe.log.” A new version is created when the MediaCentral | Cloud UX Panel for Adobe Premiere Pro CC is opened, and the previous version is amended with a time stamp in its filename. The filename pattern for rotated log files is the following: com.avid.central.cloudux.adobe_<year><month><day>_<hours><minutes><seconds>.logExample: com.avid.central.cloudux.adobe_20171214_124413.log

Configuring the MediaCentral | Cloud UX Panel for Adobe Premiere Pro CC
25
All log files are saved in the “Temp” directory:
• Windows: %TMP%\(Usually: C:\Users\<Username>\AppData\Local\Temp\)
• macOS: $TMPDIR/
Five rotated log files can be saved in the “Temp” directory at the same time. When you open the MediaCentral | Cloud UX Panel for Adobe Premiere Pro CC for the sixth time, the earliest log file is replaced.
Troubleshooting: Missing Premiere-Specific Actions
In some cases, the MediaCentral | Cloud UX Panel for Adobe Premiere Pro CC does not load the correct resources from the MediaCentral Cloud UX server, but from the Adobe extension’s local cache. The cached files prevent the Adobe Panel from displaying the Premiere-specific actions, such as Import to Premiere and Import to Premiere (Convert), in the context menu.
To fix this issue, delete the corresponding cache folder “<PremiereProVersion>_com.avid.central.cloudux.Adobe.Main” from the “cep_cache” directory.
To delete the cache folder:
1. Navigate to the cep_cache directory. You can find it in the following location:
- Windows: C:\Users\<Username>\AppData\Local\Temp\cep_cache
- macOS: /Users/USERNAME/Library/Logs/CSXS/cep_cache
2. Delete the folder “<PremiereProVersion>_com.avid.central.cloudux.Adobe.Main.”
3. Close and relaunch the Adobe Panel.

Working with the MediaCentral | Cloud UX Panel for Adobe Premiere Pro CC
26
Working with the MediaCentral | Cloud UX Panel for Adobe Premiere Pro CC
The following topics provide information about how to work with the MediaCentral | Cloud UX Panel for Adobe Premiere Pro CC in Adobe Premiere Pro:
• Opening MediaCentral | Cloud UX
• Understanding the MediaCentral | Cloud UX Layout
• Importing Assets from MediaCentral | Cloud UX
• Setting Compatibility Options for MediaCentral | Production Management Assets During Import
• Exporting the Active Sequence from Adobe Premiere to MediaCentral | Cloud UX
Opening MediaCentral | Cloud UX
Opening MediaCentral Cloud UX is a two-step procedure: calling the extension from within Adobe Premiere and signing in to MediaCentral Cloud UX. Once opened, the MediaCentral Cloud UX sign-in page remembers the last five connected MediaCentral servers and the last used user name and password. For security reasons, auto-sign in is not supported.
Note that there is no dedicated logout option for MediaCentral Cloud UX. You need to close the Avid MediaCentral Cloud UX panel.
To open MediaCentral Cloud UX:
1. In Adobe Premiere Pro CC, select Window > Extensions > Avid MediaCentral Cloud UX.
The Avid MediaCentral Cloud UX sign-in screen opens.
2. At the sign-in screen, do the following:
a. Type or select the name of the MediaCentral Cloud UX server.
b. Type your user name.
c. Type your password.

Working with the MediaCentral | Cloud UX Panel for Adobe Premiere Pro CC
27
d. Click the Sign In button.
After a few moments, the MediaCentral Cloud UX application opens and displays the Browse app.
To close MediaCentral Cloud UX:
t Click the Avid MediaCentral Cloud UX panel menu icon and select Close Panel.
Understanding the MediaCentral | Cloud UX Layout
The following sections detail some of the basics of using and navigating through the MediaCentral Cloud UX user interface, including information on actions common to all apps.
Understanding the Fast Bar
The Fast Bar at the top of the screen provides easy access to available apps. When working with the MediaCentral | Cloud UX Panel for Adobe Premiere Pro CC, the following apps enable your roundtrip workflow with Avid’s asset management systems.
Button Title Description
Dashboard Currently, the Dashboard functions as a background panel, but future versions of MediaCentral Cloud UX will allow you to track your activity across all apps. The Dashboard is displayed when you dock the Browse app.

Working with the MediaCentral | Cloud UX Panel for Adobe Premiere Pro CC
28
For more information, see the MediaCentral | Cloud UX User’s Guide.
Opening and Closing Apps
When you click on any of the icons in the Fast Bar, the selected app opens and the icon is highlighted to indicate that the app is active. Unless docked, clicking on a different app switches the user interface to the newly selected app. If apps are closed, the interface shows the Browse app as default view. When using the Docking feature, you can have two apps open at the same time.
Additionally, you can show the Asset Editor to the right of the core or focused app. See “The Asset Editor” on page 29.
To open an app:
t Click the app button on the Fast Bar.
To close an app:
t Click the X in the app’s upper right corner.
Docking Apps
The left side of the MediaCentral Cloud UX window is the place where you can dock an app. When an app is docked, the app closes up, but not completely, to the left side. You can then use the docked app alongside other apps. Apps that support docking provide a Dock/Undock toggle button in its upper right corner. You can dock any core app, but you can only dock one app at the same time. If you have one app docked and dock another app, the first app is hidden.
To dock an app, do one of the following:
t Click the app’s Dock button.
t Place your cursor over the icon of a core app in the Fast Bar and drag and drop it downward to the left side of the user interface that will be highlighted as drop area (shown dimmed and marked with a blue frame).
Browse
(core app)
The Browse app gives you access to whatever databases are configured for your system, such as MediaCentral Production Management, MediaCentral Asset Management, or both. The app includes breadcrumbs, the navigation side bar (directory sidebar), results area and can initiate the Asset Editor. The Browse app is opened by default when you sign into MediaCentral Cloud UX and shown as default view when you close other apps.
Search
(core app)
The Search app enables you to quickly and easily locate assets across multiple modules. When you search for an asset, the system accesses an index of standard text-based metadata fields to return the desired assets.
Process
(core app)
The Process app lets you monitor all processes you created. Use the Process app to monitor the Import Folder process, which imports a sequence from Adobe Premiere Pro to the selected Asset Management folder in MediaCentral Cloud UX.
User Profile The User Profile menu includes the following entries.
• About: Opens a screen with information about the product.
• Help: Opens the MediaCentral Cloud UX Help system.
Button Title Description
Working with the MediaCentral | Cloud UX Panel for Adobe Premiere Pro CC
29
To undock an app:
t To restore the app to take up the initial width, click the Dock button again.
The Asset Editor
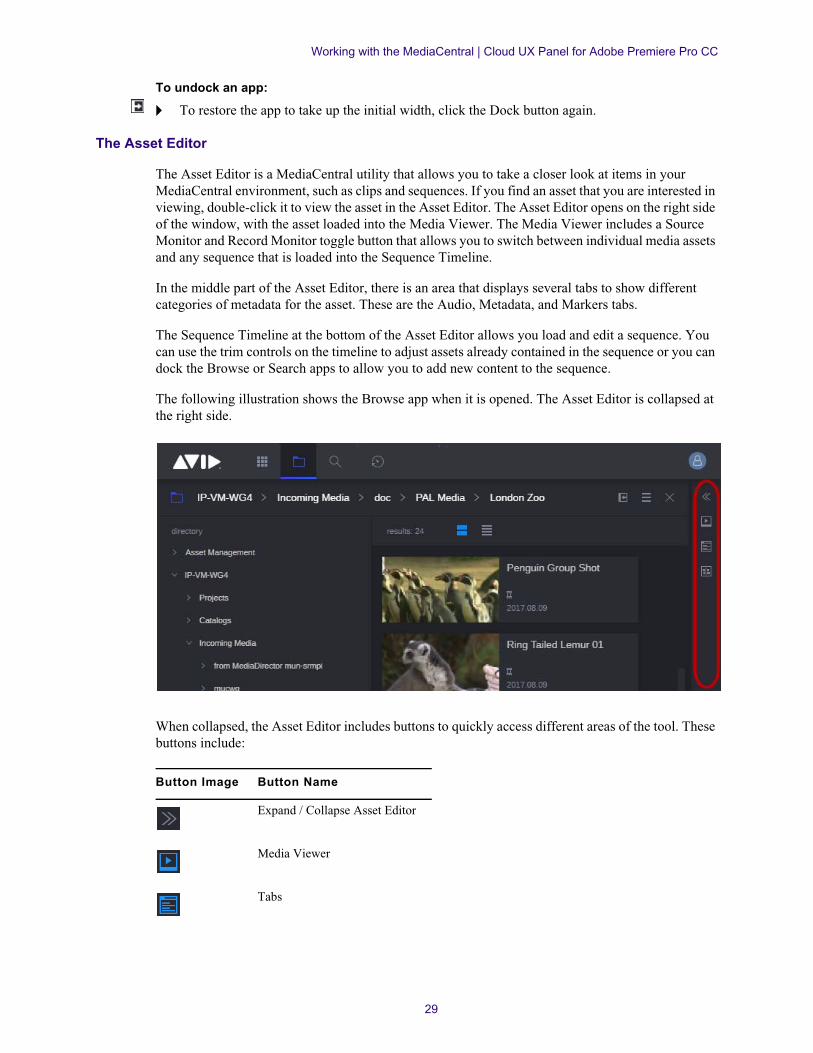
The Asset Editor is a MediaCentral utility that allows you to take a closer look at items in your MediaCentral environment, such as clips and sequences. If you find an asset that you are interested in viewing, double-click it to view the asset in the Asset Editor. The Asset Editor opens on the right side of the window, with the asset loaded into the Media Viewer. The Media Viewer includes a Source Monitor and Record Monitor toggle button that allows you to switch between individual media assets and any sequence that is loaded into the Sequence Timeline.
In the middle part of the Asset Editor, there is an area that displays several tabs to show different categories of metadata for the asset. These are the Audio, Metadata, and Markers tabs.
The Sequence Timeline at the bottom of the Asset Editor allows you load and edit a sequence. You can use the trim controls on the timeline to adjust assets already contained in the sequence or you can dock the Browse or Search apps to allow you to add new content to the sequence.
The following illustration shows the Browse app when it is opened. The Asset Editor is collapsed at the right side.
When collapsed, the Asset Editor includes buttons to quickly access different areas of the tool. These buttons include:
Button Image Button Name
Expand / Collapse Asset Editor
Media Viewer
Tabs

Working with the MediaCentral | Cloud UX Panel for Adobe Premiere Pro CC
30
The following illustration shows the Browse app to the left and Asset Editor expanded to the right side of the app. Part of the Asset Editor, the Timeline is shown at the bottom of the MediaCentral Cloud UX user interface.
Once the Asset Editor is expanded, the Media Viewer, Tabs, and Timeline buttons appear at the top of the tool and are colored blue to indicate that they are open and active. You can click on any of the buttons to show or hide different areas of the Asset Editor.
To show and hide the Asset Editor:
t Click the expand icon on the upper right corner of an app.
t To hide the Asset Editor, click the Asset Editor’s Collapse icon.
To open an asset in the Asset Editor:
t Double-click an asset in the Browse or Search app’s Results pane.
Timeline
Button Image Button Name

Working with the MediaCentral | Cloud UX Panel for Adobe Premiere Pro CC
31
Importing Assets from MediaCentral | Cloud UX
You can import the following media from MediaCentral Cloud UX:
• Asset Management assets and sequences
• Production Management assets and sequences
For triggering the import, you have the following options:
• Import to Premiere: Imports media natively to Premiere.
This option is available for Production Management and Asset Management media.
If the format of the selected assets is incompatible with Adobe Premiere, or the MediaCentral | Cloud UX Panel for Adobe Premiere Pro CC cannot determine the format of the selected asset, you can set compatibility options (Production Management media only). See “Setting Compatibility Options for MediaCentral | Production Management Assets During Import” on page 32.
• Import to Premiere (Convert): Converts Avid AAF metadata to a simple XML representation that is handed to Adobe Premiere Pro. Media is converted to the MXF OP-1a container format.
This option is available only for Production Management media. You can monitor the progress of “Convert” import jobs. See “Monitoring And Cancelling Conversion Import Jobs” on page 33.
In Adobe Premiere Pro, a new project is created in the Projects panel. For Asset Management sequences, a new bin is also created in the project.
To import assets from the Browse app:
1. To open folders in the Browse app, do one of the following:
t Click the turn-down arrow to the left of the folder in the Browse app’s directory.
This action expands the directory to show its sub-folders while still retaining a view of the rest of the Workspace file structure.
t Select the folder in the Browse app’s directory.
This action opens the folder's contents in the Browse app’s Results area.
t Double-click the folder in the Browse app’s directory.
This action expands the directory to show its sub-folders in the directory and opens the folder's contents in the Results area.
t Double-click the folder in the Browse app’s Results area.
This action opens the folder's contents in the Results area.
2. Right-click an asset in the Browse app’s Results area and select Import to Premiere or Import to Premiere (Convert).

Working with the MediaCentral | Cloud UX Panel for Adobe Premiere Pro CC
32
In Adobe Premiere, the asset opens in the Projects panel.
Setting Compatibility Options for MediaCentral | Production Management Assets During Import
When importing clips or sequences from Production Management, the MediaCentral | Cloud UX Panel for Adobe Premiere Pro CC attempts to check the asset for compatibility with Adobe Premiere. If the format of the selected assets is incompatible with Adobe Premiere, or the MediaCentral | Cloud UX Panel for Adobe Premiere Pro CC cannot determine the format of the selected asset, you can set compatibility options, as described in the following procedure. For limitations, see “MediaCentral | Production Management Compatibility Validation and Limitations” on page 13.
To set compatibility options during import:
1. Import Production Management media, as described in “Importing Assets from MediaCentral | Cloud UX” on page 31.
If the format of the selected assets is incompatible with Adobe Premiere, or if the MediaCentral | Cloud UX Panel for Adobe Premiere Pro CC cannot determine the format of the selected asset, the Unsupported MediaCentral Asset dialog box opens.
2. Do one of the following:
t Click Skip to cancel the import to Adobe Premiere.

Working with the MediaCentral | Cloud UX Panel for Adobe Premiere Pro CC
33
t Click Convert to convert Avid AAF metadata to a simple XML representation that is handed to Adobe Premiere Pro. Media is converted to the MXF OP-1a container format.
t Click Try Native to directly import Avid metadata (AAF) to Adobe Premiere Pro. Premiere Pro directly accesses the Avid (OP-Atom) media on Avid NEXIS shared storage. If Adobe Premiere detects not supported native Avid formats during import, the Link Media dialog box opens.
3. (Optional) If the Link Media dialog box opens during the import, do one of the following:
t Set the missing media offline.
t Cancel the import.
Monitoring And Cancelling Conversion Import Jobs
The Progress creating Shotlist and MXF OP-1a Media dialog box is used to monitor import jobs that are triggered by the “Convert” option. If necessary, you can also cancel an individual or all conversion jobs directly from the dialog box. The dialog box shows a list of running, completed, canceled, or failed conversion jobs. The job list persists from one session to another. It is cleared when you close the Avid MediaCentral Cloud UX extension from within Adobe Premiere.
The following illustration shows several examples of what you might encounter when monitoring conversion jobs with the Progress creating Shotlist and MXF OP-1a Media dialog box.

Working with the MediaCentral | Cloud UX Panel for Adobe Premiere Pro CC
34
To monitor and cancel conversion jobs:
1. Do one of the following:
t Select a folder in the Browse app, click the Browse app Menu button, and select Progress of Premiere Imports.
t Right-click a folder in the Browse app and select Progress of Premiere Imports.
t Right-click in the Results area of a folder in the Browse app and select Progress of Premiere Imports.
t In the Asset Editor, select a tab (Metadata, Audio, or Thumbnail), click the tab’s Menu button, and select Progress of Premiere Imports.
The Progress creating Shotlist and MXF OP-1a Media dialog box opens.
2. To cancel running conversion jobs, do one of the following:
t To cancel an individual conversion job, click the Cancel button located to the right of the active job.
t To cancel all conversion jobs, click Cancel All.
For a cancelled job, the Cancel button is replaced by a warning icon, and an “Import cancelled by user” message is shown.
3. To clear the list, do one of the following:
t To remove completed conversion jobs from the dialog box, click Clear Complete.
t To remove failed and cancelled conversion jobs from the dialog box, click Clear Failed.
The jobs are removed from the Progress of creating Shotlist and MXF OP-1a Media dialog box.
4. To close the dialog box, click outside the dialog box.
Exporting the Active Sequence from Adobe Premiere to MediaCentral | Cloud UX
You can export the active sequence that is open in Adobe Premiere to MediaCentral Cloud UX.
ww
we
1 Success icon indicates finished jobs 3 Cancel button for cancelling a conversion job underway
2 Error icon indicates cancelled and failed jobs

Working with the MediaCentral | Cloud UX Panel for Adobe Premiere Pro CC
35
To export an active sequence from Adobe Premiere:
1. In Adobe Premiere, open or create a sequence.
2. In MediaCental Cloud UX, select the folder in the Browse app in which you want to export the active sequence from Adobe Premiere.
3. Do one of the following:
t Click the Browse App Menu button and select Export to MediaCentral.
t Right-click the folder and select Export to MediaCentral.
t Right-click in the Results area of the folder and select Export to MediaCentral.
Note that the Export to MediaCentral menu item is shown only if you have an active sequence in Adobe Premiere.
The Adobe Media Encoder opens. You can monitor the progress of the encoding job in Media Encoder.
In MediaCentral, the MediaCentral | Cloud UX Panel for Adobe Premiere Pro CC triggers the check in.
- If the Fast Turnaround feature is not enabled, the check in is triggered when the encoding job is finished.
- If the Fast Turnaround feature is enabled, the check in for Production Management and Asset Management sequences is triggered as soon as the encoding job has reached 5% progress.
- If checking in fails, a message opens. Click the message or the warning icon below the message to open the Premiere Events view and clear the failed job.
The check in includes the following:
- For Asset Management, the Import Folder process starts and imports the sequence to MediaCentral Cloud UX. You can open the Process app and monitor the Import Folder process.

Working with the MediaCentral | Cloud UX Panel for Adobe Premiere Pro CC
36
- For Production Management, if the MediaCentral Ingest option is installed, MediaCentral Ingest imports the rendered timeline to MediaCentral Cloud UX using the selected Adobe import profile. Once the import is starting, progress reporting is only available from the MediaCentral Ingest process monitor. MediaCentral Cloud UX does not display the import progress.
Note that the format of the clip exported to MediaCentral Cloud UX depends on the resolution set in the profile. Your MediaCentral Ingest administrator can define whether the clip or timeline is imported as a specific High Res format, as proxy, or both.
Each encoding job results in a unique folder within the export folder, which contains the rendered file.
The exported MXF files are not automatically removed after the import to MediaCentral Cloud UX has finished. Avid recommends that an administrator periodically cleans up the export folder and removes MXF media that has already been imported to MediaCentral.

Legal Notices
37
Legal NoticesProduct specifications are subject to change without notice and do not represent a commitment on the part of Avid Technology, Inc.
This product is subject to the terms and conditions of a software license agreement provided with the software. The product may only be used in accordance with the license agreement.
This product may be protected by one or more U.S. and non-U.S patents. Details are available at www.avid.com/patents.
This guide is protected by copyright. This guide is for your personal use and may not be reproduced or distributed, in whole or in part, without permission of Avid. Reasonable care has been taken in preparing this guide; however, it may contain omissions, technical inaccuracies, or typographical errors. Avid Technology, Inc. disclaims liability for all losses incurred through the use of this document. Product specifications are subject to change without notice.
Copyright © 2018 Avid Technology, Inc. and its licensors. All rights reserved.
The following disclaimer is required by Apple Computer, Inc.:APPLE COMPUTER, INC. MAKES NO WARRANTIES WHATSOEVER, EITHER EXPRESS OR IMPLIED, REGARDING THIS PRODUCT, INCLUDING WARRANTIES WITH RESPECT TO ITS MERCHANTABILITY OR ITS FITNESS FOR ANY PARTICULAR PURPOSE. THE EXCLUSION OF IMPLIED WARRANTIES IS NOT PERMITTED BY SOME STATES. THE ABOVE EXCLUSION MAY NOT APPLY TO YOU. THIS WARRANTY PROVIDES YOU WITH SPECIFIC LEGAL RIGHTS. THERE MAY BE OTHER RIGHTS THAT YOU MAY HAVE WHICH VARY FROM STATE TO STATE.
The following disclaimer is required by Sam Leffler and Silicon Graphics, Inc. for the use of their TIFF library:Copyright © 1988–1997 Sam Leffler Copyright © 1991–1997 Silicon Graphics, Inc.
Permission to use, copy, modify, distribute, and sell this software [i.e., the TIFF library] and its documentation for any purpose is hereby granted without fee, provided that (i) the above copyright notices and this permission notice appear in all copies of the software and related documentation, and (ii) the names of Sam Leffler and Silicon Graphics may not be used in any advertising or publicity relating to the software without the specific, prior written permission of Sam Leffler and Silicon Graphics.
THE SOFTWARE IS PROVIDED “AS-IS” AND WITHOUT WARRANTY OF ANY KIND, EXPRESS, IMPLIED OR OTHERWISE, INCLUDING WITHOUT LIMITATION, ANY WARRANTY OF MERCHANTABILITY OR FITNESS FOR A PARTICULAR PURPOSE.
IN NO EVENT SHALL SAM LEFFLER OR SILICON GRAPHICS BE LIABLE FOR ANY SPECIAL, INCIDENTAL, INDIRECT OR CONSEQUENTIAL DAMAGES OF ANY KIND, OR ANY DAMAGES WHATSOEVER RESULTING FROM LOSS OF USE, DATA OR PROFITS, WHETHER OR NOT ADVISED OF THE POSSIBILITY OF DAMAGE, AND ON ANY THEORY OF LIABILITY, ARISING OUT OF OR IN CONNECTION WITH THE USE OR PERFORMANCE OF THIS SOFTWARE.
The following disclaimer is required by the Independent JPEG Group:This software is based in part on the work of the Independent JPEG Group.
This Software may contain components licensed under the following conditions:Copyright (c) 1989 The Regents of the University of California. All rights reserved.
Redistribution and use in source and binary forms are permitted provided that the above copyright notice and this paragraph are duplicated in all such forms and that any documentation, advertising materials, and other materials related to such distribution and use acknowledge that the software was developed by the University of California, Berkeley. The name of the University may not be used to endorse or promote products derived from this software without specific prior written permission. THIS SOFTWARE IS PROVIDED ``AS IS'' AND WITHOUT ANY EXPRESS OR IMPLIED WARRANTIES, INCLUDING, WITHOUT LIMITATION, THE IMPLIED WARRANTIES OF MERCHANTABILITY AND FITNESS FOR A PARTICULAR PURPOSE.
Copyright (C) 1989, 1991 by Jef Poskanzer.
Permission to use, copy, modify, and distribute this software and its documentation for any purpose and without fee is hereby granted, provided that the above copyright notice appear in all copies and that both that copyright notice and this permission notice appear in supporting documentation. This software is provided "as is" without express or implied warranty.
Copyright 1995, Trinity College Computing Center. Written by David Chappell.
Permission to use, copy, modify, and distribute this software and its documentation for any purpose and without fee is hereby granted, provided that the above copyright notice appear in all copies and that both that copyright notice and this permission notice appear in supporting documentation. This software is provided "as is" without express or implied warranty.
Copyright 1996 Daniel Dardailler.
Permission to use, copy, modify, distribute, and sell this software for any purpose is hereby granted without fee, provided that the above copyright notice appear in all copies and that both that copyright notice and this permission notice appear in supporting documentation, and that the name of Daniel Dardailler not be used in advertising or publicity pertaining to distribution of the software without specific, written prior permission. Daniel Dardailler makes no representations about the suitability of this software for any purpose. It is provided "as is" without express or implied warranty.
Modifications Copyright 1999 Matt Koss, under the same license as above.
Copyright (c) 1991 by AT&T.
Permission to use, copy, modify, and distribute this software for any purpose without fee is hereby granted, provided that this entire notice is included in all copies of any software which is or includes a copy or modification of this software and in all copies of the supporting documentation for such software.

Legal Notices
38
THIS SOFTWARE IS BEING PROVIDED "AS IS", WITHOUT ANY EXPRESS OR IMPLIED WARRANTY. IN PARTICULAR, NEITHER THE AUTHOR NOR AT&T MAKES ANY REPRESENTATION OR WARRANTY OF ANY KIND CONCERNING THE MERCHANTABILITY OF THIS SOFTWARE OR ITS FITNESS FOR ANY PARTICULAR PURPOSE.
This product includes software developed by the University of California, Berkeley and its contributors.
The following disclaimer is required by Paradigm Matrix:Portions of this software licensed from Paradigm Matrix.
The following disclaimer is required by Ray Sauers Associates, Inc.:“Install-It” is licensed from Ray Sauers Associates, Inc. End-User is prohibited from taking any action to derive a source code equivalent of “Install-It,” including by reverse assembly or reverse compilation, Ray Sauers Associates, Inc. shall in no event be liable for any damages resulting from reseller’s failure to perform reseller’s obligation; or any damages arising from use or operation of reseller’s products or the software; or any other damages, including but not limited to, incidental, direct, indirect, special or consequential Damages including lost profits, or damages resulting from loss of use or inability to use reseller’s products or the software for any reason including copyright or patent infringement, or lost data, even if Ray Sauers Associates has been advised, knew or should have known of the possibility of such damages.
The following disclaimer is required by Videomedia, Inc.:“Videomedia, Inc. makes no warranties whatsoever, either express or implied, regarding this product, including warranties with respect to its merchantability or its fitness for any particular purpose.”
“This software contains V-LAN ver. 3.0 Command Protocols which communicate with V-LAN ver. 3.0 products developed by Videomedia, Inc. and V-LAN ver. 3.0 compatible products developed by third parties under license from Videomedia, Inc. Use of this software will allow “frame accurate” editing control of applicable videotape recorder decks, videodisc recorders/players and the like.”
The following disclaimer is required by Altura Software, Inc. for the use of its Mac2Win software and Sample Source Code:©1993–1998 Altura Software, Inc.
The following disclaimer is required by 3Prong.com Inc.:Certain waveform and vector monitoring capabilities are provided under a license from 3Prong.com Inc.
The following disclaimer is required by Interplay Entertainment Corp.:The “Interplay” name is used with the permission of Interplay Entertainment Corp., which bears no responsibility for Avid products.
This product includes portions of the Alloy Look & Feel software from Incors GmbH.
This product includes software developed by the Apache Software Foundation (http://www.apache.org/).
© DevelopMentor
This product may include the JCifs library, for which the following notice applies:JCifs © Copyright 2004, The JCIFS Project, is licensed under LGPL (http://jcifs.samba.org/). See the LGPL.txt file in the Third Party Software directory on the installation CD.
Avid Interplay contains components licensed from LavanTech. These components may only be used as part of and in connection with Avid Interplay.
Portions © Copyright 2003-2007 of MOG Solutions.
Attn. Government User(s). Restricted Rights LegendU.S. GOVERNMENT RESTRICTED RIGHTS. This Software and its documentation are “commercial computer software” or “commercial computer software documentation.” In the event that such Software or documentation is acquired by or on behalf of a unit or agency of the U.S. Government, all rights with respect to this Software and documentation are subject to the terms of the License Agreement, pursuant to FAR §12.212(a) and/or DFARS §227.7202-1(a), as applicable.
TrademarksAvid, the Avid Logo, Avid Everywhere, Avid DNXHD, Avid DNXHR, Avid Nexis, AirSpeed, Eleven, EUCON, Interplay, iNEWS, ISIS, Mbox, MediaCentral, Media Composer, NewsCutter, Pro Tools, ProSet and RealSet, Maestro, PlayMaker, Sibelius, Symphony, and all related product names and logos, are registered or unregistered trademarks of Avid Technology, Inc. in the United States and/or other countries. The Interplay name is used with the permission of the Interplay Entertainment Corp. which bears no responsibility for Avid products. All other trademarks are the property of their respective owners. For a full list of Avid trademarks, see: http://www.avid.com/US/about-avid/legal-notices/trademarks.
Avid MediaCentral | Cloud UX Panel for Adobe Premiere Pro CC 2018.6 ReadMe • Revised September 10, 2018 • This document is distributed by Avid in online (electronic) form only, and is not available for purchase in printed form.


![O 2018.6/2 18:00 50—1/21 (90ffil]l 1,980B 1,480B 540B fff ...test.pp-web.jp/images/clubs/1/others/tirashi20180817.pdf · O 2018.6/2 18:00 50—1/21 (90ffil]l 1,980B 1,480B 540B](https://static.fdocuments.in/doc/165x107/61032e3c97036a6d450a4644/o-201862-1800-50a121-90ffill-1980b-1480b-540b-fff-testpp-webjpimagesclubs1others.jpg)

