White House History #31 The White House Neighborhood Revisited

WALTER: A themer’s guide
White TieVersion : 14 July 2012
DON’T PANIC
Introduction . . . . . . . . . . . . . . . . . . . . . . . . . . . . . . . . . . . . . . . . . . . . . . . . . . . . . . . . . . . . . . . . .3
Part 1 : The Basics . . . . . . . . . . . . . . . . . . . . . . . . . . . . . . . . . . . . 5Where’s WALTER? . . . . . . . . . . . . . . . . . . . . . . . . . . . . . . . . . . . . . . . . . . . . . . . . . . . . . . . . . . . .5First steps . . . . . . . . . . . . . . . . . . . . . . . . . . . . . . . . . . . . . . . . . . . . . . . . . . . . . . . . . . . . . . . . . . .6Comments . . . . . . . . . . . . . . . . . . . . . . . . . . . . . . . . . . . . . . . . . . . . . . . . . . . . . . . . . . . . . . . . . .7TCP size . . . . . . . . . . . . . . . . . . . . . . . . . . . . . . . . . . . . . . . . . . . . . . . . . . . . . . . . . . . . . . . . . . . . .7Remove Everything . . . . . . . . . . . . . . . . . . . . . . . . . . . . . . . . . . . . . . . . . . . . . . . . . . . . . . . . . .8Show a single button . . . . . . . . . . . . . . . . . . . . . . . . . . . . . . . . . . . . . . . . . . . . . . . . . . . . . . . .9The 8 number values . . . . . . . . . . . . . . . . . . . . . . . . . . . . . . . . . . . . . . . . . . . . . . . . . . . . . . . .9
Part 2 : In Depth . . . . . . . . . . . . . . . . . . . . . . . . . . . . . . . . . . . . 11Polish Notation . . . . . . . . . . . . . . . . . . . . . . . . . . . . . . . . . . . . . . . . . . . . . . . . . . . . . . . . . . . . .11Conditions . . . . . . . . . . . . . . . . . . . . . . . . . . . . . . . . . . . . . . . . . . . . . . . . . . . . . . . . . . . . . . . . .11Nesting Conditions . . . . . . . . . . . . . . . . . . . . . . . . . . . . . . . . . . . . . . . . . . . . . . . . . . . . . . . . .12Variables . . . . . . . . . . . . . . . . . . . . . . . . . . . . . . . . . . . . . . . . . . . . . . . . . . . . . . . . . . . . . . . . . . .13Summing . . . . . . . . . . . . . . . . . . . . . . . . . . . . . . . . . . . . . . . . . . . . . . . . . . . . . . . . . . . . . . . . . .14Multiplication . . . . . . . . . . . . . . . . . . . . . . . . . . . . . . . . . . . . . . . . . . . . . . . . . . . . . . . . . . . . . .15Edge Attachment . . . . . . . . . . . . . . . . . . . . . . . . . . . . . . . . . . . . . . . . . . . . . . . . . . . . . . . . . . .16Proportional Stretching . . . . . . . . . . . . . . . . . . . . . . . . . . . . . . . . . . . . . . . . . . . . . . . . . . . . .17Scalar Values . . . . . . . . . . . . . . . . . . . . . . . . . . . . . . . . . . . . . . . . . . . . . . . . . . . . . . . . . . . . . . .18Scalar Values : A Practical Example . . . . . . . . . . . . . . . . . . . . . . . . . . . . . . . . . . . . . . . . . .19Other Comparison Operators . . . . . . . . . . . . . . . . . . . . . . . . . . . . . . . . . . . . . . . . . . . . . . .20‘Always’ Comparisons . . . . . . . . . . . . . . . . . . . . . . . . . . . . . . . . . . . . . . . . . . . . . . . . . . . . . . .21Inheriting previously declared values with “ .” . . . . . . . . . . . . . . . . . . . . . . . . . . . . . . . . .22Z-order . . . . . . . . . . . . . . . . . . . . . . . . . . . . . . . . . . . . . . . . . . . . . . . . . . . . . . . . . . . . . . . . . . . . .22
Part 3 : Special Elements . . . . . . . . . . . . . . . . . . . . . . . . . . . . . 23Colours . . . . . . . . . . . . . . . . . . . . . . . . . . . . . . . . . . . . . . . . . . . . . . . . . . . . . . . . . . . . . . . . . . . .23The Extended Mixer . . . . . . . . . . . . . . . . . . . . . . . . . . . . . . . . . . . . . . . . . . . . . . . . . . . . . . . .24TCP Parameter knobs . . . . . . . . . . . . . . . . . . . . . . . . . . . . . . . . . . . . . . . . . . . . . . . . . . . . . . .24Text Elements . . . . . . . . . . . . . . . . . . . . . . . . . . . . . . . . . . . . . . . . . . . . . . . . . . . . . . . . . . . . . .25Volume Control . . . . . . . . . . . . . . . . . . . . . . . . . . . . . . . . . . . . . . . . . . . . . . . . . . . . . . . . . . . . .26Pan controls . . . . . . . . . . . . . . . . . . . . . . . . . . . . . . . . . . . . . . . . . . . . . . . . . . . . . . . . . . . . . . . .27
Knob Stacks . . . . . . . . . . . . . . . . . . . . . . . . . . . . . . . . . . . . . . . . . . . . . . . . . . . . . . . . . . . . . . . .28Meters . . . . . . . . . . . . . . . . . . . . . . . . . . . . . . . . . . . . . . . . . . . . . . . . . . . . . . . . . . . . . . . . . . . . .30
Part 4 : Arrangement . . . . . . . . . . . . . . . . . . . . . . . . . . . . . . . . 34TCP Folder Margins . . . . . . . . . . . . . . . . . . . . . . . . . . . . . . . . . . . . . . . . . . . . . . . . . . . . . . . . .34TCP Minimum Size . . . . . . . . . . . . . . . . . . . . . . . . . . . . . . . . . . . . . . . . . . . . . . . . . . . . . . . . . .35TCP Heights . . . . . . . . . . . . . . . . . . . . . . . . . . . . . . . . . . . . . . . . . . . . . . . . . . . . . . . . . . . . . . . .35MCP Minimum Height . . . . . . . . . . . . . . . . . . . . . . . . . . . . . . . . . . . . . . . . . . . . . . . . . . . . . .36Layouts . . . . . . . . . . . . . . . . . . . . . . . . . . . . . . . . . . . . . . . . . . . . . . . . . . . . . . . . . . . . . . . . . . . .36Layouts and Images . . . . . . . . . . . . . . . . . . . . . . . . . . . . . . . . . . . . . . . . . . . . . . . . . . . . . . . .37
part 5 : Strategy . . . . . . . . . . . . . . . . . . . . . . . . . . . . . . . . . . . . 38Start with simple WALTER . . . . . . . . . . . . . . . . . . . . . . . . . . . . . . . . . . . . . . . . . . . . . . . . . . .38Know some basic theming . . . . . . . . . . . . . . . . . . . . . . . . . . . . . . . . . . . . . . . . . . . . . . . . . .38Experiment & Dissect . . . . . . . . . . . . . . . . . . . . . . . . . . . . . . . . . . . . . . . . . . . . . . . . . . . . . . .39Working in ugly colour blocks . . . . . . . . . . . . . . . . . . . . . . . . . . . . . . . . . . . . . . . . . . . . . . .39Have a plan, and a well chosen panel size . . . . . . . . . . . . . . . . . . . . . . . . . . . . . . . . . . .39Formatting for readability . . . . . . . . . . . . . . . . . . . . . . . . . . . . . . . . . . . . . . . . . . . . . . . . . . .40Single Statement or Multiple Statement? . . . . . . . . . . . . . . . . . . . . . . . . . . . . . . . . . . . .40Pink Lines, Yellow Lines, WALTER . . . . . . . . . . . . . . . . . . . . . . . . . . . . . . . . . . . . . . . . . . . .41‘Theme Refresh’ Action . . . . . . . . . . . . . . . . . . . . . . . . . . . . . . . . . . . . . . . . . . . . . . . . . . . . .43SWS/S&M Theme Helper . . . . . . . . . . . . . . . . . . . . . . . . . . . . . . . . . . . . . . . . . . . . . . . . . . . .44
Part 6 : Appendices . . . . . . . . . . . . . . . . . . . . . . . . . . . . . . . . . 45Appendix 1 - Common 4 numbers cheat sheet . . . . . . . . . . . . . . . . . . . . . . . . . . . . . . . . . . . 45Appendix 2 - Predefined Variables . . . . . . . . . . . . . . . . . . . . . . . . . . . . . . . . . . . . . . . . . . . . . . . 46Appendix 3 - default_layouts .txt . . . . . . . . . . . . . . . . . . . . . . . . . . . . . . . . . . . . . . . . . . . . . . . . 46Appendix 4 - midi_note_colormap .png . . . . . . . . . . . . . . . . . . . . . . . . . . . . . . . . . . . . . . . . . 51Index . . . . . . . . . . . . . . . . . . . . . . . . . . . . . . . . . . . . . . . . . . . . . . . . . . . . . . . . . . . . . . . . . . . . . . .54

WALTER : A themer’s guide Version : 14 July 2012 3
� Introduction
WALTER is a powerful enhancement of REAPER’s theming facilities and the means by which advanced editing can be performed on some sections of REAPER’s interface . By mastering the use of WALTER, you will have far more freedom and power over not only how your theme looks, but also how REAPER interacts with the user and their workflow while they are using your theme . Carefully used, WALTER will also allow you to minimise the load your theme places on the user’s computer by wise and selective use of your graphic resources .
WALTER is entirely optional; REAPER has the same default behaviours it always has, WALTER simply overrides these when instructed to . Old themes will still work, and you can still make new themes without using WALTER . Do not be frightened of WALTER, even if you were to do something really really stupid, the worst thing that would happen is that you would break your own theme .
WALTER can currently be used to affect the following areas:
• The transport bar• The TCP (track control panel) tracks and Master track• The TCP EnvCPs (envelope control panels)• The MCP (mixer control panel) tracks and Master track
The possibilities for creative interface design are truly exciting; here’s a brief overview of some of the basics that you can do with REAPER’s buttons, faders, text . . .almost all the interface elements:
• Elements can be removed . Entirely, or selectively . If you decide your theme isn’t going to have a phase button, its your call .
• Elements can be made whatever size you like . Make your bitmap button at the size that your design needs it to be, and pop that into WALTER .
• Elements, other than the background panels themselves, can be placed wherever you like within their panel .
• When the user resizes the panel, you can dictate how the elements will move, stretch or disappear to make best use of the available space . And, if you have mastered the use of REAPER’s pink line stretch controls within your images, you can combine this control of when and how the stretching occurs to make very flexible interface elements .
• Panels can have numerous forms, known as layouts, which, for the TCP and MCP, the user can choose between for all tracks, or on a track-by-track basis . Each layout can have have its own images and WALTER . Targeted workflow streamlining is yours for the giving .
Make sure you have seen, studied, and gasped in quiet awe at the full sdk information for WALTER, which you will find here http://www.reaper.fm/sdk/walter/walter.php . If at any time you find a mismatch between this document and that one . . .trust that one!
• Why Learn WALTER?
If the easy answer of “It’ll let you make things look really groovy” isn’t persuasive, perhaps you need to look deeper at all the possibilities WALTER presents for REAPER’s interface beyond shallow visual niceties:
• Numerous user feature requests that would previously have required the attentions of the programming team can now be fulfilled by you, the themer . Go and talk to the users, they are a nice bunch, and you can bring them joy .
• Many users are putting REAPER to all manner of exciting and possibly unenvisaged uses . Perhaps they are using a 4” screen, or a touch screen, or perhaps they only need a small subset of the controls . Maybe they could benefit from some WALTER .
• If you have an interface related feature request for REAPER, perhaps you could figure out a way to do it now, yourself, with WALTER . But if not, perhaps you might see a way that a small WALTER feature request would get you there, while opening up lots of other possibilities too .
• A WALTER Warning for ‘Mix&Match’ themers
If you have been making mix&match themes, using elements from other themes, that’s great . . .some of the best themes have been made that way . And have you been giving credit to the original theme creators? You have? Excellent! Please carry on, but be aware that you may now need to be selective about where you source your images; if a theme has extensive WALTER and its images set up to match, things may well look really, really bad if you try to use those images in a theme without the appropriate WALTER for the element, or no WALTER at all .
• Doing a quick edit on a theme without learning WALTER
Perhaps you’re hoping there’s a bit in this document where I walk you through how to make a 5 minute simple edit to a theme you like but didn’t make . Well, I wish there were, but I’m afraid its almost certainly not that easy; you’re going to need to understand how the theme works before you can change it . But the good news is that WALTER is simpler than it looks, and maybe you’ll enjoy learning it . Or, if the change really is that simple, ask someone else to do it for you . Tip: ask nicely :)

WALTER : A themer’s guide Version : 14 July 2012 4
Seriously . Read the sdk .
http://www.reaper.fm/sdk/walter/walter.php
and
http://www.reaper.fm/sdk/walter/images.php
and
http://www.reaper.fm/sdk/advtheme/

WALTER : A themer’s guide Version : 14 July 2012 5
Part 1 : The BasicsCovering the essentials of finding WALTER, starting to edit, removing elements and placing simple static elements to the interface .
�Where’s WALTER?
WALTER functionality is built in to REAPER, and the WALTER code is part of the theme you are using, within its rtconfig .txt file .
Themes live in the ‘ColorThemes’ folder in your REAPER path . DO NOT go searching for the folder by name using your OS search function, you will likely have more than one of them . The ColorThemes folder you want is the one in your REAPER path .
TIP FInd your REAPER path by choosing, in REAPER, “options > Show REAPER resource path in explorer/finder...”
If the theme is unpacked, you will find a .ReaperTheme file, and a folder containing its resources . (The folder will probably have the same name, but you can find out for sure by opening the .ReaperTheme file in a text editor and looking for the ‘ui_img=’ statement .) Inside the theme’s resources folder you will find the rtconfig .txt file .
If the theme has a .ReaperThemeZip extension, you’ll need to unpack it . A .ReaperThemeZip file is nothing more than a standard Zip file with its extension changed (you could even tell your OS to treat it as such) that you can unpack in the usual way .
• Standard Statements and WALTER Statements
An rtconfig file contains two different types of statement : Standard Statements, and WALTER Statements . If you have done pre-V4 theming, it may help you to regard the difference as historical because all the old rtconfig statements that you are used to (like ‘use_overlays’ and ‘tcp_vol_zeroline’ etc . . .) are standard statements, which is correct, but there are also some useful new standard statements to weave in with your WALTER .
Most themes that you might pick apart follow the convention of putting most, or all, of the standard statements at the top of the file, with the WALTER below . This is not strictly speaking necessary, but is advisable because of their most crucial property : no matter where they are in your rtconfig, Standard Statements are global . Set them once and you’re done for your entire theme .

WALTER : A themer’s guide Version : 14 July 2012 6
Standard Element WALTER Element
Which? Statement is a single, simple entry without a starting command .
Statement starts with a WALTER command, such as ‘set’ , ‘clear’ , ‘reset’ , ‘layout’ or ‘front’ etc . . .
Found Optionally, by convention, at the top of the rtconfig file .
Optionally, by convention, below the Standard Statements .
Usage One use per theme, simple, Global .
Can be interactive, contextual and re-defined for individual layouts .
Hierarchy Overrides any .ReaperTheme settings if applicable .
Overrides any Standard Statement settings if applicable .
Listed in . . . http://www.reaper.fm/sdk/advtheme/ plus some new ones in this document .
http://www.reaper.fm/sdk/walter/walter.php#elements
In this document, Standard Statements will be highlighted in green:
a standard statement
. . .and WALTER Statements will be highlighted in yellow:
a WALTER statement
• Editing the default theme WALTER
I strongly recommend that you do not start learning WALTER by trying to edit an existing theme with complex WALTER - and the default theme has some very complex WALTER . I recommend this because so many people who have struggled with learning WALTER, and given up, have started this way . It doesn’t work . Learn how to WALTER simple things yourself, from scratch, to get an understanding of the basics . Complex WALTER will then be much, much more decipherable .
Once (but not before!) you have learned the basics of WALTER, I recommend you look at as much WALTER as you can for every theme you can find - all the great WALTER people are writing is by far the best learning resource available to you . Ignore it at your peril!
Find the ColorThemes folder in your REAPER path, as described above, and unpack the Default_4 .0 .ReaperThemeZip . You will have a new theme available called “Default_4 .0_
unpacked” and you can edit its WALTER by finding its rtconfig .txt file within the “Default_4 .0_unpacked” folder .
• Old themes, and other themes with no WALTER
If there’s no WALTER code in the rtconfig .txt file of a theme, REAPER will layout almost exactly as it used to in the past, because there is some default WALTER that is used . You can find the file here:
Windows : C:\Program Files\REAPER4\InstallData\Data\default_layouts .txt
OSX : REAPER .app/Contents/Plugins/default_layouts .txt
I recommend that you do not edit this file because not only is this WALTER used in every theme that doesn’t override it, it also provides backup data for any statements you leave unchanged . You might, however, find copying some of the contents into your own WALTER to be a useful place to start, and I’ve included it all in “Appendix 3 - default_layouts .txt” on page 46 .
� First steps
Make a new theme, or open an existing theme that has no WALTER . The first thing we need to do is tell WALTER to override the standard layout . In this tutorial we will be working on the TCP, so we need the command to clear the TCP elements .
clear tcp.*
From there onwards, WALTER will be in charge of the TCP element layout . If you look at the defaults example code in “default_layouts .txt” you will see this at the beginning of the TCP section . Lets put everything below that, down to where the TCP Master section starts ( clear master .tcp .*) into our rtconfig:
clear tcp.*
set tcp.size [258 72]
set tcp.trackidx [1 3 20 16 0 0 0 0]
set tcp.foldercomp [2 3 20 20 0 0 0 0]
; meter, recmon, recmode row
set tcp.meter h>=66 [66 46 188 20 0 0 1 0] [0]
set tcp.recmon h>=66 [24 47 20 20 0 0 0 0] [0]

WALTER : A themer’s guide Version : 14 July 2012 7
set tcp.recmode h>=66 [44 47 20 20 0 0 0 0] [0]
; vol/pan labels
rect vollabel_row1 w>650 [23 7 36 13 1 0 1 0] [0]
rect panlabel_row1 w>650 [62 7 30 13 1 0 1 0] [0]
set tcp.volume.label h<49 vollabel_row1 w<230 [0] [185 28 36 13 1 0 1 0]
set tcp.pan.label h<49 panlabel_row1 w<230 [0] [225 28 30 13 1 0 1 0]
; pan fader
rect pan_row1 w>500 w>650 [90 3 -67 20 .65 0 1 0] [90 3 2 20 .75 0 1 0] [0]
set tcp.pan w<230 [0] h<49 pan_row1 [131 24 51 20 0.75 0 1 0]
; vol fader
rect vol_row1 w>330 w>500 [85 3 5 20 0.25 0 .75 0] [85 3 7 20 0.25 0 1 0] [0]
rect vol_row1 w>650 [85 3 5 20 0.25 0 .65 0] vol_row1
set tcp.volume h<49 vol_row1 w<230 [22 24 233 20 0 0 1 0] [22 24 109 20 0 0 0.75
0]
; track name label
rect label_small w<100 [26 3 226 15 0 0 1 0] [26 3 182 15 0 0 1 0]
rect label_2row w<230 label_small [26 3 68 15 0 0 1 0]
set tcp.label h>=49 label_2row w<=330 label_2row [26 3 38 15 0 0 .25 0]
; recarm button
set tcp.recarm h<49 w<=330 [0] [64 3 20 20 .25 0 .25 0] [2 24 20 20 0 0 0 0]
; other buttons
set tcp.folder w<230 [0] [98 3 20 20 1 0 1 0]
set tcp.io w<230 [0] [118 3 20 20 1 0 1 0]
set tcp.env w<230 [0] [138 3 20 20 1 0 1 0]
set tcp.fx w<230 [0] [158 3 20 20 1 0 1 0]
set tcp.fxbyp w<230 [0] [178 3 14 20 1 0 1 0]
set tcp.phase w<230 [0] [192 3 20 20 1 0 1 0]
set tcp.mute w<100 [0] [212 3 20 20 1 0 1 0]
set tcp.solo w<100 [0] [232 3 20 20 1 0 1 0]
� Comments
The first thing to notice is the comments, which are only there to let us know what’s what, and are ignored by WALTER . Comments start with a semi-colon ;
; I am a comment so WALTER ignores me
Use as many comments as you like, so you can find your way around your code .
Comments have a second use, which is to disable a line of code without the trouble of deleting it . So, if you take this correctly formatted statement which tells WALTER to draw the FX button . . .
set tcp.fx w<230 [0] [158 3 20 20 1 0 1 0]
and turn it into a comment . . .
; set tcp.fx w<230 [0] [158 3 20 20 1 0 1 0]
The whole statement has been commented-out, WALTER will ignore the statement and therefore find no instructions for how to draw the FX button . Result : the FX button will disappear .
� TCP size
All the location measurements that you put into the WALTER of a panel are always based on a reference sized panel . The TCP size is the critical measurement that defines the dimensions (x-pixels y-pixels) of the TCP’s reference panel . Its entirely up to you to decide what it will be, and from the user’s perspective it probably won’t matter what you put here because they can stretch it as they like . However, for you it is VERY important because you will be scaling element sizes/positions based on this reference size .
For example, if you want an element to sit at 100 pixels in from the right edge of the TCP, because we measure distances from the top left of the panel, you’ll need to look at your reference size ( lets say you set that at 300 x100 ) to work out that the x-location of your button needs to be 200 . If you then set the element’s edge attachment to stick to the right edge of the panel as it resizes (we’ll cover that later), that element will always appear 100px from the right edge, no matter how wide the user stretches the panel .

WALTER : A themer’s guide Version : 14 July 2012 8
Just like tcp .size, the MCP and transport bar have their reference sizes (mcp .size and trans .size) which are just as important . Moreover, because the MCP panels do not stretch hori-ontally, the second (width) value you set will be the fixed width of the panel . See ”Have a plan, and a well chosen panel size” on page 39 .
For now, lets just remember that tcp .size is important and leave it as it is .
set tcp.size [258 72]
� Remove Everything
To simplify matters, we’re going to remove every statement from our TCP so we have a clean slate to start with . Starting with the statement below tcp .size, comment out all the statements that aren’t already comments:
clear tcp.*
set tcp.size [258 72]
; set tcp.trackidx [1 3 20 16 0 0 0 0]
; set tcp.foldercomp [2 3 20 20 0 0 0 0]
; meter, recmon, recmode row
; set tcp.meter h>=66 [66 46 188 20 0 0 1 0] [0]
; set tcp.recmon h>=66 [24 47 20 20 0 0 0 0] [0]
; set tcp.recmode h>=66 [44 47 20 20 0 0 0 0] [0]
; vol/pan labels
; rect vollabel_row1 w>650 [23 7 36 13 1 0 1 0] [0]
; rect panlabel_row1 w>650 [62 7 30 13 1 0 1 0] [0]
; set tcp.volume.label h<49 vollabel_row1 w<230 [0] [185 28 36 13 1 0 1 0]
; set tcp.pan.label h<49 panlabel_row1 w<230 [0] [225 28 30 13 1 0 1 0]
; pan fader
; rect pan_row1 w>500 w>650 [90 3 -67 20 .65 0 1 0] [90 3 2 20 .75 0 1 0] [0]
; set tcp.pan w<230 [0] h<49 pan_row1 [131 24 51 20 0.75 0 1 0]
; vol fader
; rect vol_row1 w>330 w>500 [85 3 5 20 0.25 0 .75 0] [85 3 7 20 0.25 0 1 0] [0]
; rect vol_row1 w>650 [85 3 5 20 0.25 0 .65 0] vol_row1
; set tcp.volume h<49 vol_row1 w<230 [22 24 233 20 0 0 1 0] [22 24 109 20 0 0 0.75
0]
; track name label
; rect label_small w<100 [26 3 226 15 0 0 1 0] [26 3 182 15 0 0 1 0]
; rect label_2row w<230 label_small [26 3 68 15 0 0 1 0]
; set tcp.label h>=49 label_2row w<=330 label_2row [26 3 38 15 0 0 .25 0]
; recarm button
; set tcp.recarm h<49 w<=330 [0] [64 3 20 20 .25 0 .25 0] [2 24 20 20 0 0 0 0]
; other buttons
; set tcp.folder w<230 [0] [98 3 20 20 1 0 1 0]
; set tcp.io w<230 [0] [118 3 20 20 1 0 1 0]
; set tcp.env w<230 [0] [138 3 20 20 1 0 1 0]
; set tcp.fx w<230 [0] [158 3 20 20 1 0 1 0]
; set tcp.fxbyp w<230 [0] [178 3 14 20 1 0 1 0]
; set tcp.phase w<230 [0] [192 3 20 20 1 0 1 0]
; set tcp.mute w<100 [0] [212 3 20 20 1 0 1 0]
; set tcp.solo w<100 [0] [232 3 20 20 1 0 1 0]
And the result will be a beautifully empty TCP panel:

WALTER : A themer’s guide Version : 14 July 2012 9
� Show a single button
OK, lets bring back a single button - the solo button . Its the last statement in the code, we’re going to change it back from a comment into a functioning statement by removing its semicolon and space . I’m also going to simplify its code . Replace the statement with this:
set tcp.solo [10 3 20 20 0 0 0 0]
here it is:
Have a quick play and notice that the button works, and that as you stretch the TCP in either direction, the button doesn’t move or change in any way .
OK, lets get to the meat of what we’re seeing . . .
� The 8 number values
After the ‘set tcp .solo’ you’ll have noticed the 8 numbers within brackets [ ] . Here’s what they do:
[10 3 20 20 0 0 0 0]
position
size
edge attachment
a. x-axis position . Measured in pixels inwards from the left edge of the TCP to the left edge of the element .
b. y-axis position . Measured in pixels downwards from the top edge of the TCP to the top edge of the element .
c. x-size, measured in pixels . - e .g . for a button, this would be the width of the button .d. y-size, measured in pixels . - e .g . for a button, this would be the height of the button .e. left edge attachment - a ‘1’ here would attach the left edge of the element to the RIGHT
edge of the TCP; ‘0’ attaches the left edge of the element to the LEFT edge of the TCP*f. top edge attachment - a ‘1’ here would attach the top edge of the element to the
BOTTOM edge of the TCP; ‘0’ attaches the top edge of the element to the top edge of the TCP*
g. right edge attachment -a ‘1’ here would attach the right edge of the element to the RIGHT edge of the TCP; ‘0’ attaches the right edge of the element to the LEFT edge of the TCP*
h. bottom edge attachment - a ‘1’ here would attach the bottom edge of the element to the BOTTOM edge of the TCP; ‘0’ attaches the bottom edge of the element to the top edge of the TCP*

WALTER : A themer’s guide Version : 14 July 2012 10
* The behaviours of the edge attachment values are tricky, and take some getting used to . Things get even more complicated when you put numbers between 0 and 1 here (e .g . 0 .5), which tell the element to semi-attach and stretch as the TCP is stretched . This will be covered in more detail later, for now leave them all as zeroes and we’ll work with the position and size values .
so, lets go back to our TCP solo button and its values:
set tcp.solo [10 3 20 20 0 0 0 0]
This says: draw the top left corner of the solo button 10 pixels in from the left edge of the TCP and 3 pixels down from the top . Its size is 20 pixels x 20 pixels, and all of its edges are anchored to the top left .
With this, you could now move forward and create similar simple settings for all the other elements of the TCP, and build your dream static TCP layout .

WALTER : A themer’s guide Version : 14 July 2012 11
Part 2 : In DepthA static theme, with the elements sitting quietly where you left them, is fine . But REAPER’s interface allows the users to resize panels to taste, and a good theme should adjust itself to suit the space available .
WALTER allows elements to change their visibility, size and position relative to the panel and each other, based on the panel size and other variables .
� Polish Notation
Before we get into the details, some maths . Yes, I know, I’m sorry but stick with me its important and not actually that difficu . . . . STOP DOODLING FADERS AND PAY ATTENTION! THIS IS FOR YOUR BENEFIT NOT MINE! *cough*, excuse me . Seriously, just read this bit so that if you get stuck later you’ll know to come back and read it again . . .
WALTER uses a prefix method of expression called Polish Notation . This is very, very useful once you get used to it, though if its new to you it may seem challenging at first . It works like this:
question true-answer false-answer
So - the question is asked, and if its true the first answer is used . If its false, then the first answer is skipped and we move to the next answer . Often in WALTER you will be providing the answers - if this do that - and as you get into complex statements you’ll want to do things like make an answer be a question itself, and the beauty of Polish Notation is that the second question will have all its answers next to it . Look at this (actually incorrectly formatted) statement:
question1 (question2 true-answer2 false-answer2) false-answer1
OK? Now, those brackets may make sense to you, but in Polish Notation they are not necessary and in WALTER they are not permitted . Take them out and the statement still makes sense, and it will be correctly formatted:
question1 question2 true-answer2 false-answer2 false-answer1
This may seem very odd to you at the moment, but don’t worry for now . We’ll move on, once you start using it as you write your first statements it will start to make sense .
� Conditions
We can define all new values for each element based on conditions . The simplest of these are height and width comparisons . For example,
set tcp.solo w<230 [10 3 20 20 0 0 0 0]
Lets examine that statement:

WALTER : A themer’s guide Version : 14 July 2012 12
set tcp.solo w<230 [10 3 20 20 0 0 0 0]
We’re setting the tcp solo .
Question: is the width of the TCP
less than 230 pixels?
Answer: If yes, these are its
values .
This obviously begs the question of what happens if the answer is ‘no - the width of the TCP is MORE than 230 pixels .’ If a condition is false, it will skip the first answer and continue along the line . In this case, if it skips the first answer then it reaches the end of the line and so doesn’t know what to do . So, just as when we commented-out statements, it does nothing and the button disappears .
However, we can still bring it back by giving it another go in a second statement:
set tcp.solo w<230 [10 3 20 20 0 0 0 0]
set tcp.solo w>=230 [10 3 40 40 0 0 0 0]
So : if the width is, say, 400px, its going to fail the first question and WALTER will do nothing and move onwards . In the second statement it gets asked a new question, to which the answer is ‘yes’, and so those values are used . In this case, the button is drawn in the same place but 40px big .
However we could be more efficient there by doing the same thing but it all in one statement:
set tcp.solo w<230 [10 3 20 20 0 0 0 0] [10 3 40 40 0 0 0 0]
As you can see, it starts out the same as the first statement . Again, in WALTER, if a condition is false, it will skip the first answer and continue along the line . This time, the line doesn’t end, it supplies some further values - the big 40px button values . WALTER likes this, and will use those values for the false condition .
�Nesting Conditions
In the same way that the width of the TCP can be used in a comparison, height can as well . Just use an ‘h’ instead of a ‘w’ . Lets use that, and the above, to do something more complex . Put this as the tcp .solo statement in your rtconfig .txt and try it in REAPER:
set tcp.solo w<230 [10 3 20 20 0 0 0 0] h<40 [10 3 10 10 0 0 0 0] [10 3 40 40 0 0
0 0]
Squash the width of the TCP so its nice and thin - less than 230px wide . You’ll see you get your standard button at its standard size . Note at this point that if you mess with the height of the TCP, making it really small, the button doesn’t change .
• Here’s what WALTER is thinking:
Is the TCP width less than 230px? Yes, it is . OK, doing the first thing I come to - [10 3 20 20 0 0 0 0] - and stopping there; I’m finished with this statement .
Now expand the size of the TCP so its width is more than 230px but make its height really small - less than 40px . You’ll see that you get a tiny button . Here’s what WALTER is thinking:
Is the TCP width less than 230px? NO it isn’t! OK, skipping the first thing I come to and going to the next thing . The next thing is itself another question : Is the TCP height less than 40px? Yes, it is . OK, doing the first thing I come to - [10 3 10 10 0 0 0 0] - and stopping there; I’m finished with this statement .
And finally, keep that wide TCP setting but increase the height to over 40px, and you’ll see the really big button . This time WALTER has had to go all the way to the end of the line:
Is the TCP width less than 230px? NO it isn’t! OK, skipping the first thing I come to and going to the next thing . The next thing is itself another question : Is the TCP height less than 40px? NO it isn’t! OK, skipping the first thing I come to and again going to the next thing - [10 3 40 40 0 0 0 0]
• Making that a bit neater
That statement is all very good and will function perfectly as far as WALTER is concerned . Its slight downside is the squishy human being bit (that would be us), particularly when this statement becomes one in a huge list of lines of code, since the h<40 is in the middle of the line . Imagine you wanted to go through and change these critical panel sizes at which the changes happen; it would be handy to have them all in the same place .
Not a problem! Since the h<40 is the ‘false’ reply to the first question ( w<230 ) lets reword
WALTER : A themer’s guide Version : 14 July 2012 13
the first question so h<40 becomes the ‘‘true’ reply . . . by changing it from w<230 to w>=230 .
set tcp.solo w>=230 h<40 [10 3 10 10 0 0 0 0] [10 3 40 40 0 0 0 0] [10 3 20 20 0 0
0 0]
Notice that the first question, if yes, asks the second question . If no, it skips the second question and both its answers, heading for the final reply . And it looks a bit nicer!
• Multiple Nesting
First, let me take a moment to introduce this wonderful chap, which means ‘don’t draw it’:
[0]
. . .as we’ve seen, if you don’t give WALTER any values, it won’t draw the element, but sometimes its useful to directly state ‘don’t draw it’ (for example if an answer needs to be given, so WALTER has something to skip when looking for a later answer) . It can also make it easier to come back to your statement later and read what’s going on . Use it!
OK, onwards - lets recap on how our solo button is behaving . We have a condition where, if the width is greater than 230px, it will make a change depending on the height . But if the width is less than 230px, the question about height never gets asked . What if we want to set it so that it always changes based on height as well as width? The question needs to get asked, like this:
“if the width is less than 230px and the height is less than 40, disappear the button .”
We could do it in 2 statements, and there’s no shame in that: set tcp.solo w>=230 h<40 [10 3 10 10 0 0 0 0] [10 3 40 40 0 0 0 0]
set tcp.solo w<230 h<40 [0] [10 3 20 20 0 0 0 0]
But we can also nest both answers to the width question with their own height question: set tcp.solo w>=230 h<40 [10 3 10 10 0 0 0 0] [10 3 40 40 0 0 0 0] h<40 [0] [10 3
20 20 0 0 0 0]
its such a big statement I can’t fit it in, but it works well! It may, however, displease you . . .not least because its tiresome to read through and edit, and sometimes you may find yourself
putting the same values several times . We can clear this up with an introduction to . . .
�Variables
At their most basic, variables are values which we define ourselves as handy placeholder names . Later on we will be doing much cleverer things with variables, but for now just consider this:
[10 3 40 40 0 0 0 0]
It is the code for our big solo button, and as long as we haven’t forgotten, whenever we see that code we’re going to think “ah - its the big solo button” . We can actually embrace that by making big_solo_button mean, to WALTER, those values .
set big_solo_button [10 3 40 40 0 0 0 0]
We have set a variable! Now, whenever we would have previously written out those values, we can just write the variable name set tcp.solo w>=230 h<40 [10 3 10 10 0 0 0 0] big_solo_button
It makes a lot of sense to name your variables something meaningful, it will make your code so much easier to read when you come back to it . But you don’t have to; you can name things whatever you like .
TIP To avoid confusing your variables with the predefined ones, and as a matter of etiquette, don’t use “.” characters in your variable names, so
instead of naming it “my.variable”, name it something else, perhaps “my_variable”.
Let us imagine it would amuse me to take our huge multiple nested tcp .solo statement from earlier and make it more compact and readable, while simultaneously patronising all the Swedes on the theme team . Can we achieve both these goals? Yes we can!
set bjorn [10 3 10 10 0 0 0 0]
set benny [10 3 40 40 0 0 0 0]
set frida [0]
set agnetha [10 3 20 20 0 0 0 0]

WALTER : A themer’s guide Version : 14 July 2012 14
set tcp.solo w>=230 h<40 bjorn benny h<40 frida agnetha
Mission accomplished! But we don’t have to stop there, because when we set a variable it can itself be a statement, and contain variables itself . If we make this statement:
set abba w>=230 h<40 bjorn benny h<40 frida agnetha
. . .then we can change the last statement to:
set tcp.solo abba
� Summing
Doing your layout as straight defined values will get you a long way, but sooner or later you’ll be wanting to do some calculations . In some of the previous examples, I’ve been putting a 3px border in various places, but lets imagine I wanted to change that border based on a conditional . . .e .g . make it bigger as more space becomes available as the panel grows .
Hopefully you can think of a way to do that: I’d type in all my values for all of my buttons at various values of ‘h’ and ‘w’ . But we’d be looking at some big code just to enact something that is conceptually very simple, and any tweaks would become a desperately laborious task . So we want to be a bit smarter . Lets bring in some buttons:
set tcp.fx [3 3 20 20 0 0 0 0]
set tcp.phase [23 3 20 20 0 0 0 0]
set tcp.mute [43 3 20 20 0 0 0 0]
set tcp.solo [63 3 20 20 0 0 0 0]
Look at all those 3s . What we can do is sum those 3s in the statement, instead of putting them in as values . The syntax for summing is:
set output + val1 val2
The numbers will be added by location, so what we do is this:
set tcp.fx + [3 3 0 0 0 0 0 0] [0 0 20 20 0 0 0 0]
so, a 3 in the location fields is getting added on . This isn’t the only place we’re going to want to add on those 3s, so lets define it as a variable:
set button_border [3 3 0 0 0 0 0 0]
now we have set that, let’s put it into all four buttons:
set tcp.fx + button_border [0 0 20 20 0 0 0 0]
set tcp.phase + button_border [20 0 20 20 0 0 0 0]
set tcp.mute + button_border [40 0 20 20 0 0 0 0]
set tcp.solo + button_border [60 0 20 20 0 0 0 0]
So far so good - it all looks the same, but we haven’t had to type ‘3’ as often . That’s not very exciting, so lets make out new button_border variable change depending on the TCP’s height condition:
set button_border h>40 [12 12 0 0 0 0 0 0] [3 3 0 0 0 0 0 0]
Here’s what we get:
increase the TCP height and it becomes:
• Optional Syntax Simplification
[3 3 0 0 0 0 0 0]
If we don’t provide all eight numbers , WALTER will treat the missing values as being zero . Which, in this case, is the correct number for the third value onwards, so we don’t need to write them, and can rewrite that statement as:
set button_border h>40 [12 12] [3 3]

WALTER : A themer’s guide Version : 14 July 2012 15
�Multiplication
If summing is making sense to you, lets move on to multiplication . It’s much the same:
set output * val1 val2
If we look at that old statement:
set tcp.solo + button_border [60 0 20 20 0 0 0 0]
. . .we’ll notice some 20s in there (and a 60, this is the button that skips 3 other buttons), since that is the size of the button and also therefore the amount we need to offset each button in the line so they don’t overlap . We can make those 20s a multiplied value:
* [20 20 20 20 0 0 0 0] [3 0 1 1 0 0 0 0]
Lets do that with a variable:
set button_size [20 20 20 20]
Notice I’ve left the last four 0s off, since they are redundant . We can now roll that into the tcp .solo statement:
set tcp.solo + button_border * button_size [3 0 1 1 0 0 0 0]
Just for clarity, lets read that as WALTER does . First thing it sees is that we’re setting the tcp solo . Next, it sees that we’re going to do a sum, so it looks for the first value to sum, and finds the variable ‘button_border’ . Then it looks for the second value to sum, and finds that it is itself a calculation - this time a multiplication . The first value it sees to be multiplied is the variable ‘button_size’, the second value is the [3 0 1 1 0 0 0 0]
We’ve already got the border size enlarging when the TCP height goes above 40px, lets put a similar conditional on our new button_size variable, so the buttons get ugly big at the same time .
set button_size h>40 [30 30 30 30] [20 20 20 20]
So, repeat the solo button’s strategy for the other three buttons and the whole section for these four buttons should look like this:
set button_border h>40 [12 12] [3 3]
set button_size h>40 [30 30 30 30] [20 20 20 20]
set tcp.fx + button_border * button_size [0 0 1 1 0 0 0 0]
set tcp.phase + button_border * button_size [1 0 1 1 0 0 0 0]
set tcp.mute + button_border * button_size [2 0 1 1 0 0 0 0]
set tcp.solo + button_border * button_size [3 0 1 1 0 0 0 0]
Here it is:
increase the TCP height and it becomes:
Notice that we could now do a couple of easy things to make big changes easily:
• We could easily change all our button’s sizes .• We could move any of our buttons around based on their position relative to the top
button by putting row/column numbers in the position locations, and that would continue to function if we changed the button size
Overscaled buttons may look horrible, but the skills you’ve learned here are going to be extremely useful when we start working with things like folder depth margins .
WALTER : A themer’s guide Version : 14 July 2012 16
� Edge Attachment
There’s an awful lot that can be done with the simple 0 0 0 0 edge attachment setting we’ve used so far; you’ll be able to replicate many of the features from other DAWs for example . But REAPER does a lot of stretching, and while this may seem arduous for the designer, it allows the user to do wonderful things like stretch out the TCP for higher resolution faders or meters at critical moments, so think carefully before you decide to stick with static sizes - who’s interests are you serving : the user’s, or your own? Be brave, and dive in!
0 0 0 0
Left element edge to Left panel edge
Top element edge to Top panel edge
Right element edge to Left panel edge
Bottom element edge to Top panel edge
As we have seen, 0 0 0 0 is the most simple setting - left and right edges are attached to the left edge of the panel, top and bottom edges are attached to the top of the panel . No stretching . This is equivalent to standard GUI practice of everything hanging off the top left corner of the panel, staying where it is as the panel resizes .
Lets move along to the opposite end of the scale:
0 0 1 1
Left element edge to Left panel edge
Top element edge to Top panel edge
Right element edge to Right panel edge
Bottom element edge to Bottom panel edge
Here, every element edge is going to stick to its adjacent panel edge - so as the panel resizes, we’re going to see a LOT of stretching .
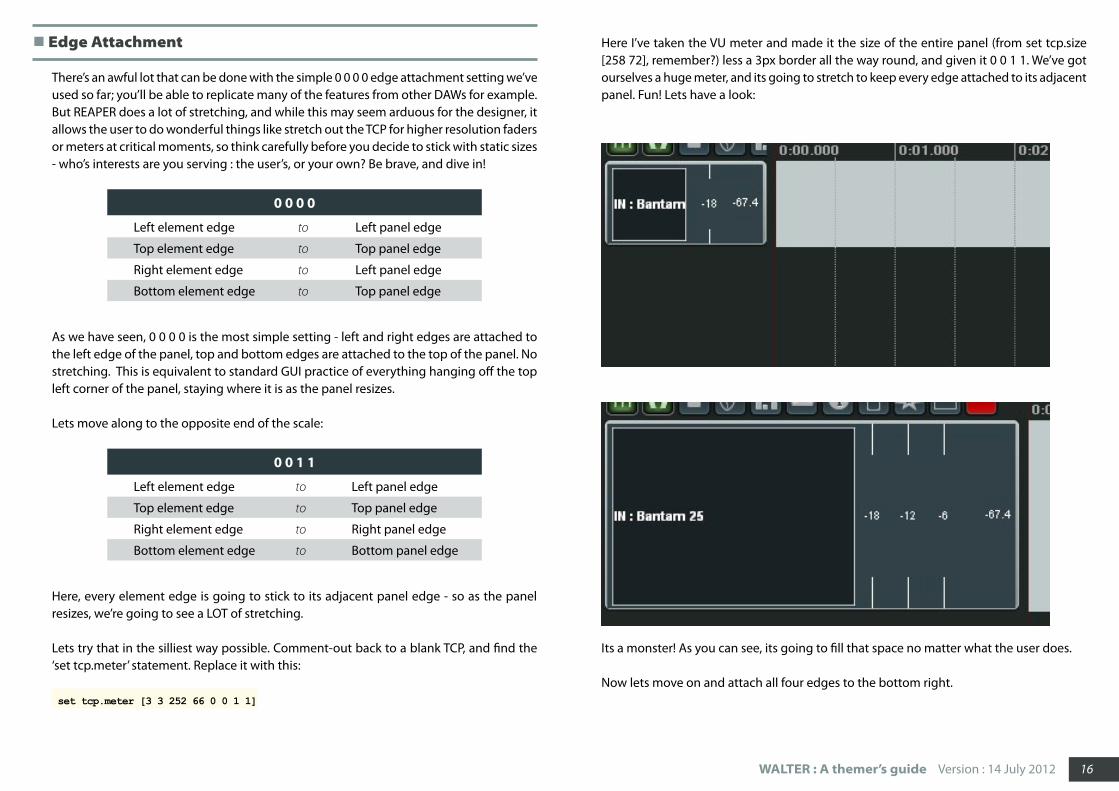
Lets try that in the silliest way possible . Comment-out back to a blank TCP, and find the ‘set tcp .meter’ statement . Replace it with this:
set tcp.meter [3 3 252 66 0 0 1 1]
Here I’ve taken the VU meter and made it the size of the entire panel (from set tcp .size [258 72], remember?) less a 3px border all the way round, and given it 0 0 1 1 . We’ve got ourselves a huge meter, and its going to stretch to keep every edge attached to its adjacent panel . Fun! Lets have a look:
Its a monster! As you can see, its going to fill that space no matter what the user does .
Now lets move on and attach all four edges to the bottom right .

WALTER : A themer’s guide Version : 14 July 2012 17
1 1 1 1
Left element edge to Right panel edge
Top element edge to Bottom panel edge
Right element edge to Right panel edge
Bottom element edge to Bottom panel edge
To see this in action, first comment-out the big meter (the set tcp .meter statement), and bring back the solo button statement, and change its settings to this:
set tcp.solo [235 49 20 20 1 1 1 1]
As you resize the TCP by moving the bottom and right edges of the TCP panel, you’ll see your solo button happily sticking to those edges .
Lets have a look at the measurement numbers I’ve used here, because they should clarify the comments made before in “TCP size” on page 7 . The most important thing to realise is that we are still measuring location from the top left corner, even though the button is in the bottom right, and these measurements are made relative to the TCP panel’s ‘set tcp .size’ values, measured if it was at this size . The tcp .size is 258x72, I wanted a 3px border, and the button is 20px square, so my numbers were:
x-axis : 258 - 3 (the border) - 20 (width of the button) = 235y-axis : 72 - 3 (the border) - 20 (height of the button) = 49
To conclude: you should now be able to stretch in either axis, or attach to either corner, by using a combination of these settings we have looked at .
Try out 1 0 1 0 and 0 0 1 0 . Then, if its making sense, here’s an experiment : try putting 1 1 0 0 in for the giant meter . Resize the TCP till you can see it . . .as you will notice, this isn’t a setting you’re ever likely to use . Make sure you understand why it’s doing that!
� Proportional Stretching
We’ve done no stretching ( e .g . 0 0 0 0 ) and full stretching ( e .g . 0 0 1 1 ) , now lets stretch things a little bit . This is extremely useful because you can, for example, make 2 elements occupy a shared area which they proportionally fill, so as the panel size is increased they will both grow to use the available space, while maintaining their relative sizes
This is where it can get very tricky if you’ve not planned your sizes, relative to tcp .size . You need to do that, or you will cry cry cry!
Lets take an element and stretch it a bit . Comment-out back to a blank TCP, and then bring back the big meter with these settings:
set tcp.meter [3 3 126 66 0 0 0.5 1]
Here I’ve set the meter size to be half what it was before in the x-axis, and told it to have a right-edge attachment value of 0 .5 . So, its going to fill half the panel, and its always going to fill half the panel, no matter how wide it is .
We have this nice gap, lets put something in it . . .and what could be more attractive than a ridiculously oversized and therefore unfairly overfiltered solo button? mmm, lets do it!
set tcp.solo [129 3 126 66 0.5 0 1 1]
This button will fill the other half of the panel, and again always fill it .
• Lets go through the numbers:
1 . 129 is the 3px border, plus the width of the meter measured at the tcp .size . We’re scooting along that far because that’s where the meter is .
2 . 3 is the border3 . 126 is the width of the button, i .e . remaining width of the panel, measured at the tcp .
size, less a 3px border for the right edge .4 . a y-axis value, we’re not changing that, so 66 as before . 5 . The clever bit - a 0 .5 because we want the left edge of the button to 0 .5 attach to the

WALTER : A themer’s guide Version : 14 July 2012 18
right edge of the panel, so it does the proportional stretching .6 . a y-axis value, we’re not changing that, so 0 as before . 7 . The right edge is 1 because we want it to attach itself to the right edge of the panel .8 . a y-axis value, we’re not changing that, so 1 as before .
Here it is:
and stretched:
Note that the gap to the bottom and right of the solo image are the padding gap we used to put in to get the button to line up with the track name (I’ve put a red rectangle over it all so you can see) . . .take a moment to celebrate that, thanks to WALTER, we won’t be doing things like that any more!
• Edge Atachment - what’s really happening
If you really want to know how your attachment numbers are affecting the reresulting position, here is the calculation that is taking place, in this case for the left edge:
“left = left_pos + (width-basewidth)*left_edge_attachment”
If that doesn’t make complete sense to you, don’t worry!
� Scalar Values
So far, we’ve mostly been dealing with coordinate lists, which are a set a values inside square brackets that have a meaning based on their position . When I write:
[10 33 10 10 0 0 0 0]
. . .you know that the ‘33’ value is the y-position . When we’ve been doing maths, we’ve done it with each coordinate in one list being added / multiplied by its counterpart coordinate in the other list; x-position to x-postion, y-position to y-position, and so forth . And that’s been useful .
We’ve also been using ‘w’ and ‘h’, the width and height of a panel, to do some comparisons . Those are scalar values, scalar meaning they could be represented on a scale, they are a single value . (see “Appendix 2 - Predefined Variables” on page 46 for other such scalar values that REAPER passes to WALTER)
Now we’re going to look at breaking the barrier between the two data types by extracting scalar values from coordinate lists, or putting them into coordinate lists . Let me start by trying to convince you why you should bother with any of this . . . consider this solo button:
set tcp.solo h<10 [10 40 10 10] h<20 [10 50 10 10] [10 60 10 10]
and suppose we want to hide the mute button if the solo has a y-position of over 49 . Well, its pretty simple walter, so we could just type it in without much hardship based on the same conditions that are determining the solo’s width :
set tcp.solo h<10 [10 40 10 10] h<20 [10 50 10 10] [10 60 10 10]
set tcp.mute h<10 [0] h<20 [10 62 10 10]
That’s going to get it done, and as long as we remember that if we edit the solo button’s WALTER, we’ll need to edit the mute as well . But what if the solo WALTER was really, really complex? We could still do it, but we’d need to mirror that solo complexity on the mute statement, even though the mute’s behaviour is actually very simple . What we want is to cut straight to the point and grab the solo button’s y-value and use it in a comparison; “if the tcp .solo’s y-position is over 49, hide the mute” . Well, we can do it, like this:
set tcp.mute tcp.solo{y}>49 [0] [10 62 10 10]
WALTER : A themer’s guide Version : 14 July 2012 19
Now, no matter how fancy we get with the solo, the mute will always follow that simple rule . What we’ve done is extracted a scalar value from the coordinate list, to use in a comparison in the same way we’ve previously been using scalar values like ‘height’ . Lets take a closer look at this bit:
tcp.solo{y}>49
What that is saying to WALTER is: Look at the result of the tcp .solo statement I’ve previously declared . For the current conditions (height / width / whatever), what is the y-position value? OK, is that greater than 49px?
As you can probably tell, this is a significant win not only because you don’t have to do so much typing now, but also when you come back to your WALTER at a later date you’ll have a much easier time figuring out what’s going on .
• How to grab each coordinate
We’ve just taken the y-position and used it as a scalar value, by the use of {y} . The curly brackets designate that its a scalar value, and the ‘y’ says to use the y-position value . Here’s the full list:
[x y w h ls ts rs bs]
So, for example, if we’ve made the coordinate list:
set tcp.solo [8 12 20 40 0 1 0 1]
then:
tcp.solo{x} = 8
tcp.solo{h} = 40
tcp.solo{ts} = 1
Alternatively, for no particular reason other than you might prefer it, you can use the coordinate list position index instead of x / y / w / h / ls / ts / rs / bs . Maybe typing ‘bs’ makes you laugh too much . . .no need to apologise, its your call . Use the numbers instead:
[0 1 2 3 4 5 6 7]so:
tcp.solo{0} = 8
tcp.solo{3} = 40
tcp.solo{5} = 1
WALTER doesn’t care, you can even mix methods up, if you have a penchant for confusing yourself .
• Putting a Scalar Value inside a Coordinate List
So far, we have used scalar values in conditions for things like comparisons . But you can also simply drop a scalar value directly into a coordinate list, like this:
set tcp.mute [tcp.solo{y} 12 20 40 0 1 0 1]
Provided that you’ve already declared tcp .solo elsewhere, its y-position value (whatever it might be at any given height / width / etc) will be used as the x-position value for the mute . Which would probably be a bit awful, but you can do it if you want to!
There is also a simplification to this rule, in that you don’t need to declare the scalar value’s index if it is the same index position where you are using it . Let me explain, using the handy example of where you want to elements to have the same edge attachment:
set tcp.solo [8 12 20 40 0 1 0 1]
set tcp.mute [8 32 20 40 tcp.solo{ls} tcp.solo{ts} tcp.solo{rs} tcp.solo{bs}]
in this example, all four of those scalar values are in the same place as the index (ls, ts etc . . .) they are referencing . On such occasions, you can leave the index out, and just write it like this:
set tcp.mute [8 32 20 40 tcp.solo tcp.solo tcp.solo tcp.solo]
� Scalar Values : A Practical Example
Here’s an example of using what we’ve just learnt to practical effect, using just two buttons . When you set one element to react to changes in another, the savings are reasonable; when you set many elements to react to changes in a single ‘anchor’ object, the savings can be very large . So stick with me . . .
I’m going to start with a blank TCP and make a solo button and a mute button . For maximum clarity, I’m going to make these buttons as ugly squares of primary colour . +I’m going to

WALTER : A themer’s guide Version : 14 July 2012 20
make this solo button stretch, move and generally jump through hoops . I want the mute button to be the same size as it, and stick to its right edge like glue, no matter what it does . And I want to do this with as little effort as possible . Here’s the code:
clear tcp.*
set tcp.size [100 72]
set tcp.solo h<50 [10 10 10 10 0 0 0 0] [40 40 20 20 0 0 1 0]
set tcp_solo_rhs + [tcp.solo{x}] [tcp.solo{w}]
set tcp.mute [tcp_solo_rhs tcp.solo tcp.solo tcp.solo tcp.solo{rs} 0 tcp.solo{rs}
0]
and here’s what we get:
Lets go through that . First, I define the solo button (yellow square) . It does all manner of silly things, but nothing we haven’t seen before:
set tcp.solo h<50 [10 10 10 10 0 0 0 0] [40 40 20 20 0 0 1 0]
Next, I want to calculate where the right hand edge of the solo button is . I’ve decided to set this to be called tcp_solo_rhs, but I could just as easily have called it blah .blah, or whatever .
set tcp_solo_rhs + [tcp.solo{x}] [tcp.solo{w}]
I’m inventing this coordinate list for my own purposes, so it doesn’t matter that I’ve made it one entry long . I’ve set it to be an addition of two single entry coordinate lists, one containing the solo’s x-position (note - I could have left that {x} out, since its position index one, but I chose not to for clarity) and the other containing the solo’s width . That will give me the unstretched location of the right edge of the solo button . Now I use it to define the mute button (red square):
set tcp.mute [tcp_solo_rhs tcp.solo tcp.solo tcp.solo tcp.solo{rs} 0 tcp.solo{rs}
0]
Notice that is a single 8 number coordinate list . Almost everything is defined by the solo button, and I could write vast lines of complex WALTER for the solo button, the mute button would pick it all up and sit next to it happily and consistently . Lets go through the 8 ‘numbers’:
1 . x-position is the right hand edge of the solo, which we calculated in the previous statement .
2 . y-position is the same as the y-position of the solo .3 . I want the height to be the same as the solo, so I grab that .4 . I want the width to be the same as the solo, so I grab that too .5 . left edge attachment : I want this left edge to stick to the right edge of the solo button .
The solo button may or may not be stretching its right edge as the panel resizes, I grab its right edge attachment value to find out .
6 . top edge; nothing special, zero it .7 . right edge attachment : this mute button itself doesn’t stretch, so its right edge wants
to do the same thing as its left edge, so I grab the solo’s right edge attachment again .8 . bottom edge, yeah fine, zero .
• ...Profit
Now the mute button is behaving as I want it, I could now add more buttons using the same values, offset by width each time, and thereby put together a whole group of controls that are all consistently placed relative to the solo’s right edge, and no matter how complex my solo WALTER might get, it would all remain easily editable .
�Other Comparison Operators
So far, we have been using ‘<’ and ‘>’ in our comparisons, and in day to day WALTER writing they will most likely be your most common operators . But there are others, and you will find them to be extremely useful .
>= , <= Greater than or equal to, less than or equal to
== Equal to

WALTER : A themer’s guide Version : 14 July 2012 21
!= Not equal to
Use these exactly as you have been using ‘<’ and ‘>’ . Just remember that the operands (the things you are comparing) must be either a constant value, or a scalar value (see “Scalar Values” on page 18 .)
• Zero and Nonzero
There are specific operators for a value being zero or nonzero:
! is zero? is not zero
. . .when they are placed in front of the operand value . For example, the scalar value ‘fold-erstate’ returns a value of zero when a track is not in a folder . So if you wanted to make a button double in size when a track is in a folder, you could do this:
set mcp.solo !folderstate [0 0 10 10 0 0 0] [0 0 20 20 0 0 0 0]
. . .which is the same as . . .
set mcp.solo ?folderstate [0 0 20 20 0 0 0] [0 0 10 10 0 0 0 0]
• AND
The AND operator is ‘&’, it can be used to effect change when two operands are the same . For example:
set fish w<300 [1] [0]
set chips h<100 [1] [0]
set tcp.solo fish{0}&chips{0} [0 0 40 40 0 0 0 0] [0 0 10 10 0 0 0 0]
. . .will use the smaller button size when width is less than 300 and height is less than 100 . If either width or height are above those values, the big button will be used .
Note that the AND operator is ‘bitwise’ , meaning the AND is performed on corresponding bits . So, the above still works if the values are changed to:
set fish w<300 [21] [0]
set chips h<100 [31] [0]
set tcp.solo fish{0}&chips{0} [0 0 10 10 0 0 0 0] [0 0 20 20 0 0 0 0]
. . .because ‘21’ and ‘31’ have a match in corresponding bits - the ‘1’ .
Again, please please remember that the operands (the things you are comparing) must be either a constant value, or a scalar value . Shall I say it again? ;)
� ‘Always’ Comparisons
As explained, if you do not provide sufficient information for WALTER to know what do in in all circumstances, Reaper will fall back to its defaults . If you inspect some of the secondary layouts of the default_layouts .txt (see “Appendix 3 - default_layouts .txt” on page 46 ) you will see statements such as this:
set mcp.meter ?1 [0 120 20 60 0 0.5 0 1.0]
set mcp.recarm ?1 [0 177 20 20 0 1.0 0 1.0]
The ?1 in those statements is an ‘always’ comparison; a question phrased to always return a yes answer ‘1’ . They are necessary, in this case, because those statements have a default logic that would not otherwise be overridden . “But wait!” I hear you cry, “I put a clear xxx .* at the beginning of my WALTER - doesn’t that mean I’ve cleared all the default logic?” No, it doesn’t . It just means you’ve cleared all the elements . The default logic remains, waiting to help you or trip you up once you add your own elements .
In most circumstances you would be providing your own logic (e .g . putting in a w>blah comparison) somewhere in the statement, and that would tell WALTER that you were taking charge of the logic, thankyouverymuch . But if your statement is very, very simple and something unexpected is happening, you may need to tell WALTER that, yes, you do really mean it to be that simple . An ‘always’ comparison will do that for you . Just put one in and you’ll be telling WALTER “stop being clever, clear the logic and always do this . . . ”
Examples of ‘always’ comparisons, use whichever one you like:
w>0
h>0
?1
!0

WALTER : A themer’s guide Version : 14 July 2012 22
1==1
1!=0
. . .and you can probably think of others .
� Inheriting previously declared values with “.”
The moment you put ‘set’ at the front of your statement, you are telling WALTER that you are now providing the values of that element and that it should ignore the defaults and prepare to overwrite any previous statements where you may have set it . However, if you are happy with most of the result but want to change, for example, the width and bottom edge attachment, then you can put in a placeholder value ‘ .’ which tells WALTER to inherit some of the previously declared values:
set mcp.meter [. . . 60 . . . . 0]
This is particularly useful when you want to make a simple conditional alteration to some values that are the result of a giant complex line of WALTER, by setting the statement a second time and judiciously using the placeholder within it . For more on multi-statement WALTER strategy see “Single Statement or Multiple Statement?” on page 40 .
� Z-order
There may be times when you want to make elements overlap each other (particularly when you start playing with yellow lines; see “Pink Lines, Yellow Lines, WALTER” on page 41) and it is likely you will run into trouble with REAPER’s default z-order, where the element you want in front of another element is actually being drawn behind it . This is solved using the ‘front’ command .
front mcp.width.label mcp.pan.label mcp.recmon
The elements you list in your ‘front’ statement will be drawn in front of any and all other elements, except the meters, and the first element you list will be drawn in front of the second element, which will be drawn in front of the third element, and so on .
The meters, however, are special . Don’t bother trying to front over them, because they aren’t in the same image composition stack (they refresh at a higher rate, to better follow the audio) so are always in front of everything else .

WALTER : A themer’s guide Version : 14 July 2012 23
Part 3 : Special ElementsThe majority of elements are the rectangle based images we’ ve seen so far . But WALTER also has control over other elements that have extended or unique functionality .
� Colours
REAPER theming isn’t just about images, there are also those important ‘code colours’ for elements that REAPER draws itself, such as background areas, indicator lines and text . You set these, as we always have, in the .reapertheme, but now you can also use WALTER to override those colours, as and when you may wish to . WALTER allows you far finer control of exactly which elements receive the colour, rather then many elements sharing a single colour, and you can also change elements’ colours dynamically with conditions and layouts .
The full rundown of which colours WALTER can define is in the sdk . As you look through the sdk , you’ll notice that there are some elements with a .color ending, which need to be either a single or double (depending on the element) block of four numbers defining the RGB value of the colour, and its alpha (transparency) . The number are in the 0-255 range, and should be laid out as follows:
[red green blue alpha]
. . .or, for double value elements like tcp .volume .color (where the first set of numbers define the knob line colour, and the second set define the fader zero line colour):
[red green blue alpha red green blue alpha]
As usual, you only need to provide as many numbers as you actuallly want to change . So, an element might support a double block of four numbers, but if you only want to change the foreground colour, but leave its alpha and anything to do with the background unchanged, its fine to just provide the first three numbers .
TIP If you’ve set a background colour that the sdk says is valid, but you don’t see anything, its probably being overridden by a background image.
Also note that, for some elements, the alpha value is just a placeholder at the moment - alpha transparency is not implemented for all elements .

WALTER : A themer’s guide Version : 14 July 2012 24
� The Extended Mixer
The Extended Mixer is the section of the MCP and MCP master where the Sends, Insert Effects and Parameter Knobs live . WALTER has no direct control over what happens within the extended mixer, but has control over the area the extended mixer appears in, which can either be automatic, or defined by you like any other WALTER element .
The first statement you’ll want to make will be the mode you want the extmixer to use .
set mcp.extmixer.mode [0]
extmixer modes
0 Automatic placement above the MCP panel . Uses the full Panel width and REAPER’s automatic show / hide logic depending on height . This is the mode you will be used to from pre-V4 .
1 Full manual WALTERing of the position, size and edge attachment .
•
Mode 1:Anywhere within the MCP panel, with WALTER’d resizing logic
extmixer, filled with mcp_extmixbg .png
panel, filled withmcp_bg .png
Mode 0:Above the MCP panel, with automatic resizing logic
If you choose mode 0, you are now finished with the extmixer; REAPER will take care of
everything . If you choose mode 1, you need to now provide a new statement where you manually declare the WALTER:
set mcp.extmixer.position [73 65 70 225 0 0 0 1]
The area is then automatically populated by REAPER with the fx list, fx parameter and send blocks as the user creates them . The width of these elements is taken from the width of the area you defined, and their height is taken from the row height of their text - for more see “Modifying Extended Mixer element heights using the .font statements” on page 25
• Force hiding the Extended Mixer
If, for example, your MCP panel is very narrow, you may find that REAPER doesn’t populate it with controls in any meaningful way, and that you’d rather just hide the whole thing . No problem; just put it in mode 1 and tell it not to draw:
set mcp.extmixer.mode [1]
set mcp.extmixer.position [0]
� TCP Parameter knobs
The TCP (track control panel) parameter knobs appear in an automatically populated area within the TCP panel that you manually WALTER .
set tcp.fxparm [179 36 176 26 0 0.5 1 0.5]
You will likely find that setting a huge area for as many parameter knobs as could possibly fit looks very messy and overpowering . For this reason, a predefined variable ‘tcp_fxparms’ is available so you can adjust your WALTER based on how many Parameter knobs the user has actually created, if any:
set tcp.recinput tcp_fxparms>0 [0] [10 60 200 12 0 0 1 0]
Its up to you to decide whether to always show at least one knob, so the user can click an empty knob to create a new parameter knob, or to hide the area until the user has created the knob another way (e .g . in the FX window, or on the MCP .)

WALTER : A themer’s guide Version : 14 July 2012 25
TIP A TCP Parameter knob is a fixed size element. Each knob, including its text areas, is 70x24 pixels.
� Text Elements
NOTE This section contains green highlighted ‘Standard State-ments’ - see “Standard Statements and WALTER Statements”
on page 5
The text elements that you can format with WALTER can be recognised by ending .label in the ‘UI Elements’ section of the sdk . For example, if we define the MCP label:
set mcp.label [0 19 73 18 0 0 0 0]
. . .then that will place the background image, mcp_namebg .png, according to those values . The text that goes over it - your MCP track name - will sit inside an invisible text box with those same coordinates . But that’s unlikely to be ideal; you’ll probably want to pad the text away from the edges and justify it . We can use text margins to do this:
• Text Margins
Here we use mcp .label .margin to push inwards from that bounding box, and center justify the text:
set mcp.label.margin [2 1 2 1 0.5 0.5]
For * .margin on text elements, the first four coordinates represent left, top, right, bottom margins, respectively, and the fifth and sixth coordinates are (where supported) the text’s horizontal and vertical text justification . (0=left,0 .5=center,1=right)
This is most easily understood on text elements that have a background image .
Using the track name to experiment with this is ideal, because if you give your track a custom colour, and set Reaper custom colour only the track name, you’ll be able to actually
see the text’s bounding box since that is the bit that gets custom coloured . Try it!
• Fonts
Fonts, their sizes and stylings are all chosen from the OS and the results are stored in the .ReaperTheme file, and the easiest way to change these assignments is with the theme editor in Options > Preferences . There are numerous font assigments you can make, but sooner or later you will discover that the preset font assignments don’t suit your design and will want some more control, and you’ll be pleased to hear we can override many of them with WALTER; just look for any ‘ .font ‘ entries in the WALTER sdk’s element list .
Of course, WALTER has no way to call up the OS font selector, so this is done within the .Reap-erTheme theme editor, where you will find eight ‘WALTER font’ entries . These are provided so you can set your font settings there, and then link to them from within WALTER, or you can link to use the font selected in the ‘Track title font’ or ‘Volume/pan label font’ entries .
set tcp.trackidx.font [x]
the possible values for x are:
Identifier Font entry used
1-8 ‘WALTER font’ entries 1-8
0 ‘Track title font’ entry
-1 ‘Volume/pan label font’ entry
Note that, since they are full WALTER statements, you can flip between your font entries based on layers and conditionals, for example changing between a number of settings of the same font at different sizes - its not just about using a multitude of fonts at once .
Remember that your users will need to have any fonts you select installed on their system . You can, of course, direct them to download and install the required fonts, but I suggest you don’t have too high an expectation that many of them will actually do so; plan accordingly .
• Modifying Extended Mixer element heights using the .font statements
The extended mixer is auto-populated, so you don’t have any direct control about the vertical size of elements within it, including the individual fx list, fx parameter or send blocks . However, those three elements take their size from the row height of their text fields (one for the fxlists and sends, two for the fx parameters) and you can WALTER each of

WALTER : A themer’s guide Version : 14 July 2012 26
their row heights . This is done with a second entry that is allowed on their .font statements:
set mcp.fxlist.font [x y]
Experiment with different values of ‘y’ to see just how powerful this is!
• Detailed volume text readout formatting
The volume readout on the MCP, TCP and their Masters can be formatted with extra detail that allows you to show or hide parts of the text readout to make best use of the space available .
*_voltext_flags x y
There are four possible settings you can make:• tcp_voltext_flags• mcp_voltext_flags• tcp_master_voltext_flags• mcp_master_voltext_flags
Note the “_” characters in the “_voltext_flags” names, not “ .” characters, because these are base rtconfig settings, they are not WALTER . And because they are not WALTER, you can’t change them with variables or layouts .
The values are:x : text change formatting .y : (optional) intelligent character limiting . REAPER will add and remove decimals to use the number of characters you set here, so a small display can show, for example, both 127 .1 and 0 .001 The x text change formatting is achieved by declaring a single flag that is the sum of all the text identifiers for the combination of changes you want to make . The identifiers are:
Identifier Text Change
1 do NOT show the ‘dB’ legend
2 do NOT show the value with sub-dB precision
4 do NOT show the ‘+’ symbol when the value is positive
8 always show the value with 2 digits of precision
So; decide which text changes you want and sum (that’s ‘add-up’ to you drummers) the corresponding identifiers . The resulting number is your flag . For example:
mcp_voltext_flags 4
. . .would mean that the volume readout text on the MCP panel would not show ‘+15 .0db’ when the fader was set to that value, instead it would show ‘15 .0dB’ . Now a more complex one:
tcp_master_voltext_flags 13
. . .would mean that the volume readout text on the TCP Master panel would not show ‘+15 .0db’ when the fader was set to that value, instead it would show ‘15 .00’, because 13 must mean 8+4+1 .
Note that if you set identifiers 2 and 8 at the same time, you won’t get any cake .
�Volume Control
The volume fader is a non-stretching ‘faderthumb’ image that moves inside a WALTER defined .volume area, which has a code-drawn zero line and can be filled with a ‘vol_bg’ image . It can be a knob instead, if you like, and then it uses either a static large or small blank knob image that is overlaid with a code pointer line .
Have another look at the section on “Colours” on page 23 to find out how to set the zero line colour and knob line colour .
Note that the faderthumb uses a different (legacy) method of pink line to define its active area . For more on pink lines, see “Pink Lines, Yellow Lines, WALTER” on page 41 and the ‘power of pink’ document .
• Fader or Knob?
By default, WALTER will change from showing a fader to a knob automatically, depending on the available space and the size of the faderthumb image . You will likely find it most predictable to override the default behaviour by defining which one you want manually using * .* .fadermode:
for a fader:

WALTER : A themer’s guide Version : 14 July 2012 27
set mcp.pan.fadermode [-1]
for a knob:set mcp.pan.fadermode [1]
If you want to use the automatic behaviour, you’ll need to understand it, and to understand it you’ll need to be cleverer than me! Thankfully, Bernstraw is, and he has unravelled the riddle of the faders, as he explains here:
Bernstraw Explains: I’ve determined that behaviour empirically, and it’s actually pretty simple or at least very logical :
The max values are :w_max = 4/3 of the width of the horizontal thumb (tcp_volthumb.png)h_max = 4/3 of the height of the vertical thumb (mcp_volthumb.png or tcp_volthumb_vert.png if present)
So, by default WALTER will display a knob :if (w < w_max) AND (h < h_max)or if (W_max < w < h < h_max) : w is higher than w_max but WALTER can’t display a horizontal fader since w < hor if (h_max < h < w < w_max) : h is higher than h_max but WALTER can’t display a vertical fader since h < w
Example :width of tcp_volthumb.png (minus the pink lines of course) = 23, then w_max = 30.66height of mcp_volthumb.png (or tcp_volthumb_vert.png) = 31, then h_max = 41.33
* You can see here that the size doesn’t need to be a square :set tcp.volume [0 0 30 41] will display a knob since (w < W_max) AND (h < H_max)
* You can also understand the paradoxal fact that a smaller size can display a fader, a bigger a knob :set tcp.volume [0 0 40 41] will display a knob since (W_max < w < h < H_max).set tcp.volume [0 0 31 30] will display a fader since none of the requirements are met.
Awesome work that man! I’ll stick to the * .* .fadermode, though, I think ;)
• Large Knob or Small Knob?
Settle down . Reaper will resize your knob image to fit the area you assign it with WALTER, which will probably look a bit nasty, so you’ll no doubt want to set the WALTER size to fit the image size . Thankfully there are two images (for example, on the mcp volume they are mcp_vol_knob_large .png and mcp_vol_knob_small .png) and REAPER will choose which one to use based on the draw size you set in your WALTER:
The small knob image if the size is 28px or less :set tcp.volume [x x 28 28 x x x x]
The large knob image if the size is 29px or more :set tcp.volume [x x 29 29 x x x x]
• Finessing the knob size and the length of the pointer line
The pointer line is a code line drawn at a length that REAPER deems to be approriate to the size of the knob . Once you’ve mastered the use of yellow lines, you can make the knob visually appear to be a different size to the user, since the size you WALTER (and therefore choose which image is used) is merely the active area of the image that is drawn . Similarly, you can change the length of the pointer line by telling REAPER that you are drawing a knob of the appropriate size for the length of line you desire, but set up your image so that the visual size is, in fact, something different .
Alas! An unfortunate side effect of this trick becomes apparent when the knob is automated . REAPER draws a code colour overlay to indicate automation modes, and it does this based on the size it thinks the knob is . If you have fooled it, so that you can change the pointer length or do an image swap, REAPER still doesn’t know that when it draws the overlay, so the combination of knob and overlay may not look optimal . I am afraid that, for now, you must just choose whichever compromise offends you least, and buckle in for some user complaints .
For more on yellow lines, see “Pink Lines, Yellow Lines, WALTER” on page 41
� Pan controls
There are two pan controls in REAPER, and their behaviour is very similar to the volume control . They will swap from fader to knob, and from big knob to small, in the same way . If a fader is set, it uses a non-stretching ‘panthumb’ image and coloured zero line . If its a knob, the same pointer techniques apply .
• Pan Modes
The user can choose which track pan mode to use in their project on a per-track basis, or for the whole project, so your theme should be tailored so it works well in all 3 modes . The predefined WALTER variable ‘trackpanmode’ can be used so you can change or arrange your

WALTER : A themer’s guide Version : 14 July 2012 28
design depending on what pan mode the user has chosen . The flags for trackpanmode are:
Flag Selected pan mode
1, 2 or 3 Default stereo balance / mono pan
4 or 5 Stereo pan (pan & width)
6 Dual Pan (Pan Left & Pan Right)
So, we can use that variable within our WALTER however we choose . Here, I use it to make the solo button appear only if the ‘Stereo Pan’ mode is chosen:
set tcp.solo trackpanmode==5 [10 10 10 10 0 0 0 0] [0]
. . .though of course most of the time you’ll be using it to make changes in the pan control elements such as tcp .pan .
• Hiding the redundant Width control
If you only WALTER the default single pan control, REAPER will help you out by squeezing two controls into the space of one when the user asks for them, and you probably won’t like how that looks . You can override this behaviour by manually declaring, and then hiding, the width control when it is redundant because the default mode is chosen:
set tcp.width trackpanmode>=4 [6 86 18 18 0 0 0 0] [0]
TIP In dual pan mode, the pan control acts as the Pan L control (put it on the left if its a knob!), and the width control acts as the Pan R control.
Have another look at the section on “Colours” on page 23 to find out how to set the zero line colour and knob line colour .
• Trick : Combined arts
There are three forms these controls can take (big knob / small knob / fader) and three pan modes . This means you can yellow line a background for your pan area that is appropriate for the mode by using a different pan form for each of the modes, for example:
set mcp.pan trackpanmode<4 [big knob] trackpanmode==6 [small knob] [fader]
Get your backgrounds looking correct for each mode, and then drop in the width knob and text elements to suit, with similar mode WALTER .
�Knob Stacks
A basic REAPER knob is a static image of a knob, over which the code line is drawn to display position . The advantage of these knobs is they have a low memory footprint and essentially infinite resolution . However, if you wish you can use a ‘knob stack’, which is a frame-by-frame animation of discrete positions of the knob, for far greater design freedom . Use enough frames to ensure that the knob movement feels smooth in use, but no more or you’ll just be bloating your users’ systems .
Note that the term ‘knob’ is used here, but you can really draw whatever you like . The defining principles are that any part of the knob controls its movement (unlike a fader where you must click the fader itself ), and that it responds using REAPER’s knob behaviour where dragging the mouse up/right increases value, dragging down/left decreases it .
Your first frame will be the lowest value of the knob . You can then continue adding frames below (if you’re making a stack) or to the right (if you’re making a strip) till the last frame, representing the highest value . Align your knob_stack image as a stack or a strip, however you like, REAPER will figure out what you meant from the aspect ratio . From here onwards, I will be describing the creation of a stack; the same methods apply for a strip, but the axes are flipped .
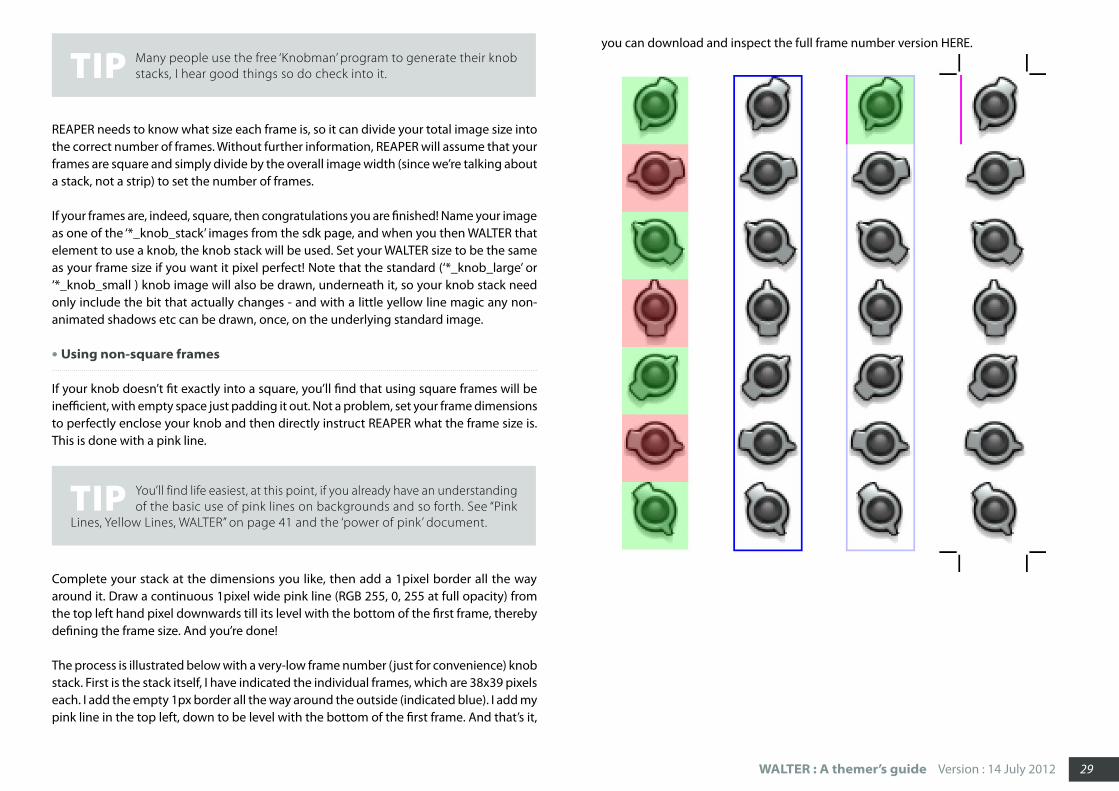
WALTER : A themer’s guide Version : 14 July 2012 29
TIP Many people use the free ‘Knobman’ program to generate their knob stacks, I hear good things so do check into it.
REAPER needs to know what size each frame is, so it can divide your total image size into the correct number of frames . Without further information, REAPER will assume that your frames are square and simply divide by the overall image width (since we’re talking about a stack, not a strip) to set the number of frames .
If your frames are, indeed, square, then congratulations you are finished! Name your image as one of the ‘*_knob_stack’ images from the sdk page, and when you then WALTER that element to use a knob, the knob stack will be used . Set your WALTER size to be the same as your frame size if you want it pixel perfect! Note that the standard (‘*_knob_large’ or ‘*_knob_small ) knob image will also be drawn, underneath it, so your knob stack need only include the bit that actually changes - and with a little yellow line magic any non-animated shadows etc can be drawn, once, on the underlying standard image .
• Using non-square frames
If your knob doesn’t fit exactly into a square, you’ll find that using square frames will be inefficient, with empty space just padding it out . Not a problem, set your frame dimensions to perfectly enclose your knob and then directly instruct REAPER what the frame size is . This is done with a pink line .
TIP You’ll find life easiest, at this point, if you already have an understanding of the basic use of pink lines on backgrounds and so forth. See “Pink
Lines, Yellow Lines, WALTER” on page 41 and the ‘power of pink’ document.
Complete your stack at the dimensions you like, then add a 1pixel border all the way around it . Draw a continuous 1pixel wide pink line (RGB 255, 0, 255 at full opacity) from the top left hand pixel downwards till its level with the bottom of the first frame, thereby defining the frame size . And you’re done!
The process is illustrated below with a very-low frame number (just for convenience) knob stack . First is the stack itself, I have indicated the individual frames, which are 38x39 pixels each . I add the empty 1px border all the way around the outside (indicated blue) . I add my pink line in the top left, down to be level with the bottom of the first frame . And that’s it,
you can download and inspect the full frame number version HERE .

WALTER : A themer’s guide Version : 14 July 2012 30
• Making an inactive border
You’ll notice in the example knob stack that there is an area where the knob never actually is; its just where the shadow goes . In situations like this the whole drawn area will act as the knob, even though in the mind of your user it isn’t . In many cases this will seem very odd, but if you’ve already mastered the use of yellow lines on other images, you can use the same techniques with your knob stack to define an ‘active area’ that actually responds as being the knob itself, with the outside area being an inactive border of shadow or other non-interactive element .
You need to have a functioning pink line if you want REAPER to obey the yellow lines . Place your yellow lines over the pink, within the 1px border you made, in the top left of the first frame, and in the bottom right of the last frame . The area bounded by yellow will be your inactive border . Save and test; depending on its design your knob may now behave in a more ‘as expected’ way . You can download and inspect the yellow line version of the test knob HERE .
Note that when WALTERing your yellow-lined knob, the area you define as your size should be the active area, NOT the total frame size .
�Meters
Most WALTER extends and controls the standard elements, but with the meters a whole new solution is available exclusively via WALTER . Familiarise yourself with the ‘Meters’ section of the sdk images page, where the cast of image components are listed:
http://www .reaper .fm/sdk/walter/images .php
• Meter Backgrounds
The background (‘bg’) images sit at the back of the meter . The meter area you define in WALTER is the area that REAPER automatically populates with all the meter elements, and this is the area your bg image will cover . There are two sets of background images, you can choose to use whichever one makes sense in your design, or you can use both:
1. Location Backgrounds
meter_bg_tcpmeter_bg_mcp
meter_bg_mcp_master
If you provide these images, REAPER will use the appropriate bg for its named panel . So, whether your meter is horiontal or vertical, the TCP will always use meter_bg_tcp if you have provided it . Note that with these backgrounds you can use yellow lines to push the bg outside the WALTER’d area, for example to create a border . (For more on yellow lines, see “Pink Lines, Yellow Lines, WALTER” on page 41 .)
2. Aspect Backgrounds
meter_bg_v meter_bg_h
The meter that is shown at any time is determined by its aspect, so a tall thin meter will appear as a vertical meter, while a short wide meter will appear as a horizontal meter . If you provide these background images, the corresponding background image for the current aspect of the meter will be used . Note that these images are drawn over the location backgrounds (z-ordered in front), and do not support yellow lines .
You might use both sets of backgrounds if your design requires you to have a panel specific detail in a yellow line border area of the meter, but also need the area behind the meter strips and in the divisions to change when you WALTER an aspect change from horizontal to vertical . But, in practice, you may find you only need to provide the location backgrounds, which is both fine and efficient .
• Strips
The most fundamental element of the meter is a strip image, which determines the colour of each and every meter strip . There is an image to be used on a vertical aspect meter (meter_strip_v), and one for a horizontal aspect meter (meter_strip_h) . Each image has eight colums/rows so you can determine the colour of each meter strip in various conditions:

WALTER : A themer’s guide Version : 14 July 2012 31
a. Unlit. The background of the strip .b. Lit. Will be swiped over to indicate signal .c. Clipped Unlit. The background of the strip, when the channel has clipped .d. Clipped Lit. Will be swiped over to indicate signal, when the channel has clipped .e. Armed Unlit. The background of the strip, when the channel is armed .f. Armed Lit. Will be swiped over to indicate signal, when the channel is armed .g. Armed & Clipped Unlit. The background of the strip, when the channel is armed
and has clipped .h. Armed & Clipped Lit. Will be swiped over to indicate signal, when the channel is
armed and has clipped .
For a stereo track the strip will be used twice, but if the track has 8 channels there will be eight of them, and its going to undergo some heavy automatic transformations as REAPER squashes it to fit all those meter strips in, so keep your image simple . Pink lines are not supported .
TIP Leave out the strip images if you want to set colours in .ReaperTheme code, which also allows your users to change them in the theme editor.
When REAPER auto-populates your meter strips, it needs to divide the area you have defined by the number of track channels the user has set, and place a border between each strip . This could result in a non-integer number of pixels, so REAPER needs to do some tweaking to fit the strips to the space . Use WALTER to indicate how you’d prefer this to be done, and REAPER will attempt to follow your preference when it can:
set <panel name>.meter.vu.div [x y]
x : First value is the division you prefer between channels, in pixels .y : Second value is the flag for the channel spacing logic you want used in situations where REAPER needs to finesse the widths of the divisions and/or strips to make things fit .
Flag Channel Spacing Logic
0 Put all make-up space in the middle of the meter
1 Center the channels
-1 Even sizes & divisions, may result in an offset
-2 Uneven sizes - will stretch some channels to fill gaps
• Clip Indicators
The clip indicators will use images if you provide them . They are auto-populated into the meter, taking a proportion of the meter width/height that is decided by REAPER .
The images (which can use pink lines) should be formatted like this:
• meter_clip_h : unlit frame on the left, with the lit frame on the right .• meter_clip_v : unlit frame on top, with the lit frame beneath it .
• RMS Meters on the MCP Master
The RMS meter on the MCP master uses its own strip image (meter_strip_v_rms) which is formatted the same as the standard vertical meter strip . It has its own image for its clip area (meter_clip_v_rms) and, in addition, an image for the ‘RMS good’ area that is drawn between the strip and the clip indicator (meter_clip_v_rms2) .
The strips are auto-populated into the meter area that you WALTER, as before, though there is a second div statement that you can use to finesse the appearance of the RMS strips:
set master.mcp.meter.vu.rmsdiv [x y]
x : First value is the division between RMS and normal channels . y : Second value adjusts the RMS area size when the user has set rms+peak mode .

WALTER : A themer’s guide Version : 14 July 2012 32
• The Other Indicators
These are little detail elements that provide extra information to your user about the status of the track, replacing the text you will get if you don’t proide them . They are not, per se, meter elements, but they appear within the meter as explanation for those moments when the user looks at the meter expecting to see activity, but there is none .
• meter_mute : track is muted• meter_automute : track (master) has been automatically muted due to excessive
level, to protect your speakers / hearing / feelings from the clipping .• meter_unsolo : one or more other tracks is solo’d, but not this one .• meter_solodim : one or more other tracks is solo’d, but not this one, and dim has
been activated .• meter_foldermute : track is in a folder, and its folder parent has been muted .
These images can use pink lines, though the current implementation means that they will never stretch so the pink lines are superfluous . Take care to size your images so they fit on the smallest meter you will be using .
• Meter Code Colours
REAPER draws text and code lines over the meters if there is room, and you have fine WALTER control over the colour and transparency of each of them, which you can set for each of tcp, master .tcp, mcp and master .mcp .
Let’s look at the readout text, which shows the peak value reached . Because this lies over the clip image (more or less) you have control over its colour and shadow both in its normal and clipped states .
set <panel name>.meter.readout.color [x y]
x : First value is the colour of the text, with alpha . y : Second value is the colour of the text’s shadow, with alpha .
The scale division lines, and their little text labels, and treated as one element, and you can apply a gradient across that whole element by assigning colour and alpha for each end of the gradient . They are named ‘top>bottom’ to describe the vertical gradient applied to a vertical meter; if your meter is horizontal then the gradient will be too, using the ‘bottom’ values for the left and the ‘top’ values for the right of the gradient .
set <panel name>.meter.scale.color.unlit.top [a b]
set <panel name>.meter.scale.color.unlit.bottom [c d]
set <panel name>.meter.scale.color.lit.top [e f]
set <panel name>.meter.scale.color.lit.bottom [g h]
a : Colour and alpha of the top of the gradient when unlit . b : Colour and alpha of the top of the gradient’s shadow when unlit . c : Colour and alpha of the bottom of the gradient when unlit . d : Colour and alpha of the bottom of the gradient’s shadow when unlit . e : Colour and alpha of the top of the gradient when lit . f : Colour and alpha of the top of the gradient’s shadow when lit . g : Colour and alpha of the bottom of the gradient when lit . h : Colour and alpha of the bottom of the gradient’s shadow when lit .
You probably would have figured all that out yourself, just from the names in the SDK .
Because the MCP Master has RMS meters, it also has an RMS readout, which you can use WALTER to colour independently, as follows:
set master.mcp.meter.rmsreadout.color [255 255 255 150]
If the meter is big enough to fit it, and the user has ticked ‘Show track input when record armed’ in the REAPER preferences (Options > Preferences > Appearance > VU Meters/Faders), then an input selector will be drawn over the meter . Two WALTER settings are available:
set <panel name>.meter.inputlabel.color [255 255 255 150]
. . .sets the colour of the input selector text, with alpha .
set <panel name>.meter.inputlabelbox.color [x y]
. . .sets the colour of the input selector box;
x : First value is the colour of the fill, with alpha . y : Second value is the colour of the border, with alpha .
• Meter Overlays
The meters can, optionally, have an overlay image, which is a semi-transparent image that is placed over all the other elements of the meter . These can use pink lines, and are your

WALTER : A themer’s guide Version : 14 July 2012 33
means for all manner of glass / glow / mask effects you may wish to use . The overlay image that is chosen in each circumstance is chosen by REAPER in the same way as the choice of meter background image, so make sure you have read and understood their instructions (see “Meter Backgrounds” on page 30) and perhaps experimented with them .
Note that all these overlays are special meter elements, not standard _ol overlays, so they ignore the ‘use_overlays’ rtconfig switch .
1. Location Overlays
meter_ol_mcp meter_ol_tcp meter_ol_mcp_master
REAPER will draw one of these images, if provided, according to the same criteria as its use of the location backgrounds, and like them can also use yellow lines to extend outside the meter area .
2. Aspect Overlays
meter_ol_v meter_ol_h
REAPER will draw one of these images, if provided, according to the same criteria as its use of the aspect backgrounds . They are limited to the meter area .
• Meters and z-order with non-meter elements
No doubt you will have enjoyed using the ‘front’ command to tweak the z-order of elements . You will have done things like put one button behind another, and a label in front of them both .
You will not be doing that with the meters.
Everything that exists inside the Meter area (that being the area that you WALTER for the meter) is in front of all of the other elements, and you cannot front other elements over that sacred rectangle . This is because the meters are redrawn at a higher rate than the rest of the interface, so the area where the redraw goes on is special .
An exception to this rule is the location-based backgrounds such as meter_bg_tcp .png, if
you have used the yellow lines to push part of them outside the meter area . Those parts that are outside the meter area are no longer special, so you can indeed front standard elements over them . . .but it will only work over the parts that are outside .

WALTER : A themer’s guide Version : 14 July 2012 34
Part 4 : ArrangementOnce you have a well WALTER’d panel, you will want to control how and when that panel appears, and how it responds to things like track hierarchy . Then you can create alternative panels for the user to choose from, using layouts .
� TCP Folder Margins
NOTE This section contains green highlighted ‘Standard State-ments’ - see “Standard Statements and WALTER Statements”
on page 5
The TCP visually represents the folder hierarchy of your users’ project by indenting the contents of each panel for each level of the hierarchy .
• tcp_folderindent
In its most basic form, this indenting is a horizontal offset that is overlaid with the three folder images (folder_start .png, folder_indent .png, folder_end .png) . WALTER can be used to overide the default offset if you want to make your indents a different size:
tcp_folderindent 20
Note that tcp_folderindent offsets the contents of the panel, not the panel itself . If you want to fake the appearance that the panel bg image has been offset, do so using the folder_indent image .
• tcp_margin
Because the folderindent is tied to the indent images, and also quite inflexible, if you have a more sophisticated hierarchy indication in mind you will be glad to know that you can, if you wish, also use the much more powerful tcp_margin .
tcp.margin [15]
The tcp_margin is simply added to whatever position the folderindent results in . So, in the above example, a track would receive as many multiples of 20 pixels as it is levels deep in the folder hierarchy, plus a single additional offset of 15 pixels . Not very interesting!
However, it really comes into its own when combined with some variables, for example the ‘folderdepth’ and ‘maxfolderdepth’ predefined variables (see “Appendix 2 - Predefined Variables” on page 46 .)

WALTER : A themer’s guide Version : 14 July 2012 35
• Example : line ‘em up with tcp_margin
Lining up elements in the TCP has some nice micro-workflow advantages for you users, so when the run their mouse up and down the TCP its always the same button that falls under the pointer, and they are able to judge relative levels from track to track for things like meters and faders . However, REAPER will by default always try to make use of any available space, so varying levels of folder hierarchy will result in varying positions of left attached elements . We can change that with WALTER:
tcp_folderindent 13
set tcp.margin +:folderdepth:1 [-13 0 0 0]
set tcp.margin +:maxfolderdepth:1 [13 0 0 0]
Line 1 - For each hierarchy level, all the panel elements are going to get pushed right by 13 pixels, and that is the space that will be filled with the folder_indent images .
Line 2 - We ‘ve got our folder_indent images from statement 1, now statement 2 undoes the bit we didn’t want , all the element movement, by pushing all the panel elements to the left by 13 pixels for each hierarchy level (folderdepth multiplied by -13) .
Line 3 sums with Line 2 and now moves all the panel elements on each track, no matter what its folder hierarchy level, all the way right by enough to get clear of any and all folder_indent images, that being 13 pixels multiplied by the maximum folder hierarchy depth for the whole project .
� TCP Minimum Size
Recall that one of the first things we looked at was tcp .size :
set tcp.size [258 72]
. . .and that its values were of crucial importance to you, the themer, but made no noticeable effect to the users of your theme? Well, if we wish, we can complicate that by also setting a minimum size for the tcp in that statement .
You don’t need to set a minimum size, because by now you’ll know how to show and hide elements depending on width and height variables, so you could, for example, just progressively hide more and more of your elements as the TCP’s width is reduced, until they are all hidden as the width approaches zero . Good for you; that’s a lot of WALTER to
write, but its simple WALTER and its offering a lot of flexibility to your users . Nice .
But if your design becomes somewhat meaningless at very low width or height, or perhaps your panel background image has details that stop making sense when stretched that small, then the minimum size values are going to be your friends . Simply add them, as minimum width then minimum height, after the size values:
set tcp.size [258 72 100 25]
What would happen with that statement is this: as the user reduced the width of the TCP below 100px, the stretching and repositioning behaviour would stop, and all your WALTER would behave as if the width remained at 100px . Reaper would, instead, crop the entire panel along from the right hand edge . So, if the user set the width at 90px, then the right hand 10px of your panel (including all the buttons, faders and other elements) would be cropped off .
• The toosmall Images
You may optionally provide toosmall images to be placed along the inside of the horizontal and vertical cropping edges, which will appear whenever the size is below your defined minimum sizes, and therefore cropping is occurring . These images are automatically stretched to fill the entire cropping edge .
� TCP Heights
NOTE This section contains green highlighted ‘Standard State-ments’ - see “Standard Statements and WALTER Statements”
on page 5
The tcp_heights gives you control over the height your TCP track takes in various circum-stances .
tcp_heights a b c d
The four values are: a : Supercollapsed - the height of any track that is inside a folder, when the foldercomp

WALTER : A themer’s guide Version : 14 July 2012 36
button has been pressed twice . b : Collapsed - the height of any track that is inside a folder, when the foldercomp button
has been pressed once . c : Small - one size above minimum size when doing cntrl+shift+up . d : Recarm - height of a record armed track .
I recommend that you follow the convention of these settings ascending in size, to avoid unexpected behaviour when using the TCP’s ‘cntrl+mousewheel’ resizing functionality .
TIP For the ‘recarm’ height to be functional, you (and your users!) must have ‘always show full track control panel on armed tracks’ ticked in
Options > Preferences > Audio > Recording.
�MCP Minimum Height
You can set a minimum height below which the MCP will not stretch, for example if your layout doesn’t make sense below a certain level . This can also solve the problem for users who get upset that if they stretch the MCP very small, the MCP becomes very small . Yes, these people really do exist, though how they manage to get the correct shoe on the correct foot will, alas, remain a mystery!
mcp_min_height 230
mcp_min_height is used to set this height in pixels . If your extended mixer is in mode 0, the height is shared with the extended mixer . Because it is not WALTER, you cannot set a different mcp_min_height for each Layout, which if you think about it makes sense to a degree because MCP layouts need to coexist . What’s a layout, you’re wondering? Glad you asked . . .
� Layouts
Multiple layouts can be defined for the TCP, TCP Master, MCP and MCP Master . A layout can completely redefine the entire WALTER for a panel, or just tweak one element; its up to you . When you set an element within a layout, the layout is automatically added as an entry to the global and per-track layout menus that contain that element . So, for example,
if you add a set mcp .solo statement, the layout becomes available in the MCP layout submenus . If you then add a set tcp .mute statement, the layout also becomes available in the TCP layout submenus .
Layouts should be used as alterations of your default WALTER . So, define your defaults first, then add a layout underneath, like this:
Layout “Layout Name”
; insert WALTER here
EndLayout
Now any WALTER you put in the middle will override your default WALTER when the user chooses that layout . Position, size, edge attachment, margins, colour . . .you name it . If you can WALTER it, you can change it with a layout!
You can organise your WALTER so that your layouts are laid out by section, or you can define your entire default WALTER first, and then put your layouts underneath . It really doesn’t matter as long as you define you defaults first . So:
set default MCP stuff
Layout “my awesome layout”
set layout’s MCP stuff
EndLayout
set default TCP stuff
Layout “my awesome layout”
set layout’s TCP stuff
EndLayout
. . .is the same as . . .
set default MCP stuff
set default TCP stuff
Layout “my awesome layout”
set layout’s MCP stuff
set layout’s TCP stuff
EndLayout

WALTER : A themer’s guide Version : 14 July 2012 37
Remember that layouts are an alteration of the default layout, so any element that you do not define in your layout will just stay how it is in your default . So, for example, a layout that just contains a single WALTER statement telling the mcp .mute to be one pixel smaller than it is in your default, will look and behave exactly like your default . . .but with a 1px smaller mute button . On the other hand, you could go as far as to redefine every single element in your new layout . The choice is yours .
� Layouts and Images
When you define a layout, you can also tell it to use its own images by pointing to a subfolder within your theme folder where you have placed some alternate images . Like this:
Layout “my awesome layout” “awesome_images”
; some WALTER here
EndLayout
Now, when you define an element within your layout, REAPER will look in the folder “/awesome_images” to see if the image for that element is there . If it finds it, it will use that image; if not, it will use your default image from the root folder .
Although you need to define your element within the layout so that the alternate image is used, you don’t actually need to re-enter all the WALTER if you don’t want to change anything other than the image . Just direct the element to use the WALTER you have already entered in your default, like this:
set tcp.solo tcp.solo
This also means that if you edit your default WALTER for that statement, you don’t need to remember to make the same edits within the alternate layouts .
Now, two very important things about using subfolder images:
• Don’t be silly and go mad with the resources
Your REAPER theme does not exist so you can steal lots of your users’ resources with an endless array of images . In fact, with careful WALTER it is actually possible to make themes that are far more resource efficient than themes from V3 and earlier . You may decide you want to do different background images for each and every layout, perhaps so you can
drop in little design details, and just make new images for everything that appears at a different size rather than using the stretch capabilities . . .you have the power to do all this, but think twice before you do; service your users not your own whims . A great big slug of a theme should not be necessary!
Notice that you can use the same image subfolder for any numer of different layouts, each layout does not need its own dedicated subfolder .
• If you’re using overlays, remember they belong to a parent image
If you don’t know what overlays are, you need to read the ‘Power of Pink’ document . In that, you will have read that overlay images belong to a parent image . So, “mcp_io_ol .png” exists relative to its parent “mcp_io .png” . When working with layout folders, this relation-ship is maintained and therefore if you have an overlay image in a layout subfolder, you need to provide the parent image in that same subfolder . If you don’t, REAPER will look for the parent image, not find it, and so use the root folder’s image and its overlay, if it has one, and if it doesn’t it will use none .

WALTER : A themer’s guide Version : 14 July 2012 38
part 5 : StrategyKamchatka to Alaska with my entire army .
� Start with simple WALTER
If your goal is to edit someone else’s WALTER, you’ll need an understanding broadly similar to that of the person who wrote it . This is a terrible way to start learning WALTER, and will most likely prolong your impression that its much more complex than it actually is, possibly to the degree that you just give up . Personally, I also much more difficult to edit WALTER than to write it in the first place .
Start with a blank panel . WALTER a single static button . Now make it move or stretch as the panel size changes . Congratulations, you have learnt the majority of the WALTER you will use from now on!
�Know some basic theming
If you’ve not done any REAPER theming before Version 4, you’re very fortunate because you are starting at a time where its likely that many of the design ideas you have will be possible . Previously, REAPER theming was mostly an exercise in knowing all the fixed limitations, contradictions and constraints within the system, and coming up with the best design you could that worked within them .
. . .BUT . . .
The old theming system is still the core of a theme, WALTER merely extends, amends and overrides it . So you still need to know a bit about it . Take some time to pick apart a V3 theme and see what goes where and how elements are defined . See how absent MCP images are inherited from their TCP equivalents . Take note of some of the inconsistencies that are with us, for example how some TCP images are named ‘tcp_***** .png’ and others are named ‘track_**** .png’ . This is required knowledge because these quirks are required for pre V4 themes to be functional within V4 .
Once you have an understanding of how a basic theme works, you are ready to start beating it with the WALTER hammer .
I know you’re going to ignore all this and just dive in, but I had to try ;)

WALTER : A themer’s guide Version : 14 July 2012 39
� Experiment & Dissect
Do not, for one moment, make the mistake of thinking that anyone knows the full range of neat things that can be done with WALTER . Its gloriously open-ended, and therefore a tool for creativity and innovation . I’m not going to extend this document into a step by step guide tutorial for achieving each and every result you might wish for because:
1 . I have a thousand theme ideas of my own I want to go and work on!2 . Such a document would be almost infinitely long . . .3 . That would divert you from the point: you won’t get far with WALTER by learning how
to do things . You need to learn how WALTER works . It is then that you can be creative with it .
I know its tempting to be goal-oriented and ask as many questions as you need to achieve the results you want in the theme you are working on . And that’s fair . But please try to experiment instead; WALTER is simpler than it looks . The answers you seek can all be found by experimentation, and if you’ve seen a theme where someone’s is doing what you want, take it apart and see how it works . Dissecting someone else’s WALTER isn’t always easy, but its the greatest resource available .
�Working in ugly colour blocks
I STRONGLY recommend you do your experimentation with blocks of bold, ugly colours .
Make a button or other element that is a bright red square with no borders, and another that is bright green . Maybe make them 50% opacity so you can see when they overlap . Make an empty panel with WALTER and drop these two in, and you have a perfect test bed for experimentation . Play with location, size, stretching, relative positioning, inherited variables . . . any aspect of WALTER that you feel you’re not understanding fully .
Doing it this way frees you from confusion caused by any transparent borders, stretched element distortion, contrast loss or indistinct image edges, so you really are just seeing the raw element rectangle that WALTER is drawing . Get your clever WALTER trick right this way, and then replace your ugly blocks with the real images .
A good proportion of WALTER problems people have asked me about would be clear to them without anyone’s help if they had worked their WALTER in ugly colour blocks first . Trust me, and try it!
�Have a plan, and a well chosen panel size
You will recall the talk of tcp .size and its importance . This reference size has equivalent definitions on the the other panels (mcp .size, trans .size) and choosing this size well, and having a good reason for the numbers you choose, is critical for maintaining clarity, under-standing and predictability as you write your WALTER .
If you ignore any of the the other bits of advice I’ve given, fine, but don’t ignore this one:
Have A Plan.
The easiest way to plan your panel is to do a graphic mockup of how your panel should look at a size where all the elements are visible . Make sure everything fits and that you haven’t missed out any elements you might decide to add later . From the mockup you can then measure your reference size for the panel , which will be the outer dimensions of the mockup, and all the locations for your elements, which will be measured from the top left corner of the mockup .
Next, and this is the important bit, you make a copy of that plan for when things have changed . If you decide that, when the height is low, some buttons will disappear and other buttons will move into their place, do that on the plan . Move those buttons . But the overall size of the mockup stays the same, because it is the reference size .

WALTER : A themer’s guide Version : 14 July 2012 40
For example, in a low height MCP situation, you’ll end up with your mockup having the top edge attached elements pushed to the top, bottom edge attached elements pushed to the bottom, and full stretching elements like faders running across a big gap . Your mockup will no longer look like what you see in REAPER; that big mockup gap will not be there in REAPER, because that is the bit that has been squashed out . So measuring things from REAPER won’t be very helpful, only the mockup will allow accurate measurement . You’re glad you have it now, right? :)
� Formatting for readability
When you are writing your WALTER, there are some things you can do to make it all a bit less visually confusing .
• WALTER ignores tabs and empty lines, so you shouldn’t
You can make good use of your tab and return keys to make your WALTER more readable, particularly if you’re making a long sprawling rtconfig filled with lots of layouts . Because they have no function within WALTER, this is all for the benefit of your future self .
; Here’s the first row stuff
set tcp.trackidx [one]
set tcp.trackidx.margin [two]
set tcp.trackidx.font [three]
set tcp.trackidx.color [four]
set tcp.label [five]
set tcp.label.color [six]
• Split statement into multiple lines with \ backslash
You can use backslash at the end of a statement line to tell WALTER that you’re not finished and will be continuing that statement on the following line . At the penalty of making a busy rtconfig into quite the scroll-fest, this can yield huge rewards in the human readability of complex nested statements .
Consider the following example; its a single statement of tcp .solo . By using multiple lines its much easier to decipher at a later date - we start with a recarm question . The two answers both start with a height question, and for each of their answers there is a width
question; its quite the rats nest! But if you are looking for the settings for a record armed track who’s height is greater than 50px and width is less than 100px, its easy to jump to the correct answer (which is ‘three’) .
set tcp.solo ?recarm \
h<50 w<100 [one] [two] \
w<100 [three] [four] \
h<50 w<100 [five] [six] \
w<100 [seven] [eight]
� Single Statement or Multiple Statement?
Its very pleasing to get all your WALTER for an element in a single statement, with all possible contingencies covered . However, sometimes it makes sense to define using muliple state-ments . The important thing to note is that the lower statement, if it is meaningful, takes precedence . Observe this solo button, which changes based on height:
set tcp.solo h<50 [one] [two]
Its going to change from values ‘one’ to values ‘two’ when the panel height goes above 50px . Now let us imagine we want it to change based on width as well, at each height . Easy:
set tcp.solo h<50 w<100 [one] [three] w<100 [two] [four]
That’s still manageable, fair enough . We can spoil that! Now imagine we want to change them all when the track is record armed . Deep breath, here we go . . .
set tcp.solo ?recarm h<50 w<100 [five] [six] w<100 [seven] [eight] h<50 w<100 [one]
[three] w<100 [two] [four]
(please excuse the line wrap, that’s all one WALTER statement .)
At this point you might decide to go to multiple statements, so the recarm activity takes place in the second statement :
set tcp.solo h<50 w<100 [one] [three] w<100 [two] [four]
set tcp.solo ?recarm h<50 w<100 [five] [six] w<100 [seven] [eight]
If the track is record armed, here’s what WALTER is thinking:

WALTER : A themer’s guide Version : 14 July 2012 41
Starting on the first statement - OK, I’m doing the tcp .solo . I’ll go through these height and width questions and act accordingly, and I’m finished with this statement . Second statement - Oh! its tcp .solo again, let me see if its valid . Its a question: Is the track armed? Yes, it is . I’ll go through these height and width questions and act accordingly, and since this second statement was valid I’ll use its result instead of the first statement’s result .
Now the clever bit : what happens if the track is NOT record armed? We’ve taken advantage of the WALTER rule that if there is no answer, do nothing . Here’s what WALTER is thinking:
Starting on the first statement - OK, I’m doing the tcp .solo . I’ll go through these height and width questions and act accordingly, and I’m finished with this statement . Second statement - Oh! its tcp .solo again, let me see if its valid . Its a question: Is the track armed? No, it isn’t . And there isn’t a ‘no’ answer to the ?recarm question on this statement, so the statement isn’t valid . I’m going to ignore the entire second statement, and use the first statement’s result .
The choice to go single statement or multiple statement is yours, each method has its own advantages and disadvantages in term of human-reading clarity, but either way is fine for WALTER .
• Second Statement amendment
Imagine we had set our TCP solo on one statement, and we were happy with it . All we want is to move it 20px to the right when the track is record armed . We could do this:
set tcp.solo ?recarm + [20] [big line of stuff] [big line of stuff]
. . .which is tiresome because if we needed to edit our big line of stuff we’d need to remember to do it twice . So, instead, we can do it in two statements, taking advantage of the fact that once we have defined out tcp .solo on the first statement, it becomes available for us to use as a value in any subsequent statements:
set tcp.solo [big line of stuff]
set tcp.solo ?recarm + [20] tcp.solo
� Pink Lines, Yellow Lines, WALTER
To get the best out of WALTER’s comprehensive stretching and positioning control, you’re going to need to know how to use these old V3 image details because they are now at the
root of a great number of powerful and significant techniques .
• Pink Lines
When you provide an image to REAPER and then use WALTER to instruct the element using that image to be a different size than the image’s native pixel dimensions, or to dynamically stretch or resize, REAPER will stretch the image to fill the area . Which is fine if your button image is a solid block of colour . But if you have some rounded corners, or a nice bit of shading at the edges, they will get stretched too . . .which is unlikely to look pleasant! To solve this, we can define four borders, one running in from each edge of the image, that are not to be stretched . Reaper will then get all its stretching done using the part of the image that remains .
The pink lines are placed in a 1 pixel border that you add to the outside of the image . This border is never drawn (if you do ever see it, you’ve made a mistake or you are using it on one of the few images that doesn’t support pink lines) and the pink lines extend from the top left and bottom right corners . If its a single image, that means the corners of the entire image . If its a 3 state image (normal, mouse over, mouse down) it also means the corners of the entire image - top left of the normal state, bottom right of the mouse down state .
The lines may be of different lengths for each edge, if you wish, or of no practical length . So, for example, a single pixel pink dot in the top left corner would represent a non-stretching border of zero from top edge and the left edge .
The pink must be continuous lines of RGB 255, 0, 255 at full opacity . If any pixel is 255, 0 254 (for example) it won’t work correctly, or at all . If you are working in a multi-layer editor, put your pink on the top layer so that no other element accidentally overlaps them in any way, thereby sullying the purity of your pink .

WALTER : A themer’s guide Version : 14 July 2012 42
On a 3 state image, put the bottom right pink lines at thebottom right of the whole image .
Mark that in a 1pixel border around the image
(will not be drawn)
Don’t stretch these bits
Note that if you make your pink lines, for example, 10px long each on one axis and then at any time set your WALTER so the element is less than 20px on that axis, you have reduced the image beyond the limitations you have set for it, and REAPER will just stretch the remainder of the image uniformly, which will probably look pretty awful . So take care, and make sure you set up the an element’s image and its WALTER as a partnership .
For a more detailed explanation of pink lines, read the ‘Power of Pink’ document:
http://stash.reaper.fm/4191/WT_Power-of-Pink.pdf
• Yellow Lines
If you have pre-V4 theming experience you may have used the yellow lines facility on media item backgrounds, where we used them to indicate which part of the image was the actual active area, and which was border and/or shadow that fell outside the active area .
This facility has been radically extended in V4 so that the yellow lines can be used on background images (single state images, not 3 state buttons) to allow us to place graphic outside the boundaries of the active element, in a very similar way to the technique we used to use with overlay hacking .
Imagine you have a background, and in the image you have done some shading at the edges . The part of your image that is the actual background is the inside bit, not the exterior shading, and we can use the yellow lines to make it behave accordingly .
Just like the pink lines, the yellow lines are placed in a 1 pixel border that you add to the outside of the image . Again, this border is never drawn, and the yellow lines extend from the top left and bottom right corners . The yellow must be continuous lines of RGB 255, 255, 0 at full opacity . Just as with the pink you should take care to keep that colour pure .
There is one desperately important rule to always keep in mind when using WALTER on images with yellow lines : WALTER sets the size and location of the active area. So, the parts you set within yellow lines are NOT included, they extend outside the prescribed area that you WALTER .

WALTER : A themer’s guide Version : 14 July 2012 43
• Combined Yellow Lines and Pink Lines
Yellow lines and pink lines can coexist in the same 1px border on background (‘_bg’) images, indeed if you have Yellow lines you must also have at least 1px of pink line extending beyond the yellow . Yellow lines are implicity Pink Lines as well, since the yellow area never stretches, so from a graphic point of view you can think of that as being the pink lines running underneath the yellow lines, if you like .
• The ‘Pink Line Crush’ Technique
Combined use of some basic WALTER and the pink lines can even be used to switch off the stretching behaviour and instead tell REAPER to crop off part of an image in response to variables such as changing panel size, aka the ‘Pink Line Crush’ technique, which is used a lot in the Default V4 theme .
This allows us, for example, to set up a button image so that it appears in two forms : the full size image, for when panel space is plentiful, and a condensed image that has a section of the button removed containing secondary importance information, for when panel space is restricted .
Here’s the mcp_io .png image that is Pink Line Crushed with WALTER .
The white area is a 15px high chunk that I have set up my pink lines to say is allowable for stretching . If I crush that section to 0px high, its gone!
If I tell WALTER to draw the element at 31px high, these are the parts of the image that will be drawn - its the full thing .
But when, for example, the panel height is low, I can tell WALTER to draw the element 15px shorter - as 16px high - and the entire stretch area is crushed to nothing .
BAD! This does mean I must be rigorous with my WALTER to ensure that the element is only ever drawn at exactly 31px or 16px high . If I allow it to stretch in between those values, ugliness results .
Doing this offers considerable flexibility to the user of your theme, because you can set your WALTER so that as they reduce the panel size of the image, they can be given access to the same number of buttons, but in reduced form . This is a more pleasing compromise situation than you removing the button entirely because there is no longer sufficient panel space to show the image in its complete full-size glory .
Here’s some example WALTER of how that button could be used . Its very simple, the only important thing is that the button is either 31px or 16px high - no other sizes or stretching are set so the in-between ugliness is never seen:
set mcp.io h<50 [0 0 39 16 0 0 0 0] [0 0 39 31 0 0 0 0]
� ‘Theme Refresh’ Action
As you create and edit your WALTER, its obviously very handy to keep checking it in REAPER . But if you save the file in your text editor (you don’t have to use Notepad++, by the way, its
WALTER : A themer’s guide Version : 14 July 2012 44
your choice as long as you don’t mind being wrong . . . .!) your changes will not be reflected in REAPER until you’ve told it to refresh the theme . You can do this by changing to another theme, and then back again, or you can simplify that by making a custom action:
Options: Switch to next color themeOptions: Switch to previous color theme
Name it ‘Theme Refresh’, assign it to a toolbar button somewhere handy (like next to that S&M Theme Helper button you’ll be making . . .) and then, when you’ve saved a change in your text editor, hit that button to see what you’ve done .
� SWS/S&M Theme Helper
Writing your WALTER can occasionally involve several cycles of “make change > save > refresh theme > take screenshot > measure > make change” particularly when fine tuning the heights and widths at which you want arrangement changes to take place . We should be very grateful, therefore, for the SWS/S&M theme helper, part of the very wonderful SWS/S&M REAPER Extensions, which can give you a readout of the current size of TCP and MCP panels, saving you a great deal of time if you are a Windows user .
Download the SWS/S&M Extension from HERE and install .
Make a custom toolbar button and assign it to the action “SWS/S&M: Show theme helper (selected track)” . When you select a track and press your new button, you will get a readout of the current height and width of that track’s panels on both the TCP and MCP . Hurrah!
TIP The display will not update as you resize the panels, but just hit the button (or a shortcut) again and it will refresh with the new sizes..

WALTER : A themer’s guide Version : 14 July 2012 45
Part 6 : AppendicesHere be stuff .
�Appendix 1 - Common 4 numbers cheat sheet
0 0 0 0 0 1 0 1
1 0 1 0 1 1 1 1
0 0 1 1 0 0 1 0

WALTER : A themer’s guide Version : 14 July 2012 46
�Appendix 2 - Predefined Variables
All panels
w width of parent, pixels
h height of parent, pixels
reaper_version REAPER version (example: 414)
Track specific
folderstate folder state of track, if applicable (0 for normal, 1 for folder, -n for last track in folder(s))
folderdepth positive if in a folder (how many folders deep)
maxfolderdepth highest folder depth of any visible TCP track
mcp_maxfolderdepth highest folder depth of any visible MCP track
recarm nonzero if track record armed
trackpanmode 6 if the user has chosen dual pan mode, and 4 or 5 for stereo pan, 1-3 for single pan/balance
tcp_iconsize size of track panel icon column, if any
tracknch number of track channels (2-64)
mcp_iconsize size of mixer icon row, if any
mcp_wantextmix flags indicating which extended mixer settings are desired (&1 for inserts, &2 for sends, &4 for fx parms)
tcp_fxparms number of fx parameter knobs the user has assigned for the track
Transport specific
trans_flags trans_flags&1 is nonzero if transport centered
trans_flags&2 is nonzero if user wants playspeed controls visible
trans_flags&4 is nonzero if user wants current time signature visible
trans_docked nonzero if docked transport
trans_center nonzero if transport centered
Envelope specific
envcp_type 4 if FX envelope (can display additional controls)
�Appendix 3 - default_layouts.txt
In Documents and Settings/<name>/Application Data/REAPER/Data you will find default_layouts .txt . This is the default WALTER that will be used if you do not provide WALTER of your own . Moreover, it is a useful guide to how the behaviours you have been used to in pre-V4 Reaper can be achieved .
Reproduced here for your convenience .
• What is ‘rect’?
‘rect’ is sometimes used by Our Fearless Leader - it is the same thing as ‘set’ .
Layout “Default TCP w/ WALTER”
clear tcp.*
set tcp.size [258 72]
set tcp.trackidx [1 3 20 16 0 0 0 0]
set tcp.foldercomp [2 3 20 20 0 0 0 0]
; meter, recmon, recmode row
set tcp.meter h>=66 [66 46 188 20 0 0 1 0] [0]
set tcp.recmon h>=66 [24 47 20 20 0 0 0 0] [0]
set tcp.recmode h>=66 [44 47 20 20 0 0 0 0] [0]
; vol/pan labels (these could be condensed into no rect lines, but its harder to
follow)
rect vollabel_row1 w>650 [23 7 36 13 1 0 1 0] [0]
rect panlabel_row1 w>650 [62 7 30 13 1 0 1 0] [0]
set tcp.volume.label h<49 vollabel_row1 w<230 [0] [185 28 36 13 1 0 1 0]
set tcp.pan.label h<49 panlabel_row1 w<230 [0] [225 28 30 13 1 0 1 0]
; pan fader
rect pan_row1 w>500 w>650 [90 3 -67 20 .65 0 1 0] [90 3 2 20 .75 0 1 0] [0]
set tcp.pan w<230 [0] h<49 pan_row1 [131 24 51 20 0.75 0 1 0]
; vol fader
rect vol_row1 w>330 w>500 [85 3 5 20 0.25 0 .75 0] [85 3 7 20 0.25 0 1 0] [0]
rect vol_row1 w>650 [85 3 5 20 0.25 0 .65 0] vol_row1

WALTER : A themer’s guide Version : 14 July 2012 47
set tcp.volume h<49 vol_row1 w<230 [22 24 233 20 0 0 1 0] [22 24 109 20 0 0 0.75
0]
; track name label
rect label_small w<100 [26 3 226 15 0 0 1 0] [26 3 182 15 0 0 1 0]
rect label_2row w<230 label_small [26 3 68 15 0 0 1 0]
set tcp.label h>=49 label_2row w<=330 label_2row [26 3 38 15 0 0 .25 0]
; recarm button
set tcp.recarm h<49 w<=330 [0] [64 3 20 20 .25 0 .25 0] [2 24 20 20 0 0 0 0]
; other buttons
set tcp.folder w<230 [0] [98 3 20 20 1 0 1 0]
set tcp.io w<230 [0] [118 3 20 20 1 0 1 0]
set tcp.env w<230 [0] [138 3 20 20 1 0 1 0]
set tcp.fx w<230 [0] [158 3 20 20 1 0 1 0]
set tcp.fxbyp w<230 [0] [178 3 14 20 1 0 1 0]
set tcp.phase w<230 [0] [192 3 20 20 1 0 1 0]
set tcp.mute w<100 [0] [212 3 20 20 1 0 1 0]
set tcp.solo w<100 [0] [232 3 20 20 1 0 1 0]
set tcp.fxparm [4 76 250 -6 0 0 1 1]
; derive from our defaults here
Layout “Vertical Meters”
set tcp.margin !recarm + tcp.margin [0 0 20 0]
set tcp.meter !recarm [260 2 16 66 1 0 1 1]
set tcp.recmode !recarm [0]
set tcp.recmon !recarm [0]
set tcp.fxparm [4 46 250 24 0 0 1 1]
EndLayout
Layout “Vertical Meters (thinner)”
set tcp.margin !recarm + tcp.margin [0 0 4 0]
set tcp.meter !recarm [253 2 8 66 1 0 1 1]
set tcp.recmode !recarm [0]
set tcp.recmon !recarm [0]
set tcp.fxparm [4 46 250 24 0 0 1 1]
EndLayout
Layout “No folder indent”
set tcp.margin + tcp.margin * [-22 0 0 0] folderdepth
EndLayout
Layout “All folder indent”
set tcp.margin + tcp.margin * [-22 0 0 0] folderdepth
set tcp.margin + tcp.margin * [22 0 0 0] maxfolderdepth
EndLayout
EndLayout ; default tcp w/ walter
Layout “Default Master TCP w/ WALTER”
clear master.tcp.*
set master.tcp.size [258 70]
set master.tcp.meter [66 3 188 20 0 0 1 0]
set master.tcp.volume w>=230 [0 26 131 20 0 0 0.75 0] [0 26 255 20 0 0 1 0]
set master.tcp.pan w<230 [0] [131 26 51 20 0.75 0 1 0]
set master.tcp.label [3 3 63 20 0 0 0 0]
set master.tcp.io w<138 [0] [118 47 20 20 1 0 1 0]
set master.tcp.env w<118 [0] [138 47 20 20 1 0 1 0]
set master.tcp.fx [158 47 20 20 1 0 1 0]
set master.tcp.fxbyp [178 47 14 20 1 0 1 0]
set master.tcp.mono [192 47 20 20 1 0 1 0]
set master.tcp.mute [212 47 20 20 1 0 1 0]
set master.tcp.solo [232 47 20 20 1 0 1 0]
set master.tcp.volume.label w<230 [0] [185 31 36 13 1 0 1 0]
set master.tcp.pan.label w<230 [0] [225 31 30 13 1 0 1 0]
set master.tcp.fxparm [4 78 250 -10 0 0 1 1]
EndLayout ; default master tcp w/ walter
Layout “Default MCP w/ WALTER”
clear mcp.*
set mcp.size [71 214]
set mcp.trackidx [3 2 24 18 0 0 0 0]
set mcp.mute [30 2 20 20 0 0 0 0]
set mcp.solo [50 2 20 20 0 0 0 0]

WALTER : A themer’s guide Version : 14 July 2012 48
set mcp.meter !mcp_panflip [25 42 22 132 0 0 0 1] [25 60 22 132 0 0 0 1]
set mcp.volume !mcp_panflip [3 42 20 132 0 0 0 1] [3 60 20 132 0 0 0 1]
set mcp.pan !mcp_panflip [3 176 65 20 0 1 0 1] [3 24 65 20 0 0 0 0]
set mcp.volume.label !mcp_panflip [0 197 38 13 0 1 0 1] [0 44 38 13 0 0 0 0]
set mcp.pan.label !mcp_panflip [39 197 29 13 0 1 0 1] [39 44 29 13 0 0 0 0]
set mcp.label !mcp_panflip [3 23 63 15 0 0 0 0] [3 196 65 15 0 1 0 1]
set mcp.folder !mcp_panflip [3 2 20 20 0 0 0 0] [3 2 20 20 0 0 0 0]
set mcp.phase !mcp_panflip [50 42 20 20 0 0 0 0] [50 60 20 20 0 0 0 0]
set mcp.io !mcp_panflip [50 62 20 20 0 0 0 0] [50 80 20 20 0 0 0 0]
set mcp.env !mcp_panflip [50 82 20 20 0 0 0 0] [50 100 20 20 0 0 0 0]
set mcp.fx !mcp_panflip [50 102 20 20 0 0 0 0] [50 120 20 20 0 0 0 0]
set mcp.fxbyp !mcp_panflip [50 122 20 12 0 0 0 0] [50 140 20 12 0 0 0 0]
set mcp.recarm !mcp_panflip [50 116 20 20 0 1 0 1] [50 134 20 20 0 1 0 1]
set mcp.recmon !mcp_panflip [50 136 20 20 0 1 0 1] [50 154 20 20 0 1 0 1]
set mcp.recmode !mcp_panflip [50 156 20 20 0 1 0 1] [50 174 20 20 0 1 0 1]
EndLayout ; Default MCP w/ WALTER
Layout “Default Master MCP w/ WALTER”
clear master.mcp.*
set master.mcp.size [122 231]
set master.mcp.mute [79 2 20 20 0 0 0 0]
set master.mcp.solo [99 2 20 20 0 0 0 0]
set master.mcp.menubutton !mcp_docked [0 0 0 0 0 0 0 0] [3 2 20 20 0 0 0 0]
set master.mcp.label !mcp_docked [3 2 73 20 0 0 0 0] [25 2 51 20 0 0 0 0]
set master.mcp.meter !mcp_panflip [26 25 68 166 0 0 0 1] [26 60 68 165 0 0 0 1]
set master.mcp.volume !mcp_panflip [3 25 20 166 0 0 0 1] [3 60 20 165 0 0 0 1]
set master.mcp.pan !mcp_panflip [2 193 116 20 0 1 0 1] [2 24 116 20 0 0 0 0]
set master.mcp.volume.label !mcp_panflip [0 214 58 13 0 1 0 1] [0 44 58 13 0 0 0
0]
set master.mcp.pan.label !mcp_panflip [62 214 47 13 0 1 0 1] [62 44 47 13 0 0 0
0]
set master.mcp.mono !mcp_panflip [99 25 20 20 0 0 0 0] [99 60 20 20 0 0 0 0]
set master.mcp.io !mcp_panflip [99 45 20 20 0 0 0 0] [99 80 20 20 0 0 0 0]
set master.mcp.env !mcp_panflip [99 65 20 20 0 0 0 0] [99 100 20 20 0 0 0 0]
set master.mcp.fx !mcp_panflip [99 85 20 20 0 0 0 0] [99 120 20 20 0 0 0 0]
set master.mcp.fxbyp !mcp_panflip [99 105 20 12 0 0 0 0] [99 140 20 12 0 0 0 0]
EndLayout ; master mcp w/ walter
Layout “Default EnvCP w/ Walter”
clear envcp.*
set envcp.size [300 100]
set envcp.margin folderdepth<1 [16 0 0 0] +:folderdepth:0 [22 0 0 0]
set envcp.hide [273 1 20 20 1 0 1 0]
set envcp.bypass [253 1 20 20 1 0 1 0]
; show fx buttons when wide (these are ignored if not fx) or hide when not wide
set envcp.learn w>222 [233 1 20 20 1 0 1 0] [0]
set envcp.mod w>222 [213 1 20 20 1 0 1 0] [0]
set envcp.label [4 1 245 20 0 0 1 0]
set altlabelpos [28 1 152 20 0 0 .93 0] ; used when singlerow
set envcp.label h<=47 w>262 altlabelpos envcp_type!=4 w>222 altlabelpos
set envcp.label envcp_type==4 w>222 + [0 0 -40 0] ; shrink label by 40px (room
for fx buttons) if wide and fx
set envcp.arm [4 25 20 20 0 0 0 0]
set altarmpos [4 1 20 20 0 0 0 0]
set envcp.arm h<=47 w>262 altarmpos envcp_type!=4 w>222 altarmpos [0] [0]
set envcp.fader [0 45 296 20 0 0 1 0] ; third row position
set envcp.fader h<=47 [0] h<=70 w>222 [28 25 205 20 0 0 .93 0] [0]
set envcp.value [28 25 268 20 0 0 1 0]
set envcp.value h<=70 w>222 [237 25 89 20 .93 0 1 0]
set envcp.value envcp_type!=4 h<=47 w<=222 [0] [184 1 67 21 .93 0 1 0]
set envcp.value envcp_type==4 h<=47 w<=262 [0] [144 1 67 21 .93 0 1 0]
EndLayout
Layout “Default Transport w/ WALTER”
clear trans.*
; todo: finish implementing default transport logic here (pain)
set trans.size [543 84]
set trans.size.minmax [219 28 2048 84]
set trans.size.dockedheight w<300 [84] [20] ; todo rules
; rows<50, 1 row, <75

WALTER : A themer’s guide Version : 14 July 2012 49
set row1pos [0 0 0 0]
set row2pos [0 0 0 0]
set row3pos [0 0 0 0]
; row1 size is 360..494
; row2 size is 348..392
; row3 size is 180..320, or 0 if !trans_flags&1
set row2adj trans_flags&4 [0] [-44 0]
set trans.rew + row1pos [5 1 24 24]
set trans.play + row1pos [29 1 24 24]
set trans.pause + row1pos [53 1 24 24]
set trans.stop + row1pos [77 1 24 24]
set trans.fwd + row1pos [101 1 24 24]
set trans.rec + row1pos [125 1 24 24]
set trans.repeat + row1pos [149 1 24 24]
set trans.automode + row1pos [175 1 24 24]
set trans.status + row1pos [209 3 190 21]
; set trans.status width
set trans.bpm.tap + row2pos [8 55 33 17]
set trans.bpm.edit + row2pos [43 55 55 17]
set trans.curtimesig trans_flags&4 + row2pos [100 55 40 17] [0]
set trans.sel + row2adj + row2pos [143 55 248 17]
set trans.rate + row3pos [8 30 74 17]
set trans.rate.fader + row3pos [84 27 441 23]
EndLayout
; some standalone tests
Layout “Compact vertmix”
clear mcp.*
set mcp.size [20 202]
set mcp.trackidx [0 0 20 16 0 0 0 0]
set mcp.label [0 20 20 80 0 0 0 0.5]
set mcp.solo [0 100 20 20 0 0.5 0 0.5]
set mcp.meter ?1 [0 120 20 60 0 0.5 0 1.0]
set mcp.recarm ?1 [0 177 20 20 0 1.0 0 1.0]
EndLayout
Layout “Compact recording mixer vertical label”
clear mcp.*
set mcp.size [40 240]
set mcp.label [3 57 14 156 0 0 0 1]
set mcp.solo [1 1 20 20]
set mcp.trackidx [0 21 16 16]
set mcp.folder [0 37 20 20]
set mcp.recarm ?1 [1 217 20 20 0 1 0 1]
set mcp.meter ?1 [20 1 18 238 0 0 0 1]
EndLayout
Layout “Compact recording mixer”
clear mcp.*
set mcp.size [40 240]
set mcp.label [2 2 35 14]
set mcp.solo [1 18 20 20]
set mcp.trackidx [0 38 16 16]
set mcp.folder [0 54 20 20]
set mcp.recarm [1 217 20 20 0 1 0 1]
set mcp.meter [20 20 18 217 0 0 0 1]
EndLayout
Layout “Compact recording mixer (smaller)”
clear mcp.*
set mcp.size [32 240]
set mcp.solo [1 1 18 18]
set mcp.trackidx [0 19 16 16]
set mcp.folder [0 36 18 18]
set mcp.label [1 37 17 180 0 0 0 1]
set mcp.recarm ?1 [1 219 18 18 0 1 0 1]

WALTER : A themer’s guide Version : 14 July 2012 50
set mcp.meter ?1 [18 18 12 219 0 0 0 1]
EndLayout
Layout “Thin mixer”
clear mcp.*
set mcp.size [20 240]
set mcp.trackidx [0 0 20 20]
set mcp.folder [0 20 20 20]
set mcp.mute [0 40 20 20]
set mcp.solo [0 60 20 20]
set mcp.fx [0 80 20 20]
set mcp.fxbyp [0 100 20 12]
set mcp.io [0 115 20 20]
set mcp.recarm [0 135 20 20]
set mcp.recmode [0 155 20 20]
set mcp.recmon [0 175 20 20]
rect meter_volhide [0 195 20 45 0 0 0 1]
rect meter_volshow [0 225 20 15 0 0.5 0 1]
set mcp.meter h>400 meter_volshow meter_volhide
set mcp.volume h>400 [0 195 20 30 0 0 0 0.5] [0]
EndLayout
Layout “Transport w/o pause”
; slightly override the defaults --
; note that the default logic for positioning will still be used as long
; as no comparison/combinators are used
set trans.automode [156 1 24 24]
set trans.repeat trans.rec
set trans.rec trans.fwd
set trans.fwd trans.stop
set trans.stop trans.pause
set trans.pause [0]
set trans.status [185 3 215 21]
EndLayout
Layout “Transport Chunky Test” ; a transport test
clear trans.*
set trans.size [500 60]
set trans.size.minmax [340 60 1024 60]
set trans.size.dockedheight [60]
set trans.sel [420 3 76 53 1 0 1 0]
set trans.bpm.tap w<490 [0] [330 3 38 20 1 0 1 0]
set trans.bpm.edit w<420 [0] [370 3 46 20 1 0 1 0]
set trans.curtimesig w<420 [0] [370 25 46 30 1 0 1 0]
def bxfac 0.4
set trans.status [5 3 195 25 0 0 bxfac 0]
set trans.rate [203 30 48 30 bxfac 0 bxfac 0]
set trans.rate.fader [5 30 195 25 0 0 bxfac 0]
set trans.play [203 2 24 24 bxfac 0 bxfac 0]
set trans.stop [227 2 24 24 bxfac 0 bxfac 0]
set trans.pause [251 2 24 24 bxfac 0 bxfac 0]
set trans.rec [274 2 24 24 bxfac 0 bxfac 0]
set trans.repeat [298 2 24 24 bxfac 0 bxfac 0]
set trans.rew [251 30 24 24 bxfac 0 bxfac 0]
set trans.fwd [274 30 24 24 bxfac 0 bxfac 0]
set trans.automode [298 30 24 24 bxfac 0 bxfac 0]
EndLayout
;GlobalLayout “name”

WALTER : A themer’s guide Version : 14 July 2012 51
�Appendix 4 - midi_note_colormap.png
This isn’t WALTER related, but I’m including it here for your convenience . The Midi Note Colormap is a fixed size image used to determine the colour of notes in the MIDI editor . Notes can have a vertical colour change (e .g . gradient or shading) that changes depending on the note’s velocity, or channel, or pitch, and the selected / unselected state in each case . Here’s how to build one:
1 . Decide on a gradient for your unselected note at velocity = 0, and its border .
Note
Border
2 . Make the gradient 64px high, the border 1px high, placed directly underneath .
3 . Now, add below that the same elements, but for selected note at velocity = 0, and its border .
4 . Take all of that and make the whole lot 128px wide, representing the 128 levels of velocity . (at each velocity level a single pixel column is used to provide the colour information of the note .)
<- 128 pixels = 128 levels ->
5 . Set the colours as you would like them to change over those 128 levels when the Midi Editor is set to Color : Velocity (note that both the note and its border can change colour as velocity changes .)
soft hard
6 . Make 17 new versions of the elements, each just 1px wide . These are mute, followed by the 16 midi channels for when the Midi Editor is set to Color : Channel .

WALTER : A themer’s guide Version : 14 July 2012 52
7 . Put these to the right of the velocity elements .
8 . Do 12 more 1px versions, this time for the 12 notes when the Midi Editor is set to Color : Pitch .
. . .and put these to the left of the other elements .
Finished! Your final image should be 157 x 130 px . Save it without transparency as midi_note_colourmap .png .

WALTER : A themer’s guide Version : 14 July 2012 53
� Index
Symbols! . . . . . . . . . . . . . . . . . . . . . . . . 21!= . . . . . . . . . . . . . . . . . . . . . . . 21? . . . . . . . . . . . . . . . . . . . . . . . . 21 . . . . . . . . . . . . . . . . . . . . . . . . . 22{ } . . . . . . . . . . . . . . . . . . . . . . . 18* . . . . . . . . . . . . . . . . . . . . . . . . 15\ . . . . . . . . . . . . . . . . . . . . . . . . 40+ . . . . . . . . . . . . . . . . . . . . . . . 14< . . . . . . . . . . . . . . . . . . . . . . . 11<= . . . . . . . . . . . . . . . . . . . . . . 20== . . . . . . . . . . . . . . . . . . . . . . 20> . . . . . . . . . . . . . . . . . . . . . . . 13>= . . . . . . . . . . . . . . . . . . . . . . 20!0 . . . . . . . . . . . . . . . . . . . . . . . 21[0] . . . . . . . . . . . . . . . . . . . . . . . 13?1 . . . . . . . . . . . . . . . . . . . . . . . 21
Aalpha . . . . . . . . . . . . . . . . . . 23, 32AND . . . . . . . . . . . . . . . . . . 13, 21
Cclear . . . . . . . . . . . . . . . . . . . . . 6Colour . . . . . . . . . . . . . . . 23, 38, 41Comments . . . . . . . . . . . . . . . . . 7Conditions . . . . . . . . . . . . . . . . . 11
DdB . . . . . . . . . . . . . . . . . . . . . . . 26default_layouts .txt . . . . . . . 21, 46, 51dual pan . . . . . . . . . . . . . . . . 28, 31
EEdge attachment . . . . . . . . . . . 9, 16envcp_type . . . . . . . . . . . . . . . . . 46envelope . . . . . . . . . . . . . . . . . . 46
Extended Mixer (extmixer) . . . . . . . 24
Ffader . . . . . . . . . . . . . . . . . . . . . 26fadermode . . . . . . . . . . . . . . . . . 26folderdepth . . . . . 6, 24, 25, 26, 28, 46folderstate . . . . . 21, 24, 25, 26, 28, 46Font . . . . . . . . . . . . . . . . . . . . . 25front . . . . . . . . . . . . . . . . . . . . . 22
Hh<0 . . . . . . . . . . . . . . . . . . . . . . 21h (height) . . . . . . . . . . . . . . . 12, 46
IImages . . . . . . . . . . . . . . . . . . . . 37
Kknob . . . . . . . . . . . . . . . . . . . . . 26knob stack . . . . . . . . . . . . . . . . . 28
LLabel . . . . . . . . . . . . . . . . . . . . . 25Layout . . . . . . . . . . . . . . . 23, 24, 36
MMargins . . . . . . . . . . . . . . . . 34, 35maxfolderdepth . . . . . . . . . . . . . . 46mcp_maxfolderdepth . . . . . . . . . . 46mcp .size . . . . . . . . . . . . . . . . . . . 39Meters . . . . . . . . . . . . . . . . . 28, 30midi_note_colormap . . . . . . . . . . 51mix&match . . . . . . . . . . . . . . . . . 3mono pan . . . . . . . . . . . . . . . . . . 28Multiplication . . . . . . . . . . . . . . . 15
NNesting . . . . . . . . . . . . . . . . . . . 12
OOperators . . . . . . . . . . . . . . . . . . 20overlays . . . . . . . . . . . . . . . . . . . 37
PPan Controls . . . . . . . . . . . . . . . . 27parameter knobs . . . . . . . . . . . . . 24Pink Line Crush . . . . . . . . . . . . . . 43Pink Lines . . . . . . . . . . . 26, 31, 41, 46Power of Pink . . . . . . . . . . . . 37, 42
RREAPER preferences . . . . . . . . . . . 32reaper_version . . . . . . . . . . . . . . 46recarm . . . . . . . . . . . . . . . . . . . . 46rect . . . . . . . . . . . . . . . . . . . . . . 46rtconfig .txt . . . . . . . . . . . . . . . . . 5
SScalar . . . . . . . . . . . . . . . . . . . . 18sdk . . . . . . . . . . . . . . . . . . 3, 23, 25stereo balance . . . . . . . . . . . . . . . 28stereo pan . . . . . . . . . . . . . . . . . 28Stretching . . . . . . . . . . . . . . . 10, 17Summing . . . . . . . . . . . . . . . . . . 14SWS/S&M Theme Helper . . . . . . . . 44
Ttab . . . . . . . . . . . . . . . . . . . . . . 40tcp_folderindent . . . . . . . . . . . . . 34tcp_margin . . . . . . . . . . . . . . 34, 35TCP minimum size . . . . . . . . . . . . 35TCP Parameter knobs (fxparm) . . . . 24tcp .size . . . . . . . . . . . . . . . 8, 35, 39Text . . . . . . . . . . . . . . . . . . . . . . 25theme refresh . . . . . . . . . . . . . . . 43toosmall images . . . . . . . . . . . . . . 35tracknch . . . . . . . . . . . . . . . . . . . 46trackpanmode . . . . . . . . . . . . 27, 46trans_center . . . . . . . . . . . . . . . . 46
trans_docked . . . . . . . . . . . . . . . 46trans_flags . . . . . . . . . . . . . . . . . 46Transport . . . . . . . . . . . . . . . . . . 46trans .size . . . . . . . . . . . . . . . . . . 39
VVariables . . . . . . . . . . . . . . . . . . 13voltext_flags . . . . . . . . . . . . . . . . 26volume . . . . . . . . . . . . . . . . . . . 26VU meters . . . . . . . . . . . . . . . 28, 30
Ww<0 . . . . . . . . . . . . . . . . . . . . . 21width control . . . . . . . . . . . . . . . 28w (width) . . . . . . . . . . . . . . . 12, 46
YYellow Lines . . . . . . . . . 27, 29, 30, 42
ZZero and Nonzero . . . . . . . . . . . . 21Z-order . . . . . . . . . . . . . . . . . . . 22

WALTER: A themer’s guideVersion : 14 July 2012
by
White Tie
with the invaluable assistance of
Bernstraw
and
Our Fearless Leader