(Version 10.1 HotFix 1) Informatica MDM Multidomain Edition...Informatica MDM Hub user who has the...
54
Informatica MDM Multidomain Edition (Version 10.1 HotFix 1) Informatica MDM Hub Security Guide
Transcript of (Version 10.1 HotFix 1) Informatica MDM Multidomain Edition...Informatica MDM Hub user who has the...
Informatica MDM Multidomain Edition(Version 10.1 HotFix 1)
Informatica MDM Hub Security Guide
Informatica MDM Multidomain Edition Informatica MDM Hub Security Guide
Version 10.1 HotFix 1April 2016
Copyright (c) 1993-2016 Informatica LLC. All rights reserved.
This software and documentation contain proprietary information of Informatica LLC and are provided under a license agreement containing restrictions on use and disclosure and are also protected by copyright law. Reverse engineering of the software is prohibited. No part of this document may be reproduced or transmitted in any form, by any means (electronic, photocopying, recording or otherwise) without prior consent of Informatica LLC. This Software may be protected by U.S. and/or international Patents and other Patents Pending.
Use, duplication, or disclosure of the Software by the U.S. Government is subject to the restrictions set forth in the applicable software license agreement and as provided in DFARS 227.7202-1(a) and 227.7702-3(a) (1995), DFARS 252.227-7013©(1)(ii) (OCT 1988), FAR 12.212(a) (1995), FAR 52.227-19, or FAR 52.227-14 (ALT III), as applicable.
The information in this product or documentation is subject to change without notice. If you find any problems in this product or documentation, please report them to us in writing.
Informatica, Informatica Platform, Informatica Data Services, PowerCenter, PowerCenterRT, PowerCenter Connect, PowerCenter Data Analyzer, PowerExchange, PowerMart, Metadata Manager, Informatica Data Quality, Informatica Data Explorer, Informatica B2B Data Transformation, Informatica B2B Data Exchange Informatica On Demand, Informatica Identity Resolution, Informatica Application Information Lifecycle Management, Informatica Complex Event Processing, Ultra Messaging, Informatica Master Data Management, and Live Data Map are trademarks or registered trademarks of Informatica LLC in the United States and in jurisdictions throughout the world. All other company and product names may be trade names or trademarks of their respective owners.
Portions of this software and/or documentation are subject to copyright held by third parties, including without limitation: Copyright DataDirect Technologies. All rights reserved. Copyright © Sun Microsystems. All rights reserved. Copyright © RSA Security Inc. All Rights Reserved. Copyright © Ordinal Technology Corp. All rights reserved. Copyright © Aandacht c.v. All rights reserved. Copyright Genivia, Inc. All rights reserved. Copyright Isomorphic Software. All rights reserved. Copyright © Meta Integration Technology, Inc. All rights reserved. Copyright © Intalio. All rights reserved. Copyright © Oracle. All rights reserved. Copyright © Adobe Systems Incorporated. All rights reserved. Copyright © DataArt, Inc. All rights reserved. Copyright © ComponentSource. All rights reserved. Copyright © Microsoft Corporation. All rights reserved. Copyright © Rogue Wave Software, Inc. All rights reserved. Copyright © Teradata Corporation. All rights reserved. Copyright © Yahoo! Inc. All rights reserved. Copyright © Glyph & Cog, LLC. All rights reserved. Copyright © Thinkmap, Inc. All rights reserved. Copyright © Clearpace Software Limited. All rights reserved. Copyright © Information Builders, Inc. All rights reserved. Copyright © OSS Nokalva, Inc. All rights reserved. Copyright Edifecs, Inc. All rights reserved. Copyright Cleo Communications, Inc. All rights reserved. Copyright © International Organization for Standardization 1986. All rights reserved. Copyright © ej-technologies GmbH. All rights reserved. Copyright © Jaspersoft Corporation. All rights reserved. Copyright © International Business Machines Corporation. All rights reserved. Copyright © yWorks GmbH. All rights reserved. Copyright © Lucent Technologies. All rights reserved. Copyright (c) University of Toronto. All rights reserved. Copyright © Daniel Veillard. All rights reserved. Copyright © Unicode, Inc. Copyright IBM Corp. All rights reserved. Copyright © MicroQuill Software Publishing, Inc. All rights reserved. Copyright © PassMark Software Pty Ltd. All rights reserved. Copyright © LogiXML, Inc. All rights reserved. Copyright © 2003-2010 Lorenzi Davide, All rights reserved. Copyright © Red Hat, Inc. All rights reserved. Copyright © The Board of Trustees of the Leland Stanford Junior University. All rights reserved. Copyright © EMC Corporation. All rights reserved. Copyright © Flexera Software. All rights reserved. Copyright © Jinfonet Software. All rights reserved. Copyright © Apple Inc. All rights reserved. Copyright © Telerik Inc. All rights reserved. Copyright © BEA Systems. All rights reserved. Copyright © PDFlib GmbH. All rights reserved. Copyright © Orientation in Objects GmbH. All rights reserved. Copyright © Tanuki Software, Ltd. All rights reserved. Copyright © Ricebridge. All rights reserved. Copyright © Sencha, Inc. All rights reserved. Copyright © Scalable Systems, Inc. All rights reserved. Copyright © jQWidgets. All rights reserved. Copyright © Tableau Software, Inc. All rights reserved. Copyright© MaxMind, Inc. All Rights Reserved. Copyright © TMate Software s.r.o. All rights reserved. Copyright © MapR Technologies Inc. All rights reserved. Copyright © Amazon Corporate LLC. All rights reserved. Copyright © Highsoft. All rights reserved. Copyright © Python Software Foundation. All rights reserved. Copyright © BeOpen.com. All rights reserved. Copyright © CNRI. All rights reserved.
This product includes software developed by the Apache Software Foundation (http://www.apache.org/), and/or other software which is licensed under various versions of the Apache License (the "License"). You may obtain a copy of these Licenses at http://www.apache.org/licenses/. Unless required by applicable law or agreed to in writing, software distributed under these Licenses is distributed on an "AS IS" BASIS, WITHOUT WARRANTIES OR CONDITIONS OF ANY KIND, either express or implied. See the Licenses for the specific language governing permissions and limitations under the Licenses.
This product includes software which was developed by Mozilla (http://www.mozilla.org/), software copyright The JBoss Group, LLC, all rights reserved; software copyright © 1999-2006 by Bruno Lowagie and Paulo Soares and other software which is licensed under various versions of the GNU Lesser General Public License Agreement, which may be found at http:// www.gnu.org/licenses/lgpl.html. The materials are provided free of charge by Informatica, "as-is", without warranty of any kind, either express or implied, including but not limited to the implied warranties of merchantability and fitness for a particular purpose.
The product includes ACE(TM) and TAO(TM) software copyrighted by Douglas C. Schmidt and his research group at Washington University, University of California, Irvine, and Vanderbilt University, Copyright (©) 1993-2006, all rights reserved.
This product includes software developed by the OpenSSL Project for use in the OpenSSL Toolkit (copyright The OpenSSL Project. All Rights Reserved) and redistribution of this software is subject to terms available at http://www.openssl.org and http://www.openssl.org/source/license.html.
This product includes Curl software which is Copyright 1996-2013, Daniel Stenberg, <[email protected]>. All Rights Reserved. Permissions and limitations regarding this software are subject to terms available at http://curl.haxx.se/docs/copyright.html. Permission to use, copy, modify, and distribute this software for any purpose with or without fee is hereby granted, provided that the above copyright notice and this permission notice appear in all copies.
The product includes software copyright 2001-2005 (©) MetaStuff, Ltd. All Rights Reserved. Permissions and limitations regarding this software are subject to terms available at http://www.dom4j.org/ license.html.
The product includes software copyright © 2004-2007, The Dojo Foundation. All Rights Reserved. Permissions and limitations regarding this software are subject to terms available at http://dojotoolkit.org/license.
This product includes ICU software which is copyright International Business Machines Corporation and others. All rights reserved. Permissions and limitations regarding this software are subject to terms available at http://source.icu-project.org/repos/icu/icu/trunk/license.html.
This product includes software copyright © 1996-2006 Per Bothner. All rights reserved. Your right to use such materials is set forth in the license which may be found at http:// www.gnu.org/software/ kawa/Software-License.html.
This product includes OSSP UUID software which is Copyright © 2002 Ralf S. Engelschall, Copyright © 2002 The OSSP Project Copyright © 2002 Cable & Wireless Deutschland. Permissions and limitations regarding this software are subject to terms available at http://www.opensource.org/licenses/mit-license.php.
This product includes software developed by Boost (http://www.boost.org/) or under the Boost software license. Permissions and limitations regarding this software are subject to terms available at http:/ /www.boost.org/LICENSE_1_0.txt.
This product includes software copyright © 1997-2007 University of Cambridge. Permissions and limitations regarding this software are subject to terms available at http:// www.pcre.org/license.txt.
This product includes software copyright © 2007 The Eclipse Foundation. All Rights Reserved. Permissions and limitations regarding this software are subject to terms available at http:// www.eclipse.org/org/documents/epl-v10.php and at http://www.eclipse.org/org/documents/edl-v10.php.
This product includes software licensed under the terms at http://www.tcl.tk/software/tcltk/license.html, http://www.bosrup.com/web/overlib/?License, http://www.stlport.org/doc/ license.html, http://asm.ow2.org/license.html, http://www.cryptix.org/LICENSE.TXT, http://hsqldb.org/web/hsqlLicense.html, http://httpunit.sourceforge.net/doc/ license.html, http://jung.sourceforge.net/license.txt , http://www.gzip.org/zlib/zlib_license.html, http://www.openldap.org/software/release/license.html, http://www.libssh2.org, http://slf4j.org/license.html, http://www.sente.ch/software/OpenSourceLicense.html, http://fusesource.com/downloads/license-agreements/fuse-message-broker-v-5-3- license-agreement; http://antlr.org/license.html; http://aopalliance.sourceforge.net/; http://www.bouncycastle.org/licence.html; http://www.jgraph.com/jgraphdownload.html; http://www.jcraft.com/jsch/LICENSE.txt; http://jotm.objectweb.org/bsd_license.html; . http://www.w3.org/Consortium/Legal/2002/copyright-software-20021231; http://www.slf4j.org/license.html; http://nanoxml.sourceforge.net/orig/copyright.html; http://www.json.org/license.html; http://forge.ow2.org/projects/javaservice/, http://www.postgresql.org/about/licence.html, http://www.sqlite.org/copyright.html, http://www.tcl.tk/software/tcltk/license.html, http://www.jaxen.org/faq.html, http://www.jdom.org/docs/faq.html, http://www.slf4j.org/license.html; http://www.iodbc.org/dataspace/iodbc/wiki/iODBC/License; http://www.keplerproject.org/md5/license.html; http://www.toedter.com/en/jcalendar/license.html; http://www.edankert.com/bounce/index.html; http://www.net-snmp.org/about/license.html; http://www.openmdx.org/#FAQ; http://www.php.net/license/3_01.txt; http://srp.stanford.edu/license.txt; http://www.schneier.com/blowfish.html; http://www.jmock.org/license.html; http://xsom.java.net; http://benalman.com/about/license/; https://github.com/CreateJS/EaselJS/blob/master/src/easeljs/display/Bitmap.js; http://www.h2database.com/html/license.html#summary; http://jsoncpp.sourceforge.net/LICENSE; http://jdbc.postgresql.org/license.html; http://protobuf.googlecode.com/svn/trunk/src/google/protobuf/descriptor.proto; https://github.com/rantav/hector/blob/master/LICENSE; http://web.mit.edu/Kerberos/krb5-current/doc/mitK5license.html; http://jibx.sourceforge.net/jibx-license.html; https://github.com/lyokato/libgeohash/blob/master/LICENSE; https://github.com/hjiang/jsonxx/blob/master/LICENSE; https://code.google.com/p/lz4/; https://github.com/jedisct1/libsodium/blob/master/LICENSE; http://one-jar.sourceforge.net/index.php?page=documents&file=license; https://github.com/EsotericSoftware/kryo/blob/master/license.txt; http://www.scala-lang.org/license.html; https://github.com/tinkerpop/blueprints/blob/master/LICENSE.txt; http://gee.cs.oswego.edu/dl/classes/EDU/oswego/cs/dl/util/concurrent/intro.html; https://aws.amazon.com/asl/; https://github.com/twbs/bootstrap/blob/master/LICENSE; https://sourceforge.net/p/xmlunit/code/HEAD/tree/trunk/LICENSE.txt; https://github.com/documentcloud/underscore-contrib/blob/master/LICENSE, and https://github.com/apache/hbase/blob/master/LICENSE.txt.
This product includes software licensed under the Academic Free License (http://www.opensource.org/licenses/afl-3.0.php), the Common Development and Distribution License (http://www.opensource.org/licenses/cddl1.php) the Common Public License (http://www.opensource.org/licenses/cpl1.0.php), the Sun Binary Code License Agreement Supplemental License Terms, the BSD License (http:// www.opensource.org/licenses/bsd-license.php), the new BSD License (http://opensource.org/licenses/BSD-3-Clause), the MIT License (http://www.opensource.org/licenses/mit-license.php), the Artistic License (http://www.opensource.org/licenses/artistic-license-1.0) and the Initial Developer’s Public License Version 1.0 (http://www.firebirdsql.org/en/initial-developer-s-public-license-version-1-0/).
This product includes software copyright © 2003-2006 Joe WaInes, 2006-2007 XStream Committers. All rights reserved. Permissions and limitations regarding this software are subject to terms available at http://xstream.codehaus.org/license.html. This product includes software developed by the Indiana University Extreme! Lab. For further information please visit http://www.extreme.indiana.edu/.
This product includes software Copyright (c) 2013 Frank Balluffi and Markus Moeller. All rights reserved. Permissions and limitations regarding this software are subject to terms of the MIT license.
See patents at https://www.informatica.com/legal/patents.html.
DISCLAIMER: Informatica LLC provides this documentation "as is" without warranty of any kind, either express or implied, including, but not limited to, the implied warranties of noninfringement, merchantability, or use for a particular purpose. Informatica LLC does not warrant that this software or documentation is error free. The information provided in this software or documentation may include technical inaccuracies or typographical errors. The information in this software and documentation is subject to change at any time without notice.
NOTICES
This Informatica product (the "Software") includes certain drivers (the "DataDirect Drivers") from DataDirect Technologies, an operating company of Progress Software Corporation ("DataDirect") which are subject to the following terms and conditions:
1.THE DATADIRECT DRIVERS ARE PROVIDED "AS IS" WITHOUT WARRANTY OF ANY KIND, EITHER EXPRESSED OR IMPLIED, INCLUDING BUT NOT LIMITED TO, THE IMPLIED WARRANTIES OF MERCHANTABILITY, FITNESS FOR A PARTICULAR PURPOSE AND NON-INFRINGEMENT.
2. IN NO EVENT WILL DATADIRECT OR ITS THIRD PARTY SUPPLIERS BE LIABLE TO THE END-USER CUSTOMER FOR ANY DIRECT, INDIRECT, INCIDENTAL, SPECIAL, CONSEQUENTIAL OR OTHER DAMAGES ARISING OUT OF THE USE OF THE ODBC DRIVERS, WHETHER OR NOT INFORMED OF THE POSSIBILITIES OF DAMAGES IN ADVANCE. THESE LIMITATIONS APPLY TO ALL CAUSES OF ACTION, INCLUDING, WITHOUT LIMITATION, BREACH OF CONTRACT, BREACH OF WARRANTY, NEGLIGENCE, STRICT LIABILITY, MISREPRESENTATION AND OTHER TORTS.
Part Number: MDM-SG-101000-HF1-0001
Table of Contents
Preface . . . . . . . . . . . . . . . . . . . . . . . . . . . . . . . . . . . . . . . . . . . . . . . . . . . . . . . . . . . . . . . . . . . . . . . 7Informatica Resources. . . . . . . . . . . . . . . . . . . . . . . . . . . . . . . . . . . . . . . . . . . . . . . . . . . 7
Informatica Network. . . . . . . . . . . . . . . . . . . . . . . . . . . . . . . . . . . . . . . . . . . . . . . . . . 7
Informatica Knowledge Base. . . . . . . . . . . . . . . . . . . . . . . . . . . . . . . . . . . . . . . . . . . . 7
Informatica Documentation. . . . . . . . . . . . . . . . . . . . . . . . . . . . . . . . . . . . . . . . . . . . . 8
Informatica Product Availability Matrixes. . . . . . . . . . . . . . . . . . . . . . . . . . . . . . . . . . . . . 8
Informatica Velocity. . . . . . . . . . . . . . . . . . . . . . . . . . . . . . . . . . . . . . . . . . . . . . . . . . 8
Informatica Marketplace. . . . . . . . . . . . . . . . . . . . . . . . . . . . . . . . . . . . . . . . . . . . . . . 8
Informatica Global Customer Support. . . . . . . . . . . . . . . . . . . . . . . . . . . . . . . . . . . . . . 8
Chapter 1: Introduction to MDM Hub Security. . . . . . . . . . . . . . . . . . . . . . . . . . . . . . . . . . 9MDM Hub Security Overview . . . . . . . . . . . . . . . . . . . . . . . . . . . . . . . . . . . . . . . . . . . . . . . 9
MDM Hub Console. . . . . . . . . . . . . . . . . . . . . . . . . . . . . . . . . . . . . . . . . . . . . . . . . . . . . 9
Dynamic Data Masking . . . . . . . . . . . . . . . . . . . . . . . . . . . . . . . . . . . . . . . . . . . . . . . . . 10
Security Access Manager . . . . . . . . . . . . . . . . . . . . . . . . . . . . . . . . . . . . . . . . . . . . . . . . 11
Authentication. . . . . . . . . . . . . . . . . . . . . . . . . . . . . . . . . . . . . . . . . . . . . . . . . . . . . . . . 11
Authorization. . . . . . . . . . . . . . . . . . . . . . . . . . . . . . . . . . . . . . . . . . . . . . . . . . . . . . . . 12
Secure Resources and Privileges. . . . . . . . . . . . . . . . . . . . . . . . . . . . . . . . . . . . . . . . . . . 12
Roles. . . . . . . . . . . . . . . . . . . . . . . . . . . . . . . . . . . . . . . . . . . . . . . . . . . . . . . . . . . . . 13
Security Implementation Scenarios. . . . . . . . . . . . . . . . . . . . . . . . . . . . . . . . . . . . . . . . . . 13
Internal Policy Decision Point. . . . . . . . . . . . . . . . . . . . . . . . . . . . . . . . . . . . . . . . . . . 14
External User Directory. . . . . . . . . . . . . . . . . . . . . . . . . . . . . . . . . . . . . . . . . . . . . . . 14
Role-based Centralized Policy Decision. . . . . . . . . . . . . . . . . . . . . . . . . . . . . . . . . . . . 15
Comprehensive Centralized Policy Decision. . . . . . . . . . . . . . . . . . . . . . . . . . . . . . . . . 15
Configuration Tasks for Security Scenarios. . . . . . . . . . . . . . . . . . . . . . . . . . . . . . . . . . 16
Chapter 2: Resources. . . . . . . . . . . . . . . . . . . . . . . . . . . . . . . . . . . . . . . . . . . . . . . . . . . . . . . . 17Resources Overview. . . . . . . . . . . . . . . . . . . . . . . . . . . . . . . . . . . . . . . . . . . . . . . . . . . 17
Secure and Private Resources . . . . . . . . . . . . . . . . . . . . . . . . . . . . . . . . . . . . . . . . . . . . . 18
Resource Groups. . . . . . . . . . . . . . . . . . . . . . . . . . . . . . . . . . . . . . . . . . . . . . . . . . . . . 18
Resource Group Hierarchies. . . . . . . . . . . . . . . . . . . . . . . . . . . . . . . . . . . . . . . . . . . 19
Secure Resources. . . . . . . . . . . . . . . . . . . . . . . . . . . . . . . . . . . . . . . . . . . . . . . . . . 19
Secure Resources Tool. . . . . . . . . . . . . . . . . . . . . . . . . . . . . . . . . . . . . . . . . . . . . . . . . . 19
Configuration of Secure Resources. . . . . . . . . . . . . . . . . . . . . . . . . . . . . . . . . . . . . . . . . . 19
Setting the Status of an MDM Hub Resource. . . . . . . . . . . . . . . . . . . . . . . . . . . . . . . . . 19
Filtering Resources. . . . . . . . . . . . . . . . . . . . . . . . . . . . . . . . . . . . . . . . . . . . . . . . . 20
Configuration of Resource Groups. . . . . . . . . . . . . . . . . . . . . . . . . . . . . . . . . . . . . . . . . . . 20
Adding Resource Groups. . . . . . . . . . . . . . . . . . . . . . . . . . . . . . . . . . . . . . . . . . . . . 20
Editing and Deleting Resource Groups. . . . . . . . . . . . . . . . . . . . . . . . . . . . . . . . . . . . . 21
Refreshing the Resources List. . . . . . . . . . . . . . . . . . . . . . . . . . . . . . . . . . . . . . . . . . 21
4 Table of Contents

Refreshing Other Security Changes. . . . . . . . . . . . . . . . . . . . . . . . . . . . . . . . . . . . . . . 21
Chapter 3: Roles. . . . . . . . . . . . . . . . . . . . . . . . . . . . . . . . . . . . . . . . . . . . . . . . . . . . . . . . . . . . . 23Roles Overview. . . . . . . . . . . . . . . . . . . . . . . . . . . . . . . . . . . . . . . . . . . . . . . . . . . . . . . 23
Role Configuration. . . . . . . . . . . . . . . . . . . . . . . . . . . . . . . . . . . . . . . . . . . . . . . . . . . . . 23
Adding Roles. . . . . . . . . . . . . . . . . . . . . . . . . . . . . . . . . . . . . . . . . . . . . . . . . . . . . 24
Editing and Deleting Roles. . . . . . . . . . . . . . . . . . . . . . . . . . . . . . . . . . . . . . . . . . . . . 24
Privileges. . . . . . . . . . . . . . . . . . . . . . . . . . . . . . . . . . . . . . . . . . . . . . . . . . . . . . . . . . . 24
Internal Roles and External Roles. . . . . . . . . . . . . . . . . . . . . . . . . . . . . . . . . . . . . . . . . . . 25
Assigning Resource Privileges to Roles. . . . . . . . . . . . . . . . . . . . . . . . . . . . . . . . . . . . 25
Assigning Roles to Other Roles. . . . . . . . . . . . . . . . . . . . . . . . . . . . . . . . . . . . . . . . . 26
Generating a Report of Resource Privileges for Roles. . . . . . . . . . . . . . . . . . . . . . . . . . . 26
Saving the Generated Report as an HTML File. . . . . . . . . . . . . . . . . . . . . . . . . . . . . . . . 26
Chapter 4: Users and User Groups. . . . . . . . . . . . . . . . . . . . . . . . . . . . . . . . . . . . . . . . . . . . 27Users and User Groups Overview. . . . . . . . . . . . . . . . . . . . . . . . . . . . . . . . . . . . . . . . . . . 27
User Configuration. . . . . . . . . . . . . . . . . . . . . . . . . . . . . . . . . . . . . . . . . . . . . . . . . . . . . 27
User Access to MDM Hub Resources. . . . . . . . . . . . . . . . . . . . . . . . . . . . . . . . . . . . . . 28
Adding User Accounts. . . . . . . . . . . . . . . . . . . . . . . . . . . . . . . . . . . . . . . . . . . . . . . 28
Editing and Deleting User Accounts. . . . . . . . . . . . . . . . . . . . . . . . . . . . . . . . . . . . . . . 28
Editing Supplemental User Information. . . . . . . . . . . . . . . . . . . . . . . . . . . . . . . . . . . . . 29
Changing Password Settings for User Accounts. . . . . . . . . . . . . . . . . . . . . . . . . . . . . . . 29
Configuring User Access to Operational Reference Store. . . . . . . . . . . . . . . . . . . . . . . . . 30
Password Policy Configuration. . . . . . . . . . . . . . . . . . . . . . . . . . . . . . . . . . . . . . . . . . . . . 30
Password Policy Settings. . . . . . . . . . . . . . . . . . . . . . . . . . . . . . . . . . . . . . . . . . . . . 30
Managing Global Password Policy. . . . . . . . . . . . . . . . . . . . . . . . . . . . . . . . . . . . . . . . 31
Managing Private Password Policies. . . . . . . . . . . . . . . . . . . . . . . . . . . . . . . . . . . . . . 31
JDBC Data Sources Security Configuration. . . . . . . . . . . . . . . . . . . . . . . . . . . . . . . . . . . . . 32
User Names and Passwords for a Secured JDBC Data Source. . . . . . . . . . . . . . . . . . . . . 32
Database ID for Oracle SID Connection Types. . . . . . . . . . . . . . . . . . . . . . . . . . . . . . . . 32
Database ID for Oracle Service Connection Types. . . . . . . . . . . . . . . . . . . . . . . . . . . . . 32
Database ID for IBM DB2 Connection Types. . . . . . . . . . . . . . . . . . . . . . . . . . . . . . . . . 32
Database ID for Microsoft SQL Server Connection Types. . . . . . . . . . . . . . . . . . . . . . . . . 33
Database ID for the Master Database. . . . . . . . . . . . . . . . . . . . . . . . . . . . . . . . . . . . . . 33
Password Encryption. . . . . . . . . . . . . . . . . . . . . . . . . . . . . . . . . . . . . . . . . . . . . . . . 33
User Group Configuration. . . . . . . . . . . . . . . . . . . . . . . . . . . . . . . . . . . . . . . . . . . . . . . . 33
Starting the Users and Groups Tool. . . . . . . . . . . . . . . . . . . . . . . . . . . . . . . . . . . . . . . 34
Adding User Groups. . . . . . . . . . . . . . . . . . . . . . . . . . . . . . . . . . . . . . . . . . . . . . . . . 34
Editing and Deleting User Groups. . . . . . . . . . . . . . . . . . . . . . . . . . . . . . . . . . . . . . . . 34
Assigning Users and Users Groups to User Groups. . . . . . . . . . . . . . . . . . . . . . . . . . . . . 35
Assigning Users to the Current ORS Database. . . . . . . . . . . . . . . . . . . . . . . . . . . . . . . . 35
Associations between Roles and Users and User Groups. . . . . . . . . . . . . . . . . . . . . . . . . . . . 35
Assigning Users and User Groups to Roles. . . . . . . . . . . . . . . . . . . . . . . . . . . . . . . . . . 36
Table of Contents 5
Assigning Roles to Users and User Groups. . . . . . . . . . . . . . . . . . . . . . . . . . . . . . . . . . 36
Chapter 5: Security Providers. . . . . . . . . . . . . . . . . . . . . . . . . . . . . . . . . . . . . . . . . . . . . . . . 37Security Providers Overview. . . . . . . . . . . . . . . . . . . . . . . . . . . . . . . . . . . . . . . . . . . . . . 37
Security Provider Management. . . . . . . . . . . . . . . . . . . . . . . . . . . . . . . . . . . . . . . . . . . . . 37
Provider File Management. . . . . . . . . . . . . . . . . . . . . . . . . . . . . . . . . . . . . . . . . . . . . . . . 38
Uploading a Provider File. . . . . . . . . . . . . . . . . . . . . . . . . . . . . . . . . . . . . . . . . . . . . 38
Deleting a Provider File. . . . . . . . . . . . . . . . . . . . . . . . . . . . . . . . . . . . . . . . . . . . . . . 39
Security Provider Settings. . . . . . . . . . . . . . . . . . . . . . . . . . . . . . . . . . . . . . . . . . . . . . . . 39
Changing Security Provider Settings. . . . . . . . . . . . . . . . . . . . . . . . . . . . . . . . . . . . . . 39
Enabling and Disabling Security Providers. . . . . . . . . . . . . . . . . . . . . . . . . . . . . . . . . . 40
Moving a Security Provider in the Processing Order. . . . . . . . . . . . . . . . . . . . . . . . . . . . 40
Provider Properties. . . . . . . . . . . . . . . . . . . . . . . . . . . . . . . . . . . . . . . . . . . . . . . . . . . . 40
Adding Provider Properties. . . . . . . . . . . . . . . . . . . . . . . . . . . . . . . . . . . . . . . . . . . . 41
Editing Provider Properties. . . . . . . . . . . . . . . . . . . . . . . . . . . . . . . . . . . . . . . . . . . . 41
Custom Providers. . . . . . . . . . . . . . . . . . . . . . . . . . . . . . . . . . . . . . . . . . . . . . . . . . . . . 41
Sample providers.properties File. . . . . . . . . . . . . . . . . . . . . . . . . . . . . . . . . . . . . . . . . 42
External Authentication. . . . . . . . . . . . . . . . . . . . . . . . . . . . . . . . . . . . . . . . . . . . . . . . . . 42
Adding a Login Module. . . . . . . . . . . . . . . . . . . . . . . . . . . . . . . . . . . . . . . . . . . . . . . 43
Deleting a Login Module. . . . . . . . . . . . . . . . . . . . . . . . . . . . . . . . . . . . . . . . . . . . . . 43
Chapter 6: Application Level Security. . . . . . . . . . . . . . . . . . . . . . . . . . . . . . . . . . . . . . . . . 44Overview. . . . . . . . . . . . . . . . . . . . . . . . . . . . . . . . . . . . . . . . . . . . . . . . . . . . . . . . . . . 44
Informatica Data Director. . . . . . . . . . . . . . . . . . . . . . . . . . . . . . . . . . . . . . . . . . . . . . . . . 45
Provisioning Tool. . . . . . . . . . . . . . . . . . . . . . . . . . . . . . . . . . . . . . . . . . . . . . . . . . . . . . 46
ActiveVOS. . . . . . . . . . . . . . . . . . . . . . . . . . . . . . . . . . . . . . . . . . . . . . . . . . . . . . . . . . 46
Dynamic Data Masking. . . . . . . . . . . . . . . . . . . . . . . . . . . . . . . . . . . . . . . . . . . . . . . . . . 47
Integration Between Dynamic Data Masking and the MDM Hub. . . . . . . . . . . . . . . . . . . . . 47
Dynamic Data Masking Best Practices for the MDM Hub. . . . . . . . . . . . . . . . . . . . . . . . . 47
Setting up Dynamic Data Masking for an Operational Reference Store. . . . . . . . . . . . . . . . 48
Appendix A: Glossary. . . . . . . . . . . . . . . . . . . . . . . . . . . . . . . . . . . . . . . . . . . . . . . . . . . . . . . . 50
Index. . . . . . . . . . . . . . . . . . . . . . . . . . . . . . . . . . . . . . . . . . . . . . . . . . . . . . . . . . . . 54
6 Table of Contents
PrefaceThe Informatica MDM Hub Security Guide is written for database administrators, system administrators, and implementers who are responsible for installing and setting up the Informatica MDM Hub. This guide assumes that you have knowledge of operating systems, database environments, and your application server.
Informatica Resources
Informatica NetworkInformatica Network hosts Informatica Global Customer Support, the Informatica Knowledge Base, and other product resources. To access Informatica Network, visit https://network.informatica.com.
As a member, you can:
• Access all of your Informatica resources in one place.
• Search the Knowledge Base for product resources, including documentation, FAQs, and best practices.
• View product availability information.
• Review your support cases.
• Find your local Informatica User Group Network and collaborate with your peers.
As a member, you can:
• Access all of your Informatica resources in one place.
• Search the Knowledge Base for product resources, including documentation, FAQs, and best practices.
• View product availability information.
• Find your local Informatica User Group Network and collaborate with your peers.
Informatica Knowledge BaseUse the Informatica Knowledge Base to search Informatica Network for product resources such as documentation, how-to articles, best practices, and PAMs.
To access the Knowledge Base, visit https://kb.informatica.com. If you have questions, comments, or ideas about the Knowledge Base, contact the Informatica Knowledge Base team at [email protected].
7
Informatica DocumentationTo get the latest documentation for your product, browse the Informatica Knowledge Base at https://kb.informatica.com/_layouts/ProductDocumentation/Page/ProductDocumentSearch.aspx.
If you have questions, comments, or ideas about this documentation, contact the Informatica Documentation team through email at [email protected].
Informatica Product Availability MatrixesProduct Availability Matrixes (PAMs) indicate the versions of operating systems, databases, and other types of data sources and targets that a product release supports. If you are an Informatica Network member, you can access PAMs at https://network.informatica.com/community/informatica-network/product-availability-matrices.
Informatica VelocityInformatica Velocity is a collection of tips and best practices developed by Informatica Professional Services. Developed from the real-world experience of hundreds of data management projects, Informatica Velocity represents the collective knowledge of our consultants who have worked with organizations from around the world to plan, develop, deploy, and maintain successful data management solutions.
If you are an Informatica Network member, you can access Informatica Velocity resources at https://velocity.informatica.com.
If you have questions, comments, or ideas about Informatica Velocity, contact Informatica Professional Services at [email protected].
Informatica MarketplaceThe Informatica Marketplace is a forum where you can find solutions that augment, extend, or enhance your Informatica implementations. By leveraging any of the hundreds of solutions from Informatica developers and partners, you can improve your productivity and speed up time to implementation on your projects. You can access Informatica Marketplace at https://marketplace.informatica.com.
Informatica Global Customer SupportYou can contact a Global Support Center by telephone or through Online Support on Informatica Network.
To find your local Informatica Global Customer Support telephone number, visit the Informatica website at the following link: http://www.informatica.com/us/services-and-training/support-services/global-support-centers.
If you are an Informatica Network member, you can use Online Support at http://network.informatica.com.
8 Preface
C H A P T E R 1
Introduction to MDM Hub SecurityThis chapter includes the following topics:
• MDM Hub Security Overview , 9
• MDM Hub Console, 9
• Dynamic Data Masking , 10
• Security Access Manager , 11
• Authentication, 11
• Authorization, 12
• Secure Resources and Privileges, 12
• Roles, 13
• Security Implementation Scenarios, 13
MDM Hub Security OverviewThe MDM Hub secures data from unauthorized access and tampering to protect information privacy and data integrity.
You can use the Security Access Manager in the Hub Console to secure MDM Hub resources and enforce operational security policies, including user authentication and authorization.
You can use Dynamic Data Masking to prevent access to sensitive data. For example, you can use Dynamic Data Masking to conceal credit card numbers from all users who do not have administrative rights.
You can configure security in MDM Hub implementations in multiple ways. You can use third-party security providers to handle specific elements of security for your organization, or you can configure the MDM Hub manage all aspects of security. For more information about using the Services Integration Framework (SIF) to configure security, see the Informatica MDM Hub Services Integration Framework Guide.
MDM Hub ConsoleUse the Hub Console to configure security in the MDM Hub.
To control access privileges to Hub Console tools, you can use the Tool Access tool in the Configuration workbench. For example, you can use the Tool Access tool to deny data stewards access to all Hub Console tools except the Data Manager and Merge Manager tools.
9
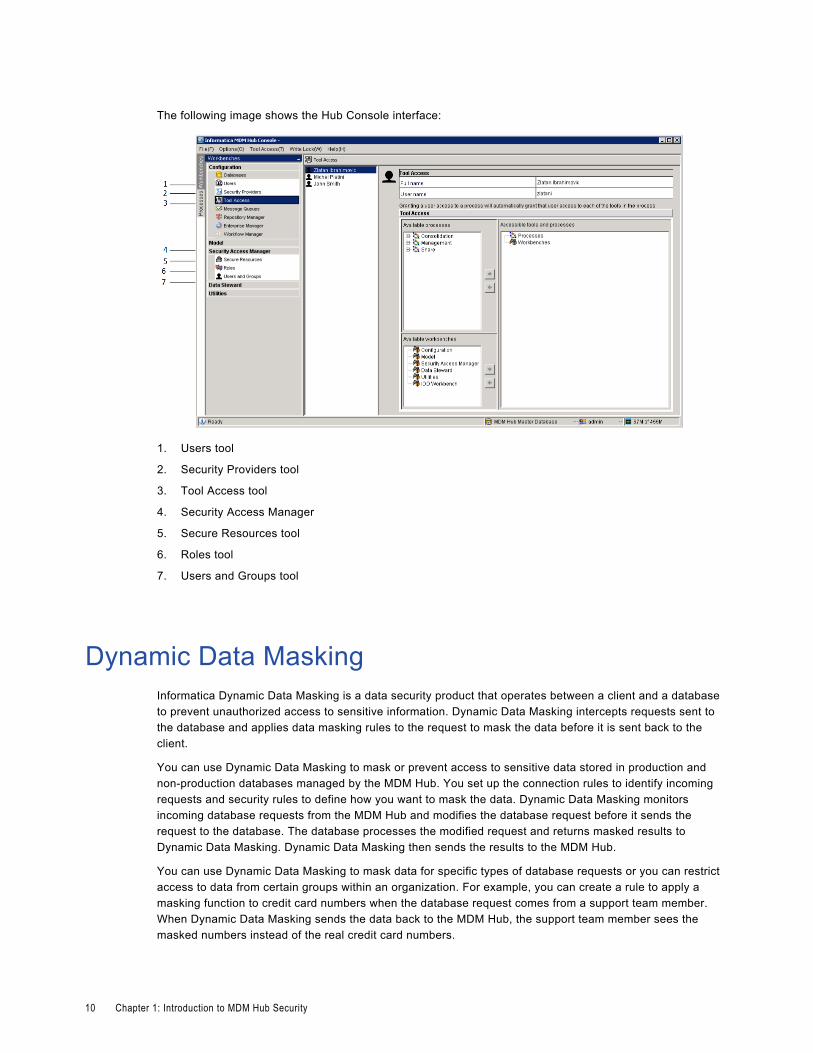
The following image shows the Hub Console interface:
1. Users tool
2. Security Providers tool
3. Tool Access tool
4. Security Access Manager
5. Secure Resources tool
6. Roles tool
7. Users and Groups tool
Dynamic Data MaskingInformatica Dynamic Data Masking is a data security product that operates between a client and a database to prevent unauthorized access to sensitive information. Dynamic Data Masking intercepts requests sent to the database and applies data masking rules to the request to mask the data before it is sent back to the client.
You can use Dynamic Data Masking to mask or prevent access to sensitive data stored in production and non-production databases managed by the MDM Hub. You set up the connection rules to identify incoming requests and security rules to define how you want to mask the data. Dynamic Data Masking monitors incoming database requests from the MDM Hub and modifies the database request before it sends the request to the database. The database processes the modified request and returns masked results to Dynamic Data Masking. Dynamic Data Masking then sends the results to the MDM Hub.
You can use Dynamic Data Masking to mask data for specific types of database requests or you can restrict access to data from certain groups within an organization. For example, you can create a rule to apply a masking function to credit card numbers when the database request comes from a support team member. When Dynamic Data Masking sends the data back to the MDM Hub, the support team member sees the masked numbers instead of the real credit card numbers.
10 Chapter 1: Introduction to MDM Hub Security
Note: To use Dynamic Data Masking in the MDM Hub, you need to have Dynamic Data Masking 9.6.0 and Emergency Bug Fix 14590 installed. Earlier versions of Dynamic Data Masking are not compatible with the MDM Hub.
For more information about Dynamic Data Masking, see the Dynamic Data Masking documentation.
Security Access ManagerThe Security Access Manager is the security module for the MDM Hub. The Security Access Manager protects MDM Hub resources from unauthorized access.
The Security Access Manager enforces the security policies of your organization in your MDM Hub implementation. The Security Access Manager manages user authentication and authorization according to your security configuration.
Note: You can use the Security Access Manager to configure user access to MDM Hub resources from third-party applications. However, you cannot configure security for Hub Console tools and resources through the Security Access Manager. The Hub Console authenticates users and authorizes user access to Hub Console tools and resources through a separate security mechanism.
AuthenticationAuthentication is the process of verifying the identity of a user.
The MDM Hub authenticates users based on their supplied credentials, such as a user name and password, or raw binary data in a security payload.
The MDM Hub uses the following types of authentication:Internal
Authenticates users within the MDM Hub, where the user logs in with a user name and password.
External Directory
Authenticates users through an external user directory, with native support for LDAP-enabled directory servers, Microsoft Active Directory, and Kerberos.
External Authentication Providers
Authenticates users through third-party authentication providers.
MDM Hub implementations can use each type of authentication exclusively, or implementations can use a combination of authentications. The type of authentication that you use depends on how you configure security.
Security Access Manager 11
AuthorizationAuthorization is the process of determining whether a user has sufficient privileges to access a requested MDM Hub resource.
In the MDM Hub, you can use internal and external authorization:Internal
Authorizes through the MDM Hub. The MDM Hub determines whether you can access secure resources by examining the privileges associated with any roles assigned to your user account.
External
Authorizes through third-party authorization providers.
You can configure the MDM Hub to use either type of authorization, or you can configure it to use both types of authorization.
Secure Resources and PrivilegesYou can configure multiple MDM Hub resources as secure resources.
The following resources are configurable:
• Base objects
• Mappings
• Packages
• Cleanse functions
• Match rule sets
• Metadata
• Profiles
• Users table
You can grant access to MDM Hub resources according to privileges. The MDM Hub can assign the following privileges:
• Read
• Create
• Update
• Merge
• Execute
• Delete
Resources can be either private or secure. By default, resources are secure. The MDM Hub can grant privileges only to secure resources.
When you configure security in the MDM Hub, consider the following facts:
• A specific resource is configured to be secure.
• A specific role is configured to have access to one or more secure resources.
12 Chapter 1: Introduction to MDM Hub Security
• Each secure resource can be configured with specific privileges, such as read or write, that define access for that role to the secure resource.
To run a Services Integration Framework request, the logged-in user must have a role that has the required privileges to access the resource involved with the request.
RolesA role represents a set of privileges to access secure MDM Hub resources. You assign a user a role in order for that user to gain privileges.
You can use the Roles tool in the Security Access Manager workbench to assign roles to users and user groups. The roles assigned to a user or user group determine the resource privileges of a user or user group. You cannot assign privileges to users directly.
The Security Access Manager enforces resource authorization for requests from external application users. Administrators and data stewards who use the Hub Console to access MDM Hub resources are not affected by resource privileges to the same extent.
Security Implementation ScenariosYou can configure security in MDM Hub implementations in multiple ways.
A policy decision point is a specific security check point that determines the identity of users at run time. This is called authentication. A policy decision point also confirms what MDM Hub resources users can access. This is called authorization. The degree to which policy decision points are handled internally by the MDM Hub, or externally by third-party security providers or other security services, depends on the MDM Hub implementation.
The following scenarios are examples of high-level ways that you can configure security in MDM Hub implementations:
• Internal-only policy decision points
• External User Directory
• Roles-based Centralized policy decision points
• Comprehensive Centralized policy decision points
Note: The MDM Hub does not reflect changes to resource privileges from an external security provider. If you make changes to resource privileges by using an external security provider, use other means to synchronize the changes with the MDM Hub.
Roles 13
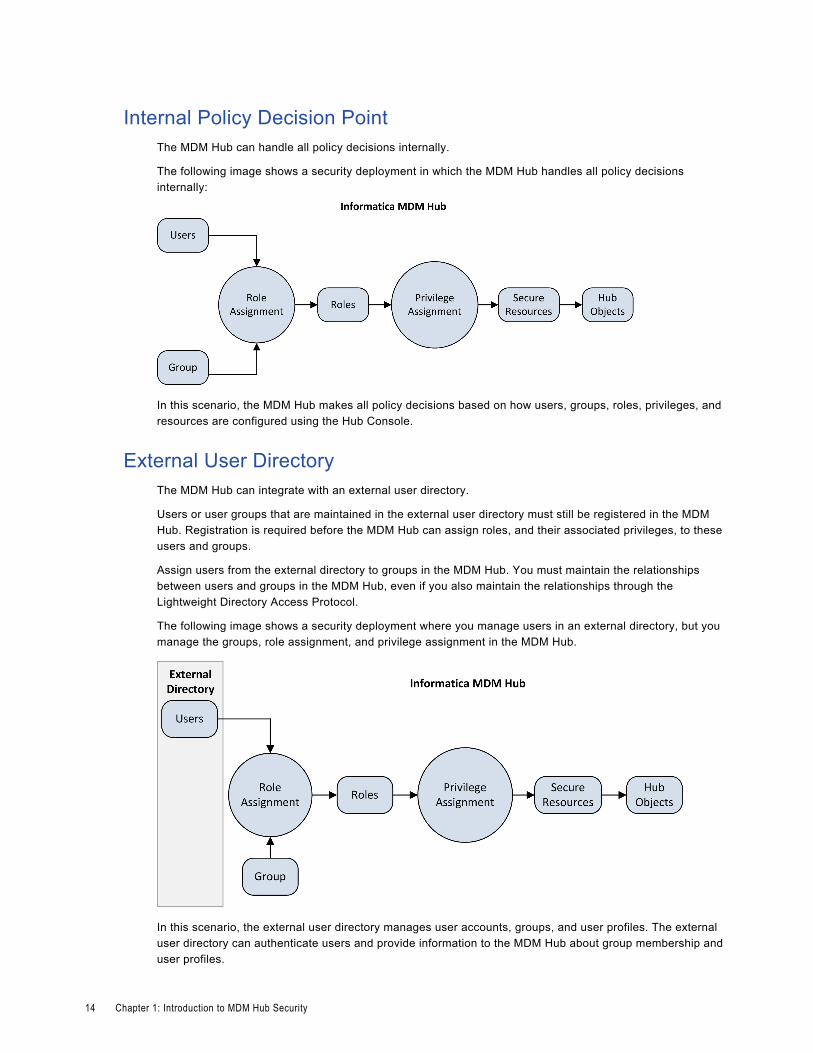
Internal Policy Decision PointThe MDM Hub can handle all policy decisions internally.
The following image shows a security deployment in which the MDM Hub handles all policy decisions internally:
In this scenario, the MDM Hub makes all policy decisions based on how users, groups, roles, privileges, and resources are configured using the Hub Console.
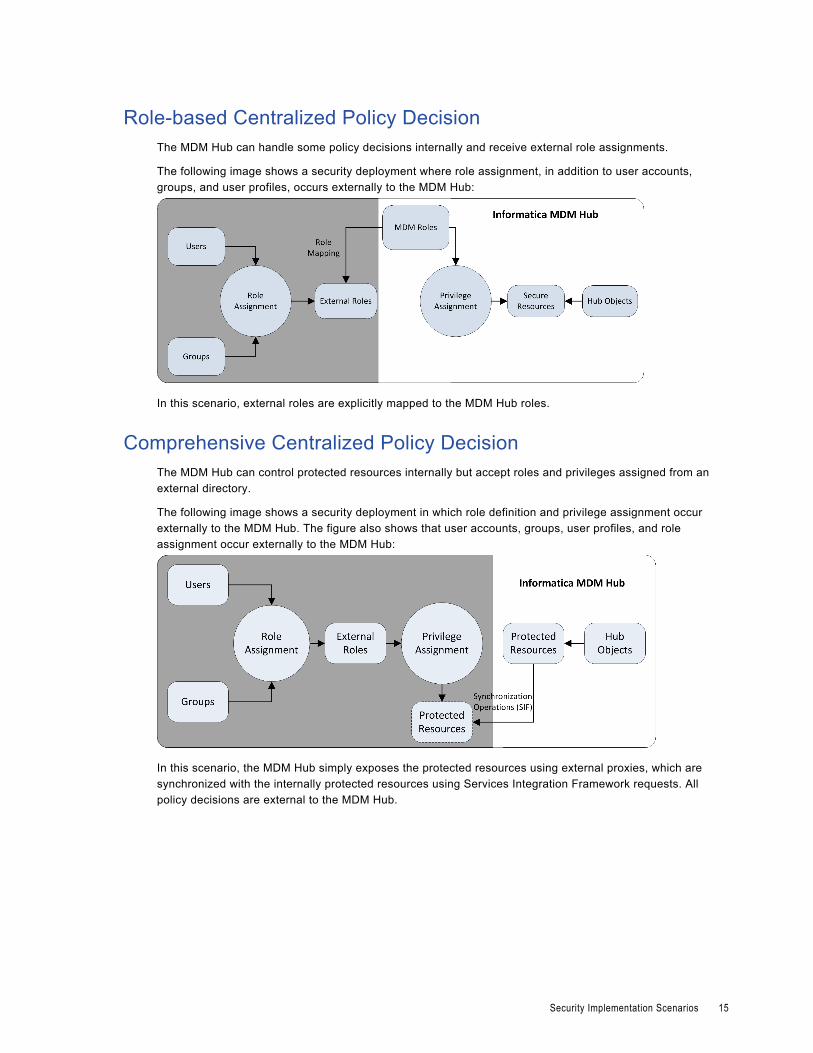
External User DirectoryThe MDM Hub can integrate with an external user directory.
Users or user groups that are maintained in the external user directory must still be registered in the MDM Hub. Registration is required before the MDM Hub can assign roles, and their associated privileges, to these users and groups.
Assign users from the external directory to groups in the MDM Hub. You must maintain the relationships between users and groups in the MDM Hub, even if you also maintain the relationships through the Lightweight Directory Access Protocol.
The following image shows a security deployment where you manage users in an external directory, but you manage the groups, role assignment, and privilege assignment in the MDM Hub.
In this scenario, the external user directory manages user accounts, groups, and user profiles. The external user directory can authenticate users and provide information to the MDM Hub about group membership and user profiles.
14 Chapter 1: Introduction to MDM Hub Security
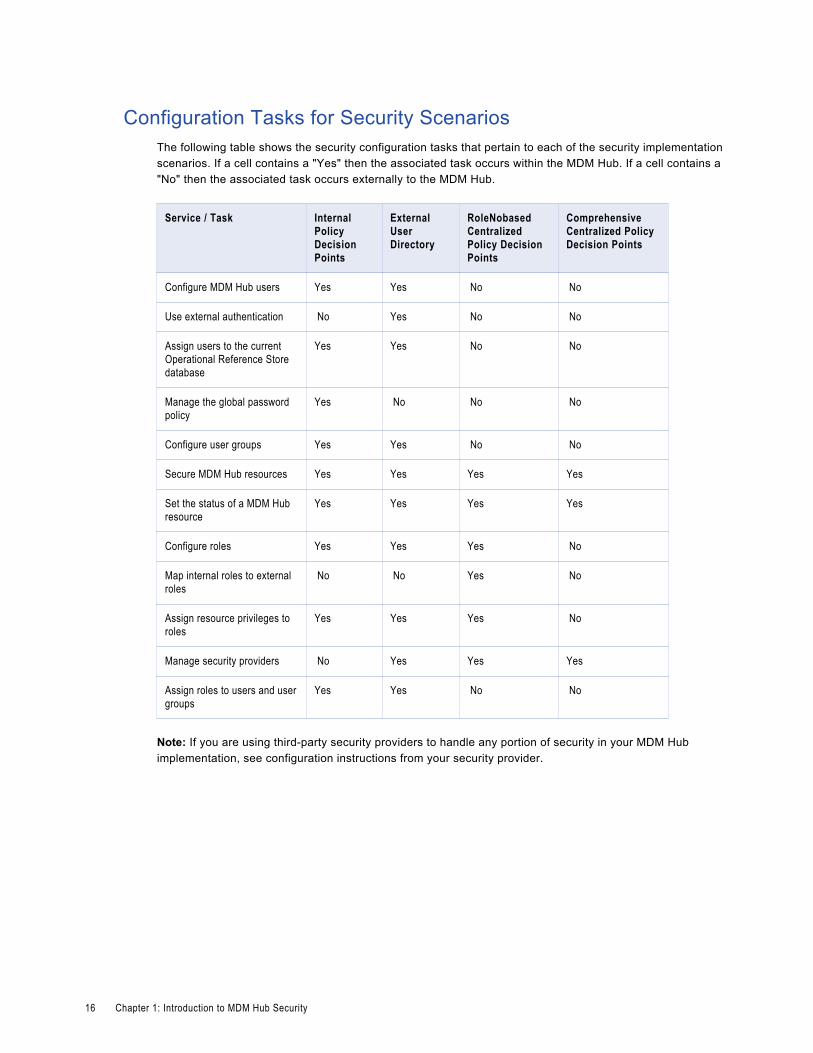
Role-based Centralized Policy DecisionThe MDM Hub can handle some policy decisions internally and receive external role assignments.
The following image shows a security deployment where role assignment, in addition to user accounts, groups, and user profiles, occurs externally to the MDM Hub:
In this scenario, external roles are explicitly mapped to the MDM Hub roles.
Comprehensive Centralized Policy DecisionThe MDM Hub can control protected resources internally but accept roles and privileges assigned from an external directory.
The following image shows a security deployment in which role definition and privilege assignment occur externally to the MDM Hub. The figure also shows that user accounts, groups, user profiles, and role assignment occur externally to the MDM Hub:
In this scenario, the MDM Hub simply exposes the protected resources using external proxies, which are synchronized with the internally protected resources using Services Integration Framework requests. All policy decisions are external to the MDM Hub.
Security Implementation Scenarios 15
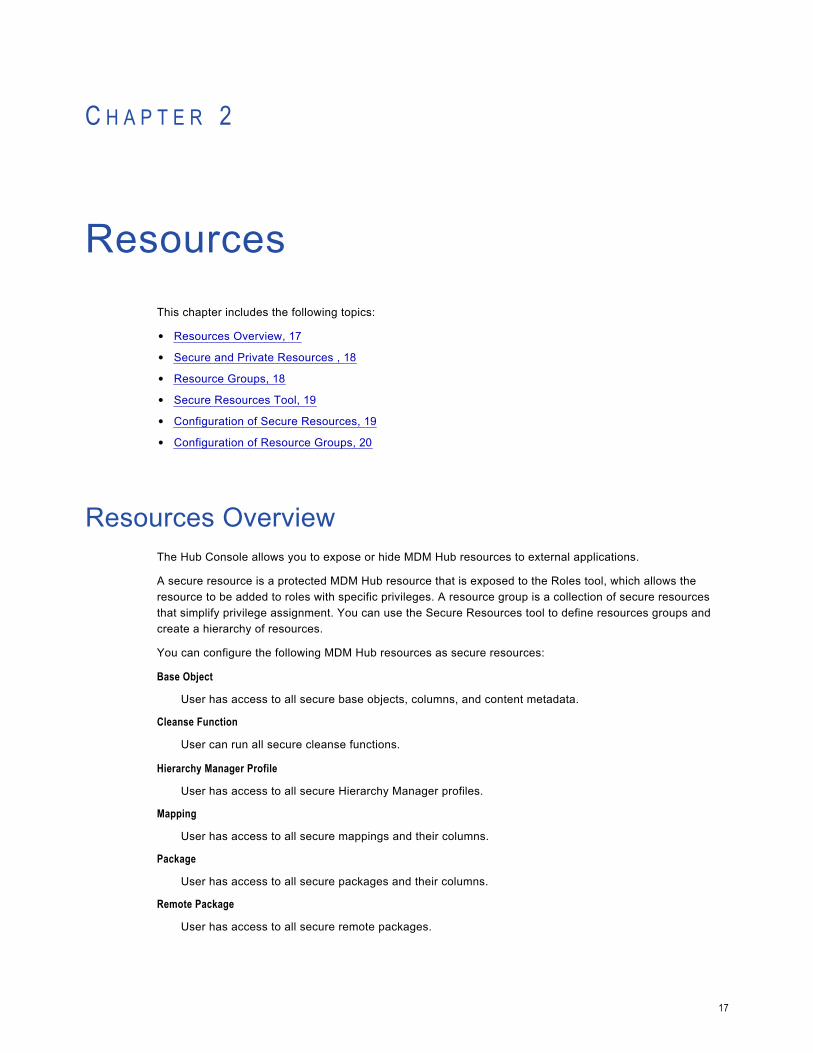
Configuration Tasks for Security ScenariosThe following table shows the security configuration tasks that pertain to each of the security implementation scenarios. If a cell contains a "Yes" then the associated task occurs within the MDM Hub. If a cell contains a "No" then the associated task occurs externally to the MDM Hub.
Service / Task Internal Policy Decision Points
External User Directory
RoleNobased Centralized Policy Decision Points
Comprehensive Centralized Policy Decision Points
Configure MDM Hub users Yes Yes No No
Use external authentication No Yes No No
Assign users to the current Operational Reference Store database
Yes Yes No No
Manage the global password policy
Yes No No No
Configure user groups Yes Yes No No
Secure MDM Hub resources Yes Yes Yes Yes
Set the status of a MDM Hub resource
Yes Yes Yes Yes
Configure roles Yes Yes Yes No
Map internal roles to external roles
No No Yes No
Assign resource privileges to roles
Yes Yes Yes No
Manage security providers No Yes Yes Yes
Assign roles to users and user groups
Yes Yes No No
Note: If you are using third-party security providers to handle any portion of security in your MDM Hub implementation, see configuration instructions from your security provider.
16 Chapter 1: Introduction to MDM Hub Security
C H A P T E R 2
ResourcesThis chapter includes the following topics:
• Resources Overview, 17
• Secure and Private Resources , 18
• Resource Groups, 18
• Secure Resources Tool, 19
• Configuration of Secure Resources, 19
• Configuration of Resource Groups, 20
Resources OverviewThe Hub Console allows you to expose or hide MDM Hub resources to external applications.
A secure resource is a protected MDM Hub resource that is exposed to the Roles tool, which allows the resource to be added to roles with specific privileges. A resource group is a collection of secure resources that simplify privilege assignment. You can use the Secure Resources tool to define resources groups and create a hierarchy of resources.
You can configure the following MDM Hub resources as secure resources:
Base Object
User has access to all secure base objects, columns, and content metadata.
Cleanse Function
User can run all secure cleanse functions.
Hierarchy Manager Profile
User has access to all secure Hierarchy Manager profiles.
Mapping
User has access to all secure mappings and their columns.
Package
User has access to all secure packages and their columns.
Remote Package
User has access to all secure remote packages.
17
Batch groups are secure by default. You cannot change the status of batch groups to private. The batch group has Read and Execute privileges.
In addition, you can use the Hub Console to protect other resources that are accessible by SIF requests, including metadata, match rule sets, the audit table, and the users table.
Note: If you use Informatica Data Director, you can use the HTTP methods GET or POST to access the Hub Server. Other HTTP methods, such as DELETE or PUT, return an HTTP error.
Secure and Private ResourcesYou can configure a protected MDM Hub resource as either secure or private.
Secure
Exposes this MDM Hub resource to the Roles tool, which allows the resource to be added to roles with specific privileges. When you assign a specific role to a user, then that user can use SIF requests to access the secure resources according to the privileges associated with that role. By default, MDM Hub designates a new resource, such as a base object, as secure.
Private
Hides the MDM Hub resource from the Roles tool. Prevents access of the resource from SIF requests.
A resource must be secure before external applications can use SIF requests to access an MDM Hub resource.
There are certain MDM Hub resources that you might not want to expose to external applications. For example, your MDM Hub implementation might have mappings or packages that are used only in batch jobs, and not in SIF requests, so these could remain private.
Note: The MDM Hub does not consider package columns to be secure resources. Package columns inherit the secure status and privileges from the parent base object columns. If package columns are based on system table columns, you do not need to set up security for them, because they are accessible by default.
Resource GroupsA resource group is a logical collection of secure resources.
You can use the Secure Resources tool to define resource groups, and then assign related resources to them. Resource groups simplify privilege assignment, which allows you to assign privileges to multiple resources and assign resource groups to a role.
To simplify administration, consider the creation of the following kinds of resource groups:
• Define an ALL_RESOURCES resource group that contains all secure resources, which allows you to set minimal privileges globally.
• Define resource groups by resource type so that you can set minimal privileges to those kinds of resources.
• Define resource groups by functional area, such as TRAINING_RESOURCES, for example.
• Define a catch-all resource group that you can then assign to many different roles that have similar privileges.
18 Chapter 2: Resources
Resource Group HierarchiesA resource group can also contain other resource groups, except a resource group to which it belongs. This means you can build a hierarchy of resource groups and simplify the management of a large collection of resources.
Secure ResourcesOnly secure resources can belong to resource groups. Private resources cannot belong to resource groups.
If you change the status of a resource to private, then the MDM Hub removes the resource from any resource groups to which it belongs. When you set the status of a resource to secure, the MDM Hub adds the resource to the appropriate resource group.
Secure Resources ToolUse the Secure Resources tool in the Hub Console to manage security for MDM Hub resources in detail, including setting the status of any MDM Hub resource to secure or private. You can also use resource groups to configure a hierarchy of resources.
The Secure Resources tool contains the following tabs:Resources
Used to set the status of individual MDM Hub resources as secure or private. MDM Hub displays the resources as a hierarchy that shows the relationships among resources. Global resources appear at the top of the hierarchy.
Resource Groups
Used to configure resource groups.
You can use the Secure Resources tool to expose resources to, or hide resources from, the Roles tool and SIF requests. You must connect to an Operational Reference Store before you use the tool.
Configuration of Secure ResourcesTo browse and configure MDM Hub resources, use the Resources tab in the Secure Resources tool.
Setting the Status of an MDM Hub ResourceYou can configure the resource status as secure or private for any MDM Hub resource.
Note: This status setting does not apply to resource groups, which contain only secure resources, or to global resources.
1. Start the Secure Resources tool.
2. Acquire a write lock.
3. On the Resources tab, navigate the Resources tree to find the resources that you want to configure.
4. Double-click the resource name to toggle between secure or private. To change the status of multiple resources at one time, perform step 5 and 6.
Secure Resources Tool 19
5. Select the resources that require a status change. You can select multiple resources if you want.
6. Update the status of the resources you selected.
• Click the Secure button to change the status of the selected resources to secure.
• Click the Private button to change the status of the selected resources to private.
7. Click the Save button to save your changes.
Filtering ResourcesTo simplify changing the status of a collection of MDM Hub resources, you can specify a filter that displays only the resources that you want to change.
1. Start the Secure Resources tool.
2. Acquire a write lock.
3. Click the Filter Resources button.
The Secure Resources tool displays the Resources Filter dialog box.
4. Select resource types.
• Select the resource types that you want to include in the filter.
• Clear the resource types that you want to exclude in the filter.
5. Click OK.
The Secure Resources tool displays the filtered Resources tree.
Configuration of Resource GroupsYou can use the Secure Resources tool to define resources groups and create a hierarchy of resources. You can then use the Roles tool to assign privileges to multiple resources in a single operation.
The Secure Resources tool differentiates visually between resources that belong directly to the current resource group and resources that belong indirectly. Resources explicitly added to a resource group have direct membership. Resources that belong to a resource group that was added to a resource group have indirect membership.
For example, you want to have two resource groups:
• Resource Group A contains the Consumer base object, which means that the Consumer base object is a direct member of Resource Group A.
• Resource Group B contains the Address base object.
• Resource Group A contains Resource Group B, which means that the Address base object is an indirect member of Resource Group A.
In this example, the Address base object is unavailable when you edit Resource Group A. You must edit Resource Group B to edit the Address base object.
Adding Resource GroupsUse the Secure Resources tool to add a resource group to the resources list.
1. Start the Secure Resources tool.
20 Chapter 2: Resources
2. Acquire a write lock.
3. Click the Resource Groups tab.
The Secure Resources tool displays the Resource Group tab.
4. Click the Add button.
The Secure Resources displays the Add Resources to Resource Group dialog box.
5. Enter a unique, descriptive name for the resource group.
6. Click the plus (+) sign to expand the resource hierarchy as needed.
Each resource has a check box indicating membership in the resource group. If you select a parent, all the children are selected as well. For example, if you select the Base Objects item in the tree then all base objects and their child resources are selected.
7. Select the resources that you want to assign to this resource group.
8. Click OK.
The Secure Resources tool adds the new resource to the Resource Groups node.
Editing and Deleting Resource GroupsYou can use the Secure Resources tool to edit or delete resource groups.
1. Start the Secure Resources tool.
2. Acquire a write lock.
3. Click the Resource Groups tab.
4. Select the resource group whose properties you want to edit or delete.
• Click the Edit button to edit a resource group.
• Click the Remove button to remove a resource group.
The Secure Resources tool displays the Assign Resources to Resource Group dialog box. Or the Secure Resources tool removes the deleted resource from the Resource Groups node.
5. Edit the resource group name.
6. Click the plus (+) sign to expand the resource hierarchy.
7. Select the Show Only Resources Selected for this Resource Group check box.
8. Select the resources that you want to assign to this resource group.
9. Clear the resources that you want to remove from this resource group.
10. Click OK.
Refreshing the Resources ListAfter adding a resource, you can refresh the resources list to update it.
To refresh the Resources list, choose Refresh from the Secure Resources menu.
The Secure Resources tool updates the Resources list.
Refreshing Other Security ChangesYou can also change the refresh interval for all other security changes.
Configuration of Resource Groups 21

To set the refresh rate for security changes, set the following parameter in the cmxserver.properities file:
cmx.server.sam.cache.resources.refresh_intervalNote: The default refresh interval is five minutes if not set.
22 Chapter 2: Resources
C H A P T E R 3
RolesThis chapter includes the following topics:
• Roles Overview, 23
• Role Configuration, 23
• Privileges, 24
• Internal Roles and External Roles, 25
Roles OverviewA role is a collection of privileges that you assign to a user or group. A role represents a set of privileges to access secure MDM Hub resources.
For users to view or manipulate a secure MDM Hub resource, those users must be assigned roles that grant them sufficient privileges to access the resource. Roles determine what a user is authorized to access and which tasks they can perform in the MDM Hub.
MDM Hub roles are highly granular and flexible, which allows administrators to implement complex security safeguards according to the security policies of their organization. Some users, such as administrators, might be assigned a single role with access to everything. Other users, such as data stewards, might have a role with explicitly restricted privileges.
A role can also have other roles assigned to it, thereby inheriting the access privileges configured for those roles. Privileges are additive, meaning that, when you combine roles, you combine the privileges of those roles as well. For example, Role A has read privileges to an Address base object, and Role B has create and update privileges to it. If a user account is assigned Role A and Role B, then that user account will have read, create, and update privileges to the Address base object. A user account inherits the privileges configured for any role to which the user account is assigned.
Role ConfigurationYou can create, edit, and delete roles in the MDM Hub.
Note: If you use a comprehensive centralized security deployment, in which users are authorized externally, you do not need to configure roles.
23
Resource privileges vary based on the scope of access required for users to do their jobs. The best practice for administrators is to follow the principle of least privilege. Assign to users the lowest level of privilege needed to do their work.
Adding RolesTo configure roles and assign access privileges to MDM Hub resources, use the Roles tool in the Security Access Manager workbench.
1. Start the Roles tool.
2. Acquire a write lock.
3. Point anywhere in the navigation pane, right-click, and choose Add Role.
The Roles tool displays the Add Role dialog box.
4. Enter the name of the role.
5. Enter an optional description of the role.
6. Enter an external name, or alias, of the role.
7. Click OK.
The Roles tool adds the new role to the roles list.
Editing and Deleting RolesTo edit or delete an existing role, use the Roles tool in the Security Access Manager workbench.
1. Start the Roles tool.
2. Acquire a write lock.
3. Scroll the roles list and select the role that you want to edit.
• For each property that you want to edit, click the Edit button next to it, and specify the new value.
• Point anywhere in the navigation pane, right-click, and choose Delete Role, and click Yes when prompted for confirmation.
4. Click the Save button to save your changes.
PrivilegesWith MDM Hub internal authorization, you can assign privileges to roles.
You can assign the following privileges to roles:
Read
User can view but not change data.
Create
User can create data records in the Hub Store
Update
User can update data records in the Hub Store.
24 Chapter 3: Roles
Delete
User can delete data records in the Hub Store.
Merge
User can merge and unmerge data.
Execute
User can run cleanse functions and batch groups.
Privileges determine the access that external application users have to MDM Hub resources. For example, you can configure a role to have read, create, update, and merge privileges on particular packages.
Note: Each privilege is distinct and must be explicitly assigned. Privileges do not aggregate other privileges. For example, a user who has update access to a resource does not necessarily have read access to it. Both privileges must be individually assigned.
When you use the Hub Console, privileges are not enforced although the settings still affect the use of the Hub Console. For example, data stewards cannot view any packages in the Merge Manager and Data Manager except those for which they have read privileges. For data stewards to edit and save changes to data in a particular package, they must have update and create privileges for that package.
If data stewards do not have update or create privileges, then they cannot change any data in the Data Manager. Similarly, a data steward must have merge privileges to use the Merge Manager to merge or unmerge records. To learn more about the Merge Manager and Data Manager tools, see the Informatica MDM Multidomain Edition Data Steward Guide.
Internal Roles and External RolesIn a role-based centralized security implementation, you must create a mapping between the MDM Hub internal role and the external role that is managed separately from the MDM Hub.
The name of the external role name might differ from the internal role name used in a MDM Hub environment.
Configuration details depend on the role mapping implementation of the security provider. You map roles in a configuration file. You can map one external role to more than one internal role.
Note: Although mappings are often created in XML, there is no predefined format for a configuration file. It might not be an XML file or even a file. The mapping is part of the custom user profile or authentication provider implementation. The purpose of the mapping is to populate a user profile object roles list with internal role IDs.
Assigning Resource Privileges to RolesYou can use the Roles tool in the Security Access Manager workbench to assign and edit resource privileges for roles.
1. Start the Roles tool.
2. Acquire a write lock.
3. Scroll the roles list and select the role to which you want to assign resource privileges.
4. Click the Resource Privileges tab.
5. Expand the Resources hierarchy to show the secure resources that you want to configure for this role.
Internal Roles and External Roles 25
6. For each resource that you want to configure:
• Select any privilege that you want to grant to this role.
• Clear any privilege that you want to remove from this role.
7. Click the Save button to save your changes.
Assigning Roles to Other RolesA role can also inherit other roles, except a role to which it already belongs. For example, if you assign Role B to Role A, then Role A inherits the access privileges of Role B.
1. Start the Roles tool.
2. Acquire a write lock.
3. Scroll the roles list and select the role to which you want to assign other roles.
4. Click the Roles tab.
The Roles tool displays any roles that can be assigned to the selected role.
5. Select any role that you want to assign to the selected role.
6. Clear any role that you want to remove from this role.
7. Click the Save button to save your changes.
Generating a Report of Resource Privileges for RolesYou can generate a report that describes the resource privileges granted to a particular role.
1. Start the Roles tool.
2. Acquire a write lock.
3. Scroll the roles list and select the role for which you want to generate a report.
4. Click the Report tab.
5. Click Generate.
The Roles tool generates the report and displays it in the Report tab.
Saving the Generated Report as an HTML File1. Click Save.
The Roles tool prompts you to specify the target location for the saved report.
2. Navigate to the target location.
3. Click Save.
The Security Access Manager saves the report using the following naming convention:
<ORS_Name>-<Role_Name>-RolePrivilegeReport.html
where:
• ORS_Name is the name of the target database.
• Role_Name is the role associated with the generated report.
The Roles tool saves the current report as an HTML file in the target location. You can subsequently display this report using a browser.
26 Chapter 3: Roles
C H A P T E R 4
Users and User GroupsThis chapter includes the following topics:
• Users and User Groups Overview, 27
• User Configuration, 27
• Password Policy Configuration, 30
• JDBC Data Sources Security Configuration, 32
• User Group Configuration, 33
• Associations between Roles and Users and User Groups, 35
Users and User Groups OverviewAn MDM Hub user is an individual who can access MDM Hub resources.
User accounts are defined in the Master Database in the Hub Store. For an introduction to MDM Hub users, see the Informatica MDM Multidomain Edition Overview.
A user account gains access to MDM Hub resources using the roles assigned to it, inheriting the privileges configured for each role.
You can use the Users tool in the Configuration workbench to configure user accounts for MDM Hub users, as well as to change passwords and enable external authentication. External applications with sufficient authorization can also register user accounts using SIF requests, as described in the Informatica MDM Multidomain Edition Services Integration Framework Guide.
User ConfigurationYou can create, edit, and delete users in the MDM Hub.
Depending on how you have deployed security, your MDM Hub implementation might require that you add users to the Master Database.
You must configure users in the Master Database in the following scenarios:
• You are using internal authorization in the MDM Hub.
• You are using external authorization with the MDM Hub.
• Multiple users access the Hub Console using different accounts.
27
A user needs to be defined only once, even if the same user will access more than one Operational Reference Store associated with the Master Database.
User Access to MDM Hub ResourcesUsers can access MDM Hub resources in the following ways:
Hub Console
Users can interact with the MDM Hub by logging into the Hub Console and using the tools to which they have access. These users typically included administrators and data stewards.
Third-Party Applications
Users can interact with MDM Hub data indirectly using third-party applications that use SIF classes. These users never log into the Hub Console. They log in to the MDM Hub using applications that can invoke SIF classes. These users are known as external application users. To learn more about the kinds of SIF requests that developers can invoke, see the Informatica MDM Multidomain Edition Services Integration Framework Guide.
Adding User AccountsUse the Users tool in the Security Access Manager workbench to add a user account to the MDM Hub.
1. Start the Users tool.
2. Acquire a write lock.
3. Click the Users tab.
4. Click the Add user button.
The Users tool displays the Add User dialog box.
5. Enter a first, middle, and last name for the user.
6. Enter the user name for the user. This is the name entered when the user logs in to the Hub Console.
7. Enter the default database for the user. This is the database that is selected by default when the user logs in to Hub Console.
8. Enter and verify a password for the user.
9. Choose the type of authentication.
• Select the Use external authentication check box if your MDM Hub implementation uses authentication through a third-party security provider.
• Clear the Use external authentication check box if you want to use the internal authentication in the MDM Hub.
10. Click OK.
The Users tool adds the new user to the list of users on the Users tab.
Editing and Deleting User AccountsYou can use the Users tool in the Security Access Manager workbench to edit or remove user accounts.
1. Start the Users tool.
2. Acquire a write lock.
3. Click the Users tab.
4. If you want to delete a user, select the user account that you want to remove.
28 Chapter 4: Users and User Groups

5. Click the Delete button.
The Users tool prompts you to confirm deletion.
6. Click Yes to confirm deletion.
The Users tool removes the deleted user account from the list of users.
7. If you want to edit a user, select the user account that you want to configure.
8. To change a name, double-click the cell and type a different name.
9. Select a different login database and server, if you want.
10. Select the Administrator check box to give this user administrative access, which allows them to have access to all Hub Console tools and all databases.
11. Select the Enable check box to activate this user account and allow this user to log in.
Note: If you use external authentication for a user, you cannot disable the user account through the Hub Console.
12. Click the Save button.
The Users tool saves your changes to the user account.
Editing Supplemental User InformationYou can use the MDM Hub to manage supplemental information for each user, such as an email address or phone numbers. The MDM Hub does not require that you provide this information, nor does the MDM Hub use this information in any special way.
To edit supplemental user information:
1. Start the Users tool.
2. Acquire a write lock.
3. Click the Users tab.
4. Select the user whose properties you want to edit.
5. Click the Edit button.
The Users tool displays the Edit User dialog box.
6. Specify any of the properties of the user, such as title, email address, or login message. The login message is the message that the Hub Console displays after this user logs in.
7. Click OK.
8. Click the Save button to save your changes.
Changing Password Settings for User AccountsYou can change password settings for a user.
1. Start the Users tool.
2. Acquire a write lock.
3. Click the Users tab.
4. Select the user whose password you want to change.
5. Click the Change Password button.
The Users tool displays the Change Password dialog box for the selected user.
6. Specify and verify the new password.
User Configuration 29
7. Choose the type of authentication.
• Select the Use external authentication check box if your MDM Hub implementation uses authentication through a third-party security provider.
• Clear the Use external authentication check box if you want to use the internal authentication in the MDM Hub.
8. Click OK.
Configuring User Access to Operational Reference StoreYou can configure user access to Operational Reference Store databases.
1. Start the Users tool.
2. Acquire a write lock.
3. Click the Target Database tab.
The Users tool displays the Target Database tab.
4. Expand each database node to see which users that can access that database.
5. To change user assignments to a database, right-click the database name and choose Assign User.
The Users tool displays the Assign User to Database dialog box.
6. Select the names of any users that you want to assign to the selected database.
7. Clear the names of any users that you do not want to assign to the selected database.
8. Click OK.
Password Policy ConfigurationYou can define global password policies for all users. Configure private password policies that override the global password policies for individual users. All passwords are case-sensitive.
Note: If you deploy the MDM Hub on the JBoss application server with security enabled, ensure that the password that you set adheres to the JBoss password policy. Your password must also adhere to the MDM Hub global password policy. This is important because the passwords for the Hub Console and for JBoss must match.
Password Policy SettingsYou can specify password policy settings for the MDM Hub users.
The MDM Hub allows you to set users the following private password policies:
Password Length
Minimum and maximum length of a password in characters.
Password Expiry
Specifies whether a password expires or not, and the number of days for which a password is valid.
Select the Password expires check box to set an expiry period for passwords. Clear the Password expires check box to set passwords that do not expire.
30 Chapter 4: Users and User Groups
If you select the Password expires check box, specify the number of days in which the password must expire. The minimum password expiry period that you can set is 10.
Login Settings
Number of grace logins and maximum number of failed logins allowed.
Password History
Number of times that a password can be reused.
Password Requirements
Select the Password pattern validation enabled check box to enforce a password pattern. You can specify the following criteria for password pattern:
• Minimum number of unique characters
• Password must start with
• Password must contain
• Password must end with
Managing Global Password PolicyThe global password policy applies to users who do not have private password policies specified for them.
1. Start the Users tool.
2. Acquire a write lock.
3. Click the Global Password Policy tab.
The Global Password Policy window appears.
4. Specify the password policy settings.
5. Click OK.
6. Click the Save button to save your global settings.
Managing Private Password PoliciesYou can specify a private password policy that overrides the global password policy for any user.
Note: Best practise for password policy management is to ensure most user passwords are managed by a global policy instead of by many private policies.
1. Start the Users tool.
2. Acquire a write lock.
3. Click the Users tab.
4. Select the user for whom you want to set the private password policy.
5. Click the Manage password policy button.
The Private Password Policy window for the selected user appears.
6. Enable the Private password policy enabled option.
7. Specify the password policy settings for the user.
8. Click OK.
9. Click the Save button to save your changes.
Password Policy Configuration 31
JDBC Data Sources Security ConfigurationIn MDM Hub implementations, if a JDBC data source uses application server security, you must configure settings in the cmxserver.properties file.
You must store the user name and password for the application server for the JDBC data source in the cmxserver.properties file. Passwords cannot appear as clear text. You must encrypted passwords before saving them in the cmxserver.properties file.
To learn more about secured JDBC data sources, see your application server documentation.
User Names and Passwords for a Secured JDBC Data SourceTo configure user names and passwords for a secured JDBC data source in the cmxserver.properties file, use the following parameters:
databaseId.username=usernamedatabaseId.password=encryptedPassword
where databaseId is the unique identifier of the JDBC data source.
Database ID for Oracle SID Connection TypesFor an Oracle SID connection type, the databaseId consists of the following strings:
<database hostname>-<Oracle SID>-<schema name>For example, with the following settings:
• <database hostname> = localhost • <Oracle SID> = MDMHUB• <schema name> = Test_ORSthe user name and password properties would be:
localhost-MDMHUB-Test_ORS.username=weblogiclocalhost-MDMHUB-Test_ORS.password=9C03B113CD8E4BBFD236C56D5FEA56EB
Database ID for Oracle Service Connection TypesFor an Oracle Service connection type, the databaseId consists of the following strings:
<service name>-<schema name>For example, with the following settings:
• <service name> = MDM_Service• <schema name> = Test_ORSthe user name and password properties would be:
MDM_Service-Test_ORS.username=weblogicMDM_Service-Test_ORS.password=9C03B113CD8E4BBFD236C56D5FEA56EB
Database ID for IBM DB2 Connection TypesFor an IBM DB2 connection type, the databaseId consists of the following strings:
<database hostname>-<database name>-<schema name>
32 Chapter 4: Users and User Groups
For example, with the following settings:
• <database hostname> = localhost • <database name> = dsui2• <schema name> = DS_UI2the user name and password properties would be:
localhost-dsui2-DS_UI2.username=weblogiclocalhost-dsui2-DS_UI2.password=9C03B113CD8E4BBFD236C56D5FEA56EB
Database ID for Microsoft SQL Server Connection TypesFor a Microsoft SQL Server connection type, the databaseId consists of the following strings:
<database hostname>-<database name>For example, with the following settings:
• <database hostname> = localhost • <database name> = ds_ui1 the user name and password properties would be:
localhost-ds_ui1.username=weblogiclocalhost-ds_ui1.password=9C03B113CD8E4BBFD236C56D5FEA56EB
Database ID for the Master DatabaseIf you want to secure the JDBC data source that accesses the Master Database, the databaseId is CMX_SYSTEM. In this case, the properties would be:
CMX_SYSTEM.username=weblogicCMX_SYSTEM.password=9C03B113CD8E4BBFD236C56D5FEA56EB
Password EncryptionTo generate an encrypted password, use the following commands:
C:\>java -cp siperian-common.jar com.siperian.common.security.Blowfish passwordPlaintext Password: passwordEncrypted Password: 9C03B113CD8E4BBFD236C56D5FEA56EB
User Group ConfigurationA user group is a logical collection of user accounts.
User groups simplify security administration. For example, you can combine external application users into one user group, and then grant security roles to the user group instead of to each individual user. In addition to users, user groups can contain other user groups.
You use the Groups tab in the Users and Groups tool in the Security Access Manager workbench to configure users groups.
User Group Configuration 33
Starting the Users and Groups ToolYou start the Users and Groups tool in the Hub Console.
1. In the Hub Console, connect to an Operational Reference Store, if you have not already done so.
2. Expand the Security Access Manager workbench and click Users and Groups.
The Hub Console displays the Users and Groups tool.
The Users and Groups tool contains the following tabs:Groups
Used to define user groups and assign users to user groups.
Users Assigned to Database
Used to associate user accounts with a database.
Assign Users/Groups to Role
Used to associate users and user groups with roles.
Assign Roles to User / Group
Used to associate roles with users and user groups.
Adding User GroupsYou can use the Users and Groups tool in the Security Access Manager workbench to add user groups.
1. Start the Users and Groups tool.
2. Acquire a write lock.
3. Click the Groups tab.
4. Click the Add button.
The Users and Groups tool displays the Add User Group dialog box.
5. Enter a descriptive name for the user group.
6. Optionally, enter a description of the user group.
7. Click OK.
The Users and Groups tool adds the new user group to the list.
Editing and Deleting User GroupsYou can also use the the Users and Groups tool to edit or remove user groups.
1. Start the Users and Groups tool.
2. Acquire a write lock.
3. Click the Groups tab.
4. Scroll the list of user groups and select the user group that you want to edit.
5. If you want to remove a user group, click the Delete button.
The Users and Groups tool prompts you to confirm deletion.
6. Click Yes.
The Users and Groups tool removes the deleted user group from the list.
7. If you want to edit a user group, click the Edit button next to each property that you want to edit, and specify the new value.
34 Chapter 4: Users and User Groups
8. Click the Save button to save your changes.
Assigning Users and Users Groups to User GroupsTo assign members to a user group:
1. Start the Users and Groups tool.
2. Acquire a write lock.
3. Click the Group tab.
4. Scroll the list of user groups and select the user group that you want to edit.
5. Right-click the user group that you just created and choose Assign Users and Groups.
The Users and Groups tool displays the Assign to User Group dialog box.
6. Select the names of any users and user groups that you want to assign to the selected user group.
7. Clear the names of any users and user groups that you do not want to assign to the selected user group.
8. Click OK.
Assigning Users to the Current ORS DatabaseTo assign users to the current Operational Reference Store database:
1. Start the Users and Groups tool.
2. Acquire a write lock.
3. Click the Users Assigned to Database tab.
4. Click the Assign users to database button to assign users to an Operational Reference Store database.
The Users and Groups tool displays the Assign User to Database dialog box.
5. Select the names of any users that you want to assign to the selected Operational Reference Store database.
6. Clear the names of any users that you do not want to assign to the selected Operational Reference Store database.
7. Click OK.
Associations between Roles and Users and User Groups
You can associate roles with users and user groups. You can use the Users and Groups tool to associate roles with users in the following ways:
• Assign users and user groups to roles.
• Assign roles to users and user groups.
Choose the way that is most appropriate for your implementation.
Associations between Roles and Users and User Groups 35
Assigning Users and User Groups to RolesTo assign users and user groups to a role:
1. Start the Users and Groups tool.
2. Acquire a write lock.
3. Click the Assign Users/Groups to Role tab.
4. Select the role to which you want to assign users and user groups.
5. Click the Edit button.
The Users and Groups tool displays the Assign Users to Role dialog box.
6. Select the names of any users and user groups that you want to assign to the selected role.
7. Clear the names of any users and user groups that you do not want to assign to the selected role.
8. Click OK.
Assigning Roles to Users and User GroupsTo assign roles to users and user groups:
1. Start the Users and Groups tool.
2. Acquire a write lock.
3. Click the Assign Roles to User/Group tab.
4. Select the user or user group to which you want to assign roles.
5. Click the Edit button.
The Users and Groups tool displays the Assign Roles to User dialog box.
6. Select the roles that you want to assign to the selected user or user group.
7. Clear the roles that you do not want to assign to the selected user or user group.
8. Click OK.
36 Chapter 4: Users and User Groups
C H A P T E R 5
Security ProvidersThis chapter includes the following topics:
• Security Providers Overview, 37
• Security Provider Management, 37
• Provider File Management, 38
• Security Provider Settings, 39
• Provider Properties, 40
• Custom Providers, 41
• External Authentication, 42
Security Providers OverviewA security provider is a third-party application that provides security services, such as authentication and authorization, for users that access the MDM Hub. Security providers are part of some MDM Hub security deployment scenarios.
A provider file contains profile information for a security provider. If you want to use other third-party security providers, use the Security Providers tool to upload provider files to the MDM Hub. You can also use the Security Providers tool to modify, delete, enable, or disable security providers in the Providers list.
The MDM Hub comes with a set of default internal security providers. You can also add third-party security providers. Internal security providers cannot be removed.
Security Provider ManagementYou can manage security providers in the MDM Hub implementation through the Security Providers tool in the Configuration workbench of the Hub Console.
You can add security providers from the default selection internal to the MDM Hub or from you own custom-added selection of providers. Internal security providers cannot be removed.
The MDM Hub supports the following types of security providers:
37
Authentication provider
Authenticates a user by validating their identity. Informs the MDM Hub that users are who they claim to be. This type of security provider does not validate whether users have the required privileges to access particular MDM Hub resources.
Authorization provider
Informs the MDM Hub whether users have the required privileges to access particular MDM Hub resources.
User profile provider
Informs the MDM Hub about individual users, such as user-specific attributes and the roles to which the user belongs.
Internal providers represent internal MDM Hub implementations for authentication, authorization, and user profile services.
Some of the MDM Hub default providers are super providers. Super providers always return a positive response for authentication and authorization requests. Use a super provider in a development environment when you do not want to configure users, roles, and privileges. Super providers can also be used in a production environment in which security is provided as a layer on top of the SIF requests for performance gains.
Provider File ManagementA provider file contains profile information for a security provider.
If you want to use your own third-party security providers, you must explicitly register them though the Security Providers tool. To register a security provider, you upload a provider file that contains the profile information needed for registration.
A provider file is a JAR file that contains the following data:
• A manifest that describes one or more external security providers. Each security provider has the following settings:
- Provider Name
- Provider Description
- Provider Type
- Provider Factory Class Name
- Properties that specify configuration details for the provider. This can be a list of name-value pairs: property names with default values.
• Provider implementation and any required third-party libraries.
The InformaticaResource Kit copies a sample implementation of a provider file on the Hub Server. For more information about the sample provider file, see the Informatica MDM Multidomain Edition Resource Kit Guide.
Uploading a Provider FileUpload a provider file to add or update provider information.
1. Start the Security Providers tool.
2. Acquire a write lock.
38 Chapter 5: Security Providers
3. In the left navigation pane, right-click Provider Files and choose Upload Provider File.
The Security Provider tool prompts you to select the JAR file for this provider.
4. Specify the JAR file, navigating the file system as needed and selecting the JAR file that you want to upload.
5. Click Open.
The Security Provider tool checks the selected file to determine whether it is a valid provider file.
6. If the provider file you upload has the same name as an existing provider file, then the Security Provider tool asks you whether to overwrite the existing provider file. Click Yes to confirm.
The Security Provider tool populates the Providers list with the additional provider information. After you upload the provider file, you can remove the original file from the file system.
Deleting a Provider FileYou can delete a provider file if you no longer use that security provider.
1. Start the Security Providers tool.
2. Acquire a write lock.
3. In the left navigation pane, right-click the provider file that you want to delete, and then choose Delete Provider File.
The Security Provider tool prompts you to confirm deletion.
4. Click Yes.
The Security Provider tool removes the deleted provider file from the list.
Note: You cannot delete the internal provider files that ship with the MDM Hub.
Security Provider SettingsThe Security Providers tool displays a list of registered providers.
The list of registered providers is sorted by provider type. The sequence of providers in the Provider list also represents the order in which they are invoked. A user needs to be authenticated by at least one provider in the Provider list.
For example, when you attempt to log in and supply your user name and password, the MDM Hub submits your login credentials to each authentication provider in the authentication list. The MDM Hub proceeds sequentially through the list. If authentication succeeds with one of the providers in the list, then MDM Hub authenticates you. If authentication fails with all available authentication providers, then you are not authenticated.
Changing Security Provider SettingsTo change the settings for a security provider, perform the following steps:
1. Start the Security Providers tool.
2. Acquire a write lock.
3. Select the security provider that you want to modify.
4. In the Properties panel, click the Edit button next to any setting that you want to edit.
Security Provider Settings 39
5. Click the Save button to save your changes.
Enabling and Disabling Security Providers1. Acquire a write lock.
2. Select the security provider that you want to enable or disable.
• Check the Enabled check box to enable a disabled security provider.
• Clear the Enabled check box to disable a security provider.
Once disabled, the provider name is unavailable and moves to the end of the Providers list. You cannot rearrange disabled providers in the Providers list.
3. Click the Save button to save your changes.
Moving a Security Provider in the Processing OrderMDM Hub processes security providers in the order in which they appear in the Providers list. You can rearrange the order in which the security providers appear.
1. Start the Security Providers tool.
2. Acquire a write lock.
3. To move a provider up, right-click the provider you want to move and select Move Provider Up.
The Security Provider tool moves the provider ahead of the previous one in the Providers list, and then refreshes the navigation pane.
4. To move a provider down, right-click the provider you want to move and select Move Provider Down.
The Security Provider tool moves the provider under the previous one in the Providers list, and then refreshes the navigation pane.
Provider PropertiesThe Provider panel contains the following fields:
Name
Name of this security provider.
Description
Description of this security provider.
Provider Type
Type of security provider. They type can be one of the following values:
• Authentication
• Authorization
• User Profile
Provider File
Name of the provider file associated with this security provider, or Internal Provider for internal providers.
40 Chapter 5: Security Providers
Enabled
Indicates whether this security provider is enabled or not. An enabled security provider is checked. A disabled security provider is not checked. Note that internal providers cannot be disabled.
Properties
Additional properties for this security provider, if defined by the security provider. Each property is a name-value pair. A security provider might require or allow unique properties that you can specify here.
Adding Provider PropertiesTo add provider properties, perform the following steps.
1. Start the Security Providers tool.
2. Acquire a write lock.
3. In the navigation pane, select the authentication provider for which you want to add properties.
4. Click the Add button.
The Security Providers tool displays the Add Provider Property dialog box.
5. Specify the name of the property.
6. Specify the value to assign to this property.
7. Click OK.
Editing Provider PropertiesTo edit an existing provider property, perform the following steps.
1. Start the Security Providers tool.
2. Acquire a write lock.
3. In the navigation pane, select the authentication provider for which you want to edit properties.
4. For each property that you want to edit, click the Edit button next to it, and specify the new value.
5. Click the Save button to save your changes.
Custom ProvidersYou can package custom provider classes in the JAR or ZIP file that comprise the provider file.
Specify the settings for the custom providers in the providers.properties file. Then place the file within the JAR file in the META-INF directory. The settings are then translated by the loader to what appears in the Hub Console.
A provider.properties file has the following elements:
ProviderList
Comma-separated list of the contained provider names.
File-Description
Description of the package.
Custom Providers 41
XXX-Provider-Name
Display name of the provider XXX.
XXX-Provider-Description
Description of the provider XXX.
XXX-Provider-Type
Type of the provider XXX. The possible values are USER_PROFILE_PROVIDER, JAAS_LOGIN_MODULE, and AUTHORIZATION_PROVIDER.
XXX-Provider-Factory-Class-Name
Implementation class of the provider, which is also in the same JAR or ZIP file.
XXX-Provider-Properties
Comma-separated list of name/value pairs that define provider properties.
Note: The provider archive file must contain all the classes required for the custom provider to be functional, in addition to the required resources. These resources are specific to your implementation.
Sample providers.properties FileNote: All of the settings are required except for XXX-Provider-Properties.
ProviderList=ProviderOne,ProviderTwo,ProviderThree,ProviderFourProviderOne-Provider-Name: Sample Role Based User Profile ProviderProviderOne-Provider-Description: Sample User Profile Provider for roled-based managementProviderOne-Provider-Type: USER_PROFILE_PROVIDERProviderOne-Provider-Factory-Class-Name: com.siperian.sam.sample.userprofile.SampleRoleBasedUserProfileProviderFactoryProviderOne-Provider-Properties: name1=value1,name2=value2ProviderTwo-Provider-Name: Sample Login ModuleProviderTwo-Provider-Description: Sample Login ModuleProviderTwo-Provider-Type: JAAS_LOGIN_MODULEProviderTwo-Provider-Factory-Class-Name: com.siperian.sam.sample.authn.SampleLoginModuleProviderTwo-Provider-Properties:ProviderThree-Provider-Name: Sample Role Based Authorization ProviderProviderThree-Provider-Description: Sample Role Based Authorization ProviderProviderThree-Provider-Type: AUTHORIZATION_PROVIDERProviderThree-Provider-Factory-Class-Name: com.siperian.sam.sample.authz.SampleAuthorizationProviderFactoryProviderThree-Provider-Properties:ProviderFour-Provider-Name: Sample Comprehensive User Profile ProviderProviderFour-Provider-Description: Sample Comprehensive User Profile ProviderProviderFour-Provider-Type: USER_PROFILE_PROVIDERProviderFour-Provider-Factory-Class-Name: com.siperian.sam.sample.userprofile.SampleComprehensiveUserProfileProviderFactoryProviderFour-Provider-Properties:File-Description=The sample provider files
External AuthenticationYou can use external authentication with the MDM Hub for users through the Java Authentication and Authorization Service (JAAS).
MDM Hub provides templates for the following types of authentication standards:
• Lightweight Directory Access Protocol (LDAP)
42 Chapter 5: Security Providers
• Microsoft Active Directory
• Network authentication using the Kerberos protocol
These templates provide the settings, such as protocols, server names, and ports, that are required for these authentication standards. You can use these templates to add a new login module with the settings you need. For more information about these authentication standards, see the applicable vendor documentation.
Adding a Login ModuleTo set up external authentication in MDM Hub, you must create a login module.
1. Start the Security Providers tool.
2. Acquire a write lock.
3. Right-click Authentication Providers (Login Modules) and select Add Login Module.
The Security Providers tool displays the Add Login Module dialog box.
4. Click the down arrow and select a template for the login module.
OpenLDAP-template
Based on LDAP authentication properties.
MicrosoftActiveDirectory-template
Based on Active Directory authentication properties.
Kerberos-template
Based on Kerberos authentication properties.
5. Click OK.
The Security Providers tool adds the new login module to the list.
6. In the Properties panel, click the Edit button next to any property that you want to edit. Specify the settings for the type of login module you want to create.
7. Click the Save button to save your changes.
Deleting a Login ModuleYou can delete a login module if you want.
1. Start the Security Providers tool.
2. Acquire a write lock.
3. In the navigation pane, right-click a login module under Authentication Providers (Login Modules) and choose Delete Login Module.
The Security Provider tool prompts you to confirm deletion.
4. Click Yes.
The Security Provider tool removes the deleted login module from the list and refreshes the left navigation pane.
External Authentication 43
C H A P T E R 6
Application Level SecurityThis chapter includes the following topics:
• Overview, 44
• Informatica Data Director, 45
• Provisioning Tool, 46
• ActiveVOS, 46
• Dynamic Data Masking, 47
OverviewThe Security Access Module (SAM) is the security module for the MDM Hub, which controls user credentials and roles. Other applications and components within an MDM Hub implementation also have security settings to ensure that they communicate with the MDM Hub securely. For example, you can configure data-level security for Informatica Data Director.
Informatica conducts internal security tests of Informatica products. For example, Informatica uses industry-standard scanning applications to test products for security vulnerabilities, such as an SQL injection attack. Other Informatica security applications, used in conjunction with SAM, add an extra layer of security to an MDM Hub implementation. Informatica Dynamic Data Masking (DDM) applies a mask to data to prevent unauthorized access to sensitive information. The Informatica MDM Provisioning tool and Informatica ActiveVOS are not security applications but they still communicate securely with the MDM Hub.
The following image shows a sample MDM Hub implementation and how the components connect with one another:
44
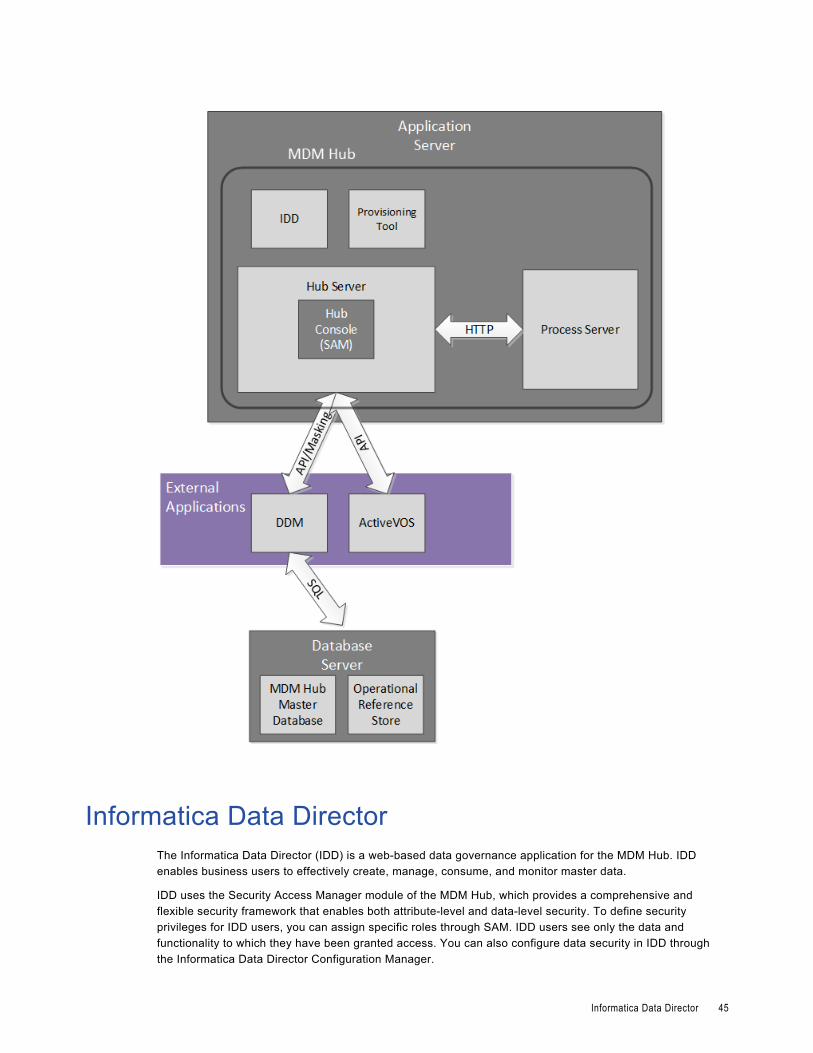
Informatica Data DirectorThe Informatica Data Director (IDD) is a web-based data governance application for the MDM Hub. IDD enables business users to effectively create, manage, consume, and monitor master data.
IDD uses the Security Access Manager module of the MDM Hub, which provides a comprehensive and flexible security framework that enables both attribute-level and data-level security. To define security privileges for IDD users, you can assign specific roles through SAM. IDD users see only the data and functionality to which they have been granted access. You can also configure data security in IDD through the Informatica Data Director Configuration Manager.
Informatica Data Director 45
IDD adheres to the top ten security recommendations of the Open Web Application Security Project (OWASP). Informatica uses IBM Security AppScan to test for security vulnerabilities, such as an SQL injection attack. The HTTP methods GET or POST can retrieve information from IDD, but other HTTP methods, such as DELETE or PUT, return an HTTP error.
For more information about IDD configuration, see the Informatica MDM Multidomain Edition Informatica Data Director Implementation Guide.
Provisioning ToolUse the Informatica MDM Provisioning tool to create business entity models based on the schema information that you defined in an Operational Reference Store. The business entity model is a foundational component of the Entity 360 framework in Informatica Data Director.
You must log in to the Provisioning tool before you can configure business entities.
As you work on the configuration files, you save your changes to a temporary workspace. The Provisioning tool does not apply changes until you publish your changes. If multiple users change the business entity configuration for an ORS simultaneously, the MDM Hub is updated with the most recently published configuration.
The Provisioning tool must run on the same application server as the Hub Server.
For more information, see the Informatica MDM Multidomain Edition Provisioning Tool Guide.
ActiveVOSInformatica ActiveVOS is a business process management (BPM) tool that helps you to automate business processes. You can create process models that integrate people, processes, and systems, which increases the efficiency of your business.
You can use ActiveVOS to ensure that updated entity data goes through a change-approval workflow before the updated records contribute to the Best Version of the Truth (BVT) records. For example, a business process might require that a senior manager review and approve updates to customer data before it becomes master data.
To support a change-approval workflow, the MDM Hub and Informatica Data Director (IDD) integrate with the ActiveVOS Server. Predefined MDM workflows, task types, and roles enable the components to synchronize with one another. You can configure your MDM implementation to work with the embedded ActiveVOS server. Alternatively, you can run a standalone instance of ActiveVOS in your environment.
Embedded ActiveVOS authenticates requests from IDD and the MDM Hub by a specific principal that is trusted by both MDM and ActiveVOS. This principal is called the trusted user. The system administrator creates the credentials and roles for the trusted user in the application server.
The ActiveVOS server must run on the same application server as the MDM Hub. For more information, see the Informatica MDM Multidomain Edition Configuration Guide.
46 Chapter 6: Application Level Security

Dynamic Data MaskingInformatica Dynamic Data Masking is a data security product that operates between a client and a database to prevent unauthorized access to sensitive information. Dynamic Data Masking intercepts requests sent to the database and applies a mask to the data before it sends the request results to the client.
Dynamic Data Masking provides an additional level of data security to databases that the MDM Hub manages. Use the Dynamic Data Masking Management Console to configure the Dynamic Data Masking connection to the Operational Reference Store and set up the masking rules for the data. You configure the MDM Hub connection to Dynamic Data Masking when you register an Operational Reference Store.
The MDM installer does not install Dynamic Data Masking with the MDM Hub. You must install Dynamic Data Masking separately. For more information about Dynamic Data Masking installation, see the Dynamic Data Masking documentation.
Note: To use Dynamic Data Masking in the MDM Hub, you must have Dynamic Data Masking 9.6.0 and Emergency Bug Fix 14590 installed. Earlier versions of Dynamic Data Masking are not compatible with the MDM Hub.
Integration Between Dynamic Data Masking and the MDM HubAfter you have Dynamic Data Masking installed and set up correctly, you can integrate Dynamic Data Masking with the MDM Hub.
The following steps describe the integration process:
1. In the Dynamic Data Masking Management Console, create a Dynamic Data Masking service. Configure the listener port number to match the port number where the client sends requests to the database.
2. Define the database connection properties for the database that requires data masking.
3. Create a connection rule. Configure the rule to identify the database requests that must be masked. Assign a database and a security rule set to the connection rule set.
4. Create a security rule set. Define the rules for masking the data sent back to the MDM Hub.
5. In the Hub Console, configure the connection to Dynamic Data Masking.
When you run processes for the Operational Reference Store, Dynamic Data Masking applies the rules on the database before it returns data to the MDM Hub.
Note: If you do not add the Dynamic Data Masking connection to the Operational Reference Store, the MDM Hub bypasses any Dynamic Data Masking rules that you define.
For more information about how to configure Dynamic Data Masking, see the Informatica Dynamic Data Masking Administrator Guide.
Dynamic Data Masking Best Practices for the MDM HubYou can use Dynamic Data Masking effectively in the MDM Hub with the help of suggested best practices.
Best practice to create Dynamic Data Masking rules in the Rule Editor
Dynamic Data Masking evaluates rules in the Rule Editor from the top to the bottom. Therefore, if you create non-masking rules, you must put them above any masking rules you create so they can be effective.
Dynamic Data Masking 47
Best practice to allow users to view unmasked data
Dynamic Data Masking does not mask data in the database. When you view data in the MDM Hub, the data appears masked. Use Create View statements in Dynamic Data Masking to give users privileges to view unmasked data.
Best practice to block users
To block users from adding a record to which masking is applied, you must create a separate rule for each affected base object. Define a text matcher as %INSERT%<BO_NAME>%<ROLE NAME>% and the Block Statement processing action.
Best practice to allow users to update masked data
By default, the Dynamic Data Masking engine prevents users from editing tables with masked data. If you want to update masked data in the MDM Hub, you can create a rule in the Dynamic Data Masking Rule Editor to allow a user to update masked columns.
Best practice to create rules with MDM_SYSTEM indicator
In the MDM Hub, the user MDM_SYSTEM is an internal indicator for system calls. MDM_SYSTEM does not appear in the roles list in the Hub Console. Dynamic Data Masking applies masking based on the MDM Hub roles that a user has. When you create Dynamic Data Masking rules in the Rule Editor, do not create rules for the MDM_SYSTEM indicator alone. YouChart of Accounts Installation and Configuration Guide must combine MDM_SYSTEM with a user name or roles that belong to a user. You can combine the MDM_SYSTEM indicator with any other rule to create fine-grained rules in Dynamic Data Masking.
Setting up Dynamic Data Masking for an Operational Reference Store
You configure the Dynamic Data Masking connection to the MDM Hub when you register an Operational Reference Store through the Hub Console.
1. Start the Hub Console.
The Change database dialog box appears.
2. Select the MDM Hub Master database, and click Connect.
3. On the Configuration workbench, start the Databases tool.
4. Acquire a write lock.
5. Click the Register database button.
The Informatica MDM Hub Connection Wizard appears and prompts you to select the database type.
6. Select the type of database, and click Next.
7. Configure connection properties for the database.
8. In the Port field, the port you enter must match the Dynamic Data Masking listener port for the database.
9. In the DDM connection URL field, enter the URL for the Dynamic Data Masking server.
10. Click Finish.
The Registering Database dialog box appears.
11. Click OK.
The MDM Hub registers the Operational Reference Store.
12. Select the Operational Reference Store that you registered, and click the Test database connection button to test the database settings.
If you use WebSphere, restart WebSphere before you test the database connection.
48 Chapter 6: Application Level Security
The Test Database dialog box displays the result of the database connection test.
13. Click OK.
Dynamic Data Masking connects to the Operational Reference Store that you registered.
Dynamic Data Masking 49
A P P E N D I X A
GlossaryauthenticationProcess of verifying the identity of a user to ensure that they are who they claim to be. In Informatica MDM Hub, users are authenticated based on their supplied credentials—user name / password, security payload, or a combination of both. Informatica MDM Hub provides an internal authentication mechanism and also supports user authentication using third-party authentication providers.
authorizationProcess of determining whether a user has sufficient privileges to access a requested Informatica MDM Hub resource. In Informatica MDM Hub, resource privileges are allocated to roles. Users and user groups are assigned to roles. A user’s resource privileges are determined by the roles to which they are assigned, as well as by the roles assigned to the user group(s) to which the user belongs.
base objectA table that contains information about an entity that is relevant to your business, such as customer or account.
batch groupA collection of individual batch jobs (for example, Stage, Load, and Match jobs) that can be executed with a single command. Each batch job in a group can be executed sequentially or in parallel to other jobs.
Configuration workbenchIncludes tools for configuring a variety of MDM Hub objects, including the Operational Reference Store, users, security, message queues, and metadata validation.
databaseOrganized collection of data in the Hub Store. Informatica MDM Hub supports two types of databases: a Master Database and an Operational Reference Store (ORS).
Data ManagerTool used to review the results of all merges—including automatic merges—and to correct data content if necessary. It provides you with a view of the data lineage for each base object record. The Data Manager also allows you to unmerge previously merged records, and to view different types of history on each consolidated record.
Use the Data Manager tool to search for records, view their cross-references, unmerge records, unlink records, view history records, create new records, edit records, and override trust settings. The Data Manager displays all records that meet the search criteria you define.
data stewardInformatica MDM Hub user who has the primary responsibility for data quality. Data stewards access Informatica MDM Hub through the Hub Console, and use Informatica MDM Hub tools to configure the objects in the Hub Store.
Dynamic Data MaskingA data security product that operates between a client and a database to prevent unauthorized access to sensitive information. Dynamic Data Masking intercepts requests sent to the database and applies data masking rules to the request to mask the data before it is sent back to the client.
hierarchyIn Hierarchy Manager, a set of relationship types. These relationship types are not ranked based on the place of the entities of the hierarchy, nor are they necessarily related to each other. They are merely relationship types that are grouped together for ease of classification and identification.
Hierarchy ManagerThe Hierarchy Manager allows users to manage hierarchy data that is associated with the records managed in the MDM Hub. For more information, see the Informatica MDM Multidomain Edition Configuration Guide and the Informatica MDM Multidomain Edition Data Steward Guide.
Hub ConsoleInformatica MDM Hub user interface that comprises a set of tools for administrators and data stewards. Each tool allows users to perform a specific action, or a set of related actions, such as building the data model, running batch jobs, configuring the data flow, running batch jobs, configuring external application access to Informatica MDM Hub resources, and other system configuration and operation tasks.
Hub ServerA run-time component in the middle tier (application server) used for core and common services, including access, security, and session management.
Hub StoreIn a Informatica MDM Hub implementation, the database that contains the Master Database and one or more Operational Reference Store (ORS) database.
KerberosComputer network authentication protocol that allows nodes that communicate over a non-secure network to prove their identity to one another in a secure manner. The Massachusetts Institute of Technology developed the protocol and makes an implementation of Kerberos freely available.
metadataData that is used to describe other data. In Informatica MDM Hub, metadata is used to describe the schema (data model) that is used in your Informatica MDM Hub implementation, along with related configuration settings.
Operational Reference Store (ORS)A database that contains master data and the rules that act on the master data. Rules include the rules for processing the master data, the rules for managing the set of master data objects, and the processing rules
Appendix A: Glossary 51
and auxiliary logic that the MDM Hub uses to define the best version of the truth. An MDM Hub configuration can have one or more Operational Reference Stores. The default name of an ORS is CMX_ORS.
packageA package is a public view of one or more underlying tables in Informatica MDM Hub. Packages represent subsets of the columns in those tables, along with any other tables that are joined to the tables. A package is based on a query. The underlying query can select a subset of records from the table or from another package.
password policySpecifies password characteristics for Informatica MDM Hub user accounts, such as the password length, expiration, login settings, password re-use, and other requirements. You can define a global password policy for all user accounts in a Informatica MDM Hub implementation, and you can override these settings for individual users.
policy decision points (PDPs)Specific security check points that authenticate user identity and authorize user access to MDM Hub resources.
policy enforcement points (PEPs)Specific security check points that enforce, at run time, security policies for authentication and authorization requests.
private resourceA Informatica MDM Hub resource that is hidden from the Roles tool, preventing its access through Services Integration Framework (SIF) operations. When you add a new resource in Hub Console (such as a new base object), it is designated a PRIVATE resource by default.
privilegePermission to access an MDM Hub resource. With MDM Hub internal authorization, each role is assigned one of the following privileges.
Privilege Allows the User To....
READ View data.
CREATE Create data records in the Hub Store.
UPDATE Update data records in the Hub Store.
MERGE Merge and unmerge data.
EXECUTE Execute cleanse functions and batch groups.
DELETE Delete data records from the Hub Store.
Privileges determine the access that external application users have to MDM Hub resources. For example, a role might be configured to have READ, CREATE, UPDATE, and MERGE privileges on particular packages and package columns. These privileges are not enforced when using the Hub Console, although the settings still affect the use of Hub Console to some degree.
52 Glossary
profileIn Hierarchy Manager, describes what fields and records an HM user may display, edit, or add. For example, one profile can allow full read/write access to all entities and relationships, while another profile can be read-only (no add or edit operations allowed).
providerSee security provider on page 53.
roleDefines a set of privileges to access secure Informatica MDM Hub resources.
securityThe ability to protect information privacy, confidentiality, and data integrity by guarding against unauthorized access to, or tampering with, data and other resources in your Informatica MDM Hub implementation.
Security Access Manager (SAM)Security Access Manager (SAM) is the security module for protecting MDM Hub resources from unauthorized access. At run time, SAM enforces your organization’s security policy decisions for your MDM Hub implementation, handling user authentication and access authorization according to your security configuration.
Security Access Manager workbenchIncludes tools for managing users, groups, resources, and roles.
security payloadRaw binary data supplied to an MDM Hub operation request that can contain supplemental data required for further authentication or authorization.
security providerA third-party application that provides security services (authentication, authorization, and user profile services) for users accessing Informatica MDM Hub.
workbenchIn the Hub Console, a mechanism for grouping similar tools. A workbench is a logical collection of related tools. For example, the Model workbench contains tools for modelling data such as Schema, Queries, Packages, and Mappings.
write lockIn the Hub Console, a lock that is required in order to make changes to the underlying schema. All non-data steward tools (except the Operational Reference Store security tools) are in read-only mode unless you acquire a write lock. Write locks allow multiple, concurrent users to make changes to the schema.
Appendix A: Glossary 53
Index
Aauthentication
about authentication 11external authentication providers 11external directory authentication 11internal authentication 11
authorization about authorization 12external authorization 12internal authorization 12
Ddatabases
user access 30Dynamic Data Masking
overview 10
Eexternal application users 28
Gglobal
password policy 31glossary 50
JJDBC data sources
security, configuring 32
OOperational Reference Stores (ORS)
assigning users to 35
Ppassword policies
global password policies 31private password policies 31
passwords global password policy 31
passwords (continued)private passwords 31
Private password policy 31providers
custom-added 41providers.properties file
example 42
Rresource groups
adding 20editing 21
resource privileges, assigning to roles 25roles
assigning resource privileges to roles 25editing 24
Ssecurity
authentication 11authorization 12configuring 9JDBC data sources, configuring 32
Security Access Manager (SAM) 11security provider files
about security provider files 37deleting 39uploading 38
Security Providers tool about security providers 37provider files 38
Uuser groups
assigning users to 35users
assigning to Operational Record Stores (ORS) 35database access 30external application users 28global password policies 31password settings 29private password policies 31supplemental information 29
54