Verizon Enterprise Center Analysis & Reporting · PDF fileVerizon Enterprise Center Analysis &...
64
Verizon Enterprise Center User Guide: Analysis & Reporting 11/1/2012
Transcript of Verizon Enterprise Center Analysis & Reporting · PDF fileVerizon Enterprise Center Analysis &...

Verizon Enterprise Center
User Guide: Analysis & Reporting
11/1/2012

© Verizon Wireless 2012
2
Verizon Enterprise Center User Guide: Analysis & Reporting
Last updated: 11/01/2012
Overview
With Verizon Enterprise Center analysis & reporting, you can create reporting structures that are unique to your company to better assist you in managing your wireless program costs. From the Analysis and Reporting tab, you will be able to look at the statement information in a more meaningful way rather than based on Verizon Wireless billing structures. This guide will explain how to use the reporting functionality located in the Analysis and Reporting tab.
Table of Contents
Wireless Reports Tab Overview ........................................................................................... 3 Accessing the Wireless Reports tab ............................................................................................ 3 Standard Reports ......................................................................................................................... 4
Charges Reports.............................................................................................................................. 4 Usage Reports ................................................................................................................................. 5 Other Reports .................................................................................................................................. 5 Integrated Reports ........................................................................................................................... 6
Customized Reports .................................................................................................................... 7 Build Your Own Report ................................................................................................................ 7 Shared Reports ............................................................................................................................ 8 Scheduled Reports ...................................................................................................................... 8 Build a Reporting Structure .......................................................................................................... 9
Create the structure ......................................................................................................................... 9 Add a folder ................................................................................................................................... 10 Assign wireless numbers ............................................................................................................... 12 Share with users ............................................................................................................................ 15
Manage a Reporting Structure ................................................................................................... 18 Upload a Reporting Structure ........................................................................................................ 18
Create a new upload file ..................................................................................................... 18 Update an existing reporting structure file .......................................................................... 18
Download a reporting structure ..................................................................................................... 20 Expire a reporting structure ........................................................................................................... 22 Delete a reporting structure ........................................................................................................... 24
Run Reports ............................................................................................................................... 25 Set your reporting position ............................................................................................................. 25 Run Standard Reports ................................................................................................................... 27
Run a Charges Report ........................................................................................................ 28 To run Other Reports .......................................................................................................... 31
Run Usage Reports ....................................................................................................................... 34 Run Integrated Reports ................................................................................................................. 37 Memo Bill Distribution .................................................................................................................... 40 Generate a Memo Bill .................................................................................................................... 41 Custom Reports ............................................................................................................................. 46
Create a custom report from a Standard Report ................................................................ 46 Build Your Own Custom Report from start to finish ............................................................ 53 Retrieve a customized report .............................................................................................. 59 Share/Unshare a Report ..................................................................................................... 60 Schedule a Report .............................................................................................................. 61 Retrieve a deferred downloaded report .............................................................................. 63

© Verizon Wireless 2012
3
Wireless Reports Tab Overview
Accessing the Wireless Reports tab
To access your company’s wireless reports:
1. Click on the Invoices tab.
2. Go to the Analysis & Reporting page.
The Wireless tab contains five sub-tabs:
Standard Reports
Customized Reports
Build Your Own Report
Shared Reports
Scheduled Reports

© Verizon Wireless 2012
4
Standard Reports
Standard Reports are organized into the four categories below. Select one from the Categories dropdown to view all the reports under that category.
1. Charges – reports tied to charges 2. Usage – reports tied to usage 3. Other – reports that aren’t directly tied to usage and charges (Company User Report, etc) 4. Integrated – reporting for other Verizon entities (Wireless, Telecom, and Business)
Charges Reports
These reports are available to all user roles except for the “Buy” role. Note: Standard Reports will only display information for wireless numbers that are currently active. Available Charges Reports:
Additional Charges: Details, sorted by mobile number, for Monthly Access, Equipment Charges, Service & Features Charges, and Taxes.
Airtime Charges Detail: information related to call usage and charges only.
Airtime Charges Summary: A summary of all your charges, including taxes, services & features, access, airtime, etc.
Analyze Phone Charges: Phone usage details for all of your company’s wireless numbers. Details include airtime, charges, phone count, price plan code and description, phone status, billing date, account number, and total minutes allowed

© Verizon Wireless 2012
5
Analyze Roaming Calls: Total roaming charges (including associated airtime charges, roaming charges, and toll charges), taxes and surcharges, number of roaming calls, total roaming minutes, “from” city and state, “to” city and state, serving SID (home system of the mobile phone), call date, incoming/outgoing number, billing period, and call duration.
Top Ten Most Expensive Calls: List of the top calls by cost
Usage Reports
Available Usage Reports:
20 Longest Calls: Longest duration billed calls
Call Detail: Voice call details for multiple wireless numbers displayed simultaneously summarized by Account Number, Wireless Number, Statement Date, Cost Center, User Name or Grand Total
Data Usage: Data usage and charges.
Grand Total: Comprehensive summary. Details total charges and total minutes
Mobile to Mobile: Calls between Verizon Wireless voice devices
Monthly Usage: Usage and charges for each wireless number, along with a grand total
Summary Usage: Summarizes usage by wireless number
Top 20 Out of Network Calls: Calls to non-Verizon Wireless devices
Unbilled Usage: Current unbilled usage for the account
Other Reports
Available Other Reports:
Billing Structure: how Verizon Wireless structures your organization
Company Users; List of VEC users and their permissions within VEC
Customer Invoice Management: Summary of charges information at the root level of the structure. The Level selected for reporting will include the selected folders and sub-folders (if applicable) within the report
De-Activated MTN: Wireless numbers which have been deactivated
Device Report: Comprehensive summary of devices and upgrade eligibility data
Global Summary: Displays data based on the accounts and wireless numbers that received statements for the chosen period.

© Verizon Wireless 2012
6
Memo Bill: Account or Phone view of the Memo Bill that contains account specific charges, adjustments and taxes.
Memo Bill Status: Displays status of Memo Bill distribution
Raw Data Download: Export of all monthly statements delivered in a .zip file with 4 individual .txt files included that can be used with your company’s internal system (e.g., Microsoft Excel or Access, etc).
Suspended MTN: Suspended wireless numbers sorted by number, name, cost-center, or suspension date.
View Structure: account and wireless numbers in a selected structure.
Integrated Reports
Available Integrated Reports:
Integrated Invoice Summary: Current charges, outstanding balances, payments, adjustments, with total amount due across all selected accounts
Summary of Current Charges by Provider: Summary across all selected accounts, with charges sorted by Verizon entity (Wireless, Telecom, Business), and other service provider, if applicable

© Verizon Wireless 2012
7
Customized Reports
The Customized Reports page contains any saved customized reports on your company’s wireless accounts.
Build Your Own Report
The Build Your Own Report tab contains options for you to build a custom report. Refer to the Create a customized report section below for steps on creating a custom report.
Available Wireless Reports to build by:
Account Summary
Overview of Lines

© Verizon Wireless 2012
8
Purchase Activity
Usage and Charges Summary Detail
Usage Details
Shared Reports
The Shared Reports tab displays reports that have been set to share. You can also view the name of the user who created the report.
Scheduled Reports The Scheduled Reports tab lists all reports that are scheduled to run. Here you can also view the structure type that each report is based on, and the date they expire.
© Verizon Wireless 2012
9
Wireless Reporting How To’s
Build a Reporting Structure
Create the structure
1. Click on the Settings tab.
2. Go the Reporting Structure page.
3. Click on the Admin link.
4. Select Create Structure from the pop-up window.

© Verizon Wireless 2012
10
5. Give the new structure a name and an optional description.
6. Click on the Create button.
7. The new structure will appear in the Select Structure dropdown.
Add a folder
1. Click on the Settings tab.

© Verizon Wireless 2012
11
2. Go the Reporting Structure page.
3. In the Select Structure dropdown, select the structure you want to create the new folder for.
4. Choose a period from the Select Period dropdown, and click on the red arrow button. The reporting structure will display.
5. Click on the reporting structure name, and select Create Sub-Folder from the pop-up window.

© Verizon Wireless 2012
12
6. Give the new folder a name and an optional description.
7. Click on the Create Sub-Folder button.
8. The new folder will appear in the structure. You have successfully added a folder to the reporting structure.
Assign wireless numbers
To add detail to the folders, you must populate the folders with the desired wireless numbers. There are two times when you would need to do this – when you first create the reporting structure, and when you activate a new wireless number.
1. Click on the Settings tab.

© Verizon Wireless 2012
13
2. Go the Reporting Structure page.
3. In the Select Structure dropdown, select the structure you want to create the new folder for.
4. Choose a period from the “Select Period” dropdown, and click on the red arrow button.
© Verizon Wireless 2012
14
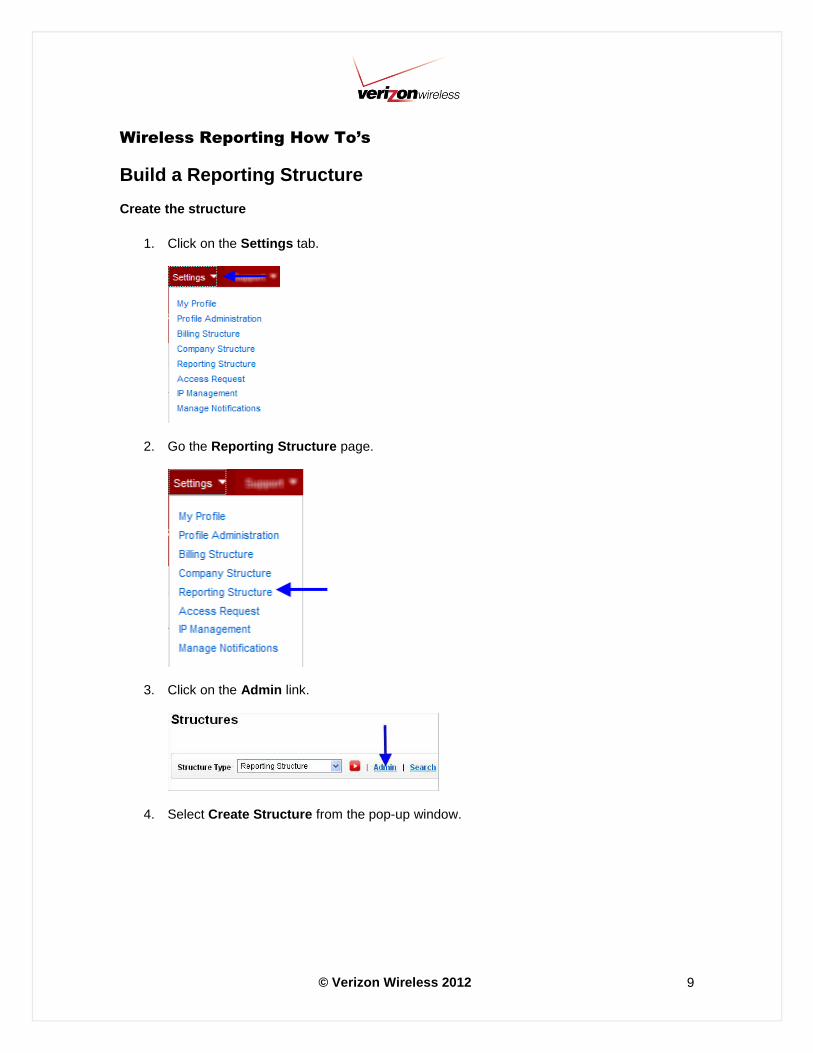
5. Click on the Items available for assignment link.
6. All of the numbers not already assigned to the reporting structure will display.
7. Check the box(es) next to the wireless number(s) you want to assign, and click on the Add to Folder button.

© Verizon Wireless 2012
15
8. Select the folder where you want to add the wireless number(s), and click on the Add to Folder button.
9. The numbers will appear in the selected folder when you open the structure.
You have successfully assigned the wireless number(s) to a reporting structure.
Share with users
Sharing a reporting structure with a user will give them access to view and edit the structure.

© Verizon Wireless 2012
16
1. Click on the Settings tab.
2. Go the Reporting Structure page.
3. In the Select Structure dropdown, select the structure you want to create the new folder for.
4. Choose a period from the Select Period dropdown, and click on the red arrow button.

© Verizon Wireless 2012
17
5. Check the box next to the folder(s) you want to share, and click on the Share with User button.
6. Check the box next to the user(s) u want to give access to the reporting structure folder(s).
7. Click on the Share with User button. You have successfully shared the reporting
structure.

© Verizon Wireless 2012
18
Manage a Reporting Structure
Upload a Reporting Structure
If you already have a reporting structure in a .csv or .xml file, you can make the changes offline and import it into Verizon Enterprise Center. This is especially helpful if you have a large reporting structure. You can either create a new reporting structure or update an existing one.
Create a new upload file
Refer to this upload template < https://b2b.vzw.com/support/pdf/RS_upload_template.xls > when creating a new reporting structure upload file. Note: this template is a .XLS file; you will need to save the actual upload file as a .CSV file. Notes:
Maximum amount of wireless numbers is 1000
File must be in .CSV or .XML format
Maximum size for an upload is 2 MB
An upload cannot be cancelled
Update an existing reporting structure file
1. Download the existing reporting structure. See the "Download a reporting structure” section of this guide.
2. Make the necessary updates to the download file. Note: In order to overwrite the old structure, the old and new file names must remain identical.
3. Import the file according to the steps below. To upload the file:
1. Click on the Settings tab.
2. Go the Reporting Structure page.

© Verizon Wireless 2012
19
3. Click on the Admin link.
4. Select Upload from the pop-up window.
5. Click on the Browse button and select the file you want to upload.
6. Select the file type from the File Type dropdown.

© Verizon Wireless 2012
20
7. Click on the Import button.
You have successfully uploaded a reporting structure.
Download a reporting structure
1. Click on the Settings tab.

© Verizon Wireless 2012
21
2. Go the Reporting Structure page.
3. Click on the Admin link.
4. Select Download from the pop-up window.
5. In the Structure Name dropdown, select the structure you want to download.
6. From the Period dropdown, select the month/year of the structure.

© Verizon Wireless 2012
22
7. Select the format you want to download from the Format dropdown.
8. Click on the Download button and follow the prompts to save the file to your computer.
You have successfully downloaded a reporting structure.
Expire a reporting structure
Once you expire a reporting structure, data will no longer be collected based the structure. You will be able to run reports based on a reporting structure up until the time period it was expired.
1. Click on the Settings tab.

© Verizon Wireless 2012
23
2. Go the Reporting Structure page.
3. Click on the Admin link.
4. Select Expire from the pop-up window.
5. In the Structure Name dropdown, select the structure you want to expire.
6. Click on the Expire button.

© Verizon Wireless 2012
24
You have successfully expired the reporting structure.
Delete a reporting structure
Once you delete a reporting structure it is permanently gone and cannot be retrieved and reports cannot be run on it.
1. Click on the Settings tab.
2. Go the Reporting Structure page.
3. Click on the Admin link.
4. Select Delete from the pop-up window.

© Verizon Wireless 2012
25
5. In the Structure Name dropdown, select the structure you want to delete.
6. Click on the Delete button. You have successfully deleted the reporting structure.
Run Reports
Before you run a report, you will need to set the reporting position. Your report will contain the data for the wireless numbers and accounts that are located within the position you set.
Set your reporting position
1. Click on the Invoices tab.
2. Go to the Analysis & Reporting page.
3. Click on the Set Reporting Position link.

© Verizon Wireless 2012
26
4. From the Structure Type dropdown, select the type of structure you will use to run the report. You can choose from one of the following structures. Note: you must first create a company or reporting structure before you can run a report on one.
Billing Structure – Wireless numbers are grouped based on the billing account they belong to; as they appear in your paper bill.
Company Structure – Wireless numbers and accounts are grouped in a way that matches how your company’s departments are organized. Note: you can only run reports on a company structure beginning the month that the structure was created.
Reporting Structure – Custom structure that allows you to create new groups of wireless numbers without altering the billing or company structure. For example, you can run a report on a group of wireless numbers with the same device, allowance, memo bill distribution list, etc.
5. For this guide we will select a Billing Structure; click on the red arrow button.
6. Search through the structure by clicking on the “+” (plus sign) next to the accounts or folders until you find the desired position.

© Verizon Wireless 2012
27
Note: with a Billing Structure, wireless numbers will be located in accounts. With Company and Reporting Structures, they will be located in folders.
7. Select the radio dial next to the desired position.
8. Click on the Set Reporting Position button.
9. Confirm in the upper right-hand corner that the correct structure and position are set. You have successfully set the reporting position.
Once you have set the reporting position, you are ready to run a report.
Run Standard Reports
1. Click on the Invoices tab.

© Verizon Wireless 2012
28
2. Go to the Analysis & Reporting page.
The Analysis & Reporting Overview page will appear with a pod for Standard Reports. Within the pod you can select the category by using the dropdown menu to display standard reports by Charges, Usage, Other or Integrated reports.
Run a Charges Report
1. Select the Standard Reports tab to view all of the Standard Reports

© Verizon Wireless 2012
29
2. All of the Standard Reports will appear with a short description for each. Select the Charges category from the dropdown menu.
3. While on the “Standard Reports” tab, Charges category, click the desired report in the Report Name section. For this example we will select the “Airtimes Charges Summary By Account” report.

© Verizon Wireless 2012
30
4. The report type will display. From here you will define the data period you want to see
displayed along with an option to change how you view the data by. Change the period by selecting new dates in the “From Date” and/or “Thru Date” dropdowns. If desired, select the View By option from the dropdown menu.
5. When you have made your selections click the red arrow to run your report

© Verizon Wireless 2012
31
6. Your data will display on the page. From here you have multiple options to help you manipulate your data as needed:
a. Filter – limit the items in your data by specific criteria b. Sort – sort by columns of your choice, OR click the column on the data page c. Download – download your data into an excel file d. Customize – add and remove columns of data from your standard report to
create a custom report e. Schedule – run the report on a recurring basis f. Search – narrow down data by searching for unique criteria
Run Other Reports
For this example we will run the “Global Summary” report. The Global Summary report displays data based on the accounts and wireless numbers that received statements for the chosen period. Note: This report will match the information contained in your Paper Bill.
1. Select the Standard Reports tab to view all of the Standard Reports

© Verizon Wireless 2012
32
2. All of the Standard Reports will appear with a short description for each. Select the Other category from the dropdown menu.
3. While on the “Standard Reports” tab, Other category, click the desired report in the Report Name section. For this example we will select the “Monthly Usage ” report.

© Verizon Wireless 2012
33
4. The report type will display. From here you will define the data period you want to see displayed. Change the period by selecting new dates in the “From Date” and/or “Thru Date” dropdowns.
5. When you have made your selections click the red arrow to run your report

© Verizon Wireless 2012
34
6. Your data will display on the page. From here you have multiple options to help you manipulate your data as needed:
a. Filter – limit the items in your data by specific criteria b. Sort – sort by columns of your choice, OR click the column on the data page c. Download – download your data into an excel file d. Customize – add and remove columns of data from your standard report to
create a custom report e. Schedule – run the report on a recurring basis f. Search – narrow down data by searching for unique criteria
Note: for quick access to details on a number or account, click the hyperlink tied to the number
Run Usage Reports
The following steps show how to run the “20 Out of Network Calls” Account Report. This is a useful report for determining who to add to your Friends & Family® for Business list. To run a Usage Report
1. Select the Standard Reports tab to view all of the Standard Reports

© Verizon Wireless 2012
35
2. All of the Standard Reports will appear with a short description for each. Select the Usage category from the dropdown menu.
3. While on the “Standard Reports” tab, Usage category, click the desired report in the Report Name section. For this example we will select the “20 Out of Network Calls” report.
© Verizon Wireless 2012
36
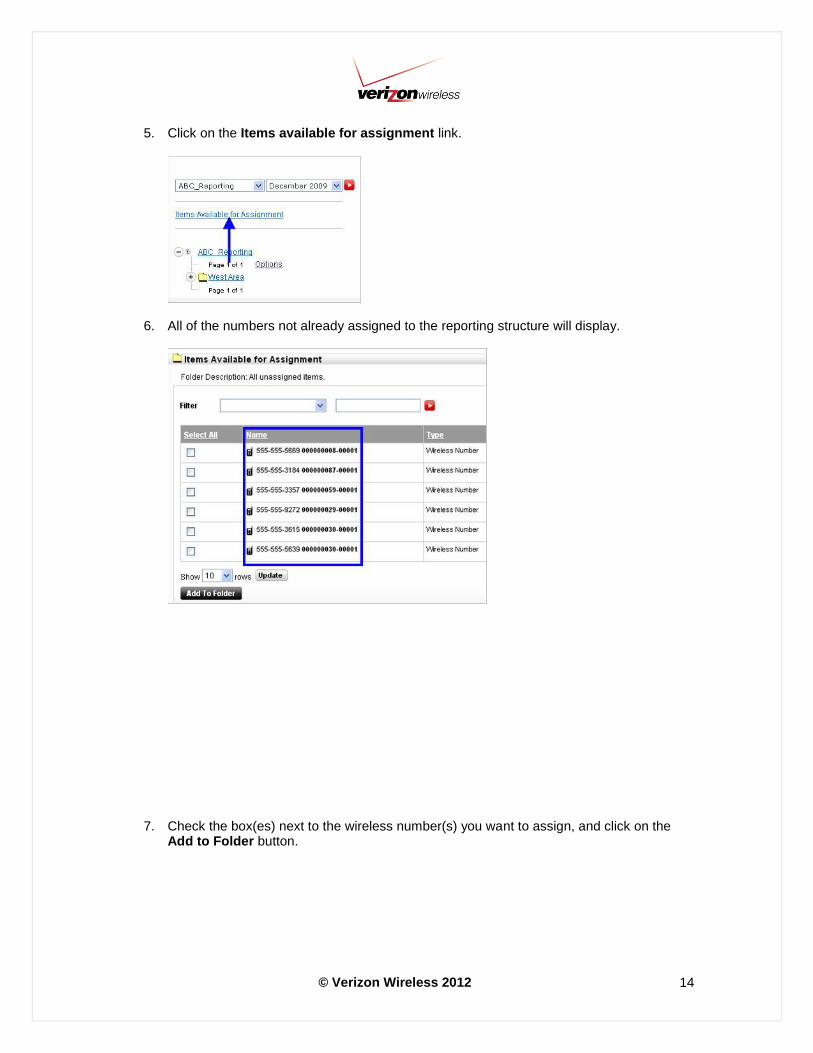
4. The report type will display. From here you will define the account and bill date you want to see displayed. Once you have selected the account and date click the red arrow to run your report.
5. The data for the Top 20 Out of Network Calls will display on the page. From here you
can modify the account number you are viewing, the invoice number and date.

© Verizon Wireless 2012
37
6. Click the download button if you would like to view the data in an excel format, search for unique criteria or schedule this report to run on a recurring basis.
Run Integrated Reports
If you have combined services such as wireless, telecom or business in VEC this section will provide a consolidated view of reports for those accounts.
1. Select the Standard Reports tab to view all of the Standard Reports

© Verizon Wireless 2012
38
2. All of the Standard Reports will appear with a short description for each. Select the Integrated category from the dropdown menu.
3. Click on the report you want to run. For this example we will run the “Integrated Invoice
Summary” report.

© Verizon Wireless 2012
39
4. Select the From and Thru Date then click the red arrow to run the report
5. Your data will display on the page. From here you have multiple options to help you
manipulate your data as needed:
a. Filter – limit the items in your data by specific criteria b. Sort – sort by columns of your choice, OR click the column on the data page c. Download – download your data into an excel file d. Customize – add and remove columns of data from your standard report to
create a custom report e. Schedule – run the report on a recurring basis f. Search – narrow down data by searching for unique criteria
Note: for quick access to details on a number or account, click the hyperlink tied to the number.

© Verizon Wireless 2012
40
Memo Bill Distribution
Note: A Memo Bill can only go out to users whose email address is loaded. Up to six email addresses can be loaded per wireless number. To verify a company user’s email address is loaded:
1. Click on the “Accounts & Maintenance” tab.
2. Go to the “Manage Wireless Lines & Services” page.
3. For the desired user, select “Change Memo Bill Email Address” in the “Actions” dropdown, and click the red arrow button.
4. Make sure there is an email address in the “Requester E-mail” field. You may also add up to five additional email addresses to the “Memo Bill E-mail Addresses” field.

© Verizon Wireless 2012
41
Generate a Memo Bill
There are two ways to generate a Memo Bill request: mass distribution to all wireless numbers in your account or individual distribution. To send a Memo Bill to all wireless numbers in the account:
1. Click on the “Invoices” tab.
2. Go to the “Analysis & Reporting” page.
3. Click on the “Set Reporting Position” link.
4. Make sure “Billing Structure” is selected in the “Structure Type” dropdown, and click on the red arrow button.
5. Open the structure by clicking on the “+” (plus sign) next to the structure name.

© Verizon Wireless 2012
42
6. Click on the desired account number.
7. In the pop-up window, select “Memo Bill Distribution”.
8. Select a date from the “Billing Period” dropdown.

© Verizon Wireless 2012
43
9. Enter the memo bill message, and an optional second subject line.
10. Click on the “Distribute” button.
You have successfully distributed a Memo Bill to the entire account. To send a Memo Bill to an individual wireless number
1. Click on the “Invoices” tab.
2. Go to the “Analysis & Reporting” page.
3. Click on the “Set Reporting Position” link.

© Verizon Wireless 2012
44
4. Open the structure by clicking on the “+” (plus sign) next to the structure name.
5. Open the account that contains the desired wireless number by clicking on the “+” (plus sign).
6. Click on the wireless number that will be receiving the memo bill.
7. In the pop-up window, select “Memo Bill Distribution”.

© Verizon Wireless 2012
45
8. Select a date from the “Billing Period” dropdown.
9. Enter the memo bill message, and an optional second subject line.
10. Click on the “Distribute” button.

© Verizon Wireless 2012
46
You have successfully distributed a Memo Bill to an individual wireless number.
Custom Reports
Create a custom report from a Standard Report
To create a custom report using pre-defined Standard Reports:
1. Click on the Invoices tab.
2. Go to the Analysis & Reporting page.
3. Select the Standard Reports category that contains the report you want to customize. For this example we will select the Usage category.

© Verizon Wireless 2012
47
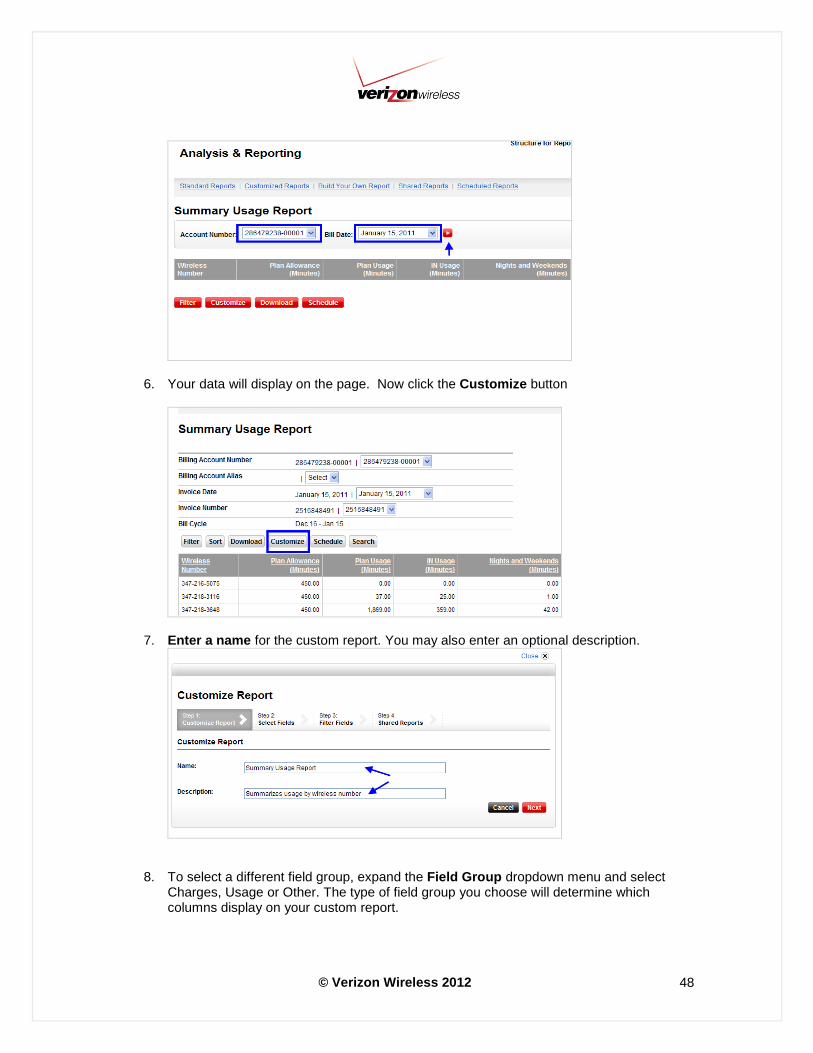
4. Click on the report name to access the report. For this example we will select the Summary Usage report.
5. The Summary Usage Report page will appear. Now start to define your data BEFORE you Customize. Select the Account Number you wish to run your report on. Note: Accounts shown will be determined by your access and structure. Select the Bill Date and click the red arrow
© Verizon Wireless 2012
48
6. Your data will display on the page. Now click the Customize button
7. Enter a name for the custom report. You may also enter an optional description.
8. To select a different field group, expand the Field Group dropdown menu and select Charges, Usage or Other. The type of field group you choose will determine which columns display on your custom report.

© Verizon Wireless 2012
49
9. Highlight the columns you would like to add and hit the > button. If you want to add or remove all of the columns, select the >> / << buttons. Note: you can add multiple fields by highlighting and holding the CTRL button.
10. To move the order of the columns in your custom report, highlight the column and select Up or Down.

© Verizon Wireless 2012
50
11. When finished creating your report, the order and the data select Next.
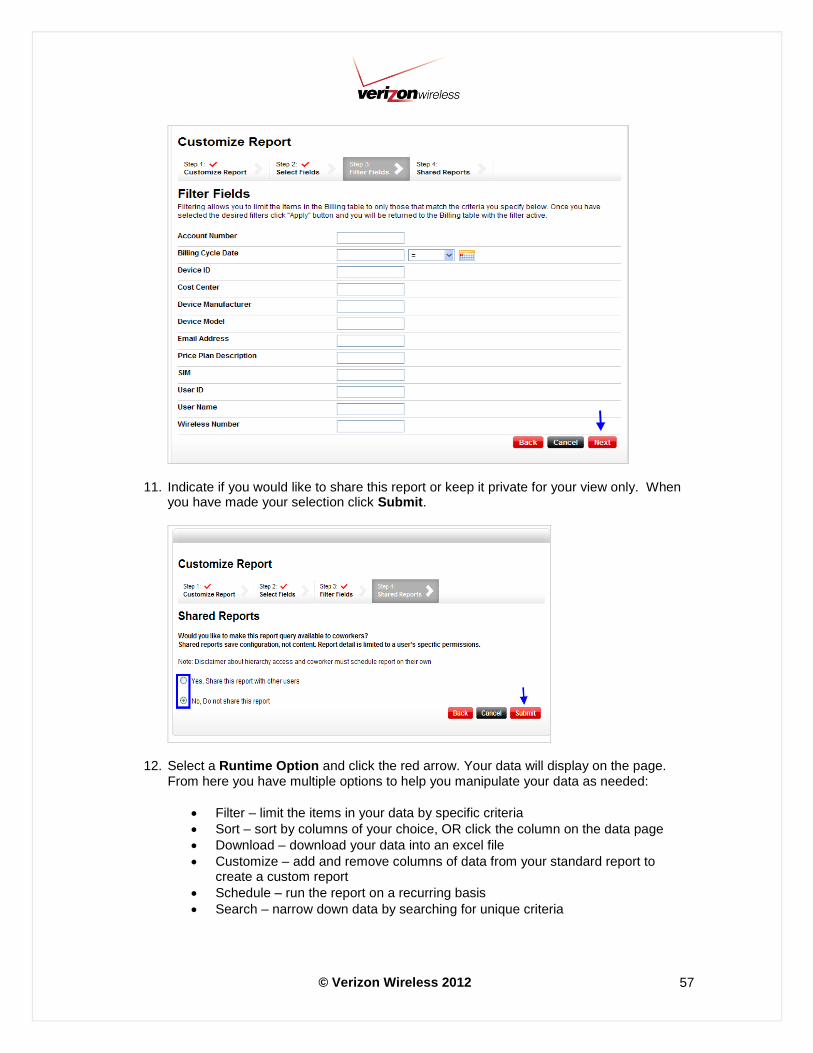
12. Enter in any specific criteria you would like to Filter your report by to bring back certain data in your report

© Verizon Wireless 2012
51
13. Indicate if you would like to share this report with other users within your company or keep it private for your view only. When you have made your selection click Submit.
Your report has now been created and saved. You can access your report in the Customized Reports tab or select a “Runtime Option” to apply to your custom report. Runtime options:
Across Months and Accounts: All accounts + from / to months.
Current Information for Wireless Accounts: Most recently available billing data for the selected account.
Current Information Across Accounts: Most recently available billing data across account
Single Date for Wireless Account: One date for selected account
Single Month Across Accounts: One month for all the accounts in the selected reporting position.

© Verizon Wireless 2012
52
Note: Depending on the type of report you select to create your custom report with, the runtime option may not be available.
6. Select a Runtime Option and click the red arrow. Your data will display on the page. From here you have multiple options to help you manipulate your data as needed:
Filter – limit the items in your data by specific criteria
Sort – sort by columns of your choice, OR click the column on the data page
Download – download your data into an excel file
Customize – add and remove columns of data from your standard report to create a custom report
Schedule – run the report on a recurring basis
Search – narrow down data by searching for unique criteria

© Verizon Wireless 2012
53
Custom Reports
Build Your Own Custom Report from start to finish
To create a customized report from scratch:
1. Click on the Invoices tab.
2. Go to the Analysis & Reporting page.
3. Click on the Build Your Own Report tab.
4. Give your report a unique name and description. A description is helpful but not required

© Verizon Wireless 2012
54
5. Start to build your report by selecting the fields. Be aware, the option you select in the Report Type dropdown will determine which options appear in the View By dropdown.
6. Once you’ve selected the report type and the View By options, the available columns will display on the left. Note: The Field Group menu groups the fields for easier sorting of available columns. You can select the group type to refresh the available columns that can be added to your report.

© Verizon Wireless 2012
55
7. Highlight the columns you would like to add to your report. You can select multiple columns to add at once by holding the CTRL key. Click the > button to add.
8. To move the order of the columns in your custom report, highlight the column and select Up or Down

© Verizon Wireless 2012
56
9. When finished creating your report, the order and the data select Next.
10. Enter in any specific criteria you would like to filter your report by to bring back certain data in your report.
© Verizon Wireless 2012
57
11. Indicate if you would like to share this report or keep it private for your view only. When you have made your selection click Submit.
12. Select a Runtime Option and click the red arrow. Your data will display on the page. From here you have multiple options to help you manipulate your data as needed:
Filter – limit the items in your data by specific criteria
Sort – sort by columns of your choice, OR click the column on the data page
Download – download your data into an excel file
Customize – add and remove columns of data from your standard report to create a custom report
Schedule – run the report on a recurring basis
Search – narrow down data by searching for unique criteria

© Verizon Wireless 2012
58
Note: Depending on the type of report you select to create your custom report with, the runtime option may not be available.
13. Select a “Runtime Option” and click the red arrow. Your data will display on the page. From here you have multiple options to help you manipulate your data as needed:
g. Filter – limit the items in your data by specific criteria h. Sort – sort by columns of your choice, OR click the column on the data page i. Download – download your data into an excel file j. Customize – add and remove columns of data from your standard report to
create a custom report k. Schedule – run the report on a recurring basis l. Search – narrow down data by searching for unique criteria
© Verizon Wireless 2012
59
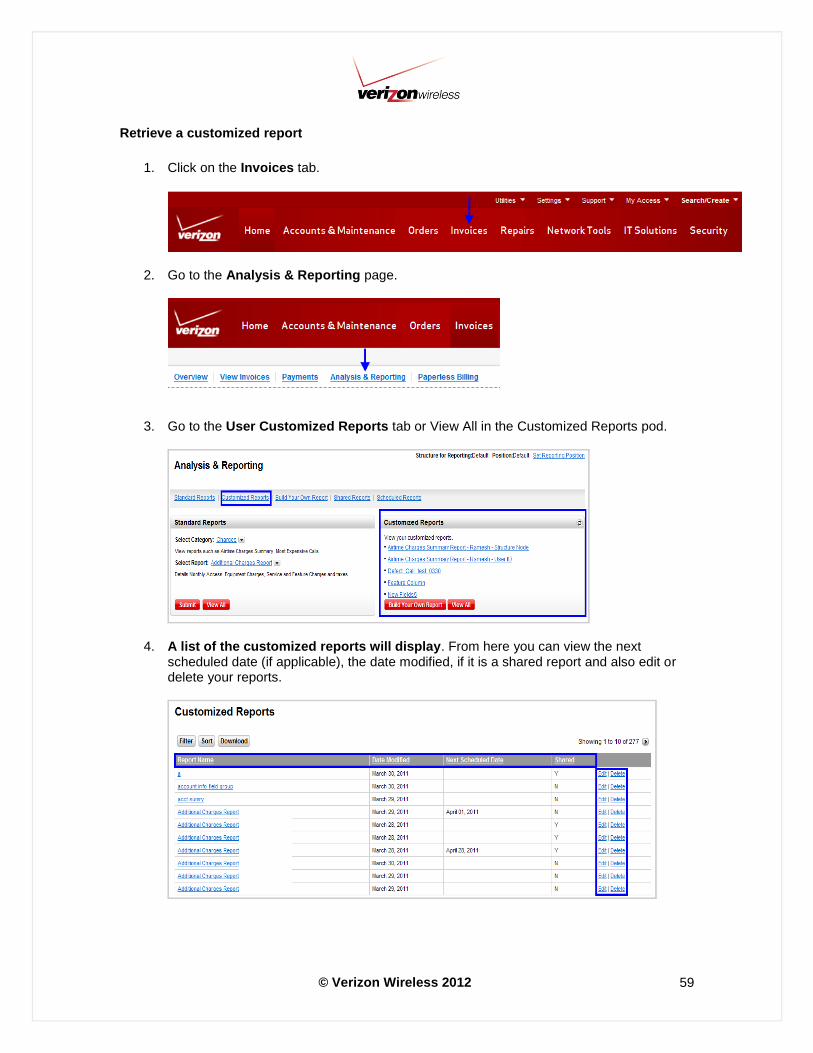
Retrieve a customized report
1. Click on the Invoices tab.
2. Go to the Analysis & Reporting page.
3. Go to the User Customized Reports tab or View All in the Customized Reports pod.
4. A list of the customized reports will display. From here you can view the next scheduled date (if applicable), the date modified, if it is a shared report and also edit or delete your reports.

© Verizon Wireless 2012
60
Share/Un-share a Report
1. Click on the Invoices tab.
2. Go to the Analysis & Reporting page.
3. Go to the Shared Reports tab or View All in the Shared Reports pod.
4. A list of Shared Reports will display. From here you can un-share by clicking Edit. Note: If you are the MYPOC on the account you can un-share any report even if you are not the creator of the report.

© Verizon Wireless 2012
61
Schedule a Report
The Scheduled Reports tab allows you to view reports already scheduled. This section will show you how to schedule a report if it is not currently set to run.
1. Click on the Invoices tab.
2. Go to the Analysis & Reporting page.
3. Go to the Scheduled Reports tab or click the View All button in the Scheduled Reports pod.
4. A list of scheduled reports will appear.

© Verizon Wireless 2012
62
5. If you want so schedule a report that isn’t shown, click on the Customized Reports tab to locate the saved custom report you want to schedule.
6. Click on the report you would like to schedule.
7. You are now in your custom report. Click the Schedule button.
8. Select the schedule you would like this report to run by. Add the e mail address you want to receive notice when the report is ready for viewing. When finished, click Save.

© Verizon Wireless 2012
63
9. Your report has now been scheduled and will display in the scheduled reports tab.
Retrieve a deferred downloaded report
Some reports may be too large to download immediately. If the report is too large it will be downloaded to the Download Center in the Utilities menu. An email notification will go to the requestor when the report is available for viewing. To access the report:
1. Click on the Utilities link and select Download Center.
2. Click on the Invoices Requested Downloads link.

© Verizon Wireless 2012
64
3. Your deferred downloaded report will display on this page for you to view.