Veritas Enterprise Vault : Setting up File System Archiving … · ·...
190
Veritas Enterprise Vault™ Setting up File System Archiving (FSA) 12.1
Transcript of Veritas Enterprise Vault : Setting up File System Archiving … · ·...

Veritas Enterprise Vault™
Setting up File System Archiving(FSA)
12.1
Veritas Enterprise Vault: Setting up File SystemArchiving (FSA)
Last updated: 2016-09-07.
Legal NoticeCopyright © 2016 Veritas Technologies LLC. All rights reserved.
Veritas, the Veritas Logo, Enterprise Vault, Compliance Accelerator, and Discovery Acceleratorare trademarks or registered trademarks of Veritas Technologies LLC or its affiliates in theU.S. and other countries. Other names may be trademarks of their respective owners.
This product may contain third party software for which Veritas is required to provide attributionto the third party (“Third Party Programs”). Some of the Third Party Programs are availableunder open source or free software licenses. The License Agreement accompanying theSoftware does not alter any rights or obligations you may have under those open source orfree software licenses. Refer to the third party legal notices document accompanying thisVeritas product or available at:
https://www.veritas.com/about/legal/license-agreements
The product described in this document is distributed under licenses restricting its use, copying,distribution, and decompilation/reverse engineering. No part of this document may bereproduced in any form by any means without prior written authorization of Veritas TechnologiesLLC and its licensors, if any.
THE DOCUMENTATION IS PROVIDED "AS IS" AND ALL EXPRESS OR IMPLIEDCONDITIONS, REPRESENTATIONS AND WARRANTIES, INCLUDING ANY IMPLIEDWARRANTY OF MERCHANTABILITY, FITNESS FOR A PARTICULAR PURPOSE ORNON-INFRINGEMENT, ARE DISCLAIMED, EXCEPT TO THE EXTENT THAT SUCHDISCLAIMERS ARE HELD TO BE LEGALLY INVALID. VERITAS TECHNOLOGIES LLCSHALL NOT BE LIABLE FOR INCIDENTAL OR CONSEQUENTIAL DAMAGES INCONNECTION WITH THE FURNISHING, PERFORMANCE, OR USE OF THISDOCUMENTATION. THE INFORMATION CONTAINED IN THIS DOCUMENTATION ISSUBJECT TO CHANGE WITHOUT NOTICE.
The Licensed Software and Documentation are deemed to be commercial computer softwareas defined in FAR 12.212 and subject to restricted rights as defined in FAR Section 52.227-19"Commercial Computer Software - Restricted Rights" and DFARS 227.7202, et seq."Commercial Computer Software and Commercial Computer Software Documentation," asapplicable, and any successor regulations, whether delivered by Veritas as on-premises orhosted services. Any use, modification, reproduction release, performance, display or disclosureof the Licensed Software and Documentation by the U.S. Government shall be solely inaccordance with the terms of this Agreement.
Veritas Technologies LLC500 E Middlefield RoadMountain View, CA 94043
http://www.veritas.com
Technical SupportTechnical Support maintains support centers globally. All support services will be deliveredin accordance with your support agreement and the then-current enterprise technical supportpolicies. For information about our support offerings and how to contact Technical Support,visit our website:
https://www.veritas.com/support
You can manage your Veritas account information at the following URL:
https://my.veritas.com
If you have questions regarding an existing support agreement, please email the supportagreement administration team for your region as follows:
[email protected] (except Japan)
Before you contact Technical Support, run the Veritas Quick Assist (VQA) tool to make surethat you have satisfied the system requirements that are listed in your product documentation.You can download VQA from the following article on the Veritas Support website:
http://www.veritas.com/docs/000095758
DocumentationMake sure that you have the current version of the documentation. Each document displaysthe date of the last update on page 2. The latest documentation is available on the Veritaswebsite:
http://www.veritas.com/docs/000001907
Documentation feedbackYour feedback is important to us. Suggest improvements or report errors or omissions to thedocumentation. Include the document title, document version, chapter title, and section titleof the text on which you are reporting. Send feedback to:
You can also see documentation information or ask a question on the Veritas community site:
http://www.veritas.com/community
Chapter 1 About this guide ................................................................. 11
Introducing this guide .................................................................... 11Where to get more information about Enterprise Vault .......................... 11
“How To” articles on the Veritas Support website ........................... 13Enterprise Vault training modules ............................................... 14
Chapter 2 About File System Archiving .......................................... 15
About File System Archiving ........................................................... 16About using FSA with clustered file servers ........................................ 17About setting up File System Archiving ............................................ 18About FSA policies ....................................................................... 20About target volumes, folders, and archive points ................................ 21About client access to FSA-archived items ........................................ 22About archived file permissions ....................................................... 22About FSA shortcut files ................................................................ 23
About internet shortcuts ........................................................... 23About placeholder shortcuts ..................................................... 24About folder shortcuts ............................................................. 26About pass-through recall for placeholder shortcuts ....................... 27
About the FSA Agent .................................................................... 28About retention folders .................................................................. 29About File Blocking ....................................................................... 30About FSA Reporting .................................................................... 31About FSAUtility ........................................................................... 32
Chapter 3 Steps to configure File System Archiving .................. 33
Steps to configure File System Archiving ........................................... 33
Chapter 4 Adding a Windows file server to File SystemArchiving ........................................................................ 36
Adding a Windows file server to File System Archiving ......................... 36Using FSA with the Windows Encrypting File System (EFS) .................. 37About archiving from Windows Server 2012 file servers ........................ 38
About the ReFS and CSVFS file systems and FSA ........................ 38
Contents
About Dynamic Access Control and FSA ..................................... 38About archiving Windows Server 2012 deduplicated files with
FSA ............................................................................... 39Account requirements for managing FSA with Windows file
servers ................................................................................. 40Permissions and privileges required by the Vault Service account on
Windows file servers ............................................................... 41Granting permissions to the Vault Service account if you do not
install the FSA Agent ......................................................... 42Configuring a file server's firewall for FSA .......................................... 42Adding a Windows file server as an archiving target ............................ 43
Chapter 5 Adding a NetApp filer to File SystemArchiving ........................................................................ 45
Adding a NetApp filer to File System Archiving ................................... 45Setting the permissions for FSA on a NetApp filer ............................... 45Adding a NetApp filer as an archiving target ....................................... 46
Chapter 6 Adding a NetApp C-Mode Vserver to File SystemArchiving ........................................................................ 48
Adding a NetApp C-Mode Vserver to File System Archiving ................. 48Permissions and privileges required by the Vault Service account on
NetApp C-mode Vservers ........................................................ 49Granting the required permission on each Vserver .............................. 50Configuring the FPolicy server details ............................................... 51Adding a NetApp C-Mode Vserver as an archiving target ...................... 52Points to note about File System Archiving on NetApp C-Mode file
servers ................................................................................. 53
Chapter 7 Adding an EMC Celerra/VNX device to FileSystem Archiving ......................................................... 54
Adding a Celerra/VNX device to File System Archiving ......................... 54Preparing a Celerra/VNX device for FSA ........................................... 55
Configuring Celerra/VNX pass-through behavior for placeholdershortcuts ........................................................................ 59
The format of the Web Access application URL in the Celerra/VNXfs_dhsm command ........................................................... 60
Configuring the Data Mover HTTP server to use SSL ..................... 61Example commands to prepare a Celerra/VNX device for FSA
..................................................................................... 62Adding a Celerra/VNX device as an archiving target ............................ 64
5Contents
Specifying a cache location for retrieved Celerra/VNX files .................... 66
Chapter 8 Configuring FSA with clustered file servers ............... 67
About configuring FSA with clustered file servers ................................ 67Steps to configure FSA with clustered file servers ............................... 68Preparing to set up FSA services in a cluster ..................................... 69Adding the Vault Service account to the non-secure VCS cluster for
FSA high availability ................................................................ 70Adding the virtual file server as an FSA target .................................... 71Configuring or reconfiguring the FSA resource ................................... 74Removing the FSA resource from all cluster groups ............................. 75Troubleshooting the configuration of FSA with clustered file
servers ................................................................................. 75'Failed to collect clustering data' error on starting FSA Cluster
Configuration wizard ......................................................... 77
Chapter 9 Installing the FSA Agent .................................................. 78
About installing the FSA Agent on a Windows file server ...................... 78Installing the FSA Agent using the Install FSA Agent wizard ............ 80Installing the FSA Agent manually .............................................. 81
About FSA Agent uninstallation ....................................................... 82Updating the logon credentials of the FSA Agent services ..................... 83
Chapter 10 Defining volume and folder policies ............................. 85
About defining FSA volume and folder policies ................................... 85Creating FSA volume policies and folder policies ................................ 85About FSA volume policy and folder policy properties .......................... 86About selecting the shortcut type for an FSA policy ............................. 87
About choosing not to display the file size in NetApp placeholdershortcuts ........................................................................ 87
About FSA policy archiving rules ..................................................... 88Tips for creating FSA policy archiving rules .................................. 88About excluding specific Mac and Windows file types from
archiving ........................................................................ 89FSA shortcut creation options ................................................... 90Notes on FSA shortcut creation ................................................. 91
About options for archiving files that have explicit permissions, andfiles under DAC ...................................................................... 91
6Contents

Chapter 11 Configuring the deletion of archived files onplaceholder deletion ................................................... 93
About configuring the deletion of archived files on placeholderdeletion ................................................................................ 93
Configuring the deletion of archived files on placeholder deletion forWindows file servers and NetApp filers ....................................... 95
Configuring the deletion of files on placeholder deletion for EMCCelerra/VNX devices ............................................................... 96
Chapter 12 Configuring target volumes, target folders, andarchive points ............................................................... 99
About adding target volumes, target folders, and archive points forFSA ..................................................................................... 99About the checks for existing archives for an FSA folder
path ............................................................................. 101Adding a target volume for FSA ..................................................... 101Adding a target folder and archive points for FSA .............................. 102About managing archive points ...................................................... 104
Viewing, editing, or deleting archive points in the AdministrationConsole ........................................................................ 105
Archive point properties ............................................................... 106Archive point properties: General tab ........................................ 106Archive point properties: Indexing tab ....................................... 107
Effects of modifying, moving, or deleting folders ................................ 109Effects of modifying folders with folder policies ............................ 109Effects of modifying folders with archive points ........................... 110
About deleting target folders, volumes, and file servers ....................... 111Deleting a target folder from FSA ............................................. 112Deleting a target volume from FSA ........................................... 112Deleting a target file server from FSA ........................................ 114
Chapter 13 Configuring pass-through recall for placeholdershortcuts ....................................................................... 115
About configuring pass-through recall for placeholder shortcuts ............ 115Configuring pass-through recall for a Windows file server .................... 116
About configuring pass-through recall for a file server cluster ......... 117Registry values for pass-through recall on Windows file
servers ......................................................................... 118Configuring pass-through recall for a NetApp filer .............................. 120
7Contents
Chapter 14 Configuring and managing retention folders ........... 122
Configuring retention folders ......................................................... 122Creating a retention folder policy .............................................. 123Adding a target folder with a retention folder policy from the
Administration Console .................................................... 123About controlling whether FSA recreates deleted or moved
retention folders ............................................................. 125About testing the effects of a retention folder configuration ............ 125
About assigning a retention folder policy using the Command LineInterface (CLI) ...................................................................... 125The format of the RtnFolder.exe settings file ............................... 126Example RtnFolder.exe commands .......................................... 128
Managing retention folders ........................................................... 128Disabling the archiving of retention folders for an FSA target ......... 129Assigning a different retention folder policy to a target folder .......... 129
Chapter 15 Configuring File Blocking ............................................... 130
About configuring File Blocking ...................................................... 130Steps to configure File Blocking ..................................................... 131Defining a local quarantine location for File Blocking .......................... 133Defining a central quarantine location for File Blocking ....................... 134Specifying the mail notification delivery mechanism for File
Blocking .............................................................................. 135Including File Blocking rules in a policy ............................................ 135About File Blocking rules .............................................................. 137
File Blocking rule: General tab ................................................. 137File Blocking rule: File Groups tab ............................................ 137File Blocking rule: File Blocking Options tab ............................... 138File Blocking rule: Notifications tab ........................................... 139File Blocking rule: Folder Filters tab .......................................... 141
Exempting File Blocking for specific users ........................................ 142Troubleshooting File Blocking in a clustered environment .................... 143
Chapter 16 Configuring and running FSA tasks ........................... 144
About configuring and running FSA tasks ........................................ 144Adding a File System Archiving task ............................................... 145Scheduling a File System Archiving task .......................................... 145Setting the FSA folder permissions synchronization schedule ............. 146Scheduling the deletion of archived files on placeholder deletion for
EMC Celerra/VNX ................................................................. 147Configuring FSA version pruning .................................................... 148
8Contents
Using Run Now to process FSA targets manually .............................. 148Processing an FSA target volume manually ............................... 149Running a File System Archiving task manually .......................... 150
About File System Archiving task reports ......................................... 151About scheduling storage expiry for FSA ......................................... 153
Chapter 17 Configuring file system filtering .................................... 154
About custom filters for File System Archiving ................................... 154Configuring file system filters ......................................................... 155About file system filter reports ....................................................... 159
Chapter 18 Managing the file servers .............................................. 160
About managing the target file servers ............................................ 160About backing up the target file servers ........................................... 160About virus-checking the target file servers ...................................... 161About changing the placeholder recall rate settings ............................ 162
Changing the placeholder recall rate settings for a Windows fileserver ........................................................................... 162
Changing the placeholder recall rate settings for a NetApp fileserver ........................................................................... 164
About preventing unwanted file recalls from placeholdershortcuts ............................................................................. 165Using FSA backup mode to prevent file recalls ........................... 166Prohibiting a program from recalling files that FSA has
archived ....................................................................... 167Preventing file recalls on EMC Celerra/VNX ............................... 168Preventing file recalls on restore due to File Blocking checks ......... 168
Chapter 19 PowerShell cmdlets for File SystemArchiving ....................................................................... 169
About the PowerShell cmdlets for File System Archiving ..................... 169Running the File System Archiving cmdlets ...................................... 170Creating PowerShell scripts using File System Archiving cmdlets ......... 170File System Archiving cmdlets error handling .................................... 171
Appendix A Permissions and privileges required for the VaultService account on Windows file servers ........... 182
About the permissions and privileges required for the Vault Serviceaccount on Windows file servers .............................................. 183
Group membership requirements for the Vault Service account ............ 183
9Contents
DCOM permissions required by the Vault Service account .................. 184WMI control permissions required by the Vault Service account ............ 184Local security user rights required by the Vault Service account ........... 184Permissions required by the Vault Service account for the FSA
Agent ................................................................................. 186FSA Agent service permissions required by the Vault Service
account ........................................................................ 186Enterprise Vault installation folder permissions required by the
Vault Service account ...................................................... 186File server registry hive permissions required by the Vault Service
account ........................................................................ 186Permissions required by the Vault Service account to support the FSA
resource on clustered file servers ............................................. 187FSA target share and folder permissions required by the Vault Service
account .............................................................................. 187
Index .................................................................................................................. 188
10Contents

About this guideThis chapter includes the following topics:
■ Introducing this guide
■ Where to get more information about Enterprise Vault
Introducing this guideThis guide describes how to set up Enterprise Vault so that you can archive filesthat are held on network file servers.
The guide assumes that you know how to administer the following:
■ Microsoft Windows Server
■ Your file server hardware and software
■ Your archive storage hardware and software
Where to get more information about EnterpriseVault
Table 1-1 lists the documentation that accompanies Enterprise Vault.
1Chapter
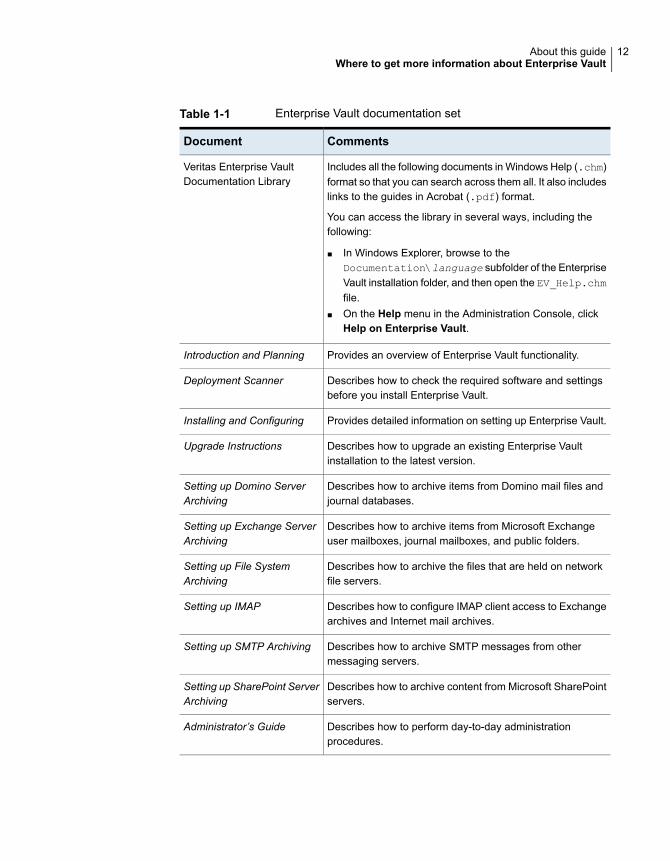
Table 1-1 Enterprise Vault documentation set
CommentsDocument
Includes all the following documents in Windows Help (.chm)format so that you can search across them all. It also includeslinks to the guides in Acrobat (.pdf) format.
You can access the library in several ways, including thefollowing:
■ In Windows Explorer, browse to theDocumentation\language subfolder of the EnterpriseVault installation folder, and then open the EV_Help.chmfile.
■ On the Help menu in the Administration Console, clickHelp on Enterprise Vault.
Veritas Enterprise VaultDocumentation Library
Provides an overview of Enterprise Vault functionality.Introduction and Planning
Describes how to check the required software and settingsbefore you install Enterprise Vault.
Deployment Scanner
Provides detailed information on setting up Enterprise Vault.Installing and Configuring
Describes how to upgrade an existing Enterprise Vaultinstallation to the latest version.
Upgrade Instructions
Describes how to archive items from Domino mail files andjournal databases.
Setting up Domino ServerArchiving
Describes how to archive items from Microsoft Exchangeuser mailboxes, journal mailboxes, and public folders.
Setting up Exchange ServerArchiving
Describes how to archive the files that are held on networkfile servers.
Setting up File SystemArchiving
Describes how to configure IMAP client access to Exchangearchives and Internet mail archives.
Setting up IMAP
Describes how to archive SMTP messages from othermessaging servers.
Setting up SMTP Archiving
Describes how to archive content from Microsoft SharePointservers.
Setting up SharePoint ServerArchiving
Describes how to perform day-to-day administrationprocedures.
Administrator’s Guide
12About this guideWhere to get more information about Enterprise Vault
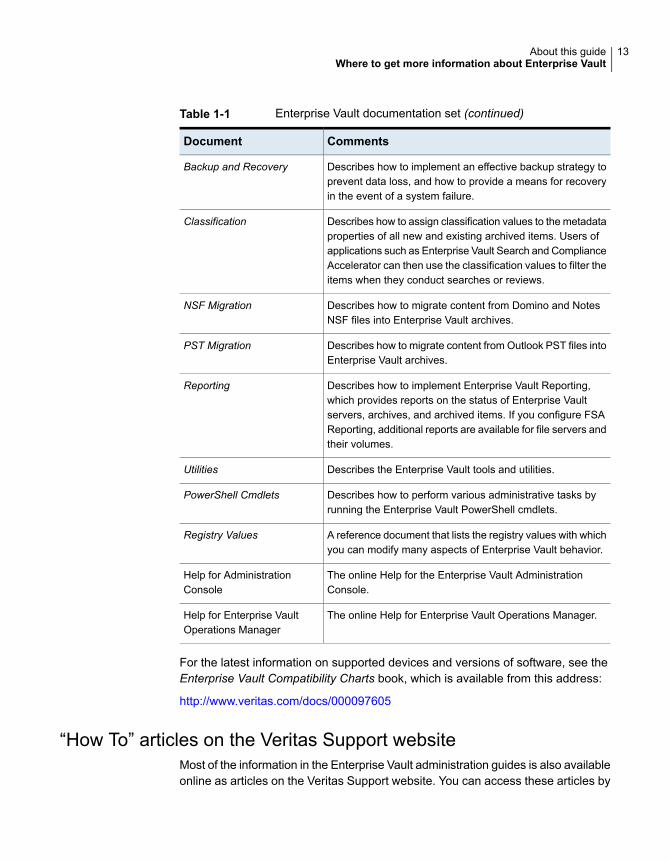
Table 1-1 Enterprise Vault documentation set (continued)
CommentsDocument
Describes how to implement an effective backup strategy toprevent data loss, and how to provide a means for recoveryin the event of a system failure.
Backup and Recovery
Describes how to assign classification values to the metadataproperties of all new and existing archived items. Users ofapplications such as Enterprise Vault Search and ComplianceAccelerator can then use the classification values to filter theitems when they conduct searches or reviews.
Classification
Describes how to migrate content from Domino and NotesNSF files into Enterprise Vault archives.
NSF Migration
Describes how to migrate content from Outlook PST files intoEnterprise Vault archives.
PST Migration
Describes how to implement Enterprise Vault Reporting,which provides reports on the status of Enterprise Vaultservers, archives, and archived items. If you configure FSAReporting, additional reports are available for file servers andtheir volumes.
Reporting
Describes the Enterprise Vault tools and utilities.Utilities
Describes how to perform various administrative tasks byrunning the Enterprise Vault PowerShell cmdlets.
PowerShell Cmdlets
A reference document that lists the registry values with whichyou can modify many aspects of Enterprise Vault behavior.
Registry Values
The online Help for the Enterprise Vault AdministrationConsole.
Help for AdministrationConsole
The online Help for Enterprise Vault Operations Manager.Help for Enterprise VaultOperations Manager
For the latest information on supported devices and versions of software, see theEnterprise Vault Compatibility Charts book, which is available from this address:
http://www.veritas.com/docs/000097605
“How To” articles on the Veritas Support websiteMost of the information in the Enterprise Vault administration guides is also availableonline as articles on the Veritas Support website. You can access these articles by
13About this guideWhere to get more information about Enterprise Vault
searching the Internet with any popular search engine, such as Google, or byfollowing the procedure below.
To access the “How To” articles on the Veritas Support website
1 Type the following in the address bar of your web browser, and then pressEnter:
http://www.veritas.com/support/en_US/products-a-z
2 In the Products A-Z page, choose the required product, such as EnterpriseVault for Microsoft Exchange.
3 Search for a word or phrase by using the Knowledge Base Search feature, orbrowse the list of most popular subjects.
Enterprise Vault training modulesThe Enterprise Vault and eDiscovery Tech Center (http://www.veritas.com/elibrary)is an eLibrary of self-paced learning modules developed around key features, bestpractices, and common technical support questions.
More advanced instructor-led training, virtual training, and on-demand classes arealso available. For information about them, seehttp://www.veritas.com/education-services/training-courses.
14About this guideWhere to get more information about Enterprise Vault

About File SystemArchiving
This chapter includes the following topics:
■ About File System Archiving
■ About using FSA with clustered file servers
■ About setting up File System Archiving
■ About FSA policies
■ About target volumes, folders, and archive points
■ About client access to FSA-archived items
■ About archived file permissions
■ About FSA shortcut files
■ About the FSA Agent
■ About retention folders
■ About File Blocking
■ About FSA Reporting
■ About FSAUtility
2Chapter

About File System ArchivingYou can set up Enterprise Vault File System Archiving (FSA) to archive files fromnetwork shares. Users can then access the archived files through facilities such asEnterprise Vault Search, or by using shortcuts in the original locations.
The Enterprise Vault Compatibility Charts document provides a full list of the targetplatforms, operating systems and protocols that Enterprise Vault supports for FSA.The document also lists the supported operating systems for client access ofarchived items, including opening Internet and Placeholder shortcuts to archiveditems. The Enterprise Vault Compatibility Charts document is available at thefollowing address on the Veritas Support website:
http://www.veritas.com/docs/000097605
By archiving from the file system, you can gain the following immediate benefits onthe volumes that are being archived:
■ It is easy to archive files. You may have files that you want to add to your archivesystem, perhaps because of legal requirements. You can create an archivingpolicy to archive them all immediately.
■ Files that are archived are indexed, so they are searchable.
■ Previous versions of archived files are retained. When a user creates a newversion of a file that has been archived, that new version will be archived whenit is matched by the rules you define. All the earlier archived versions of the fileare retained and are searchable.
■ There may be an immediate space usage reduction.
The Retention Folder feature enables you to create a hierarchy of foldersautomatically on file servers, to be managed by Enterprise Vault and archivedaccording to assigned policies. For example, you could create a hierarchy ofretention folders in every user’s home folder.
The File Blocking feature enables you to prevent unwanted files from being savedon monitored server volumes.
FSA Reporting provides summary reports on the active data on your file servers,and on the data that has been archived from them.
Free training modules for File System Archiving are available from the EnterpriseVault Tech Center at http://go.veritas.com/elibrary.
A separate guide contains best practices information for implementing File SystemArchiving with Enterprise Vault. See the following article on the Veritas Supportwebsite:
http://www.veritas.com/docs/000015085
16About File System ArchivingAbout File System Archiving
For more information on migrating and consolidating file servers that have contentthat has been archived with Enterprise Vault, see the following article on the VeritasSupport website:
http://www.veritas.com/docs/000010966
About using FSA with clustered file serversIf your Windows file servers are grouped in a cluster, you can make the FSA servicesthat run on them highly available. You must add an FSA resource to the clusterresource group or service group, and configure the FSA resource for high availability.The FSA resource monitors the state of the FSA services on the online node. If aproblem occurs with the FSA services on the online node, then the cluster resourcegroup or service group that contains the FSA resource fails over to the next availablenode.
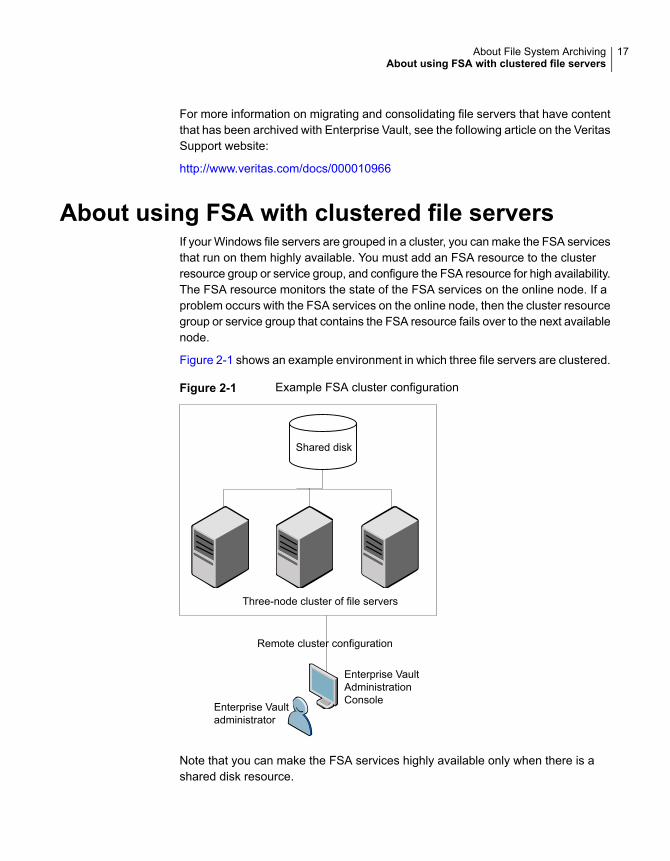
Figure 2-1 shows an example environment in which three file servers are clustered.
Figure 2-1 Example FSA cluster configuration
Three-node cluster of file servers
Enterprise VaultAdministrationConsole
Enterprise Vaultadministrator
Shared disk
Remote cluster configuration
Note that you can make the FSA services highly available only when there is ashared disk resource.
17About File System ArchivingAbout using FSA with clustered file servers
See “About configuring FSA with clustered file servers” on page 67.
About setting up File System ArchivingVery briefly, setting up File System Archiving involves the following tasks:
■ Preparing the file server as necessary, and then adding it as a target file server.You must install the Enterprise Vault FSA Agent on a Windows file server onwhich you want to leave placeholder shortcuts, implement File Blocking, orcollect data for FSA Reporting.
■ Creating volume policies to define how and what to archive from target volumes.Optionally you can also create folder policies, to override the volume policiesfor specific target folders.
■ Adding the target volumes, and assigning the volume policies.
■ Adding target folders, and assigning the parent volume policy or a folder policy.You can define an archive point for each folder that you want to associate witha separate archive. A folder with an archive point forms the top of an archive.Files from the folder and its subfolders are stored in the same archive.
■ Configuring other features as required, such as File Blocking, retention folders,and FSA Reporting.
■ Configuring the File System Archiving tasks to schedule archiving and associatedactivities, and to determine the mode in which the archiving is to run.
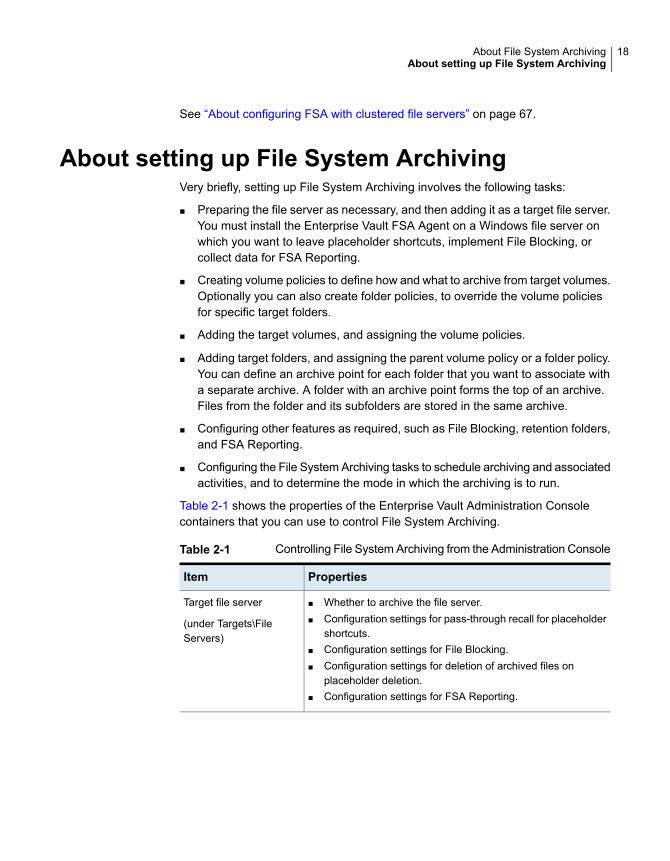
Table 2-1 shows the properties of the Enterprise Vault Administration Consolecontainers that you can use to control File System Archiving.
Table 2-1 Controlling File System Archiving from the Administration Console
PropertiesItem
■ Whether to archive the file server.■ Configuration settings for pass-through recall for placeholder
shortcuts.■ Configuration settings for File Blocking.■ Configuration settings for deletion of archived files on
placeholder deletion.■ Configuration settings for FSA Reporting.
Target file server
(under Targets\FileServers)
18About File System ArchivingAbout setting up File System Archiving

Table 2-1 Controlling File System Archiving from the Administration Console(continued)
PropertiesItem
■ Whether to archive the volume.■ The File System Archiving task that is to process the volume.■ The File System Archiving policy to apply when processing
the volume.■ For NTFS volumes, whether to enable pass-through recall for
placeholder shortcuts on this volume.
A target volume is processed according to the File SystemArchiving task schedule, but can be processed manually by usingthe Run Now option.
Target Volume
(under Targets\FileServers\<server>)
■ Whether to archive the folder.■ Whether to archive the subfolders of the folder.■ The FSA policy to apply when processing the folder.■ The location of archive points, which mark a folder that forms
the top of an archive.
Target Folder
(under Targets\FileServers\<server>\<volume>)
Each target volume is assigned a volume policy, which definesthe following:
■ The File Blocking rules to apply to the volume, if File Blockingis configured.
■ For NTFS volumes, whether to use quotas.■ The type of shortcut to leave, if the archiving rules specify that
a shortcut is to be created.■ For placeholder shortcuts:
■ Whether to delete archived files on placeholder deletion.■ Whether to delete placeholders for the items that are
deleted from archives.■ The retention category or retention plan to use for archived
files.■ The archiving rules to apply. These rules determine which
files to archive, and when to create shortcuts.■ Whether to archive files that have explicit permissions, and
files that are under Dynamic Access Control. These files aresubject to a change in permissions when archived.
Volume policy
(under Policies\File)
19About File System ArchivingAbout setting up File System Archiving

Table 2-1 Controlling File System Archiving from the Administration Console(continued)
PropertiesItem
Folder policies are optional. Use them when you want to overridethe volume policy for specific folders.
A folder policy defines the following:
■ The type of shortcut to leave, if the archiving rules specify thata shortcut is to be created.
■ For placeholder shortcuts:■ Whether to delete archived files on placeholder deletion.■ Whether to delete placeholders for the items that are
deleted from archives.■ The retention category or retention plan to use for archived
files.■ The archiving rules to apply. These rules determine which
files to archive, and when to create shortcuts.■ Whether to archive files that have explicit permissions, and
files that are under Dynamic Access Control. These files aresubject to a change in permissions when archived.
Folder policy
(under Policies\File)
Processes target volumes and folders. The task properties definethe following:
■ Whether to run in report mode or normal mode.■ Schedule settings, including the option for Run Now.■ Settings to control generation of normal and pruning reports.■ Synchronization schedule.■ Pruning options and schedule.
File System ArchivingTask
(under Enterprise VaultServers\<server>\Tasks)
About FSA policiesIn the Enterprise Vault Administration Console you define FSA policies to controlwhich files are archived by FSA.
There are three types of FSA policy:
■ Volume policies apply to entire target volumes, unless overridden by folderpolicies.
■ Folder policies are applied to specific target folders. These settings override thevolume policy settings.To make for easier management, we recommend that you do not apply folderpolicies to folders that have a short life, such as temporary folders. It is better
20About File System ArchivingAbout FSA policies
to apply folder policies to folders that will have a long life, such as a user's rootfolder.
■ Retention folder polices are a special type of FSA policy that enable you todefine a hierarchy of folders to create under a target folder.See “About retention folders” on page 29.
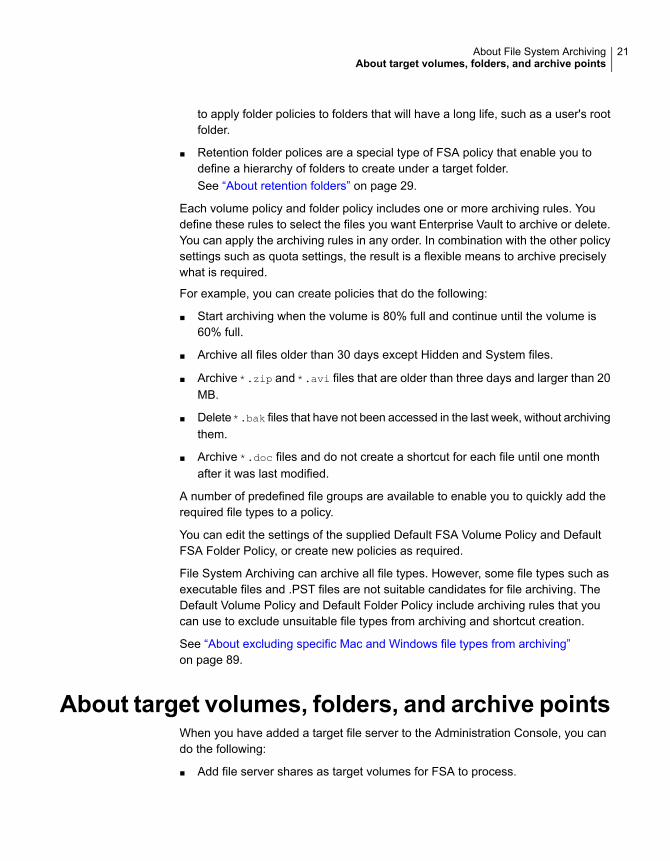
Each volume policy and folder policy includes one or more archiving rules. Youdefine these rules to select the files you want Enterprise Vault to archive or delete.You can apply the archiving rules in any order. In combination with the other policysettings such as quota settings, the result is a flexible means to archive preciselywhat is required.
For example, you can create policies that do the following:
■ Start archiving when the volume is 80% full and continue until the volume is60% full.
■ Archive all files older than 30 days except Hidden and System files.
■ Archive *.zip and *.avi files that are older than three days and larger than 20MB.
■ Delete *.bak files that have not been accessed in the last week, without archivingthem.
■ Archive *.doc files and do not create a shortcut for each file until one monthafter it was last modified.
A number of predefined file groups are available to enable you to quickly add therequired file types to a policy.
You can edit the settings of the supplied Default FSA Volume Policy and DefaultFSA Folder Policy, or create new policies as required.
File System Archiving can archive all file types. However, some file types such asexecutable files and .PST files are not suitable candidates for file archiving. TheDefault Volume Policy and Default Folder Policy include archiving rules that youcan use to exclude unsuitable file types from archiving and shortcut creation.
See “About excluding specific Mac and Windows file types from archiving”on page 89.
About target volumes, folders, and archive pointsWhen you have added a target file server to the Administration Console, you cando the following:
■ Add file server shares as target volumes for FSA to process.
21About File System ArchivingAbout target volumes, folders, and archive points
■ Add target folders to each target volume, to control which folders EnterpriseVault can archive from.
■ Create archive points on the target folders and subfolders. Each archive pointmarks the top of a folder structure that Enterprise Vault archives within a singlearchive.
Enterprise Vault creates an archive for each archive point that it finds. By defaultthe Enterprise Vault File System Archiving task gives the archive the same nameas the folder to which the archive point applies. The site defaults are used to supplythe other attributes of the archive, including the indexing level. You can overridethese defaults if you want.
Where possible, Enterprise Vault uses Alternate Data Streams (ADS) to indicatearchive points. These stream archive points are used on NTFS volumes, on NetAppfilers, and on EMC Celerra/VNX devices. If the file system does not support ADS,Enterprise Vault uses hidden XML files to mark archive points.
About client access to FSA-archived itemsUsers can access archived items as follows:
■ If FSA creates shortcuts in the item’s original location, users can access anarchived item by double-clicking its shortcut on the file server.
■ If shortcuts are not created, users can access the archived items by using theEnterprise Vault search facilities.
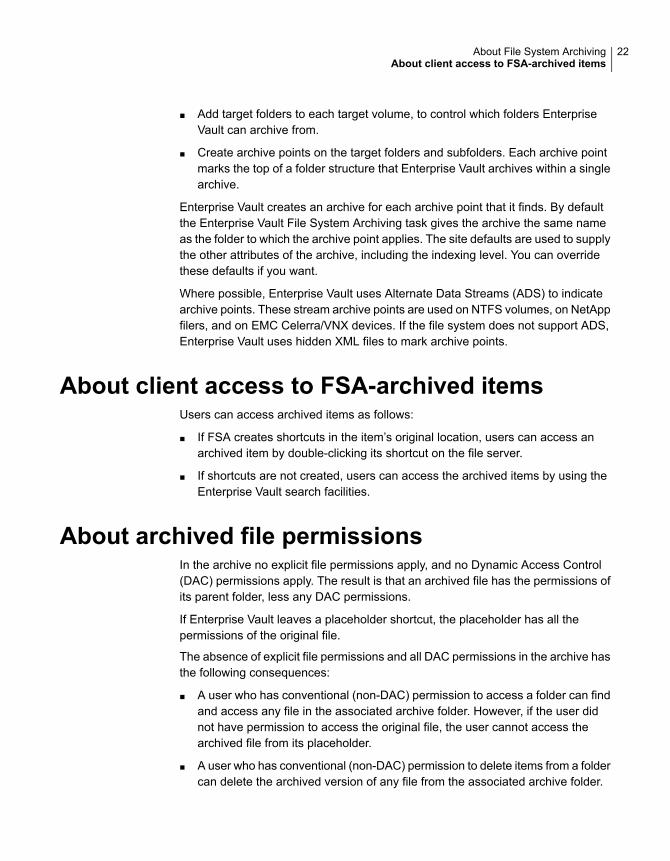
About archived file permissionsIn the archive no explicit file permissions apply, and no Dynamic Access Control(DAC) permissions apply. The result is that an archived file has the permissions ofits parent folder, less any DAC permissions.
If Enterprise Vault leaves a placeholder shortcut, the placeholder has all thepermissions of the original file.
The absence of explicit file permissions and all DAC permissions in the archive hasthe following consequences:
■ A user who has conventional (non-DAC) permission to access a folder can findand access any file in the associated archive folder. However, if the user didnot have permission to access the original file, the user cannot access thearchived file from its placeholder.
■ A user who has conventional (non-DAC) permission to delete items from a foldercan delete the archived version of any file from the associated archive folder.
22About File System ArchivingAbout client access to FSA-archived items
However, if the user did not have permission to delete the original file, the usercannot delete its placeholder.
■ A user who has access to a file through DAC alone cannot access the file in thearchive.Note that to allow access to files in the archive, you can set permissions manuallyon an archive from the Enterprise Vault Administration Console. If you setpermissions on an archive they are applied to every folder in the archive.
■ If a file is restored from the archive, the restored file has the original parent folderpermissions, less any DAC-related permissions that were applied directly to thefile.
You can choose whether to archive files that have explicit permissions, and filesthat are under Dynamic Access Control.
See “About options for archiving files that have explicit permissions, and files underDAC” on page 91.
The File System Archiving task automatically synchronizes archive folderpermissions with file server folder permissions on a scheduled basis. The automaticsynchronization can run once or twice each day. It is possible to turn off theautomatic synchronization, in which case you must synchronize manually.
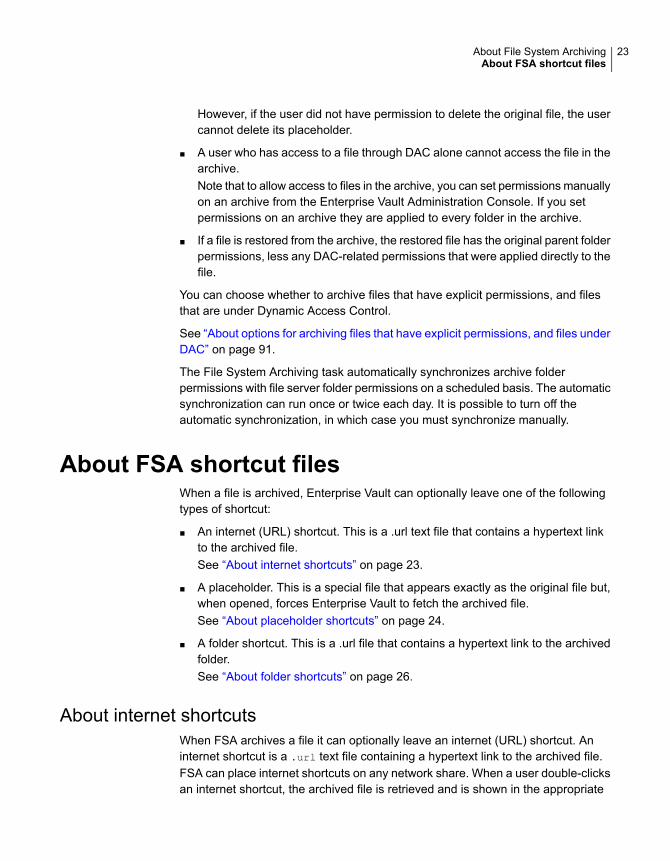
About FSA shortcut filesWhen a file is archived, Enterprise Vault can optionally leave one of the followingtypes of shortcut:
■ An internet (URL) shortcut. This is a .url text file that contains a hypertext linkto the archived file.See “About internet shortcuts” on page 23.
■ A placeholder. This is a special file that appears exactly as the original file but,when opened, forces Enterprise Vault to fetch the archived file.See “About placeholder shortcuts” on page 24.
■ A folder shortcut. This is a .url file that contains a hypertext link to the archivedfolder.See “About folder shortcuts” on page 26.
About internet shortcutsWhen FSA archives a file it can optionally leave an internet (URL) shortcut. Aninternet shortcut is a .url text file containing a hypertext link to the archived file.FSA can place internet shortcuts on any network share. When a user double-clicksan internet shortcut, the archived file is retrieved and is shown in the appropriate
23About File System ArchivingAbout FSA shortcut files
application. If you open an internet shortcut from within an application, the applicationopens the contents of the shortcut, not the archived file.
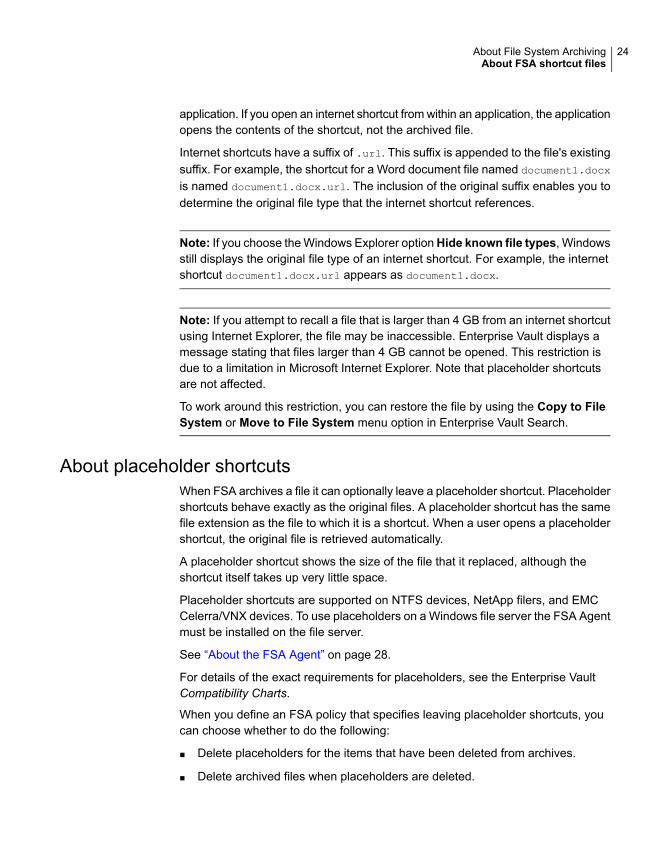
Internet shortcuts have a suffix of .url. This suffix is appended to the file's existingsuffix. For example, the shortcut for a Word document file named document1.docx
is named document1.docx.url. The inclusion of the original suffix enables you todetermine the original file type that the internet shortcut references.
Note: If you choose the Windows Explorer optionHide known file types, Windowsstill displays the original file type of an internet shortcut. For example, the internetshortcut document1.docx.url appears as document1.docx.
Note: If you attempt to recall a file that is larger than 4 GB from an internet shortcutusing Internet Explorer, the file may be inaccessible. Enterprise Vault displays amessage stating that files larger than 4 GB cannot be opened. This restriction isdue to a limitation in Microsoft Internet Explorer. Note that placeholder shortcutsare not affected.
To work around this restriction, you can restore the file by using the Copy to FileSystem or Move to File System menu option in Enterprise Vault Search.
About placeholder shortcutsWhen FSA archives a file it can optionally leave a placeholder shortcut. Placeholdershortcuts behave exactly as the original files. A placeholder shortcut has the samefile extension as the file to which it is a shortcut. When a user opens a placeholdershortcut, the original file is retrieved automatically.
A placeholder shortcut shows the size of the file that it replaced, although theshortcut itself takes up very little space.
Placeholder shortcuts are supported on NTFS devices, NetApp filers, and EMCCelerra/VNX devices. To use placeholders on a Windows file server the FSA Agentmust be installed on the file server.
See “About the FSA Agent” on page 28.
For details of the exact requirements for placeholders, see the Enterprise VaultCompatibility Charts.
When you define an FSA policy that specifies leaving placeholder shortcuts, youcan choose whether to do the following:
■ Delete placeholders for the items that have been deleted from archives.
■ Delete archived files when placeholders are deleted.
24About File System ArchivingAbout FSA shortcut files

Table 2-2 describes the behavior of placeholder shortcuts when you open, copy,move, or delete them.
Table 2-2 Characteristics of placeholder shortcuts
EffectAction on placeholder
The file is recalled from the archive.
Note: If pass-through recall is in effect, Enterprise Vault recallsthe file to disk only if the calling application requires a writeableversion.
See “About pass-through recall for placeholder shortcuts”on page 27.
A file that is recalled to the file server replaces the placeholdershortcut.
■ If the recalled file remains unmodified, then Enterprise Vaultconverts the file back to a placeholder on the next archivingservice run. The only exception is if the archiving policy'sshortcut creation rules are based on the last access time.In that case, Enterprise Vault reverts the file only when theshortcut creation rules are met.
■ If the recalled file becomes modified, then Enterprise Vaultconverts the file back to a placeholder according to thearchiving policy's shortcut creation rules.
Open
The source file is restored and then copied. The destinationfile is a copy of the restored original file.
Note: The copy operation does not restore the source file todisk if pass-through recall is in effect.
See “About pass-through recall for placeholder shortcuts”on page 27.
Enterprise Vault converts a restored original file back to aplaceholder on the next archiving service run. The onlyexception is if the archiving policy's shortcut creation rules arebased on the last access time. In that case, Enterprise Vaultreverts the file only when the shortcut creation rules are met.
Copy
If the destination is on the same volume, the placeholder ismoved.
If the destination is on a different volume, the archived file isrestored and then moved to the destination.
Move
25About File System ArchivingAbout FSA shortcut files
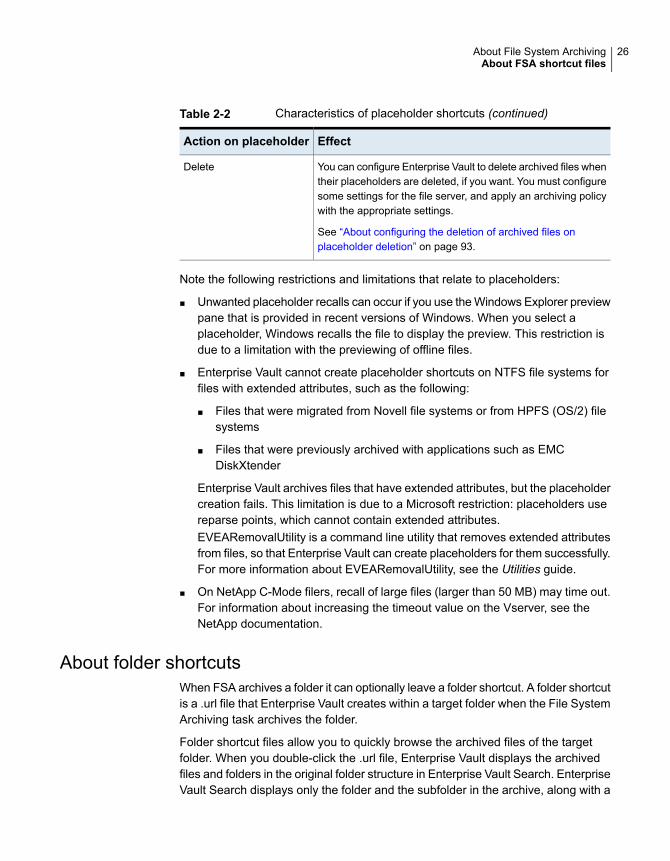
Table 2-2 Characteristics of placeholder shortcuts (continued)
EffectAction on placeholder
You can configure Enterprise Vault to delete archived files whentheir placeholders are deleted, if you want. You must configuresome settings for the file server, and apply an archiving policywith the appropriate settings.
See “About configuring the deletion of archived files onplaceholder deletion” on page 93.
Delete
Note the following restrictions and limitations that relate to placeholders:
■ Unwanted placeholder recalls can occur if you use the Windows Explorer previewpane that is provided in recent versions of Windows. When you select aplaceholder, Windows recalls the file to display the preview. This restriction isdue to a limitation with the previewing of offline files.
■ Enterprise Vault cannot create placeholder shortcuts on NTFS file systems forfiles with extended attributes, such as the following:
■ Files that were migrated from Novell file systems or from HPFS (OS/2) filesystems
■ Files that were previously archived with applications such as EMCDiskXtender
Enterprise Vault archives files that have extended attributes, but the placeholdercreation fails. This limitation is due to a Microsoft restriction: placeholders usereparse points, which cannot contain extended attributes.EVEARemovalUtility is a command line utility that removes extended attributesfrom files, so that Enterprise Vault can create placeholders for them successfully.For more information about EVEARemovalUtility, see the Utilities guide.
■ On NetApp C-Mode filers, recall of large files (larger than 50 MB) may time out.For information about increasing the timeout value on the Vserver, see theNetApp documentation.
About folder shortcutsWhen FSA archives a folder it can optionally leave a folder shortcut. A folder shortcutis a .url file that Enterprise Vault creates within a target folder when the File SystemArchiving task archives the folder.
Folder shortcut files allow you to quickly browse the archived files of the targetfolder. When you double-click the .url file, Enterprise Vault displays the archivedfiles and folders in the original folder structure in Enterprise Vault Search. EnterpriseVault Search displays only the folder and the subfolder in the archive, along with a
26About File System ArchivingAbout FSA shortcut files

Show folders link in the sidebar. You can use the Show folders link to view thecomplete folder hierarchy. Ensure that you have enabled the archive group thatcontains the archive for viewing in the sidebar.
Folder shortcuts are disabled by default. You can enable folder shortcuts by enablingthe Create folder shortcut setting in the associated FSA volume policy. Note thatthere is no option to enable folder shortcuts at the folder policy level.
Folder shortcuts have a .url file extension. The default file name is [View Archived
Files].url. You can change the name of the folder link file by editing the FileSystem Archiving setting that is provided on theAdvanced tab of the site properties.Note that the folder shortcut file name cannot contain any of the following characters:
< (less than), > (greater than), :(colon), " (double quote), / (forward slash), \(backslash), | (vertical bar or pipe), ? (question mark), * (asterisk), and characterswhose integer representations are in the range from 1 through 31.
The File System Archiving task assigns generic read and special delete permissionsto the Everyone group on the file. Additionally, folder shortcuts are always visible.If you change permissions or apply Read-only or Hidden attributes to a foldershortcut file, the task resets the permissions and attributes.
Enterprise Vault does not archive folder shortcut files. The File System Archivingtask verifies whether the folder link files have valid content and updates them onevery subsequent run. If any anomalies are found, the task records appropriateerror messages in the event log, archive report and DTrace log. If you havecustomized the folder shortcut name, you may see multiple folder shortcut filesbecause the File System Archiving task does not delete old .url files.
The File System Archiving task records the summary as well as details of foldershortcuts that are created and updated in the report file in Reports\FSA subfolderof the Enterprise Vault installation folder.
About pass-through recall for placeholder shortcutsYou can configure the pass-through recall of placeholder shortcuts on Windowsfile servers, and for read-only file systems on NetApp filers that run Data ONTAP8.0 or later. For EMC Celerra/VNX devices, Enterprise Vault supports theCelerra/VNX pass-through facility.
Note: Due to a NetApp restriction, pass-through is not supported for Data ONTAP8.2 C-Mode.
If pass-through recall is configured, then on receipt of a read request for aplaceholder Enterprise Vault passes the data directly through to the callingapplication. Enterprise Vault recalls the file to the file server, subject to permissions,
27About File System ArchivingAbout FSA shortcut files
only if the calling application makes a write request: for example if the applicationrequires a writeable file, or if the user attempts to save changes to a file.
Note: Some applications such as Excel always recall to disk even whenpass-through recall is enabled.
Pass-through recall can be useful in the following circumstances:
■ With placeholders on read-only file systems, such as snapshots. A normalplaceholder recall to a read-only file system fails because Enterprise Vault cannotwrite the recalled file to the file system.
■ With Windows file servers when there is limited space on the file server, or whenusers have strict quotas for space usage. Recalled files normally occupy spaceon the target file system, and therefore count towards a user's space quota.
Pass-through recall uses a disk cache to reduce recall times for large files. ForWindows file servers the disk cache is located on the file server. For NetApp filersthe disk cache is located on the Enterprise Vault server.
For Windows file servers you can enable or disable pass-through recall for eachtarget volume.
About the FSA AgentTo use placeholder shortcuts, File Blocking, or FSA Reporting with a Windows fileserver, you must install the FSA Agent on the file server.
The FSA Agent consists of the following FSA services:
■ Enterprise Vault File Placeholder service
■ Enterprise Vault File Blocking service
■ Enterprise Vault File Collector service (used by FSA Reporting)
Note: Do not install the FSA Agent on Enterprise Vault servers.
You can install the FSA Agent on a Windows file server either from the AdministrationConsole, or manually.
See “About installing the FSA Agent on a Windows file server” on page 78.
NetApp filers and EMC Celerra/VNX devices do not run the FSA Agent.
Table 2-3 describes how Enterprise Vault provides support for placeholders, FileBlocking, and FSA Reporting data collection on different types of file server.
28About File System ArchivingAbout the FSA Agent
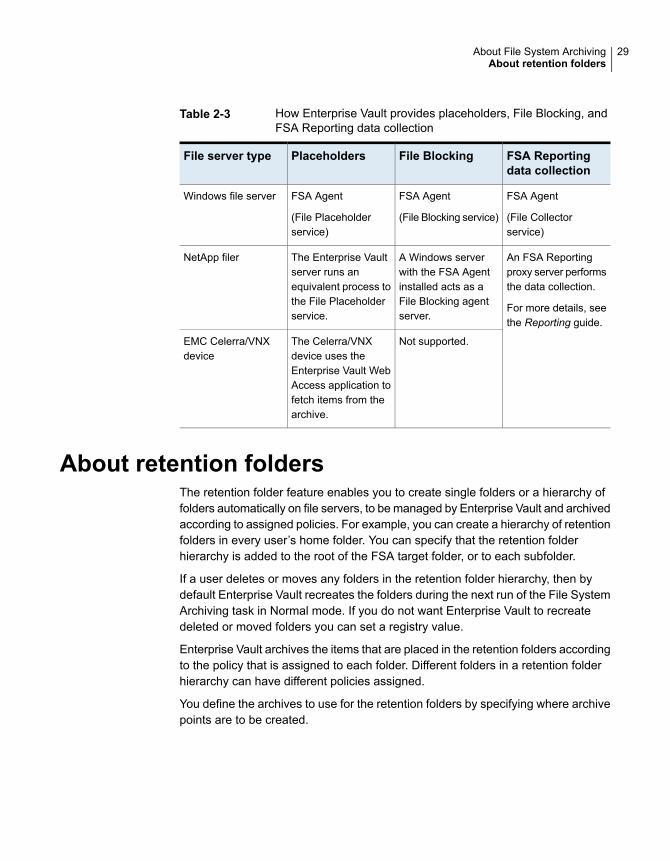
Table 2-3 How Enterprise Vault provides placeholders, File Blocking, andFSA Reporting data collection
FSA Reportingdata collection
File BlockingPlaceholdersFile server type
FSA Agent
(File Collectorservice)
FSA Agent
(File Blocking service)
FSA Agent
(File Placeholderservice)
Windows file server
An FSA Reportingproxy server performsthe data collection.
For more details, seethe Reporting guide.
A Windows serverwith the FSA Agentinstalled acts as aFile Blocking agentserver.
The Enterprise Vaultserver runs anequivalent process tothe File Placeholderservice.
NetApp filer
Not supported.The Celerra/VNXdevice uses theEnterprise Vault WebAccess application tofetch items from thearchive.
EMC Celerra/VNXdevice
About retention foldersThe retention folder feature enables you to create single folders or a hierarchy offolders automatically on file servers, to be managed by Enterprise Vault and archivedaccording to assigned policies. For example, you can create a hierarchy of retentionfolders in every user’s home folder. You can specify that the retention folderhierarchy is added to the root of the FSA target folder, or to each subfolder.
If a user deletes or moves any folders in the retention folder hierarchy, then bydefault Enterprise Vault recreates the folders during the next run of the File SystemArchiving task in Normal mode. If you do not want Enterprise Vault to recreatedeleted or moved folders you can set a registry value.
Enterprise Vault archives the items that are placed in the retention folders accordingto the policy that is assigned to each folder. Different folders in a retention folderhierarchy can have different policies assigned.
You define the archives to use for the retention folders by specifying where archivepoints are to be created.
29About File System ArchivingAbout retention folders

About File BlockingThe File Blocking feature for Windows file servers and NetApp filers preventsunwanted file types from being saved on monitored server volumes. File Blockingcan be performed independently from archiving: a File System Archiving task canalso process the volumes, but there is no requirement to do this.
You configure File Blocking at the volume level, by applying a volume policy inwhich you have defined File Blocking rules. The File Blocking rules determine thefollowing:
■ Which files are blocked or allowed.
■ Which folders to monitor, or to ignore.
■ The actions to take when a policy violation occurs. For example, you can allowa file to be created, but send a warning message to the user and log an eventin the event log.
The File Blocking rules enable you to block files according to:
■ File type. Inappropriate file types can be blocked immediately.
■ Content. Content-checking enables you to trap files that have been renamed todisguise their file types. File Blocking quarantines those files that are blockedas a result of content-checking. Additionally, it is possible to scan the contentsof compressed files, such as ZIP files.
Note: Files stored within .RAR and .CAB files cannot be blocked or quarantined.However, you can create rules to block .RAR and .CAB files.
If required, you can edit the properties of the target file server to define a list ofusers whose files are never blocked.
The File Blocking rule enables you to configure a notification to send when the ruleis broken. The following notification types are available:
■ Messenger Service messages (NET SEND)
■ Event log entries
■ SNMP traps
See “About configuring File Blocking” on page 130.
30About File System ArchivingAbout File Blocking
About FSA ReportingFSA Reporting provides summary analysis reports on the active data on your fileservers, and on the data that has been archived from them.
FSA Reporting's data analysis reports include information on the following:
■ The number of archived files for each file server, and the space used and savedas a result of archiving. You can also view the 10 largest files in a volume.
■ Active and archived space usage by different file groups, per server and perarchive point.
■ Numbers of unaccessed or duplicated files, and the space they are occupying.
■ Used and free space on the drives of each file server.
■ Storage growth trends for the FSA archiving targets on a file server. Trends areshown for both the file server and the vault store.
Many of the reports provide either an overall view for all the file servers that areconfigured for FSA Reporting, or a detailed view for a named file server.
In order to access FSA Reporting's reports, the Enterprise Vault Reportingcomponent must be installed and configured on a machine with the requiredprerequisites, including Microsoft SQL Server Reporting Services. You use the SQLServer Reporting Services Report Manager web application to view the reports.
You must also configure FSA Reporting for each target file server for which youwant to obtain reports. The Administration Console provides wizards to help youdo the following:
■ The first time that you enable a target file server target for FSA Reporting, awizard helps you to set up an FSA Reporting database to hold the FSA Reportingscan data.When you enable another target file server for FSA Reporting, you can assignthe file server to an existing FSA Reporting database, or create another database.Multiple FSA Reporting databases can provide scalability if you obtain FSAReporting data for many file servers.
■ For a Windows file server, install the FSA Agent on the file server if the agentis not already present.
■ For a non-Windows file server you must select another server to act as the FSAReporting proxy server. The FSA Reporting proxy server gathers the FSAReporting data for one or more non-Windows file servers.
Any of the following can act as an FSA Reporting proxy server, subject to someadditional prerequisites:
■ An Enterprise Vault server in the Enterprise Vault site.
31About File System ArchivingAbout FSA Reporting
■ A Windows server that is configured as a file server archiving target in theEnterprise Vault site.
■ A Windows server on the network.
For information on configuring and managing FSA Reporting, and on viewing andinterpreting the FSA reports, see the Reporting guide.
About FSAUtilityFSAUtility is a command-line utility with which you can do the following:
■ Recreate archive points on the original path.
■ Recreate the placeholders for archived files in their original location.
■ Move placeholders from one location to another location and move the archivedfiles to the corresponding destination archive, which is represented by the archivepoint on the path.
■ Migrate placeholders from a source path to a destination path without anymovement of the archived data.
■ Delete orphaned placeholders for which no corresponding item exists in thearchive.
■ Restore all archived files, or archived files of the specified file types, to theiroriginal location or a new location.
■ Recall the archived files that correspond to placeholders that are present in afolder.
The utility works with archive points and placeholders on Windows file servers,NetApp filers, and EMC Celerra/VNX devices.
For details of the utility, see the Utilities guide.
For more information on migrating and consolidating file servers that have contentthat has been archived with Enterprise Vault, see the following article on the VeritasSupport website:
http://www.veritas.com/docs/000010966
32About File System ArchivingAbout FSAUtility
Steps to configure FileSystem Archiving
This chapter includes the following topics:
■ Steps to configure File System Archiving
Steps to configure File System ArchivingTable 3-1 describes the process to set up one or more file servers for File SystemArchiving.
Note: If you want to configure FSA with clustered file servers, refer to the appropriateinstructions. See “About configuring FSA with clustered file servers” on page 67.
Note: If you want to implement File Blocking on the server, read about configuringFile Blocking before you proceed.
See “About configuring File Blocking” on page 130.
Table 3-1 Steps to configure File System Archiving
DescriptionActionStep
See the Enterprise Vault Installing andConfiguring guide.
Check that your planned system meetsthe required prerequisites for FSA.
Step 1
See the Enterprise Vault Installing andConfiguring guide.
Install and configure the Enterprise Vaultservers, and perform the initial setup ofEnterprise Vault.
Step 2
3Chapter

Table 3-1 Steps to configure File System Archiving (continued)
DescriptionActionStep
Follow the appropriate step for the fileserver type:
■ See “Adding a Windows file serverto File System Archiving”on page 36.
■ See “Adding a NetApp filer to FileSystem Archiving” on page 45.
■ See “Adding a NetApp C-ModeVserver to File System Archiving ”on page 48.
■ See “Adding a Celerra/VNX deviceto File System Archiving”on page 54.
Add the file server to FSA.Step 3
See “Creating FSA volume policies andfolder policies” on page 85.
Create the required FSA archivingpolicies.
Step 4
See “About configuring the deletion ofarchived files on placeholder deletion”on page 93.
Configure the deletion of archived fileson placeholder deletion, if required.
Step 5
See “About adding target volumes,target folders, and archive points forFSA” on page 99.
Add one or more target volumes forarchiving. Then add the required targetfolders and archive points.
Step 6
■ Configure pass-through recall forplaceholder shortcuts, if required.See “About configuring pass-throughrecall for placeholder shortcuts”on page 115.
■ Set up retention folders, if required.See “Configuring retention folders”on page 122.
Configure additional features, if required.Step 7
See “ About configuring and runningFSA tasks” on page 144.
Set up file system filtering, if required.
See “Configuring file system filters”on page 155.
Configure the File System Archivingtasks that process the target volumes.
Step 8
34Steps to configure File System ArchivingSteps to configure File System Archiving
Table 3-1 Steps to configure File System Archiving (continued)
DescriptionActionStep
■ See “About backing up the target fileservers” on page 160.
■ See “About virus-checking the targetfile servers” on page 161.
Make sure that the file servers aresuitably backed up and virus-checked.
Step 9
35Steps to configure File System ArchivingSteps to configure File System Archiving
Adding a Windows fileserver to File SystemArchiving
This chapter includes the following topics:
■ Adding a Windows file server to File System Archiving
■ Using FSA with the Windows Encrypting File System (EFS)
■ About archiving from Windows Server 2012 file servers
■ Account requirements for managing FSA with Windows file servers
■ Permissions and privileges required by the Vault Service account on Windowsfile servers
■ Configuring a file server's firewall for FSA
■ Adding a Windows file server as an archiving target
Adding a Windows file server to File SystemArchiving
Table 4-1 lists the steps that are required to add a Windows file server to FSA.
Note: The minimum supported version is Windows Server 2008 R2 SP1.
4Chapter

Table 4-1 Steps to add a Windows file server to FSA
DescriptionActionStep
See “Using FSA with the WindowsEncrypting File System (EFS)”on page 37.
If you use the Windows Encrypting FileSystem (EFS), you must perform someconfiguration steps.
Step 1
See “About archiving from WindowsServer 2012 file servers” on page 38.
For Windows Server 2012 file servers,be aware of how FSA works with newfeatures in this operating system.
Step 2
See “Account requirements formanaging FSA with Windows fileservers” on page 40.
Note the requirements for the accountsthat you use in Enterprise Vault toconfigure and manage file servers.
Step 3
See “Permissions and privilegesrequired by the Vault Service accounton Windows file servers” on page 41.
Ensure that the Vault Service accounthas the required permissions andprivileges on the file server.
Step 4
See “Configuring a file server's firewallfor FSA” on page 42.
If the file server's firewall is on, configurethe firewall for FSA.
Step 5
See “ Adding a Windows file server asan archiving target” on page 43.
Add the file server as an FSA archivingtarget.
Step 6
Using FSA with the Windows Encrypting FileSystem (EFS)
FSA is compatible with the Windows Encrypting File System (EFS) on some versionsof Windows.
For details, see the Enterprise Vault Compatibility Charts athttp://www.veritas.com/docs/000097605.
To use FSA with EFS you must perform some configuration steps before you cancreate an archive point for an encrypted folder or volume.
To use FSA the Windows Encrypting File System (EFS)
1 Configure the Vault Service account as an EFS recovery agent for the domain.
2 Enable the file server and the Enterprise Vault server as remote servers forfile encryption or decryption. See the following Microsoft Technet article:
http://technet.microsoft.com/library/cc757963.aspx
Set up the remote server delegation as follows:
37Adding a Windows file server to File System ArchivingUsing FSA with the Windows Encrypting File System (EFS)
■ With the file server selected as the remote server, trust it for delegation tothe CIFS service and the Protected Storage service on the Enterprise Vaultserver and the Active Directory (certification authority) server.
■ With the Enterprise Vault server selected as the remote server, trust it fordelegation to the CIFS service and the Protected Storage service on thefile server and the Active Directory (certification authority) server.
About archiving from Windows Server 2012 fileservers
Read this section if you have Windows Server 2012 file servers that you want toconfigure as targets for File System Archiving. Some of the new features in WindowsServer 2012 have implications that you need to be aware of when you are settingup FSA.
About the ReFS and CSVFS file systems and FSAWindows Server 2012 introduces two new file system types:
■ Resilient File System, ReFS
■ Cluster Shared Volume File System, CSVFS
Due to the lack of the necessary constructs from Microsoft, ReFS and CSVFS areunsupported for File System Archiving. If you attempt to add a volume or a folderin either format as a target for FSA, the Administration Console blocks the actionand displays an explanatory dialog.
If an NTFS volume is designated in the CSVFS format, the shares on the volumebecome inaccessible to Enterprise Vault. Archiving does not succeed andplaceholder recalls fail.
About Dynamic Access Control and FSAWindows Server 2012 introduces Dynamic Access Control (DAC), which extendsthe ability to set permissions by using additional access control entries on files andfolders.
FSA volume policies and folder policies let you choose whether to archive files thatare under Dynamic Access Control, as well as files that have explicit permissions.The default policy setting is not to archive these files.
Before you choose to archive these files, note that in the archive no DAC permissionsapply, and no explicit permissions apply. An archived file has the permissions ofits parent folder, less any DAC permissions.
38Adding a Windows file server to File System ArchivingAbout archiving from Windows Server 2012 file servers
See “About options for archiving files that have explicit permissions, and files underDAC” on page 91.
About archiving Windows Server 2012 deduplicated files with FSAWindows Server 2012 includes a new file-level data deduplication mechanism.
By default, FSA archives Windows Server 2012 deduplicated files. Options on theArchiving Rules tab and the Shortcuts tab of the Enterprise Vault FSA Volumepolicies and Folder policies enable you to turn off archiving or shortcut creation forWindows Server 2012 deduplicated files, if you want.
If you decide to turn off archiving or shortcut creation for Windows Server 2012deduplicated files, bear in mind that Windows does not deduplicate files immediately.Enterprise Vault applies the deduplicated file policy settings to a file only if the fileis in a deduplicated state when Enterprise Vault assesses it for archiving or forshortcut creation. The order of events can lead to different archiving outcomes. Forexample, suppose that you set the policy options for Windows Server 2012deduplicated files as follows:
Do not archive Windows Server 2012 deduplicated files[ Selected ]
Do not create shortcuts for Windows Server 2012 deduplicated files[ Unselected ]
The following scenario may then occur:
■ Enterprise Vault archives a file before Windows has deduplicated it. Since thefile is not in a deduplicated state when Enterprise Vault assesses it, the policysetting for archiving Windows Server 2012 deduplicated files is not considered.
■ While the file awaits shortcut creation on the file server, Windows deduplicatesit.
■ Enterprise Vault then creates a shortcut for the file, adhering to the policy settingfor creating shortcuts for deduplicated files.
The same policy settings can have different results if the deduplicated file is modifiedbefore Enterprise Vault creates a shortcut for it. Once Windows has deduplicatedthe file, Enterprise Vault does not rearchive it, because of the policy setting fordeduplicated files. Enterprise Vault does not create a shortcut for the modified file,because for shortcut creation Enterprise Vault requires the latest version of the fileto be in the archive.
39Adding a Windows file server to File System ArchivingAbout archiving from Windows Server 2012 file servers
Account requirements for managing FSA withWindows file servers
You can configure and manage file servers in Enterprise Vault with the Vault Serviceaccount, or an account that belongs to a suitable Enterprise Vault administratorrole. The predefined Enterprise Vault roles that permit FSA administration are theFile Server Administrator and the Power Administrator.
See "Managing administrator security" in the Administrator's Guide.
The account must be a member of the local Administrators group on the computeron which you run the Administration Console.
For Windows file servers, the account must also meet the following requirements:
■ The account must have Full control on any share that is configured as a targetvolume, and must have NTFS read permission on the folder that the share mapsto
■ If you want to browse in the Administration Console when selecting folders astargets, the account must have Browse permissions on the target folders.Otherwise you must specify the folder path by typing it.
The Vault Service account requires some additional permissions and privileges onthe file server.
See “Permissions and privileges required by the Vault Service account on Windowsfile servers” on page 41.
Note that to perform the following actions, you must use an account that hasadditional permissions:
■ To install the FSA Agent you must use an account that is a member of the localAdministrators group on the file server. This requirement applies both forinstallation from the Administration Console and for manual installation of theFSA Agent.
■ To configure or reconfigure the FSA resource for a file server cluster, you mustrun the FSA Cluster Configuration wizard with account that is a member of thelocal Administrators group on each node of the file server cluster. The accountmust also have Full Control permission on the FSA Cluster folder of theEnterprise Vault server. The FSA Cluster folder is a subfolder of the Utilities
folder under the Enterprise Vault installation folder. For example:C:\Program Files (x86)\Enterprise Vault\Utilities\FSA Cluster
40Adding a Windows file server to File System ArchivingAccount requirements for managing FSA with Windows file servers
Permissions and privileges required by the VaultService account on Windows file servers
The FSA Agent and other FSA processes run on target Windows file servers underthe Vault Service account. To perform the required tasks, the Vault Service accountrequires certain permissions and privileges on the file server:
■ The Vault Service account can run as a member of the built-in local PrintOperators group on the file server, with an additional set of minimal permissionsand privileges.
■ Alternatively, the Vault Service account can run as a member of the localAdministrators group on the file server. The Administrator rights allow the accountto perform the additional tasks of installing the FSA Agent and configuring theresource for a file server cluster. However, granting local Administrator rightsto the Vault Service account on a file server may not always be advisable. Forexample:
■ Your company may forbid the granting of local Administrator rights tocomputer service accounts.
■ If the file server is a domain controller, you should not make the Vault Serviceaccount a local Administrator. An account that is a member of the localAdministrators group on a domain controller is promoted to a DomainAdministrator. We recommend that you do not make the Vault Serviceaccount a Domain Administrator.
If the Vault Service account is not a member of the local Administrators group, youmust use a suitable account that is a member of that group when you install theFSA Agent, or if you configure the FSA resource for a Windows Server failovercluster.
See “Account requirements for managing FSA with Windows file servers”on page 40.
Note the following:
■ When you install the FSA Agent, either from the Administration Console ormanually, Enterprise Vault adds the Vault Service account to the Print Operatorsgroup on the file server, and configures the additional set of minimal permissionsand privileges.
■ If you do not install the FSA Agent on a file server, you must grant the requiredpermissions and privileges to the Vault Service account manually.See “Granting permissions to the Vault Service account if you do not install theFSA Agent” on page 42.
41Adding a Windows file server to File System ArchivingPermissions and privileges required by the Vault Service account on Windows file servers
■ To support the FSA resource on VCS-clustered file servers, you must make theVault Service account a member of the local Administrators group on the VCScluster nodes.
An appendix to this guide lists the permissions and privileges that the Vault Serviceaccount requires on a Windows file server.
See “About the permissions and privileges required for the Vault Service accounton Windows file servers” on page 183.
Granting permissions to the Vault Service account if you do not installthe FSA Agent
If you do not intend to install the FSA Agent on a target Windows file server, youmust do one of the following manually:
■ Add the Vault Service account to the local Administrators group on the file server.
■ Add the Vault Service account to the built-in local Print Operators group on thefile server, and grant the additional required permissions and privileges.See “About the permissions and privileges required for the Vault Service accounton Windows file servers” on page 183.
Configuring a file server's firewall for FSARead this section if the Windows file server that you want to configure as an FSAtarget is protected by a firewall.
You must perform some configuration steps to allow Enterprise Vault to communicatesuccessfully with the file server through the firewall. Unless you perform the requiredconfiguration steps, the following problems will occur:
■ Installation of the FSA Agent from the Administration Console fails.
■ The File System Archiving task fails. You may receive the following messagesfrom DTrace or in the File System Archiving task report:
■ The RPC server is unavailable. (Exception from HRESULT: 0x800706BA)
■ Error making file a placeholder file. Catastrophic failure (Exception fromHRESULT: 0x8000FFFF)
For information on how to configure a firewall for FSA, see the following technicalnote on the Veritas Support website:
http://www.veritas.com/docs/000040649
42Adding a Windows file server to File System ArchivingConfiguring a file server's firewall for FSA

Adding a Windows file server as an archivingtarget
You can add a Windows file server as an archiving target for Enterprise Vault byusing the New File Server wizard or the New-EVFSAFileServer PowerShell cmdlet.
The New File Server wizard helps you to install the FSA Agent on the file server,if required. You must install the FSA Agent on a Windows file server if you want todo any of the following on the file server:
■ Replace archived files with placeholder shortcuts
■ Implement File Blocking
■ Use FSA Reporting
If you do not install the FSA Agent from the New File Server wizard, you can installit later using the Install FSA Agent wizard. Alternatively, you can install the FSAAgent manually.
Note: Do not install the FSA Agent on an Enterprise Vault server.
See “About installing the FSA Agent on a Windows file server” on page 78.
Note: If you want to use FSA Reporting with the file server, you can configure FSAReporting when you add the file server as an archiving target.
See "Adding a file server as an archiving target with FSA Reporting data collectionenabled" in the Reporting guide.
To add a Windows file server as an archiving target
1 If you want to install the FSA Agent during the procedure, run the AdministrationConsole with an account that is a member of the local Administrators groupon the file server.
2 In the Administration Console, expand the Enterprise Vault site until the Targetscontainer is visible.
3 Expand the Targets container.
4 Right-click the File Server container and, on the shortcut menu, click New andthen File Server. The New File Server wizard starts.
5 Work through the wizard to finish adding the file server.
You will need to provide the following information:
43Adding a Windows file server to File System ArchivingAdding a Windows file server as an archiving target
■ The fully-qualified DNS name of the file server that you want to add. Youcan browse to select the server.
■ If you choose to install the FSA Agent, the password for the Vault Serviceaccount.
When you have added the file server, you can start adding the volumes thatyou want File System Archiving to process.
44Adding a Windows file server to File System ArchivingAdding a Windows file server as an archiving target
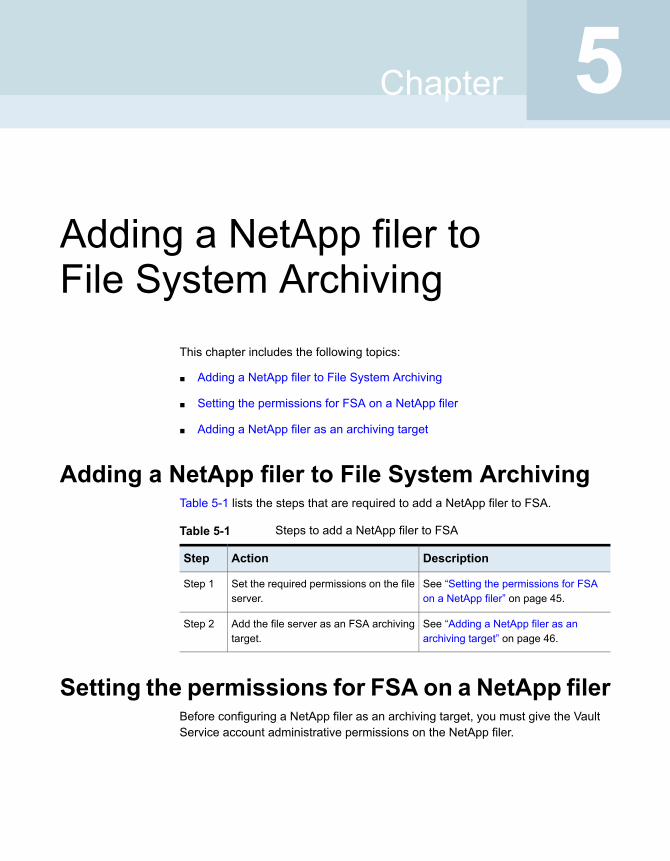
Adding a NetApp filer toFile System Archiving
This chapter includes the following topics:
■ Adding a NetApp filer to File System Archiving
■ Setting the permissions for FSA on a NetApp filer
■ Adding a NetApp filer as an archiving target
Adding a NetApp filer to File System ArchivingTable 5-1 lists the steps that are required to add a NetApp filer to FSA.
Table 5-1 Steps to add a NetApp filer to FSA
DescriptionActionStep
See “Setting the permissions for FSAon a NetApp filer” on page 45.
Set the required permissions on the fileserver.
Step 1
See “Adding a NetApp filer as anarchiving target” on page 46.
Add the file server as an FSA archivingtarget.
Step 2
Setting the permissions for FSA on a NetApp filerBefore configuring a NetApp filer as an archiving target, you must give the VaultService account administrative permissions on the NetApp filer.
5Chapter
Note: If you want to use another account to configure the NetApp filer fromEnterprise Vault, repeat the procedure for that account also.
To set the permissions for FSA on a NetApp filer
1 Add the Vault Service account as an Administrator on the NetApp filer byfollowing these steps in the order listed:
■ Log on to a Windows server as a user who already has administrative rightson the NetApp filer.
■ On the Windows desktop, right-clickMyComputer and then, on the shortcutmenu, click Manage.
■ In Computer Management, select Connect to another computer from theAction menu and then enter the name of the NetApp filer.
2 Expand Local Users and Groups and click Groups.
3 In the right pane, right-click Administrators and then, on the shortcut menu,click Add to Group.
4 Click Add to add the Vault Service account to the list of group members.
Adding a NetApp filer as an archiving targetYou can add a NetApp filer as an archiving target for Enterprise Vault by using theNew File Server wizard or the New-EVFSAFileServer PowerShell cmdlet.
Before you add a NetApp filer as an FSA archiving target, make sure that you haveset the required file server permissions.
See “Setting the permissions for FSA on a NetApp filer” on page 45.
Note: If you want to use FSA Reporting with the NetApp filer, you can configureFSA Reporting when you add the NetApp filer as an archiving target.
See "Adding a file server as an archiving target with FSA Reporting data collectionenabled" in the Reporting guide.
To add a NetApp filer as an archiving target
1 In the Administration Console, expand the Enterprise Vault site until the Targetscontainer is visible.
2 Expand the Targets container.
46Adding a NetApp filer to File System ArchivingAdding a NetApp filer as an archiving target
3 Right-click the File Servers container and, on the shortcut menu, click Newand then File Server. The New File Server wizard starts.
4 Work through the wizard.
Do not select the option to install the FSA Agent.
The wizard prompts you for the fully-qualified DNS name of the NetApp filer.You can browse to select the NetApp filer.
47Adding a NetApp filer to File System ArchivingAdding a NetApp filer as an archiving target
Adding a NetApp C-ModeVserver to File SystemArchiving
This chapter includes the following topics:
■ Adding a NetApp C-Mode Vserver to File System Archiving
■ Permissions and privileges required by the Vault Service account on NetAppC-mode Vservers
■ Granting the required permission on each Vserver
■ Configuring the FPolicy server details
■ Adding a NetApp C-Mode Vserver as an archiving target
■ Points to note about File System Archiving on NetApp C-Mode file servers
Adding a NetApp C-Mode Vserver to File SystemArchiving
Enterprise Vault FSA supports NetApp C-Mode version 8.2 or later.
Table 6-1 lists the steps that are required to add a NetApp C-Mode Vserver to FSA.
6Chapter

Table 6-1 Steps to add a NetApp C-Mode Vserver to FSA
DescriptionActionStep
See “Permissions and privilegesrequired by the Vault Service accounton NetApp C-mode Vservers”on page 49.
Ensure that the Vault Service accounthas the required permissions andprivileges on the file server.
Step 1
See “Granting the required permissionon each Vserver” on page 50.
Grant the required permission on eachVserver.
Step 2
See “Configuring the FPolicy serverdetails” on page 51.
Configure the FPolicy server detailsStep 3
See “Adding a NetApp C-Mode Vserveras an archiving target” on page 52.
Add the NetApp C-Mode Vserver as anFSA archiving target.
Step 4
To recall large files, you may need to change the NetApp C-Mode Vserver timeoutsettings.
See “Points to note about File System Archiving on NetApp C-Mode file servers”on page 53.
Permissions and privileges required by the VaultService account on NetApp C-mode Vservers
To configure a NetApp C-mode Vserver as an archiving target, the Vault Serviceaccount requires administrative permissions on the Vserver.
If the Vault Service account has the local administrator role on the NetApp Vserver,note the following:
■ The Vault Service account must have Full Control on the NetApp share youwant to add as a volume target.
■ The Vault Service account must have the following privileges:
■ SeBackupPrivilege
■ SeRestorePrivilege
■ SeTakeOwnershipPrivilege
If the Vault Service account is not in the local administrators group on the NetAppVserver, note the following:
■ If you want to add the local drive as a target, the Vault Service account musthave Full Control on the local drive.
49Adding a NetApp C-Mode Vserver to File System ArchivingPermissions and privileges required by the Vault Service account on NetApp C-mode Vservers
■ If you want to add a share within the local drive as a target, the Vault Serviceaccount must have Full Control on the share and read-only permission on thelocal drive.
Granting the required permission on each VserverBefore you add a NetApp C-Mode Vserver as an FSA target, you need to grantpermission to a domain user to register the FPolicy on the Vserver.
You can configure only one user account per Enterprise Vault site for all theVservers. If you change the user account details, you must ensure that this userhas ONTAPI permissions on all the Vservers. Refer to the NetApp documentationfor more information.
Note: Ensure that you use a user account other than the Vault Service account togrant ONTAPI permissions to.
To grant the required permission on the Vserver
1 Log on to the cluster console as a cluster administrator.
2 To create a role with specific privileges on the NetApp Vserver, type thefollowing commands at the command prompt:
security login role create -role rolename -vserver vservername
-cmddirname "vserver cifs" -access all
security login role create -role rolename -vserver vservername
-cmddirname "vserver cifs share" -access all
security login role create -role rolename -vserver vservername
-cmddirname "volume" -access all
security login role create -role rolename -vserver vservername
-cmddirname "vserver fpolicy" -access all
security login role create -role rolename -vserver vservername
-cmddirname "version" -access all
security login role create -role rolename -vserver vservername
-cmddirname "network interface" -access readonly
security login role create -role rolename -vserver vservername
-cmddirname "vserver fpolicy enable" -access all
security login role create -role rolename -vserver vservername
-cmddirname "vserver fpolicy disable" -access all
50Adding a NetApp C-Mode Vserver to File System ArchivingGranting the required permission on each Vserver

security login role create -role rolename -vserver vservername
-cmddirname "vserver fpolicy policy" -access all
security login role create -role rolename -vserver vservername
-cmddirname "vserver " -access readonly
where:
■ rolename is the name of the new role that you want to create and assignthe specified privileges to.
■ vservername is the name of the Vserver.
3 To grant the new role to a domain user, type the following at the commandprompt:
security login create -vserver vservername -username
DomainName\UserName -application ontapi -authmethod domain
rolename
where:
■ vservername is the name of the Vserver.
■ -usernameis DomainName\UserName, where DomainName is the ActiveDirectory domain of the user account.
Note: The value that is specified in -username is case-sensitive.
■ rolename is the name of the role that you created in the previous step.
Configuring the FPolicy server detailsTo configure the FPolicy server details you need to provide the following information:
■ The credentials of the domain user account that is used to register the FPolicyon the Vserver. This user account is granted ONTAPI access permission on theVserver.See “Granting the required permission on each Vserver” on page 50.
■ The port number for Enterprise Vault FPolicy servers. The Vserver's FPolicyengine attempts to establish a connection with the Enterprise Vault FPolicyserver using the specified port.
To configure the FPolicy user account credentials
1 Expand the Administration Console tree until the Targets container is visible.
2 Expand Targets.
51Adding a NetApp C-Mode Vserver to File System ArchivingConfiguring the FPolicy server details
3 Right-click the File Servers container and, on the shortcut menu, clickProperties.
4 Click the NetApp C-Mode tab.
5 In the Account text box, enter the user account credentials in the format ofDomainName\UserName, where DomainName is the name of the Activedirectory domain of the user account.
Note: The value you enter here is case-sensitive. When you create the loginand grant ONTAPI permission for this user on the NetApp C-Mode Vserver,make sure that you use the correct case.
6 Enter the password.
7 In the Port Number text box, enter the FPolicy server port number.
Note: The port number should not be greater than 65535.
8 Click OK.
Adding a NetAppC-Mode Vserver as an archivingtarget
You can add a NetApp C-Mode Vserver as an archiving target for Enterprise Vaultby using the New File Server wizard or the New-EVFSAFileServer PowerShellcmdlet.
Before you add a NetApp C-Mode Vserver as an FSA archiving target, make surethat you have set the required file server permissions.
See “Granting the required permission on each Vserver” on page 50.
To add a NetApp C-Mode Vserver as an archiving target
1 In the Administration Console, expand the Enterprise Vault site until the Targetscontainer is visible.
2 Expand Targets.
3 Right-click the File Servers container and, on the shortcut menu, click Newand then File Server. The New File Server wizard starts.
4 Work through the wizard.
■ On the first page of the wizard, click Next.
52Adding a NetApp C-Mode Vserver to File System ArchivingAdding a NetApp C-Mode Vserver as an archiving target
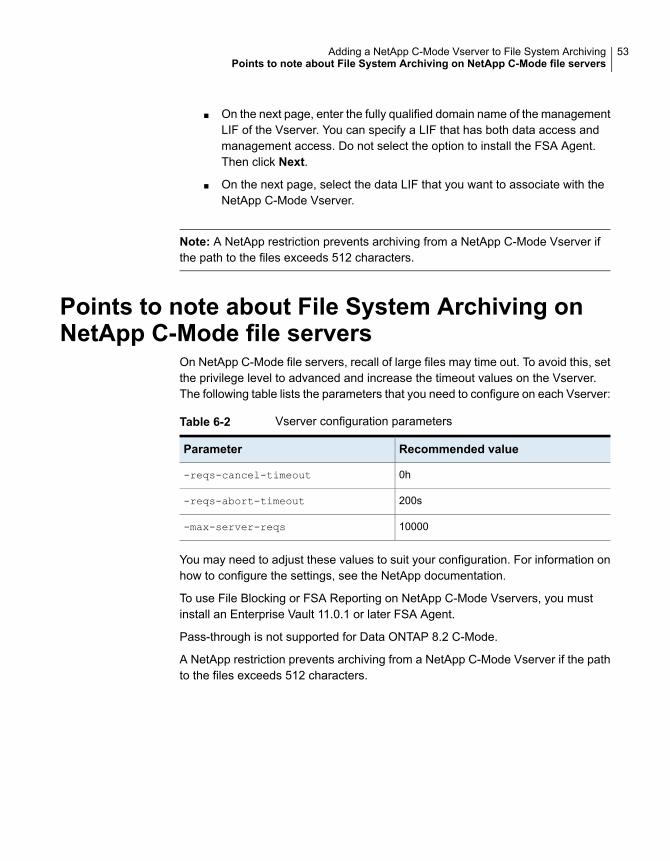
■ On the next page, enter the fully qualified domain name of the managementLIF of the Vserver. You can specify a LIF that has both data access andmanagement access. Do not select the option to install the FSA Agent.Then click Next.
■ On the next page, select the data LIF that you want to associate with theNetApp C-Mode Vserver.
Note: A NetApp restriction prevents archiving from a NetApp C-Mode Vserver ifthe path to the files exceeds 512 characters.
Points to note about File System Archiving onNetApp C-Mode file servers
On NetApp C-Mode file servers, recall of large files may time out. To avoid this, setthe privilege level to advanced and increase the timeout values on the Vserver.The following table lists the parameters that you need to configure on each Vserver:
Table 6-2 Vserver configuration parameters
Recommended valueParameter
0h-reqs-cancel-timeout
200s-reqs-abort-timeout
10000-max-server-reqs
You may need to adjust these values to suit your configuration. For information onhow to configure the settings, see the NetApp documentation.
To use File Blocking or FSA Reporting on NetApp C-Mode Vservers, you mustinstall an Enterprise Vault 11.0.1 or later FSA Agent.
Pass-through is not supported for Data ONTAP 8.2 C-Mode.
A NetApp restriction prevents archiving from a NetApp C-Mode Vserver if the pathto the files exceeds 512 characters.
53Adding a NetApp C-Mode Vserver to File System ArchivingPoints to note about File System Archiving on NetApp C-Mode file servers

Adding an EMCCelerra/VNX device to FileSystem Archiving
This chapter includes the following topics:
■ Adding a Celerra/VNX device to File System Archiving
■ Preparing a Celerra/VNX device for FSA
■ Adding a Celerra/VNX device as an archiving target
■ Specifying a cache location for retrieved Celerra/VNX files
Adding a Celerra/VNX device to File SystemArchiving
Table 7-1 lists the steps that are required to add an EMC Celerra or VNX deviceto File System Archiving.
Table 7-1 Steps to add a Celerra/VNX device to FSA
DescriptionActionStep
See “Preparing a Celerra/VNX devicefor FSA” on page 55.
Prepare the Celerra/VNX device forFSA.
Step 1
See “Adding a Celerra/VNX device asan archiving target” on page 64.
Add the device as an FSA archivingtarget.
Step 2
7Chapter
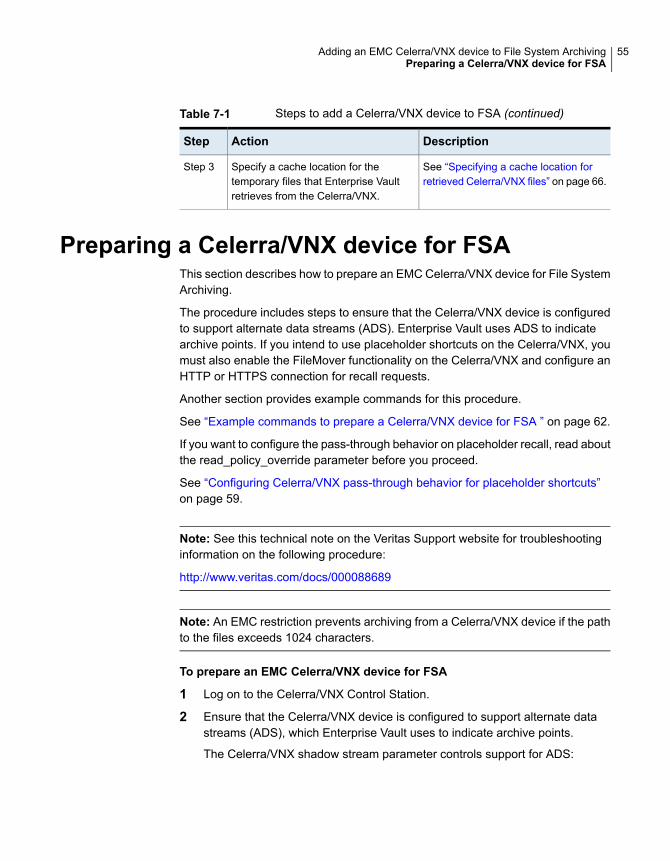
Table 7-1 Steps to add a Celerra/VNX device to FSA (continued)
DescriptionActionStep
See “Specifying a cache location forretrieved Celerra/VNX files” on page 66.
Specify a cache location for thetemporary files that Enterprise Vaultretrieves from the Celerra/VNX.
Step 3
Preparing a Celerra/VNX device for FSAThis section describes how to prepare an EMC Celerra/VNX device for File SystemArchiving.
The procedure includes steps to ensure that the Celerra/VNX device is configuredto support alternate data streams (ADS). Enterprise Vault uses ADS to indicatearchive points. If you intend to use placeholder shortcuts on the Celerra/VNX, youmust also enable the FileMover functionality on the Celerra/VNX and configure anHTTP or HTTPS connection for recall requests.
Another section provides example commands for this procedure.
See “Example commands to prepare a Celerra/VNX device for FSA ” on page 62.
If you want to configure the pass-through behavior on placeholder recall, read aboutthe read_policy_override parameter before you proceed.
See “Configuring Celerra/VNX pass-through behavior for placeholder shortcuts”on page 59.
Note: See this technical note on the Veritas Support website for troubleshootinginformation on the following procedure:
http://www.veritas.com/docs/000088689
Note: An EMC restriction prevents archiving from a Celerra/VNX device if the pathto the files exceeds 1024 characters.
To prepare an EMC Celerra/VNX device for FSA
1 Log on to the Celerra/VNX Control Station.
2 Ensure that the Celerra/VNX device is configured to support alternate datastreams (ADS), which Enterprise Vault uses to indicate archive points.
The Celerra/VNX shadow stream parameter controls support for ADS:
55Adding an EMC Celerra/VNX device to File System ArchivingPreparing a Celerra/VNX device for FSA
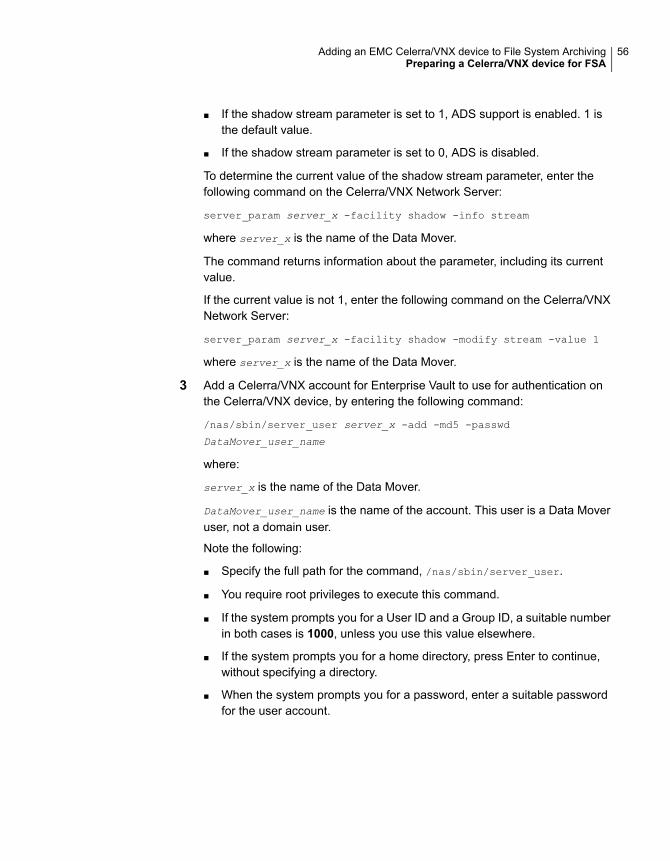
■ If the shadow stream parameter is set to 1, ADS support is enabled. 1 isthe default value.
■ If the shadow stream parameter is set to 0, ADS is disabled.
To determine the current value of the shadow stream parameter, enter thefollowing command on the Celerra/VNX Network Server:
server_param server_x -facility shadow -info stream
where server_x is the name of the Data Mover.
The command returns information about the parameter, including its currentvalue.
If the current value is not 1, enter the following command on the Celerra/VNXNetwork Server:
server_param server_x -facility shadow -modify stream -value 1
where server_x is the name of the Data Mover.
3 Add a Celerra/VNX account for Enterprise Vault to use for authentication onthe Celerra/VNX device, by entering the following command:
/nas/sbin/server_user server_x -add -md5 -passwd
DataMover_user_name
where:
server_x is the name of the Data Mover.
DataMover_user_name is the name of the account. This user is a Data Moveruser, not a domain user.
Note the following:
■ Specify the full path for the command, /nas/sbin/server_user.
■ You require root privileges to execute this command.
■ If the system prompts you for a User ID and a Group ID, a suitable numberin both cases is 1000, unless you use this value elsewhere.
■ If the system prompts you for a home directory, press Enter to continue,without specifying a directory.
■ When the system prompts you for a password, enter a suitable passwordfor the user account.
56Adding an EMC Celerra/VNX device to File System ArchivingPreparing a Celerra/VNX device for FSA
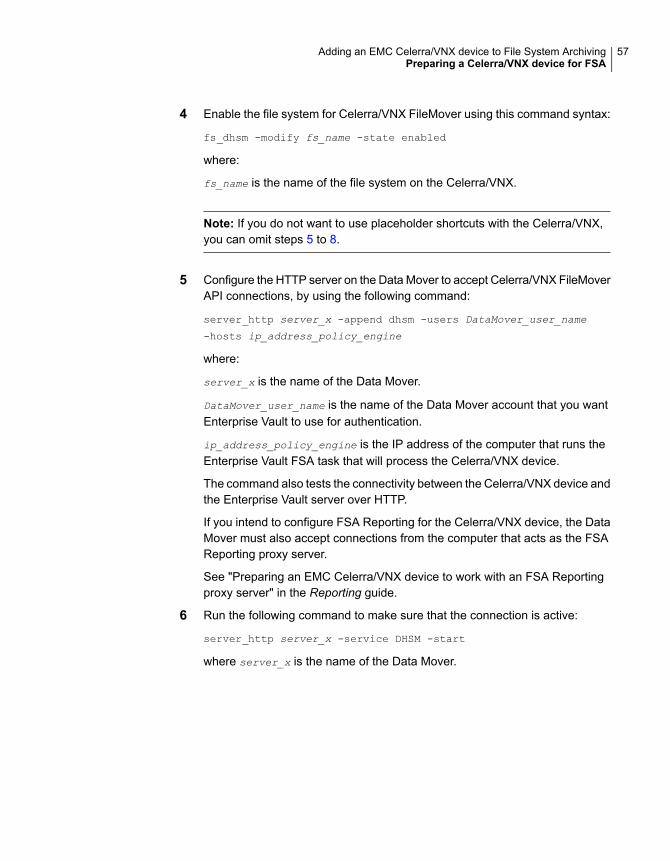
4 Enable the file system for Celerra/VNX FileMover using this command syntax:
fs_dhsm -modify fs_name -state enabled
where:
fs_name is the name of the file system on the Celerra/VNX.
Note: If you do not want to use placeholder shortcuts with the Celerra/VNX,you can omit steps 5 to 8.
5 Configure the HTTP server on the Data Mover to accept Celerra/VNX FileMoverAPI connections, by using the following command:
server_http server_x -append dhsm -users DataMover_user_name
-hosts ip_address_policy_engine
where:
server_x is the name of the Data Mover.
DataMover_user_name is the name of the Data Mover account that you wantEnterprise Vault to use for authentication.
ip_address_policy_engine is the IP address of the computer that runs theEnterprise Vault FSA task that will process the Celerra/VNX device.
The command also tests the connectivity between the Celerra/VNX device andthe Enterprise Vault server over HTTP.
If you intend to configure FSA Reporting for the Celerra/VNX device, the DataMover must also accept connections from the computer that acts as the FSAReporting proxy server.
See "Preparing an EMC Celerra/VNX device to work with an FSA Reportingproxy server" in the Reporting guide.
6 Run the following command to make sure that the connection is active:
server_http server_x -service DHSM -start
where server_x is the name of the Data Mover.
57Adding an EMC Celerra/VNX device to File System ArchivingPreparing a Celerra/VNX device for FSA
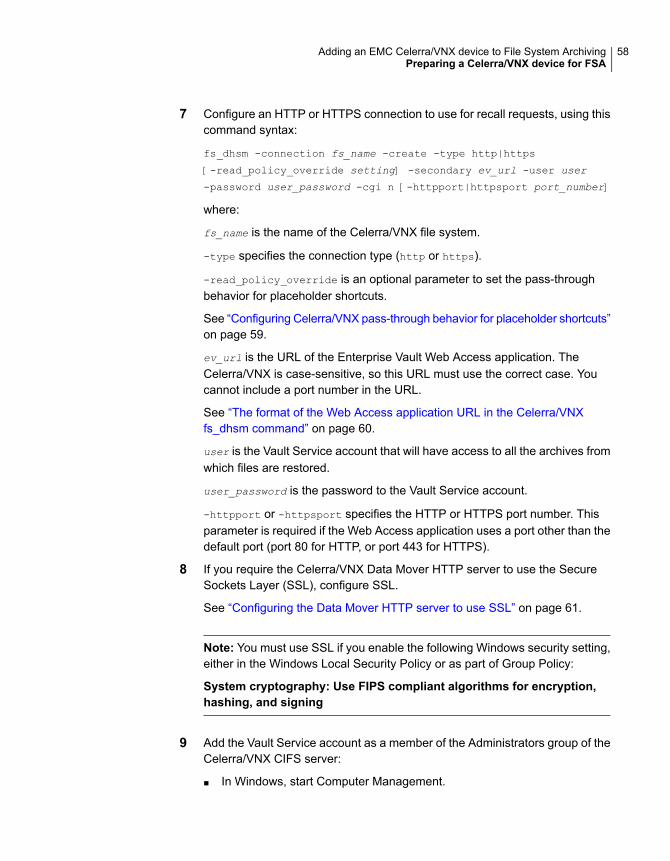
7 Configure an HTTP or HTTPS connection to use for recall requests, using thiscommand syntax:
fs_dhsm -connection fs_name -create -type http|https
[-read_policy_override setting] -secondary ev_url -user user
-password user_password -cgi n [-httpport|httpsport port_number]
where:
fs_name is the name of the Celerra/VNX file system.
-type specifies the connection type (http or https).
-read_policy_override is an optional parameter to set the pass-throughbehavior for placeholder shortcuts.
See “Configuring Celerra/VNX pass-through behavior for placeholder shortcuts”on page 59.
ev_url is the URL of the Enterprise Vault Web Access application. TheCelerra/VNX is case-sensitive, so this URL must use the correct case. Youcannot include a port number in the URL.
See “The format of the Web Access application URL in the Celerra/VNXfs_dhsm command” on page 60.
user is the Vault Service account that will have access to all the archives fromwhich files are restored.
user_password is the password to the Vault Service account.
-httpport or -httpsport specifies the HTTP or HTTPS port number. Thisparameter is required if the Web Access application uses a port other than thedefault port (port 80 for HTTP, or port 443 for HTTPS).
8 If you require the Celerra/VNX Data Mover HTTP server to use the SecureSockets Layer (SSL), configure SSL.
See “Configuring the Data Mover HTTP server to use SSL” on page 61.
Note: You must use SSL if you enable the following Windows security setting,either in the Windows Local Security Policy or as part of Group Policy:
System cryptography: Use FIPS compliant algorithms for encryption,hashing, and signing
9 Add the Vault Service account as a member of the Administrators group of theCelerra/VNX CIFS server:
■ In Windows, start Computer Management.
58Adding an EMC Celerra/VNX device to File System ArchivingPreparing a Celerra/VNX device for FSA

■ In the Computer Management console, selectAction >Connect to anothercomputer. Enter the name of the CIFS server.
■ Add the Vault Service account to the Administrators group.
Configuring Celerra/VNX pass-through behavior for placeholdershortcuts
You can use the EMC Celerra/VNX read policy override with placeholder recalls,if required. The Celerra/VNX -read_policy_override parameter determines howa read request is handled for a file in secondary storage. For example, you can optto pass a file directly through to the client without recalling it to the Celerra/VNX.The Celerra/VNX Network Server then recalls the file only if a write request isreceived.
For pass-through, the Celerra/VNX uses the same cache on the Enterprise Vaultserver that you set up for Enterprise Vault to use when retrieving files for theCelerra/VNX.
Note: If you configure Celerra/VNX pass-through, do not configure the EnterpriseVault option to delete archived files on placeholder deletion, as this combinationcan lead to data loss.
To configure the Celerra/VNX pass-through behavior, include the-read_policy_override parameter in one of the following commands:
■ The fs_dhsm -connection command to define the HTTP or HTTPS connectionthat the Celerra/VNX uses for recall requests. This method sets the pass-throughbehavior for all the placeholders that are created through the connection.
■ The fs_dhsm -modify command to configure a Celerra/VNX file system. Thismethod sets the pass-through behavior for all the placeholders on the file system.
The syntax of the -read_policy_override parameter is as follows:
-read_policy_override [none | full | passthrough | partial]
The effect of the values is as follows:
■ none (the default value). The setting has no effect.
■ full. Recall the whole file to the Celerra/VNX on read request before the datais returned.
■ passthrough. Retrieve the data without recalling the data to the Celerra/VNX.
■ partial. Retrieve only the blocks that are required to satisfy the client readrequest.
59Adding an EMC Celerra/VNX device to File System ArchivingPreparing a Celerra/VNX device for FSA
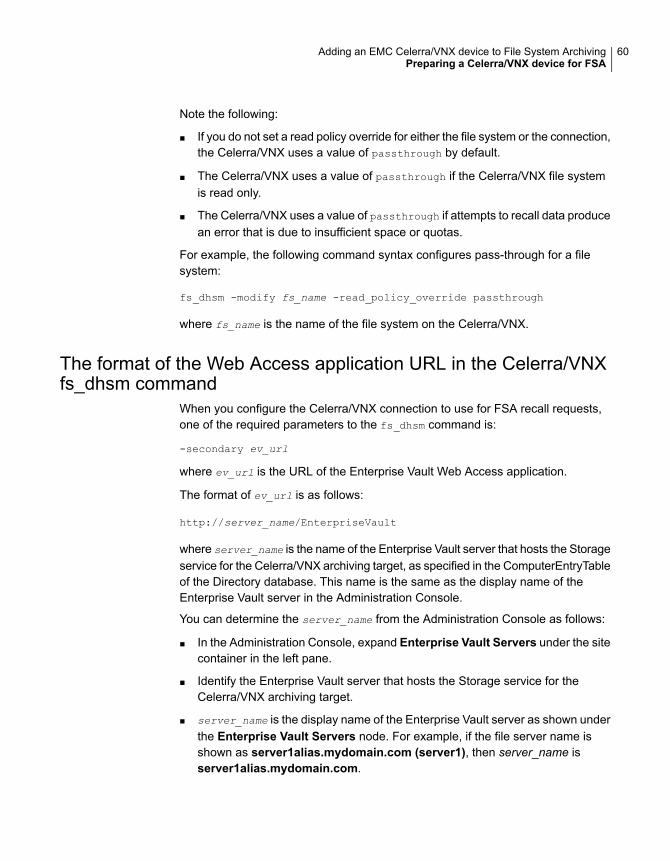
Note the following:
■ If you do not set a read policy override for either the file system or the connection,the Celerra/VNX uses a value of passthrough by default.
■ The Celerra/VNX uses a value of passthrough if the Celerra/VNX file systemis read only.
■ The Celerra/VNX uses a value of passthrough if attempts to recall data producean error that is due to insufficient space or quotas.
For example, the following command syntax configures pass-through for a filesystem:
fs_dhsm -modify fs_name -read_policy_override passthrough
where fs_name is the name of the file system on the Celerra/VNX.
The format of the Web Access application URL in the Celerra/VNXfs_dhsm command
When you configure the Celerra/VNX connection to use for FSA recall requests,one of the required parameters to the fs_dhsm command is:
-secondary ev_url
where ev_url is the URL of the Enterprise Vault Web Access application.
The format of ev_url is as follows:
http://server_name/EnterpriseVault
where server_name is the name of the Enterprise Vault server that hosts the Storageservice for the Celerra/VNX archiving target, as specified in the ComputerEntryTableof the Directory database. This name is the same as the display name of theEnterprise Vault server in the Administration Console.
You can determine the server_name from the Administration Console as follows:
■ In the Administration Console, expand Enterprise Vault Servers under the sitecontainer in the left pane.
■ Identify the Enterprise Vault server that hosts the Storage service for theCelerra/VNX archiving target.
■ server_name is the display name of the Enterprise Vault server as shown underthe Enterprise Vault Servers node. For example, if the file server name isshown as server1alias.mydomain.com (server1), then server_name isserver1alias.mydomain.com.
60Adding an EMC Celerra/VNX device to File System ArchivingPreparing a Celerra/VNX device for FSA
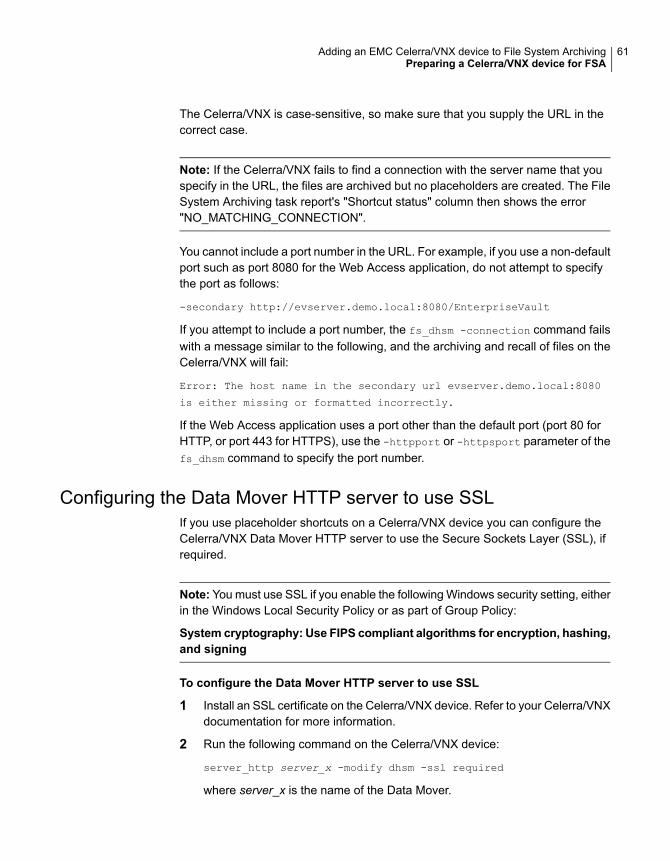
The Celerra/VNX is case-sensitive, so make sure that you supply the URL in thecorrect case.
Note: If the Celerra/VNX fails to find a connection with the server name that youspecify in the URL, the files are archived but no placeholders are created. The FileSystem Archiving task report's "Shortcut status" column then shows the error"NO_MATCHING_CONNECTION".
You cannot include a port number in the URL. For example, if you use a non-defaultport such as port 8080 for the Web Access application, do not attempt to specifythe port as follows:
-secondary http://evserver.demo.local:8080/EnterpriseVault
If you attempt to include a port number, the fs_dhsm -connection command failswith a message similar to the following, and the archiving and recall of files on theCelerra/VNX will fail:
Error: The host name in the secondary url evserver.demo.local:8080
is either missing or formatted incorrectly.
If the Web Access application uses a port other than the default port (port 80 forHTTP, or port 443 for HTTPS), use the -httpport or -httpsport parameter of thefs_dhsm command to specify the port number.
Configuring the Data Mover HTTP server to use SSLIf you use placeholder shortcuts on a Celerra/VNX device you can configure theCelerra/VNX Data Mover HTTP server to use the Secure Sockets Layer (SSL), ifrequired.
Note: You must use SSL if you enable the following Windows security setting, eitherin the Windows Local Security Policy or as part of Group Policy:
System cryptography: Use FIPS compliant algorithms for encryption, hashing,and signing
To configure the Data Mover HTTP server to use SSL
1 Install an SSL certificate on the Celerra/VNX device. Refer to your Celerra/VNXdocumentation for more information.
2 Run the following command on the Celerra/VNX device:
server_http server_x -modify dhsm -ssl required
where server_x is the name of the Data Mover.
61Adding an EMC Celerra/VNX device to File System ArchivingPreparing a Celerra/VNX device for FSA

3 Run the appropriate command on the Celerra/VNX device as follows:
■ If Windows on the Enterprise Vault server computer is configured to useFIPS-compliant algorithms, you must use basic (plain text) authentication:server_http server_x -modify dhsm -authentication basic
■ Otherwise, you must use digest authentication:server_http server_x -modify dhsm -authentication digest
Note: You can work around any errors that relate to SSL certificates by usingthe IgnoreSSLCertificateError registry value, if required.
See IgnoreSSLCertificateError in the Registry Values guide.
4 When you run the New File Server wizard in the Enterprise Vault AdministrationConsole to add the Celerra/VNX device as an archiving target, select theconfiguration option Celerra device is connected on HTTPS.
If the Celerra/VNX device is already configured as a target for FSA, do asfollows:
■ In the Enterprise Vault Administration Console, expand the File Serverscontainer under Targets to show the target file servers.Right-click the target Celerra/VNX file server, and click Properties.
■ On the EMC Celerra tab, and select Celerra device is connected onHTTPS.
■ Click OK to save your changes and close the Properties dialog box.
Example commands to prepare a Celerra/VNX device for FSAThe following example shows some commands to prepare a Celerra/VNX to useplaceholder shortcuts. In this example, neither the Web Access application nor theData Mover HTTP server uses SSL.
$ server_param server_2 -facility shadow -modify stream -value 1
$ /nas/bin/server_user server_2 -add -md5 -passwd
celerraaccessaccount
$ fs_dhsm -modify fsa_fs -state enabled
$ server_http server_2 -append dhsm -users celerraaccessaccount
-hosts 192.168.1.1
62Adding an EMC Celerra/VNX device to File System ArchivingPreparing a Celerra/VNX device for FSA
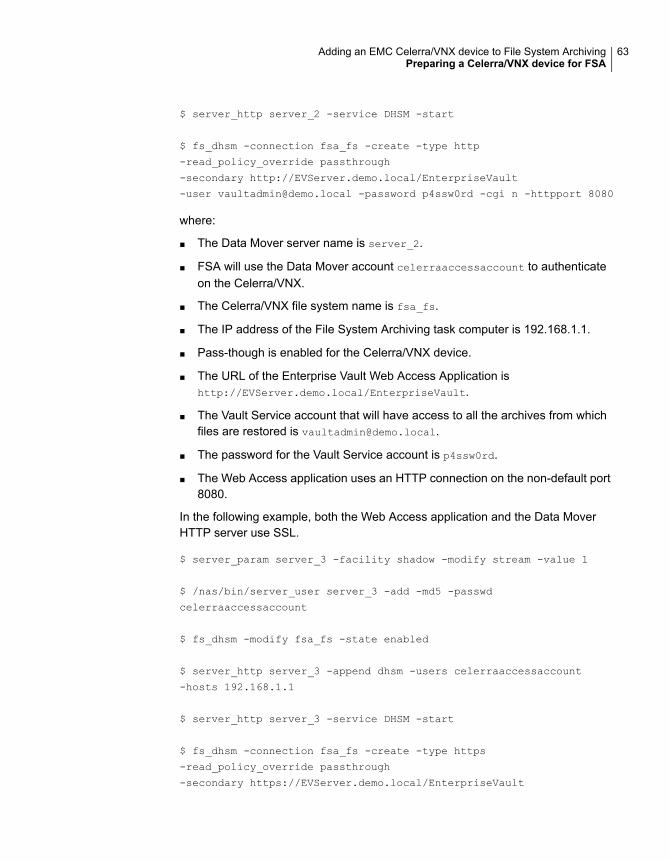
$ server_http server_2 -service DHSM -start
$ fs_dhsm -connection fsa_fs -create -type http
-read_policy_override passthrough
-secondary http://EVServer.demo.local/EnterpriseVault
-user [email protected] -password p4ssw0rd -cgi n -httpport 8080
where:
■ The Data Mover server name is server_2.
■ FSA will use the Data Mover account celerraaccessaccount to authenticateon the Celerra/VNX.
■ The Celerra/VNX file system name is fsa_fs.
■ The IP address of the File System Archiving task computer is 192.168.1.1.
■ Pass-though is enabled for the Celerra/VNX device.
■ The URL of the Enterprise Vault Web Access Application ishttp://EVServer.demo.local/EnterpriseVault.
■ The Vault Service account that will have access to all the archives from whichfiles are restored is [email protected].
■ The password for the Vault Service account is p4ssw0rd.
■ The Web Access application uses an HTTP connection on the non-default port8080.
In the following example, both the Web Access application and the Data MoverHTTP server use SSL.
$ server_param server_3 -facility shadow -modify stream -value 1
$ /nas/bin/server_user server_3 -add -md5 -passwd
celerraaccessaccount
$ fs_dhsm -modify fsa_fs -state enabled
$ server_http server_3 -append dhsm -users celerraaccessaccount
-hosts 192.168.1.1
$ server_http server_3 -service DHSM -start
$ fs_dhsm -connection fsa_fs -create -type https
-read_policy_override passthrough
-secondary https://EVServer.demo.local/EnterpriseVault
63Adding an EMC Celerra/VNX device to File System ArchivingPreparing a Celerra/VNX device for FSA
-user [email protected] -password p4ssw0rd -cgi n -httpsport 4334
$ server_http server_3 -modify dhsm -ssl required
$ server_http server_3 -modify dhsm -authentication digest
where:
■ The Data Mover server name is server_3.
■ FSA will use the Data Mover account celerraaccessaccount to authenticateon the Celerra/VNX.
■ The Celerra/VNX file system name is fsa_fs.
■ The IP address of the File System Archiving task computer is 192.168.1.1.
■ Pass-though is enabled for the Celerra/VNX device.
■ The URL of the Enterprise Vault Web Access application ishttps://EVServer.demo.local/EnterpriseVault.
■ The Vault Service account that will have access to all the archives from whichfiles are restored is [email protected].
■ The password for the Vault Service account is p4ssw0rd.
■ The Web Access application uses an HTTPS connection on non-default port4334.
■ You do not use the Windows security setting “System cryptography: Use FIPScompliant algorithms for encryption, hashing, and signing”.
■ You must also select the configuration option Celerra device is connected onHTTPS for the target file server in the Vault Administration Console.
Adding a Celerra/VNX device as an archivingtarget
After you have prepared a Celerra/VNX device for FSA, you can use the New FileServer wizard or the New-EVFSAFileServer PowerShell cmdlet to add theCelerra/VNX device as an archiving target.
Note: If you want to use FSA Reporting with the Celerra/VNX device, you canconfigure FSA Reporting when you add the device as an archiving target.
See “Adding a file server as an archiving target with FSA Reporting data collectionenabled” in the Reporting guide.
64Adding an EMC Celerra/VNX device to File System ArchivingAdding a Celerra/VNX device as an archiving target
To add a Celerra/VNX device as an archiving target
1 In the Administration Console, expand the Enterprise Vault site until the Targetscontainer is visible.
2 Expand the Targets container.
3 Right-click the File Servers container and, on the shortcut menu, click Newand then File Server. The New File Server wizard starts.
4 Work through the wizard to finish adding the file server:
■ On the first page of the wizard, click Next.
■ On the second page, enter the DNS name of the Celerra/VNX device. Donot select the option to install the FSA Agent. Then click Next.
■ On the third page, choose whether to use placeholder shortcuts.If you are using placeholder shortcuts, enter the details of the account youconfigured on the Celerra/VNX that has permission to use DHSM, and theCelerra/VNX port number on which the Data Mover services are configured.You must also specify whether the Celerra/VNX device is connected onHTTPS. Select this box if the Celerra/VNX Data Mover HTTP server usesthe Secure Sockets Layer (SSL).
Note: The Data Mover HTTP server must use SSL if you enable thefollowing Windows security setting, either in the Windows Local SecurityPolicy or as part of Group Policy:
System cryptography: Use FIPS compliant algorithms for encryption,hashing, and signing
You can change these details later if required, by editing the target fileserver properties.Click Next to continue.
■ On the summary page, click Next to add the Celerra/VNX device.
■ On the final page, click Close to exit from the wizard.
Before you add target volumes for the Celerra/VNX device, ensure that theEnterprise Vault server that archives from the Celerra/VNX has its cachelocation configured.
See “Specifying a cache location for retrieved Celerra/VNX files” on page 66.
65Adding an EMC Celerra/VNX device to File System ArchivingAdding a Celerra/VNX device as an archiving target
Specifying a cache location for retrievedCelerra/VNX files
To improve performance, an Enterprise Vault server that retrieves files from anEMC Celerra/VNX device uses a cache location for temporary files.
Before you add target volumes for a Celerra/VNX device, ensure that the EnterpriseVault server that archives from the Celerra/VNX has its cache location configured.
Note: If you configure pass-through recall for NetApp filers, the Enterprise Vaultserver also uses this cache location for the files that it retrieves from Celerra/VNXdevices.
To specify a cache location for retrieved Celerra/VNX files
1 In the Administration Console, expand the Enterprise Vault site until theEnterprise Vault Servers container is visible.
2 Expand the Enterprise Vault Servers container.
3 Right-click the server that will archive from the Celerra/VNX and, on the shortcutmenu, click Properties.
4 Click the Cache tab.
5 Under Cache Location, enter an existing path on the Enterprise Vault server.The Vault Service account must have read and write access to the location.
For more information on configuring the cache, click Help on the Cache tab.
66Adding an EMC Celerra/VNX device to File System ArchivingSpecifying a cache location for retrieved Celerra/VNX files
Configuring FSA withclustered file servers
This chapter includes the following topics:
■ About configuring FSA with clustered file servers
■ Steps to configure FSA with clustered file servers
■ Preparing to set up FSA services in a cluster
■ Adding the Vault Service account to the non-secure VCS cluster for FSA highavailability
■ Adding the virtual file server as an FSA target
■ Configuring or reconfiguring the FSA resource
■ Removing the FSA resource from all cluster groups
■ Troubleshooting the configuration of FSA with clustered file servers
About configuring FSAwith clustered file serversIn an environment where Windows file servers are grouped in a cluster, you canmake the FSA services that run on them highly available.
See “About using FSA with clustered file servers” on page 17.
FSA supports the following server cluster software:
■ Windows Server Failover Clustering (formerly known asMicrosoft Cluster Server,or MSCS)
■ Veritas Cluster Server (VCS)
8Chapter
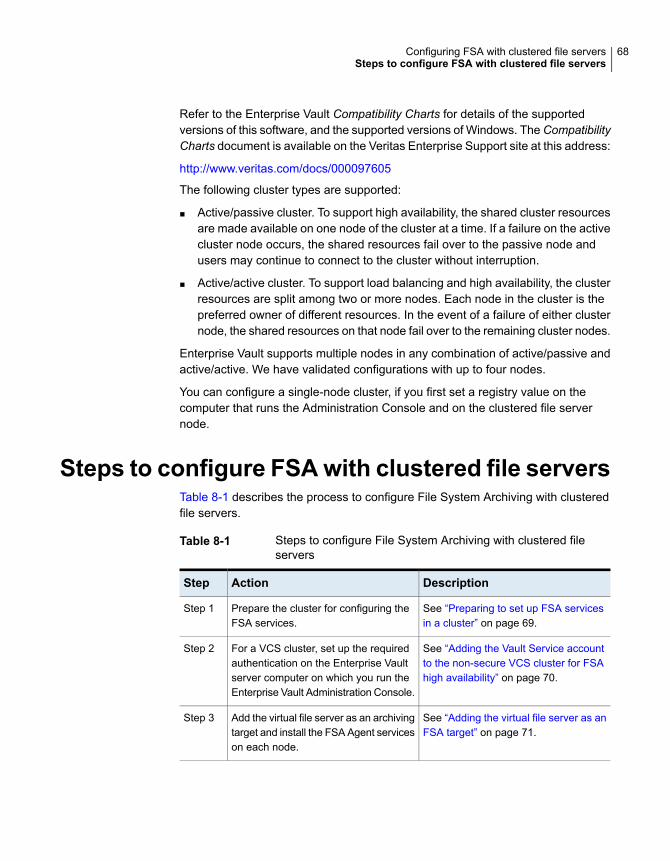
Refer to the Enterprise Vault Compatibility Charts for details of the supportedversions of this software, and the supported versions of Windows. The CompatibilityCharts document is available on the Veritas Enterprise Support site at this address:
http://www.veritas.com/docs/000097605
The following cluster types are supported:
■ Active/passive cluster. To support high availability, the shared cluster resourcesare made available on one node of the cluster at a time. If a failure on the activecluster node occurs, the shared resources fail over to the passive node andusers may continue to connect to the cluster without interruption.
■ Active/active cluster. To support load balancing and high availability, the clusterresources are split among two or more nodes. Each node in the cluster is thepreferred owner of different resources. In the event of a failure of either clusternode, the shared resources on that node fail over to the remaining cluster nodes.
Enterprise Vault supports multiple nodes in any combination of active/passive andactive/active. We have validated configurations with up to four nodes.
You can configure a single-node cluster, if you first set a registry value on thecomputer that runs the Administration Console and on the clustered file servernode.
Steps to configure FSAwith clustered file serversTable 8-1 describes the process to configure File System Archiving with clusteredfile servers.
Table 8-1 Steps to configure File System Archiving with clustered fileservers
DescriptionActionStep
See “Preparing to set up FSA servicesin a cluster” on page 69.
Prepare the cluster for configuring theFSA services.
Step 1
See “Adding the Vault Service accountto the non-secure VCS cluster for FSAhigh availability” on page 70.
For a VCS cluster, set up the requiredauthentication on the Enterprise Vaultserver computer on which you run theEnterprise Vault Administration Console.
Step 2
See “Adding the virtual file server as anFSA target” on page 71.
Add the virtual file server as an archivingtarget and install the FSA Agent serviceson each node.
Step 3
68Configuring FSA with clustered file serversSteps to configure FSA with clustered file servers
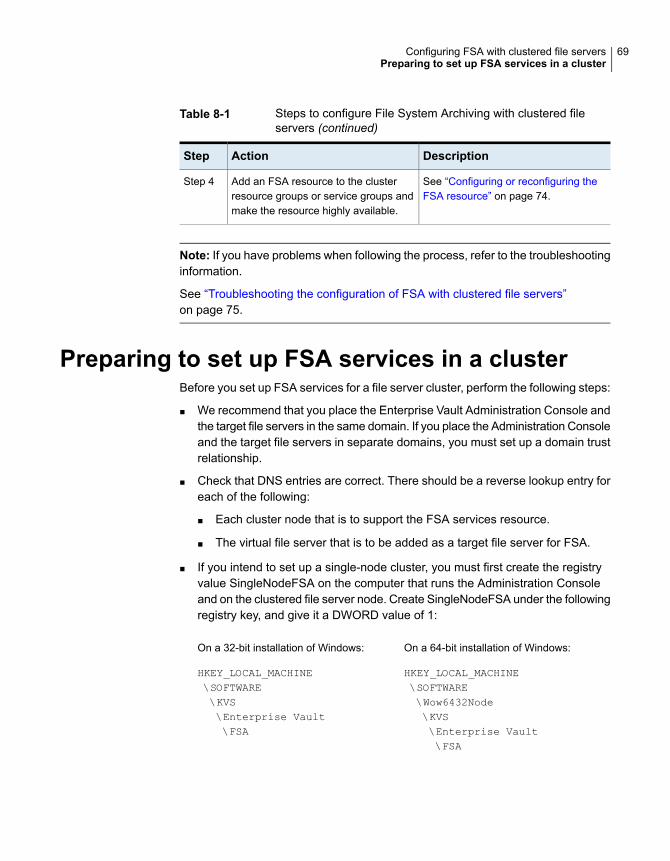
Table 8-1 Steps to configure File System Archiving with clustered fileservers (continued)
DescriptionActionStep
See “Configuring or reconfiguring theFSA resource” on page 74.
Add an FSA resource to the clusterresource groups or service groups andmake the resource highly available.
Step 4
Note: If you have problems when following the process, refer to the troubleshootinginformation.
See “Troubleshooting the configuration of FSA with clustered file servers”on page 75.
Preparing to set up FSA services in a clusterBefore you set up FSA services for a file server cluster, perform the following steps:
■ We recommend that you place the Enterprise Vault Administration Console andthe target file servers in the same domain. If you place the Administration Consoleand the target file servers in separate domains, you must set up a domain trustrelationship.
■ Check that DNS entries are correct. There should be a reverse lookup entry foreach of the following:
■ Each cluster node that is to support the FSA services resource.
■ The virtual file server that is to be added as a target file server for FSA.
■ If you intend to set up a single-node cluster, you must first create the registryvalue SingleNodeFSA on the computer that runs the Administration Consoleand on the clustered file server node. Create SingleNodeFSA under the followingregistry key, and give it a DWORD value of 1:
On a 64-bit installation of Windows:
HKEY_LOCAL_MACHINE\SOFTWARE\Wow6432Node\KVS\Enterprise Vault\FSA
On a 32-bit installation of Windows:
HKEY_LOCAL_MACHINE\SOFTWARE\KVS\Enterprise Vault\FSA
69Configuring FSA with clustered file serversPreparing to set up FSA services in a cluster
If you want to set up a single-node cluster, create this registry value before youdo either of the following:
■ Install the FSA Agent on the file server, if you perform this task from theAdministration Console.
■ Run the FSA Cluster Configuration wizard.For more information on SingleNodeFSA, see its entry in the Registry Valuesguide.
■ Ensure that the cluster group to which you want to add the FSA resource alsohas a shared disk resource (sometimes referred to as a physical disk resourceor Mount/MountV resource). Only VCS or Windows Server failover cluster groupsfor which you have configured a shared disk resource are available for selectionwhen you run the FSA Cluster Configuration wizard.
■ The Vault Service account requires some specific permissions if you add theFSA resource to a file server cluster.See “Permissions required by the Vault Service account to support the FSAresource on clustered file servers” on page 187.
■ For VCS configurations, make sure that the Public network connection is set asthe top connection in the Connections list. Perform this procedure on each nodein the cluster that is to include FSA services.
To ensure that the Public network is the top entry in the Connections list ofeach node
1 On a node that is to include FSA services, right-click My Network Places, andthen click Properties.
2 On the Advanced menu, click Advanced Settings.
3 On the Adapters and Bindings tab, ensure that the Public network is the topentry in the Connections list.
4 Repeat steps 1 to 3 for each node that is to include FSA services.
Adding the Vault Service account to thenon-secure VCS cluster for FSA high availability
If you configured the VCS cluster to use VCS User Privileges, you need to add theVault Service account to the VCS cluster. You need to add the Vault Service Accountonly once, not for each VCS node. Note that VCS 6.1 is the minimum supportedversion for Enterprise Vault 12. Additionally, Enterprise Vault supports onlynon-secure clusters.
70Configuring FSA with clustered file serversAdding the Vault Service account to the non-secure VCS cluster for FSA high availability

To add the Vault Service account to the VCS cluster
1 Open a Command Prompt window on any of the VCS cluster nodes, andnavigate to the following location:
VCS_installation_folder\cluster server\bin
2 Enter the following command to place the cluster in read-write mode:
haconf -makerw
3 Enter the following command to add the Vault Service account.
hauser -add Vault_Service_account -priv Administrator
where Vault_Service_account is the Vault Service account. Enter the accountin the format accountname, for example vaultadmin. When hauser promptsyou for the account password, enter the Vault Service account password.
If the authentication fails, try repeating the command with the account in theformat [email protected], for example [email protected].
4 Enter the following command to verify that the Vault Service account has beenadded to the VCS user list as an administrator:
hauser -display Vault_Service_account
The output should be as follows:
Vault_Service_account : ClusterAdministrator
5 Save the cluster configuration:
haconf -dump -makero
Adding the virtual file server as an FSA targetWe recommend that you add the virtual file server as a target file server for FSA,rather than adding the individual cluster nodes as targets.
71Configuring FSA with clustered file serversAdding the virtual file server as an FSA target
To add a virtual file server as an FSA target
1 If you intend to install the FSA Agent in step 6, then if the cluster nodes' firewallsare on, ensure that the firewalls are suitably configured.
See “Configuring a file server's firewall for FSA” on page 42.
Alternatively, install the FSA Agent manually on each node in the cluster. Youcan perform the manual installation of the FSA Agent before or after you addthe target file server.
See “Installing the FSA Agent manually” on page 81.
2 Start the Enterprise Vault Administration Console. If you want to install the FSAAgent or to add an FSA Resource to the cluster group during this procedure,you must run the Administration Console with an account that is a member ofthe local Administrators group on each file server node. If you want to add anFSA Resource you must also use an account that has Full Control permissionon the FSA Cluster folder of the Enterprise Vault server. The FSA Cluster
folder is a subfolder of the Utilities folder under the Enterprise Vaultinstallation folder. For example:
C:\Program Files (x86)\Enterprise Vault\Utilities\FSA Cluster
3 In the left pane of the Enterprise Vault Administration Console, expand theEnterprise Vault site until the Targets container is visible.
4 Expand the Targets container.
5 Right-click the File Server container and on the shortcut menu, click New andthen File Server. The New File Server wizard starts.
6 Enter the name of the virtual file server.
Select the option to install the FSA Agent on the file server, unless you planto install the FSA Agent manually. If you choose to install the FSA Agent, thewizard prompts you for the Vault Service account password. The wizard theninstalls the FSA Agent services on each node. After the services are installed,the wizard sets the services' logon credentials to use the Vault Service account,and then starts the services on each node.
72Configuring FSA with clustered file serversAdding the virtual file server as an FSA target
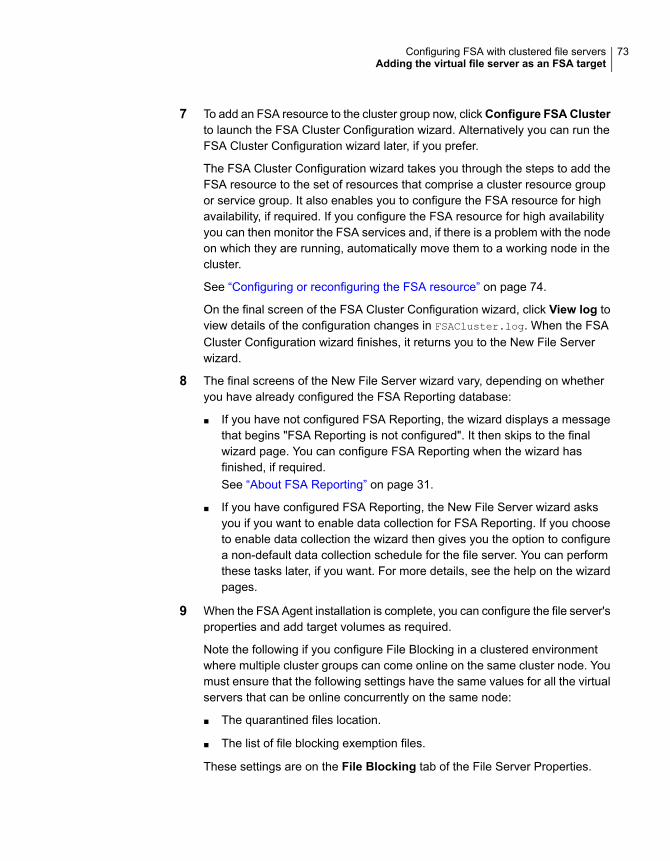
7 To add an FSA resource to the cluster group now, clickConfigure FSAClusterto launch the FSA Cluster Configuration wizard. Alternatively you can run theFSA Cluster Configuration wizard later, if you prefer.
The FSA Cluster Configuration wizard takes you through the steps to add theFSA resource to the set of resources that comprise a cluster resource groupor service group. It also enables you to configure the FSA resource for highavailability, if required. If you configure the FSA resource for high availabilityyou can then monitor the FSA services and, if there is a problem with the nodeon which they are running, automatically move them to a working node in thecluster.
See “Configuring or reconfiguring the FSA resource” on page 74.
On the final screen of the FSA Cluster Configuration wizard, click View log toview details of the configuration changes in FSACluster.log. When the FSACluster Configuration wizard finishes, it returns you to the New File Serverwizard.
8 The final screens of the New File Server wizard vary, depending on whetheryou have already configured the FSA Reporting database:
■ If you have not configured FSA Reporting, the wizard displays a messagethat begins "FSA Reporting is not configured". It then skips to the finalwizard page. You can configure FSA Reporting when the wizard hasfinished, if required.See “About FSA Reporting” on page 31.
■ If you have configured FSA Reporting, the New File Server wizard asksyou if you want to enable data collection for FSA Reporting. If you chooseto enable data collection the wizard then gives you the option to configurea non-default data collection schedule for the file server. You can performthese tasks later, if you want. For more details, see the help on the wizardpages.
9 When the FSA Agent installation is complete, you can configure the file server'sproperties and add target volumes as required.
Note the following if you configure File Blocking in a clustered environmentwhere multiple cluster groups can come online on the same cluster node. Youmust ensure that the following settings have the same values for all the virtualservers that can be online concurrently on the same node:
■ The quarantined files location.
■ The list of file blocking exemption files.
These settings are on the File Blocking tab of the File Server Properties.
73Configuring FSA with clustered file serversAdding the virtual file server as an FSA target

Note that if you configure pass-through recall for a file server cluster, all thecluster nodes must use identical pass-through recall settings.
See “About configuring pass-through recall for a file server cluster” on page 117.
Configuring or reconfiguring the FSA resourceYou can add the FSA resource to the cluster groups or reconfigure the FSA resourcesettings by running the FSA Cluster Configuration wizard.
Note: You must run the FSA Cluster Configuration wizard with an account that isa member of the local Administrators group on each node of the file server cluster.The account must also have Full Control permission on the FSA Cluster folder ofthe Enterprise Vault server. The FSA Cluster folder is a subfolder of the Utilities
folder under the Enterprise Vault installation folder. For example:
C:\Program Files (x86)\Enterprise Vault\Utilities\FSA Cluster
To configure or reconfigure the FSA resource
1 Start the FSA Cluster Configuration wizard in one of the following ways:
■ When you add the virtual file server as a target, click Configure FSACluster in the New File Server wizard
■ If you have already added the clustered file server as a target, then in theleft pane of the Enterprise Vault Administration Console, right-click theclustered file server target and then click FSA Cluster Configuration.
2 When the welcome page of the FSA Cluster Configuration wizard appears,click Next.
3 SelectAdd, remove, or reconfigure the FSA resource for groups that haveshared disks, and then click Next.
4 Select the cluster groups that are to include the FSA resource.
If you check Services HA for a selected group, and there is a problem withthe node on which the FSA services are running, then the FSA services andall the other resources in the group automatically failover to a working node inthe cluster. In effect, by checking Services HA, you make the failure of theFSA services on one node a sufficient reason to move all the resources toanother node.
74Configuring FSA with clustered file serversConfiguring or reconfiguring the FSA resource
5 Click Next, and then wait for the FSA Cluster Configuration wizard to applyyour requested settings to the cluster group.
6 The wizard displays a summary of the changes that it has made to the clustergroup. You can click View log to view details of the configuration changes inFSACluster.log. Click Finish to close the wizard.
Removing the FSA resource from all clustergroups
When you have no further need to make the FSA services highly available, youcan remove them from the cluster groups to which you previously added them.
Note: You must run the FSA Cluster Configuration wizard with an account that isa member of the local Administrators group on each node of the file server cluster.The account must also have Full Control permission on the FSA Cluster folder ofthe Enterprise Vault server. The FSA Cluster folder is a subfolder of the Utilities
folder under the Enterprise Vault installation folder. For example:
C:\Program Files (x86)\Enterprise Vault\Utilities\FSA Cluster
To remove the FSA resource from all cluster groups
1 In the left pane of the Vault Administration Console, right-click a clustered fileserver and then click FSA Cluster Configuration.
2 When the welcome page of the FSA Cluster Configuration wizard appears,click Next.
3 Select Remove the FSA resource from all groups, and then click Next.
4 Click Yes to confirm that you want to remove the FSA resource from the clustergroups.
5 Click Finish.
Troubleshooting the configuration of FSA withclustered file servers
If you experience problems when you configure FSA clusters, try the followingtroubleshooting steps.
75Configuring FSA with clustered file serversRemoving the FSA resource from all cluster groups
To troubleshoot the configuration of FSA with clustered file servers
1 Verify that you have installed and configured the FSA services on each nodeto which the cluster group can fail over.
2 Ensure that the ClusSvc service (for Windows Server Failover Clustering) orHad service (for Veritas Cluster Server) is configured and running on the fileserver.
3 Check the log files. The FSA Cluster Configuration wizard stores details of thechanges that it has made in the file FSACluster.log, which is located in the\Utilities\FSA Cluster subfolder of the Enterprise Vault program folder(for example, C:\Program Files (x86)\Enterprise Vault).
The wizard creates additional log files on the individual cluster nodes whenyou configure a group for FSA services high availability. These log files arenamed FSA-MSCSType.log or FSA-VCSType.log, depending on whether youare using Windows Server Failover Clustering or Veritas Cluster Server, andthey are stored in the FSA Agent installation folder.
The LogLevel registry value determines the level of logging. This registry valueis located under the following registry key:
On a 64-bit installation of Windows:
HKEY_LOCAL_MACHINE\SOFTWARE\Wow6432Node\KVS\Enterprise Vault\FSA
On a 32-bit installation of Windows:
HKEY_LOCAL_MACHINE\SOFTWARE\KVS\Enterprise Vault\FSA
LogLevel can have a value in the range 0 through 5, where 0 or 1 recordscritical messages only, whereas 5 records debug and diagnostic messages.
4 You can run DTrace on the FSA Cluster Configuration wizard — on theEnterprise Vault server that hosts the Enterprise Vault Administration Console,run DTrace on FSAClusterWizard.
You can also run DTrace on the FSA cluster node — on the FSA cluster nodewhere the FSA resource is online, run DTrace on FSAClusterAssist and thePlaceholder service.
If the DTrace view command does not include FSAClusterWizard orFSAClusterAssist in the list of processes that are available to monitor, registerthe file with DTrace as follows:
■ Enter the following command from DTrace:
76Configuring FSA with clustered file serversTroubleshooting the configuration of FSA with clustered file servers
set FSAClusterWizard.exe
orset FSAClusterAssist.exe
■ Then register the name when DTrace prompts you.
For more information on DTrace, see the Utilities manual.
'Failed to collect clustering data' error on starting FSA ClusterConfiguration wizard
The following error message can appear when you start the FSA ClusterConfiguration wizard in the Enterprise Vault Administration Console:
"Failed to collect clustering data
from file server 'servername'.
See the "Installing and Configuring
Enterprise Vault" manual for guidance."
This message may appear because the Vault Service account cannot authenticateand log in to the VCS cluster. You may need to add the Vault Service account tothe VCS user list.
See “Adding the Vault Service account to the non-secure VCS cluster for FSA highavailability” on page 70.
Note that this error message is not specific to this situation. It may also be displayedfor other cluster-related issues.
77Configuring FSA with clustered file serversTroubleshooting the configuration of FSA with clustered file servers
Installing the FSA AgentThis chapter includes the following topics:
■ About installing the FSA Agent on a Windows file server
■ About FSA Agent uninstallation
■ Updating the logon credentials of the FSA Agent services
About installing the FSA Agent on aWindows fileserver
If you want to use placeholder shortcuts, File Blocking, or FSA Reporting with aWindows file server, you must install the FSA Agent on the file server.
Note the following:
■ Do not install the FSA Agent on Enterprise Vault servers, NetApp filers, or EMCCelerra/VNX devices.
■ You cannot install the FSA Agent on a Windows file server that is runningWindows Server 2008 R2 or earlier.
For details of the supported versions and required service packs of the Windowsoperating system, see the Enterprise Vault Compatibility Charts athttp://www.veritas.com/docs/000097605.
For a Windows server other than a Server Core installation, the FSA Agent requires.Net Framework 4.5.2 on the file server.
For a Windows Server 2008 Server Core installation, the prerequisites are that thefollowing optional Windows features are enabled:
■ ServerCore-WOW64 (installed by default)
■ NetFx2-ServerCore
9Chapter

■ NetFx2-ServerCore-WOW64
For a Windows Server 2012 Server Core installation, the prerequisites are that thefollowing optional Windows features are enabled:
■ ServerCore-WOW64
■ NetFx3
■ NetFx3ServerFeatures
Note: FSA Agent installation requires an up-to-date root certificate on the targetcomputer. Certificate updates usually happen automatically over the Internet. If thecertificate is out-of-date, for example because the computer has no Internetconnection, the FSA Agent installation fails with a ‘Signature verification failed’ errorin the FSA Agent installation log. For more details and for instructions on how toupdate the root certificate, see the following technical note on the Veritas Supportwebsite:
http://www.veritas.com/docs/000076505
You can install the FSA Agent on the file server from the Administration Console,or manually.
Table 9-1 lists the options for installing the FSA Agent.
Table 9-1 Options for installing the FSA Agent
DescriptionNotesMethod
See “Installing the FSA Agentusing the Install FSA Agentwizard” on page 80.
If the file server's firewall ison, the firewall must besuitably configured to allowaccess.
You must run theAdministration Console withan account that is a memberof the local Administratorsgroup on the file server.
Requires the password of theVault Service account.
Installation from theAdministration Console("Push install").
79Installing the FSA AgentAbout installing the FSA Agent on a Windows file server

Table 9-1 Options for installing the FSA Agent (continued)
DescriptionNotesMethod
See “Installing the FSA Agentmanually” on page 81.
Does not require accessthrough the file server'sfirewall.
The MSI installation kits andother required files areprovided on the EnterpriseVault server.
You must use an account thatis a member of the localAdministrators group on thefile server.
Requires the user name andpassword of the Vault Serviceaccount.
Manual installation on the fileserver.
Note: Before you install any antivirus product on a file server on which you haveinstalled the FSA Agent, we recommend that you stop the File Placeholder Serviceon the file server. After completing the installation of the antivirus product, you mustrestart the File Placeholder Service.
See “About the FSA Agent” on page 28.
Installing the FSA Agent using the Install FSA Agent wizardThe following procedure describes how to install the FSA Agent on a target Windowsfile server by using the Enterprise Vault Administration Console's Install FSA Agentwizard.
Note: If you have not yet added the file server as an archiving target in theAdministration Console, you can install the FSA Agent as part of that procedure
See “ Adding a Windows file server as an archiving target” on page 43.
Note: In an environment where Windows file servers are grouped in a cluster, theFSA Agent must be installed on each cluster node.
See “Adding the virtual file server as an FSA target” on page 71.
80Installing the FSA AgentAbout installing the FSA Agent on a Windows file server
To install the FSA Agent using the Install FSA Agent wizard
1 If the file server's firewall is on, ensure that the firewall is suitably configured,otherwise the installation will fail.
See “Configuring a file server's firewall for FSA” on page 42.
Alternatively, perform a manual installation of the FSA Agent.
See “Installing the FSA Agent manually” on page 81.
2 Run the Administration Console with an account that is a member of the localAdministrators group on the file server.
3 In the Administration Console, expand the Enterprise Vault site until the Targetscontainer is visible.
4 Expand the Targets container.
5 Expand the File Servers container.
6 Right-click the server on which you want to install the FSA Agent and, on theshortcut menu, click Install FSA Agent.
7 Work through the wizard.
Installing the FSA Agent manuallyFollow the procedure below to perform a manual installation of the FSA Agent andits prerequisites on a Windows server.
The FSA Agent supports AMD64 and Intel EM64T, but it does not currently supportIntel Itanium.
To install the FSA Agent manually
1 Find the FSA Agent files on the Enterprise Vault server. The files are in theevpush\Agent folder under the Enterprise Vault installation folder; for example,C:\Program Files (x86)\Enterprise Vault\evpush\Agent.
2 Install the required Microsoft Visual C++ redistributable packages on the fileserver:
■ vcredist_x86.exe
■ vc2005redist_x86.exe
■ vcredist_x64.exe
3 Copy the Enterprise Vault File System Archiving x64.msi file to thefile server.
4 Log on to the file server with an account that is a member of the localAdministrators group on the file server.
81Installing the FSA AgentAbout installing the FSA Agent on a Windows file server
5 Perform an interactive installation or silent installation of the FSA Agent. Witha silent installation, no notification messages appear on the console.
■ To perform an interactive installation, double-click the MSI file, or open aCommand Prompt window and enter a command similar to the following:msiexec.exe /i path_to_.msi_file /L*v logfilename
The installer prompts you to specify the installation folder and the credentialsof the user account that will log on to use this application. You must specifythe name and password of the Vault Service account. The installer usesthese credentials to configure the FSA services.If you used an msiexec.exe command, any installation messages appearin the specified log file.
■ To perform a silent installation, open a Command Prompt window and entera command similar to the following:msiexec.exe /i path_to_.msi_file /L*v logfilename
[INSTALLDIR=installpath]
IS_NET_API_LOGON_USERNAME=Domain\Username
IS_NET_API_LOGON_PASSWORD=password /q
Any installation messages appear in the log file specified. Note that thelogon user name must be the Vault Service account in the formatDomain\Username.You can use INSTALLDIR to specify an installation location other than thedefault path on the system drive, if required.
For example, the following command performs a silent installation of the FSAAgent:
msiexec.exe /i "C:\TEMP\FSA\Agent\Enterprise Vault File System
Archiving x64.msi" /L*v fsainstall.log
IS_NET_API_LOGON_USERNAME=DOMAIN1\VSA
IS_NET_API_LOGON_PASSWORD=Ev@ult-723 /q
6 When the installation of the FSA Agent is complete, start the following servicesfrom the Windows Services MMC snap-in, if they are not already started:
■ Enterprise Vault File Blocking service
■ Enterprise Vault File Collector service
■ Enterprise Vault File Placeholder service
About FSA Agent uninstallationYou can uninstall the FSA Agent from a Windows file server by using the Add orRemove Programs facility in the Windows Control Panel.
82Installing the FSA AgentAbout FSA Agent uninstallation
You should not install the FSA Agent on a computer on which Enterprise Vault isalso installed. If you do have a computer on which both Enterprise Vault and theFSA Agent are installed, you must uninstall Enterprise Vault before you can uninstallthe FSA Agent. In this case you may prefer to disable the FSA Agent instead ofuninstalling it.
Updating the logon credentials of the FSA Agentservices
The FSA Agent services use the Vault Service account credentials to log on. If youchange the Vault Service account password then for each computer that has theFSA Agent installed you must update the properties of the FSA Agent services touse the new password.
■ For target Windows file servers, use the Update Service Credentials wizard inthe Administration Console. Run the wizard on each target Windows file serverthat has the FSA Agent installed.See “To update the logon credentials of the FSA Agent services on targetWindows file servers” on page 83.
■ For FSA Reporting proxy servers that are not target Windows file servers orEnterprise Vault servers, you must update the logon credentials of the FSAAgent services manually.See “To update the logon credentials of the FSA Agent services manually”on page 84.
Note: Enterprise Vault servers do not run the FSA Agent services.
To update the logon credentials of the FSAAgent services on targetWindowsfile servers
1 If the file server's firewall is on, ensure that the firewall is suitably configured,otherwise the update will fail.
See “Configuring a file server's firewall for FSA” on page 42.
Alternatively, you can perform a manual update of the services.
See “To update the logon credentials of the FSA Agent services manually”on page 84.
2 In the Administration Console, expand the Enterprise Vault site until the Targetscontainer is visible.
3 Expand the Targets container.
83Installing the FSA AgentUpdating the logon credentials of the FSA Agent services
4 Expand the File Servers container.
5 Right-click the server on which you want to update the logon credentials andclick Update Service Credentials.
6 Work through the wizard.
The wizard prompts you for the Vault Service account password. It then updatesthe logon credentials of the FSA Agent services, and starts or restarts theservices to implement the change.
To update the logon credentials of the FSA Agent services manually
1 Open the Windows Services MMC snap-in on the computer.
Perform the remaining steps for each installed FSA Agent service:
■ Enterprise Vault File Blocking service
■ Enterprise Vault File Collector service
■ Enterprise Vault File Placeholder service
2 Right-click the service and choose Properties.
3 On the Log On tab, edit Password to specify the new Vault Service accountpassword.
4 Edit Confirm password to confirm the new password.
5 Click OK to exit from the properties.
6 Restart the service for the change to take effect.
84Installing the FSA AgentUpdating the logon credentials of the FSA Agent services
Defining volume and folderpolicies
This chapter includes the following topics:
■ About defining FSA volume and folder policies
■ Creating FSA volume policies and folder policies
■ About FSA volume policy and folder policy properties
■ About selecting the shortcut type for an FSA policy
■ About FSA policy archiving rules
■ About options for archiving files that have explicit permissions, and files underDAC
About defining FSA volume and folder policiesThis section describes how to set up volume policies and folder policies for FileSystem Archiving.
There is separate documentation on how to create and assign retention folderpolicies.
See “Configuring retention folders” on page 122.
Creating FSA volume policies and folder policiesYou can create a new policy by using the New Policy wizard, or make a copy of anexisting policy to modify as required.
10Chapter

To create an FSA volume policy or folder policy with the New Policy wizard
1 In the Administration Console, expand the Enterprise Vault site until the Policiescontainer is visible.
2 Expand the Policies container.
3 Expand the File container.
4 Right-click Volume or Folder as required and on the shortcut menu, click Newand then Policy.
5 Work through the New Policy wizard.
See “About FSA volume policy and folder policy properties” on page 86.
To copy an FSA policy to use as a template for a new policy
1 In the Administration Console, expand the Enterprise Vault site until the Policiescontainer is visible.
2 Expand the Policies container.
3 Expand the File container.
4 Select Volume or Folder, as required.
5 Right-click the policy that you want to copy and then, on the shortcut menu,click Copy Policy.
6 Enter a new name and description for the policy.
7 Click OK to save the copy.
8 Double-click the new copy to display its properties.
9 Edit the properties of the copy as required.
See “About FSA volume policy and folder policy properties” on page 86.
About FSA volume policy and folder policyproperties
FSA volume and folder policies define the following:
■ For volume policies only: File Blocking rules to apply to the volume, if required.See “About configuring File Blocking” on page 130.
■ For volume policies only: whether to enable quotas for the volume, and whatquotas to use.
■ The retention category or retention plan to apply to the files that are archivedwith the policy.
86Defining volume and folder policiesAbout FSA volume policy and folder policy properties
■ The type of shortcut to leave to an archived file, if the archiving rules specifythat a shortcut is created.See “About selecting the shortcut type for an FSA policy” on page 87.
■ The archiving rules to apply in the policy. You define these rules to select thefiles to match the rule, Enterprise Vault to archive or delete. The rules are appliedin the order in which you list them.See “About FSA policy archiving rules” on page 88.
■ Whether to archive files that have explicit permissions, and files that are underDynamic Access Control.See “About options for archiving files that have explicit permissions, and filesunder DAC” on page 91.
About selecting the shortcut type for an FSApolicy
The Shortcuts tab of the properties of an FSA volume policy or folder policyspecifies the type of shortcut to leave to an archived file, when the archiving rulesspecify that a shortcut is to be created. You can choose to leave a placeholdershortcut or an internet shortcut.
See “About FSA shortcut files” on page 23.
If you choose to leave a placeholder shortcut, you must make sure that the FSAAgent is installed on any Windows file servers to which the policy is applied.
If you leave a placeholder shortcut you can choose whether to do the following:
■ Delete placeholders for the items that have been deleted from archives.
■ Delete archived files when placeholders are deleted.See “About configuring the deletion of archived files on placeholder deletion”on page 93.
If you leave placeholder shortcuts, make sure that your system does not recall thearchived files inadvertently.
See “About preventing unwanted file recalls from placeholder shortcuts” on page 165.
About choosing not to display the file size in NetApp placeholdershortcuts
By default, a placeholder shortcut shows the size of the file that it replaced, althoughthe shortcut itself takes up very little space.
87Defining volume and folder policiesAbout selecting the shortcut type for an FSA policy
Enterprise Vault incurs a performance overhead when it determines the original filesize for a placeholder on a NetApp filer. This overhead can become significantunder some circumstances. To avoid the performance overhead, you can use theregistry value SetNetappPHOriginalSize to turn off the file size determination processfor NetApp placeholders. NetApp placeholders then show a file size of 0 KB.
For more details, see the description of SetNetappPHOriginalSize in the RegistryValues manual.
About FSA policy archiving rulesWhen you create an FSA volume policy or folder policy you must define the archivingrules to apply, and the order in which to apply them. Each archiving rule specifiesthe following:
■ The file criteria to match, such as the file type, the time that the file was lastmodified or last accessed, the file size, and file attributes.See “Tips for creating FSA policy archiving rules” on page 88.
■ The action to take on the files that match the file criteria. You can chooseArchive, Do not archive, Delete, or Archive copy and reset. For moreinformation, see the help in the Administration Console for the rule's Generaltab.
■ Whether and when to create shortcuts for the matching files. If you choose tocreate shortcuts you can create them immediately or some time later, accordingto criteria that you specify.See “FSA shortcut creation options” on page 90.
Tips for creating FSA policy archiving rulesNote the following when you create archiving rules in FSA's volume policies andfolder policies:
■ An archiving rule is applied to a file when all the criteria match. You may findthat some files that you expect to be matched by a rule are not matched because,for example, the attributes are not matched exactly.
■ Do not apply too many rules in a policy. This makes it easier to apply the samepolicy to multiple volumes or folders. Also, by keeping it simple, you are lesslikely to get results you do not expect.
■ You can use File Groups to simplify rule creation. A file group enables you tospecify several different file types to that are to be treated together for thepurposes of file archiving.
88Defining volume and folder policiesAbout FSA policy archiving rules

For example, you could create a file group called "webpages" and within it havethe file types *.htm, *.html, and *.gif. Within a File System Archiving policy youcould then define a rule that applied to "webpages".File Groups are in the "File Groups" Administration Console container, underthe "File" policies container.
■ If appropriate, you can add rules to prevent the archiving of specific files.See “About excluding specific Mac and Windows file types from archiving”on page 89.
■ The Remove safety copies setting for the vault store may temporarily preventEnterprise Vault from creating shortcuts.See “FSA shortcut creation options” on page 90.
■ When you have set up File System Archiving for a volume or folder, perform anarchive run in Report Mode and then check the report to make sure that therules are matching the files you expect.
About excluding specific Mac and Windows file types from archivingWhile FSA can archive any file that it encounters on a file system, some file typesmay not be good candidates for archiving, such as operating system files, and PSTor NSF files.
Enterprise Vault includes two predefined file groups called Mac Files and WindowsFiles, which define a set of Mac file types and Windows file types respectively. Ifyou archive from a file server that includes Mac files or Windows files, you can usethese file groups to create rules to prevent these file types from being archived.
The Default Volume Policy and Default Folder Policy include two rules called ExcludeMac Files and the Exclude Windows Files. These rules are also available in theNew Policy wizard. We recommend that you use these rules to exclude system filetypes that may not be good candidates for archiving or for being turned intoshortcuts.
Note that these rules are not enabled by default.
Before you use these rules, examine the list of file types in the related file group.The file types have been added as result of feedback from the existing installedbase. Edit the list of file types to match your exclusion requirements, if necessary.
Note: File Blocking cannot perform content checking for the supplied file types inthe Mac Files file group and the Windows Files file group.
89Defining volume and folder policiesAbout FSA policy archiving rules

FSA shortcut creation optionsThe Shortcut Creation tab of an FSA policy archiving rule provides the followingshortcut creation options:
■ None. Archive and delete file. Do not create any shortcuts to archived files.Enterprise Vault archives the files that meet the archiving criteria and thendeletes the files.
■ Create shortcut immediately. Archive the files that meet the archiving criteriaand then create shortcuts to the archived files.
■ Create shortcut later. Archive the files that meet the archiving criteria but donot delete the files. Enterprise Vault leaves the files on the file server until theymeet the date criteria you define on this tab. This option enables you to archivethe files but to leave the original files in place until they are no longer needed.This means that a user can read or edit the files without them being recalledfrom the archive.
You can select one or more of the following time conditions. If you specify morethan one time condition, Enterprise Vault does not create shortcuts until all theconditions are satisfied.
■ Last archive time is. Enterprise Vault creates shortcuts when the specifiedtime has elapsed since the last time the file was archived. This option enablesyou to ensure that shortcuts are not created for frequently-archived files.
■ Last access time is. Enterprise Vault creates shortcuts when the specifiedtime has elapsed since the last time the file was accessed. This optionenables you to ensure that shortcuts are not created for frequently-accessedfiles.
■ Last modified time is. Enterprise Vault creates shortcuts after the specifiedtime has elapsed since the last time the file was modified. This option enablesyou to ensure that shortcuts are not created for frequently-modified files.
■ Created time is. Specifies that Enterprise Vault must create shortcuts whenthe specified time has elapsed since the file was created.
Note that Enterprise Vault checks the vault store setting for Remove safety copiesbefore creating shortcuts. If safety copies cannot be removed because of this setting,Enterprise Vault does not create shortcuts.
Table 10-1 shows how the vault store's Remove safety copies setting can affectshortcut creation.
90Defining volume and folder policiesAbout FSA policy archiving rules
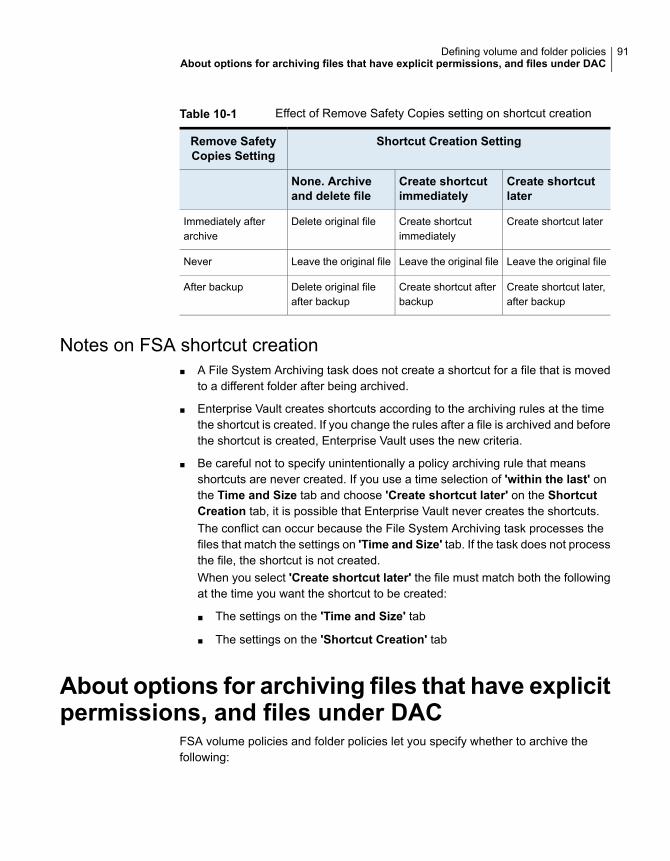
Table 10-1 Effect of Remove Safety Copies setting on shortcut creation
Shortcut Creation SettingRemove SafetyCopies Setting
Create shortcutlater
Create shortcutimmediately
None. Archiveand delete file
Create shortcut laterCreate shortcutimmediately
Delete original fileImmediately afterarchive
Leave the original fileLeave the original fileLeave the original fileNever
Create shortcut later,after backup
Create shortcut afterbackup
Delete original fileafter backup
After backup
Notes on FSA shortcut creation■ A File System Archiving task does not create a shortcut for a file that is moved
to a different folder after being archived.
■ Enterprise Vault creates shortcuts according to the archiving rules at the timethe shortcut is created. If you change the rules after a file is archived and beforethe shortcut is created, Enterprise Vault uses the new criteria.
■ Be careful not to specify unintentionally a policy archiving rule that meansshortcuts are never created. If you use a time selection of 'within the last' onthe Time and Size tab and choose 'Create shortcut later' on the ShortcutCreation tab, it is possible that Enterprise Vault never creates the shortcuts.The conflict can occur because the File System Archiving task processes thefiles that match the settings on 'Time and Size' tab. If the task does not processthe file, the shortcut is not created.When you select 'Create shortcut later' the file must match both the followingat the time you want the shortcut to be created:
■ The settings on the 'Time and Size' tab
■ The settings on the 'Shortcut Creation' tab
About options for archiving files that have explicitpermissions, and files under DAC
FSA volume policies and folder policies let you specify whether to archive thefollowing:
91Defining volume and folder policiesAbout options for archiving files that have explicit permissions, and files under DAC
■ Files that have explicit permissions. That is, files with permissions applied directlyto them. Note that when evaluating a file for explicit permissions, EnterpriseVault ignores Dynamic Access Control (DAC) permissions.
■ Files that are under DAC. That is, files whose access is controlled completelyor partially through a DAC central access policy, user claim, or device claim.
The default policy setting is not to archive these files.
Before you choose to archive files that have explicit permissions or files that areunder Dynamic Access Control, note the following:
■ In the archive no explicit file permissions apply, and no DAC permissions apply.The result is that an archived file has the permissions of its parent folder, lessany DAC permissions.
■ If Enterprise Vault leaves a placeholder shortcut, the placeholder has all thepermissions of the original file.
The absence of explicit file permissions and all DAC permissions in the archive hasthe following consequences:
■ A user who has conventional (non-DAC) permission to access a folder can findand access any file in the associated archive folder. However, if the user didnot have permission to access the original file, the user cannot access thearchived file from its placeholder.
■ A user who has conventional (non-DAC) permission to delete items from a foldercan delete the archived version of any file from the associated archive folder.However, if the user did not have permission to delete the original file, the usercannot delete its placeholder.
■ A user who has access to a file through DAC alone cannot access the file in thearchive.Note that to allow access to files in the archive, you can set permissions manuallyon an archive from the Enterprise Vault Administration Console. If you setpermissions on an archive they are applied to every folder in the archive.
■ If a file is restored from the archive, the restored file has the original parent folderpermissions, less any DAC-related permissions that were applied directly to thefile.
If a file is recalled from a placeholder, the placeholder's permissions are retainedin the recalled file. The recalled file has all the permissions of the original file, unlessthe permissions of placeholder or the inherited permissions of any of its parentfolders were changed.
92Defining volume and folder policiesAbout options for archiving files that have explicit permissions, and files under DAC
Configuring the deletion ofarchived files onplaceholder deletion
This chapter includes the following topics:
■ About configuring the deletion of archived files on placeholder deletion
■ Configuring the deletion of archived files on placeholder deletion for Windowsfile servers and NetApp filers
■ Configuring the deletion of files on placeholder deletion for EMC Celerra/VNXdevices
About configuring the deletion of archived fileson placeholder deletion
If you choose to leave placeholder shortcuts, you can configure Enterprise Vaultto delete archived files when their placeholders are deleted. You must configuresome settings for the file server, and apply an archiving policy with the appropriatesettings.
Note that if you move placeholders to a different location, the archiving policy thatapplies to the destination location determines whether the archived files are deletedon placeholder deletion.
For Windows file servers and NetApp filers, Enterprise Vault maintains a cache ofthe "Delete archived file when placeholder is deleted" policy settings. This DODcache holds the policy setting for each local target volume and target folder, includingretention folders. For Windows file servers the DOD cache is located on the file
11Chapter

server. For NetApp filers the DOD cache is located on the Enterprise Vault server.The location is not configurable.
When a placeholder is deleted on a Windows file server or a NetApp filer, EnterpriseVault does as follows:
■ It identifies the parent target folder that is closest to the folder from which theplaceholder was deleted.
■ It obtains from the DOD cache the value of the "Delete archived file whenplaceholder is deleted" setting that applies to the target folder.
■ It uses the value from the DOD cache to determine whether to delete the archivedfile. If the DOD cache value specifies deletion, Enterprise Vault immediatelydeletes the archived file.
If Enterprise Vault is unable to identify the parent target folder for a deletedplaceholder, it logs an error in the event log. It does not delete the archived file.
Note: Enterprise Vault updates the DOD cache every hour by default. A delay ofup to an hour may therefore occur before Enterprise Vault's deletion behaviorreflects a change to this policy setting.
See “Configuring the deletion of archived files on placeholder deletion for Windowsfile servers and NetApp filers” on page 95.
For EMC Celerra/VNX devices Enterprise Vault uses a different mechanism:
■ To configure archived file deletion with Celerra/VNX you must configure a targetvolume whose share points to the root of the file system. The “Delete archivedfile when placeholder is deleted” policy setting that applies to this root volumedetermines this policy setting for all of the file system's archived files. The rootvolume's policy setting overrides any “Delete archived file when placeholder isdeleted” policy setting that you apply to any other target volumes or target foldersin the same file system.
■ For Celerra/VNX placeholders, Enterprise Vault does not use a DOD cache.When a Celerra/VNX placeholder is deleted, Enterprise Vault examines thevalue of the "Delete archived file when placeholder is deleted" setting for thepolicy that applies to the Celerra/VNX target root volume.
■ You must enable FileMover logging on the Celerra/VNX device. Enterprise Vaultuses the Celerra/VNX FileMover log's records of deleted placeholders todetermine which archived files to delete.
■ The deletion of the archived Celerra/VNX files does not occur immediately uponplaceholder deletion. Deletion from the Celerra/VNX takes place daily according
94Configuring the deletion of archived files on placeholder deletionAbout configuring the deletion of archived files on placeholder deletion
to the schedule that is specified in the properties of the File System Archivingtask.
See “Configuring the deletion of files on placeholder deletion for EMC Celerra/VNXdevices” on page 96.
Configuring the deletion of archived files onplaceholder deletion forWindows file servers andNetApp filers
Use the following procedure to configure the deletion of archived files whenplaceholders are deleted, for Windows file servers and NetApp filers.
Note that Enterprise Vault does not delete the archived files in the followingcircumstances:
■ For NTFS volumes on which pass-through recall is enabled. This combinationof settings can result in data loss.
■ If the archiving policy applies a retention category with the setting Prevent userdeletion of items with this category selected.
■ For NetApp filers that run Data ONTAP 8.2 (C-Mode), if the path to the folderthat contains the placeholder exceeds 512 characters. This path length limit isdue to a NetApp Data ONTAP 8.2 FPolicy restriction.
95Configuring the deletion of archived files on placeholder deletionConfiguring the deletion of archived files on placeholder deletion for Windows file servers and NetApp filers

To configure deletion of archived files on placeholder deletion for Windowsfile servers and NetApp filers
1 Select the Delete archived file option on the Delete Placeholder tab of thefile server's properties.
2 We recommend that you specify a safety folder when you use the Deletearchived file option. An archived item is not deleted if its placeholder is deletedfrom a safety folder. On the Delete Placeholder tab, specify the folders to useas safety folders.
A safety folder is useful when a user deletes a file accidentally. You can restorefiles temporarily from backups to the safety folder so that the user can find thefile. The user can delete placeholders from the safety folder without deletingthe corresponding archived items.
3 Where required in your file archiving policies, check Delete archived file whenplaceholder is deleted on the Shortcuts tab.
Note: Enterprise Vault does not act on the changes to this setting until it updatesthe DOD cache.
See “About configuring the deletion of archived files on placeholder deletion”on page 93.
Configuring the deletion of files on placeholderdeletion for EMC Celerra/VNX devices
Use the following procedure to configure the deletion of archived files whenplaceholders are deleted, for EMC Celerra and VNX devices.
Note: Do not configure this option for Celerra/VNX devices if you configure thepass-through setting on the Celerra/VNX device. The combination of these optionscan result in data loss.
Enterprise Vault does not delete the archived files if the archiving policy applies aretention category with the setting Prevent user deletion of items with thiscategory selected.
96Configuring the deletion of archived files on placeholder deletionConfiguring the deletion of files on placeholder deletion for EMC Celerra/VNX devices

To configure deletion of archived files on placeholder deletion for EMCCelerra/VNX devices
1 Configure a target volume under the target Celerra/VNX device whose sharepoints to the root of the file system.
2 Apply an archiving policy to the root volume in which the setting Deletearchived file when placeholder is deleted is selected on the Shortcuts tab.
Note that this root volume policy setting controls the deletion of archived fileson placeholder deletion for all of the Celerra/VNX file system:
■ If you configure any additional target volumes that point to specific foldersin the same Celerra/VNX file system, Enterprise Vault ignores the policysetting that applies to the folder volume.
■ Enterprise Vault ignores the "Delete archived file when placeholder isdeleted" policy setting in any folder policies that apply to target folders.
3 Enable FileMover logging on the Celerra/VNX device. Logging must be enabledfor file deletion to work. You can test whether logging is enabled from the EMCCelerra tab in the properties of the Celerra/VNX target volume.
Note: Enterprise Vault performs archived file deletion for all of the placeholderdeletions that are listed in the log. The file deletion occurs even if theplaceholder deletion took place before you applied the "Delete archived filewhen placeholder is deleted" policy setting. If possible, do not enable FileMoverlogging before you apply the policy setting.
4 Set the DeleteOnDelete registry value on the Enterprise Vault server whoseFile System Archiving task processes the root volume.
Set the value as follows:
■ Start the Windows registry editor regedit on the Enterprise Vault server.
■ Find the following registry key:
HKEY_LOCAL_MACHINE
\SOFTWARE
\Wow6432Node
\KVS
\Enterprise Vault
\FSA
\ArchivedFilesFlags
You must create the ArchivedFilesFlags key if it does not exist.
97Configuring the deletion of archived files on placeholder deletionConfiguring the deletion of files on placeholder deletion for EMC Celerra/VNX devices

■ Create a DWORD registry value named DeleteOnDelete under theArchivedFilesFlags key, if this registry value does not already exist.
■ Give DeleteOnDelete a value of 1. This value means “Delete an archivedCelerra/VNX file when its placeholder is deleted”.Alternatively you can turn off Celerra/VNX archived file deletion onplaceholder deletion by setting this value to 0.
■ Save the changes and quit the registry editor.
5 Restart the Enterprise Vault Admin service on the Enterprise Vault server, toactivate the registry change.
6 On the properties of the File System Archiving task, configure the daily deletionschedule for the archived files whose placeholders were deleted.
See “Scheduling the deletion of archived files on placeholder deletion for EMCCelerra/VNX” on page 147.
98Configuring the deletion of archived files on placeholder deletionConfiguring the deletion of files on placeholder deletion for EMC Celerra/VNX devices
Configuring targetvolumes, target folders,and archive points
This chapter includes the following topics:
■ About adding target volumes, target folders, and archive points for FSA
■ Adding a target volume for FSA
■ Adding a target folder and archive points for FSA
■ About managing archive points
■ Archive point properties
■ Effects of modifying, moving, or deleting folders
■ About deleting target folders, volumes, and file servers
About adding target volumes, target folders, andarchive points for FSA
You must add shares on a target file server as target volumes for FSA to process.You can use the New Volume wizard or the New-EVFSAVolume PowerShell cmdletto add a volume.
When you add a target volume, you can specify the following:
■ The vault store to use for the files that are archived from the volume.
■ The File System Archiving task to use to process the volume.
12Chapter
■ The volume policy to apply when files are archived from the volume.
If FSA Reporting is configured, the New Volume wizard also lets you choose whetherto enable FSA Reporting for this volume. For information on FSA Reporting, seethe Reporting guide.
After you add a target volume you must add one or more target folders to controlwhich folders FSA can archive from. You can use the New Folder wizard or theNew-EVFSAFolder PowerShell cmdlet to add a folder.
When you add a target folder the New Folder wizard lets you do the following:
■ Specify the archiving policy to use for the target folder and its subfolders.
■ Create an archive point for the folder, and for each of its immediate subfolders,if required. Each archive point defines the top of a folder structure that EnterpriseVault archives within a single archive.
To create an archive point at the root of a target volume you can specify a backslash( \ ) as the path to the target folder when you add the target folder.
If you want, you can choose to auto-enable the creation of archive points on theimmediate subfolders of a target folder. The target folder is then referred to as anauto-enabling folder. When the File System Archiving task runs in normal modeit creates archive points for any new subfolders that are immediately below theauto-enabling folder. Auto-enabling can be useful for example when a target foldercontains a subfolder for each user, and you want a separate archive for each user.When you add a subfolder for a new user, the File System Arching task creates anarchive point on the subfolder during the next normal archiving run.
To ensure that an archive does not fill up too quickly you need to consider the sizeof the folder structure below each archive point.
When an archive point is created, it has no archive ID immediately assigned to it.An archive ID is normally assigned on the first occasion that a File System Archivingtask processes the folder. When a File System Archiving task finds an archive pointwith no archive ID or an invalid archive ID it checks the Directory database todetermine whether any archive IDs are already associated with the folder path. Ifthe folder path has no associated archive IDs, Enterprise Vault creates an archiveand assigns the archive ID to the archive point. If one or more archives alreadyexist for the folder path, Enterprise Vault assigns the oldest existing archive to thearchive point. In the case where multiple archives exist for a folder path, EnterpriseVault reports this fact.
See “About the checks for existing archives for an FSA folder path” on page 101.
By default the File System Archiving task gives an archive the same name as thefolder to which the archive point applies. The site defaults are used to supply theother attributes of the archive. You can override these defaults if you want.
100Configuring target volumes, target folders, and archive pointsAbout adding target volumes, target folders, and archive points for FSA
About the checks for existing archives for an FSA folder pathUnder some circumstances an FSA folder path can become associated with morethan one archive.
When a File System Archiving task processes a folder that has an archive pointwith no archive ID or an invalid archive ID, it checks the Directory database recordsto determine whether any archive IDs are already associated with the folder path.It then proceeds as follows:
■ If no archive ID is associated with the folder path, Enterprise Vault creates anarchive and assigns the archive ID to the archive point.
■ If one archive ID is associated with the folder path, Enterprise Vault assigns thatarchive ID to the archive point.
■ If more than one archive ID is associated with the folder path, Enterprise Vaultdoes the following:
■ Assigns the archive ID of the oldest existing archive to the archive point.
■ Indicates the existence of multiple archives for the folder path in the FileSystem Archiving task report. The report lists the archive IDs of the multiplearchives, and indicates that the oldest archive will be used for archiving.
■ Generates a warning event with event ID 41484 in the Enterprise Vault eventlog. The event lists the archive IDs of the multiple archives for the folderpath, and indicates that the oldest archive will be used for archiving.
After Enterprise Vault has assigned an archive ID to the archive point, no furtherwarnings are issued about the existence of multiple archives for the folder path.
Note: When Enterprise Vault checks for existing archives for a folder path, thecheck is restricted to the records from vault stores that belong to the EnterpriseVault storage server that hosts the vault store for the target volume.
Adding a target volume for FSAWhen you have added a target file server you must add one or more target volumesfor FSA to process. You can use the New Volume wizard or the New-EVFSAVolumePowerShell cmdlet to add a volume.
If you add an EMC Celerra/VNX volume, note the following:
■ Before you add a target volume for a Celerra/VNX device, ensure that theEnterprise Vault server that archives from the Celerra/VNX has its cache locationconfigured.See “Specifying a cache location for retrieved Celerra/VNX files” on page 66.
101Configuring target volumes, target folders, and archive pointsAdding a target volume for FSA
■ If you use the archiving policy setting "Delete archived file when placeholder isdeleted", some restrictions and requirements apply.See “About configuring the deletion of archived files on placeholder deletion”on page 93.
■ An EMC restriction prevents archiving from a Celerra/VNX device if the path tothe files exceeds 1024 characters.
To add a target volume for FSA
1 If you have not already done so, create at least one File System Archiving task.The New Volume wizard requires a File System Archiving task to assign to thetarget volume. You can configure or change the assigned File System Archivingtask later if required.
See “Adding a File System Archiving task” on page 145.
2 In the Administration Console, expand the Enterprise Vault site until the Targetscontainer is visible.
3 Expand the Targets container.
4 Expand the File Servers container to show the file servers that have beenadded as targets.
5 Right-click the file server to which you want to add a target volume and then,on the shortcut menu, click New and then Volume.
6 Work through the New Volume wizard to add the target volume.
Adding a target folder and archive points for FSAThe Administration Console's New Folder wizard lets you set up file archiving froma folder and its subfolders within a target volume. The New Folder wizard lets youdo the following:
■ Specify the archiving policy to use for the target folder and its subfolders.
■ Create archive points for the folder and its subfolders as required.
You can also use the New-EVFSAFolder PowerShell cmdlet to add a folder.
Note: You can also use the ArchivePoints command-line tool to create and managearchive points. For information, see ArchivePoints in the Utilities manual.
Note: An EMC restriction prevents archiving from a Celerra/VNX device if the pathto the files exceeds 1024 characters.
102Configuring target volumes, target folders, and archive pointsAdding a target folder and archive points for FSA
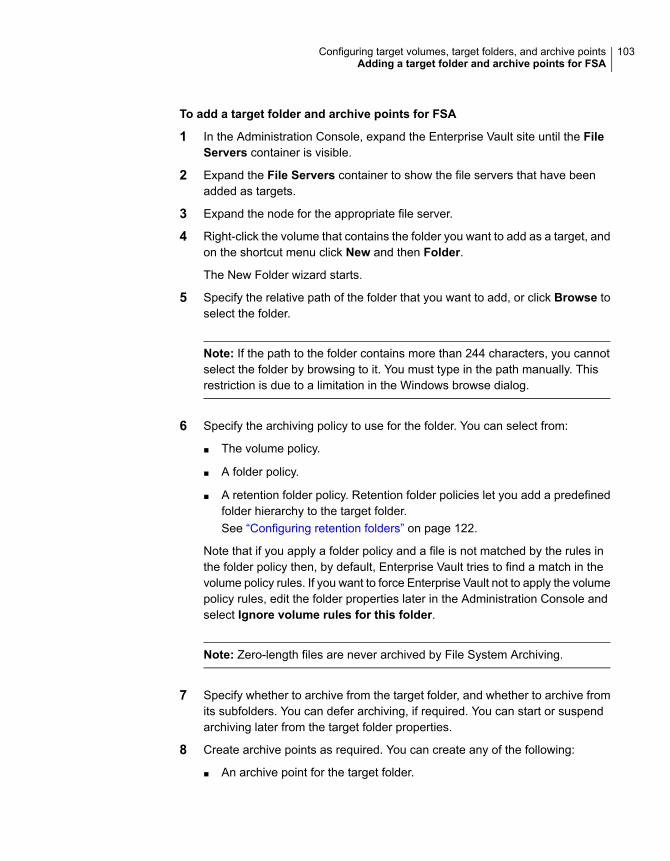
To add a target folder and archive points for FSA
1 In the Administration Console, expand the Enterprise Vault site until the FileServers container is visible.
2 Expand the File Servers container to show the file servers that have beenadded as targets.
3 Expand the node for the appropriate file server.
4 Right-click the volume that contains the folder you want to add as a target, andon the shortcut menu click New and then Folder.
The New Folder wizard starts.
5 Specify the relative path of the folder that you want to add, or click Browse toselect the folder.
Note: If the path to the folder contains more than 244 characters, you cannotselect the folder by browsing to it. You must type in the path manually. Thisrestriction is due to a limitation in the Windows browse dialog.
6 Specify the archiving policy to use for the folder. You can select from:
■ The volume policy.
■ A folder policy.
■ A retention folder policy. Retention folder policies let you add a predefinedfolder hierarchy to the target folder.See “Configuring retention folders” on page 122.
Note that if you apply a folder policy and a file is not matched by the rules inthe folder policy then, by default, Enterprise Vault tries to find a match in thevolume policy rules. If you want to force Enterprise Vault not to apply the volumepolicy rules, edit the folder properties later in the Administration Console andselect Ignore volume rules for this folder.
Note: Zero-length files are never archived by File System Archiving.
7 Specify whether to archive from the target folder, and whether to archive fromits subfolders. You can defer archiving, if required. You can start or suspendarchiving later from the target folder properties.
8 Create archive points as required. You can create any of the following:
■ An archive point for the target folder.
103Configuring target volumes, target folders, and archive pointsAdding a target folder and archive points for FSA

■ An archive point for each immediate subfolder of the target folder. A newarchive will be created for each existing immediate subfolder. If you havemany folders to enable, this option may be easier than running the NewFolder wizard many times.
■ An archive point for each immediate subfolder of the target folder, and fornew immediate subfolders when they are created. The target folder isreferred to as an auto-enabling folder.If you choose this option, make sure that there is no archive point on anyof the parent folders, or on the volume.
■ No archive point. This option enables you to use the same archive as forhigher-level folders, but to choose a different archiving policy for the targetfolder.
If you choose either of the first two options, you can set the initial propertiesof the archive points if required. Otherwise, Enterprise Vault uses the defaultvalues when it creates the archives. To set the archive point properties clickProperties.
See “Archive point properties” on page 106.
Note: If you create an auto-enabling folder, you cannot set the initial propertiesof the archive points. Enterprise Vault uses the default values.
About managing archive pointsYou can manage FSA archive points from the Administration Console.
See “Viewing, editing, or deleting archive points in the Administration Console”on page 105.
You can also manage archive points by using the ArchivePoints command-lineutility. For information on how to use the ArchivePoints utility to create, delete, list,and update archive points, see ArchivePoints in the Utilities guide.
You can get a list of archive points by processing a file server or a target volumewith a File System Archiving task in Report Mode. The report lists all the archivepoints on the server or the volume.
See “About File System Archiving task reports” on page 151.
104Configuring target volumes, target folders, and archive pointsAbout managing archive points
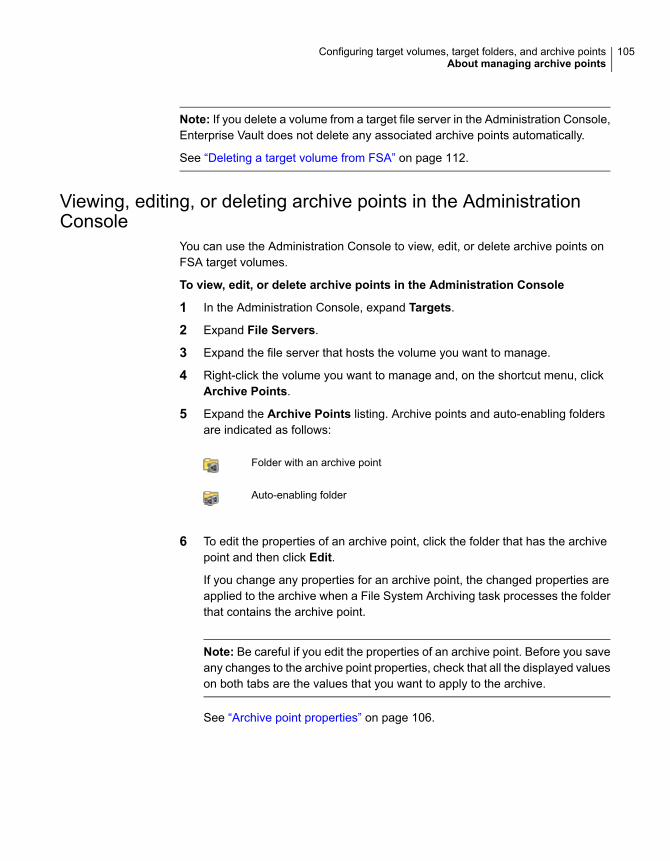
Note: If you delete a volume from a target file server in the Administration Console,Enterprise Vault does not delete any associated archive points automatically.
See “Deleting a target volume from FSA” on page 112.
Viewing, editing, or deleting archive points in the AdministrationConsole
You can use the Administration Console to view, edit, or delete archive points onFSA target volumes.
To view, edit, or delete archive points in the Administration Console
1 In the Administration Console, expand Targets.
2 Expand File Servers.
3 Expand the file server that hosts the volume you want to manage.
4 Right-click the volume you want to manage and, on the shortcut menu, clickArchive Points.
5 Expand the Archive Points listing. Archive points and auto-enabling foldersare indicated as follows:
Folder with an archive point
Auto-enabling folder
6 To edit the properties of an archive point, click the folder that has the archivepoint and then click Edit.
If you change any properties for an archive point, the changed properties areapplied to the archive when a File System Archiving task processes the folderthat contains the archive point.
Note: Be careful if you edit the properties of an archive point. Before you saveany changes to the archive point properties, check that all the displayed valueson both tabs are the values that you want to apply to the archive.
See “Archive point properties” on page 106.
105Configuring target volumes, target folders, and archive pointsAbout managing archive points
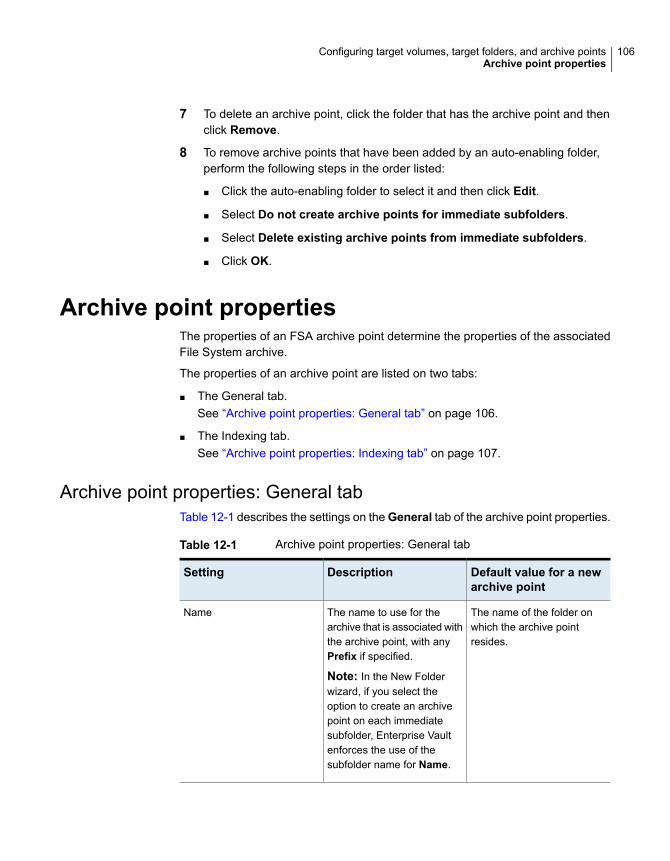
7 To delete an archive point, click the folder that has the archive point and thenclick Remove.
8 To remove archive points that have been added by an auto-enabling folder,perform the following steps in the order listed:
■ Click the auto-enabling folder to select it and then click Edit.
■ Select Do not create archive points for immediate subfolders.
■ Select Delete existing archive points from immediate subfolders.
■ Click OK.
Archive point propertiesThe properties of an FSA archive point determine the properties of the associatedFile System archive.
The properties of an archive point are listed on two tabs:
■ The General tab.See “Archive point properties: General tab” on page 106.
■ The Indexing tab.See “Archive point properties: Indexing tab” on page 107.
Archive point properties: General tabTable 12-1 describes the settings on the General tab of the archive point properties.
Table 12-1 Archive point properties: General tab
Default value for a newarchive point
DescriptionSetting
The name of the folder onwhich the archive pointresides.
The name to use for thearchive that is associated withthe archive point, with anyPrefix if specified.
Note: In the New Folderwizard, if you select theoption to create an archivepoint on each immediatesubfolder, Enterprise Vaultenforces the use of thesubfolder name for Name.
Name
106Configuring target volumes, target folders, and archive pointsArchive point properties
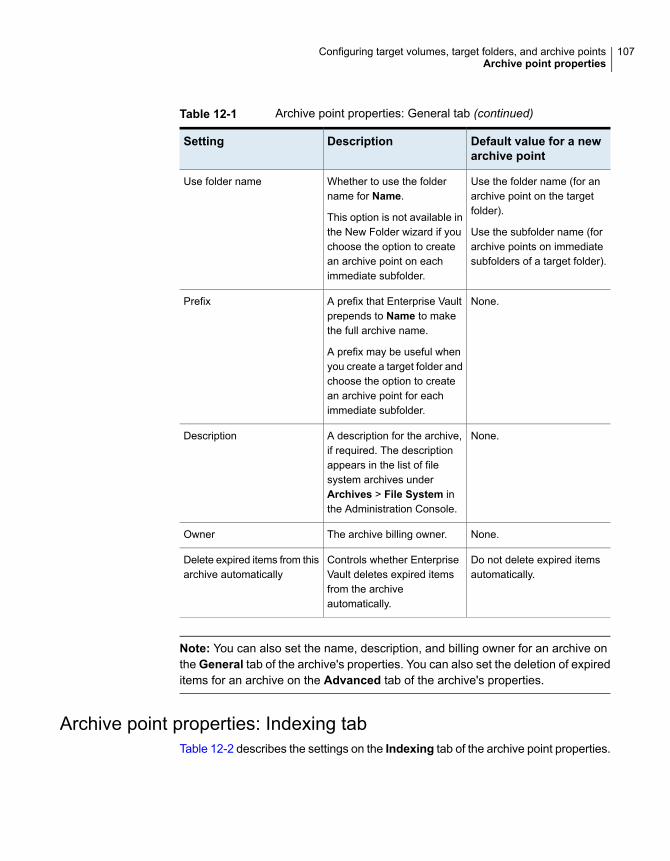
Table 12-1 Archive point properties: General tab (continued)
Default value for a newarchive point
DescriptionSetting
Use the folder name (for anarchive point on the targetfolder).
Use the subfolder name (forarchive points on immediatesubfolders of a target folder).
Whether to use the foldername for Name.
This option is not available inthe New Folder wizard if youchoose the option to createan archive point on eachimmediate subfolder.
Use folder name
None.A prefix that Enterprise Vaultprepends to Name to makethe full archive name.
A prefix may be useful whenyou create a target folder andchoose the option to createan archive point for eachimmediate subfolder.
Prefix
None.A description for the archive,if required. The descriptionappears in the list of filesystem archives underArchives > File System inthe Administration Console.
Description
None.The archive billing owner.Owner
Do not delete expired itemsautomatically.
Controls whether EnterpriseVault deletes expired itemsfrom the archiveautomatically.
Delete expired items from thisarchive automatically
Note: You can also set the name, description, and billing owner for an archive onthe General tab of the archive's properties. You can also set the deletion of expireditems for an archive on the Advanced tab of the archive's properties.
Archive point properties: Indexing tabTable 12-2 describes the settings on the Indexing tab of the archive point properties.
107Configuring target volumes, target folders, and archive pointsArchive point properties
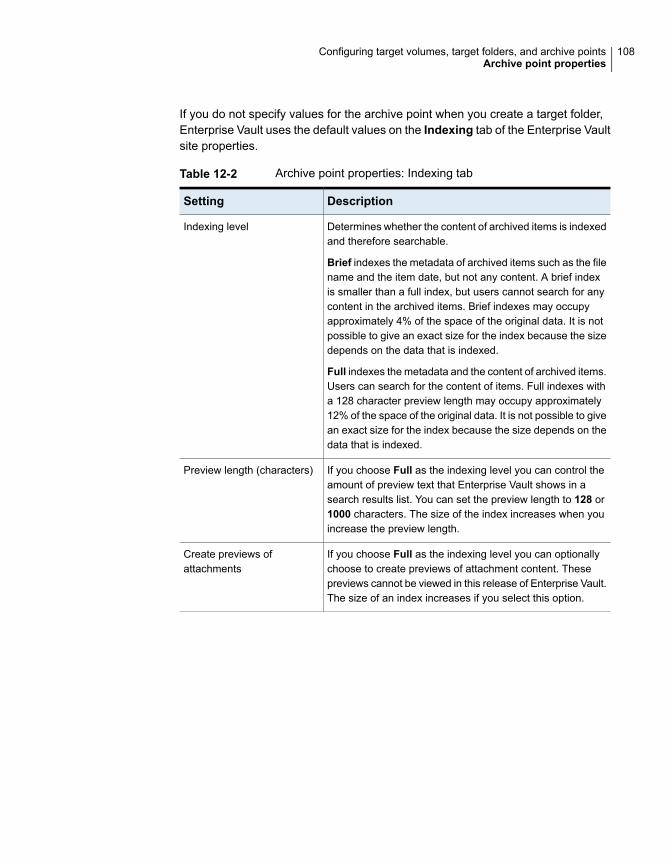
If you do not specify values for the archive point when you create a target folder,Enterprise Vault uses the default values on the Indexing tab of the Enterprise Vaultsite properties.
Table 12-2 Archive point properties: Indexing tab
DescriptionSetting
Determines whether the content of archived items is indexedand therefore searchable.
Brief indexes the metadata of archived items such as the filename and the item date, but not any content. A brief indexis smaller than a full index, but users cannot search for anycontent in the archived items. Brief indexes may occupyapproximately 4% of the space of the original data. It is notpossible to give an exact size for the index because the sizedepends on the data that is indexed.
Full indexes the metadata and the content of archived items.Users can search for the content of items. Full indexes witha 128 character preview length may occupy approximately12% of the space of the original data. It is not possible to givean exact size for the index because the size depends on thedata that is indexed.
Indexing level
If you choose Full as the indexing level you can control theamount of preview text that Enterprise Vault shows in asearch results list. You can set the preview length to 128 or1000 characters. The size of the index increases when youincrease the preview length.
Preview length (characters)
If you choose Full as the indexing level you can optionallychoose to create previews of attachment content. Thesepreviews cannot be viewed in this release of Enterprise Vault.The size of an index increases if you select this option.
Create previews ofattachments
108Configuring target volumes, target folders, and archive pointsArchive point properties

Table 12-2 Archive point properties: Indexing tab (continued)
DescriptionSetting
Select this option if you do not want Enterprise Vault to indexfiles as they are archived. Deferral of indexing can be usefulif you want to archive files as quickly as possible. However,because the archived files are not indexed, you cannot usethe Enterprise Vault Search application to search them. Inaddition, the HTML preview of items in Enterprise VaultSearch is not available.
If indexing is currently deferred for an archive point and youwant to start indexing, clear Defer indexing. Enterprise Vaultthen performs an automatic rebuild of the index when thenext item is added to the archive or deleted from the archive.The rebuild indexes all the items in the archive, but it doesnot create HTML previews of previously archived items.
Defer indexing
Note: You can also set the Indexing properties except for Defer Indexing on theIndexing tab of the File System archive's properties. To defer indexing or to canceldeferred indexing, you must edit the archive point properties.
Effects of modifying, moving, or deleting foldersYou need to be aware of the effects of deleting, renaming, moving, or copyingfolders to which you have assigned folder policies or archive points.
■ See “Effects of modifying folders with folder policies” on page 109.
■ See “Effects of modifying folders with archive points” on page 110.
Effects of modifying folders with folder policiesTable 12-3 describes the effects of deleting, renaming, moving, or copying a folderto which you have assigned a folder policy.
109Configuring target volumes, target folders, and archive pointsEffects of modifying, moving, or deleting folders
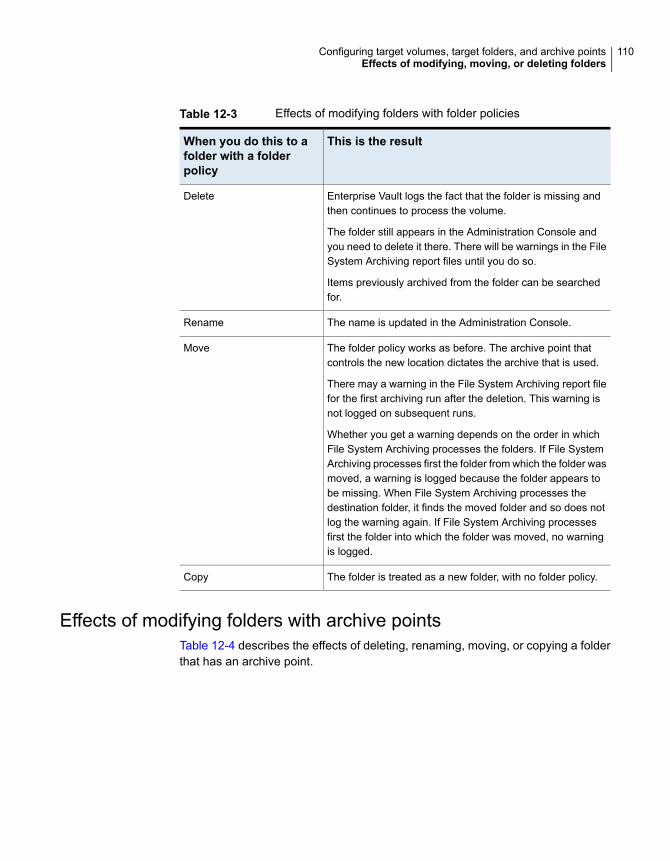
Table 12-3 Effects of modifying folders with folder policies
This is the resultWhen you do this to afolder with a folderpolicy
Enterprise Vault logs the fact that the folder is missing andthen continues to process the volume.
The folder still appears in the Administration Console andyou need to delete it there. There will be warnings in the FileSystem Archiving report files until you do so.
Items previously archived from the folder can be searchedfor.
Delete
The name is updated in the Administration Console.Rename
The folder policy works as before. The archive point thatcontrols the new location dictates the archive that is used.
There may a warning in the File System Archiving report filefor the first archiving run after the deletion. This warning isnot logged on subsequent runs.
Whether you get a warning depends on the order in whichFile System Archiving processes the folders. If File SystemArchiving processes first the folder from which the folder wasmoved, a warning is logged because the folder appears tobe missing. When File System Archiving processes thedestination folder, it finds the moved folder and so does notlog the warning again. If File System Archiving processesfirst the folder into which the folder was moved, no warningis logged.
Move
The folder is treated as a new folder, with no folder policy.Copy
Effects of modifying folders with archive pointsTable 12-4 describes the effects of deleting, renaming, moving, or copying a folderthat has an archive point.
110Configuring target volumes, target folders, and archive pointsEffects of modifying, moving, or deleting folders
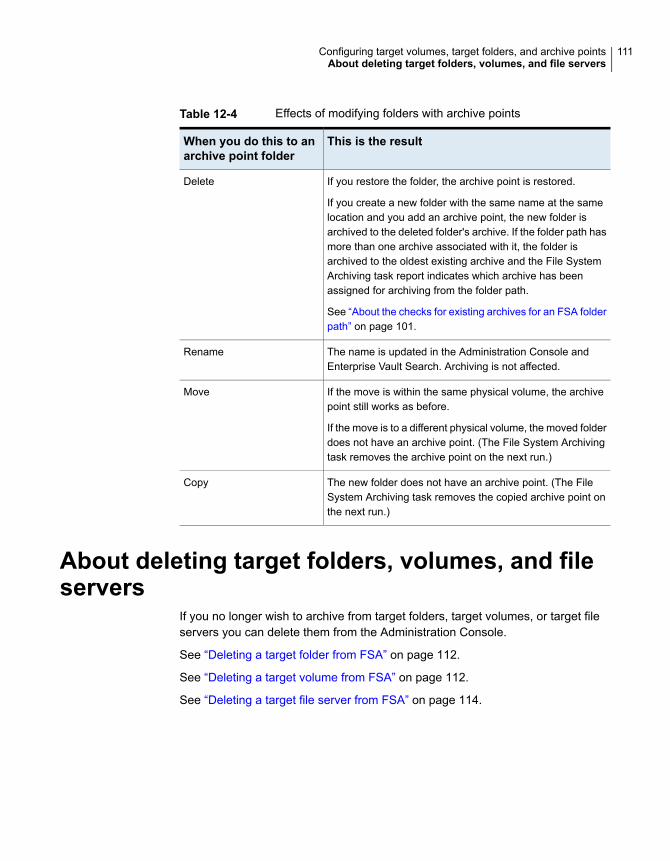
Table 12-4 Effects of modifying folders with archive points
This is the resultWhen you do this to anarchive point folder
If you restore the folder, the archive point is restored.
If you create a new folder with the same name at the samelocation and you add an archive point, the new folder isarchived to the deleted folder's archive. If the folder path hasmore than one archive associated with it, the folder isarchived to the oldest existing archive and the File SystemArchiving task report indicates which archive has beenassigned for archiving from the folder path.
See “About the checks for existing archives for an FSA folderpath” on page 101.
Delete
The name is updated in the Administration Console andEnterprise Vault Search. Archiving is not affected.
Rename
If the move is within the same physical volume, the archivepoint still works as before.
If the move is to a different physical volume, the moved folderdoes not have an archive point. (The File System Archivingtask removes the archive point on the next run.)
Move
The new folder does not have an archive point. (The FileSystem Archiving task removes the copied archive point onthe next run.)
Copy
About deleting target folders, volumes, and fileservers
If you no longer wish to archive from target folders, target volumes, or target fileservers you can delete them from the Administration Console.
See “Deleting a target folder from FSA” on page 112.
See “Deleting a target volume from FSA” on page 112.
See “Deleting a target file server from FSA” on page 114.
111Configuring target volumes, target folders, and archive pointsAbout deleting target folders, volumes, and file servers
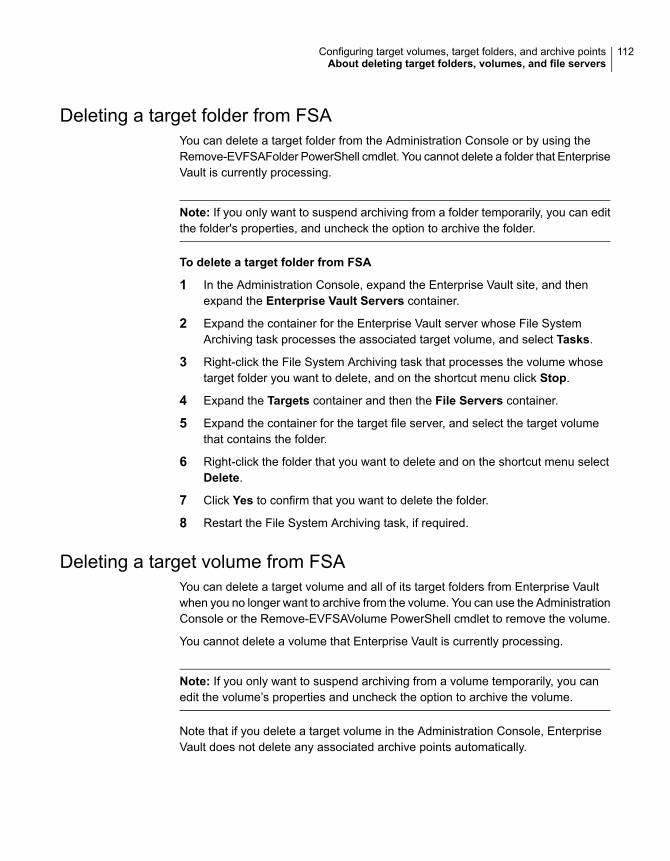
Deleting a target folder from FSAYou can delete a target folder from the Administration Console or by using theRemove-EVFSAFolder PowerShell cmdlet. You cannot delete a folder that EnterpriseVault is currently processing.
Note: If you only want to suspend archiving from a folder temporarily, you can editthe folder's properties, and uncheck the option to archive the folder.
To delete a target folder from FSA
1 In the Administration Console, expand the Enterprise Vault site, and thenexpand the Enterprise Vault Servers container.
2 Expand the container for the Enterprise Vault server whose File SystemArchiving task processes the associated target volume, and select Tasks.
3 Right-click the File System Archiving task that processes the volume whosetarget folder you want to delete, and on the shortcut menu click Stop.
4 Expand the Targets container and then the File Servers container.
5 Expand the container for the target file server, and select the target volumethat contains the folder.
6 Right-click the folder that you want to delete and on the shortcut menu selectDelete.
7 Click Yes to confirm that you want to delete the folder.
8 Restart the File System Archiving task, if required.
Deleting a target volume from FSAYou can delete a target volume and all of its target folders from Enterprise Vaultwhen you no longer want to archive from the volume. You can use the AdministrationConsole or the Remove-EVFSAVolume PowerShell cmdlet to remove the volume.
You cannot delete a volume that Enterprise Vault is currently processing.
Note: If you only want to suspend archiving from a volume temporarily, you canedit the volume’s properties and uncheck the option to archive the volume.
Note that if you delete a target volume in the Administration Console, EnterpriseVault does not delete any associated archive points automatically.
112Configuring target volumes, target folders, and archive pointsAbout deleting target folders, volumes, and file servers

If you do not delete the archive points and then you re-add the volume for archiving,Enterprise Vault uses the existing archive points, which remain associated with theoriginal vault store.
This can result in the following scenario:
■ You configure a volume for archiving, and specify that the volume is to use vaultstore 1.
■ When Enterprise Vault archives from the volume, it associates the archive pointswith vault store 1.
■ You then remove the volume from Enterprise Vault, without deleting the archivepoints.
■ You add the volume for archiving again, but you specify that the volume is touse vault store 2.
■ Enterprise Vault continues to archive any files under the original archive pointsto vault store 1.
■ If you add a folder under one of the original archive points, the folder is archivedto vault store 1, not vault store 2.
If required, delete the target volume's archive points before you delete the targetvolume.
See “About managing archive points” on page 104.
To delete a target volume from FSA
1 In the Administration Console, expand the Enterprise Vault site, and thenexpand the Enterprise Vault Servers container.
2 Expand the container for the Enterprise Vault server whose File SystemArchiving task processes the target volume, and select Tasks.
3 Right-click the File System Archiving task that processes the volume, and onthe shortcut menu click Stop.
4 Expand the Targets container and then the File Servers container.
5 Expand the container for the target file server, and select the target volumethat you want to delete.
6 On the shortcut menu select Delete.
7 Enterprise Vault displays a warning that deleting the volume deletes all itstarget folders.
Click Yes to confirm that you want to delete the volume.
113Configuring target volumes, target folders, and archive pointsAbout deleting target folders, volumes, and file servers
8 After Enterprise Vault has deleted the target volume you may need to refreshthe container for the file server before Enterprise Vault no longer displays thetarget volume.
If necessary, right-click the container for the file server and select Refresh.
9 Restart the File System Archiving task, if required.
Deleting a target file server from FSAYou can delete a target file server from Enterprise Vault if you no longer want FSAto process it. Note that deleting a target file server does not delete files or archivedfiles; it merely removes the target file server from the Administration Console. Youcan use the Administration Console or the Remove-EVFSAFileServer PowerShellcmdlet to remove the file server.
Note that if you want only to suspend archiving from a file server temporarily, youcan do either of the following:
■ Edit the target file server's properties, and uncheck the option to archive the fileserver.
■ Stop the File System Archiving tasks that process the file server. If the tasksprocess other file servers this action also stops archiving from those file servers.
You cannot delete a file server that Enterprise Vault is currently processing.
To delete a target file server from FSA
1 In the Administration Console, delete all the target volumes from the target fileserver.
See “Deleting a target volume from FSA” on page 112.
2 In the File Servers container, right-click the target file server that you want todelete and then, on the shortcut menu, click Delete.
3 Click Yes to confirm that you want to delete the file server.
114Configuring target volumes, target folders, and archive pointsAbout deleting target folders, volumes, and file servers
Configuring pass-throughrecall for placeholdershortcuts
This chapter includes the following topics:
■ About configuring pass-through recall for placeholder shortcuts
■ Configuring pass-through recall for a Windows file server
■ Configuring pass-through recall for a NetApp filer
About configuring pass-through recall forplaceholder shortcuts
This section describes the configuration of pass-through recall of placeholdershortcuts on Windows file servers, and for read-only file systems on NetApp filersthat run Data ONTAP 8.0 or later.
Note: Due to a NetApp restriction, pass-through is not supported on Data ONTAP8.2 C-Mode.
For EMC Celerra/VNX devices, Enterprise Vault supports the Celerra/VNXpass-through facility.
See “Configuring Celerra/VNX pass-through behavior for placeholder shortcuts”on page 59.
Note the following:
13Chapter
■ Pass-through recall is ignored for read-write file systems on NetApp filers.
■ FSA ignores the volume policy and folder policy setting Delete archived filewhen placeholder is deleted for NTFS target volumes on which pass-throughrecall is enabled.
Pass-through recall uses a disk cache to help reduce recall times for large files.When you configure pass-through recall you must specify a location for the diskcache:
■ For Windows file servers you must specify a location on the file server.
■ For NetApp filers you must specify a location on the Enterprise Vault server.
A set of pass-through recall registry values enables you to specify the following forWindows file servers:
■ The maximum recall rate for pass-through recall. By default, no maximum rateis applied. If you set a maximum rate you can bypass the limit for administrators,if you want.
■ A list of programs that are prohibited from receiving files by pass-through recall.By default, no programs are prohibited.
Configuring pass-through recall for a Windowsfile server
Configure pass-through recall for a Windows file server as follows.
Note: Some additional instructions apply for clustered file servers.
See “About configuring pass-through recall for a file server cluster” on page 117.
To configure pass-through recall for a Windows file server
1 Ensure that the FSA Agent is installed on the file server.
See “About installing the FSA Agent on a Windows file server” on page 78.
2 In the Administration Console, expand the Enterprise Vault site until the Targetscontainer is visible.
3 Expand the Targets container, and then expand the File Servers container
4 Right-click the Windows file server for which you want to configure pass-throughrecall and then, on the shortcut menu, click Properties.
The settings for pass-through recall are on the file server properties Generaltab.
116Configuring pass-through recall for placeholder shortcutsConfiguring pass-through recall for a Windows file server
5 Select Configure pass-through recall.
6 Enter a location on the file server for the disk cache that Enterprise Vault useswhen it recalls files. We recommend that you specify a location on ahigh-performance disk. The Vault Service account must have write permissionon the folder.
7 Select a disk cache size. Typically there is little benefit in increasing the cachesize from its default setting.
8 Click OK to save the changes to the file server's properties.
9 Enable pass-through recall for each existing volume on the file server on whichyou want to use this feature. Select Enable pass-through recall on theGeneral tab of the volume's properties.
Note: If you add new volumes for archiving on the file server, Enterprise Vaultdoes not enable them for pass-through recall. You must enable new volumesfor pass-through recall manually, if required.
Note: Enterprise Vault trims the pass-through recall disk cache automatically whenthe disk cache becomes full. If you want to trim the cache manually, you must firststop the Enterprise Vault Placeholder service on the Windows file server. Rememberto restart the Placeholder service when you have finished deleting files from thecache.
You can use registry values to set a pass-through recall rate, or to prohibit programsfrom receiving files by pass-through recall.
See “Registry values for pass-through recall on Windows file servers” on page 118.
About configuring pass-through recall for a file server clusterNote that if you configure pass-through recall for a file server cluster, all the clusternodes must use identical pass-through recall settings.
In the file server properties for the target virtual file server, make sure that thepass-through recall settings are configured as follows:
■ The "Configure pass-through recall" setting is checked.
■ The disk cache location is a local path such as C:\FSACacheFolder. This pathmust be valid for a local disk on each cluster node.
117Configuring pass-through recall for placeholder shortcutsConfiguring pass-through recall for a Windows file server
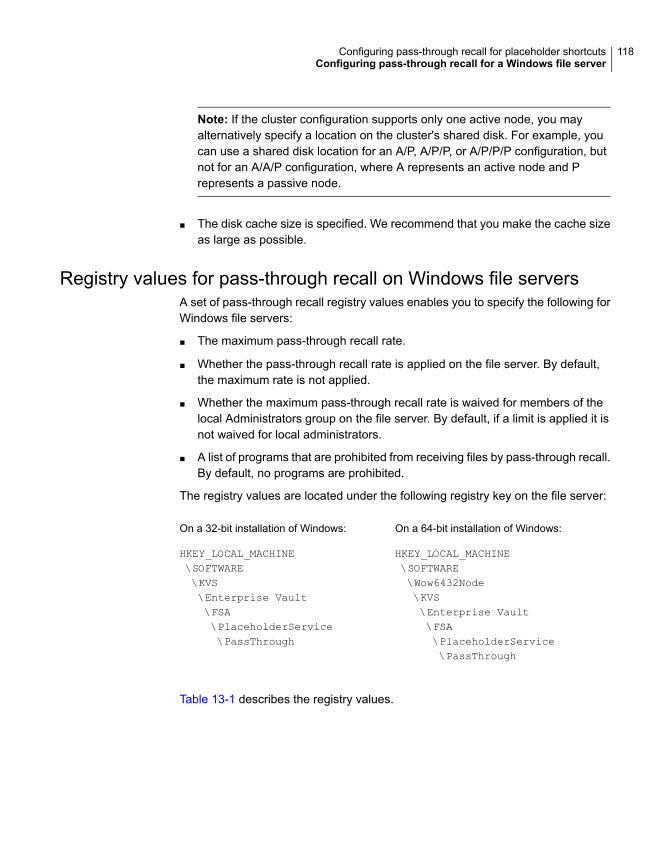
Note: If the cluster configuration supports only one active node, you mayalternatively specify a location on the cluster's shared disk. For example, youcan use a shared disk location for an A/P, A/P/P, or A/P/P/P configuration, butnot for an A/A/P configuration, where A represents an active node and Prepresents a passive node.
■ The disk cache size is specified. We recommend that you make the cache sizeas large as possible.
Registry values for pass-through recall on Windows file serversA set of pass-through recall registry values enables you to specify the following forWindows file servers:
■ The maximum pass-through recall rate.
■ Whether the pass-through recall rate is applied on the file server. By default,the maximum rate is not applied.
■ Whether the maximum pass-through recall rate is waived for members of thelocal Administrators group on the file server. By default, if a limit is applied it isnot waived for local administrators.
■ A list of programs that are prohibited from receiving files by pass-through recall.By default, no programs are prohibited.
The registry values are located under the following registry key on the file server:
On a 64-bit installation of Windows:
HKEY_LOCAL_MACHINE\SOFTWARE\Wow6432Node\KVS\Enterprise Vault\FSA\PlaceholderService\PassThrough
On a 32-bit installation of Windows:
HKEY_LOCAL_MACHINE\SOFTWARE\KVS\Enterprise Vault\FSA\PlaceholderService\PassThrough
Table 13-1 describes the registry values.
118Configuring pass-through recall for placeholder shortcutsConfiguring pass-through recall for a Windows file server
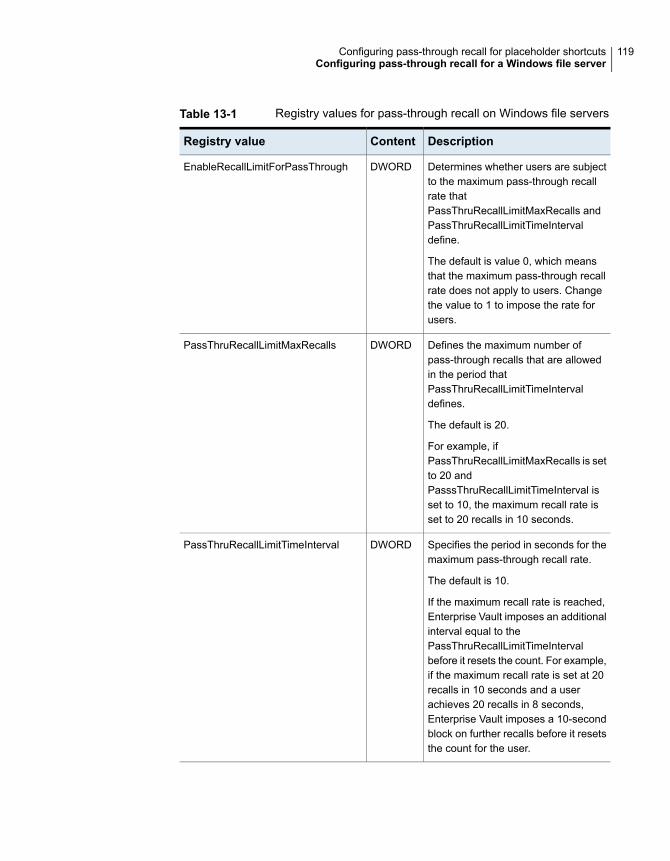
Table 13-1 Registry values for pass-through recall on Windows file servers
DescriptionContentRegistry value
Determines whether users are subjectto the maximum pass-through recallrate thatPassThruRecallLimitMaxRecalls andPassThruRecallLimitTimeIntervaldefine.
The default is value 0, which meansthat the maximum pass-through recallrate does not apply to users. Changethe value to 1 to impose the rate forusers.
DWORDEnableRecallLimitForPassThrough
Defines the maximum number ofpass-through recalls that are allowedin the period thatPassThruRecallLimitTimeIntervaldefines.
The default is 20.
For example, ifPassThruRecallLimitMaxRecalls is setto 20 andPasssThruRecallLimitTimeInterval isset to 10, the maximum recall rate isset to 20 recalls in 10 seconds.
DWORDPassThruRecallLimitMaxRecalls
Specifies the period in seconds for themaximum pass-through recall rate.
The default is 10.
If the maximum recall rate is reached,Enterprise Vault imposes an additionalinterval equal to thePassThruRecallLimitTimeIntervalbefore it resets the count. For example,if the maximum recall rate is set at 20recalls in 10 seconds and a userachieves 20 recalls in 8 seconds,Enterprise Vault imposes a 10-secondblock on further recalls before it resetsthe count for the user.
DWORDPassThruRecallLimitTimeInterval
119Configuring pass-through recall for placeholder shortcutsConfiguring pass-through recall for a Windows file server

Table 13-1 Registry values for pass-through recall on Windows file servers(continued)
DescriptionContentRegistry value
Determines whether members of thelocal Administrators group on the fileserver are subject to the maximumpass-through recall rate. This settingapplies only ifEnableRecallLimitForPassThrough isset to 1.
The default is value 0, which meansthat the rate limit applies to localadministrators. Change the value to 1to waive the rate limit for localadministrators.
DWORDBypassPassThruRecallLimitsForAdmins
Specifies a list of programs that areprohibited from receiving archiveditems by pass-through recall. Separateeach program in the list with asemicolon.
StringExcludedExes
For more information on the registry values for pass-through recall on Windows fileservers, see the Registry Values manual.
Configuring pass-through recall for a NetApp filerConfigure pass-through recall for a NetApp filer as follows.
Note: For NetApp filers the pass-through recall feature works only with read-onlyfile systems. Pass-through recall is ignored for read-write file systems. Additionally,due to a NetApp restriction pass-through is not supported for Data ONTAP 8.2C-Mode.
To configure pass-through recall for a NetApp filer
1 In the Administration Console, expand the Enterprise Vault site until the Targetscontainer is visible.
2 Expand the Targets container, and then expand the File Servers container.
120Configuring pass-through recall for placeholder shortcutsConfiguring pass-through recall for a NetApp filer

3 Right-click the NetApp filer for which you want to configure pass-through recalland then, on the shortcut menu, click Properties.
The settings for pass-through recall are on the General tab of the file serverproperties.
4 Select Configure pass-through recall.
5 Click OK to save the changes to the file server's properties.
6 Ensure that a disk cache location is configured on the Enterprise Vault serverwhose File System Archiving task manages the archiving from the NetApp filer.
The cache is used when the files are retrieved from the NetApp filer.
See “To configure the cache location on the Enterprise Vault server”on page 121.
To configure the cache location on the Enterprise Vault server
1 In the Administration Console, expand the Enterprise Vault site until theEnterprise Vault Servers container is visible.
2 Expand the Enterprise Vault Servers container.
3 Right-click the Enterprise Vault server whose File System Archiving taskmanages the archiving from the NetApp filer. Then on the shortcut menu, clickProperties.
4 Click the Cache tab.
5 Under Cache Location, enter an existing path on the Enterprise Vault serverfor the cache. The Vault Service account must have read and write access tothe location.
For more information on configuring the cache, click Help on the Cache tab.
Note: If the Enterprise Vault server archives from an EMC Celerra/VNX device,this cache location is also used for retrieved Celerra/VNX files.
121Configuring pass-through recall for placeholder shortcutsConfiguring pass-through recall for a NetApp filer
Configuring and managingretention folders
This chapter includes the following topics:
■ Configuring retention folders
■ About assigning a retention folder policy using the Command Line Interface(CLI)
■ Managing retention folders
Configuring retention foldersThe retention folder feature enables you to create single folders or a hierarchy offolders automatically on file servers, to be managed by Enterprise Vault and archivedaccording to assigned policies.
See “About retention folders” on page 29.
You can configure retention folders using the Administration Console. Theconfiguration steps are as follows:
■ Make sure that you have a suitable folder policy to use as the default folderpolicy for the retention folders. Create a suitable folder policy if required.See “Creating FSA volume policies and folder policies” on page 85.
■ Create a retention folder policy to define the hierarchy of folders to be createdon the FSA target, and the folder policy to use on each retention folder.See “Creating a retention folder policy” on page 123.
■ Add the FSA target folder under which you want the retention folders created,assign the retention folder policy, and specify where archive points are to becreated.
14Chapter
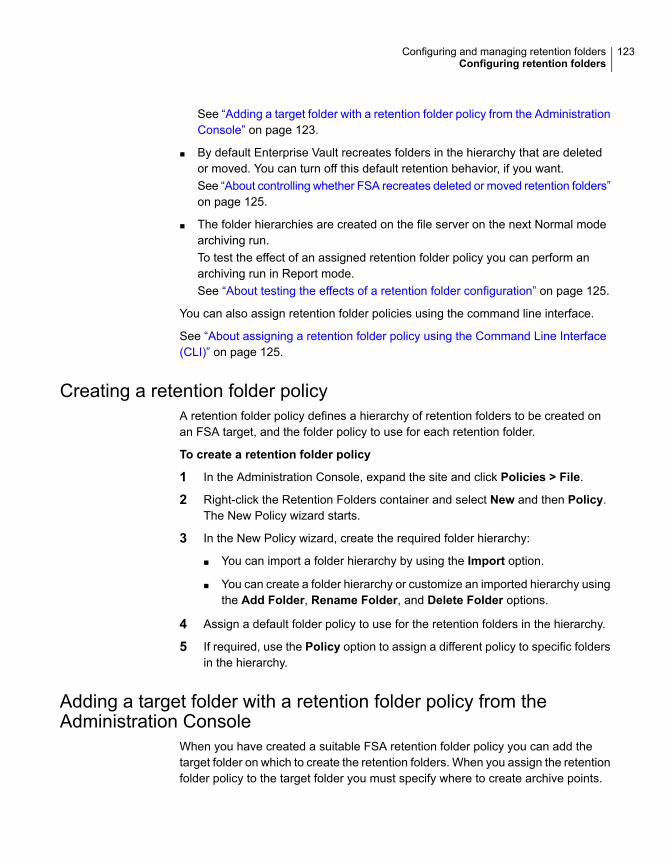
See “Adding a target folder with a retention folder policy from the AdministrationConsole” on page 123.
■ By default Enterprise Vault recreates folders in the hierarchy that are deletedor moved. You can turn off this default retention behavior, if you want.See “About controlling whether FSA recreates deleted or moved retention folders”on page 125.
■ The folder hierarchies are created on the file server on the next Normal modearchiving run.To test the effect of an assigned retention folder policy you can perform anarchiving run in Report mode.See “About testing the effects of a retention folder configuration” on page 125.
You can also assign retention folder policies using the command line interface.
See “About assigning a retention folder policy using the Command Line Interface(CLI)” on page 125.
Creating a retention folder policyA retention folder policy defines a hierarchy of retention folders to be created onan FSA target, and the folder policy to use for each retention folder.
To create a retention folder policy
1 In the Administration Console, expand the site and click Policies > File.
2 Right-click the Retention Folders container and select New and then Policy.The New Policy wizard starts.
3 In the New Policy wizard, create the required folder hierarchy:
■ You can import a folder hierarchy by using the Import option.
■ You can create a folder hierarchy or customize an imported hierarchy usingthe Add Folder, Rename Folder, and Delete Folder options.
4 Assign a default folder policy to use for the retention folders in the hierarchy.
5 If required, use the Policy option to assign a different policy to specific foldersin the hierarchy.
Adding a target folder with a retention folder policy from theAdministration Console
When you have created a suitable FSA retention folder policy you can add thetarget folder on which to create the retention folders. When you assign the retentionfolder policy to the target folder you must specify where to create archive points.
123Configuring and managing retention foldersConfiguring retention folders
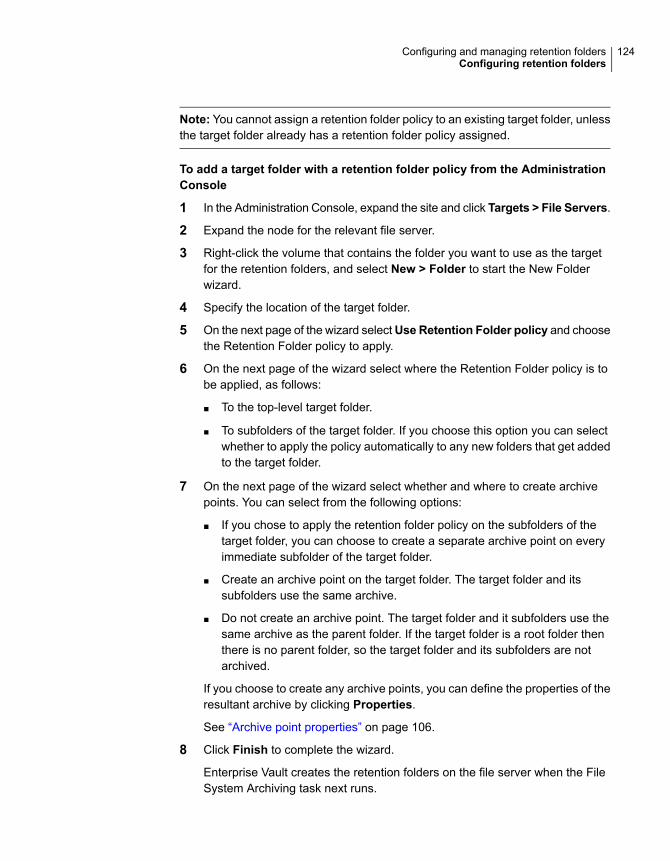
Note: You cannot assign a retention folder policy to an existing target folder, unlessthe target folder already has a retention folder policy assigned.
To add a target folder with a retention folder policy from the AdministrationConsole
1 In the Administration Console, expand the site and click Targets > File Servers.
2 Expand the node for the relevant file server.
3 Right-click the volume that contains the folder you want to use as the targetfor the retention folders, and select New > Folder to start the New Folderwizard.
4 Specify the location of the target folder.
5 On the next page of the wizard selectUse Retention Folder policy and choosethe Retention Folder policy to apply.
6 On the next page of the wizard select where the Retention Folder policy is tobe applied, as follows:
■ To the top-level target folder.
■ To subfolders of the target folder. If you choose this option you can selectwhether to apply the policy automatically to any new folders that get addedto the target folder.
7 On the next page of the wizard select whether and where to create archivepoints. You can select from the following options:
■ If you chose to apply the retention folder policy on the subfolders of thetarget folder, you can choose to create a separate archive point on everyimmediate subfolder of the target folder.
■ Create an archive point on the target folder. The target folder and itssubfolders use the same archive.
■ Do not create an archive point. The target folder and it subfolders use thesame archive as the parent folder. If the target folder is a root folder thenthere is no parent folder, so the target folder and its subfolders are notarchived.
If you choose to create any archive points, you can define the properties of theresultant archive by clicking Properties.
See “Archive point properties” on page 106.
8 Click Finish to complete the wizard.
Enterprise Vault creates the retention folders on the file server when the FileSystem Archiving task next runs.
124Configuring and managing retention foldersConfiguring retention folders

About controlling whether FSA recreates deleted or moved retentionfolders
By default, Enterprise Vault recreates deleted or moved folders in the folder hierarchythat the retention folder policy defines. You can change this default behavior if youwant, so that Enterprise Vault does not recreate these folders.
To change the default behavior, you must create the registry entryApplyRtnPolicyOnlyOnExistingFolders on the Enterprise Vault server that runsthe File System Archiving task. For details, see the description ofApplyRtnPolicyOnlyOnExistingFolders in the Registry Values manual.
About testing the effects of a retention folder configurationAfter you have completed the configuration process for retention folders, EnterpriseVault creates the folder hierarchy on the file server when the File System Archivingtask next runs in Normal mode.
To see what folders will be created by a retention folder policy, you can run the FileSystem Archiving task in Report mode.
See “About File System Archiving task reports” on page 151.
The following retention folder information is included in the File System Archivingtask report:
■ Folders that were created on the file server as a result of a retention folder policy,and the policy that is assigned to each folder.
■ Any errors that occur when processing a retention folder target.
■ Any missing retention folder targets.
About assigning a retention folder policy usingthe Command Line Interface (CLI)
You can assign retention folder policies to FSA target folders using a command-lineinterface.
The CLI executable is Enterprise Vault\RtnFolder.exe.
The command takes the following parameters (include the colon in the parametername):
■ /Policy:policy_name
■ /Target:UNC_path_of_target
■ /Settings:XML_settings_file_name
125Configuring and managing retention foldersAbout assigning a retention folder policy using the Command Line Interface (CLI)
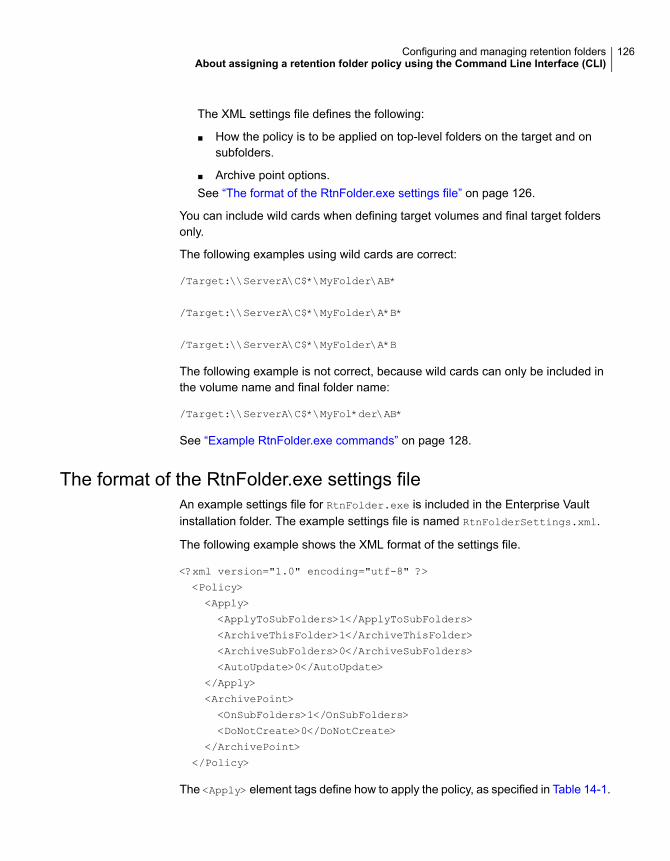
The XML settings file defines the following:
■ How the policy is to be applied on top-level folders on the target and onsubfolders.
■ Archive point options.See “The format of the RtnFolder.exe settings file” on page 126.
You can include wild cards when defining target volumes and final target foldersonly.
The following examples using wild cards are correct:
/Target:\\ServerA\C$*\MyFolder\AB*
/Target:\\ServerA\C$*\MyFolder\A*B*
/Target:\\ServerA\C$*\MyFolder\A*B
The following example is not correct, because wild cards can only be included inthe volume name and final folder name:
/Target:\\ServerA\C$*\MyFol*der\AB*
See “Example RtnFolder.exe commands” on page 128.
The format of the RtnFolder.exe settings fileAn example settings file for RtnFolder.exe is included in the Enterprise Vaultinstallation folder. The example settings file is named RtnFolderSettings.xml.
The following example shows the XML format of the settings file.
<?xml version="1.0" encoding="utf-8" ?>
<Policy>
<Apply>
<ApplyToSubFolders>1</ApplyToSubFolders>
<ArchiveThisFolder>1</ArchiveThisFolder>
<ArchiveSubFolders>0</ArchiveSubFolders>
<AutoUpdate>0</AutoUpdate>
</Apply>
<ArchivePoint>
<OnSubFolders>1</OnSubFolders>
<DoNotCreate>0</DoNotCreate>
</ArchivePoint>
</Policy>
The <Apply> element tags define how to apply the policy, as specified in Table 14-1.
126Configuring and managing retention foldersAbout assigning a retention folder policy using the Command Line Interface (CLI)
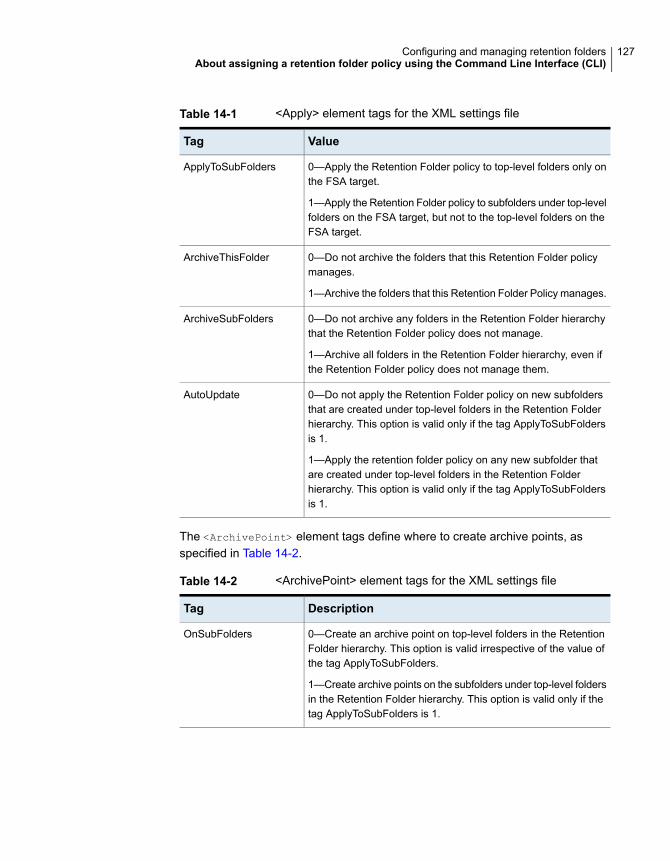
Table 14-1 <Apply> element tags for the XML settings file
ValueTag
0—Apply the Retention Folder policy to top-level folders only onthe FSA target.
1—Apply the Retention Folder policy to subfolders under top-levelfolders on the FSA target, but not to the top-level folders on theFSA target.
ApplyToSubFolders
0—Do not archive the folders that this Retention Folder policymanages.
1—Archive the folders that this Retention Folder Policy manages.
ArchiveThisFolder
0—Do not archive any folders in the Retention Folder hierarchythat the Retention Folder policy does not manage.
1—Archive all folders in the Retention Folder hierarchy, even ifthe Retention Folder policy does not manage them.
ArchiveSubFolders
0—Do not apply the Retention Folder policy on new subfoldersthat are created under top-level folders in the Retention Folderhierarchy. This option is valid only if the tag ApplyToSubFoldersis 1.
1—Apply the retention folder policy on any new subfolder thatare created under top-level folders in the Retention Folderhierarchy. This option is valid only if the tag ApplyToSubFoldersis 1.
AutoUpdate
The <ArchivePoint> element tags define where to create archive points, asspecified in Table 14-2.
Table 14-2 <ArchivePoint> element tags for the XML settings file
DescriptionTag
0—Create an archive point on top-level folders in the RetentionFolder hierarchy. This option is valid irrespective of the value ofthe tag ApplyToSubFolders.
1—Create archive points on the subfolders under top-level foldersin the Retention Folder hierarchy. This option is valid only if thetag ApplyToSubFolders is 1.
OnSubFolders
127Configuring and managing retention foldersAbout assigning a retention folder policy using the Command Line Interface (CLI)

Table 14-2 <ArchivePoint> element tags for the XML settings file (continued)
DescriptionTag
0—Use OnSubFolders tag value.
1—Do not create an archive point. The administrator takesresponsibility for manually creating archive points. Alternatively,if an archive point exists above the top-level folders in theRetention Folder hierarchy, the archive is used for all folders inthe Retention Folder hierarchy.
DoNotCreate
Example RtnFolder.exe commandsThe following example command applies the Retention Folder policy "FinanceRetention" to folders on the FSA target \\Server\C$\MyFolder, using settings inthe file RtnFolderSettings.xml. This file is in the Enterprise Vault folder.
RtnFolder.exe /Policy:"Finance Retention"
/Target:"\\ServerA\C$\MyFolder"
/Settings: RtnFolderSettings.xml
The following example command uses wildcards in defining the target volume andfolder. The Retention Folder policy, "Finance Retention", is applied to all foldersthat match the path, *C*\MyFolder\MyFolder\AB*, on the target server, ServerA.The policy is applied according to the settings in the file, RtnFolderSettings.xml,which is in the Enterprise Vault folder.
RtnFolder.exe /Policy:"Finance Retention"
/Target:"\\ServerA\*C*\MyFolder\AB*"
/Settings: RtnFolderSettings.xml
Managing retention foldersThis section covers the following topics:
■ How to disable the archiving of retention folders.See “Disabling the archiving of retention folders for an FSA target” on page 129.
■ Change the retention folder policy that is assigned to a target folder.See “Assigning a different retention folder policy to a target folder” on page 129.
128Configuring and managing retention foldersManaging retention folders
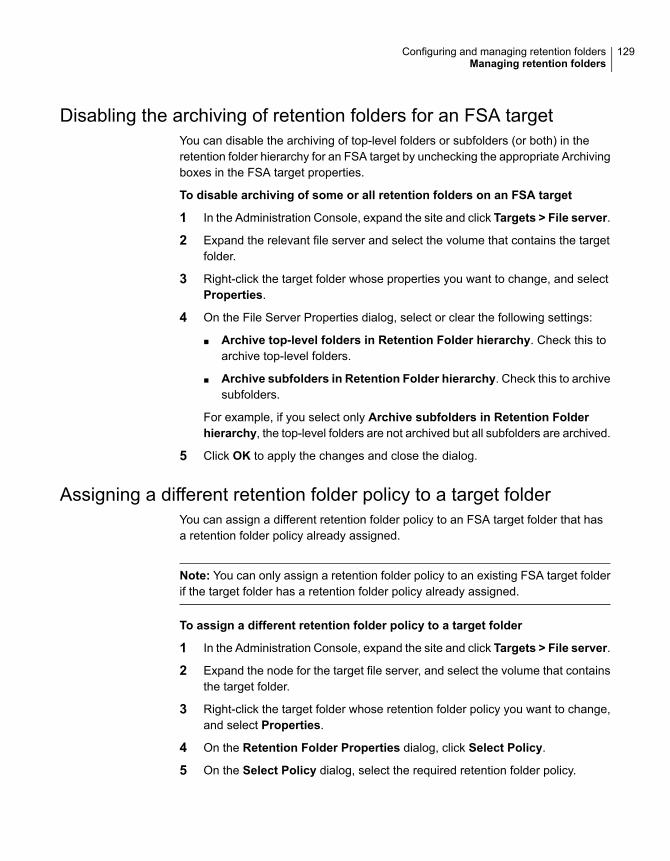
Disabling the archiving of retention folders for an FSA targetYou can disable the archiving of top-level folders or subfolders (or both) in theretention folder hierarchy for an FSA target by unchecking the appropriate Archivingboxes in the FSA target properties.
To disable archiving of some or all retention folders on an FSA target
1 In the Administration Console, expand the site and click Targets > File server.
2 Expand the relevant file server and select the volume that contains the targetfolder.
3 Right-click the target folder whose properties you want to change, and selectProperties.
4 On the File Server Properties dialog, select or clear the following settings:
■ Archive top-level folders in Retention Folder hierarchy. Check this toarchive top-level folders.
■ Archive subfolders in Retention Folder hierarchy. Check this to archivesubfolders.
For example, if you select only Archive subfolders in Retention Folderhierarchy, the top-level folders are not archived but all subfolders are archived.
5 Click OK to apply the changes and close the dialog.
Assigning a different retention folder policy to a target folderYou can assign a different retention folder policy to an FSA target folder that hasa retention folder policy already assigned.
Note: You can only assign a retention folder policy to an existing FSA target folderif the target folder has a retention folder policy already assigned.
To assign a different retention folder policy to a target folder
1 In the Administration Console, expand the site and click Targets > File server.
2 Expand the node for the target file server, and select the volume that containsthe target folder.
3 Right-click the target folder whose retention folder policy you want to change,and select Properties.
4 On the Retention Folder Properties dialog, click Select Policy.
5 On the Select Policy dialog, select the required retention folder policy.
129Configuring and managing retention foldersManaging retention folders

Configuring File BlockingThis chapter includes the following topics:
■ About configuring File Blocking
■ Steps to configure File Blocking
■ Defining a local quarantine location for File Blocking
■ Defining a central quarantine location for File Blocking
■ Specifying the mail notification delivery mechanism for File Blocking
■ Including File Blocking rules in a policy
■ About File Blocking rules
■ Exempting File Blocking for specific users
■ Troubleshooting File Blocking in a clustered environment
About configuring File BlockingYou can configure File Blocking for the following devices:
■ Windows computers. File Blocking is carried out by a File Blocking service thatis installed on the Windows computer as part of the FSA Agent.
■ NetApp filers with Data ONTAP 8.0 or later, and Data ONTAP 8.2 (C-Mode)and Data ONTAP 8.3 (C-Mode). The File Blocking is carried out by a FileBlocking service that runs on a Windows file server. When you configure FileBlocking for a NetApp filer you must select a target Windows file server to performthe File Blocking. It is possible for a Windows file server to run File Blocking formore than one NetApp filer, but for best performance you are recommended touse a different Windows file server for each NetApp filer.
15Chapter
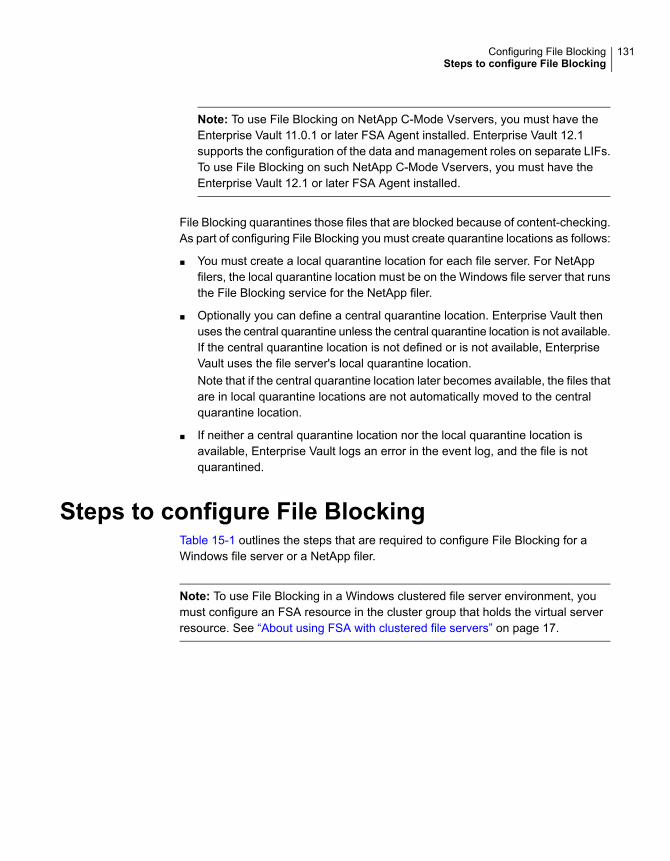
Note: To use File Blocking on NetApp C-Mode Vservers, you must have theEnterprise Vault 11.0.1 or later FSA Agent installed. Enterprise Vault 12.1supports the configuration of the data and management roles on separate LIFs.To use File Blocking on such NetApp C-Mode Vservers, you must have theEnterprise Vault 12.1 or later FSA Agent installed.
File Blocking quarantines those files that are blocked because of content-checking.As part of configuring File Blocking you must create quarantine locations as follows:
■ You must create a local quarantine location for each file server. For NetAppfilers, the local quarantine location must be on the Windows file server that runsthe File Blocking service for the NetApp filer.
■ Optionally you can define a central quarantine location. Enterprise Vault thenuses the central quarantine unless the central quarantine location is not available.If the central quarantine location is not defined or is not available, EnterpriseVault uses the file server's local quarantine location.Note that if the central quarantine location later becomes available, the files thatare in local quarantine locations are not automatically moved to the centralquarantine location.
■ If neither a central quarantine location nor the local quarantine location isavailable, Enterprise Vault logs an error in the event log, and the file is notquarantined.
Steps to configure File BlockingTable 15-1 outlines the steps that are required to configure File Blocking for aWindows file server or a NetApp filer.
Note: To use File Blocking in a Windows clustered file server environment, youmust configure an FSA resource in the cluster group that holds the virtual serverresource. See “About using FSA with clustered file servers” on page 17.
131Configuring File BlockingSteps to configure File Blocking
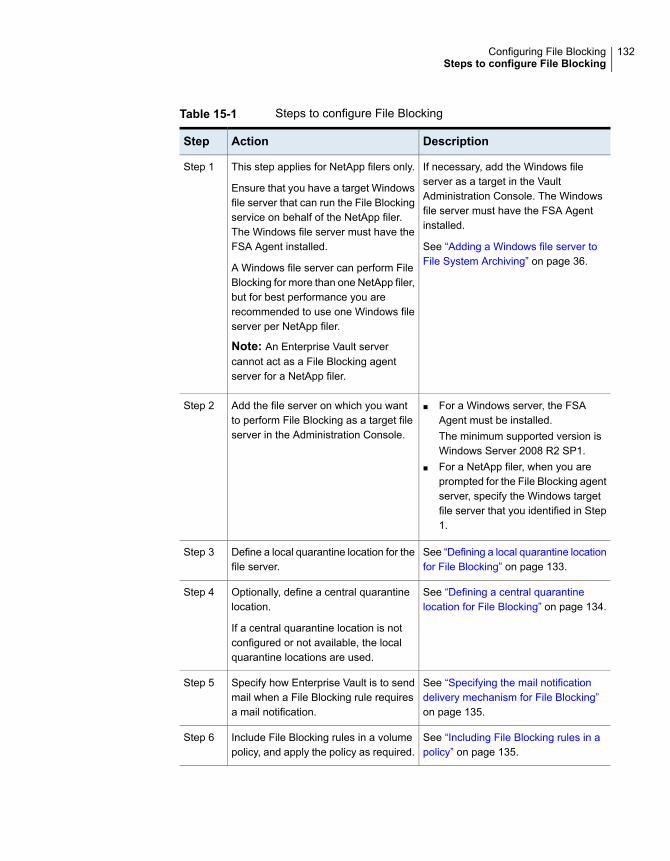
Table 15-1 Steps to configure File Blocking
DescriptionActionStep
If necessary, add the Windows fileserver as a target in the VaultAdministration Console. The Windowsfile server must have the FSA Agentinstalled.
See “Adding a Windows file server toFile System Archiving” on page 36.
This step applies for NetApp filers only.
Ensure that you have a target Windowsfile server that can run the File Blockingservice on behalf of the NetApp filer.The Windows file server must have theFSA Agent installed.
A Windows file server can perform FileBlocking for more than one NetApp filer,but for best performance you arerecommended to use one Windows fileserver per NetApp filer.
Note: An Enterprise Vault servercannot act as a File Blocking agentserver for a NetApp filer.
Step 1
■ For a Windows server, the FSAAgent must be installed.The minimum supported version isWindows Server 2008 R2 SP1.
■ For a NetApp filer, when you areprompted for the File Blocking agentserver, specify the Windows targetfile server that you identified in Step1.
Add the file server on which you wantto perform File Blocking as a target fileserver in the Administration Console.
Step 2
See “Defining a local quarantine locationfor File Blocking” on page 133.
Define a local quarantine location for thefile server.
Step 3
See “Defining a central quarantinelocation for File Blocking” on page 134.
Optionally, define a central quarantinelocation.
If a central quarantine location is notconfigured or not available, the localquarantine locations are used.
Step 4
See “Specifying the mail notificationdelivery mechanism for File Blocking”on page 135.
Specify how Enterprise Vault is to sendmail when a File Blocking rule requiresa mail notification.
Step 5
See “Including File Blocking rules in apolicy” on page 135.
Include File Blocking rules in a volumepolicy, and apply the policy as required.
Step 6
132Configuring File BlockingSteps to configure File Blocking
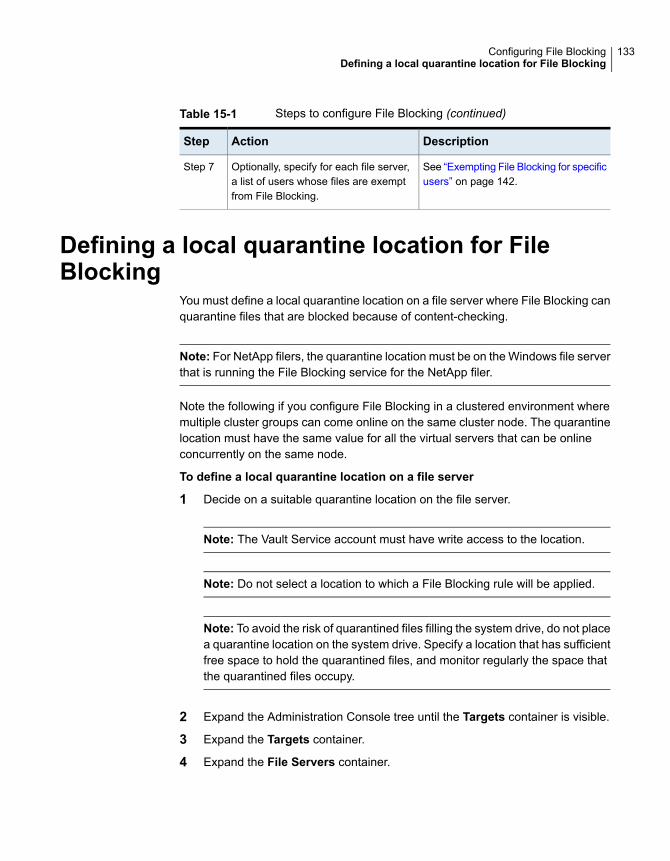
Table 15-1 Steps to configure File Blocking (continued)
DescriptionActionStep
See “Exempting File Blocking for specificusers” on page 142.
Optionally, specify for each file server,a list of users whose files are exemptfrom File Blocking.
Step 7
Defining a local quarantine location for FileBlocking
You must define a local quarantine location on a file server where File Blocking canquarantine files that are blocked because of content-checking.
Note: For NetApp filers, the quarantine location must be on the Windows file serverthat is running the File Blocking service for the NetApp filer.
Note the following if you configure File Blocking in a clustered environment wheremultiple cluster groups can come online on the same cluster node. The quarantinelocation must have the same value for all the virtual servers that can be onlineconcurrently on the same node.
To define a local quarantine location on a file server
1 Decide on a suitable quarantine location on the file server.
Note: The Vault Service account must have write access to the location.
Note: Do not select a location to which a File Blocking rule will be applied.
Note: To avoid the risk of quarantined files filling the system drive, do not placea quarantine location on the system drive. Specify a location that has sufficientfree space to hold the quarantined files, and monitor regularly the space thatthe quarantined files occupy.
2 Expand the Administration Console tree until the Targets container is visible.
3 Expand the Targets container.
4 Expand the File Servers container.
133Configuring File BlockingDefining a local quarantine location for File Blocking
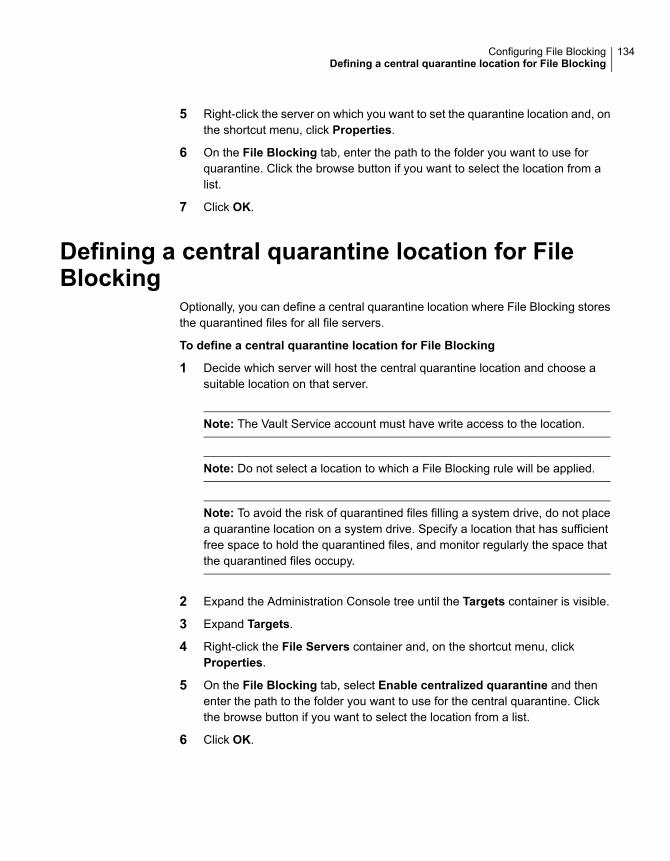
5 Right-click the server on which you want to set the quarantine location and, onthe shortcut menu, click Properties.
6 On the File Blocking tab, enter the path to the folder you want to use forquarantine. Click the browse button if you want to select the location from alist.
7 Click OK.
Defining a central quarantine location for FileBlocking
Optionally, you can define a central quarantine location where File Blocking storesthe quarantined files for all file servers.
To define a central quarantine location for File Blocking
1 Decide which server will host the central quarantine location and choose asuitable location on that server.
Note: The Vault Service account must have write access to the location.
Note: Do not select a location to which a File Blocking rule will be applied.
Note: To avoid the risk of quarantined files filling a system drive, do not placea quarantine location on a system drive. Specify a location that has sufficientfree space to hold the quarantined files, and monitor regularly the space thatthe quarantined files occupy.
2 Expand the Administration Console tree until the Targets container is visible.
3 Expand Targets.
4 Right-click the File Servers container and, on the shortcut menu, clickProperties.
5 On the File Blocking tab, select Enable centralized quarantine and thenenter the path to the folder you want to use for the central quarantine. Clickthe browse button if you want to select the location from a list.
6 Click OK.
134Configuring File BlockingDefining a central quarantine location for File Blocking
Specifying the mail notification deliverymechanism for File Blocking
You must specify how Enterprise Vault is to send mail when a File Blocking rulerequires a mail notification.
You can choose to send either SMTP mail or Exchange Server mail. If you chooseto send Exchange Server mail then Outlook must be installed on each file server.
Note: If a File Blocking rule triggers a mail notification but Enterprise Vault is unableto send the notification, Enterprise Vault generates an error message in theEnterprise Vault event log. The message indicates the reason for the failure. Ifrepeated failures occur due to insufficient information on the Mail tab of the FileServers container, Enterprise Vault generates an error message once every 24hours.
To specify the mail notification delivery mechanism for File Blocking
1 Expand the Administration Console tree until the Targets container is visible.
2 Expand Targets.
3 Right-click the File Servers container and, on the shortcut menu, clickProperties.
4 Click the Mail tab.
5 Select your preferred delivery mechanism: either SMTP mail or ExchangeServer mail:
■ SMTP mail. Enter the name of the SMTP mail server and the name youwant to be used for the sender of the notifications.
■ Exchange Server mail. Enter the name of the Exchange Server and thename of the mailbox that you want to use to send mail.
6 Click OK.
Including File Blocking rules in a policyYou can include File Blocking rules when you create a new volume policy, or addFile Blocking rules to an existing volume policy.
135Configuring File BlockingSpecifying the mail notification delivery mechanism for File Blocking
To include File Blocking rules when creating a volume policy
1 In the Administration Console, expand the Enterprise Vault site until the Policiescontainer is visible.
2 Expand the Policies container.
3 Expand the File container.
4 Right-click Volume and then, on the shortcut menu, clickNew and then Policy.
5 On the first screen of the New Policy wizard, click Next.
6 On the second screen of the wizard enter a name for the new policy and,optionally, a description. Click Next.
7 On the third screen of the wizard you create the File Blocking rules that youwant to apply in the new policy. Click New. The File Blocking Rule propertiesappear.
8 Complete the details on each tab to define the File Blocking rule, then clickOK.
The New Policy wizard shows the new rule that you have created. The ruleis selected, so it will be enabled when this policy is applied. If you want todisable the rule, clear the checkbox next to the rule.
9 If you want to create more rules to be applied by this policy, click New.
10 When you have created the required rules, click Next to continue.
11 Work through the remainder of the wizard.
You can create and modify the rules later, if required, by editing the properties ofthe volume policy.
To add File Blocking rules to an existing volume policy
1 In the Administration Console, expand the Enterprise Vault site until the Policiescontainer is visible.
2 Expand the Policies container.
3 Expand the File container.
4 Click the Volume container.
5 In the list of policies, right-click the policy you want to modify and, on theshortcut menu, click Properties.
6 Click the File Blocking Rules tab. This tab enables you to create the FileBlocking rules that you want to apply in this policy.
7 Click New. The File Blocking Rule properties appear.
136Configuring File BlockingIncluding File Blocking rules in a policy
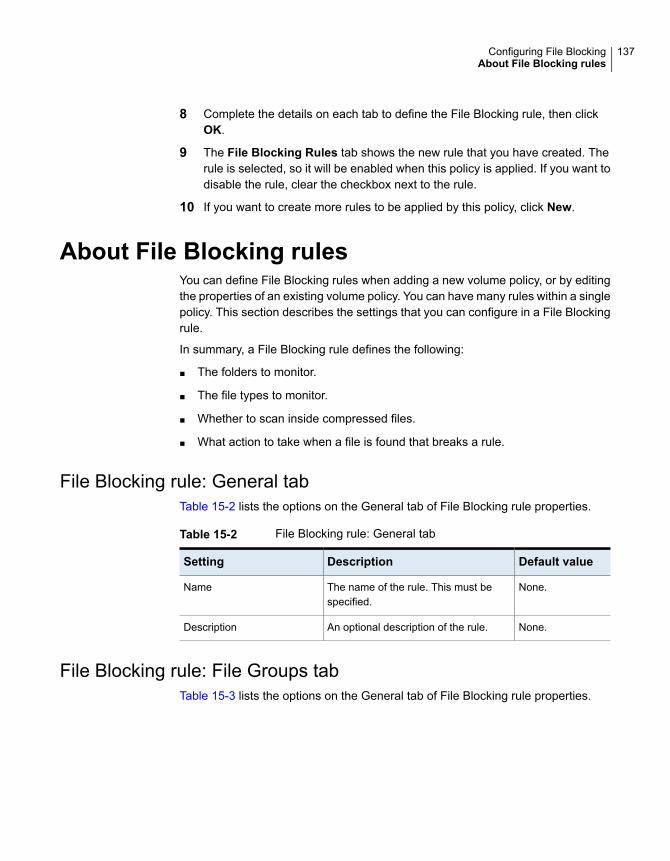
8 Complete the details on each tab to define the File Blocking rule, then clickOK.
9 The File Blocking Rules tab shows the new rule that you have created. Therule is selected, so it will be enabled when this policy is applied. If you want todisable the rule, clear the checkbox next to the rule.
10 If you want to create more rules to be applied by this policy, click New.
About File Blocking rulesYou can define File Blocking rules when adding a new volume policy, or by editingthe properties of an existing volume policy. You can have many rules within a singlepolicy. This section describes the settings that you can configure in a File Blockingrule.
In summary, a File Blocking rule defines the following:
■ The folders to monitor.
■ The file types to monitor.
■ Whether to scan inside compressed files.
■ What action to take when a file is found that breaks a rule.
File Blocking rule: General tabTable 15-2 lists the options on the General tab of File Blocking rule properties.
Table 15-2 File Blocking rule: General tab
Default valueDescriptionSetting
None.The name of the rule. This must bespecified.
Name
None.An optional description of the rule.Description
File Blocking rule: File Groups tabTable 15-3 lists the options on the General tab of File Blocking rule properties.
137Configuring File BlockingAbout File Blocking rules
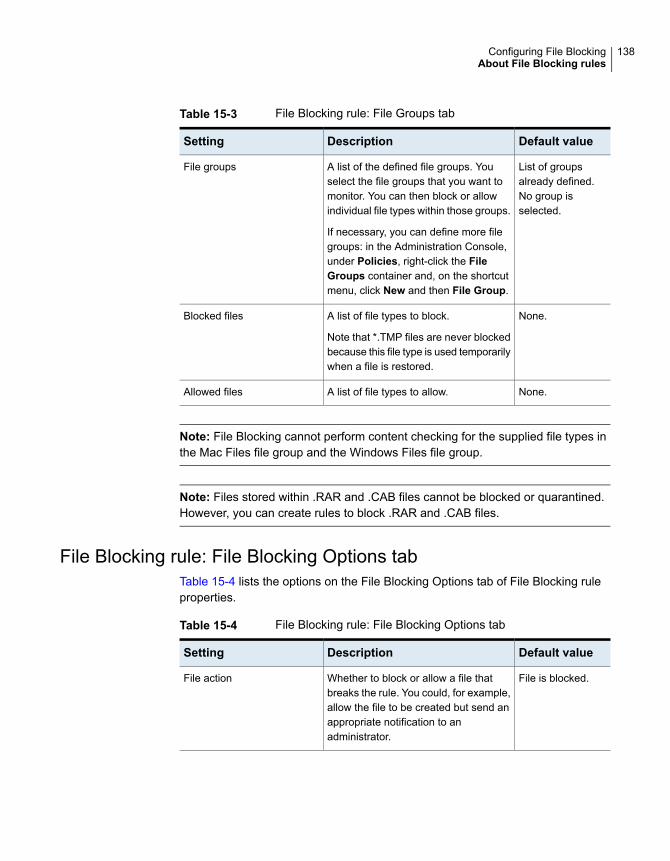
Table 15-3 File Blocking rule: File Groups tab
Default valueDescriptionSetting
List of groupsalready defined.No group isselected.
A list of the defined file groups. Youselect the file groups that you want tomonitor. You can then block or allowindividual file types within those groups.
If necessary, you can define more filegroups: in the Administration Console,under Policies, right-click the FileGroups container and, on the shortcutmenu, click New and then File Group.
File groups
None.A list of file types to block.
Note that *.TMP files are never blockedbecause this file type is used temporarilywhen a file is restored.
Blocked files
None.A list of file types to allow.Allowed files
Note: File Blocking cannot perform content checking for the supplied file types inthe Mac Files file group and the Windows Files file group.
Note: Files stored within .RAR and .CAB files cannot be blocked or quarantined.However, you can create rules to block .RAR and .CAB files.
File Blocking rule: File Blocking Options tabTable 15-4 lists the options on the File Blocking Options tab of File Blocking ruleproperties.
Table 15-4 File Blocking rule: File Blocking Options tab
Default valueDescriptionSetting
File is blocked.Whether to block or allow a file thatbreaks the rule. You could, for example,allow the file to be created but send anappropriate notification to anadministrator.
File action
138Configuring File BlockingAbout File Blocking rules
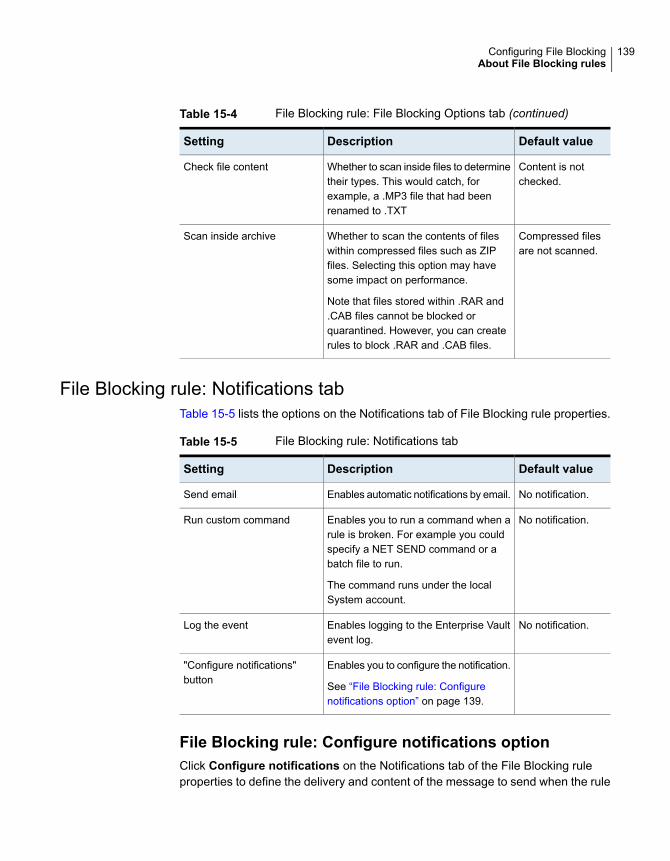
Table 15-4 File Blocking rule: File Blocking Options tab (continued)
Default valueDescriptionSetting
Content is notchecked.
Whether to scan inside files to determinetheir types. This would catch, forexample, a .MP3 file that had beenrenamed to .TXT
Check file content
Compressed filesare not scanned.
Whether to scan the contents of fileswithin compressed files such as ZIPfiles. Selecting this option may havesome impact on performance.
Note that files stored within .RAR and.CAB files cannot be blocked orquarantined. However, you can createrules to block .RAR and .CAB files.
Scan inside archive
File Blocking rule: Notifications tabTable 15-5 lists the options on the Notifications tab of File Blocking rule properties.
Table 15-5 File Blocking rule: Notifications tab
Default valueDescriptionSetting
No notification.Enables automatic notifications by email.Send email
No notification.Enables you to run a command when arule is broken. For example you couldspecify a NET SEND command or abatch file to run.
The command runs under the localSystem account.
Run custom command
No notification.Enables logging to the Enterprise Vaultevent log.
Log the event
Enables you to configure the notification.
See “File Blocking rule: Configurenotifications option” on page 139.
"Configure notifications"button
File Blocking rule: Configure notifications optionClick Configure notifications on the Notifications tab of the File Blocking ruleproperties to define the delivery and content of the message to send when the rule
139Configuring File BlockingAbout File Blocking rules
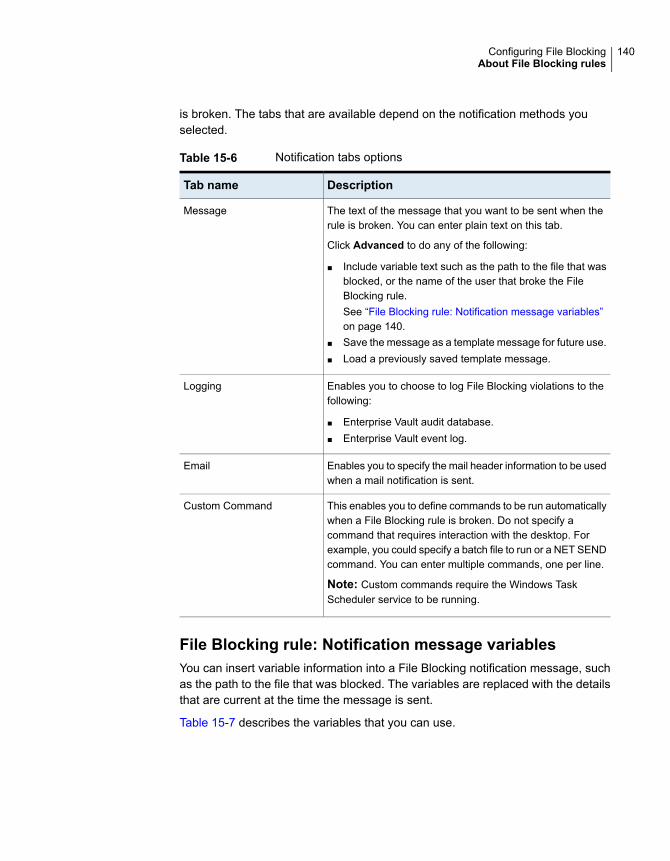
is broken. The tabs that are available depend on the notification methods youselected.
Table 15-6 Notification tabs options
DescriptionTab name
The text of the message that you want to be sent when therule is broken. You can enter plain text on this tab.
Click Advanced to do any of the following:
■ Include variable text such as the path to the file that wasblocked, or the name of the user that broke the FileBlocking rule.See “File Blocking rule: Notification message variables”on page 140.
■ Save the message as a template message for future use.■ Load a previously saved template message.
Message
Enables you to choose to log File Blocking violations to thefollowing:
■ Enterprise Vault audit database.■ Enterprise Vault event log.
Logging
Enables you to specify the mail header information to be usedwhen a mail notification is sent.
This enables you to define commands to be run automaticallywhen a File Blocking rule is broken. Do not specify acommand that requires interaction with the desktop. Forexample, you could specify a batch file to run or a NET SENDcommand. You can enter multiple commands, one per line.
Note: Custom commands require the Windows TaskScheduler service to be running.
Custom Command
File Blocking rule: Notification message variablesYou can insert variable information into a File Blocking notification message, suchas the path to the file that was blocked. The variables are replaced with the detailsthat are current at the time the message is sent.
Table 15-7 describes the variables that you can use.
140Configuring File BlockingAbout File Blocking rules

Table 15-7 Notification variables
DescriptionVariable name
Current user who caused the action. Includes domaininformation.
[USER]
Current user who caused the action without the domaininformation.
[USER NO DOMAIN]
Email ID of the user who caused the action. This ID is takenfrom Active Directory. Use this variable if the user's logonand email names might be different.
[USER MAIL ID]
Domain name.[DOMAIN]
File path and name that caused the action.[FILE SPEC]
Name of the file that caused the action.[FILE NAME]
Name of the policy that is applied to the managed resource.[POLICY NAME]
Name of the resource that caused the action.[OBJECT NAME]
Name of the owner of the file that caused the action withoutdomain information.
[OWNER NO DOMAIN]
Name of the owner of the file that caused the action. Includesdomain information.
[OWNER]
Name of the server where an alarm has been activated.[SERVER NAME]
Shared name of the resource. For example, you can enter"H" as in "H:\MyDrive" and the share name is inserted.
[OBJECT NAME SHARE]
File Blocking rule: Folder Filters tabThe Folder Filters tab enables you to specify which folders you want File Blockingto monitor. The folder selection is used on every volume to which you apply thispolicy, so you must specify path names in relation to the root of the volume.
Note: Do not apply a File Blocking rule to a folder that is used for quarantined files.
Table 15-8 lists the options on the Folder filters tab of File Blocking rule properties.
141Configuring File BlockingAbout File Blocking rules
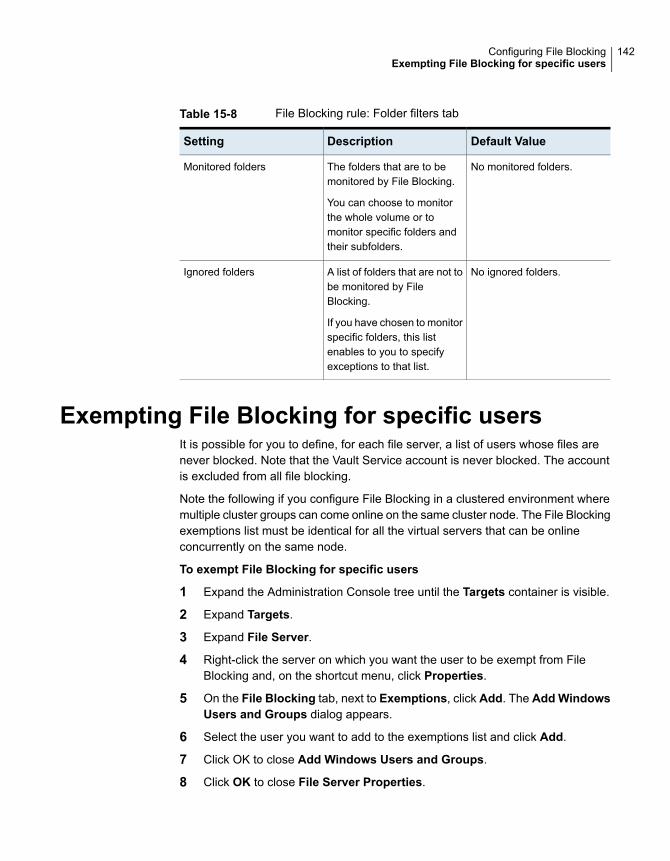
Table 15-8 File Blocking rule: Folder filters tab
Default ValueDescriptionSetting
No monitored folders.The folders that are to bemonitored by File Blocking.
You can choose to monitorthe whole volume or tomonitor specific folders andtheir subfolders.
Monitored folders
No ignored folders.A list of folders that are not tobe monitored by FileBlocking.
If you have chosen to monitorspecific folders, this listenables to you to specifyexceptions to that list.
Ignored folders
Exempting File Blocking for specific usersIt is possible for you to define, for each file server, a list of users whose files arenever blocked. Note that the Vault Service account is never blocked. The accountis excluded from all file blocking.
Note the following if you configure File Blocking in a clustered environment wheremultiple cluster groups can come online on the same cluster node. The File Blockingexemptions list must be identical for all the virtual servers that can be onlineconcurrently on the same node.
To exempt File Blocking for specific users
1 Expand the Administration Console tree until the Targets container is visible.
2 Expand Targets.
3 Expand File Server.
4 Right-click the server on which you want the user to be exempt from FileBlocking and, on the shortcut menu, click Properties.
5 On the File Blocking tab, next to Exemptions, click Add. The AddWindowsUsers and Groups dialog appears.
6 Select the user you want to add to the exemptions list and click Add.
7 Click OK to close Add Windows Users and Groups.
8 Click OK to close File Server Properties.
142Configuring File BlockingExempting File Blocking for specific users

Troubleshooting File Blocking in a clusteredenvironment
If File Blocking does not work on a shared disk, ensure that a volume share is notconfigured in the Administration Console as a volume target under multiple virtualserver targets. It is possible to set this invalid configuration in the AdministrationConsole if multiple cluster groups are online on a common node.
143Configuring File BlockingTroubleshooting File Blocking in a clustered environment

Configuring and runningFSA tasks
This chapter includes the following topics:
■ About configuring and running FSA tasks
■ Adding a File System Archiving task
■ Scheduling a File System Archiving task
■ Setting the FSA folder permissions synchronization schedule
■ Scheduling the deletion of archived files on placeholder deletion for EMCCelerra/VNX
■ Configuring FSA version pruning
■ Using Run Now to process FSA targets manually
■ About File System Archiving task reports
■ About scheduling storage expiry for FSA
About configuring and running FSA tasksTo process target file servers, an Enterprise Vault server must have at least oneFile System Archiving task.
Each File System Archiving task processes the target volumes to which it isassigned. If any file servers are unreachable, for example due to a network failure,the task processes the target volumes on the reachable file servers and logs thedetails of the unreachable file servers in the Enterprise Vault event log and in theFile System Archiving task report.
16Chapter
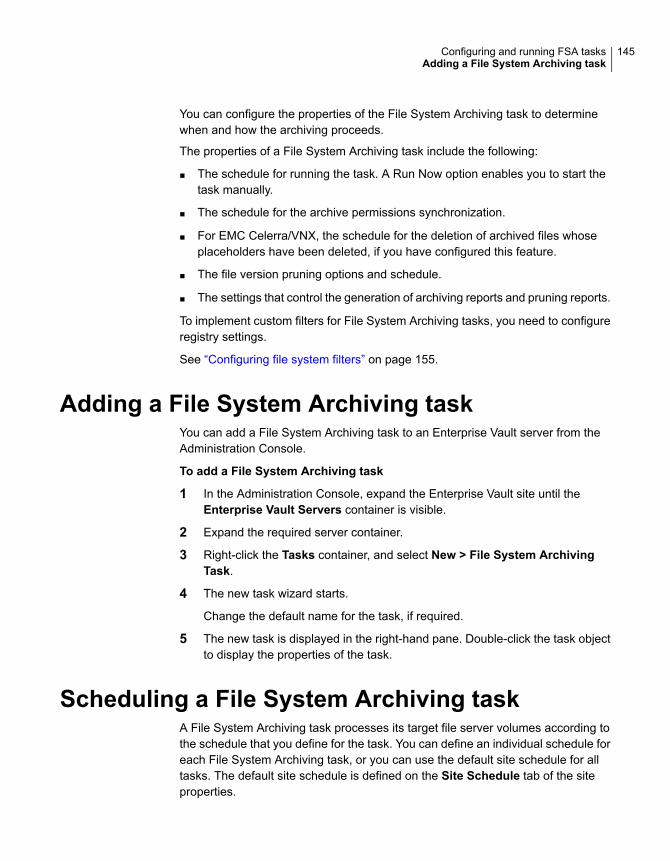
You can configure the properties of the File System Archiving task to determinewhen and how the archiving proceeds.
The properties of a File System Archiving task include the following:
■ The schedule for running the task. A Run Now option enables you to start thetask manually.
■ The schedule for the archive permissions synchronization.
■ For EMC Celerra/VNX, the schedule for the deletion of archived files whoseplaceholders have been deleted, if you have configured this feature.
■ The file version pruning options and schedule.
■ The settings that control the generation of archiving reports and pruning reports.
To implement custom filters for File System Archiving tasks, you need to configureregistry settings.
See “Configuring file system filters” on page 155.
Adding a File System Archiving taskYou can add a File System Archiving task to an Enterprise Vault server from theAdministration Console.
To add a File System Archiving task
1 In the Administration Console, expand the Enterprise Vault site until theEnterprise Vault Servers container is visible.
2 Expand the required server container.
3 Right-click the Tasks container, and select New > File System ArchivingTask.
4 The new task wizard starts.
Change the default name for the task, if required.
5 The new task is displayed in the right-hand pane. Double-click the task objectto display the properties of the task.
Scheduling a File System Archiving taskA File System Archiving task processes its target file server volumes according tothe schedule that you define for the task. You can define an individual schedule foreach File System Archiving task, or you can use the default site schedule for alltasks. The default site schedule is defined on the Site Schedule tab of the siteproperties.
145Configuring and running FSA tasksAdding a File System Archiving task

The File System Archiving task checkpoints its progress. If the task is stoppedbefore it has completely processed a volume, then when the task next starts itcontinues from the point of interruption.
To schedule a File System Archiving task
1 In the Administration Console, expand the Enterprise Vault site until theEnterprise Vault Servers container is visible.
2 Expand Enterprise Vault Servers.
3 Expand the Enterprise Vault server that runs the task you want to modify.
4 Click Tasks.
5 Right-click the name of the File System Archiving task you want to modify and,on the shortcut menu, click Properties.
6 Click the Schedule tab.
7 To use a schedule for this task other than the default site schedule, clear Usesite setting.
8 Define the schedule that you require and then click OK.
9 Stop and restart the task for the changes to take effect.
Setting the FSA folder permissionssynchronization schedule
A File System Archiving task can synchronize archive folder permissions with fileserver folder permissions automatically on a scheduled basis. The automaticsynchronization can run once or twice each day. If you choose to turn off theautomatic synchronization you can synchronize manually.
The permissions of folders within an archive are always synchronized with the NTFSpermissions of the corresponding file system folder.
The permissions of the archive itself are synchronized by default with thecorresponding file server share, as follows:
■ If the archive point folder is a share, the archive point folder permissions aremapped to the archive.
■ Otherwise, the target volume share's permissions are mapped to the archive.
If required, you can change this default behavior and synchronize the permissionsof an archive with the permissions of the archive point folder, regardless of whetherthe archive point folder is a share. You can do this by setting theSynchroniseFSASharePermissions registry value.
146Configuring and running FSA tasksSetting the FSA folder permissions synchronization schedule
See “SynchroniseFSASharePermissions” in the Registry Values guide.
To set the FSA folder permissions synchronization schedule
1 In the Administration Console, expand the Enterprise Vault site until theEnterprise Vault Servers container is visible.
2 Expand Enterprise Vault Servers.
3 Expand the Enterprise Vault server that runs the task you want to view ormodify.
4 Click Tasks.
5 Right-click the name of the File System Archiving task you want to view ormodify and, on the shortcut menu, click Properties.
6 Click the Synchronization tab.
7 Set the schedule you require and then click OK.
Scheduling the deletion of archived files onplaceholder deletion for EMC Celerra/VNX
The deletion of archived EMC Celerra/VNX files whose placeholders have beendeleted does not occur immediately. The deletion takes place once or twice eachday, according to the schedule that you define on the properties of the File SystemArchiving task.
To schedule the deletion of archived files on placeholder deletion for EMCCelerra/VNX
1 In the Administration Console, expand the Enterprise Vault site until theEnterprise Vault Servers container is visible.
2 Expand Enterprise Vault Servers.
3 Expand the Enterprise Vault server that runs the File System Archiving taskto archive from the Celerra/VNX device.
4 Click Tasks.
5 Right-click the File System Archiving task and, on the shortcut menu, clickProperties.
6 Click the Celerra tab.
7 Set the AM and PM deletion times that you require.
8 Click OK.
147Configuring and running FSA tasksScheduling the deletion of archived files on placeholder deletion for EMC Celerra/VNX
Configuring FSA version pruningBy using FSA version pruning, you can control the number of versions of files thatare stored in Enterprise Vault archives.
Each time a file is recalled and modified, subsequent archiving means that anotherversion of the file is stored in the archive.
Pruning is the process of deleting the earlier versions of archived files until therequired number of versions remains.
To configure FSA version pruning
1 In the Administration Console, expand the Enterprise Vault site until theEnterprise Vault Servers container is visible.
2 Expand Enterprise Vault Servers.
3 Expand the Enterprise Vault server that runs the task you want to modify.
4 Click Tasks.
5 Right-click the name of the File System Archiving task you want to modify and,on the shortcut menu, click Properties.
6 Click the Pruning tab.
7 Select Enable pruning.
8 Next to Prune to, select the maximum number of versions of each file youwant to retain in the archive.
9 If you also want to prune according to the amount of time that items have beenarchived, select Enable age-based pruning and specify the maximum ageallowed for archived items.
Age-based pruning never deletes the final copy of an archived file, regardlessof its age.
10 Under Scheduled Pruning, define the schedule that you require and then clickOK.
Using Run Now to process FSA targets manuallyThis section comprises the following topics:
■ Processing an FSA target volume manually
■ Running a File System Archiving task manually
148Configuring and running FSA tasksConfiguring FSA version pruning
Processing an FSA target volume manuallyNormally, a File System Archiving task processes its target volumes according tothe schedule that you define for the task. If you want to process a particular volumeoutside of this schedule you can use the Run Now option to process a volume ondemand.
Note the following:
■ Run Now reports only on files that are beneath archive points.
■ When archiving by quota, the number of files actually archived may not matchthe number shown in the report. This is because the order in which the files areprocessed during a report mode run is unlikely to be the same as the orderduring the normal run.File System Archiving archives only sufficient eligible files to meet the quotasettings, so there may be more, or fewer, files actually archived than shown inthe report.
To process an FSA target volume manually
1 In the Administration Console, expand the Enterprise Vault site until the Targetscontainer is visible.
2 Expand the Targets container.
3 Expand the File Servers container.
4 Expand the target file server whose volume you want to process.
5 Right-click the volume that you want to process and then, on the shortcut menu,click Run Now.
6 In the Run Now dialog box, select the options to specify how you want the taskto run:
■ In normal mode: The volume is processed normally; the files that matchthe archiving criteria are archived.
■ In report mode: Nothing is archived, but Enterprise Vault generates areport that shows you what would be archived if you processed the volumein normal mode.
The File System Archiving task creates the reports in the Reports\FSA subfolderof the Enterprise Vault installation folder, for example C:\Program Files
(x86)\Enterprise Vault.
Within Reports\FSA there is a subfolder for the task, with further subfolders toindicate the mode in which the task was run.
See “About File System Archiving task reports” on page 151.
149Configuring and running FSA tasksUsing Run Now to process FSA targets manually
The fields within the file are tab-separated, so the contents can easily be readinto a spreadsheet program for analysis.
7 Run the task for the creation of shortcuts only: Select this option to restrictthe task so that it does not archive, but does create shortcuts. The task createsshortcuts according to the shortcut creation settings in the policy archivingrules. When you select this option the task does not perform archiving. Youcan choose In report mode to generate a report of shortcuts that would becreated if the task ran in normal mode.
8 Click OK.
Running a File System Archiving task manuallyTypically a File System Archiving task processes file server volumes according tothe schedule you set up for the task. If you want to run the task outside of thisschedule, you can use the Run Now option to run a File System Archiving task ondemand.
Note the following:
■ If a file server’s volumes are archived by different tasks, you need to run eachof those tasks in order to archive all the volumes. As an alternative, you canprocess individual volumes.See “Processing an FSA target volume manually” on page 149.
■ Run Now reports only on files that are beneath archive points.
■ When archiving by quota, the number of files actually archived may not matchthe number shown in the report. This is because the order in which the files areprocessed during a report mode run is unlikely to be the same as the orderduring the normal run.File System Archiving archives only sufficient eligible files to meet the quotasettings, so there may be more, or fewer, files actually archived than shown inthe report.
To run a File System Archiving task manually
1 In the Administration Console, expand the Enterprise Vault site until theEnterprise Vault Servers container is visible.
2 Expand the Enterprise Vault Servers container.
3 Expand the Enterprise Vault server that hosts the task you want to run.
4 Click the Tasks container.
5 In the list, right-click the File System Archiving task you want to run and, onthe shortcut menu, click Run Now.
150Configuring and running FSA tasksUsing Run Now to process FSA targets manually
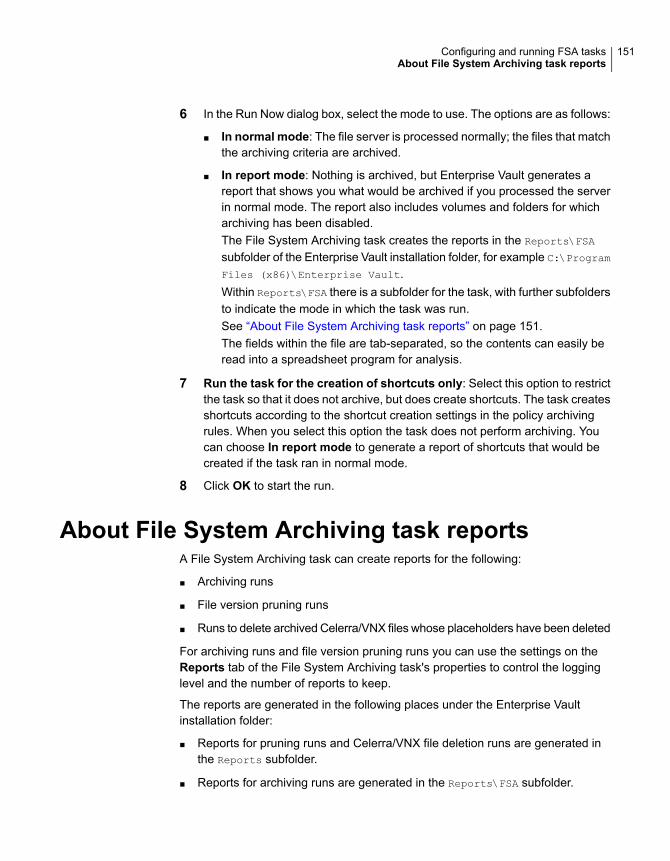
6 In the Run Now dialog box, select the mode to use. The options are as follows:
■ In normal mode: The file server is processed normally; the files that matchthe archiving criteria are archived.
■ In report mode: Nothing is archived, but Enterprise Vault generates areport that shows you what would be archived if you processed the serverin normal mode. The report also includes volumes and folders for whicharchiving has been disabled.The File System Archiving task creates the reports in the Reports\FSA
subfolder of the Enterprise Vault installation folder, for example C:\Program
Files (x86)\Enterprise Vault.Within Reports\FSA there is a subfolder for the task, with further subfoldersto indicate the mode in which the task was run.See “About File System Archiving task reports” on page 151.The fields within the file are tab-separated, so the contents can easily beread into a spreadsheet program for analysis.
7 Run the task for the creation of shortcuts only: Select this option to restrictthe task so that it does not archive, but does create shortcuts. The task createsshortcuts according to the shortcut creation settings in the policy archivingrules. When you select this option the task does not perform archiving. Youcan choose In report mode to generate a report of shortcuts that would becreated if the task ran in normal mode.
8 Click OK to start the run.
About File System Archiving task reportsA File System Archiving task can create reports for the following:
■ Archiving runs
■ File version pruning runs
■ Runs to delete archived Celerra/VNX files whose placeholders have been deleted
For archiving runs and file version pruning runs you can use the settings on theReports tab of the File System Archiving task's properties to control the logginglevel and the number of reports to keep.
The reports are generated in the following places under the Enterprise Vaultinstallation folder:
■ Reports for pruning runs and Celerra/VNX file deletion runs are generated inthe Reports subfolder.
■ Reports for archiving runs are generated in the Reports\FSA subfolder.
151Configuring and running FSA tasksAbout File System Archiving task reports

Within Reports\FSA there is a subfolder for the task, with further subfolders toindicate the mode in which the task was run.
Until the task has finished processing all its targets, the task keeps the reports ina folder that is called InProgress. When the task has finished processing, it movesthe reports to a subfolder that is underneath the Completed folder. The subfoldername is the date and time that task completed its processing.
For example, if task 'ArchiveTask1' is running in normal, scheduled mode, but hasnot finished processing, the report files could be in the following folder:
C:\Program Files (x86)\Enterprise
Vault\Reports\FSA\ArchiveTask1\ArchiveScheduled\InProgress
If task 'ArchiveTask1' completes its processing on 20-Feb-2011 at 12:29.07, thereport files are moved to the following folder:
C:\Program Files (x86)\Enterprise
Vault\Reports\FSA\ArchiveTask1\ArchiveScheduled\Completed\2011-02-20
12-29-07
Table 16-1 lists the folder names that are used for the different archiving run modes.
Table 16-1 File System Archiving task archiving run modes and theirassociated folder names
Folder nameRun mode
ArchiveScheduledNormal, Scheduled
ArchiveRunNowNormal, Run Now
ArchiveRunNowCreateShortcutsNormal, Run Now, Create shortcuts only
ReportScheduledReport, Scheduled
ReportRunNowReport, Run Now
ReportRunNowCreateShortcutsReport, Run Now, Create shortcuts only
The report files are named as follows:
TaskName_RunMode_RunNumber.txt
where:
■ TaskName is the name of the File System Archiving task.
■ RunMode is the mode in which the task was run.
■ RunNumber is the sequence number of the run.
152Configuring and running FSA tasksAbout File System Archiving task reports

It may take many runs before the File System Archiving task has completelyprocessed its target volumes. The task creates a report file for each run. The reportfor the final run has '_FINAL' added to the name to indicate that processing iscomplete.
For example, if 'ArchiveTask1' processes according to its schedule, in normal mode,the file names of successive reports could be as follows:
ArchiveTask1_ArchiveScheduled_001.txt
ArchiveTask1_ArchiveScheduled_002.txt
ArchiveTask1_ArchiveScheduled_003_FINAL.txt
When custom filters are configured for File System Archiving, report files includeinformation about the filters and the files that the filters have processed.
See “About file system filter reports” on page 159.
When a File System Archiving task processes a folder that has an archive pointwith no archive ID or an invalid archive ID, Enterprise Vault performs a check forexisting archives for the folder path. If the check identifies that multiple archive IDsare associated with the folder path, the task report lists the archive ID of eacharchive that is associated with the folder path, and indicates which archive will beused for archiving.
See “About the checks for existing archives for an FSA folder path” on page 101.
About scheduling storage expiry for FSAWhen an item's retention period expires, File System Archiving can automaticallydelete it. File System Archiving does this according to the schedule that you definewith the Administration Console, on the Storage Expiry tab of the site Propertiesdialog box.
File System Archiving does not delete archived items when either of the followingconditions applies:
■ On the Storage Expiry tab of the site Properties dialog box, the schedule is setto Never or you have checked Run in report mode.
■ On the Advanced tab of the Archive Properties dialog box, Delete expireditems from this archive automatically is unchecked.
153Configuring and running FSA tasksAbout scheduling storage expiry for FSA
Configuring file systemfiltering
This chapter includes the following topics:
■ About custom filters for File System Archiving
■ Configuring file system filters
■ About file system filter reports
About custom filters for File System ArchivingFile system filtering can be used for a variety of reasons, for example:
■ To select certain files and process them differently from the rest of the files onthe archiving target. Files not selected by a filter are processed according to theEnterprise Vault policy that is assigned to the archiving target.
■ To provide additional statistics on files.
■ To add proprietary information to files as they are archived by Enterprise Vault.
A filter defines how the File System Archiving task selects and processes files. Filescan be selected by matching one or more attributes, such as file name or file type.Additional properties can be added to the Enterprise Vault index for the file.
The action defined for the selected files can be one of the following:
■ Apply the policy that is associated with the volume or folder in which the file islocated.
■ Archive the file with or without creating a shortcut.
■ Archive the file and delete the original, without creating a shortcut.
■ Delete the file without archiving it.
17Chapter

■ Do not archive the file.
A filter can also request the archiving task to shut down.
If required, filters can pass the selected file to a third-party application for additionalprocessing. For example, files can be passed to file classification or file decryptionapplications. The filter can pass additional information to Enterprise Vault forindexing, or alter the way the file is processed based on its classification.Classification information that is added to files is then available to Enterprise Vaultsearch applications, such as Discovery Accelerator.
If a file that has already been archived is processed by a filter, the following actionsare not applied:
■ Modifying file properties, index properties or retention category.
■ File stream operations.
Only the following subset of filter actions can be applied when processing archivedfiles:
■ Create a shortcut.
■ Delete the original file on the file server.
■ Stop the archiving task.
You can develop proprietary filters for File System Archiving tasks using the FileSystem Filtering API. Generic custom filters for Exchange Server Archiving andDomino Server Archiving are shipped with Enterprise Vault. These allow you toapply filtering without the need to develop filters using the associated filtering API.Currently, no generic custom filter is provided for File System Archiving.
To develop software using Enterprise Vault APIs, your company must be a memberof Veritas Technology Partner Program (VTPP). Information about VTPP is availableat http://go.veritas.com/vtpp.
Configuring file system filtersYou use registry settings to implement custom filters, and enable filtering forEnterprise Vault File System Archiving tasks.
See “To configure file system filter registry settings” on page 157.
To control the behavior of the archiving task in the event of filter errors, you canconfigure the following entries in the XML configuration file, EnterpriseVault\EVFSAArchivingTask.exe.config:
■ MoveOnFilterFailure. This setting controls the action taken by the archivingtask if it cannot load a filter.
155Configuring file system filteringConfiguring file system filters
If the setting is not present in the configuration file, then the default value is "0";the archiving task stops if it cannot load the filter.
■ MaxFilterError. During archiving, the archiving task keeps a count of the numberof filtering errors reported. The MaxFilterError setting lets you configure themaximum number of errors permitted before the archiving task stops.If the setting is not present in the configuration file, the default value is 100.
See “To configure entries in EVFSAArchivingTask.exe.config” on page 158.
After you upgrade Enterprise Vault, you must update the .NET binding redirectionsin the configuration file to use the newer version of the Enterprise Vault API Runtime.The ReadMeFirst file for the API Runtime describes how to do this.
156Configuring file system filteringConfiguring file system filters

To configure file system filter registry settings
1 On the Enterprise Vault server, start Regedit and navigate to the followinglocation in the registry:
HKEY_LOCAL_MACHINE
\SOFTWARE
\Wow6432Node
\KVS
\Enterprise Vault
\External Filtering
\File System
If either External Filtering or File System keys do not exist, then create them.
2 Create a new string entry for each custom filter under the File System key.Filter names must be an unbroken numbered sequence starting at 1.
For the value of a custom filter setting enter a string value that contains thename of the .NET assembly, and the fully-qualified filter class name of the newexternal filter:
PathToFilterAssembly!FilterClassName
A fully-qualified class name includes the namespace. For example, if the classname is CustomFilter, the namespace isVeritas.EnterpriseVault.FileSystem, and the filter is implemented inVeritas.EnterpriseVault.FileSystemCustomFilter.dll assembly, thenthe value of the registry setting should be as follows:
Veritas.EnterpriseVault.FileSystemCustomFilter.dll!
Veritas.EnterpriseVault.FileSystem.CustomFilter
Note that the class name is case-sensitive.
3 If you change the registry settings during an archiving run, you need to restartthe associated File System Archiving task to implement the changes.
157Configuring file system filteringConfiguring file system filters
To configure entries in EVFSAArchivingTask.exe.config
1 Take a back-up copy of the file, EnterpriseVault\EVFSAArchivingTask.exe.config, and then open the file for editing.
2 Add a section called <FSAFilter> to hold the settings. This section must alsobe declared in the <configSections> element. For example,
<configSections>
<section name="FSAFilter"
type="System.Configuration.DictionarySectionHandler"/>
</configSections>
<FSAFilter>
</FSAFilter>
3 Add one or both of the entries, MoveOnFilterFailure and MaxFilterError, asrequired. The entries must be in the form:
<add key="name" value = "value"/>
Entries can take the following values:
■ MoveOnFilterFailure. "0" (default), or "1". If the setting value is "0", thenthe archiving task stops if it cannot load a filter. If the setting value is "1",then the archiving task loads the next filter, or continues to archive.
■ MaxFilterError. Integer (default 100). The maximum number of filter errorspermitted before the archiving task stops.
The following example shows the file with the settings added:
<?xml version="1.0" encoding="utf-8"?>
<configuration>
<configSections>
<section name="FSAFilter"
type="System.Configuration.DictionarySectionHandler"/>
</configSections>
<FSAFilter>
<add key="MaxFilterError" value = "150"/>
<add key="MoveOnfilterFailure" value = "1"/>
</FSAFilter>
<runtime>
<generatePublisherEvidence enabled="false"/>
</runtime>
</configuration>
The settings in this example file have the following effect:
158Configuring file system filteringConfiguring file system filters
■ key="MaxFilterError" value = "150" — The archiving task will stop if morethan 150 filtering errors are reported.
■ key="MoveOnfilterFailure" value = "1" — If the archiving task cannot loada filter, it will try to load the next filter, or continue to archive.
About file system filter reportsWhen external filters are configured for File System Archiving, information is addedto the File System Archiving task report file. The report files are located in theReports\FSA subfolder of the Enterprise Vault installation folder.
In the detailed information for each file processed, the Filter Modifications columnshows the filter actions that have been performed on the file. This information isshown in the form:
[ filter_name - action, action, ... ] [ filter_name - action, action, ... ] ...
where filter_name is the name of the external filter, and action identifies the typeof action that the filter has performed. action can be one of the following:
■ Applied filtering action The filter has changed the action applied to the file.
■ Modified file properties File attributes have been modified.
■ Modified index properties Index properties have been added or removed.
■ Performed file stream operation A file or alternate data stream has beenopened to read or write.
■ Applied retention category The retention category has been changed.
Summary information for each external filter is displayed in the report section,External Filter Summary. The information shows the number of files or alternatedata streams on which the filter has performed each action. Failure to load a filteris also reported in this section.
If files that have already been archived are processed by a filter, only the filteringaction can be applied. Therefore only Applied filtering action is reported for thesefiles.
159Configuring file system filteringAbout file system filter reports

Managing the file serversThis chapter includes the following topics:
■ About managing the target file servers
■ About backing up the target file servers
■ About virus-checking the target file servers
■ About changing the placeholder recall rate settings
■ About preventing unwanted file recalls from placeholder shortcuts
About managing the target file serversThis section provides guidance on the operational administration of the file serversthat are targets for FSA. It includes information on backing up, virus checking,placeholder recall rates, and preventing unwanted file recalls.
About backing up the target file serversYou must back up the file server disks that File System Archiving processes.
For Windows file servers the backup software must be capable of backing up thefollowing:
■ Alternate data streams
■ Sparse reparse points, if you use placeholder shortcuts
Veritas NetBackup and Veritas Backup Exec are examples of suitable data protectionproducts.
Enterprise Vault placeholder shortcuts appear to the operating system as markersfor offline files. Most backup programs can be configured to ignore offline files. If
18Chapter

you cannot configure your backup program to ignore offline files, every placeholderthat the backup program checks may result in the recall of the offline file.
To determine whether your backup software is recalling files, you can do one ofthe following:
■ Use Windows Explorer to list the files that have been backed up. Placeholdershortcuts have their own icon.
■ Check the File System Archiving report file. If files were recalled on the previousbackup run, successive reports show that an increasing number of files havebeen turned into placeholder shortcuts.
If you cannot configure your backup program to ignore offline files, you can use analternative method to prevent file recalls.
See “About preventing unwanted file recalls from placeholder shortcuts” on page 165.
A restore operation on a file server may result in the recall of placeholders if therestore program attempts to perform File Blocking checks. To prevent this problemyou can prohibit the restore program's user account from performing File Blockingchecks.
See “Preventing file recalls on restore due to File Blocking checks” on page 168.
About virus-checking the target file serversSee the Enterprise Vault Compatibility Charts athttp://www.veritas.com/docs/000097605 for a list of antivirus programs that Veritashas tested for use with Enterprise Vault. Other antivirus programs that have notbeen tested, but which can be configured to ignore offline files, will probably workwith File System Archiving.
Note: Before you install any antivirus product on a file server on which you haveinstalled the FSA Agent, we recommend that you stop the File Placeholder Service.After completing the installation of the antivirus product, you must restart the FilePlaceholder Service.
If possible, configure your antivirus program to ignore offline files before you runvirus scans on disks with Enterprise Vault placeholder shortcuts. Placeholdershortcuts appear to the operating system as markers for offline files. If you cannotconfigure your antivirus program to ignore offline files, every placeholder that theantivirus program checks results in the recall of the offline file.
If you cannot configure your antivirus program to ignore offline files, you can usean alternative method to prevent file recalls.
161Managing the file serversAbout virus-checking the target file servers
See “About preventing unwanted file recalls from placeholder shortcuts” on page 165.
About changing the placeholder recall ratesettings
For Windows and NetApp file servers you can change the maximum rate at whicha user or program can perform placeholder recalls. The default maximum is 20recalls in 10 seconds. This limit helps to prevent applications that do not honor thefile system offline attribute from recalling all the files that have been archived froma volume. An application receives an Access Denied status if it attempts to exceedthe maximum recall rate. How the status is displayed to the user depends on theapplication. A separate setting lets you waive the maximum recall rate for membersof the file server's local Administrators group, if required.
For NetApp file servers, you can also change the number of threads that EnterpriseVault uses for placeholder recalls to each file server. This setting determines themaximum number of simultaneous recalls to the file server. By default EnterpriseVault uses up to 25 threads for placeholder recalls to each NetApp file server.
You may want to adjust these settings if users who perform operations withplaceholders frequently receive error messages indicating that the files cannot berecalled.
Note: Do not increase the maximum recall rate excessively, otherwise applicationsthat fail to honor the file system offline attribute may overload the file server withrecalls.
See “Changing the placeholder recall rate settings for a Windows file server”on page 162.
See “Changing the placeholder recall rate settings for a NetApp file server”on page 164.
Changing the placeholder recall rate settings for a Windows fileserver
Registry values control the placeholder recall rate for Windows file servers. Theregistry values are located under the following registry key on the file server:
162Managing the file serversAbout changing the placeholder recall rate settings

On a 64-bit installation of Windows:
HKEY_LOCAL_MACHINE\SOFTWARE\Wow6432Node\KVS\Enterprise Vault\FSA\PlaceholderService
On a 32-bit installation of Windows:
HKEY_LOCAL_MACHINE\SOFTWARE\KVS\Enterprise Vault\FSA\PlaceholderService
Table 18-1 describes the registry values for limiting placeholder recall on Windowsfile servers.
Table 18-1 Registry values for limiting placeholder recall rate on Windowsfile servers
DescriptionContentRegistry value
Defines the maximum number of placeholderrecalls that are allowed in the period thatRecallLimitTimeInterval defines.
The default value is 20.
For example, if RecallLimitMaxRecalls is set to20 and RecallLimitTimeInterval is set to 10, themaximum placeholder recall rate is 20 recalls in10 seconds.
DWORDRecallLimitMaxRecalls
Specifies the period in seconds for the maximumplaceholder recall rate.
The default is 10.
If the maximum recall rate is reached, EnterpriseVault imposes an additional interval equal to theRecallLimitTimeInterval before it resets thecount. For example, if the maximum recall rateis set at 20 recalls in 10 seconds and a userachieves 20 recalls in 8 seconds, EnterpriseVault imposes a 10-second block on furtherrecalls before it resets the count for the user.
DWORDRecallLimitTimeInterval
163Managing the file serversAbout changing the placeholder recall rate settings

Table 18-1 Registry values for limiting placeholder recall rate on Windowsfile servers (continued)
DescriptionContentRegistry value
Determines whether members of the file server'slocal Administrators group are subject to themaximum placeholder recall rate.
The default is value 0, which means that therecall limit applies to local administrators.Change the value to 1 to waive the recall limitfor administrators.
DWORDBypassRecallLimitsForAdmins
For more information on the registry values for placeholder recall on Windows fileservers, see the Registry Values manual.
Note: A similar set of registry values controls the maximum rate of pass-throughrecall on Windows file servers.
See “Registry values for pass-through recall on Windows file servers” on page 118.
To change the placeholder recall rate settings for a Windows file server
1 Start the Windows registry editor on the file server.
2 Modify the placeholder recall registry values as required.
3 To apply the changes, restart the Enterprise Vault Placeholder service on thefile server.
Changing the placeholder recall rate settings for a NetApp file serverFor a NetApp file server the placeholder recall rate settings are configured on theproperties of the target file server in the Vault Administration Console.
To change the placeholder recall rate settings for a NetApp file server
1 In the Administration Console, expand the Enterprise Vault site until the Targetscontainer is visible.
2 Expand the Targets container and then the File Servers container.
3 Right-click the NetApp file server whose parameters you want to configure,and on the shortcut menu select Properties.
4 On the file server properties dialog, select the NetApp tab.
5 Configure the placeholder recall settings as follows:
164Managing the file serversAbout changing the placeholder recall rate settings
■ To process placeholder recalls on the NetApp file server, ensure thatProcess placeholder recalls is selected.
■ To change the number of available threads for placeholder recalls, changethe value for Number of recall threads.
■ To change the maximum placeholder recall rate for each user, change theLimit recalls to amaximumof... values. You can set the number of recallsand the time period in seconds. If the maximum recall rate is reached,Enterprise Vault imposes an additional interval equal to the time periodbefore it resets the count. For example, if the recall limit is 20 recalls in 10seconds and a user achieves 20 recalls in 8 seconds, Enterprise Vaultimposes a 10-second block on further recalls before it resets the count forthe user
■ To waive the maximum recall rate for members of the NetApp file server'slocal Administrators group, select Ignore recall limits for localadministrators.
6 Click Apply to apply the configuration changes.
About preventing unwanted file recalls fromplaceholder shortcuts
Enterprise Vault placeholder shortcuts appear to the operating system as markersfor offline files. You may experience unwanted recalls of files from FSA placeholdershortcuts in some circumstances. For example, if a backup program or an antivirusprogram does not honor the file system offline attribute it may trigger placeholderrecalls.
You can prevent unwanted recalls in the following ways:
■ For Windows file servers or NetApp filers, use the suppliedEvFsaBackupMode.exe program to exclude the appropriate Active Directoryaccount from triggering placeholder recalls.See “Using FSA backup mode to prevent file recalls” on page 166.
■ For Windows file servers, include the offending program in the list of programsthat are prohibited from recalling archived items.See “Prohibiting a program from recalling files that FSA has archived”on page 167.
■ For EMC Celerra/VNX devices, use the device's backup options to exclude theappropriate Active Directory account from triggering placeholder recalls.See “Preventing file recalls on EMC Celerra/VNX” on page 168.
165Managing the file serversAbout preventing unwanted file recalls from placeholder shortcuts
■ If a restore operation on a file server performs File Blocking checks which triggerfile recalls, you can prohibit the restore program's user account from performingthe File Blocking checks.See “Preventing file recalls on restore due to File Blocking checks” on page 168.
Using FSA backup mode to prevent file recallsFor Windows file servers and NetApp filers you can use the supplied programEvFsaBackupMode.exe to place the file server into FSA backup mode. When thefile server is in FSA backup mode, members of the following security groups areprevented from recalling files from placeholders:
■ The computer local group Enterprise Vault Backup Operators.
■ The domain universal, global, or local group Enterprise Vault Backup Operators.
Other users can continue to recall files as normal.
For example, you can use this mechanism to exclude the accounts that run backupor antivirus programs from recalling files.
Create an Enterprise Vault Backup Operators group in Active Directory and placein this group the required user accounts. You can then use EvFsaBackupMode.exe
to place the file server into FSA backup mode.
EvFsaBackupMode.exe is in the Enterprise Vault installation folder (for exampleC:\Program Files (x86)\Enterprise Vault). You can run EvFsaBackupMode.exe
from the Enterprise Vault installation folder. Alternatively you can copy it to anotherfolder, or copy it to another computer, which does not need to be an EnterpriseVault server.
The syntax for EvFsaBackupMode.exe is as follows:
EvFsaBackupMode.exe -backup | -normal Server
[DirectoryComputer]
where
■ Server is the name of the file server that is running a Placeholder service.
■ DirectoryComputer is the name of the Enterprise Vault Directory servicecomputer. This is required only when you are backing up a NetApp Filer. In thiscase, Server is the name of the NetApp Filer.
For example:
■ To place a file server that is named MyServer into FSA backup mode, type thefollowing:
EvFsaBackupMode.exe -backup MyServer
166Managing the file serversAbout preventing unwanted file recalls from placeholder shortcuts
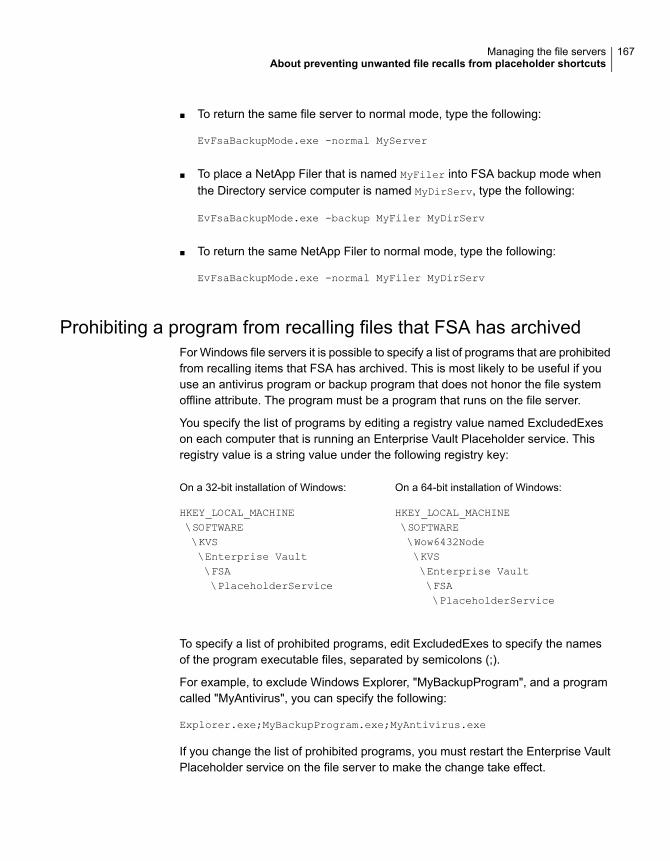
■ To return the same file server to normal mode, type the following:
EvFsaBackupMode.exe -normal MyServer
■ To place a NetApp Filer that is named MyFiler into FSA backup mode whenthe Directory service computer is named MyDirServ, type the following:
EvFsaBackupMode.exe -backup MyFiler MyDirServ
■ To return the same NetApp Filer to normal mode, type the following:
EvFsaBackupMode.exe -normal MyFiler MyDirServ
Prohibiting a program from recalling files that FSA has archivedFor Windows file servers it is possible to specify a list of programs that are prohibitedfrom recalling items that FSA has archived. This is most likely to be useful if youuse an antivirus program or backup program that does not honor the file systemoffline attribute. The program must be a program that runs on the file server.
You specify the list of programs by editing a registry value named ExcludedExeson each computer that is running an Enterprise Vault Placeholder service. Thisregistry value is a string value under the following registry key:
On a 64-bit installation of Windows:
HKEY_LOCAL_MACHINE\SOFTWARE\Wow6432Node\KVS\Enterprise Vault\FSA\PlaceholderService
On a 32-bit installation of Windows:
HKEY_LOCAL_MACHINE\SOFTWARE\KVS\Enterprise Vault\FSA\PlaceholderService
To specify a list of prohibited programs, edit ExcludedExes to specify the namesof the program executable files, separated by semicolons (;).
For example, to exclude Windows Explorer, "MyBackupProgram", and a programcalled "MyAntivirus", you can specify the following:
Explorer.exe;MyBackupProgram.exe;MyAntivirus.exe
If you change the list of prohibited programs, you must restart the Enterprise VaultPlaceholder service on the file server to make the change take effect.
167Managing the file serversAbout preventing unwanted file recalls from placeholder shortcuts
Note: A second ExcludeExes registry value under thePlaceholderService\PassThrough registry key can be used to prevent programsfrom receiving pass-through recalls.
See “Registry values for pass-through recall on Windows file servers” on page 118.
Preventing file recalls on EMC Celerra/VNXFor an EMC Celerra/VNX device, you can use the device's backup options to prohibitActive Directory groups or Active Directory accounts such as a service accountfrom triggering placeholder recalls from the Celerra/VNX file systems. For example,you can exclude the service account for a backup program or antivirus program.
To prevent members of a group or an individual account from triggering placeholderrecalls through the CIFS interface, add the appropriate group or account to theCelerra/VNX Backup Operators group. Then execute the following command toprevent those accounts from recalling placeholders:
fs_dhsm -m fs_name -backup offline
where fs_name is the name of the file system on the Celerra/VNX.
For more details, consult your EMC Celerra/VNX documentation.
Preventing file recalls on restore due to File Blocking checksA restore operation on a file server may result in the recall of archived files fromplaceholders if the restore program attempts to perform File Blocking checks. Toprevent this problem you can prohibit the restore program's user account fromperforming File Blocking checks.
To prevent FSA file recalls on restore due to File Blocking checks
1 Create an Enterprise Vault Backup Operators security group in ActiveDirectory.
2 Add to the Enterprise Vault Backup Operators group the user account underwhich the restore program runs.
3 Add the Enterprise Vault Backup Operators group to the list of users andgroups that are excluded from File Blocking on the file server.
168Managing the file serversAbout preventing unwanted file recalls from placeholder shortcuts

PowerShell cmdlets forFile System Archiving
This chapter includes the following topics:
■ About the PowerShell cmdlets for File System Archiving
■ Running the File System Archiving cmdlets
■ Creating PowerShell scripts using File System Archiving cmdlets
■ File System Archiving cmdlets error handling
About the PowerShell cmdlets for File SystemArchiving
Table 19-1 lists the PowerShell cmdlets that the Enterprise Vault Management Shellprovides for managing the File System Archiving configuration. See the PowerShellCmdlets guide for more information on them.
Table 19-1 PowerShell cmdlets for File System Archiving
DescriptionCmdlet
Retrieves details of all the file servers configured in thespecified Enterprise Vault site.
Get-EVFSAFileServer
Adds the specified file server as a File System Archivingtarget.
New-EVFSAFileServer
Removes the specified file server from Enterprise Vault site.Remove-EVFSAFileServer
19Chapter
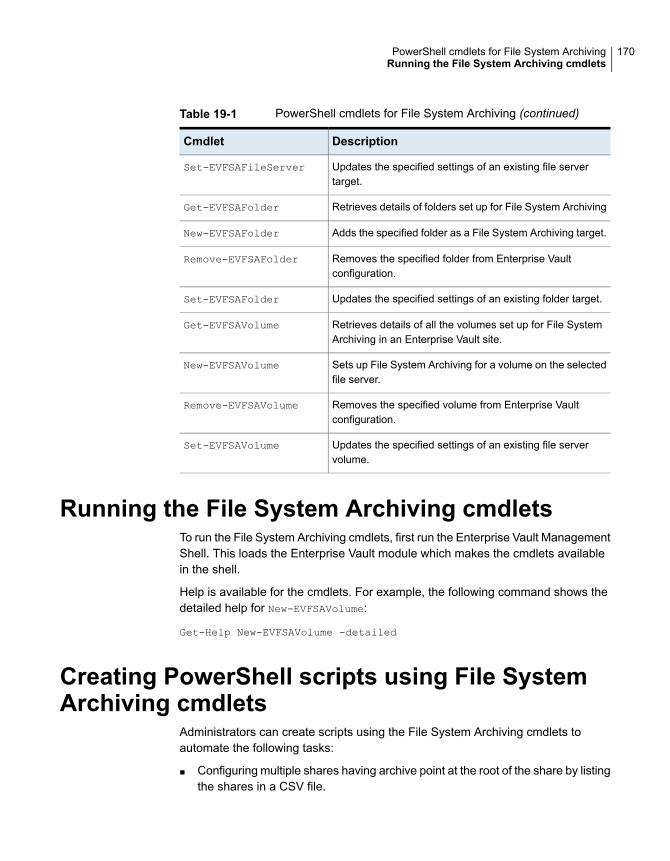
Table 19-1 PowerShell cmdlets for File System Archiving (continued)
DescriptionCmdlet
Updates the specified settings of an existing file servertarget.
Set-EVFSAFileServer
Retrieves details of folders set up for File System ArchivingGet-EVFSAFolder
Adds the specified folder as a File System Archiving target.New-EVFSAFolder
Removes the specified folder from Enterprise Vaultconfiguration.
Remove-EVFSAFolder
Updates the specified settings of an existing folder target.Set-EVFSAFolder
Retrieves details of all the volumes set up for File SystemArchiving in an Enterprise Vault site.
Get-EVFSAVolume
Sets up File System Archiving for a volume on the selectedfile server.
New-EVFSAVolume
Removes the specified volume from Enterprise Vaultconfiguration.
Remove-EVFSAVolume
Updates the specified settings of an existing file servervolume.
Set-EVFSAVolume
Running the File System Archiving cmdletsTo run the File System Archiving cmdlets, first run the Enterprise Vault ManagementShell. This loads the Enterprise Vault module which makes the cmdlets availablein the shell.
Help is available for the cmdlets. For example, the following command shows thedetailed help for New-EVFSAVolume:
Get-Help New-EVFSAVolume -detailed
Creating PowerShell scripts using File SystemArchiving cmdlets
Administrators can create scripts using the File System Archiving cmdlets toautomate the following tasks:
■ Configuring multiple shares having archive point at the root of the share by listingthe shares in a CSV file.
170PowerShell cmdlets for File System ArchivingRunning the File System Archiving cmdlets
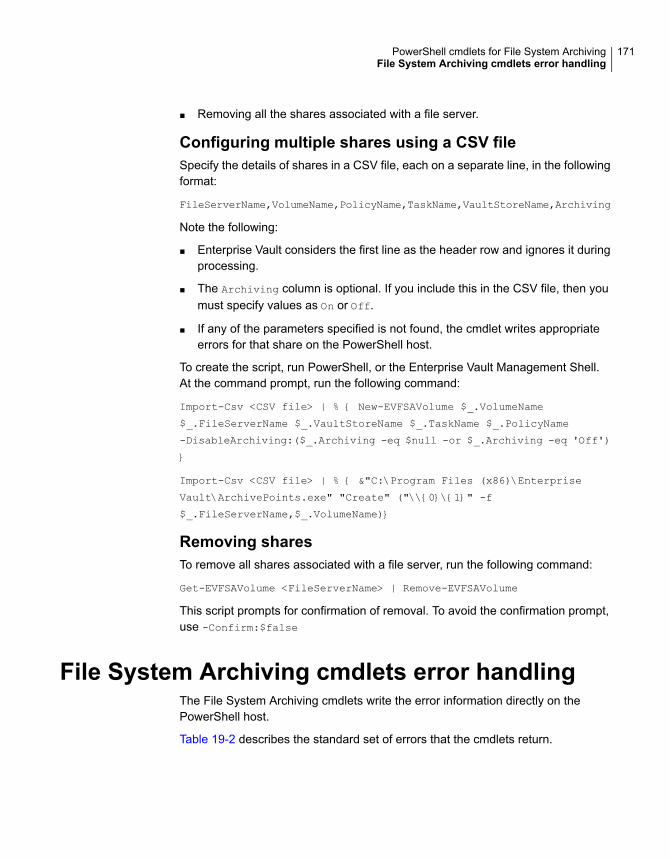
■ Removing all the shares associated with a file server.
Configuring multiple shares using a CSV fileSpecify the details of shares in a CSV file, each on a separate line, in the followingformat:
FileServerName,VolumeName,PolicyName,TaskName,VaultStoreName,Archiving
Note the following:
■ Enterprise Vault considers the first line as the header row and ignores it duringprocessing.
■ The Archiving column is optional. If you include this in the CSV file, then youmust specify values as On or Off.
■ If any of the parameters specified is not found, the cmdlet writes appropriateerrors for that share on the PowerShell host.
To create the script, run PowerShell, or the Enterprise Vault Management Shell.At the command prompt, run the following command:
Import-Csv <CSV file> | % { New-EVFSAVolume $_.VolumeName
$_.FileServerName $_.VaultStoreName $_.TaskName $_.PolicyName
-DisableArchiving:($_.Archiving -eq $null -or $_.Archiving -eq 'Off')
}
Import-Csv <CSV file> | % { &"C:\Program Files (x86)\Enterprise
Vault\ArchivePoints.exe" "Create" ("\\{0}\{1}" -f
$_.FileServerName,$_.VolumeName)}
Removing sharesTo remove all shares associated with a file server, run the following command:
Get-EVFSAVolume <FileServerName> | Remove-EVFSAVolume
This script prompts for confirmation of removal. To avoid the confirmation prompt,use -Confirm:$false
File System Archiving cmdlets error handlingThe File System Archiving cmdlets write the error information directly on thePowerShell host.
Table 19-2 describes the standard set of errors that the cmdlets return.
171PowerShell cmdlets for File System ArchivingFile System Archiving cmdlets error handling

Table 19-2 File System Archiving cmdlet errors
ActionReason for failureErrorID
Ensure that the pass-through recallcache location specified in thecommand is valid and accessible.
The cmdlet is unable to determine theavailable free disk space on file server.
CannotDetermineFreeDiskSpaceOnFileServer
Enable placeholder recalls on theNetApp file server for which you wantto update placeholder recall settings.
The cmdlet cannot update theplaceholder recall settings for thespecified NetApp file server becauseeither placeholder recall is not enabledor you have chosen to disableplaceholder recalls in the command.
CannotUpdateNetAppPHRecallSettings
■ Ensure that the file server supportsplaceholder shortcuts or thatplaceholder shortcuts are enabledon the file server.
■ Specify a folder policy that hasInternet shortcuts as the shortcuttype.
■ The associated file server does notsupport placeholder shortcuts.
■ The associated folder does nothave placeholder shortcutsconfigured.
CannotUseFolderPolicyWithPlaceholders
■ Ensure that pass-through recall isenabled on the file server.
■ Ensure that the file server is aWindows file server and the FSAagent is installed on it.
■ The associated file server does notsupport pass-through recalloperations.
■ The associated file server in theAdministration Console does nothave pass-through recallconfigured.
■ Pass-through recall is supportedon Windows file server that has theEnterprise Vault File PlaceholderService installed and theplaceholder driver version is 8.0 orlater. For NetApp 7-mode,Enterprise Vault supportspass-through recall for accessingfiles from the snapshots. There isno support for pass-through recallfor server types such as NetAppC-Mode, EMC Celerra/VNX, andothers.
■ The file server is not a Windowsfile server.
■ The Windows file server does nothave FSA agent installed.
CannotUsePassthroughSettings
172PowerShell cmdlets for File System ArchivingFile System Archiving cmdlets error handling

Table 19-2 File System Archiving cmdlet errors (continued)
ActionReason for failureErrorID
Use a different volume policy or modifythe volume policy settings for theplaceholder.
■ The share you want to configuremay be on a file server runningNetApp 7.0 or earlier versions.
■ The share you want to configure ison EMC Celerra/VNX file server.
■ The share you want to configure ison Windows file server and the filesystem type for the share is otherthan NTFS.
■ The share you want to configure ison a Windows file server and theEnterprise Vault File PlaceholderService is not installed on the fileserver.
CannotUseVolumePolicyWithPlaceholders
Use a different volume policy or modifythe volume policy.
You can configure quota settings onlywhen the volume target is an NTFSfile system and the path is the drivepath. For example, C:\, E:\, and so on.
CannotUseVolumePolicyWithQuotas
Ensure that the pass-through recallcache location that is specified in thecommand is valid and accessible.
The cmdlet cannot validate thepass-through cache location that isspecified in the command.
CannotValidatePassThroughCacheLocation
Start the Enterprise Vault Directoryservice if it is not running. Check theevent logs for any other errors.
The Enterprise Vault Directory serviceis not running on the Enterprise Vaultcomputer.
EnterpriseVaultDirectoryServiceNotAvailable
Check whether the Enterprise Vaultserver is reachable. Also check thatthe DCOM communication works.
The cmdlet cannot connect to theEnterprise Vault server to get the FileSystem Archiving license information.
ErrorCheckingFSALicense
Check the DTrace logs for moreinformation.
An unknown error has occurred.ErrorDeletingFSAFolder
Check whether the share is reachableand the user running the cmdlet hasappropriate permissions on the share.
The cmdlet cannot get volumeinformation of the share folder.
ErrorGettingFileSystemName
173PowerShell cmdlets for File System ArchivingFile System Archiving cmdlets error handling

Table 19-2 File System Archiving cmdlet errors (continued)
ActionReason for failureErrorID
■ Ensure that the file server that youwant to add is either a Windowsfile server, a NetApp filer, or anEMC Celerra/VNX device.
■ Ensure that you have the requiredpermissions on the file server thatyou want to add.
■ The file server that you want to addis not a Windows file server, aNetApp filer, or an EMCCelerra/VNX device.
■ You do not have the requiredpermissions on the file server thatyou want to add.
FailedToDetectFileServerType
Enable DTrace logs and re-run thecmdlet. Check event logs and DTracelogs for more information.
The specified file server cannot beremoved due to unknown errors.
FailedToRemoveFileServer
Remove all the associated volumes ofthe specified file server.
The specified file server hasassociated volumes that areconfigured for File System Archiving.
FileServerContainsVolumes
Open Vault Administration Consoleand update the configuration of all theNetApp file servers where thisWindows file server is configured as aFile Blocking proxy server.
The specified Windows file server isconfigured as a File Blocking proxyserver for some other NetApp server.
FileServerIsProxyOfNetAppFileServer
Check whether the folder is reachable,and the Vault Service account and theuser running the cmdlet haveappropriate permissions on the server.
The specified folder does not exist oris not accessible on the network.
FolderDoesNotExist
Specify a folder policy that isconfigured in the given EnterpriseVault site.
The specified folder policy is notconfigured in the given EnterpriseVault site.
FolderPolicyNotConfiguredInEVSite
■ Check whether the Enterprise Vaultserver is reachable and the DCOMcommunication works between theEnterprise Vault server and thecomputer where cmdlet is running.
■ Check whether the file server isreachable from Enterprise Vaultserver. Also check that the DCOMcommunication works between theEnterprise Vault server and the fileserver.
■ The cmdlet cannot connect to theEnterprise Vault server.
■ The file server is not reachablefrom the Enterprise Vault server.
FSAErrorGettingServiceStatus
174PowerShell cmdlets for File System ArchivingFile System Archiving cmdlets error handling
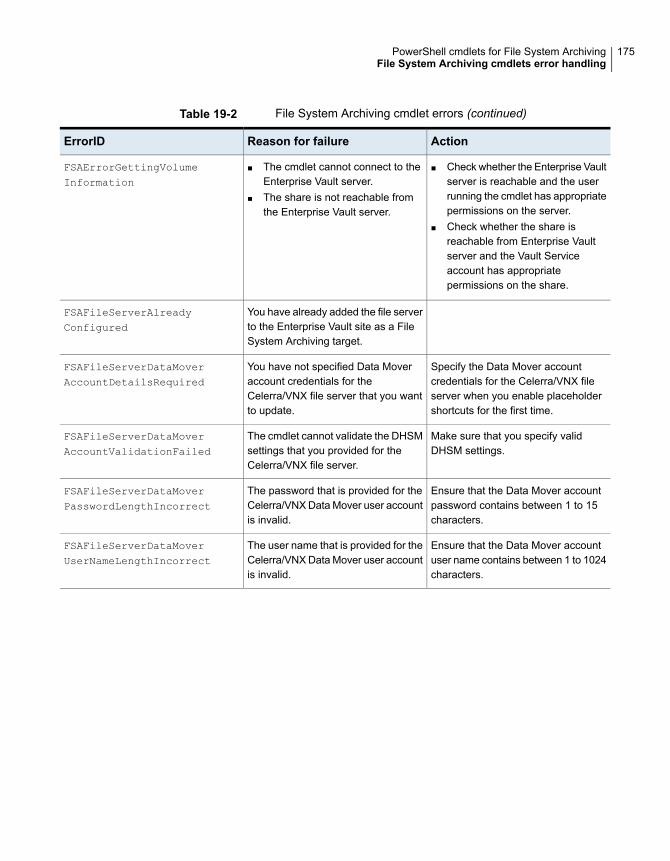
Table 19-2 File System Archiving cmdlet errors (continued)
ActionReason for failureErrorID
■ Check whether the Enterprise Vaultserver is reachable and the userrunning the cmdlet has appropriatepermissions on the server.
■ Check whether the share isreachable from Enterprise Vaultserver and the Vault Serviceaccount has appropriatepermissions on the share.
■ The cmdlet cannot connect to theEnterprise Vault server.
■ The share is not reachable fromthe Enterprise Vault server.
FSAErrorGettingVolumeInformation
You have already added the file serverto the Enterprise Vault site as a FileSystem Archiving target.
FSAFileServerAlreadyConfigured
Specify the Data Mover accountcredentials for the Celerra/VNX fileserver when you enable placeholdershortcuts for the first time.
You have not specified Data Moveraccount credentials for theCelerra/VNX file server that you wantto update.
FSAFileServerDataMoverAccountDetailsRequired
Make sure that you specify validDHSM settings.
The cmdlet cannot validate the DHSMsettings that you provided for theCelerra/VNX file server.
FSAFileServerDataMoverAccountValidationFailed
Ensure that the Data Mover accountpassword contains between 1 to 15characters.
The password that is provided for theCelerra/VNX Data Mover user accountis invalid.
FSAFileServerDataMoverPasswordLengthIncorrect
Ensure that the Data Mover accountuser name contains between 1 to 1024characters.
The user name that is provided for theCelerra/VNX Data Mover user accountis invalid.
FSAFileServerDataMoverUserNameLengthIncorrect
175PowerShell cmdlets for File System ArchivingFile System Archiving cmdlets error handling

Table 19-2 File System Archiving cmdlet errors (continued)
ActionReason for failureErrorID
Make sure that you specify validDHSM settings.
The cmdlet failed to communicate withthe Celerra/VNX file server becauseof one of the following reasons:
■ The Celerra/VNX Data Mover useraccount is not authorized.
■ Access to Celerra/VNX file serveris denied.
■ The Celerra/VNX file server isunavailable.
■ Request to connect Celerra/VNXfile server has timed out.
■ The SSL certificate on theCelerra/VNX server is not valid.
■ The Data Mover service (DHSM)is not configured on the providedport number.
FSAFileServerDHSMCommunicationError
Enable placeholder shortcuts on theCelerra/VNX file server for which youwant to update DHSM settings.
The cmdlet cannot update the DHSMsettings for the specified Celerra/VNXfile server because either placeholdershortcuts are disabled or you havechosen to disable placeholdershortcuts in the command.
FSAFileServerDHSMConfigurationNotAllowed
Check Event logs and DTrace logs formore information.
An unknown error has occurred.FSAFileServerFailedToConfigure
Specify the fully qualified domainname or UNC name or Alias name ofthe file server.
You have specified the IP address ofthe file server.
FSAFileServerIPAddressNotAllowed
■ Add the file server using the NewFile Server wizard.
■ Specify a file server that isconfigured in the given EnterpriseVault site.
The specified file server is notconfigured in the AdministrationConsole for the given Enterprise Vaultsite.
FSAFileServerNotConfiguredInEVSite
Ensure that the file server isaccessible on the network.
The specified file server is notaccessible on the network.
FSAFileServerNotFoundInNetwork
176PowerShell cmdlets for File System ArchivingFile System Archiving cmdlets error handling

Table 19-2 File System Archiving cmdlet errors (continued)
ActionReason for failureErrorID
Specify a file server that is running asupported operating system. Refer tothe Enterprise Vault CompatibilityCharts for the list of supportedoperating system versions forWindows file servers.
The version of the operating systemon the specified file server is notsupported.
FSAFileServerUnsupportedOS
You have already added the folder tothe Enterprise Vault site as a FileSystem Archiving target.
FSAFolderAlreadyConfigured
Ensure that you have the requiredpermissions on the folder that youwant to configure.
The cmdlet failed to configure thespecified folder.
FSAFolderFailedToConfigure
If you want the cmdlet to use the folderpolicy, set UseVolumePolicy tofalse.
If you want the cmdlet to use thevolume policy, do not specify a folderpolicy.
You have specified a folder policyalong with the parameterUseVolumePolicy set to true.
FSAFolderInvalidPolicyParameter
Use New-EVFSAFolder cmdlet toconfigure the folder.
The specified folder is not set up forarchiving on the file server. Thereforeyou cannot update, delete, or retrieveproperties of the folder.
FSAFolderNotConfiguredInEVSite
Specify a folder policy that isconfigured in the given EnterpriseVault site.
You have set the parameterUseVolumePolicy set to false, buthave not specified a folder policy.
FSAFolderPolicyNotSpecified
The File System Archiving license isrequired for adding new volumes. SeeInstalling and Configuring forinformation about licenses.
The File System Archiving license isnot installed on the Enterprise Vaultserver.
FSALicenseNotFound
177PowerShell cmdlets for File System ArchivingFile System Archiving cmdlets error handling
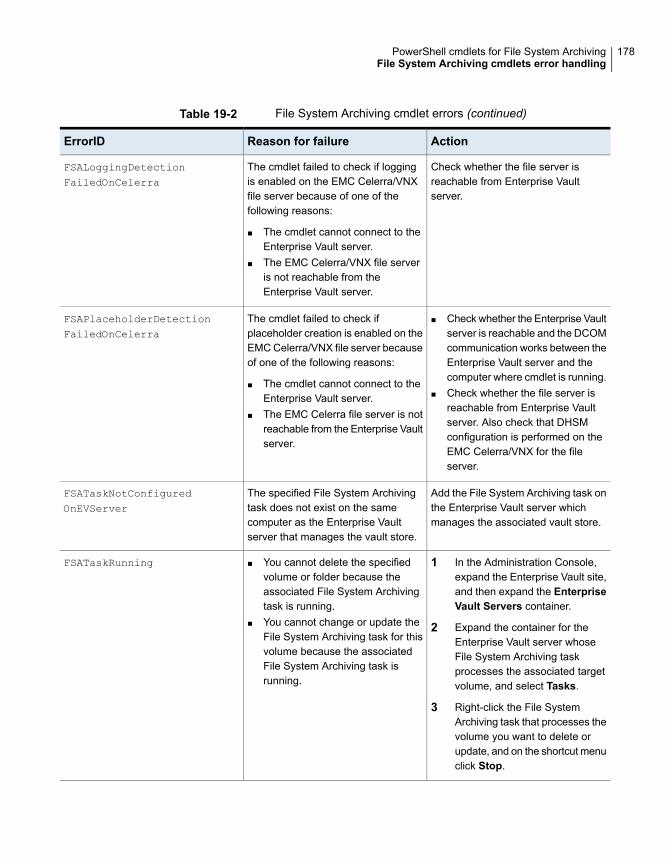
Table 19-2 File System Archiving cmdlet errors (continued)
ActionReason for failureErrorID
Check whether the file server isreachable from Enterprise Vaultserver.
The cmdlet failed to check if loggingis enabled on the EMC Celerra/VNXfile server because of one of thefollowing reasons:
■ The cmdlet cannot connect to theEnterprise Vault server.
■ The EMC Celerra/VNX file serveris not reachable from theEnterprise Vault server.
FSALoggingDetectionFailedOnCelerra
■ Check whether the Enterprise Vaultserver is reachable and the DCOMcommunication works between theEnterprise Vault server and thecomputer where cmdlet is running.
■ Check whether the file server isreachable from Enterprise Vaultserver. Also check that DHSMconfiguration is performed on theEMC Celerra/VNX for the fileserver.
The cmdlet failed to check ifplaceholder creation is enabled on theEMC Celerra/VNX file server becauseof one of the following reasons:
■ The cmdlet cannot connect to theEnterprise Vault server.
■ The EMC Celerra file server is notreachable from the Enterprise Vaultserver.
FSAPlaceholderDetectionFailedOnCelerra
Add the File System Archiving task onthe Enterprise Vault server whichmanages the associated vault store.
The specified File System Archivingtask does not exist on the samecomputer as the Enterprise Vaultserver that manages the vault store.
FSATaskNotConfiguredOnEVServer
1 In the Administration Console,expand the Enterprise Vault site,and then expand the EnterpriseVault Servers container.
2 Expand the container for theEnterprise Vault server whoseFile System Archiving taskprocesses the associated targetvolume, and select Tasks.
3 Right-click the File SystemArchiving task that processes thevolume you want to delete orupdate, and on the shortcut menuclick Stop.
■ You cannot delete the specifiedvolume or folder because theassociated File System Archivingtask is running.
■ You cannot change or update theFile System Archiving task for thisvolume because the associatedFile System Archiving task isrunning.
FSATaskRunning
178PowerShell cmdlets for File System ArchivingFile System Archiving cmdlets error handling
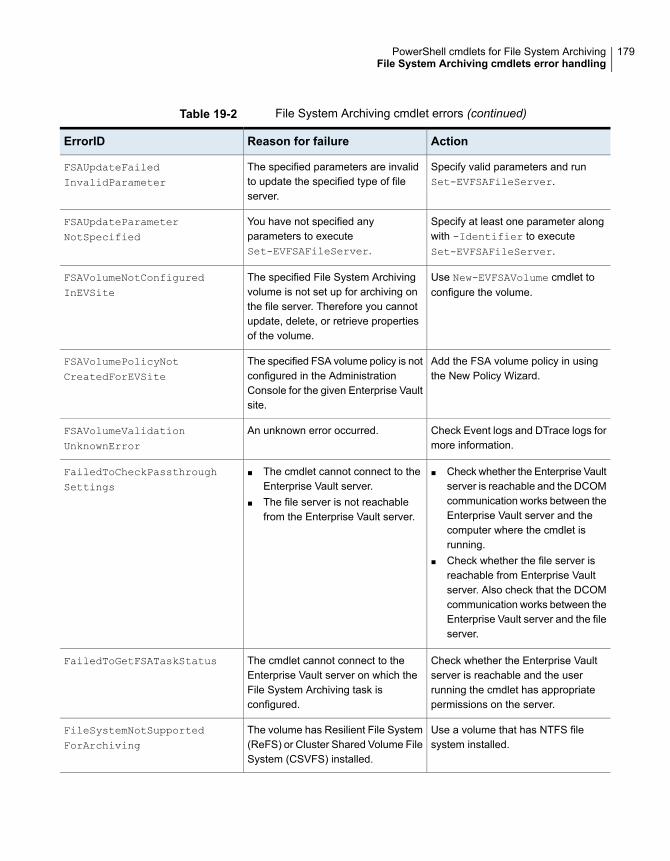
Table 19-2 File System Archiving cmdlet errors (continued)
ActionReason for failureErrorID
Specify valid parameters and runSet-EVFSAFileServer.
The specified parameters are invalidto update the specified type of fileserver.
FSAUpdateFailedInvalidParameter
Specify at least one parameter alongwith -Identifier to executeSet-EVFSAFileServer.
You have not specified anyparameters to executeSet-EVFSAFileServer.
FSAUpdateParameterNotSpecified
Use New-EVFSAVolume cmdlet toconfigure the volume.
The specified File System Archivingvolume is not set up for archiving onthe file server. Therefore you cannotupdate, delete, or retrieve propertiesof the volume.
FSAVolumeNotConfiguredInEVSite
Add the FSA volume policy in usingthe New Policy Wizard.
The specified FSA volume policy is notconfigured in the AdministrationConsole for the given Enterprise Vaultsite.
FSAVolumePolicyNotCreatedForEVSite
Check Event logs and DTrace logs formore information.
An unknown error occurred.FSAVolumeValidationUnknownError
■ Check whether the Enterprise Vaultserver is reachable and the DCOMcommunication works between theEnterprise Vault server and thecomputer where the cmdlet isrunning.
■ Check whether the file server isreachable from Enterprise Vaultserver. Also check that the DCOMcommunication works between theEnterprise Vault server and the fileserver.
■ The cmdlet cannot connect to theEnterprise Vault server.
■ The file server is not reachablefrom the Enterprise Vault server.
FailedToCheckPassthroughSettings
Check whether the Enterprise Vaultserver is reachable and the userrunning the cmdlet has appropriatepermissions on the server.
The cmdlet cannot connect to theEnterprise Vault server on which theFile System Archiving task isconfigured.
FailedToGetFSATaskStatus
Use a volume that has NTFS filesystem installed.
The volume has Resilient File System(ReFS) or Cluster Shared Volume FileSystem (CSVFS) installed.
FileSystemNotSupportedForArchiving
179PowerShell cmdlets for File System ArchivingFile System Archiving cmdlets error handling
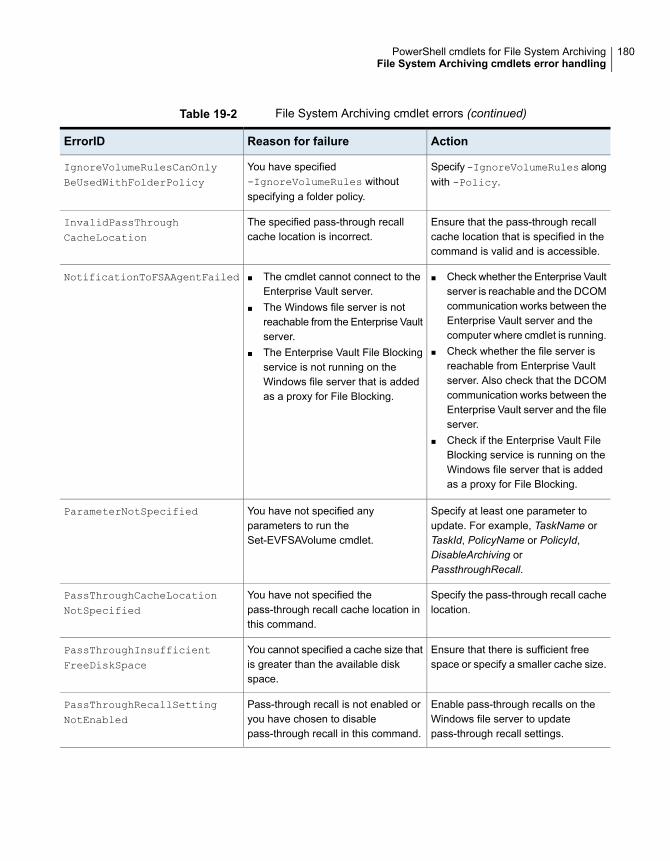
Table 19-2 File System Archiving cmdlet errors (continued)
ActionReason for failureErrorID
Specify-IgnoreVolumeRules alongwith -Policy.
You have specified-IgnoreVolumeRules withoutspecifying a folder policy.
IgnoreVolumeRulesCanOnlyBeUsedWithFolderPolicy
Ensure that the pass-through recallcache location that is specified in thecommand is valid and is accessible.
The specified pass-through recallcache location is incorrect.
InvalidPassThroughCacheLocation
■ Check whether the Enterprise Vaultserver is reachable and the DCOMcommunication works between theEnterprise Vault server and thecomputer where cmdlet is running.
■ Check whether the file server isreachable from Enterprise Vaultserver. Also check that the DCOMcommunication works between theEnterprise Vault server and the fileserver.
■ Check if the Enterprise Vault FileBlocking service is running on theWindows file server that is addedas a proxy for File Blocking.
■ The cmdlet cannot connect to theEnterprise Vault server.
■ The Windows file server is notreachable from the Enterprise Vaultserver.
■ The Enterprise Vault File Blockingservice is not running on theWindows file server that is addedas a proxy for File Blocking.
NotificationToFSAAgentFailed
Specify at least one parameter toupdate. For example, TaskName orTaskId, PolicyName or PolicyId,DisableArchiving orPassthroughRecall.
You have not specified anyparameters to run theSet-EVFSAVolume cmdlet.
ParameterNotSpecified
Specify the pass-through recall cachelocation.
You have not specified thepass-through recall cache location inthis command.
PassThroughCacheLocationNotSpecified
Ensure that there is sufficient freespace or specify a smaller cache size.
You cannot specified a cache size thatis greater than the available diskspace.
PassThroughInsufficientFreeDiskSpace
Enable pass-through recalls on theWindows file server to updatepass-through recall settings.
Pass-through recall is not enabled oryou have chosen to disablepass-through recall in this command.
PassThroughRecallSettingNotEnabled
180PowerShell cmdlets for File System ArchivingFile System Archiving cmdlets error handling
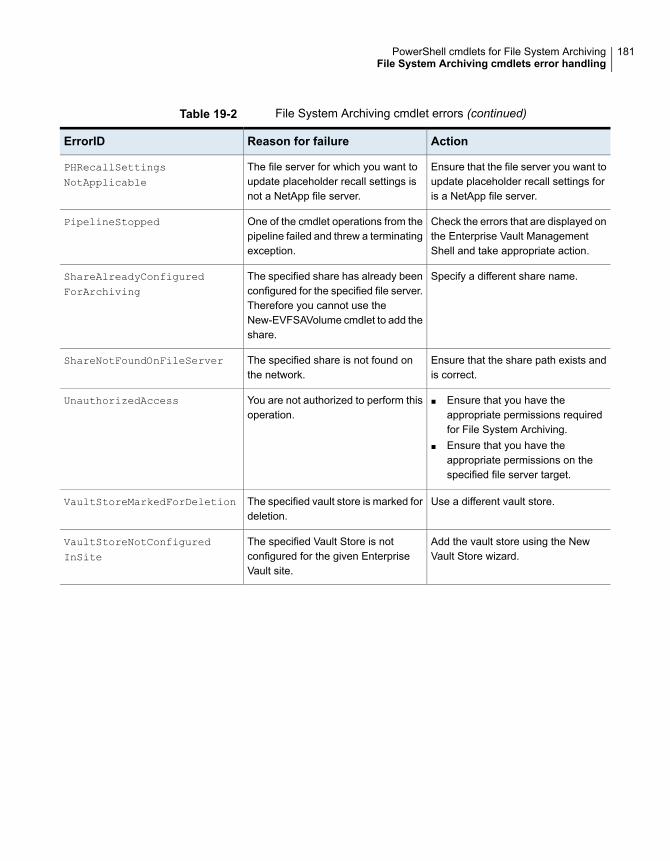
Table 19-2 File System Archiving cmdlet errors (continued)
ActionReason for failureErrorID
Ensure that the file server you want toupdate placeholder recall settings foris a NetApp file server.
The file server for which you want toupdate placeholder recall settings isnot a NetApp file server.
PHRecallSettingsNotApplicable
Check the errors that are displayed onthe Enterprise Vault ManagementShell and take appropriate action.
One of the cmdlet operations from thepipeline failed and threw a terminatingexception.
PipelineStopped
Specify a different share name.The specified share has already beenconfigured for the specified file server.Therefore you cannot use theNew-EVFSAVolume cmdlet to add theshare.
ShareAlreadyConfiguredForArchiving
Ensure that the share path exists andis correct.
The specified share is not found onthe network.
ShareNotFoundOnFileServer
■ Ensure that you have theappropriate permissions requiredfor File System Archiving.
■ Ensure that you have theappropriate permissions on thespecified file server target.
You are not authorized to perform thisoperation.
UnauthorizedAccess
Use a different vault store.The specified vault store is marked fordeletion.
VaultStoreMarkedForDeletion
Add the vault store using the NewVault Store wizard.
The specified Vault Store is notconfigured for the given EnterpriseVault site.
VaultStoreNotConfiguredInSite
181PowerShell cmdlets for File System ArchivingFile System Archiving cmdlets error handling
Permissions and privilegesrequired for the VaultService account onWindows file servers
This appendix includes the following topics:
■ About the permissions and privileges required for the Vault Service account onWindows file servers
■ Group membership requirements for the Vault Service account
■ DCOM permissions required by the Vault Service account
■ WMI control permissions required by the Vault Service account
■ Local security user rights required by the Vault Service account
■ Permissions required by the Vault Service account for the FSA Agent
■ Permissions required by the Vault Service account to support the FSA resourceon clustered file servers
■ FSA target share and folder permissions required by the Vault Service account
AAppendix
About the permissions and privileges requiredfor the Vault Service account on Windows fileservers
If the Vault Service account is not a member of the local Administrators group onan FSA target Windows file server, the account requires a set of minimumpermissions and privileges on the file server.
The Vault Service account also requires these permissions and privileges on FileBlocking agent servers, and on proxy servers for FSA Reporting.
See “Permissions and privileges required by the Vault Service account on Windowsfile servers” on page 41.
This appendix describes the required permissions and privileges.
If you install the FSA Agent, the installer configures these permissions and privilegesexcept for the following, which you must set manually:
■ Permissions required for Windows Server Failover Clustering, if you configurethe FSA resource.See “Permissions required by the Vault Service account to support the FSAresource on clustered file servers” on page 187.
■ FSA target share and folder permissions:See “FSA target share and folder permissions required by the Vault Serviceaccount” on page 187.
Note: Ensure that your group policy permissions do not override the required localpermissions for the Vault Service account.
If you change the Vault Service account you must ensure that the new account isgranted these permissions and privileges. You can use theEVFSASetRightsAndPermissions utility to help you do this.
See “EVFSASetRightsAndPermissions” in the Utilities guide.
Group membership requirements for the VaultService account
If the Vault Service account is not a member of the local Administrators group ona target Windows file server, it must be a member of the built-in local PrintOperators group.
183Permissions and privileges required for the Vault Service account on Windows file serversAbout the permissions and privileges required for the Vault Service account on Windows file servers
If you install the FSA Agent either from the Administration Console or manually,the installation process adds the Vault Service account to the Print Operatorsgroup.
DCOM permissions required by the Vault Serviceaccount
For target Windows file servers, the Vault Service account requires DCOM Securityremote access permission, plus remote launch and remote activation permissions.
You can view and set the required permissions from Administrative Tools >Component Services > Computers > My Computer.
On the COM Security tab:
■ Under Access Permissions: The Vault Service account must have RemoteAccess permission in addition to Local Access permission.
■ Under Launch and Activation Permissions: The Vault Service account musthaveRemote Launch andRemote Activation permissions in addition to LocalLaunch and Local Activation permissions.
WMI control permissions required by the VaultService account
The Vault Service account requiresRemote Enable permissions on the Root\CIMV2namespace on target Windows file servers.
You can view and set the properties of the namespace from Administrative Tools> Computer Management > Services and Applications > WMI Control.
On the Security tab, expand theRoot node and selectCIMV2. For the Vault Serviceaccount, Remote Enable permission must be allowed.
Local security user rights required by the VaultService account
If the Vault Service account does not have local administrator rights on a targetWindows file server, it requires a set of local user rights.
Table A-1 lists the required user rights.
184Permissions and privileges required for the Vault Service account on Windows file serversDCOM permissions required by the Vault Service account

Table A-1 User rights required by the Vault Service account
NotesUser right stringPrivilegeConstant/Value
The Enterprise VaultPlaceholder service requiresthis right to read the processname, for excluding certainprocesses from recalling files.
Debug programsSE_DEBUG_NAME /
SeDebugPrivilege
The Vault Service accountrequires this privilege tomodify file properties whenperforming file archiving orFile Blocking operations, forexample to change fileattributes or to delete files,when it does not have directaccess to a file or folder
Take ownership of files orother objects
SE_TAKE_OWNERSHIP_NAME/
SeTakeOwnershipPrivilege
Required for the archiving offiles that the Vault Serviceaccount does not have directaccess to.
The Enterprise VaultPlaceholder service requiresthis right to read the XML andalternate datastreammetadata of files on shares.
Backup files and directoriesSE_BACKUP_NAME/
SeBackupPrivilege
Required for the restoring offiles that the Vault Serviceaccount does not have directaccess to.
Restore files and directoriesSE_RESTORE_NAME/
SeRestorePrivilege
The Vault Service accountrequires this right for the FSAAgent services.
Log on as a serviceLog on as a service
/SeServiceLogonRight
To view or set the user right strings, open the Local Security Settings MicrosoftManagement Console (MMC) snap-in and navigate to Security Settings > LocalPolicies > User Rights Assignment. Windows displays the user right strings inthe Policy column.
Note: You must make sure that there are no Group policy overrides for these localuser rights.
185Permissions and privileges required for the Vault Service account on Windows file serversLocal security user rights required by the Vault Service account
Permissions required by the Vault Service accountfor the FSA Agent
This section describes the permissions that the Vault Service account requires ona target Windows file server for the FSA Agent.
Note: These permissions are required only if the FSA Agent is installed.
FSA Agent service permissions required by the Vault Service accountThe Vault Service account requires the access permission SERVICE_ALL_ACCESSon the service object security descriptor for each of the FSA Agent services:
■ Enterprise Vault File Placeholder Service
■ Enterprise Vault File Blocking Service
■ Enterprise Vault File Collector Service
You can set a service's security descriptor by using a command similar to thefollowing:
sc sdset ServiceName ServiceSecurityDescriptor
See your Microsoft documentation for details.
Enterprise Vault installation folder permissions required by the VaultService account
The Vault Service account requires READ/WRITE access on a target file server'sEnterprise Vault installation folder, (for example C:\Program Files
(x86)\Enterprise Vault). This access is required to enable the FSA Agentservices to read, write, and create files under the installation folder.
File server registry hive permissions required by the Vault Serviceaccount
The Vault Service account requires FULL control access on a target file server'sEnterprise Vault registry hive, HKLM\Software\KVS. This access is required toenable the FSA Agent services to create, read, and update the information underthe hive.
186Permissions and privileges required for the Vault Service account on Windows file serversPermissions required by the Vault Service account for the FSA Agent

Permissions required by the Vault Service accountto support the FSA resource on clustered fileservers
The Vault Service account requires the following permissions if you add the FSAresource to a file server cluster:
■ For VCS, the Vault Service account must be a member of the local Administratorsgroup on each cluster node.
■ For a Windows Server failover cluster, the Vault Service account requires specificcluster permissions if it is not a member of the local Administrators group oneach cluster node.You must set the cluster permissions to grant the Vault Service account FullControl permissions for managing the cluster.The FSA Agent installer does not set these permissions. You must set thepermissions manually.
FSA target share and folder permissions requiredby the Vault Service account
The Vault Service account requires the following permissions on a Windows fileserver that is a target for FSA:
■ Full control on any share that is configured as a target volume.
■ NTFS read permission on the folder that the share maps to.
Optionally the Vault Service account also requires browse permissions on the targetfolders, and on any folders in the paths to the target folders. If these optionalpermissions are not set, you cannot browse in the Administration Console for thetarget folder, and so you must specify the path by typing it in.
You must set these target share and folder permissions manually as required.
187Permissions and privileges required for the Vault Service account on Windows file serversPermissions required by the Vault Service account to support the FSA resource on clustered file servers

AAdministration Console
File System Archiving containers 18ApplyRtnPolicyOnlyOnExistingFolders 125Archive points 21, 100–101
adding 102effects of modifying folders with archive
points 110managing 104properties 106
Auto-enabling folders 100, 102
CCelerra/VNX device
adding to FSA 54preparing for FSA 55
Clustered file servers 17adding a virtual file server 71adding the Vault Service account to the
non-secure VCS cluster 70configuring FSA with 68configuring the FSA resource 74removing the FSA resource 75single-node cluster 69supported cluster types 67troubleshooting 75, 77
DDelete archived file on placeholder deletion
about 93configuring for Celerra/VNX 96configuring for Windows and NetApp 95
DOD cache 93Dynamic Access Control and FSA 38
EEMC Celerra/VNX
configuring pass-through recall for FSA 59configuring the Data Mover HTTP server to use
SSL 61
EMC Celerra/VNX (continued)scheduling deletion of archived files on
placeholder deletion 147specifying an FSA cache location 66
EMC Celerra/VNX deviceadding to FSA 54preparing for FSA 55
EVEARemovalUtility 26EvFsaBackupMode.exe 166ExcludedExes 167Excluding file types from FSA 89Explicit permissions and FSA 38Extended attributes 26
FFailed to collect clustering data error 77File Blocking
about 30central quarantine 134configuring 130–131exempting users from 142local quarantine 133notifications 30quarantine location 130rules 137troubleshooting in a clustered environment 143
File Server Admininistration 160File servers
deleting from FSA 114processing immediately 150
File System Archivingaccount requirements 40adding a target volume 101adding folder policies 102adding target folders 102archive points 21, 100, 104, 106archived file permissions 22archiving rules 88Archiving task reports 151auto-enabling folders 100backing up file servers 160
Index
File System Archiving (continued)clustered file servers 17, 67–68configuration steps 33configuring 18containers in Administration Console 18defer indexing for an archive 106deleting target file servers 114deleting target folders 112deleting target volumes 112Deletion of files on placeholder deletion 93ExcludedExes registry value 167excluding files from FSA 89File Blocking 30, 130–131File Blocking rules 137files under Dynamic Access Control 91files with explicit permissions 91FSA Agent 28, 78FSA backup mode 166FSAUtility 32indexing level for archives 21, 106internet shortcuts 24managing the file servers 160migrating and consolidating file servers 17, 32modifying folders 109multiple archives for a folder path 101overview 16pass-through recall 27, 115permissions and privileges for the Vault Service
account on Windows file servers 41, 183placeholder shortcuts 24, 87policies 20, 85, 123preventing file recalls 165–166preventing file recalls on EMC Celerra/VNX 168preventing file recealls on restore due to File
Blocking checks 168prohibiting a program from recalling files 167retention folders 29, 122–123Run Now option 148scheduling 145scheduling permissions synchronization 146scheduling storage expiry 153shortcut creation options 90shortcut files 23targets 21targets for archiving 99version pruning 148virus-checking file servers 161with a Windows Encrypting File System (EFS) 37
File System Archiving taskadding 145configuring 144
File system filteringoverview 154registry setting 155reports 159
Files under Dynamic Access Control 91Files with explicit permissions 91Firewall settings 42Folder policies
effects of modifying folders that have folderpolicies 109
FSA Agentabout 28installing 78manual installation 81silent installation 81uninstalling 82Update service credentials 83wizard-based installation 80
FSA Cluster Configuration wizard 71, 74–75troubleshooting 75, 77
FSA Reportingabout 31and the FSA Agent 43
FSA resource 187FSAUtility 32
IInternet (URL) shortcuts 24
MMac file types
excluding from FSA 89
NNetApp filer
adding to FSA 45required permissions 45
PPass-through recall
about 27configuring 115configuring for a file server cluster 117for Celerra/VNX file servers 59for NetApp filers 120
189Index
Pass-through recall (continued)for Windows file servers 116registry values for 118
Placeholder shortcuts 24displaying file sizes 24, 87limitation for files with extended attributes 26preventing unwanted recalls 165recall rate settings 162recalls with Windows Explorer preview pane 26
RRetention folders
about 29command line interface 125configuring 122controlling the recreation of deleted folders 125disabling 129managing 128policies for 123testing the effects of 125
RtnFolder.exe 125settings file 126
RtnFolderSettings.xml 126Run Now option for FSA 148
SShortcut creation options in FSA 90Shortcuts
File System Archiving 23FSA policy settings 87
SingleNodeFSA 69
UUpdate Service Credentials 83
VVault Service account
permissions and privileges required for FSA 41, 183
permissions required for FSA clusters 187version pruning of files in FSA 148Volumes
creating a volume policy for FSA 85processing manually 149
WWindows Encrypting File System 37
Windows file serveradding to FSA 36configuring the firewall for FSA 42
Windows file typesexcluding from FSA 89
Windows Server 2012 file servers 38archiving deduplicated files 39Dynamic Access Control and FSA 38ReFS and CSVFS file systems with FSA 38
190Index


![[PPT]Title slide with picture · Web viewControlPoint Retention of business records with HPE Records Manager Enterprise information archiving with Commvault & Veritas Enterprise Vault](https://static.fdocuments.in/doc/165x107/5b263b907f8b9af1188b4f97/ppttitle-slide-with-picture-web-viewcontrolpoint-retention-of-business-records.jpg)