V511901 - B-Pillar Noise while Driving 2018 Tiguan LWB
13
Technical Bulletin Page 1 of 13 © 2019 Volkswagen Group of America, Inc. All rights reserved. Information contained in this document is based on the latest information available at the time of printing and is subject to the copyright and other intellectual property rights of Volkswagen Group of America, Inc., its affiliated companies and its licensors. All rights are reserved to make changes at any time without notice. No part of this document may be reproduced, stored in a retrieval system, or transmitted in any form or by any means, electronic, mechanical, photocopying, recording, or otherwise, nor may these materials be modified or reposted to other sites, without the prior expressed written permission of the publisher. Model(s) Year Eng. Code Trans. Code VIN Range From VIN Range To Tiguan LWB 2018 All All AX_JM000001 AX_JM158351 Condition 51 19 01 April 8, 2019 2050753 Supersedes Technical Bulletin 51-18-03 dated August 2, 2018 to update labor operation numbers per Elsa updates. B-Pillar Noise while Driving Technical Background B-Pillar noise due to part production process. Note: This TB must be read in its entirety before attempting the procedure described below. First range of affected vehicles are required to perform steps 1-4 described in this TB: From VIN AX_JM000001 to AX_JM020826. Second range of affected vehicles are required to perform ONLY steps 2-3 described in this TB: From: AX_JM020827 to AX_JM158351. Production Solution 5 welding points plus adhesive added as of VIN: AX_JM020827. Improvement in production process to open gap between brackets and A-Pillar reinforcement and technical change to reduce bracket/leg dimensions as of AX_JM158351.
Transcript of V511901 - B-Pillar Noise while Driving 2018 Tiguan LWB
Technical Bulletin
Page 1 of 13 © 2019 Volkswagen Group of America, Inc. All rights reserved. Information contained in this document is based on the latest information available at the time of printing and is subject to the copyright and other
intellectual property rights of Volkswagen Group of America, Inc., its affiliated companies and its licensors. All rights are reserved to make changes at any time without notice.
No part of this document may be reproduced, stored in a retrieval system, or transmitted in any form or by any means, electronic, mechanical, photocopying, recording, or
otherwise, nor may these materials be modified or reposted to other sites, without the prior expressed written permission of the publisher.
Model(s) Year Eng. Code Trans. Code VIN Range From VIN Range To
Tiguan LWB 2018 All All AX_JM000001 AX_JM158351
Condition
51 19 01 April 8, 2019 2050753 Supersedes Technical Bulletin 51-18-03 dated August 2, 2018 to update labor
operation numbers per Elsa updates.
B-Pillar Noise while Driving
Technical Background
B-Pillar noise due to part production process.
Note:
This TB must be read in its entirety before attempting the procedure described below.
First range of affected vehicles are required to perform steps 1-4 described in this TB:
From VIN AX_JM000001 to AX_JM020826.
Second range of affected vehicles are required to perform ONLY steps 2-3 described in this TB:
From: AX_JM020827 to AX_JM158351.
Production Solution
5 welding points plus adhesive added as of VIN: AX_JM020827.
Improvement in production process to open gap between brackets and A-Pillar reinforcement and technical
change to reduce bracket/leg dimensions as of AX_JM158351.
Technical Bulletin
Page 2 of 13 © 2019 Volkswagen Group of America, Inc. All rights reserved. Information contained in this document is based on the latest information available at the time of printing and is subject to the copyright and other
intellectual property rights of Volkswagen Group of America, Inc., its affiliated companies and its licensors. All rights are reserved to make changes at any time without notice.
No part of this document may be reproduced, stored in a retrieval system, or transmitted in any form or by any means, electronic, mechanical, photocopying, recording, or
otherwise, nor may these materials be modified or reposted to other sites, without the prior expressed written permission of the publisher.
Service
Procedure
Perform a test drive under the same conditions as the customer complaint: temperature, road, speed, number & seating position of passenger(s), etc., as to identify where the noise is coming from, upper and/or down, in the left and or right side of the vehicle.
Preparation of the vehicle for performing rework:
Remove the headliner according to Repair Manual group 70 Interior Trim in Elsa.
Remove the seat belt height adjuster according to Repair Manual group 69 Passenger Protection in Elsa.
Partially remove door seal.
WARNING:
Review the general safety regulations when working on Airbag, belt tensioner and battery isolator units
(pyrotechnic components). Refer to Body Interior, Repair Group 00. General Technical data in Elsa.
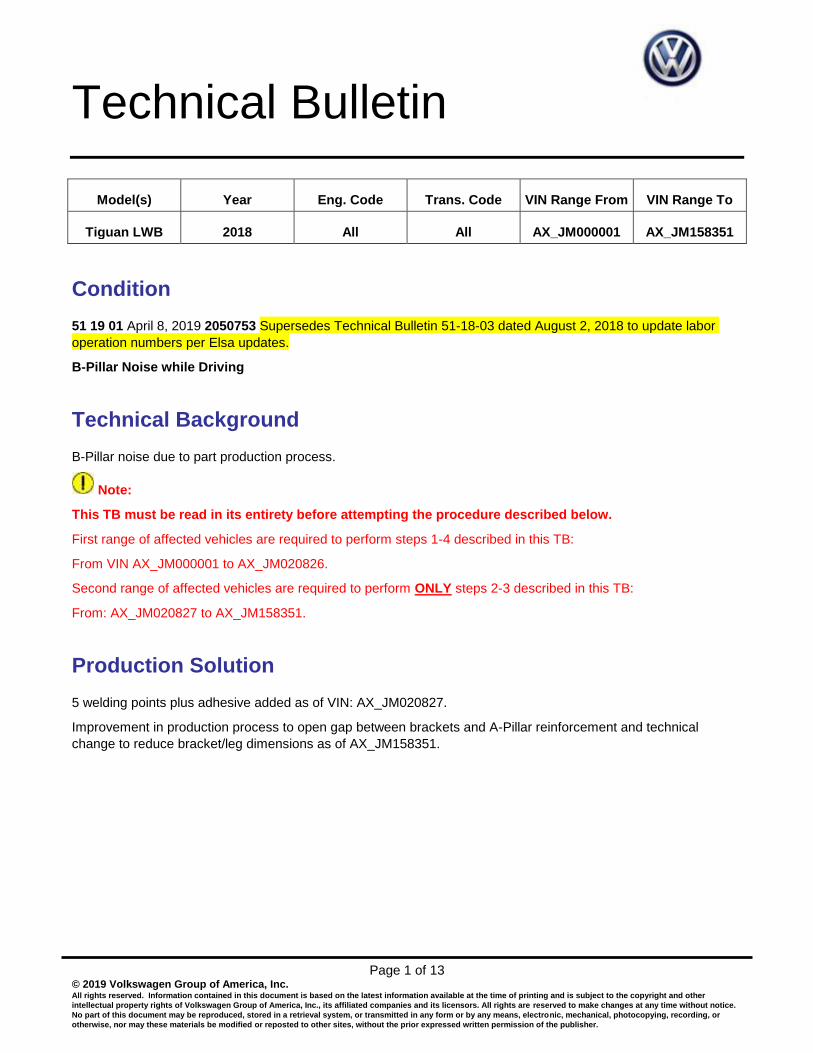
Partially remove the Head Curtain Airbag (only disconnect according to Repair Manual and remove the igniter, see Figure 1). See Repair Manual group 69 Passenger Protection in Elsa.
Figure 1 (NOTE: The direction of the YELLOW arrows indicates the front of the vehicle.)
Technical Bulletin
Page 3 of 13 © 2019 Volkswagen Group of America, Inc. All rights reserved. Information contained in this document is based on the latest information available at the time of printing and is subject to the copyright and other
intellectual property rights of Volkswagen Group of America, Inc., its affiliated companies and its licensors. All rights are reserved to make changes at any time without notice.
No part of this document may be reproduced, stored in a retrieval system, or transmitted in any form or by any means, electronic, mechanical, photocopying, recording, or
otherwise, nor may these materials be modified or reposted to other sites, without the prior expressed written permission of the publisher.
Step 1:
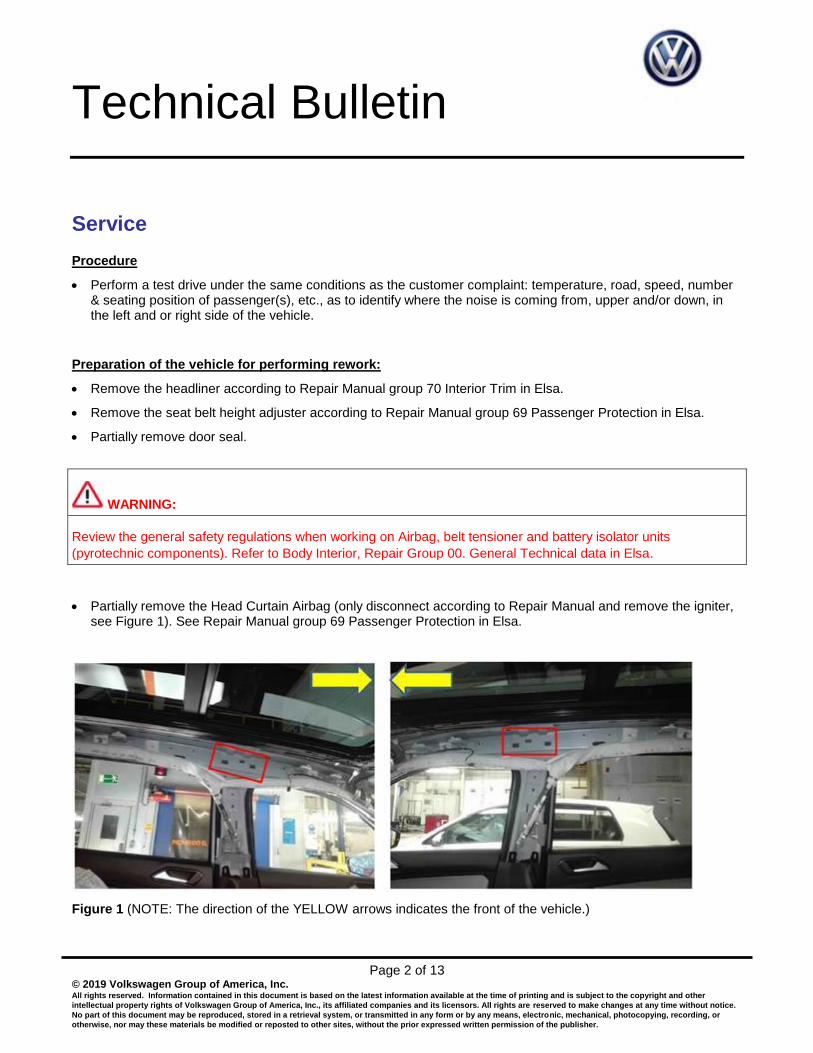
1.1 Using a conical punch ½” and metal 16 oz. hammer strike once moderately in the reference points indicated on B-Pillar below, see Figure 2.
Figure 2: Striking points on the B-Pillar.

Technical Bulletin
Page 4 of 13 © 2019 Volkswagen Group of America, Inc. All rights reserved. Information contained in this document is based on the latest information available at the time of printing and is subject to the copyright and other
intellectual property rights of Volkswagen Group of America, Inc., its affiliated companies and its licensors. All rights are reserved to make changes at any time without notice.
No part of this document may be reproduced, stored in a retrieval system, or transmitted in any form or by any means, electronic, mechanical, photocopying, recording, or
otherwise, nor may these materials be modified or reposted to other sites, without the prior expressed written permission of the publisher.
Step 2:
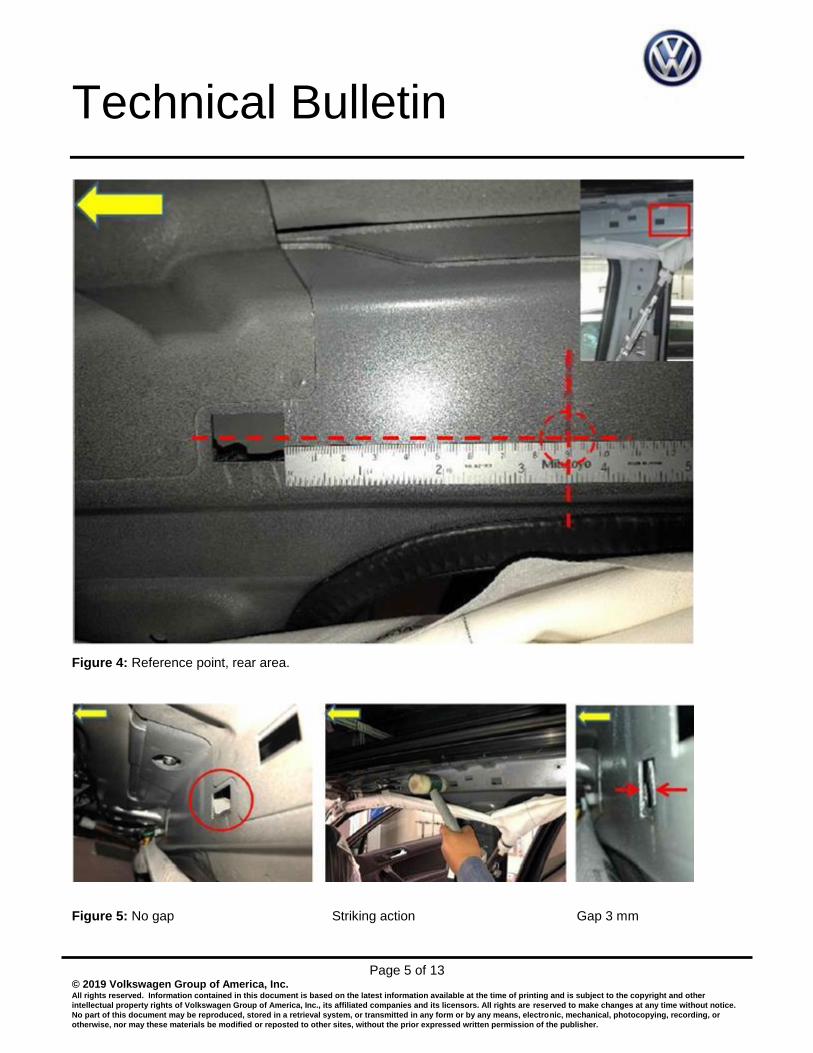
2.1 Using a plastic 16 oz. hammer strike twice in the upper zone of the B-Pillar according to the reference points described, see Figures 3 and 4. The end result is to create a gap approximately 3 mm between the internal bracket and cover sheet metal. See Figure 5.
Figure 3: Reference point, front area.
Technical Bulletin
Page 5 of 13 © 2019 Volkswagen Group of America, Inc. All rights reserved. Information contained in this document is based on the latest information available at the time of printing and is subject to the copyright and other
intellectual property rights of Volkswagen Group of America, Inc., its affiliated companies and its licensors. All rights are reserved to make changes at any time without notice.
No part of this document may be reproduced, stored in a retrieval system, or transmitted in any form or by any means, electronic, mechanical, photocopying, recording, or
otherwise, nor may these materials be modified or reposted to other sites, without the prior expressed written permission of the publisher.
Figure 4: Reference point, rear area.
Figure 5: No gap Striking action Gap 3 mm

Technical Bulletin
Page 6 of 13 © 2019 Volkswagen Group of America, Inc. All rights reserved. Information contained in this document is based on the latest information available at the time of printing and is subject to the copyright and other
intellectual property rights of Volkswagen Group of America, Inc., its affiliated companies and its licensors. All rights are reserved to make changes at any time without notice.
No part of this document may be reproduced, stored in a retrieval system, or transmitted in any form or by any means, electronic, mechanical, photocopying, recording, or
otherwise, nor may these materials be modified or reposted to other sites, without the prior expressed written permission of the publisher.
Note:
The following step only applies to the forward bracket.
2.2 To ensure a uniform gap of 3 mm, insert a flat screwdriver (recommended 3/8”x16”) through the indicated window and strike moderately using a plastic 16 oz. until reaching a gap of 3 mm. See Figure 6.
Figure 6: Insert screwdriver Strike moderately upper/lower Gap 3 mm
Step 3:
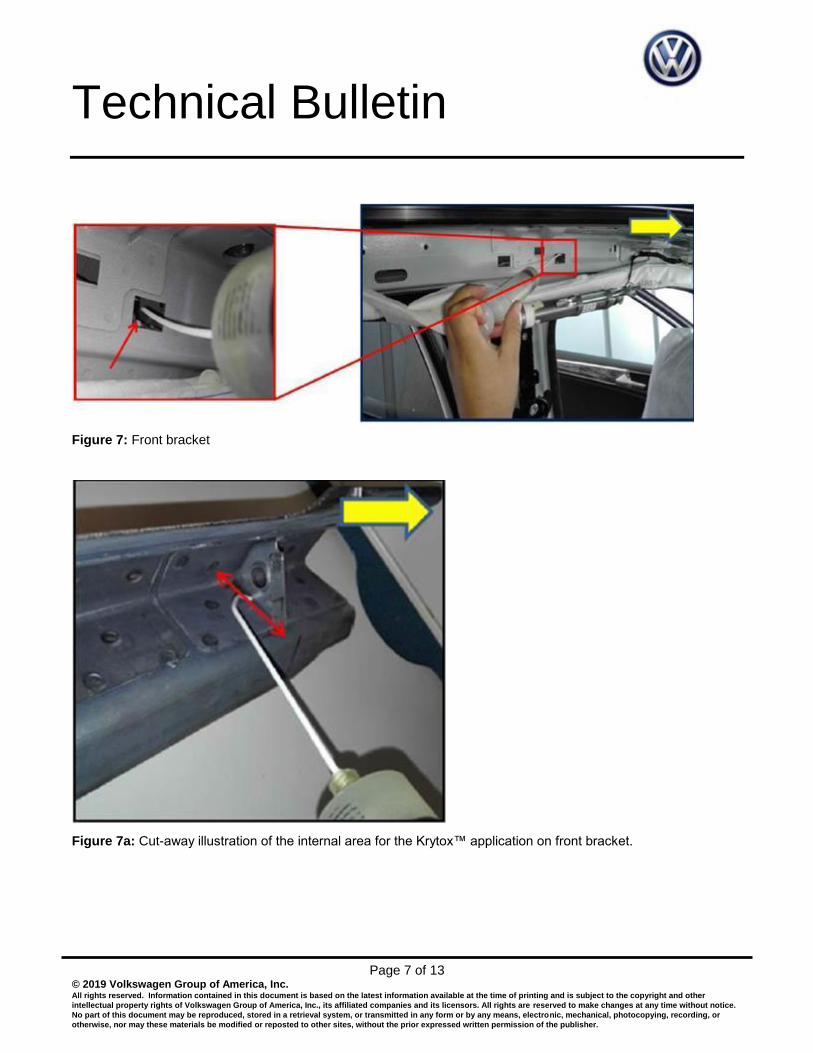
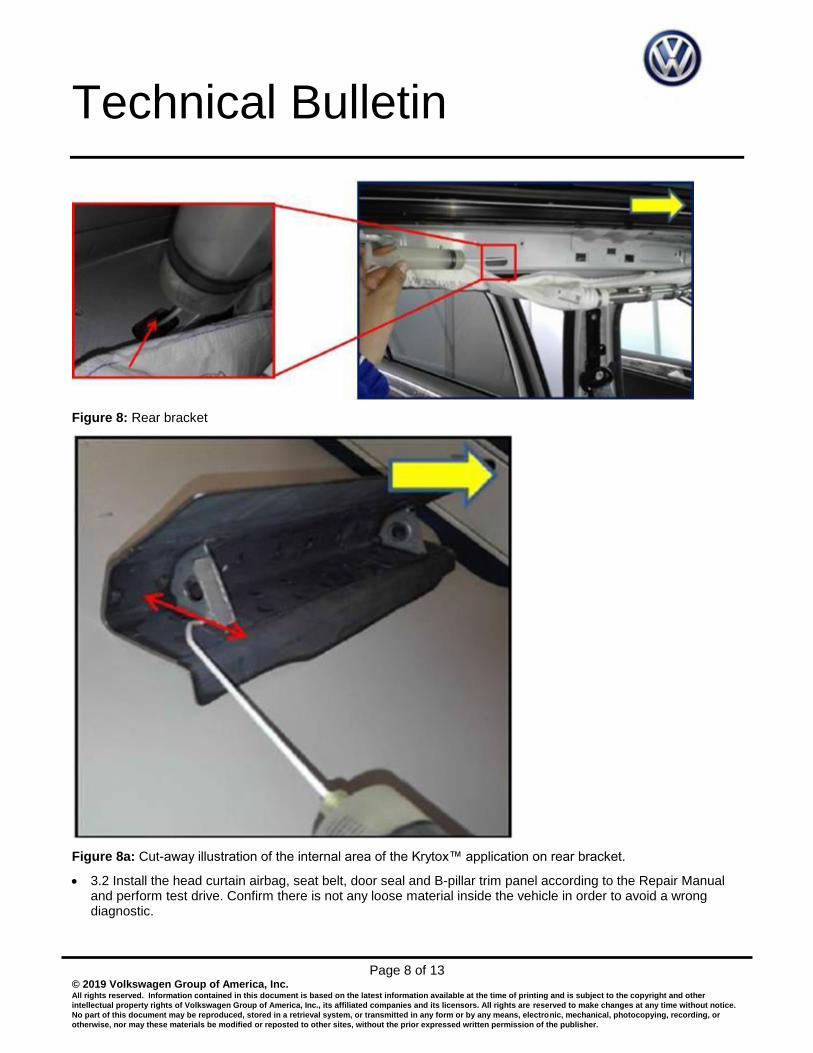
3.1 Apply approximately 5 ml of Teflon (Krytox™) between the lower part of the bracket and cover sheet metal, apply in a uniform application on the entire contact zone of the bracket. See Figures 7 and 8.
Note:
Figures 7 -8 show use with Krytox™ syringe, however, use Part #G 052 172 M2 and apply with the supplied
nozzle.
Krytox™ aerosol 100ml can.
Technical Bulletin
Page 7 of 13 © 2019 Volkswagen Group of America, Inc. All rights reserved. Information contained in this document is based on the latest information available at the time of printing and is subject to the copyright and other
intellectual property rights of Volkswagen Group of America, Inc., its affiliated companies and its licensors. All rights are reserved to make changes at any time without notice.
No part of this document may be reproduced, stored in a retrieval system, or transmitted in any form or by any means, electronic, mechanical, photocopying, recording, or
otherwise, nor may these materials be modified or reposted to other sites, without the prior expressed written permission of the publisher.
Figure 7: Front bracket
Figure 7a: Cut-away illustration of the internal area for the Krytox™ application on front bracket.
Technical Bulletin
Page 8 of 13 © 2019 Volkswagen Group of America, Inc. All rights reserved. Information contained in this document is based on the latest information available at the time of printing and is subject to the copyright and other
intellectual property rights of Volkswagen Group of America, Inc., its affiliated companies and its licensors. All rights are reserved to make changes at any time without notice.
No part of this document may be reproduced, stored in a retrieval system, or transmitted in any form or by any means, electronic, mechanical, photocopying, recording, or
otherwise, nor may these materials be modified or reposted to other sites, without the prior expressed written permission of the publisher.
Figure 8: Rear bracket
Figure 8a: Cut-away illustration of the internal area of the Krytox™ application on rear bracket.
3.2 Install the head curtain airbag, seat belt, door seal and B-pillar trim panel according to the Repair Manual and perform test drive. Confirm there is not any loose material inside the vehicle in order to avoid a wrong diagnostic.

Technical Bulletin
Page 9 of 13 © 2019 Volkswagen Group of America, Inc. All rights reserved. Information contained in this document is based on the latest information available at the time of printing and is subject to the copyright and other
intellectual property rights of Volkswagen Group of America, Inc., its affiliated companies and its licensors. All rights are reserved to make changes at any time without notice.
No part of this document may be reproduced, stored in a retrieval system, or transmitted in any form or by any means, electronic, mechanical, photocopying, recording, or
otherwise, nor may these materials be modified or reposted to other sites, without the prior expressed written permission of the publisher.
Is pillar noise repaired?
YES: Reassemble interior.
NO: Continue to step 4.
Step 4:
Note:
This step is not necessary unless you can confirm the noise is coming from the lower B-pillar area. A very small
number of the affected VIN’s will require this step.
Remove the B-pillar trim panel and partially remove the door seal according to the Repair Manual.
4.1 Using vice grips or equivalent, clamp in the (6) areas indicated, bend back and forth the metal panel of the front door frame. Following the sequence described, see Figure 9.
Tip:
Wrap vise grips or equivalent with tape or similar material to avoid damaging the paint on the metal panel of the
door frame while bending.
Figure 9: Sequence, bend back and forth on the metal panel of the front door frame, use the striker as the
reference point.

Technical Bulletin
Page 10 of 13 © 2019 Volkswagen Group of America, Inc. All rights reserved. Information contained in this document is based on the latest information available at the time of printing and is subject to the copyright and other
intellectual property rights of Volkswagen Group of America, Inc., its affiliated companies and its licensors. All rights are reserved to make changes at any time without notice.
No part of this document may be reproduced, stored in a retrieval system, or transmitted in any form or by any means, electronic, mechanical, photocopying, recording, or
otherwise, nor may these materials be modified or reposted to other sites, without the prior expressed written permission of the publisher.
4.2 Install the door seal and B-pillar trim panel according to the Repair Manual and perform test drive. Confirm there is not any loose material inside the vehicle in order to avoid a wrong diagnostic.
Is pillar noise repaired?
YES: Reassemble interior.
NO: Please see tip below.
Tip:
If the B-pillar noise is still present, it is likely due to steps 2 and or 3 that were not performed properly. In that case
it is recommended to verify the gap between the internal bracket and the cover sheet metal as described (gap =
3mm) and or the Krytox™ application was not enough and not in the indicated area.
Technical Bulletin
Page 11 of 13 © 2019 Volkswagen Group of America, Inc. All rights reserved. Information contained in this document is based on the latest information available at the time of printing and is subject to the copyright and other
intellectual property rights of Volkswagen Group of America, Inc., its affiliated companies and its licensors. All rights are reserved to make changes at any time without notice.
No part of this document may be reproduced, stored in a retrieval system, or transmitted in any form or by any means, electronic, mechanical, photocopying, recording, or
otherwise, nor may these materials be modified or reposted to other sites, without the prior expressed written permission of the publisher.
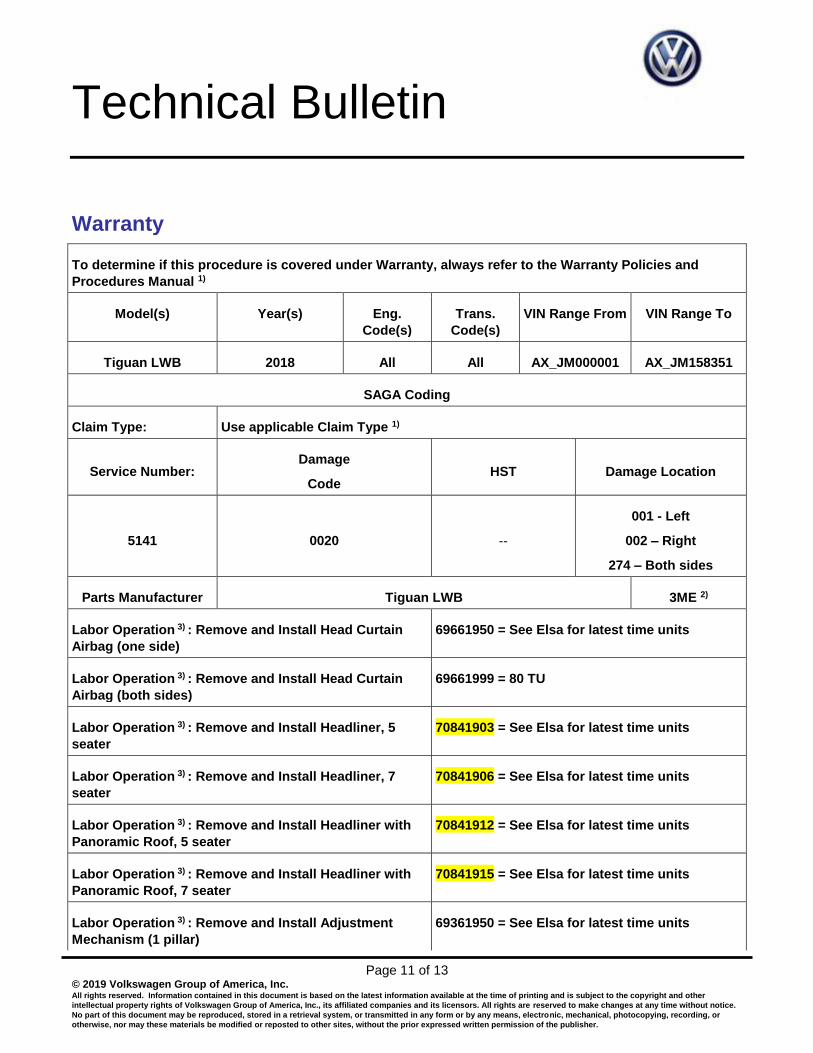
Warranty
To determine if this procedure is covered under Warranty, always refer to the Warranty Policies and
Procedures Manual 1)
Model(s) Year(s) Eng.
Code(s)
Trans.
Code(s)
VIN Range From VIN Range To
Tiguan LWB 2018 All All AX_JM000001 AX_JM158351
SAGA Coding
Claim Type: Use applicable Claim Type 1)
Service Number: Damage
Code HST Damage Location
5141 0020 --
001 - Left
002 – Right
274 – Both sides
Parts Manufacturer Tiguan LWB 3ME 2)
Labor Operation 3) : Remove and Install Head Curtain
Airbag (one side)
69661950 = See Elsa for latest time units
Labor Operation 3) : Remove and Install Head Curtain
Airbag (both sides)
69661999 = 80 TU
Labor Operation 3) : Remove and Install Headliner, 5
seater
70841903 = See Elsa for latest time units
Labor Operation 3) : Remove and Install Headliner, 7
seater
70841906 = See Elsa for latest time units
Labor Operation 3) : Remove and Install Headliner with
Panoramic Roof, 5 seater
70841912 = See Elsa for latest time units
Labor Operation 3) : Remove and Install Headliner with
Panoramic Roof, 7 seater
70841915 = See Elsa for latest time units
Labor Operation 3) : Remove and Install Adjustment
Mechanism (1 pillar)
69361950 = See Elsa for latest time units
Technical Bulletin
Page 12 of 13 © 2019 Volkswagen Group of America, Inc. All rights reserved. Information contained in this document is based on the latest information available at the time of printing and is subject to the copyright and other
intellectual property rights of Volkswagen Group of America, Inc., its affiliated companies and its licensors. All rights are reserved to make changes at any time without notice.
No part of this document may be reproduced, stored in a retrieval system, or transmitted in any form or by any means, electronic, mechanical, photocopying, recording, or
otherwise, nor may these materials be modified or reposted to other sites, without the prior expressed written permission of the publisher.
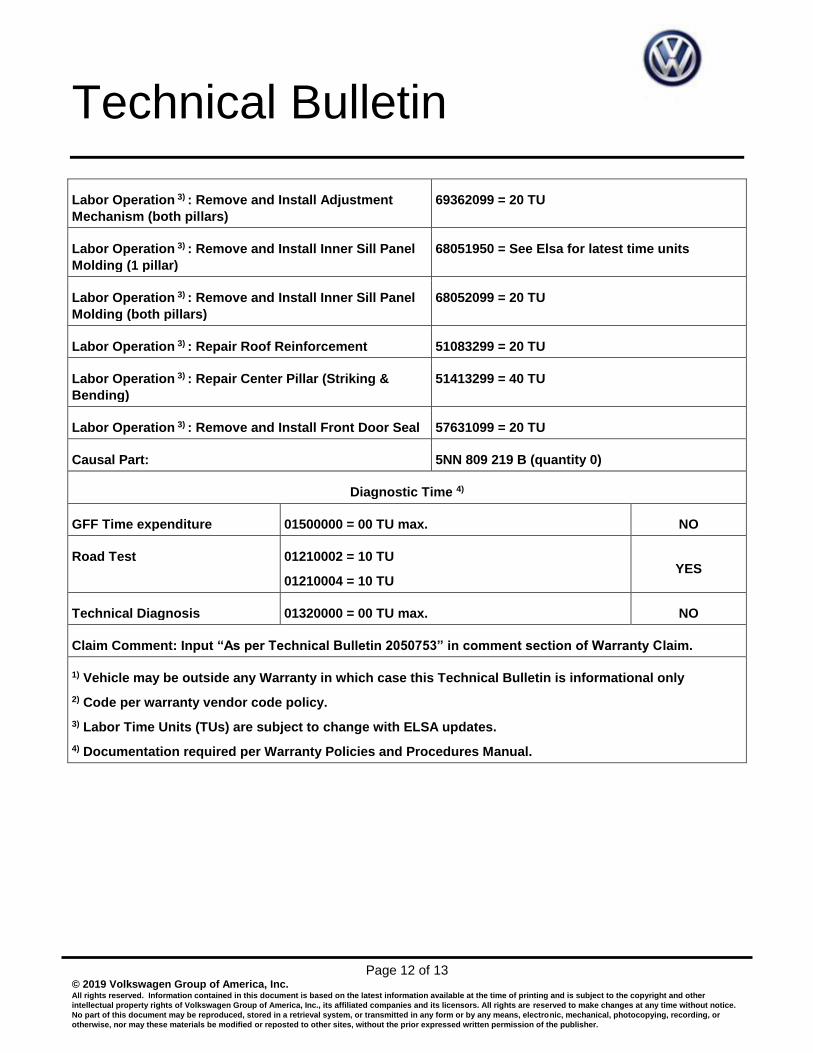
Labor Operation 3) : Remove and Install Adjustment
Mechanism (both pillars)
69362099 = 20 TU
Labor Operation 3) : Remove and Install Inner Sill Panel
Molding (1 pillar)
68051950 = See Elsa for latest time units
Labor Operation 3) : Remove and Install Inner Sill Panel
Molding (both pillars)
68052099 = 20 TU
Labor Operation 3) : Repair Roof Reinforcement 51083299 = 20 TU
Labor Operation 3) : Repair Center Pillar (Striking &
Bending)
51413299 = 40 TU
Labor Operation 3) : Remove and Install Front Door Seal 57631099 = 20 TU
Causal Part: 5NN 809 219 B (quantity 0)
Diagnostic Time 4)
GFF Time expenditure 01500000 = 00 TU max. NO
Road Test 01210002 = 10 TU
01210004 = 10 TU YES
Technical Diagnosis 01320000 = 00 TU max. NO
Claim Comment: Input “As per Technical Bulletin 2050753” in comment section of Warranty Claim.
1) Vehicle may be outside any Warranty in which case this Technical Bulletin is informational only
2) Code per warranty vendor code policy.
3) Labor Time Units (TUs) are subject to change with ELSA updates.
4) Documentation required per Warranty Policies and Procedures Manual.

Technical Bulletin
Page 13 of 13 © 2019 Volkswagen Group of America, Inc. All rights reserved. Information contained in this document is based on the latest information available at the time of printing and is subject to the copyright and other
intellectual property rights of Volkswagen Group of America, Inc., its affiliated companies and its licensors. All rights are reserved to make changes at any time without notice.
No part of this document may be reproduced, stored in a retrieval system, or transmitted in any form or by any means, electronic, mechanical, photocopying, recording, or
otherwise, nor may these materials be modified or reposted to other sites, without the prior expressed written permission of the publisher.
Required Parts and Tools
Part No: Part Description Quantity
G 052 172 M2 Special Lubricant – Krytox™ –
Aerosol 100ml
0.5
5NA 867 276 * Clips 2 (for Both Pillars)
N 108 162 01 Hexagonal socket head collared
bolt, thread forming M6x18
1
Part numbers are accurate at time of publication. Always refer to ETKA for the latest part information.
No Special Tools required.
Additional Information
All part and service references provided in this Technical Bulletin are subject to change and/or removal.
Always check with your Parts Dept. and Repair Manuals for the latest information.
Document Control Revision Table
Instance Number Published Date Version Number Reason For Update
2050753/4 4/8/19 51-19-01 To update labor operation
numbers per Elsa updates.
2050753/3 8/2/18 51-18-03 Update ending VIN range.
2050753/2 4/4/18 51-18-02 To update parts table.
2050753/1 3/29/18 51-18-01 Original publication.