V1.0 2016.10 3-axis Handheld Stabilizer Gimbal Beholder-EC1ikancorp.com/Downloads/EC1/EC1 User...
24
2016 Beholder ® All Right Reserved V1.0 2016.10 3-axis Handheld Stabilizer Gimbal Beholder-EC1 Instruction Manual Encoders
-
Upload
vuongquynh -
Category
Documents
-
view
221 -
download
0
Transcript of V1.0 2016.10 3-axis Handheld Stabilizer Gimbal Beholder-EC1ikancorp.com/Downloads/EC1/EC1 User...
2016 Beholder ® All Right Reserved
V1.0 2016.10
3-axis Handheld Stabilizer Gimbal
Beholder-EC1Instruction Manual Encoders
2 2016 Beholder ® All Right Reserved
Table of Contents
Introduction – About the EC1 3 – Features 4
Product Description– What’s Included 5 – Parts Diagram 6 – Charging the batteries 7 – Installing the battery holder 9 – Camera Installation and Balance 10
Getting to Know the EC1 – Powering On 15 – Modes of Operation (Profiles) 16 – OLED Display 17 – Extensions and Extra Features 17
Compatible Camera Models– List of supported cameras 18
Gimbal Working Angles– Operable camera angles 18
– Mount Modes 19
Precautions and Safety– Precautions 20 – Safety 21
Copyright– Copyright/Trademark Statement 22
Product Specifications– Technical specifications 23
Frequently Asked Questions– FAQ 24

3 2016 Beholder ® All Right Reserved
Beholder EC1 – 3-Axis handheld gimbal stabilizer
The Beholder EC1 is the newest upgrade to the popular gimbal Beholder DS1. It is designed specifically for professional filmmakers looking for a single handheld stabilizer for a large range of medium and small cameras. The EC1 makes it simple and easy to get outstanding stable footage.
Beholder EC1 is the first to use the 32bit motor encoder. It features adjustable curved arms and also adds an innovative pitch double adjustment that allows customers to use a large variety of camera sizes, from small mirrorless to large DSLR cameras.
Whether filming fast-paced actions or aiming for high or low-angle shots, this device will help you correct shakes or swaying and will balance and smooth the picture in order to achieve professional grade image stabilization.
Beholder EC1 is lightweight and easy to use and can be carried in the supplied case or a small photographer bag. EC1 can be widely used in movies, professional wedding films, and other applications. EC1 uses a 32-bit electronic board system that has several profiles for multiple shooting modes, which are easy to select by simply pressing a key. Beholder EC1 is shipped “ready to use” and does not require software changes in order to handle your camera. The encoder technology is built-in for faster system responsiveness, greatly improving the accuracy and stability at any angle, without having to switch modes manually.
EC1 allows the camera to rotate 360 degrees on all axes using slip-ring technology while removing rotation blockers used in previous versions to prevent wire twisting. It supports external remote control (wired or wireless), allowing you to extend the handle and mount directly onto a rocker arm to achieve high angle shots, boom moves, dolly shots, a smooth and seamless transition from high to low mode and also time-lapse photography. Beholder EC1 supports firmware upgrades for further software optimization.
EC1 has a standby time of 20 hours, while the built-in self-luminous OLED screen displays real- time power usage, allowing users to better understand the product’s electricity consumption in a timely manner in order to charge the battery. The OLED screen also displays the profile selected, allowing users to clearly understand the shooting mode currently in use.
About the EC1 ▲
WARNING
To reduce fire or shock hazard, do not expose the unit to rain or moisture.

▲ Features
4 2016 Beholder ® All Right Reserved
Beholder EC1 features
Dimensions: 360 x 184 x 79 mm Compatibility: Mirrorless & DSLR Cameras up to 4.5 lbs Main Features: • 32-bit controller with motor control units (MCUs) and 12bit Encoder system• OLED screen display for power and battery level• OLED screen display for Profile Mode and joystick• 3-axis gimbal stabilizer and 4-axis toolless design• 3-axis 360° Pitch, Roll, Pan (no limitation)• Quick-release plate compatible with Manfrotto 577• 4-way joystick to control the pitch and roll angle• 3x 3.7v mAh Detachable Rechargeable batteries• Battery with an operation time of up to 20 hours• One 3/8" screw hole in the handle bottom and two 1/4" hole on the side for mounting accessories like
a monitor or microphone• Increase the precision of stabilization by applying FOC-specific compensations• Five pre-configured profiles including Follow, Pitch Lock, Full Lock, Follow Roll, and Home position• Prevents motors from losing synchronization and skipping steps• Auto-Invert-Mode (all profiles can also be used in this condition)• Bluetooth module for remote control (not included)• 2.4g wireless joystick module for remote control (not included)• Supported temperature accelerometer calibration• Adaptive PID-algorithm for preventing vibrations in wide angles• ACC low-pass filter to improve stability• Provides information about frame angle and angle of the camera relative to the frame• Five user-configurable modes of operation with a toggle button• Option to adjust camera position with hands• Low voltage protection for integrated battery• Can significantly decrease power consumption by using field-oriented control strategy to drive motors• Sound alerts for mode change and calibration• Increases instant torque

▲ What’s Included
5 2016 Beholder ® All Right Reserved
After you’ve received the product and before you use it, please check whether the package contains all the items in the following inventory. If any item is missing, please get in touch with the dealer to resolve the situation.
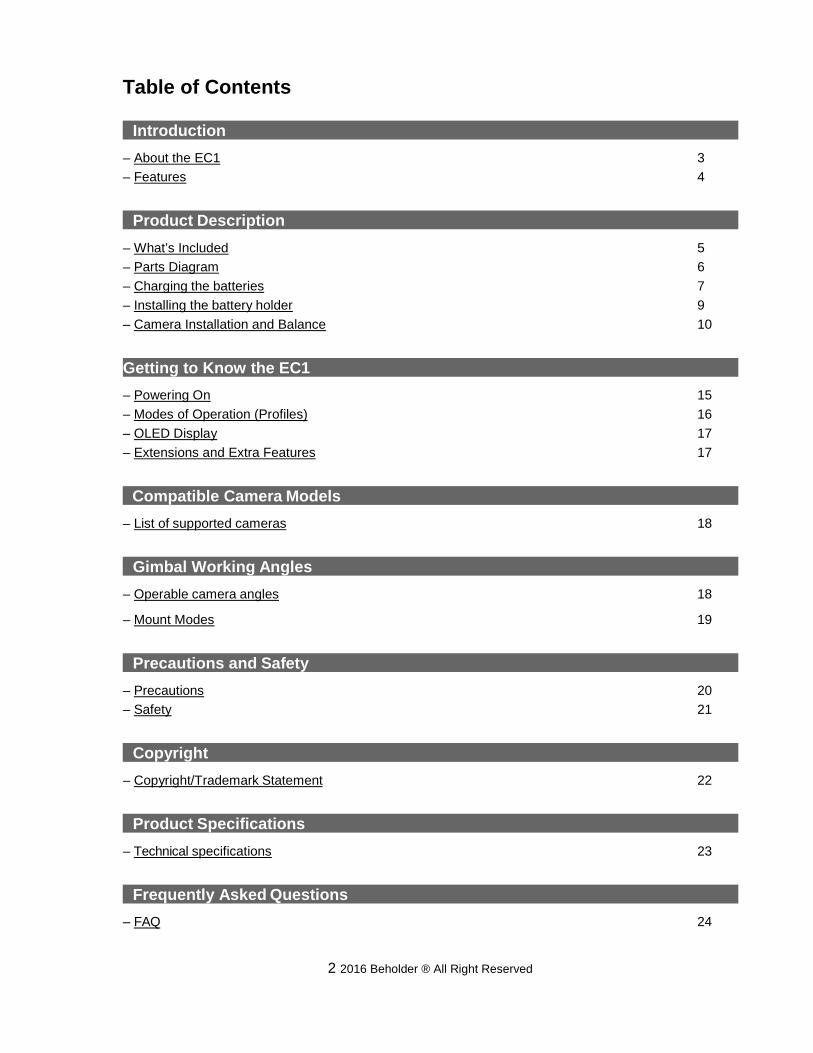
EC1 body 1. Tilt motor2. Roll motor3. Pan motor4. 5 *M4 thumb screw5. The four-way joystick6. Power Switch7. The handheld handle head8. The data port9. Camera Quick Release Plate10. 3 x 18650 battery11. The battery holder12. The battery holder USB charging port13. ¼ nut14. OLED screen15. Mode button16. Power Adapter or USB Cable (dependent on the country’s specifications)17. Main button base18. Button mount base19. Remote control external port20. Battery cover
▲ Parts Diagram
6 2016 Beholder ® All Right Reserved
1 2
3
10 10
1120
19
1817
12
13
9
5
6
4 4
4
4
15
14
7
8
16
Identifying parts
▲ Charging the Batteries
7 2016 Beholder ® All Right Reserved
Battery charging and inserting
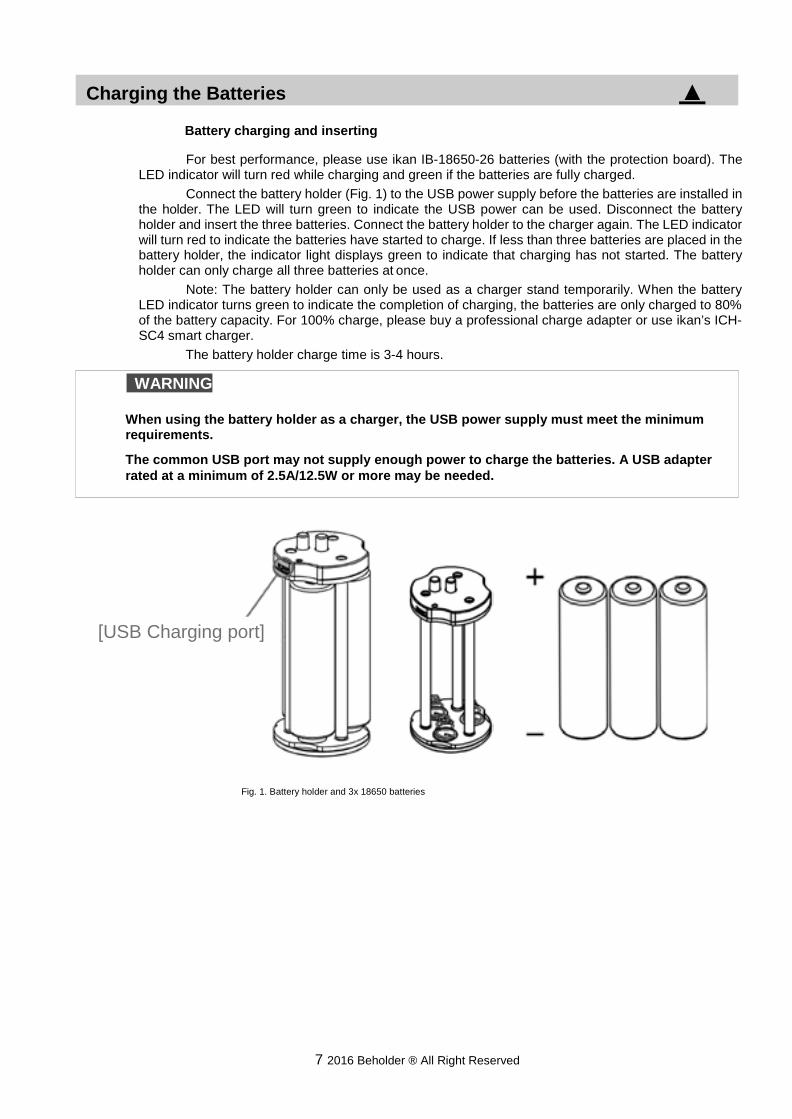
For best performance, please use ikan IB-18650-26 batteries (with the protection board). The LED indicator will turn red while charging and green if the batteries are fully charged.
Connect the battery holder (Fig. 1) to the USB power supply before the batteries are installed in the holder. The LED will turn green to indicate the USB power can be used. Disconnect the battery holder and insert the three batteries. Connect the battery holder to the charger again. The LED indicator will turn red to indicate the batteries have started to charge. If less than three batteries are placed in the battery holder, the indicator light displays green to indicate that charging has not started. The battery holder can only charge all three batteries at once.
Note: The battery holder can only be used as a charger stand temporarily. When the battery LED indicator turns green to indicate the completion of charging, the batteries are only charged to 80% of the battery capacity. For 100% charge, please buy a professional charge adapter or use ikan’s ICH-SC4 smart charger.
The battery holder charge time is 3-4 hours.
[USB Charging port]
Fig. 1. Battery holder and 3x 18650 batteries
WARNING
When using the battery holder as a charger, the USB power supply must meet the minimum requirements.
The common USB port may not supply enough power to charge the batteries. A USB adapter rated at a minimum of 2.5A/12.5W or more may be needed.

▲ Charging the Batteries
8 2016 Beholder ® All Right Reserved
Recommendations
• It is recommended to use a dedicated charger like the ikan ICH-SC4.• If the product is not used for a long time, charge the batteries up to 70% of their capacity and
store them in a cool, dry place.• If you need more batteries, try to purchase ikan IB-18650-26-3PK official batteries or other
reliable batteries with a protection circuit to avoid overcharging and damaging the batteries.Using damaged or different capacity batteries may result in failing to start up the Beholder EC1.
• Hint: Currently, the maximum capacity of an 18650 battery is 3500mah. Try to avoid fakesuppliers advertising a huge capacity.
▲ Installing the battery holder
9 2016 Beholder ® All Right Reserved
Instructions to use the battery holder
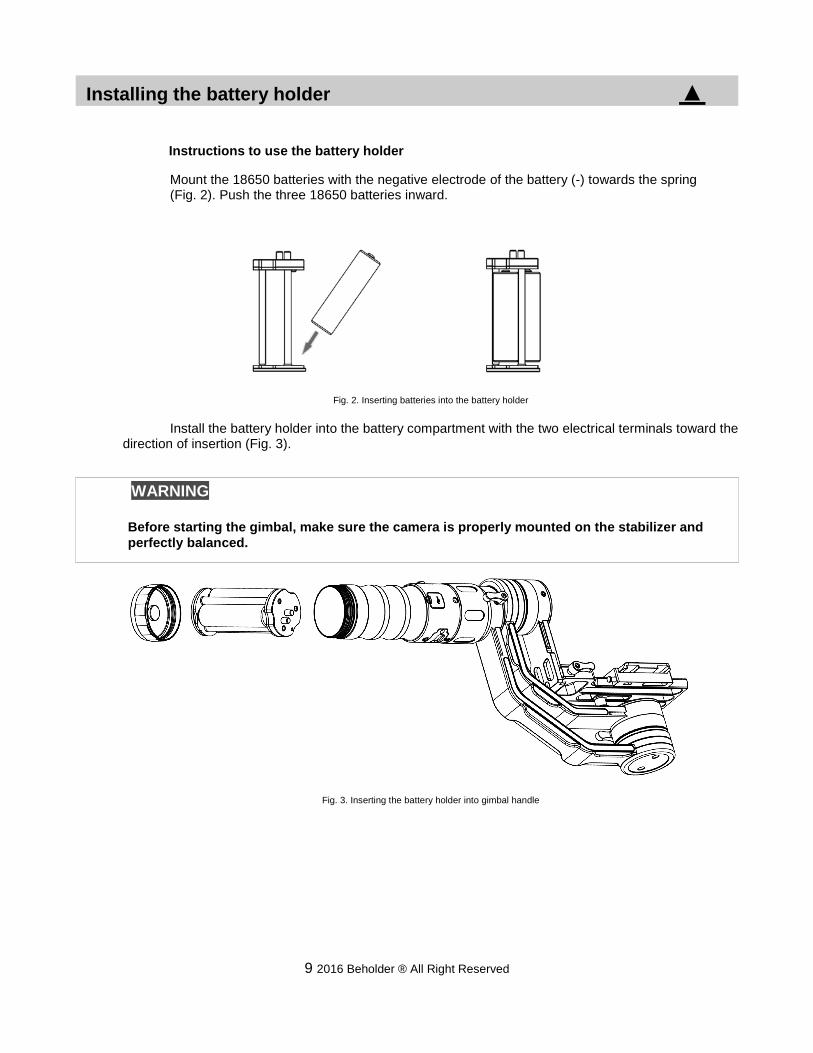
Mount the 18650 batteries with the negative electrode of the battery (-) towards the spring (Fig. 2). Push the three 18650 batteries inward.
Fig. 2. Inserting batteries into the battery holder
Install the battery holder into the battery compartment with the two electrical terminals toward the direction of insertion (Fig. 3).
Fig. 3. Inserting the battery holder into gimbal handle
WARNING
Before starting the gimbal, make sure the camera is properly mounted on the stabilizer and perfectly balanced.
▲ Camera Installation and Balance
10 2016 Beholder ® All Right Reserved
Instructions to install the camera
STEP 1
Mount the camera quick release
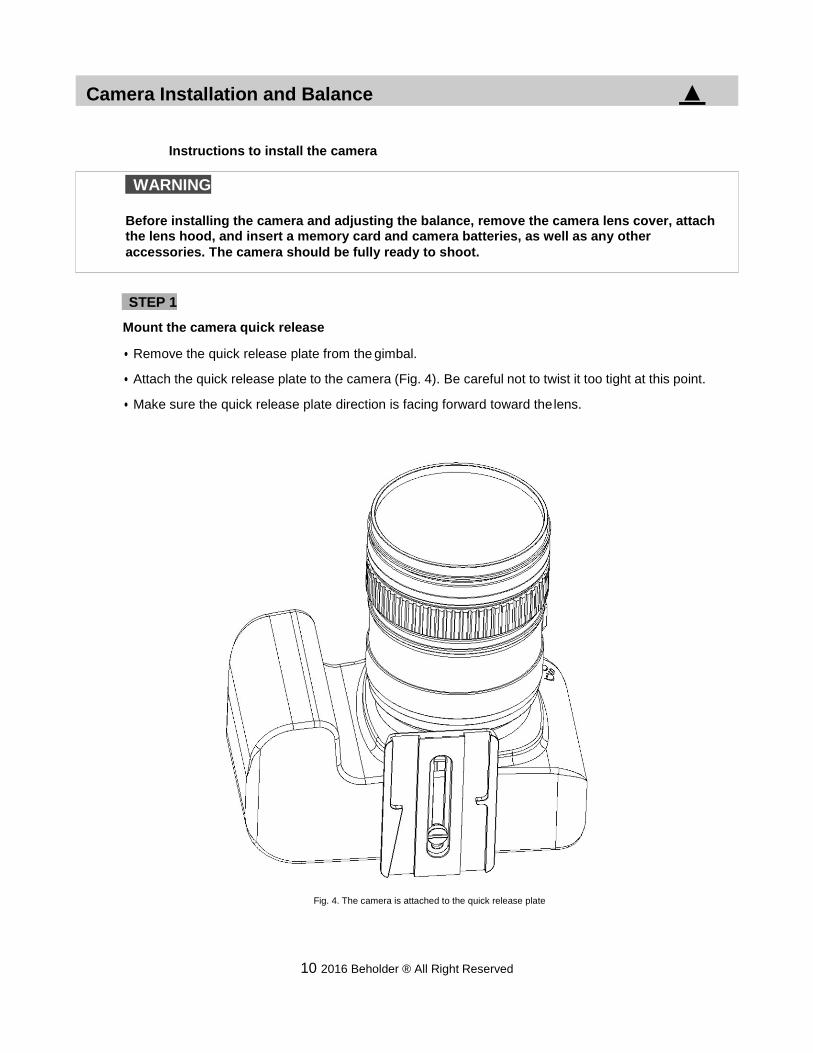
• Remove the quick release plate from the gimbal.
• Attach the quick release plate to the camera (Fig. 4). Be careful not to twist it too tight at this point.
• Make sure the quick release plate direction is facing forward toward the lens.
Fig. 4. The camera is attached to the quick release plate
WARNING
Before installing the camera and adjusting the balance, remove the camera lens cover, attach the lens hood, and insert a memory card and camera batteries, as well as any other accessories. The camera should be fully ready to shoot.
11 2016 Beholder ® All Right Reserved
STEP 2
Install the camera on gimbal base
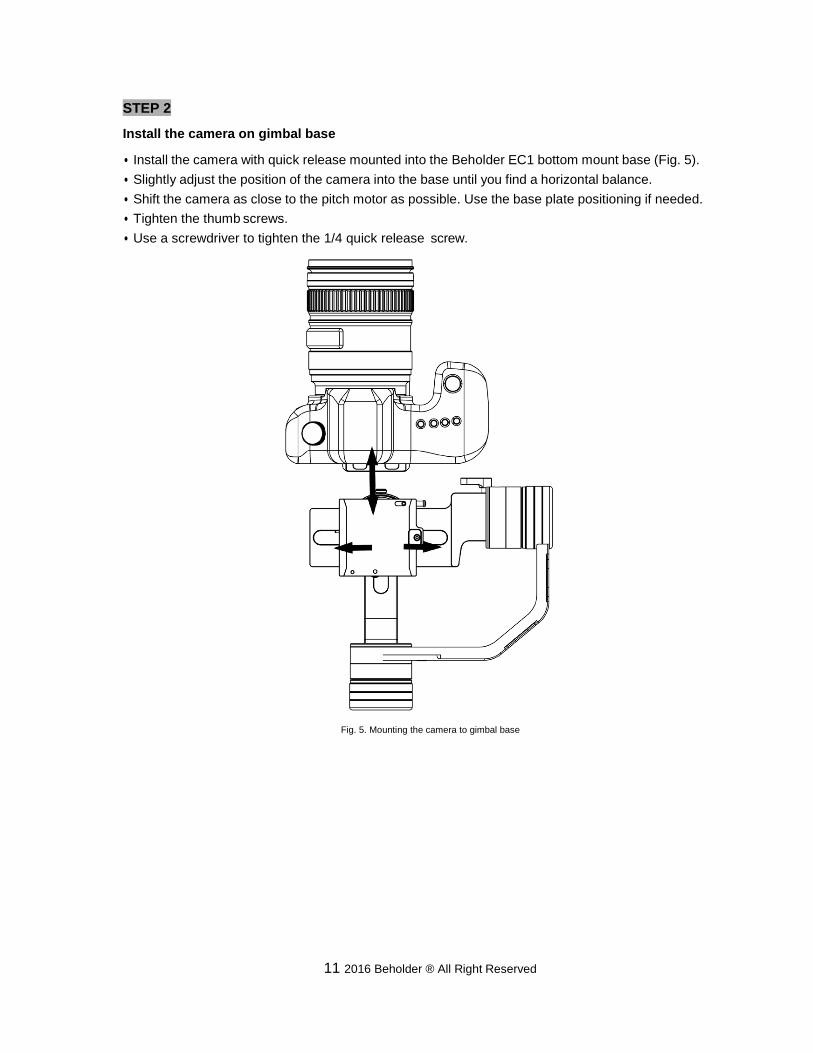
• Install the camera with quick release mounted into the Beholder EC1 bottom mount base (Fig. 5).• Slightly adjust the position of the camera into the base until you find a horizontal balance.• Shift the camera as close to the pitch motor as possible. Use the base plate positioning if needed.• Tighten the thumb screws.• Use a screwdriver to tighten the 1/4 quick release screw.
Fig. 5. Mounting the camera to gimbal base
12 2016 Beholder ® All Right Reserved
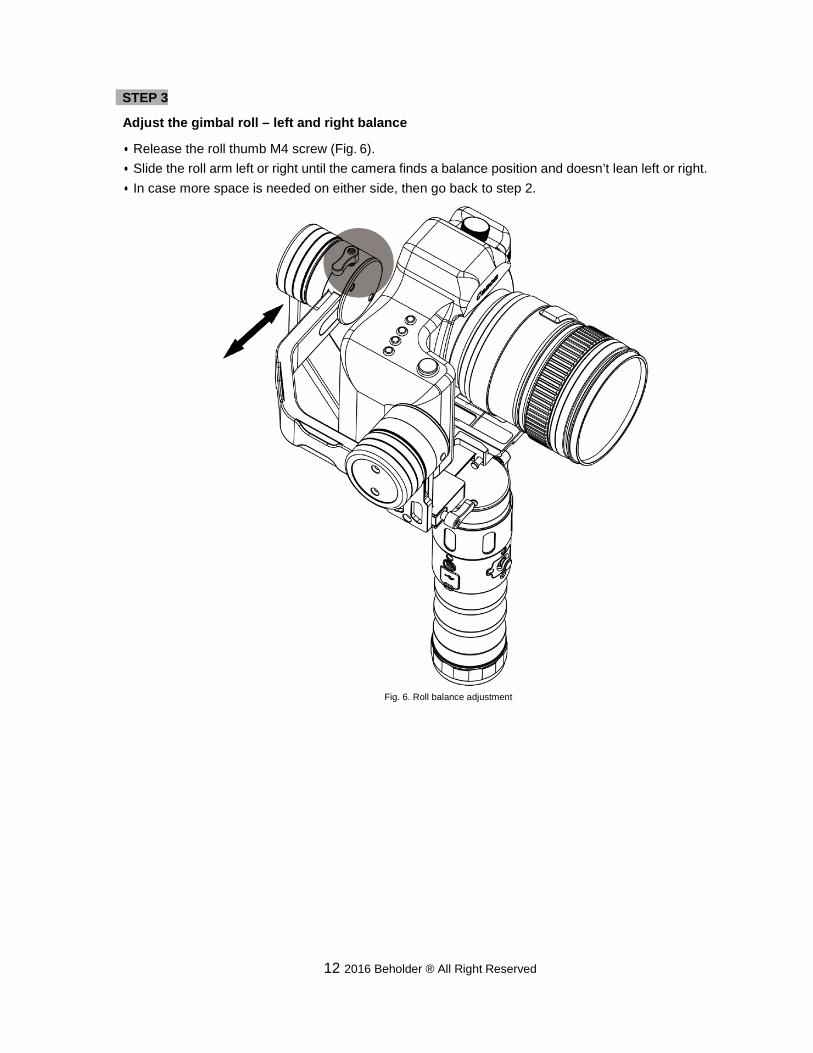
STEP 3
Adjust the gimbal roll – left and right balance
• Release the roll thumb M4 screw (Fig. 6).• Slide the roll arm left or right until the camera finds a balance position and doesn’t lean left or right.• In case more space is needed on either side, then go back to step 2.
Fig. 6. Roll balance adjustment
13 2016 Beholder ® All Right Reserved
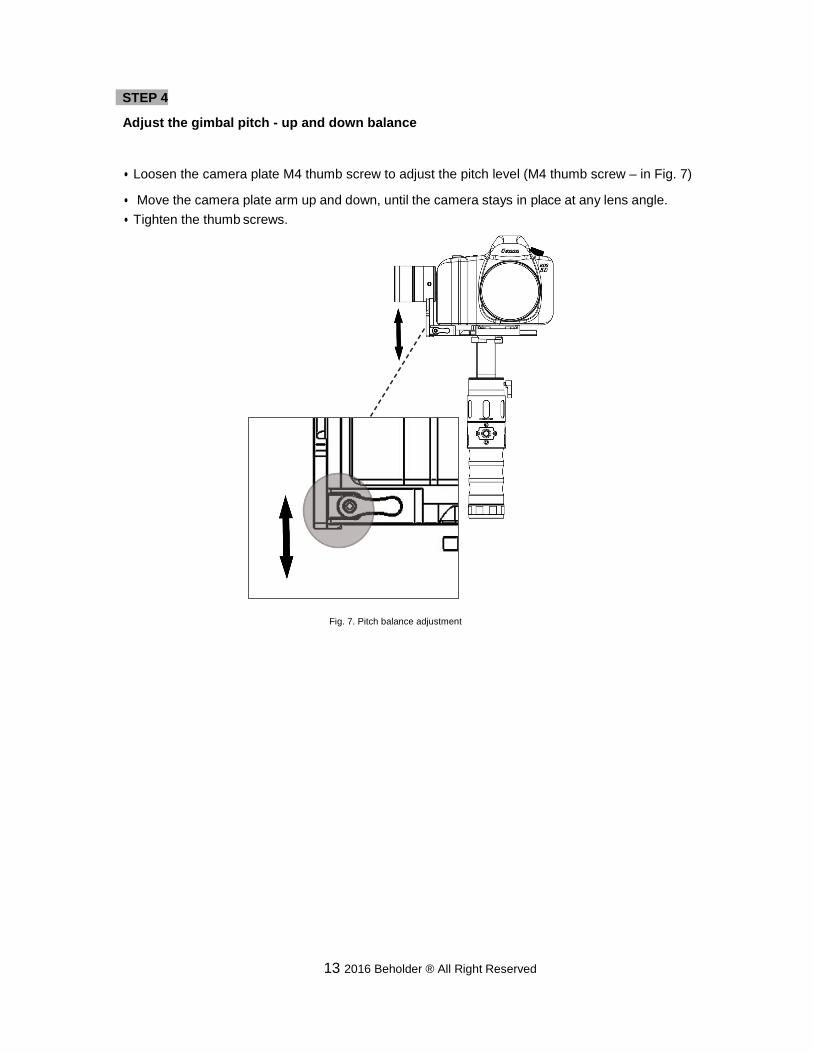
STEP 4
Adjust the gimbal pitch - up and down balance
• Loosen the camera plate M4 thumb screw to adjust the pitch level (M4 thumb screw – in Fig. 7)
• Move the camera plate arm up and down, until the camera stays in place at any lens angle.• Tighten the thumb screws.
Fig. 7. Pitch balance adjustment
14 2016 Beholder ® All Right Reserved
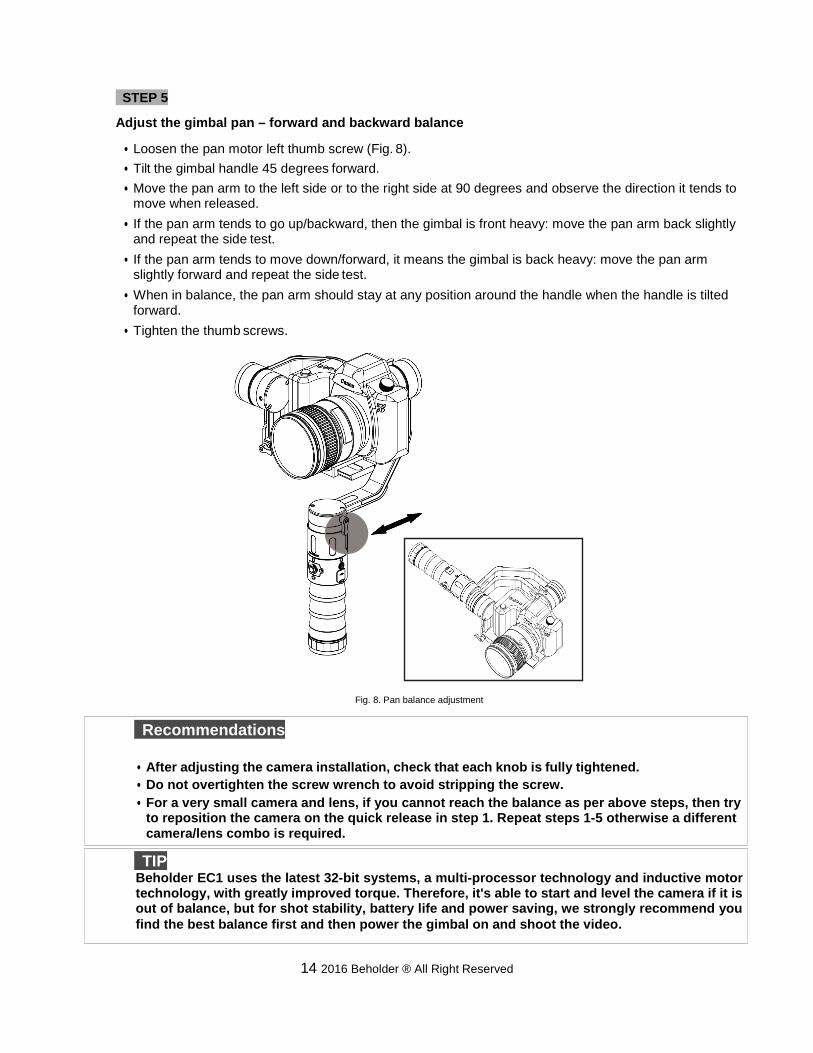
STEP 5
Adjust the gimbal pan – forward and backward balance
• Loosen the pan motor left thumb screw (Fig. 8).• Tilt the gimbal handle 45 degrees forward.• Move the pan arm to the left side or to the right side at 90 degrees and observe the direction it tends to
move when released.• If the pan arm tends to go up/backward, then the gimbal is front heavy: move the pan arm back slightly
and repeat the side test.• If the pan arm tends to move down/forward, it means the gimbal is back heavy: move the pan arm
slightly forward and repeat the side test.• When in balance, the pan arm should stay at any position around the handle when the handle is tilted
forward.• Tighten the thumb screws.
Fig. 8. Pan balance adjustment
Recommendations
• After adjusting the camera installation, check that each knob is fully tightened.• Do not overtighten the screw wrench to avoid stripping the screw.• For a very small camera and lens, if you cannot reach the balance as per above steps, then try
to reposition the camera on the quick release in step 1. Repeat steps 1-5 otherwise a differentcamera/lens combo is required.
TIP Beholder EC1 uses the latest 32-bit systems, a multi-processor technology and inductive motor technology, with greatly improved torque. Therefore, it's able to start and level the camera if it is out of balance, but for shot stability, battery life and power saving, we strongly recommend you find the best balance first and then power the gimbal on and shoot the video.
▲ Power ON
15 2016 Beholder ® All Right Reserved
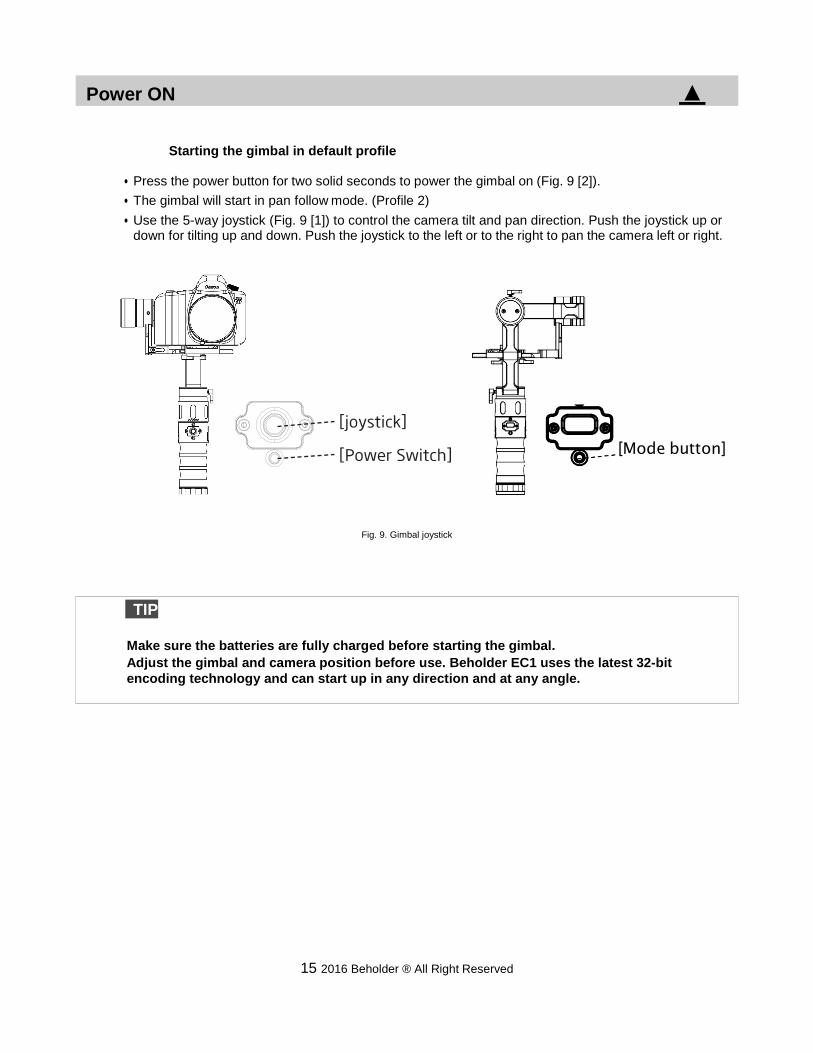
Starting the gimbal in default profile
• Press the power button for two solid seconds to power the gimbal on (Fig. 9 [2]).• The gimbal will start in pan follow mode. (Profile 2)• Use the 5-way joystick (Fig. 9 [1]) to control the camera tilt and pan direction. Push the joystick up or
down for tilting up and down. Push the joystick to the left or to the right to pan the camera left or right.
[Mode button]
Fig. 9. Gimbal joystick
TIP
Make sure the batteries are fully charged before starting the gimbal. Adjust the gimbal and camera position before use. Beholder EC1 uses the latest 32-bit encoding technology and can start up in any direction and at any angle.
[joystick]
[Power Switch]
▲ Modes of Operation (Profiles)
16 2016 Beholder ® All Right Reserved
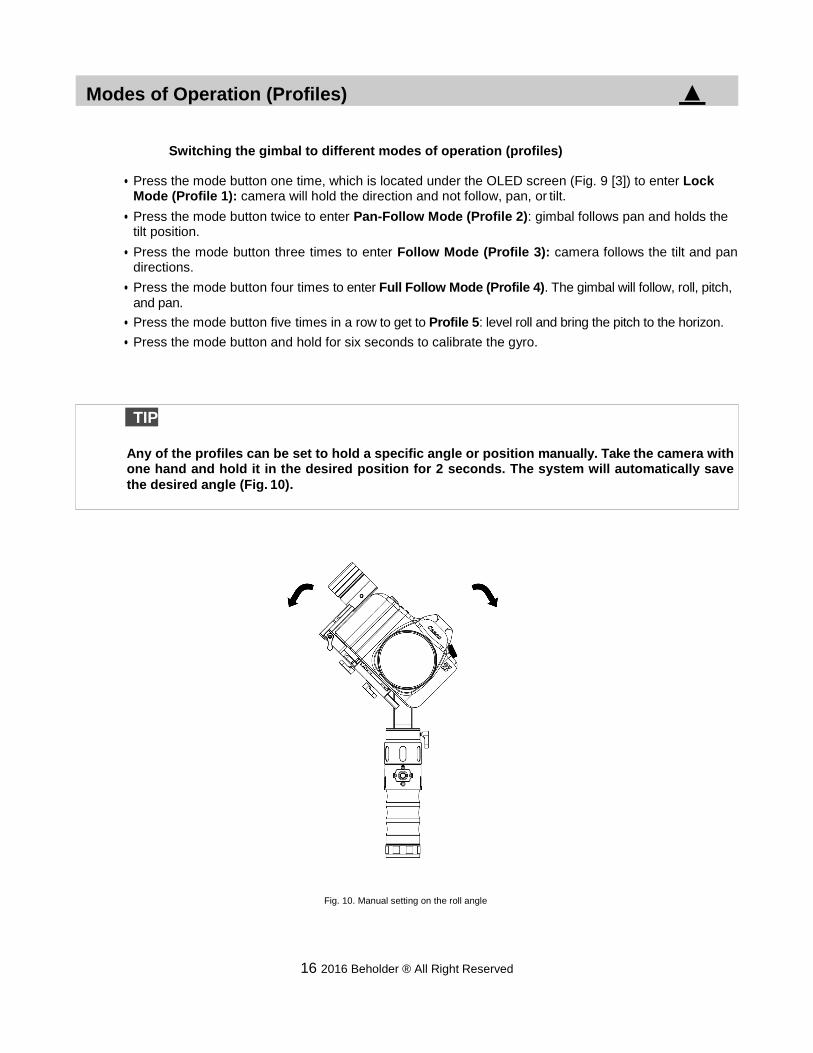
Switching the gimbal to different modes of operation (profiles)
• Press the mode button one time, which is located under the OLED screen (Fig. 9 [3]) to enter LockMode (Profile 1): camera will hold the direction and not follow, pan, or tilt.
• Press the mode button twice to enter Pan-Follow Mode (Profile 2): gimbal follows pan and holds thetilt position.
• Press the mode button three times to enter Follow Mode (Profile 3): camera follows the tilt and pandirections.
• Press the mode button four times to enter Full Follow Mode (Profile 4). The gimbal will follow, roll, pitch,and pan.
• Press the mode button five times in a row to get to Profile 5: level roll and bring the pitch to the horizon.• Press the mode button and hold for six seconds to calibrate the gyro.
Fig. 10. Manual setting on the roll angle
TIP
Any of the profiles can be set to hold a specific angle or position manually. Take the camera with one hand and hold it in the desired position for 2 seconds. The system will automatically save the desired angle (Fig. 10).
▲ OLED display
17 2016 Beholder ® All Right Reserved
Description of OLED display functions
Boot interface with company logo
Charge:
85% to 100%
65% to 85%
45% to 65%
30% to 45%
10% to 30%
10% or less
joystick right direction
joystick left direction
joystick tilt up
joystick tilt down
profile1: Press mode button once: Lock mode profile2: Press mode button twice: Pan Follow mode profile3: Press mode button three times: Follow mode profile4: Press mode button four times: Full Follow mode profile5: Press mode button five times: Return to the Home position
Note: Press and hold the mode button for 6 seconds to start gyro calibration. Do not move the gimbal while calibration is in process. In case the gimbal is moved, please redo the calibration. The calibration will take about 5 seconds and during this time, the gimbal will shut off and restart the motors.
Extensions and extra features
• 3/8 standard screw holes, connecting rods 1/4 or 3/8 turn screws sold separately.• Mini USB for controlling the gimbal via wired joystick• Handle screw for an external monitor and microphone, lights, etc.• Genuine universal quick release plate Manfrotto 577 series, such as 501PL, 701,
etc. 50mm width Quick Edition
Extra features ▲
▲ Compatible cameras
18 2016 Beholder ® All Right Reserved
Compatible camera models
• Beholder EC1 supports lighter than 2KG (including lenses) DSLR or mirrorless cameras• List of supported cameras:• DSLR: Canon 6D / 5D / 7D• Mirrorless: A6300, A7R2, A7S + 24- 70 / 16- 35, GH4 + 12- 35, GH3 + 14- 140 and so on.• Compact cameras: RX100, LX100
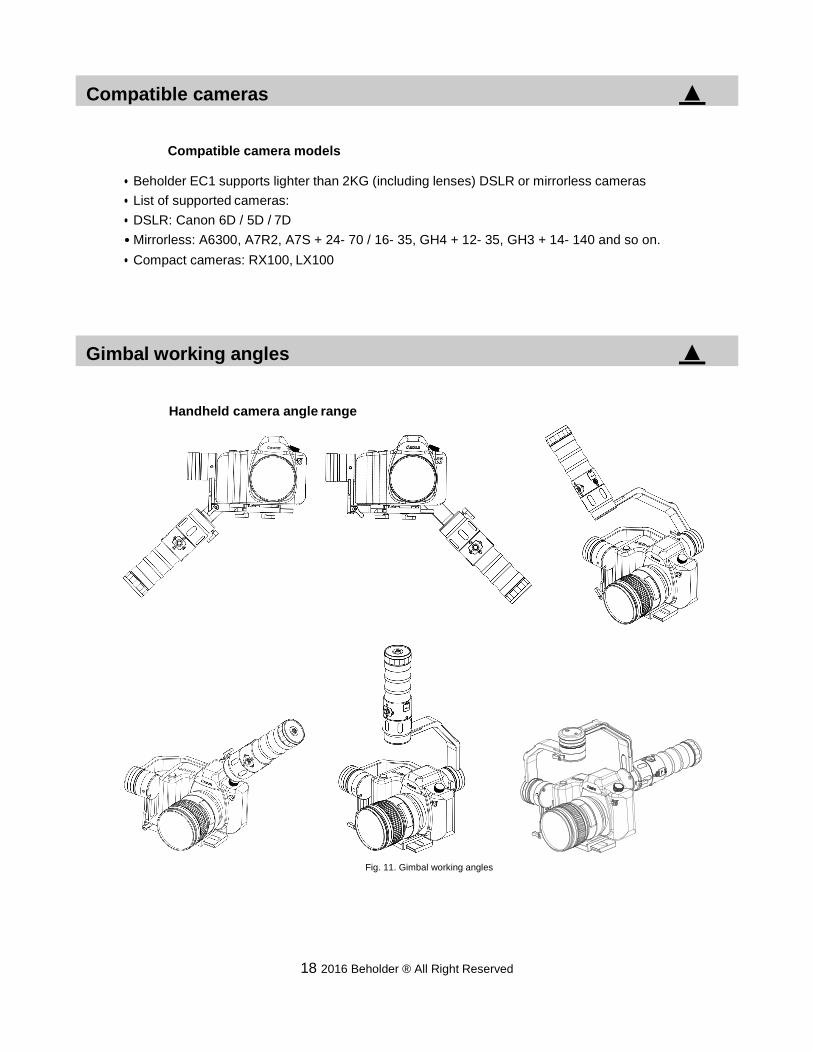
Handheld camera angle range
Fig. 11. Gimbal working angles
Gimbal working angles ▲
▲ Mount modes
19 2016 Beholder ® All Right Reserved
Mounting options
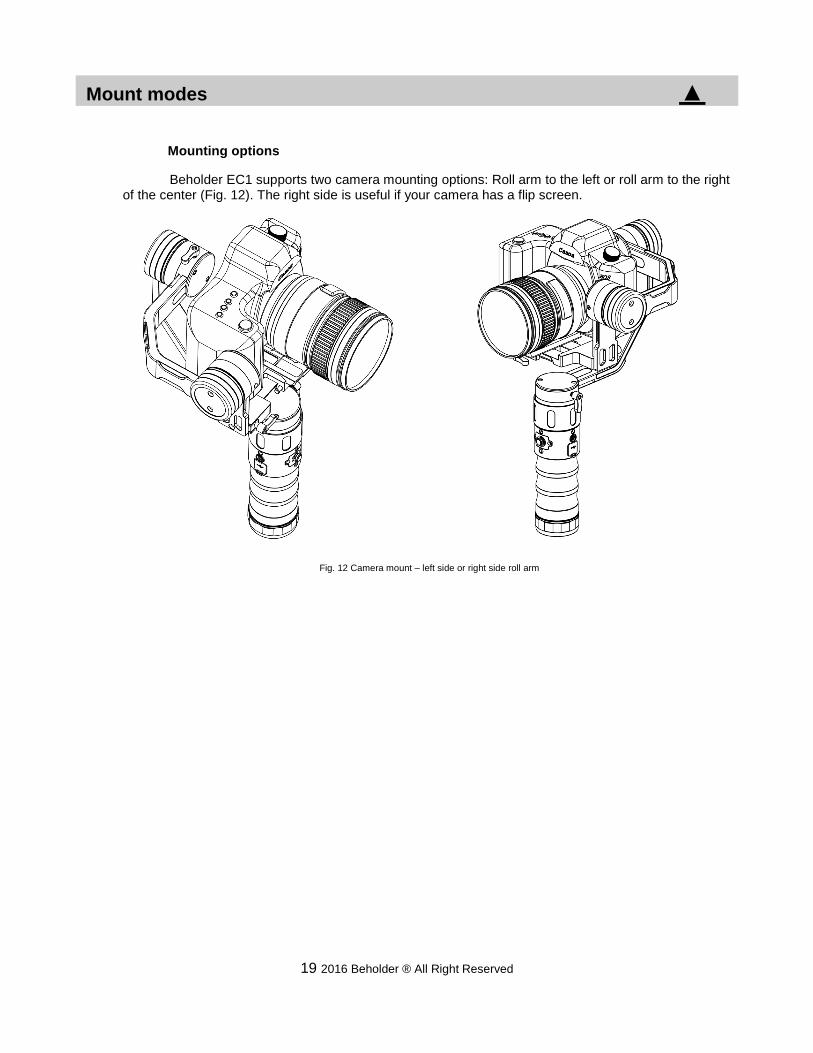
Beholder EC1 supports two camera mounting options: Roll arm to the left or roll arm to the right of the center (Fig. 12). The right side is useful if your camera has a flip screen.
Fig. 12 Camera mount – left side or right side roll arm
▲ Precautions
20 2016 Beholder ® All Right Reserved
Things to consider before use
Beholder EC1 is shipped from the factory with perfect calibration. However, after a long period of unuse or if the temperature difference is too large, it may cause the gyro to drift automatically or to tilt during use.
Gyro Correction: Place the Beholder EC1 horizontally on the table, power on the gimbal and press and hold the menu button for 6 seconds. The system automatically enters the gyroscope calibration mode. The motors lose power for 5 seconds. After that, the automatic system calibration is complete and the stabilizer can resume normal use.
Note:
1. During the calibration process, hold the gimbal handle on the table as stable as possible. 2. The mini USB port is designed only for a wired joystick and can't be used for charging. 3. In order to obtain a better shooting experience in the use of EC1 when shooting, avoid any
collision and do not use excessive force.

▲ Safety
21 2016 Beholder ® All Right Reserved
Important safety instructions
1. Do not get too close to a magnetic field or a source of extreme heat and fire. 2. Using and storing this product under high temperature and humidity, water, or in a highly corrosive
environment can cause the device to have internal failure. 3. Protect the power cord to avoid trampling or backlog, particularly at plugs, sockets and other parts. 4. Do not use an incompatible power supply, charger or batteries that may cause a fire, explosion or
other hazard. Use only manufacturer-approved equipment and matching accessories to meet safety standards. Other types of accessories may cause problems with the product, or a safety incident.
5. When not using the product for a long period of time, please remove the battery, wrap it in dust-proof packaging and place it in a dry environment.
6. Do not use the device during a thunderstorm or it may result in equipment malfunction or risks being struck by lightning.
7. Do not expose the battery to excessive heat in the environment, such as sunlight, fire or similar factors.
8. Do not expose this appliance to dripping or splashing liquids. 9. Do not place conductive objects at the battery holder electrical terminal, or in contact with the battery
ends, in order to avoid short-circuiting the battery or getting burns and other physical injuries due to the battery overheating.
10. Do not expose the battery near any heat sources such as sunlight, heaters, microwave, oven, stove, radiator, or other instruments that produce heat (including amplifiers).
11. If the battery is used improperly, there may be an explosion hazard. In order to reduce the risk of fire or burns, do not disassemble, crush, puncture, short external connections, expose to heat or throw in fire.
12. If the batteries leak, do not allow the liquid to come in contact with the skin or eyes. If the liquid does come in contact with the skin or eyes, wash affected area with water immediately and go to the hospital for medical treatment.
13. If battery discoloration, deformation, abnormal heat, or other phenomena occurs, please stop using and replace the battery.
14. WARNING: CHOKING HAZARD - This product may contain small equipment and parts. Keep the device and its accessories out of reach of children as they may damage the device or swallow small parts.
15. Dispose of used batteries in accordance with local regulations.

▲ Copyright/Trademark Statement
22 2016 Beholder ® All Right Reserved
Copyright/Trademark statement
Beholder® and ikan® are certified trademarks, which cannot be used without our permission for any other purposes. The product has a number of patents so if copies of the product are found, the perpetrator will hold the relevant legal responsibility.
A regular dealer must obtain marketing authorization documents. Please visit an authorized dealer to purchase.
A list of distributors can be found on the website. In case the product is purchased on a non- authorized channel, we will not provide after-sales service for the product.
Product features, appearance or other functions may change over time. The company is free to implement and release any changes as desired.
Learn More: More dynamic information at official website: www.ikancorp.com Support: Contact email: [email protected]
▲ Product specifications
23 2016 Beholder ® All Right Reserved
Beholder EC1 technical specifications
Model: EC1 3-axis single handheld gimbal stabilizer
Load Capacity 2000 g
Battery 3x 18650 3.7v
Battery Operating Time Approx. 8-10 hours
Battery Charging time Approx. 3-4 hours
Working temperature: -10 to 70 degrees Celsius
Working angles:
(360° no limit) Pan: 360 °
Roll: 360 ° Pitch: 360 °
Tripod Mounting Thread 3/8"
Accessory Mounting Threads 1 x 1/4"
Length 360 mm Dimensions Width 184 mm
Height 79 mm
Weight 2.6 lb (1.2 kg)
Canon: 5D / 6D / 7D + 16-35
f4.0 / f2.8,24-105
f4.0,24-70
Camera Support: Mirrorless, bridge and compact cameras: A6300, A7 Series + 24-70 / 16-35, GH4 + 12-35 / 14-40 / 7-14, RX100, LX100
Product weight (without camera): 2.6 lb (1.2 kg) Package weight: 4.8 lb (2.2 kg) Packing size: 42 x 22.5 x 10 cm
24 2016 Beholder ® All Right Reserved
Frequently asked questions and answers
1. How do you charge the gimbal?Beholder EC1 can be charged in two ways: using the built-in battery holder micro USB or using a separate authorized dedicated charger (recommended) such as the ikan ICH-SC4. Charging using the battery holder:
- Remove the battery cap cover on the bottom of the handle.- Take the battery holder out.- Connect the power cable to the Micro USB.- Connect the other cable end to power supply.
Charging using a dedicated charger: - Buy an authorized smart charger- Release the battery holder.- Take out the batteries and charge with fast charger.
2. After mounting the quick release plate, sliding it into the stabilizer seems difficult. How do you fixthis?
Release the 1/4 screw about two turns and then insert to the gimbal QR base.
3. After balancing the camera, adjusting the camera’s center of gravity, and tightening thescrews, the camera is still wobbly and unstable. Why?
You need to put the rubber stickers onto the quick release plate and then put the camera back on.
4. Why is my battery holder not charging?When using the battery holder as a charger, the USB power supply must meet the minimum requirements. The common USB port may not supply enough power to charge the batteries. A USB adapter rated at a minimum of 2.5A/12.5W or more may be needed. You can also purchase the Beholder multi-function intelligent charger.
5. When I start up the stabilizer (the camera’s center of gravity has been adjusted), why is italways twisted to one side?This may be from gyro magnetic fields that are affecting the surrounding environment, leading to an incorrect gyro direction. Solution: Press and hold the mode button for about 6 seconds to enter the calibration mode. It can be used normally after calibration is complete.
TIP
Fully charged 18650 batteries measure 4.21V through a volt meter.
TIP
After balancing the camera, mark the position with a pen. This will help you find the balance faster the next time you mount the same camera and lens.