
Using your FIDO U2F Authenticator (Token) with StrongKey ...
29
Using your FIDO U2F Authenticator (Token) with StrongKey CryptoCabinet User Guide - v3 StrongAuth, Inc. 150 W Iowa Ave Sunnyvale CA 94086-6171 USA August 2015
Transcript of Using your FIDO U2F Authenticator (Token) with StrongKey ...
Using your FIDO U2FAuthenticator (Token) withStrongKey CryptoCabinetUser Guide v3
StrongAuth, Inc.150 W Iowa AveSunnyvale CA 94086-6171USA
August 2015
UTHS – How To Page 1
Copyright 2001-2015 StrongAuth, Inc. 150 W Iowa Ave. Sunnyvale CA 94086 U.S.A. All rights reserved.
StrongAuth, Inc. has intellectual property rights relating to technology embodied in the product that is described in this document. In particular, and without limitation, these intellectual property rights may include one or more U.S. patents or pending patent applications in the U.S. and in other countries.
U.S. Government Rights – Commercial software. Government users are subject to the StrongAuth, Inc. standard license agreement and applicable provisions of the FAR and its supplements.
This distribution may include materials developed by third parties.
StrongAuth, StrongKey, StrongKey Lite, the StrongAuth logo, the StrongKey logo and the StrongKey Lite logo are trademarks or registered trademarks of StrongAuth, Inc. or its subsidiaries in the U.S. and other countries.
Products covered by and information contained in this publication are controlled by U.S. Export Control laws and may be subject to the export or import laws in other countries. Nuclear, missile, chemical or biological weapons or nuclear maritime end uses or end users, whether direct or indirect, are strictly prohibited. Export or reexport to countries subject to U.S. embargo or to entities identified on U.S. export exclusion lists, including, but not limited to, the denied persons and specially designated nationals lists is strictly prohibited.
DOCUMENTATIONIS PROVIDED “AS IS” AND ALL EXPRESSOR IMPLIED CONDITIONS, REPRESENTATIONS AND WARRANTIES, INCLUDING ANY IMPLIED WARRANTYOF MERCHANTABILITY, FITNESS FOR A PARTICULAR PURPOSEORNON-INFRINGEMENT, AREDISCLAIMED, EXCEPT TO THE EXTENT THAT SUCHDISCLAIMERS ARE HELD TO BE LEGALLY INVALID.
Page 2

StrongKey CryptoCabinet (SKCC) is an open-source web-application which allows end-users to encrypt files within a corporate environment and share those files securely with others while storing all encryption keys securely within a secure vault on-premises.
SKCC was originally created to demonstrate how to write web-applications using StrongAuth's open-source StrongKey CryptoEngine (SKCE) software. SKCE is the underlying “engine” that encrypts files of any-type and any-size, optionally storing them in public clouds such as Amazon Web Services' Simple Secure Storage (S3), Microsoft's Azure and Eucalyptus Walrus.
The SKCE also allows you to digitally sign documents to establish the authenticity of documents while simultaneously verifying their integrity.
More recently, StrongAuth built a Fast Identity Online (FIDO) Universal 2nd Factor (U2F) server into the SKCE to support the burgeoning protocol for strong-authentication. The SKCE is now an officially FIDO CertifiedTM U2F server.
SKCC, the web-application, was FIDO-enabled to take advantage of the FIDO Server built into SKCE, to demonstrate how to use the FIDO strong-authentication capability in the SKCE to protect end-user credentials within web-applications.
This document walks you through a demonstration of how to use your FIDO U2F Authenticator (aka Token) with SKCC on a demo site established by StrongAuth. The high-level architecture of the infrastructure you are interacting with, looks like the following:
FIDO Demo User Guide v3 Page 3
Introduction
LDAP
1 Connect 2 1FA
4 Escrow key
5 Encrypt &store file
5 Encrypt &store file
3 2FA (FIDO)
Note: Secure cloud-storage is a standard feature of CryptoEngine, and may be used to store encrypted documents in the cloud if desired. However, cryptographic keys are never stored in the cloud.
Strong-Authentication
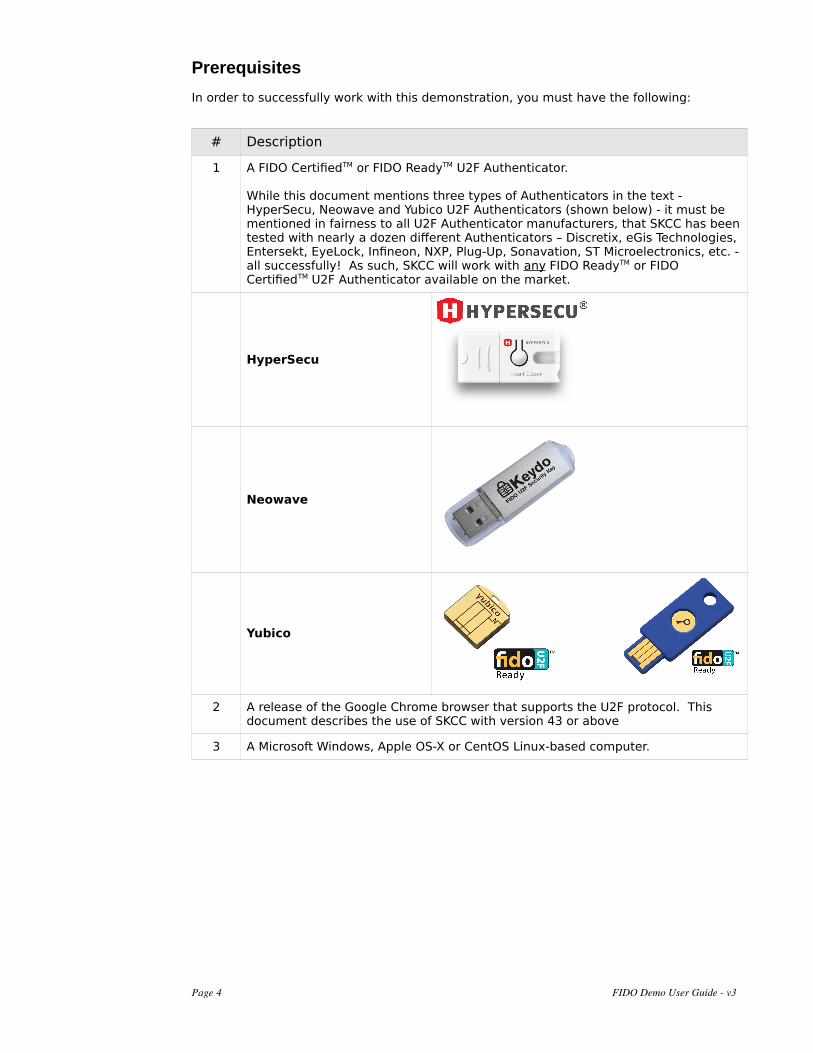
Prerequisites
In order to successfully work with this demonstration, you must have the following:
# Description
1 A FIDO CertifiedTM or FIDO ReadyTM U2F Authenticator.
While this document mentions three types of Authenticators in the text - HyperSecu, Neowave and Yubico U2F Authenticators (shown below) - it must be mentioned in fairness to all U2F Authenticator manufacturers, that SKCC has beentested with nearly a dozen different Authenticators – Discretix, eGis Technologies, Entersekt, EyeLock, Infineon, NXP, Plug-Up, Sonavation, ST Microelectronics, etc. -all successfully! As such, SKCC will work with any FIDO ReadyTM or FIDO CertifiedTM U2F Authenticator available on the market.
HyperSecu
Neowave
Yubico
2 A release of the Google Chrome browser that supports the U2F protocol. This document describes the use of SKCC with version 43 or above
3 A Microsoft Windows, Apple OS-X or CentOS Linux-based computer.
Page 4 FIDO Demo User Guide v3

Please note that if you are using a Linux PC, you must perform the following task before beginning the demo:
1. As the root user, or using sudo, modify the /etc/udev/rules.d/70-u2f.rules file. If it doesn't exist, create it;
2. Add the following text to the file:
ACTION!="add|change", GOTO="u2f_end"KERNEL=="hidraw*", SUBSYSTEM=="hidraw", ATTRS{idVendor}=="*", ATTRS{idProduct}=="*", TAG+="uaccess"LABEL="u2f_end"
3. Reboot the Linux PC
FIDO Demo User Guide v3 Page 5

Register a New User Account
In this section of the demonstration you will create a new account on the public site where SKCC is hosted. After creating the account, you will login with the newly-created credential into SKCC without a FIDO Authenticator.
Step Description
1 Using Chrome, connect to https://fidodemo.strongauth.com/skcc.
2 At the home-page of the SKCC application, click on the Not Registered? Createan account now web-link.
3 The link will pop-up a registration panel.
4 Supply a Username while keeping the following rules in mind:
• Username must be between 3 and 30 characters in length; and• Username must consist of only lowercase alphabet (a-z), numbers, and
periods.
5 Supply a Password and repeat it while keeping the following rules in mind:
Page 6 FIDO Demo User Guide v3

Step Description
• Password must be at least 6 characters long;
6 Click on the Register button to create the account:
7 If you see the following error message, it implies the Username already exists on the system and was chosen by another user; click the Close button and attempt registering with a different Username.
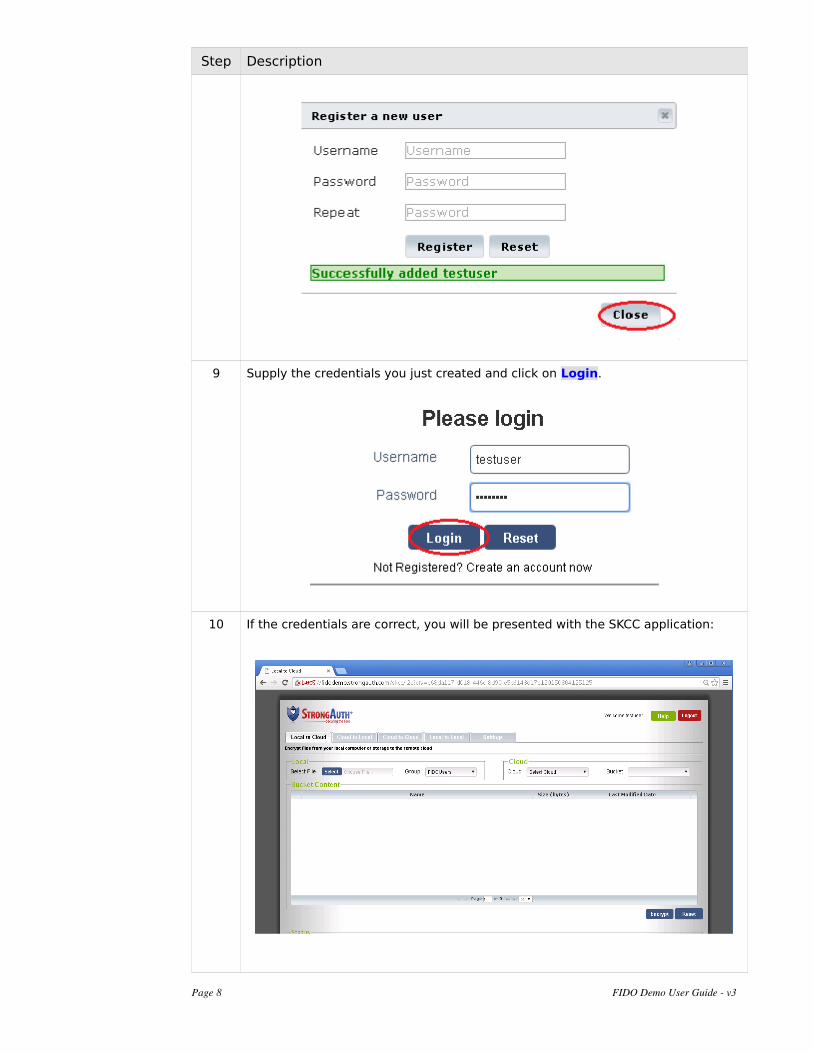
8 If you see the following message, the account was created successfully. Click on Close - you will be taken back to the Login page.
FIDO Demo User Guide v3 Page 7
Step Description
9 Supply the credentials you just created and click on Login.
10 If the credentials are correct, you will be presented with the SKCC application:
Page 8 FIDO Demo User Guide v3

Enable 2-Step Verification
In this section of the demonstration you will enable 2-Step Verification – a process by which a random, one-time code is sent to a registered e-mail address (supplied by you), so the system can verify your identity when you confirm your credential with the one-time code.
If FIDO authentication is so strong, easy and intends to supplant passwords, it begs the question: why is 2-Step Verification necessary?
Designers of web-applications must take into account, that a user may forget their FIDO Authenticator at home before coming into work,, may lose their FIDO Authenticators, or Authenticators may become inoperable accidentally. In case of any of these events, a web-application must allow legitimate users to get back into their accounts without having to spend inordinate amounts of time with Support staff to get back into the website.
On the assumption that a user's mobile phone or e-mail account is generally secure or in control of the legitimate user, 2-Step Verification is a reliable mechanism to enable users to take control of their accounts using a one-time random code sent to an e-mail address or a mobile phone number.
If the user opts to use 2-Step Verification to authenticate to the web-application, after receiving the random code the user must supply that code to the web-application to gain access to the account. The SKCC implements this mechanism.
Step Description
1 In the SKCC application, click on the Settings tab to navigate to that page:
2 Click on the 2-Step Verification label to open up the “accordion-page”:
FIDO Demo User Guide v3 Page 9

Step Description
3 Click on the Turn ON button to activate 2-Step Verification:
4 You will see a configuration panel. Click on the Use My Email Address button toconfigure an email address:
Page 10 FIDO Demo User Guide v3

Step Description
5 Supply an email address to which you have access and click on the Send Code button:
6 In the mail tool you use (Outlook, Thunderbird, browser, etc.) to access the e-mailaccount associated with the address you provided for 2-Step Verification, check for an e-mail from [email protected] and a subject of Your verification code. Itwill have a 6-digit code in the body of the e-mail.
7 Type this 6-digit code in the Make sure it works field, and click on the Verify & Save button. In case the code times out, or in case the e-mail goes to your Spamfolder or you accidentally delete the e-mail, you can click on the Resend Code link and have a new verification code sent to your e-mail address:
FIDO Demo User Guide v3 Page 11

Step Description
8 If your code is verified successfully, you will see 2-Step Verification turned ON, You will also see the e-mail address you provided stored in the Your Email Addresses section of the 2-Step Verification accordion-page.
9 If the code you typed in is incorrect, you will see an error message indicating the code was incorrect. You are then prompted to try again, or have a new code sent to you.
Page 12 FIDO Demo User Guide v3

Register a FIDO Authenticator with your account
Now that 2-Step Verification has been configured, in this section of the demonstration, you will learn how to register a unique FIDO cryptographic key (generated on your FIDO Authenticator) with your account.
Since the process appears to sound complex, the industry and text in this document might sometimes refer to this as “register your FIDO Authenticator” or “register your FIDOToken” to simplify it. Please recognize that it really implies the generation of a new and unique cryptographic key-pair and the public-key of that pair being registered with the website.
Step Description
1 If you are still within the Settings page, click on the FIDO Keys label to open that accordion-page. If have navigated away from the Settings page, navigate back tothat page.
If you have logged out of SKCC, login again – but recognize that you will now be prompted to enter the one-time verification code before you can gain access to SKCC (because of the previous 2-Step Verification process).
2 You will see a panel with a list of Your Security Keys. Unless you have registered FIDO keys with this instance of SKCC before (under the username you used to login into the application), the list will be empty.
3 Click on the Add Security Key button to register a new cryptographic key on a FIDO Authenticator, for this site, with your account:
FIDO Demo User Guide v3 Page 13

Step Description
4 The SKCC will bring up a panel with a set of instructions on how to register your FIDO Authenticator. Review the instructions to ensure you can meet the requirements mentioned there.
5 Since the FIDO U2F protocol currently supports using Authenticators only as a Human Interface Device (HID) over the Universal Serial Bus (USB), plug-in the FIDO Authenticator into an available USB port on your computer.
Once plugged in, wait for a little (no more than a minute) to ensure any necessaryHID device drivers are installed and registered with the operating system. The Microsoft Windows operating system will specifically notify you on the status bar when the Authenticator is ready to use.
Note that the installation of device drivers is done only once by the operating system – subsequent operations with the FIDO Authenticator should be possible as soon as the device is plugged into the USB port.
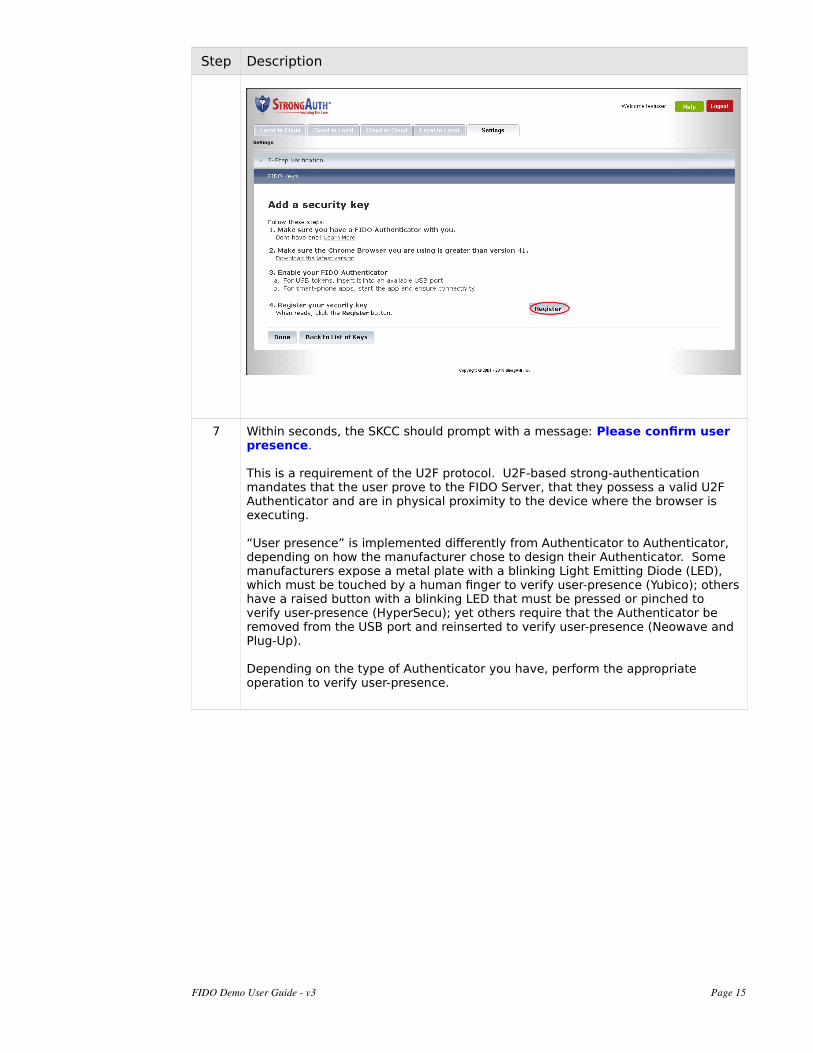
6 When the FIDO Authenticator's device driver is enabled, click on the Register button:
Page 14 FIDO Demo User Guide v3
Step Description
7 Within seconds, the SKCC should prompt with a message: Please confirm user presence.
This is a requirement of the U2F protocol. U2F-based strong-authentication mandates that the user prove to the FIDO Server, that they possess a valid U2F Authenticator and are in physical proximity to the device where the browser is executing.
“User presence” is implemented differently from Authenticator to Authenticator, depending on how the manufacturer chose to design their Authenticator. Some manufacturers expose a metal plate with a blinking Light Emitting Diode (LED), which must be touched by a human finger to verify user-presence (Yubico); othershave a raised button with a blinking LED that must be pressed or pinched to verify user-presence (HyperSecu); yet others require that the Authenticator be removed from the USB port and reinserted to verify user-presence (Neowave and Plug-Up).
Depending on the type of Authenticator you have, perform the appropriate operation to verify user-presence.
FIDO Demo User Guide v3 Page 15

Step Description
8 Note that there are at least two reasons that a FIDO key-registration operation might fail:
1. There is a challenge sent by the FIDO Server (in the SKCE) that can time-out within 30 seconds. If it does, time-out, a response from the FIDO Authenticator/Browser to the FIDO Server will be invalid; or
2. The driver for the FIDO Authenticator may not yet have been installed when the user-presence action was performed. As a result the FIDO Authenticator will not be able to digitally sign the challenge sent by the FIDO Server.
In both cases, you are likely to see the following error:
Page 16 FIDO Demo User Guide v3

Step Description
9 To attempt the registration once again, you can either refresh the browser-page, or you can click on either of the two buttons – Done or Back to List of Keys – and then click on the Add Security Key button to start over again.
10. If the key-registration succeeds, you will see the following confirmation:
11 Click on the Done button to go back to the page with the list of keys.
12 When there are FIDO keys registered in your account, this page displays some meta-data about them – such as the date/time when they were generated, date/time when they were last used, and if geo-location retrieval is enabled, the geographical location (city) from which the key was last used.
FIDO Demo User Guide v3 Page 17

Step Description
13 You can delete a key on this page, by selecting the key-to-delete in the list and clicking on the Delete Security Key button. (See note below on why you might choose to delete one or more FIDO keys from your account).
14 Log out from the application by clicking on the Logout button on the top right-hand corner.
Page 18 FIDO Demo User Guide v3

If FIDO provides strong-authentication and protects your account from getting hacked, why would you ever want/need to delete one or more keys?
Good question! As long as you control the FIDO Authenticator and you have it in your possession, the premise is that the keys are “good” and can be trusted. However, there isalways a possibility that a FIDO Authenticator might get lost; or a batch of Authenticators may be declared unsafe due to a manufacturing defect discovered after the Authenticatorwas sold on the market.; or that there is a vulnerability discovered in an implementation of an Authenticator.
In all cases, to protect the user-account, registered FIDO keys must be deleted to prevent unauthorized people from accessing your account. This design allows users to “manage” their keys on their own and protect them from such risks. Once deleted, anyone – including the legitimate user herself – will be unable to use that FIDO Authenticator to authenticate to that web-application (if there are other keys on that Authenticator, registered at other web-sites, those may also need to be deleted).
In the event the user “loses” their Authenticator and deletes their registered keys from their account (after having authenticated with 2-Step Verification), and then finds the “lost” Authenticator, they can use the same Authenticator to generate a new key-pair andregister the key for the same site and account. This is possible because, once a user has deleted their registered key with a site, the FIDO protocol does not “recognize” that key on the Authenticator even if the key is still present on the Authenticator.
The user can choose to use multiple FIDO Authenticators - a primary and a backup – to register multiple keys with an application site, and use either Authenticator to access the web-application. The loss of one Authenticator does not force them to go through a 2-Step Verification – they can use the alternate Authenticator to login. The user may also choose to carry one FIDO Authenticator on their key-chain, and leave one on their desk at home, or one permanently plugged-in into their computer; all these use-cases are permissible.
FIDO Demo User Guide v3 Page 19

Authenticate with FIDO and Userid/Password
Now that you have a FIDO Authenticator registered with the SKCC, in this section of the demonstration, you will strongly-authenticate to the user-account with the FIDO U2F Authenticator.
Note that this example of strong-authentication shows the use-case where the user must authenticate with their Userid/Password (UP) and a FIDO Authenticator to access the web-application.
The benefit of this mode of authentication – FIDO+UP – is that the user can choose to use a FIDO Authenticator that does not mandate local authentication (on the FIDO Authenticator) with a Personal Identification Number (PIN) or some biometric, because their Userid/Password still protects access to their account even if the FIDO Authenticator is compromised through loss, negligence or other mishap.
Later sections of this document demonstrate using two other authentication modes:
• FIDO+CAPTCHA – when the web-application chooses to dispense authenticating with the Userid/Password and only uses FIDO strong-authentication. This is usefulon an internet-facing website to prevent random, drive-by attempts to bog down your web-application with authentication requests, while keeping it convenient forlegitimate users with FIDO Authenticators because they don't have to remember apassword any more to the site; and
• FIDO – when the web-application dispenses with UP and CAPTCHA completely, andonly requires a FIDO Authenticator for strong-authentication. This is useful for web-applications on the intranet (completely inside the enterprise network) so you know authentication requests are likely to come only from trusted entities with FIDO Authenticators, and when the FIDO Authenticator has a mechanism to authenticate the user using a PIN or biometric match on the Authenticator. (You don't want a legitimate user to lose an Authenticator that does not have local-authentication, and for someone else to masquerade as the legitimate user if theyhappen to find the Authenticator and connect to the web-application).
StrongAuth is happy to discuss these details with you at any time; just let us know.
Step Description
1 At the login page for SKCC, type in the Username and Password for the credential you created in this demonstration. When done, click on the Login button:
2 Since FIDO authentication is enabled (by the fact that a FIDO key is registered for
Page 20 FIDO Demo User Guide v3

Step Description
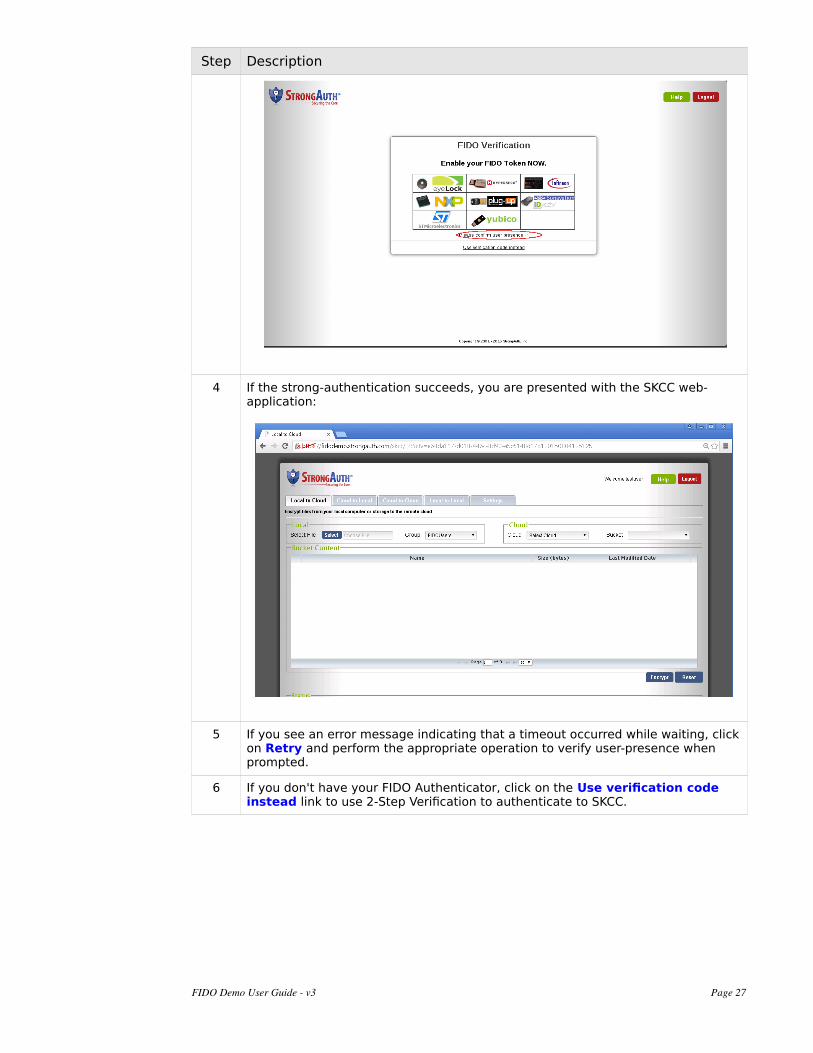
the application) SKCC automatically prompts with a challenge on the FIDO Verification page asking you to Please confirm user presence.
This page displays the logos of various FIDO U2F Authenticators that were previously tested by StrongAuth at one point or another; you can, technically, useany FIDO CertifiedTM U2F Authenticator with SKCC even if they do not appear on this list.
3 Insert the FIDO Authenticator into an available USB port and depending on the type of Authenticator, perform the appropriate operation to verify user-presence:
4 If the strong-authentication succeeds, you are presented with the SKCC web-application:
5 If you see an error message indicating that a timeout occurred while waiting, clickon Retry and perform the appropriate operation to verify user-presence when prompted.
6 If you don't have your FIDO Authenticator, click on the Use verification code instead link to use 2-Step Verification to authenticate to SKCC.
FIDO Demo User Guide v3 Page 21

Encrypt/Decrypt a File
Since SKCC is a web-application that encrypts/decrypts files using a centralized key-management system and FIDO-based strong-authentication, in this section of the demonstration you will learn how to encrypt and decrypt a file local to your computer.
Step Description
1 After authenticating to SKCC, navigate to the Local to Local tab by clicking on it.
The “Local to Local” label implies that the file to encrypted (or decrypted) is sourced from your local computer, and the destination for the encrypted (or decrypted) file is your local computer. The other tabs allow for using Public or Private Cloud storage for the encryption/decryption operations, but they are disabled on the fidodemo.strongauth.com site.
2 Using the Select button, choose a file from your local computer for encryption.
3 By default, the demonstration site is configured with only a single decryption group from a Lightweight Directory Access protocol (LDAP) Directory Server. Usersfrom this decryption group – called FIDOUsers on this demonstration site - are authorized to decrypt the file being encrypted. Users on Production sites may select any number of decryption groups from their Directory Server, thereby authorizing one or more users within those groups to decrypt encrypted files:
Page 22 FIDO Demo User Guide v3

Step Description
4 Click on the Encrypt button. This initiates an upload of the selected file to the SKCC servlet, where it is handed off to the SKCE EncryptionEngine which generates a symmetric key, escrows the key on a DEMO StrongAuth KeyAppliancecluster, encrypts the plaintext file and returns a zipped-encrypted file (with a .zenc extension) to be saved in the default download folder of your browser.
5 Click on the Reset button to reset the application's state to perform another cryptographic operation.
FIDO Demo User Guide v3 Page 23

Step Description
6 Using the Select button, this time select the downloaded encrypted file with the.zenc extension:
7 Click on the Decrypt button.
Page 24 FIDO Demo User Guide v3
Step Description
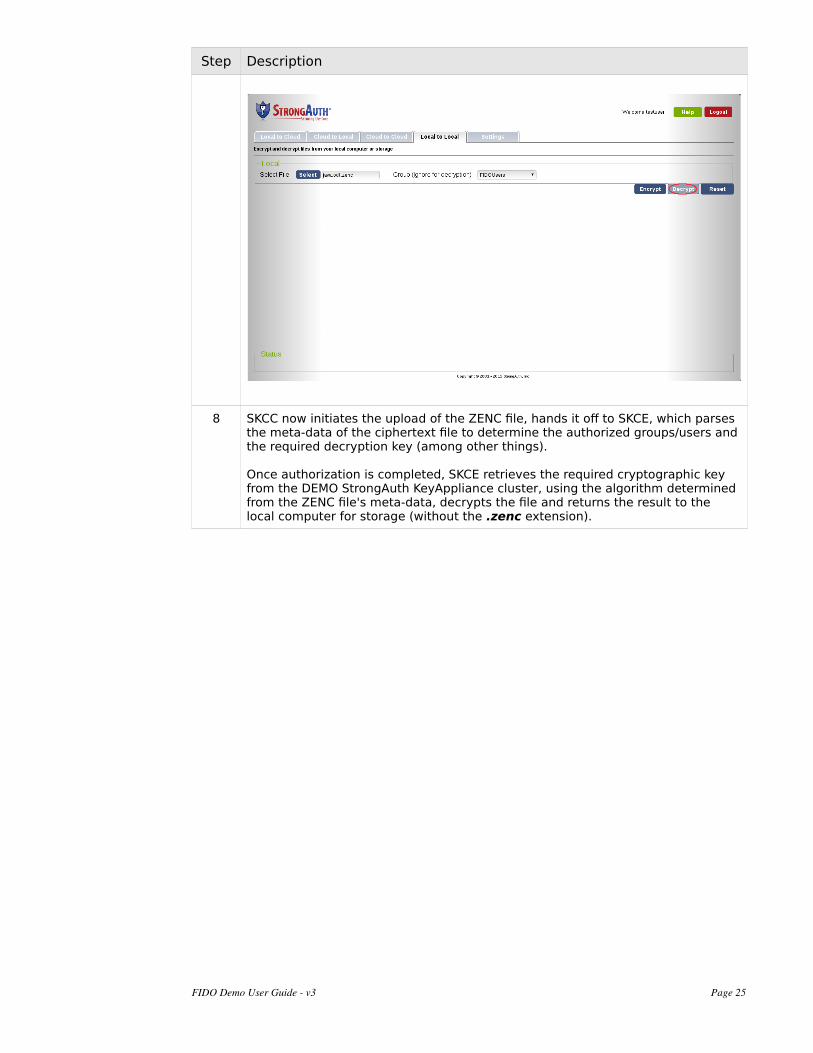
8 SKCC now initiates the upload of the ZENC file, hands it off to SKCE, which parses the meta-data of the ciphertext file to determine the authorized groups/users andthe required decryption key (among other things).
Once authorization is completed, SKCE retrieves the required cryptographic key from the DEMO StrongAuth KeyAppliance cluster, using the algorithm determined from the ZENC file's meta-data, decrypts the file and returns the result to the local computer for storage (without the .zenc extension).
FIDO Demo User Guide v3 Page 25

Authenticate with FIDO and CAPTCHA
In this section of the demonstration, you will strongly-authenticate to the user-account with the FIDO U2F Authenticator and the use of CAPTCHA (Completely Automated Public Turing test to tell Computers and Humans Apart) instead of a password.
The benefit of this mode of authentication is that the web-application can dispense authenticating the user with a password, thus allowing them to forget the password to the account and never having to reset it. This is useful on an internet-facing website to preventrandom, drive-by attempts to bog down the web-application with spurious authentication requests while keeping it convenient for legitimate users with FIDO Authenticators.
This demonstration requires connecting to a slightly different URL with the browser: https://fidodemo.strongauth.com/pno. It leads to the same web-application, but through a login-page that does not prompt for the user's password.
Step Description
1 At the login page for SKCC, type in the Username and the CAPTCHA code visible on the page, for the credential you created in this demonstration. When done, click on the Login button:
2 Since FIDO authentication is enabled (by the fact that a FIDO key is registered for the application) SKCC automatically prompts with a challenge on the FIDO Verification page asking you to Please confirm user presence.
This page displays the logos of various FIDO U2F Authenticators that were previously tested by StrongAuth at one point or another; you can, technically, useany FIDO CertifiedTM U2F Authenticator with SKCC even if they do not appear on this list.
3 Insert the FIDO Authenticator into an available USB port and depending on the type of Authenticator, perform the appropriate operation to verify user-presence:
Page 26 FIDO Demo User Guide v3
Step Description
4 If the strong-authentication succeeds, you are presented with the SKCC web-application:
5 If you see an error message indicating that a timeout occurred while waiting, clickon Retry and perform the appropriate operation to verify user-presence when prompted.
6 If you don't have your FIDO Authenticator, click on the Use verification code instead link to use 2-Step Verification to authenticate to SKCC.
FIDO Demo User Guide v3 Page 27
Authenticate with FIDO only
In this section of the demonstration, you will strongly-authenticate to the account with just the FIDO U2F Authenticator and nothing else – no password or CAPTCHA. Your username is always required in all forms of U2F strong-authentication to identify you.
The benefit of this mode of authentication is that the web-application can completely dispense with the password or CAPTCHA. If the web-application is designed well (to remember the username from a cookie, then it will allow the user to move seamlessly from application to application by clicking on bookmarks, links or URLs without having to type anything – and yet be strongly authenticated with their FIDO Authenticator. This is most useful for intranet web-applications where users are authorized to access the applications internally.
This demonstration requires connecting to a slightly different URL with the browser: https://fidodemo.strongauth.com/pnoc. It leads to the same web-application, but through a login-page that does not prompt for the user's password.
Step Description
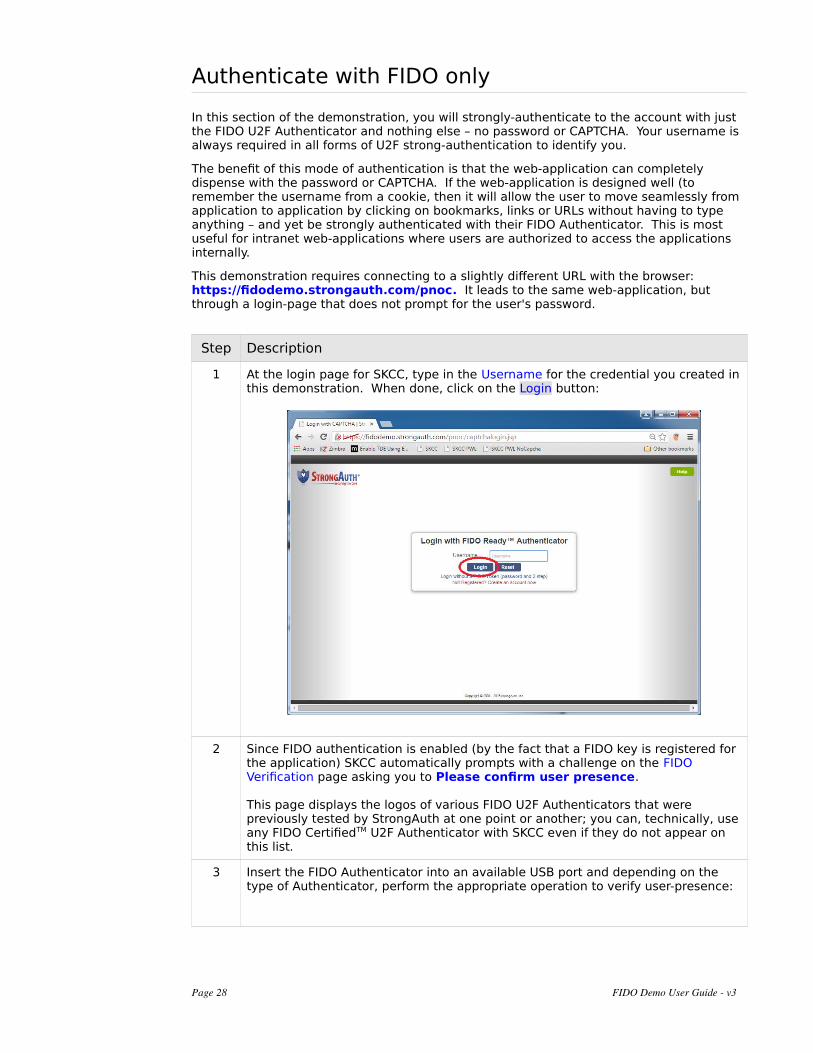
1 At the login page for SKCC, type in the Username for the credential you created inthis demonstration. When done, click on the Login button:
2 Since FIDO authentication is enabled (by the fact that a FIDO key is registered for the application) SKCC automatically prompts with a challenge on the FIDO Verification page asking you to Please confirm user presence.
This page displays the logos of various FIDO U2F Authenticators that were previously tested by StrongAuth at one point or another; you can, technically, useany FIDO CertifiedTM U2F Authenticator with SKCC even if they do not appear on this list.
3 Insert the FIDO Authenticator into an available USB port and depending on the type of Authenticator, perform the appropriate operation to verify user-presence:
Page 28 FIDO Demo User Guide v3
Step Description
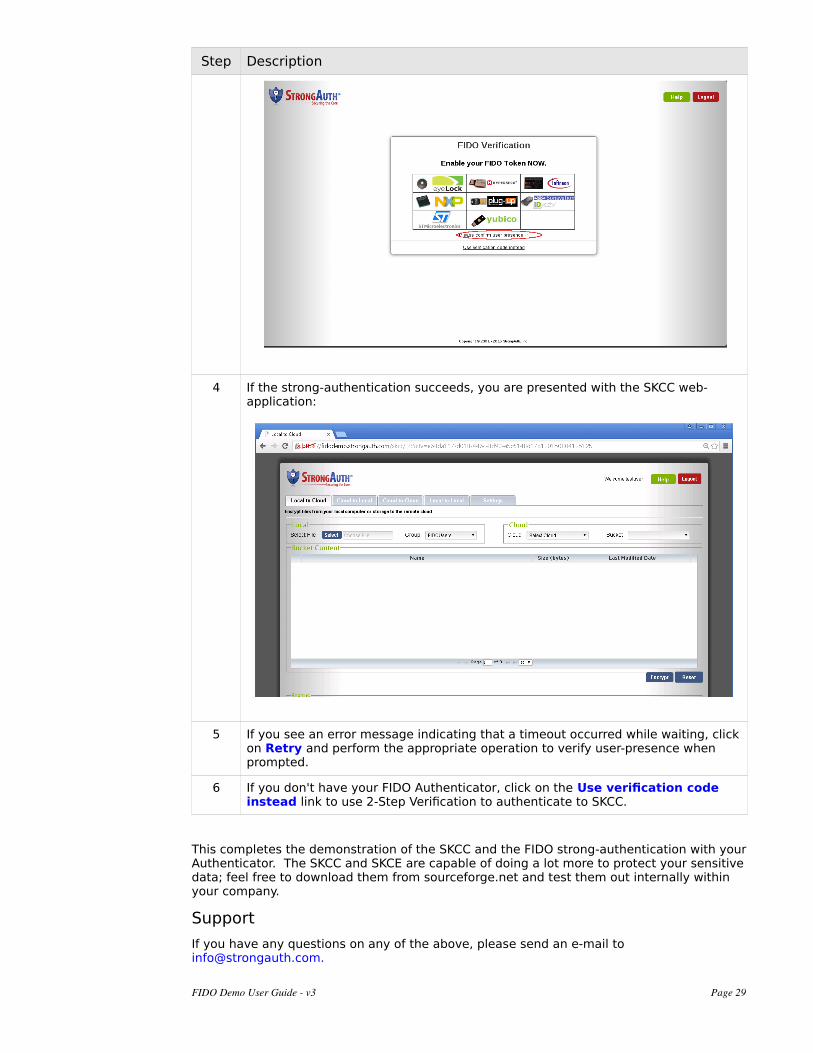
4 If the strong-authentication succeeds, you are presented with the SKCC web-application:
5 If you see an error message indicating that a timeout occurred while waiting, clickon Retry and perform the appropriate operation to verify user-presence when prompted.
6 If you don't have your FIDO Authenticator, click on the Use verification code instead link to use 2-Step Verification to authenticate to SKCC.
This completes the demonstration of the SKCC and the FIDO strong-authentication with yourAuthenticator. The SKCC and SKCE are capable of doing a lot more to protect your sensitivedata; feel free to download them from sourceforge.net and test them out internally within your company.
Support
If you have any questions on any of the above, please send an e-mail to [email protected].
FIDO Demo User Guide v3 Page 29


![Functional Certification Program Policy · FIDO Functional Certification Program for both the U2F [1-1] and UAF [1-2] specifications. These policies are the requirements and operational](https://static.fdocuments.in/doc/165x107/5e928c340a65f02a6b08c7e0/functional-certification-program-policy-fido-functional-certification-program-for.jpg)


