Using the VFD - Electrical and Computer Engineeringanderson/Outreachfiles/VFDInstructions.pdf ·...
13
1 Using the VFD (vacuum fluorescent display) Betty Lise Anderson, The Ohio State University This is a set of instructions for learning to use the Noritake GUD7000 vacuum fluorescent display. It uses a VFD Development Kit and the software GUD10K. You will need a Windows computer with a serial port. If you don’t have a serial port, you can get a serial to USB adaptor. If you do not already have the software, you can download it (Windows only) from http://www.noritakeelec.com/gud10k.html. When I bought my VFD development kit, it came with a CD containing the software, but a more recent version was online. The vacuum fluorescent display
-
Upload
phungthien -
Category
Documents
-
view
216 -
download
1
Transcript of Using the VFD - Electrical and Computer Engineeringanderson/Outreachfiles/VFDInstructions.pdf ·...

1
Using the VFD (vacuum fluorescent display) Betty Lise Anderson, The Ohio State University
This is a set of instructions for learning to use the Noritake GUD-‐7000 vacuum fluorescent display. It uses a VFD Development Kit and the software GUD-‐10K. You will need a Windows computer with a serial port. If you don’t have a serial port, you can get a serial to USB adaptor. If you do not already have the software, you can download it (Windows only) from http://www.noritake-‐elec.com/gud10k.html. When I bought my VFD development kit, it came with a CD containing the software, but a more recent version was online.
The vacuum fluorescent display
2
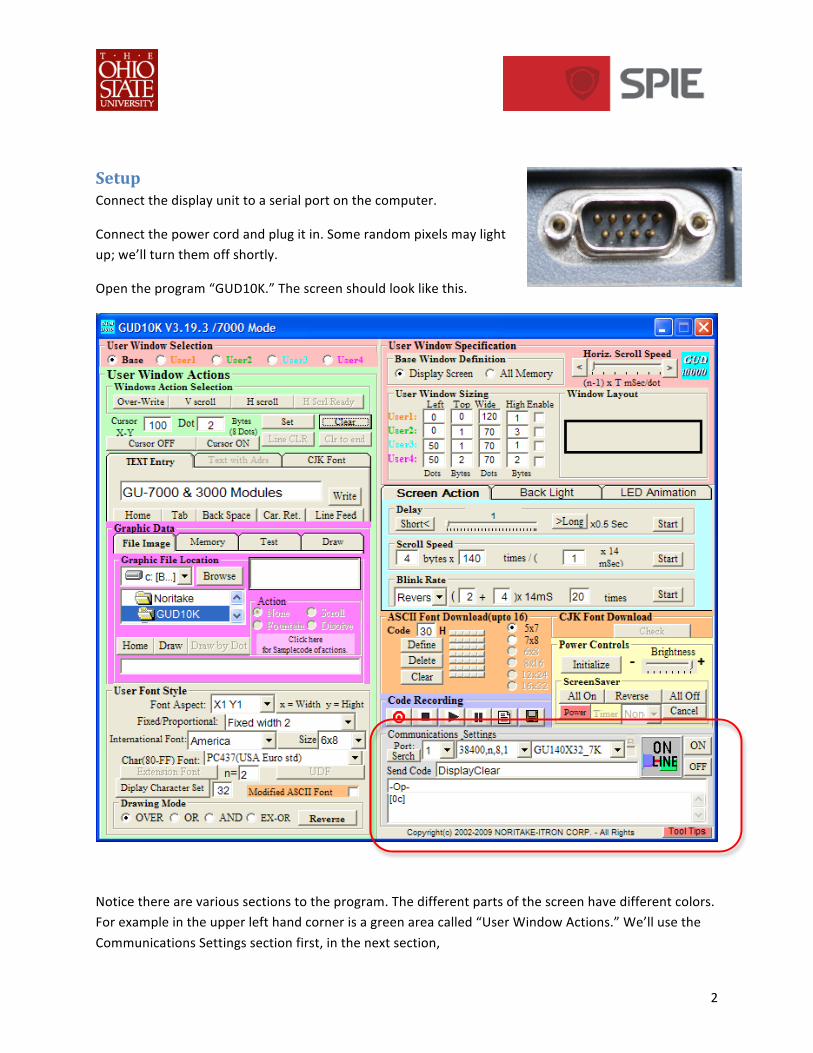
Setup Connect the display unit to a serial port on the computer.
Connect the power cord and plug it in. Some random pixels may light up; we’ll turn them off shortly.
Open the program “GUD10K.” The screen should look like this.
Notice there are various sections to the program. The different parts of the screen have different colors. For example in the upper left hand corner is a green area called “User Window Actions.” We’ll use the Communications Settings section first, in the next section,

3
Just so you know, there is built-‐in tutorial. It is designed for engineers who are considering using this display in their products, and need to learn how to program it quickly. It may assume some previous knowledge that you don’t have, but if you’d rather run that tutorial than this one, have at it! Simply click the aqua-‐colored box in the upper right-‐hand corner (it says GUD 10000) and follow the steps.
Or, follow these steps below.
Setting up the serial port The VFD unit consists of a display (128x 32 pixels) that is mounted on a circuit board. The circuit board has a microprocessor and some other electronics to drive the display. The computer will send commands to the display via the serial cable you connected earlier. The first step is to make sure the computer is talking to the right port. In the lower right hand region of the GUD 10000 program is a gray box labeled “Communications Settings.” Select the port you connected to. If you don’t know, try “1” first. If the next step doesn’t work, go back and try another. You can also scan to see which ports the computer thinks are available, using the Scan button.
Select the correct display Also in the Communication Settings panel, there is a drop-‐down menu that will show something like “GU140X32_7K.” Ours is a 128x32 display, so select that one.

4
Writing text to the display In the green User Windows Actions box, you’ll find a box labeled “TEXT Entry” with an entry like “GU-‐7000 & 3000 Modules.”
• Delete that text and write something of your own in there, for example your name. Click “write.” Did it appear on the display? If not, try selecting a different port.
• Click “Write” several more times, you will see that the next writing occurs right after the last one. When the computer sends the command to “write,” the cursor moves to the end of what it wrote.
• If you want the text to start at the beginning of the display, you will have to send a command to tell the computer to do that.
o Click the Home button, and try writing your message again. o You may notice that if you move the cursor to Home, the display will just write over
what was there before. If you want to clear the display first, click “Clear.”
5
If you want to start your message in a particular location, in the green User Window Actions area, enter values in the Cursor XY boxes. The display is 128 pixels by 32 pixels. You can set the cursor to any X (horizontal) value from 0 to 127 (computers and computer engineers like to start counting at 0 instead of 1), but the y cursor position (vertical) is measured in bytes, or 8 dots. There are four rows of 8 dots, so you can choose anything fro 0 to 3. If you want the text to begin writing in the middle of the display, what should you enter?
• Enter your answer in the boxes, and click “Set.” • Click Write. Did the text appear where you expected?
Scrolling You may have noticed that if you click “Write” many times, when the text fills the display it begins again at the beginning and writes over what was there before. “Overwrite” is the default condition.
o Try typing in a long message, such as a verse to a song you know. Click “Write: and observe what happens. You should see your message spell out, and when the screen is full, the old text disappears as the newer text appears.
o Now click the “V scroll” button (vertical scroll) and click “Write.” o Try it again after clicking “H scroll” (horizontal).
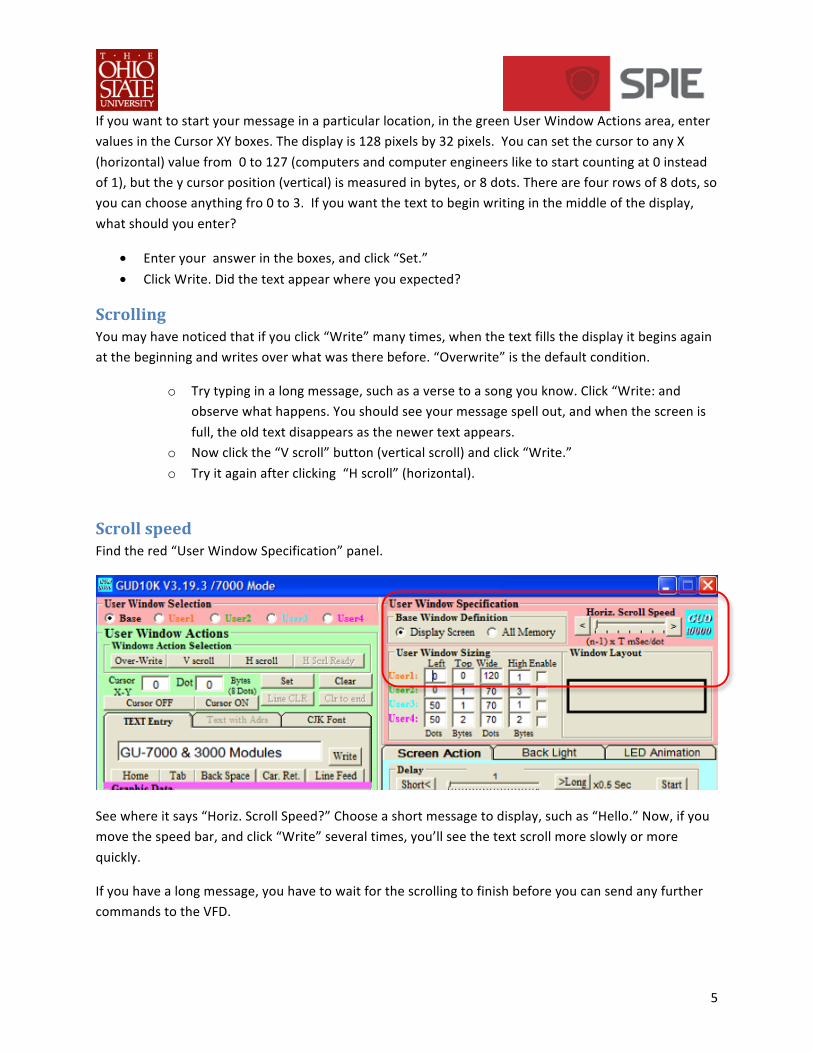
Scroll speed Find the red “User Window Specification” panel.
See where it says “Horiz. Scroll Speed?” Choose a short message to display, such as “Hello.” Now, if you move the speed bar, and click “Write” several times, you’ll see the text scroll more slowly or more quickly.
If you have a long message, you have to wait for the scrolling to finish before you can send any further commands to the VFD.

6
o Cliick “Overwrite” in the green User Window Actions panel again before proceeding to the next section.
Magnified Font o Clear the display, and enter the letter “S” in the text box, and click “Write.” The letter
“S” fills up one character position. How many dots wide and how many dots tall is it? You should find the characters are 5x7 dots. That is a standard size, and lets you display letters and numbers clearly and pleasingly.
o Now go to the gray User Font Style panel.
Find the box that says “Font Aspect.” The “aspect ratio” is an engineering term for how tall and skinny or short and fat something is. When you start up GUD10000, the aspect is X1Y1, which means they both normal. If you select “X2Y1” then the x ( horizontal) aspect will become twice as big but the Y aspect (height) will remain normal.
o Select X2Y2 and write your message again. What happened? Was it what you expected? Try some of the other aspects. When you are done, set it back to X1Y1 for the next section.
Fixed and Proportional Font o Next, with the Aspect set to X1Y1 and the Fixed/Proportional selection set to Fixed
Width 1,” write the word “Simple” to the display. The width of every letter is fixed at 5 dots wide. Even if the letter is narrow (like “i”), the room allowed for each letter is 5 dots wide and 7 dots tall.
o Without clearing the display, select Fixed Width 2 and write “SImple” again. Notice the letters all are now allowed 6 dots of width. Since the letters themselves are the same, there is not a little more space between them.

7
o Click “Car. Ret.” (carriage return) and “Line feed” in the text entry area. This will make the next text you write appear directly below the “Simple Simple” you are already displaying in fixed width fonts. Now, select Proportional1, and write “Simple” and proportional 2 and “Simple.” Proportional means that the amount of space allowed for each letter changes with the width of the letter.
If you are designing a display for a gas pump or pay phone, you, as the engineer, would need to decide which of these fonts to use. What kinds of things might influence your decision? Some things to think about are:
What is easiest to read
What kind of information you want to display (letters, numbers, pictures...)
Whether the information you need to display has to all fit on the screen at once
The fixed fonts might be easier to program because they are the same width. Therefore it could be that it’s less work (cheaper, since engineers like to be paid for their work) to use the simpler fixed font.
Make your own font Up to now we have been using the standard font that is built into the display software. Next, you’ll make up your own. Let’s try a single character. Suppose we want to replace the number “0” with a smiley face.
o Locate the ASCII Font Download panel. ASCII stands for American Standard Code for Information Interchange. It’s a way to code the various symbols on the keyboard into a form the microprocessor can understand.
o Click the “clear” button next to the 5 x 7 array of squares. o Now, click individual squares to make a smiley face. o When you are satisfied, enter the code “30” in the box labeled Code. This is the code for
the numeric character zero, which you will replace with your smiley face. o Click “define.” This tells the microprocessor than when you use the modified ASCII font,
whenever you type a “0” (character code30), you really mean “smiley face.” o Next, you need to tell the microprocessor that you want to use the modified font, not
the standard. To do that, click the orange box labeled “Modified ASCII Font” located in the lower left hand area of the window.
o Now, enter a “0” in the text entry area and click “Write.” A smiley face should appear. If you enter ”GUD7000” and click “Write,” you should see smiley faces instead of zeros.
8
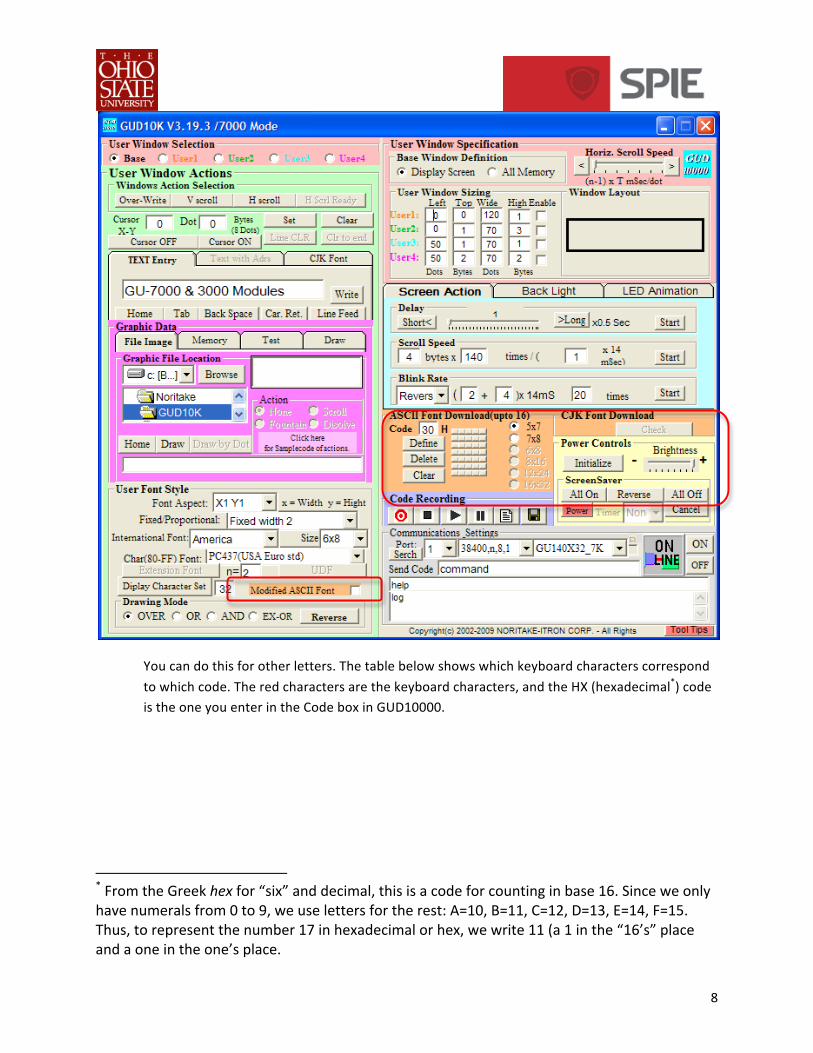
You can do this for other letters. The table below shows which keyboard characters correspond to which code. The red characters are the keyboard characters, and the HX (hexadecimal*) code is the one you enter in the Code box in GUD10000.
* From the Greek hex for “six” and decimal, this is a code for counting in base 16. Since we only have numerals from 0 to 9, we use letters for the rest: A=10, B=11, C=12, D=13, E=14, F=15. Thus, to represent the number 17 in hexadecimal or hex, we write 11 (a 1 in the “16’s” place and a one in the one’s place.

9
For example, if you wanted to write your name in script instead of block letters, you could modify the letters in your name.
When you power off the display, all the modified codes will be lost.
The Code generator Recall that this software you’ve been using is designed to help engineers get up to speed quickly using the display You may have noticed some letters and numbers appearing in the Code recording panel. Every time you execute a command, the program shows the actual codes that are sent to the VFD unit. This way the engineer can learn them quickly.
You can generate programs yourself without even learning to program. You can use the Code Recording function. If you click the Code Recording button, the computer will save every command until you click stop. Then you can open the file, review all the commands, and make changes there.
Let’s do an example.

10
• • Click Initalize (in the yellow panel above the Code Recording section. This just clears the display
and resets a bunch of stuff in case you have been, shall we say, exploring. (If things get too whacked out, just close the program and re-‐open it.)
• Next, click on the page icon. This will open a new window. Move it to where you can see it.

11
• Let’s record a series of actions. Begin by clicking the red target button in the recording panel. It should turn into a red target with vertical lines on either side.
• Click Clear. You should see the following appear in the program: ***DisplayClear*** ***-‐Op-‐*** PRT 0ch The lines with the *** are comments, meaning they are for the human reader; the machine will ignore them. The third line is a ”print” command, and the code 0ch means to print a “clear.” Here “PRT” really just means “send the command to the display unit.” • Type the word “Hello” in the text entry section, and click “Write.” Observe the code that is
entered. • Move the cursor to new location. Set Cursor X-‐Y to 50 and for the Dot enter 1. • Click Set. • Select X2Y1 font under Font Aspect in the User Font Style • Enter “Teacher “ In the Text Entry area and click Write. You will notice that the word
“teacher” wraps to the next line. We can fix this later. • Click the line feed button. • Select X1Y1 again under Font Aspect.

12
• Enter “What’s up?” in the text entry area and click Write. Click “Write” a second time. Oh, dear, now the next text is overlapping the old text.
• Click the black square in the Code recording section to stop recording.
Well! We need to fix the program. We need to start the word “Teacher” farther to the left. Let’s try setting the Cursor XY to 30 instead of 50. In the window where the program is recorded, look for the lines that have to do with Cursor Set. You can see in there that you entered “
***CursorSet(50,1)***
***-‐OpCode-‐ xL xH yL yH (xL:CursorX LowByte)(xH:CursorX HeighByte)(yL:CursorY LowByte)(yH:CursorY HeighByte)***
PRT 1fh 24h 32h 00h 01h 00h;
Remember, the stuff in the first two lines is just stuff for the human, so editing it will not affect the display. Instead, select these three lines, and delete them.
• Now, leaving the cursor right where the deleted stuff was, go back to the GUD10K program, click “record.”
• Change the Cursor X-‐Y to “30” • Click Set • Click the stop record button.
You should have seen new lines of code appear in your program.
To see if the code is fixed, click “initialize,” then click the triangle that means play.
(If you have trouble anywhere along the line and want to start over, click “Clear” in the program window. It’ll ask if you’re sure, click OK, and the program will disappear and you can begin again.)
Well, the “Teacher” part looks OK, but the “what’s up” part is still overwriting some previous text. Let’s set the last line to horizontal scroll instead.
Find the place in the program where you entered “Whats’ up?” Put the cursor in front of the lines pertaining to this command.
• Click Record • Click H Scroll • Click stop record.

13
• Click Initialize • Click play.
This is just an illustration of how you can use the code record function to try more complicated things.
Drawings (advanced) In this section, we’ll learn how to make a drawing appear on the display. To do this, we have to create the drawing first. Remember the display is 128 x 32 pixels, so your drawing can’t be any larger than this.
• Open “Paint” on your computer. It is probably under Programs>Acessories>Paint. • In the tool bar, select “Image” and then “Attributes.” Set the Width to 128 and the height to 32.
Make sure the units are pixels, and set the colors to black and white (monochrome). • You may want to make the picture larger while you edit it-‐ use the zoom function. • Select the pencil tool or brush tool, and draw a picture. If you make a mistake, you can use the
eraser to erase big areas, or you can select the color white , then the pencil, and turn individual pixels white.
• When you have completed your drawing, save it as a .bmp file, and remember where you put it and what you named it.
• Go back to the GUD10K program. In the Graphic Data section (pink panel) click the “File Image” tab. Under Graphic File location, browse to locate the drawing you made, and select it.
• Click “clear” to clear the display, then click “Draw.” Your picture should appear.
Animations (really advanced) You can see that if you want to make animations, you could make a separate bitmap drawing for each frame of your animation. Then, while recording your actions, you would select each image and click draw. When you play the program, you should see the images appear rapidly in order.