
Using the 9131-944 Belt Tensioning Tool - Porsche 928 S4...
6
Version 1.01 Using the 9131-944 Belt Tensioning Tool Page 1 Using the 9131-944 Belt Tensioning Tool Introduction: this short document contains a step-by-step guide for using the 9131-944 belt tensioning tool manufactured by ArnnWorx Specialty Tools. This tool is designed to assist with the tensioning of both the cam belt and balance belt on the Porsche 944. A down-loadable version of this document is available at http://www.arnnworx.com/9131_info.htm. The downloadable file has color images which may help with understanding how the tool works and has the most recent changes. Below are procedures for setting the tension of the cam belt and balance shaft belts. Each procedure can be done independently or sequentially. Cam belt first, immediately followed by balance belt is best though as it guarantees the balance belt is the identical position as was used during calibration tests. All adjustments are to be done on an engine that has completely cooled. Shop and engine surface temperatures must be above 67 degrees Fahrenheit. The basic process for adjusting the belts is outlined in the Porsche Workshop Manuals. A number of things can inadvertently lead to faulty or inconsistent readings. The procedural steps must be followed closely to ensure proper use. Please read through these steps and familiarize yourself with the information.
Transcript of Using the 9131-944 Belt Tensioning Tool - Porsche 928 S4...

Version 1.01 Using the 9131-944 Belt Tensioning Tool Page 1
Using the 9131-944 Belt Tensioning Tool
Introduction: this short document contains a step-by-step guide for using the 9131-944 belt tensioning tool manufactured by ArnnWorx Specialty Tools. This tool is designed to assist with the tensioning of both the cam belt and balance belt on the Porsche 944. A down-loadable version of this document is available at http://www.arnnworx.com/9131_info.htm. The downloadable file has color images which may help with understanding how the tool works and has the most recent changes. Below are procedures for setting the tension of the cam belt and balance shaft belts. Each procedure can be done independently or sequentially. Cam belt first, immediately followed by balance belt is best though as it guarantees the balance belt is the identical position as was used during calibration tests. All adjustments are to be done on an engine that has completely cooled. Shop and engine surface temperatures must be above 67 degrees Fahrenheit. The basic process for adjusting the belts is outlined in the Porsche Workshop Manuals. A number of things can inadvertently lead to faulty or inconsistent readings. The procedural steps must be followed closely to ensure proper use. Please read through these steps and familiarize yourself with the information.

Version 1.01 Using the 9131-944 Belt Tensioning Tool Page 2
What is the 9131-944? The 9131-944 is a tensioning tool derived from a Porsche tool, the P9131. The P9131 was prescribed for the early model years of the Porsche 928. It was later discontinued in favor of the expensive P9201. We have adapted and extended the original P9131 design for use on the 944 and provided an alternative way to check belt tension. The tool is a simple approach to a difficult problem – measuring the tension of the 944’s cam and balance belts. To do this the tool must be precisely positioned on the belt and light finger pressure used to twist the belt. The belt resists the twisting pressure and a scale measures the resistance. A fold-away arm is used as a twisting stop.
Is the 9131-944 Accurate? Porsche’s P9201 is a sophisticated tool and will yield a much more accurate tension reading. Our 9131-444 tool was developed and tested in a series of side-by-side tests with the P9201. This was done on two 944s (one with new belts and one with used). With many years of 944 maintenance, we feel our new tension tool is sufficiently accurate.
Reading the Scale The 9131-944 is uses colored index marks together with a moving boundary scale. Reading the scale is simple, when the index is within the boundary, the belt is tensioned correctly. Refer to the image below - the left edge of the boundary scale notch represents the maximum acceptable boundary and the right is the minimum. For new cam belts, the maximum is the ideal setting, for used cam belts the minimum is ideal.
Problem Reading the Cam Belt Scale on an Installed Engine There is only a very small area along the lower span of the cam belt where the 9131-944 tool can work. When in that position, the scale is difficult to see. So, we transfer the boundary scale marks to a viewable place on the tool. These are very lightly scribed; you may wish to darken these marks with a pencil.

Version 1.01 Using the 9131-944 Belt Tensioning Tool Page 3
Cam Belt
1. Begin by gaining access to the cam belt. This varies a little by model but generally, the air filter box, intercooler pipes and upper belt cover must be removed. Spark plugs must be installed for accurate tensioning of the cam belt. Note: If you have an 87 or later model and intend to use the standard pin wrench to deflect the spring tensioner, then the lower front belt cover and accessory belts may have to be removed to fit the pin wrench onto the spring tensioner.
2. Ensure the twist stop arm is folded as shown below.
3. Place the car in neutral and set the hand brake. Remove the distributor cap and the cam gear cover. Note: This procedure assumes the cam belt is pre-set to a tension tight enough so that rotating the crank will not cause the belt to jump or skip over teeth. On engines with the spring tensioner, the spring tensioner must be tightened; else the belt will skip teeth during rotation of the crank.
4. Using a 24mm socket, rotate the crankshaft and cam until the cam is 1 tooth left of Top
Dead Center. 5. Place the tool on the cam belt notch, as near to the water-pump pulley as is possible. At
this point, the 9131-944 tool may be touching the water-pump pulley.

Version 1.01 Using the 9131-944 Belt Tensioning Tool Page 4
6. While observing the 9131-944, slowly rotate the crankshaft clockwise (approximately ½ tooth). This will cause the 9131-944 to move away from the water-pump pulley. Stop as soon as the tool is clear of the pulley. In this location the tool can be rotated downward without touching either the belt cover or the water-pump pulley. Also, the clockwise rotation of the crank shifts the belt’s slack to the lower belt span (where the tool is located).
7. Gently press down on the tool until the twist stop arm contacts the water-pump. With the arm lightly touching the pump, read the scale (or pencil mark). No belt adjustment is needed if the black mark is within the boundary scale. If an adjustment is needed, then it is best to make the adjustment and then repeat steps 4 through 7.

Version 1.01 Using the 9131-944 Belt Tensioning Tool Page 5
8. WARNING: Damage will result to both the engine and the 9131-944 if the engine is started or even turned over while the tool is installed.
Balance Belt For this procedure, the engine does not need to be in any particular position but for best results, its best to check the balance belt immediately following the cam belt. This ensures the balance belt is ideally positioned. Note: a properly adjusted balance belt will, to most people, seem VERY loose.
1. Ensure the twist stop arm is extended as seen in the image at the top of this document. The angle of the arm is not critical; a final positioning of it will be done just prior to the reading.
2. Insert the tool onto the 5th open belt notch (count left from the upper balance belt cog). Be sure to use the small notch of the tool.
Version 1.01 Using the 9131-944 Belt Tensioning Tool Page 6
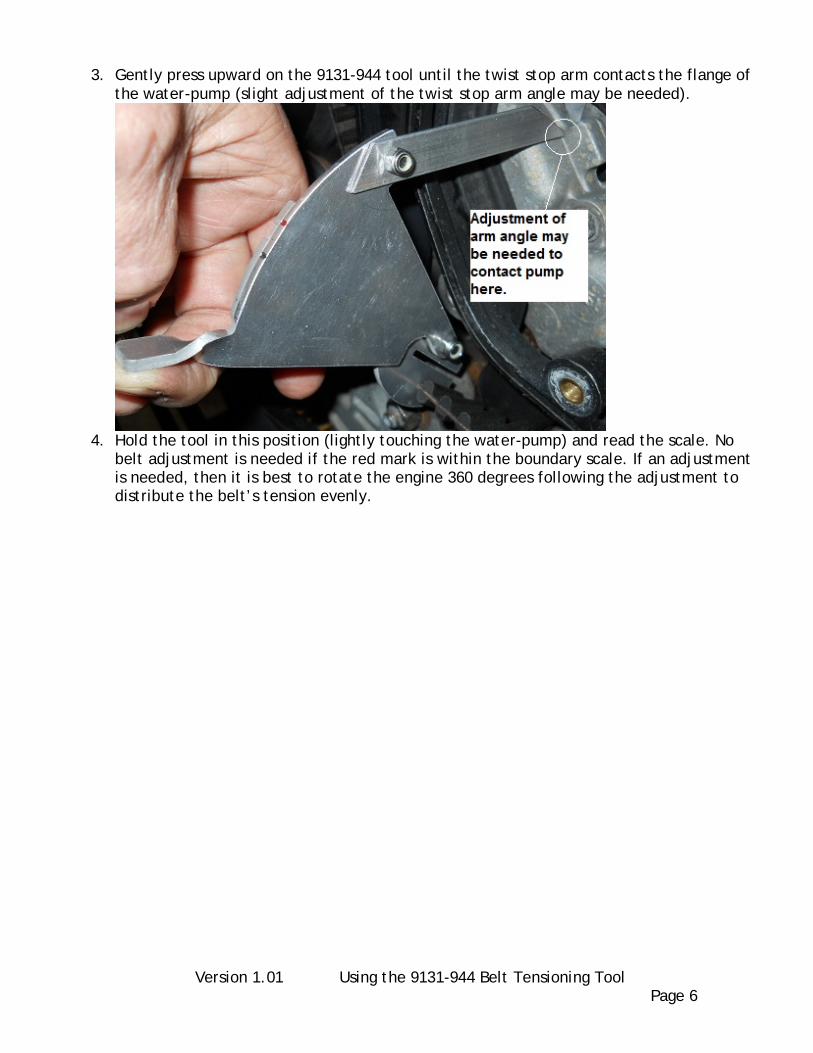
3. Gently press upward on the 9131-944 tool until the twist stop arm contacts the flange of the water-pump (slight adjustment of the twist stop arm angle may be needed).
4. Hold the tool in this position (lightly touching the water-pump) and read the scale. No
belt adjustment is needed if the red mark is within the boundary scale. If an adjustment is needed, then it is best to rotate the engine 360 degrees following the adjustment to distribute the belt’s tension evenly.


![Post Tensioning[1]](https://static.fdocuments.in/doc/165x107/543ffc0bafaf9fff098b4bcd/post-tensioning1.jpg)


