Using the 34401A Multimeter - BME-HITpapay/edu/Lab/34401A_present.pdf · · 2003-02-26An ideal...
60
Using the 34401A Multimeter The University of Texas at Arlington Electrical Engineering Department Electric Circuit Lab I
Transcript of Using the 34401A Multimeter - BME-HITpapay/edu/Lab/34401A_present.pdf · · 2003-02-26An ideal...

Using the 34401AMultimeter
The University of Texas at ArlingtonElectrical Engineering Department
Electric Circuit Lab I

In order to measure resistance, DC and AC voltage and current, as well as frequency wewill use the 34401A digital multimeter(DMM).
The 34401A has a built-in microprocessor, memory and other electronics components that give it numerous features such as built-in math functions, recording and storing up to 512 readings, giving the maximum, minimumand average of the readings.

34401A Multimeter6 1/2 digit, high performance digitalmultimeterAC/DC voltage measurementsAC/DC current measurements2 and 4 wire resistance measurementsFrequency and Period measurementsMath functions

For resistance measurements, one connects the DMM over the resistor.
Notice that for voltage measurements one puts the multimeter in parallel with the circuit element so that one measures the voltage across the element.
In case of a current measurement, one must put the DMM in series with the element in order to measure the current through the element. That involves breaking the circuit in order to insert the multimeter in the circuit loop.
In the following we will discuss the use of the DMM in more detail for resistance, voltage and current measurements.

Protect Instrument1) Inductive Devices (e.g. transformers, chokes/inductors)
induce very high transient voltages.
2) Measuring resistance: Avoid contacting probes with live circuits when in resistance modes.
3) Measuring Current: Do not connect probes across voltagesource.
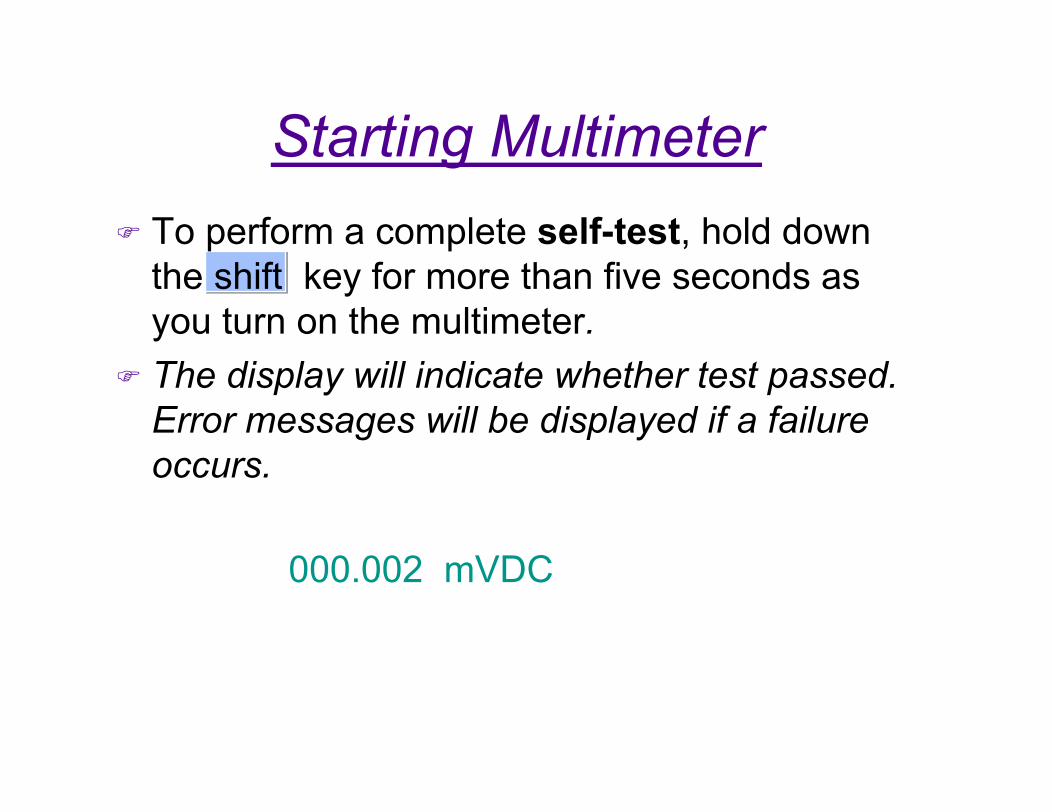
Starting MultimeterTo perform a complete self-test, hold downthe shift key for more than five seconds asyou turn on the multimeter.The display will indicate whether test passed.Error messages will be displayed if a failureoccurs.
000.002 mVDC
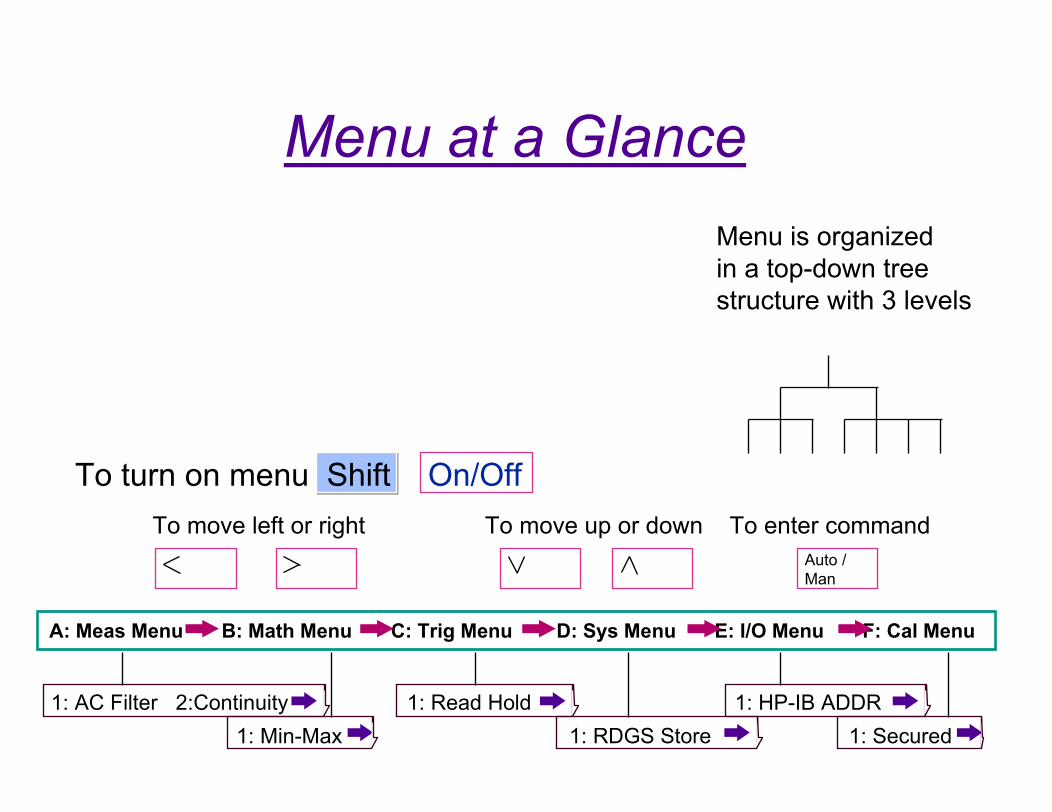
Menu at a GlanceMenu is organizedin a top-down treestructure with 3 levels
To turn on menu Shift On/OffTo move left or right To move up or down To enter command
Auto /Man
A: Meas Menu B: Math Menu C: Trig Menu D: Sys Menu E: I/O Menu F: Cal Menu
1: AC Filter 2:Continuity 1: Read Hold 1: HP-IB ADDR1: Min-Max 1: RDGS Store 1: Secured

Math Functions
To make null (relative) measurement NullMin
To store min/max readings
To make dB measurements Shift dBdB = reading in dBm - relative value in dBm
To make dBm measurements Shift dBmdBm = 10*Log10 (reading 2/ reference resistance/ 1mW)
Limit testing (Access through Menu)
Max

TriggeringAuto-trigger: Continuously takes readings at fastest rate
possible for present configuration. Default.
Single trigger: Manual trigger by pressing SingleOne reading or specified number of readings (Samplecount).
Number of samples: Number of readings meter takes with eachtrigger: 1 to 50,000. Default is 1.
Reading hold: Select by pressing Shift Auto/HoldCaptures and holds a stable reading on the display.

(1) Voltage measurement
Principle of measurementA DC voltage is measured by using a voltage amplifier and an analog-to-digital converter as schematically shown in the following. A microprocessor further manipulates the data before displaying the results.

Schematic of the DMM as a DC voltage meter.

To measure a voltage, connect the nodes over which one wants to measure the voltage between the HI and LO input terminals of the DMM.
In order to activate the DMM for DC measurements you have to select the DC Voltage function by pushing the DC V button on the front panel.
The Math functions, such as Max/Min and average, can be activated (in a similar fashion as was done for the resistance measurements). Also, the range can be selected manually by pushing the Man/Auto key in the Range menu.

Errors due to the internal resistance
An ideal voltmeter has an infinite input resistance so that it will not draw any current from the circuit under testing.
However, in reality, there is always a finite input resistance Ri. As a result, one has a voltage divider that will cause the voltage Vm one sees at the input of the voltmeter to be slightly different from the actual voltage Vs one wants to measure.
The 34401A has a relatively large input resistance of at least 10Mohm (depending on the selected voltage range) so that the error will be small as long as Rs << Ri.
CAUTION:Do not exceed the maximum allowable voltage input (1000V
DC). Also, never apply a voltage over the current input terminal (I)
of the DMM.

Measuring DC Voltage
1.000000 VDC+
- 1 VDC
2 V p-pAC
Note: measurement indicates only DC portion of signal

Measuring DCV
1.000000 VDC 2 Vp-p AC
1 Vdc
+
-
Input divider putssignal within amplifier's range
DC inputamplifier
DCV
Signal
3210
1 Vdcoffset
Integrating A/Deliminates AC
*"Terminals" switch in "FRONT"
* Press DCV* Note measurementindicates only the dc portion of signal
Protectioncircuit
ReferenceVoltages
2 Vp-p=0.707Vrms

Range and Resolution
Range 100 mV 1 V 10 V 100 V 1000 V(750 VAC)
MaximumResolution (750 VAC)
100 nV 1 V 10 V 100 V 1 mVµ µµµ

Resolution Choices &Integration Time
Integration Time** Resolution Choices
.02 PLC Fast 4 Digit
.2 PLC Fast 5 Digit1 PLC * Slow 4 Digit10 PLC * Slow 5 Digit
* Fast 6 Digit100 PLC Slow 6 Digit
Fastest, Least Accurate
Default
Slowest, Most Accurate
* Equivalent to Pressing “Digits” key on front panel.**In Power Line Cycles (PLC).
Note: Integration times of .02 and .2 do not provide power-line noise rejection characteristics.

Measuring AC Voltage
1 VDC
2 V p-pAC+
-
Coupling capacitorblocks DC; only letsAC signal through
AC amplifier/attenuator
AC to DCconverter
A/Dconverter
AC to DC conversion:DCV proportional to AC RMS
707.106 mVAC
Note: measurement indicates only the AC portion of signal

Measuring ACV
707.106 mVAC+
-
Coupling Capacitorblocks dc; only letsac signal through
AC amplifier/attenuator
ACV
1 Vdcoffset
*"Terminals" switch in "FRONT"
* Press ACV* Note measurementindicates only the ac portion of signal
AC to DCConverter
DC proportionalto RMS value
To A/D
2 Vp-p AC
1 Vdc
3210
2 Vp-p=0.707Vrms
Signal

AC Filter
Frequency Range* Time to settle3 Hz and above Slow 7 sec.20 Hz and above Medium 1 sec.200 Hz and above Fast 0.1 sec.
*Selectable through the measurement menu

AC-Coupling vs. DC-CouplingAC-Coupling-Advantage
*Removes DC Portion of Signal
AC-Coupling-Disadvantage
*Low Frequency waveforms can be cut-off

Vrms: Root-Mean-Square
Instantaneous power to a resistor is:Average power to a resistor is:
A given Vrms AC has the heating (power)effect of a VDC with the same value.
Solvingfor Vrms: Vrms *1
T to
to+Tdtv( )t 2
to
1R(1
T )to+T
v(t)2 dtPavg = Vrms2
R=
v(t)2
RP =

RMS: Root-Mean-Square* RMS is a measure of a signal's average power. Instantaneous power delivered to aresistor is: P= [v(t)] /R. To get average power, integrate and divide by the period:2
Solving for Vrms:
Pavg= 1 1 [v (t)]dt = (Vrms)2 2t0+T
R T R
t0
Vrms= 1 [v (t)]dt 2
T
t0+T
t0* An AC voltage with a given RMS value has the same heating (power) effect as a DC voltage with that same value.
* All the following voltage waveforms have the same RMS value, and should indicate1.000 VAC on an rms meter:
11.733 v1.414 v 1 v1 v
WaveformVpeakVrms
Sine1.4141
Triangle1.7331
Square11
DC11
All = 1 WATT

Peak to Peak
Vrms = Vp * .707 (Sine wave)
VppVrms
Vp

(2) Current measurementPrinciple of the measurementAn ammeter senses the current flowing through its
input terminals. The ammeter (or DMM) must be connected in series with the circuit such the same current flows through the DMM and the test circuit.
The principle of the current measurement is quite simple. The ammeter has a small resistance ri at its input terminals and measures the voltage Vthat the test current generates over this resistance in the following. The microprocessor then calculates the current, I=V/ri, according to Ohm's law.
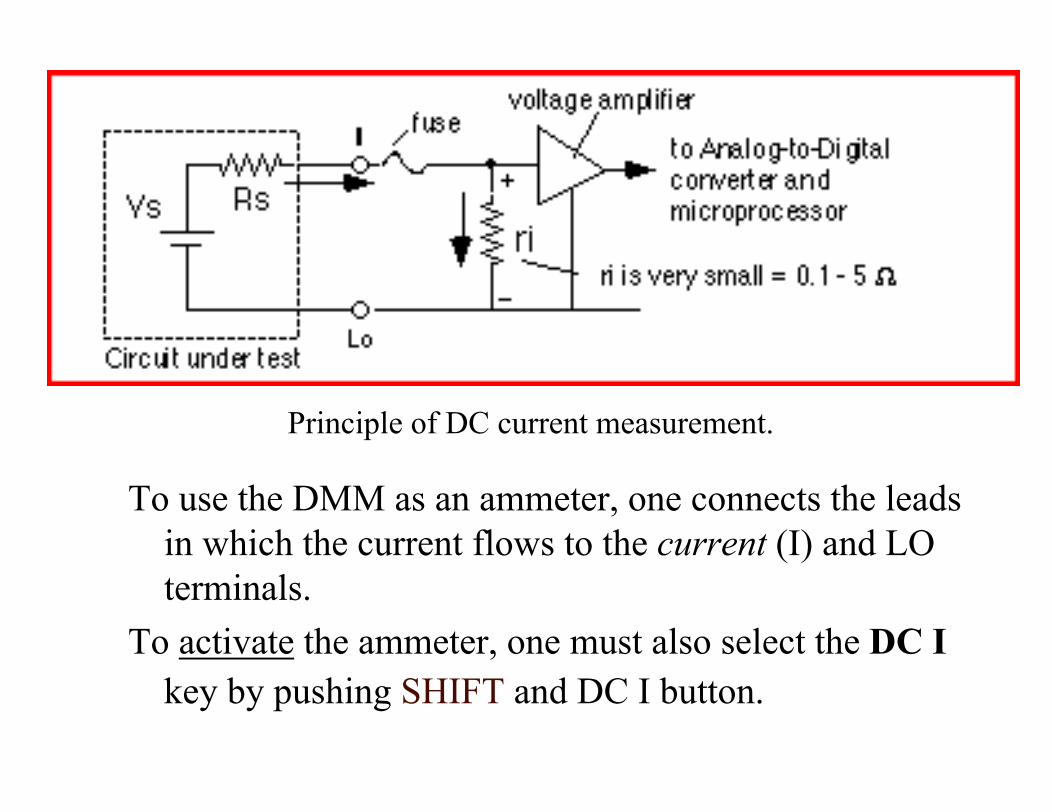
Principle of DC current measurement.
To use the DMM as an ammeter, one connects the leads in which the current flows to the current (I) and LO terminals.
To activate the ammeter, one must also select the DC Ikey by pushing SHIFT and DC I button.

Error due to the non-zero input resistance
An ideal ammeter has a zero input resistance so that it does not disturb the current under test.
The small input resistance will cause a small voltage drop which gives a small error. Fortunately, the input resistance of the 34401A is pretty small (ri = 0.1ohm for 1 and 3 A range, and 5 ohm for the 10mA and 100mA ranges) and can, in most cases, be ignored as long as RS >> ri.
CAUTION:Do not exceed the maximum allowable current input (3A
DC). Also, never apply a voltage over the current input terminal
(I) of the DMM. This will cause a large current to flow through the small input resistor ri and can damage the DMM.

Measuring Current
I =∆Vr
1.000000 ADC
Break circuit to measure I
Iac+Idc
X
+RSHIFT DC I = Measure DCI
SHIFT AC I = Measure ACI* NEVER HOOK CURRENT LEADS
DIRECTLY ACROSS A VOLTAGE SOURCE
–

Measuring CURRENT
1.000000 ADC
Internal Current shunt(same for ac and dc)To DC input
amplifier
Iac+Idc -
+
X
Iac+Idc -
+
+
-
To AC inputamplifier
ACI
DCI
DCI
* SHIFT DCV = Measure DCI
* SHIFT ACV = Measure ACI
Input HI terminal isNOT the same as for voltage measurement.
Breakcircuit to measure I
* Never hook current leadsdirectly across a voltage source.

(3) Resistance measurements
Principle of 2 wire measurementThe DMM measures a resistance by applying a known DC voltage over unknown resistance in series with a small resistance Rm . It measures the voltage over the resistance Rm as shown in the following Figure (a). The DMM (remember the DMM has a built-in microprocessor) can then calculate the unknown resistance R.

Figure (a) Two-wire resistance measurement; (b) four-wire measurement.

To use the DMM for resistance measurements, connect the resistor to the terminals labeled HI (V Ω)and LO, select the resistance measurement function by pushing the [Ω] button (one of the function keys) on the front panel as shown below.
Notice that the selection keys are annotated in black and blue. To select the function in blue, you must first select the blue SHIFT key.
Function buttons to select resistance, voltage, current or frequency

Measuring Resistance 2-wire
1 kΩ1.000000 kΩ
* Press Ω 2W* Resistance measured includes
lead resistanceTo eliminate the lead resistance:- Short leads together- Press NULL- Lead resistance will be subtracted from reading
*

Measuring ResistanceTwo-Wire Technique
1.000000 k
Protectioncircuit
To DC InputAmplifier
OhmsCurrentSource Iref
Iref2w
Rx =1 k
*"Terminals" switch in "FRONT"* Press 2W* Since voltage is sensed atfront terminals, measurementincludes all lead resistance
* To eliminate the lead resistance:* Short leads together* Press * Original value will now be subtracted from each reading
Null

Small Resistance Measurement
Measurement errors and NULLing function
When one measures the value of a resistor one connects the resistor to the DMM input terminals using cables.
If the resistor one measures is very small, it is possible that the resistance of the cables themselves are comparable or even larger than the resistance of interest.
The 34401A DMM has a handy way to overcome this problem by using the NULL feature. The front panel of the DMM has a button labeled NULL. To null the wire resistance, one shorts the ends of the test wires together and then presses the NULL button. You can disable the NULL function by pushing the button again.

The 4-wire methodFor really accurate measurements of small resistances, there is a
clever method one can use: i.e. the 4-wire method, as shown in the following figure.
The DMM supplies a test current through the resistor, as in the 2-wire method, but measures the voltage over the resistance with two other terminals. The two leads used for the voltage do not conduct any current, so that the lead and contact resistances do not influence the measurement. The four terminals for the 4-wire method are shown on the front panel.
CAUTION:When doing a resistance measurements, it is safest to disconnect all voltage sources before connecting the DMM to the circuit. Putting a large voltage over the input terminals of the DMM may damage the meter.

Measuring Resistance 4-wire
1 kΩ1.000000 kΩ
* Turn off “Null”
* Press SHIFT Ω4W* No error due to lead resistance

Measuring ResistanceFour-Wire Technique
1.000000 k
Protectioncircuit
To DC InputAmplifier
OhmsCurrentSource Iref
4wIref
* Turn off "Null"*"Terminals" switch in "FRONT"* Press 4W* Voltage is now sensed directly at the resistor, solead resistance is not a factor
* Because input impedance ofDC Input Amplifier is so high,no current flows through senseleads, hence no lead resistance error
Rx =1 k

4-Wire Resistor Measurement
i
High- Input
High- Sense
Low- Sense
Low- Input
∆V High Z Itest
i
i
i=0
i=0
∆V = Itest * R
R = ∆VItest
i R

Range selectorThe multimeter automatically selects the range using the auto-
ranging feature. However, you can also manually select a fixed range (e.g.
1KOhm or 1MOhm) using the Auto/Man button on the front panel (under Range/Digits) buttons. The 'down' arrow selects the lower range and the 'up' arrow the higher range.
Function, Math, Range and Menu keys

Additional features of the 34401A:average, max and min value
One often needs to take a series of data points to find the average value of the measured variable. Instead of doing this by hand, the 34401A has a built-in feature that does this for us. Also, you can ask for the maximum and minimum values during the measurement interval.
To enable this feature, push the Min/Max button (one of the Math buttons) on the front panel. You will see the Math annunciator lit on the front display. Also, the DMM will make short beeps indicating it is taking readings and storing the MAX, MIN, the Average value, and the total COUNT.
Push the Min/Max button again to stop the readings.

To access these stored numbers, you have to turn the Menu on by pressing the On/Off key (SHIFT <) on the front panel.
Then, use the > or < keys until you are in the MATH (B) menu. You can now go down to the "parameter level" of the selected MIN-MAX menu by pressing the "down" button until you see the desired parameter menu (1:MIN_MAX) displayed. Push once more the "down" button.
Once you are in the MIN-MAX menu you can use the > or < buttons to scroll through the menu and read the values.
The menu is organized in a top-down tree structurewith three levels, as schematically shown in the following.

The front panel menu organization.
The MIN-MAX feature can be used for resistance measurements as well as for voltage, current, and frequency measurements.

Power rating of resistors
In addition to the value and tolerance of a resistor, the power rating is another important characteristic. It tells how much power the resistor can dissipate before being damaged by overheating. Resistors come in different power ratings: 1/8, 1/4, 1/2, 1 and 2 Watts are typical values.
Lets look at an example. Suppose you are using a 1 kohm resistor with a 0.25W power
rating. The maximum DC voltage and current the resistor can tolerate is than Vmax=sqrt(P.R)=15.8V and Imax=sqrt(P/R)=15.6mA.
Exceeding the power rating will result in poor reliability and early break-down of the circuit. The power rating depends on the physical size of the resistor, the larger the size, the larger the power rating will be.

(4) Continuity Test& Diode Check
+
-
Forward Bias
Open orClosedCircuit.
Cont = Continuity test
Shift = Diode check

(5) Measuring Frequency &Period
33 kHz
33.000,0 kHz
Freq = Measure FrequencyShift Period = Measure Period

Frequency and PeriodPeriod
f1( )t
Frequency = 1/Period

(6) Ratio Measurements
Signal Voltage
+
–ReferenceVoltage
+
–
DCV : DCV
Ratio = dc signal voltagedc reference voltage
*To enable ratio measurements, use the MEAS menu.

VoltageRMS vs. Peak
Waveform Vrms Vp1.0
1.0
1.0
1.0
1.414
1.733
1.0
1.0
sine
triangle
square
DC
* Peak voltage = 1/2 of Peak to Peak voltage

High Z TerminationSIGNAL SOURCE MEASURING DEVICE
High Resistance
Ri Ci Vm
i
Ro=50 ΩVs
i
As frequency increases, Zin decreases
Vs = ∗1 + RoZin
Vm . . . . for very large Zin, Vs ≅ Vm
1 Ri∗ZcZinZcRi + Zcj 2π f C
> 100 RoFor less than 1% error Zin

50 TerminationΩ
Ro=50 Ω Ri Ci Vm50 Ω
i
i
High Resistance∗1+ 50Ω
50ΩVm
2 ∗ Vm
Vs
SIGNAL SOURCE MEASURING DEVICE
i
Vs
Vs
Vm 12
∗Vs
*Vm will not equal Vs, if Zin = Ro, but the ratio between them is 2:1.

• Specifications (34401A)• DC Characteristics:
– DC Voltage range and input resistance: • 0.1V, 1V, 10V: input resistance selectable 10MW or > 10GW • 100V and 1000V: Rin = 10MW
– DC Current range and shunt resistance: • 10mA, 100mA: Rshunt= 5 W • 1A and 3A: 0.1 W
– Resistance range: 2-wire and 4-wire method • 100 W, 1 kW, 10 kW, 100 kW, 1 MW and 100 MW • Input protection: 1000V
• AC Characteristics: true RMS – AC Voltage: from 3 Hz to 300 kHz (for accuracy specs consult the manual) – AC Current from 3 Hz to 5 kHz
• Frequency and Period measurement: – Frequency range: 3 Hz - 300 kHz
• Input voltage range: 100 mV to 750 V

Remote Interface
GP-IB (IEEE-488) Address:Can be any value between 0 - 31. Factory set at 22.Address 31 is talk only mode. Adjustable only through the I/O menu.
RS-232 Interface:Baud rate must be selected (I/O menu): 300, 600, 1200, 2400, 4800, or 9600.Parity selection (I/O menu): Even or Odd
Programming Languages GP-IB RS-232SCPI LanguageHP 3478A Language Not allowedFluke 8840A Language Not allowed

Loading Errors (DC volts)
Idealmeter
Ri
Rs HI
VsLO
Vs = ideal DUT voltageRs = DUT source resistanceRi = multimeter input resistance
(10 MΩ or > 10 GΩ)
Error(%) = 100 * RsRs + Ri

Leakage Current Errors
Idealmeter
Ri
HI
LO
Rs
Vs Ib Ci
Ib = multimeter bias currentRs = DUT source resistanceCi = multimeter input capacitace
Error(v) ≅ Ib ∗ Rs

Common Mode Rejection(CMR)
Idealmeter
Ri > 10 GΩ
HI
Vtest RsLO
Vf
Vf = float voltageRs = DUT source resistance
imbalanceRi = multimeter isolation
resistance
Error(v) =Vf * RsRs +Ri
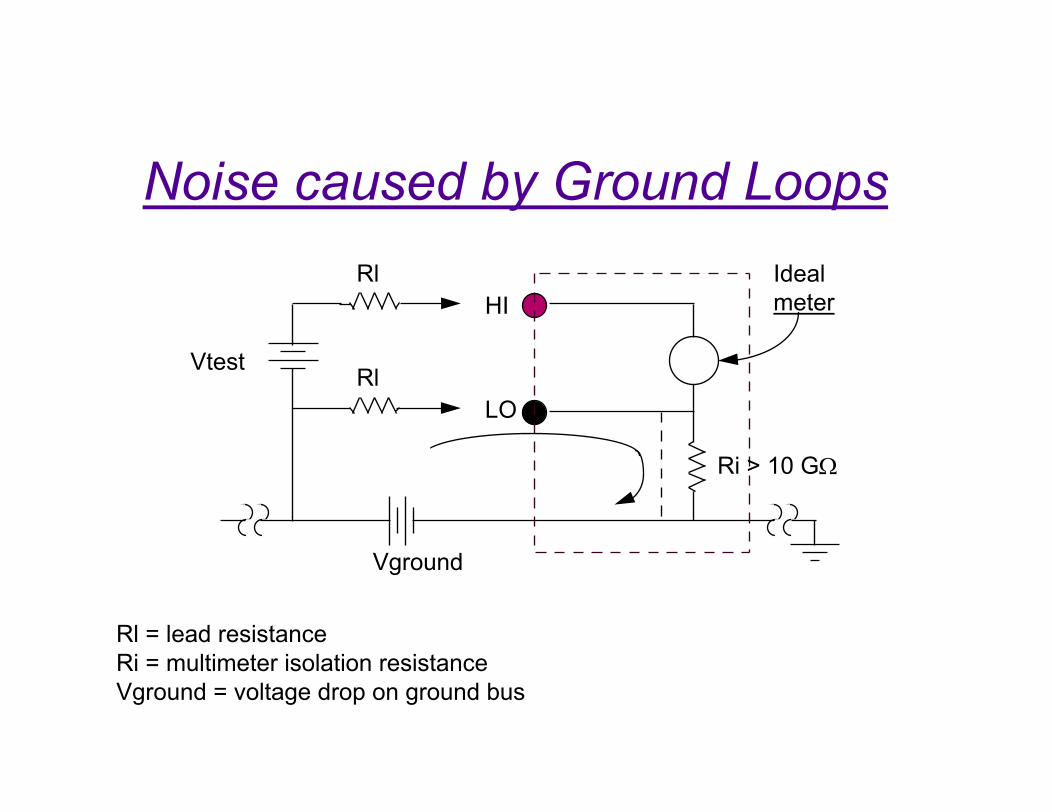
Noise caused by Ground LoopsIdealmeter
Vtest Rl
HI
LO
Ri > 10 GΩ
Rl
Vground
Rl = lead resistanceRi = multimeter isolation resistanceVground = voltage drop on ground bus

1) Converts voltage to time to digits2) Integrator is a
line-frequency filter3) Integrator is
a low-pass filter Comparator CPU
VrefVx(t)
Integrator
C
R1
R2
C T
0- 1
R1 Vx(t)
dt
C
T
0
- 1 i(t)dtVout=
t0 T T+To
To
Vx= 1 voltVx= 2 volts
Integrator:
T is fixed at one cycle of 50 Hz or 60 Hz to eliminate line noise; Vref is fixed; R, C and Time are all ratioed, so accuracy is excellent.
T
0
Vxdt =
T+To
T
-Vref dtIf R1=R2
C
T+To
T
R2 Vref dt
- 1
T*Vx= To*(-Vref)Vx = To
-Vref T
Integrating A/D

The DIGITAL MULTIMETERHints for Accurate Measurements:
Measure as near full scale as possibleUse a Ratio measurement wheneverPossible (Measure a RATIO rather than an absolute value) .
Before measuring, short the test leadstogether to check for offsets.
(Exception: RMS AC measurements)

Where to get more information
34401A User’s Guide34401A Service Guide